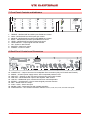
1
X XT TE EE EL LE EC CT TR RO ON NIIC C Evolution Series EV6 – EV120 – EV240 Amplified Mixer User’s Manual ▫ User’s Manual ▫ 1 ▪ 11 X XT TE EE EL LE EC CT TR RO ON NIIC C Table of contents 1. Important safety instructions 3 2. Declaration of conformity 3 3. User’s liability 4 3.1 Damages to the loudspeakers 4 3.2 Dangerous output voltage 4 3.3 Radio interferences 4 Introduction 4 4.1 Unpacking 4 4.2 Assembly 4 5. Description 5 6. Features 5 7. Front Panel: Controls and Indicators 6 8. Back Panel: Controls and Connectors 6 9. Power Supply 7 4. 10. Connections 10.1 7 General criteria 7 10.2 Balanced Mic / Line Input 7 10.3 Pre Out 7 10.4 Main In 7 10.5 Effect 7 10.6 AUX 1 /AUX 2 7 10.7 REC 7 10.8 Power Output 8 11. Protection System 9 11.1 Power Output Short Circuit 9 11.2 Turn On / Turn Off Delay 9 11.3 Power Unit Over Temperature 9 12. Advanced Functions 9 12.1 Pre Out Setting 9 12.2 DIN-DON card 9 13. System SetUp (Step by Step) 10 14. Technical Specifications 11 ▫ User’s Manual ▫ 2 ▪ 11 X XT TE EE EL LE EC CT TR RO ON NIIC C 13. Do not connect input signal higher than that indicated in the manual. 1. Important safety instructions This symbol indicates the presence of important directions for use and information that should be given particular attention so as to use the product properly. 14. Do not connect the amplifier output to the input of another channel. 15. Do not connect any output of the amplifier to power sources such as battery, voltage supply or outlet, regardless of the amplifier is on or off. 16. Keep the volume controls to a minimum during the amplifier switching on/off . This symbol indicates the presence of “dangerous voltage” that may cause the risk of electrical shock. Pay the utmost attention and proceed cautiously. 17. Do not remove the upper or lower cover: there is a risk of electrical shock. 18. Do not try to self-repair the appliance, but apply to qualified personnel. 19. Clean with a dry cloth only. 20. The product shall be handled by skilled personnel in the following cases: 1. Follow carefully the attached documentation and keep it for future reference 2. Comply with the warnings 3. Store the packaging and check that all material is in excellent conditions. mains cable or plug damaged Exposure of the product to rain or humidity Some liquid entered inside the unit. An object fell on the unit The unit fell down and is damaged The product does not work correctly or shows a remarkable change of performance. 4. Do not use water near the product, do not pour water or any other liquid on the amplifier. Do not to use it with wet hands or feet into the water. 21. A careful supervision is necessary if the product is used in the presence of children or inexpert adults. 5. Do not use next to heat sources such as radiators, stoves or the like. 22. This product could produce sound levels, which cause damage to the hearing. Pay the utmost attention and do not operate at high level of volume or at an uncomfortable level for a long time. Consult an audiometric specialist in case of hearing loss or complaints. 6. Check the integrity of the mains cable. Do not tread on the cable and do not squeeze the plug. 7. Connect the plug to a socket equipped with grounding. Do not camper the plug. If the plug supplied is not consistent with your socket, please apply to an electrician for its replacement. 2. Declaration of conformity This device conforms to the requirements of the EMC directive 2004/108/EEC, and the requirements of the Low Voltage Directive 2006/95/EEC. Standards Applied: EN55103-1 (Emissions) EN55103-2 (Immunity) EN60065, Class I (Safety) 8. Connect to supply mains with the same voltage as indicated on the back of the amplifier. 9. Install the amplifier in compliance with the instructions. 10. Do not obstruct the air ducts. 11. Disconnect the appliance in case of storm and if unused. 12. Connect according to the instructions only. ▫ User’s Manual ▫ 3 ▪ 11 X XT TE EE EL LE EC CT TR RO ON NIIC C 3. User’s liability 4. Introduction Congratulations on choosing XTE device and thanks for trusting us and our products. Your device has been carefully planned in the smallest details, starting with every part of its equipment till final assemblage. All products XTE are made with the main purpose of guaranteeing our clients’ full satisfaction, thus we underline that the product you have chosen uses the most advanced technology. An improper use of the device can compromise its correct operation. Therefore we recommend you to carefully and correctly use it. Read this manual carefully as it contains essential information for a safe use of your device. 3.1. Damages to the loudspeakers Always check the peak and continuous power of the loudspeakers. This amplifier is extremely powerful and can be potentially dangerous both for the loudspeakers and for the persons. Most loudspeakers may be easily damaged or broken. Even if there is a gain reduction through the attenuators on the amplifier’s front panel, it is still possible to reach the maximum output power if the input signal level is high enough. 4.1. Unpacking Immediately inspect the package and its content so as to check whether there are any signs of damage. After unpacking check the product and all parts, if you notice any damage inform your dealer immediately. It is advisable to save the packaging materials even if the amplifier shows no sign of shipping damage; you might have to return it to XTE or to one of its dealers. Use the original package only, which is the best way to protect the equipment from shipping mishandling. 3.2. Dangerous output voltage The amplifier can generate hazardous output voltage. Do not touch exposed cables of loudspeakers with the amplifier in operation. 3.3 Radio interferences A sample of this product has been tested and approved to meet the requirements of the Electromagnetic Compatibility Directive (EMC). These requirements have been defined so as to provide reasonable protection against dangerous interference of electrical equipment. Whenever this product has not been installed or handled according to these guidelines, it might interfere with other equipment such as radio receivers. However, there is no guarantee that they should not occur in a specific installation. Should this equipment interfere with transceiver equipment (such possibility can be checked by switching on and off the device), the user should try to cancel the interference by observing one or more of the following measures: 4.2. Assembly Metal framing of all the XTE products is suitable to be supported on a surface (table, etc.) and is equipped with separated stirrups for assembly in 19” rack standard. Pay particular attention during the installation; we remind you that the devices should not be installed in places with: Increase the distance between the device and the receiver. Connect the device to a plug linked to a different circuit with respect to the one to which the receiver is connected. Redirect or move the receiver’s antenna. Make sure that the unit concerned conforms to the EMC immunity limits (CE-labelled). All electrical equipment sold in the EC should be approved as for what concerns protection against electromagnetic fields, high tension and radio interference. Contact qualified personnel. ▫ User’s Manual ▫ 4 ▪ 11 High temperatures Dust and excessive humidity Presence of intense magnetic fields Water next to the component Vibrations Closed spaces inhibiting a proper ventilation X XT TE EE EL LE EC CT TR RO ON NIIC C 5. Description 6. Features XTE has developed a series of mixer and integrated amplifiers, with unique features and technical specifications that excel these from similar products. Their three bands equalizer for each of the six inputs, guarantees clear sound quality and a perfect intelligibility. Mixer and Amplified Mixers of Evolution Plus series, incorporate a set of features that make them adaptable to any application. Monophonics amplifier and mixer of Evolution Series has 6 MIC/AUX inputs (labelled with 1-6), electronically balanced, adjustable for mediumhigh level microphone and sources, connected to input sockets for a simple use (as later indicated), 1 SEND output and 1 RETURN input to insert an external additional equipment, for ulterior elaboration of the sound (equalizer, level processor, etc.), in the circuit, 1 LINK IN input, 1 PRE OUT output. A 24 VCC potential is available for the 6 MIC sockets, which could be inserted by a 6 way micro-switch and conveyed on the phonic line, the same potential for the eventual direct “phantom” power supply of electret microphones. It has a power indicator and led vu meters, sensitivity controls (GAIN), tones (TREBLE, MIDDLE, BASS), volume (LEVEL) separated to each input and main volume control (MASTER). Audio power outputs for loudspeakers of amplified series (EV120 and EV240) are arranged for connection to constant impedance lines and constant voltage. This evolved version of Evolution Series, has been improved with Noise Gate and Feedback Suppressor processor to optimize the product performance also in very difficult noise situations, such as those that can be found in Places of Worship and congress halls. Noise Gate, complete with adjustable threshold of activation, allows to minimize the reproduction of noise when no microphones are used. Feedback Suppressor is capable of reducing the effects of acoustic feedback between the speaker unit and the microphone. This solution enables the best management of any sound system by the use of a single product, with a significant cost and space saving. The whole electronic circulation has quality and safety features in working; it is provided with “earth-lift” switch (on the back). Metal framing is suitable to be supported on a surface (table, etc.) and is equipped with separated stirrups for assembly in 19” rack; in this case it occupies 2 U units = 88mm. ▫ User’s Manual ▫ 5 ▪ 11 Constant Impedance and constant Voltage outputs (Amplified Version) 6 balanced Micro/Line XLR inputs complete of selectable 24Vdc Phantom supply 2 stereo AUX RCA inputs 1 Stereo REC RCA output 3 band Equalizer for each input Output level meter indicator Arranged for 19” rack mounting in 2 unit space X XT TE EE EL LE EC CT TR RO ON NIIC C 7. Front Panel: Controls and Indicators 1 2 GAIN GAIN GAIN GAIN GAIN LEVEL METER GAIN +3dB TREBLE TREBLE TREBLE TREBLE TREBLE TREBLE MIDDLE MIDDLE MIDDLE MIDDLE MIDDLE MIDDLE BASS BASS CH1 4 5 3 4 8 1 3 1. 2. 3. 4. 5. 6. 7. 8. 9. 4 8 8 4 6 8 1 10 5 I 6 7 2 9 0 LEVEL 4 3 7 2 9 0 5 3 8 1 10 LEVEL ON 4 7 240 PROFESSIONAL AMPLIFIED MIXER -15dB CH6 6 2 9 0 5 3 8 1 10 LEVEL 4 7 2 9 0 CH5 6 3 7 1 10 LEVEL 5 4 EV -7dB BASS CH4 6 2 9 0 5 3 7 1 10 LEVEL BASS CH3 6 2 9 0 5 3 7 2 BASS BASS CH2 6 0dB 0 8 1 10 9 0 LEVEL POWER 10 MASTER 5 6 7 8 9 TREBLE – MICRO/LINE and AUX inputs Treble tone control GAIN – MICRO/LINE and AUX inputs gain control MIDDLE – MICRO/LINE and AUX inputs Middle tone control BASS – MICRO/LINE and AUX inputs Bass tone control LEVEL – MICRO/LINE and AUX inputs level control LEVEL METER – Output signal level led indicator ON – Power on led indicator MASTER – Main level control POWER – Power on switch 8. Back Panel: Controls and Connectors 13 S.N. CAUTION XLR BAL INPUT RISK OF ELECTRIC SHOCK DO NOT OPEN Made in Italy 100V 70V 50V COM WARNING: TO REDUCE THE RISK OF MAINS 230 V~ 50÷60Hz FIRE OR ELECTRIC SHOCK DO NOT EXPOSE THIS EQUIPMENT TO RAIN OR MOISTURE. PRE OUT FOR CONTINUED GROUNDING PROTECTION DO NOT REMOVE SCREW GND COLD HOT + LINK IN EFFECT GND HOT + DIN BAL INPUT 1 = COLD2 = GND 3 = HOT+ 4 = +24Vdc 5 = PRIORITY 1 1 = GND 2 3 2 = HOT + 3 = COLD - + - 4W POWER OUTPUT AUX 2 4 2 CH 1 PRIORITY PRIORITY CONTORL 5 3 BALANCED MIC / LINE INPUTS AUX 1 PUSH PUSH PUSH PUSH EFFECT 2 GND LIFT 1 1 3 2 2 1 3 1 3 2 1 PUSH CHANNEL 654321 2 3 1 PUSH 2 1 3 3 PHANTOM 24V CH 2 CH 1 22 21 23 ON FUSE T AL/250V~ 14 10. 11. 12. 13. 14. 15. 16. 17. 18. 19. PRE OUT 15 16 LINK IN 17 RETURN SEND 18 REC 19 CH 6 CH 5 20 CH 6 CH 5 CH 4 21 CH 3 POWER OUT – Output connector for loudspeaker lines connection (Only for EV120P and EV240P) MAINS – AC 230V power supply socket, with incorporated protection fuse GND LIFT – Selector for the connection of the electric ground with chassis PRE OUT – Mixed balanced output of the amplifier “PRE” section LINK IN – Unbalanced input, mixed and main level control dependent EFFECT – Unbalanced In / out for external signal processor insertion REC – Mixed stereo line output AUX1 / AUX2 – Stereo line input MICRO / LINE – Balanced input with variable sensitivity PHANTOM 24V – 24V Phantom activation selector for CH1, CH2, CH3, CH4, CH5 and CH6 inputs ▫ User’s Manual ▫ 6 ▪ 11 X XT TE EE EL LE EC CT TR RO ON NIIC C 9. Power Supply connections to this socket. electronically balanced. The unit is expected to work with 230 VCA – 50/60 Hz distribution system. In case of power dysfunction, check the outside protection fuses and eventually replace them with others of same calibration; if one of them burns out immediately, do not go on and have check the unit by qualified personnel. Take away plug from 230 VCA electric power socket always, before removing fuses and, in any case, open the unit framing. 10.4. Link In output is The Jack input socket (22) for the eventual connection from other external audio source, directly “mixed” to preamplifier are located on the rear panel of the equipment. The figure Fig3. shows the connections to this socket. This input is unbalanced and main level control dependant. 10.5. Effect The Jack input sockets (23) for the eventual connection of outside sound processing devices (equalizer, level processor, etc.) in order to improve sound reproduction quality and to correct the environment response, or to satisfy particular specifications requirements. Mic / Line inputs are involved with the above mentioned insert devices. The figure Fig4. shows the connections to this socket. This input is unbalanced. 10. Connections 10.1. General criteria In order to allow the equipment to work correctly, it is advisable to comply with a number of general criteria when making the connections: Avoid positioning cables or microphones on the cabinet of the equipment. Avoid laying the signal lines parallel to the power-supply lines. Keep a minimum distance of 30/40 cm. Position the input lines and the output lines at a distance from one another. In order to avoid acoustic feedback (the Larsen effect), position the microphones out of the angle of coverage of the loudspeakers. 1 = GND 2 = HOT + 3 = COLD - 2 3 1 Fig1. XLR Bal Input / Output Pin-out 10.2. Balanced Mic / Line Inputs GND COLD HOT + The 6 female XLR input sockets (26) for the mic / line level signals are located on the rear panel of the equipment. The figure Fig2. shows the connections to these sockets. These inputs are electronically balanced. The mic / line sensitivity could be adjusted through the Gain control (2) placed on the front panel.24Vdc “phantom” supply could be joint to each socket (on the same balanced phonic line), through the multi-micro switch (27) placed on the back panel; therefore, before connecting a microphone it should pay attention to the model (if dynamic or electret). In case of dynamic microphone do not insert 24 Vdc; insert it with electret microphone only. CH5 and CH6 socket cannot be used at the same time of AUX 1 and AUX 2 sockets, because electronic circuits and controls are in common: CH5 with AUX 1, CH6 with AUX 2. The CH1 input with DIN connector is suitable for microphone desk with priority function. Fig2. Jack Bal Input / Output Pin-out GND HOT + Fig3. Jack Unbal Input / Output Pin-out 10.6. AUX 1 / AUX 2 The 2 couple of mono female RCA input sockets (25) for the AUX sources are located on the rear panel of the equipment. These inputs are unbalanced. 10.7. REC The couple of mono female RCA output socket (24) for the REC preamplified signal and 3 band EQ of each channel processed is located on the rear panel of the equipment. This output is unbalanced. 10.3. Pre Out The Jack output socket (21) for the preamplified signal are located on the rear panel of the equipment. The figure Fig2. shows the ▫ User’s Manual ▫ This 7 ▪ 11 X XT TE EE EL LE EC CT TR RO ON NIIC C In order to achieve the maximum efficiency of the system and to take precautions from amplifier bad working, it is necessary to check the effective total power handling of the loudspeakers that has to be equal or lower than the RMS power value of used amplifier. It’s a good rule arranging a 10-20% safety margin on the amplifier power capability. 10.8. Power Output The device is provided with a multi-way power output terminal strip for constant-voltage distribution (50, 70, 100 V) and low impedance (4 Ohms ) systems (13). Constant impedance lines 4 Ohms terminal should be used. In order to achieve the maximum efficiency of the system and to take precautions from amplifier bad working, it is necessary to check the effective loading impedance of the lines. The total speakers impedance should be equal or higher than preselected value for connection. To get that, each loudspeaker should be without impedance-matching transformer and should be connected in series or in series-parallel groups; In any case loudspeakers should also have the same power handling. The figure Fig5. shows the connections of the line to these sockets. Constant voltage lines 50, 70, 100 V terminals should be used with each loudspeaker equipped with impedance-matching transformers and parallel connected. This fact makes the system easy to create and, if any of the loudspeakers should be disconnected from the line for any reason, the rest of the system would continue to function properly. The figure Fig4. shows the connections of the line to these sockets. 70V 70V 100V + - 100V 70V 50V COM 100V 70V 50V COM 70V 4W POWER OUTPUT 100V 100V + - 4W POWER OUTPUT Fig4. Constant Voltage Lines 8W Z tot= 4W 8W + - 100V 70V 50V COM 100V 70V 50V COM Z tot= 4W 4W POWER OUTPUT ▫ User’s Manual ▫ 8 ▪ 11 4W 4W 4W + - 4W POWER OUTPUT Fig5. Constant Impedance Lines 4W X XT TE EE EL LE EC CT TR RO ON NIIC C 11. Protection Systems 12. Advanced Functions In addition to the usual protection consisting of fuses, these products are complete of different protection devices in order to safeguard them from possible risks of damage. 12.1. Pre Out Setting Internal jumpers are provided to assign Pre or Post Master Pre Out setting. Thanks this internal setting it is possible to adjust the Pre Out level by the Master control or make it independent, following the system requirements. From the factory, Pre Master setting is assigned. The figure Fig6. shows the instructions to assign the Pre Out Setting. 11.1. Power Output Short Circuit Applying a lower loading impedance than the rated value means requiring the equipment to supply a power higher than it can do on a continuous basis. In order to avoid this problem, the units are equipped with a circuit protecting them against overloads that protects automatically. The protection circuit will be tripped immediately on the amplifier if any of the following cases occurs: Short circuit on one of the loudspeaker outputs. Loading impedance less than 50% of the rated value. power required of the loudspeaker system connected to the constant-voltage lines higher than the power that the amplifier is able to deliver. PRE / POST Fig6. Pre Out Internal Adjustment Overload conditions are signalled by the fact that the unit doesn’t supply any amplified signal at the power output. The equipment will resume normal operation after a power cycle as soon as the cause of the overload has been eliminated. 12.2. DIN-DON card It’s possible insert an internal card to generate a Din-Don alert tone when the priority is activated. 11.2. Turn On / Turn Off Delay A mute circuit with relay, with a delayed starting up and immediate power turning off, has been inserted in order to avoid the switch-on/turn-off transients that may cause damage to the loudspeakers. 11.3. Power Unit Over Temperature The thermal protection is of the self-resetting type, and is tripped when the equipment reaches an excessively high temperature. This may be due, for example, to the fact that the ambient temperature is too high or to the insufficient ventilation of the rack cabinet. The equipment will resume normal operation as soon as the cause of the temperature overload has been eliminated. ▫ User’s Manual ▫ 9 ▪ 11 X XT TE EE EL LE EC CT TR RO ON NIIC C 13. System SetUp (Step by Step) The following step by step procedure has been devised to assist during the setup process. The inputs of the mixer can accommodate a wide range of sources including active paging stations, dynamic microphones, DVD,CD and Mp3 players and mixers. The Preout outputs may be used to drive power amplifiers, mixers, or mixer amplifiers. The Power output may be used to drive constant voltage or constant impedance speaker lines. Each installation will require setting the appropriate relative mix of levels between paging, program sources and mic/line inputs for each line or amplified outputs. Because of the variation in levels between the possible sources, the mixer offers a number of gain stage adjustments and parameter tools so you can set the correct levels for your application. Setting up correct parameter structure through the whole system is important to achieve optimal results. ▫ User’s Manual ▫ 10 ▪ 11 Connect the speaker lines to the correct power output socket. Active the phantom supply by the dipswitch (27) located on the back panel if electrect microphones are used. Ensure that all the Gains and Volume controls are at minimum, and that the Tone controls are flat. Keep the master volume for each output channel at about 10%÷20% Keep the input channels LEVEL (5) at about 5 (50%). Adjust the master volume and the input channels LEVEL in order to obtain the required sound pressure. Adjust the 3 band equalizer (1,3,4) for each channel in order to obtain the best result with each different input source. X XT TE EE EL LE EC CT TR RO ON NIIC C 14. Technical Specifications MODEL EV6P Configuration 6 In/1 Out Mixer 6 In/1 Out Amplified Mixer 6 balanced mic/line; 2 stereo AUX Pre Out 0dBu 120W @100-70-50V/4ohm 3 band EQ, Gain and Level for each input; Master Level -43 ÷ +5dBu 5,5mV ÷ 1,4V -43 ÷ +5dBu 5,5mV ÷ 1,4V -43 ÷ +5 dBu 5,5mV ÷ 1,4V -59÷-11dBu -59÷-11dBu Inputs Outputs Controls AUX Inputs Sensitivity MICRO/LINE Inputs Sensitivity Micro-balanced inputs Impedance Bass control Middle control Treble control REC output level PRE OUT output level SEND and RETURN level Link In input level Frequency response (-3 dB) Rating power distortion @ 1 KHz SN Ratio Micro SN Ratio Line Power Requirements Consumption (1/8 p.n.) Dimensions (WxHxD) Weight - Net EV120P 0,8mV÷218mV -59÷-11dBu EV240P 0,8mV÷218mV 6 In/1 Out Amplified Mixer 240W @100-70-50V/4ohm 0,8mV÷218mV 10 Kohm 10 Kohm 10 Kohm ± 12 dB at 60 Hz ± 8 dB a 700 Hz ± 12 dB at 10 KHz -9 dBu 275mV 0 dBu 775mV -9 dBu 275mV -9 dBu 275mV ± 12 dB at 60 Hz ± 8 dB a 700 Hz ± 12 dB at 10 KHz -9 dBu 275mV 0 dBu 775mV -9 dBu 275mV -9 dBu 275mV ± 12 dB at 60 Hz ± 8 dB a 700 Hz ± 12 dB at 10 KHz -9 dBu 275mV 0 dBu 775mV -9 dBu 275mV -9 dBu 275mV 60-18.000 Hz 60-15.000 Hz 60-15.000 Hz < 1% < 1% < 1% > 62dB > 80dB AC 230V-50÷60Hz 15VA 482x88x204mm 3,3 Kg > 62dB > 80dB AC 230V-50÷60Hz 130VA 482x88x254mm 6,7Kg > 62dB > 80dB AC 230V-50÷60Hz 180VA 482x88x339mm 9,9Kg XTE Electronic reserve the right to make changes to the drawings and specifications at any time and without notice. XTE electronic Via Tragni, 6 42043 Gattatico RE ITALY Tel. +39 0522 900166 Fax. +39 0522 678548 EN_EvolutionSeriesPlus / Rev. 1.3 11 ▪ 11 WWW.XTE-ELECTRONIC.COM