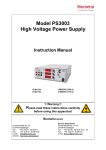
1
Biometra a Whatman company Dot Blot 96 System Dot Blot 96 (Order No. 053-400/490/491) (Order No. 053-401) Manual January 1998 !! Warning !! Please read these instructions carefully before using this apparatus! Biometra biomedizinische Analytik GmbH Rudolf-Wissell-Straße 30, D-37079 Göttingen P.O. Box 1544, D-37005 Göttingen Tel:++49 – (0)5 51 / 50 68 6-0 * Fax: ++49 – (0)5 51 / 50 68 6-66 e-mail: [email protected] internet: http://www.biometra.de 1.0 Intended Uses And Specifications The Dot Blot 96 concept is based on knowledge of scientists’ current requirements. Therefore, the device is appropriate for exceedingly different experimental approaches. For the use of the Dot Blot 96, it is irrelevant whether the user desires to analyse proteins or nucleic acids and whether the sample determination is performed using antigen-antibody complexes or via hybridisation with radioactive or non-radioactive probes. This multiplicity of applications makes the Dot Blot 96 a very valuable device in all cases where a standardised and reproducible assay of concentrated punctate samples is desired. Typical examples for the application of the Dot Blot 96 are the detection of genomic DNA, screening of bacterial DNA for recombinants, screening of expression plasmids using an antibody, the immunological detection of a protein in column fractions, etc. A newly designed sealing system makes the use of conventional sealing rings unnecessary and thus greatly facilitates the set-up of the transfer unit. The Dot Blot 96 can be assembled extremely quickly and is then ready for the application of samples. Multiple channel pipettes can be used to apply valuable reagents (e.g. antibodies, nucleic acid probes) as the arrangement of the 96 wells, which are marked with A—H and 1—12, corresponds to the format of microtiter plates. These precisely milled wells (volume: 350 µl) allow a reproducible application of the same sample volumes. Washing sequences can be performed within minutes comfortably and without tedious pipetting. To achieve this, the wash solution is placed in a buffer reservoir, which has a volume of 150 ml, on the cover plate and is drawn through all 96 wells on applying vacuum. The liquid which has passed through the membrane accumulates in the collecting tank and can be used for further analyses (monitoring for radioactivity, monitoring for antigens, among others). The generous dimensions of this tank give the device the required stability and normally permit the performance of several “dots” without having to empty the collecting tank. 1 Systems and Accessories Available Dot Blot 96 (Order No. 053-401) • • • • • • Transfer unit, consisting of Collecting tank (volume: 500 ml) Filter plate (support) with 96 wells and 2 guide pins Cover plate with 96 wells and buffer reservoir (volume: 150 ml) 4 Screws 1 Silicone sealing sheet (sealing mat) for the filter plate (96 wells plus 2 bores for the guide pins) (Order-No. 053-410) 1 Tube adapter for the collecting tank 1m Vacuum tube (Order No. 049-001) 1 Certificate of guarantee 1 Instruction Manual Dot Blot 96 System 230 V(Order No. 053-400) Dot Blot 96 System 115 V(Order No. 053-490) Dot Blot 96 System 100 V(Order No. 053-491) • • • • • • • Transfer unit, consisting of Collecting tank (volume: 500 ml) Filter plate (support) with 96 wells and 2 guide pins Cover plate with 96 wells and buffer reservoir (volume: 150 ml) 4 Screws 1 Silicone sealing sheet (sealing mat) for the filter plate (96 wells plus 2 bores for the guide pins) (Order-No. 053-410) 1 Tube adapter for the collecting tank 1 Vacuum pump with flow valve and manometer (Order-No.: 049-000 [230V, 50 Hz] or 049-090 [115V, 60 Hz] or 040-091 [100V, 50/60 Hz]) 1m Vacuum tube (Order No. 049-001) 1 Certificate of guarantee 1 Instruction Manual 2 Ordering Information Item Dot Blot 96 System with vacuum pump, 230 V Dot Blot 96 System with vacuum pump (see above), 115 V, 60 Hz Dot Blot 96 System with vacuum pump (see above), 100 V, 50/60 Hz Dot Blot 96 without vacuum pump Order No. 053-400 053-490 053-491 053-401 Vacuum pump MP86 with manometer and adjustable vacuum gauge (max. delivery 6 l/min, end vacuum 100 mbar), 230 V dto. 115 V, 60 Hz dto. 100 V, 50/60 Hz 049-000 049-090 049-091 Accessories: Silicone sealing sheet (sealing mat) Srews, 2 pcs. Vacuum tube, 1m 053-410 014-013 049-001 Whatman filter paper Whatman DEAE paper DE81 Whatman Nitrocellulose WCN Whatman nylon membrane 092-002 3658915 090-001 091-001 25 pieces, 29,7 cm x 21 cm (thickness: 0.9 mm) 25 pieces, 46 cm x 57 cm 15 pieces, 16 cm x 16 cm (pore size: 0.45 µm) 15 pieces, 16 cm x 16 cm (pore size: 0.45 µm) 3 2.0 Safety and Operating Information Caution! Don’t use organic solvents or solvents with chaotropic ions for cleaning. Solvent resistance: Use neither organic solvents (e.g.: acetone, chloroform), nor >30% ethanol; Don’t use chaotropic ions (e.g. urea, guanidine hydrochloride) Cleaning: A detergent solution 0.1 N NaOH solution A dilute alcohol solution (≤ 30 %) Vacuum: Maximum 500 mbar less than atmospheric pressure or or 3.0 Set Up 3.1 Unpack and Check Unpack and carefully examine the electrophoresis unit. Report any damage to BIOMETRA. Do not attempt to operate this device if physical damage is present. Save all packing material if damage is found. Do not attempt to operate this device if physical damage is present. !! Attention !! Please fill out and send back the warranty registration card. This is important for you to claim to full warranty: both parts and repair are covered within the full warranty period! 4 4.0 Location Place the chamber in proximity to the vacuum pump with which it is to be connected. Be sure to place the chamber in a safe, dry location away from the edge of the working surface. 5.0 Assembling the Transfer Unit Prior to use, ensure that the 96 wells in the filter plate (support) are not clogged. Before inserting a membrane into the Dot Blot 96, please read the information about pretreatment of the desired filter material given by the manufacturer. 1. Screw the tube adapter into the housing of the collecting tank. The vacuum pump can either be connected directly to the Dot Blot apparatus or indirectly via an intermediate wash bottle. The use of a wash bottle is advisable when working with radioactive substances or very concentrated saline solutions (e.g.: 10 x SSC). 2. Place the filter plate (support + stabilizer) into the collecting tank. 3. Align the silicone sealing sheet (rubber mat) with the guide pins on the filter plate (support). The 96 bores of the sealing mat must exactly correspond with the 96 wells in the filter plate (support). Note: Wells which are not in use can be covered with appropriately cut strips of Parafilm, which are laid onto the desired section of the sealing mat. 4. Place a piece of Whatman 3MM filter paper, which has been cut to size and equilibrated in a buffer solution, on the sealing mat. Use the wash solution which is employed for washing during the blot procedure as the buffer solution. 5. The membrane, which has been pre-cut to fit your sample needs and equilibrated in buffer solution, is laid on the filter paper. Select the size of the membrane so that the guide pins on the filter plate (support) lie beyond the edges of the membrane; otherwise, the membrane will crack. Note: Eliminate all air bubbles between the membrane, filter paper and sealing mat by rolling a glass pipette or a similar object across the membrane. 6. Place the cover plate with the buffer reservoir on the membrane so that it corresponds to the orientation of the guide pins. 7. First tighten one pair of opposite screws and then the other pair. Note: Hand-tighten the screws! Do not use any tools! 5 8. Apply vacuum to the transfer unit (≤ 150 mbar less than atmospheric pressure) and tighten the screws again if necessary. Check your vacuum by pipetting buffer solution into some (or all) of the wells and filtering it through the membrane. Cover plate with 96 wells and buffer reservoir Membrane Screw Whatman 3MM filter paper Silicone sealing sheet Support Tank Vacuum connector Stabilizer Fig. 1: Set up of a Dot Blot 96 sandwich 6 6.0 Disassembling the unit 1. First interrupt the vacuum before opening the screws. When using the vacuum pump delivered with the system (Order-No.: 049-000/090/091) you can apply ambient pressure by opening the flow valve. 2. Remove the transfer buffer from the upper buffer reservoir. Afterwards the apparatus can be disassembled in reverse order to assembling. 3. Please rinse all parts of the Dot Blot 96 after use with deionised water. Pay attention to the guide lines for cleaning given in chapter “2.0 Safety and Operating Informations”. 7 7.0 Application Information 7.1 Membrane Properties Membrane Type Nitro-cellulose Binding of DNA, RNA, Proteins Nylon DNA, RNA, Protein DEAE1-Cellulose PVDF2-Membrane Protein Protein Type of Bond Hydrophobic Bond Electrostatic Bond Hydrophobic Bond Electrostatic bond Ionic Bond Hydrophobic Bond Recommended Application Protein Blot DNA, RNA Blot Preparative Protein-Blot Protein Blot Protein Sequencing DNA, RNA Blot DBM3-Cellulose DNA, RNA, Protein Electrostatic Bond 4 DPT -Cellulose Covalent Bond 1 DEAE: Diethylaminoethyl; 2 PVDF: Polyvinylidendifluoride; 3 DBM: Diazobenzyloxymethyl; 4 DPT: Diazophenylthioether. 7.2 Immunoblot Application Note: Do not use gelatine for blocking as it clogs the membrane completely. BSA or ovalbumine, among others, are suitable reagents. Note: Pay attention to the maximal binding capacity of your membrane during the trial application, as, otherwise, the membrane can become clogged. If the composition and concentration of your sample is unknown, first conduct a dilution series with the Dot Blot 96. Note: Do not ever let the membrane dry out completely during the individual incubation or washing steps. Note: When using the included vacuum pump, aerate the Dot Blot 96 while the pump is running by loosening the knurled wheel on the manometer. Reapply vacuum to the Dot Blot 96 apparatus by tightening the knurled wheel. 1. When using nitro-cellulose filters, equilibrate the membrane for 5—10 minutes in the buffer solution which you use to wash your samples. 2. After assembling the apparatus (see 5), rinse the membrane with buffer solution. Rinsing: Vacuum on 3. Pipette your samples into the individual wells. Add samples: Vacuum off Filtration: Vacuum on Filter the samples through the membrane with a weak vacuum for approximately 30 minutes. If the sample volumes are greater than 350 µl, filtering time will take longer. Allow the liquid which remains in the wells to be drawn off by the vacuum. 8 4. Wash the membrane at least twice with wash solution. 5. Pipette your blocking solution into the wells. „Blocking“: Vacuum off Filter the blocking solution through the membrane for about 30 minutes with Filtration: a weak vacuum. Vacuum on Allow the liquid which remains in the wells to be drawn off by the vacuum. 6. Wash the membrane at least twice with wash solution. 7. Pipette the primary, specific antibodies (Ab) into the wells. Add 1st Ab: Vacuum off Filter the antibody solution through the membrane for about 30 minutes with Filtration: a weak vacuum. Vacuum on 8. Wash the membrane at least twice with wash solution. Washing: Vacuum on 9. Pipette the secondary antibodies (Ab) into the wells. Add 2nd Ab: Vacuum off Filtration: Vacuum on Filter the antibody solution through the membrane for about 30 minutes through the membrane with a weak vacuum. 10. Wash the membrane at least twice with wash solution. 11. Remove the membrane from the Dot Blot 96 apparatus to perform further reaction steps for determining the samples. Use this chart for the following blot determinations: Glycoprotein–Lectin Interaction Receptor–Ligand Interaction 9 Washing: Vacuum on Washing: Vacuum on Washing: Vacuum on 7.3 DNA and RNA Dot Blot Note: Nitro-cellulose and nylon bind nucleic acids at different salt concentrations. Select application and wash solutions which are appropriate for the type of membrane you employ. 1. Equilibrate the membrane for approximately 30 minutes in your application solution before placing it into the Dot Blot 96 apparatus. Rinsing: 2. After the transfer unit has been assembled (see Chapter 5.), rinse the wells twice with wash solution. Allow a small amount of wash solution to remain in Vacuum on the wells. 3. Pipette the prepared samples, which have been diluted with application solution, into the wells. Filter the samples for approximately 30 minutes through the membrane using a weak vacuum. Add samples: Vacuum off Filtration: Vacuum on 4. Wash the membrane at least twice with wash solution. Washing: Vacuum on 5. After the wash solution has flowed through the membrane, maintain the vacuum for an additional 5 minutes to dry the membrane. Drying: Vacuum on 6. Remove the membrane from the Dot Blot 96 apparatus and allow it to dry completely at room temperature. Further treatment of the membrane (fixation, prehybridisation, hybridisation) is identical to conventional “Northern” or “Southern” protocols. 10 8.0 Service Should you have any problems with this unit, please contact our service department or your local Biometra dealer: Biometra biomedizinische Analytik GmbH Service Department Rudolf-Wissell-Straße 14 - 16 D-37079 Göttingen Phone:++49 – (0)5 51 / 50 88 1- 10 Fax: ++49 – (0)5 51 / 50 88 1 -11 If you would like to send the unit back to us, please read the following return instructions. Instructions for return shipment • Return only defective devices. For technical problems which are not definitively recognisable as device faults please contact the Technical Service Department at Biometra ( Tel.: +49/551/5068640 ). • Use the original box or a similarly sturdy one. • Label the outside of the box with “CAUTION! SENSITIVE INSTRUMENT!” • Please enclose a precise description of the fault, which also reveals during which procedures the fault occurred, if possible. • Important: Clean all parts of the instrument from residues, and of biologically dangerous, chemical and radioactive contaminants. Please include a written confirmation (use the “Equipment Decontamination Declaration” following on the next page) that the device is free of biologically dangerous and radioactive contaminants in each shipment. If the device is contaminated, it is possible that Biometra will be forced to refuse to accept the device. • The sender of the repair order will be held liable for possible losses resulting from insufficient decontamination of the device. • Please enclose a note which contains the following: 11 a) Sender’s name and address, b) Name of a contact person for further inquiries with telephone number. 12 Equipment Decontamination Certificate To enable us to comply with german law (i.e. §28 StrlSchV, §17 GefStoffV and §19 ChemG) and to avoid exposure to hazardous materials during handling or repair, will you please complete this form, prior to the equipment leaving your laboratory COMPANY / INSTITUTE ____________________________________________________________ ADDRESS ____________________________________________________________ TEL NO _____________________ FAX NO _____________________ E-MAIL _____________________ ______________________________ EQUIPMENT If on loan / evaluation Model Serial No __________ __________ __________ __________ __________ __________ __________ __________ Start Date: ________ Finish Date ________ Hazardous materials used with this equipment _________________________________________________________________________________ _________________________________________________________________________________ _________________________________________________________________________________ Has the equipment been cleaned and decontaminated? YES / NO (delete) Method of cleaning / decontamination _________________________________________________________________________________ _________________________________________________________________________________ _________________________________________________________________________________ NAME ________________________________ POSITION __________________________ (HEAD OF DIV./ DEP./ INSTITUTE / COMPANY) SIGNED ______________________________ DATE ______________________________ PLEASE RETURN THIS FORM TO BIOMETRA GMBH OR YOUR LOCAL BIOMETRA DISTRIBUTOR TOGETHER WITH THE EQUIPMENT. PLEASE ATTACH THIS CERTIFICATE OUTSIDE THE PACKAGING. INSTRUMENTS WITHOUT THIS CERTIFICATE ATTACHED WILL BE RETURNED TO SENDER. 13 9.0 Notes ________________________________________________________________ ________________________________________________________________ ________________________________________________________________ ________________________________________________________________ ________________________________________________________________ ________________________________________________________________ ________________________________________________________________ ________________________________________________________________ ________________________________________________________________ ________________________________________________________________ ________________________________________________________________ ________________________________________________________________ ________________________________________________________________ ________________________________________________________________ ________________________________________________________________ ________________________________________________________________ ________________________________________________________________ ________________________________________________________________ ________________________________________________________________ ________________________________________________________________ ________________________________________________________________ ________________________________________________________________ ________________________________________________________________ ________________________________________________________________ ________________________________________________________________ ________________________________________________________________ ________________________________________________________________ ________________________________________________________________ ________________________________________________________________ ________________________________________________________________ ________________________________________________________________ ________________________________________________________________ ________________________________________________________________ ________________________________________________________________ ________________________________________________________________ ________________________________________________________________ ________________________________________________________________ 14 Warranty This laboratory instrument is produced with the highest practical standards of materials, workmanship, and design. The design and manufacture of parts have been conceived with one purpose - to produce units which will give satisfactory service. Biometra GmbH guarantees this unit to be free from defects in materials or workmanship under normal use or service for 12 months from date of shipment. If, during this time, this unit proves defective in materials or workmanship, Biometra GmbH will repair or replace it free of charge if returned to us prepaid. This guarantee does not cover damage in transit, damage caused by carelessness, misuse or neglect, or unsatisfactory performance as a result of conditions beyond our control; or consequential losses as a result of failure of our product. ___________________________________________________________________________ Biometra biomedizinische Analytik GmbH Rudolf-Wissell-Straße 30, D-37079 Göttingen P.O. Box 1544, D-37005 Göttingen Tel:++49 – (0)5 51 / 50 68 6-0 * Fax: ++49 – (0)5 51 / 50 68 6-66 e-mail: [email protected] internet: http://www.biometra.de 15