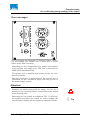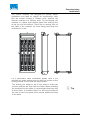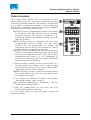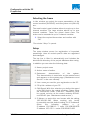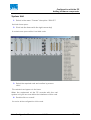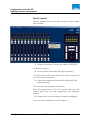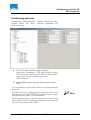
1
zirkon Configuration
Manual
Digital Broadcast Audio Mixing Console
Release:
V 1.22
Issue: 2005-11-08
interstage
Phistersvej 31, 2900 Hellerup, Danmark
Telefon 3946 0000, fax 3946 0040
www.interstage.dk
- pro audio with a smile
Copyright
All rights reserved. Permission to reprint or electronically reproduce any document or
graphic in whole or in part for any reason is expressly prohibited, unless prior written
consent is obtained from the Lawo AG.
All trademarks and registered trademarks belong to their respective owners. It cannot be
guaranteed that all product names, products, trademarks, requisitions, regulations,
guidelines, specifications and norms are free from trade mark rights of third parties.
All entries in this document have been thoroughly checked; however no guarantee for
correctness can be given. Lawo AG cannot be held responsible for any misleading or
incorrect information provided throughout this manual.
Lawo AG reserves the right to change specifications at any time without notice.
© Lawo AG, 2002, 2003
Contents
Contents
CONTENTS
PREFACE
Manual structure
Typographical Markers
Conventions of the Notes
WARNING NOTES
ZIRKON SYSTEM: INTRODUCTION
Features of the zirkon system
Components of the zirkon system
System block diagramme
COMMISSIONING
Warning notes
Air conditioning and grounding of the zirkon
Operating modules
System unit
Error messages
Grounding the audio interfaces
Plug-and-socket connections
Control bus (Can-Bus)
System cable
Air conditioning
Installation
Equipping the system unit
Warning notes on equipping the system unit
DIP switch settings
Equipping the 3RU mounting frame
Equipping the 6RU mounting frame
Labelling the buttons
Switching on the zirkon system
CONTROL ELEMENTS, WHAT IS WHERE?
Channel module
Central module
CONFIGURATION WITH THE PC
Installing the software
System requirements
Installation
Starting the configuration software
Preparation
zirkon Configuration Manual
V 1.22
3
7
7
8
9
11
13
13
14
15
17
17
17
17
18
19
20
20
20
21
21
22
24
24
25
26
27
28
28
29
29
31
33
33
33
34
34
34
3/ 114
Contents
Checking the connection
Opening an existing configuration database
Generating a new configuration database
Selecting the frame
Setup
Saving a configuration database
Downloading the setup
Adding hardware components
System Unit
Control panel
Configuring the I/O cards
AES IN card
LINE IN card
MIC LINE IN card
AES OUT card
LINE OUT card
GPI/O card
SDI I/O
Configuring the buttons
Multi-functional buttons
LCD buttons
Display of used system ressources
Calling up the tree definition
Sources
Inserting a new source
Input of an assignment
Assigning signal processing
Assigning a source to the main sum
Assigning LED colours
Word-music switch (1n2, 2n1)
Channel On/Off Channel Mute
Example for a configured channel
Summing buses
Assigning summing buses
Mix-minus/pre-conference sums
Fader–source–sum–assignment
Default Audio
Downloading the configuration
Minimixer
Minimixer as two-channel mixer
Adding a minimixer
Minimixer: settings
Connect/Routing
Priconnect
4/ 114
V 1.22
34
35
35
36
36
38
38
38
39
40
41
41
42
42
43
43
44
44
45
45
46
46
47
48
48
49
49
50
52
52
52
54
55
56
57
58
59
59
60
60
61
61
62
64
zirkon Configuration Manual
Contents
GP Sum – Mix Remote
Defining a GP Sum
Generating a summing bus assignment
Logic
Selecting a function
OR 8:(4)
OR 32: (16)
AND 8: (4)
TFF: (4)
MFF: (2)
NOT:(1)
Button16:(16)
PRIO:(4)
DEL:
(2)
IMP:
(4)
Configuring audio generators
Global settings
Settings
Sync
MADI
Meter
Fader
Snapshot
OnAir Control
TCP Link
GPI/O network
Principle
Establishing networks
Establishing ports (senders)
Establishing receivers
Software update
Before the update
Update
SYSTEM PAGE AND ERROR MESSAGES
System page (http:// )
DSP card information (snapshot)
Sync information (snapshot)
Slot information (snapshot)
Panel information (snapshot)
Error messages
Supplementary Information
Check connections – when something went wrong!
Download Config – When something went wrong!
ACCESSORIES
zirkon Configuration Manual
V 1.22
65
65
65
66
66
67
68
68
68
69
69
70
72
76
76
77
79
79
80
81
83
85
87
88
89
89
90
91
92
93
95
95
95
97
97
98
98
98
98
98
99
99
101
103
5/ 114
Contents
Power supply unit for console modules
Redundant PSU for the system unit
19” Push button module (KS16)
TECHNICAL DETAILS
I/O cards
GLOSSARY
6/ 114
V 1.22
103
103
103
105
105
107
zirkon Configuration Manual
Warning notes
Preface
This manual is subdivided into individual, self-contained
chapters that can be studied independently from each
other.
Basically, every chapter is structured in a general
introduction which is followed by topics that include
description or instruction sequences.
Parallel descriptions or interrelations between
described elements or functions are cross-referenced.
the
Manual structure
The manual structure is explained by the following brief
descriptions of the individual chapters’ contents.
Chapter 1 Warning Notices
Includes general warnings about the handling of lowvoltage devices and first aid in case of electric shock.
Chapter 2 Introduction about the zirkon
Offers a brief overview over the features and the
components as well as a block diagram that illustrates the
system structure.
Chapter 3 Commissioning
From integrating the hardware into the studio environment
to power supply and earthing, air-conditioning information
to switching on the system.
Chapter 3 Control Surface Modules - What is where?
Explains buttons, light emitting diodes (LEDs) and rotary
controls of the surface modules
Chapter 5 Configuration with the PC
All settings supplied by the zirkon from installation of the
configuration software to the software update are
explained here. Amongst others: Configuration of the
boards and control modules as well as the programming of
some logic functions and small matrix functions.
Chapter 6 Error messages
A selection of typical errors and their solutions.
Chapter 6 Accessories
Lists accessories e.g. a redundant power plug and highquality LCD push-button strips.
Chapter 8 Technical details
Compilation of all technical details of the console modules,
mounting frame as well as the DALLIS boards.
zirkon Configuration Manual
V 1.22
7/ 114
Warning notes
Chapter 9 Glossary
Lists the used technical terms.
Chapter 10 Index
Index for looking up terms and descriptions quickly.
Typographical Markers
For easy handling and orientation with this manual at hand
you will find here some explanations about the most
important typographical markers.
Chapter
The headlines are marked by bold and large font. The
headlines structure the topics to guarantee fast
orientation.
1. Action Request
The action requests are numbered. These numbers serve
for showing you the reasonable sequence of actions. This
way you have always an overview over the complete action
sequence.
Result
The results are written in italic letters. They inform about
intermediate as well as final results to give you the chance
to identify errors at an early stage.
Marginal Note
Marginal Note
The marginal note serves as eye-catcher. Beside the
marginal note you will find at this position useful tips,
notes or warnings. About warnings you will learn more in
the paragraph conventions.
8/ 114
V 1.22
zirkon Configuration Manual
Warning notes
Conventions of the Notes
This symbol is followed by useful tips!
Tip
This symbol signifies that something is pointed out to you.
Notes include useful suggestions or cross-references to
records not included in this document.
Note
This symbol appears when something must be observed
strongly. Not observing the warnings can cause heavy
damages of the device and perilous bodily injuries. Please
absolutely observe notes with this symbol.
.
zirkon Configuration Manual
V 1.22
9/ 114
Warning notes
Warning notes
Attention:
Read all notes with this “attention” symbol before
installing the device. Observe all these notes during
installation. Please observe also all other operation and
application notes.
Attention:
Check the device and the accessories with regard to
transport damages.
A device damaged mechanically or by the intrusion of
liquids must not be connected to the mains supply or
must be disconnected from it immediately by pulling the
power plug.
Attention:
The device must be grounded.
If the device is not operated with a mains power supply
unit please use only such line cords with three-leads as
provided with the delivered product.
Attention:
By removing parts of the casing, shields, etc., live parts
are laid open. Therefore you must strictly observe the
following safety instructions:
•
Manipulations inside the device must be carried out
by qualified service personell only under observance
of the applicable regulations.
•
Inside the device are no user-servicable parts.
Attention:
Before removing parts of the casing the device must be
switched off and disconnected from the mains supply in
any case.
•
Before opening the device the power supply
capacitor must be discharged with a suitable
resistor.
•
Components that carry heavy electrical loads like
power transistors and resistors should not be
touched until cooled off to avoid burns.
zirkon Configuration Manual
V 1.22
11/ 114
Warning notes
Attention:
Servicing unprotected and operating devices can be
carried out only by instructed qualified personell at their
own risk. The following instructions must be observed:
•
Never touch bare wires or circuitry
•
Use insulated tools only
•
Do not touch metal semi-conductor casings as they
can bear high voltages.
Attention:
First Aid (in case of electric shock):
•
Separate the person as quickly as possible from the
electric power source:
o
Switch off the equipment
o
Unplug or disconnect the mains cable
o
Push the person away from the power source by
using dry insulating material (such as wood or
plastic)
Attention:
If the person is unconscious:
•
Check the pulse
Reanimate the person if respiration is poor.
•
Lay the body down and turn it to one side, call for a
doctor immediately.
After having sustained an electric shock, always consult a
doctor.
Attention:
Do not touch the person or his/her clothing before power
is turned off, otherwise you stand the risk of sustaining an
electric shock as well
12/ 114
V 1.22
zirkon Configuration Manual
zirkon system: introduction
Features of the zirkon system
zirkon system: introduction
The zirkon system offers a solution for small and mid-sized
broadcasters to operate fully digital studios. The
components are also suited for remote studios and the
operation in OB vans.
Features of the zirkon system
For these applications, the zirkon provides the following
essential characteristics:
•
Fully modular design
Allows favourable spares
maintenance.
pooling
and
fast
•
Intuitive operation
Also by non-trained staff.
•
Digital and analogue interfaces
Derive from high-quality mixing consoles; their
number can be increased easily (up to system
limits).
•
•
Control panel size is scalable in 4-fader-steps.
•
Signal processing in the System Unit
is performed in a 19’’ system frame with 3RU or 6RU
which is designed for installation in equipment
rooms. This avoids noises by cooling and heat
dissipation.
•
The System Unit can be operated also without
control panel.
In case of a control panel failure no audio
interruption is caused. After replacing the defect
part, all operating elements and displays are
restored. The work can continue trouble-free.
•
Graphical PC surface
A graphical PC user interface allows programming
the system very customer-specific. Functions like
talkback, redlight, studio switch and many other
requests can be realised.
Flat control panel
for fitting into a table.
zirkon Configuration Manual
V 1.22
13/ 114
zirkon system: introduction
Components of the zirkon system
•
Motor faders are standard
The motor faders allow the transparent operation in
combination with a radio automation system
(connection of radio automation via serial protocol,
RS422).
•
CAN bus connection
Control panel and System Unit are connected via
CAN bus. 19’’ 1RU button panels (KS16) can be also
integrated.
•
Simple installation
The system is cabled via RJ45 plug-in connectors.
•
56/64-channel MADI interface
The system can be extended by this interface. The
interface is designed redundantly.
Components of the zirkon system
Fundamentally, a system consists of one System Unit and
at least two control panel modules (Central Module and
Channel Module).
The System Unit includes the masterboard and a number
of analogue and/or digital interfaces. The motherboard
serves for the signal processing. The interfaces serve for
integrating the studio environment.
With the Central Module you operate monitoring
functions, many programmable special functions and the
signal processing of individual input signals. The Channel
Module includes four channel strips. Each channel strip
is fitted with one motor fader and five buttons. You can
connect up to nine channel modules to the system.
14/ 114
V 1.22
zirkon Configuration Manual
zirkon system: introduction
System block diagramme
System block diagramme
The block diagramme shows a simple zirkon system with
system unit, central module and three channel modules.
The service PC allows an easy configuration but is not
needed for operating the console.
Connecting the system unit with the control panel and the
control modules among each other (CAN bus) requires
standard network cables (STP-CAT5 cable shielded
twisted pair, with RJ 45 connectors on both sides and
one 1-to-1 assignment).
The maximum distance of the bus system is:
Transfer speed
500 kbit/sec
60 m
100 kbit/sec
300 m
10 kbit/sec
1000 m
Please note that all system components are on the same
grounding potential.
The zirkon master board is fitted with an Ethernet
interface. For connecting a PC directly you need a
crosscable (CAT 5 STP RJ 45 connectors on both sides).
When the system is connected to a network via hub, like
with a CAN bus link, a 1-to-1 cable is necessary.
zirkon Configuration Manual
V 1.22
15/ 114
Commissioning
Warning notes
Commissioning
Warning notes
Attention!
The electrical interfaces must be supplied only with
voltages and signals that are mentioned in these
instructions.
Attention!
Do not use the mixing console at extreme temperatures.
Proper operation can only be guaranteed for the use at
temperatures between 5° and 32° C and a maximum
relative humidity of 80%!
Attention!
Please use rack-rails for mounting the System Unit. The
19’’ frame must not carry the complete weight!
Air conditioning and grounding of the
zirkon
The zirkon system must be grounded by you. All lowvoltage devices must be grounded before operation.
Operating modules
The operating modules supply on the right side connecter
patches for the power supply (PSU) and a possibility for
additional grounding the module.
zirkon Configuration Manual
V 1.22
17/ 114
Commissioning
Air conditioning and grounding of the zirkon
The PSU has the following features:
•
•
Tip
Input: 100-240 V / 50–60 Hz / max. 700 mA
Output: 12 VDC / 2,5 A
For country-specific
adapters.
plug
norms
we
offer
different
Each casing of the operating modules is fitted with a
ground bolt.
1. Fasten the grounding cable at the ground bolt
2. Connect all operating modules with the grounding
cable.
3. Establish a direct connection with the system unit
(parallel with the CAT-5 cable).
Attention!
Please see that the operating modules are on the same
ground potential like the system unit!
System unit
Each system-unit is delivered with a power supply unit
(PSU) as a standard. The PSU in a 3RU-frame has the
following characteristics:
•
•
Input: 100 240 VAC (PFC)/ 50–60 Hz/ max. 1,6 A
Output: 12 VDC / 8,3 A
The PSU in the 6RU mounting frame has the following
features:
•
•
18/ 114
Input: 100 240 VAC (PFC)/ 50–60 Hz/ max. 2A
Output: 12 VDC / 11 A
V 1.22
zirkon Configuration Manual
Commissioning
Air conditioning and grounding of the zirkon
Error messages
Error messages are displayed via collective alarm contact.
For the transfer the system unit is fitted with a 15-pin
DSub- and a BNC connector.
Depending on the configuration the power consumption
of the system unit adds up to 70W and a maximum of
200W (with redundant PSU).
The system unit is supplied with power via the top colddevice connector.
Operator protection is guaranteed as the system unit is
connected via the cold-device plugs with the ground of
the power supply system.
Attention!
Establish an additional ground for safety. You can fix it
directly to the mounting frame. Use the M4 screw thread
at the housing rear!
Optionally you can install an additional PSU. To this end,
the system unit offers two inputs for mains voltage. We
recommend to supply the two inputs by separate circuits.
zirkon Configuration Manual
V 1.22
Tip
19/ 114
Commissioning
Grounding the audio interfaces
Attention!
Please note that the circuits lie on the same ground
potential. Otherwise, an internal bridge of two ground
wires will lead to a ground loop!
Grounding the audio interfaces
Attention!
For compliance with AES3, please note that digital
interfaces should be connected with a field ground!
For connecting microphones please note:
Guide the ground connection from the zirkon interface to
the microphone directly via the cable shielding as
otherwise no phantom supply can be transferred. Take
care that the shielding does not lie on the field ground.
This way you prevent interferences and quality loss.
Plug-and-socket connections
Control modules
The console modules have nearly identical connector
panels at the front. The central module is a little wider and
so its connectors are a little further apart.
Control bus (Can-Bus)
For cabeling the control panels use a symmetrical
network- (Ethernet-) cable. The cable must comply with
CAT5.
The CAN bus uses only one of four available pairs of CAT5
wires.
1. Loop the CAN bus through the control modules. Use
the sockets CAN IN – CAN OUT!
2. Terminate the last channel module with the CAN
termination plug.
20/ 114
V 1.22
zirkon Configuration Manual
Commissioning
Air conditioning
Before switching on you only have to set the CAN address
at the control modules. This is performed by a rotary
selector (hexadecimal):
3. Set the address handling the rotary selector. Use a
screw driver for this operation!
Assign the addresses 1 to 9 for the channel modules. The
address 0 is reserved for the service menu. The central
module must be provided with the address F.
System cable
All system cables within the system unit are connected to
the masterboard. Available are:
•
•
•
BNC Wordclock 75 Ohm input
•
RS–422 interface for linking a radio automation
system with the Lawo diamond protocol
System unit
CAN – bus for connecting the control modules
Ethernet for configuration, display of the system
page (http)...
The RJ45 socket for connecting a radio automation system
is assigned according to the following diagramme:
For the interface assignments of the different modular
plug-in cards please consult the chapter “Technical
details”.
Interface boards
Air conditioning
The system unit needs a constant air stream with a
maximum exhaust air temperature of 32 centrigrade. Thus
the installation in a 19’’ rack is recommended.
The housing of the device is perforated at the top and at
the bottom. This requires an air stream guided
respectively to cool the system unit best.
zirkon Configuration Manual
V 1.22
21/ 114
Commissioning
Installation
Attention!
When mounting take care that no devices or cables
prevent the convection!
For calculation with respect to air conditioning you can
assume a power consumption of 200 Watt.
•
•
•
•
•
Housing 19“ / 3RU or 6RU
Height: 132,5mm (6RU: 265mm)
Width: 483mm (front plate), 440mm (body)
Depth: 433mm (without plug-in connectors)
Weight: 7,15kg (unmounted, 6RU: 11kg)
The control modules are designed for normal studio
installation and need no special air conditioning.
Installation
The plug-in connectors are at the front of the module.
Therefore, when using 19’’ racks with doors please leave
enough room in between for the cables plugged there. The
cables plugged at the front can be ducted backwards
under the unit into the rack.
22/ 114
V 1.22
zirkon Configuration Manual
Commissioning
Installation
The control modules are designed for normal studio
installation and need no special air conditioning. Note
that the central module is 200mm wide, whereas the
channel modules are 160mm wide. For positioning the
modules on a table, both module types have seating rims
at the top and the bottom. There are no seating rims at
the sides of the modules for close fitting when they are
combined in a row.
For a permanent table installation please have a rim
moulded for these seating rims so that the surface of the
mixing console is flush with the table surface.
The seating rim needs to be 9 mm deep to make the
console modules be flush with the table. When installing
the modules into the table it is guaranteed that they stay
at their place. In addition there is a M3 screw thread at
the rear of the front panel which allows additional fixing
in the table.
zirkon Configuration Manual
V 1.22
Tip
23/ 114
Commissioning
Equipping the system unit
Mounting into a table of 21mm is no problem. When the
table is thicker it has to be guaranteed that the frontal
fitted connectors are still accessible.
Equipping the system unit
Only after equipped with plug-in cards, the system unit
becomes a functioning module.
Warning notes on equipping the system unit
Equipping the system unit and the handling of the plug-in
cards must be performed with the utmost carefulness.
Equipping must be done by authorised personell only as
the plug-in cards carry highly sensitive electronic
components.
Attention!
In principle always observe the following rules:
24/ 114
•
Discharge yourself before touching a plug-in card.
•
Wear conductive safety-shoes and grounding
wristbands. This reduces the risk of electrostatic
charging.
•
Avoid bending the cards at any rate.
V 1.22
zirkon Configuration Manual
Commissioning
Equipping the system unit
•
Mind that the plug-in cards glide smoothly in the top
and bottom guide-rails. Only then can the cards lock
in place correctly at the contact inside.
•
The card front panels serve as protection against
contact with live parts and thus must be fastened.
•
Fasten the knurled screws of the plug-in cards
before starting operation.
This:
•
reduces the emission of electro-magnetic radiation
considerably
•
protects the cards
unintentionally.
from
being
pulled
out
DIP switch settings
Some DALLIS cards include DIP switches. With these it is
possible to directly set certain features of the cards. For
these settings please consult the chapter “Technical
details”!
Attention!
Check the settings of the DIP switch before inserting the
cards!
zirkon Configuration Manual
V 1.22
25/ 114
Commissioning
Equipping the system unit
Equipping the 3RU mounting frame
20 slots are available in all, whereas the two centre slots
(M1 and M2) are designated for special plug-in cards.
The system only works after the slot M1 is fitted with a
master board.
1. Use a card of the type 947/81 or 947/82!
2. Close the slot M2 with a dummy plate of the type
940/32!
The slot M2 is designated for possible future extensions.
3. Equip slots 1 to 16 freely according to your
requirments.
The order of the cards is arbitrary.
Note
Tip
26/ 114
4. Use for the slots 17 and 18 only GPIO cards or a
phantom power card!
In a 3RU mounting frame, 8GU wide plug-in cards occupy
two slots. 4GU plug-in cards allow to realise more
interfaces in the system.
V 1.22
zirkon Configuration Manual
Commissioning
Equipping the system unit
Equipping the 6RU mounting frame
The 6RU system unit offers only 8GU wide slots for
interfaces.
1. When fitting a 4GU wide card close the remaining
slot with a 4GU dummy plate!
This way you protect the sensitive electric parts of the system.
The slot at bottom centre next to slot 10 is reserved for
the phantom power supply card.
2. When you want to use a phantom power card plug it
into this slot only.
In other slots this function of the card is not available!
Like in the 3RU version also in the 6RU system unit it is
not possible to install audio interfaces in the slots 17 and
18. Here are only plug-in cards of the type GPIO possible.
zirkon Configuration Manual
V 1.22
27/ 114
Commissioning
Labelling the buttons
Labelling the buttons
The four buttons in the channel strip and the most buttons
in the central module can be labelled with inlet plates.
These plates can be produced and printed by yourselve.
For this you find in the enclosed software package a MS
Excel template for the print of button plates
(ZirkonButtonLayers.xlt). You can print out these plates on
foil with a laser printer.
Mounting the labels:
1. Remove the button cap with the button cap remover!
2. Pull off the button cap!
3. Insert the correctly cut-out foil between the button
body and the transparent button cap!
4. Fasten the button cap on the button body by
pushing!
Button is labelled.
Switching on the zirkon system
When equipped and installed completely, the zirkon
system can be switched on. The zirkon system has no
on/off switch but starts automatically when connected
with the mains supply. Please use a general switch where
applicable.
The devices find and initialise themselves automatically.
When switching on please note that the central module is
also switched on. This guarantees the initialising of the
control modules.
28/ 114
V 1.22
zirkon Configuration Manual
Control elements, what is where?
Channel module
Control elements, what is where?
All control elements are positioned on the central module
or the channel modules. Thus all functions are provided on
the control panel which is clearly designed.
Channel module
All channel strips in the channel module are designed
identically. This allows to assign any kind of signals
(microphone/line/transmission line) to any channel strip.
(1) Three LEDs at the top indicate the signal status,
thus providing a quick overview.
•
You identify an overload when the top diode blinks or
when it is on. In this case please adjust the input
signal gain to not jeopardise the signal quality.
•
The middle diode shows the activity of the integrated
active limiter.
•
The bottom lamp indicates whether an input signal is
supplied. It lights up in the signal clock and has a
responding threshold of -20dB.
(2) The operation of the four freely programmable
buttons is defined by the selected operating modes.
If you have questions about the configuration please
ask your network administrator!
(3) The middle section of the channel strip carries the
faders. These are motor faders fitted with tracks of
conductive plastic. The faders are maintainance-free.
The scale ranges from -∞ to +9.
(4) The respective channel is indicated by the selflabelling button (access button).
•
The button label shows the source name (input
signal) and the time. Particularly for devices without
a time display (recorders, microphones, record
players, etc.) this is a big help in the on-air
scheduling.
zirkon Configuration Manual
V 1.22
29/ 114
Control elements, what is where?
Channel module
(5) The rotary control above the access button serves
for the setting of any parameter in the channel strip.
•
30/ 114
When handling the rotary control the display of the
access button changes. It shows no longer source
name and time but the rotary control function and
the set value instead.
The rotary control is used for all sources to set the
gain in the channel. This way, inputs with different
volume can be adapted to the mixing console. For
microphone channels, the gain before digital
conversion can be set.
Pushing the rotary control allows the setting of
panorama/balance.
V 1.22
zirkon Configuration Manual
Control elements, what is where?
Central module
Central module
This control panel module can be integrated in every
zirkon system only once. It includes buttons for operating
monitoring, talkback equalizer and dynamics. Furthermore
it is possible to programme buttons for the summing bus
assignment. Established configurations can be managed
with the built-in chipcard reader/writer.
(1) These 24 freely programmable buttons are ordered
in six groups with four buttons each to establish
functional groups. This allows to separate e. g.
monitoring selection and talkback optically and with
regard to position.
(2) The bottom section is equipped with two freely
programmable volume controls. The two rotary
controls can be programmed for setting the
monitoring level as well as for functions like import,
headset volume, loudspeaker volume etc.
(3) The top section includes twelf self-labelling (access)
buttons. In the default status these keys are assigned
with the pre-configured functions. They can be freely
programmed and allow e. g. the assignment of
channels to summing buses or special operations
(remote function with foldback).
•
With selecting a channel via the access button of a
channel module the buttons of the central module
are labelled according to the source. (See chapter
“Operating concept - audio control“)
(4) With the rotary controls positioned vertically above
the access buttons you can set parameters offered
according to the source.
•
The settings are explained in detail in the chapter
“Operating concept - audio control”).
(5) A chipcard reader/writer is integrated in the top
section of the central module.
•
With this reader/writer you can store your own
settings and load them next time.
For more about using the chipcard please consult the
respective chapter.
zirkon Configuration Manual
V 1.22
31/ 114
Configuration with the PC
Installing the software
Configuration with the PC
Installing the software
The enclosed configuration software works under all
common Microsoft Windows™ operating systems (2000,
XP). The software serves for the setup and the
programming of:
•
•
•
•
All programmable buttons and rotary controls
The interfaces in the system unit
All sources
Complex control functions.
All the programming can be performed with the help of the
TCP/IP protocol from any place within the network. The
transfer is carried out via Ethernet. Thus the configuration
and the remote maintenance can be performed at a
central place.
System requirements
The system must fulfil the following prerequisites to
guarantee the smooth running of the configuration:
•
•
•
•
•
•
Operating system: MS Windows™ 2000 oder XP
Random access memory: 256 MB RAM
Processor: Pentium™ III
Ethernet interface
MDAC driver version 2.5
Microsoft JET 4.0 SP 6
For keeping the instructions short we don’t mention the
left mouse key in every single instruction. Please use the
left mouse key as long as the right mouse key is not
expressedly demanded.
zirkon Configuration Manual
V 1.22
Note
33/ 114
Configuration with the PC
Preparation
Installation
Before installing the application you have to assure in any
case that the MDAC driver version 2.5 and Microsoft JET
4.0 SP6 are installed.
1. Double-click on the programme system!
The installation programme is started.
2. Follow the instructions of the programme!
3. Click on “Ready” to finish the installation!
The configuration programme is fully installed on your
system.
Starting the configuration software
4. Double-click on the zirkon symbol!
The configuration programme starts with a blank screen.
Preparation
Checking the connection
Before transferring your settings to the zirkon system you
should check the connection first. This is performed the
easiest way by using the ping command in the “DOS”
box”.
1. Open the MS DOS prompt!
2. Enter the following syntax:
“cd..“
“cd programme\zirkon“
3. Enter the following command:
ping 192.168.101.240 (ex works settings)
The zirkon confirms! If you have set another IP address please
use this!
After the system confirmed you can carry on. If the
system does not give out a confirmation please read the
paragraph “Download setup – when something went
wrong” in the chapter “Error messages”.
When the zirkon system is connected with a network then
proceed as follows:
34/ 114
V 1.22
zirkon Configuration Manual
Configuration with the PC
Preparation
4. Disconnect the network connection!
5. Repeat the “ping” command in the MS DOS prompt!
When the system does not confirm, carry on! When the
system confirms consult the paragraph „Check connection –
When something went wrong”“
6. Re-establish the network connection!
7. Test the connection again!
When the zirkon confirms again you can start with the
transfer.
Opening an existing configuration database
You can open an existing database or generate a new
configuration. You find the existing databases under:
c:\programme\zirkon\database.
1. Select from the menu “File” the option “Open”!
The context menu “Open” appears.
2. Change to the directory mentioned above!
3. Select the required database!
4. Confirm your selection with “OK”!
The configuration database is opened.
Generating a new configuration database
1. Select from the menu “File“ the option “New”
The window ”Frame Selection” appears.
zirkon Configuration Manual
V 1.22
35/ 114
Configuration with the PC
Preparation
Selecting the frame
In this window you select the scope presentation of the
control modules (SURFACE) and the system unit (DALLIS)
aus.
The small control panel window allows to equip up to four
channel modules. The large window admits up to nine
channel modules. These are virtual frame sizes. The
zirkon can be extended to up to 9 channel modules.
1. Select the required frame sizes and confirm with
“OK”
The window “Setup” is opened.
Setup
The setup window serves for registration of important
presettings. Here all control-specific data are registered
and managed.
The top line is filled in automatically and includes the
absolute file directory of the project database after saving.
In addition you can enter the following data:
36/ 114
•
•
•
Name: project name
•
•
•
User: name you used for your registration on the PC.
•
IP-Adress: ex works this card comes with the setting
192.169.101.240. When working only locally
(crosscable) use this default setting. All IP addresses
follow
the
following
pattern,
e.
g.
IP-address 192.168.0.2 -> enter 192.168.000.002
IP-address 10.3.15.2 -> enter 010.003.015.002
Author: name of author
Deskname:
denomination
of
the
system.
This denomination is saved also on the master board
and appears on the system page (“Maintenance and
Service” in the user manual).
PC Ip-Adr: address of your PC
CAN-Speed: With this selection you define the speed
of the CAN link to the control modules. Please follow
the instructions under “CAN bus”. Alterations must
be carried out also at the control modules 950/41
und 950/42 (see “Maintenance and service”)
V 1.22
zirkon Configuration Manual
Configuration with the PC
Preparation
•
Gateway: address of the IP-router, if available,
otherwise the preset address can be retained. Ask
your network administrator if you want to connect the
zirkon to a LAN or WAN. The input format conforms
to that of the IP address.
•
Nameserver: address of a name server. The input
format conforms to that of the IP address.
•
NTP-Server: address of the Network Time ProtocolServer. This allows to synchronise the internal
system time to that of a NTP server.
•
Netmask: bit templates. Ex works the card is set to
255.255.255.0. If working only locally (crosscable)
use this default setting. Ask your network
administrator for the applicable bit template
according to the IP address if you want to connect
the zirkon to a LAN or WAN.
•
Host name, domain name: if you want to connect the
system to a larger network please have a name
assigned to it.
•
CONSOLE: this field indicates the communication
between PC and zirkon.
After changing the IP address or the netmask to another
number range you have to adapt your settings in the PC,
otherwise no communication via Ethernet – TCP/IP can be
performed.
zirkon Configuration Manual
V 1.22
37/ 114
Configuration with the PC
Adding hardware components
Saving a configuration database
After entering the parameters you have to save the
settings:
1. Select in the menu “File” the option “Save as...“!
2. Name the new configuration!
3. Confirm saving by “OK”!
Your configuration is saved.
Downloading the setup
The settings you carried out must now be communicated
to the zirkon system:
1. Select in the menu “Download” the option “Setup”!
The window “Create: config” opens.
2. Click on “Execute” to transfer the settings!
The settings are transferred. After the transfer the zirkon
carries out an automated reset! After the reset the new
settings are valid.
Adding hardware components
After performing the basic settings you can now
communicate the configuration software the current
hardware equipment of the system unit.
38/ 114
V 1.22
zirkon Configuration Manual
Configuration with the PC
Adding hardware components
System Unit
1. Select in the menu “Frames” the option “DALLIS”!
An blank frame opens.
2. Click into the frame with the right mouse-key!
A context menu opens with all available cards.
3. Select the required card and confirm by mouseclick!
The selected card appears in the frame.
When the equipment at the PC accords with the real
system unit you can now define the interfaces of this card.
4. Double-click on a card!
You arrive at the configuration of the cards.
zirkon Configuration Manual
V 1.22
39/ 114
Configuration with the PC
Adding hardware components
Control panel
Like the system unit you can also equip the control panel
with modules:
1. Select in the menu “Frame” the option “SURFACE”!
A blank frame opens.
2. Click into the frame with the right mouse-key!
A context menu opens that contains one central module and
up to nine channel modules.
3. Select the respective module and confirm with the
left mouse-key!
The selected module appears in the frame.
When the equipment at the PC accords with the real
control panel you can now programme the individual
buttons.
4. Double-click on the module you want to configure!
You arrive at the configuration of the modules!
40/ 114
V 1.22
zirkon Configuration Manual
Configuration with the PC
Configuring the I/O cards
The modules are assigned by an address at their rear.
Thus you can freely choose the order of the modules in
the configuration programme. However, an order
according to the real control panel makes sense as a clear
assignment of the modules facilitates the configuration.
When addressing the modules you should see that you
assign the addresses in ascending order from left to right
starting with 1, according to the graphic. The central
module carries always the address “F”.
Tip
Configuring the I/O cards
AES IN card
After a double-click on an AES IN card the displayed
window opens. The title bar names type and slot.
1. Name the inputs. Use cleartext names (CD 1, MD 2
etc.)
This nomination makes it easier to distinguish the individual
inputs within the configuration.
In 1 / 1: AES input 1 channel 1
In 1 / 2: AES input 1 channel 2
In 2 / 1: AES – input 2 channel 1
In 2 / 2: AES – input 2 channel 2
Assigning a digital pre-amplification to a channel you
proceed as follows:
2. Enter under Dig Offset Gain a value between -30 and
+9!
Now a digital pre-amplification is assigned to the channel.
For releasing an interface for the matrix control, proceed
as follows:
3. Click into the box next to “Matrix enable” to set a
check mark!
When the check mark is not set the interface cannot be
connected.
If you want to connect a stereo source to this interface:
4. Click into the box next to “Stereo” to set a check
mark!
zirkon Configuration Manual
V 1.22
41/ 114
Configuration with the PC
Configuring the I/O cards
The name of the source In 1/1 is copied to In 1/2 and
extended by”L” or “R”.
Note
You can continue using the signals as mono signals in the
configuration.
LINE IN card
The parameters of the LINE IN card correspond to those
of the AES IN card.
This card type offers only four inputs, though. As they are
mono inputs they are named IN 1, IN 2, IN 3 and IN 4.
MIC LINE IN card
The MIC/LINE Karte Typ 941/52 offers, like the LINE IN
card, four analogue inputs. Additional parameters are:
Checkbox for Mic:
1. Click into the box next to “MIC” to set a check mark!
When the check mark is set the input can be used for
microphones (> 2,4 kOhm, v=0-70 dB, 48 V and high pass
filter).
When the check mark is not set the interface works as LINE
input (R = 5,9 kOhm).
Analog Offset Gain:
Here you can set a fix pre-amplification on the analogue
side.
42/ 114
V 1.22
zirkon Configuration Manual
Configuration with the PC
Configuring the I/O cards
AES OUT card
After a double-click on the AES OUT card opens the
displayed window. The title bar contains type and slot of
the card.
1. Enter in this window name and format (mono or
stereo). Set a check mark for the digital preamplification if applicable!
The green field named “Default Audio” cannot be
manually labelled.
2. Double-click on the green field!
You arrive at the tree selection.
This tree selection includes all signals defined so far.
Under Audio Input you find all audio inputs (Inp). They
includ all defined plug-in cards as well as all outputs of
the DSP functions, sums and mini mixers.
In addition, all physical outputs (Out) are also available
as sources for simple realisation of signal distribution.
Selecting an individual signal:
3. Mark the entry Inp or Out!
4. Confirm with “OK” ( a double-click is also possible)!
As neither sums, monitoring signals nor anything similar are
defined yet an assignment it makes no sense at this point.
LINE OUT card
The configuration of a LINE OUT card is similar to that of
an AES OUT card.
zirkon Configuration Manual
V 1.22
43/ 114
Configuration with the PC
Configuring the I/O cards
GPI/O card
A GP I/O card offers all available contacts (GPI 1–8 and
GPO 1–8) to be labelled.
The following settings under GPO (general purpose
output, relay output) are to be carried out:
With the check box next to “Contact Type” you can choose
between static and pulse switching.
1. Click into the box to set a check mark!
The “Contact Type” is set to pulse switching.
2. Click into the box to remove the check mark!
The „Contact Type“ is set to static.
With “Pulsetime” you define the duration of the pulse in
steps of 1/10 seconds.
3. Click into the field next to “Pulsetime”!
The prompt is in the text field.
4. Enter the duration of the pulse!
A pulse is triggered by a rising edge of the logical input
signal.
Like for „Default Audio“, you can select with ”Select
Logic” a logical signal via tree definition.
SDI I/O
The configuration conforms to that of an AES IN/OUT
interface card.
Tip
44/ 114
The inputs and outputs 1-4 in the configuration
correspond to the inputs and outputs 1-4 of Block A. The
inputs and outputs 5-8 correspond with Block B. As every
block can work either as embedder or deembedder, the
unused signals are ignored.
V 1.22
zirkon Configuration Manual
Configuration with the PC
Configuring the buttons
Configuring the buttons
Multi-functional buttons
At this point we explain the configuration of the buttons to
you.
Only after the definition of the signals controlling the
LEDs you should generate a logical link.
The multi-functional buttons (MF buttons)
programmed for different applications.
can
Tip
be
1. Double-click on a MF button in the view of the
central module (figure below)!
The window displayed here opens. The prompt is in the
respective line.
2. Name the MF button clearly and confirm with the
“Enter” button!
The button is named.
You define the behaviour of the lamps behind the buttons
with the green fields labelled with Red, White, Green and
Blink.
3. Double-click on the green field next to the colour
designation!
The tree selection opens.
4. Select a condition for the colour!
A lamp lights up in the respective colour as long as the
control signal is logical “1”.
For the control of the key illumination applies:
•
•
Red has highest priority
Off has lowest priority
The order is: Red, White, Yellow, Green, Off.
zirkon Configuration Manual
V 1.22
45/ 114
Configuration with the PC
Configuring the buttons
With the input of the control signal “Blink” it is possible to
make the button blink instead of the static illumination.
LCD buttons
The LCD buttons, in contrast to the MF buttons, can be
controlled only in the colours red, yellow and green. A
priority automation is also supplied.
1. Double-click on a LCD button in the central module
view!
The displayed window opens.
2. Enter the labelling of the LCD buttons into the fields
“Name Line 1” and “Name Line 2”! (6 characters
per line)
Enter one-line text into Name Line1. The text is centred
automatically.
3. Double-click on the green field next to the colour
designation!
A tree selection opens.
4. Assign a respective function to the function of the
LCD button!
Under Control1
potentiometers.
and
Control2
you
can
name
the
Display of used system ressources
With the help of the status window “Resources” you are
offered a fast overview over the still available mixing
console resources.
1. Select from the menu “Command” the option
“Resources”.
The displayed window opens.
A fully filled blue bar indicates that all resources of the
respective category are absorbed.
The display of the frame resources refers to the frame of
the system unit resp. console selected at the beginning. If
you select in the beginning a larger frame then more free
resources at this point are available.
46/ 114
V 1.22
zirkon Configuration Manual
Configuration with the PC
Calling up the tree definition
Calling up the tree definition
The configuration of the mixing console is performed by a
configuration tree. With the help of the tree definition you
can assign clearly all channel strips, buttons, lamps and
sums to the functions.
All white fields within the tree can be labeled resp.
activated by a mouse-click. A double-click with the left
mouse-key on fields with a green background open a submenu (tree selection) for signal selection.
You reach the configuration tree as follows:
1. Click on the menu “Command”!
The selection menu opens.
2. Select the option “Treedefinition”!
The configuration tree opens. You can now start configuring
the mixing console functions.
zirkon Configuration Manual
V 1.22
47/ 114
Configuration with the PC
Sources
Sources
After assigning the hardware resources you can configure
all sources. For this serves the sub-directory “Source”.
Inserting a new source
For inserting a new source you proceed as follows:
1. Click with the right mouse-key in sub-directory
“Source”!
A context menu opens in which you can insert a new source
or delete an old one.
2. Select whether it is a mono or stereo source!
3. Select a group for the source!
The new source is inserted.
Note
The groups serve only for giving an overview and have no
influence on the function.
After generating it, the new source can be configured as
shown in the example “Presenter” above.
Assign a source name to make the source accessible in
the system. It is independent from that on the display.
The display is entered in the line below. It can show a
maximum of 6 characters.
48/ 114
V 1.22
zirkon Configuration Manual
Configuration with the PC
Sources
Input of an assignment
That the source is really available you have to assign an
input to it.
1. Double-click on the green field!
A tree definition opens.
2. Assign an input to the source (see I/O-card
configuration)!
The source appears in the green field as well as in the tree
structure.
Assigning signal processing
With these three check boxes you can assign a signal
processing to a source.
1. Click into the check box next to the respective signal
processing!
A check mark is set and the signal processing for this source
is now available.
zirkon Configuration Manual
V 1.22
49/ 114
Configuration with the PC
Sources
Note
The signal processing performance selected here is
subtracted from the complete number of resources of the
mixing console. In all, the system provides 10 limiters
(can be used stereo or mono), 10 compressors (can be
used stereo or mono) and 48 equalizers for free use
(mono, pool principle), assignable to any input channel or
sum.
After having defined at least one pre-conference sum
beforehand, this field allows to assign a certain preconference sum to the source. Establishing a mix-minus
sum refers then to this signal.
Assigning a source to the main sum
For assigning the source to one of the two main sums you
proceed as follows:
1. Click into the check box next to the sum name!
The source is assigned automatically to the selected
summing bus.
This way of assignment to a summing bus applies only to
the two main sums. All freely defined summing buses
must be assigned via control panel.
This field allows as standard a fader positioning at 0dB
instead of -∞dB. This makes sense particularly for sources
not on the operating surface (hidden sources).
Every source offers not only control inputs but also control
outputs. The MF buttons are included completely in the
channel strip. MF 1 is the top and MF4 the bottom button.
50/ 114
V 1.22
zirkon Configuration Manual
Configuration with the PC
Sources
Additionally you can use also other source states in the
GPIO system.
The control signal Access active becomes logical one if the
access function in the source was activated. This allows to
realise further functions via the ACCESS selection.
Fader Start is active when the fader is open. NFader Start
is the negatived signal.
Fad. 20dB is active when the fader is on the –20 dB mark.
This function can be used for a seperate redlight to
signalise the speaker that he is heard well on the radio.
PFL active is active when the PFL function of the source is
active. (fader closed and PFL active see user manual, PFL
mode)
PFL prepare is active when the PFL mode PFL R or PFL
SUM is selected and PFL ON is set (also possible via
toggle), but the fader is opened. Thus the PFL is prepared
but not active.
PFL off is active if no other state is active.
Conf active is active when in this source the conference
status is active but not in any other source, and the fader
is closed. The conference sum remains set as mix-minus,
so on the sum is still modulation.
Conf prepare is active when the status Conf on is selected
(also possible via Conf toggle), but the fader is opened.
Conf off is active, when none of the states Conf active,
Conf prepare or Conf Audio is active.
Conf Audio is active when several sources are in the status
Conf active. Then the conference becomes established.
With regard to the zirkon, conference means that on the
mix-minus sum of a source no longer all open sources are
assigned “post-fader” but that sources with active
conference are assigned “pre Fader”.
Now we look at the control inputs for source control. After
a double-click on the green field appears the above
mentioned tree selection.
With Input Mute you mute the audio input. This is the
point before the signal is distributed in the “matrix”. With
Source Mute you mute the real source. The input signal is
not affected and can be still monitored. Both kinds of
mute are active until the logical input signal is “one”.
zirkon Configuration Manual
V 1.22
51/ 114
Configuration with the PC
Sources
The entered actions control the status of the fader, PFL
function and pre-conference function. While the functions
Up, Down, On and Off set the status of the source
unambiguously, the toggle function allows a status change
with every new action. For example you can alternate the
PFL function between on and off with a button. These
functions are all triggered by the rising edge.
Assigning LED colours
These fields exist for all four multifunctional buttons in
the channel strip. They activate the lamps (LEDs) behind
the buttons.
1. Double-click on the green field next to the required
colour!
A tree selection opens.
2. Assign a logic function to the button (see „logic“)!
Word-music switch (1n2, 2n1)
With these two functions you can easily establish a wordmusic switch.
The action assigns the source to summing bus 2 and cuts
it from summing bus 1. In the second field the reverse
happens.
1. Double-click on the green field and assign a
condition to the function!
Remember to define Sum1 and Sum2 in "System ->
Definition -> Aux". Otherwise 1n2 and 2n1 will not be
available.
The functions Channel On, Channel Off and Channel Mute
facilitate the audio signal of a source assigned to the
control panel to be switched on and off in addition to the
fader and the input Mute.
Channel On/Off Channel Mute
52/ 114
V 1.22
zirkon Configuration Manual
Configuration with the PC
Sources
The function Channel On uses the value of the fader for
amplification or attenuation. With Channel Off the fader
position is ignored and the channel is switched to mute.
The states Faderstart and nFaderstart of a source work
independent from Channel On/Off.
As a standard the status is always Channel On. This
guarantees that if this functions is not used the source is
not muted.
Note
All bus assignments in the status pre-fader remain
unaffected by this function.
The control inputs Channel On Edge, Channel Off Edge,
Ch On/Off Toggle and Channel Mute control this function.
When the control signal assigned to the input Channel On
Edge has a positive edge the source is routed through.
When a positive edge is supplied at the input Channel Off
Edge then the source is muted, irrespective of the fader
position.
With rising edges supplied at the input Ch On/Off Toggle
the status is alternated between mute and not-mute.
Channel Mute mutes a source as long as this input is
supplied with an active signal. The source is muted with a
positive edge, with a negative edge it is routed through.
This input replaces the function Source Mute.
The functions Channel On/Off Edge and Channel Mute
should not be used in combination. In this case a Channel
Mute should be used in combination with Channel On/Off
via separate logic functions (TFF-OR or IMP-OR).
Information about the source status you acquire via the
control outputs Channel On and Channel Mute.
When a faderstart in combination with Channel On is
required they can be linked by an AND gate.
zirkon Configuration Manual
V 1.22
53/ 114
Configuration with the PC
Example for a configured channel
Example for a configured channel
The left side shows the example configuration
of the source Tel 1 in the tree definition. The
right side shows the channel strip how it is
labelled.
Apart from PFL OFF, CONF OFF and MF 1
Green, the control inputs are linked with
source-specific functions.
PFL OFF and CONF OFF are controlled with a
button on the central module.
MF 1 Green is linked with a function
TRUE.Out, which is always active (see
“Logic”).
54/ 114
V 1.22
zirkon Configuration Manual
Configuration with the PC
Summing buses
Summing buses
The sub-directories “Conf Bus” and “Sum Bus” allow to
establish two kinds of summing buses:
•
•
Summing buses with signal processing
Pre-conference (conference) summing buses or mixminus summing buses
These buses can be configured either in mono or stereo.
In the basic configuration are defined already one PFL
sum “PFL System” and two summing buses “Bus 1
System” and “Bus 2 System”.
Further sums you have to add manually.
1. Click with the right mouse-key into the sub-directory
“SumBus”!
The displayed selection menu opens.
2. Select a suitable category for your sum!
The new sum is adopted into the structure tree.
The characteristics of the summing buses with signal
processing can be set like that of the sources.
Hinweis
However, the functions PFL, Conf, Mute and the remote
control of the sum assignment are not available.
For locking a pre-fader assignment for the summing bus:
3. Click into the check box next to “Post only”!
zirkon Configuration Manual
V 1.22
55/ 114
Configuration with the PC
Summing buses
Assigning summing buses
Before you can assign summing buses to the control
panel they have to be prepared. This is performed via an
allocation
table
in
the
tree
definition
under
System/Definition/Parm = Aux.
1. Double-click on the green
field next to “Aux1”!
A tree selection opens.
2. Define a bus to be
assigned with this button!
3. Double-click in the green
field next to “Select” in
the same line.
A tree selection opens.
4. Assign a control input!
56/ 114
V 1.22
zirkon Configuration Manual
Configuration with the PC
Summing buses
The control inputs (e. g. buttons) work in the toggle mode.
The first rising edge activates the mode “sum
assignment”. The second rising edge re-establishes the
normal status of the channel strips is re-established.
This way the individual summing bus assignments are
mutually exclusive. If a sum assignment is active and a
positive edge is supplied to another select input, the sum
assignment “Aux Sum” is activated.
The status of the sum assignment is indicated by the LCD
buttons of the channel strips and by control inputs
supplied by the GPI system. These signals are active as
long as the sum assignment is activated. They can control
e. g. the LEDs of a MF button.
Mix-minus/pre-conference sums
Mix-minus/pre-conference sums are added the same way
as the summing buses.
zirkon Configuration Manual
V 1.22
57/ 114
Configuration with the PC
Fader–source–sum–assignment
The PFL sum and the pre-conference sums are without
signal processing and other control functions. This is
because they are controlled via the sources. Thus the
respective configuration lines are not available.
5. Enter here a name for the sum and add the display
line (max. six characters)!
Fader–source–sum–assignment
After all sources and sums are defined it is now time to
assign the control panel.
1. Double-click on the channel module of the control
panel view you want to configure!
The displayed window (Parameter ChannelModule) opens.
2. Enter the name of the control module into the white
field (module)!
You can name up to 11 different sources per channel strip.
These are then available on the LCD buttons of the central
module.
3. Double-click on the green field next to “Source”!
A tree selection opens.
The source, which is entered under Default Source 1,
appears after a reset on the surface.
4. Click into the check box to set a check mark!
When a check mark is set under “Only Default” the source
under “Default Source” cannot be deselected.
Tip
If a source/sum selection shall be possible
that the MF buttons are labelled with
Therefore, only sources with the same
assignment should be assignable to a channel
please note
printed foil
MF button
strip.
A source can be made available in several channel strips
but not at the same time be assigned to the surface (see
chapter “operation” in the user manual).
For the handling with regard to this restriction it is
convenient to let the MF buttons show green when ready to
use (see chapter “Logic”). Then sums and mixminus/conference sums are assignable to nearly each
channel strip without the operation becoming confusing.
Hidden sources are generated by assigning a channel
module which in reality does not exist.
58/ 114
V 1.22
zirkon Configuration Manual
Configuration with the PC
Default Audio
Default Audio
As you have already defined the input signals and sums
you can now define the audio outputs in the system unit.
Supply also outputs without defined output signal (e. g.
PPM or main out). Only then you can test the present
programming status at the zirkon.
Downloading the configuration
Before downloading first test the link with the zirkon
system (see “Check connections”)
When the system confirms you proceed as follows:
1. Select form the menu “Download” the option
“Config”!
The displayed window opens.
2. Click on “Execute” to start the download!
zirkon Configuration Manual
V 1.22
59/ 114
Configuration with the PC
Minimixer
The progress bar shows the progress of the process.
3. “Cancel” aborts the process!
4. Open the window “Setup Console”!
The displayed window “Console” opens.
5. Click on “Sending Restart” to start the test!
After “Sending Restart“ please wait some
Afterwards the system is ready for operation again.
seconds.
When executing this intermediate test it is recommended
to test also all audio channels.
Minimixer
With the available minimixers you can conveniently
programme monitoring systems. Beside volume you can
easily realise popular extra functions like mono creation,
phase reverse, mute, level diminuition (DIM) and channel
change.
The minimixers are stereo as a standard.
Minimixer as two-channel mixer
The minimixers can be used as simple two-channel mixer.
The mono function remains activated for this (see chapter
“Logic”) and the inputs left and right are connected with
the sources which to be mixed. From the outputs the
mixed output signal can be distributed.
Note
60/ 114
For a stereo mix you need two mini-mixers.
V 1.22
zirkon Configuration Manual
Configuration with the PC
Minimixer
Adding a minimixer
1. Click with the right mouse-key into the sub-directory
“Minimixer”!
A minimixer is added to the system.
Minimixer: settings
Before you can use the minimixer you have to carry out
the required settings.
1. Enter a name in the white field next to “Minimixer”!
This way you can access the outputs of the function in the
complete system.
2. Double-click on the green fields next to In L and In
F!
You reach a tree selection.
3. Select here the required inputs for the mixer (e. g.
“Default Audio” for audio outputs)!
The inputs are assigned to the minimixer.
When you don’t want to assign a volume control to the
minimixer you can define a standard volume under
“Default Level”.
4. Enter a volume value in the white field next to
“Default Level”!
When you want to assign other signals within the mixing
console operation (e. g. control room or studio
monitoring) you can perform this by “Connects”. Please
consult first the chapter “Logic”.
With the functions of the fields „Level“, „Out.L Dim Level“
and “Out.R Dim Level” you work somewhat differently:
5. Double-click on the green fields!
A tree definition opens. It displays all volume controls the
system offers.
6. Assign a volume control to the selected function!
zirkon Configuration Manual
V 1.22
61/ 114
Configuration with the PC
Connect/Routing
This way you can freely assign the controls for control room
monitoring, headset or studio monitoring volume.
This way you can set also the controls for the output level
in the status “DIM”. Here you can assign different controls
for the two separate outputs.
Standard value for the Dim Level works similar to the
Default level. It is used for signal processing if no control
is assigned to the output level diminuition.
7. Enter here the value for the “Dim Level”!
All the following parameters are control inputs.
Out.L Mute and Out.R Mute switch off the ouputs Left or
Right.
8. Assign a button to this function by a double-click!
With Mono the two input signals are mixed with an
diminuition of 3dB at the outputs.
Phase rotates the right input signal by 180 degrees.
SIDE routes the right input signal to the left output and
vice versa.
In.L Dim and In.R Dim diminuate the left or right output
signal.
All functions are active as long as the control signal is a
logical “one”.
Connect/Routing
Apart from assignment of a “Default Audio” in the
configuration of the output hardware you can carry out
connects between audio inputs and outputs. This
facilitates the programming of e. g. monitoring
functionalities or simple matrix applications.
1. Click with the right mouse-key on the sub-directory
“Connect”!
The displayed window opens!
2. Assign the crosspoint to a group!
3. Confirm with “OK”!
62/ 114
V 1.22
zirkon Configuration Manual
Configuration with the PC
Connect/Routing
The crosspoint is established. The displayed window opens.
4. Enter a label into the top line!
The line “In” is the argument for performing the audio
connect.
5. Double-click on the green field next to “In”!
A tree selection for control signals opens.
6. Assign a control signal!
A positive edge triggers the establishing of a connect.
7. Assign the audio input and output signal in the
bottom lines by double-click!
Here applies the following relation: Audio In 1 is connected
with Audio Out 1 and Audio In 2 is connected with Audio Out
2.
A “Default Audio” defined for an output is cancelled. A
reset to the „Default Audio“ must be carried out by a new
connect.
Functions best suited for this action are PRIO or
BUTTON16, which are described in the chapter “Logic”.
zirkon Configuration Manual
V 1.22
63/ 114
Configuration with the PC
Connect/Routing
Priconnect
This function combines the logic functions Prio and
Connect. You can find them under Connect -> Insert
Element.
Under Audio Out you assign that output to which all
signals are routed. Under Default Audio In shall be preset
that signal which is active when none of the control inputs
In 1-7 triggers another connect.
In 1-7 are control inputs. In correspondence to this audio
signals (Audio In 1-7) can be defined. The audio signal is
routed through to the output Audio Out whose control
inputs are active with the highest priority. In analogy to
the Prio function In 1 carries lowest and In 7 highest
priority.
The current states of the priority connection are available
as control outputs.
64/ 114
V 1.22
zirkon Configuration Manual
Configuration with the PC
GP Sum – Mix Remote
GP Sum – Mix Remote
GP Sum (General Purpose Summing Buses) is another
summing bus type beside the already existing ones (AUX
Bus, Conf Bus). A source assigned to the control panel can
be connected to or disconnected from these sums pre or
post fader via control signals with the function Mix
Remote. Also a level can be preconfigured.
Defining a GP Sum
The tree definition contains now an entry GP-Sum. With
“Insert Element” you can add a stereo or – GP Sum.
Corresponding to the other summing buses these are also
taken from the pool of sums.
Generating a summing bus assignment
1. Click in the tree definition on “Connect” with the
right mouse-key. You can now add an assignment in
the tree definition.
zirkon Configuration Manual
V 1.22
65/ 114
Configuration with the PC
Logic
The menu “Insert Element” opens.
With the (edge-controlled) control inputs Mix On, Mix Off
and Mix Toggle the status of the assignment can be
controlled.
With the input “Mix AF” it is possible to alternate between
a “pre-“- and a “post-fader” assignment. If not defined
the assignment is always pre-fader.
2. Select a configured source.
3. Select a configured GP sum.
4. Configure the level used for adding the source to the
GP sum.
Application note
This summing bus type can be elegantly used for the
following applications:
•
•
•
•
Summing monitoring
OFF-AIR-recording
Regionalisation connects
AFL bus
Logic
The sub-directory “Logic” offers mathematically logic
functions. These functions allow you to realise applications
like mutually exclusive button panels, redlight switching,
programme switch and talkback functions.
Selecting a function
1. Click with the right mouse-key on the sub-cirectory
“Logic”!
The displayed selection menu opens. It offers all available
logic functions and categories.
2. Select a function!
The function is sorted into the sub-directory. The function can
now be configured.
All function can be used in many cases as long as system
resources are still available.
The system can process up to 3,000 control units. A list
below contains the number of control units in brackets
required for every function.
66/ 114
V 1.22
zirkon Configuration Manual
Configuration with the PC
Logic
When using the logic functions, the labels (variables)
should be assigned very carefully and logically from the
beginning. Later changes are very labour-intensive and
leads often to configuration errors.
Note
The control inputs labelled here are all displayed as green
fields, and control signals can be assigned to each of them
via tree-selection. The outputs, in turn, are manifest in the
tree-selection as signals. Thus, they do not appear in the
tree-definition.
It is also possible to connect control outputs of logic
functions to control inputs of further logic functions. This
allows to establish combinations.
The configuration programme does not request with
regard to loops when programming. Thus, the
programming requires taking care and preventing loops.
This applies also for the control of external devices that
are for example linked via GPIO.
The following table lists all logic functions:
OR 8:(4)
The OR gate offers the control inputs In 1-8. Check boxes
allow the function Neg for negativing every input.
Furthermore, there is the function Pulse. It generates a
pulse with the length of 32.5 msec when a rising edge
occurs at the input.
As control outputs, the normal OR (Out) is offered, as well
as the negated signal (nOut).
Example:
zirkon Configuration Manual
V 1.22
67/ 114
Configuration with the PC
Logic
Displayed here is a simple OR8 function for the controlled
summing of faderstarts, the sources HEAD and MOD to a
redlight.
As for all logic functions, the output signal is via treeselection accessible for all other control inputs.
OR 32: (16)
This OR gate offers 32 inputs (In 1-32) which can be
individually negatived (Neg)..
The control outputs comply with those of the OR 8 - gate
(Out and nOut).
AND 8: (4)
The AND gate includes 8 inputs (In 1-8). They can be
individually negatived via the check box Neg. Available
outputs are the regularly formed AND (Out) and also the
negatived AND (nOut).
TFF: (4)
This is a toggle flip-flop. Toggle signifies that input whose
positive edge triggers the change of status of the output.
With Reset Static you can force a reset (output is set to
“null”) which is active as long as the input contains logical
“one”.
The same applies to Set Static, only that with this the
output is set to “one”.
The inputs Reset Pos. Edge and Set Pos. Edge work
similar to the inputs Reset Static and Set Static, only that
here matters the rising edge.
Out and nOut are again supplied as oututs.
68/ 114
V 1.22
zirkon Configuration Manual
Configuration with the PC
Logic
MFF:
(2)
This function is actually a mono flip-flop. With a positive
edge at the control input Trigger the output is set to a
logical “one” for the time entered under Time (in 1/10
second).
Reset resets the output immediately.
The tree-selection offers Out as output.
NOT:(1)
NOT is a simple gate for the negativing of signals. The
control input is signified In. The output is named Out.
The configuration requires sometimes a variable which
contains always a logical “one”. For example: LEDs, as
long as their status on the button is not active, should
show green.
zirkon Configuration Manual
V 1.22
Note
69/ 114
Configuration with the PC
Logic
Button16:(16)
With this function you programme easily monitoring
panels or programme switches.
It is a 1-out-of-N logic with N being maximally 16.
This function offers 16 inputs (In 1-16) and 16 outputs
(Out 1-16). When an edge is rising at one of these inputs,
the output with the same number is set to a logical “one”.
It remains set until another input is affected by a rising
edge.
Example:
A button triggers a rising edge for IN 1. By this, OUT 1 is
set to a logical “one” and remains in this status. Another
button triggers after 5 minutes a rising edge for IN3. OUT
1 is set to a logical “null” and OUT 3 is set to a logical
“one”.
This means that only one output can have a logical “one”.
After switching the zirkon on,
automatically set to a logical „one“.
output
OUT
1
is
With control input “Pushout” active you can, by
retriggering the active Input, set the corresponding output
to a logical “null”. Thus all outputs are "null".
All control inputs are locked as long as “Disable” is
activated. Another of the inputs (In 1–16) cannot be set.
The status of all outputs is maintained.
The input Reset recovers automatically the default status
of this function, i. e. OUT 1 becomes active.
Application example:
This example shows the programming of a monitoring
selection with 8 buttons in the central module. The
buttons are labelled with the prefix MON, followed by the
monitoring signal, e. g. MON ON AIR, MON MAIN 1 or
MON N-1 TEL 1.
After the control inputs are assigned to the buttons
respectively you can start with the defining the colour of
the button lamps.
70/ 114
V 1.22
zirkon Configuration Manual
Configuration with the PC
Logic
In this example, the buttons show green as a standard.
After activating the output, the button shows red.
zirkon Configuration Manual
V 1.22
71/ 114
Configuration with the PC
Logic
Afterwards please create the audio assignments:
In this case, the main-output of the MAIN 1 (MAIN
1.OUT.L and R) is assigned to the input of a minimixer.
The control input is, like the LED, assigned to the output
of the Button16 function. Function “Connect” is explained
individually.
PRIO:(4)
The function PRIO is, like Button16, a mixing-consolespecific function. With this function it is easy to realise an
output switch with prioritisation.
This function includes 8 inputs (In 1-8) and the same
number of outputs (Out 1-8). In 1 possesses lowest
priority and In 8 the highest. If In 1 is set to a logical
“one” and all others are set to a logical “null”, then Out 1
is set to a logical “one” and all other outputs are logically
“null”.
If now In 2 is set to a logical “one”, Out 1 is set
automatically to “null” and Out 2 to “one”. The following
four example tables with possible states are shown for
clarification.
72/ 114
V 1.22
zirkon Configuration Manual
Configuration with the PC
Logic
Example table 1:
Example table 2:
IN
Status
Out
Status
IN
Status
Out
Status
1
1
1
1
1
1
1
0
2
0
2
0
2
1
2
1
3
0
3
0
3
0
3
0
4
0
4
0
4
0
4
0
5
0
5
0
5
0
5
0
6
0
6
0
6
0
6
0
7
0
7
0
7
0
7
0
8
0
8
0
8
0
8
0
Example table 3:
Example table 4:
IN
Status
Out
Status
IN
Status
Out
Status
1
1
1
0
1
0
1
0
2
1
2
0
2
0
2
0
3
1
3
1
3
1
3
0
4
0
4
0
4
0
4
0
5
0
5
0
5
1
5
1
6
0
6
0
6
0
6
0
7
0
7
0
7
0
7
0
8
0
8
0
8
0
8
0
Example monitoring:
One of the standard applications in the field of broadcast
is the switching over between different signals in the
monitoring channels.
Example: The DJ hears the programme signal. When he
assigns himself to a pre-conference he should hear it on
his right ear. Does he use the PFL bus he should hear this
also at his right ear and the pre-conference should no
longer be supplied. When he terminates pre-listening, the
pre-conference should appear return at his right ear. A
talkback of the DJ must be supplied in any case also at
the right ear.
When he sees the redlight he must not hear anything else
but the programme. PFL and pre-conference should be
blocked.
This problem is easily solved by the PRIO-function.
zirkon Configuration Manual
V 1.22
73/ 114
Configuration with the PC
Logic
The already described function TRUE.Out is assigned to In
1. This guarantees that Out 1 is always active as long as
no other input has a logical “one”.
The DJ has in this case the source HEAD. This allows to
use the control output Conf Audio of the source Quelle
HEAD directly for controlling the monitoring status preconference (In 2).
For reaching the status PFL ACTIVE it makes sense to
create an OR gate that includes the PFL Active states of
all sources as inputs. This output can be assigned to the
In 3.
74/ 114
V 1.22
zirkon Configuration Manual
Configuration with the PC
Logic
In 4 is in this example also supplied by an output of an
OR function. All talkback target buttons can be ored there.
This status is reached as soon as someone talks back to
the DJ.
In case of a redlight that is also generated via an OR gate
(faderstart of different sources) In 5 is activated.
After this function is prepared with regard to control, the
audio assignments can be set up.
It is important here that all connects aim towards the
same output.
In this example the connect routes always to the
minimixer KH for regulating the gain afterwards.
The argument triggering the connects generates from the
outputs of the PRIO function (DJ HP RIGHT. OUT 1–5).
According to the logical input the suitable signal is
assigned. With DJ HP Right.Out 5 by a further connect the
MAIN 1 is routed to the right ear. With a further
preconnected OR8 function this can be achieved also with
only one connect.
zirkon Configuration Manual
V 1.22
75/ 114
Configuration with the PC
Logic
DEL:
(2)
The DEL function (delay) delays the input signal (In) by
the time under Delay Time (1/10 sec.). Control output is
Out.
This delay can prove vital when controlling recording
machines: as many devices expect a record signal first
and afterwards a delayed Play or Pause command for the
actual start of the recording.
IMP:
(4)
The function IMP (Impulse) turns an input signal (In) into
six different output signals.
The output Switch On Out becomes logical “one” if a
rising edge is supplied to the input. The status remains
until the time given under Pulsetime On (1/10 sec.) has
run out.
The signal Switch Off Out is set for a falling edge, for the
time given under Pulsetime Off (also 1/10 sec).
Switch On Off Out is set by both the rising and the falling
edge of the input signal, each according to the respective
time.
The outputs NEG Switch On Out, NEG Switch Off Out and
NEG Switch On Off Out are the same signals as described
above, only that they are negatived.
76/ 114
V 1.22
zirkon Configuration Manual
Configuration with the PC
Configuring audio generators
Configuring audio generators
Every zirkon system offers three audio generators.
Supplied signals are a reference level tone (1 kHz, 0dB),
mute and one Hinz trill (TA – Traffic-Announcement).
For checking the line level it is possible to configure the
reference level tone as source on the one hand and on the
other to supply it via connects to outputs.
Mute can be defined as signal for default-audio for outputs
that are usually assigned via Connects. When outputs are
not run via minimixers it is also possible to switch off e. g.
redlight via connects.
zirkon Configuration Manual
V 1.22
77/ 114
Configuration with the PC
Configuring audio generators
The Hinz trill generator produces a sinus tone with a
frequency of 2.35 kHz which is frequency-modulated with
123 Hz. This signal is used for controlling TA and RDS
(Radio-Data-System). This is possible by a Hinz trill
detector at the FM sender that detects a start signal of
about 0.7 sec. and a stop signal of about 1.4 sec. The
start signal is the beginning of the TA and the stop signal
is its end. The advantage of this method is that you don’t
need a separate data channel for control-data transfer to
the sender.
The Hinz trill is best mixed to the main out. The zirkon
uses two mini-mixers, one for the left and one for the right
programme channel. The one for the left channel you
supply with the left channel of the programme signal. The
right input is linked with the Hinz-trill signal. Both signals
are mixed with the function “mono”. The same should be
done with the right programme channel. The time of 0.7
sec and 1.4 sec can be generated via the mono-flip-flop
function (MFF). Here is a simple solution: programme each
of the TA start button and stop button to one MFF
function. The outputs are mixed with OR8-function. This
output, in turn, controls the mono functions of the minimixers.
78/ 114
V 1.22
zirkon Configuration Manual
Configuration with the PC
Global settings
Global settings
Under the sub-directory “System” you can define different
parameters. The most important parameters are
described in the following.
1. Under System->Definition-> Parameter you find the
system variables!
The different parameters are explained in the following.
Settings
On this page you define the default function of the
incremental encoder in the channel strip. When the check
mark under Pan/Bal first is not set, the GAIN/MIC of the
source is controlled when the source name is displayed
and the incremental encoder is turned.
When the check mark is set you directly set Pan/Bal. The
input field Matrix Port is only required when the system is
connected with large matrix systems. Otherwise, this field
should remain blank.
zirkon Configuration Manual
V 1.22
79/ 114
Configuration with the PC
Global settings
Sync
On this page you predefine the possible synchronsiation
sources.
1. Set a check mark for releasing one of the listed
sources as synchronisation source.
The position Enable Sync from Madi works only when a
masterboard 947/82 is mounted.
The zirkon offers as standard a wordclock input which
can be activated as input here.
Switching between the different inputs are performed
automatically, following the priority list given below:
•
•
•
•
SyncCard (highest priority)
MADI
Wordclock
Internal clock generator (lowest priority)
The clock source used as master can be retrieved via the
integrated webserver.
80/ 114
V 1.22
zirkon Configuration Manual
Configuration with the PC
Global settings
MADI
If you configure a masterboard 947/82 this page will
affect the system.
With Enable 64 Tx-Slots you can switch the zirkon MADI
output from 56 to 64 timeslots.
1. Click into the check box next to “Enable 64 TxSlots”!
When the check mark is set the output works with 64
timeslots.
Most MADI addressees can handle the standard MADI
mode with 56 timeslots. When 64 slots are preset and the
addressee cannot handle this mode it is possible that the
MADI stream is not recognised.
The zirkon can handle both variants (56 and 64). The
modes change automatically. When the sender transfers a
MADI signal with 56 timeslots, the inputs 57 to 64 are
attributed with mute.
Note
The control input Select Input B controls the switching
between the two fibre-optic inputs. As long as the signal is
active MADI B is used as input.
Available status signals are Input A present, Input B
present and TCP Command. Input A/B present. They are
activeated when a TAXI signal is supplied at the respective
MADI port.
zirkon Configuration Manual
V 1.22
81/ 114
Configuration with the PC
Global settings
Simple automatic switching can be realised by negativing
the control signal Input A present by the logic function
NOT. The output signal can be linked directly with the
control input Select Input B.
Afterwards switching is performed when the MADI-Port A
receives no longer a signal.
82/ 114
V 1.22
zirkon Configuration Manual
Configuration with the PC
Global settings
Meter
With the parameters on this page you set the level diplays
(meters) and level ratios of the system.
With Relative System Level (dBFs) you define the relative
working point in the zirkon. The value can be calculated
with the formula RSL = headroom (digital) –18.
Example: The working point (0 dBr) for the ARD (German
Broadcasters’ Network) is at -9 dBFS. From this follows
the Relative System Level (dBFs) -27.
The ratio between analogue line levels (dBu) is defined by
the type of the board (all boards except 941/83, 941/84
and 942/84)
Example: 941/02 -> 0 dBFs = + 15 dBu
In combination with the Relative System Level (dBFs) the
working level is on the analogue level at +6 dBu.
For the cards 941/83, 941/84 and 942/84 you can set
the reference level globally via the parameter Analog Ref
Level (dBu). The cards offer the following reference levels:
0 dBFs = 12, 15, 18, 21, 24 dBu. One of the values must
be entered correspondingly.
The working point is important as dynamics and limiter
unit refer to this value. When the threshold value is set to
0 dB the absolute level is on the working point.
Overload Threshold (dBr) is that value from which on athe
overload LED lights up (relative to the working point).
In reference to the working point the Signal Present
Threshold (dBr) defines the level from which on the
Signal Present LED in the channel strip of a source is on.
zirkon Configuration Manual
V 1.22
83/ 114
Configuration with the PC
Global settings
Application note
The Signal Present LED lights up as soon as a usable
level is supplied at the input. This helps the mixing
console user to locate quickly at which channels a signal
is supplied.
When “Play” is pushed at a CD player the respective
channel can be easily identified. Therefore the level
should be set not too low (e. g. -30 dB).
Using the Overload LED can make sense in two ways. On
the one hand you can set the level just below the physical
overmodulation. It is for digital system just below the
digital distortion and thus peaks can move into the
distortion.
The other possibility is to set the value just above the
working point (e. g. 3 dBr). This trains the user to work
close to the working point. The output signal lies thus in a
consistent range and the following signal processing can
regulate better.
We recommend the latter version.
84/ 114
V 1.22
zirkon Configuration Manual
Configuration with the PC
Global settings
Fader
The zirkon system offers the possibility to alternate
between two different fader scales during operation.
The control input Use Scale +9 dB activates (with rising
edge) the scale which is printed on the channel modules.
Use Scale 0 dB uses another scale not printed. For that
the 0 dB point at the top dead-stop. The characteristic
line corresponds about with printed one but shifted by 9
dB.
For the status repirt exist two outputs (Scale +9dB.active
and Scale 0dB.active). Depending on which status is
active its output is also active.
Application note:
Alternating between the two modes makes sense for
systems used by technically trained and less trained user.
The “DJ” works with the 0 dB scale using the fader as
“soft switch” driving it always to the top dead-stop. The
level should be nevertheless still in the working range
depending on the connected source, and depending on
the input amplification (see “Global settings meter!).
An “engineer” can mix with precision using a +9 dB scale
and, if required, gain the level.
zirkon Configuration Manual
V 1.22
85/ 114
Configuration with the PC
Global settings
When switching from the +9 dB-scale to the 0 dB scale
the open faders should be positioned either to 0 dB or
below as otherwise the level is drawn down to 0 dB with
switching.
DSP fast mode
The zirkon system includes “Soft-Switch-Filters“ in the
signal processing. These are used for faders (fader-source
functions Fader ON/OFF, Channel ON/OFF/MUTE) and
for minimixer functions (e. g. mute). They guarantee that
switching (e. g. Fader ON/OFF) or fast control (moving-up
of fader) does not leed to crack. The regular mode is
optimised for critical programme material (e. g. classical
music).
For a “fast-driven” programme this may possibly be too
languid. Hence exists the possibility to switch the filter
parameters globally.
1. Click into the check box to set a check mark!
When the check mark is set the parameters are switched with
the next download of the configuration.
86/ 114
V 1.22
zirkon Configuration Manual
Configuration with the PC
Global settings
Snapshot
The zirkon can store five snapshots on the masterboard.
For loading the snapshots exist five corresponding control
inputs (Load Snapshot 1-5). With a rising edge at these
inputs the respective snapshot is loaded if it exists.
The snapshots are stored via the audio central operation.
The control outputs Snap1.set – Snap5.set are active
when a snapshot is stored.
It is possible that loading individual snapshots can be
combined with switching the fader scale.
zirkon Configuration Manual
V 1.22
Note
87/ 114
Configuration with the PC
Global settings
OnAir Control
If a radio automation system is connected via the SAS
protocol you can transfer control states via 32 so-called
GPIO telegrammes. Of course, this depends on the used
radio automation system. The picture shows the control
outputs.
As control outputs are also up to 32 signals available.
These GPIO telegrammes are available in addition to the
source functions (e. g. faderstart).
The precise functionality must be counter-configured on
the side of the radio automation system.
88/ 114
V 1.22
zirkon Configuration Manual
Configuration with the PC
GPI/O network
TCP Link
On this page you configure the communication channels
via Ethernet-TCP/IP for which the zirkon works as “client”
Under “Active TCP Connection 1-8 you enter the TCP/IP
address at which the “server” is available. The server
must be within the same IP address range as the zirkon
system.
Under “Mode” you enter the setting used by the zirkon to
register with the “server”:
Mode: AIF1 or AIF2
This mode offers a link with the error message server. The
software is available as an option.
GPI/O network
With the GPI/O network it is possible to network different
zirkon and Nova17 systems via Ethernet TCP/IP-networks.
Control signals (logic and level) are transferred via this
link.
With the networking of different systems via EthernetTCP/IP the systems must be connected via Ethernetswitch(es) or routers.
With the networking via hubs all data packages reach the
mixing consoles and matrix systems. This slows down at
least the transfer speed. Large data quantities in the net
(e. g. when copying files) it may happen that data is
swallowed. Example: When there is a congestion,
packages of status changes are received directly one after
the other and the time interval is smaller as the
programme circle of the control system.
The IP addresses of all zirkon or Nova17 systems must
lie within the same number range (TCP/IP address +
subnet template) so that network communication is
guaranteed.
zirkon Configuration Manual
V 1.22
89/ 114
Configuration with the PC
GPI/O network
The time for establishing a network link may vary
depending on the network topology.
Principle
For a “port”, a zirkon- or Nova17 system represents the
sender. One further system can now listen to this “port”.
“Port” denotes a telegramme number whose assignment
was defined by the sender using logic and level values.
This is not a TCP/IP port but a separate applicationrelated address.
90/ 114
V 1.22
zirkon Configuration Manual
Configuration with the PC
GPI/O network
Establishing networks
Establishing communication requires informing every
system about the other systems dedicated for
communicating.
1. Find in the tree-definition under “System>Definition->Parameter = TCP Link“ the field “Active
TCP Connection“ and enter the TCP/IP address the
system you are just configuring uses for
communication.
2. Under MODE please enter for this connection type
GNET.
You can enter up to eight systems that can communicate with
this mode.
Functions like error logging (future option) are also to be
entered into this table. Therefore it makes sense to keep
free at least one to two TCP connections.
Note
On the receiver side it is also necessary to fill in this entry
from which TCP/IP addresses (senders) news can be
received. The mode is also GNET.
zirkon Configuration Manual
V 1.22
91/ 114
Configuration with the PC
GPI/O network
Establishing ports (senders)
1. Via “Insert Element“ (right mouse-key) via GPI/O
network you can add an element of the type NET.
2. Under “Net” you can enter a name.
3. Under “Port” you enter a port number.
Within a communication network there should be only
one that sends to this port number. If several send to one
port there could arise undefined states!
In contrast, there can be different senders with different
ports!
4. With a double-click onto a GPO you link a logical
status with a control output. This is afterwards sent
via network.
92/ 114
V 1.22
zirkon Configuration Manual
Configuration with the PC
GPI/O network
5. Using the outputs “Level Send” you can transfer
input elements of the type level (potentiometers,
VCA inputs).
In order to keep the quantity of transfer data small it is
recommended to assign an input element level or a
control signal only once to a level send or GPO. They can
be distributed at the receiver’s side.
Establishing receivers
Every system can be sender and receiver of several ports
at the same time. For availability of the signals within the
system you proceed as follows:
1. Enter the TCP/IP address of the sender into the
system definition (see “Establish networks!).
2. Add a new element of the type NET in the same way
as for the sender.
3. Fill in the name.
4. Insert the port number corresponding with the
sender.
zirkon Configuration Manual
V 1.22
93/ 114
Configuration with the PC
GPI/O network
Now the logic and level elements are available that are
configured at the sender.
Depending on the distance and routing of the network the
transfer time of data can vary.
94/ 114
V 1.22
zirkon Configuration Manual
Configuration with the PC
Software update
Software update
In case of a software update (not: configuration update) of
the system, the configuration software offers the function
of the download of system files.
Before the update
Save your zirkon system files before replacing the files of
the system software. Save the existing system files in the
program directory (e. g. c:\programme\zirkon)
Tip!!
Example:
zdsp.rbf –> zdsp_021022.rbf (date is here 22.10.02)
ticker.bin –> ticker_021022.bin
dspprg.dsp –> dspprg_021022.dsp
Update
Attention!
Never update when the target system is on-air or used in
another way!
During an update the system repeatedly carries out a
reset which disturbs the smooth programme flow.
For carrying out a software update it needs to copy the
new files into the programme directory (e. g.
c:\programme\zirkon).
You find the commands for the update in the menu
“Download” of the zirkon configuration software. The
commands are “System”, “DSP” and “FPGA”. A full
update can only be guaranteed when all commands have
been carried out.
For a successful update you should leave the system
alone while the system files are transferred. After the
message “SENDING Restart” you should leave the system
alone further 30 seconds as possibly initialisations are
being carried out!
Tip
1. Select in the menu “Download” the command
“System”!
A protection request “Transmit File” opens!
2. Confirm the protection request with “Yes”!
zirkon Configuration Manual
V 1.22
95/ 114
Configuration with the PC
Software update
The files are transferred The line “Sending Restart” appears.
With the commands “DSP” and “FPGA” you deal with
likewise.
Permanent illuminated lamps of my I/O cards!
?
During the download it is possible that the I/O boards
don’t initialise themselves immediately!
Wait another 30 seconds after the download!
Won’t
the cards initialise themselves afterwards
please switch off the system unit and switch it on
again after 10 seconds. After this the cards
initialise themselves automatically!
96/ 114
V 1.22
zirkon Configuration Manual
System page and error messages
System page (http:// )
System page and error messages
System page (http:// )
The zirkon system allows to monitor the system status via
a website. To this end the master board includes an
integrated web server.
The following points must be observed when establishing
the link with a “crosscable”:
•
•
TCP/IP – address (see configuration)
•
No link of the type telecommunication header record
or VPN should be initialised automatically by the
computer.
Important
The option “Use of a Proxy Server” in the web
browser must be deactivated. Otherwise the access is
prevented by looking for a “Proxy”.
To integrate the zirkon into your local network you should
ask your network administrator for assistance.
You reach the systempage by:
1. Enter the IP-Address into your Webbrowser. e.g.:
http://192.168.101.240 (factory setting)
The systempage is being opened.
The system page shows static and current data. The
current data are grouped under the heading “snapshot”.
This information refers always to the time of the last page
update.
zirkon Configuration Manual
V 1.22
97/ 114
System page and error messages
Error messages
DSP card information (snapshot)
Local Date and Local Time show the system time and the
date. The addition NTP indicates that a connection with a
NTP server is established.
Every master board works with three voltages. The current
value can be found out under the entries Voltage 1, 2, and
3. Nominally, Voltage 1 is 1.8 V, Voltage 2 is 3,3 V and
Voltage 3 is 12 V.
Temperature displays the temperature of the master
board in Celsius.
Attention!
The temperature of 947/81 should not exceed 45° C.
This indication does not give information about the
temperature in the rest of the frame or in the rack.
It can be only used to find out a tendency.
Sync information (snapshot)
SyncCard: Madi: Wordclock: Intern: present enable active
Slot information (snapshot)
This table represents the plug-in cards of the DALLIS
frame. Under “slot” you find the number of the slot. Card
ID signifies the module number. Card type gives a short
term of the card type.
Panel information (snapshot)
Available in this manual for release 1.3!
Error messages
98/ 114
V 1.22
zirkon Configuration Manual
System page and error messages
Check connections – when something went wrong!
Supplementary Information
This category indicates common static system
information. Under Deskname you find the name of the
console defined in the configuration. Last Restart shows
date and time.
Check connections – when something
went wrong!
This chapter is systemised by questions and answers. The
title describes the situation followed by a list of questions.
Test the system according to these questions. If the
answer is “NO” then follow the instructions to remedy this
problem. Afterwards check the communication by applying
the “ping” command.
If you can answer the question with a clear „YES“ then you
move on to the next question.
After switching on the system for the first time I tried the
described “ping” command but I didn’t receive an answer
from the zirkon system
Is the zirkon connected to the mains supply?
Connect the zirkon to the mains supply.
Shows the RUN-LED?
Operate
the reset button at the front plate. Wait
until the RUN LED lights up cyclically which means
the system is started-up.
Does a network connection exist?
Establish the network connection. If the zirkon and
the PC are connected to a HUB/SWITCH you can
establish a direct connection between the PC and
the zirkon for general functional tests (via crossover
network-cable). If this works please inform your
network administrator.
Is an IP address assigned to the PC within the same
number range?
Change
the IP address of your PC so that they lie
within the same number range. Acquire information
via internet (e. g. http://www.microsoft.com,
http://www.leo.org/information/computer/auskunf
t_de.html).
zirkon Configuration Manual
V 1.22
99/ 114
System page and error messages
Check connections – when something went wrong!
I changed the setup and receive no answer on my “ping”
command.
Lights up the RUN-LED?
Operate
the reset button at the front plate. Wait
until the RUN LED lights up cyclically which means
the system is started-up.
Is an IP address assigned to the PC within the same
number range?
Change
the IP address of your PC so that they lie
within the same number range as the masterboard.
Acquire the required information via internet (e. g.
http://www.microsoft.com,
http://www.leo.org/information/computer/auskunf
t.de.html) abgerufen werden.
Do you have entered the address according to the format
192.168.0.2(address) -> 192.168.000.002(input)?
Enter
the address in the requested format. Carry
out a “ping” command again.
I have forgotten the TCP/IP address.
Draw the masterboard out of the system unit.
Unscrew the plug-in module
Plug the top jumper:
Replug the masterboard into the system unit.
Carry
out the “ping” command again with the
settings ex works. Ex works settings (IP address
192.168.101.240 Subnet mask 255.255.255.0).
Load your setup again.
100/ 114
V 1.22
zirkon Configuration Manual
System page and error messages
Download Config – When something went wrong!
When
the RUN-LED blinks cyclically unplug the
Master board, plug the jumper to the parking
position and mount the plug-on module.
Replug the card again into the system unit.
Download Config – When something
went wrong!
This chapter is systemised by questions and answers. The
title describes the situation followed by a list of questions.
Test the system according to these questions. If the
answer is “NO” then follow the instructions to remedy this
problem. Afterwards check the communication by applying
the “ping” command.
If you can answer the question with a clear “YES” then you
move on to the next question.
I loaded a new configuration and the zirkon system does
not boot after the download.
Are differences between the different configurations
considerable?
Press the reset button on the masterboard. Many or
deeper changes or modifications may require a real
reset.
Haben Sie eine Rückkopplung auf der Steuerungsebene
konfiguriert?
Check
your configuration on feedbacks. These
could be for example:
o
The output of a logic function (e. g. OR8) is
used as input signal of the same function.
o
The feedback of a source (e. g. CD player) is
used for the control of functions of the same device
(control loop). Avoid control loops when
programming the configuration. Depending on the
situation it is possible that the feedback frequency
increases thus affecting heavily the control system.
o
Limiting the feedback frequency is achieved
by interposing a delay function.
When the feedback frequency is so high that the system
cannot boot without problems then proceed as follows:
1. Unplug the masterboard from the system unit.
2. Remove the displayed jumper.
zirkon Configuration Manual
V 1.22
101/ 114
System page and error messages
Download Config – When something went wrong!
3. Wait 2-3 minutes until the S-RAM is cleared.
4. Replug the jumper onto its position.
5. Replug the masterboard cautiously into its slot.
6. Replug the CAN cable and the Ethernet cable.
7. Load all sstem files described under “SoftwareUpdate” in the following order:
1.
Config
2.
DSP
3.
FPGA
4.
System
I load a new configuration and the console does not
accept the changes.
Have you entered the correct IP address in the setup?
Open
the correct configuration or change the IP
address in the setup.
Include these changes the deleting of fixed assignments
of the outputs?
Carry
out a reset. After the download of the
configuration follows a warmstart, i. e. old settings,
particularly of the fix output assignments, are
retained.
102/ 114
V 1.22
zirkon Configuration Manual
Accessories
Power supply unit for console modules
Accessories
Power supply unit for console modules
For the supply of Central Module and Channel Module are
high-quality power supply units (PSU) available. These are
adapted especially to the supply of these console modules
and perform permanent operation. The PSU is delivered
with country-specific adapters for many socket-systems.
Redundant PSU for the system unit
The 3RU as well as the 6RU system unit can integrate an
optional second PSU. This works in parallel operation and
takes over the full load in case of failure of the other PSU.
The PSUs are hot-pluggable and can be replaced while the
system is working.
19” Push button module (KS16)
In addition to the central module and up to 9 channel
modules, the zirkon can be extended via the CAN bus of
the system by up to five 19’’ 1RU push button modules of
the Lawo diamond programme. These dievices include 16
self-labelling and freely programmable buttons. One
button can be defined as “SHIFT” button so that
alternatively 15 programmable buttons are available in 2
layers.
Furthermore, this control panel offers eight opto-couplers,
eight relays (contact: 1 x shutter) and four connectors for
potentiometers. All functions can be programmed freely.
Thus, this control panel is suited optimally for remote
talkback panels, matrix controls and remote controls, or
as problem-solver for difficult cases of application.
The power is supplied with 230V by the integrated PSU.
zirkon Configuration Manual
V 1.22
103/ 114
Technical details
Technical details
For technical details please refer to the respective data sheets.
I/O cards
The following DALLIS plug-in cards support the release of this software version:
Card type
Type
D-Sub
Inputs
Outputs
XLR
Mic / Line (transmitter)
941/52
941/62
4 mono
-
Line in (transmitter)
941/02, 04, 06
941/12, 14, 16
4 mono
-
Line out (transmitter)
942/02, 04, 06
942/12, 14, 16
-
4 mono
Mic / Line (electronically bal.)
941/51
8 mono
-
Line in (electronically bal.)
941/84
8 mono
-
Line in/out (electronically bal.)
941/83
8 mono
8 mono
Line out (electronically bal.)
942/84
-
8 mono
Headset
942/61
-
4 stereo
AES3 in (with SRC)
943/02, 84
4 stereo
-
AES3 in/out (with SRC in)
943/52
4 stereo
4 stereo
AES3 in/out (with SRC in/out)
943/54
4 stereo
4 stereo
AES3 out
944/01
-
4 stereo
SDI - embedded audio
946/01 - BNC
1 SDI
1 SDI
Serial Routing
945/21 – RJ-45
4 RS422
4 RS422
zirkon Configuration Manual
943/12
944/11
V 1.22
105/ 114
Glossary
Glossary
Access
= to access, to take into access
For editing a channel it has to be taken into access and thus be
made the active channel that can be edited in the central control
section.
Access
= to access, to take into access
For editing a channel it has to be taken into access and thus be
made the active channel that can be edited in the central control
section.
AFL
After Fader Listen
This mode includes the relative volume while monitoring and allows
the sound evaluation and settings of the channel.
Assign
= to assign, assignment
Assigning a DSP channel to a fader resp. the direct or indirect
summing bus assignment for the channel in access. The operation
assign is based on the fact that the required channel is in access.
ATM
Asynchronous Transfer Mode (Packing of signals in small portions
commonly used and highly standardised network protocol)
Attack- Time
1) Musical instruments differ in the time (attack time) their tone
needs to develop the full level.
2) The attack time defines the duration over which the level of the
input signal is measured. The more time was chosen the more
delayed the module (gate, expander, compressor, limiter) reacts.
Auto on
All modules selected for automation are in the status Auto on.
Aux
Auxiliary = reserve
Aux and number signifies an auxiliary channel which can be used as
additional output e. g. to effect modules.
Aux- Master- Channel
= Auxiliary master channel
This channel type offers an additional sum output signal. The input
of the aux master channel is fix-connected with the respective aux
summing bus. and cannot edited by the matrix. The signal
processing includes the same range like a summing channel with
insert point and direct out.
The output signal of the aux master is available at the direct out. It
is positioned at the end of the signal processing chain.
It is not possible to access a summing bus from an aux master
channel.
Aux- Return
Auxiliary return = auxiliary input which is used as return for the
effect signal of an effect module. An aux return offers usually no or
only a simplified sound regulation and cannot be assigned to an aux
send channel. For separate control of the effect signal and
assignment to a monitor the aux return should be used for effects
only when better equipped channels are occupied.
Aux- Send
Auxiliary send = auxiliary output
Auxiliary output of a mixer for any part of any channel. With the
auxiliary outputs you define the effect parts and the monitor level
independently for any channel. The auxiliary output is linked with
the input of the effect processor or the input of the monitor
amplifier (or its equalizer). A mixer includes in every channel strip
several aux fader for the mix on the auxiliary outputs. They are
positioned PF or AF.
zirkon Configuration Manual
V 1.22
107/ 114
Glossary
Balance
Ratio of the level between left and right channel of a stereo signal.
Weighting the signal to the left means the diminishing of the level on
the right.
Band pass filter
Serial connected high and low pass filter that lets pass only
frequences between these two limiting frequency, i. e. a frequency
band of a defined bandwidth.
Bandwidth
Frequency band or range of frequences that can pass a system or
device e. g. a filter given in Hertz. Often octave is given as unit
whereby the next higher octave equals the doubling of the
frequency.
Bargraph
Optical display instrument in shape of a LED bar.
Bypass
Mode for evading a signal processor. The bypass switches off the
module and the signal passes unprocessed.
Channel
Channels are defined as mono or stereo. Apart from channel types
used for the processing of audio signals exists also the type master
that containes no individual audio signal but is used for controlling
assigned slave channels.
Channel cassette
Operating elements in the channel strip are combined in the
channel cassettes (e. g. Unit Processing).
Control panel
Part of the mixing console that includes the control modules,
display instruments, operating elements, etc.
Core
Core of the system (Lawo core includes routing system and DSP)
Crosstalk attenuation
Problem caused mainly by electromagnetic induction. The proper
signal of a channel appears attenuated also in neighbouring
channels. The quality of the separation is given in dB, i. e. the
difference between the level of the proper signal and the crosstalklevel.
Cue point
Point of time during automated operation at which a certain signal
is to be played.
Cueing
Monitoring or a tape during the modes fast forward wind or rewind.
dB
Dezibel
dBr
dB describes ratios, like percentage does. As long as dB is not
completed by a reference , e. g. dB(A) it works as a factor, i. e. a
number multiplied with another.
Relative voltage level according to the following equation:
dBr=20lg U2/U1
dBu
Measure of the absolute voltage level based on 0,775 Volts. 0 dBu
equals 0,775 V (RMS).
The radio house norm level of +6 dBu is 1,55 V
The studio level of +4 dBu is 1,228 V
Delay
Modulation effect based on the delayed play-back of the input
signal. The signal is delayed and combined with the original signal.
Direct- Out
The direct out supplies the signal of a channel directly. The pick-up
is carried out usually after mute switch, which means also after
fader. It is positioned at the end of the signal flow in the channel
strip (after insert point and sound control.
Drop- Out
Interruption of the audio signal caused by an error in the signal
transfer or recording.
DSP
Digital Signal Processor
Central processing unit in a digital signal processor on a board. The
108/ 114
V 1.22
zirkon Configuration Manual
Glossary
DSP is used for processing of data in realtime, which means it can
permanently receive, process and give out data without interruption.
This allows also a permanent reverberation.
Dynamic parameters
Real audio parameters like e. g. fader or equalizer, the dynamics
unit or the pan/bal module.
Equalizer
An equalizer is used for adjust imbalances of the frequency
response of the amplitude ( equalising non-linearities of the
frequency response).
Fader
Potentiometer often for gain adjustments
FC
Free Control
Control elements that can be individually assigned by the user.
Filter
Device or circuitry which changes the frequency response of the
amplitude (⇒ Equalizer)
Floor
This value defines by which amount the input signal is diminished
when it falls below a certain threshold.
fps
Frames per second
The ⇒ SMPTE timecode subdivides the time in hours, minutes,
seconds, and frames.
Gain
The gain control serves for the adjustment of the level to the
requirements, i. e. an increase of the gain leads to an amplification,
whereas a reduction leads to an attenuation.
GPI/O
Actually GPI→General Purpose Interface
GUI
Graphical User Interface
Screen unit for performing a multitude of settings and
configurations.
Headroom
Modulation reserve, usually at +9dB (Germany)
High pass filter
Frequences above a defined limiting frequency can pass this filter
type, frequences below this value are attenuated with a certain edge
steepness.
High pass filter
Filter in the input of microphone amplifiers and gain faders to
suppress rumbling noises that occur when stepping noises
penetrate as impact sound the mic housing via the mic tripod.
Hold
Gate and expander allow to keep open the ⇒VCA for a certain time
after the falling below the threshold. This parameter is named hold;
the respective time is the hold time.
HP
Horizontal pitches ⇒ 5,08 mm resp. 0,2 inch
Input- channel
This channel type is used to edit supplied external sources
individually. The input channel receives its source signal via matrix.
The output signal is usually routed with the console-internal
summing buses to groups, sums or also tracks.
Insert point
Connection (combined input and output) that routes an amplified
signal into an effect device and back again into the signal path.
Insert return = Input of the insert point
Insert send = Output of the insert point
IT
Internationales Tonspurverfahren = international sound
Last access
Function to return to the channel accessed last.
Level control
Serves for displaying the input signal (input level) to be set by gain
zirkon Configuration Manual
V 1.22
109/ 114
Glossary
control or fader that level peaks do not cause distortions but the
basic noise (signal to noise ratio) is drowned.
LFE
Low Frequency Effect = a channel for certain surround formats.
Locator
Remote functional unit at a tape recorder that allows an automated
finding of certain tape positions. With the locator you define the
tape positions (locator points or locator positions) at which for
certain tracks the tape recorder switches from play to record and
vice versa while playing.
Low pass filter
Frequencies below a defined limiting frequency can pass this filter
type, those above are attenuated with a certain edge steepness.
MADI
Multi-channel Audio Interface; digital interface for combining audio
signals of 56 channels. This format serves for the transfer between
digital mixing consoles and DASH recorders.
Main sum- channel
This channel type serves for generating the main out signal. The
input of the main sum channel is connected fix with the respective
summing bus.
The signal processing has practically the same range like an input
channel incl. insert point or direct out. The output signal of the main
sums is supplied at the direct out which is positioned at the end of
the signal processing chain.
From a main sum channel it is not possible to access summing
buses (ASSIGN bus assignment).
Master
Operating element that rules over other elements of the same type
by definition and assignment.
Merge mode
Mode in which two data streams or tracks of MIDI data are merged
to one track or one signal.
Meter
= Display instrument
MIDI
Musical Instrument Digital Interface
Manufacturer spanning digital interface which is seen as the
standard for the realtime data transfer between different musical
instruments.
Module
With regard to the zirkon it signifies the combination of display
instrument, LED bar and operating element(s) for setting and
monitoring parameters.
Monitor
Loudspeaker box used by musicians or presenters on stage or in the
studio for monitoring themselves.
Monitor channel
This channel type is used for integrating optimally a connected
multichannel machine with the console. For this purpose the
monitor channel includes two signal paths:
The summed signal of the track summing bus is supplied to the
multitrack machine via direct output of the channel and the matrix
(track send).
The output signal of the machine (track return) is routed via matrix
to the input of the monitor channel and allows the editing of the
monitor mix. With the console-internal buses, this signal is routed to
groups or sums.
Notch- Filter
Generates a steep-edged notch in the frequency response of the
amplitude and thus a high Q factor with a frequency controlled
freely. This filter type is well suited for suppressing disturbing
noises with a clearly defined frequency.
On air
= Radio programme is being broadcasted
110/ 114
V 1.22
zirkon Configuration Manual
Glossary
Overload
System is strained at the input with too large a level → non-linear
distortion
Panning
Also stereo tremolo
Effect which causes the signal to move automatically within the
stereo basis (left-right).
Panning table
Table which contains already defined points of the signal within the
stereo basis.
Panorama
Stereo basis
The stereo effect is generated when identical sounds are perceived
in the centre between two loudspeakers. The level ratio between the
two channels (position of the mono signal within the stereo basis)
defines the panorama position of a signal.
Peak- type- filter
also bell-type filter
The filter curve corresponds with a Gauß curve or bell. Amplification
or attenuation are performed around the filter frequency. The
bandwidth is defined by the Q factor. Bell type filters are typically
used for mid-range controls and parametric equalizers.
PFL
Pre Fader Listening
The activated channels can be monitored with the headphones
without being influenced by the position of the channel fader. As
with the PFL function the channels remain unchanged, they are
used for controlling during the concert or a recording.
Phantom power
Power supply for condenser microphones. The mixing console
supplies the microphone with the necessary power of 48V via the
symmetrical audio cable.
Q- Faktor
The bandwidth of a bell filter which is calculated as dimensionless
ratio of middle frequency and bandwidth. The larger the ratio the
better is the quality and the smaller the controlled frequency band.
Ratio
Compression or expansion ratio in a dynamic processor.
Release- Time
Time the level needs to die away completely.
Reset
= Warmstart
Resets the system to the status after switching it on.
Return
Return line or auxiliary input of the effect signal, e. g. reverberator.
Routing
Signal routing
The routing of a way from input to output of a mixing console.
RU
Rack Units ⇒ 44,45 mm resp. 1,75 inch
Sampling rate
Speed during collecting the measured values during the sampling
Send
⇒ Aux- Send
Send channel that serves for editing by external signals.
Sensing
Function: multiple use of an operating element by touching it
Shelving- Filter
Shelving filters are used usually for bass and treble controls.
The frequency response of this filter type is characterised by lower
edges and resembles with an increase to a steep and with a
decrease to a softly hanging cow’s tail.
Sigma
Signalmatrix
Tool for programming project specific special functions, i. e. freely
programmable buttons can be individually defined by sigma
programming.
zirkon Configuration Manual
V 1.22
111/ 114
Glossary
Slope
Rise or fall within a curve with regard to an envelope.
SMPTE
Abbreviation for Society of Motion Picture and Television Engineers
Standardised protocol for the synchronisation of audio and video
technology ⇒Timecode
SRC
Sample Rate Converter
Sum
Signal mixed together with a mixing console from different input
signals with the purpose of further editing.
TDM
Time division multiplex, picking up a signal from a data stream
Telephone hybride
Device for the level adjustment of a 2-wire phone line (tone line with
two wires for bidirectional talk and for one message or comment
line) to a telephone mixing console without acoustic feedback.
Threshold
Parameter that defines for the compressor the gain above which a
gain reduction is triggered. For gate and expander it is the level
below which a reduction is triggered.
Tiny channel
Audio channel without signal processing.
Unit
This general expression signifies the complete range of all units of a
console that are accessable (channel, fader, ...)
VCA
Abbreviation for Voltage Controlled Amplifier.The VCA serves lesser
for the amplification of audio signals but rather for their exactly
dosed attenuation.
Sources:
Jürg Jecklin, „Musikaufnahmen”, 2 Auflage, Franzis Unterhaltungs-Elektronik
Michael Dickreiter, „Handbuch der Tonstudiotechnik” Band 1/2” , 5 Auflage, K.G.
Saur
Jan Friedrich Conrad, „Taschenlexikon”, PPV
Jan Friedrich Conrad, „Recording”, PPV
Friedrich Guthmann, „Lexikon der Tontechnik”
„KEYBOARDS”, Magazin für Musik und Computer, Ausgaben 12/00, 01/01, 02/01
User Manual mc² series (Version 1.7)
112/ 114
V 1.22
zirkon Configuration Manual
Lawo AG
Am Oberwald 8
D-76437 Rastatt
Tel. +49 (0) 7222.1002-0
Fax. +49 (0) 7222.1002-24
E-Mail: [email protected]
Web: www.lawo.de
interstage
Phistersvej 31, 2900 Hellerup, Danmark
Telefon 3946 0000, fax 3946 0040
www.interstage.dk
- pro audio with a smile