1
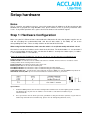
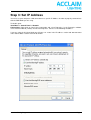
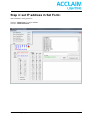
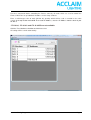
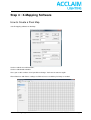
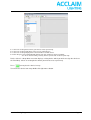
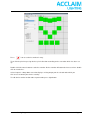
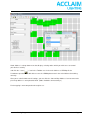
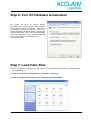
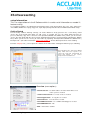
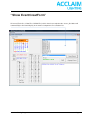
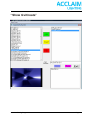
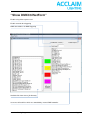
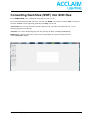
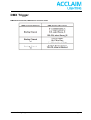
Instruction Manual
AL-NET-8
8 Universal DMX System
•
Artnet, 8 Universal DMX System.
•
Standard DMX-512 8 Universal DMX System.
•
High Speed DMX-1000K(1M) 2048 dmx channels per universe
www.acclaimlighting.com
Page 1
Table of Content
1. About Al-Net-8
2. Setup the system.
3. Pixel mapping
4. Run Movie files from PC
5. Setting Event schedule to run from PC
6. Setting Event schedule to run in standalone
7. ArtNet
www.acclaimlighting.com
Page 2
About AL-Net-8
Introduction:
Thank you for your purchasing the Acclaim Lighting 8 Universal DMX System(AL-NET-8). To optimize the
performance of this product, please read these operating instructions carefully to familiarize yourself with
the basic operation of this system. The Acclaim Lighting AL-NET-8 is simple to use, 8 Universal DMX
System. All system components & software have been tested at the factory before being shipped to you.
These software include X-mapping & X-Software. Before use this system, please backup them in your
computer, then simply connect the LAN-cable(RJ45) between your AL-NET-8 and your computer, then
you're ready to go!
The AL-NET-8 has been thoroughly tested and shipped in perfect working condition. Please take a few
minutes to carefully inspect the system carton for damage that may have occurred during shipping. If the
carton appears to be damaged, carefully inspect each system component for damage, in the case that
damage is found, please contact our customer support center, listed below, for further instructions.
Every effort has been made to design dependable and reliable products. New products are constantly
being designed to meet the needs of the entertainment lighting industry. Your comments regarding our
products and services are welcome. Acclaim Lighting will provide set up help and to answer any question
should you encounter problems during you set up or initial operation. You may also visit us on the web at
for any comments or suggestions. And please send us an e-mail to and let us know how to improve to
better serve you. It is both a privilege and a pleasure serving you.
There are no user serviceable parts inside this unit. Do not attempt any repairs yourself, doing so will void
your manufactures warranty. In the unlikely event your unit may require service, please contact your
nearest Acclaim Lighting dealer. Do not discard this carton in the trash, please recycle when ever
possible. Upon unpacking, carefully inspect your unit for any damage that any have occurred during
shipping. If damage may have occurred, do not plug the unit in, please contact your dealer as soon as
possible.
Main Features:
•
•
•
•
•
•
•
•
•
The newest Artnet, 8 Universal DMX System.
Standard DMX-512 and High Speed DMX-1000K(1M) protocol compatible.
With network control, supporting TCP/IP, Artnet and CL100M protocol.
Fixed built-in 128 memory CHIP allows to hold DMX data files.
Up to 32 Shows can be created, assigned and updated by configuring AL-Net-8 Configure
Software on PC platform.
With a real-time record function.
Astronomical time color schedule event table.
All output channels can be patched with any of input.
DMX trigger function available.
Main Technical Data:
• Supporting DMX-512 and DMX-1000K(1M) protocol
• DMX Output: 512 channels per output (DMX-512 protocol control)
• total 8* 3 XLR DMX connector,
• total 512 x 8 channels
• High Speed DMX-1000K(1M) protocol control with 2048 channels per output,
total 2048 x 8 channels.
• 3 XLR DMX connector,
• Dimensions: 19''/1U(482 x 205 x 44 mm)
• Fuse protection with F3.15A 250V 5x20mm
• Power input of AC100~240V, 50/60Hz.
www.acclaimlighting.com
Page 3
Setup hardware
Notes
This is a step by step guide to ensure a successful startup of our X-Software & AL-Net 8 package with
Windows XP. If you plan on using Windows Vista, please contact us first as you may encounter some
issues . If any further questions arise, please feel free to contact us for technical support.
Step 1: Hardware Configuration
Make sure your PC’s Ethernet Port is connected to the Port on the AL-Net, that all power supplies are on
and not exceeding the recommended load, and that all data cables (3 Pin DMX) are run to the
corresponding PD- 150’s. There are 2 dip switches on the front of the AL-Net 8.
When using Acclaim X-Software, make sure that switch 1 is on (CL100 mode) and switch 2 is off.
Also make a note of the IP address on the back of the AL-Net 8. The default address is 172.16.0.250. If
you are using multiple AL-Net 8’s make sure that the IP address’ are only one number apart. (i.e. Node 1
= 172.16.0.250, Node 2 = 172.16.0.251).
Please be aware that IP addresses 172.16.0.0, 172.16.0.3, 172.16.0.255 are not available for use.
Controls & Functions: Front Panel View
ArtNet encoder: To activate and set SubNet and Universe of ArtNet. And use Universe encode to set the
starting number of the existing node's Universe.
Power Indicator: To indicate the work status of the unit.
Ethernet port: With RJ 45 standard network port.
Link/Data Indicator: To indicate the status of network linking and data linking.
Link/Data Indicator: To indicate the status of network linking and signal/data linking.
250K/1000K indicator: To indicate the signal output of 8 Universe DMX uses standard DMX-512 protocol or
Work Mode Selector(SW1~2): To select and activate the Control Protocol as you desire;
Special Note:
1.
Under CL100M protocol, the AL-Net-8 Configuration software from Acclaim Lighting will be available.
You MUST firstly set your PC's IP address of "172.16.0.3", and Sub mask addressing of
"255.255.255.0".
2.
Once you remove Sw1 or Sw2 if you need, you MUST restart your AL-Net-8. (How to set your PC's IP
addressing and Subnet mask addressing, please refer to "Configuring Ethernet card".)
www.acclaimlighting.com
Page 4
IP Address Setting(SW1~3 Operation):
Before using the node, please set the existing AL-Net-8's IP addressing from 1720.16.0.[0]~172.16.0.[255] by
using SW1~SW3 as you desired. As per AL-Net-8, 172.16.0.0, 172.16.0.3, 172.16.0.255 are not available.
NOTE:
In case of the value of IP address when you set the IP address of AL-Net-8 exceeds 255, the "172.16.0.250"
will be available as the IP address of the existing node automatically.
Step 2: Program Installation
Unzip the X-Software Setup file. Once unzipped open the X-Software setup folder and double click on the
setup icon. Install X-Soft to the default location in Program Files. You should receive a confirmation that
the install was successfully completed.
After installation you should have these 4 programs.
X-Mapping for pixel mapping
XSoftwareRunning to run movie files from pc
XSoftwaresetting to configure IP settings and Event schedule run by PC
X-NetConfig to setup Node in standalone mode or with DMX trigger.
www.acclaimlighting.com
Page 5
Step 3: Set IP Address
You must set your computers LAN connection to a specific IP Address in order to properly communicate
with the DMX Node you are using.
To do this go to:
Start Menu -> Control Panel -> Network
Connections. Right click on Local Area Connection and select Properties. In the Properties window,
select Internet Protocol (TCP/IP) and click on Properties. Select Use the following IP address.
If you are using the AL-Net 8 Node you will enter 171.16.0.3 in the IP address section and 255.255.255.0
in the Subnet Mask section. Click OK to confirm.
www.acclaimlighting.com
Page 6
Step 4: set IP address in Set Form:
Start XSoftwaresetting proramm.
Click on “Show Form” on top of window.
Click on “Show IPSetForm”
www.acclaimlighting.com
Page 7
For these connected Nodes controlling the fixtures correctly, all nodes which are used to control the
Fixtures MUST be set up individual IP address in this Setup software.
Enter a valid integer value of node (AL-Net 8’s) quantity which will be used as needed in the entire
system in the top left box marked IP. Then under IP Address, enter the IP Address from the back of your
AL-Net 8.
172.16.0.0, 172.16.0.3 and 172.16.0.255 are not available.
Click the Test Hardware checkbox and click Save Set.
All settings will be saved automatically.
www.acclaimlighting.com
Page 8
Step 4 : X-Mapping Software
How to Create a Pixel Map
start X-mapping software on desktop.
Set the needed screen dimensions,
Set the needed node numbers
Once you set this numbers it isn’t possible to change. You have to start over again.
After all devices and fixtures settings are finished, access to built a pixel map as needed.
www.acclaimlighting.com
Page 9
6.1. Select an existing device which you wish to create a pixel map.
6.2. Select an existing node which you to use to control device.
6.3. Select an existing output port of selected node to control device.
6.4. Click the grey area in Work Grid till Arrow( )turn red, Grid( )turn green in Toolbar.
6.5. Then click the Grid( ) to array device's pixels and create the pixel map.
Device Select is a drop down menu that displays existing device which you wish to assign the device to
the Pixel Map.. Select an existing device which you wish to create a pixel map.
Press
icon to place the device in map .
To remove the device from map double click right mouse button.
www.acclaimlighting.com
Page 10
Press
icon to set device number in map.
Then click the pixel map assign devices pixels direction according to the scan order which has been set
up.
Double click left mouse button to set device number. Device number will automatic increase when double
click on next device .
Select Output is a drop down menu that displays existing output port of selected node which you
wish to use to control your devices actually.
To edit device number and/or node or port number press right button
www.acclaimlighting.com
Page 11
Node Address is a drop down menu that displays existing nodes which you wish to use to control
your devices actually.
and click the '' Save (
)'' icon in the Toolbar save in the main folder as a LEDMap file for
X-Software operation. It is advisable to save the LEDMap document in the main folder to for working
correctly.
After you're satisfied with overall settings, you can click the ''Convert Map Address'' icon to convert the
pixel map addresses and upload to Node. (Node should be connected to pc)
Pixel mapping is now competed and ready for use.
www.acclaimlighting.com
Page 12
Step 6: Turn Off Hardware Acceleration
For certain file types to operate properly
(specifically avi), you must shut down hardware
acceleration on your PC. To do this, right click on
your desktop and click on Properties. Once in the
Display Properties window click on the Settings tab.
On the bottom right, click on the Advanced button.
In the next dialog click on the Troubleshooting tab,
and set the hardware acceleration to none.
Click OK to Confirm.
Step 7: Load Video Files
Now you can load the video files that you plan to use on you video wall or led matrix. The folder that you
need to drop videos in:
C: Drive (or Local Disc) -> Program Files -> XSoftware -> Sence_lib
The Sence_lib folder will be where all you video files should be dropped.
www.acclaimlighting.com
Page 13
Step 8 : Test output with XSoftwareRunning
Click on XSoftwareRunning icon on your desktop.
X-Soft can operate in several different
control modes such as Manual, DMX
trigger, PC Clock Trigger and GVI
(Playlist Creation).
To test X-Soft we will use the manual
mode. For details on the other modes
of operation please consult the full
manual. Once in XSoft click on the
manual button, this will open a
directory dialog.
If this dialog does not already point to
the Sence_lib folder, please direct it
there. (you can also create a desktop
shortcut to make access easier). You
can select one of the sample videos or
you can load your own content into the
sence_lib folder.
If the video plays properly and in the
right
configuration,
you
have
successfully setup your system and
are now ready to use X-Software in
the style of your choosing.
If you do not get output, turn off your firewall & antivirus and try again.
www.acclaimlighting.com
Page 14
DMX Trigger Interface(XLR male connector):
To feature DMX trigger function which is used to control Show by connecting DTC-512 or USB-cable trigger.
(For further information, please refer to its accompanying user manual.)
DMX Channel Selection, DMX Value & Functions Table
1.
2.
DMX starting Channel is available to be set by operating AL-Net-8 Configuration software.
For Downloading DMX data files, Editing Show and Event Triggering, please refer to user manual of
AL-Net- 8 Configuration Software.
www.acclaimlighting.com
Page 15
XSoftwaresetting
setup Information
This is a setup software in the X-Software which is used to set all information as needed. It
features mainly;
To set Node IP Address To edit/Create Events(trigger time setup) Events(Flash files-*swf, *GVI, Video Files*AVI,*WMV, MPAG Files-*mpeg,*mpg,*mlv, *mp2,*mp3) Backup/Load Create GVI DMX Control Mode Setup
Getting Started
For the setup software working correctly, all events MUST be firstly placed in the scene library called
"Scene_lib" of the X-Soft main folder. To add scenes as needed, the user can simply follow two ways to
process; Manually copy these selected scenes(Falshfiles,MPAG Files,MPAG Files) which you wish to the
"Scene_lib" main folder with the mouse action. Automatically load these events(Falshfiles, MPAG Files, MPAG
Files) which you wish to he "Scene_lib" main folder by operating "Event(Flashfiles,MPAG Files,MPAG Files)
Backup/Load" . (For further information, please see Section_3: "Events Backup/Load" for events loading.
Click the "Setproj" icon ( ) icon to open this software in the main folder. A dialog box will bring up as following;
All events(Flash files, Video Files, MPAG
Files) which have been copied to the
"Scene_lib" folder will automatically be
listed and display in the Source
Components Presentation List.
Overview (menu options)
“Show IPSetForm” To add IP address of nodes which will be used
In the system as needed.
“Show EventCreatForm” To create events as needed.
“Show CopyFileForm” To copy files as needed.
“Show GviCreate” To create Gvi as needed.
“Show DMXCtrlSetForm” To set DMX control/trigger as needed.
“Show DMXAddrForm” N/C
“EXIT” Exit from the software
www.acclaimlighting.com
Page 16
“Show EventCreatForm”
All events(Flash files, Video Files, MPAG Files) which have been copied to the "Scene_lib" folder will
automatically be listed and display in the Source Components Presentation List.
www.acclaimlighting.com
Page 17
Show CopyFileForm”
www.acclaimlighting.com
Page 18
“Show GviCreate”
www.acclaimlighting.com
Page 19
“Show DMXCtrlSetForm”
Enable using video capture-card
Enable external dmx triggering
DMX Start address for DMX triggering
Available files from Sence_lib directory.
Secuence of listed files which are controlled by external DMX controller
www.acclaimlighting.com
Page 20
X-NetConfig software
X-Netconfig software is used for setting up the AL-Net-8 up as a single stand-alone replay unit which can
triggert by :
1. DMX trigger by external dmx controller / console ( 3 dmx channels dor selecting, start/stop
blackout ).
2. Event calender (Weekly Mode, Daily Mode and Date Mode).
Getting Started:
Befor you can use the node you have to set IP address on the
backside of the node.
IP Address Setting(SW1~3 Operation):
Before using the node, please set the existing AL-Net-8's IP addressing from 1720.16.0.[0]~172.16.0.[255] by
using SW1~SW3 as you desired. As per AL-Net-8, 172.16.0.0, 172.16.0.3, 172.16.0.255 are not available.
NOTE:
In case of the value of IP address when you set the IP address of X-Net-8 exceeds 255, the "172.16.0.250" will
be available as the IP address of the existing node automatically.
Always reset the node if you made changes on IP address or other dip-witches
www.acclaimlighting.com
Page 21
Playing flash files (SWF)
Click "OPEN FLASH" icon, a dialogue box will appear on the screen.
Select your desired flash file with extension .swf and click "OPEN" icon to open, click the "Play" icon to play
the flash, "Pause" icon to temporarily terminate and "Stop" icon to end.
Movie will appear in white box as patched.
www.acclaimlighting.com
Page 22
Converting flash files (SWF) into SCN files
Click "OPEN FLASH" icon, a dialogue box will appear on the screen.
Select your desired flash file with extension .swf and click "OPEN" icon to open, click the "Play" icon to play
the flash, "Pause" icon to temporarily terminate and "Stop" icon to end.
"ConvertSet" icon used to convert the flash file with extension .swf into the file with extension .scn for
AL-Net-8 playing the one directly.
"Preview" icon used to temporarily play flash files effect by AL-Net-8 controlling RGB lightings.
NOTE: Before converting flash files, please enter a valid number to set the desired flash frame
in the “ConvertSet” Option.
www.acclaimlighting.com
Page 23
Uploading SCN files
Change this standard IP address into existing AL-NET-8
Show Option Operation:
"DIR"
"Read"
"Write"
"Del"
"Format"
"Edit Show"
Icon used to have files in AL-Net-8 readout and list.
icon used to read pointed file in AL-Net-8.
icon used to write files with extension .scn into AL-Net-8.
icon used to delete pointed files in AL-Net-8.
icon used to clear up all files in AL-Net-8.
icon used to start and edit the SHOW in AL-Net-8. It is necessary to click the icon for SHOW
readout AL-Net-8.
"DMX Address"User can set up DMX initial address for A-Net-8 controller receiving in DMX Address bar and
amendment upon requirement.
www.acclaimlighting.com
Page 24
DMX Trigger
DMX Channel Selection, DMX Value & Functions Table
www.acclaimlighting.com
Page 25
ArtNet
1.Under ArtNet protocol, you MUST firstly set your PC's IP address of "2.016.0.3", and Subnet mask
addressing of "255.0.0.0"
www.acclaimlighting.com
Page 26