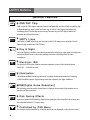
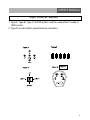
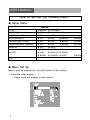
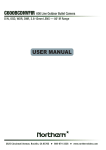
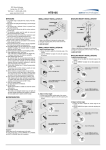
1
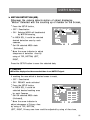
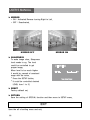
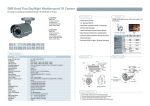
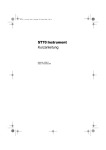
DNR Hood True Day/Night Weather-proof IR Camera DC Auto Iris Varifocal Lens(5mm-50mm) / Super ø10 IR LED Built-in 15 pcs General Features * Third-Generation DSP Chip ■ SETTING Settings can be made using the OSD button located in the body housing. * 1/3" Sony Super HAD CCD HD-D931T-N 560TV Lines DC Auto Iris Varifocal Lens(5mm-50mm) True Day/Night Capability ICR-IR Cut Filter Removable 850nm IR LEDs * 15pcs(∮10) LENS SHUTTER SPEED WHITE BAL BLC AGC DNR SENS-UP SPECIAL EXIT * Removed Noise. Ghosting Effect with DNR * True Day & Night (ICR-IR Cut Filter Removable) * External Control Rings for Easy Focus & Distance Adjustment OSD OSD Control Board * Highest Resolution:Vivid Sharp Picture in completely darkness * DC Auto Iris Varifocal Lens(4mm-9mm),(3.5mm-16mm), (9mm-22mm)-Option * Dual Power(AC 24V/DC 12V)-Option CAMERA OPERATION (SET-UP LENS SHUTTER (Condition & Speed Control) WHITE BALANCE ●DC ●ATW ●AWC ●MANUAL BACK LIGHT (Backlight Compensation) ●OFF ●LOW ●MIDDLE ●LOW ●MIDDLE ●LOW ●MIDDLE AGC (Auto Gain Control) DNR (Digital Noise Reduction) UP DOWN LEFT MODEL Image Pick-Up Device TV System Total Pixels Effective Pixels Scanning Frequency Scanning System Synchronization Resolution Minimum Illumination S/N Ratio White Balance Gamma Characteristic Video Output Electronic Shutter Speed OSD BLC AGC DNR Day&Night(Color) Sharpness Privacy Power Supply Power Consumption Lens Operational Temp. Storage Temp. Dimension Weight ●HIGH ●OFF ●HIGH ●OFF ●HIGH SENS-UP (Low illuminance) ●OFF ●AUTO SPECIAL ●CAMERA ●COLOR ●MIRROR ●SHARPNESS ●RESET ●RETURN EXIT HD-D931T-N 1/3" SONY SUPER HAD CCD NTSC, PAL NTSC=811(H) * 508(V) / PAL=795(H) * 596(V) NTSC=768(H) * 494(V) / PAL=752(H) * 582(V) NTSC=15.734KHz(H) / 59.94Hz(V) / PAL=15.625KHz(H) / 50.00Hz(V) 2:1 Interlace Internal 560TV Lines CDS OFF : 0.1Lux / CDS ON 0.00006Lux More than 50dB ATW / AWBC / MANUAL(1800˚K ~ 10,500˚K) r=0.45 CVBS : 1.0Vp-p 75ohm NTSC=(1/60sec~1/120,000sec) / PAL=(1/50sec~1/120,000sec) Built-in Low,Middle,High,Off Selectable Low,Middle,High,Off Selectable Low,Middle,High,Off Selectable On/Auto Selectable (Electrical) On/Off (Level Adjustable) On/Off (4 Programmable Zone) DC 12V CDS ON:1.5A Max DC Auto Iris Varifocal Lens(5mm-50mm) -10 ~ +50 Deg C. RH 95% Max. -20 ~ +60 Deg C. RH 95% Max. 90mm(W) * 134mm(H) * 290mm(D) 2200g Dimensions HOW To Install Camera Adjustment ① ② ③ ④ Connect Video & Power Line (12V DC Regulated Power). Please set the position where you want to connect the camera. Loosen the locking screws and adjust camera angle. Combine each camera part and lock & tighten each locking screw. RIGHT) ●FLK ●MOTION DETECTION SPECIFICATIONS DC ELC ATW HIGH OFF LOW OFF ●SYNC ●PRIVACY Operating Manual USER'S INSTRUCTIONS High Resolution DNR Day/Night Color Camera ISO9001 / ISO14001 / ROHS USER’S MANUAL CAUTION CAUTION CAUTION RISK OF ELECTRIC SHOCK DO NOT OPEN RISK OF ELECTRIC SHOCK RISK OF DOELECTRIC NOT OPENSHOCKCAUTION:TO REDUCE THE RISK OF ELECTRIC SHOCK DO NOT OPEN DO NOT REMOVE COVER(OR BACK). CAUTION:TO REDUCE THE RISK OF ELECTRIC SHOCK USER-SERVICEABLE PARTS INSIDE. CAUTION:TO REDUCE THE RISK OF ELECTRIC NO SHOCK DO NOT REMOVE COVER(OR BACK). DO NOT REMOVE COVER(ORREFER BACK).SERVICING TO QUALIFIED SERVICE PERSONNEL. NO USER-SERVICEABLE PARTS INSIDE. NO USER-SERVICEABLE PARTS INSIDE. REFER SERVICING TO QUALIFIED SERVICE PERSONNEL. REFER SERVICING TO QUALIFIED SERVICE PERSONNEL. ISO14001 ISO14001 ISO14001 The lightning flash with an arrowhead symbol, within an equilateral triangle is intended to alert the user to the presence of uninsulated dangerous voltage within the product's enclosure that may be of sufficient magnitude to constitute a risk of electric shock to persons. The exclamation point within an equilateral triangle is intended to alert the user to the presence of important operating and maintenance (servicing) instructions in the literature accompanying the appliance. INFORMATION - This equipment has been tested and found to comply with limits for a Class A digital device, pursuant to part 15 of the FCC Rules & CE Rules. These limits are designed to provide reasonable protection against harmful interference when the equipment is operated in a commercial environment. This equipment generates, uses, and can radiate radio frequency energy and, if not installed and used in accordance with the instruction manual, may cause harmful interference to radio communications. Operation of this equipment in a residential area is likely to cause harmful interference in which case the user will be required to correct the interference at his own expense. WARNING - Changes or modifications not expressly approved by the manufacturer could void the user’s authority to operate the equipment. CAUTION : To prevent electric shock and risk of fire hazards: ☞Do NOT use power sources other than those specified. ☞Do NOT expose this appliance to rain or moisture. This installation should be made by a qualified service person and should conform to all local codes. 2 USER’S MANUAL Sefety Instructions Precautions for use ◑P lease read this manual enough before using this camera to obtain the skill of correct operation. Warranty ◑ This manual is including Warranty Card at last page. This warranty card is available within One(1) year from the 1st date when you purchased this unit and keep this warranty card well for A/S. The A/S cost would be free of charge except only user’s fault in warranty year. ◑K eep the camera box well and it could be used when it need to have after Service. Cautions when using ◑D o not open the camera body and touch to prevent electric shock. ◑D o not insert other object into camera body to prevent hazards of fire and electric shock. ◑ Do not touch with wet hands to prevent electric shock. ◑ Must pull out by taking plug socket. ◑ If the camera has burning smells, please plug out and ask to shop where you bought It or the nearest A/S center. Cautions when Install ◑P lug on after installation of all device. ◑D o not install the camera face to strong light directly. ◑ Do not install or use the camera in places where the humidity is high. ◑ Do not install near the cooling device or heating device. ◑ Do not install the camera where is high humidity or heavy dust. ◑ Do not install the camera to the place where it has physical shocks. ◑ Do not expose the camera to rain or moisture. ◑ This products must use DC adaptor for power. 3 USER’S MANUAL Precautions Do not install the camera in extreme temperature conditions. Do not install or use the camera in an environment where the humidity is high. Severe lighting change or flicker can cause the camera to work improperly. Only use the camera under conditions where temperatures are between -10°C and +50°C. Be especially careful to provide ventilation when operating under high temperatures. Do not touch the front lens of the camera. This is one of the most important parts of the camera. Be careful not to leave fingerprints on the lens cover. Do not expose the camera to rain or spill liquids on it. Do not install the camera under unstable lighting conditions. Do not drop the camera or subject it to physical shocks. It can cause malfunctions to occur. Do not expose the camera to radioactivity. Never keep the camera pointed directly at strong light. Severe lighting change or flicker can cause the camera to work improperly. NOTE * If the camera is exposed to spotlight or object reflecting strong light, smear or blooming may occur. * please check that the power satisfies the normal specification If it gets wet, wipe dry immediately. Liquids can contain minerals that corrode the electronic components. 4 If exposed to radioactivity the CCD will fail. before connecting the camera. USER’S MANUAL Contents ◑ General Features 6 ◑ Operating Key Button 7 ◑ Camera Menu Set Up 8 1. LENS (Option) 10 2. SHUTTER SPEED 11 3. WHITE BALANCE 12 4. BACKLIGHT (BLC) 13 5. AGC Function (Auto Gain Control) 14 6. DNR 15 7. SENS-UP 16 8. SPECIAL 17 5 USER’S MANUAL General Features DNR DSP DNR DNR DNR DNR 560 DNR DNR DSP DSP DSP DSP Horizontal DSP Resolution DSP DSP 560 560 560 560 560 560 DAY & NIGHT Horizontal Horizontal Resolution Resolution Horizontal Resolution Horizontal Resolution Horizontal Resolution Horizontal Horizontal Resolution Resolution DAY & NIGHT DAY & NIGHT DAY & NIGHT Electronic ◑ DNR DSP Chip - DNR is superior DSP chipset enhanced various and powerful function of high resolution, Day & Night,Removing camera noise and sense up, as well. It is the highest and advanced technology that is unified Up-most necessary functions by one DSP chipset enhanced powerful surveillance functions. ◑ 560TV Lines - Unification of DNR Technology and Sony Super HAD CCD image sensor provides Clear & Superior High resolution of 560 TV lines. ◑ Day & Night - Up to the lighting conditions, the video automatically switching to color mode in bright zone DAY & NIGHT IRIS DAY & NIGHT and Monochrome mode in dark zone making to achieve safe and perfect 24 hours DAY DAY & & NIGHT NIGHT surveillance. Electronic Electronic IRIS IRIS Electronic Electronic IRIS Minimum Electronic IRIS Illumination Electronic IRIS 0.0002 Lux IRIS IRIS Minimum Minimum Illumination Illumination 0.0002 Lux 0.0002 Lux Minimum Illumination Minimum Illumination Minimum Digital Illumination Noise Minimum Minimum Reduction Illumination Illumination DNR 0.0002 Lux 0.0002 Lux 0.0002 Lux 0.0002 Lux Digital Digital Noise Noise Reduction Reduction DNR Digital DNR Noise Digital Reduction Noise Digital Reduction DNR Noise Digital Digital DNR Reduction Noise Noise DNR Reduction DISK SAVING Reduction DNR DNR DISK SAVING DISK SAVING DISK SAVING DISK SAVING DISKOSD SAVING DISK DISK SAVING SAVING OSD OSD OSD OSD OSD OSD OSD 6 ◑ Electronic IRIS - The electronic IRIS function enables continuous automatic control of the shutter between 1/60(1/50) ~ 1/120,000 seconds. ◑ Illumination - Ultra Advanced DNR technology enhanced incredibly minimum illumination of amazing 0.0002 Lux With capture of good image under the extremely low light conditions. ◑DNR(Digital Noise Reduction) - DNR technology solved the trouble of ghost figures. it displaying clearer,superior High resolution even in extremely low light circumstance. ◑ Disk Saving Effects - Up-most and advanced DNR technology camera picture quality has a disk saving effects due to Image sizes are smaller than standard CCTV camera image. ◑ Controlled by OSD Menu - The camera can be controlled by selecting the menu text displayed on the monitor screen. USER’S MANUAL OSD Control Button 1. Type A, Type B, Type C of OSD button could be used when it needs to OSD control. 2. Type D is extra Option (wired Remote controller) 7 USER’S MANUAL How to Set Up the camera menu ● Setup Menu SETUP LENS ◑ MANUAL ◑ DC/VIDEO SHUTTER(Shutter Speed control) ◑ ESC ◑ MANUAL ◑ FLK WHITE BALANCE ◑ ATW ◑ AWC ◑ MANUAL BACKLIGHT(BLC) ◑ OFF ◑ LOW ◑ MIDDLE ◑ HIGH AGC(Auto gain control) ◑ OFF ◑ LOW ◑ MIDDLE ◑ HIGH DNR(Digital Noise reduction) ◑ OFF ◑ LOW ◑ MIDDLE ◑ HIGH SENS-UP ◑ OFF ◑ AUTO ◑ CAMERA ID ◑ COLOR ADJUST ◑ SYNC ◑ MOTION DET ◑ PRIVACY ◑ MIRROR ◑ SHARPNESS ◑ RESET EXIT ● Menu Set Up Menu could be adjusted by the OSD button of the camera. 1. Press the setup button. - Setup menu will display on the monitor. SETUP LENS SHUTTER WHITE BAL BACKLIGHT AGC DNR SENS-UP SPECIAL EXIT 8 MANUAL ESC ATW OFF LOW LOW OFF ◑ RETURN USER’S MANUAL 2. Move and Select the function what you want to control by the button. - Move the arrow indicator UP or Down to indicate onto desired feature by pressing the UP or Down button. SETUP Select desired Feature LENS SHUTTER WHITE BAL BACKLIGHT AGC DNR SENS-UP SPECIAL EXIT MANUAL ESC ATW OFF LOW LOW OFF Change the adjustment by Left or Right button 3. Menu Set Up will change by Left or Right Button - Available value or Status will be displayed by pressing the Left or Right button. Please press the button until desired features appears. 4. After complete the adjustment, move the arrow indicator to "EXIT" and press the "SET" button to Exit. ☞ CAUTION ■ Moving available to submenu by moving the ◄┛arrow to desired feature. ■ Access are not available to submenu on the mode of "─ ─ ─ ─ ─" 9 USER’S MANUAL LENS (Option) It's function of control the picture brightness. 1. Move to arrow indicator to "LENS" by pressing of UP or Down button on the Set Up menu screen. 2. Select the desired lens type by pressing of Left or Right button. SETUP LENS SHUTTER WHITE BAL BACKLIGHT AGC DNR SENS-UP SPECIAL EXIT DC -------ATW OFF LOW LOW OFF DC/VIDEO:DC Auto IRIS Lens ☞ CAUTION ■ Available to control the brightness when selected DC. Brightness control range will be 1 ~ 70. LENS BRIGHTNESS I---------I---------I 35 Press Set to Return ►MANUAL : Manual Lens 3. Press the SETUP button to return previous menu. 10 USER’S MANUAL SHUTTER SPEED CONTROL It's a function of selecting the Automatic shutter speed control or Manual shutter speed control. 1. On the Set Up menu screen, move the arrow indicator to shutter by using of UP or Down button. 2. Select desired shutter mode by pressing of Left or Right Button. - FLK : Select "FLK" mode when it has flickering by unmatched of electric lights and radio waves. - ESC : A vailable automatic shutter speed control. Brightness could be automatically controlled when Selected "ESC" mode. - MANUAL : Shutter speed could be controlled by manually. SETUP LENS SHUTTER WHITE BAL BACKLIGHT AGC DNR SENS-UP SPECIAL EXIT MANUAL ESC ATW OFF LOW LOW OFF 3. Manual shutter speed could be controlled when select. - Manual shutter speed could be controlled from 1/60 to 1/120,000sec. 4. Press the Set Up button to exit after completed the set up menu. ☞ CAUTION ■ Lens Shutter speed will be fixed to 1/60sec. when selected DC/VIDEO lens. ■ Do not make the camera exposed fluorescent lamp directly. It should be caused of unstable image quality in the internal synchronization mode. ■ In case of Shutter menu selected to Manual mode, SENS UP does not work. Please control the menu. 11 USER’S MANUAL WHITE BALANCE Use the White Balance function when need to color control on the screen. 1. Move the arrow indicator to "WHITE BAL" by pressing of SET button on the SETUP Menu screen. 2. Select desired mode by using of Left or Right button. SETUP LENS SHUTTER WHITE BAL BACKLIGHT AGC DNR SENS-UP SPECIAL EXIT MANUAL ESC ATW OFF LOW LOW OFF * Select in below 3 functions up to user's purpose. - ATW : It is suitable in the color temperature ranges from 1,800◦k to 10,500◦k - AWC : In order to obtain the best result, press the Set button while the camera focuses on to White paper. If the environment and/or lights source has changed, it could be readjusted the white balance. - MANUAL : Available to fine adjustment in case of selected to Manual mode. After adjustment of ATW or AWC, select the manual mode and press the SETUP button to increase or decrease the value of R-Gain(RED) and B-Gain(Blue) while watching the color of image. Press the SET button when obtained the desired best color. ☞ CAUTION roper White Balance may not be worked under the following conditions. In P that case, Select the AWC mode ■ When the scene of object has most high color temperature.(Ex:Blue Sky, Sunset) ■ When the scene of object is so dim. ■ When install the camera in place of the changing illumination and/or faces directly to Fluorescent lights. 12 USER’S MANUAL Backlight (BLC) This camera provide intelligent light level control to overcome the severe Backlight condition. 1. Move the arrow indicator to 'BACKLIGHT' by pressing of up or Down button on the SETUP Menu screen. 2. Select the desired mode by pressing of Left or Right button. SETUP LENS SHUTTER WHITE BAL BACKLIGHT AGC DNR SENS-UP SPECIAL EXIT - HIGH MIDDLE LOW OFF : : : : MANUAL ESC ATW OFF LOW LOW OFF Gain could be increased max. from 6dB to 34dB. Gain could be increased max. from 6dB to 30dB. Gain could be increased max. from 6dB to 18dB. BACKLIGHT function will not operated. BLC ON BLC OFF 13 USER’S MANUAL AGC (AUTO GAIN CONTROL) 1. M ove the arrow indicator to 'AGC' by by pressing of UP or Down button on the SETUP Menu screen. 2. S elect the desired mode by pressing of Left or Right button. AGC is for bright image. Higher gain level makes brighter screen but increases the noise - HIGH : Gain could be increased from 6dB to 34dB max. - MIDDLE : Gain could be increased from 6dB to 30dB max. - LOW : Gain could be increased from 6dB to 18dB max. - OFF : Gain will be fixed at 6dB. SETUP LENS SHUTTER WHITE BAL BACKLIGHT AGC DNR SENS-UP SPECIAL EXIT MANUAL ESC ATW OFF LOW LOW OFF 3. Press the SETUP button. The BRIGHTNESS could be adjusted from 1 to 70 max. Brightness BRIGHTNESS I---------I---------I 35 Press Set to Return 4. Press the SETUP button when completed the menu set up. 14 USER’S MANUAL DNR (Digital Noise Reduction) DNR is to reduce the digital noise on the screen. 1. Move the arrow indicator to 'DNR' by pressing of UP or Down button on the SETUP Menu screen. 2. Select the desired mode by pressing of Left or Right button. - HIGH : High reduction of noise but ghost effect will be appear. - MIDDLE : Middle reduction of noise but most effective with less ghost effect. - LOW : Low reduction of noise without ghost effect. - OFF : Deactivation. SETUP LENS SHUTTER WHITE BAL BACKLIGHT AGC DNR SENS-UP SPECIAL EXIT MANUAL ESC ATW OFF LOW LOW OFF 15 USER’S MANUAL SENS-UP It could be always displayed clear image with this function even under low level or night time. 1. Move the arrow indicator to 'SENS-UP' by pressing of UP or Down button on the SETUP Menu screen. 2. Select the desired mode by pressing of Left or Right button. ● AUTO : Auto mode status ● OFF : Deactivation ☞ CAUTION ■ When AGC OFF, SENS-UP does not working. ■ When SHUTTER selected to MANUAL, SENS-UP does not working. SETUP LENS SHUTTER WHITE BAL BACKLIGHT AGC DNR SENS-UP SPECIAL EXIT MANUAL ESC ATW OFF LOW LOW OFF 3. Press the SETUP button when completed the menu set up. ☞ CAUTION ■ If press the SETUP button, it could be controlled maximum magnifications. (Adjusted to 12 Step) - Expanding magnifications, screens brighter after image sensitivity but increasing the noise on the screen. - When SENS-UP activated, increasing magnification makes noise, spots and whitish. (It is not out of order) 16 USER’S MANUAL SPECIAL 1. M ove the arrow indicator to 'SPECIAL' by pressing of UP or Down button on the SETUP Menu screen. 2. Select the desired mode by pressing of Left or Right button. SPECIAL CAMERA ID COLOR SYNC MOTION DET PRIVACY MIRROR SHARPNESS RESET RETURN OFF ON INT OFF OFF OFF ON ► CAMERA ID : If inputted ID, Camera ID will be displayed onto the screen. 1) Move the arrow indicator to 'Camera ID' by pressing of UP or Down button on the SETUP Menu screen 2) Set "ON" by using of Left or Right button. ☞ CAUTION ■ When Camera ID is set to "OFF", The Camera ID will not displayed onto the monitor. 3)Press the SETUP button. CAMERA ID ABCDEFGHIJKLM NOPQRSTUVWXYZ abcdefghijklm nopqrstuvwxyz , 0 1 2 3 4 5 6 7 8 9 ← → CLR POS END ▀ ------------------------------ 17 USER’S MANUAL 4) ID could be entered up to 15 characters. ① Move the cursor to character enter location by using of Left or Right button. CAMERA ID ABCDEFGHIJKLM NOPQRSTUVWXYZ abcdefghijklm nopqrstuvwxyz , 0 1 2 3 4 5 6 7 8 9 ← → CLR POS END ▀ ------------------------------ ② Select the desired character in A, B~Y, Z, a, b~y, z, 0, 1~8, 9 by using of Up, Down, Left And Right button. ③ Set the desired character by pressing of SETUP button. - The cursor will move to next position after character select by pressing SETUP button. ④ Repeat above steps until created the desired full name. ☞ CAUTION ■ In Case of Wrong Camera ID Input····· Move the cursor to "CLR" and press the SETUP button from right to left to erase the characters. And repeat above steps to correct the characters again. 5) Select the position at camera ID should be located on the screen. ① Move the cursor to "POS" and press the SET button. CAMERA ID ABCDEFGHIJKLM NOPQRSTUVWXYZ abcdefghijklm nopqrstuvwxyz , 0 1 2 3 4 5 6 7 8 9 ← → CLR POS END ▀ ------------------------------ 18 USER’S MANUAL ② Created Camera name will be displayed. ③ Select the position by using of the 4-Directional button, then press the SET Button to confirm the position. SHOP SHOP 6) Move the cursor to "END" and press the SET button after completed the above processing. ► COLOR ( Electronic DAY & NIGHT) - AUTO : Electronically sensing Day & Night. - ON : Fixed only color mode. ☞ CAUTION ■ Color mode could not available when AGC OFF. 19 USER’S MANUAL ► SYNC he line lock synchronization is used in only areas of T 60Hz(NTSC) and 50Hz(PAL). SYNC PHASE I---------I---------I 225 Press Set to Return - INT : Internal Synchronization - L/L : Line Lock mode * Press the SETUP button. * It could be adjusted to desired phase from 0 to 359. ☞ CAUTION ■ In DC 12V, the SYNC menu sets "INT" mode. 20 USER’S MANUAL ► MOTION DETECTION (MD) henever the camera detects motion of object displaying W "Motion" Detected with the counting up of number on the Screen. * Press the SETUP button. - OFF : Deactivation - ON : Selected AREA will bedetected by MOTION sensing. * In AREA SEL, it could be selected desired detection area by each cameras. * Set ON selected AREA state (Activated). * Move the arrow indicator to adjust sharpness of detection Area by using of TOP, BOTTOM, LEFT, RIGHT. MOTION DETECTION ►AREA SEL AREA1 AREA STATE ON TOP I---------I---------I 31 DOWN I---------I---------I 60 LEFT I---------I---------I 47 RIGHT I---------I---------I 31 PRESS SET TO RETURN Press the SETUP button to save the selected data. ☞ CAUTION ■ MD will be displayed on the screen but there is not OUTPUT signal. It masking the area which is desired areas to mask. - OFF : Deactivated - ON : PRIVACY mode activated * Press the SETUP button. PRIVACY ► AREA SEL AREA1 * In AREA SEL, it could be AREA STATE ON selected desired masking area AREA TONE I---------I---------I 50 TOP I---------I---------I 31 by each Cameras. DOWN I---------I---------I 60 * Set ON selected AREA state LEFT I---------I---------I 47 (Activated). RIGHT I---------I---------I 31 PRESS SET TO RETURN * Move the arrow indicator to adjust sharpness of Privacy Area by using of TOP, BOTTOM, LEFT, RIGHT. Privacy area tone could be adjusted by using of Area tone. 21 USER’S MANUAL ► MIRROR - ON : Activated Reverse turning Right to Left. - OFF : Deactivated. MIRROR OFF MIRROR ON ► SHARPNESS To make image clear, Sharpness level needs to up. The level could be controlled to get proper image. When level is too much higher it would by caused of unnatural mage with the noise. * Press the SETUP button. * It could be controlled desired LEVEL from 1 to 31. SHARPNESS LEVEL I---------I---------I 15 Press Set to Return ► RESET Factory default set. ► RETURN Save the setting of SPECIAL function and then move to SETUP menu. EXIT Save the all of setting menu and exit. 22