1
TransAct 2.0
Scale Data Management Program
Installation &
Operation Guide
44476
KENWORTH
1.0
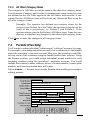
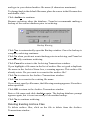
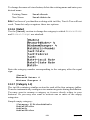
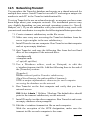
Overview and Menu Structures
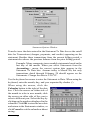
Thank you for purchasing TransAct™ 2.0 for Windows®. This program will
reduce labor costs, minimize human error, and increase data-handling
capabilities in your truck scale operations. Both the standard Transact 2.0
program and the financial accounting version, Transact Plus 2.0 , provide
the following features:
• Automatic ticket processing
• Fault-tolerant data recovery to
protect from system crashes
• Multilevel password protection
• Stores and combines up to three
tares per transaction—truck,
trailer, and container
• Four user-definable categories to
customize your application
• Configurable product rates
• Unlimited configurable ticket formats
• Interfaces to ticket, tape, journal, and laser printers
• Summary or detailed reports by customer account, tonnage, material
category, date, and transaction
• Compatible with barcode, magstripe, and RF interfaces
Additional features in Transact Plus 2.0:
• Prints customer invoice statements with detailed transaction data
• Complete payment tracking and financial reporting capabilities
® Windows is a registered trademark of Microsoft Corp.
™ TransAct is a trademark of Rice Lake Weighing Systems.
1
Overview
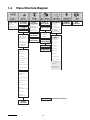
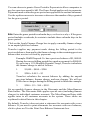
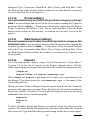
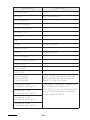
1.1
Menu Structure Diagram
User Login
Guest
Operator
Supervisor
Administrator
Customer
Accounts
Jobs
Permits
Categories
Two main
categories
installed
Up to 4
configurable
categories
available
Utilities
Backup
Begin
Transaction
by Account
by Job
by Permit
by Truck ID
by Ticket
Weigh-In
Transaction
Weigh-Out
Transaction
Setup &
Misc Rates
Quick Scan
by Ticket
by Date
by Type
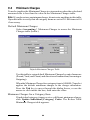
Min Charges by Account
by Job
by Hauler
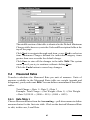
Meas Rates by Material
Rate 1
Rate 2
Report
Rate 3
Options
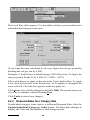
Tonnage/
Charges
Discounts
& Acct Flags
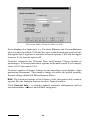
Accounts
Statements
Payments
Attend/
Unattend
Permits
Haulers
Material
Restore
Trucks
Archive
Transaction
Containers
Pup Trailers
Restore
Archives
Payments/
Credits
Import Data
Balances/
Reconcile
Export Data
Preferences
Company
Data
Scale Port 1
Scale Port 2
Ticket
Printer Port
Data
Terminal Port
Tickets
Notes
Headings
= TransAct Plus Only
About
TransAct
Overview
Installation
2
Quit
TransAct
2.0
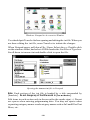
Installing TransAct for Windows
TransAct for Windows requires the following hardware and software:
•
An IBM-compatible computer, 486-75 MHz or higher CPU
•
At least 8 MB of RAM (16 MB RAM is highly recommended)
•
A fixed hard disk with a minimum of 4 MB of available disk space
to install the program files
•
VGA, SVGA, or higher resolution monitor
•
DOS version 5.0 or higher
•
Windows Version 3.1 or later running in enhanced mode
During installation, the setup program installs all of the files to run
TransAct, the initialization files, and all icons associated with the program.
These instructions explain how to install TransAct on an individual
workstation using Windows 3.1 or Windows 95. Before running the setup
program, ensure that your system is currently running Windows 3.1 or
higher. It is important to be familiar with the basic navigation techniques of
using Windows. If you are not familiar with moving around in Windows,
review your Windows User’s manual.
Note: Before beginning the installation, quit any open programs, then log off
any networks to which your computer is connected.
2.1
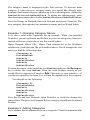
Installation
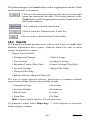
Insert the TransAct diskette labeled Disk: 1 of 3 in drive A or B.
Windows 3.1:
Windows 95:
Choose File | Run from the
Program Manager menu.
Select Start from the taskbar.
Then
click
Run.
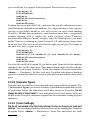
3
Installation
In the Command Line (3.1) or Open (95) field, type a:setup or b:setup
depending on the disk drive you are using.
Windows 3.1:
Windows 95:
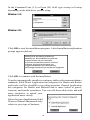
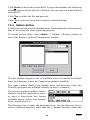
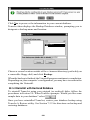
Click OK to start the installation program. A brief installation explanation
prompt appears (below).
Thank you for purchasing TransAct for
Windows 2.0. This installation program will
install TransAct onto your hard disk.
If you have purchased a previous version of
TransAct, this program will find it and
suggest installation in the same directory.
We strongly recommend you accept this suggestion.
Click OK to continue with the installation.
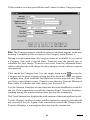
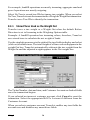
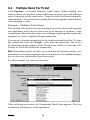
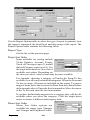
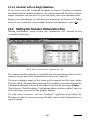
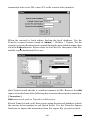
TransAct automatically installs two category tables with common industry
standards. Solid Waste Application has categories for Hauler and Refuse
and works well for a landfill or recycling operation. General Application
has categories for Hauler and Material and is more suited to gravel,
concrete, and similar operations. You can edit these tables later and add
more categories to match your
application more closely.
Select the type of application (Solid
Waste or General) that more closely
relates to your type of business.
Installation
4
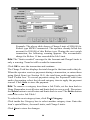
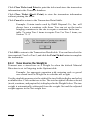
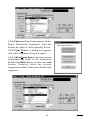
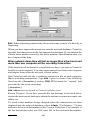
The setup program looks for any previously installed versions of TransAct
and recommends installation to that same directory. For a first time
installation, the setup program recommends installation to the directory
c:\transact. Unless there is a particular reason, do not change the directory.
Click OK to continue and accept
the default installation directory.
The TransAct setup program
starts installing the program
files, displaying a status bar to
monitor the progress.
Default Installation Directory
When prompted, insert the
remaining two installation disks. Click OK to continue installation.
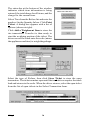
The AUTOEXEC.BAT configuration file must include the command
SHARE /F:5100 /L:500 for TransAct to run. If TransAct needs to add this
command, the following message appears:
Click Yes to add the command and continue.
The Windows 3.1 and Windows 95 Share program installs file-sharing and
locking capabilities. Windows for Workgroups uses the VSHARE command
instead of the SHARE command. If TransAct needs to add this command,
an additional message appears.
Click Yes to make the necessary changes and continue.
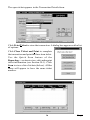
The following message appears when installation is 100% complete:
Installation of TransAct for Windows 2.0
is now complete. We are certain you will find this
program a valuable asset to your truck scale operation.
Please contact your Rice Lake Weighing systems representative
if you have any questions.
Click OK to continue.
5
Installation
A final dialog box asks if you want to reboot (restart) the system.
Remove the disk in drive A. Click Yes to reboot your computer system and
allow the changes to take effect.
You have now completed the installation. Once you restart the computer,
double click on the TransAct icon in the Program Manager to start the
program.
Windows 3.1
2.2
Windows 95
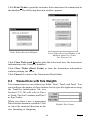
Customizing TransAct
During installation, the program creates the transact.ini file, located in your
hard drive c:\windows directory as shown below.
This file contains the program defaults for category names, category setup,
tare legends, ticket formats, and other information used to run TransAct.
After you become familiar with TransAct, you may want to change these
defaults to customize the program for your business and your customers.
See Section 12.2 for more on modifying the transact.ini file.
Installation
6
!
Caution
Do not delete or move the transact.ini file. If you delete or move
this file to another directory, you will not be able to access or
run TransAct.
3.0
Starting and Exiting TransAct
3.1
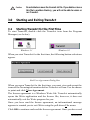
Starting TransAct for the First Time
To start TransAct, double click the TransAct icon from the Program
Manager (see below).
Windows 3.1
Windows 95
When you start TransAct for the first time, the following button selections
appear.
End User Agreement Dialog Box
When you open TransAct for the first time, you must view and accept the
terms of the licensing information before TransAct will run. Use the mouse
to point and click View Agreement.
The license agreement is a Windows Write file. TransAct automatically
opens the Write application and the license file; however, it does not
automatically exit the Write program for you.
Once you have read the license agreement, an informational message
appears to remind you to exit Write using the pull-down File menu.
Click OK to continue and read the license agreement. Once you have read
7
Installation
the license agreement, select File | Exit to quit Write and continue with
TransAct.
After reading the license agreement you must choose to accept the agreement
before continuing. Click Accept Agreement to continue.
If you select Reject Agreement, TransAct closes and returns you to the
Program Manager.
3.2
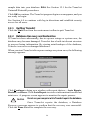
Creating a Customer Database
The final step before using TransAct is to create the customer database.
After accepting the license agreement, TransAct asks if you wish to build
a database. This database provides the forms on which you will enter your
customer accounts and other data.
Click Start Build. Another message appears, asking if you would like your
database to contain sample information.
If you have never used a data management program like TransAct, we
recommend installing this sample database to help you to learn how to use
the program. The sample database contains fictitious customer accounts,
trucks, and transactions. Once you are familiar with the program, you can
overwrite or delete all of the information in the sample database and enter
your own information.
Click Yes to install the sample database.
Click No to install an empty database.
If you click Yes to install the sample database. A TransAct Database Utility
screen appears with a bar graphic to monitor the progress of the database
installation.
When the database installation is 100% complete, a message with a single
OK button appears to signal a successful installation.
When you are familiar with the program, you can delete or overwrite the
sample database information. Rather than overwriting each fictitious
customer account in the sample database with your actual customer accounts,
we recommend that you quit TransAct, then delete (uninstall) the entire
TransAct program. The Uninstall program finds and deletes all TransAct
files in your system. Note: The Uninstall program does not delete the
categories or customer account files. You must manually delete these files.
With a “clean slate,” you can then reinstall TransAct onto your system. Use
the same installation procedure as before, except this time choose not to put
Installation
8
sample data into your database. Note: See Section 12.1 for the TransAct
Uninstall/Reinstall procedures.
Click OK to continue. The TransAct program log in screen appears, and you
are ready to begin.
See Section 6.0 to continue with log in directions and establish security
access for all users.
3.2.1
Quitting TransAct
Click the Quit icon from the main menu toolbar to quit TransAct.
3.2.2
Database Recovery and Restoration
If TransAct closes abnormally, due to a power outage or system error, the
database may become damaged. TransAct has a built-in tolerant structure
to prevent losing information. By storing mini-backups of the database,
TransAct can recover damaged databases.
When you start TransAct after a power outage or system error, the following
message appears.
Click Continue to bring up a window with repair choices—Auto Repair,
Restore, and Done. Click Auto Repair to retrieve information from the last
mini-save. A progress screen appears to monitor the repair process.
! Caution
Do not use your computer while TransAct repairs the database.
Once TransAct repairs the database, a Database
Recovery message appears to confirm that the recovery was successful.
Click the Done button to complete the recovery.
9
Installation
Review the repaired database. If the database is not correct, you may want
to restore your last backup. See Section 7.5.2 for restore backup procedures.
If you have any questions about the database recovery utility, call your
distributor, or see Section 14.0.
4.0
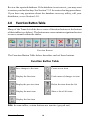
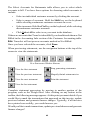
Function Button Table
Many of the TransAct tables have a row of function buttons at the bottom
of their tables (see below). The buttons are a convenient navigation shortcut
to move around within the tables.
Function Buttons
The Function Button Table below describes each of these buttons.
Function Button Table
Save changes to the item
Create a new item
Display the first item
Undo unsaved changes to item
Display the previous item
Delete the item from the list
Display the next item
Show a list of all items
Display the last item
Note: In some tables, certain buttons are inactive (grayed out).
Function Buttons
10
5.0
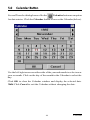
Calendar Button
Several TransAct dialog boxes offer the
Calendar button as an option
for date entries. Click the Calendar button to access the Calendar (below).
Use the left/right arrows on either side of the year and month to select a new
year or month. Click on the day of the month in the Calendar to select the
day.
Click OK to close the Calendar window and display the selected date.
Note: Click Cancel to exit the Calendar without changing the date.
11
Calendar
6.0
Logins and Passwords
The first time you open TransAct, you operate at the administrator level and
can set up logins, passwords, and access levels for everyone who uses the
program. Once the administrator has established these security items, only
a user with administrator-level security access can view or change logins,
passwords, and access levels.
Users with lower levels of security have restricted access to items in the
TransAct program.
TransAct recognizes four access levels of users and restrictions:
6.1
Level 3
Administrator Read, set up, and update everything
Level 2
Supervisor
Read, update all except security logins
Level 1
Operator
Read all tables, add scale transactions
Level 0
Guest
Read selected tables only
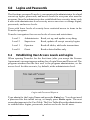
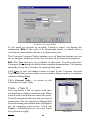
Establishing User Access Levels and Logins
When opening TransAct for the first time (after you accept the License
Agreement) a prompt appears asking for a Login Name and Password. The
program assumes that the first user is the program administrator, so the
access level for this screen is, by default, at the administrator level.
Login and Password Request
Type admin for the Login Name and press the Enter key. You do not need
a password for this initial set up, so simply press Enter again. The next
screen that appears is the User Table. The User Table allows the administrator
to establish user logins, passwords, and access levels for all users.
Logins and Passwords
12
Login User Table
If the User Table does not appear automatically, you can manually call up
the User Table by clicking the Login… icon from the menu bar.
The User Table consists of a Login Name, Password, Security Level, and
Real Name. Use the Tab key to move through entry fields, or click inside
the entry field to edit. Enter an item in the field, then press Enter to move
to the next entry field. See the following sections for entry field descriptions.
Click New in the User Table to create a new user screen.
6.1.1
Login Name
Enter a Login Name for the first user (8 characters maximum), then press
Enter. Note: Entries in this field are not case sensitive.
6.1.2
Password
Passwords are optional, but recommended to ensure a secure environment.
Without password protection, any user can sign in as the administrator and
make unauthorized changes to the database. Enter the password (8 characters
maximum), then press Enter. Remember your password! The system asks you
to verify this password later. Note: Entries in this field are not case sensitive.
When entering a password, only an asterisk (∗) appears to symbolize a
character.
6.1.3
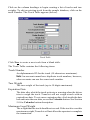
Security Level
Click the single down arrow
next to the Security Level box to display a
drop-down box listing valid security levels.
13
Logins and Passwords
Security Levels
Use the mouse to click on the desired security level for the user. TransAct
provides four levels of security.
Level 0—Guest level
Guest level users can only view tables such as Customer Accounts,
Categories, and Permits in the program. A guest cannot edit tables,
view weigh transactions, or create transactions.
Level 1—Operator Level
Operator level users can read, but not update, all tables. This level
provides access to the Weigh form and allows an operator to view
Quick Scan results, run reports, and perform all functions under
Utilities.
Level 2—Supervisor Level
The Supervisor level allows access to everything in the TransAct
program except Logins…. Supervisor level users are not allowed
to add or delete users or reset passwords.
Level 3—Administrator Level
Only the Administrator can add or delete users and reset passwords.
TransAct is packaged with an “admin” login set to the administrator
level. Note: The admin login is not password protected when
shipped. Because the administrator level has access to everything
in the program, enter your own unique password at login.
Logins and Passwords
14
6.1.4
Real Name
Type in the user’s first and last name. This field helps the administrator
identify the logins in the future.
Click Save when you have completed all entry lines.
6.2
Password Verification
After you have saved the completed User Table, an additional window
appears asking you to verify the password.
Password Verification
Retype the password you entered in the User Table. Press Enter key to
continue. If the password is incorrect, the following message appears:
Password verification failed.
Click OK and enter the correct password.
If you entered the password correctly, the following message appears:
Password change successfully verified.
Click OK to continue.
15
Logins and Passwords
6.3
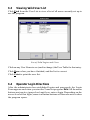
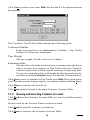
Viewing Valid User List
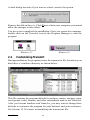
Click Find from the User List to view a list of all users currently set up to
use the program.
List of Valid Logins and Users
Click on any User Name to see (and/or change) the User Table for that entry.
Click Done when you have finished, and the list is correct.
Click Print to print the user list.
6.4
Operator Login Directions
After the administrator has established logins and passwords, the Login
Form appears each time you start the TransAct program. Note: All the menu
buttons are inactive (grayed out) until you enter a login. Depending on the
access level of that login, some or all menu buttons will become active when
the program opens.
Logins and Passwords
16
Program Login Prompt
To log in, enter the Login Name, then press Enter. Enter the Password, then
press Enter.
TransAct opens with the About TransAct screen (below). You can open any
active menu item by clicking on the associated icon in the main menu
toolbar..
Serial # TR0006
Version 2.0
Copyright © 1998
All rights reserved.
Other brands and products are trademarks of their respective
holder/s.
17
Logins and Passwords
7.0
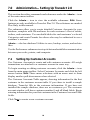
Administration—Setting Up TransAct 2.0
This section describes commands and submenus under the Admin… icon
of the main menu toolbar.
Click the Admin… icon to view the available submenus. Note: Some
features are only available in TransAct Plus 2.0. These features are marked
Plus Only in this manual.
The submenus allow you to create detailed Customer Accounts for your
database, complete with IDs and tares for each customer’s fleet of trucks,
trailers, and containers. You can build tables for each customer’s selected
Categories and create Permits for others who may be authorized to use a
customer’s account.
Admin… also has database Utilities to save, backup, restore, and archive
files.
Use the Preferences submenus to set up tickets and establish communication
between your scale, printer, and computer.
7.1
Setting Up Customer Accounts
Use Customer Accounts to create and edit customer accounts. All weigh
transactions are attached to a customer account in some way.
To begin creating or editing customer accounts, click the Admin… icon
from the main menu toolbar. Select Customer Accounts and click the left
mouse button. Note: Those menu selections with an arrow next to them
display another pull-down menu when selected.
The Customer Accounts Table appears, showing information for the first
customer in the customer account table. If you chose to install a sample
database, TransAct fills in the customer information. If you have not
installed the sample database, there are no customers yet. The customer
account window will show customer number 0 and all blank fields. Begin
entering information for your first customer in the Customer Account Table
fields.
Click New to create a new customer account.
Admin
18
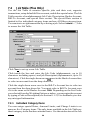
Customer Account Table: General Information
7.1.1
Customer Number, Name, and Address
Every customer account must have a Customer Number (10 digits maximum)
and Name (40 characters maximum).
You can enter address information for the customer, but an address is not
required. Enter the address information in the Address, City, State/Province,
and Zip/Postal Code fields of the Customer Account Table.
7.1.2
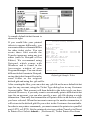
Ticket Type
Each customer account can default
to a specific ticket format that you
design. TransAct comes with a ticket
format pre-designed for you, named
default.gtk (shown at right).
However, you can create your own
custom tickets. Note: See Section
12.4 for more information on creating
you own tickets.
Stillson County Landfill
Ticket:
3777
T & J Services
Vehicle: 4
Container:
101
Time In:
04/18/97
Time Out:
04/18/97
In: 7740 lb
Out: 7300 lb
Net: 440 lb = 440.0 lbs
Non-Hazardous Asbestos
@ $0.02 per lb
Total Charge: $8.80
Amount Paid:
$0.00
11:14:22 AM
11:18:05 AM
[Special Ticket Info]
[Notes Info]
19
Admin
7.1.3
Default Categories (Hauler/Refuse)
Default categories are intended to simplify weigh form processing and
eliminate the need to select a main category each time the customer comes
into the landfill. For example, if a customer brings garbage into a solid waste
landfill 95% of the time, you could use Garbage as a default category. When
creating customer accounts, you can set default items for each category.
TransAct then automatically enters the default category item into the
Categories text box on the weigh forms.
Click the single down arrow
to the right of the main category name to
display a drop-down list containing all of the items in a main category. Click
on the item you want as the default for the customer account. All category
fields automatically fill with item None. TransAct uses the default items
when the operator creates transactions in the Weigh form, unless the
operator changes the items.
Selecting Items in Refuse Category
Note: When operating in Unattended mode, you cannot change the default
category during the transaction. Use caution when setting up default
category items. Be certain this is the only material the account will haul.
You can edit the ticket using Quick Scan, if necessary (see Section 10.1).
Verify how the unattended system works. If the unattended system is able
to prompt the hauler to enter a code, leave all category items set to None.
Admin
20
TransAct permits you to assign four main categories to each account. For
simplicity, TransAct initially installs only two categories. There is no limit
to the number of items you can enter under each main category. See Section
7.4 for more information on setting up categories.
You can modify main categories and assign them different names to make
TransAct more appropriate for your application. Only an administrator with
computer experience should perform this procedure, as it entails opening
special initialization (.ini) files in the TransAct folder on the hard drive. See
Section 12.2 for more information about using .ini files.
7.1.4
Hotlinked Buttons
From the Customer Account Table, you can jump directly to the screens
needed to set up accounting information, truck ID’s and tares, container
ID’s and tares, and pup trailer ID’s and tares. Make those jumps by clicking
the hotlinked buttons (see below) near the bottom of the Customer Account
Table.
TransAct allows each account to use three different tare types: Truck,
Container, and Pup Trailer. You can change these tare names in the
TransAct initialization file( for example, you can change Container to
Boxes). See Section 12.2 for more information.
When using tare weights during a transaction, TransAct calculates the total
of all tares for the transaction and applies the total toward the net weight.
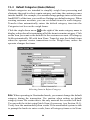
Accounting Info (Plus Only)
Click Accounting Info… to display accounting information for the customer
account. The Customer Accounting Info window allows the user to adjust
previous and current balances, revoke an account, activate account invoicing,
require the customer to pay in cash, or select a tax exempt account.
21
Admin
Customer Account Table
If you mark an account as revoked, TransAct warns you during the
transaction. Note: If the scale is in Unattended mode, a vehicle from a
revoked account cannot activate a weigh transaction.
The Customer Account Table contains a row of function buttons you can
use to navigate within the table. See Section 4.0 for button descriptions.
Note: The New button is not available in this table. TransAct generates
Customer Accounting Info tables from completed transactions. You cannot
manually set up the Customer Accounting Info table.
Click Save to save all changes made to items in the Customer Account
Table. Note: The system warns you if you make changes and try to continue
without clicking Save.
Click General Info… to return to the
Customer Account Table.
Truck… (Tare 1)
You can attach a list of trucks with their
recorded tare weights to each account. When
a truck with a recorded tare enters the scale,
TransAct automatically uses the tare for the
transaction. The tare appears as Weight Out
for an incoming transaction and as Weight In
for an outgoing transaction. Click the
Truck… hotlink button to view the Truck
List (shown at right).
Admin
22
Truck List
Click on the column headings to begin creating a list of trucks and tare
weights. To edit an existing truck from the sample database, click on the
truck Number. The Truck Table appears (below).
Truck Table
Click New to create a new truck from a blank table.
The Truck Table contains the following items:
Truck Number
An alphanumeric ID for the truck (10 characters maximum).
Note: An account cannot have duplicate truck numbers; however,
other accounts can use the same truck number.
Tare Weight
The tare weight of the truck (up to 10 digits maximum).
Expiration Date
The date after which the truck activates a warning when the driver
tries to weigh the truck. TransAct will not weigh a truck with an
expired tare date. To set a new expiration date, click inside the date
box and enter the new date, or use the Calendar button. See Section
5.0 for Calendar button description.
Maximum Legal Weight
The weight that the truck should not exceed. If the truck is over this
maximum weight, TransAct will not allow the operator to complete
the transaction.
23
Admin
Badge Number
The number assigned to an ID badge, used to identify a customer
vehicle or account (10 characters maximum). The badge number
must be identical to the number entered into the database.
Weigh Only
Check this box if the badge assigned to a truck is for a weigh only
or check weight application. Only the date, time, and weight print
on the ticket, and TransAct does not record the transaction. Example:
If a company allows the public to use their scale, the driver pays a
fee to receive a badge. With their truck on the scale, the driver
swipes the card to have their weight printed on a ticket. The driver
then returns the badge to the office.
Container Required / Pup Trailer Required
When a truck requires a Container or Pup Trailer during the weigh
process, TransAct will not store or print the truck weight information
until the driver also selects a Container or Pup Trailer. Click in the
Container and Pup Trailer Required option box to enable this
function.
Click Save to store each completed Truck Table screen.
Click Done to return to the Trucks List.
Click Done again to return to the main Customer Account window.
Container… and Pup Trailer… (Tare1 and Tare 2)
Each customer account can have a list of
both Containers and Pup Trailers with stored
tare weights. TransAct adds Container and
Pup Trailer tare weights to the truck’s tare
weight to generate the total tare weight for
the transaction.
Click either the Container… or Pup
Trailer… hotlink button to view the
Container or Pup Trailer List with existing
numbers and tare weights for the account.
Click on the column headings to begin
creating a list of container or pup trailer tare
weight. To edit existing information, click
on the number. The Container Table or Pup
Trailer Table appears.
Admin
24
Container List
Click New to create a new item. Note: See Section 4.0 for function button
descriptions.
The Container / Pup Trailer Table contains the following items:
Container Number
Each item must have an alphanumeric Container / Pup Trailer
Number (10 characters maximum).
Tare Weight
The tare weight, if used, can be up to 9 digits.
Expiration Date
The date after which the truck activates a warning when the driver
tries to activate the Container or Pup Trailer function. TransAct
will not weigh a truck with an expired container or pup trailer date.
To set a new expiration date, click inside the date box and enter the
new date, or use the Calendar button. See Section 5.0 for assistance.
Click Save to save a Container or Pup Trailer item. Note: The system warns
you if you have made changes and try to continue without clicking Save.
Click Done to return to the Truck List.
Click Done again to return to the main Customer Account Table.
7.1.5
Viewing and Selecting Customer Accounts
Click Find from the Customer Account Table to view a list of all customer
accounts.
Double-click on the Account Name to edit an account.
Click Print to print the customer account list.
Click Done to return to the Customer Account Table.
25
Admin
7.2
Job Table (Plus Only)
Use the Job Table to monitor specific jobs and their cost, organize
transactions, setup default bill-to accounts, and define special rates. The Job
Table consists of an alphanumeric Job Code, Description, Hauler Account,
Bill-To Account, and special Rate section. The special Rate section is
limited to five individual category items and one All Other category item.
You can start a weigh transaction by selecting a job. Select Admin… Jobs
to access the Job Table.
Click New to set up a new Job Table.
Click inside the box and enter the Job Code (alphanumeric, up to 10
characters including spaces) and job Description (alphanumeric, up to 30
next to the Hauler Account box
characters). Click the single down arrow
to select an account from the drop-down list.
Click the single down arrow next to the Bill-To Account box to select an
account from the drop-down list. You must select a Bill-To Account even
if it is the same as the Hauler Account. Note: Depending on the List Order
you selected from the Weighing Options window, you can enter the account
by typing a Code or Description (see Section 8.1.5). Use the Esc key to clear
any mistyped information.
7.2.1
Individual Category Items
You can assign special Rates, Amount Limits, and Charge Limits to as
many as five Category items. The only items available in the Job Table are
those category items that have attached rates. Use the midsection of the Job
Admin
26
Table window to setup special Rates and Limits for these Category items.
Note: The Category name to which the rates are attached appears as the rate
heading. Examples in this section use the Category name Refuse 1.
During a weigh transaction, all Category items are available. If you select
a Category item with a special Rate, TransAct uses the special rate to
calculate the total charge. TransAct uses rates from the Measured Rates
table to calculate the total charge for those category items without a special
rate attached.
next to the
Click inside the Category box. Use the single down arrow
Category box to select a category from the drop-down list. Once you select
a category item, click inside the first Rate box to enter a special rate. When
you leave a special rate at zero, TransAct uses the rates from the Measured
Rates table to calculate the total charge (see Section 9.4).
Use the Amount Limit box to enter the limit the item should not exceed for
the job. If the transaction exceeds the Amount Limit, TransAct displays a
warning during the transaction but does not stop the transaction.
The Total Amount box displays the total amount of the item used for the job.
Use the Charge Limit box to enter a dollar amount the category item should
not exceed for the job. Again, if the transaction exceeds the Charge Limit,
TransAct displays a warning but does not stop the transaction.
27
Admin
Example: The above table shows a Charge Limit of $500.00 for
Refuse type MSW Commercial. The operator already billed this
account for $540.00 of this Refuse type. During the next weigh
transaction, the following warning appears: The accumulative
charge for Refuse 11 has exceeded the Job Limit.
Note: The “limit exceeded” message for the Amount and Charge Limits is
only a warning. TransAct still records the transaction.
Click OK to save the transaction and continue.
The Charge Total box displays the total charge for the item used in the job.
When the operator receives payments during a transaction, or enters them
using Quick Scan (see Section 10.1), the total item credit appears in the
Total Credits box. To record payments using the Payment/Credit form
under Accounting, select the job and category item to apply the payment
toward. Click Save to store the payment.
Note: To remove a category item from a Job Table, set the item back to
None. Remember to set all rates and limits back to zero as well. Do not use
the Delete button to set all rates and limits back to zero! The Delete button
erases the entire Job Table!
To select the next category item, click Next Category.
Click inside the Category box to select another category item. Enter the
item’s special Rates, Account Limits, and Charge Limits.
Click Save to store the changes.
Admin
28
7.2.2
All Other Category Items
The category for All Other works the same as the other five category items.
Total Amount, Charges, and Credits for transactions using a category item
not defined in the Job Table appear in the All Others item section. A rate
entered for the All Others item will override any Measured Rate setup for
all other category items.
Example: The operator has defined ten category items for the
category type Refuse. In a Job Table, the operator set up two of the
items to use a special rate, i.e. Refuse-1 and Refuse-2. If the
operator enters a rate in the Refuse-All Others item, TransAct uses
that rate to calculate any charges for the other eight category items.
Click Save to store the changes to all category items.
7.3
Permits (Plus Only)
Use Permits to setup individual “subaccounts” within a Customer Account.
For example, a township may allow several of its residents to use the landfill
under the township’s customer account. However, the township would like
to keep track of the residents using the landfill under their account. Using
the Permits section, you could assign individual permit numbers to each
township resident using the township’s customer account. You could
include the resident’s name, address, driver’s license number, license plate
number, and issue/expiration date in Permits.
Select Admin… Permits to access the Permits table and begin creating or
editing permits.
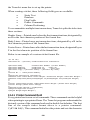
3
Active Disposal & Recycling, Inc.
P.O. Box 637
P.O. Box 637
WI
54390-
L153-1111-2222-33
(609) 254-7278
LTF-947
WDNR License No. 10531
1/1/1997
3
12/31/1999
Valid
Active Disposal & Recycling, Inc.
0.000
29
Admin
The Permits window shows the information for the first permit in the permit
table. If there are currently no permits, the Permit window shows a Permit
Number of 0 and all fields are blank.
Click New to create a new permit from a blank table.
The Permit window contains the following items.
Permit Number
The Permit Number can be up to 9 digits.
Permit Name
The Name can be up to 40 characters.
Customer Account
Click on the single down arrow to the right of the Customer
Account field. Point and click to select the desired Customer
Account from the drop-down list.
Addresses, Phone, Memo, License Number, License Plate
Optional fields. Note: The first character of a driver’s license entry
must be a letter.
Memo
The Memo field allows for up to 40 characters.
Issue Date
The date the permit was issued. To set a new issue date, click inside
the date box and enter the new date, or use the Calendar button. See
Section 5.0 for assistance.
Expires
The permit expiration date. To set a new expiration date, click
inside the date box and enter the new date, or use the Calendar
button (see Section 5.0 for assistance). Note: If you do not set a
specific expiration date, the permit will never expire.
Status
Click the single down arrow next to the Status option to set a permit as Valid
or Invalid. When a permit expires, or is invalid, TransAct warns the operator
at the start of the transaction. Only a system administrator or supervisor can
renew or validate a permit.
Click Save to save a permit. Note: The system warns you if you make
changes and try to continue without clicking Save.
Admin
30
7.4
Categories
Use Categories to create and edit items in a category. A category groups
transactions for reporting purposes. For example, a category could be
Refuse and items in this category could be Compost, Tires, Yard Waste, etc.
for solid waste applications. For aggregate applications, the category could
be Material with items such as Sand, Gravel, Cement, etc. Categories also
serve as a means for applying rates.
Define Categories in the TransAct initialization file. For example, a solid
waste location may refer to material as Refuse or simply Product. You can
change the category heading to Refuse or Product by editing the initialization
file. See Section 12.2 for more information on configuring the transact.ini
file.
Note: TransAct installs two main categories by default. You can add two
more main categories using the transact.ini file.
Each category can have one or two subcategories. Subcategories help group
category items for reporting purposes and are defined in the initialization
file. For example, a solid waste landfill may wish to add a subcategory In/
Out to their Refuse category. Each Refuse item in the category can be
classified as a Refuse coming into the landfill or going out of the landfill.
Later this subcategory can be used to create reports for regulatory agencies
on refuse deposited in the landfill and refuse moved out of the landfill.
Select Admin… Categories then the desired category to access the
Category table, in this case, the Refuse table.
The Refuse Table shows the information for the first item in the category.
If there are no items in the category yet, the category window shows a code
of 0000 and blank description field.
31
Admin
Click New to create a new category item using a blank table.
The category window has a Code (4 alphanumeric characters maximum)
and Description (30 alphanumeric characters maximum) field.
If you define subcategories, they appear as drop-down lists. Click on the
to view a list of subcategory items. Point and click
single down arrow
on the desired item.
Click Save to save an item you created. Note: The system warns you if you
have made changes and try to continue without clicking Save.
Click Find to view a list of all items in the main category. A Select Refuse
Type window appears with a list of all the items in the main Refuse category
of the sample database.
Select Refuse Type List
Note: TransAct automatically generates a category item called None that has
a code -1. You cannot edit the None item nor is it shown in the item list.
However, the None item is available elsewhere in the program. Do not
create a category item called None.
To edit an existing item, click on the item from the item list. The item
appears in the category window for editing. Click inside a field to edit.
Admin
32
Click Print to print the category type list.
Click Undo to undo changes before you save.
Click Done to return to the Category table.
Click Save to save a category you created. Note: The system warns you if
try to continue without clicking Save.
7.5
Utilities
7.5.1
Backup
Backing up your data is very important. Create a routine procedure for
backing up your data and train your employees to follow this backup
procedure.
The most common form of backup is to store data on DAT tapes. Many
companies run weekly backups, where a week’s worth of daily tapes are
rotated Monday through Friday. Other companies use a monthly rotation,
using a different tape for each day of the month. Regardless of your backup
method, be certain not to rely on a single tape.
TransAct provides a utility for backing up your database to your local hard
drive. TransAct allows backup of the database to a floppy diskette if the
database is small enough to fit on one floppy. Unfortunately, databases are
usually too large for a single floppy disk. A good backup procedure is to
store a daily backup on your local hard drive prior to running a tape backup.
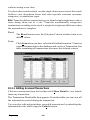
Creating a Backup File
To run the backup utility, select Admin… Utilities Backup. The
Backup Database window appears.
33
Admin
The left Backup Database window displays a list of existing backup names;
the right window displays the destination drive and directory.
TransAct, by default, places the database
backup on the same drive and directory in
which TransAct has been installed (usually
c:\transact). To change that location, click
the single down arrow next to the drive box (above) to show a drop-down
box of available destinations. Click on the letter to select your preferred
backup drive.
Under the destination box is the directory
box (shown at right). Use this box to select
a different directory other than the default
directory where you installed the TransAct
program.
TransAct automatically generates the
default backup file name by adding today’s
date numbers to the letters bu (i.e.
bummddyy). Use the Tab key to highlight the default file name or click
inside the Enter Backup Name box to edit the name. Delete the default file
name, and type your desired backup file name in the box.
Note: File names can be up to 8 characters long with no spaces. They can
contain letters, numbers, and special characters.
Admin
34
To change back to the default file name, place the cursor in the file name box
and double click.
Click Backup to begin the backup procedure.
If you selected a backup file name that already exists, the following warning
appears:
This backup name already exists. Do you want to overwrite this backup file?
Click Yes to overwrite the file with the new backup.
Click No to return to the Backup Database window.
If you don’t enter a file name or enter an unacceptable name, a
Bad file name warning appears.
Click OK to return to the Backup Database window so you can enter a
correct backup file name.
Once the backup is complete, Backup Successfully Completed appears at
the bottom of the Backup Database window.
Deleting Existing Backup Files
While it is important to backup the database, it is equally important to delete
old backup files. Deleting old backup files helps keep information on the
computer hard drive manageable. No more than one month’s worth of
backups need be stored on the hard drive. One or two weeks is sufficient.
To delete existing backup files, click on the file to delete from the list of used
backup names.
Click Delete to delete the selected file. To avoid mistakes, the following
warning appears: Are you sure you want to delete this backup?
Click Yes to delete the file and proceed.
Click No to return to the backup window without deleting.
7.5.2
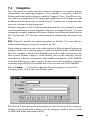
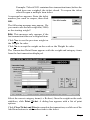
Restore Backup
This utility allows you to restore any backed up file in case the database
becomes damaged or corrupted.
To restore a backup file, select Admin… Utilities Restore to access the
Restore Database window.
35
Admin
The left window displays a list of available backups found in the default
drive and directory.
The right window displays the default drive and directory where the
TransAct program was installed (usually c:\transact).
If you are restoring from a diskette click the single down arrow to show a
drop-down box listing available
drives. Select your diskette drive
(usually a:).
Under the destination box is the
directory box. Use this box to select a
different directory.
A list of available backup files on your diskette appears in the box to the left.
Point and click on the file you wish to restore.
Click Backup to begin restoring the backup. A warning appears asking you
to verify the file being stored and asking if you want to erase the current
database:
This restore will undo any changes you have made to the database since the
date “bu041497” was created. Do you have a current backup and are you
sure you want to do this?
Click Yes to continue, or click No to cancel.
Restore Successfully Completed appears at the bottom of the Restore
Backup window once the restore is complete.
Admin
36
7.5.3
Archive Transactions
Archiving is a method of removing transactions from the database and
storing them without having to delete information. Archiving is important
because it helps you manage your database and improves system
performance.
TransAct allows you to archive all transactions or just invoiced transactions
for a specified date range.
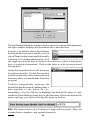
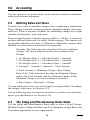
Creating an Archive
To archive transactions, select Admin… Utilities Archive Transactions
to access the Archive Transactions window (below).
Select a date range to archive by typing in the From and To dates, or use the
Calendar button to the right of the boxes to set the dates (see Section 5.0
for assistance).
The area next to the date allows you to choose which transactions to archive.
Note: The default selection is All Transactions. To select only invoiced
transactions to archive, click inside the Invoiced Transactions circle.
To use a default archive file name, click inside the Archive Name box and
double click. TransAct generates the file name by adding the invoice Date
To numbers to the letters “ar” (i.e. armmddyy).
To change the file name, use the Tab key to highlight the default file name,
or click inside the Archive Name box to edit. Delete the default file name
37
Admin
and type in your desired archive file name (8 characters maximum).
To change back to the default file name, place the cursor in the file name box
and double click.
Click Archive to continue.
Because archiving alters the database, TransAct recommends making a
backup of the current database prior to archiving.
Backup Warning
Click Yes to automatically open the Backup window. Once the backup is
complete, archiving continues.
Click No when you do not want a backup prior to archiving, and TransAct
automatically continues archiving.
Click Cancel to return to the Archiving Transactions window.
If you highlight a file name in the list of archive files or typed a duplicate
file name in the Archive Name box, a warning appears: This archive file
already exists. Do you want to overwrite this archive file?
Click No to return to the Archive Transactions window.
Click Yes to overwrite the existing file name.
If you do not specify a file name, the following warning appears: No archive
name specified.
Click OK to return to the Archive Transaction window.
Enter a file name and click Archive again. The backup database prompt
appears again, but it is not necessary to do another backup.
Click No to continue archiving.
Deleting Existing Archive Files
To delete archive files, click on the file to delete from the Archive
Transactions window.
Admin
38
Click Delete to delete the selected file. To prevent mistakes, the following
warning appears before the file is deleted: Are you sure you want to delete
this archive?
Click Yes to delete the file and proceed.
Click No to return to the archive window without deleting.
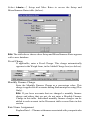
7.5.4
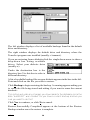
Restore Archive
Use Restore to restore archived transactions. Restoring archived transactions
may be necessary for some reporting purposes.
To run the restore utility, select Admin… Utilities Restore Archive to
access the Restore Archived Transactions window.
The left window displays a list of available archives found in the default
drive and directory where the TransAct program is installed.
The right window displays the default drive and directory where the
TransAct program was installed (usually on drive c:\transact ).
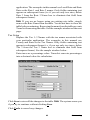
If you are restoring an archive from a
diskette, click the single down arrow
to show a drop-down box listing
available drives. Select your diskette
drive (usually drive a:).
The directory box is under the destination box. Use the directory box to
select a different directory other than the c: default directory where the
39
Admin
A list of available backup files on your diskette appears in the box to the left.
Click on the file(s) you wish to restore.
Note: To select multiple files for restoring, hold down the Shift key and click
to select continuous file names. Hold down the Ctrl key and click to select
discontinuous file names.
Click Restore Archive to begin the restoration of your selected file.
Because restoring an archive alters the database, TransAct recommends
making a backup of the current database. Prior to restoring, the following
message appears: Restoring an archive can potentially add many transactions
to your database. We strongly suggest you perform a backup at this time.
Would you like to make a backup?
Click Yes to automatically open the Backup window. Once the backup is
complete, archive restoring continues. Archive Restored appears at the
bottom of the window when the archive restoration is complete.
Click No when you do not wish to perform a backup prior to restoring an
archive; archive restoring automatically begins.
Click Cancel to return to the Restore Archive Transactions window.
Admin
40
7.6
Importing and Exporting Data
TransAct provides utilities for importing and exporting transaction
information. Currently, only the database Transaction Table can be used for
importing and exporting.
Before importing or exporting, you need to create definition files. A
definition file tells TransAct what information you want to import or export,
and how TransAct should import or that information.
Create definition files using any text editor, such as Windows Notepad or
Dos Editor. Save the files with a .gid extension in the TransAct installation
directory. The first line of the definition file identifies the database table to
use. Each line of the definition file is formatted into seven comma-delimited
columns.
The following is an example of an export definition file named transexp.gid
TransactionTable
Ticket Number
Account
Truck Number
Waste Code
Date Out
Time Out
Weight In
Weight Out
Net Weight
Charge
,Number
,Number
,Character
,Character
,Character
,Character
,Number
,Number
,Number
,Number
,
,
,
,
,
,
,
,
,
,
,
,
,
,
,
,
,
,
,
,
,
,
,
,
,
,
,
,
,
2,
,COMMA,
,COMMA,
,COMMA,
,COMMA,
,COMMA,
,COMMA,
,COMMA,
,COMMA,
,COMMA,
,COMMA,
Each line contains the following information. You must define a place for
each of the seven delimiters, even if you don’t use the delimiter.
Field Name
Valid Transaction database field names (listed later).
Field Type
A database field is either a Character or Number.
Field Length
Length of field that will be written to export data file. Number of characters
extracted from an import file. Ignored if a field delimiter is defined.
Decimals
Used for importing numeric data fields that have an implied decimal point.
For example, if decimals is 2 and the imported field is 15025, then the
data is converted to 150.25.
Fixed Value
Used to place a fixed value in an export data file field or to assign a fixed
value to a database field when importing.
41
Admin
Delimiter
Character used to delimit the field. These names can be used for the
following predefined delimiters:
TAB
NL (new line)
SPACE
COMMA
CR (carriage return)
LF (line feed)
Any character can be used for a delimiter field by entering the character's
numeric ASCII code. For example, the ASCII code for a space is 32 and a
tab is 9.
Multi-delimiters
Yes or No. Used to import files that have multiple delimiter characters
between fields. The default value for this field is No.
The following is a list of fields from the Transaction Table that can be used
in the export/import definition files.
Charge Type
Character
Regular Charge, Finance Charge, Payment or Credit
Ticket Number
Number
Sequential number assigned to each transaction
Ticket Sequence
Number
Item Number when multiple items per ticket are used
Hauler Account
Number
Hauler account number
Account
Number
Bill-To account number
Permit
Number
Permit Number
Job
Character
Job Code
Job Table
Character
Job Code Description
Tare1 Number
Character
Replace Tare1 with user-assigned name
Tare2 Number
Character
Replace Tare2 with user-assigned name
Tare3 Number
Character
Replace Tare3 with user-assigned name
Category1 Code
Character
Replace Category1 with user-assigned name
Category2 Code
Character
Replace Category2 with user-assigned name
Category3 Code
Character
Replace Category3 with user-assigned name
Category4 Code
Character
Replace Category4 with user-assigned name
User Number
Number
User-defined number
Date In
Character
Date transaction started
Time In
Character
Time transaction started
DateTime In
Character
Date and Time transaction started
Date Out
Character
Date transaction ended
Time Out
Character
Time transaction ended
DateTime Out
Character
Date and Time transaction ended
Admin
42
Date Edited
Character
Date transaction was edited in Quick Scan
Time Edited
Character
Time transaction was edited in Quick Scan
DateTime Edited
Character
Date and Time transaction was edited in Quick Scan
Weight In
Number
Weight-based number derived from the scale
Weight Out
Number
Weight-based number derived from the scale
Net Weight
Number
Weight-based number derived from the scale
Adj Weight
Number
Weight after percentage adjustments were made
Adjustment1
Number
Percent of Load adjustment
Adjustment2
Number
Percent decrease adjustment
Scale Unit
Number
Unit of measure of the scale
Unit
Number
Unit of measure selected in TransAct
Charge
Number
Total charge of the transaction
Added Charge
Number
User-defined number
Sales Tax1
Number
User-defined number
Sales Tax2
Number
User-defined number
Sales Tax3
Number
User-defined number
Rate1
Number
User-defined number
Rate2
Number
User-defined number
Rat e3
Number
User-defined number
Payment
Number
User-defined number
Check Number
Number
User-defined number
43
Admin
7.6.1
Import Data
Once you have defined an import definition file to match data in the file to
be imported, use TransAct to import the data into the Transaction Table.
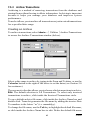
To run the import utility, select Admin… Utilities Import Data to access
the Transaction Selection Criteria window.
Use this window to select specific data to import.
To import all data from the import file, click the Import button as soon as
the above window appears.
To import only certain data from the import file, use the Select Criteria form
to determine which information should be selected from the import file.
Click the OK button to continue on to the Import Data window (below). Use
this window to select the import file and import definition file.
transact
Admin
44
Select a file, then click the
Notepad or Dos Editor.
button to view the file using Windows
Once the you have selected the import and definition files, click the Import
button. TransAct uses the definition file to read information in the import
file. If the system encounters any errors during the read, it halts operation
and displays the following error message.
Note: The system writes nothing to the database unless it is error free.
Click the OK button to clear the error message. To help determine what
might be wrong, click the View Log button. Correct the problem with either
file, then try again. When the system reads the data correctly, the following
message appears: XX transactions were processed with no errors. 0
transactions were rejected. The message also lists the Total Weight, Total
Charge, and Total Credit values, and asks: Would you like to add these to
your database?
If the information displayed is correct for the import file, click the Yes
button to complete the operation and add the transactions to the Transaction
Table.
Click the No button to cancel the operation and add nothing to the
Transaction Table.
7.6.2
Export Data
Once you have defined an import definition fil to match data needed for
exporting, use TransAct to export the data from the Transaction Table.
To run the export utility, select Admin… Utilities Export Data to access
the Transaction Selection Criteria window.
45
Admin
Use this window to select specific data to export.
To export all data to the export file, click the Export button as soon as this
window appears.
To export only certain data from the export file, use the Selection Criteria
window to determine which of the data should be selected from the import
file. Click the Export button to continue on to the Export Data window.
transact
Use this window to select the export file and the export definition file. In
most cases, exporting requires you to create a new file. Type the name of the
export file in the Export File Name box. To overwrite an existing file, select
the file from the Select an Export File list. Select to overwrite the file during
Admin
46
exporting. To view an existing file, select the file, then click the
to view the file using Windows Notepad or MS Write.
button
Once you have selected the export and definition files, click Export.
TransAct uses the definition file to send information to the export file.
TransAct may encounter errors when you type/use the wrong Transaction
Table field, or when one of the comma delimiters is missing in a line. The
following message appears:
Click OK to clear the error message. To help determine what might be
wrong, click the View Log button. Correct the problem with the export
definition file, then try again.
When the system sends the data correctly, the following message appears.
If the information displayed is correct for the import file, click the Yes
button to complete the operation and add the transactions to the Transaction
Table.
Click the No button to cancel the operation and add nothing to the
Transaction Table.
47
Admin
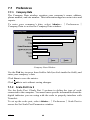
7.7
Preferences
7.7.1
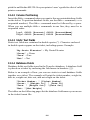
Company Data
The Company Data window contains your company’s name, address,
phone number, and site number. This information appears on invoices and
reports.
To enter your company’s data, select Admin… Preferences
Company Data to access the Company Data window.
Company Data
Stillson County Landfill
Old County J
Stillson
WI
54729
715-726-0691
D
Company Data Window
Use the Tab key to move from field to field (or click inside the field), and
enter your company’s data.
Click Save to save the entries.
Click Undo to exit without saving changes.
7.7.2
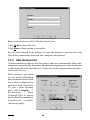
Scale Port 1 & 2
Use the Scale Port 1/Scale Port 2 sections to define the type of scale
connected to the computer. You must know specific information about the
digital indicator you are using with the scale to properly interface with
TransAct.
To set up the scale port, select Admin… Preferences Scale Port to
access the Set Scale Port Parameters window.
Admin
48
Set Scale Port Parameters
A direct scale interface is not required to run TransAct in demonstration
mode. If you do not interface a scale, select MANUAL from the Connector
list. Nothing else needs to be done to set up the port.
To demonstrate how TransAct runs with a scale, select SIM, to let you
simulate a scale in the Weigh form. Arrows to increase and decrease the
weight appear next to the scale indicator in the Weigh form.
If you are interfacing a scale with the computer, select the communication
port (COM1 through COM4) to which the interface cable is attached. Use
the up and down arrows in the Connector box to view all four ports.
Use the arrows to the right of the Device Type box to view available scale
types. If you cannot find the type of indicator you are using, call your dealer
or the TransAct technical support line for assistance.
Note: TransAct supplies common scale drivers to make setting up these
devices simple. Unfortunately, we cannot list every indicator in the industry.
Contact us with additional indicator types so we can add the drivers to later
releases of the software.
When you select a Connector and Device Type, the settings boxes become
available for editing (i.e. Baud Rate, Flow Control, Data Bits, Stop Bits, and
Parity). Note: Set the indicator to continuous mode. Always use continuous
(not demand) mode when interfacing with a computer. Check your indicator’s
installation manual for the correct settings.
49
Admin
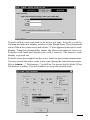
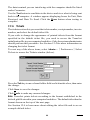
After you set up the scale port, click the Test button to view data from the
scale. If you have difficulty connecting with the scale you may need to
change one or more of the settings. The following screen shows a test
display from a correctly interfaced scale.
If you have correctly interfaced the scale with the computer, you will be able
to read the scale weight in the right side of the window. The correct weight
should also appear in the Weight box at the bottom of the window.
Click Done to return to the Set Scale Port Parameters window.
Click Pause to stop the window from scrolling.
If the test screen is blank or shows something other then the above picture,
the computers settings are not correct for the scale indicator.
7.7.3
Dual Scales
Some applications may dictate using one scale as for Weigh In and another
separate scale for Weigh Out. To initialize a second scale indicator, your PC
must have an available serial port. You can configure and use a second scale
in the TransAct Weigh form. When enabled, both scale displays appear in
the Weigh form.
Admin
50
TransAct allows only one scale to be active at a time. Activate a scale by
clicking the indicator display window in the Weigh form. The foreground
color of the active scale is red, and a letter “a” also appears in the active scale
display. TransAct automatically makes the other scale inactive; however,
TransAct still reads and displays the scale’s activity. The inactive scale
display is grayed out.
TransAct uses the weight from the active scale for processing transactions.
You can switch the active scale at any time during the transaction process.
Select Admin… Preferences Scale Port 2 to access the Set Scale 2 Port
Parameters window. Use this window to setup the second scale.
51
Admin
Select the Device type, Connector (i.e. serial port), and correct settings for
the second scale. Click the Test button to view activity received from the
scale. Data will be readable if the settings are correct.
Note: Be sure to select either Comm Ports 1 & 2 together, or Comm Ports
3 & 4 together. These combinations ensure that each port has a unique
interrupt, unless you have changed their configuration. If two scales have
the same interrupt, the dual scale feature will not work.
When you are not using a second scale, set the Connector to None. This
prevents the second indicator display window from appearing in the Weigh
form.
7.7.4
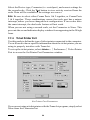
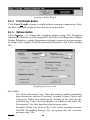
Ticket Printer Port
Use this mode to define the type of ticket printer connected to the computer.
You will need to know specific information about the ticket printer you are
using to properly interface with TransAct .
To set up the ticket printer, select Admin… Preferences Ticket Printer
Port to access the Set Printer Port Parameters window.
Set Printer Port Parameters
If you are not using a ticket printer with the TransAct program, simply select
None from the Connector list.
Admin
52
TransAct provides several ticket printer options, including receipt printers,
dot matrix printers, and laser printers. Use the arrow buttons within the
Device Type box to view a list of all available print drivers.
Note: TransAct supplies common ticket printer drivers to make setting up
these devices simple. Unfortunately we cannot list every printer in the
industry. Please contact us with your specific ticket printer types so we can
add the new drivers to later releases of the software.
Select the communications port (LPT1, LPT2 or
COM1 through COM4) to which your printer cable
is attached. Use the arrows in the Connector box to
view all ports and choose the appropriate one.
When using a printer selection other than Windows
Default or Direct to Printer Port, you also need to set the Baud Rate, Flow
Control, Data Bits, Stop Bits, and Parity sections. After you have selected
the communication port and device type, the settings boxes become
available for editing. Check your ticket printer reference manual for correct
settings.
TransAct provides common drivers for ticket printers that produce receipts
similar to those at a grocery store. Such drivers include the SP2000,
SP2200, IDS 150A, Star SP200, and the Epson TM. Select Serial Printer
when the available drivers do not match a printer type. Use the arrows in the
Device Type option box to choose a printer.
TransAct also provides options for using an existing Windows printer, such
as a dot matrix or laser printer. To use a printer already configured for
Windows, select Windows Default from the Device Type list.
You can also send data directly to a printer via the Ticket file. This option
is helpful when printing to custom preprinted forms. Select Direct to Printer
Port to utilize this option. Using this option for a ticket printer should not
affect how reports are printed if they are printing to the same printer as long
as the printer is also defined as a Windows printer.
After you set up the ticket printer, click the Test button to send up to four
lines of text to the printer. Test Lines 1–4 appear.
53
Admin
Enter text into any or all of the four Test Lines.
Click Send to print the text.
Click Done when testing is complete.
If you send nothing to the printer, be sure the printer is powered on, and
check the connections between the computer and printer.
7.7.5
Data Terminal Port
A data terminal is a device used to collect and store information. Bar code,
magnetic strip, and radio frequency identification equipment can be interfaced
to data terminal collection devices. TransAct can be customized to interface
with such devices.
This section is provided
to test and troubleshoot
data terminal devices that
have been configured to
interface with TransAct.
To test a data terminal
port, select Admin…
Preferences Data
Terminal Port to access
the Set Data Terminal Port
Parameters window
(shown at right).
Admin
54
The data terminal you are interfacing with the computer should be listed
under Connector.
Use the Test button to send data to the device and view what is being sent
back to the computer. A window appears displaying boxes for Unit, Data
Received, and Data To Send. Click the Done button when testing is
complete.
7.7.6
Tickets
The tickets section lets you reset the ticket number, receipt number, invoice
number, and select the default ticket file.
If you wish to change the appearance of printed tickets from the format
specified in the default ticket file, you need to access the TransAct
initialization file in your computer hard drive. Only the system administrator
should perform this procedure. See Section 12.4 for more information on
changing the ticket format.
To reset any of the above items, select Admin… Preferences Select
Tickets to access the Tickets window (below).
Press the Tab key to move from field to field or click inside a box, then enter
the change.
Click Save to save the changes.
Click Undo to undo any unsaved changes.
Note: TransAct prints tickets according to the format established in the
default.gtk file stored in your computer hard drive. The default ticket has the
format shown on the top of the next page.
See Section 12.4 to learn more about editing the ticket file and to see an
example default ticket.
55
Admin
7.7.7
Note Headings
TransAct allows the user to define up to four note lines used in the Weigh
form when creating or completing a transaction. TransAct prints these notes
on the transaction ticket given to the customer.
To edit the headings for the notes, select Admin… Preferences Note
Headings to access the Configure Ticket Note Headings window (below).
Only the boxes containing text appear
when you select the Notes button in
the Weigh form. Any of the empty
lines of notes will not show on printed
tickets. TransAct only stores a note
with incomplete transactions. Once
the transaction has been completed
and printed, TransAct erases the note.
The following is an example of a
three-line note in the Weigh form
generated from note headings Name, Address, City text entered in the
Configure Ticket Note Headings window.
In this example, only three Note lines appear with headings because the user
defined only three of the four lines in the Configure Ticket Note Heading
window.
If you want only a simple one-line note with a single heading, enter only that
heading on only one line in the Configure Ticket Note Heading window. In
that case, a one-line memo window appears. Enter the note into the Memo
box, then click Done to store the one-line note.
Admin
56
7.8
About TransAct
To display the current TransAct version and serial number you are using,
select About from the Admin… pull-down menu.
The start-up About TransAct screen appears (see below). This screen also
appears whenever you first start TransAct.
Serial #TR0006
Version 2.0
Copyright © 1998.
All rights reserved.
Other brands and products are trademarks of their respective
holder/s.
About TransAct Start-Up Screen
When the About TransAct screen appears, you can click any other main
menu icon in the toolbar to close the About TransAct screen and move to
other parts of the program.
57
Admin
8.0
Weigh
Use the Weigh… section of TransAct to create, complete, and store weigh
transactions in the database. TransAct allows you to edit these transactions
and print transaction reports using the Reports features in the Reporting…
menu.
8.1
Select Transaction Window
Click the Weigh… icon from the main menu toolbar to access the Weigh
form Select Transaction window (below) and begin a transaction.
8.1.1
Date and Time
The top left corner of the window contains the date and time. TransAct reads
this information from the computer system. If the time or date is wrong, exit
TransAct, change your computer’s time and date, and restart TransAct.
The time, date, Print Weight button, Options… button, and display
window are always present in the Select Transaction window. The Update
Tares… button is only available when you start a transaction.
8.1.2
Status Bar
The status bar at the bottom of the window displays the next ticket number
and the ticket format file (default.gtk, unless you have modified the ticket
format).
Weigh
58
8.1.3
Display Window
The display window shows the scale weight. This window will look
different depending on the type of scale you selected and whether you
selected dual scale mode. See Section 7.7.3 for more information.
When the scale port is in MANUAL mode, the display window is inactive.
You must manually enter weights in the Weight In/Weight Out boxes of the
Transaction Detail table.
When the scale port is in SIM mode, arrows for increasing and decreasing
a truck weight appear next to the display window to simulate a scale action.
These buttons increase or decrease simulated truck weights in increments
of 3000 pounds.
Weight Display Window in Simulation Mode
When you connect a scale to the computer, TransAct reads the weight
supplied by the scale indicator and displays the weight in the display
window. The unit of measure (lb-pound or kg-kilogram) used by the scale
indicator also appears in the display window.
A motion indicator in the top left corner of the display window informs you
when the scale is in motion. You cannot continue with the transaction until
the motion indicator clears from the display.
Once motion stops, you can lock the scale weight to help speed the weighing
process. To lock the weight, double click in the lower left corner of the
display window. Once you lock the weight, the truck can continue into the
site while you modify information about the transaction before storing the
ticket.
59
Weigh
Locking a Stable Weight
8.1.4
Print Weight Button
Click Print Weight to print a weight without creating a transaction. Only
the date, time and weight of the truck print on the ticket.
8.1.5
Options Button
Click Options… to change the weighing options setup. The Weighing
Options screen allows you to change the List Order, Scale Properties, Badge
Reader Properties, weight Adjustment readings (expressed as a percentage
of actual scale weight), Default transaction Direction, and Ticket format
file.
Weighing Options screen
List Order
List Order determines how TransAct displays tables containing
drop-down lists, such as (Customer) Account, (Open) Ticket, and
Categories. Make your selection by clicking in the circle by the
selection: By Code—the lists displays in number code order; By
Description—the lists displays in description order.
Example: When List Order is By Code, select customer account
286-EM Groundhog Racing, Inc., by typing only the customer
account code, 286.
Weigh
60
When List Order is By Description, select customer account
286-EM Groundhog Racing, Inc., by typing only the customer
description, EM Groundhog Racing, Inc.
Scale Properties
Use Scale Properties to set up tolerances and zero return for
interfaced scale indicators. Choosing Zero Return prevents TransAct
from creating or completing transactions until the scale indicator
returns to zero. If you attempt a transaction before the indicator
returns to zero, the following warning appears: Next transaction
cannot begin until scale returns to zero.
Tolerance is the amount the indicator can fluctuate when there is no
load on the scale. When you specify a tolerance weight, TransAct
recognizes a Zero Return, + or – the tolerance weight. Enter a
positive weight for this field. The tolerance is used exclusively with
the Zero Return property.
Adjustments
TransAct provides two Adjustments fields. When the operator
enters a description in either box, adjustment option boxes appear
in the Transaction Detail form. If you do not enter a description, the
Adjustments option boxes do not appear.
Adjustment 1—Percent of Load Label
Use the percent load label when
splitting a load between two or
more items. Enter meaningful text
in this box and click the Multiple
Ticket Items box to turn the feature
on. Using the Percent of Load
feature only requires the truck to
weigh in and out one time. The Weight In, weight Out, and Net
weight remain the same; however, TransAct calculates changes
using the percent entered. The status bar at the bottom of the Weigh
form will display the adjusted charge calculation.
Example: A recycling center allows a hauler to bring recyclable
materials for commercial and residential customers in the same
load. However, the recycling center needs to track how much of the
load is commercial and how much is residential. The hauler
informs the recycling center attendant that 60% of the load is
commercial and 40% of the load is residential. During the transaction,
the attendant enters 60% in the % Load field. When the attendant
61
Weigh
selects Print Ticket, a decision window appears. Click Add a
Percent of Load Item to add the next item at 40%.
Reports display the adjusted weight. In most cases, the adjusted
weight equals the Net weight. TransAct stores the adjusted percent
with the completed transaction ticket. You can view the adjusted
percent using the Quick Scan feature (see Section 10.1).
Adjustment 2—Percent Decrease Label
Use this adjustment when
changes affect a single load.
Enter meaningful text in this
box to turn the feature on. The
Weight In, weight Out, and
Net weight remain the same;
however, TransAct calculates charges using the percent entered.
The status bar at the bottom of the Weigh form displays the adjusted
charge calculation.
Example: Grain elevators will take moisture into account when
weighing a trailer. TransAct weighs the trailer and stores the
weight. The driver then unloads the grain, and the grain is tested for
a moisture percentage. For the weigh-out procedure, the attendant
enters the moisture percentage in the %decrease box. The Weight
In, weight Out, and Net weight will not change; however, TransAct
uses the adjustment % to calculate the charge.
The adjusted weight prints on reports, and on the ticket, if desired.
TransAct stores the adjusted percent with the completed transaction
ticket. The operator can view the ticket using the Quick Scan
feature under the Reporting… menu.
Charge Rounding Properties
Rounding applies to the base charge
only. TransAct adds Sales Tax,
Minimum Charges, and Fixed
Charges to the base charge. For
example, if you set Rounding to the
next higher $10, and Sales Tax is
5.5%, then TransAct rounds a $98 charge to $100. TransAct then
calculates tax on the $100 rounded charge for a total charge of
$105.50.
By default, rounding is to the nearest penny. Use this section to
modify the rounding parameters. You can choose to round charges
Weigh
62
up to the next higher increment, down to the next lower increment,
or to the nearest increment of the Rounding Amount.
Default Material Direction
Click inside the circle to select the direction of material flow for
your application. Is material entering your site like it would at a
landfill, or is material leaving your site like a gravel quarry? Note:
The Default Material Direction only applies when a transaction
uses tare weights.
Multiple Ticket Items
When you turn on Multiple Ticket Items, you enable TransAct to
place items of different category types and different units of
measure on the same ticket. Using a landfill application as an
example, a single ticket could contain separate items for 2500
pounds of garbage, 1000 pounds of demolition material, and 5
appliances. TransAct calculates a charge for each item and stores
the charges separately in the database. You can choose to group
these charges together and total them when printing a ticket.
Click inside the check box (mark with an X) to turn on Multiple
Ticket Items.
Badge Reader Properties
You can use badge reader equipment (i.e. magnetic strip, bar code,
RFID) to create an automated or semi-automated system. TransAct
stores the badge number in the customer database and uses this
badge number to identify a truck. The badge reader sends information
to Transact to start the transaction. TransAct matches the badge
number to the customer, then displays the customer’s information
in the Transaction Detail form.
Badge Reader Preferences allow you to set up parameters for these
badge readers. The Preamble is a string of characters preceding the
decoded data used by wedge decoders to differentiate between a
keyboard input and a badge input. . When available, use the Auto
Store Ticket option to automatically save the transaction once the
scale weight stabilizes. If you select the Auto Print Ticket option,
the ticket prints, and the transaction completes automatically.
Ticket Format File
The Ticket Format File contains information from the database that
is printed on the customer’s ticket. During installation, TransAct
installs a default ticket file for the appropriate application you
selected, Solid Waste or General.
63
Weigh
To select a different ticket format file for the current transaction,
use the single down arrow to the right of the Ticket Format File box.
Once the transaction is complete, TransAct restores the default
ticket file specified in Preferences.
You can manually create a custom Ticket Format File with any text
editor (such as Windows Notepad or Dos Editor). See Section 12.4
for more information on editing a ticket file.
Returning to the Weigh Form
Click the Done button to save the settings selected in
Options before returning to the Weigh form.
8.1.6
Update Tares Button
Update Tares… allows you to update stored tare weights while the truck
is on the scale. TransAct only allows you to update tares at the beginning
of the transaction so that it can overwrite a previously-stored tare (that for
whatever reason is now incorrect) with the actual weight from the scale.
To add or update a tare, wait for the motion indicator to clear. Click Update
Tares… to access the Update Tares Table (below).
Note: Once you are in the final Transaction Detail screen, you cannot update
a tare.
The table uses the descriptions you assigned to each tare field. For example,
Truck = Tare1, Container = Tare2, and Pup Trailer = Tare3. If you do not
use a tare field, the button is disabled.
Weigh
64
Select a customer account by typing the account Code or Description in the
Select Account field, or click the single down arrow next to the Select
Account field to choose from the list. The customer account and existing
tare fields appear in the tare table.
From this table, you can add or update tare weights by clicking Add or
Update to the right of each tare field type. A grayed out tare field (for
example, Pup Trailer in the preceding window) indicates that no tares exist
for that field.
To add a new truck tare, leave the tare field blank and click Add or Update
Truck. When you select Truck (Tare1), an empty Truck Table appears.
Likewise, an empty table appears when you select Container (Tare2) or Pup
Trailer (Tare3). To demonstrate adding a new tare, we will use the Truck
Table (below).
Adding a New Truck Tare
TransAct automatically places the weight from the scale into the Tare
Weight box. You can modify that value by keying in changes to the tare
value; however, doing so triggers TransAct to print a Keyed Tare note on
the final weigh ticket. Enter a Truck Number and any other information
needed for this entry.
Click Save to store the new tare.
Click Done to return to the Select Transaction table. Note: The system warns
you if you try to continue without clicking Save.
65
Weigh
To edit an existing tare, use the single down arrow next to the tare fields to
select a tare from the tare list.
Selecting an Existing Tare to Update
Click the Add or Update (Truck, Container, or Pup Trailer) button. The
selected tare table appears, a Truck Table in the example below.
Add or Update Tares
The selected truck information appears in the Truck Table. TransAct
replaces the stored Tare Weight with the weight from the scale. To restore
the stored value to the Truck Table, click the Undo button.
Make any other changes to the table, then click Save.
Weigh
66
Click Done to return to the Select Transaction table.
8.2
Weigh In / Weigh Out Transactions
When a transaction does not use any stored tare weights, TransAct considers
it a Weigh In/Weigh Out transaction. The driver must weigh the truck
coming into the site and exiting the site. TransAct records the net weight,
calculates the charges, and stores the ticket.
8.2.1
Weigh In
Click the Weigh… icon from the main menu toolbar to start a transaction.
The Select Transaction table appears where you can select an Account, Job,
Permit, or Truck ID to begin the transaction.
Use the Tab key to move from field to field or click inside a field to edit.
Click on the single down arrow next to Account to produce a drop down box
list of all customer accounts.
Depending on the List Order selected from the Options window, you can
enter the account by typing a Code or Description. Use the Esc key to clear
any information typed incorrectly. Press Enter when correct.
Note: If more than one company uses a Truck ID number, a window
appears asking to which account you want to assign the truck.
Choose the customer account to start the transaction.
67
Weigh
After selecting an Account, Job, Permit, or Truck ID, press Enter. The main
weigh form, Transaction Details, appears (below).
The Ticket Number, date and time, and Customer Account are locked fields
established from the previous screen.
If you selected the wrong Customer Account, click Cancel.
Select the appropriate Bill-To Account if different from the Customer
Account. Use the single down arrow next to the Bill-To Account field to
display a list of available account names.
If an account has stored tare groups, TransAct enables the available fields
in the Transaction Detail table. For this Weigh In/Weigh Out transaction,
TransAct assumes you will not select one of these stored tares.
If you decide to select a stored tare, click the single down arrow next to the
tare field to display a list of available tares. If you select a stored tare, you
no longer have a Weigh In/Weigh Out transaction. Turn to the next sections
in this chapter dealing with stored tares to continue the transaction.
If you select a Truck, Container, or Pup Trailer tare but the display shows
a 0 stored weight, TransAct still treats the transaction as Weigh In/Weigh
Out.
Click the Units button to change the unit of measure you want to print on
the ticket. You can only adjust the units of measure when you are creating
the transaction. The Weight In, Weight Out, and Net Weight fields reflect
the same unit of measure as the scale.
The status bar at the bottom of the window displays how TransAct
Weigh
68
calculates the charge, the direction of the transaction (Incoming/Outgoing)
and if the charge is a payable or receivable.
When you create a transaction, TransAct displays the account’s default
categories. Click the single down arrows to list items in a category. Use
these lists to select or change a category item, or use the keyboard to type
the Code or Description in the field. TransAct only stores changes to the
default items with the current transaction. Once the transaction is complete,
TransAct resets the account defaults.
Click Cancel to return to the Select Transaction table.
Click Notes… to add a message that prints on the customer ticket. TransAct
stores the note until the transaction is completed and the ticket prints. Use
Preferences in the Admin… mode to define Note Headings.
Click Store Ticket to store the ticket information from the Weigh In
transaction. Storing the open transaction also makes the scale available for
another transaction. Once TransAct stores the ticket, the program returns to
the Select Transaction table, where you can create a new weigh transaction.
8.2.2
Weigh Out
Starting from the Select Transaction table, select an open ticket. Highlight
the Ticket field and type the ticket number or account name, or click the
single down arrow next to the Ticket field to produce a drop down box
listing all open transaction tickets.
69
Weigh
Click the open Ticket number to complete the Weigh Out.
Note: Depending on the List Order you selected in the Weighing
Options window, you can enter the ticket by typing a Code or
Description.
The Transaction Detail table appears, containing the information recorded
at the beginning of the transaction.
Transaction Detail Window
If you selected an incorrect ticket, click Cancel.
The total scale weight appears in the weight Out box. The net weight is
calculated and displayed in the Net weight box.
Use the single down arrow to the right of the Bill-To Account field, to
change the billing account if different from the Customer Account.
Use the single down arrow to the right of the Category fields to select a
different category.
Use the function buttons on the right of the window to add Notes, receive
a Cash payment, and Print the ticket.
Click Notes… to add a message to the customer
ticket.
Click Cash… to record a cash payment received
at the time of transaction completion. After
clicking the Cash button, the Transaction Detail
table displays fields for entering the cash Amount
and Check #.
Weigh
70
Click Print Ticket to print the customer ticket and store the transaction in
the database. The following decision window appears.
Print Ticket Decision Window
Print Ticket Decision Window with
Multiple Items Per Ticket
(see Section 8.4)
Click Close Ticket and Print to print the ticket and store the transaction
information in the TransAct database.
Click Close Ticket (Don’t Print) to store the transaction information
without printing the ticket.
Click Cancel to return to the Transaction Detail table.
8.3
Transactions with Tare Weights
Tare transactions use one of three tare fields: Tare1, Tare2, and Tare3. You
can configure the names of these buttons for the specific application using
the TransAct initialization file (see
Section 12.2). We will refer to Tare1
as Truck, Tare2 as Container, and Tare3
as Pup Trailer.
When you select a tare, a transaction
Direction box becomes available. Click
to select the material direction at the
site: Incoming or Outgoing.
Default Tare Names
71
Weigh
For example, landfill operations are mostly incoming; aggregate sand and
gravel operations are mostly outgoing.
Select No Tare to record tare IDs but ignore tare weights. When you select
No Tare, TransAct treats the transaction as a Weigh In/Weigh Out transaction.
TransAct uses Tare IDs to identify the transaction.
8.3.1
Stored Tares Used as the Weight Out
TransAct uses a tare weight as a Weight Out when the default Refuse
Direction is set to Incoming in the Weighing Options table.
Example: A landfill operation has incoming refuse; therefore, TransAct
uses stored tares to calculate the net weight of loads.
Use the single down arrows to the right of the tare fields to display and select
(click on) available tares. The total weight of all tares selected appears in the
weight Out box. TransAct automatically subtracts the tare weight from the
Weight In and the adjusted weight appears in the Net weight box.
The Ticket Number, date and time, and Customer Account are locked fields
once the transaction begins.
If you selected an incorrect customer account, click Cancel to reset the
transaction. Select the appropriate Bill-To Account if different from the
Customer Account.
When you select a customer account, TransAct enables any tare fields the
account uses and disables any unused tare fields.
Weigh
72
Example: The customer in the preceding figure (D&D Disposal Co., Inc.)
uses two tare fields, Truck and Container. The account does not use the third
tare field.
When you select a customer account, TransAct displays the default categories
for the customer. You can change a category item by clicking the single
down arrow next to each category. Select the new category item from the
list. TransAct only stores changes with the current transaction. When you
select an account for a new transaction, TransAct resets to the default
categories.
The status bar at the bottom of the window displays how TransAct
calculates the charge, the direction of the transaction (Incoming/Outgoing)
and whether the charge is a payable or receivable.
Use the function buttons on the right of the screen
to add Notes, receive a Cash payment, change the
measurement Unit, and Print the Ticket.
Click the Cash button to record payments received
at the time of the transaction. After selecting the
Cash button, options for entering the cash Amount
and Check # appear.
Click
to print the customer ticket and store the transaction in the
database. A decision window appears for the next item.
Print Ticket Decision Window
Print Ticket Decision Window with
Multiple Items Per Ticket
(see Section 8.4)
73
Weigh
Click Close Ticket and Print to print the ticket and store the transaction
information in the TransAct database.
Click Close Ticket (Don’t Print) to store the transaction information
without printing the ticket.
Click Cancel to return to the Transaction Detail table.
Example: Certain trucks used by D&D Disposal Co., Inc. will
always have a container with them. You can set up the trucks
bringing containers to the site to require a container in the tare
table. To setup Tare 1 items to require Tare 2 or Tare 3 items, see
Section 7.1.4.
Click OK to return to the Transaction Detail table. You can then select the
item required, Tare2 or Tare3, and click the Print Ticket button to complete
the transaction.
8.3.2
Tares Used as the Weight In
Transact uses a stored tare as a Weight In when the default Material
Direction is set to Outgoing in the Options table.
Example: An aggregate operation with outgoing rock or gravel
uses stored tares as Weight In to calculate net weight.
Use the single down arrows to the right of the tare fields to display and select
available tares. Click on the tare to use. The total weight of all tares selected
(truck, container, and pup trailer) is displayed in the Weight In box. The tare
weight is automatically subtracted from the weight Out and the adjusted
weight appears in the Net weight box.
Weigh
74
Tare Weight Applied to Outgoing Material Leaving a Site
Select the appropriate Bill-To Account if different from the Customer
Account.
When you select a customer account, TransAct displays the default categories
for the customer. Change a category item by clicking the single down
arrows next to each category. Select the new category item from the list.
Category item changes for an account are only stored with the current
transaction. When you select the account for a new transaction, TransAct
lists the default categories again.
Use the function buttons on the right to add Notes,
receive a Cash payment, change the Unit of measure,
and Print the Ticket.
Click Print Ticket to print the customer’s ticket and store the transaction
in the database. The Next Item decision window appears.
Click Close Ticket and Print to print the ticket and store the transaction
information in the TransAct database.
Click Close Ticket (Don’t Print) to store the transaction information
without printing the ticket.
Click Cancel to return to the Transaction Detail table.
75
Weigh
8.4
Multiple Items Per Ticket
Click Options… to enable Multiple Ticket Items. When enabled, this
feature allows you to place items of different category types and different
units of measure on the same ticket. TransAct stores each item separately
in the database. You can choose to group these items together and total them
when printing a ticket.
Example—Multiple Ticket Items
This example shows how to create a multiple item ticket for a truck carrying
two appliances and four tires that need to be entered as separate Count
transactions. The truck also carries several bags of garbage that require the
attendant to create a separate Weigh transaction.
It is easiest to create transactions for the appliances and tires first. To start
the transaction, click the Weigh… icon from the menu bar. The Select
Transaction window appears in the Weigh form. Select an Account, Job,
Permit, or Truck ID to start the transaction.
Note: Depending on the List Order you selected in the Options window, you
can enter the account by typing a code or description. Use the Esc (Escape)
key to clear any information typed incorrectly.
For this example, we select an Account.
After selecting an account, the Transaction Detail form appears. The first
transaction will dispose of the appliances.
Weigh
76
Click Units until Unit Count appears. Select
Major Household Appliances from the
Refuse list. Enter 2 in the Quantity In box.
Click Print Ticket. A dialog box appears
with a list of options (shown at right).
Click Add a Count Item to store the current
transaction and return to the Transaction
Detail form. Note: When you select any Add
button, TransAct stores the current
transaction, and the Transaction Detail form
reappears.
77
Weigh
The status bar at the bottom of the window
indicates which item information is being
entered, the total charge for all items, and the
charge for the current item.
Select Tires from the Refuse list and enter the
number 4 in the Quantity In box. Click Print
Ticket. A dialog box appears with a list of
options (shown at right).
Click Add a Weighment Item to store the
tire transaction. TransAct is then ready to
start the weighing portion of the ticket. The
driver moves the truck onto the scale (minus
the appliances and tires) to weigh the garbage.
Select the type of Refuse, then click Store Ticket to store the open
transaction. The ticket remains open until the truck driver empties the truck
load and returns to the scale. When the driver returns, select the open ticket
from the list of open tickets in the Select Transaction form.
Weigh
78
The open ticket appears in the Transaction Details form.
Click Print Ticket to store the transaction. A dialog box appears with a list
of options.
Click Close Ticket and Print to complete
the transaction and print the three item ticket.
Use the Quick Scan feature of the
Reporting… section to view, edit, and reprint
ticket information (see Section 10.1). Click
Scan to view a list of tickets (below). All the
items will appear to have the same ticket
number.
79
Weigh
Click Show Detail to view details of the transaction. The item sequence
number appears in the details form next to the transaction number.
Click Unlock to edit the ticket fields. Click inside the fields to edit. Click
Save to save changes.
8.4.1
Reopen an Old Ticket
The Ticket section of the Select Transaction form has an option to Reopen
a multiple item ticket.
Reopen a ticket when you need to add items to the transaction. If the last
item you entered was a weight, TransAct may use the item as the Weigh In
for the new transactions.
Weigh
80
Example: Ticket #3851 contained two transaction items; before the
third item was weighed, the ticket closed. To reopen the ticket
select Reopen a multiple item ticket.
A message box appears. Enter the ticket
number you want to reopen, then click
OK.
The following message may appear: Do
you want to use the last weigh out (2400)
as the starting weight?
Note: This message only appears if the
last transaction item was a weighed item.
Click Yes to use the previous weight as
the Weight In value.
Click No to accept the weight on the scale as the Weight In value.
The Transaction Detail form appears with the weight and category items
from the last transaction displayed.
Select the correct category items (i.e. Refuse). Once the weight on the scale
stabilizes, click Print Ticket. A dialog box appears with a list of print
options.
Click Close Ticket and Print to complete the transaction, or click on of the
Add Item buttons to add another item to the ticket.
81
Weigh
8.4.2
Dual Scale Operation
See Section 7.7.3 for information on Dual Scale operation.
8.5
Axle Weighing
! Warning
Axle weighing is not NTEP certified!
You can activate axle weighing by adding the following line to the [Weigh
Options] section of the transact.ini file.
AxleWeighing=On
To learn more about editing the .ini file, see Section 12.2.
When you activate axle weighing, a button
for recording axle weights becomes available
in the Transaction Details form.
Each time you click the Axle button,
TransAct adds an axle weight to the Weight
In or Weight Out box. You can click Axle up
to five times to add five axle weights together.
The Weigh window title bar displays each axle weight. To delete axle
weights, hold down the Shift key and click Axle.
Weigh
82
9.0
Accounting
Use this section to set up rate tables, create and print customer statements,
and record customer payments.
9.1
Defining Rates and Taxes
TransAct uses rates to calculate charges after completing a transaction.
These charges are based on measured rates, minimum charges, discounts,
and taxes. Units of measure available for calculating charges are weight
(pounds or kilograms), yard, and count.
Rates are based on one of the four category tables, i.e. Refuse. You can set
up three different Rates and Tax tables for the category. This feature was
specifically added for the state of Minnesota. Minnesota requires their
landfills to account for local and state fees separately.
Example: The following steps show how TransAct calculates
charges. The unit of measure used for this example is Net
Weight.
1. Net Weight ×Rate 1 + Calculated Taxes = Amount1
2. Net Weight ×Rate 2 + Calculated Taxes = Amount2
3. Net Weight ×Rate 3 + Calculated Taxes = Amount3
4. Amount1 + Amount2 + Amount3 = Total Amount
5. Total Amount vs. Minimum Charge = Base Charge
Note: If the Total Amount is less than the Minimum Charge,
replace the Total Amount with the Minimum Charge. (If the
Minimum Charge is not used, nothing is replaced.)
6. Base Charge – Discounts = Charge
You can attach rates to any one of the TransAct category tables. To change
the category table rates, see Section 12.2.
Use the following steps to setup rate structures. If you have any questions,
please your distributor or see Section 14.0.
9.2
The Setup and Miscellaneous Rates Table
Use the Setup and Miscellaneous Rates table to enter a Fixed Charge,
Monthly Finance Charge and Rate and Tax definitions (assign Rates and
Tax names appropriate to your organization).
83
Weigh
Select Admin… Setup and Misc Rates to access the Setup and
Miscellaneous Rates table (below).
Note: The table above shows a how Setup and Miscellaneous Rates appears
with a new database.
Fixed Charge
If applicable, enter a Fixed Charge. This charge automatically
appears in the Weigh form, in the Added Charge box (see below).
Monthly Finance Charge
Enter the Monthly Finance Charge as a percentage value. This
charge is applied to all accounts during Statement processing (Plus
Only).
Note: If you have accounts that are charged a monthly finance
charge and others that are not, do not enter a Monthly Finance
Charge in this table. Individual monthly finance charges can be
added to each account in the Discounts table covered later in this
section.
Rate Name Assignment
Replace Rate 1–3 Names with names associated with your particular
Accounting
84
application. The examples in this manual use Local Rate and State
Rate as the Rate 1 and Rate 2 names. Only fields containing text
appear on subsequent forms (i.e. if you use only two rates, delete
Rate 3 from the Rate 3 Name box to eliminate that field from
subsequent forms).
Note: If you are no longer using an existing rate table, simply
remove the Rate Name from the table. You do not have to clear the
table before continuing. Removing the name from the table prevents
TransAct from using the table. See the example window on the next
page.
Tax Setup
Replace the Tax 1–3 Names with the tax names associated with
your particular application. The examples in this manual use
County and State as the Tax Names. Only fields containing text
appear in subsequent forms (i.e. if you use only two taxes, delete
Tax 3 from the Tax 3 Name box to eliminate that field from
subsequent forms). See the sample window below.
Enter taxes as a percentage value. TransAct converts percentages
into a decimal value for calculation.
Click Save to store all the changes to the table. Note: The system warns you
if you try to continue without clicking Save.
Click Undo to cancel any changes.
85
Accounting
9.3
Minimum Charges
TransAct applies the Minimum Charge to a transaction when the calculated
measured rate is less than the value in the Minimum Charges table.
Note: If you do not use a minimum charge, do not enter anything in this table.
Open the table to verify that all category items are set to 0.0. Set items to 0.0
if necessary.
Default Minimum Charges
Select Accounting Minimum Charges to access the Minimum
Charges table (below).
Default Minimum Charges Table
Use this table to setup default Minimum Charges by unit of measure
(Pound, Yard, and Count) and direction of transaction (Incoming or
Outgoing).
When the Minimum Charge for a category item is 0.00000, TransAct
applies the default minimum charges to the charge calculation.
Press the Tab key to move through the dialog boxes, or use the
mouse to click inside the box, then enter the value.
Minimum Charges for a Category Item
If individual category items receive a different minimum charge,
click Update Individual [Category] Codes. The Refuse Table
Minimum Charges table appears.
Accounting
86
The middle section of the table is identical to the Default Minimum
Charges table; however, note the Code and Description fields at the
top of the page.
Click Next to navigate through each item, or use Find to select an
item. Minimum Charges defined for individual category items
greater than zero override the default charge.
Click Save to store all the changes to the table. Note: The system
warns you if you try to continue without clicking Save.
Click the Undo button to cancel any changes.
9.4
Measured Rates
TransAct calculates the Measured Rate per unit of measure. Units of
measure available in the Measured Rates table are weight (pounds and
kilograms), yards, and count. Note: You can define a maximum of three Rate
tables.
Total Charge = Rate 1 + Rate 2 + Rate 3
Example: Total Charge = (Net Weight × Rate 1) + (Net Weight
× Rate 2) $30.50 = (1800 × .019) + (1800 × .0035)
9.4.1
Rate Table 1
Choose Measured Rates from the Accounting… pull-down menu to define
measured rates for the first rate table. Click on the desired Measured Rate
to edit, in this case, Local Rate.
87
Accounting
The Local Rate table appears. Use this table to define system default rates
and individual category item rates.
If you want the rates calculated by the ton, figure the rate per pound by
dividing the rate per ton by 2,000.
Example: A land fill uses a default charge of $25.00 per ton. To figure the
rate per pound, divide 25 by 2,000 (25 ÷ 2000 = .0125).
Select which taxes to apply to this rate in the Taxes Applied box. To apply
a tax, click the box next to the desired tax. An X appears to designate the
taxes selected. Click the box again to undo the apply tax.
Click Save to store all the changes to the table. Note: The system warns you
if you try to continue without clicking Save.
Click Undo to cancel any changes.
9.4.2
Measured Rates for a Category Item
If individual category items receive a different Measured Rate, click the
Update Individual [Category] Codes button. The Rate table changes to
display the Code and Description of each category item.
Accounting
88
Setting Measured Rates for a Category Item
Enter the appropriate rate for each item that has a rate different from the
default rate. Place an X (click inside) in the Taxable box to apply the taxes.
Note: Taxes applied are the same as those selected in the default rate
window. In this example, County and State taxes will be applied to
Outgoing Demolition material. Note: Measured Rates defined for individual
category items greater than zero override the default rate.
Click Save to store all the changes to the table. Note: The system warns you
if you try to continue without clicking Save.
Click Undo to cancel any changes.
9.4.3
Rate Table 2 and 3
If you use multiple rates, set up Rate 2 and Rate 3. Use the same procedures
as listed for Rate 1 (see Section 9.4.1) to set Rates 2 and 3.
9.5
Discounts and Account Flags (Plus Only)
Use Discounts and Account Flags to setup discounts and finance charges for
individual customer accounts. TransAct applies finance charges when
generating statements. Use Discounts and Account Flags for marking
accounts as revoked, not billed , cash only, and tax exempt.
Select Accounting… Discounts to access the Customer Account Table.
89
Accounting
Discounts Table (TransAct Plus version)
Items displayed as light gray (i.e. Previous Balance and Current Balance
above) cannot be edited. Click the box next to the desired option to activate
that option (an X appears to mark the selected option). Click the box again
(remove X) to turn the option off.
TransAct interprets the Discount Rate and Finance Charge options as
percentages. You must enter these options in decimal format. For example,
enter a 10% discount as 0.10.
TransAct applies a Finance Charge to any unpaid previous balance when
generating statements. This finance charge overrides the global monthly
finance charge defined in Miscellaneous Rates.
Note: The function buttons at the bottom of the discounts table window
operate like the function buttons in other TransAct tables.
Click General Info… to display general customer information such as
account number, address, and default categories.
Accounting
90
Discount Rates: Customer General Information
Note: You cannot edit the Customer General Info. window from Discounts.
If you need to edit this information, access them from Customer Accounts
under the Admin… pull-down menu.
9.5.1
Discounts (TransAct 2.0 Standard)
The Discount feature for the standard version of TransAct has fewer options
than TransAct Plus. The only fields available are Discount Rate, Finance
Charge, and Last Transaction.
Accounting features such as Previous and Current Balance, Not Invoiced,
and Cash Only are not available. There is also no General Info… button
since there is no accounting information to display.
9.6
Statements (Plus Only)
Use Statements to create monthly billing statements.
To generate statements, select Accounting… Statements to access the
Statement Options window.
91
Accounting
Statement Options Window
TransAct uses the date entered in the Statement To Date box as the cutoff
date for Transactions (charges, payments, and credits) appearing on the
statement. Besides these transactions from the current billing period, a
statement also shows the previous balance from the prior billing period.
Example: Many companies issue monthly statements based on the
last day of the month. When you select Statements from the
Accounting… menu, the current system date appears in the
Statement To Date box. Assume today is March 5th, but only
transactions dated through February 28 should appear on the
Statements. Change the date to 2/28/YY.
Use the keyboard or mouse to enter the Statement to Date. When using the
keyboard, enter the month, day, and year separated by slashes (/).
When using the mouse, click the
Calendar button to the right of the date
box. Click the arrows on either side of
the month to select a new month; click
the arrows on either side of the year to
select a different year. Select the day by
clicking on the numbers displayed in the
calendar. Click OK to store the new date
and return to the Statements window, or
click Cancel to exit the calendar without
saving.
Accounting
92
You can choose to grant a Grace Period to Payments to allow companies to
pay for a previous month’s bill. The Grace Period applies only to payments.
Payments made within the grace period are applied to the current statement.
Use the up/down arrows to increase or decrease the number of days granted
for the grace period.
Note: Enter the grace period in calendar days, not business days. If the grace
period includes weekends, be certain to include those calendar days in the
grace period.
Click on the Apply Finance Charge box to apply a monthly finance charge
to an unpaid previous balance.
TransAct applies any payment made during the billing period to the
previous balance, then applies the finance change to the remaining previous
balance that was not covered by payments.
Example: D&D Disposal Co. has a previous balance of $1,000.00.
During the current billing period they made a payment for $800.00.
If you set up a 1.5% Monthly Finance Charge, TransAct calculates
the finance charge to add as follows:
1.
$1,000 – $800 = $200
2.
$200 × 0.015 = $3
TransAct calculates the current balance by adding the unpaid
previous balance, finance charge, and new charges. We will use
$300 of new charges during the billing period to finish the example.
3.
$200 + $3 + 300 = $503.
Set up monthly finance charges in the Discounts and the Miscellaneous
Rates tables. The Discounts table applies special rates (including finance
charges) to individual customer accounts. The Miscellaneous Rates table
applies rates to all customer accounts in the system. These tables are
explained in detail later in this chapter.
By default, TransAct does not print a statement for accounts with a zero
balance. If you need to print statements for accounts with zero balances,
click to place an X in the Print Zero Balance Statements box.
93
Accounting
To view the statements before printing,
select Window as the Invoice
Destination.
To send the statements directly to the
printer, without viewing the
statements first, select Printer as the Invoice Destination.
Click View or Print (only one will be visible, depending on the Invoice
Destination choice you made).
After completing billing, TransAct marks transaction, payments, and
credits as having been billed. Note: Once TransAct marks these items, you
cannot unmark them.
Because billing makes changes to the database, TransAct advises you to
make a backup of the database before continuing: Invoicing can potentially
make many updates to your database. We strongly suggest you perform a
backup at this time. Would you like to make a backup?
Click No to skip the backup operation.
Click Yes to make the recommended backup.
When TransAct completes the backup, or if you choose to skip the backup,
the Select Accounts for Statements table appears.
Accounting
94
The Select Accounts for Statements table allows you to select which
accounts to bill. You have three options for choosing which accounts to
include:
•
Select an individual customer account by clicking the account.
•
Select a range of accounts. Hold the Shift key on the keyboard
while selecting continuous customer accounts in a row.
•
Select accounts. Hold the Ctrl key on the keyboard, while selecting
discontinuous customer accounts.
•
Click Select All to select every account in the database.
If there are accounts that TransAct should bill, you should mark them as Not
Billed in the Accounting Info section of the Customer Accounting table.
Note: TransAct will not process accounts marked as Not Billed.
Once you have selected the accounts, click Done.
When previewing statements, use the navigation buttons at the top of the
screen to view the statements.
View Statements Window Buttons
View the first statement
Stop generating statements
View the previous statement
Magnify/shrink statement size
View the next statement
Print the statement
View the last statement
Complete statement processing by moving to another portion of the
program, such as the Weigh form. After clicking on any button in the
toolbar, the following message appears: At this point you must decide if you
would like to mark the transactions that appeared on this invoice, update
previous balance and generate finance charges. Typically, if all invoices
have printed successfully, you would answer yes.
Would you like to mark transactions, update previous balances and generate
finance charges?
95
Accounting
If the statements print correctly, click Yes. When you select Yes, TransAct
marks all transactions for the current billing period as having been billed.
These transactions will not reappear on subsequent statements. TransAct
updates the previous balance to include payments, charges, credits and
finance charges.
If the statements did not print correctly, or you need more time to review
printed statements, click No. This cancels the update process, preventing
you from making changes to customer accounts.
When you have resolved any problems, rerun the statements. Choose to
either view or print the statements. Select another portion of the program to
continue. Select Yes to update transactions. Note: If you already printed
statements and do not need to reprint any, choose to only View the
statements. Enter another section of the program (i.e. Weigh, Reporting,
etc.) to continue, and click Yes when TransAct prompts you to update
transactions.
9.7
Payments (Plus Only)
Use the Payments section of Accounting… to record customer payments
and credits.
9.7.1
Recording a Payment
Select Accounting Payments to access the Payment/Credit Form (below).
Click inside the circle to select Payment. Note: A black dot inside the circle
denotes the selected item.
Accounting
96
Use the single down arrow
next to the Account box to select the
customer account to apply the payment to, or type the customer name inside
the Account box.
After you select the Customer Account, TransAct displays the account’s
default categories. If you received payments as itemized payments, use
Save Item to enter multiple items per payment. It is not necessary to use the
category fields unless you want to generate payment reports sorted on
categories.
Single-Item Payment
When you select the Customer Account, TransAct displays the
customer’s default category items. If desired, use the single down
arrow next to the category field to change the category item for
which payment is being made. Tab to or click inside the Check
Number box to enter a Check Number (if applicable).
Click Save to save the receipt.
Multi-Line Item Payment
The Payment/Credit Form allows for multiple items on one receipt.
To apply portions of a payment toward different items, use the
single down arrow next to the category field. Select the item being
paid for, click inside the Amount Paid box, then enter the amount.
Click inside the Check Number box and enter the Check Number
(if applicable).
Click Save Item to save the item. TransAct displays a status bar at the
bottom of the form to help track the number of items entered and the total
amount entered for the receipt.
After clicking Save Item, TransAct adjusts the Account Balance box and
clears the Amount Paid box. The check number stays present in the Check
Number box. The status bar increases the item count and total value.
Select the next category item and Amount Paid. The Check Number will
still be present; you do not need to reenter the Check Number. Click Save
Item. Continue entering each item, clicking Save Item after each item.
When you have entered all items, click Save to save the receipt. The
Balances/Reconciliation report will list each receipt by number and list all
items recorded for the receipt. Example: A landfill wants to track payments
by refuse types. A check arrives in the mail from one of their customers for
$100.00. $75.00 is payment for residential rubbish and $25.00 is for yard
waste. This payment transaction uses the multi-item payment option
97
Accounting
described above. Item 1 would be $75.00 with refuse type Residential
Rubbish. Item 2 would be $25.00 with refuse type Yard Waste. The
statement will show a single payment of $100.
The status bar at the bottom of the window displays the current receipt
number, item number, and the total value of the receipt.
9.7.2
Applying a Credit
TransAct applies credits the same way it applies payments.
To begin entering credits, select Payments from the Accounting… pulldown menu. When the Payment / Credit Form appears, select Credit rather
than Payment. This action changes several of the entry boxes.
You can enter credits as single-item receipts or multi-item receipts, just
like payments.
Rather than an Amount Paid box, the Credit form has a Credit Amount box.
A space is provided on the Credit form for recording a Memo of up to ten
characters. Other than these differences, the Credit form is the same as the
Payment form. See Section 9.7 for information on handling payments.
Reporting
98
10.0 Reporting
Use the Reporting… section to view, edit, reprint, or delete stored transaction
tickets, and create daily, weekly, and monthly reports based on selected
criteria.
10.1 Quick Scan
The Quick Scan command provides a quick way to view, edit and delete
transaction ticket information. Quick Scan allows you to query transactions
based on categories and customer accounts for a specified date range.
To run a query, click Reporting… from the menu bar and select Quick Scan
to access the Selection Criteria window (below).
Selection Criteria Table
If you know the ticket number, enter the number in the Select Ticket
Number box. Click Scan to view the transaction.
To find a transaction or group of transactions, select a date range for the
search and any other applicable criteria. To select a date, use the Tab key
to select (highlight) the box and enter the date using the keyboard (you do
not need to type the slashes), click the Calendar button to the right of the
date boxes. Click the arrows on either side of the month and year to select
a different month or year. Click on the day of the month the query should
start or finish. Click OK to close the calendar window and display the
selected date. Note: Click Cancel to return to the Transaction Scan window
99
Reporting
without setting a new date.
To select other search criteria, use the single down arrow next to the search
fields to view drop-down boxes and select specific customer accounts,
categories, or transaction types.
Note: TransAct defines transaction type as items being brought into a site or
items being taken out of a site. TransAct automatically categorizes
transactions according to the truck’s weight in/weight out difference when
the transactions is complete.
Reset
The Reset button resets the Selection Criteria window back to its
default values.
Scan
Click Scan when you have selected all field information. TransAct
scans all transactions in the database and creates a Transaction List
table containing all transactions that meet the defined criteria.
10.1.1 Editing Scanned Transactions
Click on a transaction from the list then click Show Detail to view details
from any transaction.
The Transaction Detail table then appears. From this table you can view all
the information created during the transaction.
You can also edit and print these recorded transactions by unlocking the
information in the table using the Unlock button.
Reporting
100
The following function keys are available:
Click to unlock the transaction for editing.
Click to print a transaction.
Click to lock the transaction and not allow editing.
Click to delete a transaction.
Click to cancel any unsaved change to the transaction.
Click to return to the transaction list table.
Click to store changes and return to the Transaction list table.
Note: The system warns you if you try to continue without
clicking Save.
To view and edit charge information, click Charge Details. The Charge
Details window appears.
101
Reporting
Note: Fields unavailable for editing are shown in gray.
Click Ticket Details to return to the Transaction Details window.
Totals
Use Totals to view the total weight, volume and unit count, for the
entire transaction list.
Click Totals to view the Transaction List table.
The following function buttons appear at the bottom of the Transaction List
table.
Click to show detailed information about the selected
transaction, including weight, volume and unit counts. Note:
This button is not available in the Totals window.
Reporting
102
The button changes to the Scan button to allow toggling between the Totals
and Transaction List windows.
Click to scan transactions that meet the selected criteria and
create the transaction list table. The button changes to the
Totals button to allow toggling between the Transaction List
and Totals windows.
Click to delete a selected transaction.
Click to print the Transaction or Totals list.
Click to return to the Selection Criteria table.
10.2 Reports
The Reports command provides users with several ways to compile their
database information into a report. TransAct allows the user to select
criteria to include in a report.
Report Types include:
• Tonnage and Charges
• Truck Listings
• Tare Listings
• Category Listings
• Payments/Credits (Plus Only)
• Permit Listings (Plus Only)
• Account Listings
• Aging (Plus Only)
• Charges (Plus Only)
• Balances/Reconciliation (Plus Only)
The type of report selected activates, deactivates or expands available
report criteria fields. Report criteria fields include:
• Transaction Type
• Sort Order
• Account Number
• Destination
• Detail Level
• Copies
• From Date
• To Date
Note: A report field is inactive if it is grayed-out.
To generate a report, Select Reporting… Select Reports to access the
Report Options window.
103
Reporting
Use the Report Options table to select the type of report to generate, how
the report is organized, the detail level and date range of the report. The
Report Options table contains the following fields.
Report Type
See the list on the previous page.
Major Sort Order
Items available for sorting include
Ticket Number, Account, Permit,
Truck, all Tare types (up to 3), and all
defined Category types (up to 4). Use
the single down arrow to view a list of
available sort orders. Depending on
the item you select, other criteria may become available.
For example, choosing a category will make the From/To box
available, as well as any related subcategories. When the From and
To box is empty, all items are included on the report. To enter a
range of items, move the cursor to the Enter Item box (Enter Refuse
in the example above). Enter the first item number. Move the cursor
to the To box and enter the last item number.
If you have defined subcategories for a category, they will also be
available when you select the category. Click the single down
arrow to choose a different subcategory item.
Minor Sort Order
Minor Sort Order options are
available for report types Tonnage
and Charges and Payment/Credits.
Reporting
104
The Minor Sort Order functions the same as Major Sort Order
previous page. Again, other fields will become available depending
on the item selected.
General Report Options
General report options include Detail
Level (Detailed or Summary),
Transaction Type (All, Incoming, or
Outgoing), and Date range.
Print Options
Allows you to View a report before
printing or select Printer to send the
report directly to the printer. When
you select Printer as the Destination,
you must select the number of Copies
to print.
Once you select the report criteria, click the View button to see the
report on-screen, or click Print to send the report to the printer.
The View report contains a row a function buttons that control how you
view the report on-screen. The buttons function as follows:
View the first page of the report
View the previous page of the report
View the next page of the report
View the last page of the report
Stop allows the user to stop generation of the report
Zoom—magnify or shrink view of the report
Print the report
To return to the Report Options window, select Reports from the Reporting
pull-down menu. The Report Options window displays the previously
selected criteria. After you quit TransAct, the Report Options window
returns to the default criteria.
Note: The Aging report groups unpaid transactions in the following age
brackets:
0 to 30 days
31 to 60 days
61 to 90 days
105
Over 90 days
Reporting
It is possible that the sum of unpaid transactions in the above four age
brackets will not equal the current account balance. This can be due to the
initial balance entered when the account was set up or by archiving unpaid
transactions. The amount of the initial balance is placed in a fifth age bracket
called Initial Balance.
10.2.1 Custom Reports
Please see Section 12.4 for more information about creating custom reports.
11.0 Attended vs. Unattended
The Unattended option of TransAct is sold separately. When you purchase
and install the option, the Attended icon appears in the menu bar.
Once you install the equipment and test the system, you can place TransAct
in Unattended mode.
Click the Weigh… icon from the menu bar. The Attended icon becomes
active to designate that the system is running in Attended mode.
To switch to Unattended mode, click the Attended icon in the menu bar.
The icon changes to the Unattended icon, and all features of TransAct are
disabled until the operator clicks the Unattended icon. TransAct is then
placed back in Attend mode.
Reporting
106
12.0 Appendix
12.1 Uninstall/Reinstall
12.1.1 Uninstall and Delete the Database
During installation, TransAct adds an Uninstall icon to your desktop.
Windows 3.11
Windows 95
If you want to clear the entire program from your system, double click the
Uninstall icon in the TransAct program group to delete all TransAct files
from the hard drive and remove changes made to your system files.
If you wish to delete the existing database (for example, to clear out the
fictitious customer accounts from the sample database), it is crucial that you
use Uninstall first before reinstalling the software.
Uninstall removes any changes you have made to the current database. For
example, if you selected the industry type Solid Waste in your current
program but now want to use General for an industry type, you must
uninstall TransAct prior to reinstalling the software for the new General
category tables to become active.
12.1.2 Uninstall and Preserve the Database
If you wish to preserve your existing customer database for use after you
have reinstalled the TransAct software, you must make a backup copy
before using Uninstall. To save database changes before uninstalling
TransAct, create a database backup using TransAct’s Backup Utility. Copy
the backup to a different location on your hard drive or to a floppy disk to
protect it from the Uninstall program. During the uninstall routine, the
Backup Utility screen allows you to do this.
107
Reporting
Appendix
Click Yes to preserve the information in your current database.
TransAct then displays the Backup Database window, prompting you to
designate a backup name and location.
transact
Choose a secure location outside of the c:\transact directory (preferably on
a removable floppy disk) and click Backup.
When the backup is finished, the Uninstall program continues to completion.
Depending on your computer’s configuration, you may have to restart after
completing the Uninstall.
12.1.3 Reinstall with Restored Database
To reinstall TransAct using your original (or archival) disks, follow the
procedures in Section 2.0. When TransAct prompts: Would you like some
sample data in your database? select
.
Once you have reinstalled TransAct, restore your database backup using
TransAct’s Restore utility. See Section 7.5.2 for directions on backup and
restoring databases.
Appendix
108
12.1.4 Reinstall with an Empty Database
If you have used the Uninstall program to remove fictitious customer
accounts from the sample database, you can now reinstall TransAct with an
empty customer account base so you can enter your own customer data.
Begin a new installation by following the directions in Section 2.0. When
asked if you would like some sample data in your database, select No.
12.2 Editing the TransAct Initialization File
During installation, setup creates the transact.ini file, located in the
c:\windows directory.
Hard Drive Location of transact.ini file
The transact.ini file contains system defaults, ticket-format preference file,
category setup, and other information used to run TransAct.
You can configure many of the items in the transact.ini file from within
TransAct while the program is running. For example, you can configure the
[Tickets Notes] section from within TransAct by selecting Admin…
| Preferences | Note Headings. Configuring these sections within TransAct
is best because you can use the graphic display.
To edit other sections, use the Notepad ® application provided by
Windows in the Accessories group. Double-click on the Notepad icon to
open Notepad.
109
Appendix
Windows Notepad in Accessories Window
You should quit TransAct before opening and editing the .ini file. When you
are done editing the .ini file, rerun TransAct to initiate the changes.
When Notepad opens, pull down File | Open. Select drive c. Double-click
on the windows folder, and select All Files under the List Files of Type box.
Scroll down to transact.ini and double-click to open the file.
Opening the transact.ini file in Notepad
Note: Each section of the .ini file is headed by a title surrounded by
[brackets]. Do not change any of the title words in [brackets].
Edit items in each section only in the area after the equals sign (=). Do not
use spaces when entering programming data. You may use spaces when
separating category names or subcategory names such as In Landfill or Peat
Moss, etc.
Appendix
110
12.2.1 [TransAct] Directory
The [TransAct] section contains the path to the directory where TransAct
is installed. If there is a problem running TransAct because a file cannot be
found, check the path.
When all of the defaults are selected during installation this line will look
as follows:
Appdir=C:\TRANSACT\
If the path has changed, back space over c:\transact\ and enter the new path
name. A valid path name would appear as:
Appdir=X:\TRANS\
12.2.2 [Options] Database Directory
The [Options] section contains the path and file name to the directory
where the database resides. If there is a problem running TransAct because
the system cannot find a file, check the path. When all of the defaults are
selected during installation this line will look as follows:
SystemDB=C:\TRANSACT\TRANSACT.MDA
If the path or directory name has changed, delete the existing directory name
and enter the new path or directory name.
12.2.3 [Ticket Notes]
The [Ticket Notes] section defines the four headings for the Notes
feature of the Weigh form. You can configure these headings while running
the TransAct program by selecting Admin… | Preferences | Note Headings.
If you leave any of the label definitions blank, that line will not appear
111
Appendix
when you click the Notes… button in the Weigh form.
12.2.4 [Weigh Options]
Use the [Weigh Options] section to change the default Unit of Measure
(UOM). UOM defines the unit of measure to which TransAct converts the
scale value. This value appears as the Ticket Weight on the Weigh form.
Possible values are: Pounds, Yards, Unit Count, Kilograms,
Tons, or Metric Tons. For example, if you would like to print tons on
your tickets, you need to change the UOM in the .ini file to read Tons.
If you need to activate Axle Weighing, add the following command line to
this section.
AxleWeighing=On
You can change all of the other information in the [Weigh Options]
section by clicking the Options… button in the Weigh form while running
the TransAct program. TransAct recommends using the Weighing Options
window for all other changes.
12.2.5 [Tares]
Use the [Tares] section to activate up to three tare options. Some or all of
the tares were activated when you install TransAct. Active tares appear in
TransAct under Admin… | Customer Accounting.
To activate a tare button, position the cursor after the equal sign and type the
name for the button. Remember: Type the name in exactly as you would like
to see it displayed in TransAct.
Existing Name:
Tare3=
New Name:
Tare3=Pup Trailer
To deactivate a tare, position the cursor after the existing name and press the
Backspace key on the keyboard until nothing is displayed after the = sign.
Existing Name:
Tare2=Container
New Name:
Tare2=
Appendix
112
To change the name of a tare button, delete the existing name and enter your
desired name.
Existing Name:
Tare1=Truck
New Name:
Tare1=Vehicle
Note: For those of you familiar working with .ini files, Tare4=Tare will not
work. TransAct only recognizes three tare options.
12.2.6 [Rates]
Use the [Rates] section to change the category to which Measured Rates
and Minimum Charges are attached.
Enter the category number corresponding to the category after the equal
sign.
[Rates]
Measured Rates= 4
Minimum Charges= 4
12.2.7 [Category 1-4]
The .ini file contains a similar section for each of the four category tables.
TransAct automatically configures two main categories during installation.
You may want to rename a category so it more closely relates to your
business. Or you may also want to activate one or more of the empty
categories.
Sample empty category:
[Category 2]Title=SubCat1=
SubCat1Title=
SubCat2=
SubCat2Title=
113
Appendix
The category name is displayed in the Title section. To activate main
category 2, enter the new category name you would like directly after
Title=. Each main category can have up to two subcategories, defined by
SubCat1Title and SubCat2Title. To define the subcategories, enter
the subcategory names directly after SubCat1Title= and SubCat2Title=.
Save the change in Notepad, then exit Notepad and restart TransAct. The
new category then appears on customer accounts and on Weigh forms.
Example 1: Changing Category Names
Let’s use a solid waste operation for an example. When you installed
TransAct, you set up Hauler and Refuse as your two categories; however,
instead of Refuse you prefer to use the word Product.
Open Notepad. Select File | Open. Find transact.ini in the Windows
subdirectory and open the file as described above. Scroll through the text
until you find the following lines.
[Category 4]
Title=Refuse
SubCat1=
SubCat1Title=
SubCat2=
SubCat2Title=
Position the cursor at the end of the word Refuse and press the Backspace
key to delete the word Refuse. Enter the word Product exactly as you
would like it to appear in TransAct. Note: This entry is case-sensitive—if
you do not capitalize the letter P, it will not be capitalized in the program.
You should see the following:
[Category 2]
Title=Product
SubCat1=
SubCat1Title=
SubCat2=
SubCat2Title=
Save the file and exit Notepad. Open TransAct to verify the change has
taken effect. The previously-named Refuse category should now be named
Product.
Example 2: Adding Categories
Let’s assume that in addition to the two categories TransAct automatically
Appendix
114
installed, you need an additional category called Area. You can configure
up to two additional categories, but we’ll only use one for this example. It
doesn’t matter which empty category you choose to edit.
We’ll use Category 2 for our example. Run the Notepad program found in
the Windows Accessories group. Select File | Open. Find transact.ini in the
Windows subdirectory and open the file. Scroll through the text until you
find the following lines.
[Category 2]
Title=
SubCat1=
SubCat1Title=
SubCat2=
SubCat2Title=
Position the cursor after Title= and type the word Area, just as you would
like it displayed in TransAct.
Save the file and exit Notepad. If you did not quit TransAct before making
changes to the .ini file, do so now. The changes made to the .ini file will take
effect when you reopen TransAct. When you return to TransAct and select
Admin… | Categories, your new category heading appears in the menu.
Select your new Area category to begin adding items.
Example 3: Adding Multiple Sub-Categories
You can add two subcategories to each main category. We’ll add two
subcategories to the Refuse category in the following example.
Different types of Refuse may go into specific locations within a landfill
operation, and you may wish to track refuse going to those different
locations. One of the subcategories then under Refuse could be Location.
When you use subcategories in this manner, it will help to create more
detailed reports.
To setup a subcategory, run Notepad found in the Windows Accessories
group. Select File | Open. Find transact.ini in the Windows subdirectory and
open the file. Scroll through the text until you find the following lines:
[Category 2]
Title=Refuse
SubCat1=
SubCat1Title=
SubCat2=
SubCat2Title=
Position the cursor after SubCat1Title= and enter the word Location as
115
Appendix
you would like it to appear in the program. Do not leave any spaces.
[Category 2]
Title=Refuse
SubCat1=
SubCat1Title=Location
SubCat2=
SubCat2Title=
Position the cursor after SubCat1= and enter the specific subcategory items
(each location) enclosed in parentheses. It is important not to leave spaces
(except as previously noted) or you will receive an error when running
TransAct. Within the parentheses, each location must have a sequential
number starting with 0, unlike the main category where TransAct
automatically defines a “none” category item. In subcategories, you must
define None as a subcategory item if desired. All subcategory items must
fit on one line. The screen will scroll to the right as you type. If it wraps to
the next line, you’ve gone too far.
[Category 2]
Title=Refuse
SubCat1=(0,In Landfill)(1,Out Landfill)(2,None)
SubCat1Title=Location
SubCat2=
SubCat2Title=
Save the file and Exit Notepad. If you did not quit TransAct before making
changes to the .ini file, do so now. The changes made to the .ini file will take
effect when you reopen TransAct. When you return to TransAct and select
Admin… | Categories | Refuse your new Location subcategory heading
appears as a drop-down list so you can select the location where your refuse
goes.
12.2.8 [Indicator Types]
TransAct has provided several scale indicator types with the program. The
[Indicator Types] section is a listing of the indicator name and a series
of codes that define the indicators serial data stream to TransAct. Do not
change the data in these fields! If your indicator is not listed, please call your
dealer or the TransAct customer support line for assistance setting up your
indicator.
12.2.9 [Scale Settings]
We do not recommend using the [Scale Settings] section to change your scale port
settings. You can change and test all of the items while running the TransAct
program. Select Admin… | Preferences | Scale Port and select the scale
Appendix
116
Indicator Type, Connector, Baud Rate, Flow, Parity, and Stop Bits. Click
the Test button at the bottom of the window to view the data the computer
is receiving from the scale indicator.
12.2.10
[Printer Settings]
We do not recommend using the [Printer Settings] section to change your printer port
setup. You can change and test all of the items while running the TransAct
program. Select Admin… | Preferences | Printer Port and select the Printer
Type, Connector, Baud Rate, Flow, Parity, and Stop Bits. Click the Test
button at the bottom of the window, to send up to four lines of text to the
printer.
12.2.11
[Data Terminal Settings]
We do not recommend using the [Data Terminal Settings] section to change your data
terminal port setup. You can change and test all of the items while running the
TransAct program. Select Admin… | Preferences | Data Terminal Port and
select the Type, Connector, Baud Rate, Flow, Parity, and Stop Bits. Click
the Test button at the bottom of the window, to send up to four lines of text
to the printer.
12.2.12
[Reports]
You can add custom reports using Crystal Reports for Visual Basic™
Version 2.0 to the list of reports in the Report Options form. Add the
following heading and report information at the end of the transact.ini file.
[Reports]
Report1=Name of Report,nameorpt.rpt
Where Name of Report is the name of the report you want displayed in
the Report Type drop-down list, and nameorpt.rpt is the name of the
Crystal Report file.
When you select Name of Report from the report drop-down list, TransAct
generates the nameorpt.rpt report. Place the file in the TransAct installation
directory (usually c:\transact). You can add subsequent reports by inserting
additional lines in the initialization file.
Report2=
Report3=
etc.
TransAct disables Major and Minor sort controls when you select custom
reports. You must handle all transaction selection (other than the General
Selections for Type and Date Range) and sorting within the custom report.
117
Appendix
12.3 Modifying Standard Reports
You can modify standard reports to preserve the use of all sorting options.
Standard reports are located in the TransAct installation directory (usually
c:\transact). All report files are of the following GF*.RPT name type. Below
is a list of all the standard reports.
GFACCT.RPT
GFAGING.RPT
GFBALNCE.RPT
GFCAT.RPT
GFCHGDET.RPT
GFCHGSUM.RPT
GFCHGTKT.RPT
GFCMMDET.RPT
GFCMMSUM.RPT
GFINVOI.RPT
GFPAYDET.RPT
GFPAYTKT.RPT
GFPERMIT.RPT
GFPMMDET.RPT
GFPMMSUM.RPT
GFTARES.RPT
GFMMDET.RPT
GFMMSUM.RPT
GFTONDEL.RPT
GFTONSUM.RPT
GFTONTKT.RPT
To change one of the standard reports, use Crystal Reports for Visual Basic
Version 2.0. When saving the modified report, select Save As from the File
pull-down menu and replace the G in the file name with the letter C
(examples: CFACCT.RPT, CFAGING.RPT, etc.). Always preserve the
original file report.
Save the modified file in the TransAct installation subdirectory. When
selecting a report type, TransAct uses the report type beginning with the
letter C first. If TransAct does not find a custom report, it uses the report
beginning with the letter G.
By changing the first letter of the file name, future software upgrades will
not erase the changed reports. TransAct automatically uses the modified
standard report in place of the distributed standard report.
12.4 Creating Custom-Format Print Tickets
TransAct’s default ticket format (default.gtk) is stored in a separate file on
your hard drive. TransAct uses this file as a template when generating
transaction tickets in the program. For these instructions, it is assumed that
you have not moved the original default.gtk ticket format file and the file
is still in the same directory (c:/transact/default.gtk) where TransAct
installed it.
Appendix
118
A sample default ticket format is
shown at right.
If you would like your printed
tickets to appear differently, you
can create and save formatted files
for other ticket styles. You can
create these files outside the
TransAct program, using any text
editor (such as Notepad or Dos
Editor). We recommend using
Notepad, which comes with
Windows and is found in the
Accessories window of your
Program Manager. You can create
different ticket formats in Notepad,
saving the ticket format files in the
same folder as the original
default.gtk and using the .gtk suffix .
Stillson County Landfill
Ticket:
3777
T & J Services
Vehicle: 4
Container:
101
Time In:
04/18/97
Time Out:
04/18/97
In: 7740 lb
Out: 7300 lb
Net: 440 lb = 440.0 lbs
Non-Hazardous Asbestos
@ $0.02 per lb
Total Charge: $8.80
Amount Paid:
$0.00
11:14:22 AM
11:18:05 AM
[Special Ticket Info]
[Notes Info]
Default.gtk Sample Ticket
After creating the files, you can select any .gtk file as the new default ticket
type for any account, using the Ticket Type dialog box in any Customer
Account table. That account will then default to the ticket style you have
selected. However, if you only want to occasionally print a different ticket
type for an account, you can also specify a new .gtk file during a weigh
transaction. Then only that transaction will print a ticket with the new style
you have selected. When that account comes up for another transaction, it
will return to the default.gtk file you select in the Customer Account table.
In order to use printer commands, you must connect the printer to a parallel
port (LPT1 or LPT2). Set the printer device type within TransAct to Direct
to Printer Port. Select Admin… | Preferences | Ticket Printer Port from
119
Appendix
the TransAct menu bar to set up the printer.
When creating a ticket, these following field types are available:
•
•
•
•
•
Static Text
Database
Flag Fields
Printer Commands
Column Positioning
To accommodate multiple item transactions, TransAct splits the ticket into
three sections:
Header Lines—Printed once before the first transaction item; designated by
an H in the first character position of the format line.
Body Lines—Printed once per transaction item; designated by a B in the
first character position of the format line.
Footer Lines—Printed once after the last transaction item; designated by an
F in the first character position of the format line.
Below is an example of a custom ticket format file.
\27 24 18\\
H"Account No. "[Account] COL46"Transaction Information
H[Account Name]
COL46"Ticket Number "[Ticket Number]
H[Account Address]
COL46"Date In
"[Date In]
H[Account Address2]
COL46"Date Out
"[Date Out]
H[Account City]","[Account State]" "[Account Zip Code]
H
H"Truck No.:" COL12[Truck Number]
H
H"Detailed Transaction Information"
H"Refuse Code:"COL15"Rate""Gross Weight:"COL40"Tare Weight:"COL55"Net Weight:"
B[Refuse Code]COL15[Rate]COL25[Weight In]COL40[Weight Out]COL55[Net Weight]
F
F
F
F"Total Items"COL12[Ticket Items]COL23"Total Weight:"[Grand Total Weight]
F"Total Charge"[Grand Total Charge]
F
F{Edited"Ticket Edited"} COL48[Notes]
F{Reprint"Reprinted Ticket"}
F{Keyed Weight"Keyed Weight"}
12.4.1 Printer Command Field
Every printer has its own set of commands. These commands can be helpful
when printing to a preprinted form. The TransAct program understands the
decimal version of the command enclosed in double backslashes. The first
line of the sample ticket format above is a printer command:
\\27 24 18\\. This command initializes the printer and sets the character
Appendix
120
pitch for an Okidata ML320. See your printer’s user’s guide for a list of valid
printer commands.
12.4.2 Column Positioning
Insert the COLnn command when you want to line up certain database fields
on the ticket. To position database fields, use the COLnn command (nn=a
sequential number). The COLnn command must be followed by a space.
When you use multiple COLnn commands in one line, they must be in
sequential order.
Legal: COL20 [Account] COL50 [AccountName]
Illegal: COL50 [Account] COL20 [AccountName]
12.4.3 Static Text Fields
Static text fields are contained in double quotes ("). Character enclosed
in double quotes appear on the ticket, including spaces. Example:
"My Grain Elevator" = My Grain Elevator
"Gross" = Gross
"Tare" =Tare
"Net" = Net
12.2.4 Database Fields
Database fields are fields stored in the TransAct database. A database field
is placed on a ticket by enclosing the field name in brackets ([ ]).
Below is an example of how you can use static text and database fields
together on a ticket. The example will print the ticket number, weight in,
date in, weight out, date out, and net weight on the ticket.
"Ticket Number: " [Ticket Number]
"Gross: " [Weight In]" " [Date In]
"Tare: " [Weight Out]" "[Date Out]
"Net: "[Net Weight]
The tables on the following pages list the database field names you can use
in the ticket format file.
121
Appendix
Field Name
Description
Ticket Number
Account
Account Number
Account Name
Account Address
Account Address2
Account City
Account
Zip
Hauler
Hauler Number
Hauler Name
Permit
Permit Number
Permit Address
Permit Street Address
Permit City
Permit State
Permit Zip
Tare1 Number
Tare2 Number
Tare3 Number
Tare1, Tare2, and Tare3 must be
replaced with the user-assigned
names for the tare tables
Category1 Code
Category1 Description
Category1, Category2, Category3
and Category4 Codes and
Descriptions must be replaced with
the user-defined names assigned
to the category tables.
Category2 Code
Category2 Description
Category3 Code
Category3 Description
Category4 Code
Category4 Description
Appendix
122
Field Name
Description
Job
Job code
Job Table
Job description
Date In
Date for the weigh-in side of the
transaction
Time In
Time for the weigh-in side of the
transaction
DateTime In
Date and time for the weigh-in side
of the transaction
Date Out
Date for the weigh-out side of
transaction
Time Out
Time for the weigh-out side of the
transaction
DateTime Out
Date and time for the weigh-out
side of the transaction
Date Edited
Date the transaction was edited
Time Edited
Time the transaction was edited
DateTime Edited
Date and Time the transaction was
edited
Weight In
Weight in, in units displayed on the
scale
Weight Out
Weight out, in units displayed on
the scale
Gross
The greater of the weigh-in and
weigh-out values
Tare
The lesser of the weigh-in and
weigh-out values
Net Weight
Net weight, in units displayed on
the scale
Adj Weight
New weight less any adjustments
(see Adjustment1 and
Adjustment2)
123
Appendix
Field Name
Description
Ticket Weight
Adjusted weight, converted to
some other unit (see Units)
Adjustment1
A percentage used to modify
(decrease) net weight
Adjustment2
Another percentage used to modify
(decrease) net weight
Unit
Ticket unit (lb, kg, yard, unit count,
ton, metric ton)
Units
Same as Unit except plural
Added Charge
Additional charge
Payment
Amount paid
Check Number
Check number
Rate1
Rate2
Rate3
Rate
Total. Stored in database as a
charge per scale unit but adjusted
on the ticket to Unit setting
Sales Tax1
Sales Tax2
Sales Tax3
Sales Tax
Total
Base Charge1
Net Weight x Rate1
Base Charge2
Net Weight x Rate2
Base Charge3
Net Weight x Rate3
Base Charge
Total base charge
Charge
Total Charge
Appendix
124
Field Name
Description
Discount
A percentage used to modify total
charge
Notes 1
Ticket notes
Notes 2
Notes 3
Notes 4
Multiple Items Fields
Can only be used in footer
Ticket Item
Number of items on the ticket
Grand Total Charge
Total of all ticket item charges
Grand Total Payment
Total of all ticket item payments
Grand Total Weight
Total net weight for all weighed
items
Grand Total Units
Total units for all unit count items
Grand Total Yards
Total yards of all yard items
125
Appendix
12.4.5 Flag Fields
TransAct sets a flag in the database whenever a transaction meets a special
condition. The table below lists these special conditions.
Condition
Description
Minimum Charge
A minimum charge was applied to this transaction
Keyed Weigh In
The weight on a weigh-in was manually entered
Keyed Weigh Out
The weight on a weigh-out was manually entered
Keyed Gross
The Gross was manually enetered
Keyed Tare
The Tare was manually entered
Recalled Weigh In
Weigh-in weight was recalled
Recalled Weight Out
Weigh-out was recalled (stored tare)
Recalled Gross
The Gross weight was recalled
Recalled Tare
The Tare weight was recalled
Edited
The transaction was edited
Reprint
The ticket for this transaction is being reprinted from the Quick Scan form
Incoming
Icoming transaction (weigh-in > weigh-out)
Outgoing
Outgoing transaction (weigh-out > weigh-in)
A user-defined static text field can be associated with each of these
conditions. A flag field is enclosed in braces ({ }). The example below
assigns the static text, "Keyed" to the Keyed Weigh In flag. This text will
print on the ticket whenever the Keyed Weigh In flag is set for a
transaction.
Example: {Keyed Weigh In “Keyed”}
Appendix
126
12.5 Networking TransAct
You can place the TransAct database and reports on a shared network for
multiple user access. Install TransAct on each PC and assign a unique site
number to each PC in the TransAct initialization file.
To set up TransAct for use on a shared network, we assume you have some
knowledge about your computer network. The installation process may
vary slightly depending on your network operating system (i.e. Novell,
Banyan, etc.). If you are unfamiliar with your network setup, work with
your network coordinator to complete the following installation procedure.
*1. Create a transact subdirectory on the file server.
*2. Make sure every user accessing the TransAct database from the
server is given rights to the new subdirectory.
3. Install TransAct on one computer. Run TransAct on that computer
and set up an empty database.
*4. Quit TransAct, and copy the following files from the local hard
drive of the computer to the network drive.
• lmsdata.mdb
• template.mdb
• *.rpt (all .rpt files)
*5. Use a Windows editor, such as Notepad, to edit the
c:\windows\transact.ini file. Add the following lines to the end of
the [TransAct] section:
[TransAct]
DBDir=network path to TransAct subdirectory
(On a Novell server, the path could be f:\transact)
SITE=a unique alphanumeric character for each computer
accessing the database on the network
6. Run TransAct on the first computer and verify that you have
network access.
Hint: Select Admin Utilities Backup. The default drive should
point to the transact subdirectory on the network.
7. Install TransAct on the other computers. Run TransAct and create
an empty database when prompted.
*8. Edit the c:\windows\transact.ini file on each computer.
With the exception of the SITE designation, make sure the
transact.ini file on each computer is the same.
127
Appendix
Hint: Once you have configured the transact.ini file to meet your
needs (categories, tare names, etc.), copy the file to the transact
subdirectory on the network. Copy the file from the network to the
c:\windows subdirectory on each computer using TransAct. Edit
the c:\windows\transact.ini file and change the SITE = character.
Note: The SITE designation should be unique for each computer.
*9. Restart TransAct to let the new changes in the transact.ini file take
effect. Note: You can also set the Site designation within Transact.
Select Admin Preferences Company Data to open the Company
Data window (see below). Enter the Site designation in the Site
field.
Company Data
Stillson County Landfill
Old County J
Stillson
WI
54729
715-726-0691
D
12.5.1 Moving TransAct
Use steps 1, 2, 4, 5, 8, and 9 (marked with *) from Section 12.5 to move the
TransAct database and reports from a stand-alone computer to the network.
12.5.2 Administrator Functions
With several computers sharing the same database, certain TransAct
functions only work with one computer at a time accessing the database.
The following functions can only be performed by one computer at a time.
Set all other computers to the About TransAct screen or exit TransAct
completely:
•
•
•
•
•
Backup
Restore
Import
Export
Archive
We recommend storing a copy of the database on the local hard drive of each
computer, in the unlikely event that the network goes down. Replace the
Appendix
128
local copy of the database whenever you change the database, i.e. customer
information, rates, job table, etc. Use the TransAct backup utilities to
“copy” the database to the local hard drive. Select Admin Utilities
Backup to access the backup function. Select drive C and the TransAct
subdirectory. Enter a meaningful file name (up to 8 characters), then click
the Backup button. This ensures that you will access the most current
changes if the network is down.
12.5.3 Error Messages
The following is a list of sharing violations that you may encounter when
sharing the database on a network.
Error 3197—The following error occurred while attempting to
update record.
The error occurs when another user updates the record you are viewing.
Click OK to continue and view the updated record. Enter your changes and
click Save. You may see this error when editing any table such as Customer
Accounts, Permits, Categories, etc.
Example: User A is updating addresses for Customer Accounts and User B
is updating zip codes for Customer Accounts. User A and User B select
Account #3 at the same time. User A updates the address and clicks Save.
User B's screen does not change. User B enters the correct zip code for
Account #3 and clicks the Save button. TransAct prompts: The following
error occurred while attempting to update record. Error 3197: Another user
has updated this record since your read. Your update will be lost.
When User B clicks OK to clear the message, the updated record (with User
A's changes) appears. User B can then continue making changes to the zip
code for Account #3, then click Save.
Error 3167—The following error occurred while attempting to
move to record.
This error occurs when a user deletes a record you are trying to view using
the navigation buttons. Click OK to clear the message. You will continue
to see this message until the table is refreshed. To refresh a table, reselect
the table.
Example: User A and User B open the Customer Account table at the same
time. User A deletes Account #16. User B clicks Next to move through the
table. When User B gets to the point where Account #16 used to be, the
following message appears: The following error occurred while attempting
to move to record.
129
Appendix
Error 3167: Another user has deleted the record to which you are moving.
Click OK to clear the message and continue. To avoid getting this message
again, reselect Admin Customer Accounts.
12.5.4 Transaction Numbers
When you assign a Site number to a computer, TransAct uses that number
as part of the transaction number. Each computer will have its own set of
transaction numbers. It is possible for several computers to have the same
transaction numbers. The site number determines which transaction number
corresponds to each computer.
12.5.5 Network Down Time
Below are some examples to help you develop a backup plan that works for
your particular company.
When the network crashes but downtime will be short
Your backup plan may be as simple as hand writing tickets and entering the
tickets later when the network is back up. This is generally the solution
when the network down time is short (a few minutes to an hour).
When network down time will last more than a few hours and one
computer is recording transactions
If the network is down for several hours or days, you can use TransAct
locally on the computer that is connected to the scale. You can then export
transactions from the computer and import them into the network database
when the network is back online.
Quit TransAct and edit the c:\windows\transact.ini file of the computer
recording transactions (usually the computer connected to the scale) and
type REM (space) in front of the line below from the [TransAct] section.
Note: REM stands for “remark” and prevents TransAct from executing the
line.
[TransAct]
REM DBDir=network path to TransAct subdirectory
Restart TransAct. If you have periodically run backups to the local drive,
restore the most recent backup to obtain the current customer accounts, rate
tables, etc.
To avoid ticket numbers being changed when you later import the transactions
into the network database, select Admin Preferences Tickets and enter
the next ticket number in the Current Ticket box. For example, if the last
Appendix
130
transaction ticket was 200, enter 201 as the current ticket number.
When the network is back online, backup the local database. Use the
TransAct export features found in Admin Utilities Export. Set the
criteria to export all transactions created during the network downtime, then
click the Export button. Select where to store the file, the name of the file,
and the export definition file to use.
transact
Quit TransAct and edit the c:\windows\transact.ini file. Remove the REM
(space) from the front of the following line to restore the network connection.
[TransAct]
DBDir=network path to TransAct subdirectory
Restart TransAct and verify that you are using the network database (check
the current ticket number or run Quick Scan). Use the TransAct Import
functions to import the transaction from the export file you just created.
131
Appendix
transact
Note: When importing transactions, do not select any criteria. Go directly to
Importing.
When you have imported transactions into the network database, TransAct
appends the transactions to the last transaction database. If you entered the
current ticket number correctly, the ticket numbers should match after you
have imported the data.
When network down time will last no longer than a few hours and
more than one computer will be recording transaction.
If the network will be down for several hours or days, you can use TransAct
locally on each computer. You can export transactions from each computer
and import them when the network is back online.
Quit TransAct and edit the c:\windows\transact.ini file on each computer
that is recording transactions. Type REM (space) in front of the following
line from the [TransAct] section. Note: REM stands for “remark” and
prevents the line from executing.
[TransAct]
REM DBDir=network path to TransAct subdirectory
Restart Transact. If you have periodically run backups to the local drive,
restore the most recent backup to obtain the current customer accounts, rate
tables, etc.
To avoid ticket numbers being changed when the transactions are later
imported into the network database, select Admin Preferences Tickets
and enter the next ticket number in the Current Ticket box. For example, if
the last transaction ticket was 200, enter 201 as the current ticket number.
Appendix
132
More than likely, each computer will have a different transaction ticket
number.
When the network is back online, use the following procedure on each
computer that recorded transactions while the network was down. Backup
the local database on each computer. Use the TransAct export features
found in Admin Utilities Export to set the criteria, and export all
transactions you created during the network downtime. Click the Export
button to export the transactions.
transact
Select where to store the file, the name of the file, and the export definition
file to use.
transact
133
Appendix
Quit TransAct and edit the c:\windows\transact.ini file. Remove the REM
(space) from in front of the following line to restore the network connection.
[TransAct]
DBDir=network path to TransAct subdirectory
Restart TransAct and verify that you are using the network database (check
the current ticket number or run Quick Scan). Use the TransAct Import
functions to import the transactions from the export file you just created.
Note: When importing transactions, do not select any criteria. Go directly to
Importing.
When you import transactions into the network database, TransAct appends
the transactions to the last transaction in the database. If you entered the
current ticket number correctly, the ticket numbers should still match after
you have imported the data.
Note: Remember, importing requires exclusive rights to the database. Only
one computer can use the database on the network at one time. Once you
have imported the database from one computer, quit TransAct before
reconnecting the next computer. Once that computer is finished, quit
TransAct and move on to the next computer until you have imported the
database on all the computers. You can then run TransAct again on all
computers.
When network down time is scheduled and only one computer will
record transactions
If your network down time is scheduled, backup the database to the hard
drive of the computer that will record transactions. Quit TransAct and edit
the c:\windows\transact.ini file. Type REM (space) in front of the following
line from the [TransAct] section. Note: REM stands for “remark” and
prevents TransAct from executing the line.
[TransAct]
REM DBDir=network path to TransAct subdirectory
Once you have made the changes to the .ini file and restarted TransAct,
restore the backup and continue where you left off.
When the network is available again, backup the database to the local hard
drive. Quit TransAct and edit the c:\windows\transact.ini file. Delete the
REM (space) from the front of the following line.
[TransAct]
DBDir=network path to TransAct subdirectory
Appendix
134
Restart TransAct. Check to make sure you are using the network database
by checking the ticket number or use Quick Scan. To restore the database
on the local hard drive, run the Restore utility under Admin Utilities.
Select the file you just backed up to the local hard drive (c:).
Once you restore the database, any other computer that accesses the
network database can use TransAct.
When network down time is scheduled and more than one
computer will record transactions
If your network down time is scheduled and will last for several hours or
days, you can use TransAct locally on each computer. When the network is
back online, you can export transactions from all computers and import
them on the shared network database.
Use the TransAct Backup utilities to backup the network database to the
hard drive of each computer. Note: The Backup utility requires exclusive
rights. Make sure all other computers are set to the About TransAct screen
or have quit TransAct.
Quit TransAct and edit the c:\windows\transact.ini file on each computer
recording transaction. Type REM (space) in front of the following line from
the [TransAct] section. Note: REM stands for “remark” and prevents
TransAct from executing the line.
[TransAct]
REM DBDir=network path to TransAct subdirectory
Restart TransAct. Everything should appear the same as it was before the
network was taken off-line. In TransAct, verify the correct ticket number by
selecting Admin Preferences Ticket.
When the network is available again, backup the local database on each
computer. Export all transactions created during network downtime. Use
the TransAct export feature found in Admin Utilities Export. Set the
criteria to export all transactions during the downtime, then click the
Export button.
135
Appendix
transact
Select the drive, file name, and export definition file to use.
transact
Quit TransAct and edit the c:\windows\transact.ini file. Delete the REM
(space) in front of the following line to restore the network connection.
[TransAct]
DBDir=network path to TransAct subdirectory
Restart TransAct and verify you are using the network database. Check the
current ticket number or run Quick Scan. Use the TransAct Import functions
to import the transactions from the export file you just created. Note: When
importing transactions into the network database, do not select any criteria.
Go directly to Importing.
When you have imported the transactions into the network database,
TransAct appends the them to the last transaction in the database. If you
Appendix
136
entered the current ticket number correctly, the ticket numbers should still
match after you have imported the data.
Note: Remember, importing requires exclusive rights to the database. Only
one computer can use the network database at one time. Quit TransAct on
each computer once you have imported the data to the network database.
Once you have completed importing on each computer, all computers can
again start using the network database.
137
Appendix
13.0 TRANSACT License Agreement
This is a legal Agreement between you (either an individual or an entity) and
Rice Lake Weighing Systems. If you do not agree to the terms of this
Agreement, promptly return the disks and the accompanying items (including
written materials and binders or other containers) to the place you obtained
them for a full refund.
Rice Lake Weighing Systems SOFTWARE LICENSE
1. GRANT OF LICENSE. Rice Lake Weighing Systems grants to you the
right to use one copy of the Rice Lake Weighing systems software program
identified above in the following manner. You may use one copy of the
SOFTWARE on any single computer connected to a single terminal (i.e.
single CPU).
2. COPYRIGHT. The SOFTWARE is owned by Rice Lake Weighing
Systems or its suppliers and is protected by United States copyright laws
and international treaty provisions. Therefore, you must treat the
SOFTWARE like any other copyrighted material (e.g. a book or musical
recording) except that you may either (a) make one copy of the SOFTWARE
solely for backup or archival purposes, or (b) transfer the SOFTWARE to
a single hard disk provided you keep the original solely for backup or
archival purposes.
3. OTHER RESTRICTIONS. You may not rent or lease the SOFTWARE,
but you may transfer the SOFTWARE and accompanying written materials
on a permanent basis provided you retain no copies and the recipient agrees
to the terms of this Agreement. You may not reverse engineer, decompile,
or disassemble the SOFTWARE. If the SOFTWARE is an update or has
been updated, any transfer must include the most recent update and all prior
versions. The source code of the SOFTWARE is confidential information
owned by Rice Lake Weighing Systems. You may not disclose it to any
third party, make derivative works based upon it, or use it for any purpose
except the specific uses expressly permitted in the user documentation
which accompanies the SOFTWARE.
LIMITED WARRANTY
Rice Lake Weighing Systems warrants that (a) the SOFTWARE will
perform substantially in accordance with the accompanying written materials
for a period of ninety (90) days from the date of receipt; and (b) any
Appendix
138
hardware accompanying the SOFTWARE will be free from defects in
materials and workmanship under normal use and service for a period of one
(1) year from the date of receipt. Any implied warranties on the SOFTWARE
and hardware are limited to ninety (90) days and one (1) year, respectively.
Some states/countries do not allow limitations on duration of implied
warranty, so the above limitation may not apply to you.
CUSTOMER REMEDIES. Rice Lake Weighing Systems and its suppliers
entire liability and your exclusive remedy shall be, at Rice Lake Weighing
Systems option, either (a) return of the price paid or (b) repair or
replacement of the SOFTWARE or hardware that does not meet Rice Lake
Weighing Systems Limited Warranty and which is returned to Rice Lake
Weighing Systems with a copy of your receipt. This Limited Warranty is
void if failure of the SOFTWARE or hardware has resulted from accident,
abuse, or misapplication. Any replacement SOFTWARE will be warranted
for the remainder of the original warranty period or thirty (30) days,
whichever is longer.
NO OTHER WARRANTIES. Rice Lake Weighing Systems and its
suppliers disclaim all other warranties, either express or implied,
including, but not limited to implied warranties of merchantability and
fitness for a particular purpose, with regard to the SOFTWARE, the
accompanying written materials, and any accompanying hardware.
This limited warranty gives you specific legal rights. You may have
others which vary from state/country to state/country.
NO LIABILITY FOR CONSEQUENTIAL DAMAGES. In no event shall
Rice Lake Weighing Systems or its suppliers be liable for any damages
whatsoever (including without limitation, damages for loss of business
profits, business interruption, loss of business information, or any
other pecuniary loss) arising out of the use of or inability to use this Rice
Lake Weighing Systems product, even if Rice Lake Weighing Systems
has been advised of the possibility of such damages. Because some
states/countries do not allow the exclusion or limitation of liability for
consequential or incidental damages, the above limitation may not
apply to you.
© 1998 Rice Lake Weighing Systems, Inc., Rice Lake, WI USA. All Rights Reserved.
Rice Lake Weighing Systems • 230 West Coleman Street • Rice Lake, Wisconsin 54868
139
Appendix
14.0 Software Programming Support Service
As a new support program for valued customers, Rice Lake Weighing
Systems now offers field software support if you need additional technical
assistance. Our direct Service Hotline provides access to our software
support staff, and includes a charge for extended software support. This
support should be used for specific technical and configuration assistance.
Before calling Rice Lake Weighing Systems, refer to your software
Installation/Operation manual to:
1. Determine if your system meets the stated minimum hardware
requirements.
2. Determine if the product has been correctly installed on your PC.
3. Review troubleshooting tips.
If you still have problems after thoroughly reviewing the documentation,
follow these steps:
1. Locate your customer number and the serial number of the software
product.
2. Call our direct access Service Hotline at 715-234-2003 and request
software assistance. Software programming support is billed at
$115.00 list per hour with a minimum service charge of $20.00 per
call.
Note: Warranty support will be provided at no charge for diskette or
program software defects.
3. A technician will assist you with the configuration particulars and
invoice you for the time utilized. For your records, software support
technicians will be online with our computer database to fully
describe the service provided and time billed.
We look forward to providing you the highest level of support possible. If
you have any questions on this service, please contact our Sales or Service
Department, or your Regional Sales Director. We’re sure you’ll find this
new service useful in helping you get the most from your software.
Appendix
140