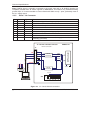
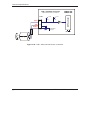
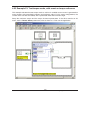
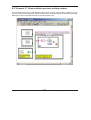
1
SPARC-CS-12/007 08 Giugno 2012 LabVIEW software per driver Technosoft IDS-IDM 240-640 Sandro Fioravanti INFN-LNF Abstract Di seguito verrano spiegate le principali funzioni utilizzate nel sistema di controllo di SPARC per movimentare i motori stepper con i driver della Technosoft IDS-IDM 240 e 640. 1. Introduzione I driver della Technosoft sono dei controllori di movimento molto performanti in grado di comunicare con PC e PLC in RS232. Ogni driver ha una sua memoria programmabile e un indirizzo fisico configurabile per la comunicazione in CANopen la quale, una volta stabilita la comunicazione con il driver principale (detto MASTER) si può accedere alla catena di driver formata dal CANopen. Fig.1 Driver Technosoft IDM —2— 2. Installazione librerie e funzioni LabVIEW Per poter comunicare tramite un PC con un driver della Technosoft è necessario installare il programma "Easy Motion studio" il quale installerà (in un sistema operativo Windows) nella cartella "C:\WINDOWS\system32" la libreria "tmlcomm.dll". Le funzioni necessarie per comunicare e comandare attraverso le funzioni LabVIEW, sono contenute e installate dal programma "TML_Lib Lybrary for Labview", la sua installazione creerà una cartella chiamata "TML_LIB_LabVIEW" dove al suo interno troveremo le funzioni, gli esempi e i vari file di configurazione. Tutti i VI installati sono proprietari della Technosoft, in quanto non è possibile modificarli perché costituiti da una "Call Library Function Node" che non può è essere in alcun modo alterata, perché ogni VI richiama la libreria "tmlcomm.dll". Fig.2 Block Diagram del VI "TS_OpenChannel.vi" —3— 3. Inizializzazione driver e VI di lettura errore. Per inizializzare la porta di comunicazione, come primo VI viene utilizzato "\TML_LIB_LabVIEW\Functions\TS_OpenChannel.vi" Fig.3 Spiegazione VI "TS_OpenChannel.vi" Come spiegato in figura 3, il "Device name" è una stringa dove scrivere il numero della porta seriale, il "Type" definisce il tipo di protocollo seriale (0 = RS232 | 1 = RS485), "HostID" definisce l'ID del driver (MASTER) al quale il PC è collegato direttamente (da 1 a 255) e nella voce "Baud Rate" verrà passato il numero di caratteri al secondo. Dopo l'apertura del canale, è necessario caricare le impostazioni di sistema dal file "\TML_LIB_LabVIEW\Setups\IBL2403 - CAN - ID1.t.zip" passando il percorso del file direttamente nella funzione "TS_LoadSetup.vi" Fig.4 Spiegazione VI "TS_LoadSetup.vi" —4— Dopo aver carico in memoria le informazione contenenti nei file "setup.cfg" e "variables.cfg", si devono associare al driver che vogliamo movimentare, quindi utilizzeremo la funzione "TS_SetupAxis.vi" al quale passeremo il numero ID del driver da controllare. Fig.5 Spiegazione VI "TS_SetupAxis.vi" In figura 6 è rappresentata la funzione "TS_SelectAxis.vi" la quale seleziona il driver che andremmo a controllare. Tramite l'input "Axis ID" (da 1 a 255) viene richiamato il driver "Master" o uno qualsiasi dei driver collegati in catena tramite CANopen. Fig.6 Spiegazione VI "TS_SelectAxis.vi" Per verificare se tutte le funzioni di inizializzazione sono andate a buon fine, utilizziamo la funzione "TS_DriveInitialisation.vi" che esegue il comando ENDINIT e verifica se il driver è stato inizializzato correttamente, restituendo un Output di conferma. Fig.7 Spiegazione VI "TS_DriveInitialisation.vi" —5— Ogni funzione possiede un output di "Return" dove il VI restituisce un valore di tipo numerico o booleano. Per sapere che tipo di errore è stato rilevato, dobbiamo utilizzare la funzione di "TS_GetLastErrorText.vi" che semplicemente restituirà l'ultimo messaggio di errore rilevato sottoforma di una stringa. Fig.8 Spiegazione VI "TS_GetLastError.vi" 4. Funzioni di controllo dello stato del driver Le funzioni che la Technosoft mette a disposizioni, sono più di 90. Di seguito elencherò solo le funzioni utilizzate dal sistema di controllo che necessitano di una più dettagliata spiegazione. La funzione "TS_ReadStatus.vi" permette di leggere i registri interni al driver, in particolar caso noi abbiamo bisogni di leggere lo stato di funzionamento del motore. Grazie ai registri "REG_SRH" "REG_SRL" e "REG_MER" possiamo accedere a delle word di 16bit che rilevano lo status del driver e del motore. Oltre ai registri di errore, è molto importante lo status dei bit presenti nel registro "SRL" i quali rilevano se il motore è ON (bit 15) o se il motore è in stato di attesa o di running (bit 10). Fig.9 Spiegazione VI "TS_ReadStatus.vi" —6— Fig.10 Elenco e significato dei bit presenti nei registri Per rilevare lo stato dei fine corsa, oltre a poterli leggere dallo stato dei registri, usiamo la funzione "TS_GetInput.vi", la quale restituisce lo stato degli input presenti sulla scheda. Elenco input: Port[2] = IN INVERT "2/LSP" Port[5] = IN "5/CAPI" Port[16] = IN INVERT "16/ENABLE" Port[24] = IN INVERT "24/LSN" Port[29] = IN INVERT "29/GPIN1" Port[30] = IN INVERT "30/GPIN2" Port[34] = IN "34/H1" Port[35] = IN "35/H2" Port[36] = IN "36/H3" Port[37] = IN "37/DIR" Port[38] = IN "38/PULSE" Fig.11 Spiegazione VI "TS_GetInput.vi" —7— Le funzioni "TS_GetIntVariable.vi" , "TS_GetLongVariable.vi" e "TS_GetFixedVariable.vi" restituiscono tutte quelle variabili che necessitano di word da 16 o 32 bit. Nel manuale (sezione TML Variables) sono descritte molteplici variabili, quelle da noi più utilizzate sono "TPOS" (Long) che rileva la posizione relativa ai passi eseguiti dal motore, e le due variabili AD2 e AD5 (Int) che restituiscono i valori "reference e feedback" corrispondenti alle tensioni del potenziometro esterno. Fig.12 Tabella dei formati di rappresentazione variabili. 5. Funzioni di comando motore Anche le funzioni di comando e di configurazione del driver sono molteplici. Si può, oltre a comandare il motore, gestire lo stato degli output digitali (con il VI "TS_SetOutput.vi") e settare le variabili per la movimentazione del motore. Le funzioni essenziali per movimentare un motore sono tre. TS_Power.vi Questa funzione abilita il passaggio di corrente verso il motore (1 = ON | 0 = OFF) - TS_MoveRelative.vi Questa funzione permette di muovere il motore passandogli come parametri principali, il valore dei passi da compiere (Position) la velocità (Speed) l'accelerazione (Acceleration) e varie variabili settabili a seconda del caso e delle necessità. - TS_Stop.vi Questa funzione ferma immediatamente il motore Nel caso della funzione di stop, esistono 4 varianti. Queste varianti possono essere attivate con un "TML command" LSACT STOPx, dove la x è uguale a 0,1,2 o 3. STOP0 ferma il motore con il tasso di decelerazione preventivamente programmato STOP1 imposta la velocità a 0 STOP2 imposta la corrente a 0 STOP3 imposta la tensione del motore a 0. Per inviare un qualsiasi comando (TML command) al driver, si utilizza il VI "TS_Execute.vi" che, come mostrato in figura 13, deve essere inviato sotto forma di stringa. —8— Fig.13 Spiegazione VI "TS_Execute.vi" Bibliografia - Manuale delle funzioni LabVIEW Versione 2.0 P091.040.LabVIEW.v20.UM http://www.oemmotor.se/Archive/FilesArchive/245387_1_812.pdf - Manuale tecnico IDM240 IDM640 Version 1.1 IDM240_640-User-Manual http://www.google.it/url?sa=t&rct=j&q=&esrc=s&source=web&cd=1&ved=0CFMQFjAA&u rl=http%3A%2F%2Fftp.ruigongye.com%2Fdownloadfile.aspx%3Fpath%3D%252F200808% 252FIDM240_640-User-Manual.pdf&ei=OwjfT7uMCmk4gTF8aCvCg&usg=AFQjCNErIwdAdl1Uftdls35-qGssk6O9hA IDM240 IDM640 Version 1.1 Intelligent Servo Drive for DC, Brushless DC and AC Motors Intelligent Servo Drives Technical Reference ! Technosoft 2003 TECHNOSOFT IDM240/640 v1.1 Technical Reference P091.048.051.IDM.UM.0803 August 2003 Technosoft S.A. Rue des Courtils 8A CH 2035 Corcelles - NE Switzerland Tel.: +41 (0) 32 732 5500 Fax: +41 (0) 32 732 5504 [email protected] http://www.technosoftmotion.com/ Read This First About This Manual This book is a technical reference manual for the IDM240/640 intelligent servo drive. It describes the IDM240/640 operation and provides basic information needed to program the IDM240/640 in the Technosoft Motion Language (TML) environment. Notational Conventions This document uses the following conventions: The Technosoft Motion Language will be referred to as TML !" TML variables, parameters or instructions are shown in special italic typeface. Here is a sample: !" SETIO#4 IN; UPD; Information about Cautions This book may contain caution statements. CAUTION ! This is an example of a caution statement. A caution statement describes a situation that could potentially cause harm to you or to the IDM240/640 intelligent servo drive unit Related Documentation from Technosoft Technosoft MotionChip User Manual, parts 1 and 2 (parts no. UMMCp1, UMMCp2), describes in detail the Technosoft Motion Language and how to use it to program motion applications on products like IDM240/640 supporting this high-level language interface IPM Motion Studio User Manual (part no. UMMS) describes how to use the IPM Motion Studio – the complete development platform for IDM240/640 including: motion system setup & tuning wizard, motion sequence programming wizard, testing and debugging tools like: data logging, watch, control panels, on-line viewers of TML registers, parameters and variables, etc. If you Need Assistance … If you want to … Contact Technosoft at … Visit Technosoft online World Wide Web: http://www.technosoftmotion.com/ Receive general information or assistance (see Note) World Wide Web: http://www.technosoftmotion.com/ Email: [email protected] Ask questions about product operation or report suspected problems (see Note) Fax: (41) 32 732 55 04 Email: [email protected] Make suggestions about, or report errors in documentation. Mail: Technosoft SA Case postale 52 Rue des Courtils 8A CH-2035 Corcelles - NE Switzerland Note: You need to register your IDM240 or IDM640 system in order to get free assistance and support. Use the License no. of your IPM Motion Studio. Trademarks MS-DOS and Windows are registered trademarks of Microsoft Corporation. PC is trademark of International Business Machines Corporation. Contents 1. IDM240/640 Overview 1.1 Key Features 1.2 Functional Overview 1.2.1 Block diagram 1.2.2 Motion Application Configurations 1.2.3 Sensors 1.2.4 Controlled Loops 1.2.5 Special Features 1.2.6 PWM Frequency and Sampling Rates 1.2.7 Motion Modes 1.2.8 Operating Modes 1.2.9 Memory Map 2. Technical Specifications 2.1. Key Features 2.2. Drive Drawings 2.3. Connector Specifications 2.3.1 Analog & 24V Digital I/O - J9 Connector 2.3.2 Motor & Supply - J2 Connector 2.3.3 Serial - J4 Connector 2.3.4 CAN - J10, J11 Connectors 2.3.5 SW1 - DIP-Switch 2.3.6 Feedback - J13A Connector (IDM240-5EI and IDM640-8EI) 2.3.7 Feedback - J13B Connector (IDM240-5RI and IDM640-8RI) 2.4 Electrical Specifications 2.5 IDM240/640 LEDs 3. IDM240/640 Programming in the TML Environment 3.1 How to Access IDM240/640 I/O pins from TML 3.1.1 General-purpose Digital Inputs 3.1.2 General-purpose Digital Outputs 3.1.3 Encoder Signals 3.1.4 Hall Signals 3.1.5 Analog Inputs 3.1.6 Limit Switch Inputs LSP, LSN 3.1.7 ENABLE Input 3.1.8 CAPI Capture Input 3.1.9 READY Output 3.2 PWM Voltage Command Scaling 3.3 Error Signal 3.4 Supply / DC-bus Voltage Measurement Scaling 3.5 Motor Currents Scaling 3.6 Motor Speed Scaling 3.7 Motor Position Scaling 4. Technosoft Motion Language 4.1. TML Environment 4.2. Motion Modes 4.3. Application Programming 4.4. Event Triggers 4.5. Conditional Jump and Functions 4.6. TML Interrupts 4.7. Arithmetic and Logic Operations 4.8. Multiple-Axis Programming Appendices A. Serial Communication Protocol B. CAN Communication Protocol C. TML Data Components D. TML Instruction Set Summary E. IDM240/640 Dimensions F. Connectors Type and Mating Connectors IDM240 / 640 Overview 1. IDM240/640 Overview This chapter describes the IDM240/640 key features along with a block diagram and provides a functional overview. The IDM240/640 is a fully digital intelligent servo drive based on the latest DSP controller technology. Embedded with the high level Technosoft Motion Language (TML) the IDM240/640 offers a flexible, compact and easy to implement solution for single or multi-axis applications with • brushless DC motors • permanent magnet synchronous motors (PMSM) • DC brush motors The IDM240/640 can operate stand-alone, with the motion sequences stored in the internal E2ROM, or under the supervision of a master controller that can send motion commands through RS-232, RS-485 or CAN communication channels. Limit switches; capture inputs or general purpose I/Os may also be used to trigger the execution of pre-stored motion sequences. The powerful TML offers the possibility of programming various motion modes, like position or speed profiles, contouring, electronic gearing, electronic cam, external references, including 2 test modes for hardware setup validation. The configuration, tuning and programming of the IDM240/640 intelligent servo drive can be easily done using the Technosoft IPM Motion Studio - an integrated development platform for digital motion control applications that offers a set of high level graphical tools: • Setup Wizard that provides a quick way to: • • • • • • • Describe the system structure like motor and sensors types, control mode, etc. Enter the basic system parameters Perform tests to validate the system hardware Identify the motor and load parameters Tune the controllers Motion Wizard for motion application programming Data logging and watch facilities enabling the graphical or numerical display of the status of various motion system variables during tests. @ Technosoft 1-1 IDM240 / 640 Technical Reference IDM240 / 640 Overview 1.1 Key Features • • • • • • • • • • • • • • • • Fully digital servo drive with embedded intelligence Suitable for brushless DC, PMSM and DC brush motors Vector (field-oriented) control of AC motors (PMSM) High level quick setup, tuning and motion programming with Technosoft IPM Motion Studio Powerful TML instruction set for definition and execution of motion sequences, enabling: o Single or multi axis control o Standalone operation with motion sequences stored in E2ROM o Different control modes: open-loop, torque, speed or position close-loop control o External variables control capabilities (pressure, flow, temperature, …) o Various motion modes: #" Electronic cam, gearing, contouring, profiling: position or speed (jogging) #" External digital or analogue reference inputs #" Test modes for hardware setup validation o 18 programmable event triggers when motion modes can be changed on-the-fly o Automatic subroutines (TML interrupts) for monitoring up to 12 conditions like protections triggered, communication or control error, etc. o Motion sequences triggered by digital inputs o On-line motion parameterization and adjustment using analogue inputs o Precise position capture on CAPI encoder Index input Emergency shutdown RS-232 and RS-485 serial interface CAN interface 32K×16 zero-wait state SRAM memory 4K×16 E2ROM to store TML programs (16Kx16 optional) Compact design: 136 x 95 x 26mm Nominal PWM switching frequency: 20kHz1 Nominal update frequency for torque loop: 10kHz1 Nominal update frequency for speed/position loop: 1kHz1 Minimal load inductance: 50µH @12V, 200µH @48V, 330µH @80V Operating ambient temperature: 0-50°C 1 Nominal values cover all cases. Higher values may be programmed for configurations with brushless DC and with DC brush motors @ Technosoft 1-2 IDM240 / 640 Technical Reference IDM240 / 640 Overview 1.2 Functional Overview 1.2.1. Block Diagram Figure 1.1 presents the block diagram of the IDM240/640 intelligent servo drive with its main components. Positio n Refere nce + - PC Speed Contro Torqu e SC TC + - 3-phase inverter Hall Sens PWM 6 d dt RS-485 RS-232 CAN E2RO RAM Enco der TML PROGRAM I/O Control Enabl Analo Digi LS LS Res Rea Error g e tal P N et dy TML Commands Figure 1.1. The block diagram of the IDM240/640 intelligent servo drive @ Technosoft 1-3 IDM240 / 640 Technical Reference IDM240 / 640 Overview 1.2.2. Motion Application Configurations Tables 1.1 and 1.2 show the motion application configurations selectable with the IDM240/640. In bold typeface are the recommended configurations, for the available sensors. In normal typeface are the possible configurations. These may be covered by a recommended one. In italic typeface are technically possible configurations. In these cases the performances have to be evaluated prior to selection. Table 1.1. Motion application configurations with DC brush and brushless DC motors No Application Configuration Controlled Loops Crt Pos Spd Sensors Required User Pos Spd 1 2 Open loop, Voltage mode Torque control 3 Speed control, Voltage mode * √ 4 Speed control, Current loop √ √ Anyone √ 5 Position control, Speed & Current loop √ √ √ √ √ 6 Position control, Voltage mode * √ 7 Position control, Current loop * √ 8 Position control, Speed mode * √ 9 User specific control, Voltage mode * √ 10 User specific control, Current loop * √ 11 User specific control, Speed loop, Voltage mode * √ √ 12 User specific control, Speed & Current loop √ √ √ Crt √ Anyone √ √ √ √ √ √ √ √ √ √ √ √ Anyone √ Anyone √ Table 1.2. Motion application configurations with brushless AC motors (PMSM) No Application Configuration Controlled Loops Pos Spd 1 Open loop, Voltage mode 2 Torque control, FOC 3 Speed Control, Voltage mode * 4 Speed control, Current loop, FOC 5 Position control, Speed & Current loop, FOC √ 6 Position control, Voltage mode * √ 7 Position control, Current loop, FOC* √ 8 Position control, Speed mode * √ 9 User specific control, Voltage Mode * √ 10 User specific control, Current loop, FOC * √ 11 User specific control, Speed loop, Voltage mode * √ √ 12 User specific control, Speed & Current loop, FOC √ √ Crt Sensors Required User Pos Spd Crt (√ ) √ √ √ √ √ √ √ √ √ √ √ √ √ √ √ √ √ √ √ √ √ (√ ) √ √ √ √ √ √ √ √ Legend: * – Special mode, an outer loop is closed in the absence of an inner one. Lower performances may be expected than in the case when the inner loop is closed (√ ) – Sensor is optional. 2 different approaches: a) sensor present, b) sensor not present Controlled Loops: Pos – Position or user external, Spd – Speed, Crt – Current/Torque @ Technosoft 1-4 IDM240 / 640 Technical Reference IDM240 / 640 Overview 1.2.3. Sensors Table 1.3 presents the categories of sensors accepted by the IDM240/640, and their connections. Table 1.3. IDM240/640 accepted sensors Cat Usage Type Incremental encoder singlePositi Position ended or on feedback differential Speed Speed feedback Analogue sensor Sent on-line by a host Computed from position Tachometer (analogue) Computed from time between Hall edges, single-ended or differential Hall Sent on-line by a host A1+ for A, (A1- for A ) B1+ for B, (B1- for B ) Z1+ for Z, ( Z1- for Z ) +Tach, -Tach RS-232/RS-485 communication channel The position sensor connections +Tach, -Tach H1/B2/DT+ for Hall1, (H1/B2/DT- for Hall1) H2/Z2+ for Hall2, (H2/Z2- for Hall2 ) H3/A2/CK+ for Hall3, (H3/A2/CK- for Hall3 ) RS-232 / RS-485 / CAN communication channel On-board Curre nt Torqu e User specifi c Current feedback Torque feedforward External-loop sensor feedback Hall senso rs Commutation 120° apart, single-ended or differential Voltag e Over and under- voltage protection VDC compensation Drive overtemperature protection Motor overtemperature protection Analogue sensor On-board Analogue sensor On-board Analogue sensor Therm, GND Temp. @ Technosoft 2 shunts in inverter legs Connections Sent on-line by a host Analogue sensor Sent on-line by a host 1-5 RS-232 / RS-485 / CAN communication channel +Tach, -Tach RS-232 / RS-485 / CAN communication channel H1/B2/DT+ for Hall1, (H1/B2/DT- for Hall1) H2/Z2+ for Hall2, (H2/Z2- for Hall2 ) H3/A2/CK+ for Hall3, (H3/A2/CK- for Hall3 ) IDM240 / 640 Technical Reference IDM240 / 640 Overview 1.2.4. Controlled Loops As Figure 1.1 shows, the IDM240/640 control unit includes 3 control loops. The outer loop is used for motor position control. It can be also used to control an external signal if user specific control mode is selected. In this case, the IDM240/640 can perform for example a temperature, pressure or flow control. The outer loop controller is a PID with filter on the derivative term. The PID output can be used as speed, torque or voltage command for the motor. The middle loop implements the speed control. The speed loop controller is a PI with speed, acceleration and torque feedforward. The speed loop controller output can be used as torque or voltage command for the motor. A limit for torque command can be set from an analogue input. The inner loop performs the current/torque control. For AC motors, torque control is performed using a field oriented control (FOC) scheme. The inner loop uses 2 PI controllers one for torque control (Q axis controller) and the other for flux control (D axis controller). The inner loop provides a voltage vector command, which is translated into PWM commands. 1.2.5. Special Features The IDM240/640 control unit includes a set of programmable special features. These offer the possibility to select different strategies according with the application specific. The next table summarizes these features. Table 1.4. Special features of the IDM240/640 control unit Function Options Current Offset Detection Automatic, with motor supplied (PWM outputs active) Automatic, without motor supplied (PWM outputs inactive) Automatic detection is disabled. User provides the offset Start method for the Motor is aligned on phase A, by injecting a current in phases B and A brushless AC (PMSM) Motor is aligned on phase A, by applying a voltage on phases B and A motors Motor starts as a brushless DC using Hall commutation. After first Hall transition, commutes to brushless AC mode (FOC, sinusoidal currents) Motor is moved with a rotary current vector, till encoder index pulse is reached. Index offset to motor position when aligned on phase A should be known Motor is moved with a rotary voltage vector, till encoder index pulse is reached. Index offset to motor position when aligned on phase A should be known Motor is aligned on phase A, by injecting a currents in phases in a way that moves the motor only in the programmed direction Motor is aligned on phase A, by applying voltages on phases in a way that moves the motor only in the programmed direction Direct, using an absolute position sensor. The sensor offset to motor position aligned on phase A should be known. @ Technosoft 1-6 IDM240 / 640 Technical Reference IDM240 / 640 Overview PWM command Techniques 1.2.6. Automatic detection of an absolute position sensor offset. Motor is aligned on phase A with one of the above methods and computes the offset. With compensation of DC-bus voltage variation With compensation of dead-time With 3rd harmonic injection to increase maximum applicable voltage With PWM frequency wobbling around programmed value to reduce EMI (electromagnetic interference) PWM Frequency and Sampling Rates The IDM240/640 uses a fast loop for current/torque control and a slow loop for position/speed sampling. The sampling rates of these loops are synchronized and linked in a fixed ratio with the PWM frequency in order to eliminates the beat-frequency problems. The maximum sampling frequency on the fast loop can be half of the PWM frequency. The PWM frequency and the divider ratios for fast and slow loops are user programmable in a wide range. The maximum values for PWM frequency and sampling rate frequencies depend on the application configuration. Table 1.5 shows the typical (default) values, which cover all motion application configurations. Table 1.5. Typical values for PWM frequency and sampling rates PWM 20kHz 1.2.7. Fast loop (current/torque) 10kHz Slow loop (position/speed) 1kHz Motion modes The IDM240/640 provides 35 motion modes. Each motion mode designates a reference mode and a control structure. Table 1.6 summarizes for each type of control the reference modes accepted. Table 1.6. Motion Modes 1.1.1.1.1 Reference Modes Profiles (trapezoidal speed) Contouring (point to point with linear interpolation) Electronic Gearing Master Electronic Gearing Slave Electronic Cam Master Electronic Cam Slave External, reference read @ Technosoft 1.1.1.1.2 Position User Specific √ Control Type / Speed orque oltage √ √ √ SL √ SL √ √ √ √ √ √ √ √ √ √ √ 1-7 IDM240 / 640 Technical Reference IDM240 / 640 Overview from the analogue input (+Ref, -Ref) External, reference sent on-line through RS-232/RS485 communication channel Test (limited ramp) Stop √ √ √ √ √ FL √ SL √ SL √ SL √ FL √ FL √ FL √ √ FL √ Legend SL – Reference update is done on the slow (position/speed) loop FL – Reference update is done on the fast (current/torque) loop In all the cases where SL or FL is not mentioned, the reference update is done on the slow loop 1.2.8. Operating Modes The IDM240/640 can operate in 2 modes: Autorun (stand-alone) and External (slave). In Autorun (stand-alone) mode, the IDM240/640 executes motion sequences, stored in the E2ROM. There are no restrictions to motion modes or application configurations. The IDM240/640 enters in this operation mode automatically if: Auto / Ext position of DIP Switch is ON immediately after power-on The code of the TML instruction BEGIN is detected in first location from the E2ROM at the address 4000h (see Par. 1.2.9. Memory) In External (slave) mode, the IDM240/640 wait commands from an external device (PC or master controller) through communication channels. There are no restrictions to motion modes or application configurations. The IDM240/640 enters in slave mode if Auto / Ext position of DIP Switch is OFF immediately after power-on. In External mode, the commands sent by the master have higher priority, acting like “interrupts” if in the moment of reception a TML program is executing from the local memory. The possibility to execute both commands sent by a master and TML programs or functions from the local memory with or without automatic execution after power-on, offer the flexibility required for multiple-axis applications with distributed intelligence. For example, each axis can store in the local memory the start-up initialization procedure plus a set of functions performing different motion sequences. After power-up, with Auto / Ext position of DIP Switch in ON state, the axis automatically executes the initialization sequence, and then waits for master commands. These can resume to “call homing procedure”, “call motion sequence no. 1” etc. Once the command issued it is the slave axis job to execute it. @ Technosoft 1-8 IDM240 / 640 Technical Reference IDM240 / 640 Overview 1.2.9. Memory Map The IDM240/640 has 2 types of memory: a 32K×16 zero-wait-state SRAM and an 8K×8 serial E2ROM. The SRAM memory is mapped both in the program space and in the data space in the address range 8000h to 0FFFFh. The data memory can be used for real-time data acquisition and to temporary save variables during a TML program execution. The program space can be used to download and execute TML programs. It is at user choice to decide how to split the 32K SRAM in data and program memory. The E2ROM is seen as 4K×16 program memory mapped in the address range 4000h to 4FFFh. It offers the possibility to keep TML programs in a non-volatile memory. Read and write accesses to the E2ROM locations as well as TML programs downloading and execution are done from the user point of view similar with those in the SRAM program memory. The E2ROM SPI serial access is completely transparent for the user. TML Program E2ROM 4000h E2ROM 0000h Program memory 8K x 8 serial SPI-E2ROM 4FFFh 5000h SRAM Data Not available SRAM Program 1FFF 7FFFh 8000h 8000h 8000h Data memory for data acquisition Not used as Program memory SRAM Data memory Not used as Data memory Program memory for TML programs SRAM Program memory FFFFh FFFFh FFFFh Figure 1.2. IDM240/640 Memory Map @ Technosoft 1-9 IDM240 / 640 Technical Reference Technical Specifications 2. Technical specifications The following paragraphs present in detail all the technical specifications of the IDM240 / 640 family of Intelligent Servo Drives. Please read this chapter before starting to work with the drive. Carefully observe the specifications and compare them with your motor / sensor specifications. 2.1 Key Features • • • • • • • • • Single-ended, open-collector or differential encoder interface (IDM240-5EI and IDM640-8EI) 1 Resolver interface (IDM240-5RI and IDM640-8RI) 2 : o Differential outputs for resolver excitation o Excitation signal: sinusoidal, f = 10KHz o Amplitude of the output signal, adjustable in 0-8Vpp o Output current: max 50 mARMS o Differential inputs (from resolver Sin & Cos) o Input voltage: Vin = 4 Vpp Single-ended, open collector or differential Hall sensor interface Second encoder input (single-ended, open-collector or differential) used for master reference 24V opto-isolated IO: o 8 digital inputs: 6 general purpose, RESET and ENABLE #" All digital inputs active high (24V): connected to 24V => DSP pin = 1 #" 2 digital inputs available as 24V and 5V: #" Maximum input frequency signal = 5MHz o 6 digital outputs 24V compatible: #" All 6 digital outputs at 24V and 80mA #" All active low: 0 on DSP pin => IO in 24V; 1 on DSP pin or HighZ => IO in HighZ #" Maximum output frequency signal = 30KHz o 2 differential analog inputs+/-10V (reference and tacho) Compact design: 136 x 95 x 26 mm RS-232, RS-485 serial communication CAN-Bus 2.0B up to 1Mbit/s 1 The IDM240-5EI and IDM640-8EI can support the SSI and EnDat position sensors. For more information, please contact Technosoft. 2 The IDM240-5RI and IDM640-8RI can support the SSI, EnDat, SinCos and Linear Hall position sensors. For more information, please contact Technosoft. @ Technosoft 2-1 IDM240 / 640 Technical Reference Technical Specifications • Hardware Axis ID selection • Motor sensor thermal interface • On-board temperature sensor • Nominal PWM switching frequency: 20kHz1 • Nominal update frequency for torque loop: 10kHz1 • Nominal update frequency for speed/position loop: 1kHz1 • Logic power supply: 12-48VDC • Motor power supply: o (IDM240 – 5EI and IDM240 – 5RI): 12-48V; 5A; 16A peak o (IDM640 – 8EI and IDM640 – 8RI): 12-80V; 8A; 16A peak • Minimal load inductance: 50µH @12V, 200µH @48V, 330µH @80V • Operating ambient temperature: 0-50°C 1 Nominal values cover all cases. Higher values may be programmed for configurations with brushless DC and DC brush motors. @ Technosoft 2-2 IDM240 / 640 Technical Reference Technical Specifications 2.2 Drive Drawings SW1 - DIP Switch J2 - Motor & Supply Connector J13A - Feedback Connector IDMx40-xEI 26 mm A1+ B1+ +5VDC H3/A2/CK+ H1/B2/DT+ 1 95 mm Therm Z1+ Z1H2/Z2+ H2/Z2- A1B1GND H3/A2/CKH1/B2/DT- GND +5V N.C. N.C. RxD N.C. TxD 485B485A+ 19 CAN_V+ CAN_H CAN_L CAN_GND 10 CAN_V+ CAN_H CAN_L CAN_GND 26 0VPLC OUT#31 OUT#30 OUT#29 OUT#28 OUT#25/RD OUT#12/ER 24VPLC FU / Norm 485 / 232 9 ID-Bit4 ID-Bit3 ID-Bit2 ID-Bit1 ID-Bit0 18 Auto / Ext GND -Tach +Tach -Ref +Ref IN#38/P5V IN#37/D5V RESET +VLOG 0VPLC IN#24/LSN IN#2/LSP IN#39 IN#38/P IN#37/D IN#36 IN#16/EN 24VPLC Intelligent Servo Drive 136 mm J10, J11 - CAN Connectors J9 - Analog & 24V Digital I/O Connector J4 - Serial Communication Connector Figure 2.1. IDM240-5EI and IDM640-8EI drawings @ Technosoft 2-3 IDM240 / 640 Technical Reference Technical Specifications SW1 - DIP Switch J2 - Motor & Supply Connector J13B - Feedback Connector IDMx40-xRI 26 mm +5VDC H3/A2/CK+ H1/B2/DT+ COS+ SIN+ 1 95 mm Therm H2/Z2+ H2/Z2EXC+ EXC- GND H3/A2/CKH1/B2/DTCOSSIN- GND +5V N.C. N.C. RxD N.C. TxD 485B485A+ 19 CAN_V+ CAN_H CAN_L CAN_GND 10 CAN_V+ CAN_H CAN_L CAN_GND 26 0VPLC OUT#31 OUT#30 OUT#29 OUT#28 OUT#25/RD OUT#12/ER 24VPLC FU / Norm 485 / 232 9 ID-Bit4 ID-Bit3 ID-Bit2 ID-Bit1 ID-Bit0 18 Auto / Ext GND -Tach +Tach -Ref +Ref IN#38/P5V IN#37/D5V RESET +VLOG 0VPLC IN#24/LSN IN#2/LSP IN#39 IN#38/P IN#37/D IN#36 IN#16/EN 24VPLC Intelligent Servo Drive 136 mm J10, J11 - CAN Connectors J9 - Analog & 24V Digital I/O Connector J4 - Serial Communication Connector Figure 2.2. IDM240-5RI and IDM640-8RI drawings @ Technosoft 2-4 IDM240 / 640 Technical Reference Technical Specifications 2.3 2.3.1. Pin Connector’s Specifications Analog & 24V Digital I/O – J9 Connector 1 2 Name on the Drive cover 24VPLC IN#16/EN 3 4 IN#36 IN#37/D 5 IN#38/P IN#38 PULSE 6 7 IN#39 IN#2/LSP 8 IN#24/LSN 9 10 11 12 0VPLC +VLOG RESET IN#37/D5V IN#39 IN#2 LSP IN#24 LSN IN#37 DIR 13 IN#38/P5V IN#38 PULSE 14 15 16 17 +Ref -Ref +Tach -Tach AD5 18 19 GND 24VPLC - @ Technosoft TML name IN#16 / ENABLE IN#36 IN#37 / DIR Typ e I I / I / I I / I / I O I I / I AD2 I I I I I I O I Function / Alternate function / Comments 24 V power supply (+) terminal for all opto-isolated I/O 24V compatible input. Opto-isolated Connect to +24V to disable the PWM outputs 24V compatible input. Opto-isolated. 24V compatible input. Opto-isolated. Shared with pin 12 (IN#37/D5V) Can be used as DIRECTION input in Pulse & Direction motion mode 24V compatible input. Opto-isolated. Shared with pin 13 (IN#38/P5V) Can be used as PULSE input in Pulse & Direction motion mode 24V compatible input. Opto-isolated 24V compatible input. Opto-isolated Positive limit switch 24V compatible input. Opto-isolated Negative limit switch 24 V power supply (-) terminal for all opto-isolated I/O + VLOG. Logic supply voltage (as applied on J2, pin 7) RESET pin – connect to +24V for reset the board 5V compatible input. Opto-isolated. Shared with pin 4 (IN#37/D) Can be used as DIRECTION input in Pulse & Direction motion mode 5V compatible input. Opto-isolated. Shared with pin 5 (IN#38/P) Can be used as PULSE input in Pulse & Direction motion mode +/-10V differential analog input. May be used as analogue position, speed or torque reference +/-10V differential analog input. May be used as analog position or speed feedback (from a tachometer). Internally filtered (3.4KHz). Ground of the +5VDC.power supply output 24 V power supply (+) for all opto-isolated I/O 2-5 IDM240 / 640 Technical Reference Technical Specifications 20 21 OUT#12 /ER OUT#12 / ERROR O OUT#25 /RD OUT#25 / READY O 22 OUT#28 OUT#28 O 23 OUT#29 OUT#29 O 24 OUT#30 OUT#30 O 25 OUT#31 OUT#31 O 26 case 0VPLC SHIELD - I - @ Technosoft 24V compatible output. Opto-isolated TML instruction ROUT#12 force this pin to +24V and set light to the red LED 24V compatible output. Opto-isolated TML instruction ROUT#25 force this pin to +24V and set light to the green LED 24V compatible output. Opto-isolated TML instruction ROUT#28 force this pin to +24V 24V compatible output. Opto-isolated TML instruction ROUT#29 force this pin to +24V 24V compatible output. Opto-isolated TML instruction ROUT#30 force this pin to +24V 24V compatible output. Opto-isolated TML instruction ROUT#31 force this pin to +24V 24 V power supply (-) for all opto-isolated I/O Shield 2-6 IDM240 / 640 Technical Reference Technical Specifications J9 - Analog & 24V Digital I/O Connector J9 24VPLC Optoisolated inputs 24V RESET IN#16/EN IN#36 IN#39 IN#2/LSP IN#24LSN 11 2K5 6 7 8 IN#37/DIR IN#38/PULSE 4 IN#37/D5V IN#38/P5V 12 + +3.3V 2 3 2K5 +3.3V 5 250R 13 5V LOAD LOAD LOAD LOAD LOAD OUT#28 OUT#29 OUT#30 OUT#31 OUT#12/ER OUT#25/RD 0VPLC 24V (0.5A) + 24VPLC 24VPLC 0VPLC 0VPLC 24VPLC +3.3V 22 23 80mA max 24 24VPLC 25 20 +3.3V 80mA max 21 1 DSP Controller High speed (5MHz) LOAD Optoisolated outputs 24V IDMx40-xxI Green and Red LEDs 24VPLC 19 9 26 0VPLC 0VPLC +VLOG Power logic output GND +Tach +VLOG (from J2 / pin 7) 18 -Tach +Ref 14 15 -Ref SHIELD 0 - 3.3V + 50K 16 17 +/-10V +/-10V 10 - 50K + F -3dB = 3.4KHz 0 - 3.3V - +3.3V Connected to case Figure 2.3. J29 – I/O connections @ Technosoft 2-7 IDM240 / 640 Technical Reference Technical Specifications J9 - Analog & 24V Digital I/O Connector IDMx40-xxI DSP Controller - 24V Pulse & Direction connection - Figure 2.4. J9 – 24V Pulse & Direction connection Note1: When using 24V Pulse & Direction connection, leave open pins 12 (IN#37/D5V) and 13 (IN#38/P5V). @ Technosoft 2-8 IDM240 / 640 Technical Reference Technical Specifications J9 - Analog & 24V Digital I/O Connector IDMx40-xxI - 5V Pulse & Direction connection - J9 +3.3V 13 250R 5V + Incr. IN#37/D5V 12 High speed (5MHz) Decr. DIRECTION Switch 0VPLC DSP Controller IN#38/P5V 9 26 0VPLC Connected to case +3.3V Figure 2.5. J9 – 5V Pulse & Direction connection Note1: When using 5V Pulse & Direction connection, leave open pins 4 (IN#37/D) and 5 (IN#38/P). Note2: When IN#38/P or IN#38/P5V is used as PULSE input in Pulse & Direction motion mode, on each rising edge the reference (or feedback) is incremented / decremented. Note3: When IN#37/D or IN#37/D5V is used as DIRECTION input in Pulse & Direction motion mode, the reference (or feedback) is incremented if this pin is pulled low. @ Technosoft 2-9 IDM240 / 640 Technical Reference Technical Specifications 2.3.2. Motor & Supply – J2 Connector Pin 1 2 3 4 5 6 Name A B C Brake Earth +VMOT Type O O O O I Function Phase A for 3-phase motors, Motor+ for DC brush motors Phase B for 3-phase motors, Motor- for DC brush motors Phase C for 3-phase motors, unconnected for DC brush motors Brake output for external brake resistor Earth connection Positive terminal of the motor supply: 12 to 48VDC for IDM240-5EI 7 8 +VLOG GND I - Positive terminal of the logic supply: 12 to 48VDC Negative terminal of the +VMOT and +VLOG external power supplies 12 to 80VDC for IDM640-8EI J2 - Motor & Supply Connector IDMx40-xxI J2 For DC Brush Motors use only Phases A & B Connected to case +VMOT VMOT 12...48V + IDM240-5EI -------------------12...80V IDM640-8EI +VLOG +3.3V VLOG + 12...48V DC GND GND DC DSP Controller RBR (Optional) Figure 2.6. J2 – Motor and supply connection @ Technosoft 2-10 IDM240 / 640 Technical Reference Technical Specifications Note: EARTH signal is internally connected to the metal case and to all SHIELD signals, but completely isolated from all electric signals of IDM240/640. This feature may facilitate avoiding ground loops. It is recommended to connect Earth with GND at only 1 point, preferably close to the VDC supply output. 2.3.3. Pin 1 2 3 4 5 6 7 8 9 Serial – J4 Connector Name 485A+ TxD RxD N.C. GND 485BN.C. N.C. +5V Type I/O O I Function RS-485 line A (positive during stop bit) RS-232 Data Transmission RS-232 Data Reception Not Connected Ground RS-485 line B (negative during stop bit) Not Connected Not Connected Supply for RS-485 terminator and/or supply for handheld terminal (internally generated) I/O O J4 - RS-232 / RS-485 Connector IDMx40-xxI - RS-232 Connection - 1 TxD RxD GND 2 RS-232 Transceiver 3 5 232Rx 6 3 232Tx 485Tx 9 +5V 485Rx 5 4 3 2 1 9 8 7 6 RS-232 serial cable 1 to 1, male-female TX232 GND RX232 SHIELD DSP Controller J4 +3.3V RS-485 Transceiver 485 / 232 OFF SW1 ON Figure 2.7. J4 – Serial RS-232 connection @ Technosoft 2-11 IDM240 / 640 Technical Reference Technical Specifications J4 - RS-232 / RS-485 Connector IDMx40-xxI - RS-485 Connection - 485A+ 120R 1K2 2 RS-232 Transceiver 3 GND 1K2 1 485B+5V 232Tx 485Tx 5 232Rx 6 9 +5V 485Rx DSP Controller J4 RS-485 +3.3V RS-485 Transceiver 120R 485 / 232 RS-232/RS-485 Adapter 3 OFF SW1 ON RS-232 Figure 2.8. J4 – Serial RS-485 connection @ Technosoft 2-12 IDM240 / 640 Technical Reference Technical Specifications +5V IDMx40 AXISID = 1 Node A 1K2 +485A 120R 5%, 0.25W -485B GND 1K2 +485A IDMx40 AXISID = 2 Node B PC Host Address = 255 RS-232/RS-485 Adapter -485B GND +485A Node N -485B GND +5V 1K2 +485A IDMx40 AXISID = 254 Node Z 120R 5%, 0.25W -485B GND 1K2 Figure 2.9. Multiple-Axis RS-485 Network connection Note1: For the PC, parameter Host Address can have values between 1 and 255 and this value must be different from parameter Axis ID for the IDMs in the network. For example, if the Host Address is set to 255, then none of the IDMs in the network can have Axis ID set to 255. Note2: The PC can be placed in any position in the network. @ Technosoft 2-13 IDM240 / 640 Technical Reference Technical Specifications 2.3.4. Pin 1 2 3 4 CAN – J10, J11 Connectors Name CAN_V+ CAN_H CAN_L CAN_GN D Type I I/O I/O - Function +24VDC (optional +5VDC) isolated supply input CAN-Bus positive line (positive during dominant bit) (see Notes) CAN-Bus negative line (negative during dominant bit) (see Notes) Reference ground for CAN_L, CAN_H and CAN_V+ signals Note1: The CAN network require a 120 Ohms terminator. This is not included on-board. Note2: All 4 CAN signals are fully isolated from all other IDM’s circuits (system ground - GND, IO ground – 0VPLC and Earth). J10, J11 - CAN Connectors IDMx40-xxI SJ15 = OPEN To Previous Node J10 CAN_H CAN_L CAN_GND 24V +5V 5V 1 DSP Controller CAN_V+ 2 3 Optical isolation 4 CAN transceiver J11 CAN_V+ CAN_H CAN_L CAN_GND +3.3V 1 2 3 4 To Next Node Figure 2.10. J10, J11 – CAN Connectors @ Technosoft 2-14 IDM240 / 640 Technical Reference Technical Specifications CAN_H CAN_L IDMx40 AXISID = 1 Node A CAN_V+ CAN_GND 120R 5%, 0.25W CAN_H CAN_L IDMx40 AXISID = 2 Node B CAN_V+ L < Lmax CAN_GND CAN_H IDMx40 AXISID = 3 Node C CAN_L CAN_V+ CAN_GND RS-232 120R 5%, 0.25W PC Host Address = 3 CAN_H CAN_L IDMx40 AXISID = 255 Node Z CAN_V+ CAN_GND + 24V (optional 5V) Figure 2.11. Multiple-Axis CAN network @ Technosoft 2-15 IDM240 / 640 Technical Reference Technical Specifications SW1 – DIP-Switch FU / Norm 485 / 232 ID-Bit4 ID-Bit3 ID-Bit2 ID-Bit1 ID-Bit0 Auto / Ext 2.3.5. OFF ON Figure 2.12. SW1 – DIP Switch o ON: Position 1: FU / Norm Enable firmware update • OFF: Normal operation o ON: OFF: Position 2: 485 / 232 IDM240/640 drive communicates in RS-485 mode IDM240/640 drive communicates in RS-232 mode The state of 485 / 232 switch is sampled during power-up, and the communication protocol is configured accordingly. o Position 3 … 7: ID-Bitx These switches are sampled during power-up, and the Axis ID is configured accordingly. See Table 2.1. o Position 8: Auto / Ext ON: IDM240/640 in Autorun (stand-alone) mode. After reset, automatically executes a program from the internal E2ROM. OFF: IDM240/640 in External (slave) mode. After reset, waits for commands from an external device. @ Technosoft 2-16 IDM240 / 640 Technical Reference Technical Specifications Table 2.1. Axis ID / Address configuration DIP Switch position 3 4 ID – Bit4 ID – Bit3 OFF OFF OFF OFF OFF OFF OFF OFF OFF OFF OFF OFF OFF OFF OFF OFF OFF ON OFF ON OFF ON OFF ON OFF ON OFF ON OFF ON OFF ON ON OFF ON OFF ON OFF ON OFF ON OFF ON OFF ON OFF ON OFF ON ON ON ON ON ON ON ON ON ON ON ON ON ON ON ON 5 ID – Bit2 OFF OFF OFF OFF ON ON ON ON OFF OFF OFF OFF ON ON ON ON OFF OFF OFF OFF ON ON ON ON OFF OFF OFF OFF ON ON ON ON 6 ID – Bit1 OFF OFF ON ON OFF OFF ON ON OFF OFF ON ON OFF OFF ON ON OFF OFF ON ON OFF OFF ON ON OFF OFF ON ON OFF OFF ON ON 7 ID – Bit0 OFF ON OFF ON OFF ON OFF ON OFF ON OFF ON OFF ON OFF ON OFF ON OFF ON OFF ON OFF ON OFF ON OFF ON OFF ON OFF ON Axis ID 255 1 2 3 4 5 6 7 8 9 10 11 12 13 14 15 16 17 18 19 20 21 22 23 24 25 26 27 28 29 30 31 Note1: Others Axis ID values (32 - 255) can be set by software with AXISID instruction. @ Technosoft 2-17 IDM240 / 640 Technical Reference Technical Specifications 2.3.6. Pin Feedback – J13A Connector (IDM240-5EI and IDM640-8EI) Name on the Drive cover Type Function / Comments 1 A1+ 2 3 4 B1+ +5VDC H3/A2/CK+ I I O I 5 H1/B2/DT+ 6 7 8 9 Therm Z1+ Z1H2/Z2+ 10 H2/Z2- 11 12 13 14 A1B1GND H3/A2/CK- 15 H1/B2/DT- case SHIELD Positive A for differential encoder or A for single-ended encoder 1*) Positive B for differential encoder or B for single-ended encoder 1*) +5VDC Supply (generated internally) Positive Hall 3 for differential Hall or Hall 3 for single-ended Hall 2*) Second encoder positive A for differential encoder or A for single-ended encoder Positive Hall 1 for differential Hall or Hall 1 for single-ended Hall 2*) Second encoder positive B for differential encoder or B for single-ended encoder Analog input from motor thermal sensor Positive Z for differential encoder or Z for single-ended encoder 1*) Negative Z for differential encoder Positive Hall 2 for differential Hall or Hall 2 for single-ended Hall 2*) Second encoder positive Z for differential encoder or Z for single-ended encoder Negative Hall 2 for differential Hall Second encode: negative Z for differential encoder Negative A for differential encoder Negative B for differential encoder Ground of the encoder supply Negative Hall 3 for differential Hall Second encoder negative A for differential encoder Negative Hall 1 for differential Hall Second encoder negative B for differential encoder Shield I I I I I I I I I I - 1 *) In application configurations without encoder feedback, this input may be used as general-purpose inputs. *) In application configurations without Hall or second encoder feedback, this input may be used as general-purpose inputs. 2 @ Technosoft 2-18 IDM240 / 640 Technical Reference Technical Specifications J13A - Feedback Connector - Single-ended / open-collector encoders - IDM240-5EI IDM640-8EI J13A A1+ B1+ +5V 3 +5V 3 x 4K7 1 2 Z1+ 7 GND DSP Controller +5VDC 13 SHIELD Connected to case +3.3V Figure 2.13. J13A – Single-ended / open-collector encoder connection @ Technosoft 2-19 IDM240 / 640 Technical Reference Technical Specifications J13A - Feedback Connector - Differential encoder (RS-422) - IDM240-5EI IDM640-8EI J13A +5VDC 3 +5V 3 x 4K7 SJ16 1 DSP Controller A1+ A1- 11 B1+ B1Z1+ Z1- SJ20 2 12 SJ22 7 8 3 x 120R 3 x 3K1 +3.3V +1.6V GND SHIELD 13 Connected to case Figure 2.14. J13A – Differential (RS-422) encoder connection Note1: For differential encoders with long cables, the solder-joints SJ16, SJ20 and SJ22 must be strapped, else these straps are optional. @ Technosoft 2-20 IDM240 / 640 Technical Reference Technical Specifications J13A - Feedback Connector - Second Encoder - Differential (RS-422) - IDM240-5EI IDM640-8EI J13A +5VDC 3 +5V 3 x 4K7 SJ23 5 H1/B2/DT15 H2/Z2+ H2/Z2H3/A2/CK+ H3/A2/CK- SJ19 9 10 SJ21 4 14 DSP Controller H1/B2/DT+ 3 x 120R 3 x 3K1 +3.3V +1.6V GND 13 SHIELD Connected to case Figure 2.15. J13A – Second encoder - differential (RS-422) connection Note1: For differential encoders with long cables, the solder-joints SJ19, SJ21 and SJ23 must be strapped, else these straps are optional. @ Technosoft 2-21 IDM240 / 640 Technical Reference Technical Specifications J13A - Feedback Connector - Single-ended / open-collector Hall - IDM240-5EI IDM640-8EI J13A H1/B2/DT+ H2/Z2+ H3/A2/CK+ GND +5V 3 +5V 3 x 4K7 DSP Controller +5VDC 5 9 4 13 SHIELD Connected to case +3.3V Figure 2.16. J13A – Single-ended / open-collector Hall connection @ Technosoft 2-22 IDM240 / 640 Technical Reference Technical Specifications J13A - Feedback Connector - Differential Hall (RS-422) - IDM240-5EI IDM640-8EI J13A +5VDC +5V 3 3 x 4K7 SJ23 5 H1/B2/DT15 H2/Z2+ H2/Z2H3/A2/CK+ H3/A2/CK- SJ19 9 10 SJ21 4 14 DSP Controller H1/B2/DT+ 3 x 120R +3.3V 3 x 3K1 +1.6V GND 13 SHIELD Connected to case Figure 2.17. J13A – Differential (RS-422) Hall connection Note1: For differential encoders with long cables, the solder-joints SJ19, SJ21 and SJ23 must be strapped, else these straps are optional. @ Technosoft 2-23 IDM240 / 640 Technical Reference Technical Specifications J13A - Feedback Connector - Differential SSI Encoder (RS-422) - IDM240-5EI IDM640-8EI J13A +5VDC 3 +5V H1/B2/DT+ 5 H1/B2/DT- 15 H3/A2/CK+ H3/A2/CK- DSP Controller 2 x 4K7 SJ23 120R SJ21 4 14 120R 2 x 3K1 +1.6V GND +3.3V 13 SHIELD Connected to case Figure 2.18. J13A – Differential (RS-422) SSI encoder connection Note1: For differential encoders with long cables, the solder-joints SJ21 and SJ23 must be strapped; otherwise, these straps are optional. @ Technosoft 2-24 IDM240 / 640 Technical Reference Technical Specifications - Motor thermal sensor connection - J13A +3.3V Raux Therm GND +3.3V 4K7 4 13 SHIELD IDM240-5EI IDM640-8EI DSP Controller J13A - Feedback Connector Connected to case +3.3V Figure 2.19. J13A – Motor thermal sensor connection @ Technosoft 2-25 IDM240 / 640 Technical Reference Technical Specifications 2.3.7. Pin Feedback – J13B Connector (IDM240-5RI and IDM640-8RI) 1 2 Name on the Drive cover +5VDC H3/A2/CK+ 3 H1/B2/DT+ 4 5 6 7 COS+ SIN+ Therm H2/Z2+ Typ e O I H2/Z2- 9 10 11 12 EXC+ EXCGND H3/A2/CK- 13 H1/B2/DT- 14 15 case COSSINSHIELD +5VDC Supply (generated internally) Positive Hall 3 for differential Hall or Hall 3 for single-ended Hall 1 *) Second encoder positive A for differential encoder or A for single-ended encoder 1 I Positive Hall 1 for differential Hall or Hall 1 for single-ended Hall *) Second encoder positive B for differential encoder or B for singleended encoder I I I Resolver input for Cosines (+) Resolver input for Sinus (+) Analog input from motor thermal sensor 1 I 8 Function / Comments I O O I I I I Positive Hall 2 for differential Hall or Hall 2 for single-ended Hall *) Second encoder positive Z for differential encoder or Z for singleended encoder Negative Hall 2 for differential Hall Second encoder: negative Z for differential encoder Excitation output signal (+) Excitation output signal (-) Ground of the 5VDC supply Negative Hall 3 for differential Hall Second encoder negative A for differential encoder Negative Hall 1 for differential Hall Second encoder negative B for differential encoder Resolver input for Cosines (-) Resolver input for Sinus (-) Shield Note: The symbols + and – means the phase for the differential signals. To be observed when the resolver would be connected. 1 *) In application configurations without Hall or second encoder feedback, this input may be used as general-purpose inputs. @ Technosoft 2-26 IDM240 / 640 Technical Reference Technical Specifications J13B - Feedback Connector - Resolver connection - IDM240-5RI IDM640-8RI SIN+ SINEXC+ EXCCOS+ COS- 10K 5 + 4VPP 15 9 10 8VPP / 50mARMS max, 10KHz 10K 4 14 3.3VPP - + 4VPP SHIELD - DSP Controller J13B 3.3VPP Connected to case +3.3V EXCITATION COSINE SINE RESOLVER Resolver coupling ratio = 0.5 ... 3 V Figure 2.20. J13B – Resolver connection @ Technosoft 2-27 IDM240 / 640 Technical Reference Technical Specifications J13B - Feedback Connector - Single-ended / open-collector Hall - IDM240-5RI IDM640-8RI J13B H1/B2/DT+ H2/Z2+ H3/A2/CK+ GND +5V 1 +5V 3 x 4K7 DSP Controller +5VDC 3 7 2 11 SHIELD Connected to case +3.3V Figure 2.21. J13B – Single-ended / open-collector Hall connection @ Technosoft 2-28 IDM240 / 640 Technical Reference Technical Specifications J13B - Feedback Connector - Differential Hall (RS-422) - IDM240-5RI IDM640-8RI J13B +5VDC +5V 1 3 x 4K7 SJ23 3 H1/B2/DT13 H2/Z2+ H2/Z2H3/A2/CK+ H3/A2/CK- SJ19 7 8 SJ21 2 12 DSP Controller H1/B2/DT+ 3 x 120R +3.3V 3 x 3K1 +1.6V GND 11 SHIELD Connected to case Figure 2.22. J13B – Differential (RS-422) Hall connection Note1: For differential encoders with long cables, the solder-joints SJ19, SJ21 and SJ23 must be strapped; otherwise, these straps are optional. @ Technosoft 2-29 IDM240 / 640 Technical Reference Technical Specifications J13B - Feedback Connector - Second Encoder - differential (RS-422) - IDM240-5RI IDM640-8RI J13B +5VDC 1 +5V 3 x 4K7 SJ23 3 DSP Controller H1/B2/DT+ H1/B2/DT- 13 H2/Z2+ H2/Z2H3/A2/CK+ H3/A2/CK- SJ19 7 8 SJ21 2 12 3 x 120R +3.3V 3 x 3K1 +1.6V GND 11 SHIELD Connected to case Figure 2.23. J13B – Second encoder - differential (RS-422) connection @ Technosoft 2-30 IDM240 / 640 Technical Reference Technical Specifications - Motor thermal sensor connection - J13B +3.3V Raux Therm GND +3.3V 4K7 6 11 SHIELD IDM240-5RI IDM640-8RI DSP Controller J13B - Feedback Connector Connected to case +3.3V Figure 2.24. J13B – Motor thermal sensor connection @ Technosoft 2-31 IDM240 / 640 Technical Reference Technical Specifications 2.4 Electrical Specifications Electrical characteristics: All parameters measured under the following conditions (unless otherwise noted): Tamb = 0…50°C, VLOG = 24VDC, V24VPLC = 24VDC, CAN_V+ = 24VDC; VMOT = 48VDC (IDM240-5EI) or 80VDC (IDM640-8EI); Supplies start-up / shutdown sequence: -any- ; Load current 5ARMS (IDM240-5EI) or 8ARMS (IDM640-8EI) Logic Supply Input Supply voltage Supply current Measured between +VLOG and GND. Nominal values, including ripple up to ±25% Absolute maximum values, continuous Min. 12 8 Absolute maximum values, surge (duration ≤ 10mS) +VLOG = 12V +VLOG = 24V +VLOG = 48V † Typ. 24 Max. 48 60 63 V 250 100 50 400 250 150 mA mA mA Typ. Max. Units 12 48 VDC 0 63 VDC -0.5 65 V 12 80 VDC 0 100 VDC -0.5 105 V 1.5 4 16 30 mA A APEAK Typ. 24 Max. 30 Units VDC 32 V 20 30 mA 600 650 mA 200 VRMS -0.5 Units VDC VDC Motor Supply Input Supply voltage IDM240 Measured between +VMOT and GND. Nominal values, including ripple & braking-induced overvoltage up to ±25% Absolute maximum values, continuous † Supply voltage IDM640 Supply current Absolute maximum values, surge (duration ≤ 10mS) Nominal values, including ripple & braking-induced overvoltage up to ±25% Absolute maximum values, continuous Absolute maximum values, surge (duration ≤ 10mS) Idle Operating Power-up surge (duration ≤ 10mS) † Min. I/O Supply Input (isolated) Supply voltage Supply current Isolation voltage rating Measured between +24VPLC and 0VPLC. Nominal values Min. 8 † Absolute maximum values, surge (duration ≤ 10mS) All inputs and outputs disconnected All inputs tied to +24VPLC; all outputs sourcing 80mA each into external load(s) Between 0VPLC and GND -0.5 CAN-Bus Supply Input (isolated) @ Technosoft 2-32 IDM240 / 640 Technical Reference Technical Specifications Supply voltage, default config. Measured between CAN_V+ and CAN_GND. Nominal values Absolute maximum values, surge (duration ≤ 10mS) † Supply voltage, SJ15 strapped Nominal values Absolute maximum values, surge (duration ≤ 10mS) † Supply current Isolation voltage rating Min. 8 Typ. 24 Max. 30 Units VDC 32 V 5.25 VDC 7.5 V 12 60 25 180 200 mA mA VRMS Typ. Max. +5 +8 +16.5 ±24 40 +250 +350 +1 Units ARMS ARMS A A -0.5 4.75 5 -0.5 CAN-Bus idle CAN-Bus operating at 1Mbit/s Between CAN_GND and GND Motor Outputs Motor output current IDMx40-5 Motor output current IDMx40-8 Motor output current, peak Short-circuit protection threshold Short-circuit protection delay On-state voltage drop All voltages referenced to GND. Continuous operation Continuous operation Min. -5 -8 -16.5 ±20 10 -800 -900 -1 50 200 400 Output current = ±5A (IDMx40-5) Output current = ±8A (IDMx40-8) Off-state leakage current Motor inductance FPWM = 20kHz, +VMOT = 12V FPWM = 20kHz, +VMOT = 48V FPWM = 20kHz, +VMOT = 80V (IDM640) ±22 20 ±150 ±200 ±0.1 µS mV mV mA µH µH µH 24V Digital Inputs (opto-isolated) Input voltage Input current All voltages referenced to 0VPLC. Logic “LOW” Logic “HIGH” Absolute maximum, surge (duration ≤ 1S) Logic “HIGH” Logic “LOW” Input frequency Minimum pulse width @ Technosoft Pulse “LOW”-”HIGH”-“LOW” Pulse “HIGH”-“LOW”-”HIGH” 2-33 Min. -5 18 † Typ. 0 24 -30 2.5 0 0 10 100 Max. 1.2 30 Units V +80 10 15 0.2 5 mA KHz µS µS IDM240 / 640 Technical Reference Technical Specifications 5V Digital Inputs (opto-isolated) Input voltage Input current All voltages referenced to 0VPLC. Logic “LOW” Logic “HIGH” Absolute maximum, surge (duration ≤ 1S) Logic “HIGH” Logic “LOW” Min. -0.5 2.4 † Input frequency Minimum pulse width Typ. 0 5 -5 Max. 0.8 5.5 Units V +7.5 4 0 0 150 10 20 0.1 5 Min. Typ. Max. 22 23 24.5 mA MHz nS 24V Digital Outputs (opto-isolated) Output voltage All voltages referenced to 0VPLC. Logic “HIGH”; +24VPLC = 24VDC; External load = 330Ω † Output current Absolute maximum, surge (duration ≤ 1S) Logic “HIGH”; [+24VPLC – VOUT] ≤ 2V Logic “LOW” (leakage crt.) Absolute maximum, surge (duration ≤ 1S) † Units V -0.5 35 0.05 -350 80 0.2 mA 350 Resolver Interface Applicable to IDM240-5RI and IDM640-8RI Excitation frequency Excitation voltage Min. Typ. Units 8 KHz VPP mARM 10 Software adjustable 0 Excitation current Resolver coupling ratio Sin / Cos Input voltage Sin / Cos Input impedance Max. 50 USIN / COS : UEXC 1:2 2:1 4 10 S VPP KΩ Encoder / Hall Inputs Single-ended mode compliance Input threshold voltage Differential mode compliance Input hysteresis Input common mode range Input impedance Min. Typ. Max. TTL / CMOS / open-collector 1.4 1.5 1.6 TIA/EIA-422 ±0.1 ±0.2 ±0.5 -7 +12 Leave negative inputs disconnected Single-ended mode For full RS422 compliance, see 1 Differential mode Referenced to GND Absolute maximum, surge (duration ≤ 1S) Single-ended mode Differential mode (see 1) † -25 +25 4.7 120 Units V V V KΩ Ω Analog Inputs Min. @ Technosoft 2-34 Typ. Max. Units IDM240 / 640 Technical Reference Technical Specifications Differential voltage range Common-mode voltage range Input impedance Common-mode impedance Referenced to GND Differential, Tach input Differential, Ref input Referenced to GND; Tach input Referenced to GND; Ref input ±9.5 -12 Resolution ±10 0…10 60 44 30 44 10 ±10.5 +50 Differential linearity Guaranteed 10-bits no-missing-codes 0.09 Offset error Common-mode voltage = 0…10V ±0.1 ±0.3 Gain error Common-mode voltage = 0…10V ±0.5 ±1 Bandwidth (-3dB) Ref input (depending on software settings) Tach input 5 3.4 V V KΩ KΩ KΩ KΩ bits % FS2 % FS2 % FS2 KHz KHz RS-232 Standards compliance Bit rate ESD Protection Min. Typ. TIA/EIA-232-C 9600 Max. Units 115200 ±15 Baud KV Min. Typ. TIA/EIA-485 Max. Units Measured at 1MHz 90 150 Ω Depending on software settings Depending on software settings Human Body Model 9600 115200 64 ±15 Baud KV All voltages referenced to CAN_GND Min. Typ. Max. CAN-Bus 2.0B error active; ISO 11898-2 Units Measured at 1MHz 90 150 Ω Depending on software settings Depending on software settings Human Body Model 125K 1M 64 ±15 Baud KV Max. 5.25 Units V mA Depending on software settings Human Body Model RS-485 Standards compliance Recommended transmission line impedance Bit rate Number of network nodes ESD Protection 120 CAN-Bus Standards compliance Recommended transmission line impedance Bit rate Number of network nodes ESD Protection 120 Supply Outputs +5VDC voltage +5VDC available current @ Technosoft Current sourced = 350mA 2-35 Min. 4.75 350 Typ. 5 IDM240 / 640 Technical Reference Technical Specifications Others Operating temperature Dimensions Weight Frame Insulation voltage withstand Storage temperature Humidity Length x Width x Height GND to SHIELD (connected to frame) Not powered Non-condensing Min. Typ. 0 136 x 91.5 x 26.5 0.28 -40 0 Max. 50 250 85 90 Units °C mm Kg V °C %RH 1 To connect 120Ω RS-422 terminators, strap solder-joints SJ16, SJ20, SJ22 (encoder) and/or SJ21, SJ23, SJ19 (Hall or second encoder). 2 “FS” stands for “Full Scale” † Stresses beyond those listed under “absolute maximum ratings” may cause permanent damage to the device. Exposure to absolute-maximum-rated conditions for extended periods may affect device reliability. 2.5 IDM240/640 LEDs LED Color Function Green Red Turned on when OUT#25 output is set low Turned on when the power stage error signal is generated or when OUT#12 is set low @ Technosoft 2-36 IDM240 / 640 Technical Reference Programming in the TML Environment 3. IDM240/640 Programming in the TML Environment 3.1 How to Access IDM240/640 I/O pins from TML 3.1.1. General-purpose Digital Inputs The IDM240/640 general-purpose digital input pins are named IN#n where n can be: 2, 24, 36, 37, 38 or 39. Some of the input pins have also an alternate function. For example pin A1+/IN#3 is IN#3 with alternate function A1+ – encoder A input. After reset, all the input pins with an alternate function like A1+/IN#3 have the input function enabled and the alternate function disabled. The alternate function may be enabled after execution of the TML command ENDINIT (end of initialization), function of the application configuration set through the previous commands. For example, if the application configuration is with encoder feedback, at ENDINIT the pin A1+/IN#3 function will switch automatically from general-purpose IN#3 to encoder input A1+. In order to read a digital input use TML command var = IN#n; where var is a 16-bit integer variable. After execution, var is set as follows: var = 0, if IN#n = 0 var != 0, if IN#n = 1 In order to use a digital input after the alternate function is enabled, 2 more steps are necessary before reading the input. Disable the alternate function and enable the I/O function using the TML command: ENIO#n; where n is the input pin number (0 for IN#0, 1 for IN#1, etc.) Specify that the I/O pin is input using TML command: SETIO#n IN; where n is the input pin number Now the input can be read with the TML command var = IN#n. It is not necessary to repeat the ENIO#n and SETIO#n IN commands next times the input is read. Once the pin function is set as input it remains in this state until the input function is specifically disabled with TML command DISIO#n; where n is the input number or the alternate function is enabled with a specific command. For example the TML command ENCAPI 0 enables capture function of the Z1+/IN#5 pin and disables the IN#5. ! Technosoft 2003 3-1 IDM240 / 640 Technical Reference Programming in the TML Environment State of inputs IN#36, IN#37, IN#38 and IN#39 can be read all together using TML command var = IN2, bitmask; which puts in var the result of an AND logic between the state of inputs/outputs and the value of the bitmask. The state of the IN2 is read as follows: Bits 15-8 0 Bit 2 Bit 1 Bit 0 IN#35/ IN#34/ IN#33/ H3+ H2+ H1+ The state of an input pin is 1 if the input signal is high and 0 if the input signal is low. 3.1.2. Bit 7 X Bit 6 IN#39 Bit 5 IN#38 Bit 4 IN#37 Bit 3 IN#36 General-purpose Digital Outputs The IDM240/640 has 5 general-purpose digital output pins are named OUT#n where n can be 25, 28, 29, 30, 31 and a special output OUT#12/ER to signalize the power stage error. In order to set an output high (1 logic) use TML command SOUT#n; set OUT#n (1 logic) In order to set an output low (0 logic) use TML command ROUT#n; reset OUT#n (0 logic) After reset, the digital outputs must be first declared as outputs using TML command SETIO#n OUT; where n is the output pin number After an output pin is declared as output it can be set high or low with SOUT#n or ROUT#n. It is not necessary to repeat the SETIO#n OUT command next times the output is used. Once the pin function set as output it remains in this state. CAUTION ! You should not set as outputs other IDM240/640 pins. Use the TML command SETIO#n OUT only for n = 12, 25, 28, 29, 30 and SETTING AS AN OUTPUT OF ONE OF THE INPUT PINS CAN DAMAGE THE DRIVE! 31! Remark: The state of an output pin is 0 if the output is set high and 1 if the output is set low. 3.1.3. Encoder Signals In application configurations with encoder feedback, A1+/IN#3 and B1+/IN#4 inputs are automatically setup as encoder inputs when the TML command ENDINIT is executed. The motor position is computed by the on-board encoder interface and provided in the TML variable APOS (actual motor position). If the encoder has an index pulse connected to Z1+/IN#5, the capture input can be enabled (see 3.1.8 for details) and used to capture the actual motor position on rising or falling edge of the encoder index pulse. In application configurations without encoder feedback, A1+/IN#3 and B1+/IN#3 inputs may be used as general-purpose inputs IN#3 and IN#4. The Z1+I/IN#5 input may also be used as ! Technosoft 2003 3-2 IDM240 / 640 Technical Reference Programming in the TML Environment general-purpose input IN#5 if the application doesn’t need to capture actual motor position on using Z1+ input. 3.1.4. Hall Signals In application configurations requiring Hall signals feedback, H1+/IN#33, H2+/IN#34 and H3+/IN#35 pins are setup as Hall inputs. The actual state of the Hall signals is provided in the TML variable HALL, which can take values from 1 to 6. The HALL variable has on bits 2-0 the values of the H3+, H2+, H1+ signals applied on J13A/J13B connector. In application configurations without Hall signals feedback, Hall inputs may be used as generalpurpose inputs IN#33, IN#34 and IN#35. 3.1.5. Analog Inputs IDM240/640 Pins TML Environment +Ref -Ref The 10-bit A/D conversion result, left-shifted by 6 is provided in TML variable AD5. The position or speed reference can be read from TML variables TPOS or TSPD. These are computed as (AD5 – AD5OFF) x CADIN / 216-SFTADIN , where AD5OFF is a programmable offset and CADIN, SFTADIN are 2 TML parameters. The 10-bit A/D conversion result, left-shifted by 6 is provided in TML variable AD2. In applications where position feedback is read from this input, TML variable APOS contains (AD2 >> 6). In applications where speed feedback is read from this input, TML variable ASPD contains (AD2OFF – AD2)>>6, where AD2OFF is a programmable offset. +Tach -Tach 3.1.6. Limit Switch Inputs LSP, LSN The IDM240/640 has 2 dedicated inputs for limit switches: LSP (positive direction) and LSN (negative direction). The inputs can be programmed to sense rising of falling transitions. The following actions can be programmed when a transition is detected on a limit switch input: Automatically stop the motor. This feature can be activated with TML command LSACT STOPx where x = 0,1,2 or 3. STOP3 to STOP0 indicate 4 different ways to stop a motor: a) smooth with a programmed deceleration rate; b) by setting speed reference to 0; c) by setting current reference to 0; d) by setting motor voltage command to 0; Generate a TML interrupt. The TML interrupt service routine accepts any TML command, hence when a limit switch is reached, any desired action can be programmed; Generate a TML event. On event occurrence, the motion mode and/or parameters can be automatically changed. This feature is useful if the motor is on-purpose moved towards a limit switch to execute a specific motion sequence when the limit switch is reached. The edge-detection feature of a limit switch input must be enabled using the TML commands ! Technosoft 2003 3-3 IDM240 / 640 Technical Reference Programming in the TML Environment ENLSP 0; enable LSP to sense a falling edge ENLSP 1; enable LSP to sense a rising edge ENLSN 0; enable LSN to sense a falling edge ENLSN 1; enable LSN to sense a rising edge The edge-detection is automatically disabled after the transition is sensed, to avoid the potential problems caused by multiple transitions. Hence, after each transition sensed, the capture input must be enabled again in order to detect the next transition. The edge-detection can also be disabled using TML commands DISLSN or DISLSP. 3.1.7. ENABLE Input The IN#16/EN input can be used as an emergency stop. When asserted high, the following events happen: The IDM240/640 executes automatically the TML command AXISOFF that has the following effects: the controllers are disabled; the power-stage transistors are turned off; Generate a TML interrupt. The TML interrupt service routine accepts any TML command, hence when a Enable input is triggered, any desired action can be programmed; The IN#16/EN input acts like a non-maskable interrupt, which is always executed, no matter of the IDM240/640 operation context. If the TML command AXISON is executed while IN#16/EN pin is held low, the command has no effect. By default, in order to applying a voltage to motor, the IN#16/EN input must be held low or left open. 3.1.8. CAPI Capture Input The actual motor position can be captured when rising or falling transitions occur on the capture input Z1+. The latency from the time a transition happens on a capture input to the time the motor position is read is maximum 63ns. This feature offers the possibility to perform precise motor positioning relative to its position at the time when the capture input was triggered. For example, connecting the encoder index pulse to Z1+ can do accurate homing. When a transition is detected on a capture input, the motor position is saved in the TML variable CAPPOS. In the same time, the following actions may be programmed: Generate a TML interrupt. The TML interrupt service routine accepts any TML command, hence when a capture input is triggered, any desired action can be programmed; Generate a TML event. On event occurrence, the motion mode and/or parameters can be automatically changed. This feature may be used to pre-program next motor move after the capture input was triggered. The edge-detection feature of a the capture inputs must be enabled using the TML commands ENCAPI 0 enable CAPI to sense a falling edge ENCAPI 1 enable CAPI to sense a rising edge The edge-detection is automatically disabled after the transition is sensed, to avoid the potential problems caused by multiple transitions. Hence, after each transition sensed, the capture input must be enabled again in order to detect the next transition. The edge-detection can also be disabled using TML commands DISCAPI. When capture inputs are disabled their alternate function as general-purpose inputs IN#5 is enabled. ! Technosoft 2003 3-4 IDM240 / 640 Technical Reference Programming in the TML Environment 3.1.9. READY Output The OUT#25 /RD output is set high immediately after reset. It goes low after the IDM240/640 internal initialization ends. This output can be used to signal to an external device that the IDM240/640 is powered and it is ready to receive and execute TML commands. When is low the IDM240/640 green LED is turned on. The state of the output may be changed with TML commands 3.2 SOUT#25; set OUT#25 /RD high and turn off green LED ROUT#25; set OUT#25 /RD low and turn on green LED PWM Voltage Command Scaling In the TML environment all PWM voltage commands are normalized as 16-bit signed integers. The following table presents the how these commands are translated into voltages TML Voltage Command [bits] Voltage Applied [Volts] +32767 +Vmax1 0 0 -32768 -Vmax Vmax is the maximum voltage applicable defined as Vmax = VMOT – VD – VDT , where VMOT is the IDM240/640 motor supply / DC-bus voltage VD is the voltage drop on inverter transistors VDT is the voltage drop due to dead-time (if dead-time compensation is not activated) Hence the scaling factor for the voltage commands is: Voltage [V] = V max[ V ] × TML Voltage [bits] 32768[bits] Remark: The resolution of the PWM voltage commands depends on the PWM frequency, set by default at 20KHz. At this value PWM resolution is 1:1000. This means that a modification of the voltage applied occurs only if the 10MSB of the TML command voltage are changed. 3.3 Error Signal The IDM240/640 power stage generates an error signal in case of short-circuit and/or earth-fault. When the error signal is set, the following events happen: The inverter transistors are turned off as long as the error state is set 1 A positive voltage determines in the motor a current that is measured as positive ! Technosoft 2003 3-5 IDM240 / 640 Technical Reference Programming in the TML Environment The OUT#12 /ER output is set high and the IDM240/640 red led is turned on Generate a TML interrupt. The TML interrupt service routine accepts any TML command, hence when power-stage protection is triggered, any desired action can be programmed If the error condition has disappeared, it is possible to resume the moving through executing the AXISON instruction, and optionally, setting low the OUT#12 /ER signal and turn off the red led using the SOUT#12 instruction. 3.4 Supply / DC-bus Voltage Measurement Scaling The IDM240/640 includes a supply / DC-bus voltage feedback. In the TML environment, the A/D converted value of the supply / DC-bus voltage feedback can be read as the TML variable AD4. The scaling factor for the DC-bus voltage measurement is: 108.5[V ] × AD4 [bits] 65472[bits ] where 108.5 V is the maximum measurable DC-bus voltage 65472 is the AD4 value for DC-bus voltage = 108.5 V DC-bus [V] = Remark: AD4 value is the result of a 10-bit A/D conversion, left-shifted by 6. The 6LSB of AD6 are always 0. If the A/D conversion result varies with 1LSB this translates into a variation of the AD4 value with 26 = 64. 3.5 Motor Currents Scaling The IDM240/640 measures motor currents through shunts placed in the lower-legs of the inverter. Only currents measured on phases A and B are connected to 2 A/D inputs with a current gain factor of 0.1V/A. The shunt from phase C is used only to sense a short-circuit. In applications with 3-phase AC motors, the TML variables IA and IB provide the motor currents in phases A and B. In applications with DC or brushless DC motors, TML variable IQ gives the motor current. The scaling factor for the motor currents is: 1.65[V ] × TML current [bits], or 32704[bits ] × 0.1[V / A] Motor current [A] = 16.5[ A] × TML current [bits] 32704[bits ] Motor current [A] = Remark: The A/D conversion result has 10-bit resolution and is used left-shifted by 6. The 6LSB of TML currents are always 0. If the A/D conversion result varies with 1LSB this translates into a variation of the TML current value with 26 = 64. ! Technosoft 2003 3-6 IDM240 / 640 Technical Reference Programming in the TML Environment 3.6 Motor Speed Scaling TML variable ASPD gives the motor speed. The scaling factor depends on the speed sensor. When the motor has a position sensor like an encoder, the speed can be estimated as position increment per speed-loop sampling period (set by default at 1ms). In this case the scaling factor is 60 × ASPD [bits] Motor speed [rpm] = 4 × N [lines] × T[s] where N is the number of encoder lines T is the speed-loop sampling period in seconds 4 is the multiplication ratio of the position resolution done in the encoder interface Example: If T = 1ms, and N = 500 lines, motor speed [rpm] = 30 × ASPD [bits] When the motor has a position sensor like a resolver, the speed can be estimated as position increment per speed-loop sampling period. In this case the scaling factor is Motor speed [rpm] = 1 PRES [bits/rev] × T[s] × ASPD [bits] where PRES is the resolver interface resolution T is the speed-loop sampling period in seconds If the speed feedback is provided by a tachometer, connected to IDM240/640 connector J9 on analogue input Tach, the scaling factor is Motor speed [rpm] = 3.3[V ] 1024[ bits ] × 0.165[V / V ] × KT [V / rpm ] × ASPD [bits] where KT is the tachometer constant 0.165 [V/V] is the IDM240/640 feedback gain factor Remark: In speed control motion modes, the speed reference should be provided in the same units as ASPD i.e. based on the same scaling as for the speed measurement. 3.7 Motor Position Scaling TML variable APOS gives the motor position. When encoder feedback is used, APOS is measured in encoder counts (1 encoder count = 1 bit). The scaling factor is: 1 × APOS [bits] Motor position [revolutions] = 4 × N [lines] where N is the number of encoder lines 4 is the multiplication ratio of the position resolution done in the encoder interface If the position feedback is read from the resolver analogue inputs, the scaling factor is ! Technosoft 2003 3-7 IDM240 / 640 Technical Reference Programming in the TML Environment Motor position [revolutions] = PRES 1 × APOS [bits] [bits/rev] where PRES is the resolver interface resolution If the position feedback is read from the analogue input TACH, the scaling factor is Motor position [revolutions] = 3.3[V ] 1024[ bits ] × 0.165[V / V ] × K P [V / rpm ] × APOS [bits] where KP is the analogue position sensor constant. 3.8 Drive Temperature Scaling The IDM240/640 includes a temperature sensor. TML variable AD7 gives the drive temperature. The scaling factor is: Drive temperature [°C] = ! Technosoft 2003 3.3[V ] 1024[bits ] × 0.01[V / °C ] 3-8 × AD7 [bits] - 50[°C] IDM240 / 640 Technical Reference Technosoft Motion Language 4. Technosoft Motion Language The Technosoft Motion Language (TML) consists of a high-level set of instructions allowing to: • Set up the Intelligent drive for a particular motion application configuration • Program and execute motion sequences For the setup phase the TML enables the user to: • Describe the basic system configuration (as motor and sensors type) • Perform specific settings (as motor start mode, PWM mode, sampling rates, etc.) • Setup the controllers (current, speed, position, external user specific loop), etc. For motion programming and execution the TML permits to: • Select the motion mode (profiles, contouring, gearing in multiple axes structures, etc.) • Setup events and change on-the-fly the motion mode and/or parameters when the events occur • Detect transitions and program specific actions for external signals as limit switches, captures • Execute homing sequences • Compute motion parameters using the built-in ALU • Synchronize multiple-axis structures, by sending group commands, etc. The ultimate goal of the TML instruction set is to implement complex motion applications based on high-level motor-independent motion sequencing commands. 4.1 TML Environment The TML environment includes 3 basic components: • the “motion processor” • the trajectory generator • the motor control kernel The software implemented “motion processor” represents the core of the TML environment. It decodes and executes the TML commands. Like any processor, it includes specific elements as program counter, stack, ALU, interrupt management and registers. The trajectory generator computes function of the motion mode selected, the target position, speed, torque or voltage in order to reach the commanded values. The motor-control kernel implements the control loops including acquisition of feedback sensors, the controllers, the coordinate transformations for FOC, the motor protections, etc. When the “motion processor” executes motion configuration or command instructions, it translates them into actions upon the trajectory generator and/or the motor control kernel. The TML works with 3 data types: int/uint – 16-bit signed/unsigned integers long – 32-bit signed integers fixed – 32-bit fixed-point where the 16 MSB represent the integer part and the 16 LSB the fractional part ! Technosoft 2003 4-1 IDM240 / 640 Technical Reference Technosoft Motion Language 4.2 Motion Modes The Intelligent drive offers the 8 reference modes, i.e. 8 modes to provide the target reference: • profiles • contouring • pulse & direction • external • electronic gearing • electronic cam • test • stop Each reference mode can be applied to several control structures. From this combination results 40 motion modes, where each motion mode designates a reference mode and a specific control structure. 4.2.1. Position Profile Modes In position profile modes, a position control is performed using a trapezoidal speed profile. The user specifies the desired position (absolute or relative), the slew speed and the acceleration/deceleration ramp. The reference generator computes the position trajectory corresponding to a trapezoidal or triangular speed profile. Depending on the control structure used, 4 position profile modes are possible: Table 4.1. Position Profile - Motion Modes Position Profile Motion Modes PP3 PP2 PP1 PP0 Controlled Loops Position / User Speed √ √ √ √ Torque √ √ √ √ Related Parameters CPOS Command position (long) – desired position (absolute or relative) in position units1 CSPD Command speed (fixed)– desired slew speed in speed units2 CACC Command acceleration (fixed) – desired acceleration / deceleration in acceleration units3 1 Position units can be: a) counts of encoder (1 count = 1/(4 * no. of encoder lines); b) 1 LSB if position feedback is read from an analogue input or parallel port; c) one micro-step for steppers 2 Speed units can be: a) position units/slow-loop sampling if speed is estimated as position difference; b) 1LSB if speed feedback is read from an analogue input or parallel port; 3 Acceleration units are speed units / slow-loop sampling ! Technosoft 2003 4-2 IDM240 / 640 Technical Reference Technosoft Motion Language Related Instructions MODE PPx Set position profile mode x (x = 0, 1, 2, 3) CPR Command position is relative CPA Command position is absolute UPD Update – updates motion parameters. Start command if no motion STOP0, STOP1, STOP2 or STOP3 – Stop motion using methods 0 to 3 In all position profile modes, the motion parameters CPOS, CSPD, CACC can be changed any time during motion. The reference generator automatically re-computes the position trajectory in order to reach the new commanded position using the new values for slew speed and acceleration. Figure 4.1 shows an example when slew speed and acceleration rate are changed, while commanded position is kept the same. 172 CSPD = 8 CACC = 2 UPD CPOS = 172 CSPD = 4 CACC = 1 UPD Figure 4.1. Position profile. On-the-fly change of motion parameters There is no restriction for the commanded position. If during motion a new position command is issued that require to reverse the motor, the reference generator does automatically the following operations: • stops the motor with the programmed deceleration rate • accelerates the motor in the opposite direction till the slew speed is reached or till the motor has to decelerate • stops the motor on the commanded position In position profile modes, the reference generator automatically eliminates the round-off errors, which may appear when the commanded position can’t be reached with the programmed slew speed and acceleration/deceleration rate. This situation is illustrated by the example below. ! Technosoft 2003 4-3 IDM240 / 640 Technical Reference Technosoft Motion Language Example: Commanded position is 258 counts, with the slew speed 18 counts/sampling and the acceleration rate 4 counts/sampling1. To reach the slew speed 2 options are available: Accelerate at 16 in 4 steps, then from 16 to 18 in a 5th step. Acceleration space is 49 counts Accelerate from 0 to 2 in 1st step, then from 2 to 18 in 4 steps. Acceleration space is 41 counts For the deceleration phase the options and spaces are the same. But, no matter what option is used for acceleration and deceleration phase, the space that remains to be done at constant speed is not a multiple of 18 i.e. the position increment at each step. Hence when to start the deceleration phase? Table 4.2, presents the possible options and the expected errors. Table 4.2. Round-off error example. Options and expected errors. Acceleration Space Deceleration Space [counts] [counts] 49 counts 49 counts 49 counts 41 counts 41 counts 49 counts 41 counts 41 counts Space to do at constant speed [counts] Time to go at constant speed Deceleration starts after Target position Error [sampling steps] [samplings] [counts] 258 – 2 * 49 = 160 counts 258 – 49 – 41 = 168 counts 258 – 41 – 49 = 168 counts 258 – 2 * 41 = 176 counts 160/18 = 8.8 5 + 8 = 13 5 + 9 = 14 5 + 9 = 14 5 + 10 = 15 5 + 9 = 14 5 + 10 = 15 5 + 9 = 14 5 + 10 = 15 - 16 +2 -6 + 12 -6 +12 -14 +4 168/18 = 9.3 168/18 = 9.3 176/18 = 9.7 The Intelligent drive comes with a different approach. It monitors the round-off errors and automatically eliminates them by introducing during deceleration phase short periods where target speed is kept constant. Hence, the target position is always reached exactly without errors. CPOS=258 CSPD=18 CACC=4 Figure 4.2. Position profile. Automatic elimination of round-off errors ! Technosoft 2003 4-4 IDM240 / 640 Technical Reference Technosoft Motion Language Figure 4.2 shows the target speed generated by the Intelligent drive for the above example. During the deceleration phase the target speed: • decelerates from 18 to 6 in 3 steps (target position advances with 36 counts) • is kept constant for 1 step (target position advances with 6 counts) • decelerates from 6 to 2 in one step (target position advances 4 counts) • decelerates from 2 to 0 in the last step (target position advances 1 count) Hence deceleration space is 47 counts which added to 49 counts for acceleration phase and 162 counts for constant speed gives exactly the 258 counts commanded position. Programming Example MODE PP3; CACC = 1.5; CSPD = 20.; CPOS = 20000; CPA; UPD; 4.2.2. // set position profile mode 3 // command acceleration = 1.5 counts/sampling2 // command speed = 20 counts/sampling // command position = 2000counts // command position is absolute // update - start the motion Speed Profile Modes In speed profile modes, a speed control is performed using a trapezoidal profile. The user specifies the jog speed and the acceleration/deceleration ramp. When motion starts, the motor accelerates up to the specified speed and continues to jog at this speed until a new speed or a stop command is issued. Speed, direction and acceleration can be changed any time during motion. Depending on the control structure used, 2 speed profile modes are possible: Table 4.3. Speed Profile - Motion Modes Controlled Loops Position / Speed User Speed Profile Motion Modes Torque √ √ SP1 SP0 √ Related Parameters CSPD Command speed (fixed) – desired jog speed in speed units. Sign gives direction. CACC Command acceleration (fixed) – desired acceleration / deceleration in acceleration units Related Instructions MODE SPx UPD Set speed profile mode x (x = 0, 1) Update – updates motion parameters. Start command if no motion ! Technosoft 2003 4-5 IDM240 / 640 Technical Reference Technosoft Motion Language STOP0, STOP1, STOP2 or STOP3 – Stop motion using methods 0 to 3 ! Technosoft 2003 4-6 IDM240 / 640 Technical Reference Technosoft Motion Language Programming Example MODE SP1; // set speed profile mode 1 CACC = 1.; // command acceleration = 1.0 counts/sampling2 CSPD = -25.5; // command speed = -25.5 counts/sampling // negative command speed = negative direction UPD; // update - start the motion 4.2.3. Position/Speed/Torque/Voltage Contouring Modes In contouring mode, an arbitrary profile can be prescribed. The profile contour is described by reference increments per sampling over a time interval (see Figure 4.3). The contour profile is: !" a position reference in position contouring mode; !" a speed reference in speed contouring mode; !" a torque reference in torque contouring mode; !" a voltage reference in voltage contouring mode; 24 20 16 12 8 4 0 0 2 4 6 8 10 12 14 Figure 4.3. Reference generation in contouring modes In position/speed contouring, the starting point is either the current value of the target position/speed, or the actual value of the motor position/speed (see par. Motion Mode Changing). In torque/voltage contouring, the starting value is settable by the user (default value is 0). The contouring modes require a local memory where to place the sequence of contour segments to be executed. First the contouring mode must be set and first segment should be provided. Then contouring mode can be activated with the UPD command. Once a contouring mode is activated, the rest of the segments are automatically executed. The sequence of contour segments must end with a segment where the time interval is 0. When the reference generator works with one segment, the next segment is already fetched waiting in a local buffer. This procedure permits to immediately start the following segment when the current one ends. Each ! Technosoft 2003 4-7 IDM240 / 640 Technical Reference Technosoft Motion Language time the reference generator starts a new segment, the parameters of the next segment are transferred into the local buffer. A host may also send through any communication channel contouring segments. But these segment commands are treated differently. Each time a segment command is sent by the host, it starts to execute immediately, canceling previous segment processing. Table 4.4, presents the possible contouring modes. Table 4.4. Contouring Modes Category Position Contouring Speed Contouring Torque Contouring Voltage Contouring Related Parameters REF0(H)1 Time segment Increment Motion Modes PP3 PP2 PP1 PP0 SC1 SC0 TC VC Controlled Loops Position / User Speed √ √ √ √ √ √ Torque √ √ √ √ √ √ Starting value (int) – torque/voltage contouring in torque/voltage units2 Value or variable (int) – represents time interval in samplings of a Value or variable (fixed) – represents reference increment per sampling Related Instructions MODE PCx MODE SCx MODE TC MODE VC Set position contouring mode x (x = 0, 1, 2, 3) Set speed contouring mode x (x = 0, 1) Set torque contouring Set voltage contouring. Voltage reference represents motor voltage for DC motor quadrature component (Q-axis) of the voltage vector for AC motors SEG Time, Increment Set a contour segment with parameters Time and Increment UPD Update – updates motion parameters. Start if no motion STOP0, STOP1, STOP2 or STOP3 – Stop motion using methods 0 to 3 1 (H) means high part (16MSB) of a 32-bit variable 10 SFTCRT Torque unit. Torque [torque units] = Torque [Nm] * 2 / (VREFHI - VREFLO) * 64 * KI / (KT * 2 ) where: VREFHI - VREFLO = analogue input range, KI – current measurement gain [V/A], KT – motor torque constant [Nm/A], SFTCRT – a TML parameter set by default at 0) Voltage unit. Voltage [voltage unit] = Voltage [V] * 32768/ UDC where UDC – DC-bus voltage [V] 2 ! Technosoft 2003 4-8 IDM240 / 640 Technical Reference Technosoft Motion Language Programming Example (see Figure 4.3) MODE PC3; // set position contouring mode 3 SEG 2, 4.; // set 1st segment. Increment position reference // with 4 counts/sampling in the next 2 samplings UPD; // update – start motion SEG 4, 2.; // set 2nd segment SEG 4, 1.; // set 3rd segment SEG 2, 0.; // set 4th segment SEG 0, 0.; // end contour sequence 4.2.4. Position/Speed Pulse & Direction Modes In pulse & direction modes, the position or speed reference is provided by an external device, which gives 2 digital signals: Pulse – a sequence of pulses. Each pulse represents a position unit. The sum of the pulses indicates the position displacement to be performed. The variation of number of pulses during one sampling period represents a speed reference. Direction - a digital signal which indicates the reference sign (motion direction) The external device Pulse signal must be connected to the intelligent drive input IN#38/P or IN#38/P5V. The external device Direction signal must be connected to the intelligent drive input IN#37/D or IN#37/D5V. Table 4.5, presents the possible pulse & direction modes. Table 4.5. Pulse & Direction Modes Category Position Pulse & Direction Speed Pulse & Direction Motion Modes Controlled Loops Position / User Speed √ √ √ √ PPD3 PPD2 PPD1 PPD0 SPD1 SPD0 √ √ Torque √ √ √ √ √ Related Instructions MODE PPDx Set position pulse & direction mode x (x = 3, 2, 1, 0) MODE SPDx Set speed pulse & direction mode x (x = 1, 0) UPD Update – updates motion parameters. Start command if no motion STOP0, STOP1, STOP2 or STOP3 – Stop motion using methods 0 to 3 Programming Example MODE PPD3; UPD; ! Technosoft 2003 // set pulse & dir mode 3 // update – activate new mode. Motion starts 4-9 IDM240 / 640 Technical Reference Technosoft Motion Language // when external device provides pulses 4.2.5. External Position/Speed/Torque/Voltage Modes In the external modes, an external device provides the target reference in one of the following ways: !" using TML on-line commands sent through any communication channel; !" as an analogue voltage connected to Ref input; !" as a 16-bit value which can be read from the an input port mapped in the I/O space; !" as a 32-bit value which can be read from two input port mapped in the I/O space; Table 4.6, presents the possible external modes. Torque and voltage external modes include 2 options: !" torque/voltage slow – reference is read at each slow-loop (position/speed) sampling period !" torque/voltage fast – reference is read at each fast-loop (torque/current) sampling period Related Parameters EREF (long) where the external device writes the position reference when it is provided online. The speed, torque or voltage reference should be written in EREF(H) which seen as an integer Related Instructions MODE PEx Set external position mode x (x = 3, 2, 1, 0) MODE SEx Set external speed mode x (x = 1, 0) MODE TES Set external torque mode slow MODE TEF Set external torque mode fast MODE VES Set external voltage mode slow MODE VES Set external voltage mode fast EXTREF 0 Set external reference type: provided on-line EXTREF 1 Set external reference type: read from analogue input (+Ref, -Ref) EXTREF 2 Set external reference type: read from a 16-bit I/O port EXTREF 3 Set external reference type: read from a 32-bit I/O port UPD Update – updates motion parameters. Start command if no motion STOP0, STOP1, STOP2 or STOP3 – Stop motion using methods 0 to 3 The external reference should be in position units for position external modes; speed units for speed external modes; torque units for torque external modes; and voltage units for voltage external modes. ! Technosoft 2003 4-10 IDM240 / 640 Technical Reference Technosoft Motion Language Table 4.6. External Modes Category Position External Speed External Torque External Slow Torque External Fast Voltage External Slow Voltage External Fast Programming Example EXTREF 1; MODE SE1; UPD; 4.2.6. Motion Modes Controlled Loops Position / User Speed √ √ √ √ PE3 PE2 PE1 PE0 SE1 SE0 TES TEF VES VEF √ √ Torque √ √ √ √ √ √ √ // external reference read from analogue input // set speed external mode 1 // update – activate new mode Torque/Voltage Test Modes The torque and voltage test modes are intended for performing preliminary tests during the setup phase. The test reference is a limited ramp (see Figure 4.4). In application configurations with brushless AC motors, the test modes also give the possibility to drive the motor by setting up the electrical angle variation (see Figure 4.5) Figure 4.4. Reference profile in test modes ! Technosoft 2003 4-11 IDM240 / 640 Technical Reference Technosoft Motion Language Figure 4.5. Electrical angle setup in test modes with brushless AC motors Related Parameters REFTST RINCTST THTST TINCTST maximum value of the test reference in torque or voltage units (int) reference increment at each slow-loop sampling period (int) initial value for the electrical angle in electrical angle units1 (int) electrical angle increment at each fast-loop sampling period (int) Related Instructions MODE TT MODE VT Set torque test mode Set voltage test mode 4.2.7. Electronic Gearing Modes In electronic gearing mode one axis set as master transmits its position to one or several axes set as slaves. The slaves can receive the master position through CAN communication channel or from second encoder input, and follow the master position with a programmable ratio. The master position can be the actual motor position (default) or the current target position. If actual position is sent, the master can work in any motion mode. If target position is sent, the master should work in a mode that generates a target position. The master sends its position once at each slow-loop sampling. Slave axes perform a position control. The master reference increment multiplied by the gear ratio is added to their actual position. Depending on the control structure the following 4 motion modes are possible for the slaves Table 4.7. Electronic Gearing Slave - Motion Modes Electronic Gearing Slave Motion Modes GS3 GS2 GS1 GS0 Controlled Loops Position Speed √ √ √ √ Torque √ √ √ √ Related Parameters SLAVEID GEAR MREF the axis or group ID to which master sends its position slave(s) gear ratio (fixed). Negative values means opposite direction (long) slave location where the master sends its position Related Instructions MODE GSx SGM Set electronic gear slave mode x (x = 3, 2, 1, 0) Set electronic gearing master mode 1 Electrical angle [electrical angle units] = electrical angle [degrees] * 32767 / 180 in the range – 32768 to +32767 i.e. +/- 180 degrees ! Technosoft 2003 4-12 IDM240 / 640 Technical Reference Technosoft Motion Language RGM Reset electronic gearing master mode Programming Example // MODE GS3; // GEAR = -0.5;// UPD; // SAVEID 1; SGM; UPD; 4.2.8. // // // // // On slave axis (Axis ID = 1): set electronic gearing slave mode 3 slave gear ratio is 0.5 opposite direction update – activate new mode On master axis: slave axis has Axis ID = 1 set electronic gearing master mode update – activate new mode. Master starts to send its position Electronic Cam Modes In electronic cam mode one axis set as master transmits its position to one or several axes set as slaves. The slaves can receive the master position through CAN communication channel or from second encoder input. A cam table specifies the slaves position function of the master position. Between master points linear interpolation is performed. The master position can be the actual motor position (default) or the current target position. If actual position is sent, the master can work in any motion mode. If target position is sent, the master should work in a mode that generates a target position. The master sends its position once at each slow-loop sampling. Slave axes perform a position control. The master reference increment multiplied by the gear ratio is added to their actual position. Depending on the control structure the following 4 motion modes are possible for the slaves. Table 4.8. Electronic Cam Slave - Motion Modes Electronic Cam Slave Motion Modes CS3 CS2 CS1 CS0 Related Parameters SLAVEID MREF MPOS0 CAMOFF Controlled Loops Position Speed √ √ √ √ Torque √ √ √ √ the Axis or Group ID to which master sends its position (long) slave location where the master sends its position (long) slave location where is master position after correction cam offset Related Instructions ! Technosoft 2003 4-13 IDM240 / 640 Technical Reference Technosoft Motion Language MODE CSx SGM RGM INITCAM LoadAddress, RunAddress Set electronic cam slave mode x (x = 3, 2, 1, 0) Set electronic cam master mode Reset electronic cam master mode Copy cam table from E2ROM to RAM Programming Example // On slave axis (Axis ID = 1): INITCAM 0x4500,0xF000; // copy cam table from E2ROM to RAM MODE CS3; // set electronic cam slave mode 3 UPD; // update – activate new mode UPD; 4.2.9. // On master axis: SAVEID 1; // slave axis has Axis ID = 1 SGM; // set master mode for electronic cam // update – activate new mode. Master starts to send // its position Stop Modes The Intelligent drive offers 4 modes to stop the motor. These are presented in Table 4.9. Table 4.9. Stop Modes Stop Modes STOP3 STOP2 STOP1 STOP0 Action Smoothly decelerates the motor till speed is 0 Forces target speed to 0 Forces target torque to 0 Forces motor voltage to 0 In order to start a new the motion after a STOP command, the motion mode has to be set again. This operation disables the stop mode and allows motor to move. Related Instructions STOPx Set stop mode x (x = 3, 2, 1, 0) Programming Example STOP3; // smooth stop MODE PP3; // set position profile mode 3 UPD; // update – restart motion after a STOP command ! Technosoft 2003 4-14 IDM240 / 640 Technical Reference Technosoft Motion Language 4.2.10. Motion Mode Changing The intelligent drive allows switching on the fly all the motion modes except the test modes. This feature is especially useful for position/speed control applications where the target reference is provided by the internal trajectory generator using position/speed profile modes, position/speed contouring modes, electronic gearing, electronic cam and stop modes. On the fly change of the motion modes is possible because the target reference is updated each time the motion mode changes. Whenever a new motion mode is set, the target position/speed reference is set to the actual values of the motor position/speed. This default target update mode (TUM0) is particularly useful to perform precise relative positioning triggered by an external event, because the input data for the relative position profile computation are the real motor position and speed. For open-loop applications where there is no position/speed feedback, the intelligent drive offers also the possibility cancel the target position/speed update with the actual motor values. In this case (set with TUM1 command) the target reference is preserved when motion modes are changed. In speed profile or speed contouring modes the trajectory generator continues to integrate the target position allowing thus on the fly transition from these modes to position profile or position contouring modes, even in the absence of the motor feedback. 4.3 Application Programming Motion Command Categories Basically, there are two categories of motion commands: • immediate • sequential, which can only reside in the local memory (if present) The immediate motion commands don’t require a wait loop to complete the execution. These commands can be send to the Intelligent drive via the communication channels, or can reside in the local memory. The sequential motion commands require a wait loop to complete. In this category enter the following 2 commands: WAIT! Wait a programmed event to occur SEG Time, Increment Set a contour segment with parameters Time and Increment to be executed when the previous one ends The sequential commands can reside only in a local memory. If these commands are sent via the communication channels are immediately executed as if the wait loop condition is always true. TML Program Structure A TML program starts with instruction BEGIN and ends with instruction END. It is divided into 2 sections: • the initialization section • the motion application programming section The initialization section starts after BEGIN and lasts until the ENDINIT command, which means end of initialization section. In this section, the intelligent drive is setup for a particular motion ! Technosoft 2003 4-15 IDM240 / 640 Technical Reference Technosoft Motion Language application configuration. This involves setup of the TML configuration registers for the application motor and sensors types, the PWM and sampling rates settings, the parameterization of the controllers, protections and other special features like: motor start method, PWM mode, etc. When ENDINIT command is executed, it uses the information from the initialization section to setup the intelligent drive for a particular motion application configuration. After ENDINIT execution, the basic configuration involving the motor and sensors types, the sampling rates, can’t be changed unless the intelligent drive is reset. The motion application programming section contains the motion sequences to be executed. The section starts after ENDINIT and lasts until the TML program ends. In many cases, the first instruction to be executed in this section is AXISON which activates the PWM commands for the default motion mode after reset: external voltage, reference provided on-line in EREF(H). Default value of EREF(h) is 0. Structure of a TML Program BEGIN; // TML program start ... // Intelligent drive setup for a particular application configuration ... ENDINIT; // end of initialization ... // Motion Sequences ... END; // TML program end 4.4 Event Triggers The IDM240/640 can be programmed to monitor an event and do actions on the event occurrence. A typical example is the situation when the parameters and/or the motion mode have to be changed (updated) at a precise moment, when a certain event happens. The TML recognizes a set of 18 events, which can be programmed, one at a time, for monitoring (Table 4.10). Table 4.10. Programmable Event Triggers No. Mnemonic Event Description 1 2 3 4 5 6 !MC !CAP !LSP !LSN !IN#n 0 !IN#n 1 !RT value32 !RT var32 !AT value32 Set event when motion complete Set event when a capture input is triggered Set event when positive limit switch (LSP input) is triggered Set event when negative limit switch (LSN input) is triggered Set event when digital input #n is reset; Set event when digital input #n is set; Set event after a time period (relative to event setting) = a 32-bit long value or variable. Time unit is slow-loop period Set event when absolute time = a 32-bit long value or variable 7 8 ! Technosoft 2003 4-16 IDM240 / 640 Technical Reference Technosoft Motion Language 9 10 11 12 13 14 15 16 17 18 !AT var32 !SU value32 !SU var32 !SO value32 !SO var32 !RPU value32 !RPU var32 !RPO value32 !RPO var32 !APU value32 !APU var32 !APO value32 !APO var32 !RU value32 !RU var32 !RO value32 !RO var32 !VU var32a, value32 !VU var32a, var32b !VO var32a, value32 !VO var32a, var32b Set event when actual (motor) speed <= a 32-bit fixed value or variable Set event when actual (motor) speed >= a 32-bit fixed value or variable Set event when actual (motor) relative position (from current motion start or POS0 value) <= a 32-bit long value or variable Set event when actual (motor) relative position (from current motion start or POS0 value) >= a 32-bit long value or variable; Set event when actual (motor) absolute position <= 32-bit long value or variable Set event when actual (motor) absolute position >= 32-bit long value or variable Set event when target reference <= 32-bit long/fixed value or variable Set event when target reference >= 32-bit long/fixed value or value Set event when a 32-bit long/fixed variable (var32a) <= 32-bit long/fixed value or variable Set event when a 32-bit long/fixed variable (var32a) >= 32-bit long/fixed value or variable After an event is programmed, the user has the following options: !" wait until the event occurs, then do a certain action !" set a new motion mode and/or set of motion parameters, to be automatically activated when the event occurs !" stop motion when the event occurs Programming Examples 1) !RT 100; // set relative time event: after 100 slow-loop periods // i.e. after 100ms for default sampling values WAIT!; // wait event to occur 2) !CAP; // set event when a capture input is triggered STOP3!; // smooth stop when event occurs 3) !IN#4 0 // set event when input IO#4 goes low MODE PP3 // set position profile mode 3 CPR; // command position is relative CPOS=2000; // command position is 2000 ! Technosoft 2003 4-17 IDM240 / 640 Technical Reference Technosoft Motion Language !UPD; 4.5 // when event occurs, move 2000 from actual position Conditional Jumps and Functions TML offers 2 powerful instructions for program control: !" conditional GOTO; !" conditional CALL of a TML function A TML function starts with a label and ends with RET instruction. The function can contain any TML command. When a conditional GOTO or CALL instruction is encountered, the condition is checked and, if it is true, a jump or call to the specified label is executed. If condition is false, the next TML instruction is executed. The condition to check is a comparison of a given parameter or variable with 0. The possible conditions are: < 0, <= 0, >0, >=0, =0, != 0. Programming Examples GOTO label1, i_var2, LT; GOTO label2, i_var2, LEQ; GOTO label3, i_var2, GT; GOTO label4; CALL fct1, i_var1, GEQ; CALL fct1, i_var1, EQ; CALL fct1, i_var1, NEQ; CALL fct1; // jump to label1 if i_var2 < 0 // jump to label2 if i_var2 <= 0 // jump to label3 if i_var2 > 0 // unconditional jump to label4 // call function fct1, if i_var1 >= 0 // call function fct1, if i_var1 = 0 // call function fct1, if i_var1 != 0 // unconditional call of // function fct1 fct1: … … RET 4.6 TML Interrupts – Automatic Functions for Monitoring Conditions The TML interrupts offer the possibility to select up to 12 interrupt conditions that can be monitored. On the contrary to the event triggers where the programmed event is expected to occur and it is waited, the TML interrupts main goal is to provide a way to react to unexpected events as are most of the conditions from Table 4.11. The TML interrupt service routine is like a TML function except the RET instruction which is replaced by RETI (return from interrupt). In order to generate a TML interrupt 3 conditions are necessary: !" the TML interrupts should be globally enabled (with TML command EINT) !" one or more interrupt conditions should be individually unmasked !" the monitored condition should occur ! Technosoft 2003 4-18 IDM240 / 640 Technical Reference Technosoft Motion Language The TML interrupts use, requires to define an interrupt table with the addresses (starting labels) of the TML interrupt service routines. Table 4.11. TML Interrupt Conditions TML Interrupt No. 0 1 2 3 4 5 6 7 8 9 10 11 Condition Description ENABLE input is set low or left open Power-stage protection (short-circuit and/or earth-fault) is triggered At least one software-monitored protection: over-current, I2t, TEMP1 input over limit, TEMP2 input over limit, over-voltage, under-voltage) is triggered Control error. The difference between the target and actual value is over a programmed limit Communication error 32-bit position wraps-around Positive Limit Switch (LSP input) is triggered Negative Limit Switch (LSN input) is triggered A capture input (CAPI) was triggered When motion is completed When a new contour segment can be provided When a programmable event trigger occurs Programming Example INTTABLE = IntVect; ICR = 0x4; EINT; … … // set interrupt table // unmask INT2 // global enable for TML interrupts Int2_SoftProtection: STOP3; RETI; // INT2 Interrupt service routine // stop motion // return from interrupt IntVect: @Int0_Disable; @Int1_PDPINT; @Int2_SoftProtection; @Int3_ControlError; @Int4_CommError; @Int5_WrapAround; @Int6_LimitSwitchP; @Int7_LimitSwitchM; // interrupt vector table ! Technosoft 2003 4-19 IDM240 / 640 Technical Reference Technosoft Motion Language @Int8_Capture; @Int9_MotionComplete; @Int10_UpdateContourSeg; @Int11_EventReached; 4.7 Arithmetic and Logic Operations The TML “motion processor” ALU permits the following operations: addition subtraction !" multiplication !" left and right shift !" logic AND and OR !" !" The operands, TML variables or parameters are treated always as signed numbers. Right shift is performed with sign-extension. Addition. The right-side operand (variable or value) is added to the left-side operand Examples: i_var1 += 10; // i_var1 = i_var1 + 10 i_var1 += i_var2; // i_var1 = i_var1 + i_var2 Subtraction. The right-side operand (variable or value) is subtracted from the left-side operand Examples: i_var1 -= 10; // i_var1 = i_var1 - 10 i_var1 -= i_var2; // i_var1 = i_var1 - i_var2 Arithmetic Shift. Can be performed with one or 2 operands. In shift instructions, with a single operand, its value is left or right shifted. At right shifts, high order bits are sign-extended and the low order bits are lost. At left shifts, high order bits are lost and the low order bits are zeroed. The shift value is between 0 and 15. Examples: i_var1 <<= 2; // i_var1 = i_var1 left shifted by 2 l_var1 >>= 7; // l_var1 = l_var1 right shifted by 7 In shift operations with 2 operands, the destination operand is a 32-bit variable (long or fixed) and the source operand is a 16-bit integer. The destination operand takes the value of the source operand left shifted between 0 and 16. The high order bits of the shifted value are sign-extended. Examples: i_var1 = 16; // integer i_var1 = 16 (0x10) ! Technosoft 2003 4-20 IDM240 / 640 Technical Reference Technosoft Motion Language l_var1 = i_var1 <<3; i_var1 = -10; l_var1 = i_var1 <<0; // long l_var1 = 128 (0x80) // integer i_var1 = -10 (0xFFF6) // long l_var1 = -10 (0xFFFFFFF6) The last example shows how shift instruction can be used to assign to a long variable the value of an integer variable, preserving the sign. Shift operations can also be done with the 48-bit PROD Register, which keeps the result of the last performed multiply operation. Example: PROD >>= 1; // right shift by 1 the contents of PROD register, // in order to divide by 2 the last Multiplication. The multiply instructions, include 2 source operands. The first operand can be any parameter or a variable (integer, long or fixed). The 2nd operand can be only an integer variable or a 16-bit immediate value. The 48-bit result is automatically saved in a dedicated register named PROD. The multiplication result can be saved in PROD, left or right shifted with a value between 0 and 15. Examples: l_var1 * -200 <<0; // PROD = 48-bit result of l_var1 * (-200) i_var1 * i_var2 >>1; // PROD = (i_var1 * i_var2)/2 l_var1 = PROD; // save in l_var1 the 32LSB of PROD l_var1 * i_var2 >>2; // PROD = (l_var1 * i_var2)/4 Logic AND and OR. Bit manipulation can be done using TML instruction SRB var16, ANDmask, ORmask This command performs a logic-AND between var16 value and the ANDmask value and afterwards a logic-OR with the ORrmask value. The result is saved in var16. ! Technosoft 2003 4-21 IDM240 / 640 Technical Reference Technosoft Motion Language 4.8. Multiple-axis Programming For multiple-axis application the TML offers 3 categories of instructions: a) write a data to a remote axis or group of axes Example: [2]i_var1 = i_var2;// i_var1 from axis 2 = i_var2 from local axis b) read a data from a remote axis Example: i_var1 = [1]i_var2;// i_var1 from local axis = i_var2 from axis 1 c) send a TML command to a remote axis or group of axes Example: [3]{UPD}; ! Technosoft 2003 // send command UPD to axis 3 4-22 IDM240 / 640 Technical Reference Serial Communication Protocol Appendix A. Serial Communication Protocol TML Instruction Format The TML instruction code consists of 1 to 5, 16-bit words (see Figure A.1). The first word is the operation code. The rest of words (if present) represent the instruction data words. The operation code is divided into 2 fields: Bits 15-9 represent the code for the operation category. For example all TML instructions that perform addition of 2 integer variables share the same operation category code. The remaining bits 8-0 represent the operand ID that is specific for each instruction. Operation Code Data (1) … Data (4) Operation Category Operand ID 15 ……………………9 8 ……………………….. 0 Figure A.1. TML Instruction Format Axis Identification in a Multiple-axis Network Another information that has to be included in a serial message is the axis or group ID. The axis ID is a unique number between 0 and 255 through which an axis is identified. After power-on, the Axis ID is set by default at 255. It can be changed using the TML command AXISID. This command may se sent by a host or may be included in a TML program that is automatically executed after power-on. This program may set for example the Axis ID according with the value read from the IDM240/640 J6 connector, which is dedicated for this purpose. Each axis also includes a group ID. When a TML command is sent to a group, all axes sharing the same group ID will receive the command. This feature allows a host to send a command simultaneously to several axes, for example to start or stop the axes motion in the same time. The group ID is like the Axis ID an 8-bit value. A TML command can be sent to 8 different groups. Each group is defined as having one of the 8 bits of the group ID value set to 1 (see Table A.1) The group ID of an axis can have any value between 0 and 255. If for example the group ID is 11 (1011b) this means that the axis will receive all messages sent to groups 1, 2 and 4 ! Technosoft 2003 A-1 IDM240 / 640 Technical Reference Serial Communication Protocol Table A.1. Definition of the groups Group No. 1 2 3 4 5 6 7 8 Group ID value 1 ( 0000 0001b ) 2 ( 0000 0010b ) 4 ( 0000 0100b ) 8 ( 0000 1000b ) 16 ( 0001 0000b ) 32 ( 0010 0000b ) 64 ( 0100 0000b ) 128 (1000 0000b ) When a TML Instruction is sent through the serial channel, the body of the message consists of the axis or group ID followed by the instruction code (see Figure A.2). Axis/Group ID Operation Code Data (1) … Data (4) Figure A.2. Message Structure The axis or group ID is sent as a 16-bit word with the following structure: 15 0 14 0 13 0 12 G 11 ID7 10 ID6 9 ID5 8 ID4 7 ID3 6 ID2 5 ID1 4 ID0 3 0 2 0 1 0 0 H Figure A.3. Structure of the axis or group ID in a communication message Where: Bit 0 – HOST bit. When a host is connected with an IDM240/640 through the RS-232 protocol, both host and IDM240/640 must have the same ID (same value for bits ID7 to ID0). The difference is done through the HOST bit: 0 – IDM240/640, 1 – host. When RS-485 protocol is used, the host and the IDM240/640 board(s) must have different ID (different values for bits ID7 to ID0) and HOST bit should be 0 Bits 11-8 – ID7-ID0: the 8-bit value of an axis or group ID Bit 12 – GROUP bit: 0 – ID7-ID0 value is an Axis ID, 1 – ID7-ID0 value is a group ID ! Technosoft 2003 A-2 IDM240 / 640 Technical Reference Serial Communication Protocol Message Types The serial communication protocol is based on 2 types of messages: • • Type A: Messages that don’t require an answer (a return message). In this category enter for example the messages containing commands for parameter settings, commands that start or stop motion execution, etc. Type B: Messages that require an answer. In this category enter the messages containing commands that ask to return data, for example the value of TML parameters, registers, or variables. The type B message has 2 components: • • A request message with the TML command “Give Me Data”. An answer message with the TML command “Take Data” All messages, type A or type B have the structure presented in Figure A.3. The “Give Me Data” request message includes the following information: Axis ID (destination axis) Operation Code: 0B004 for 16-bit data 0B005 for 32-bit data Data(1): Sender Axis ID Data(2): Requested Data Address Figure A.4 “Give Me Data” Message Contents The “Take Data” answer message includes the following information: Axis ID (destination axis) Operation Code: 0B404 for 16-bit data 0B405 for 32-bit data Data(1): Sender Axis ID Data(2): Requested Data Address Data(3): Data Requested 16LSB Data(4): Data Requested 16MSB (for 32-bit data) Figure A.5. “Take Data” Message Contents ! Technosoft 2003 A-3 IDM240 / 640 Technical Reference Serial Communication Protocol Serial RS232/RS485 Communication Protocol The IDM240/640 serial communication interface works with 8 data bits, 2 stop bits, no parity at the following baud rates: 9600 (default after reset), 19200, 38400, 56600 and 115200. The messages exchanged through serial communication are packed in the following format: Byte 1: Message length Byte 2: Axis/Group ID – high byte Byte 3: Axis/Group ID – low byte Byte 4: Operation code – high byte Byte 5: Operation code – low byte Byte 6: Data (1) – high byte Byte 7: Data (1) – low byte Byte 8: Data (2) – high byte … Byte13: Data (4) – low byte Last byte: Checksum Figure A.6. Serial communication message format The message length byte contains the total number of bytes of the message minus 2. Put in over words, the length byte value is the number of bytes of the: axis/group ID (2bytes), the operation code (2 bytes) and the data words (variable from 0 to 8 bytes). The checksum byte is the sum modulo 256 of all the bytes of the message except the checksum itself. Example1: The TML instruction “kpp = 5” (set proportional part of the position controller), has the instruction code: Operation Code = 205Eh Data (1) = 0005h A host connected on RS-232 with an IDM240/640 with Axis ID = 255 = 0FFh (default after reset) wants to send the TML instruction “kpp = 5”. The serial message must have the following contents: Byte 1: 06h – length: ID=2,Opcode=2,Data=2 Byte 2: 0Fh – high byte of ID = 0FF0h Byte 3: F0h – low byte of ID = 0FF0h Byte 4: 20h – high byte of OpCode = 205Eh Byte 5: 5Eh – low byte of OpCode = 205Eh Byte 6: 00h – high byte of Data(1) = 0005h Byte 7: 05h – low byte of Data(1) = 0005h) Byte 8: 88h – checksum Figure A.7. Serial message contents when TML instruction “kpp = 5” is sent ! Technosoft 2003 A-4 IDM240 / 640 Technical Reference Serial Communication Protocol Example2: The host connected on RS-232 wants to get the value of the kpp parameter from an IDM240/640 with Axis ID = 255 = 0FFh. The kpp value to be returned is 120h. The host has to send a “Give Me Data” TML command with the following instruction code: Operation Code = B004h ( 16-bit value) Data (1) = 0FF1h (sender ID = destination ID + HOST bit set) Data(2) = 025Eh (kpp variable address) The” Take Data” answer will have the following instruction code: Operation Code = B404h ( 16-bit value) Data (1) = 0FF0h (sender ID) Data(2) = 025Eh (kpp variable address) Data(3) = 0120h (kpp variable value) The serial message send by the host with “Give Me Data” command must have the following contents: Byte 1: 08h – length ID=2,Opcode=2,Data=4 Byte 2: 0Fh – high byte of ID = 0FF0h Byte 3: F0h – low byte of ID = 0FF0h Byte 4: B0h – high byte of OpCode = B004h Byte 5: 04h – low byte of OpCode = B004h Byte 6: 0Fh – high byte of Data(1) = 0FF1h Byte 7: F1h – low byte of Data(1) = 0FF1h Byte 8: 02h – high byte of Data(2) = 025Eh Byte 9: 5Eh – low byte of Data(2) = 025Eh Byte 8: 1Bh – checksum Figure A.8. Serial message contents for “Give Me Data” value of kpp The serial message received by the host with “Take Data” command must have the following contents: ! Technosoft 2003 A-5 IDM240 / 640 Technical Reference Serial Communication Protocol Byte 1: 0Ah – length ID=2,Opcode=2,Data=6 Byte 2: 0Fh – high byte of ID = 0FF1h Byte 3: F1h – low byte of ID = 0FF1h Byte 4: B4h – high byte of OpCode = B404h Byte 5: 04h – low byte of OpCode = B404h Byte 6: 0Fh – high byte of Data(1) = 0FF0h Byte 7: F0h – low byte of Data(1) = 0FF0h Byte 8: 02h – high byte of Data(2) = 025Eh Byte 9: 5Eh – low byte of Data(2) = 025Eh Byte 10: 01h – high byte of Data(3) = 0120h Byte 11: 20h – low byte of Data(3) = 0120h Byte 12: 42h – checksum Figure A.9. Serial message contents for “Take Data” value of kpp RS-232 Protocol The RS-232 communication can be used to connect a host with one IDM240/640 working in slave mode. The RS-232 protocol is full duplex, allowing simultaneous transmission in both directions. After each command (Type A or B) sent by the host, the IDM240/640 will confirm the reception by sending one acknowledge-Ok byte. This byte is’ O’ (ASCII code of capital o, 0x4F). If the host receives the ‘O’ byte, this means that the IDM240/640 has received correctly (checksum verification was passed) the last message sent, and now is ready to receive the next message. If the checksum computed by the IDM240/640 doesn’t match with the one sent by the host, the IDM240/640 will send one acknowledge-Not-ok byte. This is ‘N’ (ASCII code of capital n, 0x4E). If the host receives the ‘N’ byte, it can start immediately to send again the last message. If after a message sent, the host doesn’t receive any acknowledge byte (after the programmed timeout period), this means that at some point during the last message transmission, one byte was lost and the synchronization between the host and the IDM240/640 is gone. In order to restore the synchronization the host should do the following: 1. send a SYNC byte having value 0x0d 2. wait a programmed timeout period for an answer; 3. if the IDM240/640 sends back the same SYNC byte, the synchronization is restored and the host can again the last message, else go to step 1 4. repeat steps 1 to 3 until IDM240/640 answers or 15 SYNC bytes are sent. If after 15 SYNC bytes there is no answer from the IDM240/640, then there is a serious communication problem and the serial link must be checked When a host sends a type A message through RS-232 it has to: a) Send the SCI message (as in Example 1); ! Technosoft 2003 A-6 IDM240 / 640 Technical Reference Serial Communication Protocol b) Wait the acknowledge-OK byte ‘O’ from the IDM240/640; When a host sends a type B message through RS-232 it has to: a) Send a message with “Give Me Data” command (as in Example 2) b) Wait the acknowledge-OK byte ‘O’ from the IDM240/640; c) Wait the response message from the IDM240/640, which contains the command “Take Data”. When the IDM240/640 returns a “Take Data” message it doesn’t expect to receive an acknowledge byte from the host. It is the host task to monitor the communication. If the host gets the response message with a wrong checksum, it is the host duty to send again the “Give Me Data” request. RS-485 Protocol The RS-485 communication can be used to connect up to 255 IDM240/640 in a multi-axis network. The master is also one of the network nodes. The RS-485 protocol is semi-duplex. If at one moment one network node transmits – it has the transmission enabled and the reception disabled – all the other nodes must listen – their transmission is disabled and the reception is enabled. This procedure imposes certain limitations: An acknowledge byte is sent back to the master after receiving a message on RS-485, ONLY if the message was sent to an individual axis. No acknowledge byte is sent back after receiving a group message on RS-485 by a group of several axes. This avoids conflicting messages on the RS-485 bus, if more slave axes try to send the acknowledge byte at the same time. Hence it is the master job to request data from each axis in order to check that sent group messages were received correctly by each axis. An IDM240/640 device can’t send a message to itself. This situation may occur if for example the message is sent to a group and the sender is included in the group It is not recommended to program a slave axis to send a message when a certain event happens. The correct approach is to program the master to periodically interrogate each axis about its status If after a message sent to one axis, the host doesn’t receive the acknowledge byte (after the programmed timeout period), in order to restore the synchronization the host should do the following: 1. Send 15 SYNC bytes (value 0x0d) 2. Send again the message ! Technosoft 2003 A-7 IDM240 / 640 Technical Reference CAN Communication Protocol Appendix B. CAN Communication Protocol TML Instruction Format The TML instruction code consists of 1 to 5, 16-bit words (see Figure B.1). The first word is the operation code. The rest of words (if present) represent the instruction data words. The operation code is divided into 2 fields: Bits 15-9 represent the code for the operation category. For example all TML instructions that perform addition of 2 integer variables share the same operation category code. The remaining bits 8-0 represent the operand ID that is specific for each instruction. Operation Code Data (1) … Data (4) Operation Category Operand ID 15 ……………………9 8 ……………………….. 0 Figure B.1. TML Instruction Format Axis Identification in a Multiple-axis Network In multiple-axis configurations, each axis needs to be identified through a unique number – the Axis ID. The Axis ID is set hardware from SW1 and is sampled at power-on. It can be later changed using the TML command AXISID. This command may se sent by a host or may be included in a TML program that is automatically executed after power-on with the Intelligent drive set in stand-alone mode. The Technosoft Motion Language allows several axis to be assigned to a group. When a TML command is sent to a group, all axes sharing the same group ID, will receive the command. This feature allows a host to send a command simultaneously to several axes, for example to start or stop the axes motion in the same time. The Group ID is like the Axis ID an 8-bit value. A TML command can be sent to 8 different groups. Each group is defined as having one of the 8 bits of the group ID value set to 1 (see Table B.1) ! Technosoft 2003 B-1 IDM240 / 640 Technical Reference CAN Communication Protocol Table B.1. Definition of the groups Group No. Group ID value G1 G2 G3 G4 G5 G6 G7 G8 1 ( 0000 0001b ) 2 ( 0000 0010b ) 4 ( 0000 0100b ) 8 ( 0000 1000b ) 16 ( 0001 0000b ) 32 ( 0010 0000b ) 64 ( 0100 0000b ) 128 (1000 0000b ) The Group ID of an axis can have any value between 0 and 255. If for example the group ID is 11 (1011b) this means that the axis will receive all messages sent to groups 1, 2 and 4. When a TML Instruction is send through the CAN-bus channel, the Axis/Group ID and the operation code are included in the CAN Message Identifier Words (see Figure B.2). CAN Message Identifier Word1 (contains part of the Operation Code and Axis/Group ID) CAN Message Identifier Word2 (contains rest of the Operation Code and Axis/Group ID) Data (1) … Data (4) Figure B.2. Message Structure In a serial or CAN message, the axis or group ID is a 16-bit word with the following structure: 15 0 14 0 13 0 12 G 11 ID7 10 ID6 9 ID5 8 ID4 7 ID3 6 ID2 5 ID1 4 ID0 3 0 2 0 1 0 0 H Where: Bit 0 – HOST bit. In a network configuration like in Figure B.3, the HOST bit indicates the destination axis for messages received by the relay axis: 0 – relay axis, 1 – host. Messages received by the relay axis with HOST bit set to 1, will be retransmitted through RS-232 to the host. Messages received by the relay axis with HOST bit set to 0, will be interpreted as commands for this axis and will be executed. In a network configuration like in Figure B.4, the HOST bit must always be 0. Bits 11-4 – ID7-ID0: the 8-bit value of an axis or group ID Bit 12 – GROUP bit: 0 – ID7-ID0 value is an Axis ID, 1 – ID7-ID0 value is a group ID ! Technosoft 2003 B-2 IDM240 / 640 Technical Reference CAN Communication Protocol Host or PC connected on RS232 Rx Gn Tx RS- transceiver 4 4 IDM240 used as SCIRX relay axis SCITX IDM240 IDM240 CAN_L CAN_H CAN_V+ CAN_GND Figure B.3. Multiple-axis network using CAN-bus communication with host connected through RS-232 to an axis used as communication relay IDM240 used as “normal” axis Host or PC connected on RS232 IDM240 IDM240 work CAN_L CAN_H CAN_V+ CAN_GND Figure B.4. Multiple-axis network using CAN-bus communication with host connected directly to the CAN network CAN Message Types The communication protocol is based on 2 types of messages: Type A: Messages that don’t require an answer (a return message). In this category enters for example the messages containing commands for parameter settings, commands that start or stop motion execution, etc. These messages have the structure presented in Figure B.2. Type B: Messages that require an answer. In this category enter the messages containing commands that ask to return data, for example the value of TML parameters, registers, or variables. The type B message has 2 components: A request message with the TML command “Give Me Data” An answer message with the TML command “Take Data” The “Give Me Data” request message has the following content: ! Technosoft 2003 B-3 IDM240 / 640 Technical Reference CAN Communication Protocol CAN Message Identifier Word1 (contains part of the Operation Code and Axis/Group ID) CAN Message Identifier Word2 (contains rest of the Operation Code and Axis/Group ID) Data(1): Sender Axis ID Data(2): Requested Data Address Figure B.5. “Give Me Data” Message Contents The Operation Code for the “Give Me Data” request is 0B004 for 16-bit data and 0B005 for 32-bit data. The “Take Data” answer message includes the following information: CAN Message Identifier Word1 (contains part of the Operation Code and Axis/Group ID) CAN Message Identifier Word2 (contains rest of the Operation Code and Axis/Group ID) Data(1): Sender Axis ID Data(2): Requested Data Address Data(3): Data Requested 16LSB Data(4): Data Requested 16MSB (for 32-bit data) Figure B.6. “Take Data” Message Contents The Operation Code for the “Take Data” request is 0B404 for 16-bit data and 0B405 for 32-bit data. CAN-bus Communication Protocol – Frames Description The Intelligent drive implements the CAN 2.0B protocol that uses 29 bits for the identifier. Figure B.7 presents how the standard TML Instruction from Figure B.2 is packed and transmitted on the CAN-bus: the CAN message identifier format and the CAN data bytes correspondence with the instruction code data words. CAN Message Identifier Word 1 x x x Operation Code (7MSB) (Operation Category) GROUP Bit Axis/Group ID (5MSB) ID7-ID3 CAN Message Identifier Word 2 Axis/Group ID (3LSB) ID7-ID3 ! Technosoft 2003 0 0 0 HOST bit Operation code (9LSB) (Operation ID) CAN Message Data Byte No. TML Data Word 1 2 Data(1) – high byte Data(1) – low byte B-4 IDM240 / 640 Technical Reference CAN Communication Protocol 3 4 5 6 7 8 Data(2) – high byte Data(2) – low byte Data(3) – high byte Data(3) – low byte Data(4) – high byte Data(4) – low byte Figure B.7. CAN message frame The CAN-bus communication offers the possibility to work on a semi-duplex network like in a fullduplex one. The CAN controller automatically solves the conflicts that occur while 2 axes try to transmit messages in the same time. For example, in an RS-485 network, such an event usually corrupts both messages, while in a CAN-bus the higher priority message always wins. The lower priority message is automatically sent after the transmission of the first message ends. Any Intelligent drive from a CAN-bus network may also be connected through RS-232 with a host (see Figure B.3). In this structure, the axis connected to the host, apart from executing the commands received from host or other axes, acts also as a retransmission relay which: receives through RS-232, commands from host for another axis and retransmits them to the destination through CAN-bus receives through CAN-bus data requested by host from another axis and retransmits them to the host through RS-232 This flexibility enables a host to program and monitor a CAN-bus network of Intelligent drives using only one RS-232 connection to any axis, without the need to have a CAN-bus interface. In this case the CAN-bus protocol is completely transparent for the host. By default, the CAN baud-rate is set at 125Kbps. The maximum baud-rate is 1Mbps. It can be changed at any value supported by the CAN transceiver. CAN-bus Communication Protocol – Examples Example 1: Suppose the host wants to send on the CAN bus to an IDM240/640 the message containing the TML instruction “KPP = 0x1234” (set proportional part of the position controller). As this is a type A message (no answer required), the instruction (see extracts from Table D.2 and C.6 below) has the following code: Operation Code = 205Eh Data (1) = 1234h (Extract from Table D.2. TML Instruction Set. Assignment Group) Syntax Description TML Instruction Format Operation Code Data(1) V16 = val16 V16 = val16 0x2000 | 9LSB(&V16) val16 Data(2) Data(3) Data(4) (Extract from Table C.6. Controllers Parameters) Name Address Type Description KPP 0x025E int Proportional term coefficient for position controller ! Technosoft 2003 B-5 IDM240 / 640 Technical Reference CAN Communication Protocol If the destination IDM240/640 has the Axis ID = 5, the CAN Message Identifier Words have the following content: CAN Message Identifier Word 1 x x x 0 0 0 Operation Code (7MSB from 205Eh) 0010 000 GROUP Bit 0 Axis/Group ID (5MSB) ID7-ID3 = 04 00 h 0000 0 CAN Message Identifier Word 2 Axis/Group ID (3LSB) ID7-ID3 0 0 0 101 0 0 0 HOST bit 0 Operation code (9LSB from 205E) 0 0101 1110 = A0 5E h Consequently, the CAN message for “kpp = 0x1234” is: Byte no. 1 2 3 4 5 6 Value 04 00 A0 5E 12 34 Description high byte of CAN Message Identifier Word1 = 0400h low byte of CAN Message Identifier Word1 = 0400h high byte of CAN Message Identifier Word2 = A05Eh low byte of CAN Message Identifier Word2 = A05Eh high byte of Data(1) = 1234h low byte of Data(1) = 1234h Figure B.8. CAN message contents when TML instruction “kpp = 0x1234” is sent Example 2: Suppose the host connected directly on the CAN bus wants to get the value of the local position error from an IDM240/640. The position error is a 16-bit TML variable named POSERR situated at the 0x022A internal memory address (see extract from Table 39 below). (Extract from Table 39. Controllers Variables) Name Address Type Description POSERR 0x022A int Position error Suppose the host CAN bus address is 3 and that the questioned IDM240/640 has 5 as CAN bus address. As this is a type B message (an answer is required), it has 2 components: the request command “Give Me Data” and the answer “Take Data”. The request command “Give Me Data” has the following content: CAN Message Identifier Word1 (Op. Code = B004h and ID = 5) CAN Message Identifier Word2 (Op. Code = B004h and ID = 5) Data(1): Sender Axis ID Data(2): Requested Data Address 1600h A004h 0030h 022Ah Supposing that the POSERR value is 2, the ”Take Data” answer will have the following content: CAN Message Identifier Word1 (Op. Code = B404h and ID = 3) ! Technosoft 2003 B-6 1680h IDM240 / 640 Technical Reference CAN Communication Protocol CAN Message Identifier Word2 (Op. Code = B404h and ID = 3) Data(1): Sender Axis ID Data(2): Requested Data Address Data(3): Value Existing at Requested Data Address 6004h 0050h 022Ah 0002h The request CAN Message Identifier Words for the CAN message “?POSERR” are: CAN Message Identifier Word 1 x x x 0 0 0 Operation Code (7MSB from B004h) 1011000 GROUP Bit 0 Axis/Group ID (5MSB) ID7-ID3 = 16 00 h 0000 0 CAN Message Identifier Word 2 Axis/Group ID (3LSB) ID7-ID3 0 0 0 101 0 0 0 HOST bit 0 Operation code (9LSB from B004h) 000000100 = A0 04 h Consequently, the request CAN message for “?POSERR” is: Byte no. 1 2 3 5 5 6 7 8 Value 16 00 A0 04 00 30 02 2A Description high byte of CAN Message Identifier Word1 = 1600h low byte of CAN Message Identifier Word1 = 1600h high byte of CAN Message Identifier Word2 = A004h low byte of CAN Message Identifier Word2 = A004h high byte of Data(1) = 0030h low byte of Data(1) = 0030h high byte of Data(2) = 022Ah low byte of Data(2) = 022Ah Figure B.9. CAN message contents when TML instruction “?POSERR” is sent The answer CAN Message Identifier Words for the CAN message answer to “?POSERR” are: CAN Message Identifier Word 1 x x x 0 0 0 Operation Code (7MSB from B404h) 1011010 GROUP Bit 0 Axis/Group ID (5MSB) ID7-ID3 = 16 80 h 0000 0 CAN Message Identifier Word 2 Axis/Group ID (3LSB) ID7-ID3 0 0 0 011 0 0 0 HOST bit 0 Operation code (9LSB from B004h) 000000100 = 60 04 h Consequently, the CAN message answered to the request “?POSERR” is: Byte no. ! Technosoft 2003 Value Description B-7 IDM240 / 640 Technical Reference CAN Communication Protocol 1 2 3 5 5 6 7 8 9 10 16 80 60 04 00 50 02 2A 00 02 high byte of CAN Message Identifier Word1 = 1680h low byte of CAN Message Identifier Word1 = 1680h high byte of CAN Message Identifier Word2 = 6004h low byte of CAN Message Identifier Word2 = 6004h high byte of Data(1) = 0050h low byte of Data(1) = 0050h high byte of Data(2) = 022Ah low byte of Data(2) = 022Ah high byte of Data(2) = 0002h low byte of Data(2) = 0002h Figure B.10. CAN message contents for “Take Data” value of POSERR ! Technosoft 2003 B-8 IDM240 / 640 Technical Reference TML Data Components Appendix C. TML Data Components TML Registers The TML environment works with configuration, command and status registers. The configuration registers contain essential configuration information like motor and sensors type, or basic operation settings like PWM mode, motor start method, etc. The configuration registers must be setup during the initialization phase. The command registers hold configuration settings that can be changed during motion. These settings refer to the activation/deactivation of software protections, use of TML interrupts and communication options. The status registers, provide information about the status of different motion system elements like communication, motion mode, active control loops, system protections, TML interrupts. The status registers can be used to detect events and to take decisions in a TML program. Configuration registers (R/W): SCR – System Configuration Register. Used to define the basic application configuration: motor and sensors types, brake circuit presence, external user loop existence OSR – Operating Settings Register. Used to define specific system operating settings, as current offset detection mode, Brushless AC motor start procedure, PWM special features, stepper control type, how to read the sensor of the external user loop, which pin to use for brake command Command registers (R/W): CCR – Communication Control Register. Contains settings for SPI and parallel I/O channels. ICR – Interrupt Control Register. Used to define the masks for TML interrupts PCR - Protections Control Register. Used to activate different protections in the system, as maximum current, I2t, over and under voltage and over-temperature (TEMP1,2 inputs over limits) Status registers (RO): AAR - Axis Address Register. Keeps the Axis ID and the group ID CBR – CAN Baud rate Register. Keeps the current settings for CAN-bus baud-rate CER – Communication Error Register. Contains error flags for the communication channels CSR – Communication Status Register. Contains status flags for the communication channels ISR - Interrupt Status Register. Contains interrupt flags set by the TML interrupt conditions MCR – Motion Command Register. Contains information about the motion modes: reference mode, active control loops, positioning type: absolute or relative, etc. MSR – Motion Status Register. Mainly used internally by the TML kernel, the register bits give indications about motion progress and specific motion events as software protections, control error, wrap-around, limit switches, captures, contour segments, events, axis status, etc. ! Technosoft 2003 C-1 IDM240 / 640 Technical Reference TML Data Components PCR - Protections Control Register. Used to examine the status of different protections in the system, as over-current, I2 t, over and under voltage and TEMP1, TEMP2 inputs over limits The TML registers have reserved mnemonics, but no specially dedicated instructions. Hence, in a TML program, registers are treated like any other TML parameter or variable. The configuration and command registers can be read or written. The status registers can only be read. Table C.1 presents the TML registers, their mnemonic, type and the corresponding data memory addresses. Table C.1. TML Registers Mnemonic Register Name Type Address SCR System Configuration Register Configuration 0x300 OSR Operating Settings Register Configuration 0x302 CCR Communication Control Register Command 0x30A ICR Interrupt Control Register Command 0x304 PCR Protections Control Register Cmd/status 0x303 AAR Axis Address Register Status 0x30C CBR CAN Baud rate Register Status 0x30D CER Communication Error Register Status 0x301 CSR Communication Status Register Status 0x30B ISR Interrupt Status Register status 0x306 MCR Motion Command Register Status 0x309 MSR Motion Status Register status 0x308 TML Parameters TML programs use some specific data information structured through the TML parameters. Having reserved TML mnemonics, the TML parameters allow setup and/or examine the parameters of the different motion system components. Some of the TML parameters share the same memory address. They are used in application configurations that exclude one each other, and thus are not needed at the same time. A part of the TML parameters must be setup during the initialization phase. They are used to define the real-time kernel including the PWM frequency and the control loops sampling periods and should not be changed after the execution of the ENDINIT command. The other parameters can be initialized, used and changed any time before or after ENDINIT command. The following tables present the TML parameters, grouped by functionality. ! Technosoft 2003 C-2 IDM240 / 640 Technical Reference TML Data Components Table C.2. Real-time Kernel Parameters Parameter Name Address Data Type Significance CLPER SLPER 0x0250 0x0251 uint uint Current loop sampling time Speed loop sampling time Table C.3. Motors Parameters Parameter Name Address Data Type Significance BOOST 0x027D int Boost voltage CORDDTH 0x028E int Acceleration correction factor CORDTH 0x028D int Speed correction factor CWEAK 0x0257 int Weak factor GUARD 0x027E int Stepper guard factor IDMAX 0x027B int D axis maximum current IDMIN 0x027C int D axis minimum current IDRSTEP 0x027B int D axis reference current IQRSTEP 0x027C int Q axis reference current KSLIP 0x0279 int Slip factor KSPD 0x0277 int Speed factor KVOLT 0x0279 int Voltage factor POSTRGG 0x0289 uint Position trigger for controlled start SCL2H 0x0281 int Scaling factor 2 - high part SCL2L 0x0282 uint Scaling factor 2 - low part SCL3 0x0283 int Scaling factor 3 SCL4 0x0286 int Scaling factor 4 SENSE 0x0288 int PMSM start sense SFTCWEAK 0x0258 int Shift for weak factor SFTKSLIP 0x027A int Shift slip factor SFTKSPD 0x0278 int Shift for speed factor SFTKVOLT 0x027A int Shift voltage factor SFTSCL1 0x0280 int Scaling factor shift SGCODTH 0x0289 int Speed sign correction factor SIN2REC 0x0287 int Sinusoidal to rectangular transition level SRCOR 0x027F int Sinusoidal to rectangular transition correction SRECTCOMP 0x028F int Device correction term T1ONA 0x0284 uint Time on A phase T1ONB 0x0285 uint Time on B phase TIMELIM 0x0286 uint Time limit for controlled start WEAKINC 0x0259 int Weak increment ! Technosoft 2003 C-3 IDM240 / 640 Technical Reference TML Data Components Table C.4. Sensors Parameters Parameter Name Address Data Type Significance AD0OFF 0x0244 uint Offset for AD0 channel AD1OFF 0x0245 uint Offset for AD1 channel AD2OFF 0x0246 uint Offset for AD2 channel AD3OFF 0x0247 uint Offset for AD3 channel AD4OFF 0x0248 uint Offset for AD4 channel AD5OFF 0x0249 uint Offset for AD5 channel AD6OFF 0x024A uint Offset for AD6 channel AD7OFF 0x024B uint Offset for AD7 channel CADIN 0x025C int Analog feedback scaling factor CI0 0x028D int Static friction current factor CIQ 0x028E int Motor torque current factor ELRES 0x0279 uint Encoder increments / electrical resolution FILTER1 0x029D int Coefficient for the first order filter for analogue reference HALLCASE 0x0259 int Hall sensors configuration parameter HALLDIR 0x028F int Speed estimate from time (Hall pulse length) parameter MECRES 0x0277 uint Position sensor increments / mechanical revolution PFOVF 0x029C uint POSOKLIM 0x036A uint Position feedback overflow value (analogue, parallel I/O or on-line position sensor) Position accepted error band to lock control SETAD01 0x024C int Specific AD channels assignment (IA, IB) for the selected power stage SETAD23 0x024D int specific AD channels assignment (ANALOG_FDBK, IC) for the selected power stage specific AD channels assignment (VDC, REF) for the selected power stage SETAD45 0x024E int SETAD67 0x024F int specific AD channels assignment (TEMP1/TQLIM, TEMP2/TQFFW) for the selected power stage Shift for analog feedback scaling factor SFTADIN 0x025D int SFTCRT 0x0290 int Current measurement shift factor TONPOSOK 0x036B uint Trigger time for control lock after positioning VDCN 0x025A uint DC bus voltage nominal value (V_dc compensation) ZAOFF 0x0289 uint Offset between encoder Z ! Technosoft 2003 C-4 IDM240 / 640 Technical Reference TML Data Components Table C.5. Power Converters Parameters Parameter Name Address Data Type Significance BRAKEDC 0x028B uint Brake duty cycle BRAKELIM 0x028A uint Brake activation level BRAKEOFF 0x028C uint Brake inactive state set value (default active Lo) DBT 0x0253 uint Power stage dead-time DBTLIM 0x027E int Dead band compensation parameter DBTTH 0x027F int Dead band threshold PWMPER 0x0252 uint PWM period SATPWM 0x0254 int Saturation limit for voltage command NEWPERWOB 0x0287 uint Central PWM period for wobbling MAXPWMWOB 0x028F uint Maximum PWM frequency variation during wobbling Table C.6. Controllers Parameters Parameter Name Address Data Type Significance ENC2TH 0x0278 uint Scaling constant for electrical angle computation IMAXP 0x0266 int Saturation limit for integral part for position controller IMAXS 0x026C int Saturation limit for integral part for speed controller KDFP 0x0264 int Derivative term filter coefficient for position controller KDP 0x0262 int Derivative term coefficient for position controller KFFA 0x026E int Acceleration feedforward factor KFFL 0x026F int Load torque feedforward factor KFFS 0x026D int Speed feedforward factor KII 0x0273 int Integrative term coefficient for current controller KIP 0x0260 int Integrative term coefficient for position controller KIS 0x0269 int Integrative term coefficient for speed controller KPI 0x0271 int Proportional term coefficient for current controller KPP 0x025E int Proportional term coefficient for position controller KPS 0x0267 int Proportional term coefficient for speed controller SATID 0x0275 int Saturation limit for ud command SATIQ 0x0276 int Saturation limit for uq command SATP 0x0265 int Saturation limit for speed command SATS 0x026B int Saturation limit for current command SFTAFFW 0x0291 int Shift feedforward acceleration SFTKDP 0x0263 int Derivative term shift for position controller SFTKFF 0x0270 int Feedforward shift SFTKII 0x0274 int Integrative term shift for current controller SFTKIP 0x0261 int Integrative term shift for position controller SFTKIS 0x026A int Integrative term shift for speed controller SFTKPI 0x0272 int Proportional term shift for current controller SFTKPP 0x025F int Proportional term shift for position controller SFTKPS 0x0268 int Proportional term shift for speed controller SFTSFFW 0x0292 int Shift feedforward speed ! Technosoft 2003 C-5 IDM240 / 640 Technical Reference TML Data Components Table C.7. Reference Generator Parameters Parameter Name Address Data Type Significance Acceleration command for position/speed profile modes CACC 0x02A2 fixed CPOS 0x029E long Position command for position profile mode CSPD 0x02A0 fixed Speed command for position/speed profile modes GEAR 0x02AC fixed Gearing factor for slave axis POS0 0x02B8 long Position origin for relative position event REF0 0x02A8 fixed Initial reference in voltage test mode (fixed) REF0 0x02A8 long Initial reference in torque test mode (long) REFTST 0x0281 int Test reference saturation value RINCTST 0x0280 int Test reference increment value SLAVEID 0x0311 int Axis / group ID for slave in electronic gearing THTST 0x0282 int Test reference electric angle TIME0 0x02BE long Time origin for relative time event TINCTST 0x0283 int Test reference electric angle increment Table C.8. Protections Parameters Parameter Name Address Data Type Significance ALPHA 0x0295 long I2t cooling coefficient BETA 0x0293 long I2t heating EFLEVEL 0x02C7 int Earth fault - protection limit ERRMAX 0x02C5 uint Control error limit IMAXPROT 0x0297 int Maximum current - protection limit NI2T 0x0255 long I2t computation interval T1MAXPROT 0x0298 uint Temp1. maximum - protection value T2MAXPROT 0x0299 uint Temp2. maximum - protection value TERRMAX 0x02C6 uint Trigger time for control error TIMAXPROT 0x02C4 uint Trigger time for maximum current protection UMAXPROT 0x029A uint DC bus voltage maximum - protection value UMINPROT 0x029B uint DC bus voltage minimum - protection value Table C.9. Motion Language Parameters Parameter Name Address Data Type Significance INITABLE 0x0307 int Start address of TML interrupts vector table ! Technosoft 2003 C-6 IDM240 / 640 Technical Reference TML Data Components TML Variables TML programs use some specific data information structured through the TML variables. Having reserved TML mnemonics, the TML variables are used in the control module of the program. Their values can be read at any time during the execution of the program. Activating the on-chip logger module, real-time data tracing can also be implemented for any of these variables. The TML variables are internally initialized before activating the motion system real time structure (before the ENDINIT TML command), or before activating the motion control functions (before the execution of the AXISON TML command). Majority of TML variables is read only (RO). Modifying their value during motion execution may cause improper operation of the motion system. In specific situations, some of the TML variables can also be written (are R/W variables). The following tables present the TML variables, grouped by functionality. Table C.10. Motors Variables Name Address Type Description APOS 0x0228 Long actual position ASPD 0x022C Fixed actual speed IA 0x0239 Int A phase current IB 0x023A int B phase current IC 0x023B int C phase current STATE 0x0288 int Sinusoidal/rectangular actual stepper control mode UAREF 0x0236 int A phase reference voltage UBREF 0x0237 int B phase reference voltage UCREF 0x0238 int C phase reference voltage Table C.11. Sensors Variables Name Address Type Description ACCPL 0x02FF int Estimated acceleration between tow Hall/encoder pulses AD0 0x023C uint 1st AD channel (current i_A) AD1 0x023D uint 2nd AD channel (current i_B) AD2 0x023E uint 3rd AD channel (reference) AD3 0x023F uint 4th AD channel (current i_C) AD4 0x0240 uint 5th AD channel (DC link voltage) AD5 0x0241 uint 6th AD channel (feedback) AD6 0x0242 uint 7th AD channel (Temperature 1 / Limit torque) AD7 0x0243 uint 8th AD channel (Temperature 2 / Feedforward torque) CAPPOS 0x02BC long Captured position COSTH 0x0226 int Cosine theta ELPOS 0x0221 int Absolute electrical position ! Technosoft 2003 C-7 IDM240 / 640 Technical Reference TML Data Components FFL 0x0223 int Feedforward load torque POSINC 0x0222 int On-line incremental position feedback SSPL 0x02FE int Speed samples between tow Hall/encoder pulses THETAINC 0x020E int Electrical angle increment Table C.12. Controllers Variables Name Address Type Description CRTERR 0x0231 int Q axis current error HALL 0x0227 int Hall sensors information ID 0x0234 int D axis current IDREF 0x0233 int D axis reference current IQ 0x0230 int Q axis current IQREF 0x022F int Q axis reference current POSERR 0x022A int Position error SINTH 0x0225 int Sinus theta SPDERR 0x022E int Speed error SPDREF 0x022B int Reference speed THETA 0x0224 int Field position angle UDREF 0x0235 int D axis reference voltage UQREF 0x0232 int Q axis reference voltage Table C.13. Power Converter Variables Name Address Type Description CVDC 0x025B int DC bus compensation ratio Table C.14. Motion Language Variables Name Address Type Description PROD 0x030E 48 bits Result of a TML multiply operation ! Technosoft 2003 C-8 IDM240 / 640 Technical Reference TML Data Components Table C.15. Reference Generator Variables Name Address Type Description ATIME 0x02C0 Long Absolute system time CDREF 0x02A4 Fixed Reference increment for a contour segment CTIME 0x02A6 Int No. of samplings for a contour segment EREF 0x02A8 fixed/long External reference for all external modes MREF 0x02AA Long Reference send from master RPOS 0x02BA Long Relative position for event tests RTIME 0x02C2 Long Relative time for event tests TACC 0x02B6 Fixed Target acceleration TPOS 0x02B2 Long Target position TREF 0x02AE fixed/long Target reference TSPD 0x02B4 Fixed Target speed TML User variables Besides the TML pre-defined variables, the users of TML environment can define their own variables, which can be used in all the TML instructions that manipulate variables of the same types. The on-chip data memory offers the possibility to work with up to 32 integer / 16 long or fixed user-defined variables (see Table C.17). The address of the user variables is automatically set in order of declaration starting with 0x03E0. Apart from these variables the Intelligent drive also provides 3 pre-defined variables for general-purpose use (see Table C.16) Table C.16. General-purpose Pre-defined Variables Name Address Type Description VAR_I1 0x0366 Int Predefined user variable VAR_I2 0x0367 Int Predefined user variable VAR_LF 0x0368 Fixed/long Predefined user variable Table C.17. User-defined Variables Type Format Representation Range Int Long Signed integer Signed long integer 16 bits 32 bits Fixed (Integer part).(fractional part ) 32 bits -32768 ¸ 32767 (0x8000 ¸ 0x7FFF) -2147483648 ¸ 2147483647 (0x80000000 ¸ 0x7FFFFFFF) -32768.999969 ¸ 32767.999969 (0xFFFF.FFFF ¸ 0x7FFF.FFFF) ! Technosoft 2003 C-9 IDM240 / 640 Technical Reference TML Instruction Set Summary Appendix D. TML Instruction Set Summary This paragraph describes the complete set of TML instructions, grouped by functionality. Within each group, the instructions are ordered alphabetically and contain the mnemonic syntax, a short description and the instruction code. The next table presents the symbols used. Table D.1. TML Instructions Code Symbols Symbols Description &Label Address of TML program label &V16 Address of a 16-bit integer variable &V32 Address of a 32-bit long or fixed variable (V16) Memory location at address equal with V16 value (la) 9LSB(&V16) Long addressing. Source/destination operand provided with 16-bit address. Some TML instructions using 9-bit short addressing are doubled with their long addressing equivalent The 9 LSB (less significant bits) of the address of a 16-bit integer 9LSB(&V32) The 9 LSB (less significant bits) of the address of a 32-bit long or fixed A Axis ID A/G Axis ID or Group ID ANDdis ANDin 16-bit AND mask. See Table MCRx & AND/OR masks for DISIO#n and Table MCRx & PxDIR addresses 16-bit AND mask. See Table MCRx & AND/OR masks for ENIO#n and Table MCRx & PxDIR addresses 16-bit AND mask. See Table AND/OR masks for SETIO#n IN ANDm 16-bit user-defined AND mask ANDout 16-bit AND mask. See Table AND/OR masks for SETIO#n OUT ANDen ANDrst 16-bit AND mask. See Table AND/OR masks for ROUT#n ANDset 16-bit AND mask. See Table AND/OR masks for SOUT#n Bit_msk BitMskIO 16-bit AND mask. See Tables PxDIR & Bit_msk for V16=IN#n and table MCRx & PxDIR addresses 16-bit AND mask. See Table BitMskIO for V16=INPORT#n D_ref 32-bit fixed value D_time 16-bit value Flag See Table Condition Flag for GOTO/CALL LengthMLI Length of a TML instruction code in words – 1 MCRx ORin See Tables MCRx & AND/OR masks for ENIO#n / DISIO#n and Table MCRx & PxDIR addresses 16-bit OR mask. See Table MCRx & AND/OR masks for DISIO#n and Table MCRx & PxDIR addresses 16-bit OR mask. See Table MCRx & AND/OR masks for ENIO#n and Table MCRx & PxDIR addresses 16-bit OR mask.. See Table AND/OR masks for SETIO#n IN ORm 16-bit user-defined OR mask ORdis ORen ! Technosoft 2003 D-1 IDM240 / 640 Technical Reference TML Instruction Set Summary ORout 16-bit OR mask. See Table AND/OR masks for SETIO#n OUT ORrst 16-bit OR mask. See Table AND/OR masks for ROUT#n ORset 16-bit OR mask. See Table AND/OR masks for SOUT#n PxDIR See Table PxDIR & Bit_msk for V16=IN#n and Table MCRx & PxDIR addresses pm Data memory space: 200 – 3FFh (internal), 8000 – 0FFFFh (external) dm Program memory space: 8000 – 0FFFFh (external) dpi SPI-E2ROM memory space: 4000h – 7FFFh (external) TM V16 Type of memory. When used in syntax TM should be replaced by dm or pm or spi. When used in code, see Table TM values. 16-bit integer variable V16D 16-bit integer variable used as destination V16S 16-bit integer variable used as source V32 32-bit long or fixed variable V32(L) 16LSB of a 32-bit long or fixed variable (seen as a 16-bit integer) V32(H) 16MSB of a 32-bit long or fixed variable (seen as a 16-bit integer) V32D 32-bit long or fixed variable used as destination V32S 32-bit long or fixed variable used as source Val16 16-bit integer value Val32 32-bit long or fixed value Val32(L) 16LSB of a 32-bit long or fixed value Val32(H) 16MSB of a 32-bit long or fixed value ! Technosoft 2003 D-2 IDM240 / 640 Technical Reference TML Instruction Set Summary Table D.2. TML Instruction Set. Assignment Group Syntax Description Code 0 1 2 (V16D), TM = V16S (V16D) from TM = V16S 0x90B0 | TM &V16D &V16S (V16D), TM = V32S (V16D) from TM = V32S 0x90B1 | TM &V16D &V32S (V16D), TM = val16 (V16D) from TM = val16 0x90A0 | TM &V16D val16 (V16D), TM = val32 (V16D) from TM = val32 0x90A1 | TM &V16D val32(L) (V16D+), TM = V16S (V16D) from TM = V16S then V16D += 1 0x9030 | TM &V16D &V16S (V16D+), TM = V32S (V16D) from TM = V32S thenV16D += 1 0x9031 | TM &V16D &V32S (V16D+), TM = val16 (V16D) from TM = val16 then V16D += 1 0x9020 | TM &V16D val16 (V16D+), TM = val32 (V16D) from TM = val32 then V16D += 1 0x9021 | TM &V16D val32(L) SRB V16,ANDm,ORm Set / Reset Bits of a V16 0x5800 | 9LSB(&V16) ANDm ORm SRBL V16,ANDm,ORm Set / Reset Bits of a V16 (la) 0x5C00 &V16 ANDm V16 = label V16 = address of a TML label 0x2000 | 9LSB(&V16) &label V16 = val16 V16 = val16 0x2000 | 9LSB(&V16) val16 V16D = (V16S), TM V16D = (&V16S) from TM 0x9180 | TM &V16S &V16D V16D = (V16S+), TM V16D = (&V16S) from TM then V16S += 1 0x9100 | TM &V16S &V16D V16D = IN#n Read input #n 0x6000 | 9LSB(&V16D) PxDIR Bit_msk V16D = IN1, ANDm Read IN#25 to IN#32 with ANDm 0x6000 | 9LSB(&V16D) PEDIR ANDm V16D = IN2, ANDm Read IN#33 to IN#39 with ANDm 0x6000 | 9LSB(&V16D) PFDIR ANDm V16D = INPORT#n Read input #n from IO space port 0x6800 | 9LSB(&V16D) BitMskIO V16D = INPORT,ANDm Read all inputs from IO space port 0x6800 | 9LSB(&V16D) ANDm V16D = V16S V16D = V16S 0x2800 | 9LSB(&V16D) &V16S V16D = -V16S V16D = -V16S 0x3000 | 9LSB(&V16D) &V16S V16D = V32S(H) V16D = V32S(H) 0x2800 | 9LSB(&V16D) &V32S+1 V16D = V32S(L) V16D = V32S(L) 0x2800 | 9LSB(&V16D) &V32S V16D, dm = V16S V16D from dm = V16S (la) 0x9014 &V16D V16 from dm = val16 (la) 0x9004 &V16D val16 V32 = val32 V32 = val32 0x2400 | 9LSB(&V32) val32(L) val32(H) V32(H) = val16 V32(H) = val16 0x2000 | 9LSB(&V32+1) val16 V32(L) = val16 V32(H) = val16 0x2000 | 9LSB(&V32) val16 V32D = (V16S), TM V32D = (V16S) from TM 0x9181 | TM &V16S &V32D V32D = (V16S+), TM V32D = (V16S) from TM then V16D += 1 0x9101 | TM &V16S &V32D V32D = V32S V32D = V32S 0x2C00 | 9LSB(&V32D) &V32S V32D = -V32S V32D = -V32S 0x3400 | 9LSB(&V32D) &V32S V32D =V16S << N V32D = V16S left-shifted by N 0x8960 | N (N=0-16) &V32D V32D(H) = V16S V32D(H) = V16 0x2800 | 9LSB(&V32D+1) &V16S V32D(L) = V16S V32D(L) = V16 0x2800 | 9LSB(&V32D) &V16S V32D, dm = V32S V32D from dm = V32S (la) 0x9015 &V32D &V32S V32D, dm = val32 V32 from dm = val32 (la) 0x9005 &V32D val32(L) D-3 val32(H) val32(H) Orm &V16S V16D, dm = val16 ! Technosoft 2003 3 &V16S val32(H) IDM240 / 640 Technical Reference TML Instruction Set Summary Table D.3. TML Instruction Set. Arithmetic Group Syntax Description Code 0 1 PROD <<= N Left shift PROD by N 0x88A0 | N (N=0-15) 0x030e 2 PROD >>= N Right shift PROD by N 0x8880 | N (N=0-15) 0x030e V16 <<= N Left shift V16 by N 0x8820 | N (N=0-15) &V16 V16 >>= N Right shift V16 by N 0x8800 | N (N=0-15) &V16 V16 += val16 Add val16 to V16 0x3800 | 9LSB(&V16) val16 V16 -= val16 Subtract val16 from V16 0x4800 | 9LSB(&V16) val16 V16 * val16 << N PROD = (V16 * val16) >> N 0x8C20 | N (N=0-15) &V16 val16 V16 * val16 >> N PROD = (V16 * val16) >> N 0x8C00 | N (N=0-15) &V16 val16 V16A * V16B << N PROD = (V16A * V16B) << N 0x8CA0 | N (N=0-15) &V16A &V16B V16A * V16B >> N PROD = (V16A * V16B) >> N 0x8C80 | N (N=0-15) &V16A &V16B V16D += V16S Add V16S to V16D 0x4000 | 9LSB(&V16D) &V16S V16D -= V16S Subtract V16S from V16D 0x5000 | 9LSB(&V16D) &V16S V32 * V16 << N PROD = (V32 * V16) << N 0x8DA0 | N (N=0-15) &V32 &V16 V32 * V16 >> N PROD = (V32 * V16) >> N 0x8D80 | N (N=0-15) &V32 &V16 V32 * val16 << N PROD = (V32 * val16) << N 0x8D20 | N (N=0-15) &V32 val16 V32 * val16 >> N PROD = (V32 * val16) >> N 0x8D00 | N (N=0-15) &V32 val16 V32 >>= N Right shift V32 by N 0x8900 | N (N=0-15) &V32 V32 <<= N Left shift V32 by N 0x8920 | N (N=0-15) &V32 V32 += val32 Add val32 to V32 0x3C00 | 9LSB(&V32) val32(L) val32(H) V32 -= val32 Subtract val32 from V32 0x4C00 | 9LSB(&V32) val32(L) val32(H) V32D += V32S Add V32S to V32D 0x4400 | 9LSB(&V32D) &V32S V32D -= V32S Subtract V32S from V32D 0x5400 | 9LSB(&V32D) &V32S 3 Table D.4. TML Instruction Set. Program Flow Decision Group Syntax Description Code 0 1 2 CALL Label Unconditional CALL of a function 0x7401 &Label CALL Label, V16, Flag CALL function if V16 Flag 0 0x7401 | Flag &V16 &Label CALL Label, V32, Flag CALL function if V32 Flag 0 0x7501 | Flag &V32 &Label GOTO Label Unconditional GOTO to label 0x7400 &Label GOTO Label, V16, Flag GOTO label if V16 Flag 0 0x7400 | Flag &V16 &Label GOTO Label, V32, Flag GOTO label if V32 Flag 0 0x7500 | Flag &V32 &Label RET Return from TML function 0x0404 RETI Return from TML Interrupt SR 0x0504 ! Technosoft 2003 D-4 3 IDM240 / 640 Technical Reference TML Instruction Set Summary Table D.5. TML Instruction Set. Motion Mode Setting Group Syntax Description Code 0 1 2 MODE CS0 Set MODE Cam Slave 0 () 0x5909 0xB4C6 0x8406 MODE CS1 Set MODE Cam Slave 1 (T) 0x5909 0xB5C6 0x8506 MODE CS2 Set MODE Cam Slave 2 (S) 0x5909 0xB6C6 0x8606 MODE CS3 Set MODE Cam Slave 3 (S,T) 0x5909 0xB7C6 0x8706 MODE GS0 Set MODE Gear Slave 0 () 0x5909 0xB4C5 0x8405 MODE GS1 Set MODE Gear Slave 1 (T) 0x5909 0xB5C5 0x8505 MODE GS2 Set MODE Gear Slave 2 (S) 0x5909 0xB6C5 0x8605 MODE GS3 Set MODE Gear Slave 3 (S,T) 0x5909 0xB7C5 0x8705 MODE PC0 MODE Position Contouring 0 ( ) 0x5909 0xBCC2 0x8402 MODE PC1 MODE Position Contouring 1 (T) 0x5909 0xBDC2 0x8502 MODE PC2 MODE Position Contouring 2 (S) 0x5909 0xBEC2 0x8602 MODE PC3 MODE Position Contouring 3 (S,T) 0x5909 0xBFC2 0x8702 MODE PE0 MODE Position External 0 ( ) 0x5909 0xBCC0 0x8400 MODE PE1 MODE Position External 1 (T) 0x5909 0xBDC0 0x8500 MODE PE2 MODE Position External 2 (S) 0x5909 0xBEC0 0x8600 MODE PE3 MODE Position External 3 (S,T) 0x5909 0xBFC0 0x8700 MODE PP0 MODE Position Profile 0 ( ) 0x5909 0xBCC1 0x8401 MODE PP1 MODE Position Profile 1 (T) 0x5909 0xBDC1 0x8501 MODE PP2 MODE Position Profile 2 (S) 0x5909 0xBEC1 0x8601 MODE PP3 MODE Position Profile 3 (S,T) 0x5909 0xBFC1 0x8701 MODE PPD0 MODE Position Pulse & Dir 0 ( ) 0x5909 0xBCC4 0x8404 MODE PPD1 MODE Position Pulse & Dir 1 (T) 0x5909 0xBDC4 0x8504 MODE PPD2 MODE Position Pulse & Dir 2 (S) 0x5909 0xBEC4 0x8604 MODE PPD3 MODE Position Pulse & Dir 3 (S,T) 0x5909 0xBFC4 0x8704 MODE SC0 MODE Speed Contouring 0 (T) 0x5909 0xBAC2 0x8202 MODE SC1 MODE Speed Contouring 1 (T) 0x5909 0xBBC2 0x8302 MODE SE0 MODE Speed External 0 (T) 0x5909 0xB2C0 0x8200 MODE SE1 MODE Speed External 1 (T) 0x5909 0xB3C0 0x8300 MODE SP0 MODE Speed Profile 0 ( ) 0x5909 0xBAC1 0x8201 MODE SP1 MODE Speed Profile 1 (T) 0x5909 0xBBC1 0x8301 MODE SPD0 MODE Speed Pulse & Dir 0 ( ) 0x5909 0xBAC4 0x8204 MODE SPD1 MODE Speed Pulse & Dir 1 (T) 0x5909 0xBBC4 0x8304 0x8103 MODE TC MODE Torque Contouring 0x5909 0xB1C3 MODE TEF MODE Torque External Fast loop 0x5909 0xB1E0 0x8120 MODE TES MODE Torque External Slow loop 0x5909 0xB1C0 0x8100 MODE TT MODE Torque Test 0x5909 0xB1C8 0x8108 MODE VC MODE Voltage Contouring 0x5909 0xB0C3 0x8003 MODE VEF MODE Voltage External Fast loop 0x5909 0xB0E0 0x8020 MODE VES MODE Voltage External Slow loop 0x5909 0xB0C0 0x8000 MODE VT MODE Voltage Test 0x5909 0xB0C8 0x8008 ! Technosoft 2003 D-5 3 IDM240 / 640 Technical Reference TML Instruction Set Summary Table D.6. TML Instruction Set. Configuration and Command Group Syntax Description Code AXISOFF AXIS is OFF (deactivate control) AXISON AXIS is ON (activate control) 0x0102 BEGIN BEGIN of a TML program 0x649C BREAK BREAK TML program execution 0x0010 CHECKSUM, TM Start, Stop, V16D CONTINUE V16D = Checksum between Start and Stop addresses from TM Resume TML program execution 0xD910 | (TM<<3) CPA Command Position is Absolute 0 1 2 3 &V16D Start Stop 0x5909 0xFFFF 0x2000 0xDFFF 0x0000 0x0002 0x0110 CPR Command Position is Relative 0x5909 DINT Disable TML Interrupts 0x0410 EINT Enable TML Interrupts 0x0510 END END of a TML program 0x0001 ENDINIT END of Initialization 0x0020 EXTREF 0 0x5909 0xFF3F 0x0000 0x5909 0xFF7F 0x0040 0x5909 0xFFBF 0x0080 0x5909 0xFFFF 0x00C0 0xD840 addrS addrD LSACT NONE External Reference read from EREF updated on-line External Reference read from REFERNCE input External Reference read from a16bit IO port External Reference read from a 32=bit IO port Copy CAM table from SPI (addrS address) to RAM (addrD address) Limit Switch Action = NONE 0x20A7 0x0000 LSACT STOP0 Limit Switch Action = STOP0 0x20A7 0x0001 LSACT STOP1 Limit Switch Action = STOP1 0x20A7 0x0002 LSACT STOP2 Limit Switch Action = STOP2 0x20A7 0x0004 LSACT STOP3 Limit Switch Action = STOP3 0x20A7 0x0008 NOP No Operation 0x0000 RAOU Reset Automatic Origin Update 0x5909 RESET RESET DSP controller 0x0402 SAOU Set Automatic Origin Update 0x5909 SAP V32 Set Actual Position = V32 0x8000 | 9LSB(&V32) SAP val32 Set Actual Position = val32 0x8400 val32(L) val32(H) SEG D_time, D_ref Segment D_time, D_ref 0x7800 D_time D_ref(L) SEG V16, V32 Segment V16, V32 0x7C00 | 9LSB(&V16) &V32 SETWS val16 SET Wait-States for PS,DS,IS 0xD802 val16 STA Set Target pos. = Actual pos. 0x2CB2 0x0228 STOP0 STOP motion in mode 0 0x0104 EXTREF 1 EXTREF 2 EXTREF 3 INITCAM addrS, addrD ! Technosoft 2003 D-6 0xEFFF 0x0000 0xFFFF 0x1000 D_ref(H) IDM240 / 640 Technical Reference TML Instruction Set Summary STOP0! STOP0 when ! (event occurs) 0x0004 STOP1 STOP motion in mode 1 0x0144 STOP1! STOP1 when ! (event occurs) 0x0044 STOP2 STOP motion in mode 2 0x0184 STOP2! STOP2 when ! (event occurs) 0x0084 STOP3 STOP motion in mode 3 0x01C4 STOP3! STOP3 when ! (event occurs) 0x00C4 TUM0 Set Target Update Mode 0 0x5909 0xBFFF 0x0000 0xFFFF 0x4000 TUM1 Set Target Update Mode 1 0x5909 UPD Update motion immediate 0x0108 UPD! Update when ! (event occurs) 0x0008 ! Technosoft 2003 D-7 IDM240 / 640 Technical Reference TML Instruction Set Summary Table D.7. TML Instruction Set. Event group Syntax Description Code 0 1 2 !APO V32 ! if Relative Position Over V32 0x7192 0x0228 &V32 !APO val32 ! if Relative Position Over val32 0x7092 0x0228 val32(L) !APU V32 ! if Relative Position Under V32 0x7183 0x0228 &V32 !APU val32 ! if Relative Position Under val32 0x7083 0x0228 val32(L) !AT V32 ! if Absolute Time >= V32 0x7198 0x02C0 &V32 !AT val32 ! if Absolute Time >= val32 0x7098 0x02C0 val32(L) !CAP ! if Capture triggered 0x700E !IN#n 0 ! if Input #n is 0 0x70DB PxDIR Bit_msk !IN#n 1 ! if Input #n is 1 0x70DA PxDIR Bit_msk !LSN ! if Limit Switch Negative active 0x700C !LSP ! if Limit Switch Positive active 0x700D !MC !(set event) if Motion Complete 0x700F !RO V32 ! if Reference Over V32 0x7190 0x02AE &V32 !RO val32 ! if Reference Over val32 0x7090 0x02AE val32(L) !RPO V32 ! if Relative Position Over V32 0x7194 0x02BA &V32 !RPO val32 ! if Relative Position Over val32 0x7094 0x02BA val32(L) !RPU V32 ! if Relative Position Under V32 0x7185 0x02BA &V32 !RPU val32 ! if Relative Position Under val32 0x7085 0x02BA val32(L) !RT V32 ! if Relative Time >= V32 0x71B9 0x02C2 &V32 !RT val32 ! if Relative Time >= val32 0x70B9 0x02C2 val32(L) !RU V32 ! if Reference Under V32 0x7181 0x02AE &V32 !RU val32 ! if Reference Under val32 0x7081 0x02AE val32(L) !SO V32 ! if Speed Over V32 0x7196 0x022C &V32 !SO val32 ! if Speed Over val32 0x7096 0x022C val32(L) !SU V32 ! if Speed Under V32 0x7187 0x022C &V32 !SU val32 ! if Speed Under val32 0x7087 0x022C val32(L) !VO V32A, V32B ! if V32A >= V32B 0x7190 &V32A &V32B !VO V32A, val32 ! if V32A >= val32 0x7090 &V32A val32(L) !VU V32A, V32B ! if V32A <= V32B 0x7181 &V32A &V32B !VU V32A, val32 WAIT! ! if V32A <= val32 Wait until event occurs 0x7081 0x0408 &V32A val32(L) ! Technosoft 2003 D-8 3 val32(H) val32(H) val32(H) val32(H) val32(H) val32(H) val32(H) val32(H) val32(H) val32(H) val32(H) val32(H) IDM240 / 640 Technical Reference TML Instruction Set Summary Table D.8. TML Instruction Set. I/O Group Syntax Description Code DIS2CAPI Disable 2nd CAPI capture 0x04A0 DISCAPI Disable CAPI capture 0x0481 DISIO#n Disable IO#n DISLSN Disable LSN limit switch DISLSP EN2CAPI0 0 1 2 3 0x5C00 MCRx ANDdis ORdis 0x5C00 0x7070 0xFFFE 0x0000 Disable LSP limit switch 0x5C00 0x7071 0xFFFE 0x0000 0x0420 ENCAPI0 Enable 2nd CAPI capture for 1->0 Enable 2nd CAPI capture for 0->1 Enable CAPI capture for 1->0 ENCAPI1 Enable CAPI capture for 0->1 0x0501 ENIO#n Enable IO#n 0x5C00 MCRx ANDen ORen ENLSN0 Enable LSN limit switch for 1->0 0x5C00 0x7070 0x7FFB 0x0001 EN2CAPI1 0x0520 0x0401 ENLSN1 Enable LSN limit switch for 0->1 0x5C00 0x7070 0x7FFF 0x0005 ENLSP0 Enable LSP limit switch for 1->0 0x5C00 0x7071 0x7FFB 0x0001 0x7071 0x7FFF 0x0005 ENLSP1 Enable LSP limit switch for 0->1 0x5C00 OUTPORT V16 OUT V16 value to IO space port 0x6C00 | 9LSB(&V16) ROUT#n Reset IO#n output to 0 0x5C00 PxDIR ANDrst ORrst SETIO#n IN Set IO#n as input 0x5C00 PxDIR ANDin ORin SETIO#n OUT Set IO#n as output 0x5C00 PxDIR ANDout ORout SOUT#n Set IO#n output to 1 0x5C00 PxDIR ANDset ORset ! Technosoft 2003 D-9 IDM240 / 640 Technical Reference TML Instruction Set Summary Table D.9. TML Instruction Set. Communication and Multiple axis group Syntax Description Code 0 1 2 [A/G] { Instr1; Instr2; …} Send a series of TML instructions to [A/G] [A/G] (V16D),TM = local V16S 0x9400 | LengthMLI A/G MLI code 1-4 words 0x9830 | TM A/G & V16D & V16S & V32S [A/G] (V16D),TM = V16S [A/G] (V16D),TM = V32S [A/G] (V16D),TM = local V32S 0x9831 | TM A/G & V16D [A/G] V16D = V16S [A/G] V16D = local V16S 0xB800 | 9LSB(&V16D) A/G & V16S [A/G] V16D,dm = V16S [A/G] V16D,dm = local V16S (la) 0x9814 A/G & V16D [A/G] V32D = V32S [A/G] V32D = local V32S 0xBC00 | 9LSB(&V32D) A/G & V32S [A/G] V32D,dm = V32S [A/G] V32D,dm= local V32S (la) 0x9815 A/G & V32D ADDGRID V16 Add Group ID = V16 0x0940 &V16 ADDGRID val16 Add Group ID = val16 0x0840 val16 AXISID val16 AXIS ID = val16 0x0801 val16 CANBR val16 Set CAN-bus Baud-Rate 0x0804 val16 GROUPID val16 GROUP ID = val16 0x0802 val16 REMGRID V16 Remove Group ID = V16 0x0980 &V16 REMGRID val16 Remove Group ID = val16 0x0880 val16 RGM Reset axis as Gear/Cam Master 0x5909 0xF7FF SCIBR V16 Set SCI Baud Rate 0x0920 &V16 SCIBR val16 Set SCI Baud Rate 0x0820 val16 SGM Set axis as Gear/Cam Master 0x5909 0xFFFF SPIBR V16 Set SPI Baud Rate 0x0910 &V16 SPIBR val16 Set SPI Baud Rate 0x0810 val16 3 & V16S & V32S 0x0000 0x8800 V16D = [A] (V16S),TM Local V16D = [A] (V16S), dm 0x9D00 | TM A/G & V16S V16D = [A] V16S Local V16D = [A] V16S 0xD800 | 9LSB(&V16S) A/G & V16D V16D = [A] V16S,dm Local V16D = [A] V16S, dm (la) 0x9C00 A/G & V16S V32D = [A] V32S,dm Local V32D = [A] V32S, dm (la) 0x9C01 A/G & V32S & V32D V32D = [A] (V16S),TM Local V32D = [A] (V16S),TM 0x9D01 | TM A/G & V16S & V16D V32D = [A] V32S Local V32D = [A] V32S 0xDC00 | 9LSB(&V32S) A/G & V32D ! Technosoft 2003 D-10 & V16D & V16D IDM240 / 640 Technical Reference TML Instruction Set Summary The following tables explicit the symbols used in the TML instruction set. Table D.10. AND/OR for masks SETIO#n IN #n ANDin Table D.11. AND/OR masks for SETIO#n OUT ORin Function #n ANDout ORout Function #0 0xFEFF 0x0000 R8 #0 0xFFFF 0x0100 S8 #1 0xFDFF 0x0000 R9 #1 0xFFFF 0x0200 S9 #2 0xFBFF 0x0000 R 10 #2 0xFFFF 0x0400 S 10 #3 0xF7FF 0x0000 R 11 #3 0xFFFF 0x0800 S 11 #4 0xEFFF 0x0000 R 12 #4 0xFFFF 0x1000 S 12 #5 0xDFFF 0x0000 R 13 #5 0xFFFF 0x2000 S 13 #6 0xBFFF 0x0000 R 14 #6 0xFFFF 0x4000 S 14 #7 0x7FFF 0x0000 R 15 #7 0xFFFF 0x8000 S 15 #8 0xFEFF 0x0000 R8 #8 0xFFFF 0x0100 S8 #9 0xFDFF 0x0000 R9 #9 0xFFFF 0x0200 S9 #10 0xFBFF 0x0000 R 10 #10 0xFFFF 0x0400 S 10 #11 0xF7FF 0x0000 R 11 #11 0xFFFF 0x0800 S 11 #12 0xEFFF 0x0000 R 12 #12 0xFFFF 0x1000 S 12 #13 0xDFFF 0x0000 R 13 #13 0xFFFF 0x2000 S 13 #14 0xBFFF 0x0000 R 14 #14 0xFFFF 0x4000 S 14 #15 0x7FFF 0x0000 R 15 #15 0xFFFF 0x8000 S 15 #16 0xFEFF 0x0000 R8 #16 0xFFFF 0x0100 S8 #17 0xFDFF 0x0000 R9 #17 0xFFFF 0x0200 S9 #18 0xFBFF 0x0000 R 10 #18 0xFFFF 0x0400 S 10 #19 0xF7FF 0x0000 R 11 #19 0xFFFF 0x0800 S 11 #20 0xEFFF 0x0000 R 12 #20 0xFFFF 0x1000 S 12 #21 0xDFFF 0x0000 R 13 #21 0xFFFF 0x2000 S 13 #22 0xBFFF 0x0000 R 14 #22 0xFFFF 0x4000 S 14 #23 0x7FFF 0x0000 R 15 #23 0xFFFF 0x8000 S 15 #24 0xFEFF 0x0000 R8 #24 0xFFFF 0x0100 S8 #25 0xFEFF 0x0000 R8 #25 0xFFFF 0x0100 S8 #26 0xFDFF 0x0000 R9 #26 0xFFFF 0x0200 S9 #27 0xFBFF 0x0000 R 10 #27 0xFFFF 0x0400 S 10 #28 0xF7FF 0x0000 R 11 #28 0xFFFF 0x0800 S 11 #29 0xEFFF 0x0000 R 12 #29 0xFFFF 0x1000 S 12 #30 0xDFFF 0x0000 R 13 #30 0xFFFF 0x2000 S 13 #31 0xBFFF 0x0000 R 14 #31 0xFFFF 0x4000 S 14 #32 0x7FFF 0x0000 R 15 #32 0xFFFF 0x8000 S 15 #33 0xFEFF 0x0000 R8 #33 0xFFFF 0x0100 S8 #34 0xFDFF 0x0000 R9 #34 0xFFFF 0x0200 S9 #35 0xFBFF 0x0000 R 10 #35 0xFFFF 0x0400 S 10 #36 0xF7FF 0x0000 R 11 #36 0xFFFF 0x0800 S 11 #37 0xEFFF 0x0000 R 12 #37 0xFFFF 0x1000 S 12 #38 0xDFFF 0x0000 R 13 #38 0xFFFF 0x2000 S 13 #39 0xBFFF 0x0000 R 14 #39 0xFFFF 0x4000 S 14 ! Technosoft 2003 D-11 IDM240 / 640 Technical Reference TML Instruction Set Summary Table D.12.AND/OR masks for ROUT#n #n ANDrst #0 #1 Table D.13. AND/OR masks for SOUT#n Orrst Function #n ANDset ORset Function 0xFFFE 0x0000 R0 #0 0xFFFF 0x0001 S0 0xFFFD 0x0000 R1 #1 0xFFFF 0x0002 S1 #2 0xFFFB 0x0000 R2 #2 0xFFFF 0x0004 S2 #3 0xFFF7 0x0000 R3 #3 0xFFFF 0x0008 S3 #4 0xFFEF 0x0000 R4 #4 0xFFFF 0x0010 S4 #5 0xFFDF 0x0000 R5 #5 0xFFFF 0x0020 S5 #6 0xFFBF 0x0000 R6 #6 0xFFFF 0x0040 S6 #7 0xFF7F 0x0000 R7 #7 0xFFFF 0x0080 S7 #8 0xFFFE 0x0000 R0 #8 0xFFFF 0x0001 S0 #9 0xFFFD 0x0000 R1 #9 0xFFFF 0x0002 S1 #10 0xFFFB 0x0000 R2 #10 0xFFFF 0x0004 S2 #11 0xFFF7 0x0000 R3 #11 0xFFFF 0x0008 S3 #12 0xFFEF 0x0000 R4 #12 0xFFFF 0x0010 S4 #13 0xFFDF 0x0000 R5 #13 0xFFFF 0x0020 S5 #14 0xFFBF 0x0000 R6 #14 0xFFFF 0x0040 S6 #15 0xFF7F 0x0000 R7 #15 0xFFFF 0x0080 S7 #16 0xFFFE 0x0000 R0 #16 0xFFFF 0x0001 S0 #17 0xFFFD 0x0000 R1 #17 0xFFFF 0x0002 S1 #18 0xFFFB 0x0000 R2 #18 0xFFFF 0x0004 S2 #19 0xFFF7 0x0000 R3 #19 0xFFFF 0x0008 S3 #20 0xFFEF 0x0000 R4 #20 0xFFFF 0x0010 S4 #21 0xFFDF 0x0000 R5 #21 0xFFFF 0x0020 S5 #22 0xFFBF 0x0000 R6 #22 0xFFFF 0x0040 S6 #23 0xFF7F 0x0000 R7 #23 0xFFFF 0x0080 S7 #24 0xFFFE 0x0000 R0 #24 0xFFFF 0x0001 S0 #25 0xFFFE 0x0000 R0 #25 0xFFFF 0x0001 S0 #26 0xFFFD 0x0000 R1 #26 0xFFFF 0x0002 S1 #27 0xFFFB 0x0000 R2 #27 0xFFFF 0x0004 S2 #28 0xFFF7 0x0000 R3 #28 0xFFFF 0x0008 S3 #29 0xFFEF 0x0000 R4 #29 0xFFFF 0x0010 S4 #30 0xFFDF 0x0000 R5 #30 0xFFFF 0x0020 S5 #31 0xFFBF 0x0000 R6 #31 0xFFFF 0x0040 S6 #32 0xFF7F 0x0000 R7 #32 0xFFFF 0x0080 S7 #33 0xFFFE 0x0000 R0 #33 0xFFFF 0x0001 S0 #34 0xFFFD 0x0000 R1 #34 0xFFFF 0x0002 S1 #35 0xFFFB 0x0000 R2 #35 0xFFFF 0x0004 S2 #36 0xFFF7 0x0000 R3 #36 0xFFFF 0x0008 S3 #37 0xFFEF 0x0000 R4 #37 0xFFFF 0x0010 S4 #38 0xFFDF 0x0000 R5 #38 0xFFFF 0x0020 S5 #39 0xFFBF 0x0000 R6 #39 0xFFFF 0x0040 S6 ! Technosoft 2003 D-12 IDM240 / 640 Technical Reference TML Instruction Set Summary Table D.17. MCRx & AND/OR masks for ENIO#n ORen Table D.18. MCRx & AND/OR masks for DISIO#n #n MPCRx ANDen Function #n MCRx ANDdis ORdis Function #0 MCRA 0xFFFE 0x0000 R0 #0 MCRA 0xFFFF 0x0001 S0 #1 MCRA 0xFFFD 0x0000 R1 #1 MCRA 0xFFFF 0x0002 S1 #2 MCRA 0xFFFB 0x0000 R2 #2 MCRA 0xFFFF 0x0004 S2 #3 MCRA 0xFFF7 0x0000 R3 #3 MCRA 0xFFFF 0x0008 S3 #4 MCRA 0xFFEF 0x0000 R4 #4 MCRA 0xFFFF 0x0010 S4 #5 MCRA 0xFFDF 0x0000 R5 #5 MCRA 0xFFFF 0x0020 S5 #6 MCRA 0xFFBF 0x0000 R6 #6 MCRA 0xFFFF 0x0040 S6 #7 MCRA 0xFF7F 0x0000 R7 #7 MCRA 0xFFFF 0x0080 S7 #8 MCRA 0xFEFF 0x0000 R8 #8 MCRA 0xFFFF 0x0100 S8 #9 MCRA 0xFDFF 0x0000 R9 #9 MCRA 0xFFFF 0x0200 S9 #10 MCRA 0xFBFF 0x0000 R 10 #10 MCRA 0xFFFF 0x0400 S 10 #11 MCRA 0xF7FF 0x0000 R 11 #11 MCRA 0xFFFF 0x0800 S 11 #12 MCRA 0xEFFF 0x0000 R 12 #12 MCRA 0xFFFF 0x1000 S 12 #13 MCRA 0xDFFF 0x0000 R 13 #13 MCRA 0xFFFF 0x2000 S 13 #14 MCRA 0xBFFF 0x0000 R 14 #14 MCRA 0xFFFF 0x4000 S 14 #15 MCRA 0x7FFF 0x0000 R 15 #15 MCRA 0xFFFF 0x8000 S 15 #16 MCRB 0xFFFE 0x0000 R0 #16 MCRB 0xFFFF 0x0001 S0 #17 MCRB 0xFFFD 0x0000 R1 #17 MCRB 0xFFFF 0x0002 S1 #18 MCRB 0xFFFB 0x0000 R2 #18 MCRB 0xFFFF 0x0004 S2 #19 MCRB 0xFFF7 0x0000 R3 #19 MCRB 0xFFFF 0x0008 S3 #20 MCRB 0xFFEF 0x0000 R4 #20 MCRB 0xFFFF 0x0010 S4 #21 MCRB 0xFFDF 0x0000 R5 #21 MCRB 0xFFFF 0x0020 S5 #22 MCRB 0xFFBF 0x0000 R6 #22 MCRB 0xFFFF 0x0040 S6 S7 #23 MCRB 0xFF7F 0x0000 R7 #23 MCRB 0xFFFF 0x0080 #24 MCRB 0xFEFF 0x0000 R8 #24 MCRB 0xFFFF 0x0100 S8 #25 MCRC 0xFFFE 0x0000 R0 #25 MCRC 0xFFFF 0x0001 S0 #26 MCRC 0xFFFD 0x0000 R1 #26 MCRC 0xFFFF 0x0002 S1 #27 MCRC 0xFFFB 0x0000 R2 #27 MCRC 0xFFFF 0x0004 S2 #28 MCRC 0xFFF7 0x0000 R3 #28 MCRC 0xFFFF 0x0008 S3 #29 MCRC 0xFFEF 0x0000 R4 #29 MCRC 0xFFFF 0x0010 S4 #30 MCRC 0xFFDF 0x0000 R5 #30 MCRC 0xFFFF 0x0020 S5 #31 MCRC 0xFFBF 0x0000 R6 #31 MCRC 0xFFFF 0x0040 S6 #32 MCRC 0xFF7F 0x0000 R7 #32 MCRC 0xFFFF 0x0080 S7 #33 MCRC 0xFEFF 0x0000 R8 #33 MCRC 0xFFFF 0x0100 S8 #34 MCRC 0xFDFF 0x0000 R9 #34 MCRC 0xFFFF 0x0200 S9 #35 MCRC 0xFBFF 0x0000 R 10 #35 MCRC 0xFFFF 0x0400 S 10 #36 MCRC 0xF7FF 0x0000 R 11 #36 MCRC 0xFFFF 0x0800 S 11 #37 MCRC 0xEFFF 0x0000 R 12 #37 MCRC 0xFFFF 0x1000 S 12 #38 MCRC 0xDFFF 0x0000 R 13 #38 MCRC 0xFFFF 0x2000 S 13 #39 MCRC 0xFFFF 0x0000 - #39 MCRC 0xFFFF 0x0000 - ! Technosoft 2003 D-13 IDM240 / 640 Technical Reference TML Instruction Set Summary Table D.14. PxDIR & Bit_msk for V16=IN#n; #n PxDIR Bit_msk Function #0 PADIR 0x0001 1<<n #1 PADIR 0x0002 1<<n #2 PADIR 0x0004 1<<n #3 PADIR 0x0008 1<<n #4 PADIR 0x0010 1<<n #5 PADIR 0x0020 1<<n #6 PADIR 0x0040 1<<n #7 PADIR 0x0080 1<<n #8 PBDIR 0x0001 1<<(n-8) #9 PBDIR 0x0002 1<<(n-8) #10 PBDIR 0x0004 1<<(n-8) #11 PBDIR 0x0008 1<<(n-8) #12 PBDIR 0x0010 1<<(n-8) #13 PBDIR 0x0020 1<<(n-8) #14 PBDIR 0x0040 1<<(n-8) #15 PBDIR 0x0080 1<<(n-8) #16 PCDIR 0x0001 1<<(n-16) #17 PCDIR 0x0002 1<<(n-16) #18 PCDIR 0x0004 1<<(n-16) #19 PCDIR 0x0008 1<<(n-16) #20 PCDIR 0x0010 1<<(n-16) #21 PCDIR 0x0020 1<<(n-16) #22 PCDIR 0x0040 1<<(n-16) #23 PCDIR 0x0080 1<<(n-16) #24 PDDIR 0x0001 1<<(n-24) #25 PEDIR 0x0001 1<<(n-25) #26 PEDIR 0x0002 1<<(n-25) #27 PEDIR 0x0004 1<<(n-25) #28 PEDIR 0x0008 1<<(n-25) #29 PEDIR 0x0010 1<<(n-25) #30 PEDIR 0x0020 1<<(n-25) #31 PEDIR 0x0040 1<<(n-25) #32 PEDIR 0x0080 1<<(n-25) #33 PFDIR 0x0001 1<<(n-33) #34 PFDIR 0x0002 1<<(n-33) #35 PFDIR 0x0004 1<<(n-33) #36 PFDIR 0x0008 1<<(n-33) #37 PFDIR 0x0010 1<<(n-33) #38 PFDIR 0x0020 1<<(n-33) #39 PFDIR 0x0040 1<<(n-33) !IN#n 0; and !IN#n 1; ! Technosoft 2003 D-14 IDM240 / 640 Technical Reference TML Instruction Set Summary Condition Flags for GOTO/CALL Flag Value LT 0x0090 LEQ 0x0088 EQ 0x00C0 NEQ 0x00A0 GT 0x0084 GEQ 0x0082 ! Technosoft 2003 MCRx and PxDIR Addresses Register Address MCRA 0x7090 MCRB 0x7092 MCRC 0x7094 PADIR 0x7098 PBDIR 0x709A PCDIR 0x709C PDDIR 0x709E PEDIR 0x7095 PFDIR 0x7096 D-15 TM (Type Memory) values TM Value pm 0x0000 dm 0x0004 spi 0x0008 IDM240 / 640 Technical Reference IDM240/640 Dimensions Appendix E. IDM240/640 Dimensions The next figures present the IDM240/640 dimensions. 44.5 mm (1.752”) 4.2 mm (0.165”) 95 mm (3.74”) 26 mm (1.024”) 136 mm (5.354”) 15 mm (0.591”) 4 mm (0.157”) Figure E.1. IDM240-5EI and IDM640-8EI dimensions ! Technosoft 2003 E-1 IDM240 / 640 Technical Reference IDM240/640 Dimensions 44.5 mm (1.752”) 4.2 mm (0.165”) 95 mm (3.74”) 26 mm (1.024”) 136 mm (5.354”) 15 mm (0.591”) 4 mm (0.157”) Figure E.2. IDM240-5RI and IDM640-8RI dimensions ! Technosoft 2003 E-2 IDM240 / 640 Technical Reference Connectors Appendix F. Connectors Type and Mating Connectors Table below presents the IDM240/640 connectors type and the mating connectors Connector Function Version 1.1 Mating connector Technosoft specification feedback to customer included with the IDM240/640 J2 J4 J10 & J11 J13A / J13B J9 Motor & supply Serial CAN Feedback Analog & 24V digital I/O Phoenix Contact MC 1.5/8-STF-3.5 generic RS232, 9-pin Sub-D male generic RJ11-4/4 phone plug generic 15-pin High Density Sub-D male generic 26-pin High Density Sub-D male YES NO YES YES YES ! Technosoft 2003 F-1 IDM240 / 640 Technical Reference TML_LIB_LabVIEW v2.0 Motion Control Library for Technosoft Intelligent Drives User Manual ¤ Technosoft 2006 TECHNOSOFT TML_LIB_LabVIEW v2.0 User Manual P091.040.LABVIEW.v20.UM.0406 April 2006 Technosoft S.A. Rue de Buchaux 38 CH-2022 BEVAIX Switzerland Tel.: +41 (0) 32 732 5500 Fax: +41 (0) 32 732 5504 [email protected] www.technosoftmotion.com/ Read This First Whilst Technosoft believes that the information and guidance given in this manual is correct, all parties must rely upon their own skill and judgment when making use of it. Technosoft does not assume any liability to anyone for any loss or damage caused by any error or omission in the work, whether such error or omission is the result of negligence or any other cause. Any and all such liability is disclaimed. All rights reserved. No part or parts of this document may be reproduced or transmitted in any form or by any means, electrical or mechanical including photocopying, recording or by any information-retrieval system without permission in writing from Technosoft S.A. About This Manual This book describes the motion library TML_LIB_LabVIEW v2.0. TML_LIB_LabVIEW is a collection of functions, which can be integrated in a PC application developed in LabVIEW environment. With TML_LIB_LabVIEW motion library, you can quickly program the desired motion and control the Technosoft intelligent drives and motors (with the drive integrated in the motor case) from a PC. The TML_LIB_LabVIEW allows you to communicate with Technosoft drive/motors via serial RS-232, RS-485, CAN-bus or Ethernet protocols. Scope of This Manual This manual applies to the following Technosoft intelligent drives and motors: • IDM240 / IDM640 (models IDM240-5EI, IDM240-5LI, IDM640-8EI and IDM640-8LI), with firmware F000H or later (revision letter must be equal or after H i.e. I, J, etc.) • IDM240 CANopen/ IDM640 CANopen (models IDM240-5EI CANopen, IDM240-5LI CANopen, IDM640-8EI CANopen and IDM640-8LI CANopen) with firmware version F500A. • IDS240 / IDS640 (all models), with firmware F000H or later • IDS640 CANopen with firmware F500A or later • ISCM4805 / ISCM8005 (all models), with firmware F000H or later • IBL2403 (all models), with firmware F020H or later • IPS110 (all models), with firmware F005H or later • IM23x (models IS and MA), with firmware F900H or later IMPORTANT! For correct operation, these drives/motors must be programmed with firmware revision H. EasySetUp 1 - Technosoft IDE for drives/motors setup, includes a firmware 1 EasySetUp is included in TML_LIB_LabVIEW installation package as a component of EasyMotion Studio Demo version. It can also be downloaded free of charge from Technosoft web page © Technosoft 2006 III TML_LIB_LabVIEW – User Manual programmer with which you can check your drive/motor firmware version and revision and if needed, update your drive/motor firmware to revision H. Notational Conventions This document uses the following conventions: Drive/motor - an intelligent drive or an intelligent motor having the drive part integrated in the motor case TML – Technosoft Motion Language IU – drive/motor internal units ACR.5 – bit 5 of ACR data FAxx – firmware versions F000H, F020H, F005H, F900H or later FBxx – firmware versions F500A or later Related Documentation TML_LIB v2.0 User Manual (part no. P091.040.UM.xxxx) describes in detail the TML_LIB Technosoft Motion Language Library and how to use it to program motion applications in Visual C++, Visual Basic or Delphi environments. MotionChip™ II TML Programming (part no. P091.055.MCII.TML.UM.xxxx) describes in detail TML basic concepts, motion programming, functional description of TML instructions for high level or low level motion programming, communication channels and protocols. Also give a detailed description of each TML instruction including syntax, binary code and examples. MotionChip II Configuration Setup (part no. P091.055.MCII.STP.UM.xxxx) describes the MotionChip II operation and how to setup its registers and parameters starting from the user application data. This is a technical reference manual for all the MotionChip II registers, parameters and variables. Help of the EasyMotion Studio software platform – describes how to use the EasyMotion Studio, which support all new features added to revision H of firmware. It includes: motion system setup & tuning wizard, motion sequence programming wizard, testing and debugging tools like: data logging, watch, control panels, on-line viewers of TML registers, parameters and variables, etc. © Technosoft 2006 IV TML_LIB_LabVIEW – User Manual If you Need Assistance … If you want to … Contact Technosoft at … Visit Technosoft online World Wide Web: http://www.technosoftmotion.com/ Receive general information or assistance World Wide Web: http://www.technosoftmotion.com/ Email: [email protected] Ask questions about product operation or report suspected problems Fax: (41) 32 732 55 04 Email: [email protected] Make suggestions about or report errors in documentation © Technosoft 2006 V TML_LIB_LabVIEW – User Manual Contents 1 Introduction ............................................................................................................................. 1 2 Getting started......................................................................................................................... 3 2.1 Hardware installation ......................................................................................................... 3 2.2 Software installation........................................................................................................... 3 2.2.1 Installing EasySetUp................................................................................................... 3 2.2.2 3 Installing TML_LIB_LabVIEW library.......................................................................... 3 2.3 Drive/motor setup............................................................................................................... 4 2.4 Build an application with TML_LIB_LabVIEW ................................................................... 5 TML_LIB_LabVIEW description............................................................................................. 7 3.1 Basic concept..................................................................................................................... 7 3.2 Internal units and scaling factors ....................................................................................... 8 3.3 Axis Identification ............................................................................................................... 8 3.4 Functions descriptions ....................................................................................................... 9 3.4.1 Motion programming................................................................................................. 10 3.4.1.1 TS_MoveAbsolute.vi ......................................................................................... 10 3.4.1.2 TS_MoveRelative.vi........................................................................................... 12 3.4.1.3 TS_MoveSCurveAbsolute.vi ............................................................................. 14 3.4.1.4 TS_MoveSCurveRelative.vi .............................................................................. 16 3.4.1.5 TS_MoveVelocity. vi .......................................................................................... 18 3.4.1.6 TS_SetAnalogueMoveExternal.vi...................................................................... 20 3.4.1.7 TS_SetDigitalMoveExternal .............................................................................. 22 3.4.1.8 TS_SetOnlineMoveExternal.vi .......................................................................... 23 3.4.1.9 TS_VoltageTestMode.vi .................................................................................... 25 3.4.1.10 TS_TorqueTestMode.vi..................................................................................... 26 3.4.1.11 TS_PVTSetup.vi ................................................................................................ 27 3.4.1.12 TS_SendPVTFirstPoint.vi.................................................................................. 29 3.4.1.13 TS_SendPVTPoint.vi......................................................................................... 31 3.4.1.14 TS_PTSetup.vi .................................................................................................. 32 3.4.1.15 TS_SendPTFirstPoint.vi .................................................................................... 34 3.4.1.16 TS_SendPTPoint.vi ........................................................................................... 35 3.4.1.17 TS_SetGearingMaster.vi ................................................................................... 36 3.4.1.18 TS_SetGearingSlave.vi ..................................................................................... 37 3.4.1.19 TS_SetCammingMaster.vi ................................................................................ 39 3.4.1.20 TS_SetCammingSlaveRelative.vi ..................................................................... 40 © Technosoft 2006 VII TML_LIB_LabVIEW – User Manual 3.4.1.21 TS_SetCammingSlaveAbsolute.vi .................................................................... 42 3.4.1.22 TS_CamDownload.vi......................................................................................... 44 3.4.1.23 TS_CamInitialization.vi ...................................................................................... 46 3.4.1.24 TS_SetMasterResolution .................................................................................. 47 3.4.1.25 TS_SendSynchronization.................................................................................. 48 3.4.2 Motor commands ...................................................................................................... 49 3.4.2.1 TS_Power.vi ...................................................................................................... 49 3.4.2.2 TS_UpdateImmediate.vi.................................................................................... 50 3.4.2.3 TS_UpdateOnEvent.vi....................................................................................... 51 3.4.2.4 TS_Stop.vi ......................................................................................................... 52 3.4.2.5 TS_SetPosition.vi .............................................................................................. 53 3.4.2.6 TS_SetTargetPositionToActual.vi ..................................................................... 54 3.4.2.7 TS_SetCurrent.vi ............................................................................................... 55 3.4.2.8 TS_QuickStopDecelerationRate.vi.................................................................... 56 3.4.3 Events ....................................................................................................................... 57 3.4.3.1 TS_CheckEvent.vi ............................................................................................. 57 3.4.3.2 TS_SetEventOnMotionComplete.vi................................................................... 58 3.4.3.3 TS_SetEventOnMotorPosition.vi....................................................................... 60 3.4.3.4 TS_SetEventOnLoadPosition.vi ........................................................................ 61 3.4.3.5 TS_SetEventOnMotorSpeed.vi ......................................................................... 62 3.4.3.6 TS_SetEventOnLoadSpeed.vi .......................................................................... 63 3.4.3.7 TS_SetEventOnTime.vi ..................................................................................... 64 3.4.3.8 TS_SetEventOnPositionRef.vi .......................................................................... 65 3.4.3.9 TS_SetEventOnSpeedRef.vi............................................................................. 66 3.4.3.10 TS_SetEventOnTorqueRef.vi............................................................................ 67 3.4.3.11 TS_SetEventOnEncoderIndex.vi....................................................................... 68 3.4.3.12 TS_SetEventOnLimitSwitch.vi........................................................................... 69 3.4.3.13 TS_SetEventOnDigitalInput.vi........................................................................... 70 3.4.3.14 TS_SetEventOnHomeInput.vi ........................................................................... 71 3.4.4 TML jumps and function calls ................................................................................... 72 3.4.4.1 TS_GOTO.vi...................................................................................................... 72 3.4.4.2 TS_GOTO_Label.vi ........................................................................................... 73 3.4.4.3 TS_CALL.vi ....................................................................................................... 74 3.4.4.4 TS_CALL_Label.vi............................................................................................. 75 3.4.4.5 TS_CancelableCALL.vi ..................................................................................... 76 3.4.4.6 TS_CancelableCALL_Label.vi .......................................................................... 77 3.4.4.7 TS_ABORT.vi .................................................................................................... 78 3.4.5 IO handling ............................................................................................................... 79 3.4.5.1 TS_SetupInput.vi ............................................................................................... 79 3.4.5.2 TS_GetInput.vi................................................................................................... 80 3.4.5.3 TS_SetupOutput.vi ............................................................................................ 81 3.4.5.4 TS_SetOutput.vi ................................................................................................ 82 3.4.5.5 TS_GetHomeInput.vi ......................................................................................... 83 3.4.5.6 TS_GetMultipleInputs.vi .................................................................................... 84 3.4.5.7 TS_SetMultipleOutputs.vi.................................................................................. 85 3.4.5.8 TS_SetMultipleOutputs2.vi................................................................................ 86 3.4.6 Data transfer ............................................................................................................. 87 © Technosoft 2006 VIII TML_LIB_LabVIEW – User Manual 3.4.6.1 TS_SetIntVariable.vi.......................................................................................... 87 3.4.6.2 TS_GetIntVariable.vi ......................................................................................... 88 3.4.6.3 TS_SetLongVariable.vi...................................................................................... 89 3.4.6.4 TS_GetLongVariable.vi ..................................................................................... 90 3.4.6.5 TS_SetFixedVariable.vi..................................................................................... 91 3.4.6.6 TS_GetFixedVariable.vi .................................................................................... 92 3.4.6.7 TS_SetBuffer.vi ................................................................................................. 93 3.4.6.8 TS_GetBuffer.vi ................................................................................................. 94 3.4.7 Drive/motor monitoring ............................................................................................. 95 3.4.7.1 TS_ReadStatus.vi.............................................................................................. 95 3.4.7.2 TS_OnlineChecksum.vi..................................................................................... 96 3.4.8 Miscellaneous ........................................................................................................... 97 3.4.8.1 TS_DownloadProgram ...................................................................................... 97 3.4.8.2 TS_Execute.vi ................................................................................................... 98 3.4.8.3 TS_ExecuteScript.vi .......................................................................................... 99 3.4.8.4 TS_GetOutputOfExecute.vi............................................................................. 100 3.4.8.5 TS_Save.vi ...................................................................................................... 101 3.4.8.6 TS_ResetFault.vi ............................................................................................. 102 3.4.8.7 TS_Reset.vi ..................................................................................................... 103 3.4.8.8 TS_GetLastErrorText.vi................................................................................... 104 3.4.9 Data logger ............................................................................................................. 105 3.4.9.1 TS_SetupLogger.vi.......................................................................................... 105 3.4.9.2 TS_StartLogger.vi............................................................................................ 106 3.4.9.3 TS_CheckLoggerStatus.vi............................................................................... 107 3.4.9.4 TS_UploadLoggerResults.vi............................................................................ 108 3.4.10 Drive setup.............................................................................................................. 110 3.4.10.1 TS_LoadSetup.vi ............................................................................................. 110 3.4.10.2 TS_SetupAxis.vi .............................................................................................. 111 3.4.10.3 TS_SetupGroup.vi ........................................................................................... 112 3.4.10.4 TS_SetupBroadcast ........................................................................................ 113 3.4.10.5 TS_DriveInitialization.vi ................................................................................... 114 3.4.11 Drive administration ................................................................................................ 115 3.4.11.1 TS_SelectAxis.vi.............................................................................................. 115 3.4.11.2 TS_SelectGroup.vi .......................................................................................... 116 3.4.11.3 TS_SelectBroadcast.vi .................................................................................... 117 3.4.12 Communication setup............................................................................................. 118 3.4.12.1 TS_OpenChannel.vi ........................................................................................ 118 3.4.12.2 TS_SelectChannel.vi....................................................................................... 120 3.4.12.3 TS_CloseChannel.vi........................................................................................ 121 4 Examples ............................................................................................................................. 122 4.1 Example 1. Profiled positioning movement followed by a speed profile jogging........... 125 4.2 Example 2. Positioning movement; wait a while; speed jogging; stop after a time period 127 4.3 Example 3. Speed profile with two acceleration values ................................................ 129 © Technosoft 2006 IX TML_LIB_LabVIEW – User Manual 4.4 Example 4. Speed jogging; wait a time period; positioning movement ......................... 131 4.5 Example 5. Speed jogging; wait for an input port to be triggered; positioning movement 133 4.6 Example 6. Absolute position motion profile with different acceleration / deceleration rate 135 4.7 Example 7. Positioning movement; speed jogging; wait a time period, then stop ........ 137 4.8 Example 8. Repeat a motion at input port set, with current reduction between motions 139 4.9 Example 9. Move to the positive limit switch, reverse to the negative limit switch ........ 141 4.10 Example 10. Move between limit switches until an input port changes its status...... 143 4.11 Example 11. Move forward and backward at 2 different speeds, for a given distance 145 4.12 Example 12. Speed profile, followed by profiled positioning at a given speed .......... 147 4.13 Example 13. Speed control with external reference .................................................. 149 4.14 Example 14. Profiled positioning, with output port status changing at a given position 151 4.15 Example 15. Execute a jogging speed motion, until the home input is captured ...... 153 4.16 Example 16. Different motions based on the status of two digital inputs of the drive 155 4.17 Example 17. Move between limit switches. Power-off if blocked on a limit switch .... 157 4.18 Example 18. Jog at a speed computed from an A/D signal, until a digital input is reset 159 4.19 Example 19. Speed control, with drive interrogation / setup of TML speed parameters 161 4.20 Example 20. Setup positioning motion, using tables stored into drive memory ........ 163 4.21 Example 21. Setting the Digital External motion mode.............................................. 165 4.22 Example 22. Test the voltage mode, with event on voltage reference ...................... 167 4.23 Example 23. Test torque mode, with event on torque reference ............................... 169 4.24 Example 24. Profiled positioning and speed movement, with event test from PC side 171 4.25 Example 25. Movement as defined in an external file containing TML source code. 173 4.26 Example 26. Positioning command to a group of axes.............................................. 175 4.27 Example 27. Jogging motion until the index capture is detected, then position on index 177 4.28 zero Example 28. Speed jogging until home found, position to home, and set position to 179 4.29 Example 29. Download a COFF format file & send a positioning command on-line . 181 © Technosoft 2006 X TML_LIB_LabVIEW – User Manual 4.30 Example 30. Download a COFF format file, then call TML functions ........................ 183 4.31 mode Example 31. Set up the Master and Slave Gearing Mode; use the drives in gearing 185 4.32 mode Example 32. Set up Master and Slave in electronic cam Mode; use the drives in cam 187 4.33 Example 33. Usage of data logger to upload real-time stored data from the drive ... 189 4.34 Example 34. Homing procedures based on pre-stored TML sequences on the drive 191 4.35 Example 35. Positioning with S-Curve profile for speed; speed jogging ................... 194 4.36 Example 36. Reset FAULT state................................................................................ 196 4.37 Example 37. Read multiple inputs/set multiple outputs ............................................. 198 4.38 Example 38. Positioning when an event on home input occurs ................................ 200 4.39 Example 39. Write/read in the drive memory............................................................. 202 4.40 Example 40. View binary code of a TML command................................................... 204 4.41 Example 41. Speed jog and positioning with direction change.................................. 205 © Technosoft 2006 XI TML_LIB_LabVIEW – User Manual 1 Introduction The programming of Technosoft intelligent drives/motors involves 2 steps: 1) Drive/motor setup 2) Motion programming For Step 1 – drive/motor setup, Technosoft provides EasySetUp. EasySetUp is an integrated development environment for the setup of Technosoft drives/motors. The output of EasySetUp is a set of setup data, which can be downloaded to the drive/motor EEPROM or saved on your PC for later use. The setup data is copied at power-on into the RAM memory of the drive/motor and is used during runtime. The reciprocal is also possible i.e. to retrieve the complete setup data from a drive/motor EEPROM previously programmed. EasySetUp can be downloaded free of charge from Technosoft web page. It is also provided on the TML_LIB_LabVIEW installation CD. For Step 2 – motion programming, Technosoft offers multiple options, like: 1) Use the drives/motors embedded motion controller and do the motion programming in Technosoft Motion Language (TML). For this operation Technosoft provides EasyMotion Studio, an IDE for both drives setup and motion programming. The output of EasyMotion Studio is a set of setup data and a TML program to download and execute on the drive/motor. 2) Use a .DLL with high-level motion functions which can be integrated in a host application written in C/C++, Delphi Pascal, Visual Basic or LabVIEW 3) Use a PLCopen compatible library with motion function blocks which can be integrated in a PLC application based on one of the IEC 61136 standard languages 4) Combine option 1) with options 2) or 3) to really distribute the intelligence between the master/host and the drives/motors in complex multi-axis applications. Thus, instead of trying to command each step of an axis movement, you can program the drives/motors using TML to execute complex tasks and inform the master when these are done. TML_LIB_LabVIEW is part of option 2) – a collection of functions allowing you to implement motion control applications on a PC computer. The link between the Technosoft drives/motors and the PC can be done via serial link, via CAN-bus using a CAN interface or via Ethernet using an adapter/bridge between Ethernet and RS-232. Realized as a collection of high-level functions, the library allows you to focus on the main aspects related to your application specific implementation, and to simply use the drive and execute motion commands by calling appropriate functions from the library. This manual presents how to install and use the components of the TML_LIB_LabVIEW library version 2.0. Remarks: • • Option 4) requires using EasyMotion Studio instead of EasySetUp. With EasyMotion Studio you can create high-level motion functions in TML, to be called from your PC EasyMotion Studio is also recommended if your application includes a homing as it comes with 32 predefined homing procedures to select from, with possibility to adapt them © Technosoft 2006 1 TML_LIB_LabVIEW – User Manual MyExample.vi TML_LIB … TS_MoveVelocity (…) … CSPD=12.5; MODE SP; UPD; Communication channel Figure 1.1. Using TML_LIB_LabVIEW to control a Technosoft intelligent drive from the PC computer © Technosoft 2006 2 TML_LIB_LabVIEW – User Manual 2 Getting started 2.1 Hardware installation For the hardware installation of the Technosoft drives/motors see their user manual. For drives/motors setup, you can connect your PC to any drive/motor using an RS232 serial link. Through this serial link you can access all the drives/motors from the network. Alternately, you can connect your PC directly on the CAN bus network if it is equipped with one of the CAN interfaces supported by EasySetUp. 2.2 Software installation In order to perform successfully the following software installations, make sure that you have the “Administrator” rights. 2.2.1 Installing EasySetUp On the TML_LIB_LabVIEW installation CD you’ll find the setup for EasyMotion Studio Demo version. This application includes a fully functional version of EasySetUp and a demo version of EasyMotion Studio. Start the setup and follow the installation instructions. 2.2.2 Installing TML_LIB_LabVIEW library Start the TML_LIB_LabVIEW setup and follow the installation instructions. After library installation open the LabVIEW environment and add in the list VI Search Path, the installation path of the library, by default C:\Program Files\Technosoft\TML_LIB_LabVIEW..Table 2.1 details the package contents. Table 2.1 TML_LIB_LabVIEW package contents Directory Root directory Files TML_lib.dll TMLcomm.dll P091.040.UM.xxxx.PDF Examples Files Ex25TML.txt Ex29RAM.out Ex30.out Ex32_MyCam.cam Ex32_MyCam.txt Examples Example diagrams Functions VI functions GlobalVIs sub VIs variables Setups Setup data directories © Technosoft 2006 with global 3 Description TML_LIB DLL library file TML communication DLL file The PDF file of the TML_LIB user manual (this document) TML source file for Example 25 COFF file for Example 29 COFF file for Example 30 A cam file for example 32, in Technosoft cam file format A cam file for example 32, in text file format A complete Visual C project implementing the examples from Chapter 4. Contains the sub VIs of the library which implement the functions from TML_LIB.dll Sub VIs containing the declaration of global variables used in examples Sample setup data of the drives used in examples. For your configurations generate the setup data (see paragraph 2.3) TML_LIB_LabVIEW – User Manual 2.3 Drive/motor setup Before starting to send motion commands from the PC, you need to do the drive/motor setup according with your application needs. For this operation you’ll use EasySetUp. EasySetUp is an integrated development environment for the setup of Technosoft drives and motors (with the drive integrated in the motor case). The output of EasySetUp is a set of setup data, which can be downloaded to the drive/motor EEPROM or saved on your PC for later use. A setup contains all the information needed to configure and parameterize a Technosoft drive/motor. This information is preserved in the drive/motor EEPROM in the setup table. The setup table is copied at power-on into the RAM memory of the drive/motor and is used during runtime. The reciprocal is also possible i.e. to retrieve the complete setup data from a drive/motor EEPROM previously programmed Steps to follow for commissioning a Technosoft drive/motor Step 1. Start EasySetUp From Windows Start menu execute: “Start | Programs | EasySetUp | EasySetUp” or “Start | Programs | EasyMotion Studio | EasySetUp” depending on which installation package you have used. Step 2. Establish communication EasySetUp starts with an empty window from where you can create a New setup, Open a previously created setup which was saved on your PC, or Upload the setup from the drive/motor. Before selection one of the above options, you need to establish the communication with the drive/motor you want to commission. Use menu command Communication | Setup to check/change your PC communication settings. Press the Help button of the dialogue opened. Here you can find detailed information about how to setup your drive/motor and do the connections. Power on the drive/motor and then close the Communication | Setup dialogue with OK. If the communication is established, EasySetUp displays in the status bar (the bottom line) the text “Online” plus the axis ID of your drive/motor and its firmware version. Otherwise the text displayed is “Offline” and a communication error message tells you the error type. In this case, return to the Communication | Setup dialogue, press the Help button and check troubleshoots. Remark: When first started, EasySetUp tries to communicate with your drive/motor via RS-232 and COM1 (default communication settings). If your drive/motor is powered and connected to your PC port COM1 via an RS-232 cable, the communication can be automatically established. Step 3. Setup drive/motor Press New button and select your drive/motor type. Depending on the product chosen, the selection may continue with the motor technology (for example: brushless motor, brushed motor) or the control mode (for example stepper – open-loop or stepper – closed-loop) and type of feedback device (for example: incremental encoder, SSI encoder) This opens 2 setup dialogues: for Motor Setup and for Drive setup through which you can configure and parameterize a Technosoft drive/motor, plus several predefined control panels customized for the product selected. In the Motor setup dialogue you can introduce the data of your motor and the associated sensors. Data introduction is accompanied by a series of tests having as goal to check the © Technosoft 2006 4 TML_LIB_LabVIEW – User Manual connections to the drive and/or to determine or validate a part of the motor and sensors parameters. In the Drive setup dialogue you can configure and parameterize the drive for your application. In each dialogue you will find a Guideline Assistant, which will guide you through the whole process of introducing and/or checking your data. Close the Drive setup dialogue with OK to keep all the changes regarding the motor and the drive setup. Step 4. Download setup data to drive/motor Press the Download to Drive/Motor button to download your setup data in the drive/motor EEPROM memory in the setup table. From now on, at each power-on, the setup data is copied into the drive/motor RAM memory that is used during runtime. It is also possible to Save the setup data on your PC and use it in other applications. Step 5. Reset the drive/motor to activate the setup data Step 6. Create the setup data for TML_LIB_LabVIEW. The TML_LIB_LabVIEW requires drive/motor setup information for proper execution of the application. The setup data is generated with the Setup | Export to TML_LIB… command if you are in EasySetUp, or the Application | Export to TML_LIB… command if you are using EasyMotion Studio. The information is generated in the form of an archive file with the .t.zip extension and is saved in the Archives folder from EasySetUp/EasyMotion Studio installation folder (by default C:\Program Files\Technosoft\ESM\). 2.4 Build an application with TML_LIB_LabVIEW The library TML_LIB_LabVIEW is a collection of high level functions, grouped in several categories and provided as the TML_LIB.dll file. To simplify the functions usage, each function has a subVi associated. Most of these subVIs are of Boolean type, and return a ‘True’ value if the execution of the function is performed without any error (at PC level). If the function returns a ‘False’ value, you can interrogate the error type by calling the function TS_GetLastErrorText.vi. Steps to build an application with TML_LIB_LabView: 1. Create a new VI. Launch LabVIEW and press the button New VI. For details read the LabView online help. 2. Setup the communication. The application developed is based on the communication between PC and Technosoft drives/motors thus it should begin with the communication channel setup. The communication channel is opened with the TS_OpenChannel.vi subVI. At the end of the application you must close the communication channel with subVI TS_CloseChannel.vi. 3. Load setup configurations. The setup information is required by the library functions in order to check if there are incompatibilities between the drive and the operation to be executed (as an example, avoiding issuing an “Output port” command to a port which is an input port on that drive). EasySetUp/EasyMotion Studio generates the setup information in the form of an archive file with the .t.zip extension. The archives are saved in the Archives folder from EasyMotion Studio/ EasySetUp installation folder. The drive’s/motor’s setup data are declared in the PC application with function TS_LoadSetup.vi. The subVI must be called for each configuration setup used. © Technosoft 2006 5 TML_LIB_LabVIEW – User Manual 4. Setup axes. Each axis defined at PC level requires the setup information. The configuration setup is associated to an axis with subVI TS_SetupAxis.vi. 5. Select the active axis/group. The messages sent from the PC address to one axis. Use subVI TS_SelectAxis.vi to choose the messages destination. All further function calls, which send TML messages on the communication channel, will address the messages to this active axis. 6. Program the motion for current axis. Use the TML_LIB_LabVIEW functions to program the motions required. © Technosoft 2006 6 TML_LIB_LabVIEW – User Manual 3 TML_LIB_LabVIEW description 3.1 Basic concept The Technosoft intelligent drives are programmable using the Technosoft Motion Language (TML). TML consists of a high-level set of codes allowing the user to parameterize and execute specific motion operations. TML allows to: • • • • • • Configure the motion mode (profiles, contouring, gearing in multiple axes structures, etc.) Detect / specifically treat external signals as limit switches, captures Execute homing sequences Setup / start specific action on pre-defined motion events Synchronize multiple axes structures, by sending group commands etc. The TML_LIB_LabVIEW library is the tool that helps you to handle the process of motion control application implementation on a PC computer, at a high level, without the need to write / compile TML code. A central element of the library is the communication kernel, which is responsible of correct opening of the communication channel (serial RS-232 or RS-485, CAN-bus or Ethernet), as well as of TML messages handling. This includes handling of the specific communication protocol, for each of these channels. Consequently, each application you’ll develop starts with the opening of the communication, i.e. calling the TS_OpenChannel.vi subVI. The application must end with the TS_CloseChannel.vi subVI execution. You’ll be able to handle multiple-axis applications from the PC. Besides the drive/motor setup with EasySetUp or EasyMotion Studio, you’ll also need to indicate some basic drive information for correct usage of the library functions. Thus, for each drive that is installed in the system, you’ll need to execute the TS_SetupAxis.vi subVI, indicating the axis ID and configuration setup. Such information will be used for some functions of the library, in order to check if there are incompatibilities between the drive and the operation to be executed (as an example, avoiding issuing an “Output port” command to a port which is an input port on that drive). Note that besides setting-up individual axes, it is also possible to setup groups of axes (with the TS_SetupGroup.vi subVI). This will allow you to issue commands, which will be received and executed simultaneously on all the axes initialized as belonging to that group. Once all the axes are defined, the library allows you to select the so-called ‘active axis or group’, using the TS_SelectAxis, or TS_SelectGroup subVI respectively. Consequently, all future commands that you’ll execute after the selection of one axis or group will be addressed to that axis or group. You can change at any time in your program the active axis/group. © Technosoft 2006 7 TML_LIB_LabVIEW – User Manual 3.2 Internal units and scaling factors Technosoft drives/motors work with parameters and variables represented in internal units (IU). The parameters and variables may represent various signals: position, speed, current, voltage, etc. Each type of signal has its own internal representation in IU and a specific scaling factor. In order to easily identify each type of IU, these have been named after the associated signals. For example the position units are the internal units for position, the speed units are the internal units for speed, etc. The scaling factor of each internal unit shows the correspondence with the international standard units (SI). The scaling factors are dependent on the product, motor and sensor type. Put in other words, the scaling factors depend on the setup configuration. In order to find the internal units and the scaling factors for a specific case, select the application in the project window and then execute menu command Help | Setup Data Management | Internal Units and Scaling Factors. Important: The Help | Setup Data Management | Internal Units and Scaling Factors command provides customized information, function of the application setup. If you change the drive, the motor technology or the feedback device, check again the scaling factors with this command. It may show you other relations! 3.3 Axis Identification The data exchanged on the communication channel is done using messages. Each message contains one TML instruction to be executed by the receiver of the message. Apart from the binary code of the TML instruction attached, any message includes information about its destination: an axis (drive/motor) or group of axes. This information is grouped in the Axis/Group ID Code. Each drive/motor has its own 8-bit Axis ID and Group ID. Remarks: 1. The Axis ID of a drive/motor must be unique and is set during the drive/motor setup phase with EasySetUp. 2. The Axis ID and Group ID of a drive/motor are stored in TML variable AAR. Use TS_GetIntVariable.vi to read the value of the Axis ID and Group ID. The Group ID represents a way to identify a group of axes, for a multicast transmission. This feature allows to send a command simultaneously to several axes, for example to start or stop the axes motion in the same time. When a function block sends a command to a group, all the axes members of this group will receive the command. For example, if the axis is member of group 1 and group 3, it will receive all the messages that in the group ID include group 1 and group 3. Remark: A drive/motor belongs, by default, to the group ID = 1. Each axis can be programmed to be member of one or several of the 8 possible groups. © Technosoft 2006 8 TML_LIB_LabVIEW – User Manual Table 3.1Definition of the groups Group No. 1 2 3 4 5 6 7 8 Group ID value 1 ( 0000 0001b ) 2 ( 0000 0010b ) 4 ( 0000 0100b ) 8 ( 0000 1000b ) 16 ( 0001 0000b ) 32 ( 0010 0000b ) 64 ( 0100 0000b ) 128 (1000 0000b ) 3.4 Functions descriptions The section presents the functions implemented in the TML_LIB_LabVIEW library. The functions are classified as follows: • • • • • • • • • • • • Motion programming – functions for motion programming on the selected axis. Motor commands – functions to enable/disable the motor power stage, start/stop the motion, change the value of the motor position and current Events – functions for events programming and test TML jumps and function calls – functions which allows you to execute code downloaded in the drive/motor memory I/O handling – functions for read/write operations with drive/motor I/O ports Data transfer – functions for read/write operations from/to the drive/motor memory Drive/motor monitoring – functions for monitoring the drive/motor status Miscellaneous – functions for FAULT state reset and drive reset Data logger – functions for logger setup and data upload Drive setup – functions for axis setup in the PC application Drive administration – functions that control the destination axis of the message sent via communication channels Communication setup – functions that manage the PC communication channel For each function you will find the following information: • • • • • • The subVi symbol The function C prototype SubVI parameters description A functional description Name of the related subVIs Examples reference. The examples that illustrate the correct use of the functions (subVIs) are listed in chapter 4. © Technosoft 2006 9 TML_LIB_LabVIEW – User Manual 3.4.1 Motion programming 3.4.1.1 TS_MoveAbsolute.vi Symbol: Prototype: LONG _TS_MoveAbsolute@28(LONG Position, DOUBLE Speed, DOUBLE Acceleration, SHORT INT Move Moment, SHORT INT Reference Base); Parameters: Name Position Speed Input Acceleration Move Moment Reference Base Output return Description Position to reached expressed in drive/motor position units Slew speed expressed in TML speed units. If the value is zero the drive/motor will use the previously value set for speed Acceleration/deceleration rate expressed in TML acceleration units. If its value is zero the drive/motor will use the previously value set for acceleration Defines the moment when the motion is started Specifies how the motion reference is computed: from actual values of position and speed reference or from actual values of load/motor position and speed TRUE if no error, FALSE if error Description: The function programs an absolute positioning with trapezoidal speed profile. The motion is described through Position parameter for position to reach, Speed for slew speed and Acceleration for acceleration/deceleration rate. The position to reach can be positive or negative. The Speed and Acceleration can be only positive. Once set, the motion parameters are memorized on the drive/motor. If you intend to use values previously defined for the acceleration rate and/or the velocity you don’t need to send their values again in the following trapezoidal profiles. Set to zero the value of speed and/or acceleration and the drive/motor will use the values previously defined (this option reduces the TML code generated by this function). The motion is executed: • • • Immediately when Move Moment = UPDATE_IMMEDIATE When a programmed event occurs if Move Moment = UPDATE_ON_EVENT If you select Move Moment = UPDATE_NONE, the movement is parameterized, but does not execute. You’ll need to issue an update command to determine the execution of the movement. Use the TS_UpdateImmediate.vi or the TS_UpdateOnEvent.vi functions in order to activate the movement. Set Reference Base = FROM_REFERENCE if you want the reference generator to compute the motion profile starting from the actual values of the position and speed reference. Set Reference © Technosoft 2006 10 TML_LIB_LabVIEW – User Manual Base = FROM_MEASURE if you want the reference generator to compute the motion profile starting from the actual values of the load/motor position and speed. When this option is used, at the beginning of each new motion profile, the position and speed reference are updated with the actual values of the load/motor position and speed. Remark: In open loop control of steppers, this option is ignored because there is no position and/or speed feedback. Related functions: TS_MoveRelative.vi, TS_MoveSCurveAbsolute.vi, TS_MoveSCurveRelative.vi, TS_MoveVelocity.vi Associated examples: © Technosoft 2006 Example 6, Example 11, Example 12, Example 14, Example 27, Example 28, Example 29, Example 37, Example 39 11 TML_LIB_LabVIEW – User Manual 3.4.1.2 TS_MoveRelative.vi Symbol: Prototype: LONG _TS_MoveRelative@32(LONG Position, DOUBLE Speed, DOUBLE Acceleration, UNSIGNED CHAR Additive, SHORT INT Move Moment, SHORT INT Reference Base); Parameters: Name Position Speed Acceleration Input Additive Move Moment Reference Base Output return Description Position increment expressed in TML position units Slew speed expressed in TML speed units. If its value is zero the drive/motor will use the previously value set for speed Acceleration/deceleration rate expressed in the TML acceleration units. If its value is zero the drive/motor will use the previously value set for acceleration Specifies how is computed the position to reach Defines the moment when the motion is started Specifies how the motion reference is computed: from actual values of position and speed reference or from actual values of load/motor position and speed TRUE if no error, FALSE if error Description: The function programs a relative positioning with trapezoidal speed profile. The motion is described through Position for position increment, Acceleration for acceleration/deceleration rate and Speed for slew speed. The position increment can be positive or negative; the sign gives the motion direction. The speed and acceleration can be only positive. Once set, the motion parameters are memorized on the drive/motor. If you intend to use values previously defined for the acceleration rate and/or the velocity you don’t need to send their values again in the following trapezoidal profiles. Set to zero the value of speed and/or acceleration if you want the drive/motor to use the values previously defined with other commands (this option reduces the TML code generated by this function). The position to reach can be computed in 2 ways: standard (default) or additive. In standard mode, the position to reach is computed by adding the position increment to the instantaneous position in the moment when the command is executed. In the additive mode, the position to reach is computed by adding the position increment to the previous position to reach, independently of the moment when the command was issued. The additive mode is activated with Additive = IsAdditive. The motion is executed: • • Immediately when Move Moment = UPDATE_IMMEDIATE When a programmed event occurs if Move Moment = UPDATE_ON_EVENT © Technosoft 2006 12 TML_LIB_LabVIEW – User Manual • If you select Move Moment = UPDATE_NONE, the movement is parameterized, but does not execute. You’ll need to issue an update command to determine the execution of the movement. Use the TS_UpdateImmediate.vi or the TS_UpdateOnEvent.vi functions in order to activate the movement. Set Reference Base = FROM_REFERENCE if you want the reference generator to compute the motion profile starting from the actual values of the position and speed reference. Use this option for example if successive standard relative moves must be executed and the final target position should represent exactly the sum of the individual commands. Set Reference Base = FROM_MEASURE if you want the reference generator to compute the motion profile starting from the actual values of the load/motor position and speed. When this option is used, at the beginning of each new motion profile, the position and speed reference are updated with the actual values of the load/motor position and speed. Remark: In open loop control of steppers, this option is ignored because there is no position and/or speed feedback. Related functions: TS_ MoveAbsolute.vi, TS_MoveSCurveAbsolute.vi, TS_MoveSCurveRelative.vi, TS_MoveVelocity.vi Associated examples: © Technosoft 2006 Example 1, Example 2, Example 4, Example 5, Example 7, Example 8, Example 16, Example 20, Example 24, Example 26, Example 29, Example 31, Example 32, Example 33, Example 36, Example 38, Example 40, Example 42 13 TML_LIB_LabVIEW – User Manual 3.4.1.3 TS_MoveSCurveAbsolute.vi Symbol: Prototype: LONG _TS_MoveSCurveAbsolute@32(LONG Position, DOUBLE Speed, DOUBLE Acceleration, LONG Jerk Time, SHORT INT Move Moment, SHORT INT Deceleration Type); Parameters: Name Position Speed Acceleration Input Jerk Time Move Moment Deceleration Type Output Return Description Position to reach expressed in TML position units The slew speed expressed in TML speed units. Acceleration/deceleration rate expressed in TML acceleration units. Represents the time interval for acceleration to reach the programmed value. It is expressed in TML time units. Defines the moment when the motion is started Specifies the speed profile used when the motion is stopped with TS_Stop TRUE if no error, FALSE if error Description: The function block programs an absolute positioning with an S-curve shape of the speed. This shape is due to the jerk limitation, leading to a trapezoidal or triangular profile for the acceleration and an S-curve profile for the speed. The motion is described through Position parameter for position to reach, Speed for slew speed, Acceleration for acceleration/deceleration rate and Jerk Time. The position to reach can be positive or negative. The Speed, Acceleration and Jerk Time can be only positive. An S-curve profile must begin when load/motor is not moving. During motion the parameters should not be changed. Therefore when executing successive S-curve commands, you should wait for the previous motion to end before setting the new motion parameters and starting next motion. When the motion is stopped with function TS_Stop.vi, the deceleration phase can be done in 2 ways: • Smooth, using an S-curve speed profile, when Deceleration Type = S_CURVE_SPEED_PROFILE • Fast, using a trapezoidal speed profile, when Deceleration Type = TRAPEZOIDAL_SPEED_PROFILE The motion can be executed: • • • Immediately when Move Moment = UPDATE_IMMEDIATE When a programmed event occurs if MoveMoment = UPDATE_ON_EVENT If you select Move Moment = UPDATE_NONE, the movement is parameterized, but does not execute. You’ll need to issue an update command to determine the execution of © Technosoft 2006 14 TML_LIB_LabVIEW – User Manual the movement. Use the TS_UpdateImmediate.vi or the TS_UpdateOnEvent.vi functions in order to activate the movement. Related functions: TS_MoveAbsolute.vi, TS_MoveRelative.vi, TS_MoveSCurveRelative.vi TS_MoveVelocity.vi, TS_QuikStopDecelerationRate.vi Associated examples: Example 35 © Technosoft 2006 15 TML_LIB_LabVIEW – User Manual 3.4.1.4 TS_MoveSCurveRelative.vi Symbol: Prototype: LONG _TS_MoveSCurveRelative@32(LONG Position, DOUBLE Speed, DOUBLE Acceleration, LONG Jerk Time, SHORT INT Move Moment, SHORT INT Deceleration Type); Parameters: Name Position Speed Acceleration Input Jerk Time Move Moment Deceleration Type Output Return Description Position increment expressed in drive/motor position units Slew speed expressed in drive/motor speed units. Acceleration/deceleration rate expressed in drive/motor acceleration units. Represents the time interval for acceleration to reach the programmed value. It is expressed in drive/motor time units. Defines the moment when the motion is started Specifies the speed profile used when the motion is stopped with TS_Stop.vi TRUE if no error, FALSE if error Description: The function block programs a relative positioning with an S-curve shape of the speed. This shape is due to the jerk limitation, leading to a trapezoidal or triangular profile for the acceleration and an S-curve profile for the speed. The motion is described through Position parameter for position increment, Speed for slew speed, Acceleration for acceleration/deceleration rate and Jerk Time. The position to reach can be positive or negative. The Speed, Acceleration and Jerk Time can be only positive. An S-curve profile must begin when load/motor is not moving. During motion the parameters should not be changed. Therefore when executing successive S-curve commands, you should wait for the previous motion to end before setting the new motion parameters and starting next motion. When the motion is stopped with function TS_Stop.vi, the deceleration phase can be done in 2 ways: • Smooth, using an S-curve speed profile, when Deceleration Type = S_CURVE_SPEED_PROFILE • Fast, using a trapezoidal speed profile, when Deceleration Type = TRAPEZOIDAL_SPEED_PROFILE The motion can be executed: • Immediately when Move Moment = UPDATE_IMMEDIATE • When a programmed event occurs if Move Moment = UPDATE_ON_EVENT • If you select Move Moment = UPDATE_NONE, the movement is parameterized, but does not execute. You’ll need to issue an update command to determine the execution of © Technosoft 2006 16 TML_LIB_LabVIEW – User Manual the movement. Use the TS_UpdateImmediate.vi or the TS_UpdateOnEvent.vi functions in order to activate the movement. Related functions: TS_MoveAbsolute.vi, TS_MoveRelative.vi, TS_MoveSCurveAbsolute.vi TS_MoveVelocity.vi Associated examples: Example 35 © Technosoft 2006 17 TML_LIB_LabVIEW – User Manual 3.4.1.5 TS_MoveVelocity. vi Symbol: Prototype: LONG _TS_MoveVelocity@24(DOUBLE Speed, DOUBLE Acceleration, SHORT INT Move Moment, SHORT INT Reference Base); Parameters: Name Speed Acceleration Input Move Moment Reference Base Output return Description Jog speed expressed in TML speed units Acceleration rate expressed in TML acceleration units. If the value is zero the drive/motor will use the previously value set for acceleration. Defines the moment when the motion is started Specifies how the motion reference is computed: from actual values of position and speed reference or from actual values of load/motor position and speed TRUE if no error, FALSE if error Description: The function programs a trapezoidal speed profile. You specify the jog Speed. The load/motor accelerates until the jog speed is reached. The jog speed can be positive or negative; the sign gives the direction. The Acceleration can be only positive. Once set, the motion parameters are memorized on the drive/motor. If you intend to use values previously defined for the acceleration rate you don’t need to send its value again in the following speed profiles. Set to zero the value of acceleration if you want the drive/motor to use the value previously defined with other commands (this option reduces the TML code generated by this function). The motion is executed: • • • Immediately when Move Moment = UPDATE_IMMEDIATE When a programmed event occurs if Move Moment = UPDATE_ON_EVENT If you select Move Moment = UPDATE_NONE, the movement is parameterized, but does not execute. You’ll need to issue an update command to determine the execution of the movement. Use the TS_UpdateImmediate.vi or the TS_UpdateOnEvent.vi functions in order to activate the movement. Set Reference Base = FROM_REFERENCE if you want the reference generator to compute the motion profile starting from the actual values of the position and speed reference. Use this option for example if successive standard relative moves must be executed and the final target position should represent exactly the sum of the individual commands. Set Reference Base = FROM_MEASURE if you want the reference generator to compute the motion profile starting from the actual values of the load/motor position and speed. When this option is used, at the beginning of each new motion profile, the position and speed reference are updated with the actual values of the load/motor position and speed. © Technosoft 2006 18 TML_LIB_LabVIEW – User Manual Remark: In open loop control of steppers, this option is ignored because there is no position and/or speed feedback. Related functions: TS_MoveRelative.vi, TS_MoveAbsolute.vi, TS_MoveSCurveAbsolute.vi, TS_MoveSCurveRelative.vi Associated examples: © Technosoft 2006 Example 1, Example 2, Example 3, Example 4, Example 5, Example 7, Example 9, Example 10, Example 12, Example 15, Example 16, Example 17, Example 18, Example 19, Example 24, Example 27, Example 28, Example 29, Example 30, Example 31, Example 39, Example 40 19 TML_LIB_LabVIEW – User Manual 3.4.1.6 TS_SetAnalogueMoveExternal.vi Symbol: Prototype: LONG _TS_SetAnalogueMoveExternal@20(SHORT INT Reference Type, UNSIGNED CHAR Update Reference, DOUBLE Limit Variation, SHORT INT Move Moment); Parameters: Name Reference Type Update Reference Input Limit Variation Output Move Moment Return Description Specifies how the analogue signal is interpreted Specifies how often the analogue reference is read when torque control is performed Speed/acceleration limit value for position/speed control expressed in TML internal units Defines the moment when the motion is started TRUE if no error, FALSE if error Description: The function block programs the drive/motor to work with an external analogue reference read via a dedicated analogue input (10-bit resolution). The analogue signal can be interpreted as a position, speed or torque analogue reference. Through parameter ReferenceType you specify how the analogue signal is interpreted: • • • Position reference when Reference Type = REFERENCE_POSITION. The drive/motor performs position control. Speed reference when Reference Type = REFERENCE_SPEED. The drive/motor performs speed control. Torque reference when Reference Type = REFERENCE_TORQUE. The drive/motor performs torque control. Remark: During the drive/motor setup, in the Drive setup dialogue, you have to: 1. Select the appropriate control type for your application at Control Mode. 2. Perform the tuning of controllers associated with the selected control mode. 3. Setup the analogue reference. Specify the reference values corresponding to the upper and lower limits of the analogue input. In addition, a dead-band symmetrical interval and its center point inside the analogue input range may be defined. In position control you can limit the maximum speed at sudden changes of the position reference and thus to reduce the mechanical shocks. In speed control you can limit the maximum acceleration at sudden changes of the speed reference and thus to get a smoother transition. These features are activated by setting the Limit Variation parameter to a positive value and disabled when the Limit Variation is zero. In torque control you can choose how often to read the analogue input: at each slow loop sampling period (Update Reference = UPDATE_FAST) or at each fast loop sampling period (Update Reference = UPDATE_SLOW). © Technosoft 2006 20 TML_LIB_LabVIEW – User Manual The motion is executed: • • • Immediately when Move Moment = UPDATE_IMMEDIATE When a programmed event occurs if Move Moment = UPDATE_ON_EVENT If you select Move Moment = UPDATE_NONE, the motion parameters are set, but does not execute. You’ll need to issue an update command to determine the execution of the movement. Use the TS_UpdateImmediate.vi or the TS_UpdateOnEvent.vi functions in order to activate the movement. Related functions: TS_SetDigitalMoveExternal.vi, TS_SetOnlineMoveExternal.vi Associated examples: Example 13 © Technosoft 2006 21 TML_LIB_LabVIEW – User Manual 3.4.1.7 TS_SetDigitalMoveExternal Symbol: Prototype: LONG _TS_SetDigitalMoveExternal@24(UNSIGNED CHAR Set Gear Ratio, SHORT INT Denominator, SHORT INT Numerator, DOUBLE Limit Variation, SHORT INT Move Moment); Parameters: Input Output Name Set Gear Ratio Denominator Numerator Limit Variation Move Moment Return Description Specifies if the digital reference is followed by the drive with a gear ratio Gear ratio denominator Gear ratio numerator Acceleration limit value Defines the moment when the motion is started TRUE if no error, FALSE if error Description: The function block programs the drive/motor to work with an external digital reference provided as pulse & direction or quadrature encoder signals. In either case, the drive/motor performs a position control with the reference computed from the external signals. Remarks: The option for the input signals: pulse & direction or quadrature encoder is established during the drive/motor setup. The drive/motor follows the external reference with a gear ratio different than 1:1 when Set Gear Ratio = YES. The gear ratio is specified as a ratio of 2 integer values: Numerator / Denominator. The Numerator value is signed, while the Denominator is unsigned. The sign indicates the direction of movement: positive – same as the external reference, negative – reversed to the external reference. You can limit the maximum acceleration at sudden changes of the external reference and thus to get a smoother transition. This feature is activated when the parameter Limit Value has a positive value and disabled when its value is zero. The motion is executed: • • • Immediately when Move Moment = UPDATE_IMMEDIATE When a programmed event occurs if Move Moment = UPDATE_ON_EVENT If you select Move Moment = UPDATE_NONE, the motion parameters are set, but the motion is not activated. You’ll need to issue an update command to determine the execution of the movement. Use the TS_UpdateImmediate.vi or the TS_UpdateOnEvent.vi functions in order to activate the movement. Related functions: TS_SetAnalogueMoveExternal, TS_SetOnlineMoveExternal Associated examples: Example 21 © Technosoft 2006 22 TML_LIB_LabVIEW – User Manual 3.4.1.8 TS_SetOnlineMoveExternal.vi Symbol: Prototype: LONG _TS_SetOnlineMoveExternal@24(SHORT INT Reference Type, DOUBLE Limit Variation, DOUBLE Initial Value, SHORT INT Move Moment); Parameters: Name Reference Type Input Output Limit Variation Initial Value Move Moment Return Description Specifies how the analogue signal is interpreted Speed/acceleration limit value for position/speed control expressed in drive/motor internal units The initial value of the reference received on-line Defines the moment when the motion is started TRUE if no error, FALSE if error Description: The function programs the drive/motor to work with a reference received via a communication channel from an external device. Depending on the control mode chosen, the external reference is saved in one of the TML variables: • • • • EREFP, which becomes the position reference if the Reference Type REFERENCE_POSITION EREFS, which becomes the speed reference if the Reference Type REFERENCE_SPEED EREFT, which becomes the torque reference if the Reference Type REFERENCE_TORQUE EREFV, which becomes voltage reference if the Reference Type REFERENCE_VOLTAGE = = = = Remark: During the drive/motor setup, in the Drive setup dialogue, you have to: 1. Select the appropriate control type for your application in Drive Setup dialogue. 2. Perform the tuning of controllers associated with the selected control mode. In position control you can limit the maximum speed at sudden changes of the position reference and thus to reduce the mechanical shocks. In speed control you can limit the maximum acceleration at sudden changes of the speed reference and thus to get a smoother transition. These features are activated by setting the Limit Variation parameter to a positive value and disabled when the Limit Variation is zero. The motion is executed: • • • Immediately when Move Moment = UPDATE_IMMEDIATE When a programmed event occurs if Move Moment = UPDATE_ON_EVENT If you select Move Moment = UPDATE_NONE, the movement is parameterized, but does not execute. You’ll need to issue an update command to determine the execution of © Technosoft 2006 23 TML_LIB_LabVIEW – User Manual the movement. Use the TS_UpdateImmediate.vi or the TS_UpdateOnEvent.vi functions in order to activate the movement. If the external device starts sending the reference AFTER the motion mode is activated, it may be necessary to initialize EREFP, EREFS, EREFT or EREFV. The desired starting value is set through Initial Value parameter. Related functions: TS_SetAnalogueMoveExternal.vi, TS_SetDigitalMoveExternal.vi Associated examples: Example 13 © Technosoft 2006 24 TML_LIB_LabVIEW – User Manual 3.4.1.9 TS_VoltageTestMode.vi Symbol: Prototype: LONG _TS_VoltageTestMode@20(SHORT INT MaxVoltage, SHORT INT IncrVoltage, SHORT INT Theta0, SHORT INT Dtheta, SHORT INT MoveMoment); Parameters: Name MaxVoltage IncrVoltage Input Theta0 Dtheta Output Move Moment return Description Maximum test voltage expressed in drive/motor voltage command units Voltage increment expressed in drive/motor internal units Initial value of electrical angle expressed in drive/motor electrical angle units Electric angle increment expressed in drive/motor electrical angle increment units Defines the moment when the motion is started TRUE if no error, FALSE if error Description: The function allows you to set the drives/motors in voltage test mode. In the test mode a saturated ramp voltage is applied to the motor, i.e. the voltage will increase with the IncrVoltage increment at each slow sampling period up to the MaxVoltage value. Remark: This is a test mode to be used only in some special cases for drives setup. The test mode is not supposed to be used during normal operation For AC motors (like for example the brushless motors), you have the possibility to rotate a voltage reference vector with a programmable speed. As a result, these motors can be moved in an “open-loop” mode without using the position sensor. The main advantage of this test mode is the possibility to conduct in a safe way a series of tests, which can offer important information about the motor parameters, drive status and the integrity of the its connections. The voltage reference vector initial position is set through parameter Theta0 and its speed through Dtheta. For DC motors set these parameters to zero. The motion is executed: • • • Immediately when Move Moment = UPDATE_IMMEDIATE When a programmed event occurs if Move Moment = UPDATE_ON_EVENT If you select Move Moment = UPDATE_NONE, the movement is parameterized, but does not execute. You’ll need to issue an update command to determine the execution of the movement. Use the TS_UpdateImmediate.vi or the TS_UpdateOnEvent.vi functions in order to activate the movement. Related functions: TS_TorqueTestMode.vi Associated examples: Example 22 © Technosoft 2006 25 TML_LIB_LabVIEW – User Manual 3.4.1.10 TS_TorqueTestMode.vi Symbol: Prototype: LONG _TS_TorqueTestMode@20(SHORT INT MaxTorque, SHORT INT IncrTorque, SHORT INT Theta0, SHORT INT Dtheta, SHORT Move Moment); Parameters: Input Output Name MaxTorque IncrTorque Theta0 Dtheta Move Moment return Description Maximum test torque expressed in TML current units Torque increment expressed in TML internal units Initial value of electrical angle expressed in TML electrical angle units Electric angle increment expressed in TML electrical angle increment units Defines the moment when the motion is started TRUE if no error, FALSE if error Description: The function allows you to set the drives/motors in torque test mode. In the test mode a saturated ramp current is applied to the motor, i.e. the current will increase with the IncrTorque increment at each slow sampling period up to the MaxTorque value. Remark: This is a test mode to be used only in some special cases for drives setup. The test mode is not supposed to be used during normal operation For AC motors (like for example the brushless motors), you have the possibility to rotate a current reference vector with a programmable speed. As a result, these motors can be moved in an “open-loop” mode without using the position sensor. The main advantage of this test mode is the possibility to conduct in a safe way a series of tests, which can offer important information about the motor parameters, drive status and the integrity of the its connections. The current reference vector initial position is set through parameter Theta0 and its speed through Dtheta. For DC motors set these parameters to zero. The motion is executed: • • • Immediately when Move Moment = UPDATE_IMMEDIATE When a programmed event occurs if Move Moment = UPDATE_ON_EVENT If you select Move Moment = UPDATE_NONE, the movement is parameterized, but does not execute. You’ll need to issue an update command to determine the execution of the movement. Use the TS_UpdateImmediate.vi or the TS_UpdateOnEvent.vi functions in order to activate the movement. Related functions: TS_VoltageTestMode.vi Associated examples: Example 23 © Technosoft 2006 26 TML_LIB_LabVIEW – User Manual 3.4.1.11 TS_PVTSetup.vi Symbol: Prototype: LONG _TS_PVTSetup@28(SHORT INT Clear Buffer, SHORT INT Integrity Checking, SHORT INT Change PVT Counter, SHORT INT Absolute Position Source, SHORT INT Change Low Level, SHORT INT PVT Counter Value, SHORT INT Low Level Value); Parameters: Name Clear Buffer Integrity Checking Change PVT Counter Input Absolute Position Source Change Low Level Output PVT Counter Value Low Level Value return Description Specifies if the PVT buffer is cleared Enable/disable PVT counter integrity checking Specifies if the integrity counter is updated with the value of PVTCounterValue parameter Selects the source for initial position for absolute PVT mode Specifies if the level for BufferLow signaling is updated with the value of LowLevelValue parameter The new value for the drive/motor PVT integrity counter The new value for the level of the BufferLow signal TRUE if no error, FALSE if error Description: The function programs a drive/motor to work in PVT motion mode. In PVT motion mode the drive/motor performs a positioning path described through a series of points. Each point specifies the desired Position, Velocity and Time, i.e. contains a PVT data. Between the points the built-in reference generator performs a 3rd order interpolation. Remark: The function block just programs the drive/motor for PVT mode. The motion mode is activated with function TS_SendPVTFirstPoint.vi and the PVT points are sent to the drive with function TS_SendPVTPoint.vi. A key factor for getting a correct positioning path in PVT mode is to set correctly the distance in time between the points. Typically this is 10-20ms, the shorter the better. If the distance in time between the PVT points is too big, the 3rd order interpolation may lead to important variations compared with the desired path. The PVT motion mode can be started only when the previous motion is complete. However, you can switch at any moment to another motion mode. The PVT mode can be relative or absolute. In the absolute mode, each PVT point specifies the position to reach. The initial position may be either the current position reference TML variable TPOS (Absolute Position Source = 1) or a preset value read from the TML parameter PVTPOS0 (Absolute Position Source = 0). In the relative mode, each PVT point specifies the position increment relative to the previous point. In both cases, the time is relative to the previous © Technosoft 2006 27 TML_LIB_LabVIEW – User Manual point i.e. represents the duration of a PVT segment. For the first PVT point, the time is measured from the starting of the PVT mode. Remark: The PVT mode, absolute or relative, is set with function TS_SendPVTFirstPoint.vi. Each time when the drive receives a new PVT point, it is saved into the PVT buffer. The reference generator empties the buffer as the PVT points are executed. The PVT buffer is of type FIFO (first in, first out). The default length of the PVT buffer is 7 PVT points. Each entry in the buffer is made up of 9 words, so the default length of the PVT buffer in terms of how much memory space is reserved is 63 (3Fh) words. The drive/motor automatically sends messages to the host when the buffer is full, low or empty. The messages contain the PVT status (TML variable PVTSTS). The buffer full condition occurs when the number of PVT points in the buffer is equal with the buffer size. The buffer low condition occurs when the number of PVT points in the buffer is less or equal with a programmable value. The level for BufferLow signaling is updated when Change Low Level = YES with the value of parameter Low Level Value. The buffer empty condition occurs when the buffer is empty and the execution of the last PVT point is over. When the PVT buffer becomes empty the drive/motor: • • Remains in PVT mode if the velocity of last PVT point executed is zero and waits for new points to receive Enters in quick stop mode if the velocity of last PVT point executed is not zero Therefore, a correct PVT sequence must always end with a last PVT point having velocity zero. Remarks: 1. The PVT and PT modes share the same buffer. Therefore the TML parameters and variables associated with the buffer management are the same. 2. Both the PVT buffer size and its start address are programmable via TML parameters (int@0x0864) and PVTBUFLEN (int@0x0865). Therefore if needed, the PVT buffer size can be substantially increased. Use TS_SetIntegerVariable.vi to change the PVT buffer parameters. Each PVT point also includes a 7-bit integrity counter. The integrity counter value must be incremented by the host by one, each time a new PVT point is sent to the drive/motor. If the integrity counter error checking is activated (Integrity Checking = YES), the drive compares its integrity counter value with the one sent with the PVT point. This comparison is done every time a PVT point is received. If the values of the two integrity counters do not match, the integrity check error is triggered, the drive/motor sends messages with PVTSTS to the host and the received PVT point is discarded. Each time a PVT point is accepted (the integrity counters match or the integrity counter error checking is disabled), the drive automatically increments its internal integrity counter. The default value of the internal integrity counter after power up is 0. Set Change PVT Counter = YES to change its value with PVT Counter Value parameter. The integrity counter checking is disabled when parameter Integrity Checking = NO. Related functions: TS_SendPVTFirstPoint.vi, TS_SendPVTPoint.vi Associated examples: – © Technosoft 2006 28 TML_LIB_LabVIEW – User Manual 3.4.1.12 TS_SendPVTFirstPoint.vi Symbol: Prototype: LONG _TS_SendPVTFirstPoint@36(LONG Position, DOUBLE Velocity, WORD Time, SHORT INT PVT Counter, SHORT INT PositionType, LONG InitialPosition, SHORT INT Move Moment, SHORT INT Reference Base); Parameters: Name Position Velocity Time Input PVT Counter Position Type Initial Position Move Moment Reference Base Output return Description Position value for first PVT point expressed in drive/motor internal position units Speed at the end of the first PVT segment expressed in drive/motor internal speed units Represents the time interval of the PVT segment expressed in drive/motor internal time units. The maximum time interval is 511 IU. Integrity counter for first PVT point. Specifies the type of PVT mode The initial position at the start of an absolute PVT movement Defines the moment when the motion is started Specifies how the motion reference is computed: from actual values of position and speed reference or from actual values of load/motor position and speed TRUE if no error, FALSE if error Description: The function sends the first PVT point and activates the PVT motion mode. Parameter Position Type sets the PVT mode: absolute or relative. In the absolute mode (Position Type = ABSOLUTE_POSITION), each PVT point specifies the position to reach. The initial position may be either the current position reference TML variable TPOS or a preset value read from the TML parameter PVTPOS0. In the relative mode (Position Type = RELATIVE_POSITION), each PVT point specifies the position increment relative to the previous point. Remark: The source for initial position, TPOS or PVTPOS0, is set with function TS_PVTSetup.vi. The motion is executed: • • • Immediately when Move Moment = UPDATE_IMMEDIATE When a programmed event occurs if Move Moment = UPDATE_ON_EVENT If you select Move Moment = UPDATE_NONE, the movement is parameterized, but does not execute. You’ll need to issue an update command to determine the execution of © Technosoft 2006 29 TML_LIB_LabVIEW – User Manual the movement. Use the TS_UpdateImmediate.vi or the TS_UpdateOnEvent.vi functions in order to activate the movement. Set Reference Base = FROM_REFERENCE if you want the reference generator to compute the motion profile starting from the actual values of the position and speed reference. Set Reference Base = FROM_MEASURE if you want the reference generator to compute the motion profile starting from the actual values of the load/motor position and speed. When this option is used, at the beginning of each new motion profile, the position and speed reference are updated with the actual values of the load/motor position and speed. Related functions: TS_PVTSetup.vi, TS_SendPVTPoint.vi Associated examples: – © Technosoft 2006 30 TML_LIB_LabVIEW – User Manual 3.4.1.13 TS_SendPVTPoint.vi Symbol: Prototype: LONG _TS_SendPVTPoint(LONG Position, DOUBLE Velocity, WORD Time, SHORT INT PVT Counter); Parameters: Input Output Name Position Velocity Time PVT Counter return Description Position at the end of the PVT segment expressed in TML position units Velocity at the end of the PVT segment expressed in TML speed units Time interval for the current PVT segment expressed in TML time units The integrity counter for the current PVT point TRUE if no error, FALSE if error Description: The function sends a PVT point to the drive/motor. Each point specifies the desired Position, Velocity and Time, i.e. contains a PVT data. Between the PVT points the reference generator performs a 3rd order interpolation. The PVT point also includes a 7-bit integrity counter read from PVT Counter. The integrity counter value must be incremented by the host by one, each time a new PVT point is sent to the drive/motor. Related functions: TS_PVTSetup.vi, TS_SendPVTFirstPoint.vi Associated examples: – © Technosoft 2006 31 TML_LIB_LabVIEW – User Manual 3.4.1.14 TS_PTSetup.vi Symbol: Prototype: LONG _TS_PTSetup@28(SHORT INT Clear Buffer, SHORT INT Integrity Checking, SHORT INT Change PT Counter, SHORT INT Absolute Position Source, SHORT INT Change Low Level, SHORT INT PT Counter Value, SHORT INT Low Level Value); Parameters: Name Clear Buffer Integrity Checking Change PT Counter Input Absolute Position Source Change Low Level Output PT Counter Value Low Level Value Return Description When TRUE the PT buffer is cleared Enable/disable PT counter integrity checking Specifies if the integrity counter is updated with the value of PT Counter Value parameter Selects the source for initial position for absolute PVT mode Specifies if the level for BufferLow signaling is updated with the value of LowLevelValue parameter The new value for the drive/motor PVT integrity counter The new value for the level of the BufferLow signal TRUE if no error, FALSE if error Description: The function programs a drive/motor to work in PT motion mode. In PT motion mode the drive/motor performs a positioning path described through a series of points. Each point specifies the desired Position and Time, i.e. contains a PT data. Between the points the built-in reference generator performs a linear interpolation. Remark: The function block just programs the drive/motor for PT mode. The motion mode is activated with function TS_SendPTFirstPoint.vi and the PT points are sent to the drive with function TS_SendPTPoint.vi. The PT motion mode can be started only when the previous motion is complete. However, you can switch at any moment to another motion mode. The PT mode can be relative or absolute. In the absolute mode, each PT point specifies the position to reach. The initial position may be either the current position reference TML variable TPOS (Absolute Position Source = 1) or a preset value read from the TML parameter PVTPOS0 (Absolute Position Source = 0). In the relative mode, each PT point specifies the position increment relative to the previous point. In both cases, the time is relative to the previous point i.e. represents the duration of a PT segment. For the first PT point, the time is measured from the starting of the PT mode. Remark: The PT mode, absolute or relative, is set with function TS_SendPTFirstPoint.vi. © Technosoft 2006 32 TML_LIB_LabVIEW – User Manual Each time when the drive receives a new PT point, it is saved into the PT buffer. The reference generator empties the buffer as the PT points are executed. The PT buffer is of type FIFO (first in, first out). The default length of the PT buffer is 7 PT points. Each entry in the buffer is made up of 9 words, so the default length of the PVT buffer in terms of how much memory space is reserved is 63 (3Fh) words. The drive/motor automatically sends messages to the host when the buffer is full, low or empty. The messages contain the PVT status (TML variable PVTSTS). The buffer full condition occurs when the number of PVT points in the buffer is equal with the buffer size. The buffer low condition occurs when the number of PVT points in the buffer is less or equal with a programmable value. Set Change Low Level = YES to change the level for BufferLow signaling with the value of parameter Low Level Value. The buffer empty condition occurs when the buffer is empty and the execution of the last PT point is over. When the PT buffer becomes empty the drive/motor keeps the position reference unchanged. Remarks: 3. The PT and PVT modes share the same buffer. Therefore the TML parameters and variables associated with the buffer management are the same. 4. Both the PT buffer size and its start address are programmable via TML parameters (int@0x0864) and PVTBUFLEN (int@0x0865). Therefore if needed, the PT buffer size can be substantially increased. Use TS_SetIntegerVariable.vi to change the PT buffer parameters. Each PT point also includes a 7-bit integrity counter. The integrity counter value must be incremented by the host by one, each time a new PT point is sent to the drive/motor. If the integrity counter error checking is activated (Integrity Checking = YES), the drive compares its integrity counter value with the one sent with the PT point. This comparison is done every time a PT point is received. If the values of the two integrity counters do not match, the integrity check error is triggered, the drive/motor sends messages with PVTSTS to the host and the received PT point is discarded. Each time a PT point is accepted (the integrity counters match or the integrity counter error checking is disabled), the drive automatically increments its internal integrity counter. The default value of the internal integrity counter after power up is 0. Set Change PT Counter = YES to change the value of integrity counter with PT Counter Value parameter. The integrity counter checking is disabled when parameter Integrity Checking = NO. Related functions: TS_SendPTFirstPoint.vi, TS_SendPTPoint.vi Associated examples: – © Technosoft 2006 33 TML_LIB_LabVIEW – User Manual 3.4.1.15 TS_SendPTFirstPoint.vi Symbol: Prototype: LONG _TS_SendPTFirstPoint@28(LONG Position, WORD Time, SHORT PT Counter, SHORT Position Type, LONG Initial Position, SHORT Move Moment SHORT Reference Base); Arguments: Input Name Position Time PT Counter Position Type Initial Position Move Moment Reference Base Output Return Description Position value for first PT point expressed in TML position units Time interval of the PT segment expressed in TML time units. Integrity counter for first PT point. Specifies the type of PT mode The initial position at the start of an absolute PT movement Defines the moment when the motion is started Specifies how the motion reference is computed: from actual values of position and speed reference or from actual values of load/motor position and speed TRUE if no error, FALSE if error Description: The function sends the first PT point and activates the PT motion mode. Parameter Position Type sets the PT mode: absolute or relative. In the absolute mode (Position Type = ABSOLUTE_POSITION), each PT point specifies the position to reach. The initial position may be either the current position reference TML variable TPOS or a preset value read from the TML parameter PVTPOS0. In the relative mode (Position Type = RELATIVE_POSITION), each PT point specifies the position increment relative to the previous point. Remark: The initial position source, TPOS or PVTPOS0, is set with function TS_PTSetup.vi. The motion is executed: • • • Immediately when Move Moment = UPDATE_IMMEDIATE When a programmed event occurs if Move Moment = UPDATE_ON_EVENT If you select Move Moment = UPDATE_NONE, the movement is parameterized, but does not execute. You’ll need to issue an update command to determine the execution of the movement. Use the TS_UpdateImmediate or the TS_UpdateOnEvent functions in order to activate the movement. Related functions: TS_PTSetup.vi, TS_SendPTPoint.vi Associated examples: – © Technosoft 2006 34 TML_LIB_LabVIEW – User Manual 3.4.1.16 TS_SendPTPoint.vi Symbol: Prototype: LONG _TS_SendPTPoint@12(LONG Position, UNSIGNED SHORT INT Time, SHORT INT PT Counter); Parameters: Input Output Name Position Time PT Counter return Description Position at the end of the PT segment expressed in TML position units Time interval for the current PT segment expressed in TML time units The integrity counter for the current PT point TRUE if no error, FALSE if error Description: The function sends a PT point to the drive/motor. Each point specifies the desired Position, and Time. Between the PT points the reference generator performs a linear interpolation. The PT point also includes a 7-bit integrity counter read from parameter PT Counter. The integrity counter value must be incremented by the host by one, each time a new PT point is sent to the drive/motor. Related functions: TS_PTSetup.vi, TS_SendPTFirstPoint.vi Associated examples: – © Technosoft 2006 35 TML_LIB_LabVIEW – User Manual 3.4.1.17 TS_SetGearingMaster.vi Symbol: Prototype: LONG _TS_SetGearingMaster@24(SHORT INT Group, UNSIGNED CHAR Slave ID, SHORT INT Reference Base, SHORT INT Enable, UNSIGNED CHAR Set Slave Pos, SHORT INT Move Moment); Parameters: Name Group Input Output Slave ID Reference Base Enable Set Slave Pos Move Moment Return Description Specifies if the master sends its position to one slave or a group of slaves The axis ID of the slave or group ID of group of slaves Specifies if the master sends its load position or its position reference Enable/disables the master in electronic gearing Specify if the master is initializing the slave(s) Defines the moment when the settings are activated TRUE if no error, FALSE if error Description: The function programs the active axis as master in electronic gearing. Once at each slow loop sampling time interval, the master sends either its load position APOS (Reference Base = FROM_MEASURE) or its position reference TPOS (Reference Base = FROM_REFERENCE) to the axis or the group of axes specified in the parameter Slave ID. Remark: The Reference Base = FROM_MEASURE option is not valid if the master operates in open loop. It is meaningless if the master drive has no position sensor. The Slave ID is interpreted either as the Axis ID of one slave (Group = NO) or the value of a Group ID i.e. the group of slaves to which the master should send its data (Group = YES). The master operation is enabled with Enable = ENABLE and is disabled when Enable = DISABLE. In both cases, these operations have no effect on the motion executed by the master. If the master activation is done AFTER the slaves are set in electronic gearing mode, set Set Slave Pos = INITIALIZE to determine the master to send an initialization message to the slaves. The commands are executed: • Immediately when Move Moment = UPDATE_IMMEDIATE • When a programmed event occurs if Move Moment = UPDATE_ON_EVENT • If you select Move Moment = UPDATE_NONE, the movement is parameterized, but does not execute. You’ll need to issue an update command to determine the execution of the movement. Use the TS_UpdateImmediate.vi or the TS_UpdateOnEvent.vi functions in order to activate the movement. Related functions: TS_SetGearingSlave, TS_SendSynchronization Associated examples: Example 31 © Technosoft 2006 36 TML_LIB_LabVIEW – User Manual 3.4.1.18 TS_SetGearingSlave.vi Symbol: Prototype: LONG _TS_SetGearingSlave@28(SHORT INT Denominator, SHORT INT Numerator, SHORT INT Reference Base, SHORT INT Enable, DOUBLE Limit Variation, SHORT INT Move Moment); Parameters: Name Denominator Numerator Reference Base Input Output Enable Slave Enable Superposition Limit Variation Move Moment return Description Gear ratio denominator (always positive) Gear ratio numerator (positive or negative) Specifies how the motion reference is computed: from actual values of position and speed reference or from actual values of load/motor position and speed Enables the electronic gearing slave mode Enables/disables motion superposition Acceleration limit when the slave is coupling Defines the moment when the settings are activated TRUE if no error, FALSE if error Description: The function programs the active axis to operate as slave in electronic gearing. In electronic gearing slave mode the drive/motor performs a position control. At each slow loop sampling period, the slave computes the master’s position increment and multiplies it with its programmed gear ratio. The result is the slave’s position reference increment, which added to the previous slave position reference gives the new slave position reference. The gear ratio is the result of the division Numerator / Denominator. Numerator is a signed integer, while the Denominator is unsigned integer. The Numerator sign indicates the direction of movement: positive – same as the master, negative – reversed to the master. Numerator and Denominator are used by an automatic compensation procedure that eliminates the round off errors, which occur when the gear ratio is an irrational number like: 1/3 (Slave = 1, Master = 3). The slave can get the master position in two ways: 1. Via a communication channel (Enable Slave = SLAVE_COMMUNICATION_CHANNEL), from a drive/motor set as master with function block TS_SetGearingMaster 2. Via an external digital reference of type pulse & direction or quadrature encoder (Enable Slave = SLAVE_2ND_ENCODER) Remark: Set Enable Slave = SLAVE_NONE if you want to program the motion mode parameters without enabling it. © Technosoft 2006 37 TML_LIB_LabVIEW – User Manual When master position is provided via the external digital interface, the slave computes the master position by counting the pulse & direction or quadrature encoder signals. The initial value of the master position is set by default to 0. Use function TS_SetLongVariable to change its value by writing the desired value in the TML variable APOS2. You can smooth the slave coupling with the master, by limiting the maximum acceleration on the slave. This is particularly useful when the slave must couple with a master running at high speed. This feature is activated when the parameter Limit Value has a positive value and disabled when its value is zero. Set Reference Base = FROM_REFERENCE if you want the reference generator to compute the slave position starting from the actual values of the position and speed reference. Set Reference Base = FROM_MEASURE if you want the reference generator to compute the slave position starting from the actual values of the load/motor position and speed. When this option is used, at the beginning of each new motion profile, the position and speed reference are updated with the actual values of the load/motor position and speed. Remarks: 1. The function requires drive/motor position loop to be closed. During the drive/motor setup select Position at Control Mode and perform the position controller tuning. 2. Use function block TS_SetGearingMaster.vi to program a drive/motor as master in electronic gearing 3. When the reference is read from second encoder or pulse & direction inputs you don’t need to program a drive/motor as master in electronic gearing Related functions: TS_SetGearingMaster.vi, TS_SetMasterResolution.vi Associated examples: Example 31 © Technosoft 2006 38 TML_LIB_LabVIEW – User Manual 3.4.1.19 TS_SetCammingMaster.vi Symbol: Prototype: LONG _TS_SetCammingMaster@20(SHOT INT Group, UNSIGNED CHAR Slave ID, SHORT INT Reference Base, SHORT INT Enable, SHORT INT Move Moment); Parameters: Name Group Input Output Slave ID Reference Base Enable Move Moment Return Description Specifies if the master sends its position to one slave or a group of slaves The axis ID of the slave or group ID of group of slaves Specifies if the master sends its load position or its position reference Enable/disables the master in electronic camming Defines the moment when the settings are activated TRUE if no error, FALSE if error Description: The function programs the active axis as master in electronic camming. Once at each slow loop sampling time interval, the master sends either its load position APOS (Reference Base = FROM_MEASURE) or its position reference TPOS (Reference Base = FROM_REFERENCE) to the axis or the group of axes specified in the parameter Slave ID. Remark: The Reference Base = FROM_MEASURE option is not valid if the master operates in open loop. It is meaningless if the master drive has no position sensor. The SlaveID is interpreted either as the Axis ID of one slave (Group = SET_SLAVE) or the value of a Group ID i.e. the group of slaves to which the master should send its data (Group = SET_GROUP). The master operation is enabled with Enable = ENABLE and is disabled when Enable = DISABLE. In both cases, these operations have no effect on the motion executed by the master. The commands are executed: • • • Immediately when Move Moment = UPDATE_IMMEDIATE When a programmed event occurs if Move Moment = UPDATE_ON_EVENT If you select Move Moment = UPDATE_NONE, the movement is parameterized, but does not execute. You’ll need to issue an update command to determine the execution of the movement. Use the TS_UpdateImmediate.vi or the TS_UpdateOnEvent.vi functions in order to activate the movement. Related functions: TS_CamDownload.vi, TS_CamInitialization.vi TS_SetCammingSlaveRelative.vi, TS_SetCammingSlaveAbsolute.vi, TS_SendSynchronization.vi Associated examples: Example 32 © Technosoft 2006 39 TML_LIB_LabVIEW – User Manual 3.4.1.20 TS_SetCammingSlaveRelative.vi Symbol: Prototype: LONG _TS_SetCammingSlaveRelative@36(UNSIGNED SHORT INT RunAddress, SHORT INT Reference Base, SHORT INT Enable Slave, SHORT INT Move Moment, LONG Offset From Master, DOUBLE Mult Input Factor, DOUBLE Mult Output Factor); Parameters: Name Run Address Reference Base Input Output Enable Slave Move Moment Offset From Master Mult Input Factor Mult Output Factor Return Description Drive/motor RAM address where the cam table is copied with function TS_CamInitialization Specifies how the motion reference is computed: from actual values of position and speed reference or from actual values of load/motor position and speed Enable the electronic camming slave mode Defines the moment when the settings are activated Cam table offset expressed in TML position units CAM table input scaling factor CAM table output scaling factor TRUE if no error, FALSE if error Description: The function block programs the active axis to operate as slave in electronic camming relative mode. The slave drive/motor executes a cam profile function of the master drive/motor position. The cam profile is defined by a cam table – a set of (X, Y) points, where X is cam table input i.e. the master position and Y is the cam table output i.e. the corresponding slave position. Between the points the drive/motor performs a linear interpolation. In electronic camming relative mode the output of the cam table is added to the slave actual position. The cam tables are previously stored in drive/motor EEPROM memory with function TS_CamDownload.vi. After download, previously starting the camming slave, you have to initialize the cam table, i.e. to copy it from EEPROM memory to RAM memory. Use function TS_CamInitialization.vi to initialize a cam table. The active cam table is selected through parameter Run Address. The Run Address must contain the drive/motor RAM address where the cam table was copied. The slave can get the master position in two ways: 1. Via a communication channel (Enable Slave = SLAVE_COMM_CH), from a drive/motor set as master with function block TS_SetGearingMaster 2. Via an external digital reference of type pulse & direction or quadrature encoder (Enable Slave = SLAVE_2ND_ENCODER) © Technosoft 2006 40 TML_LIB_LabVIEW – User Manual Remark: 1. Set Enable Slave = SLAVE_NONE if you want to program the motion mode parameters without enabling it. 2. Use function block TS_SetCammingMaster.vi to program a drive/motor as master in electronic camming. When the reference is read from second encoder or pulse & direction inputs you don’t need to program a drive/motor as master in electronic camming When master position is provided via the external digital interface, the slave computes the master position by counting the pulse & direction or quadrature encoder signals. The initial value of the master position is set by default to 0. Use function block TS_SetLongVariable to change its value by writing the desired value in the TML variable APOS2. With parameter Offset From Master you can shift the cam profile versus the master position, by setting an offset for the slave. The cam table input is computed as the master position minus the cam offset. For example, if a cam table is defined between angles 100 to 250 degrees, a cam offset of 50 degrees will make the cam table to execute between master angles 150 and 300 degrees. You can compress/extend the cam table input. Set the parameter Mult Input Factor with the correction factor by which the cam table input is multiplied. For example, an input correction factor of 2, combined with a cam offset of 180 degrees, will make possible to execute a cam table defined for 360 degrees of the master in the last 180 degrees. You can also compress/extend the cam table output. Specify through input Mult Output Factor the correction factor by which the cam table output is multiplied. This feature addresses the applications where the slaves must execute different position commands at each master cycle, all having the same profile defined through a cam table. In this case, the drive/motor is programmed with a unique normalized cam profile and the cam table output is multiplied with the relative position command updated at each master cycle. If you intend to use the default or previously defined values for the Mult Input Factor, Mult Output Factor and/or Offset From Master, you don’t need to send their values. Set to zero their values if you want the drive/motor to use the values previously defined with other commands (this option reduces the TML code generated by this function). Related functions: TS_CamDownload.vi, TS_CamInitialization.vi, TS_SetCammingSlaveAbsolute.vi, TS_SetCammingMaster.vi, TS_SetMasterResolution.vi Associated examples: Example 32 © Technosoft 2006 41 TML_LIB_LabVIEW – User Manual 3.4.1.21 TS_SetCammingSlaveAbsolute.vi Symbol: Prototype: LONG _TS_SetCammingSlaveAbsolute@44(UNSIGNED SHORT INT Run Address, DOUBLE Limit Variation, SHORT INT Reference Base, SHORT INT Enable Slave, SHORT INT Move Moment, LONG Offset From Master, DOUBLE Mult Input Factor, DOUBLE Mult Output Factor); Parameters: Name Run Address Limit Variation Input Output Reference Base Enable Slave Move Moment Offset From Master Mult Input Factor Mult Output Factor Return Description Drive/motor RAM address where the cam table is copied with function TS_CamInitialization Slave speed limit value expressed in TML speed units Specifies how the motion reference is computed: from actual values of position and speed reference or from actual values of load/motor position and speed Enable the electronic camming slave mode Defines the moment when the settings are activated Cam table offset expressed in TML position units CAM table input scaling factor CAM table output scaling factor TRUE if no error, FALSE if error Description: The function block programs the active axis to operate as slave in electronic camming absolute mode. The slave drive/motor executes a cam profile function of the master drive/motor position. The cam profile is defined by a cam table – a set of (X, Y) points, where X is cam table input i.e. the master position and Y is the cam table output i.e. the corresponding slave position. Between the points the drive/motor performs a linear interpolation. In electronic camming absolute mode the output of the cam table represents the position to reach. The electronic camming absolute mode may generate abrupt variations on the slave position reference, mainly at entry in the camming mode. Set parameter Limit Variation to limit the speed of the slave during travel towards the position to reach. The limitation is disabled if the Limit Variation is set to zero. The cam tables are previously stored in drive/motor EEPROM memory with TS_CamDownload.vi. After download, previously starting the camming slave, you initialize the cam table, i.e. to copy it from EEPROM memory to RAM memory. Use TS_CamInitialization.vi to initialize a cam table. The active cam table is selected © Technosoft 2006 42 function have to function through TML_LIB_LabVIEW – User Manual parameter Run Address. The Run Address must contain the drive/motor RAM address where the cam table was copied. The slave can get the master position in two ways: 1. Via a communication channel (Enable Slave = SLAVE_COMM_CH), from a drive/motor set as master with function block TS_SetGearingMaster 2. Via an external digital reference of type pulse & direction or quadrature encoder (Enable Slave = SLAVE_2ND_ENCODER) Remark: 1. Set Enable Slave = SLAVE_NONE if you want to program the motion mode parameters without enabling it. 2. Use function block TS_SetCammingMaster.vi to program a drive/motor as master in electronic camming. When the reference is read from second encoder or pulse & direction inputs you don’t need to program a drive/motor as master in electronic camming When master position is provided via the external digital interface, the slave computes the master position by counting the pulse & direction or quadrature encoder signals. The initial value of the master position is set by default to 0. Use function block TS_SetLongVariable to change its value by writing the desired value in the TML variable APOS2. Set the parameter Offset From Master to shift the cam profile versus the master position, by setting an offset for the slave. The cam table input is computed as the master position minus the cam offset. For example, if a cam table is defined between angles 100 to 250 degrees, a cam offset of 50 degrees will make the cam table to execute between master angles 150 and 300 degrees. You can compress/extend the cam table input. Set the parameter Mult Input Factor with the correction factor by which the cam table input is multiplied. For example, an input correction factor of 2, combined with a cam offset of 180 degrees, will make possible to execute a cam table defined for 360 degrees of the master in the last 180 degrees. You can also compress/extend the cam table output. Specify through input Mult Output Factor the correction factor by which the cam table output is multiplied. This feature addresses the applications where the slaves must execute different position commands at each master cycle, all having the same profile defined through a cam table. In this case, the drive/motor is programmed with a unique normalized cam profile and the cam table output is multiplied with the relative position command updated at each master cycle. Remark: If the Offset From Master, Mult Input Factor and/or Mult Output Factor are set to zero the drive/motor will use the value previously set for the parameter or the default value. With this option the TML code generated by this function is reduced. Related functions: TS_CamDownload.vi, TS_CamInitialization.vi, TS_SetCammingSlaveRelative.vi, TS_SetCammingMaster.vi, TS_SetMasterResolution.vi Associated examples: – © Technosoft 2006 43 TML_LIB_LabVIEW – User Manual 3.4.1.22 TS_CamDownload.vi Symbol: Prototype: LONG _TS_CamDownload@20(CSTR Cam File, UNSIGNED SHORT INT Load Address, UNSIGNED SHORT INT Run Address, UNSIGNED SHORT INT *Next Load Address, UNSIGNED SHORT INT *Next Load Address); Parameters: Name Cam File Input Load Address Run Address Next Load Address Output Next Run Address Return Description The name of the file containing the cam table description The EEPROM memory address where the cam table is downloaded The RAM address where the cam table is copied at initialization Next available EEPROM address from where a cam table can be downloaded Next available RAM address where a cam table can be copied TRUE if no error, FALSE if error Description: The function downloads a cam table in the drive/motor EEPROM memory starting with address Load Address. The Run Address parameter is required to compute the Next Run Address. The function returns the next valid memory addresses for cam tables trough output parameters Next Load Address respectively Next Run Address. If the values returned by the function are 0 then there is no memory available. The Load Address and Run Address for the first cam table downloaded are computed by EasyMotion Studio and displayed in the dialogue Memory Settings. To open the dialogue Memory Settings select the appropriate application and in Application General Information press the button Memory Settings. For the next cam tables, if available, the Load Address and Run Address are the values returned by the previous call function TS_CamDownload (parameters Next Load Address and Next Run Address). The cam table description is read from the file Cam File. The file is generated from EasyMotion Studio and has the extension *.cam. Steps to follow when using cam tables: 1. Create or import a cam table in EasyMotion Studio. The cam table is saved by EasyMotion Studio in the application’s directory. 2. Download the cam table in the drive/motor EEPROM memory with TS_CamDownload.vi 3. Initialize the cam table with function TS_CamInitialization.vi 4. Program the drive/motor to operate as slave in electronic camming mode with TS_SetCammingSlaveAbsolute.vi or TS_SetCammingSlaveRelative.vi. Select the cam table used with the parameter RunAddress. © Technosoft 2006 44 TML_LIB_LabVIEW – User Manual Related functions: TS_SetCammingSlaveRelative.vi, TS_SetCammingSlaveAbsolute.vi, TS_CamInitialization.vi Associated examples: Example 32 © Technosoft 2006 45 TML_LIB_LabVIEW – User Manual 3.4.1.23 TS_CamInitialization.vi Symbol: Prototype: LONG _TS_CamInitialization(UNSIGNED SHORT INT Load Address, UNSIGNED SHORT INT Run Address); Parameters: Input Output Name Load Address Run Address Return Description EEPROM memory address where the cam table is downloaded RAM address where the cam table is copied at run time TRUE if no error, FALSE if error Description: The function copies a cam table from drive/motor EEPROM memory in the RAM memory at address Run Address. The cam table was previously downloaded with function TS_CamDownload.vi at EEPROM address Load Address. The function must be called for each cam table used by the application. Related functions: TS_SetCammingSlaveRelative.vi, TS_SetCammingSlaveAbsolute.vi, TS_CamDownload.vi Associated examples: Example 32 © Technosoft 2006 46 TML_LIB_LabVIEW – User Manual 3.4.1.24 TS_SetMasterResolution Symbol: Prototype: LONG _TS_SetMasterResolution@4(LONG Master Resolution); Parameters: Name Input Output Master Resolution Return Description Number of encoder counts per one revolution of the master position sensor. TRUE if no error, FALSE if error Description: The function sets the TML parameter MASTERRES with the value Master Resolution. The master resolution is needed by the electronic gearing or camming slaves to compute correctly the master position and speed (i.e. the position increment). If master position is not cyclic (i.e. the resolution is equal with the whole 32-bit range of position), set master resolution to FULL_RANGE. Remark: Call function TS_SetMasterResolution.vi before activating the electronic gearing or camming slave mode with function TS_SetGearingSlave.vi respectively TS_SetCammingSlaveAbsolute/Relative.vi. Related functions: TS_SetGearingSlave.vi, TS_SetCammingSlaveAbsolute.vi, TS_SetCammingSlaveRelative.vi Associated examples: Example 32 © Technosoft 2006 47 TML_LIB_LabVIEW – User Manual 3.4.1.25 TS_SendSynchronization Symbol: Prototype: LONG _TS_SendSynchronization@4(LONG Period); Parameters: Name Input Period Output return Description Time period between two synchronization messages. It is expressed in drive/motor internal time units TRUE if no error, FALSE if error Description: The function enables/disables the synchronization procedure between axes. The synchronization process is activated when the parameter Period has a non-zero value. The active axis is set as the synchronization master and the other axes become synchronization slaves. To disable the synchronization procedure set the Period to zero. The synchronization process is performed in two steps. First, the master sends a synchronization message to all axes, including to itself. When this message is received, all the axes read their own internal time. Next, the master sends its internal time to all the slaves, which compare it with their own internal time. If there are differences, the slaves correct slightly their sampling periods in order to keep them synchronized with those of the master. As effect, when synchronization procedure is active, the execution of the control loops on the slaves is synchronized with those of the master within a 10µs time interval. Due to this powerful feature, drifts between master and slave axes are eliminated. The Period represents the time interval in internal units between the synchronization messages sent by the master. Recommended value is 20ms. Related functions: TS_SetGearingMaster.vi, TS_SetGearingSlave.vi, TS_SetCammingMaster.vi, TS_SetCammingSlave.vi Associated examples: – © Technosoft 2006 48 TML_LIB_LabVIEW – User Manual 3.4.2 Motor commands 3.4.2.1 TS_Power.vi Symbol: Prototype: LONG _TS_Power@4(SHORT INT Enable); Parameters: Input Output Name Enable return Description Enables/disables the power stage of the active axis TRUE if no error; FALSE if error Description: The function enables/disables the power stage of the active axis. If Enable = POWER_ON the power stage is enabled (executes the TML command AxisON). The power stage is disabled (executes the TML command AxisOFF) when Enable = POWER_OFF. Related functions: TS_ResetFault.vi, TS_Reset.vi Associated examples: all examples © Technosoft 2006 49 TML_LIB_LabVIEW – User Manual 3.4.2.2 TS_UpdateImmediate.vi Symbol: Prototype: LONG _TS_UpdateImmediate@0(void); Parameters: Input Output Name – return Description – TRUE if no error, FALSE if error Description: The function updates the motion mode immediately. It allows you to start a motion previously programmed. This can be useful for example if you already defined a motion and you want to start it in a specific context (after testing a condition, event, input port, etc.). The command can also be useful to repeat the last motion that was already defined and eventually executed (as for example a relative move). Related functions: TS_UpdateOnEvent.vi Associated examples: Example 5, Example 19 © Technosoft 2006 50 TML_LIB_LabVIEW – User Manual 3.4.2.3 TS_UpdateOnEvent.vi Symbol: Prototype: LONG _TS_UpdateOnEvent@0(void); Parameters: Input Output Name – return Description – TRUE if no error, FALSE if error Description: The function updates the motion mode on next event occurrence. It allows you to start a motion that was previously programmed at the occurrence of the active event. This can be useful for example if you already defined a motion and you want to start it when an event occurs. The command can also be used to repeat the last motion that was already defined and eventually executed (as for example a relative move), when the event will occur. Related functions: TS_UpdateImmediate.vi Associated examples: Example 6, Example 38 © Technosoft 2006 51 TML_LIB_LabVIEW – User Manual 3.4.2.4 TS_Stop.vi Symbol: Prototype: LONG _TS_Stop@0(void); Parameters: Input Output Name – return Description – TRUE if no error, FALSE if error Description: The functions stops the motor with the deceleration rate set in TML parameter CACC. The drive/motor decelerates following a trapezoidal speed profile. If the function is called during the execution of an S-curve profile, the deceleration profile may be chosen between a trapezoidal or an S-curve profile. You can detect when the motor has stopped by setting a motion complete event with function TS_SetEventOnMotionComplete.vi and waiting until the event occurs (Wait Event = WAIT_EVENT). When the drive performs torque control the drive is set in torque external mode with current reference = 0. Remarks: • • • In order to restart after a TS_Stop.vi call you need to set again the motion mode. This operation disables the stop mode and allows the motor to move When TS_Stop.vi is executed it will automatically stop any TML program execution, to avoid overwriting the command from the TML program During abrupt stops an important energy may be generated. If the power supply can’t absorb the energy generated by the motor, it is necessary to foresee an adequate surge capacitor in parallel with the drive supply to limit the over voltage. Related functions: TS_QuickStopDecelerationRate.vi Associated examples: © Technosoft 2006 Example 10, Example 13, Example 16, Example 18, Example 21, Example 22, Example 24, Example 25, Example 26, Example 27 Example 29, Example 30, Example 31, Example 32, Example 34, Example 40 52 TML_LIB_LabVIEW – User Manual 3.4.2.5 TS_SetPosition.vi Symbol: Prototype: LONG _TS_SetPosition@4(LONG Position); Parameters: Input Output Name Position return Description The value used to set the position, expressed in TML position units TRUE if no error, FALSE if error Description: The function sets/changes the referential for position measurement by changing simultaneously the load position (TML variable APOS) and the target position values (TML variable APOS), while keeping the same position error. Future motion commands will then be related to the absolute value, as updated at this point to Position. Related functions: – Associated examples: © Technosoft 2006 Example 6, Example 12, Example 14, Example 28, Example 32, Example 35, Example 39 53 TML_LIB_LabVIEW – User Manual 3.4.2.6 TS_SetTargetPositionToActual.vi Symbol: Prototype: LONG _TS_SetTargetPositionToActual@0(void); Parameters: Input Output Name – return Description – TRUE if no error, FALSE if error Description: The function sets the value of the target position (the position reference) to the value of the actual load position i.e. TPOS = APOS_LD. The command may be used in closed loop systems when the load/motor is still following a hard stop, to reposition the target position to the actual load position. Remark: The command is automatically done if the next motion mode is set with Reference Base = FROM_MEASURE. In this case the target position and speed are both updated with the actual values of the load position and respectively load speed: TPOS = APOS_LD and TSPD = ASPD_LD. Related functions: – Associated examples: Example 28 © Technosoft 2006 54 TML_LIB_LabVIEW – User Manual 3.4.2.7 TS_SetCurrent.vi Symbol: Prototype: LONG _TS_SetCurrent@4(SHORT INT Current Value); Parameters: Name Input Output Current Value Return Description Value at which the motor current reference is set expressed in drive/motor internal current units TRUE if no error, FALSE if error Description: The function sets the motor run current with Current Value. The run current is used by the drive to control the step motor in open loop. Remark: The command is valid only for configurations with step motor operating in open loop. Related functions: – Associated examples: Example 8 © Technosoft 2006 55 TML_LIB_LabVIEW – User Manual 3.4.2.8 TS_QuickStopDecelerationRate.vi Symbol: Prototype: LONG _TS_QuickStopDecelerationRate@8(DOUBLE Deceleration); Parameters: Input Output Name Deceleration return Description The value written in TML parameter CDEC TRUE if no error, FALSE if error Description: The function sets on the active axis the TML parameter CDEC with the value Deceleration. The drive/motor uses the deceleration rate when: • • The function TS_Stop is executed during a positioning set with TS_MoveSCurveRelative/Absolute and option Deceleration Type = TRAPEZOIDAL_SPEED_PROFILE Enters in quick stop mode. The drive enters in quick stop mode if an error requiring the immediate stop of the motion occurs (like triggering a limit switch or following a command error), the drive/motor enters automatically Related functions: TS_Stop.vi, TS_MoveSCurveRelative.vi, TS_MoveSCurveAbsolute.vi Associated examples: Example 34 © Technosoft 2006 56 TML_LIB_LabVIEW – User Manual 3.4.3 Events 3.4.3.1 TS_CheckEvent.vi Symbol: Prototype: LONG _TS_CheckEvent@4(SHORT INT *event); Parameters: Input Output Name – Event return Description – Signal if event occurred TRUE if no error, FALSE if error Description: The function checks if the actually active event occurred. If an event was defined using one of the SetEvent… functions with WaitEvent = NO_WAIT_EVENT then you can check if the event occurred using the TS_CheckEvent.vi function. This is an interesting alternative to the case when WaitEvent parameter was set to WAIT_EVENT in one of the SetEvent… functions. In that case, if the event will not occur, due to some unexpected problems, the program will hang-up in an internal loop of the SetEvent… function waiting for the event to occur. Thus, in order to avoid such a problem, set the WaitEvent parameter to NO_WAIT_EVENT, in the SetEvent… function, and then call the TS_CheckEvent.vi function from your application. In this way, you can detect if the event does not occur and eventually exit from the test loop after a given time period. Related functions: all SetEvent… functions Associated examples: Example 24, Example 27 © Technosoft 2006 57 TML_LIB_LabVIEW – User Manual 3.4.3.2 TS_SetEventOnMotionComplete.vi Symbol: Prototype: LONG _TS_SetEventOnMotionComplete@8(SHORT INT Wait Event, SHORT INT Enable Stop); Parameters: Name Wait Event Enable Stop return Input Output Description Specifies if the function waits the event occurrence On motion complete stop the motion TRUE if no error, FALSE if error Description: The function sets an event when the motion is completed. You can use, for example, this event to start your next move only after the actual move is finalized. The motion complete condition is set in the following conditions: • During position control: o o • If UPGRADE.11=1, when the position reference arrives at the position to reach (commanded position) and the position error remains inside a settle band for a preset stabilize time interval. The settle band is set with TML parameter POSOKLIM and the stabilize time with TML parameter TONPOSOK. This is the default condition. If UPGRADE.11=0, when the position reference arrives at the position to reach (commanded position) During speed control, when the speed reference arrives at the commanded speed The motion complete condition is reset when a new motion is started i.e. when the update command – UPD is executed. Remark: 1. Use function TS_SetIntVariable.vi to change the settle band and/or the stabilize time. 2. In case of steppers controlled open-loop, the motion complete condition for positioning is always set when the position reference arrives at the position to reach independently of the UPGRADE.11 status. If the Wait Event = WAIT_EVENT, the function will continuously test the status of the drive event, and will wait until the event occurs. There is a drawback of this situation, if the event will not occur, due to some unexpected problems. In such a case, the program hangs-up in an internal loop of the TS_SetEventOnMotionComplete.vi waiting for the event to occur. If the parameter Wait Event = NO_WAIT_EVENT you can check if the event occurred using the TS_CheckEvent.vi function. In this way, you can detect if the event does not occur and eventually exit from the test loop after a given time period. © Technosoft 2006 58 TML_LIB_LabVIEW – User Manual At event occurrence the motion is stopped if the parameter Enable Stop = STOP. Set Enable Stop = NO_STOP if you do not want to stop the motion at event occurrence. Related functions: TS_CheckEvent.vi, and all other SetEvent… functions Associated examples: © Technosoft 2006 Example 1, Example 2, Example 4, Example 7, Example 14, Example 20, Example 24, Example 28, Example 29, Example 31, Example 32, Example 33, Example 35, Example 37, Example 39, Example 40 59 TML_LIB_LabVIEW – User Manual 3.4.3.3 TS_SetEventOnMotorPosition.vi Symbol: Prototype: LONG _TS_SetEventOnMotorPosition@20(SHORT INT Position Type, LONG Position, SHORT INT Over, SHORT INT WaitEvent, SHORT INT Enable Stop); Parameters: Name Position Type Position Input Output Over Wait Event Enable Stop return Description Specifies the motor position type: absolute or relative The position value that triggers the event expressed in TML position units. Specifies the condition tested Specifies if the function waits the event occurrence Stop the motion when at event occurrence TRUE if no error, FALSE if error Description: It allows you to program an event function of motor position. The events can be: when the absolute (Position Type = ABSOLUTE_POSITION) or relative (Position Type = ABSOLUTE_RELATIVE) motor position is equal or over/under Position. The absolute motor position is the measured position of the motor. The relative position is the load displacement from the beginning of the actual movement. For example if a position profile was started with the absolute load position 50 revolutions, when the absolute load position reaches 60 revolutions, the relative motor position is 10 revolutions. The condition monitored for the event is set with parameter Over. For Over = OVER the event is set when the motor position is equal or over the Position. When Over = BELOW the event is set if the motor position becomes equal or under Position. If the Wait Event = WAIT_EVENT, the function tests continuously the event status, and waits until the event occurs. There is a drawback of this situation, if the event will not occur, due to some unexpected problems. In such a case, the program hangs-up in an internal loop of the TS_SetEventOnMotorPosition.vi waiting for the event to occur. If the parameter Wait Event = NO_WAIT_EVENT you can check if the event occurred using the TS_CheckEvent.vi function. In this way, you can detect if the event does not occur and eventually exit from the test loop after a given time period. At event occurrence the motion is stopped if the parameter Enable Stop = STOP. Set Enable Stop = NO_STOP if you do not want to stop the motion at event occurrence. Related functions: TS_CheckEvent, and all other SetEvent… functions Associated examples: Example 11, Example 12, Example 14 © Technosoft 2006 60 TML_LIB_LabVIEW – User Manual 3.4.3.4 TS_SetEventOnLoadPosition.vi Symbol: Prototype: LONG _TS_SetEventOnLoadPosition@20(LONG Position, SHORT INT Over, SHORT INT Wait Event, SHORT INT Enable Stop); Parameters: Name Position Type Position Input Output Over Wait Event Enable Stop return Description Specifies the load position type: absolute or relative The position value that triggers the event expressed in TML position units. Specifies the condition tested Specifies if the function waits the event occurrence Stop the motion when at event occurrence TRUE if no error, FALSE if error Description: It allows you to program an event function of load position. The events can be: when the absolute (Position Type = ABSOLUTE_POSITION) or relative (Position Type = ABSOLUTE_RELATIVE) load position is equal or over/under Position. The absolute load position is the measured position of the load. The relative position is the load displacement from the beginning of the actual movement. The condition monitored for the event is set with parameter Over. For Over = OVER the event is set when the load position is equal or over the Position. When Over = BELOW the event is set if the load position becomes equal or under Position. If the Wait Event = WAIT_EVENT, the function tests continuously the event status, and waits until the event occurs. There is a drawback of this situation, if the event will not occur, due to some unexpected problems. In such a case, the program hangs-up in an internal loop of the TS_SetEventOnLoadPosition.vi waiting for the event to occur. If the parameter Wait Event = NO_WAIT_EVENT you can check if the event occurred using the TS_CheckEvent.vi function. In this way, you can detect if the event does not occur and eventually exit from the test loop after a given time period. At event occurrence the motion is stopped if the parameter Enable Stop = STOP. Set Enable Stop = NO_STOP if you do not want to stop the motion at event occurrence. Related functions: TS_CheckEvent.vi, and all other SetEvent… functions Associated examples: Example 42 © Technosoft 2006 61 TML_LIB_LabVIEW – User Manual 3.4.3.5 TS_SetEventOnMotorSpeed.vi Symbol: Prototype: LONG _TS_SetEventOnMotorSpeed@20(DOUBLE Speed, SHORT INT Over, SHORT INT WaitEvent, SHORT INT Enable Stop); Parameters: Name Speed Input Output Over Wait Event Enable Stop Return Description The speed value that triggers the event expressed in drive/motor internal speed units. Specifies the condition tested Specifies if the function waits the event occurrence Stop the motion when at event occurrence TRUE if no error, FALSE if error Description: It allows you to program an event function of motor speed. The events can be: when the motor speed is over (Over = OVER) or under (Over = BELOW) the Speed parameter. If the Wait Event = WAIT_EVENT, the function tests continuously the event status, and waits until the event occurs. There is a drawback of this situation, if the event will not occur, due to some unexpected problems. In such a case, the program hangs-up in an internal loop of the TS_SetEventOnMotionComplete.vi waiting for the event to occur. If the parameter Wait Event = NO_WAIT_EVENT you can check if the event occurred using the TS_CheckEvent.vi function. In this way, you can detect if the event does not occur and eventually exit from the test loop after a given time period. At event occurrence the motion is stopped if the parameter Enable Stop = STOP. Set Enable Stop = NO_STOP if you do not want to stop the motion at event occurrence. Related functions: TS_CheckEvent.vi, and all other SetEvent… functions Associated examples: Example 3, Example 6, Example 12 © Technosoft 2006 62 TML_LIB_LabVIEW – User Manual 3.4.3.6 TS_SetEventOnLoadSpeed.vi Symbol: Prototype: LONG _TS_SetEventOnLoadSpeed@20(DOUBLE Speed, Wait Event, SHORT INT EnableStop); SHORT INT Over, SHORT INT Parameters: Name Speed Input Output Over Wait Event Enable Stop return Description The speed value that triggers the event expressed in drive/motor internal speed units. Specifies the condition tested Specifies if the function waits the event occurrence Stop the motion when at event occurrence TRUE if no error, FALSE if error Description: It allows you to program an event function of load speed. The events can be: when the load speed is over (Over = OVER) or under (Over = BELOW) the Speed parameter. If the Wait Event = WAIT_EVENT, the function tests continuously the event status, and waits until the event occurs. There is a drawback of this situation, if the event will not occur, due to some unexpected problems. In such a case, the program hangs-up in an internal loop of the TS_SetEventOnLoadSpeed.vi waiting for the event to occur. If the parameter Wait Event = NO_WAIT_EVENT you can check if the event occurred using the TS_CheckEvent.vi function. In this way, you can detect if the event does not occur and eventually exit from the test loop after a given time period. At event occurrence the motion is stopped if the parameter Enable Stop = STOP. Set Enable Stop = NO_STOP if you do not want to stop the motion at event occurrence. Related functions: TS_CheckEvent.vi, and all other SetEvent… functions Associated examples: Example 42 © Technosoft 2006 63 TML_LIB_LabVIEW – User Manual 3.4.3.7 TS_SetEventOnTime.vi Symbol: Prototype: LONG _TS_SetEventOnTime@12(UNSIGNED SHORT INT Time, SHORT INT Wait Event, SHORT INT Enable Stop); Parameters: Input Output Name Time Wait Event Enable Stop return Description Time delay expressed in TML time units Specifies if the function waits the event occurrence On event stop the motion TRUE if no error, FALSE if error Description: The function programs an event after a time period equal to the value of the Time parameter. If the parameter Wait Event = WAIT_EVENT the function tests continuously the event status, and waits until the event occurs. There is a drawback of this situation, if the event will not occur, due to some unexpected problems. In such a case, the program hangs-up in an internal loop of the TS_SetEventOnTime.vi function, waiting for the event to occur. If the parameter Wait Event = NO_WAIT_EVENT you can check if the event occurred using the TS_CheckEvent.vi function. In this way, you can detect if the event does not occur and eventually exit from the test loop after a given time period. At the event occurrence the motion is stopped if the parameter Enable Stop = STOP. Set Enable Stop = NO_STOP if you do not want to stop the motion at event occurrence. Remark: The timers start ONLY after the execution of the ENDINIT (end of initialization) command. Therefore you should not set wait events before executing this command. Related functions: TS_CheckEvent.vi, and all other SetEvent… functions Associated examples: Example 1, Example 2, Example 4, Example 7, Example 13, Example 17, Example 19 © Technosoft 2006 64 TML_LIB_LabVIEW – User Manual 3.4.3.8 TS_SetEventOnPositionRef.vi Symbol: Prototype: LONG _TS_SetEventOnPositionRef@16(LONG Position, Wait Event, SHORT INT Enable Stop); SHORT INT Over, SHORT INT Parameters: Name Position Input Output Over Wait Event Enable Stop return Description The position reference value that triggers the event expressed in TML position units. Specifies the condition tested Specifies if the function waits the event occurrence Stop the motion when at event occurrence TRUE if no error, FALSE if error Description: It allows you to program an event function of position reference. Setting this event you can detect when the position reference is over (Over = OVER) or under (Over = BELOW) the value of parameter Position. If the parameter Wait Event = WAIT_EVENT the function tests continuously the event status, and waits until the event occurs. There is a drawback of this situation, if the event will not occur, due to some unexpected problems. In such a case, the program hangs-up in an internal loop of the TS_SetEventOnPositionRef.vi function, waiting for the event to occur. If the parameter Wait Event = NO_WAIT_EVENT you can check if the event occurred using the TS_CheckEvent.vi function. In this way, you can detect if the event does not occur and eventually exit from the test loop after a given time period. At the event occurrence the motion is stopped if the parameter Enable Stop = STOP. Set Enable Stop = NO_STOP if you do not want to stop the motion at event occurrence. Related functions: TS_CheckEvent.vi, and all other SetEvent… functions Associated examples: Example 12, Example 32 © Technosoft 2006 65 TML_LIB_LabVIEW – User Manual 3.4.3.9 TS_SetEventOnSpeedRef.vi Symbol: Prototype: LONG _TS_SetEventOnSpeedRef@20(DOUBLE Speed, SHORT INT Over, SHORT INT Wait Event, SHORT INT Enable Stop); Parameters: Name Speed Input Output Over Wait Event Enable Stop Return Description The speed reference value that triggers the event expressed in TML speed units. Specifies the condition tested Specifies if the function waits the event occurrence Stop the motion when at event occurrence TRUE if no error, FALSE if error Description: It allows you to program an event function of speed reference. Setting this event you can detect when the speed reference is over (Over = OVER) or under (Over = BELOW) the value of parameter Speed. If the parameter Wait Event = WAIT_EVENT the function tests continuously the event status, and waits until the event occurs. There is a drawback of this situation, if the event will not occur, due to some unexpected problems. In such a case, the program hangs-up in an internal loop of the TS_SetEventOnSpeedRef.vi function, waiting for the event to occur. If the parameter Wait Event = NO_WAIT_EVENT you can check if the event occurred using the TS_CheckEvent.vi function. In this way, you can detect if the event does not occur and eventually exit from the test loop after a given time period. At the event occurrence the motion is stopped if the parameter Enable Stop = STOP. Set Enable Stop = NO_STOP if you do not want to stop the motion at event occurrence. Related functions: TS_CheckEvent.vi, and all other SetEvent… functions Associated examples: Example 12, Example 42 © Technosoft 2006 66 TML_LIB_LabVIEW – User Manual 3.4.3.10 TS_SetEventOnTorqueRef.vi Symbol: Prototype: LONG _TS_SetEventOnTorqueRef@16(SHORT INT Torque, SHORT INT Over, SHORT INT Wait Event, SHORT INT Enable Stop); Parameters: Name Torque Input Output Over Wait Event Enable Stop Return Description The torque reference value that triggers the event expressed in TML current units. Specifies the condition tested Specifies if the function waits the event occurrence Stop the motion when at event occurrence TRUE if no error, FALSE if error Description: It allows you to program an event function of torque reference. Setting this event you can detect when the torque reference is over (Over = OVER) or under (Over = BELOW) the value of parameter Torque. If the parameter Wait Event = WAIT_EVENT the function tests continuously the event status, and waits until the event occurs. There is a drawback of this situation, if the event will not occur, due to some unexpected problems. In such a case, the program hangs-up in an internal loop of the TS_SetEventOnTorqueRef.vi function, waiting for the event to occur. If the parameter WaitEvent = NO_WAIT_EVENT you can check if the event occurred using the TS_CheckEvent.vi function. In this way, you can detect if the event does not occur and eventually exit from the test loop after a given time period. At the event occurrence the motion is stopped if the parameter Enable Stop = STOP. Set Enable Stop = NO_STOP if you do not want to stop the motion at event occurrence. Related functions: TS_CheckEvent.vi, and all other SetEvent… functions Associated examples: Example 23 © Technosoft 2006 67 TML_LIB_LabVIEW – User Manual 3.4.3.11 TS_SetEventOnEncoderIndex.vi Symbol: Prototype: LONG _TS_SetEventOnEncoderIndex@16(SHORT INT Index Type, SHORT INT Transition Type, SHORT INT WaitEvent, SHORT INT Enable Stop); Parameters: Input Output Name Index Type Transition Type Wait Event Enable Stop Return Description Specifies the index monitored for transition Specifies the input transition monitored Specifies if the function waits the event occurrence Stop the motion when at event occurrence TRUE if no error, FALSE if error Description: It allows you to program an event function of drive/motor encoder index inputs. You can monitor the first encoder index (Index Type = Index_1) or the second encoder index (Index Type = Index_2). The event is trigger by encoder index transition low to high when Transition Type = TRANSITION_LOW_TO_HIGH or by the transition high to low when Transition Type = TRANSITION_ HIGH_TO_LOW. If the parameter Wait Event = WAIT_EVENT the function tests continuously the event status, and waits until the event occurs. There is a drawback of this situation, if the event will not occur, due to some unexpected problems. In such a case, the program hangs-up in an internal loop of the TS_SetEventOnEncoderIndex.vi function, waiting for the event to occur. If the parameter WaitEvent = NO_WAIT_EVENT you can check if the event occurred using the TS_CheckEvent.vi function. In this way, you can detect if the event does not occur and eventually exit from the test loop after a given time period. At the event occurrence the motion is stopped if the parameter Enable Stop = STOP. Set Enable Stop = NO_STOP if you do not want to stop the motion at event occurrence. Related functions: TS_CheckEvent.vi, and all other SetEvent… functions Associated examples: Example 27 © Technosoft 2006 68 TML_LIB_LabVIEW – User Manual 3.4.3.12 TS_SetEventOnLimitSwitch.vi Symbol: Prototype: LONG _TS_SetEventOnLimitSwitch@16(SHORT INT Limit Switch Type, Transition Type, SHORT INT Wait Event, SHORT INT Enable Stop); SHORT INT Parameters: Input Output Name Limit Switch Type Transition Type Wait Event Enable Stop Return Description Specifies the limit switch monitored for transition Specifies the input transition monitored Specifies if the function waits the event occurrence Stop the motion when at event occurrence TRUE if no error, FALSE if error Description: It allows you to program an event function of drive/motor limit switch inputs. The event is set: • • when a transition occurs on limit switch negative if parameter Limit Switch Type = LSW_NEGATIVE when a transition occurs on limit switch negative if parameter Limit Switch Type = LSW_POSITIVE You can monitor the limit switch transition low to high when Transition Type = TRANSITION_LOW_TO_HIGH or the transition high to low when Transition Type = TRANSITION_ HIGH_TO_LOW. If the parameter Wait Event = WAIT_EVENT the function tests continuously the event status, and waits until the event occurs. There is a drawback of this situation, if the event will not occur, due to some unexpected problems. In such a case, the program hangs-up in an internal loop of the TS_SetEventOnLimitSwitch.vi function, waiting for the event to occur. If the parameter Wait Event = NO_WAIT_EVENT you can check if the event occurred using the TS_CheckEvent.vi function. In this way, you can detect if the event does not occur and eventually exit from the test loop after a given time period. At the event occurrence the motion is stopped if the parameter Enable Stop = TRUE. Set Enable Stop = FALSE if you do not want to stop the motion at event occurrence. Related functions: TS_CheckEvent.vi and all other SetEvent… functions Associated examples: Example 9, Example 17 © Technosoft 2006 69 TML_LIB_LabVIEW – User Manual 3.4.3.13 TS_SetEventOnDigitalInput.vi Symbol: Prototype: LONG _TS_SetEventOnDigitalInput@16(UNSIGNED CHAR Input Port, UNSIGNED CHAR Status, SHORT INT Wait Event, SHORT INT Enable Stop); Parameters: Input Output Name Input Port Status Wait Event Enable Stop Return Description Specifies the digital input monitored The input status that trigger the event Specifies if the function waits the event occurrence Stop the motion when at event occurrence TRUE if no error, FALSE if error Description: It allows you to program an event function of drive/motor general purpose digital inputs. The event is set when a transition occurs on digital input Input Port. You can monitor when the digital input goes high (Status = IO_HIGH) or the digital input goes low (Status = IO_LOW). If the parameter Wait Event = WAIT_EVENT the function tests continuously the event status, and waits until the event occurs. There is a drawback of this situation, if the event will not occur, due to some unexpected problems. In such a case, the program hangs-up in an internal loop of the TS_SetEventOnDigitalInput.vi function, waiting for the event to occur. If the parameter WaitEvent = NO_WAIT_EVENT you can check if the event occurred using the TS_CheckEvent.vi function. In this way, you can detect if the event does not occur and eventually exit from the test loop after a given time period. At the event occurrence the motion is stopped if the parameter Enable Stop = STOP. Set Enable Stop = NO_STOP if you do not want to stop the motion at event occurrence. Related functions: TS_CheckEvent.vi and all other SetEvent… functions Associated examples: Example 5, Example 8, Example 15 © Technosoft 2006 70 TML_LIB_LabVIEW – User Manual 3.4.3.14 TS_SetEventOnHomeInput.vi Symbol: Prototype: LONG _TS_SetEventOnHomeInput@12(UNSIGNED CHAR Status, SHORT INT Wait Event, SHORT INT Enable Stop); Parameters: Input Output Name Status Wait Event Enable Stop Return Description Input port status (High/low) Specifies if the function waits the event occurrence Stop the motion when at event occurrence TRUE if no error, FALSE if error Description: It allows you to program an event function of drive/motor general purpose digital input assigned as home input. The home input is specific for each product and based on the setup data. The event is set when a transition occurs on home input. You can monitor when the home input goes high (Status = IO_HIGH) or the home input goes low (Status = IO_LOW). If the parameter Wait Event = WAIT_EVENT the function tests continuously the event status, and waits until the event occurs. There is a drawback of this situation, if the event will not occur, due to some unexpected problems. In such a case, the program hangs-up in an internal loop of the TS_SetEventOnHomeInput.vi function, waiting for the event to occur. If the parameter Wait Event = NO_WAIT_EVENT you can check if the event occurred using the TS_CheckEvent.vi function. In this way, you can detect if the event does not occur and eventually exit from the test loop after a given time period. At the event occurrence the motion is stopped if the parameter Enable Stop = STOP. Set Enable Stop = NO_STOP if you do not want to stop the motion at event occurrence. Related functions: TS_CheckEvent.vi and all other SetEvent… functions Associated examples: Example 28, Example 38 Example 39 © Technosoft 2006 71 TML_LIB_LabVIEW – User Manual 3.4.4 TML jumps and function calls 3.4.4.1 TS_GOTO.vi Symbol: Prototype: LONG _TS_GOTO@4(UNSIGNED SHORT INT address); Parameters: Input Output Name address return Description The memory address where the jump is made TRUE if no error, FALSE if error Description: The function commands the active axis to execute the TML code beginning from the address until TML instruction END is encountered. The TML code can be stored in the drive/motor EEPROM memory or in the TML program memory. Prior calling the TS_GOTO.vi function you have to: • • • Create a TML sequence using EasyMotion Studio Download the TML code in the drive/motor memory with EasyMotion Studio or subVI TS_DownloadProgram.vi Make sure that a valid instruction is found at address. Otherwise, unpredictable effects can occur, which can affect the correct operation of the drive/motor. Remark: 1. For more details about drive/motor memory structure see the “Memory Map” topic from EasyMotion Studio help. 2. During the execution of a local TML program on the drive, any TML command sent online from the PC is treated with higher priority, and will be executed before executing the local TML code. Related functions: TS_DownloadProgram.vi, TS_GOTO_Label.vi, TS_CALL.vi, TS_CALL_Label.vi Associated examples: Example 29, Example 30 © Technosoft 2006 72 TML_LIB_LabVIEW – User Manual 3.4.4.2 TS_GOTO_Label.vi Symbol: Prototype: LONG _TS_GOTO_Label@4(CSTR Label); Parameters: Input Output Name Label return Description TML program label where the jump is made TRUE if no error, FALSE if error Description: The function commands the active axis to execute the TML code beginning from label Label until TML instruction END is encountered. The TML code can be stored in the drive/motor EEPROM memory or in the TML program memory. The selection of the memory type used for the program is done from Memory Settings. The string Label must be a valid TML label, defined in EasyMotion Studio prior generating the setup information. Prior calling the TS_GOTO_Label.vi function you have to: • • • • • Create a TML sequence using EasyMotion Studio. The commands sequence must start with Label declaration. Select, in the Memory Setting dialogue, from where you want to run the TML program: TML program or EEPROM. Create the COFF file (*.out) with the menu command Application | Motion | Build Generate the configuration setup with the menu command Application | Export to TML_lib… to include the new Label in the setup data Download the TML code in the drive/motor memory with EasyMotion Studio or with function TS_DownloadProgram.vi. Remark: 1. For more details about drive/motor memory structure see the “Memory Map” topic from EasyMotion Studio help. 2. During the execution of a local TML program on the drive, any TML command sent online from the PC is treated with higher priority, and will be executed before executing the local TML code. Related functions: TS_DownloadProgram.vi, TS_GOTO_Label.vi, TS_CALL.vi, TS_CALL_Label.vi Associated examples: Example 29 © Technosoft 2006 73 TML_LIB_LabVIEW – User Manual 3.4.4.3 TS_CALL.vi Symbol: Prototype: LONG _TS_CALL@4(UNSIGNED SHORT INT address); Parameters: Input Output Name address return Description The memory address where the jump is made TRUE if no error, FALSE if error Description: The function commands the active axis to execute the TML function stored at address. The TML functions can be stored in the drive/motor EEPROM memory or in the TML program memory. The function execution ends when the TML instruction RET is encountered. Prior using the TS_CALL.vi function you have to: • • • • Create at least one TML function using EasyMotion Studio Download the TML code in the drive/motor memory with EasyMotion Studio or function TS_DownloadProgram In the Command Interpreter type the command ?Function_name to retrieve the function address. Repeat the procedure above for all the functions Make sure that a valid TML code subroutine begins at address. Otherwise, unpredictable effects can occur, which can affect the correct operation of the drive/motor. Remark: 1. For more details about drive/motor memory structure see the “Memory Map” topic from EasyMotion Studio help. 2. During the execution of a local TML program on the drive, any TML command sent online from the PC is treated with higher priority, and will be executed before executing the local TML code. Related functions: TS_DownloadProgram.vi, TS_CALL_Label.vi, TS_CancelableCALL.vi, TS_CancelableCALL_Label.vi Associated examples: Example 30 © Technosoft 2006 74 TML_LIB_LabVIEW – User Manual 3.4.4.4 TS_CALL_Label.vi Symbol: Prototype: LONG _TS_CALL_Label@4(CSTR Function Name); Arguments: Input Output Name Function Name Return Description Name of the TML function TRUE if no error, FALSE if error Description: The function commands the active axis to execute the TML function Function Name. The TML functions can be stored in the drive/motor EEPROM memory or in the TML program memory. The function execution ends when the TML instruction RET is encountered. The string Function Name must be a valid TML function name, defined in EasyMotion Studio prior generating the setup information. Prior using the TS_CALL_Label.vi function you have to: • • • Create at least one TML function using EasyMotion Studio Generate the configuration setup Download the TML code in the drive/motor memory with EasyMotion Studio or function TS_DownloadProgram Remark: 1. For more details about drive/motor memory structure see the “Memory Map” topic from EasyMotion Studio help. 2. During the execution of a local TML program on the drive, any TML command sent online from the PC is treated with higher priority, and will be executed before executing the local TML code. Related functions: TS_DownloadProgram.vi, TS_CALL.vi, TS_CancelableCALL.vi, TS_CancelableCALL_Label.vi Associated examples: Example 30 © Technosoft 2006 75 TML_LIB_LabVIEW – User Manual 3.4.4.5 TS_CancelableCALL.vi Symbol: Prototype: LONG _TS_CancelableCALL@4(UNSIGNED SHORT INT address); Parameters: Input Output Name address return Description Name of the TML function TRUE if no error, FALSE if error Description: The function commands the active axis to execute the TML function stored at address. Use this command if the exit from the called TML function depends on conditions that may not be reached. In this case, using function TS_Abort.vi you can terminate the function execution and return to the next instruction after the call. The TML functions can be stored in the drive/motor EEPROM memory or in the TML program memory. Prior using the TS_CancelableCALL.vi function you have to: • • • Create at least one TML function using EasyMotion Studio Download the TML code in the drive/motor memory with EasyMotion Studio or function TS_DownloadProgram Make sure that a valid TML code subroutine begins at address. Otherwise, unpredictable effects can occur, which can affect to correct operation of the drive/motor. Remark: 1. You can call only one function at a time using the TS_CancelableCALL. Any cancelable call issued during the execution of a function called with TS_CancelableCALL is ignored. This situation is signaled with bit SRL.7. 2. For more details about drive/motor memory structure see the “Memory Map” topic from EasyMotion Studio help. 3. During the execution of a local TML program on the drive, any TML command sent online from the PC is treated with higher priority, and will be executed before executing the local TML code. Related functions: TS_DownloadProgram.vi, TS_CALL.vi, TS_CALL_Label.vi, TS_CancelableCALL_Label.vi Associated examples: - © Technosoft 2006 76 TML_LIB_LabVIEW – User Manual 3.4.4.6 TS_CancelableCALL_Label.vi Symbol: Prototype: LONG _TS_CancelableCALL_Label@4(CSTR Function Name); Parameters: Input Output Name Function Name return Description Name of the TML function TRUE if no error, FALSE if error Description: The function commands the active axis to execute the TML function named Function Name. Use this command if the exit from the called TML function depends on conditions that may not be reached. In this case, using function TS_Abort.vi you can terminate the TML function execution and return to the next instruction after the call. The TML functions can be stored in the drive/motor EEPROM memory or in the TML program memory. Prior using the TS_CancelableCALL_Label.vi function you have to: • • • • • Create at least one TML function using EasyMotion Studio Select, in the Memory Setting dialogue, from where you want to run the TML program: TML program or EEPROM. Create the COFF file (*.out) with the menu command Application | Motion | Build. Generate the configuration setup with the menu command Application | Export to TML_lib… to include the new function names in the setup data Download the TML code in the drive/motor memory with EasyMotion Studio or function TS_DownloadProgram.vi Remark: 1. You can call only one function at a time using the TS_CancelableCALL.vi. Any cancelable call issued during the execution of a function called with TS_CancelableCALL.vi is ignored. This situation is signaled with bit x from SRL. 2. For more details about drive/motor memory structure see the “Memory Map” topic from EasyMotion Studio help. 3. During the execution of a local TML program on the drive, any TML command sent online from the PC is treated with higher priority, and will be executed before executing the local TML code. Related functions: TS_DownloadProgram.vi, TS_CALL.vi, TS_CALL_Label.vi, TS_CancelableCALL .vi Associated examples: Example 34 © Technosoft 2006 77 TML_LIB_LabVIEW – User Manual 3.4.4.7 TS_ABORT.vi Symbol: Prototype: LONG _TS_Abort@0(void); Parameters: Input Output Name – return Description – TRUE if no error, FALSE if error Description: The function aborts the execution of a TML function launched with a cancelable call. Related functions: TS_CancelableCALL.vi, TS_CancelableCALL_Label.vi Associated examples: Example 34 © Technosoft 2006 78 TML_LIB_LabVIEW – User Manual 3.4.5 IO handling 3.4.5.1 TS_SetupInput.vi Symbol: Prototype: LONG _TS_SetupInput@4(UNSIGNED CHAR Port Number); Parameters: Input Output Name Port Number return Description Port number to be set as input TRUE if no error, FALSE if error Description: The function sets the I/O Port Number of the drive/motor as an input port. Use the function only if the input selected may also be used as an output. Check the drive/motor user manual to find what inputs are available. Do this operation only once, first time when you use the input. If the drive/motor has the inputs separated from the outputs (i.e. none of the input line can be used as output) you don’t have to use the function. Remark: Depending on the firmware version programmed on the drive/motor, FAxx or FBxx, the digital inputs and outputs are numbered as follows: • • from #0 to #39 for firmware FAxx 1. The list is unordered, for example, a product with 4 inputs and 4 outputs can use the inputs: #36, #37, #38 and #39 and the outputs #28, #29, #30 and #31. From 0 to 15 for firmware version FBxx 2. The list is ordered, for example, a product with 5 inputs and 3 outputs can use the inputs: 0, 1, 2, 3 and 4 and the outputs 0, 1, and 2. Each intelligent drive/motor has a specific number of inputs and outputs, therefore only a part of the maximum number of I/Os is used. Related functions: TS_GetInput.vi, TS_SetupOutput.vi, TS_SetOutput.vi Associated examples: Example 5, Example 8, Example 10, Example 15, Example 16, Example 18, Example 30 1 Represents the firmware versions: F000H, F020H, F005H, F900H or later programmed on Technosoft drives/motors: IDM240/IDM640, IDS240/IDS640, ISCM4805/ISCM8005, IBL2403, IM23x (models IS and MA) 2 Represents the firmware versions F500A or later programmed on Technosoft drives: IDM240 CANopen/IDM640 CANopen, IDS640 CANopen © Technosoft 2006 79 TML_LIB_LabVIEW – User Manual 3.4.5.2 TS_GetInput.vi Symbol: Prototype: LONG _TS_GetInput@4(UNSIGNED CHAR Port Number, UNSIGNED CHAR *In Value); Parameters: Input Output Name Port Number In Value return Description Input port number read Pointer to the variable where the port status is stored TRUE if no error, FALSE if error Description: The function returns the status of digital input Port Number. When the function is executed, the variable In Value, where the input line status is saved, becomes: • • Zero if the input line was low Non-zero if the input line was high If the IO port selected can be used as input or an output, prior to call TS_GetInput.vi, you need to call TS_SetupInput and configure IO port as input. Check the drive/motor user manual to find what inputs are available. Remark: Depending on the firmware version programmed on the drive/motor, FAxx or FBxx, the digital inputs and outputs are numbered as follows: • • From #0 to #39 for firmware FAxx 1. The list is unordered, for example, a product with 4 inputs and 4 outputs can use the inputs: #36, #37, #38 and #39 and the outputs #28, #29, #30 and #31. From 0 to 15 for firmware version FBxx 2. The list is ordered, for example, a product with 5 inputs and 3 outputs can use the inputs: 0, 1, 2, 3 and 4 and the outputs 0, 1, and 2. Each intelligent drive/motor has a specific number of inputs and outputs, therefore only a part of the maximum number of I/Os is used. Related functions: TS_SetupInput.vi, TS_SetupOutput.vi, TS_SetOutput.vi Associated examples: Example 10, Example 15, Example 16, Example 18, Example 30 1 Represents the firmware versions: F000H, F020H, F005H, F900H or later on Technosoft drives/motors: IDM240/IDM640, IDS240/IDS640, ISCM4805/ISCM8005, IBL2403, IM23x (models IS and MA) 2 Represents the firmware versions F500A or later on Technosoft drives: IDM240 CANopen/IDM640 CANopen, IDS640 CANopen © Technosoft 2006 80 TML_LIB_LabVIEW – User Manual 3.4.5.3 TS_SetupOutput.vi Symbol: Prototype: LONG _TS_SetupOutput@4(UNSIGNED CHAR Port Number); Parameters: Input Output Name Port Number Return Description Port number to be set as output TRUE if no error, FALSE if error Description: The function configures the digital I/O port Port Number of the drive/motor as an output port. Use the function only if the selected output may also be used as an input. Check the drive/motor user manual to find what outputs are available. Do this operation only once, first time when you use the output. If the drive/motor has the outputs separated from the inputs (i.e. none of the output line can be used as an input) you don’t have to use the function. Remark: Depending on the firmware version programmed on the drive/motor, FAxx or FBxx, the digital inputs and outputs are numbered as follows: • • from #0 to #39 for firmware FAxx 1. The list is unordered, for example, a product with 4 inputs and 4 outputs can use the inputs: #36, #37, #38 and #39 and the outputs #28, #29, #30 and #31 From 0 to 15 for firmware version FBxx 2. The list is ordered, for example, a product with 5 inputs and 3 outputs can use the inputs: 0, 1, 2, 3 and 4 and the outputs 0, 1, and 2. Each intelligent drive/motor has a specific number of inputs and outputs, therefore only a part of the maximum number of I/Os is used. Related functions: TS_GetInput.vi, TS_SetupOutput.vi, TS_SetOutput.vi Associated examples: Example 14 1 Represents the firmware versions: F000H, F020H, F005H, F900H or later on Technosoft drives/motors: IDM240/IDM640, IDS240/IDS640, ISCM4805/ISCM8005, IBL2403, IM23x (models IS and MA) 2 Represents the firmware versions F500A or later on Technosoft drives: IDM240 CANopen/IDM640 CANopen, IDS640 CANopen © Technosoft 2006 81 TML_LIB_LabVIEW – User Manual 3.4.5.4 TS_SetOutput.vi Symbol: Prototype: LONG _TS_SetOutput@8(UNSIGNED CHAR Port Number, UNSIGNED CHAR Out Value); Parameters: Input Output Name Port Number Out Value return Description Output port number to be written Output status value to be set TRUE if no error, FALSE if error Description: The function set/resets the status of digital output port Port Number of the drive/motor. The port status IO_LOW or IO_HIGH is set corresponding to the value of the Out Value parameter. If the IO port selected may also be used as input or an output, prior to call TS_SetOutput.vi, you need to call TS_SetupOutput.vi and configure IO port as output. Remark: Depending on the firmware version programmed on the drive/motor, FAxx or FBxx, the digital inputs and outputs are numbered as follows: • • from #0 to #39 for firmware FAxx 1. The list is unordered, for example, a product with 4 inputs and 4 outputs can use the inputs: #36, #37, #38 and #39 and the outputs #28, #29, #30 and #31 From 0 to 15 for firmware version FBxx 2. The list is ordered, for example, a product with 5 inputs and 3 outputs can use the inputs: 0, 1, 2, 3 and 4 and the outputs 0, 1 and 2. Each intelligent drive/motor has a specific number of inputs and outputs, therefore only a part of the maximum number of I/Os is used. Related functions: TS_SetupOutput.vi, TS_SetupInput.vi, TS_GetInput.vi Associated examples: Example 14 1 Represents the firmware versions: F000H, F020H, F005H, F900H or later on Technosoft drives/motors: IDM240/IDM640, IDS240/IDS640, ISCM4805/ISCM8005, IBL2403, IM23x (models IS and MA) 2 Represents the firmware versions F500A or later on Technosoft drives: IDM240 CANopen/IDM640 CANopen, IDS640 CANopen © Technosoft 2006 82 TML_LIB_LabVIEW – User Manual 3.4.5.5 TS_GetHomeInput.vi Symbol: Prototype: LONG _TS_GetHomeInput@4(UNSIGNED CHAR *In Value); Parameters: Input Output Name In Value Return Description Pointer to the variable where the port status is stored TRUE if no error, FALSE if error Description: The function returns the status of the general purpose digital input assigned as home input. Check the drive/motor user manual to find the IO configuration. When the function is executed, the variable In Value where the input line status is saved becomes: • • Zero if the input line was low Non-zero if the input line was high If the input port may also be used as output, prior to call TS_GetInput.vi, you need to call TS_SetupInput.vi and configure it as input. Related functions: TS_SetupInput.vi, TS_SetupOutput.vi, TS_SetOutput.vi Associated examples: Example 32, Example 38 © Technosoft 2006 83 TML_LIB_LabVIEW – User Manual 3.4.5.6 TS_GetMultipleInputs.vi Symbol: Prototype: LONG _TS_GetMultipleInputs(CSTR Variable Name, SHORT INT *Status); Parameters: Input Output Name Variable Name Status Return Description TML variable where the inputs status is saved on the drive Pointer to variable where the value of Variable Name is stored TRUE if no error, FALSE if error Description: The function reads simultaneously the status of more inputs and save their status in TML variable Variable Name on the drive/motor. The value of Variable Name is then uploaded and stored in the Status variable. For drives/motors programmed with firmware version FAxx 1 the digital inputs read are: • • • • Enable input – saved in bit 15 of pszVarName Limit switch input for negative direction (LSN) – saved in bit 14 of pszVarName Limit switch input for positive direction (LSP) – saved in bit 13 of pszVarName General-purpose inputs #39, #38, #37 and #36 – saved in bits 3, 2, 1 and 0 of pszVarName If the drive/motor is programmed with firmware version FBxx 2 then the function reads all the input lines available of the drive/motor. The digital inputs are numbered from 0 to 15. The input’s number represents also the position of the corresponding bit from the pszVarName, i.e. input number x has associated bit x from the pszVarName. The bits corresponding to these inputs are set as follows: 0 if the input is low and 1 if the input is high. The other bits of the variable are set to 0. Remark: If one of these inputs is inverted inside the drive/motor, the corresponding bit from the variable is inverted too. Hence, these bits always show the inputs status at connectors level (0 if input is low and 1 if input is high) even when the inputs are inverted. The variable Variable Name is of type integer and must be defined with EasyMotion Studio before generating the setup files. Related functions: TS_SetIndexCapture.vi, TS_SetNegativeLimitSwitch.vi, TS_SetPositiveLimitSwitch.vi Associated examples: Example 37 1 Represents the firmware versions: F000H, F020H, F005H, F900H or later on Technosoft drives/motors: IDM240/IDM640, IDS240/IDS640, ISCM4805/ISCM8005, IBL2403, IM23x (models IS and MA) 2 Represents the firmware versions F500A or later on Technosoft drives: IDM240 CANopen/IDM640 CANopen, IDS640 CANopen © Technosoft 2006 84 TML_LIB_LabVIEW – User Manual 3.4.5.7 TS_SetMultipleOutputs.vi Symbol: Prototype: BOOL TML_EXPORT TS_SetMultipleOutputs(CSTR Variable Name, SHORT INT Status); Parameters: Name Input Output Variable Name Status return Description Intermediary TML variable necessary to store the outputs status to be set on the drive/motor The value with which the outputs are set TRUE if no error, FALSE if error Description: The function sets simultaneous more outputs of the drive/motor with the value of parameter Status. Its value is transferred and stored on the drive in pszVarName TML variable and from there is used to set the outputs. Remark: The function is designed for drives/motors programmed with firmware version FAxx 1. For drives/motors programmed with firmware version FBxx 2 use the TS_SetMultipleOutputs2 function. The outputs are: • • • Ready output – set by bit 15 of pszVarName Error output – set by bit 14 of pszVarName General-purpose outputs: #31, #30, #29, #28 – set by bits 3, 2, 1, and 0 of pszVarName The outputs are set as follows: low if the corresponding bit in the variable is 0 and high if the corresponding bit in the variable is 1. The other bits of the variable are not used. Remark: If one of these outputs is inverted inside the drive/motor, its command is inverted. Hence, the outputs are always set at connectors level according with the bits values (low if bit is 0 and high if bit is 1) even when the outputs are inverted. CAUTION: Do not use TS_SetMultipleOututs.vi if any of the 6 outputs mentioned is not on the list of available outputs of your drive/motor. There are products that use some of these outputs internally for other purposes. Attempting to change these lines status may harm your product. Related functions: TS_SetIndexCapture.vi, TS_SetNegativeLimitSwitch.vi, TS_SetPositiveLimitSwitch.vi Associated examples: Example 37 1 Represents the firmware versions: F000H, F020H, F005H, F900H or later on Technosoft drives/motors: IDM240/IDM640, IDS240/IDS640, ISCM4805/ISCM8005, IBL2403, IM23x (models IS and MA) 2 Represents the firmware versions F500A or later on Technosoft drives: IDM240 CANopen/IDM640 CANopen, IDS640 CANopen © Technosoft 2006 85 TML_LIB_LabVIEW – User Manual 3.4.5.8 TS_SetMultipleOutputs2.vi Symbol: Prototype: BOOL TML_EXPORT TS_SetMultipleOutputs2(CSTR Variable Name, SHORT INT Status); Parameters: Name Input Output SelectedPorts Status return Description Mask for selecting the outputs controlled. Each bit of the parameter represents an output port. Parameter containing the outputs status to be set TRUE if no error, FALSE if error Description: The function sets simultaneous the digital outputs of the drive/motor selected with the SelectedPorts mask using the value of the Status parameter. Remark: The function is designed for drives/motors programmed with firmware version FBxx 1. For drives/motors programmed with firmware version FAxx 2 use the TS_SetMultipleOutputs function. The digital outputs are numbered from 0 to 15 and they form an ordered list, for example, a product with 3 outputs will have 0, 1 and 2. The input’s number represents also the position of the corresponding bit from the SelectedPorts mask, i.e. input number x has associated bit x from the SelectedPorts. The outputs are set as follows: • • low if the corresponding bit from the SelectedPorts is 1 and the corresponding bit from Status variable is 0. high if it’s the corresponding bit from SelectedPorts is 1 and the corresponding bit from SelectedPorts is 1. Related functions: TS_SetIndexCapture.vi, TS_SetNegativeLimitSwitch.vi, TS_SetPositiveLimitSwitch.vi Associated examples: – 1 Represents the firmware versions F500A or later on Technosoft drives: IDM240 CANopen/IDM640 CANopen, IDS640 CANopen 2 Represents the firmware versions: F000H, F020H, F005H, F900H or later on Technosoft drives/motors: IDM240/IDM640, IDS240/IDS640, ISCM4805/ISCM8005, IBL2403, IM23x (models IS and MA) © Technosoft 2006 86 TML_LIB_LabVIEW – User Manual 3.4.6 Data transfer 3.4.6.1 TS_SetIntVariable.vi Symbol: Prototype: LONG _TS_SetIntVariable@8(CSTR Variable Name, SHORT INT Value); Parameters: Input Output Name Variable Name Value return Description TML parameter name The value to be written TRUE if no error; FALSE if error Description: The function writes the Value in the TML data Variable on the active axis. The TML data (parameter, variable or user defined variable) is of type long (16-bit). Remarks: 1. The available TML data is configuration dependent and is listed in the variables.cfg file 2. The user defined variables are set with EasyMotion Studio prior generating the setup information Related functions: TS_GetIntVariable.vi, TS_SetLongVariable.vi, TS_GetLongVariable.vi, TS_SetFixedVariable.vi, TS_GetFixedVariable.vi Associated examples: Example 18 © Technosoft 2006 87 TML_LIB_LabVIEW – User Manual 3.4.6.2 TS_GetIntVariable.vi Symbol: Prototype: LONG _TS_GetIntVariable@8(CSTR Variable Name, SHORT INT *Read Value); Parameters: Input Output Name Variable Name Read Value return Description Name of the TML parameter, variable or used defined variable Pointer to the variable where the value is stored TRUE if no error, FALSE if error Description: The function reads the value of TML data Variable Name. The TML data (parameter, variable or user defined variable) is of type integer (16-bit). The value read is saved in the variable pointed by Read Value. Remarks: 1. The available TML data is configuration dependent and is listed in the variables.cfg file. 2. The user defined variables are set with EasyMotion Studio prior generating the setup information Related functions: TS_SetIntVariable.vi, TS_SetLongVariable.vi, TS_SetFixedVariable.vi, TS_GetLongVariable.vi, TS_GetFixedVariable.vi Associated examples: Example 18, Example 20, Example 36, Example 38 © Technosoft 2006 88 TML_LIB_LabVIEW – User Manual 3.4.6.3 TS_SetLongVariable.vi Symbol: Prototype: LONG _TS_SetLongVariable@8(CSTR Variable Name, LONG value); Parameters: Input Output Name Variable Name Value return Description Name of the parameter The value to be written TRUE if no error, FALSE if error Description: The function writes the Value in the TML data Variable Name on the active axis. The TML data (parameter, variable or user defined variable) is of type long (32-bit). Remarks: 3. The available TML data is configuration dependent and is listed in the variables.cfg file 4. The user defined variables are set with EasyMotion Studio prior generating the setup information Related functions: TS_GetIntVariable.vi, TS_SetIntVariable.vi, TS_GetLongVariable.vi, TS_SetFixedVariable.vi, TS_GetFixedVariable.vi Associated examples: Example 20, Example 34 © Technosoft 2006 89 TML_LIB_LabVIEW – User Manual 3.4.6.4 TS_GetLongVariable.vi Symbol: Prototype: LONG _TS_GetLongVariable@8(CSTR Variable Name, LONG *Read Value); Parameters: Input Output Name Variable Read Value Return Description Name of the parameter Pointer to the variable where the parameter value is stored TRUE if no error, FALSE if error Description: The function reads the value of TML data Variable. The TML data (parameter, variable or user defined variable) is of type long (32-bit). The value read is saved in the variable pointed by Read Value. Remarks: 1. The available TML data is configuration dependent and is listed in the variables.cfg file. 2. The user defined variables are set with EasyMotion Studio prior generating the setup information Related functions: TS_SetIntVariable.vi, TS_SetLongVariable.vi, TS_SetFixedVariable.vi, TS_GetIntVariable.vi, TS_GetFixedVariable.vi Associated examples: © Technosoft 2006 Example 20, Example 24, Example 27, Example 28, Example 34, Example 35, Example 42 90 TML_LIB_LabVIEW – User Manual 3.4.6.5 TS_SetFixedVariable.vi Symbol: Prototype: LONG _TS_SetFixedVariable@12(CSTR Variable Name, DOUBLE Value); Parameters: Input Output Name Variable Name Value return Description Name of the parameter The value to be written TRUE if no error, FALSE if error Description: The function converts the Value to type fixed and writes it in the TML data Variable Name on the active axis. The TML data (parameter, variable or user defined variable) is of type fixed (16 bits integer part, 16 bits fractional part). Remarks: 1. The available TML data is configuration dependent and is listed in the variables.cfg file. 2. The user defined variables are set with EasyMotion Studio prior generating the setup information Related functions: TS_SetIntVariable.vi, TS_GetIntVariable.vi, TS_SetLongVariable.vi, TS_GetLongVariable.vi, TS_GetFixedVariable.vi Associated examples: Example 19, Example 34 © Technosoft 2006 91 TML_LIB_LabVIEW – User Manual 3.4.6.6 TS_GetFixedVariable.vi Symbol: Prototype: LONG _TS_GetFixedVariable@8(CSTR Variable Name, DOUBLE *value); Parameters: Input Output Name Variable Name Read Value Return Description Name of the parameter Pointer where the parameter value is stored TRUE if no error, FALSE if error Description: The function reads the value of TML data Variable Name from the active axis. The TML data (parameter, variable or user defined variable) is of type fixed (16 bits integer part, 16 bits fractional part). The value read is converted to double and saved in the variable pointed by Read Value. Remarks: 1. The available TML data is configuration dependent and is listed in the variables.cfg file. 2. The user defined variables are set with EasyMotion Studio prior generating the setup information Related functions: TS_SetIntVariable.vi, TS_SetLongVariable.vi, TS_SetFixedVariable.vi, TS_GetIntVariable.vi, TS_GetLongVariable.vi Associated examples: Example 19 © Technosoft 2006 92 TML_LIB_LabVIEW – User Manual 3.4.6.7 TS_SetBuffer.vi Symbol: Prototype: LONG _TS_SetBuffer@12(UNSIGNED SHORT INT Address, LONG *Array Values, SHORT INT Size); Parameters: Input Output Name Address Array Values Size return Description Start address where to download the data buffer Pointer to the array with data to be downloaded The number of words to download TRUE if no error, FALSE if error Description: The function downloads a data buffer on the active axis. The parameter Array Values points to the beginning of the array from where the data will be downloaded. The length of the buffer is set with parameter Size. The data is stored on the drive/motor starting with Address. The Address can belong to drive/motor EEPROM memory or TML data memory. Remark: For details about drive/motor memory structure see the “Memory Map” topic from EasyMotion Studio on line help. Related functions: TS_GetBuffer.vi Associated examples: Example 20, Example 39 © Technosoft 2006 93 TML_LIB_LabVIEW – User Manual 3.4.6.8 TS_GetBuffer.vi Symbol: Prototype: LONG _TS_GetBuffer@12(UNSIGNED SHORT INT Address, LONG *Array Values, SHORT INT Size); Parameters: Input Output Name Address Array Values Size return Description Start address from where the data will be uploaded Pointer to the array where the uploaded data will be stored The number of words to upload TRUE if no error, FALSE if error Description: The function uploads a data buffer from the active axis. The start address of the buffer is set with parameter Address and its length is Size. The Address can belong to drive/motor EEPROM memory or TML data memory. The parameter Array Values points to the beginning of the array where the uploaded data is stored. Remark: For details about drive/motor memory structure see the “Memory Map” topic from EasyMotion Studio on line help. Related functions: TS_SetBuffer.vi Associated examples: Example 20, Example 39 © Technosoft 2006 94 TML_LIB_LabVIEW – User Manual 3.4.7 Drive/motor monitoring 3.4.7.1 TS_ReadStatus.vi Symbol: Prototype: LONG _TS_ReadStatus@8(SHORT INT TML Register, SHORT INT *Status); Parameters: Input Output Name TML Register Status return Description Registers selection Pointer of the variable where the status is saved TRUE if no error; FALSE if error Description: The function returns drive/motor status information. Depending on the value of TML Register parameter, you can examine the contents of the Motion Control Register (TML Register = REG_MCR), Motion Status Register (TML Register = REG_MSR), Interrupt Status Register (TML Register = REG_ISR), Status Register Low (TML Register = REG_SRL), Status Register High (TML Register = REG_SRH) or Motion Error Register (TML Register = REG_MER) of the drive/motor. Related functions: – Associated examples: – © Technosoft 2006 95 TML_LIB_LabVIEW – User Manual 3.4.7.2 TS_OnlineChecksum.vi Symbol: Prototype: LONG _TS_OnlineChecksum@12(UNSIGNED SHORT INT Start Address, SHORT INT End Address, SHORT INT *Checksum); Parameters: Input Output Name Start Address End Address Checksum return Description The memory range start address The memory range end address Pointer to the variable where the checksum is stored TRUE if no error, FALSE if error Description: The function requests from the active axis the checksum of a memory range. The memory range is defined with parameters Start Address and End Address. The function stores the checksum received from the drive in variable Checksum. With function TS_OnlineChecksum.vi you can check the integrity of the data saved in a drive/motor EEPROM or RAM memory. The memory type is selected automatically function of the Start Address and the End Address. Related functions: TS_SetBuffer.vi Associated examples: Example 39 © Technosoft 2006 96 TML_LIB_LabVIEW – User Manual 3.4.8 Miscellaneous 3.4.8.1 TS_DownloadProgram Symbol: Prototype: LONG _TS_DownloadProgram@8(CSTR File Name, UNSIGNED SHORT INT *Entry Point); Parameters: Input Output Name pszOutFile wEntryPoint return Description The name of the out file generated with EasyMotion Studio Start address of downloaded file TRUE if no error, FALSE if error Description: The function downloads a COFF formatted file to the drive/motor, and returns the entry point of that file. Parameter File Name specifies the name of the object file to be downloaded. If the operation is successful, the function will return the entry point (start address) of the downloaded code in the Entry Point parameter. You can use this address to launch the execution of the downloaded code, by using it as the input argument of the TS_GOTO.vi or TS_CALL.vi functions. The COFF file is generated from EasyMotion Studio with menu command Application | Motion | Build and is saved in the application directory. You can download several such applications in different locations of the drive internal memory, and execute them according to your application status, with the TS_GOTO.vi or TS_CALL.vi functions. Related functions: TS_GOTO.vi, TS_CALL.vi Associated examples: Example 29, Example 30 © Technosoft 2006 97 TML_LIB_LabVIEW – User Manual 3.4.8.2 TS_Execute.vi Symbol: Prototype: LONG _TS_Execute@4(CSTR Commands); Parameters: Input Output Name Commands return Description String containing the TML source code to be executed. TRUE if no error, FALSE if error Description: The function executes the TML commands entered in TML source code format (as is entered in the Command Interpreter), from a string containing that code. Use this function if you want to send a specific motion sequence, directly written in TML language. Build a string Commands containing the source TML code and then call the TS_Execute.vi function in order to compile the code and to send on-line the associated TML object commands. If a compile error occurs, the function returns a FALSE, otherwise it returns TRUE. Related functions: TS_ExecuteScript.vi Associated examples: Example 9, Example 10, Example 11, Example 13, Example 20, Example 25, Example 39, Example 41 © Technosoft 2006 98 TML_LIB_LabVIEW – User Manual 3.4.8.3 TS_ExecuteScript.vi Symbol: Prototype: LONG _TS_ExecuteScript@4(CSTR File Name); Parameters: Name Input Output File Name Return Description The name of the file containing the TML source code to be executed. TRUE if no error, FALSE if error Description: The function executes TML commands entered in TML source code format (as is entered in the Command Interpreter) from a script file. Use this function if you want to send a specific motion sequence, directly written in TML language. Define a data file File Name containing the source TML code you want to send to the drive and then call the TS_ExecuteScript.vi function in order to compile the code and to send on-line the associated TML object commands. If a compile error occurs, the function returns a FALSE, otherwise it returns TRUE. Related functions: TS_Execute.vi Associated examples: Example 25 © Technosoft 2006 99 TML_LIB_LabVIEW – User Manual 3.4.8.4 TS_GetOutputOfExecute.vi Symbol: Prototype: LONG _TS_GetOutputOfExecute@8(CSTR Output, SHORT INT Max Chars); Parameters: Name Input Output Output Max Chars return Description String containing the TML source code generated at the last library function call. The maximum numbers of characters to return in the string TRUE if no error, FALSE if error Description: The function returns the TML output source code of the last previously executed TML_LIB_LabVIEW library function call. Use this function if you want to examine the TML code that is generated when you call one of the functions of the TML_LIB_LabVIEW library. The code is returned in the Output string. Set the maximum number of characters to be returned as the value of the Max Chars parameter. Related functions: TS_Execute.vi Associated examples: Example 41 © Technosoft 2006 100 TML_LIB_LabVIEW – User Manual 3.4.8.5 TS_Save.vi Symbol: Prototype: LONG _TS_Save@0(void); Parameters: Input Output Name – return Description – TRUE if no error; FALSE if error Description: The function saves the actual values of all the TML parameters with setup data from the active data RAM memory into the EEPROM memory, in the setup table. Through this command, you can save all the setup modifications done, after the power on initialization. Related functions: TS_Reset.vi, TS_Save.vi Associated examples: Example 20 © Technosoft 2006 101 TML_LIB_LabVIEW – User Manual 3.4.8.6 TS_ResetFault.vi Symbol: Prototype: LONG _TS_ResetFault@0(void); Parameters: Input Output Name – return Description – TRUE if no error; FALSE if error Description: The function gets out the active axis from the FAULT status in which it enters when an error occurs. After a TS_ResetFault.vi execution, most of the errors bits from Motion Error Register are cleared (set to 0), the Ready output (if present) is set to the ready level, the Error output (if present) is set to the no error level and the drive/motor returns to normal operation. Remarks: • • The TS_ResetFault.vi execution does not change the status of MER.15 (enable input on disabled level), MER.7 (negative limit switch input active), MER.6 (positive limit switch input active) and MER.2 (invalid setup table) The drive/motor will return to FAULT status if there are errors when the function is executed Related functions: TS_Power.vi Associated examples: Example 36 © Technosoft 2006 102 TML_LIB_LabVIEW – User Manual 3.4.8.7 TS_Reset.vi Symbol: Prototype: LONG _TS_Reset@0(void); Parameters: Input Output Name – return Description – TRUE if no error; FALSE if error Description: The function resets the active axis. After reset the drive/motor will load the values of TML parameters set during setup phase. If the drive/motor is configured to run in the ‘Autorun’ mode, it will automatically execute after reset the TML code stored in the E2ROM memory (if there is such a program). Remark: If during drive/motor operation you have changed the setup parameters and want to use them after the reset, call function TS_Save.vi prior TS_Reset.vi. The function TS_Save.vi stores in the drive/motor EEPROM memory the actual values of all TML parameters. Related functions: TS_Power.vi, TS_DownloadProgram.vi, TS_GOTO.vi, TS_Save.vi Associated examples: Example 20, Example 36 © Technosoft 2006 103 TML_LIB_LabVIEW – User Manual 3.4.8.8 TS_GetLastErrorText.vi Symbol: Prototype: CSTR _TS_GetLastErrorText@0(void); Parameters: Input Output Name – return Description – A text related to the last occurred error Description: The function returns a text related with the last occurred error during a TML_LIB_LabVIEW function execution. You can visualize this text in order to see what the problem was. Related functions: – Associated examples: all © Technosoft 2006 104 TML_LIB_LabVIEW – User Manual 3.4.9 Data logger 3.4.9.1 TS_SetupLogger.vi Symbol: Prototype: LONG _TS_SetupLogger@20(UNSIGNED SHORT INT Logger Address, UNSIGNED SHORT INT Logger Length, UNSIGNED SHORT INT *Array Addresses, UNSIGNED SHORT INT Count Address, UNSIGNED SHORT INT Logger Period); Parameters: Name Logger Address Logger Length Input Array Addresses Count Address Logger Period Output return Description The address of the logger buffer in drive/motor memory, where data will be stored during logging The length in words of the logger buffer Pointer to the array containing the drive/motor memory addresses to be logged The number of memory addresses to be logged Time interval between two consecutive data logging expressed in drive/motor time units TRUE if no error, FALSE if error Description: The function sets the parameters of the data logger on the active axis. Use this function if you want to perform data logging at the drive/motor level during the motion execution and analyze it at the PC level. Set the Logger Address parameter with the starting address of the drive/motor data memory buffer where a number of Logger Length data points of logged data will be stored. The addresses of TML data logged are stored in an array of length Count Address. Parameter Array Addresses points to the beginning of the array where the uploaded data will be stored. Remark The number of data sets which can be stored will be determined as the integer part of the ratio Logger Length / Count Address. The parameter Logger Period sets how often the TML data is logged. The period can have any value between 1 and 7FFF. Remark: Be careful when using the data logger functions! Incorrect settings related to data logger buffer location and size may lead to improper operation of the drive, with unpredictable results. Related functions: TS_StartLogger.vi, TS_UploadLoggerResults.vi, TS_CheckLoggerStatus.vi Associated examples: Example 33 © Technosoft 2006 105 TML_LIB_LabVIEW – User Manual 3.4.9.2 TS_StartLogger.vi Symbol: Prototype: LONG _TS_StartLogger@8(UNSIGNED SHORT INT Logger Address, UNSIGNED CHAR Logger Type); Parameters: Name Input Output Logger Address Logger Type Return Description The address of the logger buffer in drive/motor memory, where data will be stored during logging Specifies when the logging occurs TRUE if no error, FALSE if error Description: The function starts the data logger on the active axis. The function may be called only after the initialization of the data logger with the TS_SetupLogger.vi function. Use the parameter Logger Type to set if the data logging process must be done in the slow control loop (Logger Type = LOGGER_SLOW), or in the fast control loop (Logger Type = LOGGER_FAST). Related functions: TS_SetupLogger.vi, TS_UploadLoggerResults.vi, TS_CheckLoggerStatus.vi Associated examples: Example 33 © Technosoft 2006 106 TML_LIB_LabVIEW – User Manual 3.4.9.3 TS_CheckLoggerStatus.vi Symbol: Prototype: LONG _TS_CheckLoggerStatus@8(UNSIGNED SHORT INT Logger Address, UNSIGNED SHORT INT *Logger Status); Parameters: Name Input Output Logger Address Logger Status Return Description The address of the logger buffer in drive/motor memory, where data will be stored during logging Number of points still remaining to capture; if it is 0, the logging is completed TRUE if no error, FALSE if error Description: The function checks the data logger status on the active axis. Use this function in order to check if the data logging process is still running, or if the data logging process was ended. The function returns the Logger Status parameter, whose value indicates how many points are still to be captured. If Logger Status = 0 the data logging process is finished. The function may be called only after the start of the logging process with the TS_StartLogger.vi function. Related functions: TS_ SetupLogger.vi, TS_StartLogger.vi, TS_UploadLoggerResults.vi Associated examples: Example 33 © Technosoft 2006 107 TML_LIB_LabVIEW – User Manual 3.4.9.4 TS_UploadLoggerResults.vi Symbol: Prototype: LONG _TS_UploadLoggerResults(WORD wLogBufferAddr, WORD* arrayValues, WORD& countValues); Parameters: Name Logger Address Input Output Array Values Count Values Count Values return Description The address of the logger buffer in drive/motor memory, where data will be stored during logging Pointer to the array where the uploaded data is stored on the PC The size of Array Values, expressed in WORDs The number of uploaded data TRUE if no error, FALSE if error Description: The function uploads the data logged from the active axis. Use this function to upload the data stored during the data logger execution. Before calling the function, you must declare a data buffer in the PC program, starting at the Array Values address, with a size equal to the Count Values parameter. The TS_UploadLoggerResults.vi function will fill the Array Values data buffer with the data transferred from the drive, and will also return the actual number of transferred data words, in the Count Values parameter. Once the data is transferred, you can use it for data analysis, graphical representation. Remark: 1. Prior uploading the data logged, call function TS_CheckLoggerStatus.vi to test the end of data logging. 2. The number of data sets which were stored will be determined as the integer part of the ratio [ length / Count Address ] where length and Count Address are setup parameters defined when calling the TS_SetupLogger.vi function The uploaded data is stored in consecutive data sets, i.e. the first set of Count Address words will contain the first logged point for the selected variables, the second set of Count Address words will contain the second logged point for the selected variables, and so on. The following table illustrates this data structure for an example of 4 logged variables. Data WORD 1 2 3 4 5 6 7 … © Technosoft 2006 Meaning Variable 1, point 1 Variable 2, point 1 Variable 3, point 1 Variable 4, point 1 Variable 1, point 2 Variable 2, point 2 Variable 3, point 2 … 108 TML_LIB_LabVIEW – User Manual Related functions: TS_ SetupLogger, TS_StartLogger, TS_ CheckLoggerStatus Associated examples: Example 33 © Technosoft 2006 109 TML_LIB_LabVIEW – User Manual 3.4.10 Drive setup 3.4.10.1 TS_LoadSetup.vi Symbol: Prototype: SHORT INT _TS_LoadSetup@4(CSTR Setup Directory); Parameters: Input Output Name Setup Directory Return Description Name of the directory where are the setup files The index associated to the setup Description: The function loads a drive/motor configuration setup in the PC application. The configuration setup is generated from EasyMotion Studio or EasySetUp and stored in two files: setup.cfg and variables.cfg. With string Setup Directory you specify the absolute or relative path of the directory with the setup files. The function returns an index associated to the configuration setup. Use the value returned to associate the configuration setup with the corresponding axis. Remark: The function must be called for each configuration setup only once in your program, in its initialization part. Related functions: TS_SetupAxis.vi, TS_SetupGroup.vi, TS_SetupBroadcast.vi Associated examples: all examples © Technosoft 2006 110 TML_LIB_LabVIEW – User Manual 3.4.10.2 TS_SetupAxis.vi Symbol: Prototype: LONG _TS_SetupAxis@8(UNSIGNED CHAR Axis ID, SHORT INT Setup Index); Parameters: Input Output Name Axis ID Setup Index return Description Axis ID of the drive/motor Configuration index generated by TS_LoadSetup TRUE if no error, FALSE if error Description: The function associates a configuration setup to the drive/motor having Axis ID. The configuration setup is identified through Setup Index. The function must be called for each axis of the motion system, only once in your program, in the initialization part, before any attempt to send messages to that axis. Remarks: 1. The Axis ID parameter must be identical with the value set during drive/motor setup. 2. Use function TS_LoadSetup.vi to obtain the configuration setup identifier. Related functions: TS_LoadSetup.vi, TS_SetupGroup.vi, TS_SetupBroadcast.vi Associated examples: all examples © Technosoft 2006 111 TML_LIB_LabVIEW – User Manual 3.4.10.3 TS_SetupGroup.vi Symbol: Prototype: LONG _TS_SetupGroup@8(UNSIGNED CHAR Group ID, SHORT INT Setup Index); Arguments: Input Output Name Group ID Setup Index return Description Group ID number. It must be a value between 1 and 8 Name of the data file storing the setup axis information TRUE if no error, FALSE if error Description: The function associates to the group of drives/motors a configuration setup identified through Setup Index. The configuration setup is used by TML_LIB when sends commands towards axes that have the Group ID. The function must be called for each group defined in the motion system, only once in your program, in the initialization part, before any attempt to send messages to that group. Remarks: Use function TS_LoadSetup.vi to obtain the configuration setup identifier. Related functions: TS_LoadSetup.vi, TS_SetupAxis.vi, TS_SetupBroadcast.vi Associated examples: all examples © Technosoft 2006 112 TML_LIB_LabVIEW – User Manual 3.4.10.4 TS_SetupBroadcast Symbol: Prototype: LONG _TS_SetupBroadcast@4(SHORT INT Setup Index); Parameters: Input Output Name Setup Index return Description Name of the data file storing the setup axis information TRUE if no error, FALSE if error Description: The function sets the configuration setup used by TML_LIB when issuing broadcast commands. The configuration setup is identified through Setup Index. Remarks: Use function TS_LoadSetup.vi to obtain the configuration setup identifier. Related functions: TS_LoadSetup.vi, TS_SetupAxis.vi, TS_SetupGroup.vi Associated examples: – © Technosoft 2006 113 TML_LIB_LabVIEW – User Manual 3.4.10.5 TS_DriveInitialization.vi Symbol: Prototype: LONG _TS_DriveInitialization@0(void); Parameters: Input Output Name – Return Description – TRUE if no error, FALSE if error Description: The function initializes the active axis. It must be executed when the drive/motor is powered or after a reset with function TS_Reset.vi. The function call should be placed after the functions TS_SetupAxis.vi and TS_SelectAxis.vi and before any functions that send messages to the axis. Related functions: TS_LoadSetup.vi, TS_SetupAxis.vi, TS_SelectAxis.vi Associated examples: all examples © Technosoft 2006 114 TML_LIB_LabVIEW – User Manual 3.4.11 Drive administration 3.4.11.1 TS_SelectAxis.vi Symbol: Prototype: LONG _TS_SelectAxis@4(UNSIGNED CHAR Axis ID); Parameters: Input Output Name Axis ID return Description The Axis ID where the commands are sent TRUE if no error, FALSE if error Description: The function selects the currently active axis. All further function calls, which send TML messages on the communication channel, will address the messages to this active axis. Call the function only after the setup of the axis (after calling the TS_SetupAxis.vi function) for the same axis (with the same Axis ID). In a single axis motion system, call this function only once in your program. In a multiple axis configuration, call this function each time you want to redirect the communication to another axis of the system. Related functions: TS_SelectGroup.vi Associated examples: all examples © Technosoft 2006 115 TML_LIB_LabVIEW – User Manual 3.4.11.2 TS_SelectGroup.vi Symbol: Prototype: LONG _TS_SelectGroup(UNSIGNED CHAR Group ID); Parameters: Input Output Name Group ID Return Description The Group ID where the commands are sent TRUE if no error, FALSE if error Description: The function selects the currently active group. All further function calls, which send TML messages on the communication channel, will address these messages to this active group. The active group is set with parameter Group ID. It must be a value between 1 and 8. Remark: The function must be called after the group setup i.e. after calling the TS_SetupGroup.vi function. Related functions: TS_SelectAxis.vi Associated examples: Example 26 © Technosoft 2006 116 TML_LIB_LabVIEW – User Manual 3.4.11.3 TS_SelectBroadcast.vi Symbol: Prototype: LONG _TS_SelectBroadcast@0(void); Parameters: Input Output Name – Return Description – TRUE if no error, FALSE if error Description: The function enables TML_LIB to issue the broadcast messages, i.e. all further function calls, which send TML messages on the communication channel, will address these messages to all the axes. Remark: The function must be called after the broadcast setup i.e. after calling the TS_SetupBroadcast.vi function. Related functions: TS_SelectAxis.vi, TS_SelectGroup.vi Associated examples: - © Technosoft 2006 117 TML_LIB_LabVIEW – User Manual 3.4.12 Communication setup 3.4.12.1 TS_OpenChannel.vi Symbol: Prototype: SHORT INT _TS_OpenChannel@16(CSTR Device Name, UNSIGNED CHAR HostID, UNSIGNED LONG Baud rate); UNSIGNED CHAR Type, Parameters: Input Output Name Device Name Type HostID Baud Rate Return Description The communication channel to be opened The type of the communication channel Axis ID for the PC Communication baud rate The file descriptor of the or -1 if error Description: The function opens the communication channel specified with parameter Device Name. The communication channel type is set with parameter Type. The TML_LIB_LabVIEW supports the following communication types: 1 • serial RS-232 o Type = CHANNEL_RS232 for PC serial port o Type = CHANNEL_VIRTUAL_SERIAL for virtual serial interface 1 • serial RS-485 o Type = CHANNEL_RS485 for an RS-485 interface board or an RS-232/RS-485 converter • CAN-bus o Type = CHANNEL_IXXAT_CAN for IxxAT PC to CAN interface o Type = CHANNEL_SYS_TEC_USBCAN for Sys Tec USB to CAN interface o Type = CHANNEL_PEAK_SYS_PCAN_PCI for ESD PC to CAN interface o Type = CHANNEL_ESD_CAN for PEAK System PCAN-PCI interface o Type = CHANNEL_PEAK_SYS_PCAN_ISA for PEAK System PCAN-ISA o Type = CHANNEL_PEAK_SYS_PCAN_PC104 for PEAK System PC/104 o Type = CHANNEL_PEAK_SYS_PCAN_USB o Type = CHANNEL_PEAK_SYS_PCAN_DONGLE for PEAK System Dongle interfaces Contact Technosoft for more details regarding the virtual serial channel. © Technosoft 2006 118 TML_LIB_LabVIEW – User Manual • Ethernet o Type = CHANNEL_XPORT_IP for XPort adapter/bridge between Ethernet and RS-232 from Lantronix. Depending on the communication channel type, the parameter Device Name can be: • • • • For serial communication: ‘COM1’, ‘COM2’, ‘COM3’…. For virtual serial interface is the name of the dll file that implements the serial interface For CAN-bus communication: ‘1’, ‘2’, ‘3’… For Ethernet communication: ‘192.168.19.52’, ‘technosoft.masterdrive.ch’… The HostID parameter represents the Axis ID of the PC in the system. The value of HostID is set as follows: • • • For serial RS-232 the HostID is equal with the axis ID of the drive connected to the PC serial port For serial RS-485 and CAN-bus the HostId must be a unique value. Attention! Make sure that all the drives/motors from the network have a different address For Ethernet communication the HostID is equal with the axis ID of the drive connected to the serial port of the Ethernet adapter. Set the communication speed with the Baud Rate parameter. The accepted values are: • • For serial communication and Ethernet: 9600, 19200, 38400, 56000 or 115200 kbps. For CAN-bus: 125, 250, 500, 1000 kbps Remark: You can open several communication channels but only one can be active in an application at one moment. You can switch between the communication channels with function TS_SelectChannel.vi. Related functions: TS_SelectChannel.vi, TS_CloseChannel.vi Associated examples: all examples © Technosoft 2006 119 TML_LIB_LabVIEW – User Manual 3.4.12.2 TS_SelectChannel.vi Symbol: Prototype: LONG _TS_SelectChannel@4(SHORT INT fd); Parameters: Input Output Name fd return Description The communication channel file descriptor TRUE if no error, FALSE if error Description: The function selects as active the communication channel described by parameter fd. All commands send towards the drives/motors will use the selected communication channel. Remarks: 1. Use function TS_OpenChannel.vi to open the communication channels 2. The function TS_SelectChannel.vi is not required in application with only one communication channel Related functions: TS_OpenChannel.vi, TS_CloseChannel.vi Associated examples: all examples © Technosoft 2006 120 TML_LIB_LabVIEW – User Manual 3.4.12.3 TS_CloseChannel.vi Symbol: Prototype: void _TS_CloseChannel@4(SHORT INT fd); Parameters: Input Output Name fd – Description The communication channel file descriptor – Description: The function closes the communication channel described by parameters fd. With fd = -1 the function closes the channel previously selected with function TS_SelectChannel.vi. This function must be called at the end of the application. It will release the communication channel resources, as it was allocated to the program when the TS_OpenChannel.vi function was called. Related functions: TS_OpenChannel.vi, TS_SelectChannel.vi Associated examples: all examples © Technosoft 2006 121 TML_LIB_LabVIEW – User Manual 4 Examples This chapter presents a collection of applications implemented in LabVIEW, which use the functions of the TML_LIB_LabVIEW library. The examples are intended to provide you a first, basic insight about using the TML_LIB_ LabVIEW library to implement your motion control applications. The examples are based on the hypothesis that the drive is already initialized, i.e. the setup code is already downloaded into the drive (see section 2.3 for details), so that you’ll directly start sending motion commands from the PC to the drive. Remark: Most TML_LIB_LabVIEW subVIs return a Boolean TRUE if they execute correctly, and a FALSE if any error occurred (incorrect parameters, failed operation at PC level). You should check after each function call if there was an error or not. In case of error use the subVI TS_GetLastTextError.vi to obtain a description of the error occurred. Thus, a VI implemented with TML_LIB_LabVIEW subVIs should look like this: The examples automatically launch at run control panels which display the status of some drive variables (as speed, position, current, etc.). Remark: The examples and the control panels are built for configurations with Technosoft drive IBL2403-CAN. For other drives/motors generate the setup data and modify the examples and the control panels to accommodate the IO configuration of your drive/motor. © Technosoft 2006 122 TML_LIB_LabVIEW – User Manual Figure 4.1. Drive status control panel Figure 4.2 Motion speed control panel © Technosoft 2006 123 TML_LIB_LabVIEW – User Manual Figure 4.3 Motion position control panel Figure 4.4 IO control panel for IBL2403 - CAN © Technosoft 2006 124 TML_LIB_LabVIEW – User Manual 4.1 Example 1. Profiled positioning movement followed by a speed profile jogging This example implements a relative positioning movement, waits until the motion is finished, then starts moving the motor with a constant speed. The VI front panel allows you to setup the parameters for the position profile and speed profile. If an error occurs, you’ll see the error message in the ERROR text box. Remark:. For a better readability of the other examples, the error message field was introduced in the VI screen only for this example. You can add it if needed for the other examples, too. © Technosoft 2006 125 TML_LIB_LabVIEW – User Manual © Technosoft 2006 126 TML_LIB_LabVIEW – User Manual 4.2 Example 2. Positioning movement; wait a while; speed jogging; stop after a time period This example implements a relative positioning movement, waits until the motion is finished, then stays stopped for a given time interval. After this time interval, the motor starts moving with a constant speed. After another time interval, the motor is stopped. The VI front panel allows you to setup the parameters of the first speed profile, second speed profile, the time interval for which the motor remains stopped and the time interval after which the motor is stopped. © Technosoft 2006 127 TML_LIB_LabVIEW – User Manual © Technosoft 2006 128 TML_LIB_LabVIEW – User Manual 4.3 Example 3. Speed profile with two acceleration values This example implements a speed movement having two different acceleration values during motor start: one acceleration value for speeds below a given level, and another acceleration value for speeds greater than the speed level. The motor is stopped after a time interval. The VI front panel allows you to setup the parameters of the first speed profile and to set the acceleration for the second speed profiles. © Technosoft 2006 129 TML_LIB_LabVIEW – User Manual © Technosoft 2006 130 TML_LIB_LabVIEW – User Manual 4.4 Example 4. Speed jogging; wait a time period; positioning movement This example implements a speed movement for a given time period, followed by a relative positioning. The VI allows you to setup the parameters of the speed and position profile. The VI front panel allows you to setup the parameters of the speed and position profiles. © Technosoft 2006 131 TML_LIB_LabVIEW – User Manual © Technosoft 2006 132 TML_LIB_LabVIEW – User Manual 4.5 Example 5. Speed jogging; wait for an input port to be triggered; positioning movement This example implements a speed movement until a digital input of the drive is set to low. At that moment, a positioning movement with a different maximum speed is executed. The VI allows you to setup the parameters of the speed and position profiles. While the application is running, set to low the IN#37 digital input of the drive, in order to stop the motion. The VI front panel allows you to setup the parameters of the speed and position profiles. © Technosoft 2006 133 TML_LIB_LabVIEW – User Manual © Technosoft 2006 134 TML_LIB_LabVIEW – User Manual 4.6 Example 6. Absolute position motion profile with different acceleration / deceleration rate This example implements a position profile movement having different acceleration and deceleration values. One acceleration value is used at motor start. As the slew speed is reached, another acceleration value is set, thus the deceleration will be executed with the new value. Note that in order to get this behavior, two conditions must be observed: • The reference position must be big enough, so that the reference speed is a trapezoidal one (reaches the slew speed) • The motor must reach slew speed during the acceleration part of the motion profile The VI front panel allows you to setup the parameters of the first and of the second position profiles. © Technosoft 2006 135 TML_LIB_LabVIEW – User Manual © Technosoft 2006 136 TML_LIB_LabVIEW – User Manual 4.7 Example 7. Positioning movement; speed jogging; wait a time period, then stop This example implements a position profile movement followed by a speed profile jogging. After a time interval of movement on the speed profile, the motion is stopped. The VI front panel allows you to setup the parameters of the first speed profile, the second speed profile and the second speed profile travel time interval. © Technosoft 2006 137 TML_LIB_LabVIEW – User Manual © Technosoft 2006 138 TML_LIB_LabVIEW – User Manual 4.8 Example 8. Repeat a motion at input port set, with current reduction between motions This example implements a repetitive position profile movement. The motion is repeated for a given number of times, each time when a digital input port is set to low level. Between the motions, while waiting for a new start, the motor current is set to a low, stand-by value. At motion start (when the digital input port level is set to low), the current is set to a run-time value. Each time the position is doubled as compared with the previous value. Remark: This example can be used only with stepper open loop configuration. The VI front panel allows you to setup the parameters of the position profile. © Technosoft 2006 139 TML_LIB_LabVIEW – User Manual © Technosoft 2006 140 TML_LIB_LabVIEW – User Manual 4.9 Example 9. Move to the positive limit switch, reverse to the negative limit switch This example activates the limit switches of the drive, and then implements a jogging movement in the positive direction, until the positive limit switch is reached. At that moment, the motor is stopped, and a jogging movement is started in the negative direction (at negative speed) until the negative limit switch is reached. There the motor is stopped again. The VI front panel allows you to setup the parameters of the speed profile. © Technosoft 2006 141 TML_LIB_LabVIEW – User Manual © Technosoft 2006 142 TML_LIB_LabVIEW – User Manual 4.10 Example 10. Move between limit switches until an input port changes its status This example implements a jogging movement between the positive and the negative limit switches, until a digital input changes its status. At that moment, the movement is stopped. The VI front panel allows you to setup the parameter of the speed profile. © Technosoft 2006 143 TML_LIB_LabVIEW – User Manual © Technosoft 2006 144 TML_LIB_LabVIEW – User Manual 4.11 Example 11. Move forward and backward at 2 different speeds, for a given distance This example implements a forward jogging movement, over a given relative distance, followed by a movement in the opposed direction, over the same relative distance, with a different jogging speed. The movement is repeated for a given number of times. The VI front panel allows you to setup the parameters of the first and second speed profiles. © Technosoft 2006 145 TML_LIB_LabVIEW – User Manual © Technosoft 2006 146 TML_LIB_LabVIEW – User Manual 4.12 Example 12. Speed profile, followed by profiled positioning at a given speed This example implements a jogging movement, until a given speed reference, when an absolute positioning is started. During this positioning motion, the position profile is changed at a given value of the reference. The VI allows you to setup the parameters of the speed profile, the first position profile and the second position profile. © Technosoft 2006 147 TML_LIB_LabVIEW – User Manual © Technosoft 2006 148 TML_LIB_LabVIEW – User Manual 4.13 Example 13. Speed control with external reference This example implements a speed control or position control function of user selection. When the user selects Analogue the drive uses the values read from analogue input Reference for positioning. With selection Online the drive is programmed to use the reference received online from the PC. In the VI front panel select the reference type used and then press the GO button. © Technosoft 2006 149 TML_LIB_LabVIEW – User Manual © Technosoft 2006 150 TML_LIB_LabVIEW – User Manual 4.14 Example 14. Profiled positioning, with output port status changing at a given position This example implements a profiled positioning movement, and commutes the status of a digital output port of the drive, at a given motor position value. The VI front panel allows you to setup the parameters of the position profile. © Technosoft 2006 151 TML_LIB_LabVIEW – User Manual © Technosoft 2006 152 TML_LIB_LabVIEW – User Manual 4.15 Example 15. Execute a jogging speed motion, until the home input is captured This example implements a profiled speed movement, until the home input capture is detected. At that moment, the motion is stopped. The VI front panel allows you to setup the parameters of the speed profile. While the application is running, set the digital input port IN#38 to low, in order to stop the motor. © Technosoft 2006 153 TML_LIB_LabVIEW – User Manual © Technosoft 2006 154 TML_LIB_LabVIEW – User Manual 4.16 Example 16. Different motions based on the status of two digital inputs of the drive This example implements different movements, based on the status of two digital input ports of the drive. The code continuously read the status of these ports and based on their values executes a speed profile (if first input is set to low), a position profile (if second input is set to low), or stops the motion and exit (if both inputs are set to low at the same time). The VI front panel allows you to setup the parameters of the position profile and speed profile. While the application is running, set to low IN#37, in order to execute a position profile, or set to low the IN#38, in order to execute a speed profile. Then set to low both the IN#37 and IN#38 at the same time, in order to stop the motion. © Technosoft 2006 155 TML_LIB_LabVIEW – User Manual © Technosoft 2006 156 TML_LIB_LabVIEW – User Manual 4.17 Example 17. Move between limit switches. Power-off if blocked on a limit switch This example implements a jogging movement, until the positive limit switch is reached. At that point, the motion is reversed, until the negative limit switch is reached, then the motion is stopped. The program checks if, after reversing the motion at positive limit switch reach, this limit switch continues to be ON, after a given time period. In this case, the drive is powered-OFF, as this can represent an emergency situation. The VI front panel allows you to setup the parameters of the speed profile. Set to low the LSP input in order to reverse the motion. During the reverse motion, set to low the LSN input, in order to stop the motor. If the LSP input is set to low for a longer time, at its reach, the drive is poweredOFF. © Technosoft 2006 157 TML_LIB_LabVIEW – User Manual © Technosoft 2006 158 TML_LIB_LabVIEW – User Manual 4.18 Example 18. Jog at a speed computed from an A/D signal, until a digital input is reset This example implements a jogging movement, with the jogging speed computed from the value read to an A/D channel input of the drive. At start, the program reads the A/D channel value, and stores it into the drive memory, as the offset on that channel. Then, it continuously read the A/D input and set the reference jogging speed proportional with the difference between the actual A/D input and the initial offset value. The motion continues until a digital input of the drive is set to low. Run the application. Change the value of the AD5 channel in order to modify the speed reference value. Set the status of the digital input port IN#37 to low, in order to stop the motion. © Technosoft 2006 159 TML_LIB_LabVIEW – User Manual © Technosoft 2006 160 TML_LIB_LabVIEW – User Manual 4.19 Example 19. Speed control, with drive interrogation / setup of TML speed parameters This example implements a jogging movement with two levels of speed reference. The program directly reads the TML speed reference and measured values, and decides the moments when to change the speed reference. The change is done also directly at the level of TML variables into the drive memory. The VI front panel allows you to setup the parameters of the speed profile. © Technosoft 2006 161 TML_LIB_LabVIEW – User Manual © Technosoft 2006 162 TML_LIB_LabVIEW – User Manual 4.20 Example 20. Setup positioning motion, using tables stored into drive memory This example uses information locally stored in the drive internal memory, in order to set up motion parameters. Initially, the program stores 2 tables containing different values for reference positions. Then, as an example of using this information, it reads the value of an A/D channel of the drive and, based on the read value, selects one of the tables. The selected table is read from memory, and the motion is imposed based on a value read from that table at an internal location where the reference is stored. Remarks: 1. The tables’ write operation should be done only once if the tables are stored into the EEPROM memory of the drive 2. Be careful when selecting the tables’ memory location, as writing at incorrect addresses can affect the correct operation of the drive. Change the AD5 channel level, in order to set a value that will choose which element to extract from the memory buffer. Then run the application. The motor will start a position profile with a position reference value according to the element extracted from the memory buffer. © Technosoft 2006 163 TML_LIB_LabVIEW – User Manual © Technosoft 2006 164 TML_LIB_LabVIEW – User Manual 4.21 Example 21. Setting the Digital External motion mode This example programs the drive to operate with external digital reference. The external position reference is computed from pulse & direction signals. Run the application. While the application is running, apply pulses to the ‘Pulse’ input of the drive (IN#38). Set the ‘Direction’ input (IN#37) to low or high level, in order to change motion direction. Remark: For this example you have to setup the drive to read the digital external reference from pulse & direction inputs. © Technosoft 2006 165 TML_LIB_LabVIEW – User Manual © Technosoft 2006 166 TML_LIB_LabVIEW – User Manual 4.22 Example 22. Test the voltage mode, with event on voltage reference This example activates the test voltage mode on a drive. A variable voltage vector is generated on motor phases, with prescribed increment and maximum value. For AC motor configurations, the voltage vector can also be rotated, with a prescribed initial and increment angle. Setup the maximum voltage and the voltage increment parameters. If the drive controls an AC motor, set the Theta0, Dtheta parameters, else set them to 0. Then run the application. © Technosoft 2006 167 TML_LIB_LabVIEW – User Manual © Technosoft 2006 168 TML_LIB_LabVIEW – User Manual 4.23 Example 23. Test torque mode, with event on torque reference This example activates the test torque mode on a drive. A variable current vector is generated on motor phases, with prescribed increment and maximum value. For AC motor configurations, the current vector can also be rotated, with a prescribed initial and increment angle. Setup the maximum torque and the torque increment parameters. If the drive controls an AC motor, set the Theta0, Dtheta parameters, else set them to 0. Then run the application. © Technosoft 2006 169 TML_LIB_LabVIEW – User Manual © Technosoft 2006 170 TML_LIB_LabVIEW – User Manual 4.24 Example 24. Profiled positioning and speed movement, with event test from PC side This example starts a profiled positioning, and performs testing of motion complete event by drive interrogation from the PC. It also checks if the position value does not exceed some critical reverse value. Once the positioning is completed, the motor begins a speed profile movement. If an error has occurred during positioning (i.e., a wrong position value is reached, instead of a motion complete event), the motor is stopped. Such an approach can be very useful in order to avoid entering an infinite waiting loop. All eventrelated TML_LIB functions can be set to wait until the programmed event occurs. If the event does not occur, due to an error, then the PC program will not return any longer from the event function, and will be blocked. If such a case appears, use the approach from this example instead, i.e. program an event without waiting for it to occur inside the event programming function. Instead, check the event using the TS_CheckEvent function, as well as perhaps other drive variables, etc. Thus, you can decide if an error has occurred, and the PC program will not be blocked anymore. The VI front panel allows you to set the parameters for positioning profile and speed profile. © Technosoft 2006 171 TML_LIB_LabVIEW – User Manual © Technosoft 2006 172 TML_LIB_LabVIEW – User Manual 4.25 Example 25. Movement as defined in an external file containing TML source code This example opens an external TML source code file, compile each instruction and send it online to the drive. Such an approach can be very useful in order to send a fixed sequence of several TML instructions, eventually implementing some specific functionality. The application requires a file containing valid TML source code. For this example you can use the sample file, Ex25TML.txt, provided with the library. The file is installed in the sub-directory Example Files of the TML_LIB_LabView installation directory. © Technosoft 2006 173 TML_LIB_LabVIEW – User Manual © Technosoft 2006 174 TML_LIB_LabVIEW – User Manual 4.26 Example 26. Positioning command to a group of axes This example shows how to send commands to a group of drives. The example programs a group of drives to execute a relative positioning. The group has two drives with Axis ID = 1 respectively Axis ID = 2 and are connected in a CAN-bus network. The drive with Axis ID = 1 is connected to PC via RS232 link. The VI front panel allows you to setup the parameters of the position profile. © Technosoft 2006 175 TML_LIB_LabVIEW – User Manual © Technosoft 2006 176 TML_LIB_LabVIEW – User Manual 4.27 Example 27. Jogging motion until the index capture is detected, then position on index This example programs an axis to move with a jog speed until index capture is detected. When the index input transition is detected the motor is stopped and then positioned to the captured position. If the capture index is not detected and the position limit is reached the motor is stopped. Power on the drive, modify the speed profile parameter in the VI dialog, rotate manually the motor shaft, then run the application. © Technosoft 2006 177 TML_LIB_LabVIEW – User Manual © Technosoft 2006 178 TML_LIB_LabVIEW – User Manual 4.28 Example 28. Speed jogging until home found, position to home, and set position to zero This example can be used to detect the system home position and to set the absolute position to 0 at the home point. It moves the motor at constant speed until the home capture is detected. Then the motor is positioned at the home position and the absolute and the reference position values are reset. First modify the speed profile parameter, and then run the application. While the application is running, set to low the IN#38 digital input in order to generate the home position capture. © Technosoft 2006 179 TML_LIB_LabVIEW – User Manual © Technosoft 2006 180 TML_LIB_LabVIEW – User Manual 4.29 Example 29. Download a COFF format file & send a positioning command on-line This example can be used to download a COFF format file containing a TML application generated from EasyMotion Studio to the drive. This allows you to distribute the intelligence between the PC and the drives/motors in complex multi-axis applications. Thus, instead of trying to command each step of an axis movement, you can program the drives/motors using TML to execute complex tasks and inform the master when these are done. The application requires a COFF file containing valid TML code. For this example you can use the sample file, Ex29RAM.out, provided with the library. The file is installed in the sub-directory Example Files of the TML_LIB_LabView installation directory. © Technosoft 2006 181 TML_LIB_LabVIEW – User Manual © Technosoft 2006 182 TML_LIB_LabVIEW – User Manual 4.30 Example 30. Download a COFF format file, then call TML functions The example downloads a COFF format file (*.out) in the drive memory, then execute the TML code included in the downloaded code. The COFF file is generated with EasyMotion Studio based on a TML application. The addresses and the names of the functions are listed in the variables.cfg . The example first downloads the *.out file containing this code and then, based on the status of a digital input port – selects which function to execute, and launches it using the function TS_CALL. Note that, when you call a function stored in the drive memory, it executes until a RETurn TML instruction is found. At that moment, the drive enters the waiting loop executed prior to the launch of the CALL command. Meanwhile, any command sent on-line from the PC will have a higher execution priority. © Technosoft 2006 183 TML_LIB_LabVIEW – User Manual © Technosoft 2006 184 TML_LIB_LabVIEW – User Manual 4.31 Example 31. Set up the Master and Slave Gearing Mode; use the drives in gearing mode This example programs the drive with Axis ID = 2 as master and the drive with Axis ID = 1 as slave in electronic gearing mode. It initializes the master and the slave with the appropriate parameters, and then it starts a motion on the master. At the end of the gearing mode operation, it disables both the master and the slave from this operation mode. The VI front panel allows you to set for the master drive the parameters of the speed profile and the gear ratio for the slave drive. © Technosoft 2006 185 TML_LIB_LabVIEW – User Manual © Technosoft 2006 186 TML_LIB_LabVIEW – User Manual 4.32 Example 32. Set up Master and Slave in electronic cam Mode; use the drives in cam mode This example shows how to set up the electronic cam mode on the master, as well as on the slave axes, in a multiple-axis structure. It initializes the master and the slave with the appropriate parameters. It also downloads an electronic cam table file on the slave axis drive. Then it starts a motion on the master. At the end of the electronic cam mode operation, it disables both the master and the slave from this operation mode. © Technosoft 2006 187 TML_LIB_LabVIEW – User Manual The VI front panel allows to set the for the master axis the parameters of the position profile and to select the for slave axis the load address and the run address for the cam table. © Technosoft 2006 188 TML_LIB_LabVIEW – User Manual 4.33 Example 33. Usage of data logger to upload real-time stored data from the drive This example shows how to setup the data logger on a drive, to start data logging, check its end and upload the logged data from the drive to the PC. © Technosoft 2006 189 TML_LIB_LabVIEW – User Manual © Technosoft 2006 190 TML_LIB_LabVIEW – User Manual 4.34 Example 34. Homing procedures based on pre-stored TML sequences on the drive This example shows you how to execute a homing motion, based on the existence on the drive of a specific motion sequence containing the TML code needed to implement the homing. The search for the home position can be done in numerous ways. In order to offer maximum flexibility, the TML does not impose the homing procedures but lets you define your own, according with your application needs. Basically a homing procedure is a TML function and by calling it you start executing the homing procedure. The call must be done using the function TS_CancelableCALL_Label. This command offers the possibility to abort at any moment the homing sequence execution (with function TS_Abort). Therefore, if the homing procedure can’t find the home position, you have the option to cancel it. During the execution of a homing procedure bit 8 of Status Register Low part is set. Hence you can find when a homing sequence ends, either by monitoring the bit 8 from SRL or by programming the drive/motor to send a message to your host when the bit changes. As long as a homing sequence is in execution, you should not start another one. If this happens, the last homing is aborted and a warning is generated by setting bit 7 from SRL Remark: In motion programming tools like EasyMotion Studio, Technosoft provides for each intelligent drive/motor a collection of up to 32 homing procedures. These are predefined TML functions, which you may call after setting the homing parameters. You may use any of these homing procedures as they are, or use them as a starting point for your own homing routines. Before using any homing method from the TML_LIB environment you need to perform the following steps: • • • • • Create in EasyMotion Studio a project for your drive/motor Setup the drive/motor and download the setup table. After the download reset the drive/motor to activate Select Homing Modes view. In this view you can see all the homing procedures defined for your drive/motor, together with a short description of how it works. In order to select a homing procedure, check its associated button. You may choose more then homing procedure, if you intend to use execute different homing operations in the same application. Download the homing procedure with menu command Application | Motion | Download Program Generate the configuration setup for TML_LIB with menu command Application | Export to TML_LIB You are now prepared to build your PC application, which will call one of the homing methods from the drive memory. The idea is that you’ll set up, from the PC, some of the parameters needed during the homing procedure, then you’ll call one of the homing functions stored on the drive, and eventually you’ll test the status of the homing process until it will be finished. © Technosoft 2006 191 TML_LIB_LabVIEW – User Manual © Technosoft 2006 192 TML_LIB_LabVIEW – User Manual © Technosoft 2006 193 TML_LIB_LabVIEW – User Manual 4.35 Example 35. Positioning with S-Curve profile for speed; speed jogging The example shows how to program a relative position followed by an absolute positioning. The speed has an S-Curve shape for both motions. The VI front panel allows you to set the parameters for the relative and absolute positioning. © Technosoft 2006 194 TML_LIB_LabVIEW – User Manual © Technosoft 2006 195 TML_LIB_LabVIEW – User Manual 4.36 Example 36. Reset FAULT state The example shows how to restore the drive normal operation from FAULT state. The drive is programmed to do a relative positioning. The drive enters in FAULT state when you block the motor shaft during the motion. In the FAULT state: • The drive/motor is in AXISOFF with the control loops and the power stage deactivated • Ready and error outputs (if present) are set to the not ready level, respectively to the error active level. When available, ready greed led is turned off and error red led is turned on The FAULT state is reset when you press a key; the drive power stage remains disabled. The VI front panel allows you to Run the example and block the motor shaft to trigger the Control error protection and the FAULT status. © Technosoft 2006 196 TML_LIB_LabVIEW – User Manual © Technosoft 2006 197 TML_LIB_LabVIEW – User Manual 4.37 Example 37. Read multiple inputs/set multiple outputs The example shows how to read multiple outputs from the drive. The program remains in a loop until one of the inputs changes its status moment when the motor begins an absolute positioning. When the motion is complete the state of several outputs is set. © Technosoft 2006 198 TML_LIB_LabVIEW – User Manual © Technosoft 2006 199 TML_LIB_LabVIEW – User Manual 4.38 Example 38. Positioning when an event on home input occurs The example shows how to program a positioning triggered by an event on home input. The event is set when the home input goes low. © Technosoft 2006 200 TML_LIB_LabVIEW – User Manual © Technosoft 2006 201 TML_LIB_LabVIEW – User Manual 4.39 Example 39. Write/read in the drive memory The example writes/reads a data block in the drive EEPROM memory. The write operation is verified with a checksum. After the homing procedure the drive makes a positioning with the position command read from the EEPROM. © Technosoft 2006 202 TML_LIB_LabVIEW – User Manual © Technosoft 2006 203 TML_LIB_LabVIEW – User Manual 4.40 Example 40. View binary code of a TML command The example returns the binary code of a TML command MODE PP. © Technosoft 2006 204 TML_LIB_LabVIEW – User Manual 4.41 Example 41. Speed jog and positioning with direction change The example programs a speed profile followed by a position profile. The drive switches from speed control to position control when the event function of reference speed is set. When the event set function of motor position is triggered the motion is stopped and restarted in the opposite direction with a speed profile. The motion ends when the event set function of load speed is set. © Technosoft 2006 205 TML_LIB_LabVIEW – User Manual © Technosoft 2006 206 TML_LIB_LabVIEW – User Manual This page is empty © Technosoft 2006 207 TML_LIB_LabVIEW – User Manual