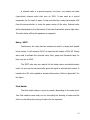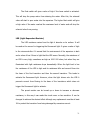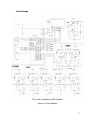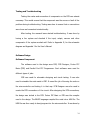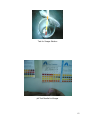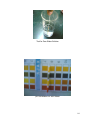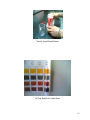
1
Microcontroller Based Self-Maintained Aquarium
Using PIC16F877 with Sensors
By
Von Arvie A. Barbosa
Christopher B. Barro
Joe Mark P. Esteban
Jan Michael E. Intia
John Alex G. Villegas
A Design Report Submitted to the School of Electrical Engineering,
Electronics and Communications Engineering, and Computer
Engineering in Partial Fulfillment of the Requirements for the Degree
Bachelor of Science in Computer Engineering
Mapua Institute of Technology
July 2008
ii
ACKNOWLEDGEMENT
It is our desire to express our gratitude to all those who extended
assistance and shared knowledge on our design prototype.
Thank you Engr. Noel B. Linsangan, our instructor and Engr. Jocelyn
Villaverde our adviser, for giving us the knowledge and idea to build our selfmaintained aquarium and for continuously guiding us to reach our objectives,
and goals as well as to our friends, for their warm accommodation and support
in making this design possible.
Our team wholeheartedly dedicates this project to our beloved parents,
for their untiring guidance, support and financial assistance in making this
project possible for us. We are also grateful for all their sacrifices and for their
relentless pursuit to equip use with the best possible tools to improve our lives.
Most of all, we thank the Almighty God, for making everything in our lives
possible and for all the blessings that He showered upon us.
Von Arvie A. Barbosa
Christopher B. Barro
Joe Mark P. Esteban
Jan Michael E. Intia
John Alex G. Villegas
iii
TABLE OF CONTENTS
TITLE PAGE
i
APPROVAL SHEET
ii
ACKNOWLEDGEMENT
iii
TABLE OF CONTENTS
iv
LIST OF TABLES
vi
LIST OF FIGURES
vii
ABSTRACT
viii
Chapter 1: INTRODUCTION AND REVIEW OF RELATED LITERATURE
1
Research Setting
Review of Related Literature and Related Studies
Conceptual Framework
Statement of the Problem
The Objective of the Study
The Significance of the Study
The Scope and Delimitation
Definition of Terms
Chapter 2: METHODS AND PROCEDURES
Design Procedure (Actual Design)
List of Materials
Hardware Design
Circuit Design
Software Design
System Flowchart
1
2
17
19
19
20
20
23
27
27
27
27
32
34
35
Chapter 3: PRESENTATION AND INTERPRETATION OF DATA
38
Chapter 4: CONCLUSION AND RECOMMENDATION
48
Bibliography
52
iv
Appendices
APPENDIX
APPENDIX
APPENDIX
APPENDIX
APPENDIX
APPENDIX
APPENDIX
APPENDIX
APPENDIX
APPENDIX
53
A – PIC16F877 Datasheet
B – BA6219B Datasheet
C – HD44780 LCD Datasheet
D – 7805 Voltage Regulator Data Sheet
E – 4MHz Crystal Oscillator Data Sheet
F – SPDT Relay Switch Data Sheet
G – Schematic Diagram
H – Source Code
I – User’s Manual
J – pH paper representation of values
54
57
60
63
65
66
67
68
79
82
v
LIST OF TABLES
Table
Table
Table
Table
Table
Table
Table
Table
Table
Table
Table
Table
Table
1: List of Materials
2: Accuracy Test Results of Filtration System
3: Reliability Test Results of Filtration System
4: Accuracy Test Results of Feeding System
5: Reliability Test Results of Feeding System
6: Accuracy Test Results of pH Meter
7: Reliability Test Results of Water pH Meter
8: Accuracy Test Results of Water Replacement System
9: Reliability Test Results of Water Replacement System
10: Accuracy Test Results of Dechlorination System
11: Reliability Test Results of Dechlorination System
12: Accuracy Test Results of Day Counter Policy
13: Reliability Test Results of Day Counter Policy
28
39
40
41
41
42
43
44
45
45
45
46
47
vi
LIST OF FIGURES
Figure
Figure
Figure
Figure
1:
2:
3:
4:
Conceptual Framework
Process Flowchart
Circuit Diagram
System Flowchart
17
26
32
35
vii
ABSTRACT
The design in this project showcases the implementation of a
microcontroller based self-maintained aquarium. The aquarium, consisting of the
microcontroller, LCD display, solenoid valve, relay, float switch, fluorescent lamp,
filter, dechlorination liquid, and the LDR (Light Dependant Resistor), performed
the following functions in the feeding, lighting, filtration, water replacement and
dechlorination systems in the aquarium. Water Replacement depends on the
alkalinity or acidity of the aquarium’s water which is measured by the pH meter.
The design incorporates an energy supply that powers up the entire
system of the aquarium. The system operates with the aid of the microcontroller,
relay, solenoid valve and its sensors that help control the whole functions of the
system. The design will also benefit the aquarist by maintaining the cleanliness
of the aquarium and the feeding system of the fishes.
Keywords: Water replacement and dechlorination system, filtration system,
microcontroller, pH meter, relay
viii
Chapter 1
DESIGN BACKGROUND AND INTRODUCTION
I.
The Research Setting or Frame of Reference
Maintaining a fish tank is very tiresome and costly. Keeping it clean is a
major problem for aquarium owners because the water should be replaced
periodically to keep it habitable for the marine creatures. Feeding is another
problem especially for those who are busy with their work and find no time to
feed their pets. Fishes require regular feeding or else they will die of starvation.
The aquarium is a living environment and therefore, some natural
processes take place namely: Fishes excrete, plant leaves decay and uneaten
foods rot. All these processes contribute to water contamination and because
the aquarium is not affected by the cleaning effects of currents, flow and rain
present in the wild, the water can quickly become turbid, harbor disease and
poison the fish. These waste products also release ammonia. It is a known fact
that even a small amount of this chemical will kill the fish.
There are effective ways of cleaning the water inside the aquarium. Firstly,
test the acidity and alkalinity. Secondly, if it is acidic or basic, a part of the water
should be gradually replaced because replacing all of the water at any point in
time will change the water chemistry which will be stressful to the fish. Thirdly,
how often and how much are basic factors to be considered in changing the
water. It should depend on the waste load in tank size, and the sensitivity of the
1
fish. Monitoring the water quality with water tests is the best way to decide how
often and how much water is to be replaced.
Finally, having a water filter will also solve the problem but keeping it
always activated will disrupt the marine creatures. The vibration from the filter
motor will stress the fish.
II.
Review of Related Literature and Studies
Automation of Aquarium Systems
Several studies and literature were published regarding the automation of
aquarium systems. An interesting article in the Fish Flash, entitled “Automated
Water Changing”, written by Bob Krampetz, explains how to construct a
siphon/overflow water change system that does not involve drilling tanks. The
author provided illustrations and a step-by-step procedure on how to implement
a water replacement system.
He used PVC and drip irrigation with valve to
control the flow of water.
Equipment called “super feeder” is made to feed the fishes automatically.
It has a base model that holds 3/4 cup of flakes or pellets, which can be
increased with its supplied 2-cup hopper extension. It also has a special
"Moisture Trap" funnel which effectively keeps excessive moisture away from the
feeder's food reservoir as well as providing a means of distributing the food
without spills. The feeder comes with a low voltage power adapter that can be
plugged into any 24-Hr lamp timer, a digital timer (for precise timing), or even a
home automation power module. Some people can operate it with a remote
2
control to manually feed the fish. It has its own internal electronic adjustable
feed timer and volume adjustment to accurately adjust the amount of food you
want to dispense per cycle (it drops the food all at once from a split second to
over a minute for the amount of time you selected). The proponents believed
that this equipment can also be used in the feeding system and in customizing
the feeder box.
The Importance of Using pH Tests To Monitor Water Conditions
According to Kordon LLC, formerly Novalek Inc. formed by biological
scientists in the California Academy of Sciences and Steinhart Aquarium, San
Francisco, pH test is important for tropical marine conditions. The pH for tropical
marine aquariums should be kept stable at 8.2-8.3. The most likely deviation in
pH is going to be by the water becoming more acid as the aquarium water ages.
To stabilize the pH, the aquarist should use water changes and/or pH buffers in
the water to maintain the pH at 8.2-8.3.
For freshwater fishes, it is best to aim for a stable pH near neutral of
about 6.8-7.2. Most freshwater fishes are raised, not wild caught, and are
already adapted to this level of pH. What has become known over time, despite
what their natural pH water conditions might have been, is that it is best to keep
the pH stable, because even one tenth of a pH change is a doubling of pH on its
logarithmic scale. This is a substantial change in acidity/alkalinity for the fish
3
and invertebrates in that water. As mentioned for marine aquariums, the proper
pH can be maintained through water changes and/or using buffers that stabilize
the pH, such as for freshwater at 7.0.
The researchers asked Professor Ariziel Ruth D. Marquez, a professor of
Mapua Institute of Technology School of Chemistry and Chemical Engineering
and she responded that the “ideal pH level of the water for the fishes to live is
6.6-7.3”. When Professor Josephine A. Ng, a Chemical Engineer, was asked by
the researchers about the accuracy of the pH level, she attested that the pH
level stated was correct. In addition, a series of tests were made to prove the
statement. Regular testing and monitoring the pH of water is highly
recommended to ensure that the water inside the aquarium will not harm the
marine creatures.
How water becomes Acidic or Alkaline
According to Brian Malinconico in his article from Aquarium-Wiki, Acidic or
Alkaline is a term used by aquarists which refers to water conditions and its pH
value. He states that water is said to be alkaline if it contains hydroxyl ions (OH).
Hence, water with a pH higher than 7 is said to be an alkaline. Alkaline water can
be high in calcium or magnesium ions. In a planted aquarium, the plants will give
off carbon dioxide when the lights are turned off. This will make the water with
less alkaline. The opposite of alkaline is acid. Some species of fish have difficulty
breeding in alkaline water even though they can live quite happily in acidic
4
water. Neon tetras and Cardinal tetras are the most commonly known examples
of acidic solutions. Typical alkaline living species of fish are Mollies and Platies.
Keeping aquatic animals in the wrong side of their normal pH level will greatly
shorten their average life expectancy. For example, keeping Neon tetras in a pH
of greater than 7 will reduce their lifespan from an average of 20 years to only 2
or 3.
Change of pH level
The Marine Environment Protection Committee in its article, “Harmful
Aquatic Organisms in Ballast Water”, states that each species of fish has its own
narrow range of pH preference and levels and outside of this range will cause
health problems. For example, koi prefers a range between 7 and 8.5, while
some tropical fishes prefer water that is slightly acidic. There are several ways
that pH can affect fish health. High acidity or alkalinity can cause direct physical
damage to skin, gills and eyes. Prolonged exposure to sub-lethal pH levels can
cause stress, increase mucus production and encourage epithelial hyperplasia
(thickening of the skin or gill epithelia) with sometimes-fatal consequences. Fish
also have to maintain their own constant internal pH. Even small fluctuations of
blood pH can prove fatal. Extreme external or water pH can influence and affect
blood pH resulting in either acidosis or alkalosis of the blood. The other
consideration is diurnal shifts in pH, mainly as a consequence of photosynthesis.
5
Large fluctuations (even though they may still be within the preferred range) are
likely to be stressful and damaging to health of the fishes.
Effects of pH to the fish
According to Brooklands V.I.P Pet Products located in New Plymouth, in
the province of Taranaki, New Zealand, pH-level in water is the measure of how
much hydrogen is found in the water. Hydrogen is a chemical that is found all
over the earth. The pH is a measure of the concentration of hydrogen ions in a
solution or “the power of Hydrogen”
The pH scale ranges from 1(acidic) to 14 (basic). A change of one pH unit
means a tenfold change in concentration. Some fish can tolerate a range of 5 to
9 pH. Other fish cannot tolerate a change in one pH unit.
Effects of pH on aquatic organisms:
-
Affects breathing
-
Cause stress, and diseases
-
Affects the reproductive cycle of fish
-
Affects the nitrogen cycle
Water replacement
In an article “Aquarium Basics: Partial Water Changes” by Haname, the
writer states that aquarist should gradually replace the water if it is already acidic
or basic. It states that the most frequent and most fatal mistake made by
6
beginners is to think that they need to "clean-up" the tank every now and then.
It means to scoop up all the fish into a bucket, remove everything from the tank,
give it all a good scrubbing, assemble everything back, and dump the fish back
into the aquarium. If this happens the fish will be stressed and might die due to
lack of oxygen.
Haname said that the good and consistent water quality is the single most
important element of a healthy aquarium. To maintain water quality, a regular
schedule of partial water changes is essential in most aquarium setups. Partial
water change is so important (as opposed to total "clean-ups"), because it
involves the concepts of Basic Aquarium Water Parameters and the Nitrogen
Cycle.
The researchers asked Mr. Amador Domingo Jr., an aquarist who has
been constantly growing different kinds of fishes regarding the partial change of
water based on a regular schedule. He said that “for an average tank, water
should be changed ¼ of the total volume of water in 24 hours”.
This was
proven by a series of tests that were conducted on the design.
Basic Aquarium Water Parameters
Scott Charles in his article “Basic Aquarium Water Parameters”, identified
the basic parameters. 1.) The pH (Power of Hydrogen) is the measurement of
hydrogen ions. Increased hydrogen ions (less bonding) results in a drop of the
pH (more acidic water), while a decrease results in a pH rise. The pH is
measured on a scale from 0-14. Changes in pH are common causes of fish
7
fatalities. Fish can adapt to most pH levels, if not broadly out of range, but they
don't adapt well to bouncing values. In other words, a change in pH from 7 to 6
means 10 times more acidic water. A further drop to a pH of 5 equals 100 times
more acidic water. If the aquarist wants to adjust the pH in the tank, he has to
consider the carbonate hardness. The pH in harder water is more difficult to
adjust because it bounces back. Keep in mind to change it slowly as it causes a
lot of stress to the fish. 2.) General Hardness (GH) primarily measures calcium
and magnesium ions. It is important for breeders (some species require very soft
water, which is hard to maintain, requiring constant monitoring for maximum
success). Other than choosing the right fish for the existing conditions, the GH is
generally not all that important for the average hobbyist. 3.) Carbonate Hardness
(kH) measures dissolved bicarbonate and carbonate ions. They are commonly
referred to as the buffering capacity. The kH determines the pH stability and is
therefore, very important. The more bond form, the higher the pH. Lesser
carbonate ions results in a drop of pH. The kH of 70 ppm and less will initiate the
pH crash. Therefore, never attempt to adjust these values unless it is absolutely
necessary. Be sure to carefully monitor any changes in kH and pH. If the fish and
tank are thriving, it is not recommended that any adjustments be attempted. 4.)
Nitrogen compounds such as ammonia and Nitrite. Nitrates are well described in
The Nitrogen Cycle article. 5.) Water companies add chlorine or chloramines as a
disinfectant to tap water. Chlorine is less stable than chloramines and airs out in
just a few days. Some persons simply let the water age for a couple of days
8
before doing the water change, thus, airing out the chlorine. When Chloramine is
stable, it does not air out even if heavily aerated. As a mixture of ammonia and
chlorine it passes through the fish’s tissue directly into the bloodstream. In the
blood, just like nitrite, Chloramine destroys the oxygen carrying cells and causes
all fish to die within 24 hours.
The Nitrogen Cycle
In the article “Nitrogen Cycle” by Vanny Devos, Tiago Beltrão and Marcos
Avila, they stated that if the pH reading is higher than 6.8, fish create ammonia
as part of its biological processes. It is created by the decaying materials in the
tank like uneaten food and dead plants. Ammonia in an aquarium has no place
to go but into the water. It is a highly toxic chemical even in very small quantity.
Bacteria is an aerobic creatures, which needs oxygen to survive. A group of
bacteria known as nitrosonomas, break down the ammonia into nitrites.
Similarly, nitrites are also lethal in small amounts, but not as small as ammonia
and are also broken down by bacteria. This group of bacteria, known as
nitrobacters, also requires oxygen to do its work. The nitrites get broken down to
nitrates. Nitrates are not lethal except in extremely large amounts. There are
only a few ways to regulate the amount of nitrate. Plants remove nitrate by
using it as food. There is a type of bacteria (anaerobic) that will consume nitrate,
but oxygen drives them away, and large amount of surface area is needed to be
exposed to very slow moving water in order for them to work. Large amounts of
9
these bacteria are lethal to fish. The other way of removing nitrate is through
water changes.
If the pH is lower than 6.8 and becomes stable at that point, ammonia is
not an issue because the lower pH ammonia becomes ammonium. Ammonium is
harmless except when in very large amounts. It is even easier for the plants to
use them for food, and is unusable by the nitrifying bacteria.
Dechlorinator
Based from the article entitled “Dechlorination” written by Keith Seyffarth,
a dechlorinator or chlorine remover is a chemical additive that neutralizes
chlorine. Most municipal water supplies, and many holding tanks for wells in rural
communities, farms, and ranches, are treated with chemicals to kill off any
harmful bacteria or other pathogens which may get into the water. The most
common of these chemicals are chlorine and chloramine. Though the dosages of
these chemicals in the water supply are low enough that they are not harmful to
a land animal (including people, dogs, cats, hamsters, horses, etc) or house
plant, they are high enough to cause damage to the biological filter and
eventually to the fish. For this reason, it is important to treat the water to
remove chlorine with an appropriate dechlorinator before adding it to the tank.
Good dechlorinators are dosed one drop for each 2 liters (0.5283 gallons). It is
advised to treat only the new water being added to the tank; not the entire tank
volume.
10
Dechlorinators are also generally very fast acting.These will neutralize the
chlorine in a bucket of source water in a minute or two, and will also neutralize
chloramine in five minutes. According to “Bio Research” the amount of
dechlorination that should be dispensed is 5 drops per gallon.
Fish foods
An article regarding fish foods was also taken into account. It is written by
Nathan Miller, entitled “Aquarium Fish Food Tips”. This article provides useful
information regarding the different kinds of food for the fishes. The author
grouped fish foods found in major aquarium shops into two categories: flake
foods, and freeze-dried foods. These foods provide a complete and balanced diet
for the fish and are available in a variety of forms: floating pellets, sinking
pellets, granules, tablets, and flakes.
•
Flakes are the most common type of processed foods, and are available in
a very wide variety. Some flakes are prepared to provide the nutritional
requirements of specific varieties or species of fish, and others are
designed to counter nutritional imbalances, while still others are balanced
to enhance color or growth or to encourage spawning.
•
Pellets are available in forms that are denser or lighter than water. This
allows the fish to feed in a more natural way - if the right pellet is
provided. Some fish prefer to feed off the bottom of the tank while others
11
prefer to feed off the surface. Like flakes, pellet foods are available in
many varieties, each with a specific purpose.
•
Granules are like very small, hard flakes or tiny pellets. Currently, only a
limited variety of fish food granules are available, usually prepared for the
general nutritional needs of small community fish.
•
Tablets are large flat pellets. Most tablets are of a sinking variety, but
there are some that cling or sink to the side of the aquarium so that the
aquarist may observe the fish being fed. Most of the sinking tablets
provide the nutritional needs of scavengers and bottom feeders.
Feeding according to the Weight of fish
According to Matsushima Y., goldfish has a weight average of 60g. It must
be fed only 4% of its body weight daily. An average of 12-14 pellets is sufficient
for feeding a goldfish in one day. Fishes are opportunistic feeders. When an
excess of food is offered, they will produce more wastes and feces partly due to
incomplete digestion of protein. Overfed fishes are sometimes recognized by
feces trailing from their cloaca. They should be fed as much food as they could
consume in one to two minutes, and no more than three times a day. Extreme
overfeeding can be fatal that may result to bursting of the intestines. Novice fish
keepers who have newly purchased fish need to watch them carefully for a few
days, as it is important to know how much the fish will eat in a couple minutes of
time and if they do not eat they will die in 4-8 days.
12
pH meter and Litmus paper water test
According to Sandy Delisle and Perry Romanowski in their article “Litmus
Paper”, the litmus paper is used to test whether a solution is acidic or alkaline. It
is the most recognized member of chemical indicators. Litmus changes color
when exposed to an acidic or basic solution. The simple pH scale ranges from 014 with 0 being the most acidic, 7 being neutral, and 14 being the most basic or
alkaline. They are both effective at indicating whether a substance is acidic or
basic because it cannot report an exact numerical pH value. Universal indicators
or pH meters are used for this purpose. Universal indicators are composed of a
variety of materials, each changing different colors at different pH values which
allows the observer to determine more precisely where the solution in question
falls on the pH scale. Universal indicators can be impregnated onto paper and
made into pH paper or they can be used in the liquid form.
A reference color card is provided with each universal indicator that
correlates a particular color with a pH range. Generally speaking, most universal
indicators are accurate within two values on the pH scale. For example, a green
result could indicate a pH from 8-9. This means universal indicators can
determine the pH of a sample quantitatively within a certain range.
Microcontrollers
According to Brain, Microcontrollers are special purpose computers
(2000). A typical low-end microcontroller chip might have 1,000 bytes of ROM
13
and 20 bytes of RAM on the chip, along with eight I/0 pins. The characteristics
of a microcontroller are as follows:
•
Microcontrollers are "embedded" inside some other device (often a
consumer product) so that they can control the features or actions of the
product.
Another name for a microcontroller, therefore, is "embedded
controller."
•
Microcontrollers are dedicated to one task and run one specific program.
The program is stored in ROM (read-only memory) and generally does not
change.
•
Microcontrollers are often low-power devices.
A desktop computer is
almost always plugged into a wall socket and might consume 50 watts of
electricity.
A battery-operated microcontroller might consume 50
milliwatts.
•
A microcontroller has a dedicated input device and often (but not always)
has a small LED or LCD monitor for output.
A microcontroller also takes
input from the device it is controlling and controls the device by sending
signals to different components in the device.
•
A microcontroller is often small and low cost. Its components are chosen
to minimize size and to be as inexpensive as possible.
In contrast to general-purpose CPUs, microcontrollers do not have an
address bus or a data bus, because they integrate all the RAM and non-volatile
14
memory on the same chip as the CPU. Because they need fewer pins, the chip
can be placed in a much smaller, cheaper package. By integrating the memory
and other peripherals on a single chip and testing them as a unit increases the
cost of that chip, but often results in decreased net cost of the embedded system
as a whole. Even if the cost of a CPU that has integrated peripherals is slightly
more than the cost of a CPU plus external peripherals, having fewer chips
typically allows a smaller and cheaper circuit board, and reduces the labor
required to assemble and test the circuit board.
Float Switch
Based from the article in wikipidea, a float switch is a device used to
sense the level of liquid within a tank. The switch may actuate a pump, an
indicator, an alarm, or other devices.
A very common application is in sump pumps and condensate pumps
where the switch detects the rising level of liquid in the sump or tank and
energizes an electrical pump which then pumps liquid out until the level of the
liquid has been substantially reduced, at which point the pump is switched off
again. Float switches are often adjustable and can include substantial hysteresis.
That is, the switch's "turn on" point may be much higher than the "shut off"
point. This minimizes the on-off cycling of the associated pump.
Some float switches contain a two-stage switch. As liquid rises to the
trigger point of the first stage, the associated pump is activated. If the liquid will
15
continue to rise, perhaps because the pump has failed or its discharge is blocked,
the second stage will be triggered. This stage may switch off the source of the
liquid being pumped and may trigger an alarm or both.
Transformer
According from the article in wikipidea, transformers are some of the most
efficient electrical 'machines’, with some large units that can transfer 99.75% of
their input power to their output. Transformers come in a range of sizes from a
thumbnail-sized coupling transformer hidden inside a stage microphone to huge
units weighing hundreds of tons used to interconnect portions of national power
grids. All operate with the same basic principles, though a variety of designs
exist to perform specialized roles throughout home and industry.
A key application of transformers is to increase voltage before transmitting
electrical energy over long distances through wires. Most wires have resistance
and therefore, dissipate electrical energy at a rate proportional to the square of
the current through the wire. By transforming electrical power to a high-voltage
(and therefore low-current) form for transmission and back again afterwards,
transformers enable economic transmission of power over long distances.
Consequently, transformers have shaped the electricity supply industry,
permitting generation to be located remotely from points of demand. All but a
fraction of the world's electrical power has passed through a series of
transformers by the time it reaches the consumer. They are used extensively in
16
consumer electronic products to step down the supply voltage to a level suitable
for the low voltage circuits they contain. In these kind of applications, the
transformer may also act as a key safety component that electrically isolates the
end user from direct contact with the potentially lethal supply voltage.
Signal and audio transformers are used to enhance the stages of
amplifiers and to match devices such as microphones and record player
cartridges to the input impedance of amplifiers. Audio transformers allowed
telephone circuits to carry on a two-way conversation over a single pair of wires
and to couple a differential-mode signal to a ground-referenced signal, and to
isolate external cables and internal circuits.
III.
The Conceptual Framework
INPUT
PROCESS
Comparison of input time
and time set for filtering.
Input Time
Input Fish Count
Set day count
Comparison of input time
and time set for feeding.
Light sensor senses if
there is light.
Ph meter checks the pH
level of aquarium water.
Comparison if day counter
is already 14 days
OUTPUT
Activate filtering system.
Activate feeding system.
Light on/off of Fluorescent
light.
Activate water
replacement system
Pour dechlorination liquid
after water replacement.
Figure 1: Conceptual Frame Work
17
There are a lot of factors to be considered when designing a selfmaintained aquarium system such as water quality, fish populations, physical
size of the aquarium, and the kinds of fishes inside the aquarium.
Water quality is a general term that refers to several categories such as:
physical and chemical characteristics, pollutants and contaminants (toxic
chemicals, petroleum derivatives), and biological agents, like water-borne
disease organisms. Each of these categories includes a set of parameters used
to measure and describe the degree of quality of each.
Some of these
parameters may include water temperature, pH level, and dissolved oxygen.
Water quality of the aquarium affects the system in a way that it determines
whether the water needs to be filtered or replaced. Fish population may affect
water quality.
An overpopulated aquarium system may lower the dissolved
oxygen which might cause serious problems to the health of the fishes.
The physical size of the aquarium could determine the number of fishes
that could live in it. Small containers may not be healthy for certain types of
fishes and may cause overpopulation.
In addition, it is important to consider
the kinds of fishes that will stay in the aquarium because some of them have
characteristics that might cause trouble with some other inhabitants. Is is also
possible that some of these fishes may not be supported by the automatic
feeder. Refer to Figure 1 for the complete process of the system.
18
IV.
Statement of the Problem
The main problem of the design is how to maintain the cleanliness of the
aquarium and to feed the fishes automatically so that the aquarist will not be
burdened of the feeding routine.
Specifically, the study seeks to answer the following:
1. How to effectively filter the water and to dispose the solid wastes in the
water;
2. How to detect the acidity and to alkalinity of water;
3. How to drain and to replace water without hurting the fishes;
4. How will the lighting system work;
5. How to pour the dechlorination liquid after replacing water; and
6. How to feed the fish.
V.
Objective of the Design
The main objectives in the implementation of the design are: to make an
aquarium that will lessen its maintenance, to retain the clean environment of an
aquarium using advanced devices, and to automatically control the food supply
of the fishes through the use of a self designed container controlled by a dc
motor.
Specific Objectives:
In order to fulfill these objectives, this study seeks to meet the following:
19
1. Test accurately the time of filtering the water using pump motors and to
dispose its solid wastes;
2. Detect the pH level of the water using a pH sensor;
3. Drain and replace the water once the water becomes acidic or basic as
monitored by the pH sensor;
4. Have a lighting system dependent on the LDR;
5. Dispense dechlorination liquid after the water is replaced; and
6. Automatically feed the fish.
VI.
The Significance of the Design
This project will greatly benefit the fish enthusiasts by maintaining a
clean environment for the fish and by providing a safer habitat for the aquarium
creatures. It will also benefit those people who go on long trips or those who
just have no time to clean their aquarium and feed the fish because they will not
worry about the safety of their fishes.
VII.
The Scope and Delimitation
The scopes of the research design are the following:
1. Filtering the water is set to a series of exact time with 4 hours interval
although filtration lasts 2 hours. Therefore, it will take a total of 6 hrs
before the filter system will work again.
20
2. An automatic feeding machine will accompany the automatic water
filter. The automatic feeder will disperse fish food periodically. It has
a self designed container which can dispense about 6 – 7 pellets per
fish and it also dispenses food according through the number of fish
entered by the user.
3. The pH meter will read the pH level of the water and will determine if
it is neutral, acid or base. If the water is detected to be acidic or
alkalinity, the water replacement process will be initiated. Then, the
dechlorination will follow to ease the chlorine in the aquarium.
4. The motor pump will drain ¼ of the total volume of water in the
aquarium. There will be two float switches that determine the
maximum and the minimum water level. Solenoid valve will be used in
controlling the flow of the water in the hose.
5. There will be one power supply source where all the devices inside the
aquarium are plugged in. It is installed at the back of the aquarium.
6. There will be a fluorescent lamp inside the aquarium that is covered by
a stainless steel box. It will automatically turns OFF if a light sensor
detects another light coming from any direction and turns ON if it
doesn’t.
7. If within 2 weeks the pH meter does not detect the water to be too
basic or too acidic, the water will still be drained to ¼ level and be
replaced because it is recommended by aquarium users.
21
The delimitations of the design are the following:
1. The design was limited to the classification and kind of fishes suitable
inside the aquarium’s environment. The quantities of fishes that can
be put inside the aquarium were also limited so as to prevent
overpopulation that may cause problems to the health of the fishes.
Although the design is for fishkeeping, the researchers only chose one
type of fish, the goldfish because it can withstand variations in pH
much better than other fishes.
2. In terms of its automatic dechlorination system, it was limited through
a fixed number of drops that the storage container could handle. It
has to be refilled manually when empty for it to release dechlorination
liquid again. This only happens through a series of dispensing.
3. The fishes in the aquarium were limited to those pellet-eating species.
Based on the pH that is maintainable by the aquarium design, the best
type of fishes that can only be placed inside the aquarium are
freshwater fishes.
4. For filtering, the filter were activated only four times a day.
5. For the feeding of the fishes, it was limited for fishes that eat two
times a day and 12 to 14 pellets a day.
6. The design did not measure the temperature of the water which could
also be a factor in maintaining the safety of the fish in the aquarium.
22
7. The light dependent resistor (LDR) did not measure a specific value of
light intensity to be activated.
8. The dissolved oxygen level of the water was not considered.
VIII. Definition of Terms
The definition of the terms in this section was taken from wikipedia, the
free encyclopedia, http://www.wikipedia.com:
Aquarium is a glass-sided tank, bowl, or the like, in which fish or other living
aquatic animals or plants are kept.
Filter is a device used in the aquarium to block certain objects or substances
while letting others through. Filters are often used to remove harmful substances
from water.
Aquarium fish feeder is electric or electronic gadget that is designed to feed
aquarium fish at regular intervals. It is often used to feed fish when the aquarist
is on vacation or is too busy to maintain a regular feeding schedule.
Feeder is a boxlike device from which animals may eat. This device is designed
to allow a number of fish to feed simultaneously or to release a specific amount
of feed at regular intervals.
23
Photo resistor is an electronic component whose resistance decreases with
increasing incident light intensity. It can also be referred to as a light-dependent
resistor (LDR), or photoconductor. It is made of a high resistance semiconductor.
If the light falling on the device is of high frequency, photons absorbed by the
semiconductor give electrons enough energy to jump into the conduction band.
The resulting free electron (and its hole partner) conducts electricity, thereby,
lowering resistance.
Sensor is a mechanical device sensitive to light, temperature, radiation level, or
the like, that transmits a signal to a measuring or control instrument. It is a
device which measures a physical quantity and converts it into a signal which can
be read by an observer or by an instrument.
Relay is an electrical switch that opens and closes under the control of another
electrical circuit. In the original form, the switch is operated by an electromagnet
to open or close one or many sets of contacts. Since relay can control an output
circuit of higher power than the input circuit, it can be considered an electrical
amplifier.
Microcontroller or MCU or µC is a computer-on-a-chip type of microprocessor
emphasizing high integration, low power consumption, self-sufficiency and costeffectiveness, in contrast to a general-purpose microprocessor (the kind used in
a PC). In addition to the usual arithmetic and logic elements of a general
purpose microprocessor, the microcontroller typically integrates additional
24
elements such as read-write memory for data storage, read-only memory, such
as flash for code storage, EEPROM for permanent data storage, peripheral
devices, and input/output interfaces.
PIC Microcontroller is a family of Harvard architecture microcontrollers made
by Microchip Technology, derived from the PIC1640 originally developed by
General Instrument's Microelectronics Division. The name PIC initially referred to
"Programmable Interface Controller", but shortly, thereafter, was renamed
"Programmable Intelligent Computer".
Proton PIC Basic is Software that provides a functional PIC assembly code
allowing emulation of commands available with the BASIC stamp, directly with
the PIC microcontroller, and in assembly language. The compiler accepts a
BASIC language to be compiled into a HEX file be burned into the
microcontroller.
PROTEUS ISIS is circuit simulation software designed to build and test
schematic diagrams. It is also used for PCB lay outing, circuit designing and realtime circuit simulation. Interactive peripheral models, CPU models and virtual
instruments can be employed in the designing of circuits.
25
Chapter 2
METHODOLOGY
Design Methodology
The researchers used the experimental method of research in testing the
prototype. They used experimental research for the materials needed and the
construction of the hardware for automation. They also carefully analyzed what
materials will be used or suited in the aquarium. In addition, they researched on
the sensors and other components for the controller. Figure 2 shows the Process
Flowchart of the design.
Figure 2: Process Flowchart
The research group gathered all the data needed and maximized the
materials required for the aquarium. They also researched in the internet
26
regarding the best environment needed for the maintenance of a clean and safe
aquarium and the sensors and other components needed for the hardware part
of the design.
After the first assignment, the group inquired about and found the
material to be used at Bio Research, a pet shop located on SM Mega Mall, and
other local pet shops. The researchers requested the pet shop managers to
share their expertise and knowledge on pertinent information about aquarium
fishes.
With the abovementioned components of the aquarium, the group
proceeded on how to automate and to keep the environment clean and livable
for the fish inside. They did not only inquire at Alexan and E-Gizmo for the
hardware to be used in the automation of the design but also for creating the
code and PCB making software.
Design Procedure for Actual Design
Hardware Design
List of Materials
The following lists of materials were acquired from Bio Research and local
pet shops for the aquarium components, and e-Gizmo and Alexan for the circuit
components. Refer to Table 1 for list of materials.
27
Component Name
Quantity
Aquarium
Components
Aquarium (10 gal)
Filter
Pump
Float Switch
Solenoid Valve
Holder
Flourescent Light
w/ Aluminum Casing
pH meter
Syringe
1 pc.
1 pc.
1 pc.
2 pcs.
1 pc.
2 pcs.
1 pc.
PIC16F877
BA6219B
DC Motor
LCD 4x20
Button
Relay
Solid State Relay
Crystal (4MHz)
7805
10K 1/4W Resistor
1K Resistor
220 Resistor
100K Resistor
4.7K Resistor
150 Resistor
22pF Capacitor
0.01uF Capacitor
3mm LDR
DC Socket
PCB 4x2
IC Holder (40 pins)
AC Cord
Diodes
Transformer
AC Outlet
1 pc.
4 pcs.
2 pcs.
1 pc.
4 pcs.
2 pcs.
4 pcs.
1 pc.
1 pc.
12 pcs.
8 pcs.
7 pcs.
2 pcs.
1 pc.
1 pc.
2 pcs.
1 pc.
1 pc.
1 pc.
5
1 pc.
1 pc.
15 pcs.
2 pcs.
4 pcs.
Male/Female Header
Shrinkable Tube
(2mm)
Ferric Chloride
Filter Foam
Terminal Block
19 pcs.
1 pc.
1 pc.
Main Circuit
Miscellaneous
1 meter
2 bottle
1 pc.
5 pcs
Table 1: List of Materials
28
Hardware Component
Microcontroller - PIC16F877
The PIC16F877 microcontroller was used for the main functions of the
aquarium. It controlled the activation of every function according to the program
that was coded and embedded. The output ports of the microcontroller were
connected to the functional components of the aquarium which are the: motor
pump, compact fluorescent lamp, filter, feeder and dechlorination.
The output of every function was controlled by the hard coded program
of the microcontroller. Output will also be dependent on the input of time, fish
count, and day counter that is settable by the user. Refer to Appendix A, for the
figure.
LCD - Hitachi HD44787A (4x20)
The LCD used is Hitachi HD44787A. The size 4x20 is second to the
smallest available in the market. It will be sufficient for the display of information
needed by the user. This will display the important information about the
functionalities of the aquarium like the pH value, the time, and the functions that
are currently working. For the figure, refer to Appendix C.
Solenoid Valve – 2/2 way Solenoid Valve 220 size ¼”
29
A solenoid valve is a general purpose, one input, one output, two state
(open/close) solenoid valve that runs on 220V. It was used as a control
component for the input of water. It was controlled by a relay that accepts a 6V
from the microcontroller to route the power source of the valve. Solenoid valve
will be deactivated by the float switch if the lower float switch gives a high value.
The valve starts refilling the aquarium as expected.
Relay – SPDT
Furthermore, the relay that the researchers used is a single push double
throw variety. It will accept a 6V DC of input and will output a 220V AC. Relays
were used to activate the solenoid valve, filter, pump and florescent lamp for
they only run on 220V.
The SPDT relay acts as a switch for the feeder motor and dechlorination
motor. As soon as the microcontroller gives the signal to activate the function, It
transfers the 220 volts needed to activate these motors. Refer to Appendix F for
the figure.
Float Switch
The float switch closes or opens its circuitry depending on the water level.
Two float switches were used; one for controlling the draining of water and the
other for controlling the pouring of water into the aquarium.
30
The float switch will give a value of high if the lower switch is activated.
This will stop the pump motor from draining the water. After this, the solenoid
valve will start to pour water into the aquarium. The higher float switch will give
a high value if the water reached the maximum level of water and will stop the
solenoid valve from pouring.
LDR (Light Dependant Resistor)
The LDR resistance varies from the light it absorbs on its surface. It will
be used as the sensor for triggering the fluorescent light. It gives a value of high
to the microcontroller if it sensed that the environment of the aquarium is dark
and a value of low if there is light that the LDR sense. Normally, the resistance of
an LDR is very high, sometimes as high as 1000 000 ohms, but when they are
illuminated with light resistance drops dramatically. When the light level is low
the resistance of the LDR is high and its resistance falls and current flows into
the base of the first transistor and then the second transistor. This tends to
activate the fluorescent light. However, when the light shines onto the LDR it
prevents current from flowing to the base of the transistors which does not
trigger the fluorescent light to activate.
The preset resistor can be turned up or down to increase or decrease
resistance, in this way it can make the circuit more or less sensitive. It can be
changed to achieve the desired effect although any replacement must be at least
1K to protect the transistor from being damaged by excessive current.
31
Circuit Design
The circuit is designed in ISIS software.
Figure 3: Circuit Diagram
32
Hardware Implementation
Building the circuit with a software
The circuit was designed and tested on ISIS; software was designed for
building and testing schematics. The circuit could also be used to simulate and to
test the code of tune and check if it works. And, considered the datasheet and
pin configuration of the different IC and components. Refer to Appendix B for the
reversible motor driver, Appendix D for voltage regulator, Appendix E for crystal
oscillator and Appendix F for SPDT relay switch.
Implementation on Breadboard
The implementation of the circuit on a breadboard was done to ensure the
function of the modules in the circuit to perform according to plan before
mounting it on a PCB. This was done to avoid the reiteration process of
implementing it in the PCB. Refer to Figure 3, for the complete circuit diagram.
Implementation on PCB
After testing rigorously the circuit on the breadboard, the design was
implemented on PCB. The process was done first by etching the PCB circuit,
done in PCB designer software, on the PCB, then drilled the necessary holes for
the mounting of components. Lastly, was soldering the materials on the PCB.
Refer to Figure 3, for the complete circuit diagram.
33
Testing and Troubleshooting
Testing the routes and connection of components on the PCB was utmost
necessary. This would ensure that the component was the source or fault of the
problem during troubleshooting. Testing was done to ensure that no connections
were loose and connected unintentionally.
After testing, the research team started troubleshooting. It was done by
having a live system and checked if the input, output, sensors and other
components if the system worked well. Refer to Appendix G, for the schematic
diagram and Appendix I for the User’s Manual.
Software Design
Software Component
The software used in the design were ISIS, PCB Designer, Proton PIC
Basic (PPB) and Parallel Port PIC Programmer. Such software were used for
different types of jobs:
ISIS was used for schematic designing and circuit testing. It was also
used to simulate the code made in PBP. It eased the job of burning the code on
the microcontroller and testing it in that way. PCB Designer was also used to
create the PCB connections of the circuit. After designing the PCB connections,
the design was etched in the PCB. Proton PIC Basic or PPB was the compiler
used in the design. The BASIC language compiled the code into a HEX file. The
HEX file was then ready to burn/program into the microcontroller. It was done by
34
using of Parallel Port PIC Programmer. Refer to Appendix H, for the program and
Figure 4, for the system flowchart.
System Flowchart
Figure 4: System Flowchart
35
Prototype Development
The first step on building the design was gathering the materials needed
for the hardware. The materials needed were: sensors, input buttons, output
display, microcontroller, etc. After computation of the materials needed, the
team inquired at Alexan and E-Gizmo for the availability and cost of the materials
needed.
To complete the hardware implementation, the researchers constructed
the circuit first in ISIS. After identifying the correct pins to be used in the design,
they assembled the gathered materials in a breadboard to test and simulate the
code. Putting components in a breadboard was a rigorous task. To check if the
connecting wires were properly connected, they rechecked if it was in the right
pin of the IC. Even so, it was done to make the modification early in the design.
If some circuits were weak, it was immediately fixed here to avoid the repetition
of the succeeding processes. After checking the system they proceeded to build
the PCB circuit and designed the PCB circuit in PCB designer. The next process
was etching the PCB circuit in the copper board using ferric chloride. When the
circuit emerges they drilled the holes for mounting the components onto the
board. Soldering the component was done to ensure the proper connectivity of
each component. It was necessary to test the connectivity of each component in
the circuit after soldering. If an improper solder or cold solder onto the board
were done the researchers de-soldered and soldered it again. After testing the
36
soldered components, troubleshooting the
system was
done
next. To
troubleshoot easily, they did them part by part or by modules. Later, they
troubleshoot the LCD of the system to test if it worked well. Then, the research
team tested the relays connected in the microcontroller to easily identify what
went wrong on the circuit. Refer to Appendix G, for the schematic diagram.
Parallel to the construction of the hardware was building the software or
the code that were used in the microcontroller. The researchers used the
compiler PIC Basic Pro which accepts a BASIC language that would be compiled
into a HEX file and would be burned into the microcontroller. While the
components were being mounted on the breadboard, the software can be tested
in ISIS. Refer to Appendix H, for the source code.
37
Chapter 3
PRESENTATION AND INTERPRETATION OF DATA
This chapter deals with the presentation, analysis and interpretation of
data that were obtained by the researchers while conducting a series of tests
and studies on the development of the prototype.
Test of Accuracy and Reliability
The accuracy and reliability of the design were tested by observing the
filtration,
pH
level,
automatic
feeder,
water
replacement
system
with
dechlorination liquid, and Lighting system.
In testing the accurate time of filtering, the time was set to 6:59AM for
the first test when the clock struck at 7:00AM. The filter device was triggered to
filter the water. The filtration duration was set to activate for 2 hours, therefore,
it stopped at exactly 9:00AM. The filtration of aquarium water must activate four
times a day which are stated in Table 2. The test results should verify if the
water was filtrated or not. Three actual testing days were conducted to perform
the accuracy and reliability testing of the filtration system. Table 2 below
summarizes the results of the accuracy testing.
38
Day
Time
Water
Filtrated
Filtering
Duration
1:00 – 3:00
Yes
2 hours
7:00 – 9:00
Yes
2 hours
13:00 – 15:00
Yes
2 hours
19:00 – 21:00
Yes
2 hours
1:00 – 3:00
Yes
2 hours
7:00 – 9:00
Yes
2 hours
13:00 – 15:00
Yes
2 hours
19:00 – 21:00
Yes
2 hours
1:00 – 3:00
Yes
2 hours
7:00 – 9:00
Yes
2 hours
13:00 – 15:00
Yes
2 hours
19:00 – 21:00
Yes
2 hours
1
2
3
Table 2: Accuracy Test Results of Filtration System
Table 3 summarizes the results of the reliability testing of the filtration
system. If water was filtrated from the time it started filtering the water to the
time duration configured in the microcontroller, success was indicated.
Otherwise, failure was indicated in the test.
39
Day
Test Result
1:00 – 3:00
Filtering
Duration
2 hours
7:00 – 9:00
2 hours
Successful
13:00 - 15:00
2 hours
Successful
19:00 – 21:00
2 hours
Successful
1:00 – 3:00
2 hours
Successful
7:00 – 9:00
2 hours
Successful
13:00 - 15:00
2 hours
Successful
19:00 – 21:00
2 hours
Successful
1:00 – 3:00
2 hours
Successful
7:00 – 9:00
2 hours
Successful
13:00 - 15:00
2 hours
Successful
19:00 – 21:00
2 hours
Successful
Time
Successful
1
2
3
Table 3: Reliability Test Results of Filtration System
In testing the accuracy of the automatic feeder system, the feeding time
was set after the 2nd and 4th full filtration, which was on 9:00 and 21:00
everyday. The feeder would release 6 to 7 pellets per fish and each dispense will
depend on the number of fish inputted on the system. It used pellets which
weigh 170mg each. With an average of 6 to 7 pellet drops per feeder action,
daily feeding requirement for the goldfish was adequate as stated in an article
“Feeding according to the Weight of the Fish” by Matsushima from page 12. The
40
feeder box was responsible for the dispensing of the pellets. Three actual testing
days were conducted to perform the accuracy and reliability testing of the
feeding system. Table 4 summarizes the results of the accuracy testing.
Day
Time
Feeder Action
No. of
fish
No. of
Dispensing
9:00
Open
1
1
21:00
Open
1
1
9:00
Open
3
3
21:00
Open
3
3
9:00
Open
4
4
21:00
Open
4
4
1
2
3
Table 4: Accuracy Test Results of Feeding System
Table 5 summarizes the results of the reliability testing of the feeding
system. The compared number of dispense was equal to the number of fishes
inside the aquarium, and if the dispensed feeds were dispensed on the set time,
success would be indicated. Otherwise, failure is indicated in the test.
Day
Time
Feeder
Action
Results
9:00
Open
Successful
21:00
Open
Successful
9:00
Open
Successful
21:00
Open
Successful
9:00
Open
Successful
21:00
Open
Successful
1
2
3
Table 5: Reliability Test Results of Feeding System
41
The accuracy of the pH meter was tested with the use of a litmus paper,
pH paper and sample items with different pH levels. The researchers compared
the reading of the pH sensor to the color value of the pH paper depending on
the pH level of the sample items if it was acidic, neutral or basic. One actual
testing of acidic, neutral and basic water was conducted to perform the accuracy
and reliability testing of the pH meter. According to Engr. Priscila N. Tagala,
formerly a Che-Chm faculty of the institution suggested that the sample items
were best for pH testing. Refer to Appendix J for the complete pH paper
representation of values. Table 6 summarizes the results of the accuracy testing
of the pH Meter feeding system.
Test
Number
1
2
3
items
Liquid
Sosa
Pure
Water
Reading
of pH
meter
13.5
Color of
litmus
paper
Red turns
Blue
Reading
of pH
paper
pH level
14
Basic
6.9
Purple
7
Neutral
Blue turns
3
Red
Table 6: Accuracy Test Results of pH Meter
Vinegar
3.4
Acidic
Table 7 summarizes the results of the reliability testing of the pH meter.
The researchers compared the reading of the pH meter to the color of the litmus
paper depending on the pH level of the sample items if it was acidic, neutral or
basic. Also, if the reading of the pH meter did not fluctuate or vary, success was
indicated. Otherwise, failure would be indicated in the test. Refer to Appendix J
for the complete pH paper representation of values.
42
Test
Number
items
1
Liquid
Sosa
2
Pure
Water
3
Vinegar
Reading
of pH
meter
13.5
6.9
Color
of
litmus
paper
Red
turns
Blue
Purple
Reading
of pH
paper
pH
level
Test
Results
14
Basic
Successful
7
Neutral Successful
Blue
3
Acidic
turns
Red
Table 7: Reliability Test Results of pH Meter
3.4
Successful
The accuracy of the water replacement system was tested by the actual
use of pump motor and two float switches placed inside the aquarium. It was
activated when the pH meter exceeded or went below normal the pH value,
which were 6.6 to 7.3 according to Professor Ariziel Ruth D. Marquez.
Furthermore, Mr. Amador Domingo Jr., told the researchers that the average
water to be replaced was ¼ of the total volume. The pump motor would drain ¼
of the water inside the aquarium and to make sure that it would only drain ¼ of
the water; the researchers used two float switches that acted as a level sensor.
The first sensor was at the top, while the second one was below the middle part
of the aquarium. The second level sensor should be reached by the level of the
water for the pump motor to stop. After ¼ of water was drained, the solenoid
valve would be triggered and would also allow the water to flow from the water
source to the aquarium. The first level sensor should be reached by the level of
the water for the solenoid valve to stop allowing the flow of water. Two actual
43
testing was conducted to perform the accuracy and reliability testing of the water
replacement system. Table 8 summarizes the results of Water Replacement
System. SW1 represents the float switch 1, SW2 for float switch 2, M4 for the
pump motor and M2 for the solenoid valve.
Test
Number
Starting
Water
Level
Water
Reaches
SW2
Water
Reaches
SW1
M4
Activates
M2
activates
1
High
Yes
No
No
Yes
2
Low
No
Yes
Yes
No
Table 8: Accuracy Test Results of Water Replacement System
Table 9 summarizes the results of the reliability testing of the water
replacement system. To check if the pump motor would drain water. The water
level was high until it reached the second level sensor and if the solenoid valve
allowed flowing of water. The water level was low if it reached the first level
sensor. Also, if the pump motor and solenoid valve were not activated at the
same time, success was indicated. Otherwise, failure was indicated in the test.
The syringe approximately poured 5 drops of dechlorination liquid, which was
enough for 1 gallon of water. The system could be tested if dechlorination liquid
would be dispensed from the syringe after the water replacement process. The
amount of dechlorination liquid to be poured was 5 drops for every gallon of
water replaced as stated on page 10. In this case, the water replacement system
replaced about 2 gallons of water. Thus, 10 drops o dechlorinated liquid was
released from the syringe.
44
1
Starting
Water
Level
High
Water
Reaches
SW2
Yes
Water
Reaches
SW1
No
2
Low
No
Yes
Test
Number
M4
Activates
M2
Activates
Results
No
Yes
Successful
Yes
No
Successful
Table 9: Reliability Test Results of Water Replacement System
The Dechlorination system was done by pouring dechlorination liquid from
the syringe so that the new water would be neutralized. Two actual testing was
conducted to perform the accuracy and reliability testing of the dechlorination
system. Table 10 summarizes the results of the Accuracy Test Results of
Dechlorination System of Water Replacement System. M2 represents the
solenoid valve and for the SW1 represents the float switch 1.
Test Number
Water Reaches
SW1
M2 Deactivates
1
Yes
Yes
Syringe
Activates
Yes
2
No
No
No
Table 10: Accuracy Test Results of Dechlorination System
Table 11 summarizes the results of the reliability testing of the
dechlorination system. If the dechlorination liquid will be poured after the water
replacement process and vice versa, success will be indicated. Otherwise, failure
is indicated in the test.
Yes
Volume of
dispensed
dechlorination
liquid
1 ml
Successful
No
0 ml
Successful
Test
Number
Water
reaches
SW1
M2
deactivates
Syringe
Activates
1
Yes
Yes
2
No
No
Results
Table 11: Reliability Test Results of Dechlorination System
45
The researchers did not fully depend on the pH meter checking whether
the water was still clean or not. They set a condition on the system that if the
day counter is equal to 14, the system will activate the water replacement. Table
12 summarizes the results of the Accuracy Test Results of Day Counter Policy.
Test Number
Day Count
1
1
Activate Water
replacement
No
2
2
No
3
3
No
4
4
No
5
5
No
6
6
No
7
7
No
8
8
No
9
9
No
10
10
No
11
11
No
12
12
No
13
13
No
14
14
Yes
Table 12: Accuracy Test Results of Day Counter Policy
46
Table 13 summarizes the results of the reliability testing of the pH meter
reading if it was still neutral and if the day counter had a value of 14 after the
last water replacement process took place. Also, if the day counter resets back to
zero after the water replacement process took place. Otherwise, failure was
indicated in the test. M4 represents Water Pump and M2 is for the Solenoid
Valve.
Test Number
Day count
M2 activate
after M4
1
1
2
Syringe
Activates
Results
No
No
Successful
2
No
No
Successful
3
3
No
No
Successful
4
4
No
No
Successful
5
5
No
No
Successful
6
6
No
No
Successful
7
7
No
No
Successful
8
8
No
No
Successful
9
9
No
No
Successful
10
10
No
No
Successful
11
11
No
No
Successful
12
12
No
No
Successful
13
13
No
No
Successful
14
14
Yes
Yes
Successful
Table 13: Reliability Test Results of day counter policy
47
Chapter 4
CONCLUSION AND RECOMMENDATION
CONCLUSION
The researchers developed an effective microcontroller based on self –
maintained aquarium using PIC16F877 with sensors – a device that can monitor
the status and switch motors “on” or “off” remotely through microcontroller. The
group was able to interface the microcontroller to the pH meter unit, filter unit,
automatic feeder unit, and lighting system unit, to the relays and to the manual
switches. The circuit was designed and the correct program was likewise created
to perform the desired functions based on the group’s intentions.
With the general objective of the study to develop a microcontroller based
on self – maintained aquarium, the researchers came with the conclusion based
upon the specific objectives:
1. A Filtration system ensures the disposal of solid wastes
from the aquarium depending on the set of time which
will be activated by a filter device. It filters on a duration
of 2 hours for every filter cycle which is enough to keep
the aquarium clean and also keeping the vibration from
the filter motor reduced to a minimum that caused the
fishes to be stressed.
48
2. An automatic feeder releases an amount of pellets that is
enough for the specific number of fish inside the
aquarium. The feeder is a customized feeder box.
3. A pH sensor detects the pH level of the water if it is
already acidic or basic. It is used to monitor the water if it
is clean or dirty. It will also stop monitoring the pH level
after the 1 hour interval of the water replacement process
which took place to avoid fish stress.
4. Water replacement system drains and replaces water if it
is already acidic or basic (monitored by the pH meter) so
that the fishes will have a clean water environment inside
the aquarium. This system will also be activated after 14
days of constant neutral reading of the pH meter.
5. Dechlorination system dispenses dechlorination liquid
from a syringe to neutralize the chlorine of the water. It
will be activated right after the water replacement
process is finished.
49
6. Lightning system uses LDR to detect if there is light on
the surrounding before the fluorescent lamp will turn ON
or OFF.
Through this system the user will not encounter problems in
taking care of their pet fishes if they are not in the house or at the
premises where the aquarium is located and at the same time
ensures the safety of the fishes from dying due to lack of food pellets
and too much chlorine that are bad for the fish. It will also limit
diseases for the fish because the system enables the water
replacement that cleans the aquarium, a user-friendly device, and
definitely requires less maintenance.
RECOMMENDATION
Several improvements can be added to the device to further enhance
its capabilities:
1. The addition of a wiper to the screen or glass of the aquarium so
that the dirt on the glass will be wiped out.
2. A sensor that will trigger the alarm when the storage containers of
the feeder and dechlorination is empty.
3. The security PIN can also be implemented to avoid the
child/children from changing the user’s preferences and for its
50
security purposes, a system that will enable the user to view the
activities happening in the aquarium and can be accessed online.
4. A system that will verify all the hardware components attached to
the machines are working properly.
5. Temperature sensor can also be added so that the user will be
informed about the temperature reading of his aquarium.
Temperature is also a major factor that should be considered for
the health of the fishes.
6. Different kinds of fishes that can be handled and properly taken
care of in the aquarium.
7. A slight change on the program is also possible so that the users
can input what time he/she wants to filter his/her aquarium and
the time to feed the fishes.
8. The value of the pH level is not displayed and replaced by a note
on the LCD that the pH meter is disabled because it already
detected that the water is acidic or basic.
9. A feeding system that will accurately dispense the volume of pellets
according to the volume setting defined by the user.
10. A sensor measuring the level of dissolved oxygen in the water may
also be useful to ensure the quality of living conditions of the fishes
51
BIBLIOGRAPHY
Bates, R.G. (1973). Determination of pH, Theory and Practice, 2nd ed, John
Wiley & Sons, New York, N.Y.
Donofrio, B. (2002). Convert your DMM to a pH meter. EDN Boston, Volume 47
(1), 96.
Fitzgerald, L. M. (1990). General Reading—The Marine Aquarium Reference. Sea
Frontiers, Miami, Volume 36 (1), 62.
Griffiths, Tom (2000). Understanding pH Measurement. Automated Aquarium
Systems.
Griffiths, Tom (2000). pH Measurement Thermal Characteristics. Automated
Aquarium Systems.
Griffiths, Tom (2000). Temperature Compensation of pH. Automated Aquarium
Systems.
Griffiths, Tom (2000). pH Buffer thermal Characteristics. Automated Aquarium
Systems.
Griffiths, Tom (2000). Practical Water Chemistry. Automated Aquarium Systems.
Hellebuyck, C.(2003). Programming PIC microcontrollers using PicBasic, Newnes,
Amsterdam.
Huang, H.W. (2005). PIC microcontroller: an introduction to software and
hardware interfacing, Thomson/Delmar Learning, Clifton park, New York.
Mintchell, G. A. (2000). Monterey Bay Aquarium reels in the perfect automation
solution. Automated Aquarium Systems.
Schliewen, U. (1992). Aquarium Fish. Barron’s Educational Series, Inc.,
Hauppauge, New York.
Matsushima Y. (1997). Developmental and Comparative Immunology, Volume
21, Number 1, January 1997, pp. 71-72(2). Elvesier Publishing.
Wikipedia, the free encyclopedia [online], (2001). URL: http://wikipedia.com
52
APPENDICES
53
APPENDIX A
PIC16F877 DATASHEET
54
55
56
APPENDIX B
BA6219B DATASHEET
57
58
59
APPENDIX C
HD44780 LCD DATASHEET
60
61
62
APPENDIX D
7805 VOLTAGE REGULATOR DATASHEET
63
64
APPENDIX E
4MHz CRYSTAL OSCILLATOR DATASHEET
65
APPENDIX F
SPDT RELAY SWITCH DATASHEET
66
APPENDIX G
SCHEMATIC DIAGRAM
67
APPENDIX H
SOURCE CODE
'****************************************************************
'* Name : AQUARIUM.BAS
*
'* Author : SHREK
*
'* Notice : Copyright (c) 2008 [select VIEW...EDITOR OPTIONS] *
'*
: All Rights Reserved
*
'* Date : 6/30/2008
*
'* Version : 1.0
*
'* Notes :
*
'*
:
*
'****************************************************************
Device 16F877
Declare XTAL = 4
Declare LCD_TYPE 0
Declare LCD_DTPIN PORTB.0
Declare LCD_ENPIN PORTB.5
Declare LCD_RSPIN PORTB.4
Declare LCD_INTERFACE 4
Declare LCD_LINES 4
Symbol Button1
Symbol Button2
Symbol Button3
Symbol Button4
PORTC.0
PORTC.1
PORTC.2
PORTC.3
TRISA=%000001
TRISB=%10000000
TRISC=%00001111
TRISD=%00000000
TRISE=%011
ADCON1 = 4
Dim on_screen As Bit
Dim hour
As Byte
Dim minute As Byte
Dim second As Byte
Dim settings As Byte
Dim up_minute As Byte
Dim up_hour As Byte
68
Dim x
As Byte
Dim onetime As Byte
Dim DAY_CTR As Byte
Dim H2O_rep As Byte
Dim HF1
As Bit
Dim HF2
As Bit
Dim pH_METER As Float
Dim Lamp
As Bit
Dim
Dim
Dim
Dim
Dim
Dim
Dim
Dim
Dim
Dim
Dim
Dim
FOOD_CTR As Byte
FISH
As Byte
TIME_FISH As Byte
VALVE_FLG As Byte
PUMP_FLG As Byte
pH_METER_FLG As Byte
FEEDER_FLG As Byte
BYPASS
As Byte
pHM_CTR
As Byte
TEST
As Byte
PUMP_CHK As Byte
VALVE_CHK As Byte
Dim
Dim
Dim
Vlve
fltr
pmp
Symbol
Symbol
As Bit
As Bit
As Bit
FSW1
FSW2
PORTE.0
PORTE.1
Symbol Feeder_On PORTD.0
Symbol feeder_Off PORTD.1
Symbol FILTER PORTD.2
PORTD.3
Symbol PUMP
Symbol LIGHT
PORTD.4
PORTD.5
Symbol VALVE
Symbol CHLORINE PORTD.6
69
settings = 1
on_screen = 1
x
=0
onetime
=0
HF1
=0
HF2
=0
VALVE_FLG = 0
PUMP_FLG = 0
pH_METER_FLG = 1
FEEDER_FLG = 1
pHM_CTR
=0
PUMP_CHK = 0
VALVE_CHK = 0
FISH
=0
Lamp
=0
Vlve
=0
fltr
=0
pmp
=0
DelayMS 150
hour
=0
minute = 0
second = 0
DelayMS 100
FISH = ERead 0
DAY_CTR = ERead 1
FOOD_CTR = FISH
' ---- Initialization ---- "
PORTA = 0
PORTB = 0
PORTC = 0
PORTD = 0
PORTE = 0
;----------- CUSTOM CHAR LCD ------------Print $FE,$40,$08,$04,$16,$1D,$16,$04,$08,$00
Print $FE,$48,$0E,$1F,$1F,$1F,$0E,$0A,$0E,$00
Print $FE,$50,$0E,$11,$11,$11,$0E,$0A,$0E,$00
Print $FE,$58,$02,$04,$0D,$17,$0D,$04,$02,$00
Print $FE,$60,$0E,$04,$0F,$18,$00,$08,$14,$00
70
Print $FE,$68,$15,$0E,$1B,$0A,$0E,$15,$00,$00
'-------------------------------------------------------------------------------------------------simula:
Cls
Print At 1, 1, "
MAPUA
"
Print At 2, 1, "School of EE-ECE-CoE"
Print At 3, 1, " SELF-MAINTAIN "
Print At 4, 1, "
AQUARIUM
"
DelayMS 1500
Cls
GoTo MAIN
'-------------------------------------------------------------------------------------------------getad:
DelayMS 50
ADCON0.2 = 1
DelayMS 50
Return
getx:
ADCON0 = $41
GoSub getad
pH_METER = ADRESH / 28
Return
'-------------------------------------------MAIN:
If on_screen = 1 Then GoSub TO_SCREEN
If on_screen = 1 Then GoSub GET_TIME
If Button1 = 1 Then
settings = settings + 1
Print $fe, 1
on_screen = 0
GoTo MENU_SET
EndIf
If settings = 2 And Button2 = 1 Then GoTo MENU_UUR
If settings = 2 And Button3 = 1 Then GoTo MENU_MINUUT
If settings = 3 And Button4 = 1 Then GoTo fish_counter
If settings = 4 And Button4 = 1 Then GoTo MENU_DAY_COUNTER
71
'=================================================
=================================================
=
'=================================================
=================================================
=
' -------------------------------- Activate FEEDER ------------------------------------------If hour = 9 And minute = 0 And FEEDER_FLG = 1 Then
'9:00
GoSub onfeeder
Else
If hour = 21 And minute = 0 And FEEDER_FLG = 1 Then
GoSub onfeeder
EndIf
EndIf
' --------------------------------
'21:00
Activate Light -------------------------------------------
If PORTB.7 = 1 Then
Lamp = 1
High LIGHT
Else
Lamp = 0
Low LIGHT
EndIf
' ---------------------------- Activate/Deactivate Aerator ----------------------------------If hour = 1 Or hour = 2 Then
High FILTER
fltr = 1
Else
If hour = 7 Or hour = 8 Then
High FILTER
fltr = 1
Else
If hour = 13 Or hour = 14 Then
High FILTER
fltr = 1
Else
If hour = 19 Or hour = 20 Then
High FILTER
fltr = 1
Else
Low FILTER
fltr = 0
72
EndIf
EndIf
EndIf
EndIf
' --------------------------------------
Activate pH Meter -------------------------------------
If pH_METER <= 6.5 And pH_METER_FLG = 1 Or pH_METER >= 8.1 And
pH_METER_FLG = 1 Or DAY_CTR = 14 And pH_METER_FLG = 1 Then
DAY_CTR = 0
PUMP_FLG = 1
pH_METER_FLG = 0
PUMP_CHK = 1
VALVE_CHK = 0
High PUMP
pmp = 1
EndIf
If PORTE.0 = 1 And PUMP_FLG = 1 Then
PUMP_FLG = 0
VALVE_FLG = 1
PUMP_CHK = 0
VALVE_CHK = 1
Low PUMP
High VALVE
pmp = 0
Vlve = 1
EndIf
If PORTE.1 = 1 And VALVE_FLG = 1 Then
VALVE_FLG = 0
pHM_CTR = 0
PUMP_CHK = 0
VALVE_CHK = 0
Low VALVE
Vlve = 0
GoSub onchlorine
EndIf
GoTo MAIN
End
73
'=================================================
=================================================
=
'=================================================
=================================================
=
TO_SCREEN:
GoSub getx
Print At 1,1," AQUARIUM STATUS "
Print At 2,1, " ",DEC2 hour, ":", DEC2 minute, ":", DEC2 second ," DAY
CNT=",DEC2 DAY_CTR
Print At 3,1, " pH = ",DEC2 pH_METER
Select Case Lamp
Case 0
Print At 4,1," L=",1
Case 1
Print At 4,1," L=",2
EndSelect
Select Case pH_METER
Case 0 To 6.5
Print At 3,12, " ACIDIC "
Case 6.6 To 8
Print At 3,12, " NEUTRAL "
Case 8.1 To 9
Print At 3,12, " BASE "
Case 9.1 To 10
Print At 3,12, " BASE "
EndSelect
Select Case pmp
Case 0
Print At 4,5," P=",1
Case 1
Print At 4,5," P=",2
EndSelect
Select Case Vlve
Case 0
Print At 4,10," V=",1
Case 1
Print At 4,10," V=",2
EndSelect
74
Select Case fltr
Case 0
Print At 4,15," F=",1
Case 1
Print At 4,15," F=",2
EndSelect
Return
'-------------------------------------------------------------------------------------------------MENU_SET:
Select Case settings
Case 2
",DEC2 hour, "Hr ", DEC2 minute,"Min"
Print At 2,1, "
Print At 1,1, " [Time Setting] "
'print at 3,1, "
"
DelayMS 150
Case 3
Print At 2,1, "
FISH = ",DEC2 FISH
Print At 1,1, " [FISH COUNTER] "
DelayMS 250
Case 4
Print At 2,1, " DAY COUNTER = ",DEC2 DAY_CTR
Print At 1,1, " DAY COUNTER SETTING"
DelayMS 250
Case 5
If onetime = 0 Then
onetime = 1
x=1
EndIf
Print $fe, 1
on_screen = 1
settings = 1
onetime = 0
Print $FE, $0C
DelayMS 250
End Select
DelayMS 100
GoTo MAIN
'-------------------------------------------------------------------------------------------------MENU_UUR:
If settings = 2 Then up_hour = hour
75
Inc up_hour
If up_hour >= 24 Then up_hour = 0
If settings = 2 Then hour = up_hour
GoTo MENU_SET
MENU_MINUUT:
If settings = 2 Then
Inc minute
If minute > 60 Then minute = 0
EndIf
GoTo MENU_SET
'-------------------------------------------------------------------------------------------------MENU_DAY_COUNTER:
If settings = 4 Then
Inc DAY_CTR
EWrite 1,[DAY_CTR]
EndIf
If DAY_CTR >= 31 Then
DAY_CTR = 0
EWrite 1,[DAY_CTR]
EndIf
GoTo MENU_SET
'-------------------------------------------------------------------------------------------------fish_counter:
If settings = 3 Then
Inc FISH
EWrite 0, [FISH]
If FISH > 10 Then FISH = 0
EWrite 0, [FISH]
EndIf
GoTo MENU_SET
'-------------------------------------------------------------------------------------------------GET_TIME:
second = second + 1
DelayMS 450
If second = 60 Then
minute=minute + 1
second = 0
EndIf
76
If minute = 60 Then
FEEDER_FLG = 1
pH_METER_FLG = 1
FOOD_CTR = FISH
minute=0
hour = hour + 1
EndIf
If hour=24 Then
DAY_CTR = DAY_CTR + 1
EWrite 1,[DAY_CTR]
hour = 0
minute = 0
second = 0
EndIf
Return
'-------------------------------------------------------------------------------------------------onfeeder:
If FOOD_CTR <= 0 Then
FOOD_CTR = 0
High feeder_Off
Low Feeder_On
FEEDER_FLG = 0
EndIf
FOOD_CTR = FOOD_CTR - 1
High Feeder_On
Low feeder_Off
DelayMS 1000
High feeder_Off
Low Feeder_On
DelayMS 1000
second = second + 2
Return
'-------------------------------------------------------------------------------------------------onchlorine:
High CHLORINE
77
'-------------------------------------------------------------------------------------------------onchlorine2:
DelayMS 5000
Low CHLORINE
second = second + 5
Return
'-------------------------------------------------------------------------------------------------'--------------------------------------------------------------------------------------------------
78
APPENDIX I
USER’S MANUAL
FRONT PANEL
BACK PANEL
OPERATING INSTRUCTIONS
1. Press “MODE” button
2. Set the current time setting by HOURS by pressing “HOURS”
3. Press “MODE” to confirm hours setting.
4. Set the current time setting by minutes by pressing “MINUTES”
5. Press “MODE” to confirm minutes setting.
6. Input number of fish by pressing “DAY” button
7. Press “MODE” to confirm day setting.
8. View the settings and aquarium status on the LCD display.
79
TROUBLESHOOTING
Preliminary checks:
1. Check for loose, broken cords or soldered wires.
2. Check for loosely connected cord plugs to the power.
Filtering device is not functioning
o Make sure that filter device power cord is plugged on the proper
outlet of the aquarium back panel.
o Check if the filtering device is running by touching it. If there is no
vibration, try connecting the power cord to other power outlets.
No Display on LCD
o Try restarting the system by reconnecting the power cord of the
aquarium system to the power outlet.
o Try pressing the “MODE” button.
Pump motor is not functioning
o Make sure that pump motor power cord is plugged on the proper
outlet of the aquarium back panel.
o Check if the pump motor is running by touching it. If there is no
vibration or noise, try connecting the power cord to other power
outlets.
80
Fluorescent Lamp is blinking
o Locate the LDR and adjust its location away from the lamp.
o Check for loose or broken wire connection of the LDR.
Feeder motor stops running
o Check the feeder device if it has a pellet stuck inside the container.
o Adjust the motor by pulling the lever and try to locate for stuck
pellet.
Dechlorination device does not function.
o Check the wiring of the device for loose or broken connection.
o Check if the syringe is empty. If it is empty, refill it by placing the
dechlorination liquid in a container and place the liquid near the
mouth of the syringe. Gently push the refill button inside the
aquarium system and wait until the syringe is full again.
81
APPENDIX J
pH paper representation of values
pH Paper Chart
82
Test for Vinegar Solution
pH Test Results for Vinegar
83
Test for Pure Water Solution
pH Test Results for Pure Water
84
Test for Liquid Sosa Solution
pH Test Results for Liquid Sosa
85