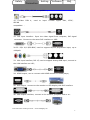
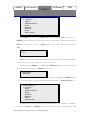
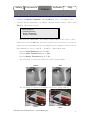
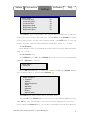
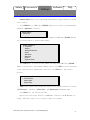
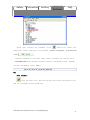
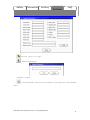
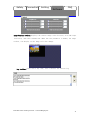
1
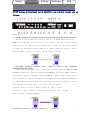
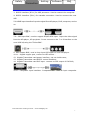
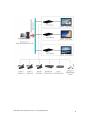
JS-VXP Series
Video Processor User’s Manual
Support JSEE
7 x 24hours support: +86-13802700271
Technical web: www.leddisplay.me Email: [email protected]
Online support: Msn: [email protected]
Skype: leddisplayme Yahoo: leddisplayme
The pictures and data in the user manual are consult only,
if there is fluctuation, according to the real object please!
Versio
n
Time
ECO
#
Responsib
le person
Description
3.0
08/09/08
0027
Publishing
JSEE
3.1
09/10/08
0036
Increased software feature descriptions
JSEE
3.2
10/05/08
0042
Added a FAQ description
JSEE
3.3
10/10/08
0064
Added function application
JSEE
LED Full Color Video processor - www.leddisplay.me
2
Connection
Setting
Software
FAQ
Safety
To avoid possible dangers, be sure to use the product in accordance with the
regulations. If you have damage to the equipment, timely contact with the customer
service staff.
Proper use of power
This product working voltage 100~230V 。 Can only use the
correct specification of the power to manipulate this
product . Correct power specifications have been marked in the
device's power connector on the left side of the label ; if
you cannot determine the correct power supply specifications,
please call our customer service personnel Division I or to
the local power company.
High risk
This product contains many have high energy storage
components, even if plug unplugged, there is still a danger.
Do not open cover
This product does not contain any user requiring
maintenance parts, therefore do not themselves carry out
maintenance of this equipment; only our company customer
service agents or our authorized maintenance engineer can
repair it. Do not put heavy pressure on cable and power cord.
Proper grounding and use fuse
This product through the power of the grounding conductor
to ground, the grounding conductor must be connected with the
land, to prevent the risk of electric shock; probe ground and
ground potential. Do not connect the ground wire of high
pressure; requires the use of suitable overcurrent and
overvoltage protection fuse.
The device away from magnets, motors, television, and
transformers.
Moisture-proof
Please use this equipment in a clean, dry environment; once
the wet this device, unplug it immediately and contact with
customer service.
LED Full Color Video processor - www.cltchina.me
1
Connection
Setting
Software
FAQ
Safety
Away from the explosive hazardous materials
In hazardous or flammable and explosive gas environment
do not operate this device, so as not to cause a fire,
explosion, or other dangerous incidents.
Waterproof and foreign bodies
Ban on liquids, metal debris or other unrelated
substances into the device, so as not to cause a fire or other
accident, or equipment failure. If you do not have to enter
the related to the substance of this device, switch off the
power immediately and unplug, clear out the material.
LED Full Color Video processor - www.cltchina.me
2
Safety
Connection
Setting
Software
FAQ
LED Video Processor: LED-Director 3 (JS-VXP series ) adopts VXP proprietary video
processing technology,top in the world, and specifically for the LED Display screen
tailored,rise LED Large screen display to a higher level , make it show a turely
charming world.
LED Video Processor LED-Director 3 (JS-VXP series ) , ensures uncommon image
processing technology, has the following typical image processing features:
� Omnipotent universal video interface signal input processing ability. Including
CVBS (composite video), S-Video ( S Terminal), YCbCr (interlaced component),
YPbPr (progressive component), RGBHV ( VGA ), DVI-I (HDMI) and SDI (standard
definition, high definition serial digital video), which HDMI , SDI does not
belong to the standard products;
� VGA 、 DVI 、 HDMI and HD/SD-SDI output (HDMI 、 SDI
does not belong to the
standard product ) ;
� Screen pauses and black screen does not exist when switching signal channel;
� Digital Adaptive 4 Line comb filter for eradication of brightness and chromaticity
of aliasing;
� Unique frame rate conversion technology enables the input signal and output signal
update rate consistent and eliminate both potential overlap;
� Image peak filtering improves the entire frequency response for brightness;
� With rapidly changing edge to edge of alternative video, image color and brightness
enhancement effect;
� Programmable brightness, contrast, chroma, and saturation to make up for the video
source defects and enhance image appearance;
� Adaptive motion compensation technology effectively eliminate aliasing, moving
images also helps to enhance video of slow motion playback, full-motion video
image noise reduction and Video Interlace processing effect;
� Automatically 3 : 2 And 2 : 2 Drop down film pattern recognition accurate frame rate
lock;
� Pixel-level compensation technology ensure that moving picture de-interlacing
after scanning and natural, without artificial cut marks;
� Industry's best image zoom processing technology, can simultaneously on both input
channels of an image for stepless zoom (you can set the image zoom is one pixel),
LED Full Color Video processor - www.leddisplay.me
3
Safety
Connection
Setting
Software
FAQ
while fully independent control of position of the two channels, as well as the
superposition of the order before and after;
� Support customers custom single-channel and customer custom dual channel mix;
� Dual channel overlays can fade image fusion effect;
� Single channel maximum output resolution 2048*1536*60Hz ;
� Full 10-bit processing, true image 1024 Level grayscale image detail ability,
excellent ;
� Movie mode NTSC Standard 3 : 2 drop-down, PAL System 2 : 2 automatic detection;
� Motion video frame lock;
� Image plus box, image, background color and customization LOGO Display;
� User-friendly keyboard and LCD Menu control;
� 60 Independent transmission Out Configuration;
� Maximum 3 Field, minimum 20 Line Video processing delay ;
� WYSIWYG PC software control, through serial communication with the device.
JS-VXP Series can connect the following input and output devices.
LED Full Color Video processor - www.leddisplay.me
4
Safety
Connection
Setting
Software
FAQ
LED Full Color Video processor - www.leddisplay.me
5
Safety
Connection
Setting
Software
FAQ
JS-VXP Series professional custom interface and control signals are as
follows.
Among them,
1、VOIP (copper RJ45),Used to connect the computer by 568B-568B twist-pair;
Through a network cable also known as line or a standard cable ends with
568B Do line standards, paying attention to both sides of the same sequence of lines
and One-to-one. Specific line sequence produced by twisted pair。Clips line sequence
is consistent, harmonized on both sides are: 1 , White, Orange,2 , Orange, 3 , White,
green, 4 , Blue, 5 , White, 6 , Green,7 , White, Brown, 8 , Brown;
2 、10/100M interface (copper RJ45). Used to connect the computer
by568B-568A twist-pair
Crossover also called back-line, line sequence according to one end 568B , End 568A
Standard arranges the good line sequence and use RJ45 Crystal head clamped. Specific
line sequence production methods used is: end 568B (i.e. White Orange, Orange, white,
green, blue, white, green, white, Brown, Brown order) do line standards unchanged at
one end and on this basis will be the eighth line of 1, 3 line and 2, 6 line reversal
location when the network cable to the line sequence becomes:
1 , White, green, 2 , Green, 3 , White, Orange, 4 , Blue, 5 , White,
6 , Orange, 7 , White, Brown, 8 , Brown (that is, the line of 1 , 3 And 2 ,
6 Bit reversed), the 568A Standards;
LED Full Color Video processor - www.leddisplay.me
6
Safety
Connection
Setting
Software
FAQ
3、RS232 interface (RJ11) for VSP processor. Used to connect the computer
4、RS232 interface (RJ11) for cascade connection. Used to connect the next
VSP。
5-6、
HDMI input interface。
Input the signal from HD player, DVD, computer, and so
on.
7-8、SDI Input BNC, used to support SD/HD SDI input。Input the video signal
from the HD player, HD projector. It can connect to the 7 or 8 interface on the
next VSP618,using the 75ohm BNC.
9、SDI loopout BNC, used to loop input SDI signal to next SDI player.
10-11、Gigabit copper port, connect to LED screen.。
12、Gigabit Transmitter card power interface, not use inside case;
13、Gigabit Transmitter card RS232 control interface;
14、Gigabit Transmitter card DVI input,connect to DVI output of SVP 618;
15-17、Composite input interface,Composite BNC. Used to input composite
LED Full Color Video processor - www.leddisplay.me
7
Safety
Connection
Setting
Software
FAQ
signal (PAL, NTSC, SECAM compatible);
18 、S-Video
SECAM
DIN
4,
used
to
input
S-Video
signal (PAL,
NTSC,
compatible);
19、 DVI input interface。 Input the video signal from computer, DVI signal
generator. Connect to the same DVI interface on VSP;
20-22、R/Pr G/Y B/Pb BNC, used to support SD/HD progressive input, up to
1080p60;
23、VGA input interface, DB-15, used to support Analog RGB input; connect to
the VGA interface on VSP;
24、HDMI output, use to connect with HDMI monitor or HDMI player;
25、DVI output,connect to the monitor or LED display with DVI interface.
26、VGA output interface, connect to the monitor, projector and so on;
LED Full Color Video processor - www.leddisplay.me
8
Safety
Connection
Setting
Software
FAQ
27、Switch and power. It must use IEC-3 power line. Always ground to avoid
electric shock.
Equipment installation
This equipment uses the standard 1U Chassis, users can use standard screws to
install it on a standard cabinets (shown). Cabinet dimensions as shown in the figure
below.
LED Full Color Video processor - www.leddisplay.me
9
Safety
Connection
Setting
Software
FAQ
Connect the power cable, press the power switch ON Location. The system is
started on the front panel LCD display Peter as technology and device name
LED-DIRECTOR words, while the device into the post condition. First time use, the
device will be in the factory default settings for processing input a composite video
signal 1 and output to the target monitor. You can use the device front panel LCD module
to track the status of the entire device.
The following figure is a schematic diagram of the device's front panel. Among
them,
1、 LCD Panel。1
2
2、 Control keys。
CV1 : Composite video input 1 , Touch this button to switch to the composite
video 1 Input; Panel LCD display is as follows:
Source Select
* CV1
CV2 : Composite video input 2 , Touch this button to switch to the composite
video 2 Input; Panel LCD display is as follows:
Source Select
* CV2
CV3 : Composite video input 2 , Touch this button to switch to the composite
video 3 Input ; Panel LCD display is as follows:
Source Select
* CV3
SVID : S Terminal of a video input, touch this button will switch to S
Terminal video input or VOIP Video input, depending on whether the add-in S
Terminal of a video signal or use VOIP Module; Panel LCD display is as follows:
Source Select
* S-Video
LED Full Color Video processor - www.leddisplay.me
10
Safety
Connection
Setting
Software
FAQ
YCbCr : Standard definition component video input, touch this button to
switch to standard definition component video input; panel LCD display is as
follows:
Source Select
* YCbCr
HDMI: HDMI Input, Touch this button to HDMI 1 à HDMI 2 à HDMI 1 Channel
switch need touch " OK "Key to confirm; touch HDMI Press Panel LCD display is
as follows:
Source Select
>HDMI 1
Source Select
>HDMI 2
�
Source Select
>HDMI 1
�
SDI : SDI Input, SD/HD compatible, Touch this button to SDI 1 � SDI 2 �
SDI 1 Channel switch need touch " OK "Key to confirm; touch SDI Press Panel LCD
display is as follows:
Source
�Select
>SDI 1
Source Select
>SDI 2
Source Select
>SDI 1
�
�
Select SDI Input signal, you need to touch " OK "Key to confirm that the
channel will switch to select the SDI Input signal, switch to select the SDI
Signal Panel LCD display is as follows:
Source Select
* SDI 1
Source Select
* SDI 2
Source Select
* SDI 1
或
或
YPbPr: High / Standard definition component video input, touch this button
to switch to high / Standard definition component video input; panel LCD display
is as follows:
Source Select
* YPbPr
VGA: VGA Input, touch this button will switch to VGA Input; Panel LCD
display is as follows:
Source Select
* VGA
LED Full Color Video processor - www.leddisplay.me
11
Safety
Connection
Setting
Software
FAQ
DVI: DVI Input, touch this button will switch to DVI Input; Panel LCD
display is as follows:
Source Select
* DVI
Ⅰ / Ⅱ : Single channel screen and dual channel screen shortcuts, touch
this button to select a single channel � Dual channel � Single channel mode;
Panel LCD display is as follows:
Mode Menu
* Single
Mode Menu
* Dual
�
PBP : Dual screen side-by-side display of shortcut keys, touch this button
to confirm the current options; panel LCD display is as follows:
Setup
* PBP
POP : Dual screen overlay display shortcut keys in dual screen mode touch
this button to confirm the current options; panel LCD display is as follows:
Setup
* A COVER B
Setup
* B COVER A
�
COPY: Dual screen display shortcut keys, access to copy the touch this
button to display COPY A TO B � CROP B TO A , Need to touch " OK "Key to
confirm that the dual-screen channel copying mode; touch" COPY "Panel LCD
display is as follows:
Setup
> COPY B to A
Setup
> COPY A to B
�
Select channel switching mode touch " OK "Key to confirm that the Panel LCD
display is as follows:
Setup
* COPY B to A
Setup
* COPY A to B
或
Menu: Menu keys, touch this button to return to the system main menu or
view the current input and output base configuration;
LED Full Color Video processor - www.leddisplay.me
12
Safety
Connection
Setting
Software
FAQ
Mode Menu
>Lang:
English
Output: Output format select button, touch this button to enter the current
output format you selected, the user through the / Arrow to select different
output formats;
Output format
>1024*768*60
OK: Confirmation key touch this button to confirm the current options;
ESC: Exit key, touch this button to exit the current options;
UP: Up arrow to touch this button to select a menu option or increase the
current options settings;
DOWN: Down, touch the button select the menu options or reduced under
a current options settings;
FS : Local display and full screen key and touch this button to display the
local display � Full screen � Local display;
Scale: Zoom keys, touch this button to enter the Zoom control, zoom control
in the three zoom mode, select the shrink � Zoom � Reduced menu by UP (Top)
/DOWN (Below) will need to modify the cursor options through touch " OK "Key
to adjust the options that UP Key /DOWN Keys to modify the required options.
Mode Scale
>H Size
V Size
H Pos
V Pos
Step 1
Mode Zoom
> H Size
V Size
H Pos
V Pos
Step 1
Mode Scale
> H Size
V Size
H Pos
V Pos
Step 1
�
�
SAVE: Save key and touch this button to save the current settings; it is
necessary to wait for the 5 Seconds, displays the following:
Save Config
>Successful
AB: Fade control keys. In dual screen mode, touch this button will cause
the original top image fade gradually until it disappeared from the screen, so
that the original row behind the image gradually fade out to the front again
LED Full Color Video processor - www.leddisplay.me
13
Safety
Connection
Software
Setting
FAQ
touch instead. Single-screen touch the screen fade gradually, until, once again,
touch the screen fade gradually, until it is fully present.
Setup
>A on B
Setup
>B on A
Setup
> A on B
�
�
System main menu specific menu as follows:
From MENU menu you can enter Language option, users can select English
and Chinese for two menu language.
Mode Menu
>LANG
Advance
Reset factory
English
Language option in the next menu to the Advanced menu ( Advance ), Advanced
menu ( Advance ) Provides users more professional VXP Series professional mode
control feature, users can access the image more effective service and support.
Reset factory is restore factory settings function.
In main menu, by UP (top) /DOWN (below) you can select a menu option to
be processed, and passed the " OK " key to confirm the entered its menu option.
3.1.1 Language selection
Touch MENU key, by UP (top) /DOWN (below) you can choose when to process
menu LANG options
Mode Menu
>LANG
English
Select OK (Confirm) key to enter the submenu, Panel LCD display is as
follows:
Language
>English
Through UP (Top) /DOWN (Below) you can select " English "Or" Chinese ”。
3.2.1 Dual screen adjustment options
Ⅰ / Ⅱ press to select a single channel � Dual channel � Single channel
mode; dual-channel screen default small screen covering big screen shows the
location of the upper-left corner, and large screen is the default channel A
LED Full Color Video processor - www.leddisplay.me
14
Connection
Safety
Setting
Software
FAQ
Screen ( PORT A ), Small screen is B Screen ( PORT B ), In SCALE Function menu
default PORT B Picture adjustment parameters.
In dual screen mode, on a channel screen adjustment options, touch MENU
Key, by UP (Top) /DOWN (Below) you can choose when to process menu Advance
Options,
Mode Menu
> Advance
Select OK (Confirm) key to enter the submenu by UP (Top) /DOWN (Below)
you can choose when to process menu channel,
Mode Advance
> Channel
Alpha
Image Enhance
Color
AB Mord
Gamma
Phase
Aspect Ratio
Select OK Keys to channel choices UP (Top) /DOWN (Below) you can select
PORT A Or PORT B 。
Mode Channe
> Channe
port B
3.2.2 Channel foreground and background of the integration of special
effects
Brightness ( Alpha ) Option is used to set the foreground and background
of the current channel's Fusion effects mode, single channel can reduce
brightness adjustment.
Touch MENU Key, by UP (Top) /DOWN (Below) you can choose when to process
menu Advance Options,
Mode Menu
> Advance
Select OK (Confirm) key to enter the submenu by UP (Top) /DOWN (Below)
you can choose when to process menu
Alpha
LED Full Color Video processor - www.leddisplay.me
15
Safety
Connection
Setting
Software
FAQ
Mode Advance
> Channel
Alpha
Image Enhance
Color
AB Mord
Gamma
Phase
Aspect Ratio
Touch OK Press to enter A lpha Submenu, through touch UP ( increase ) ,
DOWN ( reduce ) Change options values until you meet the treatment needs; touch
ESC Exit the current option, A lpha Minimum value is 0 , The maximum value is
100 。
Mode Alpha
*100
3.2.3 Image enhancement
VXP Series provide image enhancement mode including a detail enhancement,
noise reduction, motion adaptive, three functions.
Touch main menu MENU Key, by UP (Top) /DOWN (Below) you can choose when
to process menu advanced ( Advance ) Options,
Mode Menu
> Advance
Select OK (Confirm) key to enter the submenu by UP (Top) /DOWN (Below)
you can choose when to process menu image enhancement ( Image Enhance );
Mode Advance
> Channel
Alpha
Image Enhance
Color
AB Mord
Gamma
Phase
Aspect Ratio
Touch OK Press to enter the picture enhancement ( Image Enhance ) Submenu,
through touch UP Keys, DOWN Key change can choose when to process menu edge
LED Full Color Video processor - www.leddisplay.me
16
Safety
Connection
Setting
Software
FAQ
detail enhancement Detail Enhance/ Noise suppression Noise Threshold/ Motion
compensation Motion Threshold , Through OK Keys enter, according to the
terminal display adjustment can enhance terminal display effect; light touch
ESC Exit the current option,
Mode Enhance
> Detail Enhance
Noise Threshold
Motion Threshold
Which detail enhancement for enhanced image edges of any object; noise
suppression controls 2D Image interlace signal noise of airspace to get better
results by line transformation; motion compensation is primarily used to control
and compensation in the image 3 : 2 And 2 : 2 Drop-down mode.
Default Detail Enhance Range 1 To 100 ;
Default Noise Threshold Range 1 To 100 ;
Default Motion Threshold Range 1 To 20 ;
The following is the noise reduction effect graph example.
before
after
The following is the motion compensation effect graph example.
before
after
LED Full Color Video processor - www.leddisplay.me
17
Connection
Safety
Setting
Following is
Software
FAQ
Edge detail enhancement Graph example.
before
after
3.2.3 color adjustment
Touch MENU Key, by UP () Key /DOWN (Down) keys to select the pending menu
advanced ( Advance ) Options.
Mode Menu
> Advance
Select OK (Confirm) key to enter the submenu by UP (Top) /DOWN (Below)
you can choose when to process menu color ( Color );
Mode Advance
> Channel
Alpha
Image Enhance
Color
Gamma
Phase
Aspect Ratio
Touch OK Press enter screen color settings menu;
Through UP (Top) /DOWN (Below) you can select the pending submenu; Color
Option is used to set the image brightness and contrast, by default, each
parameter settings are 50 , Comply with the General requirements of conventional
display.
LED Full Color Video processor - www.leddisplay.me
18
Safety
Connection
Software
Setting
Mode Color
> Contrast Red
Contrast Green
Contrast Blue
Brightness Red
Brightness Green
Brightness Blue
FAQ
50
50
50
50
50
50
Touch OK Key will correspond to the options before * Represents selected,
users select the status of the operation, through UP Keys and DOWN Key change
options values until you meet the treatment needs; touch ESC Press to exit the
current options. Contrast and brightness adjustment range is 1 to 100.
3.2.4 AB Mord
Dual channel overlays can fade image fusion effect,The Cross fade adjustment
range is 1 to 30.
3.2.4 Gamma curve
Touch MENU Key, by UP () Key /DOWN (Down) keys to select the pending menu
advanced ( Advance ) Options,
Mode Menu
> Advance
Select OK (Confirm) key to enter the submenu by UP (Top) /DOWN (Below)
you can choose when to process menu Gamma ;
Mode Advance
> Channel
Alpha
Image Enhance
Color
AB Mord
Gamma
Phase
Aspect Ratio
Touch OK Press enter screen color settings menu;
Through UP (Top) /DOWN (Below) you can select the pending submenu option,
touch OK Key will correspond to the options before * Represents selected;
select different Gamma Curve, you can meet the different needs of brightness.
LED Full Color Video processor - www.leddisplay.me
19
Safety
Connection
Software
Setting
FAQ
Mode Gamma
>Default
sRGB
Touch ESC Exit the current options.
3.2.5 phase adjustment
Phase Is used to set the input signal phase, especially for simulation RGB
Signal input may occur when the location offset and the mode of noise.
Touch MENU Key, by UP () Key /DOWN (Down) keys to select the pending menu
advanced ( Advance ) Options,
Mode Menu
> Advance
Select OK (Confirm) key to enter the submenu by UP (Top) /DOWN (Below)
you can choose when to process menu phase;
Mode Advance
> Channel
Alpha
Image Enhance
Color
AB Mord
Gamma
Phase
Aspect Ratio
Touch OK Press to enter picture phase settings menu;
Through UP (Top) /DOWN (Below) you can select the pending submenu option,
touch OK Key will correspond to the options before * Represents selected;
Mode Phase
>Auto
Manual
15
Users UP/DOWN Moves the cursor over option, touch OK Press enter Phase
Submenu. VXP series built two adjustment phase for the menu, Auto automatically
and Manual manual adjustment via touch UP , DOWN select the adjustment mode,
touch OK press selected; for manual adjustment, in selected, you can touch UP ,
DOWN select different phase correction; touch ESC exit the current options.
Manual phase adjustment of values range 0 to 31 .
LED Full Color Video processor - www.leddisplay.me
20
Connection
Safety
Setting
Software
FAQ
3.2.7 aspect ratio control
Aspect Ratio Used to meet the needs of different target monitor's aspect
ratio control.
Touch MENU Key, by UP () Key /DOWN (Down) keys to select the pending menu
advanced ( Advance ) Options,
Mode Menu
> Advance
Select OK (Confirm) key to enter the submenu by UP (Top) /DOWN (Below)
you can choose when to process menu phase;
Mode Advance
> Channel
Alpha
Image Enhance
Color
AB Mord
Gamma
Phase
Aspect Ratio
Touch OK Press to enter picture phase settings menu; UP (Top) /DOWN
(Below) you can select the pending submenu option, touch OK Key will correspond
to the options before * Represents selected; touch ESC Exit the current
options.
Mode Aspect Ratio
> Full Screen
Letter Box
Letter Box
VXP Series offers three different aspect ratio control mode full-screen
( Full Screen ), Mailbox ( Letter Box ) And Panoramic Standards mode.
Touch ESC Exit the current options.
Below gives the target monitor to 4:3 Mode, and enter the 4:3 Format of
signal, different aspect ratio control signal for example.
LED Full Color Video processor - www.leddisplay.me
21
Safety
Connection
Setting
4:3
Software
16:9
FAQ
Anamorphic
NORMAL
(Geometry of the
input format is
preserved.
ZOOM
(Horizontally and
vertically expanded,
linearly, by 33%)
ANAMORPHIC
(Vertically
compressed, linearly,
by 33%)
Below gives the target monitor to 16:9 Mode, and enter the 16:9 Format of
signal, different aspect ratio control signal for example.
4:3
16:9
Anamorphic
NORMAL
(Geometry of the
input format is
preserved.
ZOOM
(Horizontally and
vertically expanded,
linearly, by 33%)
ANAMORPHIC
(Vertically
compressed, linearly,
by 33%)
WIDE 1
(5% off the top and
bottom. 16.5%
non-linear stretch
right & left)
LED Full Color Video processor - www.leddisplay.me
22
Safety
Connection
Setting
Software
FAQ
LED-DIRECTOR Series supporting a user-friendly PC control software that fully
supports drag-and-drop operation to make it easier to edit and display; also supports
user-customized timing control and editing and broadcasting.
� Run software
Extract the installation package to a folder. No need to install this software.
Double-click VProcessor.exe file, when a user first runs, you will need to verify code
to “YGenerator.exe” to obtain a registration code. Enter the registration code after
the software to work properly.
Once users have access to formal registration code will be free for life. The
following figure is a software interface.
LED Full Color Video processor - www.leddisplay.me
23
Safety
Connection
Setting
Software
FAQ
Connect
Software support through the serial port or network communication mode
connection LED-DIRECTOR Equipment, initial use, the user needs to click
Button to close the serial port, through
button serial port settings. If users
use the serial port to a serial port and baud rate for choice; if users use the network
address, Local Port in less than 1023 of any one number, equipment IP address can only
fill in 192.168.0.100 , Remote Port can only fill in 1000
Which serial port option needs according to the user PC is connected to a serial
port. Specific method is to right-click on "my computer", the System Properties
dialog box, select hardware dialog box in the Device Manager tool bar, eject the
Device Manager dialog box. The following figure, the red squares show port is the
user to select a port.
LED Full Color Video processor - www.leddisplay.me
24
Safety
Connection
Setting
Serial port settings are finished, click
Software
FAQ
Button for serial port
connection. Serial connection is successful, interface is displayed
in the lower left
。
corner
Software interface to the lower right corner to display the current use of
LED-DIRECTOR Series product software version, core Board version, firmware
version, and product serial number.
Use
File toolbar :
:Open the script file. The user can open a previously saved script file,
and you can change various parameters;
LED Full Color Video processor - www.leddisplay.me
25
Safety
Connection
Setting
Software
FAQ
:Save the script file. Save the currently running script files;
:Import template file. System comes with 6 template for users to reference
the user can also set the template into the template user capacity available;
LED Full Color Video processor - www.leddisplay.me
26
Safety
Connection
Setting
FAQ
Software
:Export template file. Save the changes to the template file;
:Option. You can pass options to choose when the program is open to open
the device and when the program runtime implementation schedule
When users tick the "when the program is open to open the device", you can choose
not to execute the script file, perform the last save operation and the use of script
files, you can click on the right of using the script file
Button when the
program opens you want to open the script file. So, when you close the software reopen
after implementation you want to open script file;
When users check "when the program runtime implementation timetable", close the
software reopen after implementation schedule dialog box appears.
LED Full Color Video processor - www.leddisplay.me
27
Safety
Connection
Setting
Software
FAQ
:Language. The software supports Chinese and English; the figure for the
software interface.
LED Full Color Video processor - www.leddisplay.me
28
Safety
Connection
Setting
Software
FAQ
:Exit the system.
Address toolbar
:Open the serial port;
:Close the serial port;
:Sets the serial port.
Device toolbar :
:Sync your current slave device user configuration;;
:Save to flash ;
:Time parameters;
LED Full Color Video processor - www.leddisplay.me
29
Safety
Connection
Setting
Software
FAQ
:Restore factory settings;
:Advanced debugging.
Timesheet toolbar:
:Custom schedules. The user can according to your needs every time playback
tasks;
LED Full Color Video processor - www.leddisplay.me
30
Safety
Connection
Setting
Software
FAQ
:Executing or close the schedule. The device will be in accordance with
the schedule of tasks to perform.
Help toolbar :
:Help. Displays the help dialog box;
:About. Displays information about the software.
Output resolution toolbar: Click on the right side of the drop-down arrow to
select different output resolution.
LED Full Color Video processor - www.leddisplay.me
31
Safety
Connection
Setting
Software
FAQ
Work mode toolbar: Users can drop-down arrow to select the right single-,
dual-channel operating mode.
Image display mode toolbar: When the user selects single-channel operating mode,
the dialog box is grayed out, not optional; when the user selects a dual channel
mode, you can select PIP Top Left, PIP Top Right, POP Top Left, POP Top Right, LP_POP_TL,
LP_POP_TR, LP_POP_BL, LP_POP_BR, PBP, LP_SWAPAB, LP_SWAPBA, LP_COPYAB,
LP_COPYBA, Image 2 Overlaid on the image 1 , Image 1 Overlaid on the image 2 And
users mode and other modes.
Input signal bar: Mouse over each interface diagram on the right side of the
white area shows the interface name. When the user selects single-channel operating
mode, the mouse click toolbar interface diagram select input interface, orange box
indicates that the current interface is selected as input interface;
When users select a dual-channel operating mode, select any of the images, click
the toolbar's interface diagram you can select the input for the channel, channel
one interface to select the VOIP 、 CV1 、 CV2 、 CV3 、 SVideo 、 YCbCr 、 SDI ,
Channel 2 to select DVI 、 YPbPr 、 VGA 、 HDMI 。 Cross indicates not selectable.
Orange box that is selected current interface for channel 1 input connector, a green
square indicates that the current interface is selected as the channel 2 input
LED Full Color Video processor - www.leddisplay.me
32
Safety
Connection
Setting
Software
FAQ
connector.
Image toolbar: When the user selects single channel input mode, the image 2
Property page is greyed out.
User can change a number or click on the drop-down arrow, or drag the edges of
the image on the image to zoom out, zoom, crop, image fade and Gamma Parameter;
you can also change the image display mode, including dynamic video, still-current
frame; at the same time you can change the fill color RGB Parameter. Special note
is that these features are available only if the image display mode select user
mode, use the other mode is not available.
Output image settings toolbar: Users can output the image brightness contrast
changes.
LED Full Color Video processor - www.leddisplay.me
33
Safety
Connection
Setting
Software
FAQ
Image display toolbar: Displays the current image of the location, size and output
resolution, and other information. When the user parameter to modify the image
toolbar, the display of the image will also change.
Log toolbar: Users can at any time, save or delete the current log.
LED Full Color Video processor - www.leddisplay.me
34
Safety
Connection
Software
Software
FAQ
1 , Output target monitor does not output the image
1 ) Confirm the input video output settings are correct;
2 ) Confirmation JS-VXP Series input channel settings correspond to the
input signal. For example, if an external input device of the composite video
input correspond;
3 ) Confirm the output cable connections are correct;
4 ) Confirm the objective of the monitor is not in standby or damage;
5 ) Confirmation JS-VXP Series of output resolution has not exceeded the
target monitor's maximum display resolution; if more than that to Output format
Menu to correct.
6 ) Confirmation ALPHA Set not to 0 ;
7 ) If the above suggestions do not ultimately resolve your issue, please
contact our customer service contact. Our customer service staff will be the
first time to help solve your problems.
2 、 VGA Input through JS-VXP Series after image dithering or exception
1 ) Confirm that the computer video card VGA Output or VGA Signal source
output is working properly;
2 ) Confirmation VGA Output resolution is exceeded JS-VXP Series scope of
work. Maximum receive input resolution is as follows:
640x480x60Hz,640x480x75Hz,640x480x85Hz,800x600x60Hz,800x60
0x75Hz,800x600x85Hz,1024x768x60Hz,1024x768x75Hz,1024x768x85Hz,
1280x1024x60Hz,1280x1024x75Hz,1280x1024x85Hz,1600x1200x60Hz.
3 ) Confirmation JS-VXP Series is working in VGA Input mode;
4 ) If the above suggestions do not ultimately resolve your issue, please
contact our customer service contact. Our customer service staff will be the
first time to help solve your problems.
3 、 DVI Input through JS-VXP Series does not output the image
1 ) Confirmation DVI Output video is working properly;
2 ) Confirmation DVI Output resolution is exceeded JS-VXP Series scope of
work. Maximum receives the input resolution is 1920 * 1200 * 60Hz ;
3 ) Confirmation JS-VXP Series is working in DVI Input mode;
LED Full Color Video processor - www.leddisplay.me
35
Safety
Connection
Software
Software
FAQ
4 ) Ensure JS-VXP Series and computer DVI Graphics correctly connected.
Restart DVI equipment, observation of the startup process, if there are output;
5 ) If the above suggestions do not ultimately resolve your issue, please
contact our customer service contact. Our customer service staff will be the
first time to help solve your problems.
4 , Component input cannot be displayed
1 ) Confirm that the component cable is properly connected JS-VXP Series
and signal source more corresponding ports, see the quick guide for the 6 Page
component interface description; high-definition component YPbPr Only allows
receiving HDTV component interface.
2 ) Confirm previous devices YCbCr / YpbPr Really is opened. In many DVD
setting, this option requires a separate open; SD YCbCr only supports 480i and
576i ; high-definition component YPbPr support 480i , 576i , 480P , 576P ,
720P50 , 720P60 , 1080i50 and 1080i60 ;
3 ) Confirmation SVideo Line and YcbCr / YPbPr Without at the same time
from the DVD Connection section DVD Cannot simultaneously supports similar
two load;
4 ) If the above suggestions do not ultimately resolve your issue, please
contact our customer service contact. Our customer service staff will be the
first time to help solve your problems.
5 , User setting not saved
1 ) Confirm by pressing the SAVE Keys;
2) confirmation after the save operation, the user is no longer saved to
other actions,
3 ) Confirm that the save operation, the user is no longer a factory reset,
and other actions to save,
4) if the above suggestions do not ultimately resolve your issue, please
contact our customer service contact. Our customer service staff will be the
first time to help solve your problems.
6 , How to set the fade
1 ) Touch I/II key switch to double-screen mode;
LED Full Color Video processor - www.leddisplay.me
36
Safety
Connection
Software
Software
FAQ
2 ) Select CV1/CV2/CV3/SVID/YCbCr/SDI1/SD2/VOIP in a channel as
a dual-channel image A picture; select YPbPr/VGA/DVI/HDMI1/HDMI2 in a
channel as a dual-channel image B picture;
3 ) Through SCALE menu set image A and image B 's size and location set
to the same;
4 ) Touch AB keys for the image A in image B of light into the IMAGE2 in
IMAGE1 fade; and vice versa;
7 , LCD Panel white screen
1 ) Device LCD Panel in the power 5 seconds when display a white screen
as normal;
2 ) Stays blank screen you need to view the downloaded two dial switch
is down; the downloaded two dial switch should be ploughed back to the default
state of the work;
3 ) LCD Panel in the device boot processes in normal display, eventually
display a white screen. Touch MENU key to access the main menu, select Factory
Reset options to factory reset. Again after saving the user configuration,
restart the device.
8 , How to adjust the screen size
1 ) In single channel mode
Touch SCALE Key to switch to enter the zoom keys, select shrink the settings
menu.
Mode Scale
>H Size
V Size
H Pos
V Pos
Step 1
Through UP Key /DOWN Keys to select the pending submenu option, touch OK
Key will correspond to the options before * Represents selected; modify the
horizontal size is to modify the display Terminal length resolution size,
vertical size is to modify the display terminal height resolution size, modify
the horizontal position is to modify the display Terminal image length starts
LED Full Color Video processor - www.leddisplay.me
37
Safety
Connection
Software
Software
FAQ
reading position do, modify the vertical position is to modify the display
Terminal image height starts reading the position sign, regulating units made
by " OK "Key to enter directly, through UP Key /DOWN Keys to select the touch
UP Key /DOWN Key each time you change the value of the units 1 , Unit 10 , Unit
100 。
Scale H Size
* 1024
Through UP Key /DOWN Key horizontal size can be modified.
2 ) In dual channel mode
Dual screen default small screen covering big screen shows the location of
the upper-left corner, and large screen is the default channel screen A ( PORT
A ), Small screen is screen B ( PORT B ), In SCALE Function menu default
PORT B Picture adjustment parameters.
On double-screen mode, on a channel screen adjustment options, touch MENU
Key, by UP (Top) /DOWN (Below) you can choose when to process menu Advance
Options。
Mode Menu
> Advance
Select OK (Confirm) key to enter the submenu by UP (Top) /DOWN (Below)
you can choose when to process menu channel
Mode Advance
> Channel
Alpha
Image Enhance
Color
Gamma
Phase
Aspect Ratio
Select OK Keys to channel choices UP (Top) /DOWN (Below) you can select
screen A ( PORT A ) Or screen B ( PORT B )。
Mode Channe
> Channe
port A
LED Full Color Video processor - www.leddisplay.me
38
Safety
Connection
Software
Software
FAQ
Select channel after touch SCALE Key to switch to enter the zoom key.
Mode Scale
>H Size
V Size
H Pos
V Pos
Step 1
Through UP Key /DOWN Keys to select the pending submenu option, touch OK
Key will correspond to the options before Represents selected;
Scale H Size
* 1024
Through UP Key /DOWN Key horizontal size can be modified.
LED Full Color Video processor - www.leddisplay.me
39
LED Full Color Video processor - www.leddisplay.me
40