1
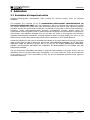
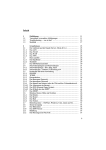
sercos International e. V. Kueblerstrasse 1 73079 Suessen, Germany www.sercos.de Steinbeis-Transferzentrum Systemtechnik Prof. Keller und Partner Martinstrasse 42-44 73728 Esslingen, Germany www.steinbeis-tzs.de sercos EasySlave-IO Evaluation Kit Getting Started Guide Version: Date: 0.2 18.09.2012 Abstract: This document is a quick start guide for the sercos EasySlave-IO Evaluation Kit. It describes the steps for getting the EasySlave-IO started. Project: Document Type: File: sercos EasySlave-IO Evaluation Kit – Getting Started Guide Guidelines GettingStarted_sercos_EasySlave-IO_EvalKit_YYYYMMDD.doc Authors: Christian Hayer (Steinbeis-Transferzentrum Systemtechnik) The Steinbeis-Transferzentrum Systemtechnik and sercos International e. V. are not liable for any errors in this documentation. Liability for direct and indirect damages arising in connection with the supply of this documentation is excluded in so far as it can be attached legally. This documentation contains copyright-protected information. All rights, especially the right of duplication, distribution and translation, are reserved. No portion of the documentation may be reproduced, copied or distributed in any form (photocopy, microfilm, electronic file or other process) without prior written permission of sercos International e. V. Revision History Revision History Date 19.07.2012 18.09.2012 Version 0.1 0.2 Revision Document created First Draft version Document name: GettingStarted_sercos_EasySlave-IO_EvalKit_20120918 Authors C. Hayer C. Hayer Version: 0.2 Date: 18.09.2012 Page: 3 of 10 Contents Contents 1 Getting started ................................................................................................................................. 5 1.1 Kit Contents ............................................................................................................................. 5 1.2 Initial Start-up .......................................................................................................................... 5 1.3 Get sercos working ................................................................................................................... 6 1.3.1 S/IP Client ............................................................................................................................ 6 1.3.2 Sercos address...................................................................................................................... 7 1.3.3 Sercos connections ................................................................................................................ 7 1.3.4 SDDML ................................................................................................................................. 7 1.3.5 Real-time communication ...................................................................................................... 7 1.4 Firmware and parameter update ................................................................................................ 8 2 References ..................................................................................................................................... 10 Document name: GettingStarted_sercos_EasySlave-IO_EvalKit_20120918 Version: 0.2 Date: 18.09.2012 Page: 4 of 10 Getting started 1 Getting started 1.1 Kit Contents The sercos EasySlave Evaluation Kit includes: EasySlave FPGA-Modul base board, including XILINX Spartan-6 XC6SLX25-FT256 FPGA EasySlave AddOn Module ETH-Connect with two RJ45 Ethernet connectors EasySlave 24V I/O interface board Documentation: o sercos EasySlave Evaluation Kit – Getting Started Guide Cable and power supply: o AC power adapter (24 VDC) o Two CAT6 Ethernet cables USB flash drive with documentation, reference designs, software tools and board files 1.2 Initial Start-up For the start-up of the EasySlave the Modules must be plugged together. Step 2 Step 1: Put the AddOn ETH-Connect module onto the FPGA-Module (assembled on delivery) Step 2: Plug the 24V I/O interface board into the FPGA-Module Step 3: Plug the 3-way power connector into the X3 connector of the AddOn Module Step 4: Create a link to the sercos master or a computer with the Ethernet cables Step 5: Turn-on the power supply (plug in the AC power adapter) Step 4 Step 3 Step 1 Step 5 Figure 1: EasySlave Development board Now the FPGA will boot and load it’s configuration from the flash. After the boot process is completed the green state LED is on. Document name: GettingStarted_sercos_EasySlave-IO_EvalKit_20120918 Version: 0.2 Date: 18.09.2012 Page: 5 of 10 Getting started 1.3 Get sercos working 1.3.1 S/IP Client Connect the EasySlave to the local network interface of a computer. Start the SIP Client software from the USB stick and explore the Network for sercos devices. If the device is found, it appears in the list box. Now the nameplate can be requested for further device information, e.g. software revision. Figure 2: Screenshot of the SIP client (Sourceforge project) [SF1] This tool can be used to read IDN’s or set the network configurations of the device. If the network configuration is within your local network you can access the device by IP services, try to ping the assigned IP address of the EasySlave. Document name: GettingStarted_sercos_EasySlave-IO_EvalKit_20120918 Version: 0.2 Date: 18.09.2012 Page: 6 of 10 Getting started 1.3.2 Sercos address The delivery configuration of the sercos address is stored within the IDN S-0-1040. The address switch is 0 and the stored address in the flash is 64. The device supports two ways of address configuration: 1. If the address switch indicates an address, which is not 0 The device applies the address, which is shown on the address switch. S-0-1040 is write protected. The write request shall be declined by the slave with a SVC error (0x7004 (Operation data cannot be changed) or 0x700C (Operation data is write protected, due to other settings) ). 2. If the address switch indicates the address 0 The sercos address can only be configured via the SVC. S-0-1040 is not write protected The address configured via the hardware address switch is read only after power up. Changes will take effect after the next reboot. 1.3.3 Sercos connections The sercos EasySlave-IO supports two fixed connections. Connection 1 (Consumer) Type: PDOUT: Quantity (IDN S-0-1502.0.3): Width (IDN S-0-1502.0.4): Digital Output IDN="S-0-1502.0.5” 16 1 Connection 2 (Producer) Type: PDIN: Quantity (IDN S-0-1503.0.7): Width (IDN S-0-1503.0.8): Digital Input IDN="S-0-1503.0.9” 16 1 1.3.4 SDDML A SDDML file describes a sercos III device for offline configuration. The structure of the document is according to the sercos III device model. Within the document there are references to the SCP, GDP and FSP that are implemented by the device described. The SDDML file of the EasySlave-IO is stored on the USB memory stick. 1.3.5 Real-time communication For real-time processing a sercos master is necessary. Dependent on the used master the initialization can vary. Therefore it’s not possible to describe the detailed initialization of the sercos communication. The SDDML contains all relevant information for initialize the slave. For diagnosis the sercos monitor is a helpful tool. It can be downloaded from the sercos website. www.sercos.de Document name: GettingStarted_sercos_EasySlave-IO_EvalKit_20120918 Version: 0.2 Date: 18.09.2012 Page: 7 of 10 Getting started 1.4 Firmware and parameter update The firmware update is performed via TFTP. The update routines are implemented in the EasySlave core. An update is only possible after power on of the device and without active sercos communication. Once the firmware update is in progress, it must not be interrupted (e.g. power fail). Interruptions will destroy the firmware. After the successful update procedure, the device must be restarted. The identification of slaves can be done via S/IP services. The identification service can be used to trigger the blinking of the S3 LED of the corresponding slave. Afterwards the ReadOnlyData service can be used to evaluate the IP settings of the slave. TFTP transfer via the command prompt: Write: tftp -i %IP_ADDR% put file.bin [cod/par] Read: tftp -i %IP_ADDR% get [cod/par] file.bin %IP_ADDR%: IP address of the slave device (e.g. 192.168.0.50) put: write file to device get: read file from device cod: firmware file (code) par: parameter file Wait until the TFTP transfer completed. The update process is finished after the S3 LED stopped blinking red. The current firmware file and a parameter file generator are located at the website from the Steinbeis-Transferzentrum Systemtechnik. See www.steinbeis-tzs.de/easyslave. Document name: GettingStarted_sercos_EasySlave-IO_EvalKit_20120918 Version: 0.2 Date: 18.09.2012 Page: 8 of 10 Addendum 2 Addendum 2.1 Evaluation kit important notice Steinbeis-Transferzentrum Systemtechnik (TZS) provides the enclosed product under the following conditions: This evaluation kit is intended for use for ENGINEERING DEVELOPMENT, DEMONSTRATION, OR EVALUATION PURPOSES ONLY and is not considered by TZS to be a finished end-product fit for general use. Persons handling the product must have electronics training and observe good engineering practice standards. As such, the goods being provided are not intended to be complete in terms of required design-, marketing-, and/or manufacturing-related protective considerations, including product safety and environmental measures typically found in end products that incorporate such semiconductor components or circuit boards. This evaluation board/kit does not fall within the scope of the European Union directives regarding electromagnetic compatibility, restricted substances (RoHS), recycling (WEEE), FCC, CE or UL, and therefore may not meet the technical requirements of these directives or other related directives. Should this evaluation kit not meet the specifications indicated in the User’s Manual, the kit may be returned within 30 days from the date of delivery for a full refund. THE FOREGOING WARRANTY IS THE EXCLUSIVE WARRANTY MADE BY SELLER TO BUYER AND IS IN LIEU OF ALL OTHER WARRANTIES, EXPRESSED, IMPLIED, OR STATUTORY, INCLUDING ANY WARRANTY OF MERCHANTABILITY OR FITNESS FOR ANY PARTICULAR PURPOSE. The user assumes all responsibility and liability for proper and safe handling of the goods. Further, the user indemnifies TZS from all claims arising from the handling or use of the goods. Due to the open construction of the product, it is the user’s responsibility to take any and all appropriate precautions with regard to electrostatic discharge. Document name: GettingStarted_sercos_EasySlave-IO_EvalKit_20120918 Version: 0.2 Date: 18.09.2012 Page: 9 of 10 References 3 References [SF1] SourceForge - sercos Internet Protocol Services http://sercosips.sourceforge.net/ [SER1] sercos Monitor http://www.sercos.de/downloads/download-tools [TZS1] User Manual sercos EasySlave-IO Evaluation kit (2012-09-18) [TZS2] Datasheet sercos EasySlave-IO (2012-09-18) Quellennachweis: Fotolia: 10056459, 10056460, 10056608, 11720149, 15998435, 28412929, 4598958, 4812346 Document name: GettingStarted_sercos_EasySlave-IO_EvalKit_20120918 Version: 0.2 Date: 18.09.2012 Page: 10 of 10