1
Mac, PC, PostScript, TrueType –
basic font converter
User’s manual for windows
se
TransType
TransType SE
Copyright ©1992-2005 by Fontlab, Ltd. All rights reserved.
Cover illustration: Paweł Jońca, pejot.com
No part of this publication may be reproduced, stored in a retrieval system, or transmitted, in
any form or by any means, electronic, mechanical, photocopying, recording, or otherwise,
without the prior written consent of the publisher. Any software referred to herein is furnished
under license and may only be used or copied in accordance with the terms of such license.
FontLab, FontLab logo, ScanFont, TypeTool, SigMaker and AsiaFont Studio are either registered
trademarks or trademarks of FontLab, Ltd. in the United States and/or other countries.
Apple, the Apple Logo, Mac, Mac OS, Macintosh and TrueType are trademarks of Apple
Computer, Inc., registered in the United States and other countries.
Adobe, PostScript, Type Manager, InDesign and Illustrator are trademarks of Adobe Systems
Incorporated, which may be registered in certain jurisdictions.
Windows, Windows 95, Windows 98, Windows XP and Windows NT are either registered
trademarks or trademarks of Microsoft Corporation in the United States and/or other
countries.
IBM is a registered trademark of International Business Machines Corporation.
Macromedia, Fontographer and Freehand are registered trademarks of Macromedia, Inc.
StuffIt, the StuffIt clamp are trademarks of Aladdin Systems, Inc.
Other brand or product names are the trademarks or registered trademarks of their respective
holders.
THIS PUBLICATION AND THE INFORMATION HEREIN IS FURNISHED AS IS, IS SUBJECT TO
CHANGE WITHOUT NOTICE, AND SHOULD NOT BE CONSTRUED AS A COMMITMENT BY
FONTLAB, LTD.
FONTLAB, LTD. ASSUMES NO RESPONSIBILITY OR LIABILITY FOR ANY ERRORS OR
INACCURACIES, MAKES NO WARRANTY OF ANY KIND (EXPRESS, IMPLIED OR STATUTORY) WITH
RESPECT TO THIS PUBLICATION, AND EXPRESSLY DISCLAIMS ANY AND ALL WARRANTIES OF
MERCHANTABILITY, FITNESS FOR PARTICULAR PURPOSES AND NONINFRINGEMENT OF THIRD
PARTY RIGHTS.
User manual release 2.5 [2/2005]
2
Contents
Contents
CONTENTS
3
INTRODUCTION
5
USER INTERFACE
7
Source Fonts List
8
Destination Fonts List
10
Pop-up Menus
11
Command Buttons
12
CONVERSION PROCESS
13
Converting a Sample Font
14
Adding Fonts to the Source List
18
Adding Macintosh Fonts
Associating PostScript Data Files
20
21
Removing Fonts
22
Previewing Fonts
23
Setting Conversion Options
25
General Conversion Options
Destination File Options
26
28
PC to Macintosh Conversion
30
TrueType Fonts
Changing Font Format
Reencoding
Symbol Encoding
Unicode Mapping
Defining the Source Encoding
Defining the Destination Encoding
Customizing Suitcases
Type 1 Fonts
Changing Font Format
Reencoding
Metrics Files
Multiple Master Fonts
Suitcases
31
32
33
34
34
35
37
40
48
48
49
52
53
57
TransType SE
Bitmap Fonts
Macintosh to PC Conversion
Macintosh Font Preparation
Single file MacBinary or BinHex intermediate format
E-mail with attached font(s)
PC formatted diskette, ZIP or MO disks
MacDrive utility and Mac formatted disks or CDs
Through special networking utilities and some Networking Operating Systems
Single Macintosh StuffIt archive
TrueType Fonts
Type 1 Fonts
TrueType<->Type 1 Conversion
Type 1 Options
General Type 1 Options
Metrics Options
Macintosh Suitcase Options
TrueType Options
General TrueType Options
Embedding And Identification Options
59
60
61
61
62
62
63
63
64
65
66
67
67
68
69
70
70
73
FontLab (VFB) Font Conversion
75
Other Types of Conversion
76
TECHNICAL DETAILS
77
Type 1 Fonts
TrueType Fonts
Customizing Codepages
78
79
80
BIBLIOGRAPHY
81
SUPPORT
83
A NOTE ON INTELLECTUAL PROPERTY
85
APPENDIX A BASICS OF DIGITAL FONT ORGANIZATION
87
Definitions
4
58
88
Introduction
TransType is a TrueType and PostScript Type 1 font conversion utility. It
can convert PC fonts to Macintosh, Macintosh fonts to PC, Type 1 fonts to
TrueType and TrueType fonts to Type 1. Moreover it can do platform and
format conversions at the same time. There are several important features
that make TransType different from other font conversion programs:
1.
TransType correctly converts fonts with Roman and non-Roman
encoding and allows you to select both source and destination
encoding while you convert fonts in either direction (PC–>Mac,
Mac–>PC, TrueType–>Type 1, Type 1–>TrueType). The fontpreviewing feature helps select proper encodings.
2.
TransType automatically controls the building of font suitcases when
you convert families of PC fonts to Macintosh. You can move fonts
from one suitcase to another, but in most cases it’s unnecessary –
TransType does it for you.
3.
TransType can automatically generate bitmap fonts when you convert
to Macintosh Type 1 format.
4.
TransType can convert multiple master Type 1 fonts either into single
master or into multiple master Type 1 fonts or into TrueType fonts for
any platform – PC or Macintosh.
TransType SE
5.
You can quickly and easily preview the fonts that are not installed in
your System.
6.
TransType can convert from VFB (FontLab’s internal format) into
TrueType or Type 1.
7.
TransType can also accept fonts in .sit archives created with StuffIt
Deluxe – a popular Macintosh file archiver.
8.
TransType can read or write Macintosh files in industry-standard
MacBinary or BinHex formats. Windows computers can’t read native
Macintosh files, but with TransType you can import or export these
specially formatted Macintosh files on your Windows computer and
use them immediately. TransType can also directly open Macintosh
files if they are saved on a PC-formatted diskette or Zip disk, or are
copied to a PC computer from a Macintosh through a network
connection. If you are using MacDrive® you can access Macintoshformatted media supported by MacDrive.
In this document we assume that you have a basic knowledge of computer
fonts, font formats and encodings. Refer to documents from the Bibliography
section for more advanced information and to Appendix A for the basics.
Note: Here and later, when speaking about font formats, we use the words
PC and Windows as synonyms.
6
User Interface
TransType’s Main Window consists of several parts: the Source and
Destination lists, the Legend fields and the Command buttons.
TransType Main Window
TransType SE
Source Fonts List
The Source list contains the names of the fonts (PC and Macintosh in
TrueType, FontLab (VFB) or Type 1 formats) that you are going to convert.
You can convert all different kinds of fonts in one step and TransType will
automatically convert Macintosh fonts to PC and vice versa. TrueType will
be converted to TrueType and Type 1 to Type 1 by default.
Source Fonts List
As you can see, the presentation of different kinds of fonts in this list
depends on the font’s platform and type. The following icons are used:
Macintosh font suitcase. Click on the icon (or the plus sign to the left of
the icon) to see the contents of the suitcase. Click with the Ctrl key
depressed to open all the suitcases. Click again with the Ctrl key down to
close them all
Macintosh Type 1 font (‘post’ resource) usually referenced by the font
suitcase. It is possible to add a Macintosh Type 1 font without the
corresponding suitcase
Macintosh multiple master Type 1 font
Macintosh TrueType font (‘sfnt’ resource) inside a font suitcase
PC (MS Windows) Type 1 font (usually has PFB extension)
PC (MS Windows) multiple master Type 1 font (usually has PFB
extension)
PC (MS Windows) TrueType font (usually has TTF extension)
FontLab 3 or FontLab 4 font in VFB format (usually has VFB extension)
8
User Interface
The Source list has two main columns: the font file name and the font
name.
Note: If you see the text “<sfnt>” instead of the file name it means that
this is a ‘sfnt’ resource located inside a Macintosh font suitcase and doesn’t
have its own file name.
To the right of the font name you will see style icons, which give you the
information about the font’s style. Only 4 main styles can be recognized:
Font is Italic
Font is Bold
Font is Bold Italic
Font is Plain
The Legend panel is located below the Source list. It includes a short
description of the currently selected item:
You can show or hide the Legend panel by clicking the triangle at the left.
Multiple selections are implemented in the Source list to make it possible
to manage several fonts at once. Use the Shift or the Ctrl key to select
more than one item in the list. Then right-click on the selection instead of
using the pop-up menu buttons at the right of the font names.
9
TransType SE
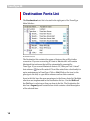
Destination Fonts List
The Destination fonts list is located in the right part of the TransType
Main Window:
Destination Fonts List
The Destination list contains the names of fonts as they will look after
conversion. If you are converting PC fonts to Macintosh it will contain
Macintosh font suitcases that will be automatically generated by
TransType. If you convert Macintosh fonts to PC, then you’ll see “virtual”
that will contain PC font files united into a font family for
font suitcases
easier maintenance in TransType. Click or Ctrl-Click on the icon (or the
plus sign to the left) to open these suitcases and see their contents.
Icons in this list have the same meaning as in the Source fonts list. Multiple
selections are implemented in the Destination list too. Use the Shift and
the Ctrl keys to select more than one item in the list. The Destination list
also has a Legend panel located below which contains a brief description
of the selected item.
10
User Interface
Pop-up Menus
The items in Source and Destination lists may contain pop-up buttons ( )
located at the right of the font and suitcase names. You can press these
buttons to open pop-up menus where you can set the destination format,
customize font conversion options, call for a family properties dialog or
manipulate individual fonts and their styles.
To manage several selected fonts at once, right-click on the selection
instead of using the pop-up buttons.
11
TransType SE
Command Buttons
Command buttons are located in the right-bottom area of the Main
Window:
Here is a brief description of each button (from left to right):
12
Add
Use this button to add fonts to the Source Fonts list and
prepare them for conversion. Note that you can add fonts to
the Source list by simply drag-dropping them to the Main
Window from the Explorer
Attach
Use this button if you are converting Macintosh fonts to PC to
let TransType know which files containing PostScript font data
to use with the currently selected font suitcase. Refer to the
Associating PostScript Data Files section below for more
information about this command
Clear
Press this button to remove the currently selected font(s) from
the Source or Destination list. Of course, the corresponding
item(s) will also be removed from the other list
Clear All
Press this button to remove all the fonts from both lists
Preferences
Press this button to open the Preferences dialog containing
various TransType settings
Convert
Press this button to begin the font conversion process. Note
that it may be disabled in some circumstances – this means
that you didn’t provide enough information for the conversion
process or that one of the fonts to be converted is damaged or
improperly constructed.
Quit
Use this button to finish working with TransType and exit the
program.
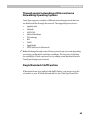
Conversion Process
To convert fonts, you have to:
•
•
•
•
•
•
•
Add the fonts you want to convert to the Source list. Remember that
Macintosh fonts must usually be in MacBinary or BinHex format.
If you are converting Macintosh fonts to PC you may have to associate
data files with the source suitcases. Usually, however, TransType does
this automatically.
Check and define the encoding and codepage settings for all the fonts
in the Source list, if necessary. The values selected in the Preferences
dialog will be used by default.
If necessary, change the destination font format (if you are converting
TrueType fonts to Type 1 or vice versa).
If necessary, organize destination suitcases (if you are converting PC
fonts to Macintosh) and adjust the fonts’ properties.
If the Convert button is disabled, fix possible problems by following
the recommendations located in the legend panel below the
Destination Fonts list.
Press the Convert button.
TransType SE
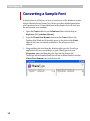
Converting a Sample Font
In this section we will show you how to convert one of the Windows system
fonts to Macintosh font format. We will not provide a detailed description
of all operations here (it’s provided later in the chapter) but will show you
the main points as an example.
14
1.
Open the Fonts folder in your Windows folder with the help of
Explorer. (C:\\windows\fonts)
2.
Copy the Times New Roman font from the Fonts folder to the
Desktop (the Windows OS restricts access to the fonts in the Fonts
folder so they are not directly available to TransType or to font
editors).
3.
Drag-and-drop the font from the Desktop right onto the TransType
application icon on your desktop (or open TransType from your
Programs menu and drag-drop the font into the Source list).
TransType will be launched and you will see its Main Window with the
Times New Roman font in the Source list:
Conversion Process
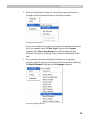
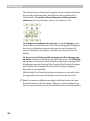
4.
Look at the Destination Fonts list. Press the pop-up menu button to
the right of the font name and observe the menu contents:
Destination Format Submenu
As you can see there is an option to change the destination font format.
Let’s, for example, select the Mac Type 1 option in the Format
submenu. The Times New Roman font will be converted from
Windows TrueType to PostScript Type 1 format for Macintosh in this
case.
5.
Now you must select the encoding for the fonts you are going to
generate. Press the pop-up menu button for the second time and select
the MacOS Roman codepage in the Codepage submenu:
Destination Codepage Submenu
15
TransType SE
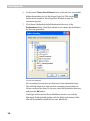
6.
As the source Times New Roman font is a Unicode font, you needn’t
define the encoding for it in the Source Fonts list. Click on the
button at the bottom of TransType Main Window to start the
conversion process.
7.
If you haven’t defined the default destination directory in the
Preferences dialog, TransType will ask you to choose the destination
for the fonts generated:
Select Directory Dialog box
We recommend you create a new directory for the destination fonts.
This will help when more than one font consisting of more than one
file are converted at a time. In any case, select the destination directory
and press the OK button.
TransType will create two files in MacBinary format: one with the
Macintosh PostScript and another with the Macintosh suitcase. Both
files will be needed to install the font on a Macintosh.
16
Conversion Process
8.
After the conversion process has finished, the Source and the
Destination Fonts lists remain – so that you can convert the same fonts
to another format or with other settings if you want. To finish working
with TransType, press the rightmost button
Main Window and the program will quit.
at the bottom of the
OK, so now you know how to do a simple PC->Mac conversion. It’s time to
look at TransType’s features in detail.
17
TransType SE
Adding Fonts to the Source List
To add one or more fonts to the Source fonts list you can use two methods:
the Add button or drag-and-drop.
To add fonts with the Add button:
1.
Press the Add button at the bottom of TransType’s Main Window . You
will see the standard Windows Open dialog box:
Open Fonts Dialog box
2.
18
Select the fonts you want to add for processing and press the Open
button. TransType will open every font selected, check it, and extract
the information necessary for further processing. Remember,
Macintosh fonts must usually be in MacBinary or BinHex format (see
details below).
Conversion Process
To add fonts using the drag-and-drop method:
1.
Open the directory with the fonts.
2.
Select the fonts you want to add and drag them to TransType’s Main
Window.
Note: You can drag-and-drop not only individual fonts but also folders
containing many fonts. Subfolders are processed recursively.
Note: When you add Macintosh Type 1 fonts for conversion you MUST
add suitcases along with the printer font files. If you cannot identify a
suitcase file add all files that you suspect contain font data.
Note that filenames for the PC fonts that will be created during processing
are generated automatically following the 8.3 requirements – this is
necessary to maintain compatibility with older versions of Windows and
DOS. This option is customizable for Windows fonts in Preferences/
General/Font Files Naming.
19
TransType SE
Adding Macintosh Fonts
Macintosh and PC have different file systems, so to access traditional
Macintosh (pre-MacOS X) fonts on a PC you have to perform some
additional steps or sometimes use third-party programs. This process is
described in full detail in the Macintosh to PC Conversion chapter on page 59,
and we strongly recommend you read it before trying to convert Macintosh
font files with TransType.
After you have added fonts to the Source list they will appear according to
their structure. Thus Macintosh font suitcases appear as two-level items
and PC font files as separate files. In the Destination list you will see the
fonts in their post-conversion form – PC fonts that will be converted to
Macintosh formats will appear united in suitcases. Macintosh fonts
converted to PC will keep their "suitcase" structure for easier navigation.
20
Conversion Process
Associating PostScript Data Files
On the Macintosh Type 1 fonts are defined in two files: a suitcase file that
contains data for the whole font family and a separate PostScript data file
for each font. So if you have a family of Type 1 fonts containing 3 styles you
will have 4 files: a suitcase file and a PostScript data file for each style.
The Mac OS automatically associates data files and suitcases using special
rules based on file name. However during conversion of Macintosh files
into MacBinary or BinHex format the files may be renamed and automatic
association will not be possible. Fonts for which TransType cannot
automatically find data files are highlighted in red in the Source Fonts list.
To manually associate font data files with a suitcase you must press the
Attach button. You will then see a file dialog where you must select one or
more Macintosh files which contain font data files. This is not easy since
the file names are usually truncated. Then try adding all files that you
suspect contain font data. TransType will open the selected files and try to
associate the font data files that they contain with one of the suitcases
currently open in the Source Fonts list.
21
TransType SE
Removing Fonts
If you added fonts to the Source list by mistake or you were going to
convert them but then changed your mind, you can easily remove some
fonts from the list. Select one or more fonts in the list by using the Shift
and Ctrl keys and then press the Clear button at the bottom of the Main
Window. You can remove item(s) from the Destination list as well. Of
course, the corresponding item(s) will also be removed from the Source
list.
To remove all the fonts from both lists, press the Clear All button.
22
Conversion Process
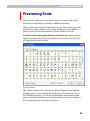
Previewing Fonts
After you have added fonts to the Source list you can preview the source
fonts and how they will be converted in a different encoding.
There is a plus sign to the left of each suitcase icon. Click on this sign or the
icon itself to see the contents of the suitcase. Holding down the Ctrl key
while you click will show the contents of all the suitcases in the list.
To have a look at the particular font character set, double-click the
font icon (not the suitcase icon) in the Source or Destination list. The font
will open in the Preview window:
Font Preview Window
This window consists of two main parts: the font character chart and the
codepage options. If you opened this window from the Destination Fonts
list of the Main Window, you will see the destination font character chart
preview. Switch between the source and destination preview by clicking on
the corresponding tabs at the top of the chart.
23
TransType SE
The character chart contains the font glyphs’ preview and their position in
the currently selected encoding. Each character has a caption with its
Unicode index. To see the code and the name of the particular
character, just move the mouse cursor to the character’s cell:
To change the encoding in the preview, use the Codepage pop-up
menu at the bottom of the window. Note that by changing the codepage in
the source or destination character chart preview you also define the
source or destination encoding for conversion (see the next section for
details).
To get access to all the possible codepages in the Codepage popup menu, uncheck the checkbox to the right of the menu. The Codepage
pop-up menu will contain not just Windows or Macintosh codepages, but
all codepages from the Program Files/Common Files/FontLab/Codepage
and Program Files/Common Files/FontLab/TransType/Codepage
directories on your hard disk.
With the help of the TransType font preview feature you can easily define
the appropriate conversion encodings for each font in the Source list.
Note: You cannot set different encodings for different fonts in the same
Macintosh suitcase or PC font family. When you set the encoding for one
font in a suitcase (family) you set it for all the fonts in the suitcase (family).
24
Conversion Process
Setting Conversion Options
After you have added fonts to the Source list (and the resulting font names
have appeared in the Destination list) TransType usually is ready to begin
conversion using the default settings. But sometimes you may need to
change the conversion options (particularly the destination font format),
the methods that TransType uses to reencode fonts and, if you are
converting PC fonts to Macintosh, the styles of the generated fonts and
their placement in suitcases.
Conversion of fonts between two main font formats – PostScript Type 1
and TrueType – is the feature that makes TransType an advanced product.
This conversion is not trivial and demands many options to be set
correctly. Sometimes it is not possible to convert a font from one format to
another without loss of font quality. That is why we will describe format
conversion separately.
Reencoding of fonts is a very important feature of TransType too. This is
necessary because Windows and Macintosh use different encodings to map
codes in the 0-255 range to characters located in the font. Usually the first
128 characters are encoded the same way, but other characters, located in
the 128-255 code range are not. Moreover, encoding of fonts is highly
dependent on the language for which the font was designed and in no
language is the Macintosh encoding the same as the one used in Windows.
The method which the two systems use to identify font styles is also very
different. On the Macintosh, fonts that comprise a font family are grouped
into a font suitcase. On Windows all the font files are separate and the
system links them into the font family using style-identification flags set in
each font.
We will give you a detailed description of each operation you can apply to
customize the font conversion process. The descriptions are grouped in
sections for each platform/format combination.
But we will describe the most common and simple setting for the
conversion process here in this section.
25
TransType SE
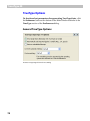
General Conversion Options
Click the Preferences button at the bottom of the Main Window and refer
to the General Conversion Options Page of the Preferences dialog:
General Conversion Options Page of the Preferences Dialog
26
Conversion Process
These general options are quite important. They actually switch between
different conversion methods implemented in TransType:
Perform conversion
with minimal changes
if possible
If this option is selected, TransType will try to use our
old conversion engine first introduced in TransType 1.x
instead of the new FontLab conversion engine
implemented in TransType 2. But switching on other
options (like Remove all unmapped glyphs… or
Always decompose composites) will force
TransType to use the standard conversion method
anyway. Moreover, the usage of TransType 1.x engine is
possible only for conversion from Type 1 to Type 1 and
TrueType to TrueType
Always perform
standard conversion
method
If this option is selected, TransType will use the new
FontLab conversion engine. This conversion algorithm
allows you to convert Type 1 to TrueType and vice
versa; and vfb files to other formats. The standard
method may be used even when this option is off and
another method is selected
Remove all
unmapped glyphs for
single-byte encoded
fonts
If this option is checked, TransType will remove those
glyphs of the source font that are not referenced by the
destination codepage. The new font will become more
compact. This option is off and all characters preserved
by default. If it is on it is ignored when the Perform
optimal conversion method option is also on.
27
TransType SE
Destination File Options
When TransType converts fonts to Macintosh format, it saves them in
MacBinary (.bin) or BinHex (.hqx) files. You may choose what format to
use in the General/Font Files Naming Page of the Preferences
dialog:
Use the General/Font Files Naming Page of the Preferences dialog
to define the file naming scheme for Windows output fonts:
The options described here are used for generating font files in any
Windows format:
28
Short (8.3) name
If this option is checked, TransType will generate file names
for Windows fonts in DOS notation for more compatibility.
This option is on by default
Long based on
PS Font Name
If this option is checked, TransType will generate long file
names. It will use the Font Name fields to generate file
names
Long based on
Full Font Name
If this option is checked, TransType will generate long file
names and will use the Full Font Name fields.
Conversion Process
Use the Defaults Page of the Preferences dialog to choose the place
where new fonts will be stored:
Click the Always ask for destination folder radio button to make
TransType open the standard directory selection dialog for each conversion
session. Click Save in the same folder as original fonts to let
TransType save the converted fonts in the same place as the input fonts
reside. To specify a particular folder, click the Use the following folder
option and select your custom destination directory on the disk where you
would like the converted fonts to be stored.
And finally, if you check the Save each font family in its own folder
option, then a separate folder will be created for each converted family in
the folder selected as the destination folder. This is particularly useful for
creating fonts in the Type 1 format.
29
TransType SE
PC to Macintosh Conversion
The following key points are important when PC fonts are converted to
Macintosh format:
1.
Only Macintosh font files have a resource-based structure.
2.
Fonts that belong to a font family have to be united in a Macintosh font
suitcase structure.
3.
Type 1 font files on the Macintosh stay separate from the font suitcase
files and are linked to the Macintosh font resources using name
reference methods, similarly to the implementation on the PC
platform.
4. Type 1 fonts on the Macintosh need to have at least one accompanying
bitmap font file (NFNT resource) for each font style.
5.
Encoding, even for the Latin fonts, is different on Macintosh and PC.
6. Most PC fonts are encoded using Unicode, but in some cases simulated
encodings are used.
In order to simplify things we describe only TrueType to TrueType and
Type 1 to Type 1 conversions in this section. The differences of conversion
between TrueType and Type 1 formats are described later in the TrueType<>Type 1 Conversion section.
When TransType converts fonts to Macintosh format, it saves them in
MacBinary or BinHex files. You may choose what format to use in the
General/Font Files Naming Page of the Preferences dialog:
30
Conversion Process
TrueType Fonts
When you add TrueType fonts to the Source fonts list TransType does the
following:
1.
Opens the TrueType font file and extracts information about all the
available glyphs, the Unicode mapping data, the font names and the
font style (plain, bold, italic or bold-italic).
2.
Tries to detect which encodings this font can support.
3.
If several added TrueType fonts belong to the same family (the family
name is the same and the style information is different), builds a
destination font suitcase.
4.
Prepares for PC TrueType to Macintosh TrueType conversion.
31
TransType SE
Changing Font Format
By default Windows TrueType will be converted to Macintosh TrueType,
but you can change the destination font format. Press the pop-up menu
button located at the right of the suitcase name in the Destination list to
open the following pop-up menu:
Destination Format Pop-up Menu
Select the platform and the type for the destination font.
32
Tip: If you have multiple selections in the Destination list, your choice will
be applied to all selected fonts. But you must right-click on the selection
instead of using the pop-up menu button at the right of the font name.
Tip: You can change the default destination platform and format in the
Defaults/Formats Page of the Preferences dialog.
Conversion Process
Reencoding
Source TrueType fonts can have the following encodings:
1.
Normal Unicode encoding. In this case all characters are assigned to
their proper Unicode indexes. This makes it very easy to determine to
which languages they belong and how they can be used.
2.
Normal Symbol encoding. The codes in the 0-255 range are mapped to
symbolic or pictorial characters.
3.
Simulated Symbol encoding. Symbol encoding is used to map normal
alphabet characters of a language to the 0-255 codes.
4.
Simulated Unicode encoding. Unicode indexes of the Latin language
are used to map characters of some other language to the 0-255 codes.
Only encodings 1 and 2 (normal Unicode and Symbol) give full information
about mapping codes to characters. All other cases require you to make
some additional definition(s). You must tell TransType which encoding is
simulated by the Symbol or Latin Unicode indexes. When TransType gets
this information from you it can assign proper Unicode indexes to
characters and treat this font as a case 1 in our list. Using this method we
can limit the number of potential source encoding configurations to two:
Unicode and Symbol.
33
TransType SE
Symbol Encoding
Symbol encoding is usually used to map symbolic or pictorial characters to
the 0-255 code space. No reencoding is necessary when you convert such
fonts to Macintosh format, so TransType will simply copy the characters
and you will use the same codes you used on the PC to access the
characters.
Unicode Mapping
In the case of Unicode mapping in the source font all we need to do is to
convert this encoding according to the Macintosh requirements. The
problem is that on the Macintosh we can use only codes in the 0-255 range
to access characters. This rule is not true in MacOS X, but we will use the
older requirements to let you build Macintosh fonts that will work on all
Macintosh systems. So we need to carefully use this space.
Every language used on the Macintosh has a codepage mapping table that
determines how characters are mapped to the 0-255 code space. When we
know which characters are in the source font (with the help of Unicode
indexing) and select a Macintosh codepage we can easily build a correctly
mapped Macintosh TrueType font.
We’ll describe below all the operations that you might need to perform to
make a correctly encoded Macintosh TrueType font.
34
Conversion Process
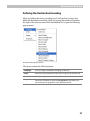
Defining the Source Encoding
When you add a PC TrueType font to the Source list you can look in the
legend field below it. If it says “TransType will use Unicode table to detect
encoding”, that means that the font has a valid Unicode mapping table and
the conversion is very simple. The Unicode table is used by default in this
case, but you have the option to change the source encoding. Press a popup menu button at the right of the font name and the pop-up menu will
appear:
Source Encoding Pop-up Menu
Tip: Press and hold down the Ctrl key on the keyboard before pressing the
pop-up menu button to get access to all the possible codepages.
35
TransType SE
Tip: It is possible to change the source encoding for multiple selected
items in the Source list at once. But you must right-click on the selection
instead of using the pop-up menu button at the right of the font name.
When the font doesn’t have a Unicode table or is encoded as a symbol font,
the legend will not say that the font is “Unicode” and you will have to use
the encoding pop-up menu. The Use Unicode item will be disabled in this
case and you have to determine which encoding the source font has. The
first item is Use Default: this means that TransType will use the codepage
currently selected as default in the Defaults/Codepages & Scripts
Page of the Preferences dialog. The other items in the dropdown list are
the names of codepages. Select one of these codepages if you know that
that codepage is used in the source font.
For example, if the source font is encoded as a symbol font but you know
that actually it is a Cyrillic font, you should choose the MS Windows 1251
Cyrillic codepage in the pop-up menu and TransType will assign the
correct Unicode indexes to all characters.
If you know that the source font is really a Symbol or pictorial font, select
any item in this menu – it doesn’t matter.
Note: When a definition of the source codepage is necessary but none is
selected (the default value is set to Unspecified and Use Default is
selected in the pop-up menu) TransType will color the font’s name in red
and will disable the Convert button until you specify the source encoding of
the font.
36
Conversion Process
Defining the Destination Encoding
When you define the source encoding for a TrueType font you may also
define the destination encoding. Press the pop-up menu button located at
the right of the suitcase name in the Destination list to open the following
pop-up menu:
Destination Codepage Pop-up Menu
The menu contains the following items:
Codepage
Used to assign a destination codepage to the font
Script
Select the script identifier for the font as required by the Mac OS
Format
Used to change the destination platform or font format
Properties…
Select this command to open the Properties dialog where you
can customize the properties of the destination font
37
TransType SE
Assigning the Codepage
In the Codepage submenu you can see three common commands and a
list of Macintosh codepage names:
Use Default
Use the destination codepage selected as the default in the Preferences
dialog.
Unicode
Is not usable in the case described here.
Leave as is
Do not reencode the source font – any selection in the Source list pop-up
menu is ignored.
A list of potential codepages to which the font can be reencoded follows
these three commands. The number of available codepages depends on the
number of characters in the font.
When TransType finally gets the information about the Unicode indexes to
which the font characters are mapped (from the font or after you have
assigned a codepage to the source font), it knows which destination
codepages this font can support and shows only these codepages in the
destination encodings menu.
38
Tip: To force TransType to include all the possible codepages, press and
hold down the Ctrl key.
Tip: It is possible to change the destination codepage for multiple selected
items in the Destination list at once. But you must right-click on the
selection instead of using the pop-up menu button at the right of the font
name.
Conversion Process
Assigning a Script Code
After you have selected the source and destination codepages, assign a
script code to the font using the Script submenu. Note that for most
Macintosh encodings when you select the destination codepage TransType
will automatically select the correct script code.
Tip: If you have multiple selection in the Destination list, your choice will
be applied to all selected fonts. But you must right-click on the selection
instead of using the pop-up menu button at the right of the family name.
Use the Defaults/Codepages & Scripts Page of the Preferences
dialog to select the script code that will be used by default:
To summarize the process of font reencoding:
1.
TransType determines the Unicode indexes of all the characters in the
source font. It does this automatically if the source font has a valid
Unicode table or with your help when you select the source encoding in
the source pop-up menu.
2.
Depending on the selection you made in the Destination list’s pop-up
menu TransType maps up to 256 Unicode indexes to the 0-255 code
space as is required by the Mac OS.
3.
A script code is assigned to the font accordingly to the selected Script.
39
TransType SE
Customizing Suitcases
When you convert several fonts that form a font family on a PC, TransType
will automatically combine these fonts into a Macintosh font family
suitcase. If for some reason you don’t want TransType to do this, you have
the following options:
1.
Force TransType to put all fonts in separate suitcases by checking
Save each Macintosh font in its own suitcase on the Font
Families Packaging Page of the Preferences dialog:
This is unusual and we do not recommend you switch on this option.
But if you do, the Set style to Plain for each saved font option is
recommended to simplify the usage of the fonts. When this option is
on, all fonts that are placed in separate suitcases will have the plain
style flag, even if the original fonts are not plain.
2.
Exclude the font from the current suitcase and move it into the new
one. To do this, position the mouse cursor on the font (not suitcase)
you want to move and press the right mouse button or use the pop-up
button ( ). Select one of the commands in the pop-up menu:
Move item to a new suitcase – to move the font from the current
suitcase to the new suitcase that will contain only this font.
Move item to... – to open the Select Destination dialog box and
choose a destination suitcase:
40
Conversion Process
Select Destination Dialog box
In the Select Destination dialog box select the suitcase to which you
want to move the font in the Move font(s) to pop-up menu or select
New Suitcase to extract the font into a new empty suitcase. Change
the font name in the editing field below if necessary. Note that if any
fonts in the suitcase have the same style (for example, if you have two
italic fonts), then the OK button is disabled. Correct the problem or
press Cancel to close the dialog.
3.
Change the style of the particular font in the suitcase by selecting the
appropriate item in the menu which appears when you press the right
mouse button or use the pop-up button ( ):
Style Pop-up Menu
41
TransType SE
Font Properties
You can easily edit the destination font suitcase information. Select the
suitcase in the Destination list. Press on the pop-up button to the right and
select the Properties command in the pop-up menu. The Properties
dialog box appears:
Font Properties Dialog box
42
Conversion Process
The Properties dialog allows you to:
1.
View the names and styles of the fonts in the family.
2.
Change the destination platform and format in the Destination
Format control. Note that you can convert fonts without changing the
platform or the font format (for example, Mac TrueType to Mac
TrueType).
3.
Set the option to create a single master font from a multiple master
(will be described later when speaking about Type 1 fonts).
4.
Change the style of the particular font in the suitcase by selecting the
appropriate item in the menu which appears when you press the popup button .
5.
Change the Menu name – the name which will appear in the font
menu when this font is installed in Windows. Note that the menu
name is the name of the FOND resource on the Macintosh.
6.
And finally, choose to edit Macintosh FOND resource information for
the suitcase by pressing the FOND Info button. Obviously this button is
available only when converting to Macintosh platform.
For more control of the font header information, you need TransType
Pro available as a separate product.
43
TransType SE
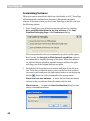
Macintosh FOND Properties
When you press the FOND Info button in the Properties dialog, the FOND
Info dialog appears in which you can change some parameters:
FOND Info Dialog box
Usually you won’t need to change these parameters. But if you are a
professional in font design, this dialog is for you.
44
Conversion Process
Besides the FOND name, which is the same as the font menu name, you
may edit parameters in the following groups.
Font family properties:
FOND ID
FOND resource identifier (or family ID number) lying in
the range of the particular script. Changing the script in
the pop-up menu to the right will automatically change
the FOND ID and vice versa. When you change the
destination codepage, the script and therefore the FOND
ID change as well
Fixed width font
If this option is switched on, the font will be treated by
the Macintosh system as one with characters of fixed
width (monospaced). Otherwise, the font is treated as
proportional
Don’t use family
fractional widths
If this option is switched on, the system will not use the
global family widths table
Use integer extra
widths
If this option is switched on, the system will use the
family style extra widths table (Family Style Property
Table)
Ignore FractEnable
If this option is switched on, the system will use the
family style extra widths table (Family Style Property
Table) even if the option Don’t use family fractional
widths is switched off
Don’t adjust
characters spacing
This option represents the 11th bit of the family flags,
which is usually set to zero.
45
TransType SE
Font family metrics:
46
Calculate values
automatically
If this radio button is checked, TransType will
automatically calculate vertical metrics for the
destination family. You cannot edit global family metrics
manually in this case
Use custom values
If this radio button is checked, you get access to the
following fields to change them. Edit family vertical
metrics only if you know what you are doing and
understand the purpose well
Ascent
The maximum height above the baseline reached by
characters in this family fonts
Descent
The maximum depth below the baseline reached by
characters in this family fonts. The depth is usually a
negative number
Leading
Maximum leading for the family. The leading value is
usually set to zero
MaxWidth
Maximum character width for the family.
Conversion Process
Style mapping flags (Font Class):
Font name needs
coordinating
This option is switched on if the font name needs
coordinating
Font family creates
the outline style by
changing PaintType
When this option is switched on, the Outline style of the
family will be created by changing PaintType, a
PostScript variable, to 2
Font family doesn’t
allow simulation of
the outline style
This option is switched on if the font family disallows
simulating the Outline style by smearing the glyph and
whiting out the middle
Font family doesn’t
allow simulation of
the bold style
This option is switched on if the font family disallows
simulating the Bold style by smearing the glyphs
Font family
simulates the bold
style by increasing
point size
This option is switched on if the font family simulates the
Bold style by increasing the point size
Font family doesn’t
allow simulation of
the italic style
This option is switched on if the font family disallows
simulating the Italic style
Font family doesn’t
allow simulation of
the condensed style
This option is switched on if the font family disallows
automatic simulation of the style Condensed
Font family doesn’t
allow simulation of
the extended style
This option is switched on if the font family disallows
automatic simulation of the style Extended
Font family should
have no additional
intercharacter
spacing
This option is switched on if the font family should have
no additional spacing other than the space character.
To get full information about the parameters represented in the FOND Info
dialog, refer to “Inside Macintosh:Text:Font Manager”.
Note: If you are not a professional typographer, be very careful
when changing the FOND Info options.
47
TransType SE
Type 1 Fonts
Conversion of PC Type 1 fonts to the Macintosh format is similar to the
TrueType conversion process with the following differences:
1.
The characters in Type 1 fonts are identified by names, not Unicode
indexes.
2.
The metrics and kerning information of Type 1 characters on the PC is
located in separate metrics files (PFM or AFM).
3.
There are no multiple master TrueType fonts.
Changing Font Format
By default PC Type 1 fonts will be converted to Macintosh Type 1, but you
can change the destination font format. Press the pop-up menu button
located at the right of the suitcase name in the Destination list to open the
following pop-up menu:
Destination Format Pop-up Menu
Select the platform and the type for destination font.
48
Tip: You can change the default destination platform and format in the
Defaults/Formats Page of the Preferences dialog.
Conversion Process
Reencoding
Type 1 fonts also must be reencoded when converting from PC to
Macintosh. To simplify this process and make it similar to the one used
when TrueType fonts are processed, TransType automatically assigns
Unicode indexes to all characters in a Type 1 font using a special table
containing thousands of name-Unicode pairs. This way TransType can
correctly handle Type 1 fonts that have more than 256 characters.
Note that this name->Unicode method works correctly only when
characters in a Type 1 font have correct PostScript names. In cases when
names are assigned incorrectly (for example, characters from a non-Latin
language using Latin character names) another method is used, similar to
the one that we described above when talking about the conversion of
symbol-encoded TrueType fonts.
49
TransType SE
When you add a PC Type 1 font to the Source fonts list you’ll see the popup menu button at the right of the font name. Click on it and you’ll see the
menu:
Source Encoding Pop-up Menu
As you can see, there is a list of codepages (we discussed what this means
in the TrueType section above) and two commands – Use Default and
Use Names.
50
Conversion Process
If you select the Use Default item TransType will refer to the codepage
selected as the default in the Defaults/Codepages & Scripts Page of
the Preferences dialog:
If you select Use Names (the default option for the source encoding popup menu) TransType will try to convert character names to Unicode
indexes and later apply Unicode-based reencoding algorithms. We
recommend that you always use the names-Unicode method unless you
know that the source font has symbol or simulated encoding, in which case
you will manually select a codepage from the codepages list. Remember
that you may use the font preview feature to look at the encoding.
As in TrueType, after you define the source codepage you should select a
destination codepage to completely define the reencoding process.
All the characters now have some Unicode index assigned, so you can
follow the same process described in the TrueType section.
51
TransType SE
Metrics Files
TransType uses the following sequence to create known font metrics:
AFM+INF, PFM, PFB. If metrics for a particular character are not present
in the PFM file, then they are extracted from the font file (PFB). After
conversion the metrics information is stored in the FOND resource, as
required by the Mac OS. Here is a more detailed description of the
algorithm that is applied by TransType to find a metrics file:
52
1.
It looks for the name.AFM file (name is the name of the PFB file:
name.pfb) located in the same folder. If it locates the file, it extracts
the metrics from it.
2.
If the AFM file is not present, it looks for the name.PFM file in the
same folder and, if the file is not found there, in the PFM subfolder of
the current folder.
3.
If the PFM file is found, it reads the kerning and metrics data from it.
Then TransType opens the PFB file and partially interprets it to extract
the metrics for the characters that are not covered by the PFM.
Conversion Process
Multiple Master Fonts
TransType can convert multiple master fonts into virtually any format or
platform. After you have added a PC multiple master Type 1 font to the
Source Fonts list for conversion, TransType automatically prepares to
convert it to a multiple master Type 1 font for Macintosh as set in the
Defaults/Formats Page of the Preferences dialog. You can see this in
the Destination fonts list of the Main Window.
To change the format, press the pop-up menu button to the right of the
suitcase name in the destination list and use the Format submenu:
Destination Format Pop-up Menu
53
TransType SE
As with other fonts in the list, you can select the Properties command for
greater control of output formatting. The familiar Properties dialog box
appears:
Font Properties Dialog box
You can change font style attributes and the FOND properties here in the
same way as for the TrueType fonts described earlier. And one more option
becomes available when a multiple master font is converted: Create
instance. You may check this option if you want to create a single master
Type 1 font, but you MUST check this option to convert to a TrueType font.
That is why, if you change the font type to TrueType this option will be
checked automatically.
Note: Multiple master fonts have characters with varying parameters
(width, weight etc.) by their nature. If you choose some constant values for
these parameters and fix them you will get an "instance" of the font that is
a plain Type 1 font.
54
Conversion Process
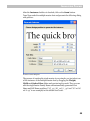
After the Instance checkbox is checked, click on the Create button.
TransType reads the multiple master font and presents the following dialog
with preview:
Generate Instance Dialog box
The process of creating the single master is very simple: you just select one
of the instances of the multiple master font by dragging the Weight,
Width and Optical Size sliders and previewing the result. Then you can
edit the single master Family Name and automatically generated Font
Name and Full Name postfixes (“367_wt_585_wd_11_op” and “367 wt 585
wd 11 op” in our example) in the editable text boxes.
55
TransType SE
As you can see it is possible to generate as many font instances as you want
from one multiple master font. But this cannot be done in one step.
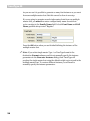
If you are going to generate several single master fonts from one multiple
master font, you must then enter a unique family name for each font
you're creating in the Family Name field. In both Font Name and Full
Name postfixes always enter "Regular":
Press the OK button when you are finished defining the instance of the
multiple master font.
Note: If you select single master Type 1 or TrueType format in the
destination Format submenu and do not manually specify the instance
parameters in the Generate Instance dialog, then TransType will
produce the single master font using the default weight vector stored in the
multiple master font. To create a different instance you will need to
manually specify the instance parameters.
56
Conversion Process
Suitcases
Suitcases containing (“referring to”, if speaking more precisely) Type 1
fonts have no major differences from suitcases containing TrueType fonts
(‘sfnt’ resources), so please refer to the TrueType section above for
information about suitcase manipulations and font suitcase properties.
The only additional option that may be useful when converting PC Type 1
fonts is to force TransType to generate suitcases by checking and using the
MSMenuName fields in the .inf files. This option, named Group
Macintosh fonts by MSMenuName, is located on the Font Families
Packaging Page of the Preferences dialog:
57
TransType SE
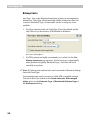
Bitmap Fonts
Any Type 1 font on the Macintosh must have at least one accompanying
bitmap font. TransType will automatically build a bitmap font when you
convert to Macintosh Type 1 format and it can do so using one of two
methods:
1.
FreeType rasterizer built into TransType. This is the default and the
only choice if you do not have ATM installed in Windows:
Mac Suitcase Building Options
2.
If ATM is present we highly recommend you to select it in the Use
bitmap rasterizer pop-up menu. It’s the best way to automatically
make professional-quality Macintosh Type 1 fonts that will work
smoothly everywhere.
Note: PC bitmap fonts and font sets aren’t converted to Macintosh bitmap
fonts with TransType.
You sometimes may need to create a so-called ATR-compatible suitcase.
You can do this if you switch on the Create suitcases with merged
styles option on the Generate Type 1/Macintosh Suitcase Page of
the Preferences dialog.
58
Conversion Process
Macintosh to PC Conversion
Converting Macintosh fonts to PC is usually easier than vice versa for the
following reasons:
1.
There are no suitcases on PCs.
2.
PC TrueType fonts are based on Unicode, so usually the reencoding
process is simpler.
3.
Bitmap fonts are not necessary for Type 1 fonts on PCs.
On the other hand, when Type 1 fonts are converted from Macintosh to PC
you must generate metrics files that will be used by Windows for
information about characters’ widths and kerning. And Macintosh font
files must be converted to a PC readable format (MacBinary,
BinHex or sit archive) before they can be converted using
TransType/Win.
59
TransType SE
Macintosh Font Preparation
Macintosh files have a significantly different structure than regular files do.
In most operating systems files are a "container" for raw unstructured
data. But the Mac OS uses a different approach. Generally a Mac OS file
consists of two forks – data and resource. The data fork can be considered
an analog of a regular file, while the resource fork contains RESOURCES.
Each of these resources has a type and is supposed to be storage for some
kind of data. Due to their complex structure Macintosh files cannot be
copied or properly accessed from a PC. So there is a need for some
intermediate format or network protocol that packs all the data into a
single file or in some other way represents a Macintosh file on the PC or
other platforms. Unfortunately there is no such standard format/protocol.
Many network protocols are limited to accessing only the data fork of
Macintosh files and that is not sufficient to read Macintosh fonts.
TransType tries many different ways to access Macintosh files through a
network but sometimes it just isn't possible. In this case or if you’re not
accessing the files over a network you will need to do a manual conversion.
There are several ways of delivering your Macintosh fonts to a PC without
any loss of data:
•
•
•
•
Single file MacBinary or BinHex intermediate format
Email attachment
PC formatted diskette, ZIP or MO disks
MacDrive utility and Mac formatted disks or CDs (HFS only)
•
Through some special networking utilities and some Networking
Operating Systems
Single Macintosh StuffIt archive
•
60
Conversion Process
Single file MacBinary or BinHex intermediate format
The simplest way to deliver a Macintosh file to a PC is to convert it into a
MacBinary or BinHex file. These formats were developed for transferring
Macintosh files through a heterogeneous network environment. When a
Macintosh file is being converted into one of these intermediate formats all
its data and resource forks are stored into a single file along with other
Mac OS related information. When it is converted back its data and
resources are restored as they were originally created on the Macintosh.
The difference between MacBinary and BinHex is that BinHex was
designed to transfer files in the body of a text message and therefore
contains only alphabetic characters. MacBinary files are meant to be a way
for treating Macintosh files as regular files. Despite their similarity
MacBinary files are considerably smaller due to their binary nature.
Note: You must convert the font files on a Macintosh before copying them
to a PC.
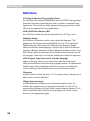
Converters for the creation of MacBinary and BinHex files on Macintosh
can be freely downloaded at:
ftp://ftp.stairways.com/other/macbinary-3.sit.hqx
http://hyperarchive.lcs.mit.edu/HyperArchive/Archive/cmp/binhex-50.hqx
or you can use commercial utilities such as StuffIt Deluxe™.
After conversion you will have a regular file that contains all the necessary
data and can be copied or sent in the usual manner through the network,
on diskette or any other media. Just drag-and-drop these files (in
MacBinary and BinHex format) into TransType or Add them.
E-mail with attached font(s)
TransType can accept fonts delivered to your PC from remote Macintosh
by e-mail. Fonts are attached to the message on Macintosh in the usual
way. After the message is received you must save it to disk as a “mail
message” (with a .eml extension) and then add this file to the TransType
Source list.
61
TransType SE
PC formatted diskette, ZIP or MO disks
Another relatively easy way of getting font files to a PC is to copy them onto
a PC formatted diskette, ZIP or MO disk. A PC formatted disk is a disk that
was formatted for a PC and thus contains a PC disk structure. When
copying files on such a disk the Mac OS stores them using a special
protocol called "PC Exchange". After you have copied files to such disk,
TransType is able to read them directly from the media. Note that files
might be “zero size”. This is just because their resource fork is stored
elsewhere (e.g. in other directory). TransType will locate all the necessary
data automatically.
utility and Mac formatted disks or CDs
MacDrive
MacDrive is a third party utility that was developed to enable the PC to
read disks that were originally formatted on a Macintosh (and thus have
the Mac OS file system). Visit http://www.macdrive.com for details. TransType
automatically uses the functionality of MacDrive if it is installed thus
enabling it to read Macintosh files from any media supported by MacDrive.
This is the only way for TransType to read fonts directly from Macintosh
disks. Note that Windows may report the size of Macintosh fonts to be
zero. Nevertheless TransType will be able to read them. Note that
MacDrive supports only Macintosh HFS CDs.
62
Conversion Process
Through special networking utilities and some
Networking Operating Systems
TransType supports a number of different networking protocols that can
see Macintosh files through the network. The supported protocols are:
•
•
•
•
•
•
•
•
•
AppleDouble
Netatalk
AUFS CAP
Helios EtherShare
PC Exchange
SGI
DAVE
AppleSingle
NTFS Services for Macintosh
Note: Exchange through some of these protocols may not work depending
on version, configuration and other conditions. The best way of checking
the availability of such a protocol is to try adding some Macintosh fonts to
TransType through your network.
Single Macintosh StuffIt archive
If Macintosh fonts were packed with StuffIt Deluxe, you can just copy the
.sit archive to your PC hard disk and add it to the TransType Source list.
63
TransType SE
TrueType Fonts
When you add a Macintosh font suitcase containing TrueType fonts (‘sfnt’
resources) to the Source list, you must let TransType know which codepage
it uses. The only case when this is not necessary is when the source
Macintosh TrueType font has a Unicode table (usually the case).
To select a codepage for the source TrueType font, follow the rules that
were described when we talked about converting PC TrueType fonts to
Macintosh format.
After TransType knows for which codepage a TrueType font was encoded,
it can assign Unicode indexes to the font’s characters and generate a
correct Unicode-mapped font, as Windows requires.
Note that the accompanying bitmap fonts (if any) from the same
Macintosh suitcase are not copied or converted to PC font format.
See also the TrueType<->Type 1 Conversion section for information on different
TrueType creation options.
64
Conversion Process
Type 1 Fonts
Conversion of Type 1 fonts from Macintosh to PC is very similar to the
conversion from PC to Macintosh. The only difference is the handling of
the metrics. Metrics information (a character’s width(s) and kerning) is
extracted from the font suitcase and converted to AFM, INF and PFM files.
Of course, the reencoding information is used when the metrics files are
generated so that you get a valid PC Type 1 font file.
Note that the accompanying bitmap fonts from the Macintosh suitcase are
not copied or converted to PC font format as in the case with TrueType
fonts. But you must always add suitcases to TransType but not
printer font files only.
See also the TrueType<->Type 1 Conversion section for information on different
Type 1 creation options.
65
TransType SE
TrueType<->Type 1 Conversion
By default TransType converts between platforms but not between formats
(TrueType to TrueType and Type 1 to Type 1). You have the option to
change the destination font type in the destination Format pop-up menu
or in the font Properties dialog box.
Before you change the destination font type (and actually before adding
fonts to the Main Window), it is a good idea to check some of the more
important options for generating fonts in the destination format.
Note: If you change any of the options in the Preferences dialog, you
have to re-add the fonts to the source fonts list in order to convert them
according to the “new rules”.
66
Conversion Process
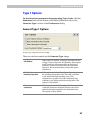
Type 1 Options
To check and set parameters for generating Type 1 fonts, click the
Preferences button at the bottom of the Main Window and refer to the
Generate Type 1 section of the Preferences dialog.
General Type 1 Options
Generate Type 1 Page of the Preferences Dialog
There are only four controls on the Generate Type 1 page:
Use FontName instead
of FullName
If this option is checked, TransType will name the files
of Type 1 fonts on the basis of FontName. If this option
is off, TransType will name the files on the basis of
FullName. In some cases this affects the font menu
name too. We recommend that you keep this option
switched on
Build Standard
Encoding if possible
If this option is checked, TransType will try to replace
the encoding information in the font with a reference
to the Adobe Standard Encoding vector. This
replacement is possible only if the destination font
conforms to the Adobe standard encoding table. This
option is off by default
Always decompose
composites
If this option is checked, TransType will decompose all
composite characters imported from the source font
and write them decomposed to the destination font.
This option is off by default
67
TransType SE
The Level of automatic hinting pop-up menu allows you to control
Type 1 hinting. Autohinting is not needed when conversion from Type 1
format is performed. All old hinting information is preserved in this case.
But when conversion from TrueType is performed, the are two ways to deal
with hints:
1.
To not generate hinting information in a new Type 1 font: Select No
Hinting in the Level of autohinting pop-up menu. The font will
loose quality in this case.
2.
To use the special autohinting algorithms that convert TrueType
instructions into Type 1 hints: Select Default Level item in the Level
of autohinting pop-up menu. This option is set by default.
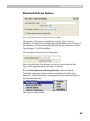
Metrics Options
Refer to the Generate Type 1/Metrics Page of the Preferences dialog:
Generate Type 1/Metrics Page of the Preferences Dialog
68
Create PFM metrics
(Windows only)
If this option is checked, TransType will save metrics
in a PFM file when converting for Windows. This
option is on by default
Create AFM & INF
metrics (Windows
only)
If this option is checked, TransType will create AFM
and INF files when creating Type 1 for Windows. This
option is on by default
Create AFM metrics for
Macintosh Type 1
If this option is checked, TransType will create a
separate AFM metrics file for Macintosh Type 1. This
option is off and metrics are saved to the main
PostScript font file by default
Use Family name as
Menu name in PFM
and INF
If this option is checked, TransType will write the font
Family name to the Menu name fields in PFM and INF
files. It is off by default
Conversion Process
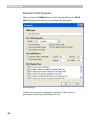
Macintosh Suitcase Options
Generate Type 1/Macintosh Suitcase Page of the Preferences Dialog
The options on this page are useful when creating Type 1 fonts for
Macintosh. TransType can automatically generate bitmap fonts with one of
two rasterizers. Choose between the built-in FreeType rasterizer or Adobe
Type Manager™ (ATM) if installed.
You can request several sizes of bitmap fonts:
Enter the point sizes of the bitmaps you want to export with the Mac
Type 1 font, separating values by a space or comma.
If the Create suitcases with merged styles option is checked,
TransType will generate a font suitcase compatible with Adobe Type
Reunion™, which lets the font’s styles appear in the hierarchical menu of
the font menu like that:
This option is off by default.
69
TransType SE
TrueType Options
To check and set parameters for generating TrueType fonts, click
the Preferences button at the bottom of the Main Window and refer to the
TrueType section of the Preferences dialog.
General TrueType Options
Generate TrueType Page of the Preferences Dialog
70
Conversion Process
Here is the description of controls which are used to customize the
TrueType font (Win TrueType and Mac TrueType) generating process:
Treat single byte
destination Win
TrueType as Symbol
If this option is checked, TransType will generate a
non-Unicode Windows TrueType font as a Symbol
font. All characters in this font will be mapped to the
F000-F0FF range. This option is on by default
Automatically add
required glyphs
If this option is checked, TransType will add some
predefined glyphs in a TrueType font automatically.
These are the “missing” character and the “space” for
Windows TrueType, and the “missing” (“default”),
“null”, “space”, “CR”, and sometimes “non-breaking
space“ for Macintosh TrueType. This option is on by
default
Remove embedded
bitmaps
If this option is not checked, TransType will try to
preserve and reencode bitmaps embedded into a
TrueType font. TransType can reencode embedded
bitmaps only with our old TransType 1.x conversion
method (see the description of the General Conversion
Options). This option is on and embedded bitmap fonts
are stripped by default.
When conversion of a Type 1 font into TrueType format is performed,
Type 1 hints must be converted into TrueType instructions. This
conversion can be done by two methods: Default and Advanced.
The Default method is commonly used and always produces good results.
The Advanced method is sometimes better than the default method as it
can produce delta hints. Select the method of TrueType hints creation in
the Level of automatic hinting pop-up menu. If No hinting item is
selected, there will be no hints in the destination TrueType font.
Note: TrueType hinting options will be ignored when conversion of
TrueType to TrueType is performed.
71
TransType SE
Font smoothing is a special technique for improving the appearance of
TrueType fonts on the screen. Font smoothing is used by the latest versions
of the Windows operating system. With this technique edges of the
characters are rendered using shades of gray. Font smoothing may be
combined with a gridfitting method that optimizes the character’s
appearance by adjusting its outline. The Font smoothing pop-up menu
lets you control the usage of these methods:
1.
Choose the Default option to apply smoothing and gridfitting
methods in accordance with the following table:
Font size in screen pixels
Methods
0-8
Smoothing
9-16
Gridfitting
17-…
Both smoothing and gridfitting
These are the usual optimal settings for font smoothing.
2.
Choose the Off menu item to not generate the smoothing table in the
destination TrueType fonts.
3.
Choose the Always menu item to apply both smoothing and
gridfitting methods to all sizes of the font on the screen:
Font size in screen pixels
0-…
Methods
Both smoothing and gridfitting
Note: Font smoothing table data make sense only on the Windows
platform as they are ignored by the Mac OS.
72
Conversion Process
Embedding And Identification Options
Generate TrueType/Embedding & Identification Page of the Preferences Dialog
The Embedding & Identification Page contains two additional pop-up
menus and two checkboxes.
The Font's embedding pop-up controls how the font may be embedded
into documents. Embedding is a feature of the operating system and some
applications that allow programs to include fonts into documents to
guarantee that they will be reproduced correctly. However, embedding may
cause problems with font piracy. It is not very hard to extract embedded
fonts from a document, so the TrueType font format includes a special
setting that can control font embedding.
There are four types of font embedding:
Only printing and
previewing
is allowed
The font may be embedded, but editing of the
document it contains is not allowed. This selection is
set by default
Editing of the document
is allowed
The font may be embedded and the document that
contains the font may be viewed, printed and edited
Everything is allowed
After the document is opened the font works as if it
was installed in the system
Embedding is not allowed
Embedding is not allowed for this font.
73
TransType SE
You cannot reduce or remove the embedding restrictions that were set in
the source font by the original creator of the font. You can either leave the
embedding restrictions unchanged or set the restrictions higher. For
example, if the original font has the embedding level Editing of the
document is allowed and you change the level to Everything is
allowed in the Preferences dialog, then in the output font the original
embedding level will be retained rather than the one you set. But if you
change the embedding level to Not allowed, then the embedding in the
output font will be changed.
Additionally you can use the Allow subsetting and the Bitmap
embedding only options for more control of the embedding fonts into
documents.
The Default font's vendor pop-up allows you to set the special up-tofour letter length code that is assigned to most TrueType producers to
identify their fonts. An uppercase vendor code must be registered with
Microsoft or Apple. All registered Vendor codes known at the time of
TransType’s release are placed in the pop-up menu. You don't need to
change the default 'PYRS' vendor code if you do not have your own.
74
Conversion Process
FontLab (VFB) Font Conversion
TransType can convert fonts from the VFB format used internally in other
Fontlab products. They can be converted to any format for any platform.
There are, however, a few caveats:
1.
Converting a VFB font in TransType is the same as exporting it from a
Fontlab application, only with the additional power that you can
choose the encoding.
2.
When you add a single master VFB font to the source list of the Main
Window, TransType prepares to convert it to a Macintosh TrueType
font by default. You can change the destination format using the
Format submenu as with other fonts.
3.
When you add a multiple master VFB font to the source list of the Main
Window, TransType prepares to convert it to a Macintosh Type 1
multiple master font by default. For details please see the section on
multiple master fonts conversion.
4.
As with other conversions you can use the different TrueType and
Type 1 creation options described in the TrueType<->Type 1 Conversion
section. Please note that the option “Perform conversion with
minimal changes” doesn’t work with VFB files.
75
TransType SE
Other Types of Conversion
By default TransType converts between platforms in one format (PC
TrueType to Mac TrueType etc.). This is set on the Defaults/Formats
Page of the Preferences dialog and can be changed. You have also the
option to change the destination platform and format in the destination
Format pop-up menu or in the Font Properties dialog and convert, for
instance, Win TrueType to Win TrueType or Mac Type 1 to Mac Type 1.
Why would you want to do this?
1.
To change a font’s encoding.
2.
To decompose composites in a font.
3.
To compact fonts by removing extra glyphs, etc.
Note: Not all the options from the Generate Type 1 and Generate
TrueType sections of the Preferences dialog work when conversion
within one format is performed. For example, hinting options never work
in such cases.
76
Technical Details
Here we’ll add some technical details for professional TransType users.
With the information contained here you can customize some of
TransType’s features and better understand how it works.
TransType SE
Type 1 Fonts
TransType opens every Type 1 font being converted and partially interprets
it to extract the names of all the characters present in the font and the
information about the characters’ widths. Note that information about the
characters’ bounding boxes is not extracted, so when Macintosh fonts are
converted to PC and an AFM file is generated, the font bounding box is
used instead of character bounding boxes.
Information about the mapping of PostScript names of characters to
Unicode indexes is located in the Standard.nam file located in the Program
Files/Common Files/FontLab/Mapping folder. This file has a very simple
structure – every line contains a PostScript name and its corresponding
Unicode index. You can edit this file or extend it at your own risk.
In addition to the Standard.nam file TransType uses an algorithm that
decodes names constructed according to Adobe’s “uniXXXX” rule.
78
Technical Details
TrueType Fonts
When TransType opens PC TrueType fonts it looks for a (3.1) CMap table.
If this table is found then the font is marked as a normal Unicode font. If
not, TransType tries to open the (3.0) table – if this table is present, it
means that the source font is a symbol font.
The last table that is checked is the (1.0) table usually used to encode fonts
on the Macintosh. This table is also used as a symbol-mapping table. If the
font contains more glyphs than are covered by the (1.0) CMap table,
TransType tries to open the post table, extract the glyph names and find
Unicode indexes using the same method which is used when PostScript
names of the Type 1 characters are mapped to Unicode.
Note that the same search sequence is used when a font is converted from
Macintosh to PC.
The MacStyle field of the head table is used to detect the style of a
Windows TrueType font.
AAT (Apple Advanced Typography) features are not created when
converting to Macintosh TrueType.
Ascender and descender values are extracted from the head table. The
OS/2 table is not used for these purposes.
79
TransType SE
Customizing Codepages
Files containing definitions of the codepages that appear in the pop-up
menus are in the Program Files/Common Files/FontLab/Codepage
directory and have a simple text structure. You can edit the existing files
and make your own codepages following the structure of any existing file.
You may put the edited codepages in the Program Files/Common Files/
TransType/Codepage/ directory or in the My Documents/FontLab/
TransType/Codepage directory.
Note that only a limited number of codepages appear in the lists by default.
The full list of codepages appears if you hold down the Ctrl key while
opening the pop-up menu.
80
Bibliography
TrueType, OpenType and TrueType Open specifications from Microsoft:
http://www.microsoft.com/typography/tt/tt.htm
OpenType Specification:
http://www.microsoft.com/typography/otspec/default.htm
TrueType Specification by Apple:
http://fonts.apple.com/TTRefMan/index.html
Adobe Type 1 Font File Specification:
http://www.adobe.com/supportservice/devrelations/PDFS/TN/T1_SPEC.PDF
Adobe’s Glyph Naming for Type 1 Font Programs:
http://www.adobe.com/supportservice/devrelations/PDFS/TN/5089_GlyphNaming
.pdf
Unicode Consortium:
http://www.unicode.org
Inside Macintosh: Text: Font Manager
http://developer.apple.com/techpubs/mac/Text/Text-181.html
Inside Macintosh: Text: Script Manager (information related to scripts and
languages):
http://developer.apple.com/techpubs/mac/Text/Text-354.html
Support
For further information about TransType browse to the TransType home
page:
http://www.fontlab.com/Font-tools/TransType/
Use the following address to get support information, TransType updates
and downloads:
http://www.fontlab.com/Font-tools/FontLab-Product-Support/
In case of any questions about TransType or any other of our products use
the form at:
http://www.fontlab.com/Font-tools/FontLab-Product-Support/
A Note on Intellectual Property
Digital fonts are complex computer programs created with a good deal of
hard work by individuals and companies. They are valuable intellectual
property and are protected by trademark, copyright, and patent laws. The
details and extent of this protection varies in different countries, but the
basics are as follows:
Trademark: A font name (and only the name) may be trademarked. Only
the trademark owner or licensees may use the name to describe a font.
Copyright: Computer programs are copyrighted. In the U.S.A. this
happens automatically as soon as the program is written. Further rights
may be secured by registering the copyright.
Patent: Some fonts, if they are distinctive and unusual enough, may be
granted a design patent. Only the patent holder or licensees may use this
font design.
If you purchase a font and then modify it for your own use you are
probably within the bounds of “fair use” and the font licensing agreement.
However, if you modify a purchased font and then sell or distribute it you
may be in violation of copyright, patent or licensing laws. Please read your
font license agreement carefully or contact the licensor to determine your
rights and obligations.
Appendix A
Basics of Digital Font Organization
Digital fonts consist of glyphs (drawings) of characters (letters of
alphabets/scripts) organized (encoded) in a particular arrangement.
Because there are many different languages and scripts each alphabet has
its own arrangement (codepage) which allows a computer to know where
to find a particular character, retrieve the glyph, and either print or display
it for the computer user.
The most familiar “encoding” to most North Americans and Western
Europeans is alphabetic order. Dictionaries, thesauri, membership lists,
databases, etc. all use this “encoding” to organize their contents. Font
encodings are a bit more complicated, because they must include not only
the letters of the alphabet (which must be represented in both their
uppercase and lowercase forms) but also punctuation, symbols, and
typographic necessities (like spaces of various sizes). Early in the history of
computing a standard “font” of 256 characters was decided upon because
that was the number that could be addressed by one byte of data.
Of course as soon as a few more alphabets were added it became obvious
that 256 characters was not nearly enough. Many different arrangements
were used and it looked like every country would have its own – some
several. Thus Unicode was born. Unicode is a two-byte font encoding that
has room for about 64,000 characters. All known scripts of the world are (or
are being) included in Unicode. While even 64000 characters is beginning
to look like it may not be enough, it seems that it will be adequate for the
immediate future.
TransType SE
Definitions
AAT (Apple Advanced Typography) fonts
the TrueType fonts especially designed for use with ATSUI. Like OpenType
fonts these fonts have special features such as swashes, contextual forms,
ligatures etc. These fonts are widely presented among system fonts in Mac
OS X and are supported in Cocoa applications.
AFM (ASCII Font Metrics) file
A text file that contains the metrics information for a PC Type 1 font.
Alphabet/Script
the collection of characters used to write a particular language. “The”
alphabet (as North Americans and English know it) is the script for the
English language, Latin script is the script for most European, SouthAmerican and some Asian languages. Cyrillic script is used in all Slavonic
languages (Russian, Ukrainian, Serbian, Bulgarian and many others). Note
that a script usually includes many more characters than necessary for the
one language. Latin script, for example, includes more than 200 characters.
ATSUI (Apple Type Services for Unicode Imaging)
Apple's technology and a set of routines that enable the rendering of
Unicode-encoded text with advanced typographic features. It automatically
handles many of the complexities inherent in text layout, including the
correct rendering of text in bidirectional and vertical script systems.
Character
a symbol used in writing. The letter “A”, for instance. Every character has a
name, which is used to identify it.
CMap (character map)
A table relating an encoding to a set of internal computer codes. For
instance the computer may use the numbers between 1100 and 1356 to
represent the characters in a font. When it needs character number 1234 it
looks at the CMap table to find the corresponding code, which, in turn,
directs it to the appropriate glyph.
88
Appendix A
Codepage
A 256-character portion of the Unicode encoding table (because that’s how
much we can address with one byte of data). The Russian codepage, for
instance, contains the characters used in writing Russian:
Composite characters
The characters that have no outline, but link to other font characters. Good
example of composite characters are accented characters, like ‘Á’, ‘å’ or ‘ñ’.
Encoding
the linear arrangement (also called the encoding vector) of a script.
Alphabetical order, ABCDEFGHIJ…, is the encoding of the English
alphabet. In earlier days (and on many older computers) ASCII (American
Symbolic Code for Information Interchange) was the standard symbol
encoding for computing. The ASCII encoding looks like this:
<space>32
!
33
“
34
#
35
$
36
%
37
&
38
‘
39
(
40
)
41
*
42
+
43
,
44
–
45
.
46
/
47
0
1
2
3
4
5
6
7
8
9
:
;
<
=
>
?
48
49
50
51
52
53
54
55
56
57
58
59
60
61
62
63
@
A
B
C
D
E
F
G
H
I
J
K
L
M
N
O
64
65
66
67
68
69
70
71
72
73
74
75
76
77
78
79
P
Q
R
S
T
U
V
W
X
Y
Z
[
\
]
^
_
80
81
82
83
84
85
86
87
88
89
90
91
92
93
94
95
`
a
b
c
d
e
f
g
h
I
j
k
l
m
n
o
96
97
98
99
100
101
102
103
104
105
106
107
108
109
110
111
p
q
r
s
t
u
v
w
x
y
z
{
|
}
~
112
113
114
115
116
117
118
119
120
121
122
123
124
125
126
127
89
TransType SE
Notice that now a number (its “code”) is assigned to each character. This is
how the computer identifies the character. Also notice that there are no
characters 0-31. This code range is “undefined” (meaning that its behavior
is unpredictable). When Unicode came along it adopted the ASCII
encoding and just added to it.
FOND resource
Macintosh terminology for the part of a Macintosh font that contains
metrics information and describes the contents of a suitcase.
FontLab format
see VFB format
Glyph
a graphic representation of a character. An “A” may appear in many
different ways:
They are all the letter “A” but each is a different glyph.
INF (Information) file
A text file that contains information about a PC Type 1 font.
Multiple master font
A special type of font format that is an extension of the Type 1 font format.
Multiple master fonts contain several font styles, called master fonts, in
one font file. A program that uses multiple master font can not only select
one of the master fonts, but it also can select an intermediate design
created by the linear interpolation of the master fonts.
NFNT resource
Macintosh terminology for the part of a Type 1 or TrueType Macintosh font
that contains the bitmap font.
OpenType
OpenType font format, jointly developed by Microsoft and Adobe.
OpenType fonts can be TrueType-flavored (or OpenType TT) and
PostScript-flavored (or OpenType PS). Both are Unicode-encoded and
support special features like swashes, contextual forms, ligatures etc. To
convert to and from OpenType format you need TransType Pro available
as a separate product.
90
Appendix A
PFB (Postscript Font Binary) file
A binary file that contains the glyph outline information for a PC Type 1
font.
PFM (Postscript Font Metrics) file
A binary file that contains the metrics information for a PC Type 1 font.
POST resource
Macintosh terminology for the part of a Macintosh font that contains an
Adobe Type 1 font.
sfnt resource
Macintosh terminology for the part of a Macintosh font that contains a
TrueType font.
Suitcase
Macintosh terminology for a file which contains information about a font
or family of fonts.
Table
A set of data defining behaviors or relationships of a font. Digital fonts
contain not only the drawings of their characters, but also information
about how those characters should behave. Information about the spacing
on each side of a character (metrics), how close particular characters
should be to each other (kerning), CMaps and many other things can be
kept in tables in a font.
TrueType
A font format using quadratic b-spline mathematics to describe glyph
outlines. Developed and promulgated by Microsoft and Apple Computer.
Type 1 (Adobe Type 1, PostScript Type 1)
A font format using cubic b-spline mathematics to describe glyph outlines.
Developed and promulgated by Adobe Systems.
Unicode range
The portion of Unicode dealing with a particular language or script. E.g.
the Hebrew range, the Cyrillic range, the extended Latin range. Unicode
range is not limited to 256 characters. It is usually a contiguous part of
Unicode.
VFB format
the internal format of FontLab products.
91