1
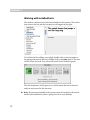
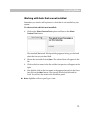
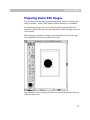
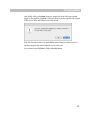
SigMaker 3 for Macintosh® User Manual SigMaker 3 user manual, edition 3.0 [03.09.2007] Copyright © 1992–2007 by Fontlab Ltd. All rights reserved. Editors: Sasha Petrov, Adam Twardoch, Ted Harrison, Yuri Yarmola Cover illustration: Paweł Jońca, pejot.com No part of this publication may be reproduced, stored in a retrieval system, or transmitted, in any form or by any means, electronic, mechanical, photocopying, recording, or otherwise, without the prior written consent of the publisher. Any software referred to herein is furnished under license and may only be used or copied in accordance with the terms of such license. AsiaFont Studio, BitFonter, CompoCompiler, FONmaker, FogLamp, FontFlasher, FontLab, ScanFont, SigMaker, TransType, TypeTool, FontAudit, VectorPaint and the FontLab logo are either registered trademarks or trademarks of Fontlab Ltd. in the United States and/or other countries. Apple, the Apple Logo , Mac , Mac OS , Macintosh and TrueType are trademarks of Apple Computer, Inc., registered in the United States and other countries. Adobe, PostScript, Photoshop, Type Manager, Illustrator, Macromedia, Fontographer, Flash and Freehand are trademarks of Adobe Systems Incorporated, which may be registered in certain jurisdictions. OpenType, Windows, Windows 95, Windows 98, Windows XP and Windows NT are either registered trademarks or trademarks of Microsoft Corporation in the United States and/or other countries. IBM is a registered trademark of International Business Machines Corporation. Other brand or product names are the trademarks or registered trademarks of their respective holders. THIS PUBLICATION AND THE INFORMATION HEREIN IS FURNISHED AS IS, IS SUBJECT TO CHANGE WITHOUT NOTICE, AND SHOULD NOT BE CONSTRUED AS A COMMITMENT BY FONTLAB LTD. FONTLAB LTD. ASSUMES NO RESPONSIBILITY OR LIABILITY FOR ANY ERRORS OR INACCURACIES, MAKES NO WARRANTY OF ANY KIND (EXPRESS, IMPLIED OR STATUTORY) WITH RESPECT TO THIS PUBLICATION, AND EXPRESSLY DISCLAIMS ANY AND ALL WARRANTIES OF MERCHANTABILITY, FITNESS FOR PARTICULAR PURPOSES AND NONINFRINGEMENT OF THIRD PARTY RIGHTS. This document was created by Fontlab Ltd (http://www.fontlab.com/). Contents INTRODUCTION 5 System Requirements 6 Installing SigMaker 7 USING SIGMAKER 9 Selecting the Source Font 11 Preparing Source Images 15 Preparing the Source Image for Scanning Scanning an Image Preparing Vector EPS Images 16 16 17 Selecting an Image 19 Editing an Image 21 Selecting the Character 22 Adjusting Glyph Size and Width 24 Defining the Output 28 Naming the Font 29 Defining a Glyphlet 31 What are Glyphlets? Defining Glyphlet Options 31 32 Saving the Font 34 APPENDIX A. GLOSSARY 37 Character Glyph Glyphlet Font Fontlet Encoding Some More Definitions 37 38 39 39 39 40 41 Introduction Thank you for purchasing SigMaker 3 – a powerful utility for creating fonts from any image you drawn or scanned. It allows you to put your signature or any other symbol into a new font or even add it to any Macintosh font. The key features of SigMaker 3 are: Create a new font from an outline or bitmap image Add an image to a copy of any installed font Save an image as a SING glyphlet for use in Adobe InDesign. SigMaker 3 System Requirements The Macintosh version of SigMaker requires one of the following hardware and software configurations: A Power PC or Intel based Macintosh with Mac OS X v 10.2 or later installed (v 10.4 is recommended). At least 20Mb of free space on the hard disk drive and at least 64 MB RAM. SigMaker will start on 32 MB RAM but you will need more RAM to open bigger fonts. 6 Introduction Installing SigMaker To install SigMaker on Macintosh: 1. Quit all open applications and disable any antivirus utilities that may prevent proper installation. 2. Run the SigMaker Installer. 3. Follow the on-screen instructions. The installer will put all the necessary files into the /Applications/SigMaker3/ folder by default. Note that you need to have enough user privileges to install software on Mac OS X. 7 Using SigMaker With SigMaker you can create new single-glyph fonts (we will call them fontlets) containing only one glyph, e.g. your signature or any other custom image. You also can create new fonts by adding your signature to existing TrueType and OpenType fonts installed on the system. Using SigMaker is very easy and doesn't require any special knowledge. The general workflow includes 6 simple steps: 1. Select the source font in which to include your signature. You may skip this step if you are going to create a single-glyph font. 2. Open the saved image of your signature or paste it from the Clipboard and make any changes to the image, including cropping. 3. Select the character code that will be used for your glyph. 4. Adjust the dimensions and position of the image to fit the other glyphs in the font. 5. Name the font or define a glyphlet. 6. Select the output format and save the font or SING glyphlet to the disk. SigMaker 3 When you start SigMaker you can see the Workflow toolbar containing all these steps: Click on the corresponding numbered button to get directly to the step you need or select the step in the Main window. But we recommend you follow the original steps’ order by clicking on the Next button located in the bottom right corner of the Main window: 10 Using SigMaker Selecting the Source Font If you are going to create a single-glyph font (fontlet) you do not need to select the existing font and may just proceed to the next step. Otherwise if you want to add your image to an existing font choose among Select Installed Font and Select Custom Font options: 11 SigMaker 3 Working with installed fonts The window contains a list of the fonts installed on the system. Click on the font name in the list and the font preview will appear at the right: To load the font for adding a new glyph, double-click on the font name or the appropriate style in the list or simply click on the Next button. The font will be chosen for work. You will see the result in the Workflow panel: The first step button is fully green now, which means the font is selected and you can proceed to the next step. 12 Note: If some fonts installed in the system cannot be loaded try the second method (described below) after copying the font to your Desktop. Using SigMaker Working with fonts that are not installed Sometimes you need to add a picture to a font that is not installed on your system. To select a font which is not installed: 1. Click on the Select Custom Font option and then on the Select Custom Font button: The standard Macintosh File Open dialog appears letting you find and select the font on your hard disk. 2. Choose the font and click on Open. The selected font will appear in the list. 3. Click on the font name in the list and the font preview will appear at the right. 4. Now double-click on the font name or the appropriate style in the list or just click on the Next button. The font will be read and selected for work. You will see the result in the Workflow panel. Note: SigMaker will not open Type 1 fonts. 13 SigMaker 3 What Are Type 1, TrueType and OpenType Fonts? 1. Type 1 (or PostScript) fonts usually having pfb extension with supplementary files .afm, .inf, .pfm. This font format uses cubic b-spline mathematics to describe glyph outlines. It is developed and promulgated by Adobe Systems. SigMaker does not work with this kind of fonts. 2. Traditional Macintosh TrueType font suitcases with 'sfnt' resources. Each 'sfnt' resource is a font. One suitcase may contain several 'sfnt' resources united in a font family or representing different font families. 3. Data-fork-based Macintosh TrueType fonts usually having a dfont extension. This is almost the same format as the previous one with one exception: these fonts may contain additional data for use with ATSUI (Apple Type Services for Unicode Imaging). These fonts are widely presented among system fonts in Mac OS X and are supported in Cocoa applications. 4. Windows TrueType/OpenType TT fonts usually having ttf extension. These fonts may contain additional data for OpenType features. 5. Windows OpenType PS (PostScript-flavored) fonts usually having otf extension. These fonts also contain additional data for OpenType features. For more reference please download and read TrueType, OpenType and Type 1 - What's the difference? (http://www.font.to/downloads/documents/TT_PS_OT.pdf) by Thomas Phinney. 14 Using SigMaker Preparing Source Images In SigMaker you can use the following sources of images: An image file in TIFF, PNG, JPEG, GIF or PICT format An image file in vector EPS format The Macintosh Clipboard You also can prepare your individual glyph image printed or written on paper and scan it in a scanner, then export in TIFF, PNG, JPEG, GIF or PICT format for SigMaker (TIFF format is preferred while JPEG is not recommended). Note that SigMaker will open not only black & white bitmaps but also color or grayscale images. However color or grayscale will be converted to B&W for insertion into the font, since TrueType and OpenType fonts support only black & white. 15 SigMaker 3 Preparing the Source Image for Scanning The scanning stage is very critical for the quality of the result, so please read this section carefully and take the time to experiment with your scanner and adjust the scanning sequence for the best results. To get best results we recommend that you prepare a source image (on paper) with the following characteristics in mind: The paper must be white and smooth. The images of characters or symbols that you want to place into a font must be large. The real size of the symbol that you want to scan depends on the optical resolution of your scanner. We recommend that the size of the symbol be at least 1 inch/2.5 cm in height. If you want to get a very precise result, you can prepare a bigger glyph, even one huge glyph on a page. SigMaker can process such a glyph, but our experiments have shown that glyphs bigger than mentioned above do not really improve the quality of the resulting outlines. If you want to scan your signature, write it as usual. The more natural it is, the better the result. But do not choose a thin pen. A standard 0.7mm pen is best. Never use a pencil! The image will look contrasted on paper, but not when scanned. As a result you will get noise in the black areas of the image and holes in the glyphs' strokes. Scanning an Image We recommend that you select 600 dpi as the default scanning resolution. If you scan a small picture, increase the scanning resolution, if the source picture is big (more than 1 inch in height), 300-400 dpi will be enough. You may scan the source picture in grayscale or color mode. Do not choose a resolution that is higher than the optical resolution of your scanner. Some scanner software lets you choose a resolution that is several times higher than the real optical scanning resolution of your scanner. The scanning software generates additional information necessary to “fill” the increased resolution automatically. For SigMaker's purposes, this is not necessary and can significantly decrease the quality of the resulting outlines. 16 Using SigMaker Preparing Vector EPS Images You can draw your signature using any application capable of saving your image in outline (“vector”) EPS format, such as Illustrator or FreeHand. As with bitmap images, the vector image should be large enough to be imported without distortion (see the image below where the page size is set to A4 format). When drawing remember to assign some kind of fill to all your drawings since SigMaker will not import paths with no fill: Also remember that your image should never exceed the bottom or the top of the document size. 17 SigMaker 3 Sometimes you may need to change the default options for output in the application's Preferences dialog. For example, in Illustrator for Macintosh you should switch on the AICB option in the Preferences > Files & Clipboard settings (which is off by default): When you finish drawing your image in Illustrator choose File > Save As (or File > Export) and save the document in EPS Version 8 or 10 format. You also can just copy your drawing onto the Clipboard and then paste it from the Clipboard in SigMaker. 18 Using SigMaker Selecting an Image This step is the most important one: here you are selecting what will be processed and exported as a new font or a glyphlet by SigMaker. Here you can open the prepared image file in almost any known bitmap format (TIFF, PNG, JPEG, PICT formats are supported) or outline EPS format which is typically created in vector-editing applications such as Adobe Illustrator. You can also paste an image from the Clipboard where it is copied from any bitmap-editing application such as Adobe Photoshop or Corel Draw. 19 SigMaker 3 Simply click on the appropriate button: If the image is imported (or pasted) correctly then you will see it in the editing area for further adjustments. The Workflow panel will contain information about the image: If something is wrong the appropriate error message will appear. 20 Using SigMaker Editing an Image After the image is imported (or pasted) correctly you can start working with it in the editing area. There are 8 toolbar buttons available above the editing area: Flip Horizontal Makes a mirror transformation in the horizontal direction Flip Vertical Makes a mirror transformation in the vertical direction Rotate 90° CW Rotates the image 90 degrees clockwise Rotate 90° CCW Rotates the image 90 degrees counter-clockwise Invert Inverts the image Crop Allows you to select part of the image Zoom-in Enlarges the image view Zoom-out Reduces the image view Use the Flip and Rotate tools to quickly change your image orientation. Just click on the corresponding tool button once. To invert colors, click on the Invert tool button. To view the image enlarged, select the Zoom-in tool, move the mouse pointer to one of the corners of the rectangular area that you want to zoom on and press the mouse button. Then, holding the mouse button down, define the zoom-in area by dragging the cursor to form a rectangle. Release the button and the new zoom mode will be selected. If you see that only part of the image is needed you may select it with the Crop tool. We recommend you crop your image only after you've done all other modifications. When finished editing the image click on the Next button to proceed. 21 SigMaker 3 Selecting the Character Every character in a font usually has its own position defined by the Unicode index and the font character map. To create a fontlet or add a new glyph to an existing font you must select the place for it in the font. This is what you do in the next step: The table represents the character set of the font selected in the first step. If no font was selected you will see gray characters. 22 Using SigMaker The character '~' (which has Unicode 007E) is selected by default. Leave it selected or click on another character that will be used for your custom symbol. The Unicode of the selected character will appear below the table. If you choose an existing character it will be replaced on export. I.e. the old character will disappear from the font. To add a character click on the grey character cell. You also can search for characters by entering their Unicode indexes in the Go to Unicode field end pressing the ENTER key. When finished click on the Next button to proceed. Note: Use the Keyboard Viewer utility (from the Input menu in Mac OS X) to learn how to access certain characters from your keyboard. If the Input menu is not visible go to System Preferences > International, click on the Input Menu and switch on the Show input menu in menu bar option. 23 SigMaker 3 Adjusting Glyph Size and Width Since the dimensions of your image may be different it may not fit with the selected font: or 24 Using SigMaker The Position Image step is needed to make your image fit with other glyphs in the font: Your custom glyph is shown here between two other glyphs from the font as if it was used in text. This lets you see the dimensions of the glyph in comparison with its neighbors. You can change the left and right glyph neighbors by typing them in the corresponding text fields. If you have not selected a font in the first step you will see the neighbors are empty. 25 SigMaker 3 To move the glyph vertically or horizontally, move the mouse cursor to the image and drag it with the mouse button pressed. Hold the SHIFT key to constrain the direction. To enlarge or reduce the glyph, use the Scale Image slider: dragging the slider to the right will enlarge the glyph: Do not enlarge your glyph too much or it might be cropped during the export. To change the glyph width, use the Set Symbol Width slider: You can also use the presets in the dropdown lists at the right of the sliders: For example, the Proportional Width option is a good choice after you have scaled the image. 26 Using SigMaker The Full Width and Half Width options are useful when working with CJK characters: Full Width Half Width To enlarge or reduce the whole preview use this control: When finished with the glyph image size and width click on Next to go forward. 27 SigMaker 3 Defining the Output At the Set Font Names step you must choose the output format for your image: As you can see you have 3 options available here. But if you skipped the first step and did not select a source font you then can only create a new single-glyph font (fontlet): A single-glyph font is a TrueType or OpenType font containing only one glyph. This font can be used in any application allowing you to select fonts in the Font menu. To make all options available, go to the first step, choose the font and then return back to the current step. 28 Using SigMaker Naming the Font If you are going to create a new single-glyph font or add your image to an existing font check one of these two options at the Set Font Names step: Renaming the font at this step is necessary so that you don’t overwrite the original font and to let the system distinguish the two different fonts. You may choose to not rename the font but this will cause font conflicts and even may result in system crashes. We recommend that you always name your new fonts differently. To name your new font, type in the New Family Name field. If an existing font was selected in the first step you may just add some characters to the original Family name: To get more control, you may switch to the Advanced Options mode: 29 SigMaker 3 In both the Basic and Advanced modes the resulting font information is displayed as shown below: To see the copyright information and the end user license agreement (EULA) for the original font, click on the Copyright/EULA: Show link. You may edit this information if the Create a new single-glyph font option was selected. After you change or enter a new font family name click on the Next button to save your font. 30 Using SigMaker Defining a Glyphlet If you want to create a SING glyphlet from your image choose the following option at the Set Font Names step: Then proceed with defining the glyphlet options. What are Glyphlets? A SING glyphlet is an extension to the OpenType font format developed by Adobe. It allows you to add supplemental glyphs to an existing OpenType font without actually editing the font. A SING glyphlet is a very small OpenType font that contains the outlines for a single glyph and several tables, including two with details about the glyphlet and metadata. Glyphlet is always connected to the existing font that must be installed. Currently glyphlets are only supported in Adobe InDesign for Japanese but it is very possible that other applications will support this new technology in the near future. You can find more information about the SING architecture at the Adobe site: http://www.adobe.com/products/indesign/sing_gaiji.html 31 SigMaker 3 Defining Glyphlet Options To create a glyphlet from your image, you might just define some basic options for it: Define the basic glyphlet properties here: Glyphlet Name and the Copyright string. To get more control, you may switch to the Advanced Options mode and click on the Edit Advanced Settings button. The Advanced SING Options dialog box appears: 32 Using SigMaker The dialog box contains the list of glyphlet properties and several controls that let you define records in the list. To learn more about glyphlet properties please use this link: http://partners.adobe.com/public/developer/opentype/gdk/topic.html Above the list there is a toolbar that you can use to modify the list; add or remove records; or generate records automatically: Add a new property record Remove the currently selected property record Remove all property records Automatically fill the list of property records. To add a new name record, click on the button on a toolbar, select property record options using the controls below the list and type in the record content. To remove a record, select it in the list and click on the the button to remove all property records. button. Click on After you set the advanced glyphlet options click on the Close button and then on the Next button to go to the last step. 33 SigMaker 3 Saving the Font To save your new font or SING glyphlet to the disk, set the file destination and name in the edit box: To change the destination and/or format for the font, click on the Browse button or select it in the dropdown list: If you select the system Fonts folder the new font will be saved there and activated. The same with the user Fonts folder. If you choose to save the font in another place on the disk you may turn on the Activate Font option to temporarily activate the font. In this case the font will be deactivated after a system restart. 34 Using SigMaker And finally click on the Next button to export the font with your custom glyph or the glyphlet. SigMaker will save the font in the original font format of the source font and inform you of the result: You may choose to start over and add the same image to another font or another image to the same original or your new font. If you want to quit SigMaker click on the No button. 35 Appendix A. Glossary Let us define some terms that may help understanding SigMaker and fonts in general. Character The minimal, atomic unit of writing with a clearly defined identity — a part of the alphabet, a letter, a digit, an ideogram, a symbol. Any image that can be recognized as having the same meaning represents the same character: All the images above represent the character “A”. Please note that sometimes, identical images represent different characters: Latin “A” Cyrillic “A” Greek “Alpha” Characters are abstract beings without a particular, strictly defined image. Computers store characters in their memory using numerical codes. A text file contains sequences of such codes that represent strings of characters. SigMaker 3 Glyph The basic, atomic element of a font, the particular image that is being shown on screen or printed. The glyph repertoire of a font is a collection of all glyphs contained in this particular font. Typically, one glyph is a graphical representation of one character. However, the same font can include several glyphs that are different graphical representations of the same character: Also, one glyph can represent several characters, for example in a ligature. Characters are the abstract, conceptual components of a text, while glyphs are the particular, visual components of a text fixed in some form. In addition to the visual appearance (the glyph image), a glyph also has some digital representation. A glyph can be represented by a bitmap, capable of reproducing the glyph image only in one specific size. More commonly, a glyph consists of outlines that are scalable so that they can reproduce the glyph image in any size. 38 Appendix A. Glossary Glyphlet A SING glyphlet is a very small OpenType font that contains the outlines for a single glyph and several tables, including two with details about the glyphlet and metadata. A glyphlet is always connected to an existing font that must be installed. Currently glyphlets are only supported in Adobe InDesign for Japanese but it is very possible that other applications will support this new technology in the near future. You can find more information about the SING architecture at the Adobe site: http://www.adobe.com/products/indesign/sing_gaiji.html (http://www.adobe.com/products/indesign/sing_gaiji.html) Font A typeface is a particular artwork of an alphabet, a set of glyphs that are designed with a common graphic idea in mind. A font is a digital file (or a few files) that holds a digital representation of a typeface. A font contains an organized collection of glyphs along with some additional information that defines the spatial relations between the glyphs (metrics and kerning) as well as some central parameters such as names, copyright information, linespacing values etc. (font header). Fontlet A font in TrueType/OpenType TT or OpenType PS format containing only the outlines for a single glyph. Fontlets are installed on the system and work just like other fonts. 39 SigMaker 3 Encoding When the user presses a key (or a combination of keys) on a keyboard, a numerical code is stored in the computer’s memory. This code represents a character, an abstract unit of writing. A series of such codes forms a string of text. Every keystroke stands for a different character, so every character uses a different numerical code (also called codepoint). Operating systems and applications need to know which number represents what character — otherwise a spelling checker couldn’t recognize words that you’re typing. So each operating system and each application uses a list that maps characters to numerical codes. This mapping is called “text encoding”. In the past, different computers used different text encoding standards (so-called codepages), so that the letter “Ä” was stored as number 142 in one program and as number 128 in another program. Modern operating systems and applications encode text using the international Unicode Standard, which assigns a unique numerical codepoint to every character used in writing by humankind. In Unicode, “Ä” always uses the code U+00C4 (which is hexadecimal for 196). Whenever the text is printed or displayed on the screen, the computer looks inside the font file and finds out which character codes correspond to which glyphs, so that the series of abstract character codes can be visualized using some specific images of letters, digits and other symbols. Every font includes a mapping of character codes to glyphs — this mapping is called the “font encoding” (sometimes, “encoding vector”, or, in this manual, just “encoding”). These days, most font formats use the Unicode Standard as basis for their font encoding, but it is possible to produce fonts that are encoded using the older codepages. It is even possible to have several different encoding vectors in one font, so that both old and modern applications can work with it. 40 Appendix A. Glossary Some More Definitions BMP the standard graphics file format on Windows-compatible computers. EPS Encapsulated PostScript. Image file format that supports both vector graphics and bitmap images. GIF Graphic Interchange Format. A common format for image files often used on the WWW. Resolution is limited to 256 colors. OpenType OpenType font format, jointly developed by Microsoft and Adobe. OpenType fonts can be TrueType-flavored (we call them OpenType TT fonts) and PostScript-flavored (OpenType PS fonts). Both are Unicode-encoded and support special features like swashes, contextual forms, ligatures etc. PNG Portable Network Graphics. A standard graphics file format designed for WWW to replace the GIF file format. RGB the color model in which red, green and blue are combined in various ways to reproduce other colors on the monitor. TIFF Tagged Image File Format. Uncompressed image file format for PC and Macintosh. TrueType a font format using quadratic b-spline mathematics to describe glyph outlines. Developed and promulgated by Microsoft and Apple Computer. We use the term Windows TrueType/OpenType TT for Windows TrueType fonts here in the Manual. Windows TrueType fonts containing embedded bitmaps are called OpenType SBIT fonts. Type 1 (Adobe Type 1, PostScript Type 1) a font format using cubic b-spline mathematics to describe glyph outlines. Developed and promulgated by Adobe Systems. 41