1
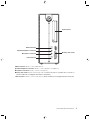
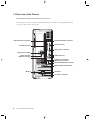
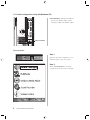
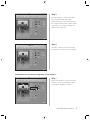
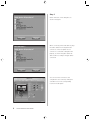
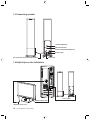
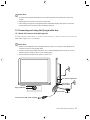
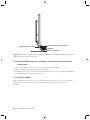
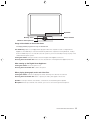
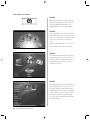
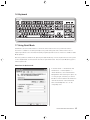
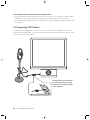
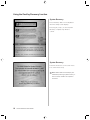
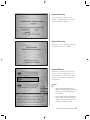
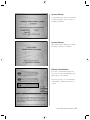
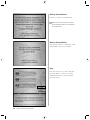
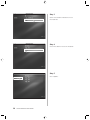
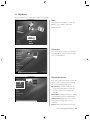
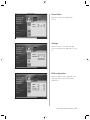
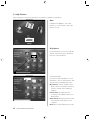
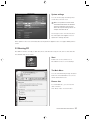
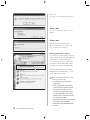
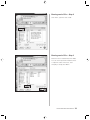
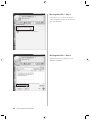
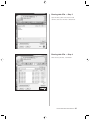
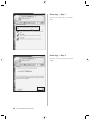
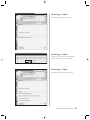
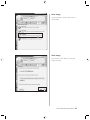
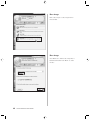
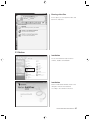
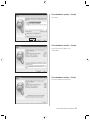
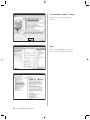
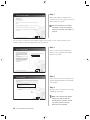
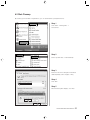
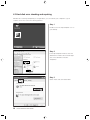
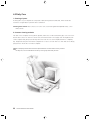
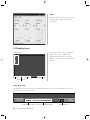
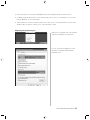
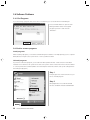
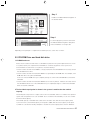
User Manual of Lenovo PC
www.lenovo.com/in
2
家悦 K 系列用户手册
Declaration
Lenovo is a trademark of Lenovo international.
Microsoft is the registered trademark of
Microsoft.
Microsoft WindowsXP is the WindowsXPregistered trademark of Microsoft Corporation.
Intel Inside is the registered trademark of Intel.
AMD, the AMD logo, AMD Athlon and AMD
Opteron are trademarks or registered
trademarks of Advanced Micro Devices, Inc.
Please find above the notes on trademarks or registered trademarks of Lenovo and its partners.
Other registered trademarks mentioned in this manual belong to the corresponding corporations, respectively.
This manual is under the protection of the Copyright Law.
All rights are reserved, and any reprint is subject to legal penalty.
No part of this manual can be photocopied, reproduced or translated into other languages without prior
consent of Lenovo international.
The names or logos of some corporations mentioned in this manual are only for purposes of announcement of trademark rights. It does not necessarily mean that the product contains the relevant
software or hardware.
Please refer to the description on the packing list for detailed configuration of the product.
家悦 K 系列用户手册
3
Explanation of Symbols
Danger: Caution, extremely dangerous
Warning: Caution, moderately dangerous
Note: Caution, minimal danger
Recommendation: Helpful instructions
Forbidden: Dangerous operation
Appendix
Please read and follow all instructions on safety in this appendix. It
will help you work comfortably, efficiently, and protect you and
your computer.
Helpful tips
1. The power supply of the computer at your home or office should be equipped with secure grounding. Make sure to use the threephase plug together with the three-phase socket with grounding. Do not change the standard power cable supplied with your
computer.
3. Do not share an electrical outlet with other home electrical appliances with large power output; otherwise, there might be an
unstable voltage output that could damage your computer or data.
4. This computer uses power supply. Please make sure your local current and voltage are correct.
5. Please do not plug or unplug any connection cables other than the USB and 1394 cable when the power is on, otherwise there
might be damage to your computer.
6. To avoid possible damage to your devices, please do not disconnect your devices until 5 seconds after your computer is shut
down.
7. The safest way to power off is to unplug your power supply. The off status of the power indicator does not necessary mean the
voltage output is zero.
8. Please check your power cable and plug on a regular basis for any damage. And make sure the connection cables are not
squeezed by any other objects.
9. Note sure about this sentence - It is strictly prohibited to change the battery on the system board without proper instructions from a
trained service professional. Only use a battery that is recommended by the manufacturer. Dispose of the battery as required by the
local ordinances or regulations.
Static Electricity Prevention
1. All internal switches, memory modules, plugs, and other components are static-senstive. Your body may be in contact with these
static-senstive devices when handling options and other components. To avoid damage to the parts, please touch a grounded
device to discharge the static electricity in your body.
2. Before touching the parts with static-proof packing, discharge the static electricity in your body.
Operating Environment
1. The optimal environmental temperature is 10~35 Celsius degree with a humidity of 35%~80%. Your computer should be located in
a well-venitliated and dry area without direct exposure to sunshine.
2. Please keep other home appliances, such as an electric fan, radio, high-power speaker, air conditioner, and microwave oven away
from your computer, because they may generate a strong magnetic field that can result in strong damage against the monitor and
disk.
Appendix
2. To prevent possible shock hazard, please do not use your computer during a lightning storm. You should disconnect the power
cable, network cable, and telephone cable.
Appendix
3. Please do not place any beverages or other objects at the top of or beside the computer or the monitor. The liquid from a beverage
can cause short circuits and damage. Keep other objects away to ensure proper heating ventiliation
4. Please place your computer in a well ventilated area and try to avoid any objects that might block the ventilation holes. Otherwise,
your computer might get overheated.
5. Please do not eat or smoke over your keyboard to help prevent from having any particles from falling into your keyboard and cause
damage.
Handling for Repair
Appendix
1. Please do not open the chassis or bezel of your computer. Please disconnect all cables before opening the chassis or disassemble
any parts. This should be done by or under the instruction of the professional technician authorized by Lenovo. Do not damage the
seal.
2. Please do not insert your hand or other objects into the hole or the joint parts of the standing of the speaker, to avoid the damage
against the vibrating film. Do not open the power supply of the computer.
3. Please handle your computer devices with care. Do not move your computer when the computer is powered on; otherwise it might
damage the head , hard disk, and CD-ROM drive. Do not move your computer until at least one minute after the system has completely shut down. And all parts including the hard disk have completed stopped working.
4. Disconnect all cables before moving the computer .
Cleaning and Maintenance
1. Please maintain the cleanness of the operating environment. If necessary, cover your computer with a piece of cloth for dust prevention 3 minutes after the system is turned off.
2. Please disconnect the power supply before cleaning the computer. Use a slightly wet, soft cloth to clean the computer. Do not use
any liquid, spray detergent, or any detergent containing inflammable material.
3. You should clean your monitor screen to avoid any damage again surface coating. Please refer to the section on computer cleaning
and maintenance for a relevant description.
4. Do not spill any liquid into your computer. If this happens, immediately disconnect the power cable and then take the proper action.
Notes in Operation
1. Try to avoid an improper shut down of your computer. Wait at least 30 seconds before restarting your computer after a shut down.
As to extend the life of your computer, do not continously turn your computer on and off.
2. To prevent damage to the diskette or even the head of the diskette drive, do not take the diskette out when the working indicator of
the diskette drive is on.
3. Do not use a CD-ROM that has been cracked or scratched, otherwise the CD-ROM drive might be damaged. Some CD-ROMs
with cracks might get broken while rotating in the CD-ROM drive at a high speed. The fragments might be thrown out at a high
speed when the CD-ROM drive is opened, which likely cause injury to the human. Please do not place any objects other than CDROM on the tray of the CD-ROM drive.
4. Please do not attach any notes or stickers onto the CD-ROM because this may cause the CD-ROM drive to fail to mobilize the CDROM and then get damaged.
5. Do not place your diskettes near any magnetic objects; otherwise the data saved on the diskettes may get damaged. Remove the
CD-ROM from the CD-ROM drive and put it in a CD-ROM bag or holder.
6. Plug and unplug all cables with slight force and pay attention to the direction. Do not quickly plug and unplug the USB device when
the power is on, to prevent the system form getting unstable. When the USB device doesn’t work well, please restart your computer.
7. Do not place an optical mouse on a transparent surface (such as glass) or reflective surface (such as a mirror); otherwise the mouse
may not work properly.
8. The power supply of the computer may have a power connector that is connected to the monitor. To shut down the computer
does not necessarily mean the monitor is turned off. You will need to turn off the monitor separately.
Data Safety
2. Do not delete unknown files or change the name of files or directories that are not created by you; otherwise, your computer or application may fail to work.
3. When accessing the network resources, you will be alerted by the hacker and antivirus software. Using some network resources
may result in hacker attack or virus infection. In a severe case, your system may get damaged.
Transporting
1. If your computer needs to be transported, please backup your data in advance to prevent any data loss. Disconnect all external
cables before the transport.
2. Try to use the original packaging during the transport because it is specifically designed to fit your computer.
Warranty Policy
1. We will carry out our warranty obligations according to the warranty policy of Lenovo.
2. Lenovo will carry out its obligations according to the limit, principle.
Appendix
1. Before using the OneKey Recovery function, please make sure to backup all important data in your hard disk as to avoid any unnecessary loss, because the OneKey Recovery will delete all data on your C partition and restore your computer to the original factory status.
Do not change the size of your C partition; otherwise the function of the restored C partition in the OneKey Recovery will be disabled. Please refer to the appropriate section when using this function.
Table of Contents
Declaration
Statement
Explanation of Symbols
Chapter 1 Computer Hardware Connections ................................... 1
1.1 Front View of the Chassis .............................................................. 2
1.2 Rear view of the Chassis ............................................................... 4
1.2.1 Audio configuration (only with Windows XP) ................................. 6
1.3 Connecting speaker ..................................................................... 10
1.4 Helpful tips on the installation ...................................................... 10
1.5 Connecting and using the flying shuttle box ................................ 11
1.5.1 Used with internet chat talking device ......................................... 11
1.5.2 Using the USB connectors, headphone, microphone connectors
on the monitor base ..................................................................... 12
1.5.3 Using the shuttle .......................................................................... 12
1.6 Keyboard ...................................................................................... 15
1.7 Using Quiet Mode ........................................................................ 15
1.8 Connecting CCD Camera ............................................................ 16
Chapter 2 OneKey Recovery ............................................................ 17
Chapter 3 The introduction on usage of software ......................... 23
3.1 Digital Mode Plateform ................................................................. 24
3.1.1 My TV and TV Program Bill .......................................................... 24
3.1.2 Update media-base ...................................................................... 27
3.1.3 My Movies .................................................................................... 29
3.1.4 My Pictures ................................................................................... 32
Table of Contents
1
3.1.5 My Music ...................................................................................... 34
3.1.6 System settings ............................................................................ 36
3.2 Burning CD ................................................................................... 37
3.3 Norton ........................................................................................... 47
Chapter 4 Safety In Use .................................................................... 53
4.1 System Restore ............................................................................ 54
4.2 Disk Cleanup ................................................................................ 57
4.3 Hard disk error checking and repairing ........................................ 58
4.4 Disk Defragment .......................................................................... 59
4.5 Daily Care ..................................................................................... 60
Chapter 5 Troubleshooting .............................................................. 61
5.1 Display .......................................................................................... 62
5.2 Sound ........................................................................................... 62
5.3 Desktop Icons ............................................................................... 64
5.4 Software Problems ....................................................................... 66
5.4.1 End Programs .............................................................................. 66
5.4.2 Add or remove programs ............................................................. 66
5.5 CD-ROM Drive and hard disk drive ............................................. 67
5.6 Special Notes on Models ............................................................. 68
Appendix
2
Table of Contents
1
Chapter 1
Computer Hardware Connections
Note: Please carefully read through this chapter. It
contains information on the various external connectors
on your computer, connecting components, and helpful
tips.
1
2
This chapter provides the following information:
Hardware configuration of the computer
Helpful tips on components connection and usage
3
Note: Not all models have all these features, Please
refer to your system.
4
5
Lenovo 5000 Series User Manual
1
1.1 Front View of the Chassis
Button and function key usage on the front panel of the chassis.
Hard disk drive indicator
OneKey Recovery
Reset
Quiet mode
Power button
Digital mode
Front digital baffleplate
Power button: By pressing this key, you can start up or shut down the computer.
Reset: By pressing this key, you shall force the computer to restart. Please use caution when using this key.
All unsaved data will be lost.
OneKey Recovery: For models that have the System reparation function. Pressing this key, while the
system power is off will start System reparation.
Quiet mode: Pressing this key, while in Windows, will reduce the computer’s noise.
Hard disk drive indicator: This indicates the read/write operations of the hard disk.
Digital mode: Pressing this key, while the system power is off will enable the Digital Home Appliance
function.
Front digital baffleplate: Behind the front digital baffleplate, you will see the front digital connectors , as
shown in the figure below:
2
Lenovo 5000 Series User Manual
Optical drives
MS/Pro/Duo
MMC/SD
USB connectors
Speaker/headphone connector
SM
1394 connector
Memory card reader
CF/MD
Microphone connector
USB connectors: Used to connect USB devices.
Speaker/headphone connector: Used to connect speakers or headphones,
Microphone connector: Used to connect a microphone.
Memory card reader: Used to read storage cards of MS,MS PRO,MS Duo,SD,MMC,SM,CF and MD etc.
(Some models are not equipped with memory card reader)
1394 connector: Used to connect 1394 devices. (Some models are not equipped with this connector)
Lenovo 5000 Series User Manual
3
1.2 Rear view of the Chassis
IO connector usage on the rear panel of the chassis
The rear panel connectors are shown in the figure below. Some models are not equipped with all the
connectors. Please refer to your system,
Standard mouse connector
Parallel connector
Standard keyboard connector
Serial connector
VGA monitor connector
LCD power connector
power connector
Ethernet connector
USB connectors
Audio line in connector
Microphone connector
Speaker/headphones connector
External VGA card connector
Modem
Telephone
TV antenna connector
4
Lenovo 5000 Series User Manual
Standard mouse connector
Parallel connector
Standard keyboard connector
Serial connector
VGA monitor connector
LCD power connector
power connector
Ethernet connector
USB connectors
7.1 Audio connector
External VGA card connector
Modem
Telephone
TV antenna connector
power connector: Used to supply power to the computer.
LCD power connector: Used to supply power to the LCD monitor that is supplied with the computer.
Standard mouse connector: Used to connect a mouse with a PS/2 type of connector.
Standard keyboard connector: Used to connect a keyboard with a PS/2 type of connector.
Serial connector: Used to connect serial devices. (COM port)
Parallel connector: Used to connect parallel devices. (LPT port)
VGA monitor connector: Used to connect the signal cable of the monitor.(VGA) (Some models have this
connector, some models have a External display card connector. See below.)
USB connectors: Used to connect USB devices.
Ethernet connector: Used to connect to LAN or wide band web devices.
External VGA card connector: Used to connect the signal cable of the monitor.(VGA) (Some models have
this connector, some models have a VGA display connector. See above.)
If the External display card has a S-video connector, it can be used to connect to a television to display
the computer screen.
TV antenna connector: Used to connect to a TV antenna. (some models equipped with TV cards have this
connector)
Modem: Used to attach your computer to a telephone line for modem use.(some models equipped with this
connector)
Telephone: Used to attach a telephone line to your computer for modem use.
7.1 Audio connector: See the following section Audio Configuration for 7.1 use.
Lenovo 5000 Series User Manual
5
1.2.1 Audio configuration (only with Windows XP)
6 I/O connectors: audio input, microphone,
line out, rear speaker output, central/
heavy bass output, side speaker output.
6 I/O connectors
To set up audio:
Step 1
Right click the audio configuration icon on
the bottom-right corner of the screen.
Step 2
Select “Sound Manager” on the audio
configuration menu as shown in the figure.
6
Lenovo 5000 Series User Manual
Step 3
Open the interface as shown in the figure.
The sound effects and mixed audio
demonstrations etc. of the sound card can
be configured in this interface. Open “Audio
I/O” and you can configure the input and
output of the sound card.
Step 4
The audio connectors shown in the figure
match the I/O connectors on the rear panel.
Configuration for the factory configuration of 2.0 speakers:
Step 1
Select 2CH speaker as shown in the figure.
And then connect the audio input cable of
the speaker to the black connector.
Lenovo 5000 Series User Manual
7
Step 2
Select “Line out” on the dialog box, as
shown in the figure.
When connecting other audio devices, plug
the audio cables into the respective I/O
connectors on the rear panel. Once a
connector is connected a dialog box will
pop up , as shown the figure. Select the
device name according to the type device
connected.
You can test if the connections and
configurations are correct by clicking the
sound box icons in the corresponding
location in the left figure.
8
Lenovo 5000 Series User Manual
Note: When connecting a device, one thing
should be paid attention—be sure to plug
microphone into the place as shown in the
figure.
If you don’t plug a microphone into the
microphone connector and select
“Microphone” in the popped up window as
shown in the figure.
An error prompt shall come up as shown in
the figure. Plugging a microphone into the
front microphone connector shall not cause
the prompt dialog box to come up.
Lenovo 5000 Series User Manual
9
1.3 Connecting speaker
Volume adjustment
Bourdon effection
Connect to Speaker/Headphone
Power switch
the connection of main and sub speaker
power cord
1.4 Helpful tips on the installation
Line in cable
Monitor signal cable
Monitopr power cord
10
Lenovo 5000 Series User Manual
Please Note:
1. To avoid electromagnetic disturbance in the monitor don’t place the speakers too close to the
monitor.
2. Please tighten the screws on the monitor signal cable.
3. If the model you bought is not equipped with the independent display card, please connect the
monitor cable to the connector of the VGA display connector.
1.5 Connecting and using the flying shuttle box
1.5.1 Used with internet chat talking device
The built-in speaker and microphone on the monitor base enable you to directly communicate with others by
voice when using internet chat software.
Please Note:
1. Please use the USB cable, that is packaged with the monitor, to connect the base shuttle to the
computer as shown in the following figure.
2. You must use the power adapter and power cord , that is packaged with the monitor to connect
them to the power supply as shown in the following figure.
3. Use the switch on the back of the monitor to power it on.
The monitor adjustment
Speaker
flying shuttle box
The monitor
power switch
Adapter
Connect to the USB of the computer
Lenovo 5000 Series User Manual
11
Flying shuttle box switch
Headphone, Microphone connector
USB HUB
Build in microphone
Note: To ensure proper operation please ensure that the LCD monitor and the base shuttle are properly plugged to
the power and the base switch is turned on.
1.5.2 Using the USB connectors, headphone, microphone connectors on the
monitor base
1. Connect to the USB connector on the back of the computer with USB cable.
2. Connect the power adapter and plug it to the power supply.
3. The USB connectors on the monitor base have limited power. Please do not use high power USB devices
like USB hard disks in all the ports at the same time.
1.5.3 Using the shuttle
Models configured with LCD monitors have a shuttle beneath the monitor that can used to start Windows
programs. After the system has booted and the Happy Shuttle program has started this function is
available...
12
Lenovo 5000 Series User Manual
Speaker
Rotary case
Menu button
Build in microphone
Usage of the shuttle on the monitor base:
The Happy Shuttle program runs only on Windows XP.
The middle key: Open/ close Happy Shuttle program. When the computer is used as a Digital Home
Appliance, the middle key is used as the Return key. IWhen the computer is running Windows, holding
down the middle key for 5 seconds will cause the system to go into the stand by. Pressing any key on the
shuttle will wake up the system.
Turning the shuttle: turning the shuttle selects the Digital Home Appliance functions.
Pressing down the shuttle dial: Enters into the selected item of the Digital Home Appliance Function.
After starting up the Digital Home Appliance:
Turning the shuttle: moves the option focus.
Pressing down the shuttle dial: confirms the option.
When playing photograph, music and video files:
Turning the shuttle: switches the playing files. When watching TV it switches the channels.
Pressing down the shuttle dial: Starts or pauses) the video, photograph or music files.
Speaker: If start up a internet chat software, conversations are heard through the speaker.
Microphone: If start up a internet chat software, your voice is sent out through the microphone.
Lenovo 5000 Series User Manual
13
The usage is as follows:
Shuttle
After the shuttle driver has been installed,
pressing the middle key of the shuttle will
start the Happy Shuttle program. The
Happy Shuttle runs only on Windows XP.
Shuttle
After starting up,and as shown in the figure,
the program dial shall come up on the lower
side of the screen, Turning the shuttle shall
cause each software icon to rotate into
focus.
When the desired software icon is in focus,
pressing “Dial” once shall start software.
Shuttle
Turning the dial will make the yellow option
bar move between each of the choices in
the menu. When the desired menu item is
highlighted pressing the dial once will
activate the function.
Shuttle
Turning the dial will make the yellow option
bar move between each of the choices in
the menu. When the desired menu item is
highlighted pressing the dial once will jump
to the folder that contains the files. Turn the
dial again and the focus moves between
files. Press down the dial and the selected
file shall be played.
14
Lenovo 5000 Series User Manual
1.6 Keyboard
1.7 Using Quiet Mode
Quiet Mode causes the CPU and fans to slow down, which reduces the noise you will hear from the
machine. It is suitable for use during word processing, web surfing and other activities that that do not
require high CPU resources. Activities like Gaming require high CPU resources and are not suitable for Quite
Mode operation.
After the system boots Windows XP, pressing the “Quiet mode” key on the front panel will cause the system
to enter “Quiet Mode”,.and the Quiet mode indicator light will turn blue.. Press the Quiet Mode key again to
exit the Quiet mode.
Attentions for Quiet mode:
In “Control Panel” → “Performance and
maintenance” → “Power Options” →
“Power Schemes”, select “Lenovo Power
Management”. After selecting this option, do
not change again, otherwise you shall not
be able to enter the Quiet mode. Where the
“Turn off the monitor” “Turn off the hard
disk” and “Standby time” etc. can be
changed by users.
Lenovo 5000 Series User Manual
15
The conditions for the system to enter the Quiet mode:
1. If you use software that needs high CPU resources for a long time, or use a third-party software to adjust
CPU frequency, the system shall automatically return from the Quiet mode to the normal mode.
2. If you start the “Quiet mode” in Windows XP, please be sure to exit the “Quiet mode” before shutting down
the computer.
1.8 Connecting CCD Camera
For models that are equipped with cameras, you can connect CCD camera to the USB connector on the
monitor base with a USB cable, as shown in the following figure. For the detailed instructions, please see the
manual that comes with the camera.
The CCD camera is connected to
the USB connector on the flying
shuttle box or the USB connector
on the computer.
16
Lenovo 5000 Series User Manual
2
Chapter 2
OneKey Recovery
1
This chapter provides the following:
By using the OneKey Recovery function, it will restore your C partition back to the
orginal factory default or to the most recent backup saved. All data in the C partition
will then be erased. Other partitions in the hard disk will not change.
2
Note: Your C partition must use the FAT32 partition
format to successfully use the OneKey Recovery
function.
3
4
5
Lenovo 5000 Series User Manual
17
Using the OneKey Recovery function
System Recovery
Press “Recovery” button on the keyboard
when the startup screen displays.
Press key ( R ) and ( r ) to select “System
Recovery”, and press key “Enter” to
confirm.
System Recovery
Follow the instructions on the screen. Press
E to confirm the recovery.
Note: Please make sure to backup all your
data before performing a system recovery. If
this is not done, all data in the C partition
will be lost.
18
Lenovo 5000 Series User Manual
System Recovery
The recovery process will take a few
minutes, so please be patient. You do not
want to interrupt the operation.
System Recovery
After the recovery is completed, you will be
prompted to restart your computer.
System Backup
To perform a system back press key ( R )
and ( r ) to select “System Backup”, and
press key “Enter” to confirm. This software
enables you to backup the current data in
the C partition.
Note:
1. When you backup the data in the C
partition, the default backup in the hidden
partition, or the last saved backup, will
be overwritten.
2. Do not change the size or location of the
C partition after you make the backup.
Otherwise, the backup data will not be
able to be successfully restored.
Lenovo 5000 Series User Manual
19
System Backup
Press E to confirm the backup and to
continue.
System Backup
System backup operation may automatically
use the un-allocated disk space from the
end of the disk if needed.
Press E to confirm the backup and to
continue.
System Backup
Follow the instructions on the screen. Press
E to confirm the backup.
20
Lenovo 5000 Series User Manual
System Backup
The backup process will take a few minutes,
so please be patient. You do not want to
interrupt the operation.
System Backup
After the backup is completed, you will be
prompted to restart your computer.
Backup Uninstallation
If you do not need the backup data any
more, you can uninstall the backup to free
up the space on the hard disk.
Press key ( R ) and ( r ) to select “Backup
Uninstallation”, and press key “Enter” to
confirm.
Lenovo 5000 Series User Manual
21
Backup Uninstallation
Press E to confirm the uninstall backup.
Note: Some space will become free space
being released and cannot be consolidated
in the last partition.
Backup Uninstallation
After the uninstallation is completed, you will
be prompted to restart your computer.
Help
Press key ( R ) and ( r ) to select “Help”,and
press key “Enter” to confirm. You can get
helpful tips about how to use the OneKey
Recovery function.
22
Lenovo 5000 Series User Manual
3
Chapter 3
The introduction on usage of software
1
This chapter provides the following:
The methods of using digital home appliances. Include: TV function, playing
video, enjoying pictures, playing DVD etc.
The method of burning optical discs.
The usage of anti-virus software
2
The TV Program Bill function is integrated into digital home appliance, which enables
you to check and read the forecast of TV programs at any time, search according
to the types of TV programs, and remind you to watch and record TV programs on
the scheduled time when you watch TV with your computer.
3
Note:
• All the software interfaces follow the software
provided with the computer you purchased.
• The TV function described in this chapter is only
applicable to the computers equipped with TV cards.
Note: The burning function described in this chapter is
4
5
only applicable to the computers equipped with the
rewritable optical drives.
Lenovo 5000 Series User Manual
23
3.1 Digital Mode Plateform
In Home Appliance mode, the Digital Home Appliance function enables you to enjoy abundant home
entertainment such as watching TV, playing videos, enjoying pictures and playing music. In addition the
Direct Burn function enables you to directly burn the contents to a CD when you are playing music, browsing
pictures or playing videos.
Digital Home Appliance functions include: My TV (including TV program bill), My Movies, My Pictures,
DVD Burn and My Music.
3.1.1 My TV and TV Program Bill
When cable TV input is connected successfully, you can watch TV shows on your computer. The
accompanied TV Program bill enables you to see the TV show schedule easily at any time. You can set the
TV program to remind you and record a TV show at the scheduled time.
Note: The first time you enable My TV, you must “auto search” for the TV stations. After successfully finding the
stations, the TV programs shall be automatically be arranged according to the order of the local TV channels.
Start
Press down the middle key of the shuttle on
the monitor base to start the Happy Shuttle
program. Turn and select a Digital Home
Appliance, start the Digital Home Appliance.
Select “My TV”, switch the channels.
Switch channel
Click the button on the bottom tool bar as
shown in the figure, to switch channels to
the previous one or the next one.
24
Lenovo 5000 Series User Manual
Multi-channel preview
The My TV function enables the computer
to display the contents of 9 channels at one
time. Click the “Menu” button on the tool
bar,select “Multi-screen preview” in the
channel setting option. You may set up
multiple groups of 9 channels.
Durng Multi-screen preview, the TV stations
muted.
Multi-screens preview
Click the PageUp or PageDown key, as
shown in the figure, to preview the channels
in other groups.
Click the selected channel, it will be
displayed in full screen mode.
Scheduled recording
Here you can set the schedule to record TV
programs. Click the “Menu” button on the
tool bar, select “TV Schedule” to set the
schedule for recording.
Lenovo 5000 Series User Manual
25
Scheduled recording
Here you can set the quality and file size of
the TV Program to be recorded.
Click the “Menu” button on the tool bar,
select “Recording Settings” to set recording
attributes.
Adjust the screen
You can adjust the picture (brightness,
contrast etc.) manually.
Click the “Menu” button on the tool bar,
select “Screen Settings” to adjust the
screen settings.
Signal setting
Here you can adjust the signal source
content of videos. Click the “Menu” button
on the tool bar, select “Signal settings” in
the Setting menu to adjust the audio and
International Broadcast Standard, and
signal source.
26
Lenovo 5000 Series User Manual
If you need to search for TV stations again, you can perform “Auto Search” in the Channel option of the
Settings menu.
Screen interception
Record/Play
Stop
Pause TV Program(delay)
Mute switch
Switch channels
Volume down Volume up
last channel
TV Program bill
menu
By clicking the time-shifting button in the My TV module you will be record TV to your hard disk to be viewed
later. Clicking the Play button will allow the TV Program to resume from where you left. Clicking the Fast
Forward key will allow you to catch up with the normal progress of the TV show.
3.1.2 Update media-base
If you want to enjoy pictures, music and movies in the Digital Home Appliance, you must first add the
pictures, music and movies to the media-base,as follows:
Step 1
In the main interface of Digital Home
Appliance, select “System Settings”.
Step 2
Select “Update”.
Lenovo 5000 Series User Manual
27
Step 3
Select the hard disk and folder that store
the media files.
Step 4
Check the folder that stores the media file.
Step 5
Click “Update”.
28
Lenovo 5000 Series User Manual
3.1.3 My Movies
Play the video movies or Video CDs stored in the computer.
Start
In the Digital Home Appliance, select “My
Movies” or use shuttle to select “My
Movies” to start.
All movies
Lists all the movies stored on the hard disk
and CD ROM,. To select the movie to play,
click on the Play button.
Play all the movies
If you want to play all the movies, check “All
movies”. Click on the Play button, then all
the movies shall be played in order.
My Favorites: click the checkbox for the
movie that you would like to add to my
favorites, and then select “Add to my
favorites” .
Movie ranks: arrange the movies according
to the number of times it has been played.
Other devices: display the movies stored
in the external storage devices of the
computer
Burn: Burn the selected movies into CDs.
Lenovo 5000 Series User Manual
29
Index
Movies can be indexed by the order of their
names, created time, formats or the most
recent date they were played.
Settings
Fast backward
Stop
Play/Pause
Fast Forward
Next Section
Fast Forward
Previous section
Slow play
Increase volume
Reduce volume
jump
menu
mute
screen interception
Left/right sound channel
Slow play /Fast play: Play slowly/ play fast, when playing fast: the playing speed can be switched to be 1,
1.5 or 2 times normal speed. When playing slowly: the playing speed can be switched to be 1, 0.8, 0.7 or
0.5 times normal speed.
Jump: Click on the Jump menu, input the amount of time to skip and the program shall jump forward that
amount of time.
Menu: Adjust the menu appearance when playing movies. Click “Menu” button, the following menu shall
come up.
Display
The display menu is used to adjust the
brightness, saturation and contrast of the
screen when playing movies.
30
Lenovo 5000 Series User Manual
Sound effect
Adjust the sound effect when playing
movies.
Settings
Adjust the size of the window when play
movies, and toggles the display time on and
off.
DVD configuration
Adjust the display of titles, dub, DVD scene
angle and memory option when playing
DVD movies.
Lenovo 5000 Series User Manual
31
3.1.4 My Pictures
Enjoy the pictures stored on the hard disk or other external computer storage devices.
Start
In Digital Home Appliance, select “My
Pictures” or use the shuttle to select “My
Pictures” to start.
All pictures
List all the pictures stored on the hard disk
and CD. select the pictures to be viewed
then click on the Play button.
View all the pictures
If you want to play all the pictures, check
“All Pictures”. Click on the Play button, then
all the pictures shall be played in order.
My Favorites: click the checkbox for the
pictures that you would like to add to my
favorites, and then select “Add to my
favorites” .
Picture ranks: arrange the pictures
according to the number of times it has
been viewed.
Other devices: display the pictures stored
in the external storage devices of the
computer
Burn: Burn the selected pictures into CDs.
32
Lenovo 5000 Series User Manual
Index
The pictures can be indexed by their
names, created time and format.
reduce volume
play/pause
stop
last piece
next piece
increase volume
mute switch
amplify
shrink
overturn anticlockwise
overturn clockwise menu
Click “menu” button, you can adjust the options to view the pictures.
Display
Adjust the display attributes of pictures such
as the time interval and effect when playing
pictures.
Lenovo 5000 Series User Manual
33
Settings
Adjust the background music when playing
pictures.
3.1.5 My Music
Enjoy the music stored on the hard disk or other external computer storage devices.
Start
In Digital Home Appliance, select “My
Music” or use the shuttle to select “My
Music” to start.
All Music
List all the Music stored on hard disk and
CD. Select the Music to be listened to and
click on the Play button.
34
Lenovo 5000 Series User Manual
Enjoy all the music
If you want to listen to all the music, then
check “All Music” and click on the Play
button.
My Favorites: select a piece of music, and
then select “Add to my favorites” to add
the music into My Favorites.
Music ranks: arrange the music according
to the number of times it has been played
Other devices: display the music stored in
the external storage devices of the
computer
Burn: Burn the selected music into CDs.
Index
The music can be indexed by the order
song title, collections, genre, artists, and
most recently played.
play/pause
stop
last piece
next piece
slow play
fast play
jump
reduce volume
pop-up/close CD
mute
increase volume
reread
menu
Jump: Click on the Jump menu, input the amount of time to be skipped, and the music shall jump forward
that amount of time.
Replay: Press the Replay key once, click on the music you want to be played repeatedly, and press the
Replay key once again, the music shall be played over and over again. Press the Replay key again, to
cancel the replaying and return back to the normal playing.
When you click on the Setting menu, you can see the following adjusting options.
Lenovo 5000 Series User Manual
35
Display
The Display menu is used to adjust the
background pattern when playing music.
And adjust if the ID3-related information is
displayed.
Settings
Adjust the mode to play music.
3.1.6 System settings
System settings
In the main interface of Digital Home
Appliance, select “System settings”, here
you can set the attibutes of the Digital
Home Appliance.
36
Lenovo 5000 Series User Manual
System settings
You can set Auto-play, transferring effect
sound effect, and auto-close.
Note: Country/District is used to select
theInternational Broadcast TV standards
that are corresponding to the Country/
District the computer is being used in. For
example: India uses PAL-B.
The storage location of the movie/sound
files that Digital Home Appliance uses is
explained in “Storage location”.
FAT32 partition format is recommended, because Digital Home Appliance does not support NTFS partition
format.
3.2 Burning CD
RecordNow software can help you burn data, music and video files easily into CD, VCD or other data CDs.
The detailed steps are as follows:
Start
Double-click on the software icon of
RecordNow for Lenovo on the desktop.
The Main Menu
You can start CD burning through the Quick
Start Links in the Main Menu. You can also
rewrite and finalize the CD.
Erase a disc
For a rewritable disc, you can erase the
data on the disc.
Click “Erase a disc” to erase the disc.
Lenovo 5000 Series User Manual
37
Erase a disc
Click “Yes” to start the disc erase process.
Erase a disc
You can choose the fast erasure or slow
erasure.
Erase a disc
Wait while the disc is being erased.
When finished, the disc is ejected , and
you can remove it for future use.
Burning music CDs — Step 1
You can burn the music stored on the hard
disk into Audio CDs by selecting “Audio CD
used with in-car or home CD players”.
Or, you can burn the music stored on the
hard disk into .MP3, WMA, WAV, or M4A
format by selecting Select “Jukebox CD”.
The software will prompt you to find the
usable music files automatically’, or allow
you to find the files manually.
Note: the following problems may cause
the burning process to fail:
• The file is being used by other
applications.
• Files recorded with non-standard
sample frequency. (WAV and MP3
files must be recorded in 16 bit
format with a sample rate of 22 or
44.1KHz. WMA files must use the
sample rate of 44.1KHz and burned
into 16-bit stereo files.)
• WMA files have been copy protected
(Windows license protection).
• Audio files of Non-MP3/WMA/WAV
formats.
38
Lenovo 5000 Series User Manual
Burning music CDs — Step 2
Click “View”, open the music folder.
Burning music CDs — Step 3
Select the music to be burned, Click “Add”,
You can use the up arrow and down arrows
to adjust the order of the music, after
everything is ready, Click “Burn”.
Lenovo 5000 Series User Manual
39
Burning data CDs — Step 1
In this option, you can select the data files
on the hard disk and burn them into data file
disc. Click “Data CD”.
Burning data CDs — Step 2
Open the data browsing dialog box, Click
“Add files and folders”.
40
Lenovo 5000 Series User Manual
Burning data CDs — Step 3
Open the dialog box to browse the hard
disk files and select the files to be burned.
Burning data CDs — Step 4
After selecting the files, Click “Burn”.
Lenovo 5000 Series User Manual
41
Exact copy — Step 1
Here you can copy the disc. Click “Exact
copy”.
Exact copy — Step 2
Place the source disc the drive and Click
“Copy”.
42
Lenovo 5000 Series User Manual
Exact copy — Step 3
Wait while the read process finishes.
Exact copy — Step 4
Remove the source disc and put a blank
disc in the drive then, Click “Confirm”.
Exact copy — Step 5
Wait while the disc burning is finished.
Lenovo 5000 Series User Manual
43
Exact copy — Step 6
After the burning of disc finishes, the CD will
eject. Please take the burned disc out.
If you need to copy another copy of the
same disc, please click “Create another
copy”, otherwise click “done”.
Archiving files
Archive common file types.
44
Lenovo 5000 Series User Manual
Save image
Create the image of the disc and save it on
the hard disk.
Save image
Put in the disc, Click “Save” to create the
image of the disc.
Lenovo 5000 Series User Manual
45
Burn image
Burn a disc image of a disc image file fron
the hard disk.
Burn image
Click “Browse” to find the disc image files to
be burned. And then Click “Burn” to create
the disc.
46
Lenovo 5000 Series User Manual
Burning video files
In this option, you can export the video and
burn it into video disc.
3.3 Norton
Installation
Access the installation folder of Norton
antivirus, double-click “CDStart”.
Installation
Select “Install Norton AntiVirus 2006” in the
dialog box. Perform the installation
according to the software instructions.
Lenovo 5000 Series User Manual
47
Main Menu
After the installation is successful, and the
software configuration is done, the main
menu will come up. The status of scanning
for and removing viruses will be displayed
on it.
Scanning for viruses — Step 1
Click “Scan”. Select the mode to scan for
viruses in the “Scan” dialog box.
Scanning for viruses — Step 2
Start scanning for viruses. Please wait while
scanning for viruses is in process.
48
Lenovo 5000 Series User Manual
Scanning for viruses — Step 3
Click “Reports”, view the scanning and
removal results.
Scanning for viruses — Step 4
Click view Quarentine on the left of the
dialog box. to view the viruses.
Virus database update — Step 1
When the prompts as shown in the figure
come up, it means the virus definition
database needs be updateded.
Lenovo 5000 Series User Manual
49
Virus database update — Step 2
Click “LiveUpdate” on the software interface
to start the update.
Note: An internet connection is required to
perform the update operation.
Virus database update — Step 3
Click “Next”.
Virus database update — Step 4
Click “Next”.
50
Lenovo 5000 Series User Manual
Virus database update — Step 5
Click “Next”.
Virus database update — Step 6
Please wait while the updates are
downloaded.
Virus database update — Step 7
Install the updated virus definitions.
Lenovo 5000 Series User Manual
51
Virus database update — Step 8
Click “Finish” to complete the update
operation.
Help
Please click “Help&Support” on the main
menu to obtain more specific information.
52
Lenovo 5000 Series User Manual
4
Chapter 4
Safety In Use
This chapter provides the following:
System restore
Disk cleanup
Hard disk error checking and repairing
Disk defragment
Daily care
1
2
3
4
5
Lenovo 5000 Series User Manual
53
4.1 System Restore
Sometimes your computer may have some problems due to improper operation. In such case, you may
restore your system by a simple way with the system backup.
(Please note the current settings of your system will be lost. Please make sure the backup of your settings.)
Step 1
Click “Start → All Programs”.
Step2
Click “Accessories”.
54
Lenovo 5000 Series User Manual
Step 3
From the “Accessories” menu, click
“System Tools”.
Step 4
Click “System Restore”.
Step 5
Select “Restore my computer to an earlier
time” and then click “Next”.
Step 6
Select the most recent date in which the
system performed well (you can choose a
specific month by clicking on the arrows
located at the sides of the calendar).
Select “System Check Point” or “Restore
Point” and then click “Next”.
Lenovo 5000 Series User Manual
55
Step 7
All programs will be closed before the
system recovery starts. Please save all your
data and then click “Next” .
After the operation is successfully
completed, you will be prompted to
restart your computer. Click “OK” to
continue.
You can create a system restore point before making some changes on your system settings (such as
installing a game, or else.) by following the instructions below.
Step 1
When you enter the “System Restore”
interface, select “Create a restore point”,
and then click “Next”.
Step 2
Enter a name that is easy to identify in the
“Restore point descriptions” field and then
click “Create”.
Step 3
After the creation of restore is successfully
completed, click “Close”.
Note: If this operation fails, please
backup your data and start the
OneKey Recovery function. Please
refer to the section of OneKey
Recovery for more details.
56
Lenovo 5000 Series User Manual
4.2 Disk Cleanup
By cleaning your hard disk on regular basis, you can obtain better system performance.
Step 1
Click “Start → All Programs →
Accessories”.
Step 2
Select “System Tools → Disk Cleanup”.
Step 3
Select the files in the dialog box that will be
deleted.(Usually select all types of files)
Step 4
Click “OK”.
Step 5
When the dialog box displays, click “Yes”.
Lenovo 5000 Series User Manual
57
4.3 Hard disk error checking and repairing
With disk error checking and repairing on a regular basis, you can maintain your computer in a good
condition, and correct some errors during operation.
Step 1
Double click on the “My Computer” icon on
your desktop.
Step 2
In the “My Computer” window, select the
disk drive that needs to be checked. Right
click on the disk drive and select
“Properties”.
Step 3
Select “Tools” and click “Check Now”.
58
Lenovo 5000 Series User Manual
Step 4
Check the two options as shown in the
figure and click “Start”.
Step 5
After your computer is restarted, the disk
error checking will be performed.
4.4 Disk Defragment
Disk fragments are some tiny storage areas that have small rooms, cannot be directly reused, and are
located in different positions in the disk. If you do not perform the disk defragment function for a long time,
the system performance may be lowered. Perform a disk defragment by following the instruction below.
Step 1
In the “My Computer” window, select the
disk drive. Right click on the disk drive and
select “Properties”.
Step 2
Select “Tools” and click “Defragment Now”.
Step 3
Select the targeted partition, such as the C
partition, and click “Defragment”.
The defragment process usually takes a
long time.
Lenovo 5000 Series User Manual
59
4.5 Daily Care
1. Cleaning of parts:
As many parts of your computer are composed of delicate integrated circuit boards, which need to be
cleaned on a regular basis to prevent dust accumulation.
Cleaning tools include: dust collector, soft cotton cloth, clean water (preferential purified water), cotton
swab, and etc.
2. Common cleaning methods
The dust on the computer, monitor, printer, speaker, and mouse can be cleaned away by a soft cotton cloth.
Use the dust collector to clean the corners that cannot be reached. To thoroughly clean the keyboard, turn
off the computer and gently clean the keys with a wet cloth. Do not use the keyboard until it is completely
dry.. Keep water away from the internal computer. Do not use a soft cloth that is too wet. And do not directly
spray water on the monitor or internal computer.
The LCD display should remain clean with especial attention to avoid contact with any oil stains.
For daily care, it is recommended to use the dry cloth to gently clean away the dust.
60
Lenovo 5000 Series User Manual
5
Chapter 5
Troubleshooting
This chapter provides the following:
Display
Sound
Desktop icons
Software
CD-ROM drive and hard disk drive
1
2
3
4
5
Lenovo 5000 Series User Manual
61
5.1 Display
1. Blank screen
1) Check to see if the monitor is turned on. If not, press the power button on the monitor.
2) Check to make sure that the power cable of the monitor is properly plugged into the monitor and into a
working electrical outlet.
3) Check to see if the signal cable of the monitor is securely connected to the video output of the VGA
card of the computer. If not, shut down your operating system and connect the signal cable.
2. Settings of display properties
The desktop display can be adjusted in the
Display Properties. Right click on any place
in the desktop that has no icons, and select
“Properties”.
You can find the options of Themes,
Desktop, Screen Saver, Appearance,
Settings, and etc.
• Desktop: Allows you to set the
background picture.
• Screen Saver: Allows you to select the
screen saver program.
• Appearance: Allows you to set the icons
and texts.
• Settings: Allows you to set the screen
resolution and color quality.
3. There is waterwave on the monitor screen
Check to see if there are any electronic devices that generate magnetic interference, such as refrigerator,
electric fan, electric dryer, UPS, manostat, and fluorescent lamp, within the distance of one meter around
the computer. Or, if the two monitors of two computers stay close to each other (within one meter), there
also might be water wave in the screen display. To resolve the problem, please move the interfering source
away from the computer. If the problem still exists, please contact your Lenovo Customer Service Center
for help.
5.2 Sound
1. When the headphones are connected to the front audio output connector, the
speakers that are connected to the rear panel have no sound.
The front audio output connector is provided for the convenience of use, which has a higher priority than
the rear audio output connector. Therefore, if the speakers or headphones are connected to the front
audio output connector, then the sound device that is connected to the rear audio output connectors will
be disabled.
62
Lenovo 5000 Series User Manual
2 The computer has no sound output at all.
1) Check to see if the speakers are properly connected to the computer.
2) Check to make sure that the sound channels are not muted. Double click the speaker icon at the
bottom right of the toolbar and confirm if the mute option is selected for all sound channels. If yes,
please uncheck them.
3) Check to see if the volume of all sound channels are set at a minimum level. If yes, please adjust the
volume to an appropriate level.
Please re-install the sound card driver.
3 Recording with the microphone
Please following the below instructions to make a recording with the microphone:
Step 1
Click “Options” at the upper left of the Main
Volume Control window, and select “Properties”.
Step 2
From the Properties menu, select
“Recording”. Check the Microphone option
and click “OK”.
Lenovo 5000 Series User Manual
63
Step 3
Under Microphone, check the Select option
and adjust the volume to a desired level.
Click “Close”.
5.3 Desktop Icons
Desktop shortcut
The monitor screen is called the desktop.
After you starts your computer. With
different desktop settings, you can find
different icons and menus are shown on the
desktop.
Start menu
Task bar
Notification area
Quick launch bar
Usage of task bar
The task bar and some shortcut icons are located at the bottom of the screen. The following section is an
introduction to the use of the task bar.
1) The quick launch icons 2) The icon of a minimized window
64
Lenovo 5000 Series User Manual
3) Notification area
1) The Quick Launch icons usually include Media Player, Internet Explorer browser, and much more.
2) To display a pop-up window that is on the task bar, right click on the icon of the window. You can select
Restore, Maximize, or Close the window.
3) There are buttons located on the bottom right of the screen, such as sound and network connection. By
double clicking on a button, it allows you to check the button's status.
Adjusting the task bar layout
Right click on any blank area of the task bar,
and select “Properties” from the menu.
You can customize the appearance of the
task bar in the Taskbar and Start Menu
Properties menu.
Lenovo 5000 Series User Manual
65
5.4 Software Problems
5.4.1 End Programs
If you are running a program and cannot exit in a normal way, you can end it with the Task Manager.
Press Ctrl+ALT+Delete to open the Task
Manager window. Select the targeted
program you want to end and click
“End Task”.
5.4.2 Add or remove programs
Install programs
When installing a program, you should avoid terminating the installation in an improper way (such as a power
break) because it might cause system errors or even system boot failure.
Uninstall programs
If you want to uninstall a program, you should never directly delete the files or directories that have been
installed. This is harmful to the system and could cause system crashes. Please follow the instructions below
to correctly uninstall the software. (Make sure to backup the relevant documents and system settings before
uninstalling the program.)
Step 1
If the program has an uninstall function, just
run its uninstall program.
Step 2
If the program does not contain the uninstall
function, click “Start” and select “Control Panel”.
66
Lenovo 5000 Series User Manual
Step 3
Double click “Add or Remove Programs” in
the “Control Panel”.
Step 4
Locate the program you want to uninstall in
the “Add or Remove Programs” dialog box,
and click “Remove” on its right side.
Depending on the prompts to complete the unstallation process, select “Yes” or “Next”.
5.5 CD-ROM Drive and hard disk drive
1.CD-ROM read error
Please check to make sure that there is a CD-ROM icon present in the system explorer. If there is not an
icon, please restart your computer. If the CD-ROM icon is still missing, please contact your Lenovo
Customer Service Center. If the icon is present, check the following:
• Check to make sure that the CD-ROM is correctly inserted into the CD-ROM drive. If necessary, reinsert
the CD-ROM into the drive.
• Check to make sure that the inserted CD-ROM is recognized by the CD-ROM drive. For example, a CDROM drive will not recognize a DVD-ROM.
Insert one of the CD-ROMs from your computer package to confirm if the CD-ROM drive can read this
CD-ROM.
• Check to make sure that the inserted CD-ROM does not have any defects. If defects are found, remove
the CD-ROM and insert one of the CD-ROMs from your computer package to confirm if the CD-ROM
drive can read this CD-ROM.
2.The hard disk capacity that is shown in the system is smaller than the marked
capacity.
The OneKey Recovery function occupies some room in the hard disk, which is not visible in the operation
system and some partition tools such as FDISK. So it is normal that the hard disk you can use is smaller
than the marked capacity.
The marked capacity of hard disk takes 1,000 as the calculation unit, while the actual capacity takes
1,024. For instance, the marked capacity of 1G equals 1,000M, while the actual capacity of 1G equals
1,024M. You can take the following example to calculate the actual capacity that is shown in Windows.
Lenovo 5000 Series User Manual
67
The actual capacity of a marked capacity of 40G is 40 x 1000 x 1000 x 1000/ (1024 x 1024 x 1024) =
37G. If there is a 3G hidden partition, which is actually 3 x 1000 x 1000 x 1000/(1024 x 1024 x 1024) =
2.79G, you can get the capacity that is shown in Windows by minus 2.79G with 37G. Due to the rounding
of minor numbers in calculation, there might be a slight discrepancy between the actual value shown in the
system and the calculated value.
5.6 Special Notes on Models
Keep the serial number of the supplied software in a safe place
Please keep the serial number of the software in a safe place. This is a special number provided by the
developer. There will not be any replacements provided if the original serial number is lost.
The drivers of this model only support WindowsXP SP2 system.
68
Lenovo 5000 Series User Manual