1
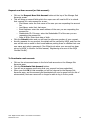
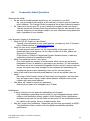
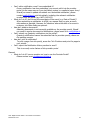
HIQA Provider Portal User Guide for Providers DATE: 12 February 2015 Contents 1. Introduction ..................................................... 3 2. What you will be able to do on the portal ............................... 4 3. How to get to the HIQA Provider Portal ................................. 5 4. Registering as a user of the HIQA Provider Portal .......................... 6 5. Login process.................................................... 9 6. Layout ........................................................ 11 7. Submitting a Notification .......................................... 13 8. Viewing Notification History ........................................ 16 9. Advanced Section for Super-User accounts ............................. 18 10. Frequently Asked Questions ....................................... 20 Title: HIQA Provider Portal - User Guide for Providers Revision No: 001 2 1. Introduction This user manual is intended to guide you through using the HIQA Provider Portal. The Person In Charge (PIC) or Registered Provider of a designated centre is legally required to notify the Authority of prescribed incidents, events or changes. The purpose of the HIQA Provider Portal is to allow that regulatory notification data to be submitted online by those individuals (or an authorised person acting on behalf of the registered provider). Initially, only notifications for Designated Centres for Older Persons that require no additional attachments/documentation are being covered. The full list of notifications allowed online is given in Section 2 of this manual, „What you will be able to do on the portal‟. This Provider Portal will benefit users in a number of ways, including: Time-saving: No need for users to go to the HIQA website to save the most recent version of the particular form to their desktop, which then had to be filled in and signed to be submitted. Less fields to fill out: Users no longer need to fill out the Provider/Centre Details at the top of the form (e.g. Organisation name, address, their own name, the Centre ID, date the form was completed, Nature of Service provided) as the portal will auto-fill those fields. Users can be safe in the knowledge that once they submit the notification online, it has been sent to HIQA successfully, no more issues with partially-received faxes or items getting lost in the post. The forms on the Provider Portal will always be the most up-to-date versions, removing the chances of out-of-date forms being submitted. Data is transmitted securely to HIQA. The submission of notifications online will stop issues such as unclear scanned forms and unintelligible handwriting. Easier record-keeping: details of all notifications which have been submitted on the portal are readily available in the Notification History section. All mandatory fields are filled in before the form is submitted to HIQA, so no need for partially filled-out forms to be re-completed and re-sent. Note: Follow-up Reports still follow the current process, in other words they are not submitted via the portal. Please add the Notification number of the original notification to the follow-up report form. This number is now easy to find on the Notification History section of the portal. Once you have submitted a notification via the portal, this notification goes straight to HIQA. Therefore there is no need to also send in the same notification by fax, email or post as that will result in duplicate forms being processed. Title: HIQA Provider Portal - User Guide for Providers Revision No: 001 3 2. What you will be able to do on the portal The Provider Portal is designed to allow users to carry out several actions regarding HIQA notifications: Submit a new notification (see the section below for the list of HIQA Notifications which can be submitted via the portal at this time). View previously submitted notifications (for that particular Organisation/Designated Centre). N.B. Only notifications which have been raised on the portal will be visible on the portal history section, it will not show notifications submitted to HIQA prior to the portal. If you are associated to more than one Organisation/Designated Centre, you can submit notifications for each of them. At this time, this list of HIQA notifications which can be submitted via the Provider Portal consists of: NF01 Notification of the unexpected death of a resident NF02 Notification of an outbreak of any notifiable disease NF03 Notification of any serious injury to a resident NF05 Notification of any unexplained absence of a resident NF06 Notification of any allegation, suspected or confirmed, of abuse of any resident NF07 Notification of any allegation of misconduct NF08 Notification of any occasion where the registered provider becomes aware that a member of staff is subject to review by a professional body NF09 Notification of any fire, loss of power/heating/water, or unexplained evacuation NF20 Notification of PIC absent for more than 28 days NF21 Notification of return of PIC after absence of more than 28 days NF60 Declaration of Occupancy Please note that this list is subject to change, so for the most up-to-date list of notifications which can be submitted via the Provider Portal, please always consult the Help Page on the portal itself, which contains the most current list. Title: HIQA Provider Portal - User Guide for Providers Revision No: 001 4 3. How to get to the HIQA Provider Portal The Provider Portal is accessed via the Health Information and Quality Authority website http://hiqa.ie/ On http://hiqa.ie/, click the Login button at the very top of the screen. This will open the portal. Title: HIQA Provider Portal - User Guide for Providers Revision No: 001 5 4. Registering as a user of the HIQA Provider Portal To use the portal, you will first need to register as a user. You will only need to go through this registration process once. Once you have registered as a user, you‟ll be able to log into the portal simply by using your username and password. There are 2 types of users of the portal, and the registration process is different for each of them. In both instances, the registration details are submitted online to HIQA and the details are validated before the accounts are created. The 2 types of user are: User (or “sub-account” user): A portal user can do standard tasks such as submit a new notification and view previously submitted notifications (for multiple Designated Centres if they are attached to more than one). A user‟s account will be created for them by a super-user. Super-user: Each Organisation/Designated Centre will have one Super-user (either the PIC or the Registered Provider Nominee). They will be the „administrator‟ of the portal at that Organisation/Designated Centre. The only difference between a super-user account and a user account is that, in addition to being able to log/view notifications, the super-user also manages the sub-user accounts for that Designated Centre (i.e. adding or deactivating a sub-user). A super-user will apply for their own account via the portal. Registration process for a Super-User account: Navigate to the portal via http://hiqa.ie/ as described in Section 3 of this manual. Click the Register Account button at the top of the screen to open up the registration form (this button is just for registering Super-User accounts). Title: HIQA Provider Portal - User Guide for Providers Revision No: 001 6 Fill in − − − − − − the fields as follows: First Name: Enter your first name Last Name: Enter your last name Email Address: Enter your work email address Organisation Name: Enter the name of your organisation/Designated Centre Registered Provider Name: Enter the name of the Registered Provider Role: Select your role from the drop-down list, either Person In Charge (PIC) or Provider Nominee. − Centre ID Number (OSV): enter your OSV number Tick to accept the Terms & Conditions. Click the Register button at the bottom of the screen. Once you click Register, you will see a reference number and a message confirming your registration request has been successfully submitted. When your registration request is received by HIQA, the details will be verified and you will receive an automated email giving you a link for you to click to verify your registration. This automated email will be from an email address of “Prism Master Owner”, rather than from a HIQA email address. The subject of the email will begin with the words “HIQA provider portal”. Registration process for a Sub-User account: Please see Section 9 of this manual, „Advanced Section for Super-User accounts‟. Title: HIQA Provider Portal - User Guide for Providers Revision No: 001 7 What to do when your account has been set up by HIQA: When your user account has been set up (whether it‟s a super-user account or a sub-user account), you will be sent an email from HIQA instructing you to activate your new account and to set up your password. As mentioned on the previous page, this email will be sent from an email address of “Prism Master Owner” and have a subject line beginning with the words “HIQA provider portal”. This step will only have to be carried out once, when your account is first set up. Click on the link which is contained in this email from HIQA. On the portal page which opens, type your User Name into the field provided. Click the Validate button. You will be asked to set and confirm the password you want to use. Fill in those details and click the Set Password button You will then be directed to the portal login page, where you can sign in for the first time, using the username you have been given and the password you have just set for yourself. Then in the future, any time you need to log into the portal, simply follow the normal login steps laid out in the next section of this manual (Section 5 „Login Process‟). Title: HIQA Provider Portal - User Guide for Providers Revision No: 001 8 5. Login process To log into the portal, you will need your Username and your password. Navigate to the portal via the HIQA webpage (as described in Section 3 „How to get to the HIQA Provider Portal‟), and you will see a sign-in section. In the User name field, type the User name which you have been supplied with by HIQA. This will be in the form of one of the following: − your email address at your organisation (e.g. [email protected]); or − a username in the format firstname.lastname, e.g. john.smith Enter your password into the Password field. Then click the Sign-in button to sign in. Title: HIQA Provider Portal - User Guide for Providers Revision No: 001 9 Forgotten Password: If you ever forget your password when you come to login to the Provider Portal, there is a Forgot Password option under the Sign In section. Click on this Forgot Password option. Enter your User Name into the field provided (this will either be your email address or a username in the format firstname.lastname Click the Submit button. Once you have done this, you will receive an email. This email contains a “Click Here” link. Click on this link to be taken to a validation page. Enter your Username as requested in the Username field on this page and click the Validate button. You will then be taken to a page where you can enter the new password that you want to use. Once you have set your new password here, you will be directed to the Sign In page where you can sign in with your Username and your newly-set password. Changing a password: If you are logged in to the Provider Portal and want to change your password: In the menu of items on the LHS of the portal screen, click onto the Change Password option. You will be asked to enter your current password (the one you want to change from). In the New Password field, enter the new password you want to use. In the Confirm new password field, re-enter your new password. Click the Submit button to submit your changes. Title: HIQA Provider Portal - User Guide for Providers Revision No: 001 10 6. Layout When you have successfully logged into the Provider Portal website, you will arrive at the landing page (i.e. the homepage of the Provider Portal). The main portion of the homepage includes an Alerts section, which HIQA will use to advise users of any alerts or news, so please check this regularly for any updates regarding the portal. On the top right-hand side of the screen, there is a Select an Organisation field. This will default to your own Organisation when you log into the portal. If you are a user who is associated to multiple organisations, you can click into this drop-down field and select which organisation you want to see. The Organisation which is selected in this field is important, as this will be the Organisation for whom notifications will be logged, and whose history you can see on the History screen. Title: HIQA Provider Portal - User Guide for Providers Revision No: 001 11 Along the LHS of the screen is the main menu, from where you will carry out most tasks. At the very top of the menu is your name. Then underneath this, the menu items are: Home: Clicking the Home button from anywhere within the portal will return you to the Homepage of the portal. My Account: this shows details about your account, such as your organisation‟s name, its OSV number, and your HIQA case-holder. Submit Notification: This is the area where you will submit a notification (see Section 7 of this manual, „Submitting a Notification‟). Notification History: This is the area which shows all previously portal-logged notifications for that organisation. Change Password: This section allows you to change your password (see Section 5 of this manual for the steps to do so). Manage Sub Accounts: this menu item and page are only visible to super-users. For steps on how to use this page, see Section 7 of this manual „Advanced Section for Super-User accounts‟. Help: The Help page of the portal provides the most up-to-date list of the Notifications which can be submitted via the Provider Portal. Title: HIQA Provider Portal - User Guide for Providers Revision No: 001 12 7. Submitting a Notification To submit a notification on the portal, click onto the Submit Notification menu item on the left-hand side of the main portal screen. On the page which opens, you will see your current Organisation at the top of the screen. If you are attached to multiple organisations, you must ensure that the correct organisation is selected for the notification you are submitting. Click into the drop-down list of Notification Types and select the particular one you need to submit (e.g. NF02 for the outbreak of an infectious disease). Click the Select button. This will open your notification form ready for you to fill out, with the reference number for the notification at the top of the screen. Title: HIQA Provider Portal - User Guide for Providers Revision No: 001 13 Fill in the fields on the form as required, and then click the Submit button at the bottom of the form to submit the notification to HIQA (you have 60 minutes to fill in this form, if you don‟t submit it within the 60 minutes your session will time out and you will need to open a new notification form). You will see a message on screen confirming that your notification has been submitted successfully, and again displaying the reference number. N.B. Once you click Submit, the form has been sent to HIQA and cannot be edited (the same as if it was a paper form which had been faxed or emailed). Therefore, should you need to edit the details on a form which has been submitted via the portal, please contact the Notifications Team at HIQA on [email protected]. Title: HIQA Provider Portal - User Guide for Providers Revision No: 001 14 Some guidance on the different types of fields: Mandatory fields are marked with a red asterisk * , so these fields must be filled out. If you try to submit a notification in which a mandatory field has been left blank, the system will stop you and flag up the empty field. Date & Time fields: There are different to the standard Date fields. For example, the „Date & Time of alleged abuse‟ on an NF06 form. Here, you can enter both the date and the time in one field. To do this: − Click into the field and the calendar will display; − Firstly select the date by clicking on it; − Then click into the Hour field to select the hour (e.g. 22), followed by clicking into the Minute field to select the minute (e.g. 15). − Once the correct Date and Time have been selected, click on Done to close the calendar pop-up. Multiple Answer fields: Where there is a drop-down field and you need to select more than one option (e.g. on the “Nature of Injury” field in an NF03, you may want to advise that the resident sustained a concussion and a fracture): − Select one of the relevant items in the drop-down field; − Then use the “Other” or “Details” field which is underneath it to write the additional information. Another example of this is the “Type of alleged abuse” field on an NF06. Title: HIQA Provider Portal - User Guide for Providers Revision No: 001 15 8. Viewing Notification History Once a notification has been submitted on the portal, it will be visible in the Notification History list on the portal. To access this list, click on the Notification History menu item in the list on the left-hand side of the portal. This will take you to the Notification History screen where you will be able to see all of the notifications which have been logged via the portal for that organisation by any of its users, not just you. All the notifications will be on that list, there is no limit to how far back you can see. To view the details of any of the records on this list, click onto its notification number (or anywhere along that line) and the record will open on screen. The record will show all of the details as they were entered when the form was submitted. It is important to note that these forms cannot be edited once they have been submitted, so if a change needs to be made to a notification, please contact [email protected]. Title: HIQA Provider Portal - User Guide for Providers Revision No: 001 16 Visible Notifications: The default number of notifications you can see on this screen is 10. If you want to increase the number of items you can see in one screen, simply click into the drop-down field to the top-right of the list, and select a higher number. If there are more notifications in the list than are visible on the one screen, then they will be on multiple pages (which you will be able to click through by clicking on the page numbers at the bottom of the list). The columns in this list are sorted by the Reference column, which contains the Notification reference number. To re-sort the list by any of the other columns, for instance by Notification Type (the Code column) or by date (the Date Submitted column), click onto that column‟s heading and the list will re-sort by that column. Clicking on the column heading once sorts the list from A-Z, click on it again if you would like the list to be sorted Z-A. Search: There is a Search option on this page which allows you to search for a particular record(s). Click into the search field and type what it is you want to search on. This might be the resident‟s ID (or part of it); the Notification number (or part of it); the Notification Type; the name of the person who submitted it; or the date it was submitted online. Title: HIQA Provider Portal - User Guide for Providers Revision No: 001 17 9. Advanced Section for Super-User accounts Each designated centre will have one super-user account, and can have up to five subuser accounts in addition to the super-user. As discussed earlier in this manual, super-users of the Provider Portal can submit/view notifications the same as a sub-user account, however they additionally have the permissions to request/deactivate sub-user accounts. To manage user accounts, click on the Manage Sub Accounts menu item on the lefthand side of the portal screen (this option will only be visible to super-user accounts; subuser accounts will not be able to see it). Manage Sub Accounts: On entering the Manage Sub Accounts screen, a list of the current sub-accounts for that designated centre will be visible. Search Sub Accounts: There is a Search field on this screen which can be used to search for sub-accounts, by entering all or part of any of the fields which are visible on that screen, e.g. name or email address. Title: HIQA Provider Portal - User Guide for Providers Revision No: 001 18 Request new User account (or Sub-account): Click on the Request New Sub-Account button at the top of the Manage Sub Accounts screen. This will bring up several fields which the super-user will need to fill in to submit their request for a sub-account for a user. o First Name: enter the first name of the user you are requesting the account for. o Last Name: enter their last name. o Email Address: enter the email address of the user you are requesting the account for. o Stakeholder ID: If known, enter the Stakeholder ID of the user you are requesting the account for. o Date of Birth: Enter their date of birth. Click the Submit button and you will see the reference number of your request. As with requests for any account, the details will be verified by HIQA, and then the user will be sent an email to their email address, asking them to validate their new user name and select a password. (See „What to do when your account has been set up by HIQA‟ in Section 4 of this manual, „Registering as a user of the HIQA Provider Portal‟). To Deactivate a sub-account: Click on the sub-account name in the list of sub-accounts on the Manage Sub Accounts page. Click the Deactivate Sub-Account button. You will see a message confirming that your request has been submitted. When you click OK on that message you will be returned to the Manage Sub Accounts page, and the account you deactivated will now be gone from the list of sub-accounts, that user name will no longer be able to log in to the portal. Title: HIQA Provider Portal - User Guide for Providers Revision No: 001 19 10. Frequently Asked Questions Access to the portal: Do we need to install/upgrade anything on our computers to run this? No, you just need to have access to the internet, you don‟t need to install any other software. The Provider Portal is supported on all main Internet browsers. Do I have to be on my work PC or can I access the Provider Portal from home? You can access the Provider Portal from anywhere that you have access to the internet, however you will always need to use your Username and password to login, regardless of your location. User accounts, logging in & passwords: What do I do if I forget my User Name? Typically your Username is your email address, so please try that. If it doesn‟t work, please email us at [email protected] What if a user at our organisation leaves? What if we need more than 5 sub-users? Some of our staff share the same email address, how do we register them as users? If a sub-account user leaves, it is the responsibility of the super-user to deactivate their portal account (for the steps to take to do this, please see Section 9 of this manual). If the Person In Charge or Registered Provider Nominee leaves, a statutory notification needs to be submitted to HIQA. Five is the maximum number of sub-accounts which can be set up for any Designated Centre (in addition to one super-user account). If 5 sub-accounts have been set up for a particular Designated Centre, and a 6th person requires access, the super-user must manage the sub-accounts by deactivating one existing sub-account and requesting a new one for the new person. Each user of the Provider Portal will have their own Username, and therefore they will each need to have a unique email address. Multiple users cannot register with same email address. How often will I need to change my password: Passwords will need to be changed every 30 days. Notifications: Is there a limit to how far back old notifications can be seen? Only notifications submitted via the portal for your Designated Centre will be visible in the Notification History section of the Provider Portal. Notifications submitted pre-portal will not be visible on the portal. Of the notifications which are visible on the portal, there is no date/number limit. How do I know if the notification I raised has gone through successfully to HIQA? The Notification History section will only display successfully submitted notifications. Title: HIQA Provider Portal - User Guide for Providers Revision No: 001 20 Can I edit a notification once I have submitted it? What do I do if I don‟t know the exact date of the event (e.g. Date of Death)? How do I attach a document? Can I submit my Quarterly notifications via the portal? How do I print a notification? Can I export the Notification History section to excel? Once a notification has been submitted, you cannot edit it via the provider portal (in the same way as if you had faxed, posted, or emailed a paper form). Should you need to update the details on a submitted notification, please contact [email protected] with the details, including the relevant notification number from the portal (e.g. NOT-0100123). When submitting a notification to HIQA, we request that you give as much information as possible. However for situations where the date of an event is unknown, the Date fields are optional. Attaching documents is not currently available on the provider portal. Should you need to send a document to Notifications, please email it to [email protected] Quarterly notifications cannot be submitted via the provider portal, please use the existing process. To print a page from the portal, press the Ctrl+P buttons and print the page to your printer. This is currently not a feature of the provider portal. General: What do I do if I have a question on how to use the Provider Portal? Please contact us at [email protected] Title: HIQA Provider Portal - User Guide for Providers Revision No: 001 21