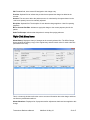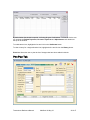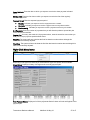
1
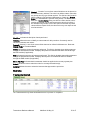
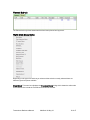
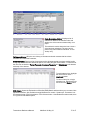
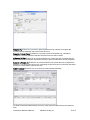
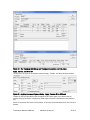
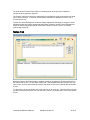
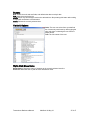
Transactions Reference Manual
Version 4.81
Contents
Introduction ...................................................................................................................................... 3
Transactions Colors ..................................................................................................................... 3
Transactions Icons ....................................................................................................................... 3
General Tab ..................................................................................................................................... 9
Fields & Options ........................................................................................................................... 9
Sub-tabs ..................................................................................................................................... 10
Tx History Sub-tab .................................................................................................................. 10
Pending Sub-tab ..................................................................................................................... 10
Unapproved Sub-tab .............................................................................................................. 10
Right-Click Menu Items .............................................................................................................. 11
Treatment Tab ............................................................................................................................... 13
Claim Section ............................................................................................................................. 13
Buttons ................................................................................................................................... 13
Fields & Options ..................................................................................................................... 13
Treatment Section ...................................................................................................................... 14
Buttons ................................................................................................................................... 14
Fields & Options ..................................................................................................................... 14
Sub-tabs ..................................................................................................................................... 15
Treatments Sub-tab ................................................................................................................ 15
Planned Sub-tab ..................................................................................................................... 16
Right-Click Menu Items .............................................................................................................. 16
Charges Tab .................................................................................................................................. 22
Buttons ....................................................................................................................................... 22
Fields & Options ......................................................................................................................... 22
Right-Click Menu Items .............................................................................................................. 23
Pmt Plan Tab ................................................................................................................................. 24
Payment Plan Section ................................................................................................................ 25
Buttons ................................................................................................................................... 25
Fields & Options ..................................................................................................................... 25
Regular Schedule Section ......................................................................................................... 26
Right-Click Menu Items .............................................................................................................. 27
Payment Tab ................................................................................................................................. 29
Buttons ....................................................................................................................................... 29
Fields & Options ......................................................................................................................... 30
Right-Click Menu Items .............................................................................................................. 31
Adjustment Tab.............................................................................................................................. 33
Buttons ....................................................................................................................................... 33
Fields & Options ......................................................................................................................... 34
Right-Click Menu Items .............................................................................................................. 34
Ins Pmt Tab ................................................................................................................................... 35
Buttons ....................................................................................................................................... 35
Fields & Options ......................................................................................................................... 36
Sub-tabs ..................................................................................................................................... 38
Ins. Payments Sub-tab ........................................................................................................... 38
Right-Click Menu Items....................................................................................................... 38
Ins Payments for Patient Sub-tab ........................................................................................... 40
Right-Click Menu Items....................................................................................................... 40
Other Windows........................................................................................................................... 41
Applying Ins. Payment Window .............................................................................................. 41
Sort Columns ...................................................................................................................... 41
Right-Click Menu Items....................................................................................................... 42
Treatment Split Window ......................................................................................................... 44
Notes Tab ...................................................................................................................................... 46
Transactions Reference Manual
Modified: 10-May-10
1 of 47
Buttons ....................................................................................................................................... 47
Fields & Options ......................................................................................................................... 47
Right-Click Menu Items .............................................................................................................. 47
Transactions Reference Manual
Modified: 10-May-10
2 of 47
Introduction
Transactions Colors
Entry lines are displayed in various colors depending on the state of the data.
Black: Entry that has been finalized, for example, a treatment that has been submitted or a
payment that has been fully allocated.
Blue: A sub total or total line.
Gray: A deleted line.
Green: Entry that has not been finalized, for example, a treatment that has not been submitted or
a payment that has not been fully allocated.
Red: An in-process or in-dispute line. In the payment sub-tab red indicates that the payment has
been adjusted or reversed.
Salmon: An Ortho Monthly charge.
Purple: A reserve / held fund.
Transactions Icons
This icon is available if your axiUm is set up to use patient reserves (In Maintenance
module – Insurance tab – Insurance Companies icon – Insurance Companies List window – search
for and select an insurance company – Insurance Company window – Advanced button – Insurance
Company Advanced Options window - Patient Reserve Funds (that are Tracked) checkbox).
Launches the Manage Patient Reserve Funds window. This icon may be displayed in one of
three ways:
- Patient currently has $0 reserve funds
- Patient has funds remaining (credit) with this policy‟s Insurance Company.
- Patient lacks funds (debit) due to over-allocation of reserved funds
Launches the Patient Attachment window. Please see Attachment_Manager
documentation for details.
Launches the Patient Contact note window.
Launches the Sticky Note window. Sticky notes are used to add unlimited length
comments/reminders about the patient. Sticky notes may also be attached to other
records including treatments, payments, and appointments.
Launches the Patient Card window. Please see Patient_Card documentation for details.
Launches the Transactions Options window shown below for illustrative purposes.
Transactions Reference Manual
Modified: 10-May-10
3 of 47
Display Options section
General Tab View
Date Ledger: Indicates to sort the records in the General tab, by the date of
entry. In this method a treatment line will not necessarily be displayed close to
the payment that was applied to it as these entries may have occurred on
different dates.
Claims Owing: Indicates to sort the records in the General tab, by their claim #.
In this method a treatment will be displayed next to all payments received on it,
and adjustments made to it, with a running balance for the individual claim.
Patient Balance Methodology
Balance Forward: Indicates to use the Balance Forward methodology where
you maintain a list of charges and payments for each account. To find out the
balance at any point in time, you add the charges, add the payments, and then
subtract total payments from total charges. In this method balances are carried
forward, and payments applied to the oldest outstanding items first. It is similar to
First in First out inventory methods. For example: With treatment in the
past that would show up in the "Over 30" bucket, and current treatment balances,
when a payment is allocated to the current balance treatment the over 30
bucket is reduced by the amount of the payment and the current balance remains
at its original amount.
Open Item: Indicates to use an open item methodology where the user indicates
which „bucket‟ to affect when allocating a payment (they tie the payment to the
treatment specifically). For example: With treatment in the past that would show
Transactions Reference Manual
Modified: 10-May-10
4 of 47
up in the "Over 30" bucket, and current treatment balances, when a payment is
allocated to the current balance treatment, the 'current' balance bucket would be
reduced, and the over 30 would remain at the original balance.
Age Treatments:
From Treatment Date: Ages your accounts receivables starting from the
treatment day.
From Claim Date: Ages your accounts receivables starting from the claim date.
Show Deleted Records
There are two different types of deleted lines in axiUm. When a user deletes a record
using a „Delete‟ icon, the system records this as a deleted record. When a user edits a
treatment and moves it from Planned to In-Process, Planned to Complete, or In-Process
to Complete, the system records this as a strike-out record (an axiUm internal delete).
All: Indicates to show both deleted lines and strike-out lines in the transactions
list windows.
None: Indicates to hide both deleted lines and strike-out lines in the transactions
list windows.
Strike-outs: Indicates to show strike-out lines in the transactions list windows,
but not deleted lines.
Show Treatment Steps
Some institutions add steps to procedure codes as a teaching tool or method of
performing grading on each individual piece of the procedure that must be done. This
most often used in an undergraduate area for difficult procedures like a bridge. When
steps are used, the workstation can be set to either show or hide the steps in the
transaction module. axiUm calls the steps „children‟ of the „parent‟ procedure (the
procedure that was broken down into several steps).
Yes: Indicates to show all steps of a procedure.
No: Indicates to hide all steps of a procedure and show only the „parent‟ code.
Show Ortho Fees (on Treatment List): Affects only the Treatment tab.
Yes: axiUm displays any ortho treatments and billing in the list
No: axiUm remove any ortho treatments and billing in the list.
Sales Tax section
Charge Sales Tax:
No: Do not apply sales tax.
Yes (use Practice rate): Apply sales tax using the practice rate set in
Maintenance module – Office tab – Practice Address icon – Practice Address
Transactions Reference Manual
Modified: 10-May-10
5 of 47
window – Practice button – Practices window – Practice Options window –
Transactions Options section, there is a Tax Rate __% field (new).
Yes (use Custom rate): Apply sales tax using a custom rate.
Custom Tax Rate: sales tax using a custom rate.
Miscellaneous section
Default Bank: Indicates which bank (cash drawer) is the default for this workstation.
When set, the user will not have to select the „bank‟ code when entering a payment. This
can be used to override the default bank code associated with an individual user when
they enter records at this workstation.
Workstation Facility Override: Indicates which facility to use as the default when
treatment is entered from this workstation. The facilities‟ place of service code is printed
on HCFA claims.
Workstation Practice Override: Indicates the Practice address to use as a default when
treatment is entered from this workstation. This overrides the default practice associated
with the provider.
Batch new claims instead of printing immediately: Indicates to batch claims to either
the Print Held, or EDI Claims area of Maintenance – System Tab – Processes instead of
immediately printing them on „submit‟. In this way, the claims can be processed (printed
or sent electronically) as one large batch instead of individually.
Treatment Options section
Billing Option
Doctor Fee: Indicates to use the institutions fee schedule when treatment is
rendered, taking in to account any overrides, exceptions, and discounts as
appropriate.
Patient Fee: Indicates to use the patient‟s fee schedule when treatment is
rendered, taking in to account any overrides, exceptions, and discounts as
appropriate.
Higher Fee: Indicates to use whichever fee is higher (the doctors or the patients)
when treatment is rendered.
Billing ID Types
Fee Guide: Indicates to list only Id‟s that are defined as „fee guide‟ types in the
Billing Id field on the transaction window, and Check Out Patient window. With
this option the workstation can have all billing occur under the licensing of the
clinic dean for example.
Doctor: Indicates to list only Id‟s that are defined as „doctor‟ types in the Billing Id
field on the transaction window, and Check Out Patient window. With this option
the workstation has all billing occur under the licensing of the specific doctor that
rendered care.
Transactions Reference Manual
Modified: 10-May-10
6 of 47
Both: Indicates to list Id‟s that are defined as „doctor‟ types, or „fee guide‟ types
in the Billing Id field on the transaction window, and Check Out Patient window.
This allows the workstation to bill under either the clinic dean (if for example
treatment is performed by an undergraduate) or the specific doctors license (if for
example the treatment is performed by a faculty member).
Discounts
Auto Discount: Indicates to automatically write off the patient „expected‟ portion
of a procedure where the insurance company‟s fee schedule is higher than the
charge for non-insured patients and clinic(s) will be billing the higher fee for
patients covered by this company. If this is the case then the insurance company
will be billed their amount, but the patient portion will be automatically written off.
For example, if the regular fee amount is $40, but the insurance will cover 60% of
$100, then the insurance company will be billed $60 and the patient billed $0.
This flag works in conjunction with the “Write Off” flag in the patient policy record.
NOTE: In most cases an agreement between the clinic and the insurance
company is required before this option may be used. In order for this to work, the
Transactions Options – “Auto Discount” flag must be checked and the “Bill
Option” set to „Higher Fee‟, the procedure must NOT have an individual charge,
the patient policy must be set o “Write-Off” and the patient must NOT have a fee
schedule specified in the Patient Information window.
Binding Quote (Planned): The fee is held at planned stage (i.e., when you do
not know who is providing treatment). Deselecting this checkbox enables the
auto-selected Binding Quote (In Process) checkbox.
Binding Quote (In Process): Fee is held at in-process stage (i.e. when you
know who is providing treatment). This checkbox is auto-selected, and is enabled
if the Binding Quote (Planned) checkbox is deselected.
Payment Options section
Payment/Adjustments
Include appointment estimate in Today’s amount: Indicates to include
amounts estimated on today‟s appointments as part of the total due from the
patient in the Payment tab of Transactions. Estimate amounts are defined in the
Maintenance – Scheduler Tab – Appt Codes window. Each appointment code
can have an estimated value for the work to be performed when this appointment
code is used.
Allow entry of negative/reverse adjustments: Indicates that the institution
allows adjustment codes to be entered as negative amounts (-) or as the reverse
of how the code was defined. For example to use an adjustment code that is
defined as a debit, but enter a (-) $ so that it then becomes a credit.
Insurance Payments
Insurance payments can be set to display payments for a period of up to 999 months ago
to today‟s date or for a period beginning and ending with absolute dates.
Transactions Reference Manual
Modified: 10-May-10
7 of 47
List Details For ___Months: Disabled if “Between _and _” is checked. Indicates
how many months to display an insurance payment in the Transactions – Ins
Payment Tab.
Between ____ and ___: Disabled if “List Details For _ Months” is checked.
Indicates a date range for the display of insurance payments in the Transactions
– Ins Payment Tab. Payments entered between these dates will be displayed;
payments entered outside the date range will not be displayed.
List all unallocated payments: Used in conjunction with the radio buttons above. If the
display is limited to certain dates, the institution may want to force unallocated payments
to stay in the list regardless of the entry date so that the user can find the record and
complete the allocation. If checked, the unallocated records will be displayed until fully
allocated; if unchecked the date settings will apply.
Load all Ins. companies in list: Indicates to list all insurance companies in the Ins
Payment tab of the Transactions window. If checked, all companies will be listed, and the
user can scroll through them to select a company to work with. This method may take a
long time if there are thousands of insurance companies on file with the institution. If
unchecked, the user must enter some search criteria and „find‟ the insurance company to
work with.
Create Secondary Claims while allocating Ins. payments: Indicates that the system
should prompt the user to submit the claim to the secondary insurance when the primary
insurance payment is allocated to the treatment, and there is a remaining balance to be
paid by secondary.
Transactions Reference Manual
Modified: 10-May-10
8 of 47
General Tab
Fields & Options
The currently selected Patient‟s name and (chart number) is displayed at the top left.
Guarantor: Name of the primary guarantor for this patient.
Emergency: Emergency contact name.
Manager: Name of the manager assigned to the patient.
Patient Type: Category given to the patient. For example: Ortho, Typodont, Pedo.
Alert Codes: Patient Alert codes, used for quick information on patients, customizable (hover
mouse over to get full description of the code).
Office Codes: Quick reference codes used by the Office, customizable.
Custom Codes: Additional quick reference codes used by the Office, customizable.
The center of the window displays the primary and secondary insurances for the patient.
Last Visit: Date of last patient appointment.
Last Recall: Date of patient‟s last recall.
Next Recall: Date of patient‟s next recall.
Next Appt: Date of next scheduled appointment.
Last Stmt: Date the last statement of this patient‟s account was printed.
The patient‟s digital image may be displayed in the upper right of the screen.
A/R Grid: Displays the patient‟s aged A/R balances.
Transactions Reference Manual
Modified: 10-May-10
9 of 47
Sub-tabs
Tx History Sub-tab
The Tx History sub-tab shows all treatment that is in-process or completed, all payments (from
both patient and insurance), all adjustments, and all office charges on the patient account. This
list can be displayed in either „claims owing‟ or „date ledger‟ format.
Pending Sub-tab
The Pending sub-tab shows all treatment that is currently planned and approved for the patient.
Unapproved Sub-tab
The Unapproved sub-tab shows all treatment that has been added / modified but is not yet
approved by a faculty member.
Transactions Reference Manual
Modified: 10-May-10
10 of 47
Right-Click Menu Items
Depending on the type of record that you select different right click options will be available.
Show History: Displays a history of changes to the currently selected line.
Claim Submission History: Displays a list
of submission dates for the selected claim
and whether the claim was sent
electronically or on paper.
Disbursement: Displays a list of charges that this payment has been applied to.
To unallocate an item,
highlight the line and click
on the Unallocate button.
Print List: Prints the full list.
Show Adjustments: Displays a list of adjustments that have been made to this payment line.
To unallocate an adjustment, highlight
the line and click on the Unallocate
button
Transactions Reference Manual
Modified: 10-May-10
11 of 47
Show Allocations: Displays a list of payments and/or adjustments that have been applied to this
charge.
By default when the
window is opened, it is
listing all types of
allocations. To filter the
list the user can uncheck
the Patient Payments,
Insurance Payments
and Adjustments radio
buttons at the top of the
window
To unallocate an item, highlight the line and click on the Unallocate button.
To view a history for a single allocation line, highlight the line and click on the History button.
Show History: Displays a history of changes to the currently selected line.
Transactions Reference Manual
Modified: 10-May-10
12 of 47
Treatment Tab
Figure 1 - The axiUm Transaction Treatment Tab Dialog
The treatment tab allows the user to add treatments, modify treatments and review existing
treatment information. Any treatment entered here will be reflected in the EHR window, and any
treatment entered via the EHR will be displayed here.
Claim Section
Buttons
New Claim: Clears the data fields and defaults the entry „date‟ to today.
Submit: Enabled after the claim is „added‟; allows the user to submit the claim to insurance.
Fields & Options
Instructor: Allows the user to indicate which faculty member has authorized/approved the
treatment that is being added.
Practice: Indicates the practice address at which this work was performed.
Date: Indicates the entry date for this claim.
Billing ID: Indicates the Billing Doctor / Fee Schedule to be used for this claim entry.
Facility: Indicates the facility at which this treatment was performed. This field is mandatory for the
submission of a medical claim.
Dental / Medical / Both: Indicates the type of claim being added.
Transactions Reference Manual
Modified: 10-May-10
13 of 47
Claim#: Disabled field; displays the internal claim number assigned for this claim.
Treatment Section
Buttons
Split: Allows the user to view / modify the split between patient and insurance.
Medical: Enabled when a procedure is „added‟; allows the user to indicate the diagnosis code
(ICD 9), any applicable modifier codes, place of service, Anesthesia minutes, and referring doctor
for the procedure.
New: Clears and defaults any applicable fields.
Add: Adds the record to the list.
Modify: Saves any changes that have been made to the highlighted line.
Delete: Deletes the currently selected (highlighted) line.
Statement: Allows the user to print a statement for the currently selected patient.
Fields & Options
Date: Indicates the date of service.
Code: Indicates the procedure code that was performed.
Site: Indicates the tooth site that was treated (if applicable).
Surface: Indicates the tooth surfaces treated (if applicable).
Provider: Indicates the provider that performed the treatment.
Description: Description of the procedure entered in „Code‟ above.
Unit: The number of units of this procedure performed (if factoring units, and if applicable to this
treatment).
Total: The total charge for the procedure.
Patient: The portion of the total charge that is expected from the patient.
Insurance: The portion of the total charge that is expected from insurance on behalf of patient.
Status: Indicates the status of treatment being entered.
P: Planned treatment (only available when on the „Planned‟ sub-tab).
I: In-Process treatment (only available when on the „Treatments‟ sub-tab).
C: Completed treatment (only available when on the „Treatments‟ sub-tab).
Transactions Reference Manual
Modified: 10-May-10
14 of 47
Custom1: “Location” is one of two custom fields that can be placed on
the treatment entry window. The school can define custom codes with
any prompt and any type of data required. This field and the Custom2
field are defined in the defined in Maintenance - Basic tab - Custom
Fields as Treatment/Note1 (see the dialog below). The Maintenance Basic tab - Custom Codes dialog can also be used to define a list of
possible entries that can be used to select the value for this field. If
the Validate using Custom Code Table option is selected only these
values will be accepted. If off, the value can be any user input as well
as a list selection.
Discipline: Indicates the discipline of work performed.
Tx.Status: Allows the user to identify a custom status for this procedure. Commonly used to
indicate a treatment was redone.
Custom2: “Session” is one of two custom fields that can be defined in Maintenance - Basic tab Custom Fields as Treatment/Note2.
Phase: Indicates the phase of treatment performed. This field is disabled when adding treatment
through the transactions window. It displays the phase for treatments that were entered through
the EHR module (if applicable).
Seq: Indicates the sequence of treatment performed. This field is disabled when adding treatment
through the transactions window. It displays the sequence for treatments that were entered
through the EHR module (if applicable).
Bill on Pmt Plan: Indicates that this treatment should be applied to the current payment plan.
Submit: Allows the user to submit the claim for currently selected item(s).
Instructor: Allows the user to select the instructor that approved the procedure.
Sub-tabs
Treatments Sub-tab
The Treatments tab only shows treatments that are in process or completed.
Transactions Reference Manual
Modified: 10-May-10
15 of 47
Planned Sub-tab
The Planned tab only shows treatments that have been planned and approved.
Right-Click Menu Items
Depending on the type of record that you select and the sub-tab currently selected there are
different right click options available
Show History: This menu item displays the Treatment History dialog which shows the edits made
to the selected line in both the Treatments and Planned sub-tabs.
Transactions Reference Manual
Modified: 10-May-10
16 of 47
Claim Submission History: Displays a list of
submission dates for the selected claim and
whether the claim was sent electronically or on
paper.
This window is used to determine how / when a
claim has been submitted. The user cannot
perform any action within this window. It is for
„lookup‟ only.
Tx Consent History: Will print out a history of all treatment-based consents that have been
created that includes this treatment.
Show Allocations: Displays a list of payments and/or adjustments that have been applied to this
charge. By default when the window is opened, it is listing all types of allocations. To filter the list
the user can uncheck the Patient Payments, Insurance Payments and Adjustments radio buttons
at the top of the window.
To unallocate an item, highlight
the line and click on the
Unallocate button.
To view a history for a single
allocation line, highlight the line
and click on the History button.
EOB Details: Opens the Explanation of Benefits (EOB) Details window where you can enter claim
adjustment reasons. Also available through Maintenance module – System tab – Processes icon –
Processes window – EDI Claims button - EDI Claims window – Unsubmitted Procedures tab, there
is a right-click EOB Details option.
Transactions Reference Manual
Modified: 10-May-10
17 of 47
Complete Tx: Enabled for in-process or planned treatment only; indicates to complete the
currently selected treatment and create a new claim for it.
Complete Tx (Last Claim): Enabled for in-process or planned treatment only; indicates to
complete the currently selected treatment and add it to the last claim created.
In Process Tx Visit: Enabled for in-process treatment only. Allows the user to indicate that the
patient came in for a treatment visit but the currently in-process treatment is still not completed.
Suspend In Process Tx: Enabled for in-process treatment only. Allows the user to suspend the
treatment. This will prevent anyone from completing the procedure and is most often used when
a patient is not expected to return to the clinic.
Rebill Treatment: Allows the user to re-bill the currently selected treatment.
The Rebill Treatments window allows the user to make several modifications to the treatment
claim.
Transactions Reference Manual
Modified: 10-May-10
18 of 47
Practice: The practice address to which the remission should be sent. Also used for
reporting purposes to determine where the procedure was performed.
Indicate whether this will be strictly a Dental procedure, strictly Medical, or can be billed to
Both dental and medical coverage‟s.
Fee Guide: The schedule of fees and licensure information to use for this claim.
Facility: The facility at which this procedure was performed. For medical claims this is
required, for dental it is optional. This indicates the place and type of service on a HCFA
claim form.
Rebill with Current Policies (use the policy information currently in the patient card to
calculate the patient/insurance split), Original Policies (use the policy information that was
used when this treatment was first entered in the system to calculate the patient/insurance
split), or Policies Effective on Treatment Date (use the policy information in the patient card
that was effective on the date of treatment to calculate the patient/insurance split).
The Modify Tx section becomes enabled as needed when changing the Dental / Medical /
Both flags at the top of the window. For example if a claim was originally a dental claim
that should have been billed to the medical coverage for a patient, when the user checks
“medical” the Medical Cd field and Site boxes will become enabled for the user to enter the
information required. Any entries / modifications made in this section must be Saved before
the user can proceed to Add Default or Add Special.
On Add Default the claim entry will be processed using the information filled in on this
window and the user will not have an opportunity to modify the fee that gets billed. The fee
is taken from the schedule of fees indicated by the “Fee Guide” filed. The new claim
information will appear at the bottom of the window for the user to review before closing.
On Add Special the user will be presented with the
Treatment Split window. This window displays the
calculated split between patient and insurance and
allows the user to override the total charge, and/or
the coverage amount expected from insurance.
Rebill Claim: Allows the user to re-bill all items on the currently selected claim.
Held in Dispute: Used to indicate this item is to be held in dispute. Held in dispute amounts are
not included in the patients „expected‟ total but are included in overall A/R for the institution.
Assign Tx Status: Allows the user to assign a Tx.Status to
the currently selected line(s).
The user can select from a custom list of status codes to
assign to the currently selected treatment.
Transactions Reference Manual
Modified: 10-May-10
19 of 47
Claim Inquiry: Enabled if the insurance
company accepts claim inquiries. Allows
the user to print a claim inquiry form to
submit to the insurance company.
For Delta Dental and Dentical claims only;
the user can submit a claim inquiry form.
The user will fill in the document control
number and any additional comments or
questions then submit (print) the inquiry
form.
Unbatch Claim: Removes the claim from the EDI submission list, or print held area. A claim that
has been batched must be un-batched prior to re-billing it.
Additional Tx Info.: Allows the user to enter additional
information that is required on a claim form for
Prosthetic or Orthodontic work.
For Prosthetics the user will need to indicate whether
this is the initial prosthetic placement, and if not the
initial placement then the date of the original.
For Orthodontics the user will indicate whether the
appliance was replaced, the appliance placement date,
the total months of ortho care to be completed and the
number of months left in the ortho care.
Add Student Eval: Allows the user to enter an evaluation of the providers‟ performance. Refer to
the document Grading_(Staff) for details of how to complete the grading information for the
provider.
PreAuthorization #: Allows the user to indicate whether a
preauthorization has been received from the insurance for
the currently selected procedure.
When preauthorization is received, the user will select the
insurance company that the pre-auth came from and will
enter the PreAuth#, Effective and Expiry dates. If preauthorization was denied, the user can indicate this also,
and /or override the denial with an authorization exception
like „Emergency‟.
Print List: Prints the full list.
For planned treatments, there is the following additional right-click menu items:
Change to In-Process: Enabled for planned treatment only; indicates to mark the currently
selected treatment as in-process.
Estimate History: Enabled for planned treatment only; allows the user to view a history of
estimates that have been provided to the patient.
In Process Tx Visit: Enabled for in-process treatment only. Allows the user to indicate that the
patient came in for a treatment visit but the currently in-process treatment is still not completed.
Transactions Reference Manual
Modified: 10-May-10
20 of 47
Print Estimate: Enabled for
planned treatment only; allows
the user to print an estimate of
the planned charges for the
patient.
Transactions Reference Manual
Modified: 10-May-10
21 of 47
Charges Tab
The charges tab allows the user to add additional fees to the account that are not necessarily
treatment specific. These are things like records copying fees, returned check charges etc.
Buttons
New: Clears and defaults any applicable fields.
Add: Adds the record to the list.
Modify: Saves any changes that have been made to the highlighted line.
Delete: Deletes the currently selected (highlighted) line.
Fields & Options
Practice: Indicates the practice address at which this charge was added.
Date: Indicates the entry date for this charge.
Code: Indicates the charge code. Can be typed or selected from the list.
Quantity: Indicates the number of units of <code> to charge for.
Description: Description of the charge being added to the account.
Custom1 <Location>: Optional field. “Location” in the image above is one of two custom fields
that can be placed on the window. The school can define custom codes with any prompt and any
type of data required.
Custom21: Optional field. To the right of “Location” in the image above is an area where one of
two custom fields can be placed on the window. The school can define custom codes with any
prompt and any type of data required.
Transactions Reference Manual
Modified: 10-May-10
22 of 47
ID#: Disabled field; is the Internal ID assigned to this charge entry.
Provider: Optional field to indicate the provider that requested the charge be added to the
account.
Amount: The amount to add to the patient account. Is calculated by the system based on the
„code‟ and „quantity‟ but can be manually adjusted.
Discipline: Optional field. The discipline of work that the charge applies to. Used for reporting
purposes.
Bill on Current Pmt Plan: Indicates to apply this charge to the current payment plan for the
patient.
Sales Tax Exempt: Indicates that this patient is exempt from paying sales tax.
Right-Click Menu Items
Show History: Displays a history of changes to the currently selected line. The Office Charge
History window will display a copy of the original entry and will contain a line for each edit that is
performed on the entry.
This is a view only window to allow the user to see some information about the charge and does
not allow any modifications within it.
Show Allocations: Displays a list of payments and/or adjustments that have been applied to this
charge.
Transactions Reference Manual
Modified: 10-May-10
23 of 47
By default when the window is opened, it is listing all types of allocations. To filter the list the user
can uncheck the Patient Payments, Insurance Payments and Adjustments radio buttons at
the top of the window.
To unallocate an item, highlight the line and click on the Unallocate button.
To view a history for a single allocation line, highlight the line and click on the History button.
Print List: Allows the user to print the list of charges that have been added in this tab.
Pmt Plan Tab
Transactions Reference Manual
Modified: 10-May-10
24 of 47
Payment plans are used in axiUm to create, calculate, and manage a system for patient
payments on account. These payments can be for completed work, work in progress, or
treatments planned for the future.
Payment Plan Section
Buttons
New: Clears and defaults any applicable fields.
Add: Adds the record to the list.
Modify: Saves any changes that have been made to the highlighted line. To modify the plan, the
user can make a change to any of the enabled fields on the main payment plan window and click
modify. To make changes to the schedule or what‟s applied to the plan, click on „Edit Sched…” or
“Apply”.
Delete: Deletes the currently selected (highlighted) line. You cannot delete a payment plan that
currently has a fee due. You must first edit the schedule so that nothing is „now due‟ before the
deletion can be completed.
Apply: Allows the user to apply the currently selected payment plan to treatment or charges.
Please see the Applying Payment Plan Treatments section below.
Edit Sched…: Allows the user to modify the current schedule of payments expected for a payment
plan. Please see the Editing Payment Plan Fees section below.
Contract: The contract button allows the user to view and get a print out of the payment plan
contract. This contract can be signed electronically by the patient, or the patient can manually
sign the paper copy. The contract content is customizable and may include coupons that the
patient could cut out and return to the dental institution with payment.
Ortho Billing: This begins the ortho billing process and creates any applicable ortho billing fees.
Fields & Options
Guarantor: Name of the responsible party for this payment plan.
The Guarantor is the person that will be making the payments. If the patient is an adult this will be
the selected patient, if the patient is a child, this will be a parent or guardian.
Plan is for:
The „Plan is for‟ option sets the plan behavior.
Figure 2 - Plan Types (detail)
The „Plan is for‟ option can be set to:
Specific Charges - This payment plan option is for planned work or a combination of treatments
with outstanding balances and work planned for the future. Specific Charges is the most
commonly used payment plan type.
Outstanding Balance - This is a payment plan for the current, overall outstanding balance on the
patient account. Only one outstanding balance type plan can be created for a patient. This type of
plan does not require the user to associate the treatment to the plan. This is most commonly
Transactions Reference Manual
Modified: 10-May-10
25 of 47
used when a contract is created to allow a discontinued patient to pay their arrears at a mutually
agreed upon and contracted amount.
Orthodontics - The payment plan is for current and / or future orthodontic work where the patient
may have insurance coverage for some or all of the treatments. This type REQUIRES that the
Maintenance – System tab – Processes – Ortho Billings be run periodically to generate the claims,
and create the fees that are currently due. An orthodontics payment plan, like a specific charges
payment plan, applies to specific treatments. An orthodontics payment plan differs from a specific
charges payment plan in that this type of plan will also generate insurance claim submissions
each time a payment comes due if the patient has insurance for the treatments applied to the
plan.
Regular Payment Schedule: This option is used to set up regular payment schedules. Not setting
this option means the payment plan is created without a regular schedule of payments and will
have to be defined manually. This is for patients that are not going to make payments on a regular
basis or will pay varying amounts at each pay period.
Plan #: Disabled field; displays the internal payment plan ID number.
Plan Total: Enter the total amount that the payment plan is for.
Plan Bal.: Disabled field; indicates the outstanding balance on the payment plan (“Plan Total” –
“Total Chg. to Date”).
Total Chg. To Date: Disabled field; indicates the total amount that has been billed to the patient
for this plan.
Total Rec. to Date: Disabled field; indicates the total amount that has been received from the
patient and applied to this plan.
Amount Now Due: Disabled field; indicates the total amount that is currently due on this plan.
Payment Schedule Details: Displays a list of the scheduled payments.
Comment: Enter a comment about the payment plan. This comment will help when more than one
plan exists for a patient, and the cashier needs to decide which plan to apply a payment to.
Only bill fee if patient visit occurred: An orthodontic payment plan allows the option of only billing
the patient if a visit has occurred. This allows setting up the orthodontic schedule ahead of time
and letting the patient start payments only after the first treatment appointment has occurred.
With the Only bill fee if patient visit occurred option checked, the system will not generate the fee
for a given month if there was no patient visit to the clinic within the specified fee period.
The following qualifies as a patient visit:
A Completed or In-Process treatment, posted from transactions, where the procedure is
in the Orthodontics category.
A Completed or In-Process treatment posted with the Practice‟s Ortho Visit Procedure
Code.
An Ortho Visit entered in the Ortho module.
Note: axiUm does not consider this flag on the initial down payment, and will always post it.
axiUm looks for records with a date between the fee posting and the previous regular fee. For
st
example, if you have monthly fees on the 1 of every month, and there was one of the above
nd
st
patient visits with a date between September 2 and October 1 , axiUm creates the fee for
October 1.
Regular Schedule Section
Down Payment: Enter the amount of the expected down payment. This can be left as 0.00 if no
down payment is expected.
Transactions Reference Manual
Modified: 10-May-10
26 of 47
Down Pmt Date: Enter the date on which you expect to receive the down payment indicated
above.
Starting Date: Enter the first date on which you expect to receive the first of the regularly
scheduled payments.
Payment Period: Enter the expected payment period
Monthly: Indicates you expect to receive a payment once a month.
Quarterly: Indicates you expect to receive a payment once every three months.
Semi-annually: Indicates you expect to receive a payment once every six months.
# of Payments: Enter the number of payments that you will allow the patient to spread the plan
over or skip to the next field.
Regular Fee: If no entry was made in # of payments above, enter the actual fee amount that you
want paid once per payment period defined above.
Final Fee: The system will auto calculate the final fee based on entries above although this
amount can be manually adjusted.
Final Date: The system will auto calculate the final fee date based on entries above although this
date can be manually adjusted.
Right-Click Menu Items
Depending on the type of record that you select different right click options will be available.
Show History: Displays a history of changes to the currently payment plan.
View Payment History: Displays a list of the payments that have been received and applied to this
payment plan.
Transactions Reference Manual
Modified: 10-May-10
27 of 47
Print List: This option prints the entire list to the selected printer.
Transactions Reference Manual
Modified: 10-May-10
28 of 47
Payment Tab
The upper left of the window displays the name and address of the currently selected patient.
Buttons
New: Clears and defaults any applicable fields. This button should be pressed for each new
payment entry.
Add: Adds the record to the list.
Modify: Saves any changes that have been made to the highlighted line.
Allocate: Allows the user to apply the payment to specific items.
To allocate to a specific item in the
list, highlight the item and click on
the Apply button.
To have the system automatically
apply the funds to the oldest
outstanding balances on the
patient account, click on Auto
Apply.
Transactions Reference Manual
Modified: 10-May-10
29 of 47
If the user has made some allocations that they now wish to cancel out of in order to
make different allocations they can click on the “Clear All” button. This will refresh the list
to its non-allocated state and allow the user to start over.
If the treatment is not in the list, the user can click on “Load All” to see all treatments on
the patient account (even $0.00 items). The list will refresh and all treatments will be
displayed whether there is an amount expected from the patient or not.
Pre-pay allows the user to reserve funds for a specific purpose. Please see the
Patient_PrePayments.pdf for details on this feature.
Receipt: Allows the user to print a receipt for the payment.
The user can select a date range for the receipt print out, and
choose whether to include payments only or include both
payments and charges that have been added to the patient
account.
Custom comments can also be added.
Fields & Options
Payor: Select the guarantor that payment is being accepted from.
Select Pt…: For a payor that has multiple dependents, allows the user to select another patient
in order to take additional payments without having to leave the transactions window.
Code: Abbreviated code that represents the form of payment. Can be typed in or selected from
the list.
Desc: Description of the form of payment. For personal checks it is recommended that the user
type the check number into this field for auditing purposes.
Pmt #: Disabled field; displays the internal payment record number.
Date: The date that the payment was received – or the date that a post-dated payment becomes
„viable‟.
Bank: The cash drawer that the payment was taken at. Can be typed in, or can be selected from
a list.
Amount: The amount ($) of the payment.
Remaining: Disabled field; displays the amount remaining to be allocated to the patient account.
This field will be blank until the payment is added.
Apply to Current Pmt Plan: Indicates that this payment is to be applied to one of the current
payment plans for this patient. If there are multiple active payment plans the system will prompt
the user to select one.
Today’s: Disabled field; displays the amount of charges added to the patient account today.
Discount: Disabled field; displays the amount of discount this patient is eligible for. This is a
discount based on the payment code selected, for example, if they pay cash they get a 10%
discount.
Today’s Due: Disabled field; displays the amount that is due from today‟s charges. This is the
calculation of “Today‟s” minus any eligible “Discount”.
Balance: Disabled field; displays the amount of all charges on the patient account excluding
expected payment plan fees. This is the calculation of “Today‟s Due” plus any outstanding
charges.
Transactions Reference Manual
Modified: 10-May-10
30 of 47
Pmt Plan Bal: Disabled field; displays the amount currently expected on the payment plan. This
can be „currently due‟ or can include outstanding balances for the payment plan.
Unapproved: Disabled field; displays the amount of charges entered today but as of yet
unapproved by a faculty member.
Total: Disabled field; displays the grand total for the patient. This is the amount that should be
collected today to bring the patient record up to date.
Right-Click Menu Items
Show History: Displays a history of changes to the currently selected line.
Show Adjustments: Displays a list of payments and/or adjustments that have been applied to
this charge.
To unallocate an adjustment, highlight
the line and click on Unallocate.
Disbursement: Displays a list of charges that this payment has been applied to.
To unallocate an item, highlight the
line and click on the Unallocate
button.
NSF Payment:
When a check is returned from the bank as
„insufficient funds‟, the user can right click on
the payment and quickly „reverse‟ the credit on
the patient account.
When a check is returned from the bank as
„insufficient funds‟, the user can right click on the payment and quickly „reverse‟ the credit on the
patient account. The date of the reversal is entered for auditing purposes. This will default to the
current date but can be modified.
The user can type the adjustment code or select it from the adjustment code list. The full
description of the code entered/selected will default and can also be modified if desired. The type
and amount fields are disabled and are automatically filled in by the system. Amount will be the
exact amount of the original check payment. Type will be either debit or credit depending on
which type of adjustment code is selected.
Refund Payment:
Transactions Reference Manual
Modified: 10-May-10
31 of 47
The date of the refund is entered for auditing
purposes. This will default to the current date
but can be modified.
The user can type the adjustment code or
select it from the adjustment code list. The full
description of the code entered/selected will
default and can also be modified if desired. The type and amount fields are disabled and are
automatically filled in by the system. Amount will be the exact amount that is „held‟ from the
original payment. Type will be either debit or credit depending on which type of adjustment code
is selected. When refunding a payment, the user can choose whether this will affect the bank
deposit or not. If the refund affects the banks deposit, the user must indicate which bank.
Full Refund:
The date of the refund is entered for auditing
purposes. This will default to the current date
but can be modified.
The user can type the adjustment code or
select it from the adjustment code list. The full
description of the code entered/selected will
default and can also be modified if desired. The type and amount fields are disabled and are
automatically filled in by the system. Amount will be the exact amount of the original payment.
Type will be either debit or credit depending on which type of adjustment code is selected. When
refunding a payment, the user can choose whether this will affect the bank deposit or not. If the
refund affects the banks deposit, the user must indicate which bank.
Reverse Payment:
The date of the refund is entered for auditing
purposes. This will default to the current date but
can be modified.
The user can type the adjustment code or select it
from the adjustment code list. The full description
of the code entered/selected will default and can also be modified if desired. The type and
amount fields are disabled and are automatically filled in by the system. Amount will be the exact
amount of the original payment. Type will be either debit or credit depending on which type of
adjustment code is selected. When reversing a payment, the user can choose whether this will
affect the bank deposit or not. If the refund affects the banks deposit, the user must indicate
which bank. Reversing a payment automatically un-allocates all items that are tied to it.
Print List: Prints the full list.
Transactions Reference Manual
Modified: 10-May-10
32 of 47
Adjustment Tab
Buttons
New: Clears all fields, sets the Date field to the current date.
Add: Adds a new Adjustment to the database, assigns the ID #, and enables the Modify, Delete
and Apply buttons.
Modify: Any changes to the fields within the window are saved to the database and updated
when the modify button is clicked.
Delete: Prompts warning message about deletion, performs check to see if Adjustment has been
applied, if so, error message is display. If everything matches the deletion criteria correctly, the
item is removed from the list box, and all fields are cleared.
Apply: Opens the Apply Adjustment Dialog. the user to apply the currently selected adjustment to
something
Transactions Reference Manual
Modified: 10-May-10
33 of 47
Fields & Options
Date: (Required) Date of Adjustment, defaults to today‟s date on “New”.
Code: (Required) Type the adjustment code or click the ellipsis (…) button to open the
Adjustment Codes list. To select a code, double click on it in the lower list.
Description: Auto populated if Code is selected or entered and there is an associated description
with it. It is a free text entry field so it is modifiable even if it is auto-populated.
Apply to Current Payment Plan: Checking this, associates the Adjustment to the patient‟s
payment plans.
Affect Bank Deposit: Checking this, causes the adjustment to appear on the Bank Deposit for
today and enables the Bank field.
ID #: (Auto-generated) Internally generated number for the Adjustment, non-modifiable.
Indicates whether the adjustment is a debit or credit to the account.
Type: (Auto-generated) Populated by the Code selected, Non-modifiable.
Amount: (Required) Numerical amount of the Adjustment, modifiable.
Remaining: Shows the remaining unapplied amount for this adjustment. As amounts are applied
to charges / payments the „remaining‟ is recalculated to reflect what is as yet unapplied.
Bank: Indicates which cash drawer (bank) this adjustment applies to. Can be typed in or
selected form the Bank Codes list.
Right-Click Menu Items
Show History: Opens the Adjustment History dialog to allow the user to see a history of changes
to the currently selected record.
Disbursement: Opens the Adjustment Disbursement dialog. Displays a list of items the
adjustment has been applied to.
To unallocate an adjustment, highlight
the line and click on the Unallocate
button.
Print List: Prompts for a printer and prints the list contents.
Transactions Reference Manual
Modified: 10-May-10
34 of 47
Ins Pmt Tab
The insurance payment tab of the axiUm transactions module allows the axiUm user to record an
insurance company‟s payment to the school and allocate / disperse / apply / pay the outstanding
insurance balances of patients that have insurance policies with the insurance provider.
This section of the Transactions module is used to apply bulk insurance payments, or individual
insurance payments. Insurance payments can be applied to the currently selected patient‟s
treatments, or a group of patients‟ treatments selected from a list by the user. A patient does not
need to be selected to use this tab of the Transactions module except for the Insurance Payments
for Patient sub-tab.
Considerable effort has gone into making the insurance payment tab as flexible an accounting
tool as possible. Changes and adjustments of treatment balances can be made, notes can be
added, histories reviewed, current patient selection changed, adjustments made and reports can
be printed from within the insurance payment tab section.
Buttons
New: Clears all entries and adds defaults any applicable fields.
Add : Adds the record to the list.
Modify: Saves any field changes made to the selected item. Not pressing this button after making
changes will cause them to be discarded.
Delete: Deletes the currently selected item. Only unallocated and unadjusted insurance payments
can be deleted.
Allocate: Apply the payment to treatments and charges with insurance balances owing.
Select an insurance payment with remaining funds to be allocated and press the „Allocate‟ button.
The list of patient‟s treatments with unpaid insurance balances covered by the insurance
company will be displayed.
Transactions Reference Manual
Modified: 10-May-10
35 of 47
Figure 3 - Allocating an Insurance payment - Applying Insurance Payment Dialog
The „Submitted Claims Only?‟ option will restrict the list to only those treatments that have been
submitted to the insurance company; otherwise all of the claims will appear.
Pt Allocate: Apply the insurance payment to items for the currently selected patient.
Select a payment with remaining funds to be allocated and press the „Pt Allocate‟ button. The „Pt
Allocate‟ button will not be selectable if there is not a currently selected patient.
Figure 4 - Patient Allocate - Applying Insurance Payment Dialog
The information displayed, sorting, and right click menu is identical to the general allocation dialog
list menu. The only difference is the addition of a „Load All‟ button. This button allows the user to
load all of the patient‟s treatments, including those not covered by insurance, those fully paid, and
those fully allocated.
Fields & Options
List Insurance: This field is used to look up the insurance company. It is used in conjunction with
the insurance company list column headings. By typing all or part of the column entry to look up
(or an underscore „_‟ for matching all) and then clicking on the column heading, all matching
entries will be found. For example: Entering „P‟ in the „List Insurance‟ field and clicking the T
(Type) column will find all parent companies. Entering „C‟ and doing the same finds all of the local
companies. The same can be done with the Code, EDI, and Name column headings. The lookup
is case insensitive.
If the list is preloaded the non-matching companies will be discarded. If not preloaded the
matching companies will be listed. See the Options and Settings - „Load all Ins. Companies in list‟
section below for more details.
Transactions Reference Manual
Modified: 10-May-10
36 of 47
The Include Inactive option allows the search to include insurance companies that are marked as
inactive.
Pmt #: An internally generated unique number identifying the payment.
Date: Intended for the user to record the remittance date. This is the date on the check, not the
date of this entry. The transaction entry date is also recorded internally as part of the audit.
Amount: The value of the check. The amount, as well as the date and the code and description
(see below), can be changed as long as the insurance payment has had no adjustments or
allocations made to it, and the users‟ security level allows it.
Remaining: Shows the amount left to allocate. This value is the amount of the check less the
allocation and adjustments made. It cannot be edited.
Figure 5 - Bank Codes Dialog
Bank: The payment handling area selected from
the list of entries defined in the Maintenance Transactions - Bank Codes list. This may a
departmental accounting construct or an actual
physical cash drawer, it does not refer to a financial
institution.
Figure 6 - Payment Codes Dialog
Code: The predefined payment code selection. The
entry can be typed in or searched for but must be an
entry from the Payment Codes dialog list (below). This
list is created in the Maintenance - Transactions Payment Codes icon.
The default bank setting of the selected code will alter
the insurance payment bank setting when selected.
The description can be altered as desired after the
code is selected but both of the Code and description
fields in the Insurance Payment dialog must have an
entry.
List Details For: Displays the setting for the cut off on
insurance payments to be displayed. This date is
defined in Transactions – Options and Settings.
Transactions Reference Manual
Modified: 10-May-10
37 of 47
Sub-tabs
Ins. Payments Sub-tab
Figure 7 - Insurance Payments Sub-tab List
This lists the entered insurance payments. None of these columns can be sorted. The applied
and held columns show the amount applied to treatments covered by insurance policies with this
company and held the amount remaining for allocation.
Right-Click Menu Items
Figure 8 - Insurance Payments List Right click menu
The following right click menu options are available for each insurance payment list item:
Show History
Figure 9 - Insurance Payment History Dialog
The Insurance Payment History dialog lists all of the the transactions performed with this
insurance payment. The „Type‟ column shows what was done. The first item is always an „Add‟
type meaning the initial check entry. „Edit‟ type history items are changes made to the initial entry.
These can only be made if there are no allocations or adjustments on the insurance payment
amount.
Transactions Reference Manual
Modified: 10-May-10
38 of 47
Add Attachment
Use this window to browse to the file location for the attachment. Insurance payment records with
an attachment displays
on the line below the Trx.# column heading.
View Attachment
If you have only one attachment, axiUm displays it.
If you have multiple attachments, axiUm displays the Select Attachment (Ins Pmt)
window. From the list view, highlight the attachment you want to see and click the OK
button.
Delete Attachment
Removes the attachment on the selected line.
Show Adjustments
Figure 10 - Insurance Payment Adjustments Dialog
The Insurance Payment Adjustments dialog displays only the adjustments made to the insurance
payment. These will always be payment refunds. Adjustments can be selected and deleted.
Disbursement
Figure 11 - Insurance Payment Disbursement Dialog
Allocations made with the insurance payment item that is currently selected are displayed in the
Insurance Payment Disbursement dialog. Each allocation can be reversed by selecting it in the
list and pressing the „Unallocate‟ button. The entire list can also be printed.
Refund Payment
Transactions Reference Manual
Modified: 10-May-10
39 of 47
Figure 12 - Refund Insurance Payment Dialog
Part or all of an insurance payment can be refunded. When the required refund code is selected
only the refunds that apply to payments will be displayed. None of the refund adjustment‟s options
has any effect on an insurance payment refund entry. An adjustment will only refund part or all of
a payment, it cannot increase the amount.
The „Affect Bank Deposit‟ option will make the adjustment appear on the next bank deposit report.
Do not select this option if the next bank deposit report is not the same bank deposited report that
the insurance payment itself appears on. If the adjustment does not appear on the same bank
deposit report as the insurance payment does, this would likely lead to confusion.
Do not change the „Apply to:‟
setting to charges before selecting the
refund code. Charge adjustment codes cannot be selected and cannot be edited from the Refund
Insurance Payment dialog interface. The user will have to use Maintenance - Transactions tab Adjustment Codes to do this.
Print List
This prints everything in the insurance payment list to the selected printer.
Ins Payments for Patient Sub-tab
Figure 13 - Insurance Payments for Patient Sub-tab List
This lists the insurance allocations for the currently selected patient. None of these columns can
be sorted. This lists individual allocations to treatments for the current patient. The „Trx#‟ field is
the insurance payment entry number. The „Date‟ field is the date the allocation was made. The
„Pmt Total‟ field is the check amount, „Tx Amount‟ the original insurance balance of the treatment,
and „Applied‟ is the amount applied to this treatment. „Tx Balance‟ is the remaining insurance
balance for the treatment.
Right-Click Menu Items
Figure 14 - Insurance Payments for Patient List Right click menu
Transactions Reference Manual
Modified: 10-May-10
40 of 47
Disbursement
This menu option shows the allocations for the selected Insurance Payments for Patient list item.
These allocations can be unallocated here.
Refund Overpayment and Reverse Payment
Like the insurance payment refund this menu item allows the payment allocation for this patient‟s
selected treatment to be allocated either in part (as in the Refund Overpayment) or the entirely
with the Reverse Payment menu option. The dialogs are identical except that the Refund
Overpayment option allows the user to edit the refunded amount.
Figure 15 - Refund Insurance Payment Dialog (from Refund Overpayment)
Print List
The contents of the currently displayed list are printed to the selected printer.
Other Windows
Applying Ins. Payment Window
Sort Columns
The list of treatments with insurance balances in the Applying Ins. Payment dialog can be sorted
(in ascending order only) by clicking on any column header. This will cause the list to sort on the
column clicked, and allows the user to sort the list in the same manner as the EOB that they are
allocating from.
Transactions Reference Manual
Modified: 10-May-10
41 of 47
Right-Click Menu Items
Figure 16 - Allocating Insurance Payments List Right click menu
Select Patient
This menu option makes the patient in the currently selected item the currently selected patient in
axiUm.
Patient Info…
This menu option displays the patient information dialog. If a claim was rejected because of
missing information, the user can correct the data here, and return to the insurance window to resubmit the claim.
Claim Submission History…
This option shows the claim submission history for the selected treatment.
Show Allocations…
The allocations and allocation history can be viewed and selected allocations can be reversed
using the Unallocate button.
Transactions Reference Manual
Modified: 10-May-10
42 of 47
The display of patient payments, insurance payments, or adjustments is selectable for both
dialogs. Note that separate insurance payment allocations for the same treatment from the same
insurance check will be summed and displayed as a single list item.
Rebill Treatment…
This menu selection allows the treatment to be completely rebilled. The treatment billing details
can be changed as well as the treatment billing split between the patient and the insurer by using
the Add Special button.
Figure 17 - Rebill Treatment and Treatment Split Dialogs
Add Sticky Note…
Transactions Reference Manual
Modified: 10-May-10
43 of 47
This is used to add a sticky note to the Applying Insurance Payment dialog list item. To assign the
sticky note enter the note text – left click on the note - and while holding down the mouse key drag the note to anywhere in the dialog and then release. The treatment will then display a note
icon in the list and the dialog will display a numbered note attachment icon
on the upper right when the treatment item is selected.
Transactions Note…
A transaction note is a full, permanent note that is attached to the treatment.
Figure 18 - Notes Dialog
These notes can be viewed, edited and deleted using the above dialog.
Print Statement…
This prints a statement (bill) for the patient in the selected item.
Print List
The current list is printed to the selected printer.
Treatment Split Window
Select one of the treatments with an unpaid insurance component and no applied amount. When
an allocation is made the item remains listed and cannot be allocated to again in the same
session even if there is still an outstanding insurance balance.
The „Split„ button allows the user to view the details as to how the treatment cost was split
between the user and the insurer.
Transactions Reference Manual
Modified: 10-May-10
44 of 47
Figure 19 - The Treatment Spilt Dialog and Treatment Deductibles and Sub-dialog
Apply, Transfer, and Write Off
The amount to be paid can be adjusted using the Apply, Transfer, and Write Off amount fields.
Figure 20 - Applying Insurance Payment Dialog - Apply, Transfer, Write Off Detail
Transfer is used to adjust the amount the patient or the insurer pays. In the above case an
amount owing by the usurer is adjusted by $100 and this amount is transferred to the patient to
pay.
If there is more than one insurer for the patient, an amount can be transferred from one insurer to
another.
Transactions Reference Manual
Modified: 10-May-10
45 of 47
The write off field is used to write off the un-remitted portion of the procedure instead of
transferring to the patient for payment.
The „Reason‟ field for the write off or the transfer is an adjustment code to indicate why the write
off or transfer occurred. It is best to sue descriptive reasons like “deductible not met”, “not a
covered service” etc.
Transfer and write off adjustment codes are always adjustments that apply to charges. Transfer
adjustment codes are always adjustments that transfer a balance amount. Write off adjustment
codes are always adjustments that do not transfer a balance amount. There is no transfer
involved with a write off.
Notes Tab
Notes that relate to the financial side of a patient record are suggested to be kept separate from
the clinical chart notes. For this reason axiUm has a Transactions Notes tab. Here the user can
enter a note, and rest assured that only people who have access to the financial data will be able
to see it.
To choose the note to use double click on the note lien in the lower list. This will pull the note text
into the previous window where you can then edit it, add to it, or simply add it „as is‟ to the patient
record.
Transactions Reference Manual
Modified: 10-May-10
46 of 47
Buttons
New: Clears the code and text fields, and defaults the date to today‟s date.
Add : Adds the record to the list.
Modify: Saves any field changes made to the selected item. Not pressing this button after making
changes will cause them to be discarded.
Delete: Deletes the currently selected item.
Fields & Options
Code: The user can select from a pre-defined
list of commonly used notes by either typing the
note code here or selecting the note from the
ellipsis button.
Text: The full content of the note
Right-Click Menu Items
Show History: Displays a history of changes to the currently selected note line.
Print List: Allows the user to print the list of transaction notes.
Transactions Reference Manual
Modified: 10-May-10
47 of 47