1
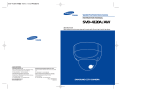
INSTRUCTION MANUAL
VCC-9784VA
VCC-9785VP
Color CCD Camera
THIS INSTALLATION SHOULD BE MADE BY A QUALIFIED SERVICE
PERSON AND SHOULD CONFIRM TO ALL LOCAL CODES.
Please read this instruction manual carefully in order to ensure correct
installation.
This manual covers 2 models. Any difference between the 2 models is
indicated when necessary.
CONTENTS
PRECAUTION ............................................................................. 2
NOTES OF USE ........................................................................... 5
INSTALLATION ........................................................................... 8
CCD CHARACTERISTIC ............................................................... 10
SPECIFICATION ......................................................................... 11
PRECAUTION
CAUTION: Changes or
Safety Guard
modifications not expressly approved by
the manufacturer may void the user’s
authority to operate this equipment.
This equipment has been tested and
found to comply with the limits for a Class
B digital device, pursuant to Part 15 of the
FCC Rules.
CAUTION: TO REDUCE THE RISK OF
ELECTRIC SHOCK, DO NOT REMOVE
COVER (OR BACK)
NO USER-SERVICEABLE PARTS INSIDE.
PREFER SERVING TO QUALIFIED SERVICE
PERSONNEL.
The lightening flash with
arrowhead symbol, within
an equilateral triangle, is
intended to alert the user to
the presence of uninsulated
"dangerous voltage" within the
product's enclosure that may
be of sufficient magnitude to
constitute a risk of electric
shock to persons.
The exclamation point within
an equilateral triangle is
intended to alert the user to
the presence of important
operating and maintenance
(servicing) instructions in the
literature accompanying the
product.
WARNING: To reduce a risk of fire or electric
shock, do not expose this appliance to rain or
moisture.
■ For
These limits are designed to provide
reasonable protection against harmful
interference in a residetenial installation.
This equipment generates, uses, and
can radiate radio frequency energy and,
if not installed and used in a accordance
with the instructions, may cause harmful
interference to radio communications.
However, there is no guarantee that
interference will not occur in a particular
installation. If this equipment does cause
harmful interference to radio or television
reception, which can be determined
by turning the equipment off and on,
the user is encouraged to try to correct
the interference by one or more of the
following meansures:
● Reorient or relocate the receiving
antenna.
● Increase the separation between the
equipment and receiver.
● Connect the equipment into an outlet
on a circuit different from that to which the
receiver is connected.
● Consult the dealer or an experienced
radio/TV technician for help.
For the customers In Canada
Russian Users
This product certified by offical
certification company which is
authorized by Russian Federation.
ДЛЯ ПОЛЬЗОВАТЕЛЕЙ РОССИИ
Данная продукция сертифицирована
AЯ46 официальным органом
по сертификации Российской
Федераци.
2
This class B digital apparatus complies
with Canadian ICES-003.
For EU Users
Please note:
Your SANYO product is designed and manufactured with high quality
materials and componets which can be recycled and reused.
This symbol means that electrical and electronic equipment, at their endof-life, should be disposed of separately from your household waste.
Please dispose of this equipment at your local community waste collection/
recycling centre.
In the European Union there are separate collection systems for used
electrical and electronic product.
Please help us to conserve the environment we live in!
This symbol mark and recycles system are applied only to EU countries
and not applied to countries in other areas of the world.
SANYO FISHER Sales (Europe) GmbH
Stahlgruberring 4, D 81829 Munich, Germany
SANYO Electric Co., Ltd.
1-1, Sanyo-cho, Daito City, Osaka 574-8534, Japan
PRECAUTIONS
■ In case of a probelm
Do not use the unit if smoke or a strange odor comes
from the unit, or if it seems not to function correctly. Turn
off the power immediately and disconnect the power
cord, and then consult your dealer or an Authorized
Sanyo Service Center.
■ Do not modify
Do not modify the cabinet and camera, as it maybe
dangerous and cause of damage to the unit. For repairs,
consult your dealer or an Authorized Sanyo Service
Center.
■ Be careful when handling the unit
To prevent damage, do not drop the unit or subject it to
strong shock or vibration.
■ Do not put objects inside the unit
Make sure that no metal objects or flammable substance
get inside the unit. If used with a foreign object inside, it
could cause a fire, a short-circuit or damage. Be careful
to protect the unit from rain, sea water, etc. If water or
liquid gets inside the unit, turn off the power immediately
and disconnect the power cord, and then consult your
dealer or an Authorized Sanyo Service Center.
■ Do not install this unit close to magnetic fields
The magnetic fields may result in unstable operation.
3
■ Protect from humidity and dust
To prevent damage, do not installl the unit where there is
greasy smoke or steam, where the humidity may get too
high, or where there is a lot of dust.
■ Protect from high temperatures
Do not install close to stoves, or other heat sources, such
as spotlights, etc., or where it could be subject to direct
sunlight, as this could cause deformation, discoloration or
damage.
■ Cleaning
* Dirt can be removed from the cabinet by wiping it with
a soft cloth. To remove stains, wipe with a soft cloth
moisteried with a soft detergent solution and wrung dry, then
dry by wiping with a soft cloth.
* Do not use benzine, thinner or other chemical products
on cabinet, as this may cause deformation and paint
peeling. Before using a chemical cloth, make sure to read
all accompany instructions. Make sure that no plastic or
rubber material comes into contact with the cabinet for a
long period of time, as this may cause damage or paint
peeling.
NOTES OF USE
■
Power supply
This dome camera can operate on AC24V or DC12V. The camera
automatically transfers the power. When connecting DC12V power
source, check polarity before switching on as a precaution. Wrong
connection may cause malfunction and/or damage to the video
camera.
■
Operating or storage location
1. Avoid viewing very bright objects, such as light fittings for long
extended periods.
2. Avoid operating or storing the unit in the following locations:
● Extremely hot or cold places (operating temperature:-10˚C to
+50˚C).
● Close to sources of strong magnetism.
● Close to sources of powerful electromagnetic radiation, such as
radio’s or TV transmitters.
● In humid and excessively dusty places.
● Where exposed to high mechanical vibrations.
● Close to fluorescent lamps or objects reflecting light.
● Under unstable light sources (it may cause flickering).
■
Attached the dome casting
Attach the dome casing with the supplied screw fittings.
■
Transportation
■
When transporting the camera, repack in it’s originally packing
or in materials equal in quality.
Cleaning
1. The dome cover is the optical part. Use a soft dry cloth to remove any fingerprints or dust.
2. Use a blower to remove dust from the lens.
3. Clean the camera casing with a dry soft cloth. More stubborn
stains, use a cloth dampened with a small quantity of neutral
detergent, then wipe dry.
4. Do not use volatile solvents such as alcohol, benzene or thinners
as they may damage the surface finishes
■
Transportation
Pattern attached for localisation camera on wall/ceiling.
4
NOTES OF USE
■ CONNECTION
Fig-1
(a) Video out connector
(b) Power connector (DC12V/AC24V)
■ LOCATION AND FUNCTION OF PARTS
(1) Conduit holes (sealed):
Connect the wires through the hole. The conduit holes are on
the side of the unit casing. The access hole is sealed at the fac
tory. Pierce the hole as needed and connect the line.
(2) Unit Casing:
The unit casing is made of Acrylonitrile Butadiene Styrene(ABS)
30% + Polycarbonate (PC)70%.
(3) Dome Casing:
The dome cover is made of polycarbonate.
(4) Zoom lever:
Loosen lock screw anti-clockwise and adjust the camera’s focal
range as desired. Tighten lock screw clockwise after adjustment.
(5) Focus lever:
Loosen lock screw anti-clockwise and adjust focus for best picture sharpness. Tighten lock screw clockwise after adjustment.
5
NOTES OF USE
Fig-2
(6) LEVEL adjustment Pot (Iris Level):
Use it to compensate for the iris level. Turn toward L (low) to
make the picture darker. Turn toward H (high) to make the pic
ture brighter
(7) V Phase adjustment Pot (PAL model only):
Adjust the phase difference between this camera and other
cameras when in line lock mode.
Note: Line lock fuction won’t be active on VCC-9784VA.
(8) Mode setting DIP switch:
The following DIP switches are set to default position (shaded)
as shipped from factory.
1: BLC (backlight compensation) ON/OFF switch
When switched on, the function adjusts exposure to compensate for situations where the subject is lit from behind.
(lnitial setting: OFF)
2: AGC (automatic gain control) ON/OFF switch
The automatic gain function automatically adjusts picture in
accordance with the brightness of subject.(lnitial setting:ON)
6
NOTES OF USE
3: DC/AES Mode switch
•DC : Suitable to DC lens.
•AES: Suitable to AES lens.
4: LL switch (VCC-9785VP only)
Use this switch to set the camera synchronization mode internal or
line lock. When the camera power is using DC12V power input,
the camera is in the internal operation mode regardless of the
switch setting.(lnitial setting:LL)
(9) Monitor out:
Connect monitor to adjust the angle of view when installing the
camera.
(10) Camera installation holes
Insert the screws (TP4*15) through these holes and
tighten onto the wall or ceiling. Tighten the screws
so that camera is firmly secured.
7
INSTALLATION
Fig-3
1. Stick the guide pattern on the wall/ceiling (See Fig-3 on page 6).
2. Drill two holes according the guide pattern then plug anchor hold
driver into the holes.
3. lnstall the camera through these holes onto the wall with the provided screws (TP4*15)
8
INSTALLATION
■ ADJUSTMENT
Fig-4
(1) Lock ring
(4) Tilt-adj screw
(2) Zoom lever
(5) Axis ring
(3) Focus lever
Adjusting procedures:
1. Hold the lens so that it does not rotate. Loosen the lock ring (1)
and Tilt-adj screw (4). Make sure to hold the lens when you turn
the lock ring, otherwise the lens may rotate with the lock ring
and the cable may become twisted.
2. Turn the lens and axis ring in the desired direction.
3. After determining the direction of the lens, lightly tighten the lock
ring and Pan-adj screw.
4. Loosen the zoom lever (2) counterclockwise a little, rotate the
zoom ring and determine the image view. Tighten after adjustment.
5. Loosen the focus lever (3) counterclockwise a little, adjust the
focus for optimum picture sharpness. Tighten after adjustment.
6. Repeat steps 2 through 5 until the desired range and focus are set.
NOTE:
* If the camera movement is not smooth, loosen the lock ring all the way. The lock ring has an internal
stopper and will not fall off.
* After adjusting the zoom and focus, make sure to lock the positions, otherwise the positions may
move, for example, temperature changes or vibrations
CAUTION:
* Do not turn the lens more than 360°. Doing so may cause the internal cables to twist and cause dam
age to wiring loom.
9
INSTALLATION
■ ATTACH THE DOME COVER
(1) DOME BODY
(2) INNER LINER
(3) DOME COVER
Fig-5
1. Match the screws on the unit casing casing to the screw holes
(3 locations) on the unit casing
2. Fix the inner liner into the pan-adj screw.
3. Holding the dome casing to maintain the matched positions.
Tighten the three screws with the screwdriver, Lock the dome
casing to the unit casing.
CCD CHARACTERISTIC
The following are characteristics that may be observed when using a
CCD camera. These are inherent characteristics of the CCD camera
and do not stem from any fault within the camera itself.
Vertical smear:
This phenomenon occurs when viewing a very
bright object.
Patterned noise: This is a fixed pattern which may appear over the
entire monitor screen.
Jagged picture: When viewing stripes,straight lines,or similar patterns, the image on the screen may appear jagged.
10
SPECIFICATION
Fig-6
11
SPECIFICATION
Scanning system
Image sensor
Number of effective pixels
Horizontal resolution
Lens
Panning range
Tilting range
Rotation
Sysnchronizing system
20IRE
Minimum
illumination
50IRE
Video S/N ratio
Backlight compensation
Electric Shutter
White balance
Auto iris drive
AGC gain
Flicker less
Gamma correction
Video/ Monitor output
Operating
Temperature
Environment
Humidity
Power supply
Power consumption
Dimensions (ĭ x H)
Weight
Accessories
VCC-9785VP
VCC-9784VA
PAL standard 625 lines
50fields/sec.
NTSC standard 525 lines
60fields/sec.
1/3" Interlace CCD sensor
752(H) x 582(V)
768(H) x 494(V)
540 TV lines (Typical)
Buit-in varifocal lens, f=2.8 to 10 mm (F1.3)
±180°
±83°
±180°
Internal / linelock
Internal
0.16 lux (F1.3, AGC on)
0.40 lux (F1.3, AGC on)
More than 48dB (AGC off)
ON/ OFF
1/50 to 1/10000
Auto
DC
ON/ OFF
NO
Flickless shutter speed
1/100sec
0.45
1.0V p-p (75ohm, composite)
-10°C to +50°C (14°F to 122°F)
90% RH
12VDC+/-10%, 24VAC+/-10%, 50/60Hz
3.5W
110mm x 96mm (4.33"x 3.78")
Approx. 300g (105.82oz)
Guide Pattern x 1
Screw P 4*15TP-1 BK x 2
Monitor out cable x 1
White Plastice Screw Anchor 1/4 x 2
User Manual x 1
The contents are subjects to be changed without notice.
12
Sanyo Electric Co., Ltd.
Printed in Taiwan