1
INSTRUCTION MANUAL
Kirisun Communications Co.,Ltd.
http://en.kirisun.com
http://en.kirisun.com
keyboard, and press
to select.
d)Keep your mouth 3~6 inches away from the
microphone.
e)Press the PTT key to make a call, and the RED LED
indicator lights on. The caller’s alias/ID and the call
type icon
displays on the LCD.
f)Wait the Talk Permit Tone to finish (if enabled *) and
speak the MIC.
g)Release the PTT key to receive. If any of the group
member answer the call, the GREEN LED indicator
lights on, the group type icon, alias or ID display on
the LCD.
h)If the Channel Free Indication feature is enabled,
you can hear a short alert tone when release the
target radio’s PTT key, (the alert tone indicates that
the channel is idle) which means that the channel is
idle and you can answer the call. Press the PTT key
to answer the call or the call ends after the preset
time (call hang time) is over, “Call End” displays on
the LCD screen.
NOTE:
INSTRUCTION MANUAL
We are very grateful for your purchasing brand
produced by Kirisun Communications Co., Ltd.
We believe
two-way radio, which always incorporates the latest
technology, can bring great convenience to your life and work.
We also believe that the quality and function of
can meet your demands for reliable communication.
7PIZ-4002-E01A
21
two-way radios
two-way radio
Notice to the User
Before using this radio, read this operating
instruction carefully for safe and convenient usage.
When you begin to use it, we deem that you have
read this manual.
Keep this manual in a safe place and make it
available to other operators in case the product is
passed on to other people.
When purchasing our product, please fill in the
WARRANTY CARD with truth information, and ask
for the valid proof of purchase so as to protect your
legal rights.
Kirisun and our authorized partners own the
intellectual property of all the parts of this product
(include accessories). Any design and materials may
not be modified, copied, extracted or translated
without the authorization of Kirisun or its authorized
parities.
Due to the update or modification of the product,
Kirisun owns the right to change the specifications of
software and hardware described in this manual
without further notice. Specifications and information
contained in this manual are for reference only.
Kirisun reserves the right to interpret the
mistakes and errors occurring in this manual, though
all the contents are checked carefully.
Safety
Before using this radio, read this operating
instruction carefully for safe and convenient usage.
This product can only be maintained by the
professional technicians. Do not disassemble the
radio by yourself.
To a v o i d o f t h e p r o b l e m s c a u s e d b y
electromagnetic interference or electromagnetic
compatibility, turn off the radio in any facilities where
posted notices instruct you to do so, such as hospital
and other health care facilities. And when on board
an aircraft, turn off the radio if instructed to do so too.
In the vehicle with an air bag, do not place the
radio in the area over an air bag or in the air bag
deployment area.
Turn off the radio before entering any area with
a potentially explosive atmosphere or blasting caps.
Do not operate the radio, disassemble or charge
the battery in the potentially flammable and
explosive atmosphere (such as gas station, coal gas
station, etc.).
Do not place the radio under the direct sunlight
or near the area with heating devices.
Do not place the radio in the area with great
dust, moisture or drips, or on the unstable surface.
Contact us or your local dealer for help if you
want to re-develop or modify the radio.
Do not use any portable radio that has a
damaged antenna. If a damaged antenna comes
into contact with your skin, a minor burn can result.
Make sure the antenna is correctly installed
when using. The radio without antenna may cause
damage in the process of transmission.
Keep the radio vertically and away from your
mouth about 5cm in the process of transmission.
When worn on your body, make sure the
antenna is at least 2.5cm away from your body in
the process of transmission.
Battery
All batteries can cause property damage and/or
bodily injury, such as burns, if a conductive material
such as jewelry, keys, or beaded chains touches
exposed terminals. The conductive material may
complete an electrical circuit (short circuit) and
become quite hot. Excessive care in handling any
charged battery, particular when placing it inside a
pocket, purse, or other container with metal objects.
To reduce the potentially damage, do not expose
the battery in the fire, or disassemble and extrude
the battery.
The maximum ambient temperature around the
CONTENTS
adapter or transformer for the charger should not
exceed 40℃ (104℉).
Turn off the radio when charging. If not, the
battery’s capacity will be affected.
Do not insert the battery pack into the charger
when charging is not necessary. The continuous
charging will shorten the battery’s lifetime. Do not
use the charger as the pedestal for the radio.
To realize the best performance of the battery,
change the battery once a year.
Kirisun Communications Co.,Ltd.
■
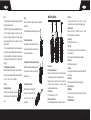
Unpacking and Checking
2
Getting Prepared
2
Getting Started
4
Basic Operation
5
Transmitting and Receiving a Call
8
◆ Selecting a zone
8
◆ Selecting a channel and contact
9
◆ Receiving and answering the call
Unpack the radio carefully. We recommend that you
check the radio and the supplied accessories listed in
the following table before discarding the packing
material. If any damage or loss has occurred during
shipment, please contact the deliveryman or the dealer
without delay.
◆ Accessories
9
◆ Making a call
10
Advanced Functions
11
◆ Radio Check
11
◆ Call Alert
12
◆ Radio Kill/Revive
13
◆ Remote Monitor
15
Emergency Alarm
16
Menu
20
◆ Contacts
Charger
Battery
20
Adapter
1
■ Getting Prepared
Unpacking and Checking
Antenna
◆ Charging the battery
Plug the adapter into the suitable AC socket, and
connect the adapter with the charger base. Then the
Yellow LED lights on. Insert the uncharged battery or the
radio into the charger. Make sure that the battery is well
connected with the connector on the charger. Then Red
LED indicator lights on and the charging begins. After
about 5 hours, the Red LED indicator lights off. Then the
Green LED indicator lights on. That indicates the battery
is fully charged.
PackBelt clip
& Screws
Keep the battery in this state for 1~2 hours, and then get it
off from the charger. The battery arrives to its best
performance. And then plug off the AC adapter from the
socket.
2
Note:
Note:
*The radio battery is not charged before shipment. Please
charge it before the initial use.
Do not short-circuit the battery terminals or dispose the
*KB-77B Li-on battery of Kirisun is applicable to this radio.
* When charging the battery for the first time after
purchase or long-time storage (over 2 months), please
repeat charging three times for the battery to achieve
normal capacity.
* Do not recharge the battery if it has been fully charged
or the radio is not in the low battery alarm state; otherwise,
it will have bad effects on the battery’s service life and
performance. Remove the battery from the charger after
charging.
battery in fire.
Do not disassemble the battery casing by yourself.
◆ Installing the antenna
Hold the base of the antenna and turn the
antenna clockwise into the connector on the
top of the radio until secure.
◆Installing the external speaker/ microphone
◆ Installing/removing the battery
Match the battery pack with the two slots on the back of
the connector on the side of the radio, and
the radio, and push forward the battery along the slots until
fasten the screw.
Match the external speaker/Microphone with
a click is heard. Then the battery is
installed.
◆ Installing the belt clip
Removing the battery
Press down the battery latch, and push
Match two holes on the belt clip with
back the battery until it separates from the
radio.
3
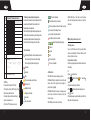
■ GettingStarted
the holes on the back of the radio,
and fasten them with the
screwdriver.
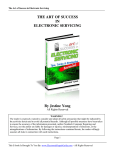
A. Antenna
B. Volume/Channel Knob
Short press the key, the function of the knob switches
from adjusting the volume to changing the channel.
Rotate the knob to adjust the volume or change the
channel. Rotate clockwise to increase; rotate
counterclockwise to decrease.
C.LCD Screen
160*128, 65K colors, 1.77TFT
D.Universal Connector
Connect USB programming cable, earphone and etc.
E.Top Key
Programmable, default: short press to enable
emergency alarm, long press to exit emergency alarm.
F.LED Indicator
RED—transmitting, GREEN—receiving, Flash
RED—low battery when transmitting.
G.Side Key 1
Programmable, default: none.
H.PTT Key
Press the key and speak to send a call; release the key
to receive the call.
Press the key to send the data and text messages.
I.Side Key 2
Programmable, default: none.
J.Left Key
Press the key to select the items shown at the bottom left
of the screen.
K.Send Key
Press the key to send the data or text messages.
L.Navigation Key
M.Right Key
Press the key to select the items shown at the bottom
right of the screen.
N.ON/OFF/End Key
4
Long press the key to turn on/off the radio.
Press the key to stop sending the data or text messages.
Return back to the standby screen.
O.Numeric keyboard
You can input the contact number; edit the contact and
text messages with the keyboard.
P.MIC
Q.Speaker
■ BasicOperation
◆Powering on
Long press the ON/OFF key to turn on the
radio. Then the LCD displays Kirisun
Logo. The backlight turns on automatically
and a beep sound is heard.
In the power on state, long press the
ON/OFF key until Powering off screen
exists, and then the radio is turn off.
◆Adjust the volume/channel
The default setting of the knob is to adjust
the volume. Short press the key, the knob
function switches from adjusting the
volume to changing the channel. Rotate
5
clockwise to increase; rotate counterclockwise to
decrease.
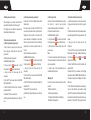
Manual Dial
Press the key once to enable squelch, press it again
to return to the normal mode (analog mode *)
Squelch On
Press the key once to enable monitor mode, press it
again to return to the normal mode (analog mode *)
Monitor
Enable/disable scan
Scan
Make a call
Make the preset private call, group call, call alert or
template message (digital mode); make the preset
call (analog mode *)
Man down
Enable/disable man down function
Contact
Enter the contact menu
Messages
Enter the short message menu
Programmable Functions:
Call Log
Enter the call log menu
Items
Functions
Call Alert
Prompt the target radio to call back
None
None
Radio Check Check if the target radio is active or not
Zone Select
Select the target zone in the zone list
Radio Kill
Home Channel
Return to the home channel speedily
Radio Enable Activate one killed radio
All Alert Tone ON
/OFF
OFF/ON all the alert tone
Remote
LCD Backlight
Always on, always off or auto
Exit Emergency
Alarm
Exit the emergency alarm state
Emergency Alarm
Switch the radio power level
High/Low Power
Select the squelch level of the radio *
Squelch Level
Enable/disable VOX function *
◆Functions overview
You can check the radio’s functions through
any of the following operations:
VOX
Input the radio ID with the keyboard to make
a call
1.Short/long press the relevant programmable
◆Programmable keys
The dealer can program the keys as the shortcut keys.
Short press—press the key and release it soon.
Long press—press and hold the key for several minutes
(depending on the setting in CPS, usually within
0.5S~5.0S).
Hold—always press and hold the key.
Enter the emergency alarm state
Kill one target radio
Monitor
Turn on the speaker of the target radio to start
transmitting without any prompt.
Vibrate
Enable/disable vibrate
keys:
2.View the menu through the navigation keys, the steps are
as follows:
a)Press
key to enter the menu;
b)Press the suitable navigation key
or rotate the knob
to enter the menu.
c)Press
,
key or short press the emergency key to
enter the sub-menu.
d)Press
or
key to return to the previous menu or
return to the previous screen.
e)Press
to return to the standby screen.
Note:
If there is no operation to the radio after a certain time
(0~30S), the radio will return to the previous screen
automatically.
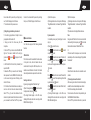
◆ Using the keyboard
You can use the 3*4 alphanumeric keyboard to view the
radio’s functions. You can use the keyboard to enter
subscriber aliases or ID and text messages. Some
characters are displayed for pressing the keyboard more
than one times. The following table is a list for your
reference.
Input mode: abc/ABC/123
6
Number of Times Key is Pressed
Key
1
2
3
4
5
6
7
8
9
1
'
(
)
*
+
‘
-
.
/
2
A
B
C
3
D
E
F
I
4
G
H
5
J
K L
6
M
N O
7
P
Q R
8
T
U
V
9
W X
Y
0
Blank
*
#
S
Z
GPS is receiving the data.
GPS enabled, but no data is received.
If the icon is going round, it means the radio is scanning.
The scan stops at the priority channel.
Low battery warning, the icon flashes.
Group call
All call
of the signal strength. Four bars are the strongest.
This item is selected.
' \ ' ' ,' " ' ,' ~ ' ,' @ ' ,' * ' ,' # ' ,' % ' ,' ( ' , ' ) ' ,' [ ' ,' ] ' ,' { ' ,
This icon displays only when receiving signal.
This item is not selected.
' } ' ,' < ' ,' > '
High power
Input punctuation ',','.','/','\\','?', '!',':', ';',
Switch the input mode: abc, ABC,123.
Low power
◆ LED indicator
Mute
RED LED flashes: receive emergency alarm call.
ORANGE LED lights on: during the time when the radio
receives the call and is going to reset (analog) or is
going to call hang (digital).
ORANGE LED flashes: the radio is in emergency alarm
status; there is missed call or incoming call alert; the
radio is scanning.
RED LED lights on: the radio is transmitting.
There is unread message in the inbox.
The inbox is full.
Keyboard is locked.
Emergency alarm mode
Alarm clock
Talk-around mode
■ Transmitting and Receiving a Call
Indicates the residual battery capacity.
Private call
◆ Icons indication
GREEN LED lights on: the radio is receiving signals
(voice, short message or data) or there is an activity on
the channel.
The scan stops at the ordinary channel.
Signal strength indication: each bar indicates one level
◆ PTT key
There are two functions for the PTT key:
(1) During the call, press the PTT key to call the
other members joined in this call.
Press down the key and talk to send the call;
release it to receive the call.
(2) Press the PTT key to make a new call.
7
◆ Switching between digital and analog mode
Each channel in the radio can be set as digital channel or
analog channel. Rotate the Channel knob to switch
between digital and analog mode.
When switching from digital mode to analog mode, some
of the functions are unavailable, e.g. short message. Icons
representing the digital function will not display on the
screen, the items will not display in the menu either.
◆ Selecting a zone
You can set 1024 channels at most in your radio. These
channels are classified into 128 zones, and there are 128
channels at most in each zone.
The operation is as follows:
Press the key programmed as Zone Select, and then come
to the step c);
Or
a)Press
to enter the menu;
b)Press
or rotate the knob to “ zone”, and press
to select;
c)The current working zone is selected;
d)Press
or rotate the knob to the target zone, and
press
to select;
e)The dialog box pops up and the setting is done. Then the
radio returns to the previous menu.
8
◆ Selecting a channel and contact
After the target zone is selected, rotate the knob to
select the channel and the contact ID or group ID.
LCD display screen will indicate the selected zone,
channel alias and channel number.
◆ Receiving and answering the call
(1) Receiving and answering a group call
In order to receive the group call, you must set your
radio as the group member (add your radio into the
group call list).
When the radio receives the group call:
a. GREEN LED indicator lights on;
b. The group call icon
, group’s alias or ID and
incoming call icon
display on the LCD screen;
c. Keep your mouth 3~6 inches away from the
microphone;
d. Press the PTT key to answer the call and the RED
LED indicator lights on;
e. Wait for the Talk Permit Tone to finish( if enabled*)
and speak to the MIC;
f. Release the PTT key to receive the call;
g. After the preset time (call hang time) is over, the call is
over.
9
(2) Receiving and answering a private call
Private call is a call from an individual radio to another
individual radio.
There are two types of private call in DP770: the first
one, where a radio presence check is performed prior to
setting up the call; the second one, the caller and the
receiver makes the call immediately. On one channel,
there is only one type of call, which can be confirmed by
programming the channel parameter (Private call
Confirm).
When the radio receives the private call:
a. GREEN LED indicator lights on;
b. The private call icon
, the caller’s alias or ID and
the incoming call icon
display on the LCD screen;
c. Keep your mouth 3~6 inches away from the
microphone;
d. Press the PTT key to answer the call and the RED
LED indicator lights on;
e. Wait for the Talk Permit Tone to finish (if enabled*) and
speak to the MIC;
f. Release the PTT key to receive the call;
g. After the preset time (call hang time) is over, the call is
over.
(3) Receiving an all call
All call is a call from an individual radio to every radio on
the channel. It is used to make important
announcements requiring the user’s full attention.
When the radio receives the all call:
a. GREEN LED indicator lights on;
b. The private call icon
, the caller’s alias or ID and
the incoming call icon
display on the LCD screen;
c. When the all call is finished, the radio returns to the
previous screen.
Note:
1. The receiver cannot answer all call. During receiving,
if the receiver switches to the other channel, the radio
stops receiving the call.
2. During all call, all the programmable keys are
unavailable until the call is over.
◆Making a call
There are four means to select a channel to send ID or
group ID:
Rotate the channel knob;
Press the programmable keys;
Through the contact list (refer to Contact Menu);
Manual Dial from the keyboard
(1) Using the channel knob to make a call
In order to make a group call, you must set your radio as
the group member (add your radio into the group call
list).
1. Rotate the channel knob to select the channel which is
preset the target alias/ID (the call type depends on the
contact)
2. Keep your mouth 3~6 inches away from the
microphone;
3. Press the PTT key to make a call and the RED LED
indicator lights on. The caller’s alias/ID and the call type
icon (Private call:
, Group call:
or All call:
)
display on the LCD screen.
4. Wait the Talk Permit Tone to finish (if enabled*), and
speak to the MIC;
5. Release the PTT key to receive the call. If the target
radio responses the call, GREEN LED indicator lights on,
the receiver’s call type, alias or ID display on the caller’s
LCD screen.
6. If the Channel Free Indication feature is enabled, you
can hear a short alert tone when release the target
radio’s PTT key, (the alert tone indicates that the channel
is idle) which means that the channel is idle and you can
answer the call. Press the PTT key to answer the call or
10
the call ends after the preset time (call hang time) is
over, “Call End” displays on the LCD screen.
7. The radio returns to the previous screen.
(2) Using the programmable key to make a call
1. Press the key programmed as Call Key to make a
group/private call to the alias or ID.
2. Keep your mouth 3~6 inches away from the
microphone.
3. Press the PTT key to make a call and the RED LED
lights on. The receiver’s alias/ID and the call type
(private call:
, group call:
) display on the LCD
screen.
4. Wait the Talk Permit Tone to finish (if enabled*) and
speak to the MIC.
5. Release the PTT key to receive the call. If the target
radio responses the call, GREEN LED indicator lights
on, the receiver’s call type, alias or ID display on the
caller’s LCD screen.
6. If the Channel Free Indication feature is enabled, you
can hear a short alert tone when release the target
radio’s PTT key, (the alert tone indicates that the
channel is idle) which means that the channel is idle and
you can answer the call. Press the PTT key to answer
11
the call or the call ends after the preset time (call hang
time) is over, “Call End” displays on the LCD screen.
■Advanced Functions
Your radio also equips with the following advanced
functions.
◆ Radio Check
This function is used to check whether the radio is active
in the system or not, while the checked radio user
cannot detect it. Except the LED flashes, there is no
audible or visual notification on the radio. The checked
radio silently sends back a response to the check radio.
Sending a radio check
By pressing the programmed “Radio Check” key: *
a)Press the Navigation keys ,
or rotate the knob to
the target contact, and press
to select.
b)The target ID/alias displays on the LCD screen,
indicating that the radio check order is sending, and the
RED LED indicator lights on.
c)Wait for the response.
d)If the target radio is active in the system, LCD displays
“Target Radio Available”, or otherwise “Target Radio Not
Available”.
By menu operation:
In the standby screen, press [Contacts] key to come to
step c), or
a)Press
key to enter the menu;
b)Press , or rotate the knob to select “ Contacts”,
and press
to select;
c)Press , or rotate the knob to select “Contacts List”,
and press
to select. Then press
,
or rotate the
knob to select the target private call contact, and press
to select.
Or
Press ,
or rotate the knob to select “Manual Dial”,
and press
to select. Then input the target ID with the
keyboard and press
to select.
d)Press , or rotate the knob to select “Radio Check”,
and press
to select.
e)The target ID/alias displays on the LCD screen,
indicating that the radio check order is sending, and the
RED LED indicator lights on.
f)Wait for the response.
g)If the target radio is active in the system, LCD displays
“Target Radio Available”, or otherwise “Target Radio Not
Available”.
h)The radio returns to the target ID/alias list screen.
Note:
During when the “Radio Check” order is sent out and the
radio is waiting for the response, press
, the radio will
terminate the order and exit “Radio Check” mode.
Or
If the time to wait for the response is over, the radio will
automatically exit this mode and displays “Target Radio
Not Available”.
◆ Call Alert
Call alert function allows the user to ask another user to
call back.
(1) Receiving and answer the call alert
When receiving call alert and the call alert decoding is
enabled, the radio will automatically answer the call.
The LCD screen displays the caller’s alias/ID.
The radio sends out the call alert tone periodically, and
the ORANGE LED indicator flashes.
Press the PTT key to call back the caller, or press other
12
keys to neglect the call alert.
(2) Sending a call alert
By pressing the programmed “Call Alert” key: *
a)Press the navigation keys
, or rotate the knob to
select the target contact, and press
to select.
b)The target ID/alias displays on the LCD, indicating that
the call alert is sending out, and the RED LED indicator
lights on.
c)Wait for the response.
d)If the response is received, the LCD displays “Call
Alert Successful”, or otherwise displays “Call Alert
Failed”.
By menu operation:
In standby screen, press [Contacts] key to come to step
c), or
a)Press
to enter the menu;
b)Press ,
or rotate the knob to select “
contacts”,
and press
to select.
c)Press , or rotate the knob to select “Contacts List”,
and press to select. And press , or rotate the knob
to select the target private call contact, press to select.
Or
13
Press , or rotate the knob to select “Manual Dial”, and
press
to select. Input the target ID with the keyboard,
and press
to select.
d)Press , or rotate the knob to select “Call Alert”, and
press
to select.
e)The target ID/alias displays on the LCD, indicating that
the call alert is sending out, and the RED LED indicator
lights on.
f)Wait for the response.
g)If the response is received, the LCD displays “Call
Alert Successful”, or otherwise displays “Call Alert
Failed”.
Note:
During when the “Call Alert” order is sent out and the
radio is waiting for the response, press
, the radio will
terminate the order and exit “Call Alert” mode.
Or
If the time to wait for the response is over, the radio will
automatically exit this mode and displays “Call Alert
Failed”.
◆ Radio Kill/Revive
This function allows one radio sending the signaling to
kill another radio. The radio to be killed cannot display
anything, make or receive calls. The radio can only
revive through CPS or the administrator radio sends a
revive order. After revived, the radio can work normally
again. This function is used to manage the unauthorized
usage of the radio, prevent misappropriating the radio
which is lost.
(1) Receiving a radio kill
When receive radio kill order and “Radio kill/decoding
enabled”, the radio will automatically reply ACK
(Successful), or otherwise reply ACK (Failed).
The radio returns to the standby screen, the channel
alias, group alias and “Status of kill” display on the
screen. The killed radio will not receive any information
except the revive order and neglect all the keyboard
input except ON/OFF key operation.
(2) Receiving a radio revive
When “Radio kill/decoding enabled” and the killed radio
receives the revive order, the radio automatically replies
ACK (Successful), or otherwise replay ACK (Failed).
The radio returns to the standby screen. Channel alias
and group alias display on the LCD.
(3) Sending a radio kill or revive
By the key programmed as “Radio kill/Radio revive”: *
a)Press the navigation keys ,
or rotate the knob to
select the target contact, and press to select.
b)The target ID/alias displays on the LCD, indicating that
the radio kill/revive order is sending out, and the RED
LED indicator lights on.
c)Wait for the response.
d)If the response is received, the LCD displays “Radio
Kill Successful”, or otherwise displays “Radio Kill
Failed”.
By menu operation:
In standby screen, press [Contacts] key to come to step
c), or
a)Press
to enter the menu;
b)Press
, or rotate the knob to select “
contacts”,
and press
to select.
c)Press , or rotate the knob to select “Contacts List”,
and press to select. Then press , or rotate the knob
to select the target private call contact, press to select.
Or
Press , or rotate the knob to select “Manual Dial”, and
press to select. Input the target ID with the keyboard,
14
and press
to select.
d)Press ,
or rotate the knob to select “Radio Kill/
Revive”, and press
to select.
e)The target ID/alias displays on the LCD, indicating that
the Radio kill/revive order is sending out, and the RED
LED indicator lights on.
f)Wait for the response.
g)If the response is received, the LCD displays “Radio
kill/revive Successful”, or otherwise displays “Radio
kill/revive Failed”.
Note:
During when the “Radio kill/revive” order is sent out and
the radio is waiting for the response, press , the radio
will terminate the order and exit “Radio kill/revive” mode.
Or
If the time to wait for the response is over, the radio will
automatically exit this mode and displays “Radio
kill/revive Failed”.
◆ Remote Monitor
This function is used to enable the target radio’s MIC,
and there is no visible or audible sign on the monitored
radio. You can use this function to remote monitor the
15
sound around the target radio.
(1) Sending remote monitor
By the programmed “Remote Monitor” key: *
a)Press the navigation keys
, or rotate the knob to
select the target contact, and press
to select.
b)The target ID/alias displays on the LCD, indicating that
the remote monitor order is sending out, and the RED
LED indicator lights on.
c)Wait for the response.
d)If the response is received, the LCD displays “Remote
Monitor Successful”, or otherwise displays “Remote
Monitor Failed”.
By menu operation:
In standby screen, press [Contacts] key to come to step
c), or
a)Press to enter the menu;
b)Press , or rotate the knob to select “ contacts”,
and press to select.
c)Press , or rotate the knob to select “Contacts List”,
and press to select. Then press , or rotate the knob
to select the target private call contact, press to select.
Or
Press , or rotate the knob to select “Manual Dial”, and
press
to select. Input the target ID with the keyboard,
and press
to select.
d)Press , or rotate the knob to select “Remote
Monitor”, and press
to select.
e)The target ID/alias displays on the LCD, indicating
that the Remote Monitor order is sending out, and the
RED LED indicator lights on.
f)Wait for the response.
g)If the response is received, the LCD displays “Remote
Monitor Successful”, or otherwise displays “Remote
Monitor Failed”.
Note:
During when the “Remote Monitor” order is sent out and
the radio is waiting for the response, press
, the radio
will terminate the order and exit “Remote Monitor”
mode.
Or
If the time to wait for the response is over, the radio will
automatically exit this mode and displays “Remote
Monitor Failed”.
■
Emergency Alarm
If enabled and the user is in danger, the user can send
out a confirmed emergency alarm signal and an
emergency voice to the administrator user. The user can
send the alarm in any time, even if the current channel is
receiving the signal.
Your radio supports the following three means of
emergency alarm mode:
Emergency alarm only
Emergency alarm with call
Emergency alarm with voice to follow
And every mode has the following types:
Alarm only—After enabled the emergency alarm, the
alarm sends out from the radio, but the Monitor Center
could not receive any alarm signal.
Regular—the radio sends out the emergency alarm,
with the sound and the LED indication.
Silent—the radio sends out the emergency alarm,
without the sound and the LED indication. Even when
the radio receives the answer, its speaker is mute until
the PTT key is pressed.
Silent with voice—the radio sends out the emergency
alarm and is able to receive an incoming call, without
16
any audio or visual indicators, until you press the PTT
key to initiate, or respond to the call.
The above type can be set by CPS, and only one type
can be chosen.
◆ Receiving an emergency alarm
If enabled “Emergency Alarm Indication”, your radio can
receive the emergency alarm, or otherwise, the alarm is
neglected.
To receive the emergency alarm, the radio must be set
as the group member (add your radio into the group call
list).
a)When receive the emergency alarm, the icon displays
on the LCD screen.
b)The caller’s alias/ID, the icon
and the emergency
alarm type icon display on the LCD. The radio sends out
the alarm alert tone periodically, and the RED LED
indicator flashes quickly.
c)If “Emergency Alarm Reply” (channel parameter) is
enabled, the radio will automatically reply the
emergency alarm.
Note:
Under the emergency alarm, the radio can receive all the
calls, including private call, group call and short
17
message. But the LCD only displays the call type after
exit the emergency alarm mode.
◆ Responding an emergency alarm
When the radio receives the emergency alarm:
a)Press any key to exit the Emergency Alarm Indication
screen.
b)Keep your mouth 3~6 inches away from the
microphone.
c)Press the PTT key to answer the caller and the RED
LED indicator lights on. The radio still stays in
emergency alarm mode.
d)Wait the Talk Permit Tone to finish (if enabled *) and
speak to MIC.
e)Release the PTT key to receive. If the caller responses
the call, the GREEN LED indicator lights on, and the
icon indicating the transmitting radio’s type, alias or ID
display on the LCD.
f)After the call is over, long press the programmed
“Emergency Alarm” key to delete the Emergency Alarm
Indication and then exit this mode.
g)The radio returns to the standby screen.
◆ Sending an emergency alarm
This function is used to send an emergency alarm
without the voice.
a)Press the key programmed as “Emergency Alarm” to
activate this mode, and the LCD displays .
b)The LCD also displays alarm group alias/ID, the
emergency alarm icon
and this icon
.
c)When the alarm is received, the LCD indicates that
“Emergency Alarm Successful”.
Or if not received, and the retry time is over, the LCD
indicates that “Emergency Alarm Failed”.
d)The radio exits Emergency Alarm mode, and return to
the standby screen.
If your radio sets as Silent and Silent with voice, there
will be no sound or sign in Emergency Alarm mode.
◆ Sending an emergency alarm with call
This function allows you to send an emergency alarm to
another radio. When this radio receives the call, the
communication can be started in the emergency alarm
channel.
a)Press the key programmed as “Emergency Alarm” to
activate this mode, and the LCD displays .
b)The LCD also displays alarm group alias/ID, the
emergency alarm icon
and this icon
.
c)When the alarm is received, the LCD indicates that
“Emergency Alarm Successful”.
d)Keep your mouth 3~6 inches away from the
microphone.
e)Press the PTT key to make a call and the RED LED
indicator lights on. The group call icon
displays on the
LCD.
f)Wait for the Talk Permit Tone to finish( if enabled*)
and speak to MIC.
g)Release the PTT key.
h)If the Channel Free Indication feature is enabled, you
can hear a short alert tone when release the target
radio’s PTT key, (the alert tone indicates that the channel
is idle) which means that the channel is idle and you can
answer the call. Press the PTT key to answer the call or
long press the programmed “Emergency Alarm” key to
end the alarm.
i)The radio returns to the standby screen.
If your radio sets as Silent, there is no sound or sign in
Emergency alarm mode. And the radio cannot receive
the response from other radios, unless you press down
the PTT key.
If your radio sets as Silent with voice, there is no sound
18
or sign in Emergency alarm mode or in receiving the
calls from other radio, unless you press the PTT key to
make a call or answer the call.
◆ Sending an emergency alarm with voice to follow
This function allows you to send an Emergency Alarm to
the other radio, and then enables your radio’s MIC
automatically, so that you can communicate with other
radios without pressing the PTT key.
The state of which MIC is activated automatically is
called “Hot MIC” state. [Hot MIC Duration] can be set by
CPS in the digital emergency system settings.
During Hot MIC Duration, press the PTT key, the radio
will neglect the PTT operation and stays at the
emergency mode.
a)Press the key programmed as “Emergency Alarm”, the
radio enters emergency alarm mode, and the LCD
displays .
b)The LCD also displays alarm call group alias/ID,
emergency alarm icon
and this icon
.
c)Keep your mouth 1~2 inches away from the
microphone and speak to it. If Hot MIC enabled, the
radio transmits automatically without pressing the PTT
key until Hot MIC Duration is over.
19
d)During transmission, the RED LED indicator lights on,
and the group call icon
displays on the LCD.
e)When Hot MIC Duration is over, the radio stops
transmitting automatically. You can press the PTT key to
continue transmitting.
If your radio sets as Silent, there is no sound or sign
displayed in Emergency alarm mode. And the radio
cannot receive the response from other radios until Hot
MIC Duration is over and you can press down the PTT
key to make a call.
If your radio sets as Silent with voice, there is no sound
or sign in Emergency alarm mode, Hot MIC Duration or
in receiving the calls from other radio, unless you press
the PTT key to make a call or answer the call.
◆ Exiting an emergency alarm
Your radio will exit the emergency alarm mode in the
following conditions:
a)In emergency alarm mode only, and receive the
response;
b)Emergency alarm retry time is over, and no response
is received;
c)The programmed Emergency key is long pressed.
■ Menu
◆ Contacts
Contacts provides “address-book” capabilities on your
radio. Each entry corresponds to an alias or ID that you
use to make a call and the call type (group call, private
call or all call).
In digital mode, contacts can store at most 512 groups.
You can add, delete or edit these records.
(1) Make a group call from Contacts
The steps are as follows:
a)Press
key to enter the menu;
b)Press , or rotate the knob to select “ Contacts”,
and press
to select;
c)Press , or rotate the knob to select “Contacts List”,
and press
to select. Then press , or rotate the
knob to select the target group call contact, and press
to select.
d)Keep your mouth 3~6 inches away from the microphone.
e)Press the PTT key to make a call, and the RED LED
indicator lights on. The caller’s alias/ID and the call type
icon
displays on the LCD.
f)Wait the Talk Permit Tone to finish (if enabled*) and
speak to the MIC.
g)Release the PTT key to receive. If any of the group
member answer the call, the GREEN LED indicator lights
on, the group type icon, alias or ID display on the LCD.
If the Channel Free Indication feature is enabled, you
can hear a short alert tone when release the target
radio’s PTT key, (the alert tone indicates that the channel
is idle) which means that the channel is idle and you can
answer the call. Press the PTT key to answer the call or
the call ends after the preset time (call hang time) is
over, “Call End” displays on the LCD screen.
(2)Make a private call from Contacts
The steps are as follows:
a)Press to enter the menu;
b)Press , or rotate the knob to select “
Contacts”,
and press
to select.
c)Press
, or rotate the knob to select “Contacts List”,
and press
to select. Then press
,
or rotate the
knob to select the target private call contact, press
to
select.
Or
Press
,
or rotate the knob to select “Manual Dial”,
and press
to select. Input the target ID with the
20