1
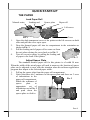
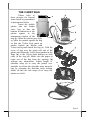
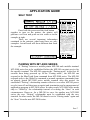
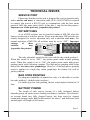
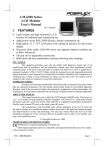
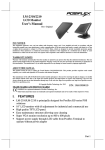
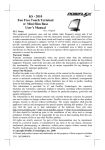
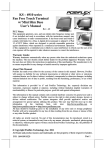
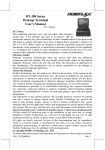
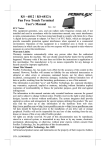
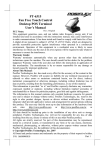
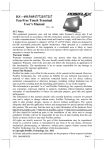
MP-300
MOBILE THERMAL
PRINTER
User’s Manual
FCC Notes:
Rev.: Original
This equipment generates, uses, and can radiate radio frequency energy and, if not installed and
used in accordance with the instructions manual, may cause interference to radio communications.
It has been tested and found to comply with limits for a Class A digital device pursuant to subpart
J of Part 15 of FCC Rules, which are designed to provide reasonable protection against
interference when operated in a commercial environment. Operation of this equipment in a
residential area is likely to cause interference in which case the user at his own expense will be
required to take whatever measures to correct the interference.
CE manufacturer’s Declaration of Conformity
(EC Council Directive 89/336/EEC of 3 May 1989)
This product has been designed and manufactured in accordance with the International Standards
EN50081-1/01.92 and EN50082-1/01.92 following the provisions of the Electro Magnetic
Compatibility Directive of the European Communities as of May 1989
Warranty Limits:
Warranty terminates automatically when any person other than the authorized technicians opens
the machine. The user should consult his/her dealer for the problem happened. Warranty voids if
the user does not follow the instructions in application of this merchandise. The manufacturer is by
no means responsible for any damage or hazard caused by improper application.
About This Manual:
Posiflex has made every effort for the accuracy of the content in this manual. However, Posiflex
will assume no liability for any technical inaccuracies or editorial or other errors or omissions
contained herein, nor for direct, indirect, incidental, consequential or otherwise damages, including
without limitation loss of data or profits, resulting from the furnishing, performance, or use of this
material.
This information is provided “as is” and Posiflex Technologies, Inc. expressly disclaims any
warranties, expressed, implied or statutory, including without limitation implied warranties of
merchantability or fitness for particular purpose, good title and against infringement.
The information in this manual contains only essential hardware concerns for general user and is
subject to change without notice. Posiflex reserves the right to alter product designs, layouts or
drivers without notification. The system integrator shall provide applicative notices and
arrangement for special options utilizing this product. The user may find the most up to date
or
information
of
the
hardware
from
web
sites:
http://www.posiflex.com
http://www.posiflex.com.tw or http://www.posiflexusa.com
All data should be backed-up prior to the installation of any drive unit or storage peripheral.
Posiflex will not be responsible for any loss of data resulting from the use, disuse or misuse of this
or any other Posiflex product.
All rights are strictly reserved. No part of this documentation may be reproduced, stored in a
retrieval system, or transmitted in any form or by any means, electronic, mechanical, photocopying,
or otherwise, without prior express written consent from Posiflex Technologies, Inc. the publisher
of this documentation.
© Copyright Posiflex Technologies, Inc. 2008
All brand and product names and trademarks are the property of their respective holders.
P/N: 19710900010
Part 1
GETTING STARTED
PRODUCT BRIEFING
The MP-300 series printer is a mobile thermal printer particularly
designed to cope with the operation of a Posiflex mobile terminal MT-2000
series. It uses thermal sensitive paper in form of a roll at a width of 58 mm. It
communicates with the host MT-2000 system through BlueTooth technology.
An option carry bag and an option battery charge power adaptor are available
for use with this printer.
PRODUCT PICTURES
Side Views
Dark Transparent Cover
Paper Exit &
Manual Cutter
Cover Lift Recess
Service Port
Battery Charge Connector
Bottom View
Velcro Patch
Battery
Battery Lock
Control Buttons & Indicators
Paper Feed Button
Charge Indicator (green) Error Indicator (red)
Power Button
Power Indicator (green)
Part 2
UNPACKING
Followings are items you may find when you carefully unpack the
carton that delivers the mobile printer. If there is any discrepancy or problem,
contact your dealer immediately. Be sure to save the packing materials in
case the printer needs to be shipped at some point in the future.
1).
The printer itself
2).
Thermal paper test roll 58 mm wide
3).
One piece of spacer plate
4).
Leather carry bag
5).
This User’s Manual
OPTIONS
1).
Battery charge Power adaptor DC 12V 15W (depend on
country type ordered)
Part 3
QUICK START-UP
THE PAPER
Load Paper Roll
Manual cutter
Leading end
Spacer plate
Paper roll
Lift recess
1.
2.
3.
4.
Cover
Pix. 1
Open the dark transparent cover of the printer at the lift recesses on both
sides and pull the cover up to open.
Drop the thermal paper roll into its compartment in the orientation as
shown in Pix. 1.
Pull the leading end of paper roll to come out from
the exit when closing the cover back as in Pix. 2.
Tear off excessive paper by pulling the leading end
of paper to the front of the printer.
Pix. 2
Adjust Spacer Plate
The standard thermal paper roll for this printer is of width 58 mm.
When the width of the actual paper roll used is narrower, the location of spacer
plate can be adjusted to cope with the situation when the software application
program also adapts to the selected paper width.
1.
Pull up the spacer plate from the paper roll compartment.
2.
Notice that there are 3 umbones on the spacer plate and there are 3 rows
of indentations in the
Pix. 3
paper roll compartment.
Match the umbones of
spacer
plate
to
appropriate
set
of
indentations as in Pix. 3
and push down the
spacer plate to click in.
Part 4
THE BATTERY
Remove / Install Battery
Please power off the printer before removing the battery. Please refer
to the bottom picture of the printer in the previous pages. Pull down the battery
lock to remove the battery. The screw on battery has nothing to do with this
operation. The battery used to power the mobile printer is identical to the one
for its host system – mobile terminal MT-2000 series and the screw on battery
is used for application in MT-2000 series only.
To install the battery, you have to insert the other end of the battery
first then push the battery till it clicks in the battery lock. The printer is then
ready for operation in option carry bag or any other appropriate carrier.
Battery Charge by Power Adaptor
Please refer to the right side picture of the printer in the previous
pages. Use the small charger (DC 12V 15W) delivered with the MT-2000
series or purchase an additional option one (P/N: 21972012120 for US market).
Check the information on the option power adaptor that if it matches the
domestic power supply specifications. Connect the power adaptor to a power
outlet and connect its output to the battery charge connector on MP-300.
Please note that prior to this charging operation the printer should be powered
off and please do not operate the printer during charging!
Battery Charge by Dock Station
Since the battery used for MP-300 is identical to the one for MT-2000
series, it is most convenient to use the option dock station (cradle, DS-100)
with its large power adaptor for MT-2000 series to charge the battery if this
option is purchased.
1.
2.
3.
When to Replace / Recharge Battery
For a new battery, it must be completely recharged before first use. It is
delivered with little reserved power for better battery life.
When the voltage measurement in self-test (described later in
APPLICATION GUIDE) reports to be near 7.2 V or lower.
When the printer gives occasional beep and “ERROR” indication.
Part 5
THE CARRY BAG
Please refer to
a
these pictures for lettered
items noted by parentheses
in descriptions below.
d
Insert the mobile
printer into the leather
carry bag so that the
buttons & indicators of the
f
printer appear in the
transparent window of the
e
bag (g). When the printer goes fully
in, press the printer against the bag
so that the Velcro loop patch on
printer bottom (a) fastens with
Velcro hook patch inside the bag (c). Fold the
cover of bag over the paper roll end of the
printer and fasten the Velcro loop patches in the
flaps (b) to the Velcro hook patches on both
sides of the bag (d). Make sure the paper to
come out of the bag from the opening (h)
without any obstruction. Adjust length of
h
shoulder strap (e) to carry the printer over
shoulder or release the shoulder strap from the
bag by releasing the shoulder strap locking
hooks (f) and use belt straps (i) to carry the
printer on a belt.
b
c
d
f
g
i
Part 6
APPLICATION GUIDE
SELF TEST
Press both the power and the feed button
together to turn on the printer, the printer will
perform a self test and print out test result as in the
example at right.
There are several important information
contained in the printout, what noted here are only
examples. Actual result will show different data from
the example.
PAIRING WITH MT-2000 SERIES
A “Pairing” between a mobile printer MP-300 and a mobile terminal
MT-2000 series has to be established before the MP-300 can start service for
the specific terminal. The MP-300 supports the “Pairing mode” in the first 40
seconds from being powered up. In the “Pairing mode”, the MP-300 can
respond to the BlueTooth Scan command from MT-2000 series. The MP-300
responds only to the WakeUp command or normal operation commands from
an already paired MT-2000 series mobile terminal after this period. An
established “Pairing” relationship remains effective even after MP-300 power
recycle (turn off and then turn on again) and termination and re-engagement of
application program in MT-2000 series. In other words, MT-2000 series needs
only to “WakeUp” the relationship instead of re-doing the “Scan” in such
circumstances. However, for a MP-300 to serve for another new MT-2000
series, the new “Pairing” relationship must be established with the new
terminal. In other words, the MP-300 must be set in “Pairing mode” again and
do “Scan” from the new MT-2000 series.
Part 7
POWER SAVING CONCERNS
The mobile printer is built-in with power saving features to provide
the user the longest possible service session for each battery change. Therefore,
the printer will automatically turn itself out when it has been idle for quite a
while (say, about half an hour) to preserve battery power. To put the printer
back to original application of the MT-2000 series, please press the power
button of the printer to resume power ON status of the printer and perform a
“Wake up” operation on MT-2000 series to resume the original BlueTooth
communication before the automatic power off.
TEST APPLICATION IN MT-2000 SERIES
The operation details rely on the application program loaded in the
host MT-2000 series. However, there is a test application program in MT-2000
series if not removed by system integrator. Please refer to the user’s manual of
MT-2000 series for details of the test program. pages 56 to 63
Part 8
TECHNICAL ISSUES
SERVICE PORT
Please note that this service port is designed for service operation only
and is not for end users. A conversion cable (P/N: 21863157600) is required
to connect this port to a RS-232 port to communicate with the host under
protocol 9600 bps, none parity check, 8 data bits, 1 stop bit for that purpose.
Improper use of this port may jeopardize the printer!
DIP SWITCHES
A set of DIP switches can be found at bottom of MP-300 when the
battery is removed as in below picture. Please note that these DIP switches are
mainly designed for service operation only and is not for end users. For
normal operation of MP-300, all switches must be set to “OFF”. Improper
settings
of
these
switches
may
jeopardize the printer!
The only adjustable switch for the user could be the switch position 1.
When this switch is set to “OFF”, the printer prints under normal printing
mode. When this switch is set to “ON”, the printer prints under high power
printing mode with following cautions. The high power printing mode helps
darken the low duty ratio graphs/logos. However, if the high power printing
mode is applied on a high duty ration graph/logo, the battery life will be
greatly reduced.
BAR CODE PRINTING
For adequate readability of printed bar code, it is advisable to set the
bar code width to 3 (default value) or above.
For ladder type bar code printing, the bar code height is limited to 54
dots.
BATTERY POWER
The length of each service session of a fully recharged battery
depends greatly on printer power loading and battery condition. For reference,
an average brand new fully charged battery has been tested to support
continuous printing under BlueTooth interface for about 7 and half hours with
printed paper roll length of 420 meters.
Part 9
SPECIFICATIONS
Control button switches: Power, Feed
LED indicators: Power, Error, Charge
Paper width : 58 mm
Print width : 48 mm
Dot per line : 384 dots
Print resolution : 8 dots/mm
Printing speed : 70 mm/s
Paper roll max. diameter: 56 mm
Command support: ESC/POS ( EPSON command )
Data buffer size : 30 KB
N.V. bit image data size : 128 KB
Application interface : BlueTooth
Power source: 7.4 V Li-ion battery1800/2400mAH
Power consumption : 50mA at stand-by, 2.3A at printing
Battery low indication: ERROR LED flash @ battery < 7.2V
Auto power down voltage: 6.8V
Auto power off after 30 minutes without operation
Width: 87.5 mm
Depth: 66 mm
Height: 178 mm
operation time : 4 hours at normal operation ( print 4 pages per minute,
6 cm long every page )
Firmware update : DIP switch position 2 set ON, power OFF and ON,
download via RS-232 conversion cable, @ 9600,n,8,1
CAUTION
Risk Of Explosion If Battery Is Replaced By An Incorrect Type
Dispose Of Used Batteries According To Local Regulations
警告使用者
警告
本電池如果更換不正確會有爆炸的危險
請依製造商說明書處理用過之電池
T31454
這是甲類的資訊產品,在居住的環
境中使用時,可能會造成射頻干
擾,在這種情況下,使用者會被要
求採取某些適當的對策。
Part 10