1
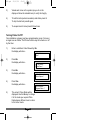
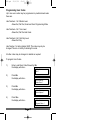
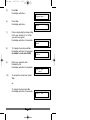
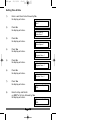
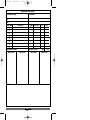
25/10/01
09:35
Page 1
TM
USER.qxd
CP8L LCD
USER
M A N UA L
TM
USER.qxd
25/10/01
09:35
Page 2
Contents
Introduction . . . . . . . . . . . . . . . . . . . . . . . . . . . . 1
Full Setting the System . . . . . . . . . . . . . . . . . . . . 1
Part Setting the System (using Part 1) . . . . . . . . 2
Part Setting the System (using Part 2 or 3) . . . . . 2
Unsetting the System . . . . . . . . . . . . . . . . . . . . . 3
Display After Alarm . . . . . . . . . . . . . . . . . . . . . . . 3
Resetting After Alarm . . . . . . . . . . . . . . . . . . . . . 3
Programmable User Options . . . . . . . . . . . . . . . . 4
Zone Remove Option . . . . . . . . . . . . . . . . . . . . . 4
System Test . . . . . . . . . . . . . . . . . . . . . . . . . . . . 5 - 6
Turning Chime On/Off . . . . . . . . . . . . . . . . . . . . . 6
Programming User Codes . . . . . . . . . . . . . . . . . . 7 - 9
Setting Time & Date . . . . . . . . . . . . . . . . . . . . . .10 - 11
Reading the Log . . . . . . . . . . . . . . . . . . . . . . . . .12 - 13
Keypad Alert . . . . . . . . . . . . . . . . . . . . . . . . . . . . 13
Tamper . . . . . . . . . . . . . . . . . . . . . . . . . . . . . . . . 13
System Details . . . . . . . . . . . . . . . . . . . . . . . . . . 14
USER.qxd
25/10/01
09:35
Page 1
Introduction
Welcome to the eurosec control panel. Your installation company will
have programmed your system to protect your premises to the highest
possible standards. Several user programmable options are available
that will be covered later in this manual. Throughout this manual reference will be made to the User Code, the factory set default is 5678.
This code is programmable along with eight other User Codes.
Full Setting the System
Two methods are available for Full Set. After checking the premises are
secure.
1)
Press Quick
or
Enter a valid User Code followed by Full.
2)
The exit tone will now sound.
3)
Exit the premises via an authorised exit route .
Note:
Pressing the Quick key during exit will shorten the exit time
to 3 seconds.
Note:
To abort the exit enter a valid User Code.
Pa g e 1
USER.qxd
25/10/01
09:35
Page 2
Part Setting the System (using Part 1)
Up to three Part Sets may be available for your system. Please refer to
the customer details at the rear of this manual for information about
Part Set zones. Part Set zones will be omitted from the system when
that particular Part Set is used. To set the system using Part 1.
1)
Press Quick followed by Part
or
Enter a valid User Code followed by Part
2)
Retire to an unprotected area.
Part Setting the System (using Part2 or 3)
Two other Part Sets may be available for your system. Part 2 is a second set of zones that may be omitted and Part 3 will combine Part 1
and Part 2. To use Part 2 or 3.
1)
Press Quick followed by 2 or 3.
or
Enter a valid User Code followed by 2 or 3.
2)
Retire to an unprotected area.
Note:
Pressing the Quick key during exit will shorten the exit time
to 3 seconds.
Note:
To abort the exit enter a valid User Code.
Pa g e 2
USER.qxd
25/10/01
09:35
Page 3
Unsetting the System
1)
Enter the premises via an authorised Entry Point.
2)
The Entry Tone will sound.
3)
Proceed to the keypad and enter a valid User Code.
Display After an Alarm
After an alarm has occurred the system should be unset as above. The
display will show the zone that caused the alarm.
Resetting After an Alarm
After an alarm the system needs to be reset. To reset the system.
If Any Code Reset has been programmed.
1)
Press Reset
or
If Master Code Reset has been programmed by the engineer.
1)
Enter a valid User Code
2)
Press Reset
Note:
The terms of your insurance may prohibit User reset.
If Tamper reset has been programmed for Engineer Reset the
display will show “ !! Service Due !” for 3 seconds each time
the user attemts to set the system. Please contact your
installation company.
Pa g e 3
USER.qxd
25/10/01
09:35
Page 4
Programmable User Options
Several user programmable options are available via user codes 1, 2
or 3. To use these options please continue below.
Delete Zone Option
This option allows individual zones to be deleted (omitted) when the
system is being set. It is only applicable to the one Set state and will
need to be repeated for subsequent Sets. If you are removing particular zones on a regular basis ask your installation company to include
them in a Part Set.
1)
Enter a valid User Code followed by No
the display will show:Do You Want to. .
Test ?
2)
3)
4)
Press No
the display will show:-
Press YES
The display will show:-
Do You Want to. .
Delete Zone ?
Enabled Zones . . .
12345678
Press the zone numbers
corresponding to the zones you
wish to delete from the set procedure.
The display will show for example:Enabled Zones . . .
1-345-78
Pa g e 4
USER.qxd
4)
5)
25/10/01
09:35
Page 5
Press 0 twice
the display will show for example:-
Press
or
Press
or
Press
or
Press
Do You Want to. .
Set User 1 ?
Full for Full Set
Part for Part 1 Set
2 for Part 2 Set
3 for Part 3 Set
6)
The system will now start the relevant Set with the zones
you deleted removed from the Set.
Note:
This will be for the one Set state only.
System Test
This option allows the User to test zones, bells and strobes on the
system.
1)
Enter a valid User Code followed by No
the display will show:Do You Want to. .
Test ?
2)
Press Yes
the display will show:Walktesting . . . . .
O.k !
Pa g e 5
USER.qxd
25/10/01
09:35
Page 6
3)
Violate each zone on the system (as you do so the
display will show the violated zone) to verify its integrity.
4)
To test the bells (external sounders) and strobe press 9.
To stop the bell test press 9 again.
5)
To escape back to Unset press 0 three times.
Turning Chime On/Off
Your installation company may have programmed a group of zones or
a single zone as Chime. This Chime function may be turned on or off
by the User.
1)
Enter a valid User Code followed by No
the display will show:Do You Want to. .
Test ?
2)
3)
4)
Press No
the display will show:-
Press No
the display will show:-
Do You Want to. .
Delete Zone ?
Do You Want to. .
Select Options ?
Press Yes
the display will show:Do You Want to. .
Program Chime ?
5)
The current Chime Mode will be
displayed. Use the No key to change
it to the mode you require. When
finished press 0 three times to return
to the Unset mode.
Pa g e 6
USER.qxd
25/10/01
09:35
Page 7
Programming User Codes
Up to nine user codes may be programmed on predetermined levels
these are.
User Numbers 1 to 3 Master Level
Allows Set, Part Set, Unset and User Programming Mode.
User Numbers 4 to 7 User Level
Allows Set, Part Set and Unset.
User Numbers 8 to 9 Set Only Level
Allows Set Only
User Number 1 is factory default 5678. This code may only be
changed. There is no facility for deleting this code.
All other codes may be changed or deleted as required.
To program User Codes.
1)
Enter a valid User Code followed by No
the display will show:Do You Want to. .
Test ?
2)
3)
4)
Press No
the display will show:-
Press No
the display will show:-
Press Yes
the display will show:-
Pa g e 7
Do You Want to. .
Delete Zone ?
Do You Want to. .
Select Options ?
Do You Want to. .
Program Chime ?
USER.qxd
5)
6)
7)
8)
9)
10)
25/10/01
09:35
Page 8
Press No
the display will show:-
Press Yes
the display will show:-
Press a single digit corresponding
to the user number (1 to 9) that
you wish to program.
the display will show for example:-
To change the code press No
the display will show for example:(to delete a code enter 0000)
Enter your required code
followed by Yes
the display will show for example:-
Do You Want to. .
Program Codes ?
Select
1..9
Code 2
####
Code 2
0 0 0 0 <-
Code
2 Text
User 2
Code
-
2 Text
To accept the current text press
Yes
or
To change the text press No
the display will show for example:-
Pa g e 8
USER.qxd
11)
25/10/01
09:35
Page 9
Text is entered in a similar way that you would enter text on
a mobile telephone. Select characters from the list below:1
3
5
7
9
=
=
=
=
=
ABC
GHI
MNO
STU
YZ blank
2
4
6
8
0
=
=
=
=
=
DEF
JKL
PQR
VWX
1234567890
Enter the required character followed by Yes. Continue
until you have enter eight characters.
12)
The display will show:-
13)
Press Yes to program more codes.
Do You Want to. .
Program Codes ?
or
Press 0 twice to return to the Unset Mode
Pa g e 9
USER.qxd
25/10/01
09:35
Page 10
Setting Time & Date
1)
Enter a valid User Code followed by No
the display will show:Do You Want to. .
Test ?
2)
Press No
the display will show:Do You Want to. .
Delete Zone ?
3)
4)
5)
6)
7)
8)
Press No
the display will show:-
Press Yes
the display will show:-
Press No
the display will show:-
Press No
the display will show:-
Press Yes
the display will show:-
Do You Want to. .
Select Options ?
Do You Want to. .
Program Chime ?
Do You Want to. .
Program Codes ?
Do You Want to. .
Set Date / Time ?
Type
0000
Day / Mnth
Type
0000
Hrs / Mins
Enter the Day and Month
e.g 0307 for 3rd July followed by Yes
the display will show:-
Pa g e 1 0
USER.qxd
9)
25/10/01
09:35
Page 11
Enter the time using the 24 Hour clock
e.g 2300 for 11pm followed Yes
the display will show for example:03 Jul
Ok ?
10)
11)
Press Yes to accept
the display will show:-
23: 00
Do You Want to. .
Set Date / Time ?
To return to the Unset Mode
press 0 twice.
It should be noted the time displayed after setting the time may be
plus or minus one minute.
Pa g e 1 1
USER.qxd
25/10/01
09:35
Page 12
Reading the Log
1)
Enter a valid User Code followed by No
the display will show:Do You Want to. .
Test ?
2)
Press No
the display will show:Do You Want to. .
Delete Zone ?
3)
4)
5)
6)
7)
8)
Press No
the display will show:-
Press Yes
the display will show:-
Press No
the display will show:-
Press No
the display will show:-
Press No
the display will show:-
Do You Want to. .
Select Options ?
Do You Want to. .
Program Chime ?
Do You Want to. .
Program Codes ?
Do You Want to. .
Set Date / Time ?
Do You Want to. .
View Log ?
Press Yes
the display will show the last event in the Log. Whilst viewing
the log pressing No will display the previous event and
pressing Yes will display the next event.
Pa g e 1 2
USER.qxd
25/10/01
09:35
Page 13
9)
To return to the Unset Mode press 0 three times.
Note:
Dependant on the Log mode programmed by your
installation engineer the log may store
256 events with no time or date stamp.
or
64 events with time and date stamp.
Keypad Alert
If programmed by your installation company keys 1 & 3 when pressed
together will act as alert keys. The exact function will depend on what
they have been programmed for but for example if they are programmed as panic pressing them will activate the alarm when the system is set or unset.
Tamper
Provision is provided by the control panel for all keypads, cabling and
detectors to be tamper protected. With the system Unset most tampers will cause an internal alarm, whilst the system is Set a full alarm
will be generated by a tamper.
Pa g e 1 3
USER.qxd
25/10/01
09:35
Page 14
System Details
Installation By:
Address:
Tel:
Fax:
Zone No.
Location
1
2
3
4
5
6
7
8
Installation Date
Serviced
Next Due
Type
Chime
Service Timer
Serviced
Notes
Pa g e 1 4
Pt1
Pt2
On
Off
Next Due
USER.qxd
25/10/01
09:35
Page 15
USER.qxd
25/10/01
09:35
Page 16
Installed By:-
PR5202 Rev1.2