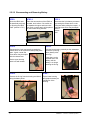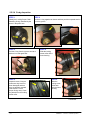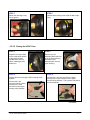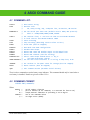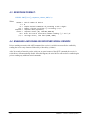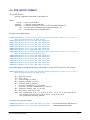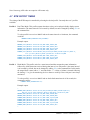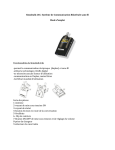
1
VEMCO, a Division of AMIRIX Systems Inc.
DOC-5073-03
2013-01-17
AMIRIX Systems Inc.
Warranty and Disclaimer
WARRANTY
AMIRIX Systems Inc., doing business under its trade name VEMCO, provides a one (1) year warranty period for the Product from date of shipment.
VEMCO warrants that on the date of shipment all Products manufactured by VEMCO are free from defects in material and workmanship under normal use and service. This warranty
applies to the components necessary for equipment upgrades, i.e. the VR1/VR2 to VR2W upgrade. With respect to transmitter products, while VEMCO is able to predict battery life with
some certainty, VEMCO cannot guarantee that these Products will remain functional while submerged for extended periods of time. This warranty does not apply to any equipment,
materials or design supplied by Buyer or a third party; re-battery services provided by VEMCO; Products for which VEMCO has not received payment; problems that results from: external
causes such as accident, abuse, misuse; servicing not authorized by VEMCO; usage not in accordance with Product instructions; failure to follow the Product instructions or failure to
perform preventative maintenance; usage of accessories, parts or components not supplied by VEMCO.
This warranty shall survive delivery only on the conditions and subject to the limitations set forth below.
NOTICE PERIODS
To receive a warranty remedy for a Product, Buyer must contact VEMCO’s Customer Support Department during the warranty period to receive the Return Material Authorization (“RMA”)
instructions. Each defective Product returned for warranty remedy must be shipped at the Buyer’s expense according to the RMA instructions and must include reasonable proof that the
claimed defect is due to a matter embraced within the warranty set forth above and that such defect did not result from any act or omission of Buyer, including but not limited to any failure
to operate and maintain the Product in accordance with VEMCO’s applicable written instructions.
REMEDY
VEMCO’s liability, and the Buyer’s exclusive remedy under this warranty, as to a defect in material or workmanship, is limited to the repair of such defect in the accessory, equipment or
part in which the defect appears or, at VEMCO’s option, to the replacement of such accessory, equipment or part with a similar item free from defect. As to any item repaired by VEMCO
or furnished as a replacement by VEMCO, VEMCO’s liability and the Buyer’s exclusive remedy to the repair or replacement of such item for any further defect in material or workmanship,
provided VEMCO receives written notice at Halifax, Nova Scotia, of such further defect from BUYER within ninety (90) days after the repaired or replaced item is shipped to BUYER and
provided that BUYER returns same to VEMCO as provided under “Notice Periods”.
RETURNED ITEMS
All repairs, replacements and corrections described above shall be performed by VEMCO at its plant at Halifax, Nova Scotia, or at such other place as may be mutually agreeable, and
with reasonable care and dispatch in order that the Product, accessory, equipment or part will not be kept out of service longer than necessary. Return to BUYER of a repaired,
replacement, or corrected accessory, equipment, part or Product shall be at VEMCO’s expense. Title to and risk of loss of the Product, accessory, equipment, or part returned to VEMCO
pursuant hereto shall at all times remain with the BUYER, except that title to a returned accessory, equipment, part, or Product shall pass to VEMCO concurrently with shipment to
BUYER of any item furnished by VEMCO to BUYER as a replacement therefore. VEMCO shall have only such responsibility for any Product, accessory, equipment, or part owned by the
BUYER and in the possession of VEMCO as is chargeable by law to a bailee for hire, but shall not be chargeable for loss of use thereof.
WEAR AND TEAR
Normal wear and tear and the need for regular maintenance shall not constitute a defect under this warranty.
DISCLAIMER AND RELEASE
THE WARRANTIES, OBLIGATIONS AND LIABILITIES OF VEMCO AND THE REMEDIES OF BUYER SET FORTH HEREIN ARE EXCLUSIVE AND IN SUBSTITUTION FOR, AND
BUYER HEREBY WAIVES AND RENOUNCES, ALL OTHER WARRANTIES AND OBLIGATIONS OF VEMCO AND ANY ASSIGNEE OF VEMCO AND ALL RIGHTS, CLAIMS AND
REMEDIES OF BUYER AGAINST VEMCO, EXPRESS OR IMPLIED, ARISING BY LAW OR OTHERWISE, WITH RESPECT TO ANY NON-PERFORMANCE OR DEFECT IN THE
PRODUCT OR IN ANY OTHER THING DELIVERED UNDER THIS AGREEMENT, INCLUDING BUT NOT LIMITED TO:
(A) ANY IMPLIED WARRANTY OF MERCHANTABILITY OR FITNESS FOR A PARTICULAR PURPOSE;
(B) ANY IMPLIED WARRANTY ARISING OUT OF COURSE OF PERFORMANCE, COURSE OF DEALING OR USAGE OF TRADE;
(C) ANY OBLIGATION, LIABILITY, CLAIM OR REMEDY IN TORT, WHETHER OR NOT ARISING FROM THE NEGLIGENCE OF VEMCO OR ANY ASSIGNEE OF VEMCO,
ACTUAL OR IMPUTED;
(D) ANY OBLIGATION, LIABILITY, RIGHT, CLAIM, OR REMEDY FOR LOSS OF OR DAMAGE TO THE PRODUCT, FOR LOSS OF USE, REVENUE, OR PROFIT WITH RESPECT
TO THE PRODUCT; OR FOR ANY OTHER DIRECT, INCIDENTAL OR CONSEQUENTIAL DAMAGES; AND
(E) VEMCO MAKES NO REPRESENTATION THAT THE PRODUCT WILL NOT INFRINGE ANY PATENT OR OTHER RIGHTS OF ANY PERSON AND BUYER AGREES TO
INDEMNIFY VEMCO AND HOLD VEMCO HARMLESS FROM ANY AND ALL CLAIMS AND LIABILITIES WITH RESPECT TO SAME TOGETHER WITH ANY CLAIMS AND
LIABILITIES WITH RESPECT TO ANY INFRINGEMENT OF ANY PATENT OR OTHER RIGHTS OF ANY PERSON ARISING AS A RESULT OF BUYER'S PRODUCTS,
TECHNOLOGY, ACTIVITIES, OR OTHERWISE.
LICENSE AGREEMENT
VEMCO grants to the Buyer a limited, personal license, with no right to sub-license, to use the Intellectual Property (“IP”) and Embedded Software in the manner set out in the
Documentation. The Embedded Software and IP are not sold to Buyer. All property rights, including Intellectual Property Rights, remain with VEMCO. All rights related to the Embedded
Software not expressly licensed to the Buyer are reserved to VEMCO. BUYER shall not permit any person other than BUYER and its employees to use or make use of the Embedded
Software and/or IP. BUYER shall not, and shall not permit any third part to, modify, adapt, translate, reverse engineer, decompile, disassemble, or create derivative works based on the
Embedded Software and/or IP. This license is assigned to the Product with which you have acquired the Embedded Software and/or IP. If the Product purchased is a Transmitter product,
be advised that the license life is equal to the operational life.
EXPORT
Products and associated materials supplied or licensed hereunder may be subject to various export laws and regulations. It is the responsibility or BUYER to comply with such laws and
regulations.
NEGOTIATED AGREEMENT
It is fully understood by the parties that the price of the Product and other mutual agreements of the parties set forth in this agreement were arrived at in consideration of this warranty,
SPECIFICALLY INCLUDING THE WAIVER, RELEASE AND RENUNCIATION BY BUYER SET FORTH ABOVE (DISCLAIMER AND RELEASE).
© (2013) AMIRIX Systems Inc. All rights reserved. The information contained herein includes information which
is confidential and proprietary to AMIRIX Systems Inc. and may not be used or disclosed without prior written
consent of AMIRIX Systems Inc.
TABLE OF CONTENTS
1
INTRODUCTION ...................................................................................................................... 1
1.1
SYSTEM OVERVIEW ................................................................................................................ 1
1.2
MODES OF OPERATION ........................................................................................................... 1
1.2.1
1.2.2
1.2.3
2
Record Mode .............................................................................................................................. 1
Storage Mode ............................................................................................................................. 2
Stop Mode .................................................................................................................................. 2
VR2C HARDWARE .................................................................................................................. 3
2.1
CASE FEATURES ..................................................................................................................... 3
2.2
MEMORY ................................................................................................................................ 4
2.3
SERIAL COMMUNICATION AND POWER CONNECTOR .............................................................. 5
2.3.1
2.3.2
2.4
2.5
Serial Communication ................................................................................................................ 5
External Power ........................................................................................................................... 5
EXTERNAL CABLE .................................................................................................................. 6
BATTERY ................................................................................................................................ 6
2.5.1
Battery Life ................................................................................................................................ 6
2.5.2
Battery Installation/Replacement ............................................................................................... 6
2.5.2.1 Opening the VR2C Case ........................................................................................................ 7
2.5.2.2 Disconnecting and Removing Battery .................................................................................... 8
2.5.2.3 Inserting or Replacing Battery ............................................................................................... 9
2.5.2.4 O-ring Inspection.................................................................................................................. 10
2.5.2.5 Closing the VR2C Case........................................................................................................ 11
2.5.2.6 Resetting the VR2C Battery Usage Indicator....................................................................... 13
3
ATTACHMENT METHODS.................................................................................................. 14
4
ASCII COMMAND GUIDE .................................................................................................... 15
4.1
COMMAND LIST: ................................................................................................................... 15
4.2
COMMAND FORMAT: ............................................................................................................ 15
4.3
RESPONSE FORMAT: ............................................................................................................. 16
4.4
ENABLING AND DISABLING RECEIVER SERIAL DRIVERS ........................................................ 16
4.5
COMMAND EXAMPLES ......................................................................................................... 17
4.5.1
4.5.2
4.5.3
4.5.4
4.5.5
4.6
4.7
4.8
4.9
4.10
4.11
4.12
INFO command: ....................................................................................................................... 17
STATUS command: ................................................................................................................. 17
BAUDRATE command: .......................................................................................................... 17
TIME command: ...................................................................................................................... 18
RTMINFO command: .............................................................................................................. 18
RTM OUTPUT FORMAT ........................................................................................................ 19
RTM OUTPUT TIMING.......................................................................................................... 20
INITIALIZING A NEW STUDY (RTM MODE) ........................................................................... 22
UPDATING THE CLOCK ......................................................................................................... 23
ERASING THE DATA LOGS .................................................................................................... 23
USING RTM AUTOERASE............................................................................................... 24
PLACING THE RECEIVER IN STORAGE MODE ........................................................................ 24
5
APPENDICES........................................................................................................................... 25
5.1
QUICK RECEIVER TEST IN AIR ............................................................................................... 25
5.2
TROUBLE SHOOTING ............................................................................................................ 25
5.2.1
5.2.2
5.2.3
5.3
5.4
5.5
5.6
Dented Threads ........................................................................................................................ 25
O-ring Care ............................................................................................................................... 25
Pressurized Case ....................................................................................................................... 26
CLEANING INSTRUCTIONS .................................................................................................... 27
CONTACT INFORMATION ...................................................................................................... 27
VR2C SPECIFICATIONS ........................................................................................................ 27
INDEX ................................................................................................................................... 28
1 INTRODUCTION
1.1 SYSTEM OVERVIEW
The VR2C is a submersible, single-channel acoustic receiver capable of identifying VEMCO coded
transmitters. The receiver operates on a factory set frequency and can decode uniquely coded pingers and
sensor transmitters. The receiver is housed in a corrosion resistant cylindrical plastic high pressure case and
incorporates an integral hydrophone at one end of the case. The VR2C features include a cabled RS232 or
RS485 communication port, a Smart LED, 8 megabytes of data storage, ability to be powered via a cable
and a replaceable internal backup battery (single Lithium cell).
The VR2C records the tag code number, the date/time of valid detections, and sensor data if the tag received
is equipped with a sensor. This information is stored in memory and can be downloaded from the receiver
over the cabled RS232 or RS485 interface.
WARNING:
The VR2C pressure case and seal have a static depth rating of 500 meters
(730 psi). Physical shocks to the receiver, such as bumping into a solid
object, when it is at any depth can result in a considerably higher pressure
on the casing than just the depth pressure, and water may enter the VR2C
case. If the O-rings or their mating surfaces are dirty or damaged, then
water may also enter the receiver case. If you are suspicious that water has
entered the receiver, then follow the suggestions in section 5.2.3 - Trouble
Shooting, Pressurized Case.
1.2 MODES OF OPERATION
1.2.1 Record Mode
Record Mode allows the VR2C to receive and record tag information. This is the normal mode used during
deployment. The VR2C is designed to enter Record Mode when any of the following events occur:
•
•
•
The “START” command is issued over the serial interface.
The “STOP” command times out (the stop command will timeout after 60 minutes at which point
the VR2C automatically returns from Stop to Record Mode).
A non-powered unit becomes powered (from an external power source or from installation of the
internal battery).
These last two above events were chosen to prevent a VR2C from being deployed while not in Record
Mode. The only way to remove a VR2C from Record Mode for more than 60 minutes, unless the memory
is full, is to place it in Storage mode or to remove the battery (see Section 2.5, Battery).
VR2C User Manual (beta)
1
1.2.2 Storage Mode
Storage Mode is used when the VR2C is not deployed for a period of time and is placed in storage. When in
Storage Mode, the receiver will not detect and record tag information. This prevents the possibility of
recording pings from noise sources during storage and also conserves battery power. For details on how to
place it in Storage Mode, see Section 4.12.
The VR2C is shipped in Storage Mode with the internal battery
connected. Put the receiver in Record Mode before deployment.
1.2.3 Stop Mode
Stop mode is intended to be used to stop the VR2C from detecting and recording tag information for a short
period of time. The STOP command is sent to the receiver to put it in Stop Mode (see section 4.2 for proper
command structure). The STOP command times out after 60 minutes at which point the VR2C returns to
Record Mode.
2
VEMCO –
a division of AMIRIX Systems
2 VR2C HARDWARE
2.1 CASE FEATURES
The VR2C is housed in a black plastic high pressure case as shown in the photo below. The lower housing
is removed from the receiver to install the D-cell Lithium battery, as described in Section 2.5.2 – Battery
Installation.
The only externally distinguishable physical differences between the VR2C-69kHz and the VR2C-180kHz
are the size of the hydrophone and the colour of the text on the serial number band. The VR2C-180kHz
hydrophone is smaller than the VR2C-69kHz hydrophone (see photos below).
IMPORTANT:
Under no circumstance should you unscrew the upper housing as
this will cause serious internal damage to the VR2C.
Threaded Endcap
VR2C-69kHz
hydrophone
Cable Tie Grooves
LED / Release
valve
Serial Number Band
Cable Connector
Text on band is blue for 69kHz
and green for 180kHz.
VR2C-180kHz
hydrophone
WARNING:
Do not bump the hydrophone (identified in the photo above) or damage may occur and
the receiver will not detect transmitters.
VR2C User Manual (beta)
3
WARNING:
The internal casing surrounding the electronics is not waterproof and is therefore
susceptible to water damage when the lower housing is removed. Water, even
condensation from a humid environment, will enter the case and damage the electronics.
Upper Housing
Lower Housing
External Connector
Battery
Compartment
A VR2C-69kHz with lower housing removed.
2.2 MEMORY
The VR2C uses non-volatile memory (memory that can retain stored information even when not powered)
to store valid detections of coded transmitters as well as the date/time at which the detection was recorded.
The VR2C will not continue to record received data once the memory is full. The memory is capable of
storing more than one million valid detections.
4
VEMCO –
a division of AMIRIX Systems
2.3 SERIAL COMMUNICATION AND POWER CONNECTOR
The VR2C uses an underwater pluggable 8-pin connector to allow for a cabled interface
to a customer PC, a data logger, a modem, or another supported device. The connector
(PN: MCBH8M) is a member of the SubConn Micro Series 8 family of connectors.
Handling instructions are available on the Subconn website at
http://www.subconn.com/filer/1031/SubConn_Handling_Procedure.416805555655519.pdf
The VR2C connector has the following pinout:
TABLE 1: VR2C external connector pinout
Pin #
1
2
3
4
5
6
7
8
Function
EXTERNAL DC POWER RS485 D+
EXTERNAL DC POWER +
RS485 DRS232 TX (from PC to VR2C)
RS232 RX (from VR2C to PC)
CGND
NO CONNECT
WARNING:
External View
Never deploy the
VR2C with the
connector exposed.
It must be connected
to the cable or the
dummy plug when
deployed.
2.3.1 Serial Communication
The VR2C connector contains both an RS232 and an RS485 serial interface to allow for communication
with external devices over a cable. By using a cable with the appropriate corresponding pinout, the user can
communicate with the VR2C through either RS232 or RS485 (not both at the same time).
The current supported method of communication with the VR2C is with serial ASCII commands. This
command protocol is explained in Section 4. Plans are also in place to release VEMCO software that will
allow more sophisticated communication with the VR2C.
2.3.2 External Power
The VR2C connector allows for the receiver to be powered from an external power source. The external
power specifications are:
External DC Voltage: +10 volts to +32 volts
Typical Power Consumption (@12V): Record Mode (idle serial communication port): < 1mA
VR2C User Manual (beta)
5
2.4 EXTERNAL CABLE
The VR2C uses an external cable to connect to other devices. VEMCO has successfully used cable with the
following specifications:
• 2 Twisted Pair - 18 AWG stranded tinned copper (STC); 0.070” PP insulated; Individual foil shield,
Drain (Twisted Pair coloring scheme: Pair 1: Green/White; Pair 2: Red/Black)
• Overall Copper Braided Shield (80% coverage)
• Black polyurethane jacket to an overall outer diameter of approximately 0.290”
• Two jacketed Kevlar 49 strength members with breaking strength of 350lb each
• UV stabilized
• Subconn MCOM8F connector on VR2C end; flying leads on surface end
There could be variations on these cable specifications based on individual customer needs. VEMCO should
be consulted when designing specific cabling solutions.
2.5 BATTERY
The VR2C can be powered externally from a DC power source and/or internally by a single “D” size 3.6
Volt Lithium battery with a connector attached – the Tadiran TL-5930/F. The VR2C is shipped in Storage
Mode with the internal battery connected.
The VR2C is shipped in Storage Mode with the internal battery
connected. Put the receiver in Record Mode before deployment.
2.5.1 Battery Life
A new Lithium D-cell battery will last approximately 10 months in a VR2C-69kHz and approximately 5
months in a VR2C-180kHz when external power is not present.
When a receiver will sit non-deployed for an extended period of time, place it in Storage Mode (see Section
4.12) to save battery power.
2.5.2 Battery Installation/Replacement
Replacing a battery in the VR2C requires six basic steps: opening the
case, removing the old battery, inserting the new battery, inspecting the
o-rings, closing the case and resetting the battery usage indicator.
These steps are identical for the VR2C-69kHz and VR2C-180kHz.
Each of these steps is dealt with in detail in the following sections.
Before removing battery:
Place the VR2C in Stop or Storage
mode prior to removing the battery
to ensure that no study data is lost.
WARNING:
Only install new batteries in the VR2C. If a partially
drained battery is installed, the battery usage indicator
will not accurately reflect the true battery usage!
6
VEMCO –
a division of AMIRIX Systems
2.5.2.1 Opening the VR2C Case
The method used to open the VR2C case is the same as
shown regardless of receiver frequency.
STEP 1
STEP 2
STEP 3
Obtain a suitably
sized strap
wrench.
Remove the
locking collar
(identified in
photo) on the
external cable.
Grasp the cable at
the connector and
pull straight back to
remove the cable
from the VR2C case.
IMPORTANT: Grip
the connector rather
than the cable to
reduce strain on the
cable.
STEP 4
STEP 5
Make sure there is absolutely no water on or near the VR2C
case. If the VR2C is attached to a wet rope or mooring system,
remove the receiver from the rope or mooring system.
Place the strap wrench around the
grooved lowered collar as shown in the
picture. Securely hold the upper housing
and loosen the collar until is moves
easily.
WARNING
It is vitally important that the electronics inside the
receiver case do not come in contact with any water
or the receiver will be damaged. This also means the
electronics cannot be exposed to a sudden change in
temperature and humidity that will cause condensation
to develop on the electronics and destroy the receiver
(see the note in the Closing the VR2C Case section).
STEP 6
STEP 7
STEP 8
Hand-thread the lower
housing from the upper
housing.
Carefully slide the lower housing
from the upper housing.
Set the two housing sections near
each other as they’re still connected.
IMPORTANT
Lower housing must be
supported so no strain is placed
on the internal wiring harness.
VR2C User Manual (beta)
DO NOT impact the threads on
the VR2C or they will dent and
prevent the VR2C case from
closing. See the Trouble
Shooting section of the Appendix
for tips on thread care.
7
2.5.2.2 Disconnecting and Removing Battery
STEP 1
STEP 2
STEP 3
Open the VR2C case
as described previously
in “Opening the VR2C
Case” (section 2.5.2.1).
Place the two sections of the VR2C on
a stable, level surface. Be careful not
to separate the upper and lower units
too much or undue strain will be placed
on the internal wiring harness.
Disconnect the 2-pin battery connector
by pressing the release lever on the
connectors while pulling them apart. A
small flat screw driver may be helpful
with the
release
lever.
STEP 4
STEP 5
Disconnect the 6-pin connector by pressing the
release lever on the connectors while pulling them
apart. Again, a small flat
screw driver may be helpful
with the release lever.
Hold the lower housing vertically so the underwater
connector is pointing
down (battery wires
point up).
Set the upper housing
aside in a safe location.
Press down on the
exposed end of the
battery until the
battery is no longer
touching the O-ring.
STEP 6
STEP 7
Remove the O-ring from the housing and slide it
along the battery wires.
Tip the lower housing
and grasp the battery as
it slides out of the
housing.
8
VEMCO –
a division of AMIRIX Systems
2.5.2.3 Inserting or Replacing Battery
The Battery Status must be reset every time the battery is replaced (see Section 2.5.2.6).
STEP 1
STEP 2
STEP 3
Disconnect the
battery as described
previously in
“Disconnecting and
Removing Battery”
(section 2.5.2.2).
Slide the new
battery into the
battery cup so
the battery
connector wires
are on the
topside of the
battery.
Position the battery so the battery wires
are close to the wires on the housing.
STEP 4
STEP 5
Slide the O-ring along the
battery
wires.
Press down on the battery
until the top of the battery
is below the O-ring
groove.
Squeeze the O-ring into
an oval shape and push it
into the groove in the
battery cup as shown in
the photo. Do not grease
the O-ring.
STEP 6
STEP 7
Make sure the connector wires
are not pinched in any way,
especially between the O-ring and
the battery or case. Pinched
wires can break internally and
disrupt power to the receiver.
Inspect the O-rings (see
section 2.5.2.4) and then close
the VR2C case (see section
2.5.2.5).
VR2C User Manual (beta)
9
2.5.2.4 O-ring Inspection
STEP 1
STEP 2
Identify the Locking Screw Collar
Retaining O-ring, identified by the
arrow in the photo here.
Pinch the o-ring together as shown and then push the exposed section
out of the groove.
STEP 3
STEP 4
Pull the O-ring from the groove and set it
aside to be used again later.
Slide the locking
screw collar off the
lower housing.
STEP 5
STEP 6
Inspect the two O-rings to
make sure they have not
been damaged and that
they are properly greased
(see section 5.2.2 for
proper O-ring care). Clean
any debris from the locking
screw collar.
Slide the
locking screw
collar back
onto the lower
housing.
Continued…
10
VEMCO –
a division of AMIRIX Systems
STEP 7
STEP 8
Return the retaining O-ring
into its groove.
Check that the locking screw collar is able to spin
freely.
2.5.2.5 Closing the VR2C Case
STEP 1
STEP 2
Inspect the O-ring surface
on the inside lower portion
of the upper housing
cylinder to be sure it is
clean, undamaged, and
debris free.
Remove any old
desiccant packs that may
be in the upper housing
and place a new
desiccant pack into the
upper housing.
STEP 3
STEP 4
Position the lower and upper VR2C housings close
together.
Connect the 2-pin connector from the lower
housing to the 2-pin connector on the upper
housing wiring harness. This is power and should
be connected last.
Connect the 6-pin
connector from the lower
housing to the 6-pin
connector on the upper
housing wiring harness.
Continued…
VR2C User Manual (beta)
11
STEP 5
STEP 6
Loop the covered
wires into the case.
This helps the wires
to slide down the
case and not be
damaged when the
case is closed.
Push the wires
away from the
edge of the case
so they won’t be
pinched in the
case and
damaged.
STEP 7
STEP 8
Line up the keying features of the upper and lower housing units
and slide the lower housing into the upper housing while being
extremely careful to avoid pinching
the wiring harness between the
upper and lower housings.
Turn the locking screw collar with your
hand until it becomes too hard to turn.
STEP 9
STEP 10
Using a suitably sized strap wrench, tighten the
locking screw collar in place.
Verify that the locking screw collar covers the O-ring on
the outside of the upper housing.
A desiccant pack has been included inside the VR2C to reduce the
occurrence of condensation inside the case. This pack should remain in
the receiver case during storage and deployment.
We recommend that you replace the desiccant pack with each deployment
and with each battery replacement cycle (see manual for instructions).
More information on the availability and usage of these packs is located on
our website, www.vemco.com.
12
VEMCO –
a division of AMIRIX Systems
2.5.2.6 Resetting the VR2C Battery Usage Indicator
1. Connect the VR2C to your interfacing hardware (terminal, PC, data logger, modem…) using the
external cable.
2. Issue the ASCII reset battery command to reset the
VR2C battery usage indicator (see example below).
Note: Prior to sending the reset battery command,
enable the receiver’s serial drivers by sending any
character followed by a short delay (>100ms).
WARNING:
Only send the RESET BATTERY command
when installing a fresh, new battery.
For example, to send the reset battery command to a VR2C receiver with the serial number 000005, enable
the serial drivers and enter the ASCII command as follows:
Send:
Send:
\r
← enable serial drivers + short delay (>100ms)
*000005.0#05,RESETBATTERY\r
VR2C User Manual (beta)
13
3 ATTACHMENT METHODS
The common method used to attach a receiver to a mooring line is to use cable ties with the characteristics
described in section 5.5. One set of cable ties is shipped with the receiver and more may be purchased from
VEMCO.
For best horizontal range, mount the VR2C in a vertical position. If the VR2C is deployed close to the
bottom of the water, mount the VR2C with the hydrophone pointing up to the surface. If the VR2C is
deployed close to the surface of the water, position the VR2C so the hydrophone is pointing down.
IMPORTANT:
The hydrophone must be kept free of mooring lines and other
obstructions. Objects around the hydrophone will affect the detection
range of the VR2C receiver.
Some customers use a rubber shrink tape, such as DAFLEX ST250 Cold Shrink Tape available from
Digikey (W211-ND), to prevent biofouling on their receivers. It can be used to cover the entire receiver
case and does not leave a glue residue when it’s removed. Another option is to use an antifouling paint,
such as Interlux Micron CSC.
WARNING: The VR2C underwater cable must be appropriately strain
relieved to ensure that the cable will not place strain on the receiver.
14
VEMCO –
a division of AMIRIX Systems
4 ASCII COMMAND GUIDE
4.1 COMMAND LIST:
STATUS
INFO
// Read status string
// Receiver Info
//
SN, study string, map, codespace list, FW Version, HW Version
BAUDRATE=x
// Set the serial port baud rate (default rate is 9600, 8N1 protocol)
//
where x = 9600,19200,38400,57600,115200.
TIME=x
//
//
//
//
//
START
STOP
ERASE
RTMINFO
RTMOFF
RTM232
RTM485
RTMNOW
RTMPROFILE=x
//
//
//
//
//
//
//
RTMAUTOERASE=x //
Set receiver clock, x = 24 hour UTC time as YYYY-MM-DD HH:MM:SS
or local time as YYYY-MM-DD HH:MM:SS +ZZZZ
Start recording
Stop recording (Recording restarts after an hour)
Erase data (must be stopped)
Read Real-Time mode configuration
Disables RTM output
Resets RTM state and enables output on the RS232 lines
Resets RTM state and enables output on the RS485 lines
Resets RTM schedule (used for Polling)
Select a RTM output method where x = 0,1,2…
(see VR2C RTM Output Timing)
Set the auto erase threshold. x = % of log to keep free, 0-50
STORAGE
RESET
// Put receiver in low power state for storage (must be stopped)
// Reset receiver (must be stopped)
QUIT
// Exit command session (Disables serial drivers)
There is also a command to reset the battery usage indicator. This command should only be issued when a
new battery is installed. Details are given in section 2.5.2.6.
4.2 COMMAND FORMAT:
*SSSSSS.P#CC,command\r
Where
SSSSSS
P
CC
command
\r
=
=
=
=
=
serial number of device
port to address (0 for commands, 1-X reserved for future use)
simple decimal summation of preceding S and P digits
one of the commands below
carriage return (0x0D)
VR2C User Manual (beta)
15
4.3 RESPONSE FORMAT:
*SSSSSS.P#CC[LLLL],response,status,#HH\r\n
Where
SSSSSS
P
CC
LLLL
response
status
HH
\r\n
=
=
=
=
=
=
=
=
serial number of device
0
simple decimal summation of preceding S and P digits
number of bytes to follow “]” including “\r\n”
response data (optional)
response status (OK, FAILURE,INVALID)
8-bit hex sum of characters between leading “],” and “,#”
carriage return, line feed (0x0D, 0x0A)
4.4 ENABLING AND DISABLING RECEIVER SERIAL DRIVERS
Prior to sending an actual serial ASCII command, the receiver’s serial drivers must first be enabled by
sending the receiver any character followed by a short delay (>100ms).
After 30 seconds of inactivity on the serial port, or upon issuance of the QUIT command, the receiver’s
serial drivers will automatically disable. Once this happens, the serial drivers will need to be enabled again
prior to sending any additional serial commands.
16
VEMCO –
a division of AMIRIX Systems
4.5 COMMAND EXAMPLES
In these examples we are sending commands to a VR2C with serial number 000005. It is assumed that the
receiver’s serial drivers are already enabled (refer to section 4.4).
4.5.1 INFO command:
Send:
*000005.0#05,INFO\r
Receive:
*000005.0#05[0104],VR2C-69:000005,'Test Study',MAP-112 [ 1105 1206 1303 1320
9001/9002 1420 1601 ],FW=0.0.17,HW=1,OK,#A7\r\n
4.5.2 STATUS command:
Send:
*000005.0#05,STATUS\r
Receive:
*000005.0#05[0120],2012-03-20 13:25:28,STS,DC=0,PC=0,LV=0.0,BV=2.9,BU=0.1,I=6.2,T=23.0,
DU=0.0,RU=0.0,XYZ=0.97:0.00:0.13,RECORDING,OK,#9C\r\n
DC
PC
LV
BV
BU
I
T
DU
RU
XYZ
=
=
=
=
=
=
=
=
=
=
Detection count
Ping count
Line Voltage in Volts
Battery Voltage in Volts
Battery used in percent
Current consumption in milliamps
Internal receiver temperature in Celsius
Detection memory used in percent
Raw memory used in percent
Tilt information in G’s as X.XX:Y.YY:Z.ZZ. +1 on the X axis
with 0s on the others indicates that the receiver is vertical
with the hydrophone pointing upward
The receiver mode will be reported as one of RECORDING, STOPPED, or STORAGE.
Note: The XYZ tilt information is only available on certain VR2C hardware platforms.
4.5.3 BAUDRATE command:
Send:
*000005.0#05,BAUDRATE=38400\r
Receive:
*000005.0#05[0009],OK,#9A\r\n
The receiver baud rate will change to 38400 after the response is sent to the user.
VR2C User Manual (beta)
17
4.5.4 TIME command:
UTC Format:
Send:
*000005.0#05,TIME=2010-10-18 21:32:13\r
Receive:
*000005.0#05[0009],OK,#9A\r\n
Local Format:
Send:
*000005.0#05,TIME=2010-10-18 17:32:13 -0400\r
Receive:
*000005.0#05[0009],OK,#9A\r\n
4.5.5 RTMINFO command:
Send:
*000005.0#05,RTMINFO\r
Receive:
*000005.0#05[0053],232,SI=60,BL=U,BI=1,MA=U,FMT=SER SEQ UTC CS,OK,#8A\r\n
232
485
OFF
SI
BL
BI
MA
FMT
=
=
=
=
=
=
=
=
RTM output via 232
RTM output via 485
RTM output disabled
Status Interval in seconds or POLL for polled mode
Block Length in lines (U = unlimited)
Block Interval in seconds between blocks (WFS =Wait for status)
Max Age filter in seconds (U = unfiltered)
Format options:
SER: Serial Number
SEQ: Sequence Number
UTC: ASCII Universal Time
LCL: ASCII Local Time
DEC_UTC: Decimal Universal Time
DEC_LCL: Decimal Local Time
CS: Checksum
The three default Real Time Mode (RTM) profiles appear as follows:
RTMPROFILE=0
*000005.0#05[0053],232,SI=60,BL=U,BI=1,MA=U,FMT=SER SEQ UTC CS,OK,#8A
RTMPROFILE=1
*000005.0#05[0055],232,SI=60,BL=U,BI=WFS,MA=U,FMT=SER SEQ UTC CS,OK,#49
RTMPROFILE=2
*000005.0#05[0057],232,SI=POLL,BL=U,BI=WFS,MA=U,FMT=SER SEQ UTC CS,OK,#1A
18
VEMCO –
a division of AMIRIX Systems
4.6 RTM OUTPUT FORMAT
The general format is:
serial,sequence,datetime,info,#HH\r\n
Where
serial
sequence
datetime
HH
\r\n
=
=
=
=
=
receiver serial number
3 digit line counter (000-999)
event time as 24 hour UTC time as YYYY-MM-DD HH:MM:SS
8-bit hex sum of all characters preceding the trailing “,#”
carriage return, line feed (0x0D, 0x0A)
Example (line endings hidden):
000005,000,2010-11-18 21:27:10,STS,DC=124,PC=998,LV=10.0,BV=3.2,BU=1.2,I=3.5,T=23.1,
DU=0.0,RU=0.0,XYZ=0.97:-0.03:0.13,#55
000005,001,2010-11-18 21:27:14,A69-1601,38658,#C6
000005,002,2010-11-18 21:27:23,A69-1303,38658,#C6
000005,003,2010-11-18 21:27:33,A69-1105,2,151,#AF
000005,004,2010-11-18 21:27:42,A69-1601,38659,#CB
000005,005,2010-11-18 21:27:51,A69-1303,38659,#CB
000005,006,2010-11-18 21:28:01,A69-1105,3,151,#AF
000005,007,2010-11-18 21:28:11,STS,DC=130,PC=1053,LV=10.0,BV=3.2,BU=1.2,I=3.7,T=23.1,
DU=0.0,RU=0.0,XYZ=0.97:-0.03:0.13,#7C
000005,008,2010-11-18 21:28:11,A69-1601,38660,#C4
000005,009,2010-11-18 21:28:20,A69-1303,38660,#C4
000005,010,2010-11-18 21:28:29,A69-1105,4,151,#B5
000005,011,2010-11-18 21:28:38,A69-1601,38661,#C8
000005,012,2010-11-18 21:28:48,A69-1303,38661,#C9
000005,013,2010-11-18 21:28:57,A69-1105,5,151,#BA
Status information is displayed following an STS identifier as a list of XX=Value pairs. For example:
000005,007,2010-11-18 21:28:11,STS,DC=130,PC=1053,LV=10.0,BV=3.2,BU=1.2,I=3.7,T=23.1,
DU=0.0,RU=0.0,XYZ=0.97:-0.03:0.13,#7C
DC =
PC =
LV =
BV =
BU =
I =
T =
DU =
RU =
XYZ =
Detection count
Ping count
Line Voltage in Volts
Battery Voltage in Volts
Battery used in percent
Current consumption in milliamps
Internal receiver temperature in Celsius
Detection memory used in percent
Raw memory used in percent
Tilt information in G’s as X.XX:Y.YY:Z.ZZ. +1 on the X axis with 0s on
the others indicates that the receiver is vertical with
the hydrophone pointing upward.
Detections are reported as follows:
000005,003,2010-11-18 17:18:42,A69-1105,2,151,#B4
000005,004,2010-11-18 17:18:51,A69-1601,38659,#D0
VR2C User Manual (beta)
← Sensor tag A69-1105-2, A2D value 151
← Standard tag A69-1601-38659
19
Note: Sensor tag A2D values are output in A2D counts only.
4.7 RTM OUTPUT TIMING
The timing of the RTM output is controlled by selecting the desired profile. Currently there are 3 profiles
available:
Profile 0
Real Time Mode. This profile outputs detections as they arrive and periodically displays status
information. The status interval is 60 seconds by default, but can be changed by adding ,SI=x to
the command line.
To select profile 0 on receiver 000005 and set the status interval to 10 minutes, the command
would be:
*000005.0#05,RTMPROFILE=0,SI=600\r
Example output:
000005,223,2010-11-18 22:07:29,A69-1601,38722,#C9
000005,224,2010-11-18 22:07:39,A69-1303,38722,#CA
000005,225,2010-11-18 22:07:48,A69-1105,66,151,#F4
000005,226,2010-11-18 22:07:58,A69-1601,38723,#CF
000005,227,2010-11-18 22:08:01,STS,DC=355,PC=2846,LV=10.0,BV=3.2,BU=1.2,
I=3.7,T=22.9,DU=0.1,RU=0.1,XYZ=0.97:-0.03:0.13,#9B
000005,228,2010-11-18 22:08:08,A69-1303,38723,#CC
000005,229,2010-11-18 22:08:17,A69-1105,67,151,#F6
000005,230,2010-11-18 22:08:27,A69-1601,38724,#C8
Profile 1
Block Mode. This profile waits for a status interval and then outputs the status information
followed by all the detections received during that interval. As with profile 0, the status interval
is 60 seconds by default, but can be changed by adding ,SI=x to the command line. In this mode,
the output block is starts with a “<” and ends with a “>”. A delay of 100ms is inserted following
the leading “<” to give the monitoring device a chance to wake up if the serial port is not always
monitored.
To select profile 1 on receiver 000005 and use the default status interval of 60 seconds, the
command would be:
*000005.0#05,RTMPROFILE=1\r
Example output:
<
000005,002,2010-11-18 22:12:16,STS,DC=382,PC=3062,LV=10.0,BV=3.2,
BU=1.2,I=3.6,T=22.9,DU=0.1,RU=0.1,XYZ=0.97:-0.03:0.13,#89
000005,003,2010-11-18 22:11:18,A69-1601,38730,#BD
000005,004,2010-11-18 22:11:27,A69-1303,38730,#BD
000005,005,2010-11-18 22:11:37,A69-1105,74,151,#E8
000005,006,2010-11-18 22:11:46,A69-1601,38731,#C2
000005,007,2010-11-18 22:11:56,A69-1303,38731,#C3
000005,008,2010-11-18 22:12:05,A69-1105,75,151,#E8
000005,009,2010-11-18 22:12:14,A69-1601,38732,#C2
>
20
VEMCO –
a division of AMIRIX Systems
Profile 2
Polled Mode. This profile outputs status and detections when triggered. To trigger the output,
enable the receiver’s serial drivers and send the RTMNOW command. The same block
termination is used as in profile 1 (“>”).
To select profile 2 on receiver 000005, the command would be:
*000005.0#05,RTMPROFILE=2\r
To enable the receiver’s serial drivers, send any character followed by a short delay (>100ms)
Example session:
\r
← enable serial drivers + short delay (>100ms)
*000005.0#05,RTMNOW\r
← command
*000005.0#05[0009],OK,#9A
← command acknowledge
000005,002,2010-11-18 22:19:28,STS,DC=427,PC=3422,LV=10.0,BV=3.2,BU=1.2,
I=3.7,T=22.9,DU=0.1,RU=0.1,XYZ=0.97:-0.03:0.13,#94
000005,003,2010-11-18 22:17:02,A69-1601,38742,#BF
000005,004,2010-11-18 22:17:11,A69-1303,38742,#BF
000005,005,2010-11-18 22:17:21,A69-1105,86,151,#EA
000005,006,2010-11-18 22:17:30,A69-1601,38743,#C4
000005,007,2010-11-18 22:17:40,A69-1303,38743,#C5
000005,008,2010-11-18 22:17:49,A69-1105,87,151,#F8
000005,009,2010-11-18 22:17:59,A69-1601,38744,#D3
000005,010,2010-11-18 22:18:08,A69-1303,38744,#C5
000005,011,2010-11-18 22:18:18,A69-1105,88,151,#F0
000005,012,2010-11-18 22:18:28,A69-1601,38745,#CB
000005,013,2010-11-18 22:18:37,A69-1303,38745,#CB
000005,014,2010-11-18 22:18:47,A69-1105,89,151,#F6
000005,015,2010-11-18 22:18:56,A69-1601,38746,#D0
000005,016,2010-11-18 22:19:06,A69-1303,38746,#CC
000005,017,2010-11-18 22:19:15,A69-1105,90,151,#ED
000005,018,2010-11-18 22:19:25,A69-1601,38747,#D1
>
VR2C User Manual (beta)
21
4.8 INITIALIZING A NEW STUDY (RTM MODE)
Follow the steps listed below to initialize a new study.
1. Wake the receiver’s serial interface:
Send:
\r + short delay (>100ms)
2. Stop the current study (or exit storage mode):
Send:
*000005.0#05,STOP\r
Receive: *000005.0#05[0009],OK,#9A\r\n
3. Erase any old data:
Send:
*000005.0#05,ERASE\r
Receive: *000005.0#05[0009],OK,#9A\r\n
4. Set the receiver clock:
Send:
*000005.0#05,TIME=2010-10-18 17:32:13 -0400\r
Receive: *000005.0#05[0009],OK,#9A\r\n
5. Start recording detections:
Send:
*000005.0#05,START\r
Receive: *000005.0#05[0009],OK,#9A\r\n
6. Select the desired RTM profile and status update interval (if applicable):
Send:
*000005.0#05,RTMPROFILE=0,SI=600\r
Receive: *000005.0#05[0009],OK,#9A\r\n
7. Select the RTM output port (RS232 or RS485 port):
Send:
*000005.0#05,RTM232\r
Receive: *000005.0#05[0009],OK,#9A\r\n
8. Disable the receiver’s serial drivers:
Send:
*000005.0#05,QUIT\r
Receive:
*000005.0#05[0009],OK,#9A\r\n
22
VEMCO –
a division of AMIRIX Systems
4.9 UPDATING THE CLOCK
To periodically make corrections to the receiver clock, send the TIME= command. The clock can be set at
any time and does not require the study to be stopped or the data logs to be erased.
1. Wake the receiver’s serial interface:
Send:
\r + short delay (>100ms)
2. Set the receiver clock:
Send:
*000005.0#05,TIME=2010-10-18 21:32:13 -0400\r
Receive: *000005.0#05[0009],OK,#9A\r\n
3. Disable the receiver’s serial drivers:
Send:
*000005.0#05,QUIT\r
Receive:
*000005.0#05[0009],OK,#9A\r\n
4.10 ERASING THE DATA LOGS
If the detection log fills up (DU=100.0 in the status line), the RTM output will stop showing new detections.
To avoid this, the log will need to be erased periodically. Erasing the log is accomplished by following the
steps listed below.
1. Wake the receiver’s serial interface:
Send:
\r + short delay (>100ms)
2. Stop the study
Send:
Receive:
*000005.0#05,STOP\r
*000005.0#05[0009],OK,#9A\r\n
3. Erase the data:
Send:
*000005.0#05,ERASE\r
Receive: *000005.0#05[0009],OK,#9A\r\n
4. Restart the study:
Send:
*000005.0#05,START\r
Receive: *000005.0#05[0009],OK,#9A\r\n
5. Disable the receiver’s serial drivers:
Send:
*000005.0#05,QUIT\r
Receive: *000005.0#05[0009],OK,#9A\r\n
VR2C User Manual (beta)
23
4.11 USING RTM AUTOERASE
An alternative to periodically erasing the data logs is to use the RTMAUTOERASE=x command. When the
threshold is set to a non-zero value, the receiver will automatically keep the desired portion of the log free
after each RTM output. Keep in mind that data erased by the auto erase function is not recoverable and is
assumed to have been captured by a device monitoring the RTM output.
Note: setting the RTM mode using RTMPROFILE=x resets the auto erase threshold to 0 (disabled). To
enable auto erase, the RTMAUTOERASE=x command must be sent after the RTMPROFILE=x command.
1. Wake the receiver’s serial interface:
Send:
\r + short delay (>100ms)
2. Select the desired RTM profile and status update interval (if applicable):
Send:
*000005.0#05,RTMPROFILE=0,SI=600\r
Receive: *000005.0#05[0009],OK,#9A\r\n
3. Set the RTM auto erase threshold:
Send:
*000005.0#05, RTMAUTOERASE=10\r
Receive: *000005.0#05[0009],OK,#9A\r\n
4. Select the RTM output port (RS232 or RS485 port):
Send:
*000005.0#05,RTM232\r
Receive: *000005.0#05[0009],OK,#9A\r\n
5. Disable the receiver’s serial drivers:
Send:
*000005.0#05,QUIT\r
Receive: *000005.0#05[0009],OK,#9A\r\n
4.12 PLACING THE RECEIVER IN STORAGE MODE
If the receiver is not going to be used for a period of time, it can be placed in Storage Mode to minimize the
battery drain. Place the receiver in Storage Mode by following the steps listed below. The receiver will
remain in Storage Mode until a START or STOP command is received.
1. Wake the receiver’s serial interface:
Send:
\r + short delay (>100ms)
2. Stop the current study:
Send:
*000005.0#05,STOP\r
Receive: *000005.0#05[0009],OK,#9A\r\n
3. Put the receiver in storage mode:
Send:
*000005.0#05,STORAGE\r
Receive: *000005.0#05[0009],OK,#9A\r\n
4. Disable the receiver’s serial drivers:
Send:
*000005.0#05,QUIT\r
Receive: *000005.0#05[0009],OK,#9A\r\n
24
VEMCO –
a division of AMIRIX Systems
5 APPENDICES
5.1 QUICK RECEIVER TEST IN AIR
The VR2C can detect coded tags in air, but at a much reduced range (between one and three meters for the
VR2C-69kHz and much less than that for the VR2C-180kHz) compared to range capabilities in water.
Perform air tests away from electrical noise sources such as motors, PC screens, or fluorescent lights.
Before beginning the test, ensure the clock of the PC to be used is set to the correct time. Follow the steps
listed:
1. Connect the VR2C to your PC or terminal using the VR2C external cable.
2. Follow the instructions in section 4 to enable Record Mode and RTM output.
3. Activate a coded tag on the same frequency that the VR2C operates (refer to Transmitter Specifications
4.
5.
6.
7.
manual for the tag information).
Lay the VR2C receiver on its side with the hydrophone (pointed end) past the edge of the table.
Hold the tag approximately one meter from the hydrophone for the VR2C-69kHz and approximately 2
cm for the VR2C-180kHz. Hold the tag so the side of the tag is facing the side of the VR2C
hydrophone.
Watch the LED on the VR2C receiver. The LED will flash briefly for each acoustic ping received. A
long flash occurs when the receiver is writing information to the memory.
Verify that the VR2C RTM output on the PC or terminal contains the tag detection.
For a detailed discussion on in water range testing, visit
http://www.vemco.com/education/whitepapers.php
5.2 TROUBLE SHOOTING
5.2.1 Dented Threads
It’s very important that the threads on the VR2C housing are not dented or the lower housing will not thread
onto the upper cylinder housing properly. If the threads are slightly dented, use a sharp knife, such as an XActo knife, to remove the deformed plastic until the sides of the thread are smooth and below the normal
line of the thread. It is important that there is nothing sticking out of the thread to damage the thread on the
lower housing or prevent the case from closing.
5.2.2 O-ring Care
O-rings located in the lower housing of the VR2C case are crucial to the watertight seal of the receiver.
Each time an O-ring is disturbed, for any reason, it must be checked before the unit is sealed again.
The O-ring surface inside the lower portion of the upper housing cylinder must be clean and smooth, free of
debris and nicks. Dirt or damage may cause flooding of the VR2C receiver.
VR2C User Manual (beta)
25
The O-rings must be free from dirt or debris and covered with a light coat of O-ring grease for lubrication.
If too much grease is used, the O-rings may pop out of their grooves and not seal correctly. Each O-ring
should be inspected for any damage, such as nicks or cracks. A damaged O-ring should be replaced
immediately with an O-ring of the same size and type.
WARNING:
Improper care of the O-rings and their mating surfaces can result in water
leaking into the receiver casing.
5.2.3 Pressurized Case
When handled correctly, the VR2C pressure case and seal have a static depth rating of 500 meters (730 psi).
If the receiver experiences a pressure greater than this, then water may enter the case.
NOTE: Physical shocks to the receiver, such as bumping into a solid object, when it is at any depth can
result in a considerably higher pressure on the casing than just the depth pressure. Also, if the O-rings or
their mating surfaces are dirty or damaged, then water may enter the receiver case.
If water enters the receiver case under high pressure, then some water may still be in the case when it is
returned to the surface, along with compressed air. This can be identified by its increased weight and a
sloshing sound when the case is moved. The VR2C case will also be very difficult to open, if at all possible.
If you are suspicious there is compressed air in the receiver case, then check for air or water leaking from
the seams in the case where the main cylinder meets the hydrophone head or the main cylinder meets the
lower housing.
To check for...
Then...
water leakage
dry the seam completely and watch for drops of water around the seam
air leakage
spread soapy water around the seam and watch for bubbles indicating air escaping
If air and/or water are found leaking from the receiver case, do not attempt to open the case. Instead, place
the receiver in a safe place and cover it with a protective layer of towels, tarpaulins, etc. until the leaking
stops. If water is still in the case after the air and/or water have finished leaking from the case, then attempt
to open the case by removing the lower locking collar. If it will open, do so very slowly to allow the
compressed air to escape. If the case will not open it is still under a great amount of pressure. Contact
VEMCO for further instructions.
When the pressure has been released from the VR2C case, carefully unscrew the lower housing from the
main cylinder housing (see section 2.5.2.1, Opening the VR2C Case). Use fresh water to rinse the internal
parts of the VR2C while avoiding skin contact with any battery electrolyte that may have escaped from the
battery.
Do not attempt to re-use the VR2C receiver after water has been inside the case. The internal casing
protecting the electronics is not waterproof and the electronics have been destroyed by contact with water.
26
VEMCO –
a division of AMIRIX Systems
5.3 CLEANING INSTRUCTIONS
Clean the VR2C with a damp cloth and mild detergent.
Do not use solvents. Do not use a scraper or abrasive cleaner on the LED window or the seal surfaces.
5.4 CONTACT INFORMATION
VEMCO Division
AMIRIX Systems Inc.
211 Horseshoe Lake Drive
Halifax, Nova Scotia
Canada B3S 0B9
Phone: +1-902-450-1700
Fax: +1-902-450-1704
Web Site: www.vemco.com
5.5 VR2C SPECIFICATIONS
Size
Receive Frequency
Length (not including external connector): 441 mm (17.3")
Diameter (widest point): 85 mm (3.35")
VR2C-69kHz: 69.0 kHz
VR2C-180kHz: 180.0 kHz
Input Voltage
10-32V DC
Typical Power
Consumption (@ 12V)
Record Mode (idle serial communication port): <1mA
Internal Backup Battery
1 - Tadiran TL-5930/F Lithium Inorganic battery or equivalent, 3.6 Volts
Backup Battery Life (if
not powered externally)
VR2C-69kHz: Approximately 10 months
Memory
8 Megabyte Non-volatile Memory
Operating temperature
-5°C to +40 °C
NOTE: Water in which VR2C is deployed must not freeze.
Static depth rating
500 meters (730 psi)
Ingress Protection
IPX8 to rated depth
VR2C-180kHz: Approximately 5 months
RS232: Supports single receiver with cable length up to 50’
RS485(2-wire): Supports multiple receivers with cable length up to 4000’
Serial Communication
Supports baud rates of 9600, 19200, 38400, 57600, 115200 bps. Achievable
baud rate depends on cable length and number of receivers per cable.
Cable Ties:
VR2C User Manual (beta)
Non-reusable lashing cable ties, 388 mm (15.25") long, 7.5 mm (0.3") wide,
UV protected, 120 lb tensile strength (VEMCO number HWE 507450).
27
5.6 INDEX
Battery
Installation/Replacement, 7
Life, 7
Case
Closing, 12
Opening, 8
O-ring care, 26
O-ring inspection, 11
Threads, 26
Disconnecting and Removing Battery, 9
External Power, 5
Inserting or Replacing Battery, 10
Memory, 5
28
Modes of Operation
Idle Mode, 2
Record Mode, 1
Storage Mode, 2
Record Mode, 1, 26, 28
Storage Mode, 2, 7, 25
System Review, 1
Testing
In-air, 26
Time command
Local format, 19
UTC format, 19
VEMCO –
a division of AMIRIX Systems