1
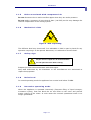
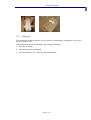
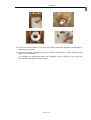
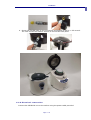
Introduction
CRYOLYS
picture 1
Page 1/24
Introduction
CRYOLYS
INDEX
1 Introduction ..................................................................................................3
1.1
1.2
1.3
1.4
1.5
Safety information and recommendations ...........................................................................3
Warranty......................................................................................................................................6
Appliance reference details......................................................................................................6
Manufacturer’s address ............................................................................................................6
Technical support. .....................................................................................................................6
2 Description of the CRYOLYS ......................................................................7
2.1
2.2
2.3
2.4
2.5
Product overview .......................................................................................................................7
Generating cold conditions ......................................................................................................8
Settings........................................................................................................................................9
Control Panel ..............................................................................................................................9
Technical Specifications..........................................................................................................10
3 Transport / Storage...................................................................................11
3.1
3.2
Transport ...................................................................................................................................11
Storage ......................................................................................................................................12
4 Installation ..................................................................................................13
4.1
4.2
Unpacking..................................................................................................................................13
Installation and connection ...................................................................................................15
5 Instructions for use ...................................................................................19
5.1
5.2
5.3
5.4
5.5
Start-up procedure..................................................................................................................19
Preparation of the cooling system .......................................................................................19
Running a cycle ........................................................................................................................19
Running a sampling sequence ..............................................................................................20
End of cycle...............................................................................................................................20
6 Maintenance / Preventative maintenance ............................................21
6.1
6.2
Troubleshooting .......................................................................................................................21
Cleaning and decontamination .............................................................................................22
Page 2/24
Introduction
CRYOLYS
1 Introduction
This user manual contains all the information required on unpacking, installing,
operating, and maintaining the CRYOLYS.
The technical specifications of the product and the following information
may change without prior notice.
1.1
Safety infor mation and recommendatio ns
User manuals for the CRYOLYS cooling system and PRECELLYS®24 must be
read carefully by the user before operating the product.
In case of any doubt about the safety of the equipment, please contact the local
distributor.
1.1.1
Risk of electric shock
Although the appliance is perfectly safe, users must be aware of the potential risks
associated with handling liquids near an electric power supply.
In the event of a liquid being accidentally spilt, the appliance must be
immediately switched off by unplugging the main power lead, even if the
appliance is running. The appliance must then be dried and the spilt liquid
wiped up.
Do not plug the appliance in until it has been checked.
1.1.2
Incorrect operation
Operating the equipment in other ways than those detailed in this user manual
may alter the protection given by the appliance.
Do not tilt the equipment : the CRYOLYS must always stand on its four
feet. Failing to do so could damage its internal components, break its
plastic shell or cause liquid nitrogen to be spilt.
Do not operate the unit when the shell is partially or entirely removed or
when it is damaged.
Do not install unauthorised cards, components or accessories as this may
alter the protection given by the appliance and cancel the warranty.
Do not overfill the tank with nitrogen (see 5.1 Start-up procedure)
Do not transport the unit before emptying the nitrogen tank completely.
Do not transport the unit in packaging which is different from the original
one.
Do not supply the unit with air pressure which is different from the
specified one.
Do not use gas which is different from the specified one.
Do not use a power adapter which is different from the one supplied with
the CRYOLYS.
Page 3 / 24
Introduction
CRYOLYS
Bertin Technologies is not responsible for any damage or injuries which may occur
as a result of operating the unit in a way other than that specified in this
document.
1.1.3
Biological risks
Individual protective equipment (IPE) must be worn when cleaning parts which
have been contaminated by biological samples, for instance, the inside of the
diffusing bowl.
See PRECELLYS®24 user manual.
1.1.4
Risks associated with liquid nitrogen
Figure 1 : Risk of asphyxiation
Figure 2 : Risk of burns
Figure 3 : Protection of eyes and face
Figure 4 : Protection of hands and skin
Liquid nitrogen is a colourless, odourless, highly refrigerated gas (around -196°C).
The main risks associated with the handling of this product are asphyxiation and
burns. To protect against projections and asphyxiation risks the operator must
wear equipment which protects the eyes, face and skin, store and use the liquid
nitrogen in an aerated location.
It is advised to have the safety instructions to hand about the risks and
precautions associated with the utilization of liquid nitrogen.
Page 4 / 24
Introduction
CRYOLYS
1.1.5
Risks associated with compressed air
Do not disconnect the in and out airflow pipes when they are under pressure.
Do not apply a pressure of more than 8 bars (116 PSI) as this may damage the
internal components of the cooling system.
1.1.6
Mechanical risks
Figure 5 : Risk of pinching
The diffusion bowl may close itself. It is advisable to hold it open by hand for any
operation requiring it to be opened. Otherwise, it is advised to shut the bowl.
1.1.7
Safety sign
!
Ne pas ouvrir le capot lors du fonctionnement.
Do not open the cover while running.
Respect the instructions associated with these signs.
Only staff authorised by the distributor or the manufacturer are authorised to
repair the equipment.
1.1.8
Noise level
In normal operating mode the appliance has a noise level below 70 dBA.
1.1.9
Intensive operating mode
When the appliance is operated intensively (frequent filling of liquid nitrogen,
successive cycles), frost can block the air exit holes on the cover and prevent
proper cooling of the tubes. In such cases the nominal operational mode is no
longer guaranteed.
Page 5 / 24
Introduction
CRYOLYS
1.2
Warranty
Bertin Technologies certifies that this product is free from defects at time of
shipment.
This warranty is limited to a period of one [1] year.
This warranty does not cover the following circumstances:
If the unit has not been installed, operated or maintained according to the
instructions described in this user manual.
If the unit has been repaired or modified by unauthorised personnel.
If the unit’s serial number has been damaged or removed.
1.3
Appliance reference de tails
Appliance code : CRYOLYS 05068.200.RD000
1.4
Manufacturer’s address
BERTIN TECHNOLOGIES
Parc d’activités du Pas du Lac
10 bis, avenue Ampère
78180 Montigny le Bretonneux
France
Tél : +33 (0)1 39 30 60 00
Fax : +33 (0)1 39 30 61 85
e-mail : [email protected]
1.5
Technical suppor t.
Should a problem occur, please contact the local distributor.
Page 6 / 24
Description of the CRYOLYS
CRYOLYS
2 Description of the CRYOLYS
2.1
Product o verview
The CRYOLYS is an appliance whose purpose is to cool biological samples during
the PRECELLYS® lysis and homogenization in order to protect them from excessive
heating. The PRECELLYS® tubes holder can be partially or entirely equipped with
tubes.
The main advantages of CRYOLYS:
It keeps samples
homogenization.
at
a
temperature
which
is
below
30°C
during
It protects temperature-sensitive molecules from degrading.
It is compatible with the lysis and homogenization product, PRECELLYS®24.
The CRYOLYS cooling system is as follows :
Nitrogen tank
Diffusion
bowl
Outflow
selector
ON / OFF Switch
CRYOLYS cover
Electrical connector
Stainless steel flex
connected
Location of
temperature probe
Air outflow
Air inflow
Page 7 / 24
Description of the CRYOLYS
CRYOLYS
2.2
Generating co ld conditions
Cold air is generated continuously and independently of the PRECELLYS®24 working
cycles.
2
1
Figure 6 : Operating process
(1) Clean, dry air cools as it travels through the spiral.
(2) Cold air is diffused through the specific cover.
Temperature Profile with Cryolys Option
6800rpm, 3x30s, 30s break
90
80
70
Temperature (°C)
60
50
Temp in tubes
40
Temp. in tubes w/ Cryolys
Precellys Run on/off
30
20
10
0
0,0
0,5
1,0
1,5
2,0
2,5
3,0
3,5
Time (minutes)
Figure 7 : Example of temperature curve in tubes with and without Cryolys
Page 8 / 24
4,0
Description of the CRYOLYS
CRYOLYS
2.3
Settings
The user can opt for one of three different air flow rates by activating the front
switch.
The user will determine the optimal air flow rate to use according to the reaction to
heat of samples as well as the PRECELLYS®24 usage settings.
Number of cycles,
Pause time,
Rotation speed,
Number of tubes.
2.4
Control Panel
The control panel consists of a knob which can be turned to 3 different positions
and an ON / OFF switch.
It is important to select the right position for the outflow before switching on the
CRYOLYS.
Figure 8 : Control panel in position 01 - OFF
Page 9 / 24
Description of the CRYOLYS
CRYOLYS
2.5
Technical Specifications
Technical Specifications
Voltage
Consumption
230 V – 50 Hz (standard Europe)
With the adapter supplied
<15 VA
Physical Specifications
Width
278 mm
Depth
408 mm
Height
311 mm
Weight
11 kg
Temperature for use
Humidity
Altitude
Air supply tube (not
provided)
15-30°C
15-85 % HR
< 2000 m
Recommended : Flexible PVC tube
with an internal diameter of 10
mm, supporting up to 8 bars (116
PSI) of pressure, which should be
attached using a tightening collar
Operating Requirements
Air outflow
Pressure of compressed air
source
Clean and dry compressed
air
Liquid nitrogen tank
Liquid nitrogen consumption
70 – 90 – 110 l /min at 20°C and
1 ATM
From 5 to 10 bars relative
(73 PSI to 150)
Purity 99,99%, water < 5ppm
2 liters max
About 1 liter / 5 min
User Interface
Air outflow switch
Switch
3 position knob
ON / OFF
Page 10 / 24
Led switched on when ON,
Led switched off when
OFF.
Transport / Storage
CRYOLYS
3 Transport / Storage
3.1
Transport
Avoid violent shocks that may damage the equipment.
Before transporting the equipment, the following actions should be done:
1. Remove the CRYOLYS cover.
2. Check that the tank does not contain any liquid nitrogen.
3. If there is, it should be left open until the liquid nitrogen has completely
evaporated.
4. Ensure that there is no dampness, especially around the power connection.
5. Otherwise, dry the damp areas with a dry cloth.
Page 11 / 24
Transport / Storage
CRYOLYS
3.2
Storage
The equipment must be stored in a dry area at a temperature of between +0°C and +
50°C on its four feet.
The equipment can be stored after checking the following:
1. The tank is empty.
2. The power lead is unplugged.
3. The equipment is dry, clean and decontaminated.
Page 12 / 24
Installation
CRYOLYS
4 Installation
WARNING :
Do not connect the unit to the main supply before installation has been
carried out.
Do not tilt the unit: The cooling system should always rest on its four feet.
Failure to do so could damage the internal components or the plastic shell.
4.1
Unpacking
1. Check the contents of the box is as follows :
1 user manual (French/English)
1 CRYOLYS (cooling system, bowl)
1 diffusion bowl with 2 screws
1 mains lead and adaptator
1 thermometer (probe and display)
1 AC power cord
1 EC certificate
1 manufacturer’s inspection certificate.
Should some parts be missing when delivered, please contact your local distributor
immediately.
2. Take out the diffusion bowl, thermometer and power lead.
3. Take the CRYOLYS carefully out of its box and install it on a clean, horizontal,
stable worktop near the PRECELLYS®24.
WARNING :
When removing the unit from its box, do not lift it up by the copper coil or
by the flange of the tank. The unit must be handled using the slots located
at the bottom and on the side of the shell. Slots are also available on the
protective foam.
Page 13 / 24
Installation
CRYOLYS
4. Check the external parts of the unit. Any defect should be reported immediately to
the delivery company.
5. Keep the original packaging, protective foam and manual : these items will be
required for transport.
* An adapter or appropriate lead (not supplied) will be needed for use with any
non-standard European electrical plug.
Page 14 / 24
Installation
CRYOLYS
4.2
Installatio n and connectio n
When purchasing a PRECELLYS®24 and CRYOLYS unit at the same time, see
chapter entitled 4.2.2 Pneumatic connection. When a CRYOLYS unit is purchased to
complement a PRECELLYS®24, follow the instructions described in chapter entitled
4.2.1 Installation of the diffusion bowl.
4.2.1
Installation of the diffusion bowl
1. Unpack the diffusion bowl.
2. Unscrew the 2 screws of the PRECELLYS®24 cover using a n° 6 Allen key.
3. Remove the original cover.
4. Position the diffusion bowl.
WARNING :
Use the 2 provided screws only.
5. Screw at a torque of 2 Nm the 2 screws on the cover using a dynamometric key.
6. Switch on the PRECELLYS®24.
7. Start a grinding cycle.
8. Open the cover slightly and check that the PRECELLYS®24 stops to check the
correct “Top Alarm” release.
WARNING :
When the unit is ON, do not stop the PRECELLYS®24 by opening the cover.
Page 15 / 24
Installation
CRYOLYS
WARNING :
Please keep the packaging.
Also, please keep the foam protection. This protection must be re-used for
transporting the equipment. Should a unit be returned to the distributor or
manufacturer without this protection the warranty will be void.
4.2.2
Pneumatic connection
Dry air is required to use the CRYOLYS unit: purity 99.99%, water content < 5%.
Connection of the supply pipe with air from the cooling system:
1. Use an air supply pipe adapted to employed pressure (pipe not provided)
2. Fix a clamp on to the air supply pipe (not provided).
3. Fix the pipe onto the grooved connection (Ø external 10 mm) so that the
connection is completely covered.
4. Position the collar in the middle of the connection.
5. Firmly tighten the collar with a screwdriver.
®
Connection of the cooling systems’s air outlet to the PRECELLYS 24 diffusion bowl:
®
1. Position the CRYOLYS and the PRECELLYS
24 so that the flexible tube can
connect them without being too tight or slack.
2. Unscrew the adaptator at the other end.
3. Screw the adaptator on the air intake of the diffusion bowl.
Page 16 / 24
Installation
CRYOLYS
4. Screw the flexible tube on the connection and tighten it with a n° 22 wrench.
The user should use another wrench to secure the fixed parts.
4.2.3 Electrical connection
Connect the CRYOLYS unit to the socket using the power cable provided.
Page 17 / 24
Installation
CRYOLYS
WARNING:
Do not connect the CRYOLYS unit with a different power cable to the one
supplied.
4.2.4
1.
2.
3.
4.
Installation of the thermometer
Unpack the thermometer.
Insert the probe into its shell until it emerges in the bowl
Fix the probe with the thumb screw.
Place the display unit on the metal plate of the bowl.
Probe
Probe
Thermometer
tightening screw
Magnetic
display
Figure 9 : Temperature probe positioning, inside and outside view
Page 18 / 24
Instructions for use
CRYOLYS
5 Instructions for use
All installation procedures must be carried out before using CRYOLYS.
5.1
Star t-up procedure
The start-up procedure should to be carried out where the last use of the CRYOLYS
was more than 4 hours previously. In which case, it is important to cool the tank.
1. Wear individual protective equipment (IPE), as previously described.
2. Pour enough liquid nitrogen into the tank to immerse the highest spiral of the coil.
The purpose of this procedure is to cool the tank.
3. Put the cover on the tank.
4. Wait for the nitrogen to evaporate (approx. 5 min).
WARNING :
Do not inhale nitrogens fumes
5.2
Preparation of the cooling system
1. Check that the switch is in the OFF position and that all connections are correct
(electrical connection and pneumatic connection).
®
2. Place the number of tubes desired in the PRECELLYS 24 tube holder.
®
3. Set up the controls on the PRECELLYS 24 so that the next touch on the Valid key
®
starts the cycle (see PRECELLYS 24 User Manual).
4. Close the PRECELLYS
®
24 lid.
5. Select the outflow on CRYOLYS using the adjustment button at the front.
WARNING:
Do not apply pressure greater than 10 bars (145 PSI), otherwise the
internal components of the cooling system may deteriorate.
5.3
Running a cycle
1. At the end of the start-up phase, re-adjust the amount of liquid nitrogen in the
tank so that the highest spiral of the serpentine is immersed. The nominal
consumption of nitrogen is 1 litre for 5 minutes of operation.
2. Put the cover on the CRYOLYS.
3. Put the switch in the ON position so that the led is on. The cold air is diffused over
the tubes.
®
4. Press the PRECELLYS
24 “Valid” button when the displayed
temperature on the thermometer reaches 10°C. The cycle will start.
Page 19 / 24
Instructions for use
CRYOLYS
WARNING:
®
Do not to open the PRECELLYS 24 cover while the switch is on or the
cooling system is being supplied with air.
®
5. At the end of a PRECELLYS 24 cycle, turn the CRYOLYS switch to the OFF
position.
®
6. Open PRECELLYS 24’s lid and take out the tubes using gloves.
5.4
Running a sampling sequence
If the last use was less than 4 hours ago, release operations from chapter “5.2
Preparation of the cooling system”. Start up procedure is not necessary.
If the last test finished more than 4 hours ago, restart operations of chapters “5.1
Start-up procedure”, “5.2 Preparation of the cooling system” and “5.3 Running a
cycle”.
5.5
End of cycle
If you don’t want to realize another run:
1. Allow the nitrogen to evaporate or suck it up using suitable equipment.
2. Wipe out the white frost and water using a cloth (flexible tube, flange of tank,
inside of diffusion bowl...).
3. Switch off the thermometer.
WARNING:
®
Avoid any direct skin contact with the cold parts of the PRECELLYS 24 and
the CRYOLYS.
Do not heat the nitrogen using a hairdryer or similar object to speed up the
evaporation process.
Handle equipment with suitable gloves whilst the tank contains liquid
nitrogen.
Page 20 / 24
Maintenance / Preventative maintenance
CRYOLYS
6 Maintenance / Preventative maintenance
6.1
Troubleshooting
The following table provides a list of the principal problems encountered when the
equipment is in operation and the action(s) to be carried out :
Problem
encountered
Possible Cause
Action(s) to be carried out
1. Check the power source.
There is no voltage.
The air does not
reach the
diffusion bowl
The cooling system is not
supplied with air.
The diffusion holes are
obstructed.
2. Check the lead between the unit and
the main.
1. Check that the air source is open.
2. Check that there is no leak along the
flexible tube.
1. Wait for diffusion bowl de-icing.
2. If malfunction persists, contact
technical support.
1. Check the power source.
The Led of the
switch does not
come on.
There is no voltage.
The Led is defective.
2. Check the lead between the unit and
the mains.
1. Turn off the power.
2. Contact technical support.
Electrical power
cut off
-
Switch off the air supply.
One or several
outflows do not
work.
One or several electro valves
are defective.
Contact technical support.
Lower
performance of
the system.
The diffusion holes are
obstructed.
1. Wait for diffusion bowl de-icing.
2. If malfunction persists, contact
technical support.
The outflow control valves are
disturbed.
Contact technical support.
The thermometer is defective.
Contact technical support.
Page 21 / 24
Maintenance / Preventative maintenance
CRYOLYS
6.2
Cleaning and decontamination
6.2.1 Recommendations
The external cover of the appliance can be cleaned with a sponge or wet cloth
which has been soaked in water or alcohol.
WARNING:
For safety reasons and so as not to damage the appliance, please follow
the following recommendations:
Do not allow the equipment to be splashed or sprinkled with fluids,
particularly the electrical connector.
Cleaning must always be carried out with the appliance disconnected.
Do not use a sponge–scraper as this may damage the equipment.
Do not use acetone or sodium.
Do not subject the appliance to an air decontamination process.
6.2.2
Example of decontamination procedure
Should splashes occur, the parts likely to be contaminated by infectious agents
must be decontaminated using a suitable disinfectant.
The user is solely responsible for choosing the decontamination procedure.
Parts of the equipment likely to be contaminated may, for example, be cleaned
with a cloth soaked in diluted bleach at 6° Cl.
Should a different decontamination procedure be required, please contact the
technical department beforehand in order to check that the procedure is
compatible for use with the equipment.
Page 22 / 24
Maintenance / Preventative maintenance
CRYOLYS
Manufactured by:
BERTIN TECHNOLOGIES
Parc d’activités du Pas du Lac
10 bis, avenue Ampère - BP 284
78053 Saint Quentin en Yvelines Cedex
France
Tél : + 33 (0)1 39 30 60 00
Fax : +33 (0)1 39 30 61 85
e-mail : [email protected]
User manual code : 05068-800-DU002 A
Revised: SEPT 2007 – English
Printing: DEC 2007
Code equipment: CRYOLYS 05068.200.RD000
Page 23 / 24
Maintenance / Preventative maintenance
CRYOLYS
picture 2
Page 24 / 24