1
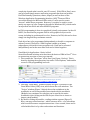
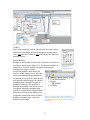
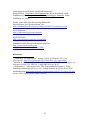
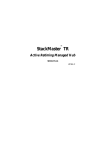
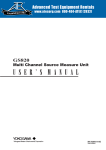
Getting Started with Excel’s Visual Basic for Applications This introduction presumes prior programming experience, such as C++ or Java. In other words, many “fundamental” programming ideas will not be covered! This handout instead focuses on getting you up to speed in programming for Visual Basic for Applications , in particular as it is implemented in Microsoft Excel. After completion of this module, you should be able to do the following: • create functions, subroutines, and UserForms; • perform mathematical and Boolean manipulations; • pull in data from the user and display results; • use structures such as IF and FOR for repetitive and evaluative elements Overview of this Tutorial 1. Introduction 2. Sample start-‐up codes: Function, Subroutine, and UserForm a. Self-‐check 3. Saving (and restoring) your work a. Self-‐check 4. The programming environment: windows, events, variables, math a. Self-‐check 5. Subroutines and functions a. Self-‐check 6. Inputs and Outputs a. Self-‐check 7. Structures: IF, DO, WHILE, FOR, SELECT…CASE a. Self-‐check 8. Other Handy Tricks, including serial communication 9. Assignments 10. References and Resources 1. Introduction Visual Basic for Applications (VBA) is a high level programming language that evolved from the earlier language Visual Basic 6 (VB6), which itself evolved from the DOS version called BASIC. BASIC is a relatively easy programming language to learn, since the code looks a lot like English. Different software companies have produced different versions of BASIC, but Microsoft VBA is very pervasive today, as it is a well developed programming language and supporting resources are available everywhere. Many features and solutions that have been produced for VB6 can be readily adapted into VBA. (VB6 is a popular “legacy” language that is still widely used; however, newer applications use VB.net and VB2010, which have capabilities and 1 complexity beyond what is used in your EP courses.) With VBA in Excel, users can go beyond simple macros and write programs that draw on both the Excel functionality (functions, charts, shapes) as well as those of the Windows Application Programming Interface (API).i,iiBecause VBA is accessible through the Microsoft Office suite, it can be used to create “macros” within those programs. However, it can also be used to access nearly any aspect of your computer through the Windows API ( which can be incorporated into Excel and other MSOffice programs. In VBA, programming is done in a graphical (visual) environment. In the old BASIC, one would write program code for each graphical object on the screen, including its position and its color. However, In VBA, this can be done simply via drag and drop and menu controls. Each object has to be programmed independently to be able to response to actions (events). Therefore, a VBA Program is made up of many subprograms, each with its own program code. Each can be executed independently and at the same time each can be linked together. Visual Basic for Applications: Basics in Excel Several books and websites exist that show the basics of VBA in Excel.iii Here we present an overview of how to get started. 1. First, enable the “Developer” tab in Excel (see Figure 1 below). This is done by checking the appropriate box under “Excel Options,” and enables access to VBA programming and code. Figure 1. Developer tab in Excel 2010 (from Microsoft Developer Network;
http://msdn.microsoft.com/en-us/library/ee814737(v=office.14).aspx .
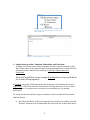
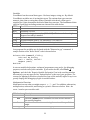
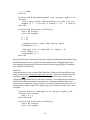
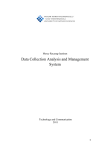
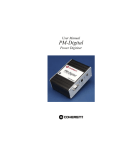
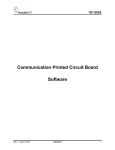
2. Selecting “Visual Basic” (leftmost button in Figure 1) switches to the Visual Basic Editor (VBE) view, which shows the code windows. The “Project” window (Figure 3 below) shows the worksheets in the workbook, as well as any modules associated with the workbook. (Modules are containers for code that can be used by the entire workbook; right-‐clicking on the VBA Project allows one to insert or import a new module.) 3. By double-‐clicking the module, a coding window appears (Figure 2). Here, one may create functions – which return a value – or a subroutine, which can follow more complex instructions. Once created, these can be called within Excel or by other subroutines and functions. 2 Figure 3. Project window in VBA. Modules are
“containers” for code that can be accessed by the
entire workbook.
Figure 2. Coding window for a module.
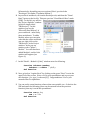
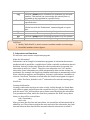
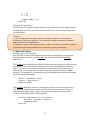
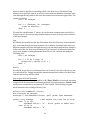
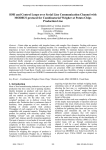
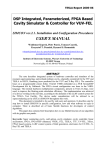
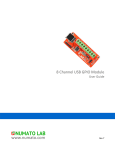
2. Sample start-‐up codes: Function, Subroutine, and UserForm To begin, we’ll create some simple programs in order to get introduced to VBA. We’ll create three of the common types of programming objects, which will all be described in more detail in later sections: Functions, Subroutines, and UserForms. First, we’ll use VBA to create a simple function that can be used in Excel (or in other VBA programs). A Function is a group of VBA statements that performs a calculation and returns a single value. This is much like the functions you already know how to use in Excel: sin(), exp(), etc. Functions can be executed on a spreadsheet, or by another subroutine. To create the function, the first steps are similar to what’s needed for Subroutines and UserForms: A. Start Microsoft Excel. If the Developer tab is not visible or available, open the “Options” window in Excel, and enable the Developer tab, as described above. 3 (Alternatively, depending on your version of Excel, you check the “Developer” box under “Customize Ribbon.”) B. In your Excel workbook, click on the Developer tab, and then the “Visual Basic” button at the far left. This puts you into “Visual Basic Editor” mode (VBE). To the left, you will see the “Project Explorer” window (which is simply titled “VBAProject”). In this window, you see the “Microsoft Excel Objects” of your workbook – most likely three worksheets. To add a Module, where you can write code that the entire workbook can use, right-‐click on the “VBAProject” in the Project window. In the pop-‐up window, select “Insert > Module.” You will then have added Module1, and its Code Figure 4. Inserting a Module in the Visual Basic
Editor.
window will appear (see Figure 4). C. In this “Book1 – Module1 (Code)” window enter the following: Function CubeRoot(number)
CubeRoot = number ^ (1/3)
End Function
D. Now, go back to “regular Excel” by clicking on the green “Excel” icon in the upper left of the screen. Select a cell in your spreadsheet and try out your new function. (I.e., type “=cuberoot(8)”.) Congratulations! You’ve just extended Excel’s capabilities. E. You can easily create functions of more than one variable, too. Go back to the VBE and enter the following (these can be entered below the previous function), then try it out in the spreadsheet! Function sum(a, b)
sum = a + b
End Function
4 Next, we’ll create a simple subroutine in the VBE. F. You will next write a Sub procedure (or subroutine): a group of statements that performs an action (or actions). Subroutines can call the same functions that Excel can call. Enter the following in the VBE, below your previous work: Sub NewSub()
dim a as double
a = inputbox(“enter a number”)
msgbox cuberoot(a)
End Function
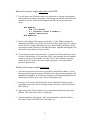
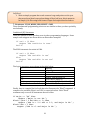
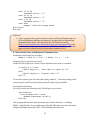
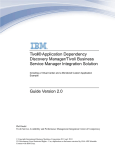
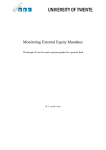
G. Notice a few things, before we go any farther: (1) the VBE automatically capitalized words for you; (2) we had to declare the variable type for a (more on this below); (3) the subroutine uses your new CubeRoot function; (4) we are using two new VBA objects for input & output: InputBox and MsgBox. We will get into more detail on these shortly. H. To run this subroutine, you can either: (1) press the F5 key while the cursor is in the Code window, or (2) press the “play” icon (triangle) in the Standard toolbar at the top of the window. Do this. You’ve now created a program usable in Excel! Granted, this was a simple program – read on for more powerful applications. Finally, we’ll create a simple UserForm. I. A UserForm appears to the user as a separate, stand-‐alone window. You’ve been exposed to simple versions of UserForms in the previous example, with InputBox and MsgBox. A UserForm is handy for collecting multiple pieces of information from the user: input values, destinations, etc. J. For now, we’ll create a UserForm that can be called with a button on the spreadsheet, and will execute a simple routine. First, go to the VBE (Visual Basic Editor). K. Right-‐click on the Project window, as you did before when inserting a new Module. This time, select Insert > UserForm. L. Two new windows will appear: the UserForm window, and the Toolbox. First, we’ll “draw” the UserForm. (See Figure 5.) 5 M. On the Toolbox, select the CommandButton icon (10th icon; hovering the pointer over it reveals the name). Then, click on the UserForm and draw a button. N. Next, select the TextBox icon on the ToolBox (3rd icon). Draw a rectangle on your UserForm. Your UserForm should look something like the figure below. O. We now need to add some code that is executed with the Figure 5. ToolBox and UserForm windows.
button click. Double-‐
click on the CommandButton1 icon in the UserForm. P. A new window should appear: “Book1 – UserForm1(Code)”. The first and last lines of a subroutine associated with that button will appear. Complete the following code, which will run every time CommandButton1 is Figure 6. Completed UserForm.
clicked: Private Sub CommandButton1_Click()
Range(“B2”)=CubeRoot(TextBox1.Value)
End Sub
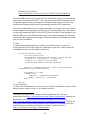
Q. Now, we want to make the new UserForm appear with the click of a button. Go back to the spreadsheet (click on the green “Excel” icon, top left). Select the Developer tab. R. Click on the “Insert” button, then select the “Button” from the Form Controls in the window that appears (see Figure 7). S. Click and drag on the spreadsheet to draw the button. Figure 7. Selecting Form Controls for the
spreadsheet (in Spreadsheet view).
T. Once you release the mouse, an “Assign Macro” window appears. Select “New,” as this macro doesn’t yet exist. (See Figure 8 below.) 6 U. Yet another coding window appears, again with the first and last lines of code written for you. Enter the code below: Sub Button1_Click()
UserForm1.Show
End Sub
V. That’s it! To try your code, go back to the Figure 8. The Assign Macro
window, which appears after
spreadsheet view. Click on Button1. (You creating a new button on the
may need press the Escape key, first, to de-‐
spreadsheet.
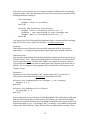
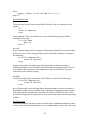
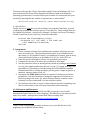
select the button.) When your new UserForm appears, enter a number in the TextBox and press the CommandButton. You should see its cube root appear in cell B2. When you’re done using the UserForm, “X” out the window. W. This example is of course underutilizing the UserForm’s abilities, but should serve as an introduction; again, more details are below. At this point, you have created working examples of Functions, Subroutines, and a UserForm. We will delve more into these, below. Self-‐Check 1. Modify your programs: a. Create a function that returns the radius of a circle, given its circumference. b. Create a subroutine that applies your new function to a user’s input. c. Create a button on your spreadsheet that summons this new subroutine. d. “CommandButton1” etc. is a boring caption – change it by exploring the “Properties” window. In the Visual Basic Editor (VBE), access this by clicking on View à Properties Window (or select F4). e. Further explore the “Properties” window to modify colors and fonts. 3. Saving (and restoring) your work Saving your programming is simple: all of your code is saved with the Excel workbook. In the current version of Excel, you will need to save your file in the “.xlsm” format, which is a “macro-‐enabled workbook.” What if you wanted to use your handy functions, subroutines and UserForms in other Excel workbooks? Fortunately, we don’t have to re-‐type everything: we can simply “export” the Module or UserForm, and then “import” it into our new workbook. 7 To export, switch to the Visual Basic Editor. In the Project Window, right-‐click on the Module or Form that you’d like to use in other worksheets. The window shown above in Figure 4 will appear; this time, select “Export File…”. Save this file (.bas for Modules, .frm for forms) as you would any other file. To import, you would again right-‐click in the VBE Project Window, this time selecting “Import File…”. Select your file, and it’s added to the current document! Note that all of the functions and subroutines in a Module are exported/imported together. Self-‐Check 1. Export your CubeRoot function (and other subroutines), and email it to yourself. Restart Excel, and add it to a new spreadsheet. 4. The Programming Environment This section will give more details about some of the parts that you used in your “Hello World” program. The Visual Basic Editor (VBE) Visual Basic for Applications features an Integrated Development Environment (IDE). IDE is a term commonly used in the programming world to describe the interface and environment that we use to create our applications. It is called integrated because we can access virtually all of the development tools that we need from one screen called an interface. The VBE is also commonly referred to as the design environment, or the program. The Visual Basic Editor is made up of a number of components. Those we will find useful include: • Menu Bar • Tool Bar • Toolbox • Project Window • Properties window • UserForm Layout Window • Code Window Menu Bar and Toolbar These are most similar to the commands you access in, for example, Word or Excel. The Menu Bar at the top of the main window displays the commands (File, Edit, View…) that are required to build an application. The main menu items have sub menu items that can be chosen when needed. The toolbars below the menu bar provides quick access to the commonly used commands and a button in the toolbar is clicked once to carry out the action represented by it. The “Standard” toolbar and the “Editing” toolbar are the most useful for VBA editing. They can be activated by clicking on View > Toolbars . 8 Figure 9. The Visual Basic Editor (VBE) environment.
Toolbox The Toolbox contains a set of controls that are used to place objects on a UserForm, thereby creating the user interface area. Note that the ToolBox is only visible when the UserForm window is active. Project Window Docked on the left side of the screen, just under the toolbar, is the Project window (see Figure 11). The Project window, as Figure 10. Toolbox
window (for
shown here, serves as a quick reference to the various UserForm creation).
elements of a project, namely UserForms, modules, and classes (we won’t be using classes, here). All of the objects associated with the workbook are packed in a project. A simple project will typically contain one form, which is a window that is designed as part of a program's interface. It is possible to develop any number of forms for use in a program, although a program may consist of a single form. Using the three buttons on the top of this window, one can quickly jump to the Code or Object Figure 11. Proect Window. Here, UserForm1 is
window associated with a selected selected; clicking on either of the icons at the top left
will “jump” you to the Code or UserForm window,
UserForm or Module. respectively.
9 Properties Window The Properties Window can be revealed via View > Properties Window (or F4). (See Figure 12.) The Properties Window displays the various characteristics of selected objects, such as forms, buttons, etc. Each and every form in an application is considered an object. Each object in Visual Basic has characteristics such as color and size. Other characteristics affect not just the appearance of the object but the way it behaves too. All these characteristics of an object are called its properties. Thus, a form has properties and any controls placed Figure 12. Properties Window. The window
shows the property of the selected object,
on it will have properties too. All of these whether button, text box, or UserForm.
properties are displayed in the Properties Window, which is a convenient means of modifying these values! UserForm Layout Window This window can be activated by double-‐clicking on the UserForm icon in the Project window. It simply shows the location on the screen of the various windows (objects) associated with your UserForm, and allows you to reposition them to the center, top, bottom, etc. of the window. Code Window You used the code window with your function and subroutines. This window shows all of the code associated with all of the objects in your program. (Again, an object can be a button, text box, check box, etc.) The code window is normally visible; if it is not, select View à Code from the menu. In the code window, you are able to select any of the objects in your program from the top left drop-‐down menu (see Figure 13). Once the object is selected, then you are able to select the event for which you wish to write code, from the top right drop-‐down menu (see Figure 14). In the figures shown here, the “Click” event is selected for the “CommandButton1” (button) object. 13. In the Code window, you can select the object for which you
Figure
would like to write
code.
Event-‐driven Programming 10 Figure 14. The “action” associated with the selected object. You can
thus create code for many more actions than just “clicking” on a button.
Event-‐Driven Programming Visual Basic programs are built around events. Events are various things that can happen in a program. For context, let us contrast this with procedural programming. In procedural languages, an application is written is executed by checking for the program logically through the program statements, one after another. For a temporary phase, the control may be transferred to some other point in a program. In an event driven application, on the other hand, the program statements are executed only when a particular event calls a specific part of the code that is assigned to that event. Let us consider a TextBox control and a few of its associated events to understand the concept of event driven programming. The TextBox control supports various events such as Change, Click, MouseMove and many more that will be listed in the Procedure dropdown list in the code window for the TextBox control. Details of some of these are given below. • The code entered in the Change event runs when there is a change in the contents of the TextBox • The DblClick event runs its code when the TextBox area is double-‐clicked by the user. As an example, the UserForm code above could have been modified to act on a different event: the clicking of a text box (TextBox will be described below.) Private Sub TextBox1_DblClick( default ignorable code here)
MsgBox("Hello, World! Double-click!")
End Sub
11 Variables Visual Basic has the several data types – Boolean, integer, string, etc. By default Visual Basic variables are of variant data types. The variant data type can store numeric, date/time or string data. When a variable is declared, a data type is supplied for it that determines the kind of data they can store. The fundamental data types in Visual Basic including variant are shown in the table below. TYPE Can Hold Boolean True or False Byte A number 0 to 255 Double A 64 bit floating point number (I.E. 3.1415) -‐ This is used when a high degree of accuracy is needed. Integer A whole number from -‐32,768 to 32,767 Long A whole number from -‐2,147,483,648 to 2,147,483,647 Single A 32 bit number like a double, but with less precision String A collection of letters such as "Hello". Used to store words and sentences. In a program, the variables are declared with the “Dim xxx As yyy” command. A sample variant of the “Hello World” code is shown below. Private Sub Command1_Click()
Dim var1 As String
var1 = “Hello, World!”
MsgBox (var1)
End Sub
A note on variable declarations: advanced programmers may prefer, for debugging purposes, to declare all of their variables. If you wish to do this, select Tools à Options… and check the “Require Variable Declaration” box in the resulting window. Alternatively, you may type the line “Option Explicit” at the top of your program. The reasons for wanting to do this are beyond the scope of this tutorial; suffice to say it can greatly simplify the debugging of typos in variable names. Mathematical Functions Math functions are what you might suspect: +, -‐, *, -‐, and ^ for addition, subtraction, multiplication, subtraction, and raising to a power. Others are below. Note: the carat ^ needs a space on either side. VBA function Description Abs Returns the absolute value of a specified number. Atn Returns a Double value containing the angle whose tangent is the specified number. Cos Returns a Double value containing the cosine of the specified angle. Exp Returns a Double value containing e (the base of natural 12 Log Round Rnd Sgn Sin Sqr Tan logarithms) raised to the specified power. Returns a Double value containing the logarithm of a specified number. This method can return either the natural (base e) logarithm or the logarithm in a specified base. Returns a Double value containing the number nearest the specified value. Returns a random number from zero to just less than one. Works best with the “Randomize” command typed on a prior line. Returns an Integer value indicating the sign of a number. Returns a Double value specifying the sine of an angle. Returns a Double value specifying the square root of a number. Returns a Double value containing the tangent of an angle. Self-‐Check 1. Modify “Hello World” so that it returns a random number as its message. 2. Round this number to three figures. 5. Subroutines and Functions We will now create a more complicated program. What Are Subroutines? Subroutines can be thought of as miniature programs. A subroutine has a name attributed with it, much like a variable does. Unlike a variable, a subroutine doesn't hold data. Instead, it holds code. When the code in a subroutine is executed, the subroutine is said to be "called." Therefore, one subroutine can "call" another subroutine. Some subroutines are called automatically when certain actions are performed. For example, the UserForm_Initialize subroutine is automatically called when a UserForm appears, and Worksheet_Activate is called when a worksheet is selected. UserForm_Terminate is called when the UserForm program is stopped. Note: UserForm_Initialize is the 1st subroutine to be run when starting your UserForm. Creating A Subroutine Creating a subroutine involves two lines of code. Luckily though, the Visual Basic code editor is smart, and will insert the second line for you! A subroutine begins with the word "Sub", followed by a space, then a name identifying the subroutine. Two parentheses follow, which are used for a parameter list. Don't worry about these yet, they will be covered later. Sub TestSub()
End Sub
After you enter the first line and press Enter, the second line will automatically be added for you. These lines represent the start and end of the subroutine. Any code inserted between these lines will be executed when the subroutine is called. A 13 subroutine can be called in one of two ways: using the Call keyword, or by simply stating its name. Enter the following code into your UserForm; try to predict what will happen before running it. Sub TestSub()
MsgBox "Code in TestSub()"
End Sub
Private Sub UserForm_Initialize()
MsgBox "Code in UserForm_Initialize ()"
TestSub ‘ use subroutine to post message box
MsgBox "Back in UserForm_Initialize ()"
End Sub
You can also use the Call keyword, as mentioned above: replace the line consisting only of “TestSub”, above, with “Call TestSub”. Try this on your own. Comments The code above also illustrates how one adds comments in VBA: by using an apostrophe ( ‘ ). Comments begin with the apostrophe and end with a new line. Subroutine Scope You may have noticed that the UserForm_Initialize subroutine above has the word "Private" before "Sub". This optional keyword in the declaration of a subroutine is used to represent scope. "Private" and "Public" are examples of scopes; a Private scope means the routine can only be called from other routines in its UserForm or Module. For our purposes, the programs will be small and we will simply use the “Private” scope. Parameters Parameters, also called Arguments, are variables that can be "passed into" a subroutine. A subroutine with parameters, DisplayAdd, is below: Private Sub DisplayAdd(x As Integer, y As Integer)
MsgBox x + y
End Sub
Private Sub UserForm_Initialize()
DisplayAdd 5, 2
End Sub
A new subroutine has been declared called DisplayAdd. This declaration is different than the declarations that you have seen so far, however, as code has been added between the parenthesis. From your knowledge of variables, this syntax should look somewhat similar to you. “x As Integer” and “y As Integer” are variable declarations without the "Dim" keyword. These declarations are separated by a comma. These 14 variables are the Parameters for the DisplayAdd subroutine. Code within the subroutine can access x and y as usual, as if they were normal variables. However, when the subroutine is called, the calling subroutine will also provide values for these parameters. Therefore, the subroutine has now become dynamic. The code can act on input without caring where the input came from. When the UserForm_Initialize subroutine calls DisplayAdd with the parameters 5 and 2, the code within DisplayAdd is executed. The first line adds x and y together and displays the result. x and y have already been filled with the values 5 and 2 from the UserForm_Initialize subroutine. The calling subroutine doesn't have to use numeric constants, however. It can use variables as well: Private Sub DisplayAdd(x As Integer, y As Integer)
MsgBox x + y
End Sub
Private Sub UserForm_Initialize()
Dim a As Integer
Dim b As Integer
a = 5
b = 2
DisplayAdd a, b
End Sub
This code has identical results. Note that DisplayAdd cannot access a and b. As far as DisplayAdd is concerned, a and b are represented as x and y. Attempting to access a or b from DisplayAdd would result in an error. ByRef and ByVal Parameters can be sent to a subroutine By Reference (ByRef) or By Value (ByVal). The ByRef and ByVal keywords are rarely used in simple programs, but it's a nice trick for your toolkit. ByRef is the default, and means that changes to the variable in the subroutine will result in changes to the source variable outside of the subroutine. ByVal literally copies the values of the variables from the calling subroutine into the called subroutine. By doing this, the variables can be changed, but their values will not change outside of the called subroutine. ByVal can also be a lot slower with large variable types, however, since memory has to be copied from one location to another. If you don't have any reason to do so, there is no need to pass variables ByVal. You can explicitly state the way that a variable is passed to a subroutine by using these keywords before the variable name. Using the ByRef keyword, one could write a Swap function, which switches the values of two variables. Private Sub Swap(ByRef x As Integer, ByRef y As
Integer)
Dim temp As Integer
temp = x
x = y
15 y = temp
End Sub
Private Sub DisplayVals(ByRef a As Integer, ByVal b As
Integer)
'Don't worry about understanding the next line yet
MsgBox "a = " & CStr(a) & vbCrLf & "b = " & CStr(b)
End Sub
Private Sub UserForm_Initialize()
Dim a As Integer
Dim b As Integer
a = 10
b = 12
'Display values, swap, and display again
DisplayVals a, b
'The next line is identical to "Swap a, b"
Call Swap(a, b)
DisplayVals a, b
End Sub Notice that Call was used instead of simply stating the subroutine name. When using the Call method however, you must use parenthesis when calling the subroutine. Note that this program would also have worked without typing "ByRef" anywhere, since “ByRef” is the default. Functions Subroutines have a close cousin called Functions. Functions are basically the exact same as subroutines, except that they return a value. That means that the function itself has a type (integer, double, …), and the function will return a value to the calling subroutine based on the code that it contains. An example of this would be a function that adds two numbers, shown below. A function is declared the exact same way as a subroutine, except using the "Function" keyword instead of "Sub". To return a value, assign a value of the proper type to the function's name, as if it were a variable. Private Function Add(ByVal x As Integer, ByVal y As
Integer) As Integer
Add = x + y
End Function
Private Sub UserForm_Initialize()
Dim a As Integer
Dim b As Integer
16 a = 32
b = 64
MsgBox Add(a, b)
End Sub
Functions Or Subroutines? The best way to determine which is better for your application is by asking yourself a simple question. Will you need to return a value? If so, use Functions. If you don't, use subroutines. Self-‐Check 1. Write a subroutine that calls a function to find the square root of a number divided by its base-‐ten logarithm. The subroutine should then show this number and its cube root in a message box. 2. Modify the “swap” code sequence above so that it executes not with the loading of a UserForm, but instead with the click of a button on your spreadsheet. 6. Inputs and Outputs Sending Inputs to your Program You may wish to have a user enter data that can be acted upon by your program. Two good ways to do this are the TextBox (in a UserForm) and the InputBox (anywhere). The TextBox can be added to your UserForm by using the proper icon on the toolbox (see above): click on the toolbox, and click-‐and-‐drag on the UserForm window to add it. You can use the Properties window to set its default Value (either text or numerical). You can then access its value from the program by using its .Value property. For example, if it is a number, this code snippet grabs the value and prints its inverse natural logarithm: Value = TextBox1.Value
Output = Exp(Value)
MsgBox Output
The InputBox displays a prompt in a dialog box, waits for the user to input text or click a button, and takes the contents of the text box into the program. Here is a complete code sample that accepts a user input and assigns it to the variable “AcctID,” which gets posted to a MessageBox: Private Sub UserForm_Initialize()
AcctID = InputBox("Enter:")
MsgBox AcctID
End Sub
17 Note that if the user clicks Cancel instead of OK, the function returns a zero-‐length string (""). (A slightly fancier version provides a ‘default’ value of “123” and gives a label to the InputBox. This is done by replacing the “AcctID” line as follows:) AcctID = InputBox("Enter ID:", "Label", "123")
Outputs from your Program To pass results from our program to the user, you have already seen one method: the MessageBox. Of course, this is inconvenient for a list of numbers, and the “interruption” of the MessageBox can get annoying. Two other methods are TextBox (again!) and Label (UserForm) and Range (worksheet). If your program uses a UserForm, TextBox and Label (accessible via the Toolbox window) can pass along outputs to the user – without need for a MessageBox – as shown below. This snippet simply replaces the MsgBox command line from the snippet above: Value = TextBox1.Value
Output = Exp(Value)
TextBox2.Value = Output
Label1.Caption = Output
The difference between TextBox and Label is that a Label cannot be altered by the user, whereas the user can type into the TextBox. Alternatively, you could put your output into the spreadsheet, for later calculations, plots, etc. The Range object allows the program to read in values from a spreadsheet; i.e. this line of code squares the number in cell A1: MsgBox Range(“A1”) ^ 2
Range can also be used to place results: Range(“A1”) = CubeRoot(value)
To add data cell by cell, the Offset property can be useful. The following expression refers to a cell two rows below cell E2 and three columns to the right of E2. In other words, cell H4: Range(“E2”).Offset(2,3)
Since the arguments of Offset could be variables, the sky is the limit! 18 Self-‐Check 1. Write a simple program that reads someone’s age and prints out the year they were born (don’t worry about being off by a half year; this is meant to be simple). Do this using both forms of input and output described above. 7. Structures: IF, DO, WHILE, FOR, SELECT…CASE These fundamental programming structures are similar to those you have probably used already. Conditional (IF) Statements These are similar to those you have seen in other programming languages. Some sample code snippets are shown below as illustrative examples: If var1 = 10 Then
MsgBox "The condition is true."
End If
The ELSE statement also exists in VBA: If var1 = 10 Then
MsgBox "The variable is ten"
Else
MsgBox "The variable is not ten"
End If
The logical operators are as shown in the table below: = Equality <> Inequality > Greater Than < Less Than >= Greater Than Or Equal To <= Less Than Or Equal To And Conjunction [i.e. (X>0 And X<=3)] (other Boolean: Not Or Xor) (As with “And”, above) Finally, here is a sample block of code that also illustrates the “ElseIf” command. It compares the variables ‘Major’ and ‘GPA’ to expected values. Each “ElseIf” statement only occurs if all statements above are false. If Major <> "EP" Then
MsgBox ("Major is not EP.")
ElseIf (GPA > 2 And GPA <= 3) Then
MsgBox ("GPA is > 2.0 and <= 3.0, and Major is EP.")
ElseIf GPA > 3 Then
MsgBox ("GPA is >3 and Major is EP.")
19 Else
MsgBox ("Major is EP and GPA is <= 2.0")
End If
Do and While Loops Do-‐Loops The most basic form of loop in Visual Basic is the Do-‐Loop. Its construct is very simple: Do
(Code to execute)
Loop
The drawback? This is an infinite loop! It can be exited by using the Exit Do command in the code: If n>300 Then
Exit Do
End If
Do Until As an alternative approach to nesting an If-‐Statement inside the loop, and invoking Exit Do once we're done looping, VB6 provides a Do Until statement. Its syntax is the following: Do Until (Expression)
(Code to execute)
Loop
(Expression) can be any legal logical expression that we wish to evaluate to determine whether or not to exit the loop. Each time the program reaches Loop it will evaluate this expression. If the expression is True, it will exit the loop, but otherwise it will continue looping. Do While In the place of Do Until, you can also use Do While. Its syntax is the following: Do While (Expression
(Code to execute)
Loop
Here, (Expression) can be any legal logical expression that we wish to evaluate to determine whether or not to exit the loop. Each time the program reaches Loop it will verify that this expression is True, and if it is False, it will exit the loop. Thus, instead of exiting when an expression is True, it now exits only once this expression is False. For-‐Next Loops In situations where you merely want to run the loop a predefined number of times, it can become quite tiresome to have to create and manage a counter for each loop, 20 which is why we also have something called a For-‐Next Loop. This kind of loop allows you to specify a counter, to tell it to count from one number to another each time through the loop, and to exit once the counter has reached its upper limit. The syntax is as follow: Dim I As Integer
For I = (Integer) To (Integer)
(Code to execute)
Next I
We used the variable name "I" above, as it is the most common name used for For-‐
Loops; however, you can use any variable name you want, so long as the variable is of the type Integer. Step By default, the variable used in the declaration of the For-‐Next loop is incremented by 1 each time through the loop; however, if you want to increment this value by a different amount each time through the loop, you can simply append Step (Integer) to the end of the For-‐Next loop declaration. If, for instance, we wanted to print out every even number counting backward from 20 to 0, we could do this using the following code: Dim I As Integer
For I = 20 To 0 Step -2
Range(“C2”).Offset(I,0) = i
Next I
Exit For As with Do Loops, there is a statement that can be used to exit a For-‐Next loop, and it is called Exit For. Simply invoke this statement anywhere within a For-‐Next loop and the current loop will be exited. Select...Case Selection Structure Select...Case structure is an alternative to If...Then...ElseIf for selectively executing a single block of statements from among multiple block of statements. Select...case can be more convenient to use than the If...Else...End If. The following program block illustrates the working of Select...Case. Private Sub Command13_Click()
Dim averageV As Integer
averageV = Val(TextBox8.Value) ‘pull grade from TextBox8
Select Case average
‘Case values run from low to high
Case 75 To 100
TextBox9.Value = "A" ‘ Print grade in Text9 box.
Case 65 To 74
TextBox9.Value = "B"
21 Case 55 To 64
TextBox9.Value = "C"
Case 45 To 54
TextBox9.Value = "D"
Case 0 To 44
TextBox9.Value = "F"
Case Else
MsgBox "Invalid average marks"
End Select
End Sub
Self-‐Check 1. Create a program that, given a student’s major and General Engineering core GPA, will determine whether that student is accepted into the engineering program of their choice. Use the data in the UW-‐Platteville catalog (http://www3.uwplatt.edu/catalog/department-‐general-‐engineering) and for the sake of simplicity only worry about EP, ME, and EE. The user should input two-‐letter abbreviations for major and a number for GPA. 8. Other Handy Tricks, including serial communication Combining several values for an output MsgBox ("This is a list " & Add(a, b) & " " & a)
Changing object properties as an event. In this case, the caption on a “Label” object depends on the value of a variable: If Rnd()<= 0.5 Then
Label1.Caption = "Less than or equal to 0.5"
Else
Label1.Caption = "Greater than 0.5"
End If
To see other options, you will notice that typing “Label1.” and then pausing yields a pop-‐up menu, which lists all possible properties that may be modified. Accessing Excel functions If you try to enter the following code, VBA will give you an error: Sub TryThis()
‘ this program won’t work!
MsgBox Sum(Range(“A1:A3”))
End Sub
This program fails because Excel has many more built-‐in functions – including SUM() – than VBA has. As you might expect, though, VBA can access these functions using the WorksheetFunction object. The following code will work: 22 Sub TryThis2()
‘ this program WILL work!
MsgBox WorksheetFunction.Sum(Range(“A1:A3”))
End Sub
Using the Macro Recorder VBA can access all the functionality that Excel has. But how would one write the code for creating a chart? Fortunately, VBA has a “Record Macro” feature that will generate code for you – and which you can then modify to your own ends. Access this from the spreadsheet view, Developer tab. The “Record Macro” is at the top left (see Figure 1). Click this, and you will get a prompt for a name for this new macro; click “OK” when ready to record. Once you’ve created your chart (or whatever your task was), return to the Developer tab and click “Stop Recording.” You’re done! The code that was generated is now in a Module. Sample code generated by the creation of a scatter chart, with its legend removed, is below. Sub Macro1()
'
' Macro1 Macro
'
'
Range("A1:B6").Select
ActiveSheet.Shapes.AddChart.Select
ActiveChart.ChartType = xlXYScatter
ActiveChart.SetSourceData Source:=Range("Sheet1!$A$1:$B$6")
ActiveChart.Legend.Select
Selection.Delete
End Sub
This not only gives you a template you can edit, but it also is educational! Serial Communication: Sending Text Commands to an External Device Sometimes it is necessary to pass commands to an external device that is connected to the PC via the computer’s serial port (COM port) or a USB port. Many instruments, such as DAQs, RFID readers, and bench top measurement equipment, are equipped to receive text commands for remote operation. To enable VBA to access the serial/USB ports, you will have to import a new Module, “modCOMM,” to your Project (see Import/Export, above): right-‐click on the Project window, select “Import File…”, and find modCOMM.bas. This file is part of all the routines used in ENGRPHYS 4210; it is also at these links: Windows 7 (64-‐bit): https://dl.dropboxusercontent.com/u/37968177/modCOMM.bas 23 Windows XP (non 64-‐bit): https://dl.dropboxusercontent.com/u/37968177/modCOMMxp.bas The modCOMM module was written by David M. Hitchner, and can be downloaded from several locations on the Web.1 The code has been modified somewhat for 64-‐
bit systems, and to increase the number of COM ports that can be accessed. This module uses Windows Application Programming Interface (API) commands. Once your workbook has access to these commands, you are now able to access the serial communication port (both the RS-‐232 port, and any USB ports). These ports are typically numbered COM1, for the RS-‐232 port at the back of the computer, and COM2, COM3, etc. for the USB and other ports. Use another program (i.e. National Instruments MAX; Agilent Technologies’ Connection Expert) to determine the COM port you need to address. 1. Open To send commands through the serial port, you will first need to “open” the serial/USB port in order to prepare it to send and receive data. This requires the CommOpen routine; see the sample code below: Private Sub Button1_Click()
'Initialize serial port
'Set baud=9600 parity=N data=8 stop=1 for most devices
‘ intPortID is 1 for COM1, 2, for COM2, etc.
‘ strError is a public String variable
‘ lngStatus and lngSize are Long variables
lngStatus = CommOpen(intPortID, "COM" & CStr(intPortID), _
"baud=9600 parity=N data=8 stop=1")
If lngStatus <> 0 Then
' Handle error.
lngStatus = CommGetError(strError)
MsgBox "COM Error: " & strError
End If
End Sub
2. Send Command To send text commands to your external device, use the CommWrite routine, which simply sends a string to the port. An example is below: 1 The serial I/O module was created by David M. Hitchner; the code was downloaded from http://www.thescarms.com/VBasic/commio.aspx. Another site has similar code (though without the acknowledgment to Mr. Hitchner): http://dev.emcelettronica.com/serial-‐port-‐communication-‐excel-‐vba . Finally, the code (again without the acknowledgment to Mr. Hitchner) was found as part of a sample code for controlling a Dimetix, Inc. distance sensor at this site: http://www.dimetix.com/appl/_FRMappl.html . 24 Private Sub SendTypedCommand_Click()
' This sends the command that's in TextBox1.
‘ The actual command will depend on your device;
‘
read the device’s user manual to learn these.
' This uses the API-based calls of modCOMM.
‘ lngStatus and lngSize are Long variables
‘ strData is a String variable
‘ intPortID is again 1 for COM1, 2 for COM2, etc.
strData = Trim(CStr(TextBox1.Value)) & Chr$(13)
lngSize = Len(strData)
lngStatus = CommWrite(intPortID, strData)
If lngStatus <> lngSize Then
' Handle error.
'Place error handler in your software here
End If
End Sub
The “Chr$(13)” is a carriage return and tells the instrument, “here is the end of the command line.” Typically, instruments need a string command followed by the carriage return. 3. Read Response To read the instrument’s response to your command (if there is one!), use the CommRead routine; an example is below: Private Sub ReadCommand_Click()
‘ lngStatus and lngSize are Long variables
‘ strData is a String variable
‘ intPortID is again 1 for COM1, 2 for COM2, etc.
Dim readDAQ as String
'
‘
‘
‘
‘
'
'
'
Depending on the device and the connection, you
may need to insert a time delay between sending the
command and reading the response. This takes some
“playing” to get right.
Sleep DelaySleep ' delay in milliseconds;
The Sleep routine is called from the kernel32.dll
Read maximum of 64 bytes from serial port. The beauty of these
commands from modCOMM is that it's "OK" if the return string is
not equal to 64 bytes.
' read data into the "strData" variable...
lngStatus = CommRead(intPortID, strData, 64)
If lngStatus > 0 Then
readDAQ = strData
ElseIf lngStatus < 0 Then
' Handle error.
lngStatus = CommGetError(strError)
MsgBox "COM Error: " & strError
End If
MsgBox readDAQ
End Sub
25 The above code uses the “Sleep” subroutine, which is from the Windows API. It is part of the kernel32.dll, the 32-‐bit dynamic link library found in the Windows operating system kernel. It can be used in your routines if it is imported into your module by entering this line outside of any functions or subroutines:2 Declare Sub Sleep Lib "kernel32" (ByVal dwMilliseconds As Long)
4. Close the Port Finally, be sure to close the port when exiting your program! Otherwise, you risk crashing the program the next time you try to use the port. This is simply done wit the CommClose routine – see below for example. If using a UserForm, it is handy to include CommClose in your UserForm_Terminate subroutine. Private Sub CloseCOMport_Click()
‘ intPortID is 1 for COM1, 2 for COM2 etc.
Call CommClose(intPortID)
End Sub
9. Assignments 1. Create a simple calculator that combines two numbers, which the user can enter into text boxes. The interface should consist of two blank boxes for data entry (i.e. for variables X and Y), one blank box for output, plus an array of buttons that will allow us to determine X+Y, X/Y, XY, sine of X*Y, etc. 2. Print the first N odd numbers, where N is provided by user input. 3. Compute the factorial of N, where N is provided by user input. 4. Use the references below to investigate two means of printing a list of values (i.e. not just a single number) for the user to read: (1) simply printing to the spreadsheet; (2) printing to a ListBox using the List1.AddItem command. Demonstrate these in a single program; you may print a simple sequence of numbers, squares, square roots, etc. 5. Investigate the With…End statement as a means of setting several Object parameters. Use this statement to change the appearance of a button or a label according to an event. (I.e. when clicking a button, or when a value (random?) crosses a threshold. Use the references below. 6. Use the Macro Recorder to create a chart with your favorite formatting; save this as a subroutine so that all of your charts have this formatting! 10. References and Resources Because of the similarities between VBA and VB6, you can get a lot of useful information from resources for either language. The VB6.us site has many tutorials and is very useful… perhaps more useful than VB6’s own help files! http://www.vb6.us/guides/visual-‐basic-‐6-‐beginners-‐guide 2 Don’t worry if this paragraph makes no sense to you; just add the line to the beginning of your Module and use Sleep 26 These books are in EGH 246, the EP Lab/Sensor Lab: Wang, Wallace. Visual Basic 6 for Dummies. IDG Books Worldwide, 1998. Walkenbach, John. Microsoft Excel VBA Programming for Dummies. Wiley Publishing, Inc. 2010. Finally, some other sites that you may find useful: Microsoft has a good “getting started” site: http://msdn.microsoft.com/en-‐us/library/ee814737(v=office.14).aspx Excel-‐Easy.com: http://www.excel-‐easy.com/vba.html Excel VBA Tutor: http://excelvbatutor.com/vba_tutorial.html Comment boards; users post & answer questions: http://www.stackoverflow.com http://www.mrexcel.com/archive/VBA/ References i
“Visual Basic for Applications.” January 4, 2014. In Wikipedia: The Free
Encyclopedia. http://en.wikipedia.org/wiki/Visual_Basic_for_Applications
ii
Ribando, R.J., "An Excel/Visual Basic for Applications (VBA) Primer," Computers in
Education Journal, Vol. VIII, No. 2, April-June 1998, pp. 38-43.
iii
Walkenbach, J., “Microsoft® Excel® VBA Programming for Dummies,” Wiley
Publishing, Indianapolis (2010); see also “Getting Started with VBA in Excel 2010,”
downloaded from http://msdn.microsoft.com/en-us/library/ee814737(v=office.14).aspx
on Jan. 4 2013 (Microsoft Developer Network).
27