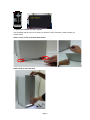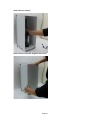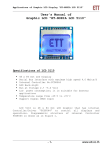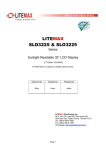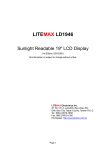
1
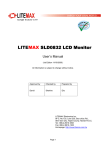
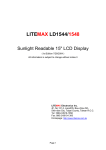
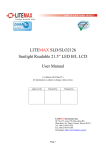
LITEMAX STA1713/STA2922 Transpixel Digital signage 17.2"/29.3" Transparency LCD Display (1st Edition 6/14/2012 ) All information is subject to change without notice. Approved by Checked by Prepared by Sabrina LITEMAX Electronics Inc. 8F, No.137, Lane 235, Bau-Chiau Rd., Shin-Dian City, Taipei County, Taiwan R.O.C. Tel : 886-2-8919-1858 Fax: 886-2-8919-1300 Homepage: http://www.litemax.com/ Page 1 RECORD OF REVISION Version Date Description V1.0 5/22/2012 Initial Release Page 2 Remark CONTENTS RECORD OF REVISION .................................................................................................. 2 1.0 GENERAL DESCRIPTION.......................................................................................... 4 1.1 Overview .............................................................................................................. 4 1.2 Key Features........................................................................................................ 4 1.3 Application............................................................................................................ 4 1.4 General Specifications ......................................................................................... 4 1.5 Product Content ................................................................................................... 5 1.6 Setting up the STA1713/2922 & Basic Operations............................................... 6 1.7 Show your sample and easy replace ................................................................... 9 2.0 Media Play Set up ......................................................................................................11 2.1 Supported Formats .............................................................................................11 2.2 Media File Name.................................................................................................11 2.3 Daily Schedule ....................................................................................................11 2.4 Picture File Format and Effects .......................................................................... 12 2.5 Picture file play effect ......................................................................................... 13 2.6 Digital Signage Player Configurations................................................................ 14 Player remote control ...................................................................................................... 15 3.1 Player remote..................................................................................................... 15 3.2 Menu Information ............................................................................................... 16 3.3 Confirm SD card status and perform (Format) ................................................... 16 3.4 Change Date Time ............................................................................................. 17 3.5 Change Aspect Ratio ......................................................................................... 19 3.6 Lock Menu Password......................................................................................... 20 3.7 Change output type............................................................................................ 21 3.8 Configure Daily Reboot Time ............................................................................. 21 3.9 Copy and Erase ................................................................................................. 22 3.10 Firmware update .............................................................................................. 22 3.11 Delete all files on the SD card .......................................................................... 22 4.0 MECHANICAL CHARACTERISTICS ........................................................................ 23 STA1713 MECHANICAL SPECIFICATION ........................................................... 23 STA2922 MECHANICAL SPECIFICATION ........................................................... 24 Page 3 1.0 GENERAL DESCRIPTION 1.1 Overview STA1713/2922 is an innovative market-leading transparency LCD integrated digital multimedia display system. Combines compact, intelligent signage controllers and state of the art displays all centrally controlled by user-friendly central management system. STA1713/2922 is an innovative ultra-wide, sunlight readable, LCD display. it provides transparency LCD panel with specific aspect ratios for digital signage, public transportation, exhibition hall, department store, and vending machine. This User’s Manual provides all the information can help you use. 1.2 Key Features - Transparency LCD digital signage High Brightness 500 nit Display Ultra Wide Screen (16 :6) LED Backlight Simple to Install, Manage and Use Easy to update content by USB drive Slim Bezel Plug & Play 1.3 Application - Wide variety of retail Product showcases Freezer doors Vendor doors Platform doors 1.4 General Specifications Model No. Panel size Display Area STA1713 17.2” 409.8 x 153.6 mm STA2922 29.3” 697.68 x 261.5 mm Brightness 500 cd/m2 350 cd/m2 Resolution Aspect Ratio Contrast Ratio Pixel Pitch (mm) 1366 x 512 16 : 6 1000:1 0.3 x 0.3 1366 x 512 16 : 6 2500:1 0.51075 x 0.51075 Viewing Angle 170°(H), 160°(V) 176°(H), 176°(V) Display Colors Response Time (Typical) Playback Function Video Codec Audio Formats Image Format Storage I/O Interface Speaker Power Consumption Dimensions (mm) 16.7M 16.7M 3.7 ms 6.5 ms Video, Music, Photo MPEG-1,2,4/ WMV9 / SMPTE 421M MP3 (No speaker hole cannot be used) Bmp / Jpg / Png SDHC card USB, IR remote NA NA 35W 71W 497.4(H)x211.8(W) x 224.5(D) 802.2(H)x323.9(W) x 271.6(D) Page 4 Operation Temperature 0 ℃ ~ 50 ℃ Storage Temperature -20 ℃ ~ 60 ℃ ※ Specifications subject to change without notice. Note : - Acrylic cover on the display , touch screen optional. - The showcase front frame can be changed color. 1.5 Product Content - STA1713/2922 Transparency LCD AC adapter & power cable 8G SD card / Remote Control Product Packing TBD STA1713/2922 x1 Remote Control x 1 Page 5 1.6 Setting up the STA1713/2922 & Basic Operations STEP 1 Check the SD card on the player。 STEP 2 Plug the Power Cable。 STEP 3 Copy and paste the media file in the root directory of the USB flash drive. Note : Only putted media file in USB flash drive, so as not to interfere with playback. Page 6 STEP 4 Connect USB flash drive Connect the USB flash drive to the USB port of the digital signage player. Restart the player. The player will copy the files. After the copying is done, please remove the USB flash drive from the USB port. Push a “restart button” , restart the player Insert an USB flash STEP 5 Begin Playing Blue screen will come out for 45 second to 1 min then shows the default。 Default pattern Page 7 Note: - IF SD card is FAT32 format, it will show bellow information and you must change the format to EXT3. - Please use remote select “1 => Yes”, it can be auto run and restart the system. - IF you wait over 1min, please press the restart bottom wait 45 second to 1 min until the blue screen will come out again and shows the default. - Operating Step 2 to Step 4 and repeat Step 5. - OSD size is not fit the display; please use the control remote press button to fit display. STEP 6 File begin copying and show progress rate in the monitor. STEP 7 Copy successfully STEP 8 After the media file is copied, the Digital Signage Player will automatically play your media file. STEP 9 Update media content To update media content, go back to step 4.5 and update the player with the new media content. STEP 10 Shutdown the player If you want to shut down the player, please press the “Power” button on the remote。 Page 8 1.7 Show your sample and easy replace This paragraph will tell you how to show your product in STA1713/2922 .Follow the step you will use easily. STEP 1 Loose screw in the back bezel below. STEP 2 Pick up the back bezel Page 9 STEP 3 Put into sample STEP 4 Close back bezel & tighten the screws Page 10 2.0 Media Play Set up 2.1 Supported Formats Video: - MPEG-4.10 (H.264) BP@L3, [email protected], [email protected] - SMPTE 421M (VC-1) MP@HL, AP@L3 - WMV9 MP@HL - MPEG-2 MP@HL - MPEG-4.2 ASP@L5 (up to HD, 1-point GMC) MPG, MPEG 1/2/4, ASF, AVI, VOB, DivX, WMV, TS, MP4 Audio: Mp3 (No speaker hole can not be used) Note: if only audio is played, the screen is blank and there will be sound only. Image: BMP / JPG / JPEG / PNG - HP@L4: High Profile(1,280×[email protected] 1,920×1,[email protected]) - MP@HL: Main Profile(1280x720@60fps, 1920x1080@30fps) 2.2 Media File Name The Player treats files with uppercase and lowercase letters differently. E.g. "A.jpg" is not the same as "a.jpg". The files are listed using ascending order. If there are capitals and small letters, the player will play the files with capital letters and then the files with small letters. The Player supports Japanese, Chinese, and English file names. Note: Do not use the symbol “&” because your file cannot be played with this symbol. Example pictures: 2.3 Daily Schedule To make a daily schedule, you can save a media file in the root directory of the SD card. If you need to play a media file at a scheduled time, create a new folder first. The name format for the folder is hhmm-hhmm. hh = 24 hours time format, mm = minutes. Example: Add a new folder named 0830-1400, the player will then play the media file in the folder from 8:30 AM to 2:00 PM. Example pictures: Page 11 Entering 0900-1000 file name means the media file in this folder will be played from 9:00 AM to 10:00 AM Entering 1000-1030 file name means the media file in this folder will be played from 10:00 AM to 10:30 AM Entering 1100-1200 file name means the media file in this folder will be played from 11:00 AM to 12:00 PM Entering 1200-1500 file name means the media file in this folder will be played from 12:00 PM to 3:00 PM Entering 1500-1700 file name means the media file in this folder will be played from 3:00 PM to 5:00 PM Entering 1700-1800 file name means the media file in this folder will be played from 5:00 PM to 6:00 PM Entering 1800-2200 file name means the media file in this folder will be played from 6:00 PM to 10:00 PM Note: in the example above there is not a play session scheduled between 10:30 AM to 11:00 AM. In this case, the player will play the default media file you saved. If there is not a default media file, it will display the "Welcome" screen. 2.4 Picture File Format and Effects Picture file format The Player supports JPG, BMP and PNG formats. The Player will automatically adjust your Picture file, whether it is 460x290 or 1920x1200, to fill the full screen, which is 1920x1080. Note : IF your picture file is not 1366x512 format, please changed file to fit 1366x512 format and vertical blank space filling white to 1920x 1080. Example pictures: 512 1080 Fill white or black color 1366 or 1920 Page 12 2.5 Picture file play effect The default pictorial effect screen rotates randomly every 5 seconds. The Player supports file names that show designated seconds before playing an effect. The format is: filename.nn.mm.jpg. nn is the number for effect and mm is the time (in seconds) before playing the next effect. If nn = 03, the Player will play the effect numbered 03. If mm = 12, it is 12 seconds. Ex. Test01.03.12.png. Note: if you enter Test01.03.121.png, 121 seconds is not the correct format and the configuration fails. The Player will only play the default effect settings. Picture file playing effect number chart Effect no Transition Effect Name 1 CHANGE 2 FLY_UP 3 FLY_DOWN 4 FLY_LEFT 5 FLY_RIGHT 6 SCROLL_UP 7 SCROLL_DOWN 8 SCROLL_LEFT 9 SCROLL_RIGHT 10 Sequence From Left 11 Sequence From Right 12 Sequence From Top 13 Sequence From Bottom 14 Snake From Left 15 Snake From Right 16 Snake From Top 17 Snake From Bottom 18 Random Shuffle 19 Clock Wise Shuffle 20 Clock Wise Shuffle_Inner 21 Counter Clock Wise Shuffle 22 Counter Clock Wise Shuffle_Inner 23 FLY_UP_MULTI 24 FLY_DOWN_MULTI 25 FLY_LEFT_MULTI 26 FLY_RIGHT_MULTI 99 Random (default) Page 13 Example pictures: 01 means the Player will player effect 01 and 10 means for 10 seconds. 2.6 Digital Signage Player Configurations Configure “OFF” The Player uses empty off folder for configuration setting. The folder name for off configuration is hhmm-hhmm-OFF Note: hhmm uses the 24 hour format. You can only use capital letters for OFF. And you can add several off configurations in the player. The configuration supports like 2100-0700-OFF setting that means off from 9:00 PM to next 7:00 AM. Example picture: Notes: The way to remove the OFF setting is deleting the hhmm-hhmm-OFF folder in USB. And use this USB to update players. Before the player turns off, the monitor will show the warning message (Warning! System will off xxxx sec.); if you manually turn on in the turning off duration, the monitor will also show the same warning message (Warning! System will off xxxx sec.), and immediately turns off. Page 14 Player remote control 3.1 Player remote The Player remote control allows you to access and configure the mediaplayer via the player on-screen display (OSD), as well as turn the Player off and control the audio output. 3 1 2 5 6 7 4 8 Figure 1. Player Remote No. 1 2 3 Item Function Description Turns the device off Opens the On-Screen Display (OSD) None function 4 Name Power Menu Output key Keypad 5 Enter The enter key saves data keyed into a field. 6 7 Arrow keys Mute The arrow keys move the cursor through the menus and the fields in each menu item. None function 8 Volume None function The keypad in conjunction with the output key is used to enter numeric and alphanumeric data into fields on the OSD. Page 15 3.2 Menu Information Press the Menu key on the remote control and the screen menu displays. It displays Kernal version, firmware version, current time (Date/Time). (Output), PIC version and length (seconds) for booting (UP T). Example picture: 3.3 Confirm SD card status and perform (Format) The screen provides the SD's status for the user as reference. It includes the status of the SD card, file system, total space, free space and available space. To format the SD card, use the remote control to turn on "Menu", use the down arrow to highlight "SD card". Then press the right arrow to move to any space on the format that you want to change (FAT32/EXT2). Press Enter to format. Example pictures: (Press the right arrow to display status and then press enter again to format SD card.) Page 16 Note: When SD is connected to the player’s port, player will check the SD card’s file system. If the SD card’s file system is FAT32, not EXT3, the player will automatically do formatting the SD’s file system to EXT3. Example pictures(1): Example pictures(2): 3.4 Change Date Time Use your control to open "Menu" and use down arrow to move to "Date Time". Then press the right arrow to move to any field for Date Time (Year/Month/Date/Hour/Minute/Second). Press enter and the area highlighted in light blue will be highlighted in black and you can make changes. Note: after making the changes, press "Apply" to set. Page 17 Example pictures: (Press the right arrow to display status) (Press enter to make the status change possible. After making changes, press enter to save) Page 18 3.5 Change Aspect Ratio Use your control to open "Menu" and use the down arrow to move to "Mode Change". Then press the right arrow to move to Aspect Ratio. Press enter and the light blue highlighted area will change to black. Use up/down/left/right to select Original or Full Screen. Note: after making changes, press "Apply" to save. The screen displays as follows: Example pictures: (Press the right arrow to display status) (Press enter to make the status change possible. After making changes, press enter to save) Page 19 3.6 Lock Menu Password Set/lock Password Use your control to open "Menu" and use the down arrow to move to "Mode Change". Press the right arrow to move to "Password", press Enter to change the light blue highlighted area to black, then enter the password. Enter the password again in the Password Confirm field below to confirm. Note: after making changes, press "Apply" to save. After the configuration takes effect, you must enter a password when you use Menu, Output or when turning off the machine. After the password is recognized as correct, you can use the desired function. Example pictures: (Press the right arrow to display status) (Press Enter to change the password. After making changes, press Enter to save) Note: The password has a maximum length of 6 digits Cancel set password To cancel password, clear password in the "Password" field and press "Apply" to save. Page 20 3.7 Change output type Press Output on your remote control. The screen displays as follows: Example pictures: (Select the desired output type, press the number key and the screen will display the configuration you selected) 3.8 Configure Daily Reboot Time Use your Remote Controller to open "Menu" and use the down arrow to move to "Mode Change". Press the right arrow to move to "Reboot Time (hhmm)", press Enter to change the light blue highlighted area to black, and then enter the reboot time. The Daily Reboot Time format is hhmm (hhmm is 24 time format). Note: after making changes, press "Apply" to save. Note: If you want to cancel the Reboot Time configuration, please input 9999 in this field to cancel the previous setting. After you input 9999, remember to press "Apply" to save. Example pictures: Page 21 3.9 Copy and Erase When you restart the Player, the system will compare the content on the USB flash drive and the content on the SD card and automatically erase additional files in the SD and copy the files on the USB flash drive to the SD. Example: If there are 4 files, A, B, C, and D on the SD card, and 5 files, C, D, E, F, and G on the USB flash drive, the System will delete A and B on the SD and copy E, F, and G to SD 3.10 Firmware update When you need to update the firmware, there must be a /home/update folder on the USB flash drive to perform a firmware update. After plugging in the USB flash drive into the USB port, restart the Player and it will automatically perform a firmware update. When the firmware is being updated, no copy & delete may be performed. 3.11 Delete all files on the SD card If an empty USB flash drive is connected to the USB port and the Player is restarted, the Player will delete all media files on the SD card. The Player will display the default "Welcome" screen. Page 22 4.0 MECHANICAL CHARACTERISTICS STA1713 MECHANICAL SPECIFICATION Page 23 STA2922 MECHANICAL SPECIFICATION Page 24