1
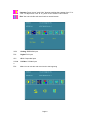
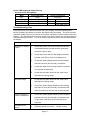
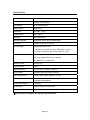
LITEMAX SLD0832 LCD Monitor User’s Manual (1st Edition 11/16/2006 ) All information is subject to change without notice. Approved by Checked by Prepared by David Sharline Eric LITEMAX Electronics Inc. 8F-2, No.133, Lane 235, Bau-chiau Rd., Shin-dian City, Taipei County, Taiwan R.O.C. Tel : 886-2-8919-1858 Fax: 886-2-8919-1300 Homepage: http://www.litemax.com.tw Page 1 Product Description Congratulations on purchasing this new generation monitor. This monitor is for industrial and professional use contributing to its industrial and professional features. Also, this monitor incorporates high quality display into a small light weighted but strong module for particular extreme environment. You will certainly benefit from this monitor in many ways; to name some of them, comfort, safety, health, and environmental protection. Product Features High contrast color TFT LCD display support resolution up to SVGA 800 x 600. Compatible with IBM VGA, VESA standards. LED backlighting. Perfect for transportation application. Support analog 、S-Video & Audio input. Support NTSC or PAL Video-in function. High sensitive USB Touch Panel Support VESA 75 (75 x 75mm) standard mounting holes for wall mount or ARM mounting application. OSD cover to prevent unauthorized change of OSD 2Wx2 speakers Standard model: 8” LED backlight TFT liquid crystal monitor Cleaning Gently wipe the screen with a clean camel hair lens brush, or a soft, clean, lint-free cloth. This removes dust and other particles that can scratch the screen. Do not apply pressure to the screen surface when wiping it clean. Do not pour or spray any liquid directly onto the screen or case of the LCD monitor. Chemical cleaners have been reported to damage the screen or case of the LCD monitor. Page 2 Mechanical Drawing Page 3 Setting Up 1. S-Video This can be connected with the S-video output of other device. 2. VGA Input This can be connected to PC or other device. 3. USB Touch This can be connected to PC or other device. 4. Power Cable This is for connecting the power adapter. 5. Audio-in This can be connected to PC or device (3.5mm.STEREO PLUG.BLACK) 6. Hot-Key Input source switching hot-key 7. Power Lamp Power status instruction OSD Keyboard 1. Power Turn ON/OFF monitor 2. LED Power status instruction 3, MENU/Enter 1. Open OSD Function Menu 2. Enter OSD function 4. LEFT Move left to next icon or function as pressing this button 5. RIGHT Move right to next icon or function as pressing this button. 6. AUTO/EXIT 1. Auto tuning 2. Exit OSD menu Page 4 OSD menu By pressing the “menu” button, you will see the below picture. Across from timing you will see resolution, frequency, and V-frequency of the panel. Version shows the firmware control version. These cannot be altered by the user. There are 7 sub menus within the OSD user interface: Brightness, Signal Select, Sound, Color, Image, Tools, and Exit. When you press the “menu” button, you enter the “Brightness” sub directory. In this directory, you will see 4 selections: press ’’menu’’ press ’’menu press ’’menu’’ press ’’menu’’ OSD Brightness: press ’’right’’ key Press the “menu” once, to adjust the brightness. Press “left” to dim down the brightness to “0”, press “right” to increase the brightness to “100” Ambient light sensor: Press this Icon for auto dimming. (OPTION) To use this option, the Litemax ambient light sensor needs to have been installed Potentiometer: Navigate to this icon to adjust the VR function. (OPTION) Ambient light sensor with OSD offset: To set minimum brightness level based on ambient light. Press ’’right’’ key Press ’menu’’ once, to adjust minimum luminance to fit your application (OPTION) Page 5 Contrast: Press “menu” and “right” buttons to adjust the contrast from “0” to “100”. To adjust from “100” to “0”, press “menu” and the “left” buttons. Exit: You can exit this sub menu back to normal screen. VGA Analog: RGB/VGA input DVI Digital: DVI input AV1 AV1: Composite input S-Vide o S-Video: S-Video input Exit Exit: You can exit this sub menu back to the beginning Page 6 There are 3 options for “Sound” sub page. Audio Volume: Audio volume adjustment. / UnMute/Mute: You can mute the speaker by pressing this option. Exit: back to the beginning menu. Auto Color: By navigating over to the “Auto Color” option, optimal color performance is invoked. SRGB: Windows standard color setting Color Temperature: You have 3 options in this selection . Color Temperature User Define: Default is 100 for “R”, “G”, and “B”. Page 7 Color Tempture_6500K: Warm color scheme Color Tempture_93OOK: Cold color scheme Exit: back to the normal screen. Go to the “Image” page, and you will see the below picture Auto Adjust: Choose this option and the AD5766 will adjust to the optimal horizontal and vertical frequency. You will see “Auto tune….” on the screen for around 3 seconds. Clock: If you are not satisfied with the Auto tune result, you can adjust manually by pressing “Clock”. Using this will make the image wider. Phase: If “double images” appear around the characters, choose “Phase” to remove them.. HPos: You can shift the screen horizontally using this function. Vpos: You can shift the screen vertically using this function. Exit: Back to normal screen. Page 8 On the “Tools” sub menu, you will see 5 icons. OSD Control: Selecting this option, brings you to 4 more options: Osd_time: Select time for the OSD user interface to stay on screen, for 2 sec. to 16 sec. Default is 6 sec. Osd_HPos: Moves the OSD user interface horizontally on screen. Osd_VPos: Moves the OSD user interface vertically on screen. Exit: back to main menu. Factory_Reset: By pressing this, the screen will revert to factory settings, and the previous settings will be deleted. Sharpness: Sharpen characters. Page 9 Dos_mode/Gxf_mode: For some old programs which use 640x400 and 720x400 (DOS Mode and graphics mode), This option needs to be selected manually. Exit OSD Lock Function: It is possible to lock all the OSD buttons to prevent unauthorized changes to occur by pressing “Menu” and “right >” buttons simultaneously. You will see the “lock” icon below on the center of the screen for 3 seconds. If any button is pushed after the lock function is initiated, the below icon will appear on the screen.' To release the OSD lock, press “Menu” and “Right >”. The below icon will appear on the center of the screen for 3 seconds. Now all OSD keys are active again. Page 10 Power LED Display & Power Saving General Power Saving Mode Mode Power LED Color Power Consumption On Stand by Green Orange <3W <4W (USB model) Suspend Orange <3W <4W (USB model) Off Orange <3W <4W (USB model) 30W (max.) Troubleshooting Tips In the event that you experience trouble with your Display, check the following items before contacting the dealer from whom the Display was purchased. The most common problems usually involve an incorrectly an incorrect connection from the Video Card to the Display. We recommend that you also consult your Video Card User’s manual during the Troubleshooting Procedure. Do not exceed the maximum refresh rate recommended for the display. Problem Troubleshooting Tip No image on display screen 1. Check that power cord of the Computer has been connected securely into wall outlet or grounded extension cable or strip. 2. Check that power switch of the Display has been pressed and LED on the front of Display is lit. 3. Check that Video (Signal) cable from the Display has been securely and correctly connected. 4. Check that Video Card is firmly seated in card slot of Computer motherboard. 5. Check that the video input from the Video Card falls within the timing range. Abnormal image 1. Check that the video input from the Video Card falls within the timing range. 2. Check that Video (Signal) Cable from the Display has been securely and correctly connected to the Video Connector at the rear side of the Computer. Colors of image on screen are abnormal 1. Check that Video (Signal) Cable from the displays has been securely and correctly connected to the 15-pin Video Connector at the rear side of the computer. Disturbances on Screen 1. OSD adjustment is incorrect. Page 11 Please consult section for OSD screen adjustment procedures. ※Please contact your local authorized distributors /retailers if you run into other unsolved problems. The Display Timing Applicable video timing The following table lists the better display quality modes that the LCD monitor provides. If the other video modes are input, the monitor will stop working or display unsatisfactory picture quality. VESA Modes Mode Resolution Total Nominal Frequency ±0.5KHz Nominal Frequency ±0.5KHz Nominal Pixel Clock (MHz) DOS 720x400@70Hz 900x449 31.469 70.087 28.322 VGA 640x480@60Hz 800x525 31.469 59.940 25.175 640x480@72Hz 832x520 37.861 72.809 31.500 640x480@75Hz 840x500 37.500 75.000 31.500 800x600@56Hz 1024x625 35.156 56.250 36.000 800x600@60Hz 1056x628 37.879 60.017 40.000 800x600@72Hz 1040x666 48.077 72.188 50.000 800x600@75Hz 1056x625 46.875 75.000 49.500 SVGA Page 12 Specification Model No. LO0832-SNB-A01 Display Area 228 (H) x 162 (V) mm LCD Display 8" TFT active matrix Display Colors 262k colors Luminance 250 cd/m2 (typ.) Contrast Ratio 500:1 (typ.) Resolution 800 x 600 (VGA) Pixel Arrangement RGB (Red, Green, Blue) vertical stripe Pixel Pitch 0.2025 (H) x 0.0675 (V) mm Viewing Angle At the contrast ratio 10:1 ‧Horizontal: Left side 70° (typ.), Right side 70° (typ.) ‧Vertical: Up side 50° (typ.), Down side 70° (typ.) Color Gamut At LCD panel center 60% (typ.) [against NTSC color space] Ton (black 10%→white 90%) Response Time 25 ms (Typ.) Panel Interface LVDS Signal Connector 15 Pin D-sub、S-Video、Audio-in Touch Panel Resistive type with USB connector F/R Control Button Power Switch, Menu, Select (+,-), Auto OSD Menu Brightness, Contrast, H/V Position, Color, Phase, Clock, Language, Management Power Consumption 11W (typ.) Module Size 230(H) x 285 (V) x 45 (D) mm Weight (Net) 2.0kg (typ.) ※Specifications subject to change without notice. Page 13 Product Safety Precautions Follow all warnings and instructions marked on the product. Do not use this product near water. This display should be installed on a solid horizontal base. When cleaning, use only a neutral detergent cleaner with a soft damp cloth. Do not spray with liquid or aerosol cleaners. Do not expose this display to direct sunlight or heat. cabinet and other parts. Hot air may cause damage to the Adequate ventilation must be maintained to ensure reliable and continued operation and to protect the display from overheating. Do not block ventilation slots and openings with objects or install the display in a place where ventilation may be hindered. This display should be operated from the type of power source indicated on the AC/DC adapter. Do not install this display near a motor or transformer where strong magnetism is generated. Images on the display will become distorted and the color irregular. Do not allow metal pieces or objects of any kind fall into the display from ventilation holes. Do not attempt to service this unit yourself. Removal of the display cover may expose you to dangerous voltage or other risks. Refer all servicing to qualified service personnel. Unplug this product from the wall outlet and refer servicing to qualified service personnel in the event that: 1. Liquid is spilled into the product or the product is exposed to rain or water. 2. The product does not operate normally when the operating instructions are followed. 3. The product has been dropped or the cabinet has been damaged. 4. The product exhibits a distinct change in performance, indicating a need for service. 5. Power cord or plug is damaged or frayed. General specifications for the LCD The following items are neither defects nor failures. Response time, luminance and color gamut may be changed by ambient temperature. The LCD may be seemed luminance uniformity, flicker, vertical seam and/or small spot by display patterns. Optical characteristics ( e.g. luminance, display uniformity, etc. ) gradually is going to change depending on operating time, and especially low temperature, because the LCD has cold cathode fluorescent lamps. Page 14