1
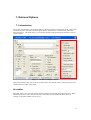
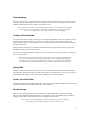
The Essential wGet – GUIde.
By Ryan Corrigal
March 2007
Foreword
When Ryan asked me whether he could do a manual for wGetGUI, I was happy for at least two
reasons. One was that obviously Ryan found wGetGUI interesting enough and the other was that
the lack of a good manual was really a thorn in my side.
When I read Ryan’s manual, I was really wow-ed. Never would I have invested as much time as
he did! I think his work really is useful and I hope that many wGetGUI users agree.
wGetGUI has recently been updated to a new version. It now includes a requested “simple” mode
and an integrated “pro” mode, now called “direct .bat access”. But reading through Ryan’s manual
will easily prepare you to understand and use the new wGetGUI.
Thanks again to Ryan and all the others who have helped wGetGUI with their constructive
feedback.
Cheers
Jens (October 17th, 2007)
Table of Contents
The Essential wGet – GUIde..................................................................................................................................i
Table of Contents ...................................................................................................................................................ii
Table of Figures ....................................................................................................................................................iv
1. Introduction ....................................................................................................................................................2
2. Before you begin............................................................................................................................................3
3. Getting the necessary software .....................................................................................................................4
4. Installing the Software...................................................................................................................................5
5. The Interface ..................................................................................................................................................6
6. Basic Functionality ........................................................................................................................................7
6.1 Introduction .............................................................................................................................................7
6.2 The main buttons explained ...................................................................................................................8
Save settings...................................................................................................................................................8
Load Settings..................................................................................................................................................8
About..............................................................................................................................................................8
Exit..................................................................................................................................................................8
Start wGetStart.bat.........................................................................................................................................9
Add to wGetStart.bat .....................................................................................................................................9
Empty wGetStart.bat .....................................................................................................................................9
Pro Mode........................................................................................................................................................9
6.3 Pro Mode ...............................................................................................................................................10
Empty wGetStart.bat ...................................................................................................................................10
Empty Window ............................................................................................................................................10
Append window content to wGetStart.bat .................................................................................................10
Save window content as wGetStart.bat ......................................................................................................11
Add wGetStart.bat to window.....................................................................................................................11
Add general file to window.........................................................................................................................11
6.4 URL and Hosts ......................................................................................................................................12
URL ..............................................................................................................................................................13
Always on top ..............................................................................................................................................13
Hosts .............................................................................................................................................................13
Span All........................................................................................................................................................14
Allow List ->................................................................................................................................................14
Reject List ->................................................................................................................................................14
Clear..............................................................................................................................................................15
Accept/Reject ...............................................................................................................................................15
6.5 Conclusion.............................................................................................................................................15
7. Retrieval Options .........................................................................................................................................16
7.1 Introduction ...........................................................................................................................................16
No clobber....................................................................................................................................................16
Timestamping ..............................................................................................................................................17
Continue file download ...............................................................................................................................17
Quota (kB)....................................................................................................................................................17
Spider (check for files) ................................................................................................................................17
No directories ...............................................................................................................................................17
Force directories ..........................................................................................................................................18
Save to custom directory.............................................................................................................................18
Clear server cache........................................................................................................................................18
Recursive Retrieval......................................................................................................................................18
Download “as-is”.........................................................................................................................................18
Mirror site.....................................................................................................................................................18
Only go deeper.............................................................................................................................................19
7.2 Conclusion.............................................................................................................................................19
ii
8.
Special ..........................................................................................................................................................20
8.1 Introduction ...........................................................................................................................................20
Retries...........................................................................................................................................................20
Additional Parameters .................................................................................................................................20
Identify as browser ......................................................................................................................................21
Convert Links...............................................................................................................................................21
Ignore robots.txt...........................................................................................................................................21
Configure Proxy...........................................................................................................................................22
8.2 Conclusion.............................................................................................................................................22
9. Running Options ..........................................................................................................................................23
9.1 Introduction ...........................................................................................................................................23
Go 2 Background.........................................................................................................................................23
No info..........................................................................................................................................................24
All info .........................................................................................................................................................24
Some info .....................................................................................................................................................24
Append to logfile .........................................................................................................................................24
Overwrite logfile..........................................................................................................................................24
9.2 Conclusion.............................................................................................................................................24
10.
Conclusion.............................................................................................................................................25
References ............................................................................................................................................................26
iii
Table of Figures
Figure 1 – The interface explained .......................................................................................................................6
Figure 2 – The main options..................................................................................................................................7
Figure 3 – The about window ...............................................................................................................................8
Figure 4 – The empty wGetStar.bat confirmation window.................................................................................9
Figure 5 – The Pro Mode window ......................................................................................................................10
Figure 6 – The URL and Hosts section ..............................................................................................................12
Figure 7 – Always on top view ...........................................................................................................................13
Figure 8 – The ominous warning ........................................................................................................................14
Figure 9 – The Retrieval Options section...........................................................................................................16
Figure 10 – The Special options section.............................................................................................................20
Figure 11 – The Proxy Configuration window ..................................................................................................22
Figure 12 – The Running Options section..........................................................................................................23
iv
1. Introduction
How many times have you been browsing the internet and have found collections of images, music,
documents, games, music, and such that you wanted to keep.
In order to download all of these files you would have to manually click the links and save them to your
hard drive individually.
If you have time to squander or you enjoy wasting your day doing menial tasks, this would probably be a
suitable method of obtaining the desired files/information.
Unfortunately, not everyone enjoys throwing away their precious time. For those of us who don’t want to,
there is a handy little tool called wGet.
The program wGet is a small, yet powerful, command line utility that allows a user to download files from
the internet via the Windows command line. Using switches, the ability to automate the process of
downloading is also possible. Unfortunately, your average computer user does not know how to, nor wants
to learn to, use the Windows command prompt.
Up until recently, this was a dilemma for most time conscientious users. Now, thanks to Jens Roesner, the
creator of wGetGUI, a simple interface has been developed to sit on top of wGet that can make the process
of automatically downloading files simple even for the most technologically challenged individuals.
This guide sets out to explain how to get wGet and wGetGUI as well as how to install, use, and efficiently
operate the said programs.
With that in mind we move on to the first chapter of the handy user manual.
2
2. Before you begin
This guide assumes that you have, at the least, a basic understanding of Windows XP as well as have the
ability to extract ZIP files and download files from the internet.
If you are not at this level of competence, there are several great guides on the internet as well as guides
published in book form that you can obtain should you wish to learn.
This guide may reference some things that are not common knowledge but the beauty of the internet is that
almost any information you should desire to acquire is available both easily and freely.
3
3. Getting the necessary software
You will need to download both wGet and wGetGUI if you would like to be able to follow the instructions
and information covered in this guide..
For your convenience, the necessary links to both pieces of software have been provided as follows:
wGet:
Homepage:
http://www.gnu.org/software/wget/
Download Location:
http://xoomer.alice.it/hherold/wget-1.10.2b.zip
wGetGUI:
Homepage:
http://www.jensroesner.de/wgetgui/
Download Location:
http://www.jensroesner.de/wgetgui/data/wgetgui.zip
Provided you have downloaded these two files, you should have all of the necessary software to run the
programs as well as follow all of the instructions in this tutorial.
For installation instructions, please proceed to the next section.
4
4. Installing the Software
Now that the necessary software has been obtained, the installation is a breeze.
Both programs can be extracted to a directory and run “as is”. This is an asset because the installation does
not install any files into the windows/system32 directory, nor does it write any values to the registry. The
only stipulation for the installation is that wGet and wGetGUI be in the same directory.
For this example, we will create a new folder in c:\Program Files. We will call the folder wGetGUI and
extract all of the files from wget-1.10.2b.zip and wgetgui.zip into this directory.
For your own reference, the installation does not have to go as outlined in the previous paragraph; it can go
anywhere you would like it to.
For convenience sake, it would be recommended that a shortcut is placed on the desktop to wGetGUI so
that you do not have to browse to the location every time you wish to run the program. Also, it is
recommended that a shortcut is placed to the folder containing the program that way it will be easy to
retrieve the files downloaded from this program at a later date.
Jens’s comment:
As you probably are aware, the behaviour of Windows versions can be very different between different
machines. It is therefore possible that some dll or ocx files are missing in your Windows installation. The
wGetGUI homepage has the necessary links and instructions to solve all known problems. So in case of a
problem, please checkthere.
5
5. The Interface
Upon opening the program, you are greeted with a screen that looks like the one below.
For your convenience, the sections have been outlined as well as referenced with page numbers to the
corresponding reference section in this guide:
Retrieval
Options
Page 16
Basic
Functionality
Page 7
Running
Options
Page 23
Special
Options
Page 20
Figure 1 – The interface explained
While this may look daunting, at first, once the various options have been explained, this screen will look a
lot less intimidating.
Jens’s comment:
During use, hovering the mouse arrow over an option or field will bring a short tooltip that will help you
remember and understand what the option or field does.
In the next sections, explanations of the various sections and their functionality will be discussed in depth
which will lead to a better understanding of the program as well as a more effective use of your time when
using wGetGUI.
6
6. Basic Functionality
6.1 Introduction
The first features and options that will be explained in this guide will be the most basic. With these
features alone, you should be able to starting ‘getting’ files within no time at all.
All of the options in this program will be covered in at least a minimal amount of detail which will make
you, the user, proficient in understanding the inner workings of wGet.
Upon loading up the program and looking at the interface, you are greeted with many small check boxes
and text boxes as well as some main buttons. The main buttons on the bottom as well as the most common
options are what will be discussed first.
The following figure shows just exactly the main options are.
Figure 2 – The main options
As was discussed earlier, the wGetGUI program sits as a user interface between the user (you) and the
program wGet, which works from the command prompt. wGetGUI works by interpreting the options that
the user inputs into the interface and creates the appropriate batch file that starts wGet with all of the
necessary switches and parameters.
In the following pages, the main settings of wGetGUI will be covered in enough detail to get you started
downloading files in no time.
7
6.2 The main buttons explained
Save settings
This button allows the user to save all of the currently selected options and parameters to a file so that they
can be recalled at a later time. If it is desirable for these settings to be loaded every time wGetGUI starts,
just save over the original wGetGUI.ini file in the program directory.
Load Settings
This is the exact opposite of the save settings option. This option allows loading of settings from a user
defined file that is different from the initially loaded wGetGUI.ini file.
About
Pressing this button brings up a window that shows basic information about the program such as the author,
version number, and other miscellaneous data.
The about window appears as follows:
Figure 3 – The about window
Exit
Pressing this button allows the user to exit the program.
8
Start wGetStart.bat
This should be pretty obvious. This is the button that you should press when all of the options and
parameters that you would like set have been added to the wGetStart.bat file and you are ready to begin the
process of actually downloading the files.
Add to wGetStart.bat
This button takes all of the currently select options and user inputted parameters and adds them to the
wGetStart.bat file. This is appended with the new information so that you can do multiple tasks in
sequence therefore eliminating the need to ‘baby-sit’ the program.
Empty wGetStart.bat
This button erases the contents of the wGetStart.bat file and allows you to work from a “clean slate”.
The following confirmation screen is presented upon pressing this button giving you one last chance to
back out should you not really want to do this:
Figure 4 – The empty wGetStar.bat confirmation window
Hint: It is really easy to forget that there is something actually in the wGetStart.bat file which
if not cleared first, may lead to unnecessarily downloading files that you do not want or have
already downloaded. This tends to be the easier option to overlook.
Pro Mode
This button allows the user to enter in custom parameters and options as well as directly modify the
wGetStart.bat file itself. For the average user this screen may be something to be avoided but if one is
feeling brave, modifications can be made here.
In the next section, the various options of pro mode will be discussed.
9
6.3 Pro Mode
Pro mode is a powerful way for more advanced users of wGet to get the most out of the wGetGUI program.
In most cases, the average user will not really need to enter this screen although the option to look at what
is currently in the wGetStart.bat file before emptying it can be useful.
Upon clicking the pro mode button, the pro mode screen presented:
Figure 5 – The Pro Mode window
Here is a brief run down of the options in the pro mode screen:
Empty wGetStart.bat
As was explained in the previous section this button simply removes whatever content is currently in the
wGetStart.bat file, leaving it blank.
Empty Window
This option is pretty self explanatory as it does exactly what it says. Pressing this button simply clears the
window contents.
Append window content to wGetStart.bat
Upon pressing this button, whatever contents are in the pro mode window are added on to the end, or
appended, to the wGetStart.bat file.
10
Save window content as wGetStart.bat
This option will replace whatever is currently in the wGetStart.bat file with the window contents. Pressing
this button will lose all current information in the wGetStart.bat file so using discretion is advisable.
Add wGetStart.bat to window
Upon pressing this button, the contents currently in the wGetStart.bat file are displayed into the pro mode
window.
Add general file to window
This option allows the user to add the contents of any file into the pro mode window. This can be useful if
there is a previous wGetStart.bat file that was saved and renamed for backup purposes.
11
6.4 URL and Hosts
The options in this section allow the user to choose exactly where to start downloading the files from.
The URL and Hosts section of the program looks like the one on the following page and all of the options
that we cover in this section you will be able to refer to in this window
This is the
always on
top
option!
Figure 6 – The URL and Hosts section
12
URL
There are 2 ways of entering in the URL that is desired. The first option is to manually type in the URL
itself. You do not need to add the http:// or the ftp:// to this field as wGetGUI will automatically do it for
you. The second option is much easier as it eliminates the need to write anything. Since wGetGUI
supports drag and drop operations, from any common internet browser (IE, Firefox, Netscape, etc) it is
possible to drag the URL right into this field.
Always on top
Pressing this button makes the wGetGUI program shrink down to a smaller size and float on top of all other
windows.
The always on top window should look like this:
Press this to
restore the
regular view
Figure 7 – Always on top view
Should you want to return to the regular interface of wGetGUI just press the same button, which now
appears with a “+” on it, again.
Hint: using the always on top button makes it really easy to
drag and drop browser URLs right into wGetGUI.
Hosts
This section allows you to select where wGetGUI will navigate to as it is downloading files.
When entering hosts into this text box, it is important to make sure that the last character is the ‘/’
character.
Please see the following example:
Correct:
Incorrect:
http://www.strangecity.ca/images/
http://www.strangecity.ca/images
Hint: if the typing of all URLs it too tedious, right click the link in your web browse and
select copy link location then right click this section and select paste This save you
keystrokes. WGetGUI automatically trims filenames at the end of the pasted URL so
there is no need to worry about ‘fixing’ the link.
13
Span All
If this option is unchecked, wGet will default to staying at the host you provided in the URL textbox. If,
however, you set this option, wGet will follow every link that it encounters and span all hosts. If you are
not careful with this option, you could leave the program on overnight and find that it has downloaded an
astronomically huge amount of data. Only use this setting if you know exactly what is contained on all of
the pages or you actually want to attempt the nearly impossible task of downloading the entire World Wide
Web.
If you select span all along with an infinite retrieval depth (discussed in chapter Retrieval Options) you will
be presented with the following error message as shown in figure 8:
Figure 8 – The ominous warning
If you know what you are doing and don’t care about this anyways, press the OK button and carry on.
Allow List ->
Entering addresses here allows you to specify which hosts that wGet will download from thereby making
the data you download much more useful to you. For example, if you are downloading from
http://www.scarification.ca you will get all of the web pages but none of the images unless you also include
the web space (http://www.photobucket.com/) where the images are actually hosted.
Reject List ->
This works exactly the opposite of the allow list. Here, you can specify explicitly which hosts not to
download from. For instance, if you have a web page that has great info but also links to files that you do
not want to download, it would be a good idea to specify the hosts where you do not want wGet to take data
from. For example, let’s say you would like to download the content of www.elderscrolls.com but do not
want to download the movie trailers and demos, you would include http://static.bethsoft.com/ in the reject
list so that wGet would not download them.
14
Clear
Pressing the button labeled clear in either of the hosts sections simply clears the contents of the text box.
Accept/Reject
This section allows you to specify which types of files you would actually like to download and which,
should you choose any, file types to ignore.
By default, wGetGUI will accept all of the file types but should you want to only include/exclude certain
types of files, you may uncheck the all option and just select the file types you would like.
Should you want to include/exclude file types not specified in the preset check boxes, you may specify
them in the custom list text box. Please note that in order to correctly add files you need to use the proper
notation which is a period followed by the file extension which commas separating multiple file types.
Please see the following example for proper usage of the custom list box:
Correct:
Incorrect:
.mov,.png,.php
*.mov *.png *.php or mov,png,php
Hint: Let’s say you want to download just .jpg files, .rar files, and .mpg files. In this
instance,you would unselect the al check box, select just .jpg and then in the custom
List text box type .rar,.mpg
If, at any time, you should wish to clear the custom list of file types, simply press the clear button.
6.5 Conclusion
Congratulations, you now should have all of the knowledge necessary to operate wGetGUI in an efficient
and effective manner. The rest of this guide will go into the more advanced options available to users who
want to get the most out of wGet and wGetGUI.
15
7. Retrieval Options
7.1 Introduction
This section includes many various options that are related to how files are retrieved by wGet. These could
be considered some of the more advanced options but any ambitious user can utilize them with a little
effort and practice. This guide will go over each of the options briefly describing the functions as well as
common usages.
Figure 9 – The Retrieval Options section
Many of the options in this section can also be found in the wGet manual which can be found on the wGet
website referred to earlier in this guide.
No clobber
When this option is set, wGet will not download any files that are currently in the target directory. When
determining whether or not to download the file, wGet will not check whether the file is current or
working, it just checks whether it exists or not.
16
Timestamping
When you select this option a time stamp will be added to the downloaded file by wGet. If you download
from the site again, wGet will check to make sure that the file on the server is a different file size or has a
different timestamp than the one currently in the target directory.
Hint: Using the No clobber / Timestamping options can save you both time and bandwidth
if used correctly. It is important to note that wGet can only use one of these methods
at once so it is impossible to select both No clobber and Timestamping.
Continue file download
One of the best features of wGet is the ability to continue the downloading of file if circumstances prevent
downloading the file in it’s entirety in one session. Currently, if using one of the more popular web
browsers, when a download is interrupted, you are forced to begin the download from scratch again which
is hugely inconvenient.
Selecting this file will allow you to continue the download of any incomplete files currently on the host,
should they already be in the target directory.
If you are downloading large files and using a wireless connection or need to stop for whatever, wGetGUI
can be your best friend.
Hint: To use the program to download a really big file such as a Linux distribution image
file just enter the full URL to the file into the URL text box. Should this download get
interrupted, just enter the same full URL into the text box, select continue file download,
and then start the program and watch as wGet continues right where the file left off!
Quota (kB)
Entering a value into this text box allows you to select the maximum amount of total kilobytes that wGet
will download. This may be useful if you have limited space on your hard drive or you do not have time to
watch what it does and do not want to download, in kilobytes, over a certain amount.
Spider (check for files)
This option checks whether the linked file works. This option can be useful for administrators or for testing
purposes but would be beyond the usefulness for your average user.
No directories
When you are downloading files with this program, they will automatically be placed into the target
directory with subdirectories named the same as every host that you are downloading from. Should you
wish the store the files not categorized by directory, simply select this option.
Hint: if you are only downloading a few files and do not want to search through
directories to get to them, this option may be very useful to you.
17
Force directories
This option is enabled by default in wGetGUI and simply places the files into directories labeled by host
name and sorted accordingly as described in the previous option. This option really helps to keep the files
that you download organized and can be quite helpful when dealing with many websites.
Save to custom directory
This textbox allows you to select the target directory for all of the files that wGet downloads. The correct
usage of this option would be following the standard file name/path notation as used in windows.
Correct:
Incorrect:
c:\downloads\wGetFiles\
wgetFiles
Clear server cache
Selecting this option has a similar effect to the refresh/reload function of browsers as it forces the server to
load the newest version of the file into the cache.
Hint: To ensure you are getting the most recent and accurate file please
activate this option.
Recursive Retrieval
This option is one of the single most powerful features of wGet and wGetGUI that you can use. Selecting
the check box activates this option and entering an integer into the depth text box tells wGet how deep to
go when following the links contained on the original URL.
For instance, if you were to enter http://www.bmezine.com into the URL text box and then select a
recursion depth of 1, you would download the main page and all of the links from the main page but you
would not obtain any of the files on the links from those pages you would simply stop at the recursion
depth that you selected, 1.
Download “as-is”
With wGet, downloading “as is” allows you to save a webpage complete with pictures, sounds, etc. This
option causes wGet to ignore the “Only go deeper” option.
Mirror site
This option is a quick way to select both Time stamping and infinite recursion depth. This option deselects
the options or any alternatives so it can be confusing for some users but is just provided as a convenience.
18
Only go deeper
This option is similar to the recursion depth option in function but can be better for trying to really isolate
the files that you wish to download. This option will only follow links that go deeper than the one provided
in the URL.
For instance, if you were to start at http://mirrors.xmission.com/ubuntu-cd/edubuntu/ you would only go to
the deeper directories such as ,,,/ubuntu-cd/edubuntu/6.06/ and .../edubuntu/dapper/ but not anywhere
“beneath” the original URL.
7.2 Conclusion
With all of the options in this section, you should now be able to tune what you wish to download to a fine
point which will make using this program even more efficient and effective.
19
8. Special
8.1 Introduction
This section of wGetGUI includes the options that mainly deal with the way that wGet appears to and
“acts” with servers. The options in this section will not really affect the way that the program will “look”
for files to download.
The special section is outlined in the figure below:
Figure 10 – The Special options section
Retries
This option is simple, it accepts an integer value in the text box that will specify the amount of times wGet
will try to download a file before giving up and moving on to the next one.
Additional Parameters
This allows you, the user, to specify addition command line options if you are experienced enough with
wGet to use them.
Hint: To get the most of this option, please refer the original wGet documentation
20
Identify as browser
Some servers do not want people to use programs like wGet to download their files because they have to
pay for bandwidth. With this option selected, wGet will “pretend” to be a web browser and will even go so
far as to identify itself as Mozilla 4.03 as well as “trick” the server into believing that it has been referred to
by another page on this server and not an external link.
Hint: Although this option seems amazing it can considerably slow down the performance of
wGet when downloading a large number of small files so only use it if completely necessary.
Convert Links
By default, wGet will download any html files as they are but, if this option is selected, the all of the paths
in the .htm(l) file(s) will be converted to contain relative paths so that the pages downloaded can be run
locally without any content actually having to be accessed from the internet itself.
Ignore robots.txt
Under normal circumstances, wGet would be considered a robot because it is a simple program that crawls
the web based on some predetermined criteria. Many servers utilize robots to get the data for their
searches. Some server administrators restrict directory access to browsers thus making it a necessity to
enable this option.
21
Configure Proxy
This option is still in beta stages currently and to fully utilize this it is suggested that you research on the
proper usage of proxy servers so that you can enter the appropriate options in to the text boxes.
The following is what the Configure Proxy screen looks like:
Figure 11 – The Proxy Configuration window
8.2 Conclusion
Now that the special options of wGet have been covered, there is only one section left to cover. All but the
most devoted geeks will have probably left at this point but if you are still hanging in there it is strongly
encouraged that you hang on until the end because almost every option has now been covered.
The next and final section covered in this guide is the Running Options section.
22
9. Running Options
9.1 Introduction
The final sets of options used by wGetGUI are the running options. These options configure the way that
wGet will present itself on the screen or in a log file. These options can be useful for keeping a catalog of
what was successfully downloaded as well as making the program run happily away in the background
without disturbing you as you go about your day to day computing..
The running options section of the wGetGUI user interface is outlined below:
Figure 12 – The Running Options section
This guide will now cover all of the options making wGetGUI even more useful than it was to you prior to
reading this section.
Go 2 Background
With this option checked, wGetGUI will go to the background once it has been started.
Hint: Be careful when using this option! Even though wGet does not appear to be running, it may
be silently downloading files without your knowledge. In order to make sure wGet has finished
or is shut off, you may check whether it is running in the Windows Task Manager.
23
No info
If this option is set, wGet will show nothing about what it is currently doing which may be good if you
really know what you are doing or do not care. Setting this option may leave you wondering what wGet is
doing or whether it is working or not.
All info
Selecting this option will make wGet output as much information as possible to the screen. This shows you
the progress of downloads, the location you are downloading from, as well as other useful information.
Some info
This option, if set, will show some of the info. This option is a compromise between the All info and the
Some info options.
Tip: You can only select one of the info options at once.
Append to logfile
When you set this option, wGet will output what would normally be on the screen to a log file. Appending
to the log file will add the results to the end of the log file. If you are using this option with All info and
downloading a large number of files, this log can get quite large in size.
Overwrite logfile
This option takes the screen output and replaces the specified log file with this one. Once again, if you are
using All info and downloading a large amount of files, this can get pretty big so be cautious.
Hint: The logfile text box allows you to specify the file name that the log will be added to or replaced.
To make viewing and editing easy, it is recommended that you use the .txt file extension.
9.2 Conclusion
With the options covered in this section you should now almost be a wGet guru. Downloading files has
never been easier and, now, keeping logs and reliable records of what you have downloaded is a really easy
task.
24
10.
Conclusion
With all that was reviewed, you should be on your way to getting files in a fast and efficient manner that
will appease even the most download hungry internet aficionados.
With this in mind, it is strongly encouraged that you review the original wGet documentation should you
wish to get even more out of the wGet software.
Congratulations, you are now a wGet power user and can begin downloading files automatically from the
World Wide Web almost immediately.
25
References
Roesner, Jens. "-- wGetGUI -- the easy to use Graphical User Interface (GUI) for wGet ". March 06, 2007
<http://www.jensroesner.de/wgetgui/>.
Hrvoje, Nikši . "GNU Wget - GNU Project - Free Software Foundation (FSF)". Free Software Foundation
, Inc. March 06, 2007 <http://www.gnu.org/software/wget/>.
26