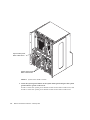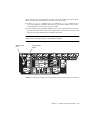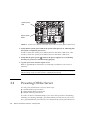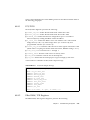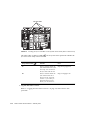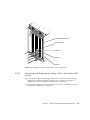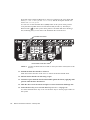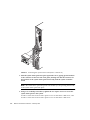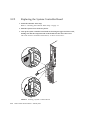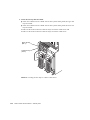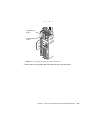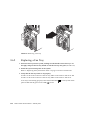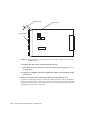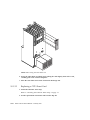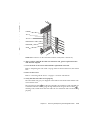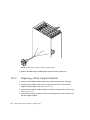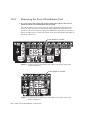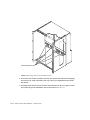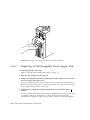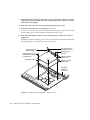
1
Netra™ ct Server Service Manual
Sun Microsystems, Inc.
901 San Antonio Road
Palo Alto, CA 94303
U.S.A. 650-960-1300
Part No. 806-3296-11
February 2001, Revision A
Send comments about this document to: [email protected]
Copyright 2001 Sun Microsystems, Inc., 901 San Antonio Road, Palo Alto, CA 94303-4900 U.S.A. All rights reserved.
This product or document is distributed under licenses restricting its use, copying, distribution, and decompilation. No part of this product or
document may be reproduced in any form by any means without prior written authorization of Sun and its licensors, if any. Third-party
software, including font technology, is copyrighted and licensed from Sun suppliers.
Parts of the product may be derived from Berkeley BSD systems, licensed from the University of California. UNIX is a registered trademark in
the U.S. and other countries, exclusively licensed through X/Open Company, Ltd.
Sun, Sun Microsystems, the Sun logo, AnswerBook2, docs.sun.com, Netra, and Solaris are trademarks, registered trademarks, or service marks
of Sun Microsystems, Inc. in the U.S. and other countries. All SPARC trademarks are used under license and are trademarks or registered
trademarks of SPARC International, Inc. in the U.S. and other countries. Products bearing SPARC trademarks are based upon an architecture
developed by Sun Microsystems, Inc.
The OPEN LOOK and Sun™ Graphical User Interface was developed by Sun Microsystems, Inc. for its users and licensees. Sun acknowledges
the pioneering efforts of Xerox in researching and developing the concept of visual or graphical user interfaces for the computer industry. Sun
holds a non-exclusive license from Xerox to the Xerox Graphical User Interface, which license also covers Sun’s licensees who implement OPEN
LOOK GUIs and otherwise comply with Sun’s written license agreements.
Federal Acquisitions: Commercial Software—Government Users Subject to Standard License Terms and Conditions.
DOCUMENTATION IS PROVIDED “AS IS” AND ALL EXPRESS OR IMPLIED CONDITIONS, REPRESENTATIONS AND WARRANTIES,
INCLUDING ANY IMPLIED WARRANTY OF MERCHANTABILITY, FITNESS FOR A PARTICULAR PURPOSE OR NON-INFRINGEMENT,
ARE DISCLAIMED, EXCEPT TO THE EXTENT THAT SUCH DISCLAIMERS ARE HELD TO BE LEGALLY INVALID.
Copyright 2001 Sun Microsystems, Inc., 901 San Antonio Road, Palo Alto, CA 94303-4900 Etats-Unis. Tous droits réservés.
Ce produit ou document est distribué avec des licences qui en restreignent l’utilisation, la copie, la distribution, et la décompilation. Aucune
partie de ce produit ou document ne peut être reproduite sous aucune forme, par quelque moyen que ce soit, sans l’autorisation préalable et
écrite de Sun et de ses bailleurs de licence, s’il y en a. Le logiciel détenu par des tiers, et qui comprend la technologie relative aux polices de
caractères, est protégé par un copyright et licencié par des fournisseurs de Sun.
Des parties de ce produit pourront être dérivées des systèmes Berkeley BSD licenciés par l’Université de Californie. UNIX est une marque
déposée aux Etats-Unis et dans d’autres pays et licenciée exclusivement par X/Open Company, Ltd.
Sun, Sun Microsystems, le logo Sun, AnswerBook2, docs.sun.com, Netra, et Solaris sont des marques de fabrique ou des marques déposées, ou
marques de service, de Sun Microsystems, Inc. aux Etats-Unis et dans d’autres pays. Toutes les marques SPARC sont utilisées sous licence et
sont des marques de fabrique ou des marques déposées de SPARC International, Inc. aux Etats-Unis et dans d’autres pays. Les produits portant
les marques SPARC sont basés sur une architecture développée par Sun Microsystems, Inc.
L’interface d’utilisation graphique OPEN LOOK et Sun™ a été développée par Sun Microsystems, Inc. pour ses utilisateurs et licenciés. Sun
reconnaît les efforts de pionniers de Xerox pour la recherche et le développement du concept des interfaces d’utilisation visuelle ou graphique
pour l’industrie de l’informatique. Sun détient une licence non exclusive de Xerox sur l’interface d’utilisation graphique Xerox, cette licence
couvrant également les licenciés de Sun qui mettent en place l’interface d’utilisation graphique OPEN LOOK et qui en outre se conforment aux
licences écrites de Sun.
LA DOCUMENTATION EST FOURNIE “EN L’ETAT” ET TOUTES AUTRES CONDITIONS, DECLARATIONS ET GARANTIES EXPRESSES
OU TACITES SONT FORMELLEMENT EXCLUES, DANS LA MESURE AUTORISEE PAR LA LOI APPLICABLE, Y COMPRIS NOTAMMENT
TOUTE GARANTIE IMPLICITE RELATIVE A LA QUALITE MARCHANDE, A L’APTITUDE A UNE UTILISATION PARTICULIERE OU A
L’ABSENCE DE CONTREFAÇON.
Please
Recycle
Contents
Part I
1.
Preparing for Service
Preparing for FRU Installation and Replacement
1.1
Tools Required
1.2
Attaching the Antistatic Wrist Strap
1.3
Determining If You Have a Front-Access or Rear-Access Model
1.4
FRU Categories
1.5
2.
3.
1-1
1-1
1-3
1-4
1.4.1
Hot-Swappable FRUs
1.4.2
Cold-Swappable FRUs
Device Names
1-1
1-4
1-5
1-5
1.5.1
Device Names for I/O Card Slots in the Netra ct Servers
1.5.2
Device Names for Hard Disk Drives
Powering the Server Off and On
1-6
2-1
2.1
Powering On the Server
2-1
2.2
Powering Off the Server
2-6
Handling Cards and Assemblies
1-5
3-1
3.1
Handling CompactPCI Cards
3.2
Handling Assemblies
3-1
3-2
Contents
iii
Part II
Troubleshooting the System
4.
Troubleshooting the System
4.1
5.
Troubleshooting the System Using the System Status Panel
4-1
4.1.1
Locating and Understanding the System Status Panel
4-2
4.1.2
Using the System Status Panel LEDs to Troubleshoot the System
4-3
4.2
Troubleshooting the System Using envmond
4-7
4.3
Troubleshooting the System Using prtdiag
4-7
4.4
Troubleshooting the System Using the SunVTS Test Suite
4.5
Troubleshooting the System Using the Power-On Self Test (POST)
4.6
Troubleshooting the System Using the Remote System Control (RSC)
4-14
4.7
Troubleshooting a Power Supply Using the Power Supply Unit LEDs
4-14
4.8
Part III
4-1
4-12
4.7.1
Troubleshooting the Power Supply Unit in the Netra ct 400
Server 4-15
4.7.2
Troubleshooting the Power Supply Units in the Netra ct 800
Server 4-15
Troubleshooting a CPU Card
4-12
4-16
4.8.1
General Troubleshooting Tips
4-17
4.8.2
General Troubleshooting Requirements
4.8.3
Mechanical Failures
4.8.4
Power-On Failures
4.8.5
Failures Subsequent to Power-On
4.8.6
Troubleshooting During POST/OBP and During Boot Process
22
4.8.7
OpenBoot PROM On-Board Diagnostics
4.8.8
OpenBoot Diagnostics (OB Diag)
4-21
4-21
4-21
4-22
4-
4-23
4-27
Replacing Hot-Swappable FRUs
Hot Swap Software Commands
5-1
5.1
5-2
Using the cfgadm Utility
Contents
iv
6.
6.2
5.1.2
Running the cfgadm Utility
5-2
5-2
Front-Access Models
6-1
6-2
6.1.1
I/O Card
6-2
6.1.2
Alarm Card
6-18
Rear-Access Models
6-39
6.2.1
Front I/O Card and I/O Rear Transition Card
6-40
6.2.2
Alarm Rear Transition Card (Netra ct 800 Server Only)
Removing and Replacing Hard Disk Drives and Removeable Media
7.1
7.2
8.
Logging In to the Netra ct Server
Removing and Replacing Hot-Swappable Cards
6.1
7.
5.1.1
Hard Disk Drive
8.2
8.3
7.1.1
Removing a Hard Disk Drive
7.1.2
Installing a Hard Disk Drive
7-2
7-7
CD-ROM/DVD or DAT Drive (Netra ct 800 Server Only)
7.2.1
Removing a CD-ROM/DVD or DAT Drive
7-9
7.2.2
Installing a CD-ROM/DVD or DAT Drive
7-11
8.4
System Status Panel
Removing the System Status Panel
8-2
8.1.2
Replacing the System Status Panel
8-5
System Controller Board
8-1
8-7
8.2.1
Removing the System Controller Board
8-7
8.2.2
Replacing the System Controller Board
8-10
8-11
8.3.1
Removing the Main Air Filter
8-11
8.3.2
Replacing the Main Air Filter
8-13
Power Supply Unit
8.4.1
7-8
8-1
8.1.1
Main Air Filter
7-1
7-1
Removing and Replacing Hot-Swappable Subassemblies
8.1
6-51
8-14
Removing a Hot-Swappable Power Supply Unit
8-14
Contents
v
8.4.2
8.5
8.6
Part IV
9.
8.5.1
Removing a Power Supply Unit Air Filter
8-18
8.5.2
Replacing a Power Supply Unit Air Filter
8-21
Fan Tray
8-22
8.6.1
Removing a Fan Tray
8-22
8.6.2
Replacing a Fan Tray
8-26
Servers
9-1
9-1
9.1.1
Removing a Server
9-1
9.1.2
Replacing a Server
9-9
Removing and Replacing Cold-Swappable Cards
10.2
Front-Access Models
10-1
10-1
10.1.1
CPU Card
10-2
10.1.2
CPU Front Transition Card
10.1.3
CPU Shunt Card (Netra ct 800 Server Only)
Rear-Access Models
10-10
10-17
10-19
10.2.1
CPU Card
10-19
10.2.2
CPU Rear Transition Card
10-26
Removing and Replacing Cold-Swappable Subassemblies
11.1
11.2
vi
8-18
Removing and Replacing the Servers
10.1
11.
Power Supply Unit Air Filter
8-17
Replacing Cold-Swappable FRUs
9.1
10.
Replacing a Hot-Swappable Power Supply Unit
Hard Disk Drive
11-1
11.1.1
Removing a Hard Disk Drive
11-2
11.1.2
Replacing a Hard Disk Drive
11-4
Disk Adapter Module (Netra ct 400 Server Only)
11.2.1
Removing a Disk Adapter Module
11-5
11.2.2
Replacing a Disk Adapter Module
11-6
Netra ct Server Service Manual • February 2001
11-5
11-1
11.3
11.4
11.5
11.6
SCSI Termination Board (Netra ct 800 Server Only)
11.3.1
Removing a SCSI Termination Board
11-7
11.3.2
Replacing a SCSI Termination Board
11-8
Power Distribution Unit
11-8
11.4.1
Removing the Power Distribution Unit
11-10
11.4.2
Replacing the Power Distribution Unit
11-15
Front-Access Cable (Front-Access Models Only)
11.5.1
Removing the Front-Access Cable
11.5.2
Replacing a Front-Access Cable
Power Supply Unit
11-16
11-16
11-19
11-19
11.6.1
Removing a Cold-Swappable Power Supply Unit
11-19
11.6.2
Replacing a Cold-Swappable Power Supply Unit
11-22
Part V
Illustrated Parts Breakdown
12.
Illustrated Parts Breakdown
Part VI
11-7
12-1
12.1
Chassis Components
12-2
12.2
Netra ct 800 Server
12-4
12.3
Netra ct 400 Server
12-6
Appendixes, Glossary, and Index
A. Connector Pinouts
A.1
A.2
CPU Card
A-1
A-2
A.1.1
Ethernet Port
A.1.2
COM Port
A-3
A-4
CPU Front Transition Card, Netra ct 800 Server
A.2.1
Parallel Port
A.2.2
Ethernet B Port
A.2.3
TTY A
A-8
A.2.4
TTY B
A-9
A.2.5
SCSI-3
A-10
A-5
A-6
A-7
Contents
vii
A.3
A.4
A.5
A.6
A.7
CPU Front Transition Card, Netra ct 400 Server
A.3.1
SCSI (VHDC)
A.3.2
Parallel Port
A.3.3
Ethernet B Port
A.3.4
TTY B
A-13
A-14
A-15
A-16
CPU Rear Transition Card
A-17
A.4.1
Parallel Port
A-19
A.4.2
TTY A
A-20
A.4.3
TTY B
A-21
A.4.4
Ethernet A Port
A-22
A.4.5
Ethernet B Port
A-23
A.4.6
SCSI (VHDC)
A-24
Alarm Card, Netra ct 800 Server
A.5.1
Alarm Port
A.5.2
Ethernet Port
A.5.3
COM 1
A-28
A.5.4
COM 2
A-29
A-25
A-26
A-27
Alarm Card, Netra ct 400 Server
A.6.1
COM 2
A-31
A.6.2
COM 1
A-32
A.6.3
Alarm Port
A.6.4
Ethernet Port
A-30
A-33
A-34
Alarm Rear Transition Card, Netra ct 800 Server
A.7.1
Ethernet Port
A-36
A.7.2
COM 2
A-37
A.7.3
COM 1
A-38
A.7.4
Alarm Port
A-39
B. Connecting a Terminal Console to the Server
B.1
viii
A-12
To Use an ASCII Terminal
Netra ct Server Service Manual • February 2001
B-1
B-1
A-35
B.2
To Use a Solaris Workstation
B.3
To Use a PC Laptop
C. Error Messages
B-5
C-1
C.1
scsb Error Messages
C.2
Anticipated Hardware Failure
C-2
C.2.1
Transient Interrupts
C.2.2
Soft Hang
I2C Complaints
C.4
Bus Busy Complaints
D. System Specifications
C-8
C-8
C-8
C.3
C-9
C-10
D-1
D.1
Physical Specifications
D.2
Electrical Specifications
D.3
Environmental Specifications
E. Upgrading CPU Memory
E.1
B-3
Memory Installation
D-1
D-2
D-3
E-1
E-1
E.1.1
Memory Configurations
E-1
E.1.2
Memory Installation Procedure
E-2
Contents
ix
x
Netra ct Server Service Manual • February 2001
Figures
FIGURE 1-1
Attaching the Antistatic Wrist Strap 1-2
FIGURE 1-2
Front-Access and Rear-Access Models 1-3
FIGURE 2-1
Locating the Power Supply Locking Mechanism on the Netra ct 800 Server 2-2
FIGURE 2-2
Locating the Power Supply Locking Mechanism on the Netra ct 400 Server 2-3
FIGURE 2-3
System Status Panel Locations 2-4
FIGURE 2-4
System Power Button and System Power LED Locations (Netra ct 800 Server) 2-5
FIGURE 2-5
System Power Button and System Power LED Locations (Netra ct 400 Server) 2-6
FIGURE 4-1
System Status Panel Locations 4-2
FIGURE 4-2
System Status Panel (Netra ct 800 Server) 4-3
FIGURE 4-3
System Status Panel (Netra ct 400 Server) 4-3
FIGURE 4-4
Power and Okay to Remove LEDs 4-4
FIGURE 4-5
Power and Fault LEDs
FIGURE 4-6
Connectors on the CPU Front Transition Card (Netra ct 800 Server) 4-18
FIGURE 4-7
Connectors on the CPU Front Transition Card (Netra ct 400 Server) 4-19
FIGURE 4-8
Connectors on the CPU Rear Transition Card (Netra ct 800 Server) 4-20
FIGURE 4-9
Connectors on the CPU Rear Transition Card (Netra ct 400 Server) 4-20
FIGURE 6-1
I/O Card Slots (Netra ct 800 Server) 6-3
FIGURE 6-2
Buses for the Netra ct 800 Server (Front View) 6-4
FIGURE 6-3
I/O Card Slots (Netra ct 400 Server) 6-5
4-4
xi
xii
FIGURE 6-4
Buses for the Netra ct 400 Server (Front View) 6-6
FIGURE 6-5
Loosening the Ejection Lever Captive Screws
FIGURE 6-6
Unlocking the Ejection Levers
FIGURE 6-7
Locating the I/O Card LEDs on the System Status Panel (Netra ct 800 Server) 6-9
FIGURE 6-8
Locating the I/O Card LEDs on the System Status Panel (Netra ct 400 Server) 6-10
FIGURE 6-9
Aligning the Card with the Card Cage Cutouts
6-14
FIGURE 6-10
Tightening the Ejection Lever Captive Screws
6-17
FIGURE 6-11
Location of Alarm Card in Netra ct 800 Server 6-20
FIGURE 6-12
Unlocking the Ejection Levers
FIGURE 6-13
Locating the Alarm Card LEDs on the System Status Panel (Netra ct 800 Server) 6-22
FIGURE 6-14
Plugging in Cables in Alarm Card in Netra ct 800 Server 6-29
FIGURE 6-15
Location of Alarm Card in Netra ct 400 Server 6-31
FIGURE 6-16
Unlocking the Ejection Lever
FIGURE 6-17
Locating the Alarm Card LEDs on the System Status Panel (Netra ct 400 Server) 6-33
FIGURE 6-18
Connectors on the Alarm Card (Netra ct 400 Server) 6-39
FIGURE 6-19
Buses for the Netra ct 800 Server (Front View) 6-41
FIGURE 6-20
Buses for the Netra ct 400 Server (Front View) 6-42
FIGURE 6-21
Locating the Alarm Rear Transition Card (RTC) in the Rear-Access Model of Netra ct 800
Server (Top View) 6-52
FIGURE 6-22
Connectors on the Alarm Rear Transition Card 6-54
FIGURE 7-1
Drive Bay Cover Locations 7-3
FIGURE 7-2
Locating the Hard Disk Drive LEDs on the System Status Panel (Netra ct 800 Server) 7-6
FIGURE 7-3
Removing the Removeable Media Module from a Netra ct 800 Server 7-11
FIGURE 8-1
System Status Panel Locations
FIGURE 8-2
Removing the System Status Panel (Netra ct 800 Server) 8-3
FIGURE 8-3
Removing the System Status Panel (Netra ct 400 Server) 8-4
FIGURE 8-4
Positioning the System Status Panel (Netra ct 800 Server) 8-5
FIGURE 8-5
Positioning the System Status Panel (Netra ct 400 Server) 8-6
6-7
6-8
6-21
6-32
Netra ct Server Service Manual • February 2001
8-2
FIGURE 8-6
Locating the System Controller Board LEDs on the System Status Panel (Netra ct 800
Server) 8-8
FIGURE 8-7
Locating the System Controller Board LEDs on the System Status Panel (Netra ct 400
Server) 8-8
FIGURE 8-8
Removing a System Controller Board
FIGURE 8-9
Inserting a System Controller Board 8-10
FIGURE 8-10
Locating the Main Air Filter (Netra ct 800 Server) 8-12
FIGURE 8-11
Locating the Main Air Filter (Netra ct 400 Server) 8-13
FIGURE 8-12
Locating the Power Supply Unit LEDs on the System Status Panel (Netra ct 800 Server) 815
FIGURE 8-13
Unlocking a Power Supply Unit 8-16
FIGURE 8-14
Removing a Power Supply Unit 8-17
FIGURE 8-15
Removing a Power Supply Unit Air Filter from a Netra ct 800 Server 8-19
FIGURE 8-16
Removing a Power Supply Unit Air Filter from a Netra ct 400 Server 8-20
FIGURE 8-17
Removing a Power Supply Unit Air Filter 8-21
FIGURE 8-18
Locating the Fan Tray LEDs on the System Status Panel (Netra ct 800 Server) 8-23
FIGURE 8-19
Locating the Fan Tray LEDs on the System Status Panel (Netra ct 400 Server) 8-23
FIGURE 8-20
Locating the Fan Trays in a Netra ct 800 Server 8-24
FIGURE 8-21
Locating the Fan Trays in a Netra ct 400 Server 8-25
FIGURE 8-22
Removing a Fan Tray
FIGURE 9-1
Power Supply Units and Power Distribution Units (PDUs)
FIGURE 9-2
Loosening the Screws at the Top and Bottom of a Netra ct 800 Server 9-5
FIGURE 9-3
Loosening the Screws at the Top and Bottom of a Netra ct 400 Server 9-6
FIGURE 9-4
Removing or Inserting a Netra ct 800 Server
9-7
FIGURE 9-5
Removing or Inserting a Netra ct 400 Server
9-8
FIGURE 10-1
CPU Card Locations
FIGURE 10-2
Loosening the Ejection Lever Captive Screws 10-4
FIGURE 10-3
Removing the Host ID Board 10-5
FIGURE 10-4
Aligning the Card with the Card Cage Cutouts
10-7
FIGURE 10-5
Tightening the Ejection Lever Captive Screws
10-8
8-9
8-26
9-2
10-3
Figures
xiii
xiv
FIGURE 10-6
Connectors on the CPU Card
FIGURE 10-7
CPU Front Transition Card Locations in a Netra ct 800 Server 10-11
FIGURE 10-8
CPU Front Transition Card Location in a Netra ct 400 Server 10-12
FIGURE 10-9
Proper Orientation for the Ejector Lever for Netra ct 400 Server CPU Front Transition
Card 10-14
FIGURE 10-10
Connectors on the CPU Front Transition Card (Netra ct 800 Server) 10-15
FIGURE 10-11
Connectors on the CPU Front Transition Card (Netra ct 400 Server) 10-16
FIGURE 10-12
Locating the CPU Shunt Cart 10-18
FIGURE 10-13
CPU Card Locations
FIGURE 10-14
Loosening the Ejection Lever Captive Screws
FIGURE 10-15
Removing the Host ID Board 10-22
FIGURE 10-16
Aligning the Card with the Card Cage Cutouts
10-24
FIGURE 10-17
Tightening the Ejection Lever Captive Screws
10-25
FIGURE 10-18
Connectors on the CPU Card
FIGURE 10-19
Locating the CPU Rear Transition Card in the Rear-Access Model of a Netra ct 800 Server
(Top View) 10-28
FIGURE 10-20
Locating the CPU Rear Transition Card in the Rear-Access Model of a Netra ct 400 Server
(Top View) 10-28
FIGURE 10-21
Aligning the Card with the Rear Card Cage Cutouts 10-29
FIGURE 10-22
Connectors on the CPU Rear Transition Card (Netra ct 800 Server) 10-30
FIGURE 10-23
Connectors on the CPU Rear Transition Card (Netra ct 400 Server) 10-31
FIGURE 11-1
Drive Bay Cover Locations 11-3
FIGURE 11-2
Removing the Disk Adapter Module 11-5
FIGURE 11-3
Removing the Disk Adapter Module Holder
FIGURE 11-4
Locating the SCSI Termination Board
FIGURE 11-5
Locating the Power Distribution Units 11-9
FIGURE 11-6
Locating the Power Distribution Unit LEDs on the System Status Panel (Netra ct 800
Server) 11-10
FIGURE 11-7
Locating the Power Distribution Unit LEDs on the System Status Panel (Netra ct 400
Server) 11-10
FIGURE 11-8
Unplugging the DC Input Power Cable From the DC Connector, Rear-Access Model
10-9
10-20
10-21
10-26
Netra ct Server Service Manual • February 2001
11-6
11-7
11-12
FIGURE 11-9
Unplugging the DC Input Power Cable From the DC Connector, Front-Access Model
FIGURE 11-10
Locating the Power Distribution Units 11-14
FIGURE 11-11
Removing the Power Distribution Unit 11-15
FIGURE 11-12
Unplugging the DC Input Power Cable From the DC Connector, Front-Access Model
FIGURE 11-13
Loosening the Front-Access Cable Screws 11-18
FIGURE 11-14
Removing or Replacing a Power Supply Unit From a Netra ct 800 Server 11-20
FIGURE 11-15
Removing or Replacing a Power Supply Unit From a Netra ct 400 Server 11-21
FIGURE 11-16
Removing a Power Supply Unit From a Netra ct 800 Server 11-22
FIGURE 12-1
Illustrated Parts Breakdown, Chassis and Rear-Access Model Components
FIGURE 12-2
Illustrated Parts Breakdown, Netra ct 800 Server
12-5
FIGURE 12-3
Illustrated Parts Breakdown, Netra ct 400 Server
12-7
FIGURE A-1
Connectors on the CPU Card
FIGURE A-2
RJ-45 Ethernet Connector Diagram
FIGURE A-3
CPU Card Front Panel TTYA Diagram
FIGURE A-4
Connectors on the CPU Front Transition Card (Netra ct 800 Server) A-5
FIGURE A-5
Parallel Connector A-6
FIGURE A-6
RJ-45 Ethernet Connector Diagram
FIGURE A-7
TTY A Connector A-8
FIGURE A-8
TTY B Connector A-9
FIGURE A-9
SCSI-3 Connector
FIGURE A-10
Connectors on the CPU Front Transition Card (Netra ct 400 Server) A-12
FIGURE A-11
Parallel Connector A-14
FIGURE A-12
RJ-45 Ethernet Connector Diagram
FIGURE A-13
TTY B Connector A-16
FIGURE A-14
Connectors on the CPU Rear Transition Card (Netra ct 800 Server) A-17
FIGURE A-15
Connectors on the CPU Rear Transition Card (Netra ct 400 Server) A-18
FIGURE A-16
Parallel Connector A-19
FIGURE A-17
TTY A Connector A-20
11-13
11-17
12-3
A-2
A-3
A-4
A-7
A-10
A-15
Figures
xv
xvi
FIGURE A-18
TTY B Connector A-21
FIGURE A-19
RJ-45 Ethernet Connector Diagram
A-22
FIGURE A-20
RJ-45 Ethernet Connector Diagram
A-23
FIGURE A-21
Connector Ports in the Alarm Card in Netra ct 800 Server A-25
FIGURE A-22
Alarm Port
FIGURE A-23
RJ-45 Ethernet Connector Diagram
FIGURE A-24
COM 1 Connector A-28
FIGURE A-25
COM 2 Connector A-29
FIGURE A-26
Connectors on the Alarm Card (Netra ct 400 Server) A-30
FIGURE A-27
RJ-45 COM Connector Diagram A-31
FIGURE A-28
RJ-45 COM Connector Diagram A-32
FIGURE A-29
Alarm Port
FIGURE A-30
RJ-45 Ethernet Connector Diagram
FIGURE A-31
Connectors on the Alarm Rear Transition Card A-35
FIGURE A-32
RJ45 Ethernet Connector Diagram A-36
FIGURE A-33
COM 2 Connector A-37
FIGURE A-34
COM 1 Connector A-38
FIGURE A-35
Alarm Port
FIGURE E-1
Installing a Memory Module on the CPU Card E-4
FIGURE E-2
Seating the Memory Module
A-26
A-27
A-33
A-34
A-39
E-5
Netra ct Server Service Manual • February 2001
Tables
TABLE 1-1
Device Names for I/O Card Slots in the Netra ct 800 Server 1-5
TABLE 1-2
Device Names for I/O Card Slots in the Netra ct 400 Server 1-6
TABLE 4-1
System Status Panel LEDs for the Netra ct 800 Server 4-4
TABLE 4-2
System Status Panel LEDs for the Netra ct 400 Server 4-5
TABLE 4-3
Meanings of Power and Okay to Remove LEDs
TABLE 4-4
Meanings of Power and Fault LEDs 4-6
TABLE 4-5
Selected OBP On-Board Diagnostic Tests
TABLE 5-1
Example Output for Basic Hot Swap Systems
TABLE 5-2
Example Output for Full Hot Swap Systems 5-6
TABLE 12-1
FRUs for the Chassis
TABLE 12-2
FRUs for the Netra ct 800 Server 12-4
TABLE 12-3
FRUs for the Netra ct 400 Server 12-6
TABLE A-1
Ethernet Connector Pinouts, CPU Card (J2301)
TABLE A-2
Parallel Port Pinouts, CPU FTC for the Netra ct 800 Server A-6
TABLE A-3
Ethernet B Connector Pinouts, CPU FTC for the Netra ct 800 Server A-7
TABLE A-4
TTY A Port Pinouts, CPU FTC for the Netra ct 800 Server A-8
TABLE A-5
TTY B Port Pinouts, CPU FTC for Netra ct 800 Server A-9
TABLE A-6
SCSI Port Pinouts, CPU FTC for Netra ct 800 Server A-10
TABLE A-7
SCSI Port Pinouts, CPU FTC for the Netra ct 400 Server A-13
TABLE A-8
Parallel Port Pinouts, CPU FTC for the Netra ct 400 Server A-14
4-6
4-26
5-6
12-2
A-3
xvii
xviii
TABLE A-9
Ethernet B Connector Pinouts, CPU FTC for the Netra ct 400 Server A-15
TABLE A-10
TTY B Port Pinouts, CPU FTC for the Netra ct 400 Server A-16
TABLE A-11
Parallel Port Pinouts, CPU RTC A-19
TABLE A-12
TTY A Port Pinouts, CPU RTC A-20
TABLE A-13
TTY B Port Pinouts, CPU RTC A-21
TABLE A-14
Ethernet Connector Pinouts, CPU RTC
A-22
TABLE A-15
Ethernet Connector Pinouts, CPU RTC
A-23
TABLE A-16
SCSI Port Pinouts, CPU RTC A-24
TABLE A-17
Alarm Port Pinouts, Alarm RTC for the Netra ct 800 Server A-26
TABLE A-18
Ethernet Connector Pinouts, Alarm Card for the Netra ct 800 Server A-27
TABLE A-19
COM 1 Connector Pinouts, Alarm Card for the Netra ct 800 Server A-28
TABLE A-20
COM 2 Connector Pinouts, Alarm Card for the Netra ct 800 Server A-29
TABLE A-21
COM 2 Connector Pinouts, Alarm Card for the Netra ct 400 Server A-31
TABLE A-22
COM 1 Connector Pinouts, Alarm Card for the Netra ct 400 Server A-32
TABLE A-23
Alarm Port Pinouts, Alarm Card for the Netra ct 400 Server A-33
TABLE A-24
Ethernet Connector Pinouts, Alarm Card for Netra ct 400 Server A-34
TABLE A-25
Ethernet Connector Pinout, Alarm RTC for the Netra ct 800 Server A-36
TABLE A-26
COM 2 Connector Pinouts, Alarm RTC for the Netra ct 800 Server A-37
TABLE A-27
COM 1 Connector Pinouts, Alarm RTC for the Netra ct 800 Server A-38
TABLE A-28
Alarm Port Pinouts, Alarm RTC for the Netra ct 800 Server A-39
TABLE B-1
Connecting an ASCII Terminal to a CPU or CPU Transition Card B-2
TABLE B-2
Connecting an ASCII Terminal to an Alarm or Alarm Rear Transition Card B-2
TABLE B-3
Connecting a Solaris Workstation to a CPU or CPU Transition Card B-4
TABLE B-4
Connecting a Solaris Workstation to an Alarm or Alarm Rear Transition Card B-4
TABLE B-5
Connecting a PC Laptop to a CPU or CPU Transition Card B-5
TABLE B-6
Connecting a PC Laptop to an Alarm or Alarm Rear Transition Card B-6
TABLE D-1
Physical Specifications, Netra ct Chassis
TABLE D-2
Physical Specifications, Netra ct 800 Server D-2
TABLE D-3
Physical Specifications, Netra ct 400 Server D-2
TABLE D-4
DC Power Requirements D-2
Netra ct Server Service Manual • February 2001
D-1
TABLE D-5
Environmental Specifications D-3
TABLE E-1
Permissible Memory Configurations on the CPU Card
TABLE E-2
Memory Sizes and Part Numbers E-2
E-1
Tables
xix
xx
Netra ct Server Service Manual • February 2001
Preface
The Netra ct Server Service Manual contains procedures for the removal and
replacement of the field-replaceable units (FRUs) in a Netra™ ct server.
The intended reader of this manual is a service provider or experienced system
administrator who has experience installing hardware—systems and components—
and has used the Solaris™ operating environment. The reader should be
comfortable with LAN fundamentals and with networking in general.
Before performing the procedures described in this book, you should have
completed the installation and setup of the Netra ct server as described in the
Netra ct Server Installation Guide.
Safety and Compliance
All Netra ct servers are shipped with the Netra ct Server Safety and Compliance
Manual, which specifies the environmental and electrical safety requirements for the
product and contains compliance certification for various countries.
How This Book Is Organized
Part I “Preparing for Service”
Chapter 1 describes the procedures you need to perform before installing, removing,
or replacing field-replaceable units (FRUs) in a Netra ct server.
xxi
Chapter 2 gives the hardware and software procedures for powering the Netra ct
server on and off.
Chapter 3 provides instructions for handling the cPCI cards and assemblies correctly.
Part II “Troubleshooting the System”
Chapter 4 provides troubleshooting procedures for the Netra ct server.
Part III “Replacing Hot-Swappable FRUs”
Chapter 5 describes the hot-swap software commands.
Chapter 6 gives instructions for removing and replacing hot-swappable cards.
Chapter 7 contains instructions for removing and replacing hard disk drives and
removable media.
Chapter 8 gives instructions for removing and replacing hot-swappable
subassemblies.
Part IV “Replacing Cold-Swappable FRUs”
Chapter 9 provides instructions for removing and replacing the Netra ct 800 server
and Netra ct 400 server.
Chapter 10 gives instructions for removing and replacing cold-swappable cards.
Chapter 11 gives instructions for removing and replacing cold-replaceable
subassemblies.
Part V “Illustrated Parts Breakdown”
Chapter 12 gives the illustrated parts breakdown for the Netra ct server.
Part VI “Appendixes, Glossary, and Index”
Appendix A lists the connector pinouts for the cards in the Netra ct server.
Appendix B provides instructions for connecting a terminal console to the server.
Appendix C gives the error messages for the Netra ct server.
Appendix D gives the system specifications for the Netra ct server.
Appendix E tells how to upgrade the memory on the CPU card installed in the
Netra ct server.
xxii
Netra ct Server Service Manual • February 2001
Using UNIX Commands
This document contains only limited information on basic UNIX® commands and
procedures such as shutting down the system, booting the system, and configuring
devices.
See one or more of the following for this information:
■
Solaris Handbook for Sun Peripherals (shipped in AnswerBook2™ form, available in
printed form as an at-cost option)
■
AnswerBook online documentation for the Solaris software environment
■
Other software documentation that you received with your system
Typographic Conventions
Typeface or
Symbol
Meaning
Examples
AaBbCc123
The names of commands, files,
and directories; on-screen
computer output
Edit your .login file.
Use ls -a to list all files.
% You have mail.
AaBbCc123
What you type, when
contrasted with on-screen
computer output
% su
Password:
AaBbCc123
Book titles, new words or terms,
words to be emphasized
Read Chapter 6 in the User’s Guide.
These are called class options.
You must be superuser to do this.
Command-line variable; replace
with a real name or value
To delete a file, type rm filename.
Preface
xxiii
Shell Prompts
Shell
Prompt
C shell
machine_name%
C shell superuser
machine_name#
Bourne shell and Korn shell
$
Bourne shell and Korn shell superuser
#
Related Documentation
In addition to this manual, the Netra ct server is accompanied by the following
manuals:
Title
Part Number
Netra ct Server Start Here
806-5161
Netra ct Server Product Notes
806-3299
Netra ct Server Safety and Compliance Manual
806-3295
Netra ct Server Product Overview
806-3298
Netra ct Server Installation Guide
806-3294
Sun Remote System Control (RSC) User’s Guide for
Netra ct Server Alarm Card
806-3301
Depending on the options you might have purchased for your machine, you might
have also received manuals for network interface cards.
As mentioned above, as a Netra ct server purchaser, you receive a suite of online
documentation for the Solaris operating environment.
xxiv
Netra ct Server Service Manual • February 2001
Accessing Sun Documentation Online
Documentation and product information for the Netra product line is available at:
http://www.sun.com/products-n-solutions/hw/networking
The docs.sun.comsm web site enables you to access Sun technical documentation
for the Solaris operating environment on the Web. You can browse the
docs.sun.com archive or search for a specific book title or subject at:
http://docs.sun.com
Ordering Sun Documentation
Fatbrain.com, an Internet professional bookstore, stocks select product
documentation from Sun Microsystems, Inc.
For a list of documents and how to order them, visit the Sun Documentation Center
on Fatbrain.com at:
http://www.fatbrain.com/documentation/sun
Sun Welcomes Your Comments
Sun is interested in improving its documentation and welcomes your comments and
suggestions. You can email your comments to Sun at:
[email protected]
Please include the part number (806-3296-11) of your document in the subject line of
your email.
Preface
xxv
xxvi
Netra ct Server Service Manual • February 2001
PART
I
Preparing for Service
Preparing for FRU Installation and Replacement
Chapter 1
Powering the Server Off and On
Chapter 2
Handling Cards and Assemblies
Chapter 3
Netra ct Server Service Manual
CHAPTER
1
Preparing for FRU Installation and
Replacement
This chapter describes the steps you need to take before you install, remove, or
replace a field-replaceable unit (FRU) in your Netra ct server. This chapter is divided
into the following sections:
■
■
■
■
■
1.1
“Tools Required” on page 1-1
“Attaching the Antistatic Wrist Strap” on page 1-1
“Determining If You Have a Front-Access or Rear-Access Model” on page 1-3
“FRU Categories” on page 1-4
“Device Names” on page 1-5
Tools Required
You will need the following tools to install, remove, or replace most of the
components in a Netra ct server:
■
■
1.2
No. 1 Phillips screwdriver
No. 2 Phillips screwdriver
Attaching the Antistatic Wrist Strap
Most field-replaceable units have sensitive electronic components that require
antistatic precautions.
1. Get the antistatic wrist strap and electrostatic discharge mat from the ship kit.
2. Place the electrostatic discharge mat close to the system.
1-1
3. Unwrap the first two folds of the wrist strap and wrap the adhesive side firmly
against your wrist.
4. Peel the liner from the copper foil at the opposite end of the wrist strap and attach
the copper end of the strap to a bare metal area on the Netra ct server or on the
chassis.
Comp
act
ETHE
PC TM
I
RN
CO
STAT
ET
M
US
ALAR
RE
RE
HD
D1
Comp
M
AD
Y
HD
D0
act
ETHE
PC TM
I
RN
ET
SET
AB
OR
T
CO
M
HD
D0
STAT
US
micro
syste
ms
ALAR
RE
RE
M
AD
Y
SET
AB
OR
T
micro
syste
ms
FIGURE 1-1
1-2
Attaching the Antistatic Wrist Strap
Netra ct Server Service Manual • February 2001
1.3
Determining If You Have a Front-Access
or Rear-Access Model
If you are not sure whether you have a front-access or a rear-access model, go to the
front of the chassis and look at the top part of the chassis.
■
If you see the DC connectors at the front of the chassis, then you have a
front-access model (FIGURE 1-2).
■
If you do not see DC connectors at the front of the chassis, and metal filler plates
fill the gaps where the DC connectors would normally be, then you have a
rear-access model (FIGURE 1-2). The DC connectors are at the rear of the chassis for
the rear-access model.
Rear-access model
Filler panels
Front-access model
DC connectors
Comp
Com
pac
ETH
tPC TM
I
ER
NE
act
ETHE
CO
CO
STA
PC TM
I
RN
ET
T
Comp
M
HD
M
D0
STAT
TUS
ALAR
RE
RE
Com
M
AD
Y
HD
D0
pac
ALAR
tPC TM
I
RE
ETH
ER
NE
T
RE
SET
AB
OR
CO
M
AD
OR
ET
Comp
M
HD
RE
RE
TUS
M
AD
PC TM
I
RN
CO
ET
M
HD
D0
Y
SET
AB
micros
act
ETHE
US
ALAR
M
HD
D0
STAT
T
D0
STA
PC TM
I
RN
CO
Y
SET
AB
T
act
ETHE
US
OR
STAT
US
T
micros
ystem
s
ALAR
RE
RE
ystem
ALAR
s
M
AD
RE
Y
RE
SET
AB
OR
AD
Y
SET
AB
T
M
OR
T
micros
ystem
s
micros
ystem
micros
s
ystem
s
FIGURE 1-2
Front-Access and Rear-Access Models
Chapter 1
Preparing for FRU Installation and Replacement
1-3
1.4
FRU Categories
In general, the FRUs in a Netra ct server can be divided into two categories:
■
Hot-installable/replaceable (referred to hereafter as hot-swappable), meaning that
you can install or remove and replace a FRU while the server is running, without
interrupting the operation of the server. This category of FRU sometimes requires
that you enter hot swap software commands before and after an installation or a
removal/replacement to incorporate the new FRU in the system correctly. For
more information on the hot swap commands, refer to Chapter 5.
■
Non-hot swappable, or cold-swappable, meaning that you must halt (and, in some
cases, also power off) the server before installing or removing and replacing a
FRU. Note that you must halt power only to the server where you would be
removing and replacing the FRUs; any other servers installed in the same chassis
can remain running.
Redundant power supplies and hard disk drives in a Netra ct 800 server are a
variation of the hot-swappable category. You can replace a single power supply in a
redundant configuration while the server is running, without having to enter any
software commands, or a single hard disk drive after you have unmounted the drive
or disengaged it if you are running a disk management software package.
1.4.1
Hot-Swappable FRUs
The FRUs listed below are hot-swappable:
■
■
■
■
■
■
■
■
■
■
■
I/O cards, both front-access and rear-access models
Alarm cards for both the Netra ct 800 server and the Netra ct 400 server1
Alarm rear transition cards (Netra ct 800 server, rear-access model only) 1
Second hard disk drive in a Netra ct 800 server
CD-ROM/DVD or DAT drives occupying the removeable media module
Fan trays
System status panels
System controller boards
Second power supply in a Netra ct 800 server
Power supply air filters
Main air filters
The instructions for removing and replacing these hot-swappable FRUs are covered
in Part III, “Replacing Hot-Swappable FRUs.”
1. The alarm card and alarm rear transition card are hot-swappable when the console is directed to the CPU or
CPU transition card. If console is directed to the alarm card or alarm rear transition card, they are no longer
hot-swappable.
1-4
Netra ct Server Service Manual • February 2001
1.4.2
Cold-Swappable FRUs
The FRUs listed below are cold-swappable:
■
■
■
■
■
■
■
■
■
CPU card
CPU front transition card (front-access model only)
CPU rear transition card (rear-access model only)
Single power supply in a Netra ct 400 server
Single or lone remaining power supply in a Netra ct 800 server
Single hard disk drive in a Netra ct 400 server
Single or lone remaining hard disk drive in a Netra ct 800 server
Powered-off or empty servers
Power distribution units
The instructions for removing and replacing these cold-swappable FRUs are covered
in Part IV, “Replacing Cold-Swappable FRUs.”
1.5
Device Names
1.5.1
Device Names for I/O Card Slots in the Netra ct
Servers
TABLE 1-1 gives the device names for the I/O card slots in the Netra ct 800 server and
TABLE 1-2 gives the device names for the I/O card slots in the Netra ct 400 server.
TABLE 1-1
Device Names for I/O Card Slots in the Netra ct 800 Server
Slot Number
Device Name
2
/devices/pci@1f,0/pci@1/pci@1/pci@f
3
/devices/pci@1f,0/pci@1/pci@1/pci@e
4
/devices/pci@1f,0/pci@1/pci@1/pci@d
5
/devices/pci@1f,0/pci@1/pci@1/pci@c
6
/devices/pci@1f,0/pci@1/pci@1/pci@b
7
/devices/pci@1f,0/pci@1/pci@1/pci@a
8
/devices/pci@1f,0/pci@1/pci@1/pci@8
Chapter 1
Preparing for FRU Installation and Replacement
1-5
TABLE 1-2
1.5.2
Device Names for I/O Card Slots in the Netra ct 400 Server
Slot Number
Device Name
1
/devices/pci@1f,0/pci@1/pci@1/pci@8
2
/devices/pci@1f,0/pci@1/pci@1/pci@f
4
/devices/pci@1f,0/pci@1/pci@1/pci@e
5
/devices/pci@1f,0/pci@1/pci@1/pci@d
Device Names for Hard Disk Drives
Following are the device names for the hard disk drives installed in the Netra ct
servers:
■
■
1-6
HDD 0—c0t0d0
HDD 1—c0t1d0
Netra ct Server Service Manual • February 2001
CHAPTER
2
Powering the Server Off and On
This chapter gives instructions on powering the Netra ct server on and off.
■
■
“Powering On the Server” on page 2-1
“Powering Off the Server” on page 2-6
Note – Whenever you reboot or power your server on and off, the hot swap states
revert back to the default basic hot swap state for all I/O slots. If you want full hot
swap on an I/O slot, you must manually reset the I/O slot to full hot swap after
rebooting or powering your server on and off.
Note – You can also power the Netra ct server on and off through the alarm card
using the poweroff and poweron commands. Refer to the Remote System Control
(RSC) User’s Guide For the Netra ct Server Alarm Card for more information.
2.1
Powering On the Server
1. Verify that the power supply locking mechanism(s) on the server you are about to
power on are in the locked (
), or down, positions.
FIGURE 2-1 shows the location of the two power supply locking mechanisms on the
Netra ct 800 server, and FIGURE 2-2 shows the location of the single power supply
locking mechanism on the Netra ct 400 server. Make sure you lock both power
supplies if you are powering on a Netra ct 800 server.
2-1
FIGURE 2-1
2-2
Locating the Power Supply Locking Mechanism on the Netra ct 800 Server
Netra ct Server Service Manual • February 2001
FIGURE 2-2
Locating the Power Supply Locking Mechanism on the Netra ct 400 Server
When the power supply locking mechanism is locked, the green LED on the power
suppl(ies) flash, indicating that the power suppl(ies) are powered on, but the server
has not been powered on yet. Also, the PDU LEDs on the system status panel should
be in this state:
■
Green LED (
■
Amber LED (
) is ON
) is OFF
This tells you that the power supply locking mechanism(s) are in the locked (down)
position and the power distribution unit(s) are receiving power and functioning
properly.
2. Locate the system status panel.
The location of the system status panel in the Netra ct 800 server and Netra ct 400
server is illustrated in FIGURE 2-3.
Chapter 2
Powering the Server Off and On
2-3
Comp
actP
ETHE
RN
CO
STAT
CITM
ET
M
US
ALAR
RE
RE
Comp
M
AD
HD
Y
D0
actP
ETHE
RN
CITM
ET
SET
AB
OR
T
CO
M
HD
D0
STAT
US
micr
osys
tems
ALAR
RE
RE
M
AD
Y
SET
AB
OR
T
micr
osys
tems
System status panel,
Netra ct 800 server
System status panels,
Netra ct 400 servers
FIGURE 2-3
System Status Panel Locations
3. Locate the system power button on the system status panel and press the system
power button to power on the server.
FIGURE 2-4 shows the system power button location for the Netra ct 800 server, and
FIGURE 2-5 shows the system power button location for the Netra ct 400 server.
2-4
Netra ct Server Service Manual • February 2001
When you first power-on the Netra ct server, some or all of the green Power LEDs
on the system status panel flash on and off for several seconds:
■
If the diag-switch variable is set to true and the diag-level variable is set to
max in the OpenBoot™ PROM, then all of the green Power LEDs on the system
status panel flash on and off for several seconds.
■
If the variables in the OpenBoot PROM are not set as described above, then the
green Power LEDs on the system status panel flash on and off for several seconds
only for the components that are installed in the server.
Note – Refer to the Solaris documentation that you received with your system for
instructions on setting variables in the OpenBoot PROM.
System power
LED
System power
button
FIGURE 2-4
System Power Button and System Power LED Locations (Netra ct 800 Server)
Chapter 2
Powering the Server Off and On
2-5
System power
LED
System power
button
FIGURE 2-5
System Power Button and System Power LED Locations (Netra ct 400 Server)
4. Verify that the system power LED on the system status panel is on, indicating that
the system is completely powered on.
FIGURE 2-4 shows the system power LED location for the Netra ct 800 server, and
FIGURE 2-5 shows the system power LED location for the Netra ct 400 server.
5. Verify that the green power ( ) LED on the power supplies are on, indicating
that they are powered on and functioning properly.
6. Log into your server and boot up the server.
Refer to Appendix B for instructions on connecting a terminal to your server, if
necessary.
Note – The CPU card will display the letters H-E-L-P as the system is booting up.
This should go away once the system is completely booted up.
2.2
Powering Off the Server
You can power off the Netra ct server in three ways:
■
■
■
Graceful hardware power-down
Ungraceful hardware power-down
Graceful software power-down
If you do not have a terminal hookup to your server and your CPU is functioning
normally, you should go through a graceful hardware power-down for your server.
For a graceful hardware power-down, you would press the system power button for
2-6
Netra ct Server Service Manual • February 2001
less than four seconds. This will start the orderly power-down sequence in a manner
that no persistent OS data structures are corrupted. In the orderly power-down,
applications in service may be abnormally terminated and no further services will be
invoked by the CPU.
If you do not have a terminal hookup to your server and your CPU is not
functioning normally, you will not be able to go through a graceful hardware powerdown; you will have to go through an ungraceful hardware power-down instead.
For an ungraceful hardware power-down, you would press the system power button
for more than four seconds. This will immediately shut the system down without
making any attempts to keep the persistent OS data structures from being corrupted.
A graceful software power-down is a normal power-down using a terminal
connected to your server, where you would log onto the server as root, then execute
a software command to bring the server down safely.
▼
■
For hardware power-down instructions, go to “To Perform a Hardware PowerOff” on page 2-7.
■
For software power-down instructions, go to “To Perform a Software Power Off”
on page 2-9.
To Perform a Hardware Power-Off
Note – You must have the envmond software package (SUNWctevx) installed on
your Netra ct server in order to perform a graceful hardware power-down.
1. In preparation for bringing down the operating system and powering off the
server, ensure that all significant application activity is quiesced on the server.
2. Go to the front of the Netra ct server and locate the system status panel.
The location of the system status panels in the Netra ct 800 server and Netra ct 400
server is illustrated in FIGURE 2-3.
3. Locate the system power button on the system status panel.
FIGURE 2-4 shows the system power button location for the Netra ct 800 server, and
FIGURE 2-5 shows the system power button location for the Netra ct 400 server.
4. Press the system power button and release it to go through a graceful hardware
power-down.
This will start the orderly power-down sequence in a manner that no persistent OS
data structures are corrupted. In the orderly power-down, applications in service
may be abnormally terminated and no further services will be invoked by the CPU.
The system power LED will blink for several seconds, then it will go off.
Chapter 2
Powering the Server Off and On
2-7
If the server does not power off when you press the system power button and
release it, this means one of two things:
■
■
The envmond software package is not installed yet, or
The CPU is unresponsive for some reason
a. Log into your server.
Refer to Appendix B for instructions on connecting a terminal to your server, if
necessary.
b. Verify that the envmond software package is installed.
To verify that you’ve installed the envmond software package, as root, enter this
command:
# pkginfo SUNWctevx
■
If you see the following error message:
ERROR: information for "SUNWctevx" was not found
then the envmond software package was not installed. Follow the instructions
in the Netra ct Server Installation Guide to install the Netra ct server software on
the server.
■
system
If you see the following message:
SUNWctevx
Netra ct Environment Monitor Daemon and FRU policy
then the problem lies with the CPU card. If this is the case, press the system
power button for more than four seconds. This immediately shuts the system
down without making any attempts to keep the persistent OS data structures
from being corrupted.
5. Verify that the green power ( ) LED on the power supplies are blinking,
indicating that the system is in the standby mode.
FIGURE 2-4 on page 2-5 shows the system power LED location for the Netra ct 800
server, and FIGURE 2-5 on page 2-6 shows the system power LED location for the
Netra ct 400 server.
6. If you want to completely power off the Netra ct server, push the purple power
supply unit locking mechanism(s) up into the unlocked ( ) position (see
FIGURE 2-1 on page 2-2 for the Netra ct 800 server or FIGURE 2-2 on page 2-3 for the
Netra ct 400 server).
2-8
Netra ct Server Service Manual • February 2001
Note – You must unlock the locking mechanism on both power supply unit(s) on the
Netra ct 800 server in order to completely power off that server.
The green power ( ) LED(s) on the power supply unit(s) should go off (unlit),
indicating that the system is now completely powered off.
▼
To Perform a Software Power Off
1. In preparation for bringing down the operating system and powering down the
server, ensure that all significant application activity is quiesced on the server.
2. Log in as root at the system console and enter:
# cd /
# shutdown -i0 -g0 -y
When the server is finished shutting down, the ok prompt is displayed.
3. Log into your server and boot up the server.
Refer to Appendix B for instructions on connecting a terminal to your server, if
necessary.
4. At the ok prompt, enter:
ok power-off
5. Go to the front of the Netra ct server and locate the system status panel (see
FIGURE 2-3 on page 2-4).
The location of the system status panel in the Netra ct 800 server and Netra ct 400
server is illustrated in FIGURE 2-3.
6. Verify that the green power ( ) LED on the power supplies are blinking,
indicating that the system is in the standby mode.
FIGURE 2-4 on page 2-5 shows the system power LED location for the Netra ct 800
server, and FIGURE 2-5 on page 2-6 shows the system power LED location for the
Netra ct 400 server.
7. If you want to completely power off the Netra ct server, push the purple power
supply unit locking mechanism(s) up into the unlocked ( ) position (see
FIGURE 2-1 on page 2-2 for the Netra ct 800 server or FIGURE 2-2 on page 2-3 for the
Netra ct 400 server).
Chapter 2
Powering the Server Off and On
2-9
Note – You must unlock the locking mechanism on both power supply unit(s) on the
Netra ct 800 server in order to completely power off that server.
The green power ( ) LED(s) on the power supply unit(s) should go off (unlit),
indicating that the system is now completely powered off.
2-10
Netra ct Server Service Manual • February 2001
CHAPTER
3
Handling Cards and Assemblies
This chapter gives instructions on how to safely handle the CompactPCI cards and
assemblies. This chapter is divided into the following sections:
■
■
“Handling CompactPCI Cards” on page 3-1
“Handling Assemblies” on page 3-2
Consult the Netra ct Server Safety and Compliance Manual for safety information prior
to performing the procedures in this chapter.
3.1
Handling CompactPCI Cards
Each Netra ct server in a chassis has a CompactPCI bus. All of the cards in a
server—the CPU card, alarm card, and I/O cards—are CompactPCI cards.
Caution – The system is sensitive to static electricity. To prevent damage to the
assembly, always connect an antistatic wrist strap between you and the system.
Caution – Do not flex the CompactPCI cards; the surface-mounted components can
break if the card is bent.
3-1
To minimize the amount of card flexing, observe the following precautions:
■
When removing a card from an electrostatic discharge bag, keep it vertical until
you lay the card on the electrostatic discharge mat.
■
Do not place a card on a hard surface. Use a cushioned antistatic mat. The card
connectors and components have very thin pins that bend easily.
■
Be careful of small parts located on the component side of a card.
■
Do not use an oscilloscope probe on the components. The soldered pins are easily
damaged or shorted by the probe point.
■
Transport a card in an antistatic bag.
Caution – The heat sinks on a card can be damaged by incorrect handling. Do not
touch the heat sinks while installing or removing a card. Hold a card only by the
edges. If a heat sink is loose or broken, obtain a replacement card.
Caution – The heat sinks on a card can be damaged by improper packaging. When
storing or shipping a card, ensure that the heat sinks have sufficient protection.
Caution – The system controller card and its modules have surface-mount
components that can be broken by flexing the card.
3.2
Handling Assemblies
Assemblies have their own set of handling requirements, similar to the requirements
for CompactPCI cards.
Caution – The system is sensitive to static electricity. To prevent damage to the
board, always connect an antistatic wrist strap between you and the system.
3-2
Netra ct Server Service Manual • February 2001
PART
II
Troubleshooting the System
Troubleshooting the System
Chapter 4
Netra ct Server Service Manual
CHAPTER
4
Troubleshooting the System
This chapter gives instructions for troubleshooting the Netra ct server. You can
troubleshoot the system several ways.
■
“Troubleshooting the System Using the System Status Panel” on page 4-1
■
“Troubleshooting the System Using envmond” on page 4-7
■
“Troubleshooting the System Using prtdiag” on page 4-7
■
“Troubleshooting the System Using the SunVTS Test Suite” on page 4-12
■
“Troubleshooting the System Using the Power-On Self Test (POST)” on page 4-12
■
“Troubleshooting the System Using the Remote System Control (RSC)” on
page 4-14
■
“Troubleshooting a Power Supply Using the Power Supply Unit LEDs” on
page 4-14
■
“Troubleshooting a CPU Card” on page 4-16
In addition, Appendix C lists the error messages that might appear when you are
operating or servicing your Netra ct server.
4.1
Troubleshooting the System Using the
System Status Panel
You can use the system status panel to troubleshoot the Netra ct server.
4-1
4.1.1
Locating and Understanding the System Status
Panel
The system status panel on the Netra ct server give the majority of troubleshooting
information that you will need for your server. FIGURE 4-1 shows the locations of the
system status panels on the Netra ct servers. FIGURE 4-2 shows the system status
panel for the Netra ct 800 server, and FIGURE 4-3 shows the system status panel for
the Netra ct 400 server.
Netra ct 400 servers
Netra ct 800 server
Comp
actP
ETHE
RN
CO
STAT
CITM
ET
M
US
ALAR
RE
RE
Comp
M
AD
HD
Y
D0
actP
ETHE
RN
CITM
ET
SET
AB
OR
T
CO
M
HD
D0
STAT
US
micr
osys
tems
ALAR
RE
RE
M
AD
Y
SET
AB
OR
T
micr
osys
tems
System status panels
FIGURE 4-1
4-2
System Status Panel Locations
Netra ct Server Service Manual • February 2001
4.1.2
FIGURE 4-2
System Status Panel (Netra ct 800 Server)
FIGURE 4-3
System Status Panel (Netra ct 400 Server)
Using the System Status Panel LEDs to
Troubleshoot the System
When you first power-on the Netra ct server, some or all of the green Power LEDs
on the system status panel flash on and off for several seconds:
■
If the diag-switch variable is set to true and the diag-level variable is set to
max in the OpenBoot PROM, then all of the green Power LEDs on the system
status panel flash on and off for several seconds.
Chapter 4
Troubleshooting the System
4-3
■
If the variables in the OpenBoot PROM are not set as described above, then the
green Power LEDs on the system status panel flash on and off for several seconds
only for the components that are installed in the server.
Do not attempt to troubleshoot the system until after the LEDs have gone through
their initial power-on testing. Refer to the documentation that you received with
your Solaris operating environment for more information on making settings in the
OpenBoot PROM.
Each major component in the Netra ct 800 server or Netra ct 400 server has a set of
LEDs on the system status panel that gives the status on that particular component.
Each component will have either the green Power and the amber Okay to Remove
LEDs (FIGURE 4-4) or the green Power and amber Fault LEDs (FIGURE 4-5).
Green Power LED
FIGURE 4-4
Amber Okay to Remove LED
Power and Okay to Remove LEDs
Green Power LED
FIGURE 4-5
Amber Fault LED
Power and Fault LEDs
TABLE 4-1 describes which combination of LEDs is used for each component in the
Netra ct 800 server, and TABLE 4-2 describes which combination of LEDs is used for
each component in the Netra ct 400 server. Note that the components in the Netra ct
servers all have the green Power LED, and they will have either the amber Okay to
Remove LED or the amber Fault LED, but not both.
TABLE 4-1
System Status Panel LEDs for the Netra ct 800 Server
LED
LEDs Available
Component
HDD 0
Power and Okay to Remove
Upper hard disk drive
HDD 1
Power and Okay to Remove
Lower hard disk drive
Slot 1
Power and Fault
CPU card (▲) installed in slot 1
Slot 2
Power and Okay to Remove
I/O card (●) or CPU front transition card installed in slot 2
4-4
Netra ct Server Service Manual • February 2001
TABLE 4-1
System Status Panel LEDs for the Netra ct 800 Server (Continued)
LED
LEDs Available
Component
Slots 3–7
Power and Okay to Remove
I/O cards (●) installed in slots 3–7
Slot 8
Power and Okay to Remove
Alarm card (■) installed in slot 8
SCB
Power and Fault
System controller board (behind the system status panel)
FAN 1
Power and Fault
Upper fan tray (behind the system status panel)
FAN 2
Power and Fault
Lower fan tray (behind the system status panel)
RMM
Power and Okay to Remove
Removeable media module
PDU 1
Power and Fault
Leftmost power distribution unit (behind the server)
PDU 2
Power and Fault
Rightmost power distribution unit (behind the server)
PSU 1
Power and Okay to Remove
Leftmost power supply unit
PSU 2
Power and Okay to Remove
Rightmost power supply unit
TABLE 4-2
System Status Panel LEDs for the Netra ct 400 Server
LED
LEDs Available
Component
Slot 1
Power and Okay to Remove
Double-wide alarm card(■) installed in slot 1 and 2
Slot 2
Power and Okay to Remove
Single-wide I/O card installed in slot 2 (only if alarm card
is not present)
Slot 3
Power and Fault
CPU card (▲) installed in slot 3
Slots 4 and 5
Power and Okay to Remove
I/O cards (●) installed in slots 4 and 5
HDD 0
Power and Okay to Remove
Hard disk drive
SCB
Power and Fault
System controller board (behind the system status panel)
FAN 1
Power and Fault
Upper fan tray (behind the system status panel)
FAN 2
Power and Fault
Lower fan tray (behind the system status panel)
FTC
Power and Fault
CPU front transition card
PDU 1
Power and Fault
Power distribution unit (behind the server)
PSU 1
Power and Okay to Remove
Power supply
■
If the component has the Power and amber Okay to Remove LEDs, refer to
TABLE 4-3.
■
If the component has the Power and Fault LEDs, refer to TABLE 4-4.
Chapter 4
Troubleshooting the System
4-5
Note – Do not use the information in TABLE 4-3 to troubleshoot a power supply unit
in a server that has only one power supply unit (a Netra ct 400 server or a Netra ct
800 server with only one power supply). To troubleshoot the power supply in a
single power supply system, use the LEDs on the power supply itself. Refer to
“Troubleshooting a Power Supply Using the Power Supply Unit LEDs” on page 4-14
for more information. The information given in TABLE 4-3 applies to all other
components in the Netra ct 800 server or Netra ct 400 server, including the power
supplies in a two power supply Netra ct 800 server.
TABLE 4-3
LED State
Power LED
Okay to Remove LED
On, Solid
Component is installed and
configured.
Component is Okay to Remove.
You can remove the component
from the system, if necessary.
On, Flashing
Component is installed but is
unconfigured or is going through
the configuration process.
Not applicable.
Off
Component was not recognized by
the system or is not installed in the
slot.
Component is not Okay to Remove.
Do not remove the component
while the system is running.
TABLE 4-4
4-6
Meanings of Power and Okay to Remove LEDs
Meanings of Power and Fault LEDs
LED State
Power LED
Fault LED
On, Solid
Component is installed and
configured.
Component has failed. Replace the
component.
On, Flashing
Component is installed but is
unconfigured or is going through
the configuration process.
Not applicable.
Off
Component was not recognized by
the system or is not installed in the
slot.
Component is functioning
properly.
Netra ct Server Service Manual • February 2001
4.2
Troubleshooting the System Using
envmond
You can troubleshoot the system using the envmond command. Log into the server
console and, as root, enter:
# pkill -HUP envmond
You should get output on the console similar to the following:
Date/time
Date/time
Date/time
Date/time
Date/time
Date/time
servername
servername
servername
servername
servername
servername
envmond[901]:
envmond[901]:
envmond[901]:
envmond[901]:
envmond[901]:
envmond[901]:
alarmcard.so:Alarm Card is OK.
powersupply.so:Power Supply 1 is OK.
powersupply.so:Power Supply 2 is OK.
fancpu.so:Fan 1 is OK.
fancpu.so:Fan 2 is OK.
scsi.so:Hard Disk Drive (HDD) 0 is OK.
You should also get this output whenever you reboot your server.
Note – If you get no output after entering the previous command, it might mean
that you did not install the envmond software from the Supplement for Solaris
Operating Environment for Sun Computer Systems CD when you installed the
Solaris operating environment onto your Netra ct server. Follow the instructions
given in the Netra ct Server Installation Guide to install the envmond software onto
your Netra ct server, then repeat these procedures.
4.3
Troubleshooting the System Using
prtdiag
You can troubleshoot the system using the prtdiag command. Log into the server
console and, as root, enter:
# /usr/platform/sun4u/prtdiag
Chapter 4
Troubleshooting the System
4-7
If you have a Netra ct 800 server, you should get output on the console similar to the
following:
CODE EXAMPLE 4-1
prtdiag Output for a Netra ct 800 Server
System Configuration: Sun Microsystems sun4u Netra ct800 (UltraSPARC-IIi 440MHz)
System clock frequency: 100 MHz
Memory size: 640 Megabytes
=============================== FRU Information ===============================
FRU
FRU
FRU
Green Amber
Miscellaneous
Type
Unit# Present
LED
LED
Information
---------- ----- ----------- -----------------------------Midplane
1
Yes
Netra ct800
Properties:
Version=0
Maximum Slots=8
SCB
1
Yes
on
off
System Controller Board
Properties:
Version=2
hotswap-mode=basic
SSB
1
Yes
System Status Panel
CPU
1
Yes
on
off
CPU board
temperature(celsius):38
I/O
2
Yes
on
off
CompactPCI IO Slot
Properties:
auto-config=disabled
Board Type:Unknown
Devices:
pci
pci108e,1000
SUNW,hme
SUNW,isptwo
I/O
3
Yes
on
off
CompactPCI IO Slot
Properties:
auto-config=disabled
Board Type:Unknown
Devices:
pci
pci108e,1000
SUNW,hme
SUNW,isptwo
I/O
4
Yes
on
off
CompactPCI IO Slot
Properties:
auto-config=disabled
Board Type:Unknown
Devices:
pci
pci108e,1000
4-8
Netra ct Server Service Manual • February 2001
CODE EXAMPLE 4-1
prtdiag Output for a Netra ct 800 Server
I/O
5
Yes
on
I/O
6
Yes
on
I/O
7
Yes
on
I/O
8
Yes
on
PDU
PDU
PSU
1
2
1
Yes
Yes
Yes
on
on
on
PSU
2
Yes
on
SUNW,hme
SUNW,isptwo
off
CompactPCI IO Slot
Properties:
auto-config=disabled
Board Type:Unknown
Devices:
pci
pci108e,1000
SUNW,hme
SUNW,isptwo
off CompactPCI IO Slot
Properties:
auto-config=disabled
off
CompactPCI IO Slot
Properties:
auto-config=disabled
Board Type:Unknown
Devices:
pci
pci108e,1000
SUNW,qfe
pci108e,1000
SUNW,qfe
pci108e,1000
SUNW,qfe
pci108e,1000
SUNW,qfe
pci1176,608
off
CompactPCI IO Slot
Properties:
auto-config=disabled
Board Type:Alarm Card
Devices:
pci
ebus
ethernet
off
Power Distribution Unit
off
Power Distribution Unit
on
Power Supply Unit
condition:ok
temperature:ok
ps fan:ok
supply:on
on
Power Supply Unit
condition:ok
temperature:ok
Chapter 4
Troubleshooting the System
4-9
CODE EXAMPLE 4-1
prtdiag Output for a Netra ct 800 Server
FAN
1
Yes
on
off
FAN
2
Yes
on
off
HDD
0
Yes
on
off
HDD
1
Yes
on
off
Yes
on
on
RMM
ps fan:ok
supply:on
Fan Tray
condition:ok
fan speed:low
Fan Tray
condition:ok
fan speed:low
Hard Disk Drive
condition:ok
Hard Disk Drive
condition:ok
Removable Media Module
condition:Unknown
System Board PROM revision:
--------------------------OBP 3.14.1 2000/04/28 12:56
If you have a Netra ct 400 server, you should get output on the console similar to the
following:
CODE EXAMPLE 4-2
prtdiag Output for a Netra ct 400 Server
System Configuration: Sun Microsystems sun4u Netra ct400 (UltraSPARC-IIi 440MHz)
System clock frequency: 100 MHz
Memory size: 512 Megabytes
=============================== FRU Information ===============================
FRU
FRU
FRU
Green Amber
Miscellaneous
Type
Unit# Present
LED
LED
Information
---------- ----- ----------- -----------------------------Midplane
1
Yes
Netra ct400
Properties:
Version=0
Maximum Slots=5
SCB
1
Yes
on
off
System Controller Board
Properties:
Version=2
hotswap-mode=basic
SSB
1
Yes
System Status Panel
I/O
1
Yes
on
off
CompactPCI IO Slot
Properties:
auto-config=disabled
Board Type:Alarm Card
Devices:
4-10
Netra ct Server Service Manual • February 2001
CODE EXAMPLE 4-2
prtdiag Output for a Netra ct 400 Server
pci
I/O
2
Yes
off
off
CPU
3
Yes
on
off
I/O
4
Yes
on
off
I/O
5
Yes
on
off
PDU
PSU
1
1
Yes
Yes
on
on
off
off
FAN
1
Yes
on
off
FAN
2
Yes
on
off
HDD
0
Yes
on
off
ebus
ethernet
CompactPCI IO Slot
Properties:
auto-config=disabled
CPU board
temperature(celsius):38
CompactPCI IO Slot
Properties:
auto-config=disabled
Board Type:Unknown
Devices:
pci
pci108e,1000
SUNW,hme
SUNW,isptwo
CompactPCI IO Slot
Properties:
auto-config=disabled
Board Type:Unknown
Devices:
pci
pci108e,1000
SUNW,qfe
pci108e,1000
SUNW,qfe
pci108e,1000
SUNW,qfe
pci108e,1000
SUNW,qfe
Power Distribution Unit
Power Supply Unit
condition:ok
temperature:ok
ps fan:ok
supply:on
Fan Tray
condition:ok
fan speed:low
Fan Tray
condition:ok
fan speed:low
Hard Disk Drive
condition:ok
Chapter 4
Troubleshooting the System
4-11
CODE EXAMPLE 4-2
prtdiag Output for a Netra ct 400 Server
System Board PROM revision:
--------------------------OBP 3.14.1 2000/04/28 12:56
4.4
Troubleshooting the System Using the
SunVTS Test Suite
SunVTS is a validation test suite that is provided as a supplement to the Solaris
operating environment. The individual tests can stress a device, system or resource
so as to detect and pinpoint specific hardware and software failures and provide
users with informational messages to resolve any problems found.
For more information on the SunVTS test suite, including instructions for running
SunVTS tests specific to the Netra ct server, refer to the Computer Systems Release
Notes Supplement for Sun Hardware document or the SunVTS documentation on
the Solaris on Sun Hardware Answerbook, both included with your Solaris
operating environment.
4.5
Troubleshooting the System Using the
Power-On Self Test (POST)
When you first power-up the Netra ct server, some or all of the green Power LEDs
on the system status panel will flash on and off for several seconds. The green Power
LED for the I/O slot holding the CPU card (slot 1 in the Netra ct 800 server and slot
3 in the Netra ct 400 server) will go to solid green while the green Power LEDs for
the remaining components are still flashing on and off; this is an indication that the
CPU card has passed the power-on self test (POST).
Before any processing can occur on a system, it must successfully complete the
POST. Messages are displayed for each step in the POST process. If there is a critical
failure, the system will not complete POST and will not boot. To monitor this
process, you must be connected to the TTY A port on the CPU card or CPU
transition card. See “Logging In to the Netra ct Server” on page 5-2.
OpenBoot PROM (OBP) variables control the console port. The variables and their
possible settings are described below.
4-12
Netra ct Server Service Manual • February 2001
To see the console output device, as root, enter:
ok printenv output-device
The screen will display something similar to the following:
output-device
ttya
The possible settings for this variable are:
■
■
■
■
ttya (default)
ttyb
screen
rsc
ttya and ttyb represent the serial ports on the CPU card. screen represents the
display attached to the first frame buffer installed in the system (not present on the
Netra ct server). rsc is used by the alarm card.
To see the console input device, as root, enter:
ok printenv input-device
The screen will display something similar to the following:
input-device
ttya
The possible settings for this variable are:
■
■
■
■
ttya (default)
ttyb
keyboard
rsc
ttya and ttyb represent the serial ports on the CPU card. keyboard represents the
standard system keyboard (not present on the Netra ct server). rsc is used by the
alarm card. If no system keyboard is connected, the console port defaults to ttya.
Note – Be sure the two variables are consistent with each other. For example, do not
set the output-device to screen and the input-device to ttya.
Chapter 4
Troubleshooting the System
4-13
There is another OBP variable that controls the behavior of the POST process called
diag-level. By default, this variable is set to max, which means POST will run
more thorough/verbose tests against the hardware. This variable can also be set to
min, which will run a less stringent set of tests against the hardware. A minimum
level of POST testing also takes less time, so the Solaris operating environment can
boot more quickly on a machine with diag-level set to min.
To run the maximum amount of POST tests, as root, enter:
ok setenv diag-level max
To run the minimum amount of POST tests, as root, enter:
ok setenv diag-level min
4.6
Troubleshooting the System Using the
Remote System Control (RSC)
For information on troubleshooting the alarm card, refer to the Remote System Control
(RSC) User’s Guide For the Netra ct Server Alarm Card (part number 806-3301-xx).
4.7
Troubleshooting a Power Supply Using
the Power Supply Unit LEDs
There are two LEDs on each power supply unit: a green (
) LED and an amber
(
) LED. You can use the LEDs on the power supply unit to troubleshoot each
power supply unit; however, because there is one power supply unit in the Netra ct
400 server and two power supply units in the Netra ct 800 server, the actions to take
are different.
4-14
Netra ct Server Service Manual • February 2001
4.7.1
Troubleshooting the Power Supply Unit in the
Netra ct 400 Server
Following are the states of the LEDs on the power supply unit in the Netra ct 400
server:
4.7.2
■
Green, flashing—The power supply unit is in the standby mode; the power
supply unit is powered on, but it is not supplying power to the server.
■
Green, solid—Both the server and the power supply unit are powered on and
functioning properly.
■
Amber—A fault was found in the power supply unit. Replace the power supply
unit. See “Power Supply Unit” on page 11-19 for those instructions.
Troubleshooting the Power Supply Units in the
Netra ct 800 Server
When both power supply units in a Netra ct 800 server are up and running properly,
the green (
)LEDs on both power supply units will be ON (note that these are the
LEDs on the power supply units themselves, not the LEDs on the system status
panel).
If a power supply unit fails, the amber (
) LED on the power supply unit might
light, depending on the type of failure that has occurred:
■
If a soft-fault occurs, such as a stuck fan or a temperature warning, you should get
a notification of the error, assuming the envmond daemon is running; however,
the amber (
) LED on the power supply unit will not light for a soft-fault
condition. The power supply unit is still supplying power to the system during a
soft-fault condition.
■
If a hard-fault occurs, such as a voltage problem, you should get a notification of
the error, assuming envmond is running. In addition, the amber (
) LED on the
power supply unit does light for a hard-fault condition. The power supply unit
does not supply power to the system during a hard-fault condition.
Chapter 4
Troubleshooting the System
4-15
If one power supply unit fails (either a soft-fault or a hard-fault), but the other
power supply unit is still functioning normally, you should replace the faulty power
supply unit as soon as possible to keep the system up and running. If both power
supply units fail, the action you should take varies depending on which of the two
types of fault has occurred:
4.8
If
Then
Both power supply units go through a
soft-fault
Replace one power supply unit at a time
in order to keep the system up and
running.
One power supply unit goes through a
soft-fault and the other power supply unit goes
through a hard-fault
Replace the power supply unit that has
gone through a hard-fault first in order to
keep the system up and running.
Both power supply units go through a
hard-fault
The system is down and you should
replace at least one of the power supply
units to bring the system back up again.
Troubleshooting a CPU Card
This section describes how to troubleshoot problems related to the CPU card. The
information provided here primarily covers those situations when the system
containing the CPU card does not boot up or when the CPU card is not fully
functional after boot up. Only general troubleshooting tips are provided here. No
component level troubleshooting information is included in this section.
The following topics are covered:
■
General troubleshooting tips
■
General troubleshooting requirements
■
Mechanical failures
■
Power-on failures
■
Failures subsequent to power-on
■
Troubleshooting during POST/OBP and during boot process
The following diagnostic procedures are also described:
4-16
■
OpenBoot PROM on-board diagnostics
■
OpenBoot diagnostics
Netra ct Server Service Manual • February 2001
4.8.1
General Troubleshooting Tips
Caution – High voltages are present in the Netra ct server. To avoid physical injury,
follow all the safety rules specified in the Netra ct Server Safety and Compliance Manual
when opening the enclosure and/or removing and installing the board.
The following general troubleshooting tips are useful in isolating the problems
related to the CPU card:
1. Make sure the CPU card is installed properly in the correct slot in the Netra ct
server.
The CPU card should be installed in I/O slot 1 in the Netra ct 800 server and in I/O
slot 3 in the Netra ct 400 server.
2. Make sure all the necessary cables are attached properly to the CPU transition
card.
The following figures show the connectors on the different CPU transition cards:
■
■
■
■
CPU
CPU
CPU
CPU
front transition card, Netra ct 800 server—FIGURE 4-6
front transition card, Netra ct 400 server—FIGURE 4-7
rear transition card, Netra ct 800 server—FIGURE 4-8
rear transition card, Netra ct 400 server—FIGURE 4-9
Note – The CPU rear transition card is the same for both the Netra ct 800 server and
the Netra ct 400 server; only the location in the rear card cage differs.
Chapter 4
Troubleshooting the System
4-17
Parallel
Ethernet
Com
HD
D1
pact
ETH
ER
CO
STA
PC TM
I
NE
ALA
mic
RM
AD
Y
SET
AB
4-18
TTY B
M
RE
FIGURE 4-6
TTY A
TUS
RE
CP
T
OR
ros
1500
yste
SCSI
T
ms
-360
Connectors on the CPU Front Transition Card (Netra ct 800 Server)
Netra ct Server Service Manual • February 2001
SCSI
Parallel
Ethernet
TTY B (DB9)
FIGURE 4-7
Connectors on the CPU Front Transition Card (Netra ct 400 Server)
Chapter 4
Troubleshooting the System
4-19
Parallel
TTY A
TTY B
Ethernet A
Ethernet B
SCSI
FIGURE 4-8
Connectors on the CPU Rear Transition Card (Netra ct 800 Server)
Parallel
TTY A
TTY B
Ethernet A
Ethernet B
SCSI
FIGURE 4-9
4-20
Connectors on the CPU Rear Transition Card (Netra ct 400 Server)
Netra ct Server Service Manual • February 2001
4.8.2
General Troubleshooting Requirements
The following devices are generally required to take some of the recommended
actions in this section:
■
■
■
■
4.8.3
Network interface
TTYA and TTYB connection or an ASCII terminal connection to serial port
Parallel port interface
Loopback connectors
Mechanical Failures
Symptom
Unable to insert the CPU card into the backplane.
Action
1. Verify that there are no mechanical and physical obstructions in the slot where the
CPU card is going to be installed.
2. Make sure no pins on the board connectors or the CompactPCI backplane
connectors are bent or damaged.
4.8.4
Power-On Failures
This section provides examples of power-on failure symptoms and suggested
actions. There can be several reasons for the power-on failures.
● Make sure the CPU card is installed properly.
Note – If both Ready and Alarm LEDs on the CPU card are green, the board is
partially functional and capable of running POST (power on self-test). It means that
the basic functionality of the board is present. If none of the aforementioned LEDs is
green, and the board is installed properly, the board is not functional. In that case,
contact your Sun supplier or field service engineer.
Chapter 4
Troubleshooting the System
4-21
4.8.5
Failures Subsequent to Power-On
Symptom
Cannot connect successfully to a TTY serial port; there are no POST messages and
unable to send keyboard input.
Action
1. Check the TTY cable for proper setup.
2. If you do not see any output after connecting the TTY terminal to the CPU
transition card, remove it and connect it to the COM port of the CPU card and try
again.
4.8.6
Troubleshooting During POST/OBP and During
Boot Process
This section describes certain possible problems encountered while running POST
and OBP and during the boot process.
Symptom
POST error message displays:
cannot establish network service
Action
● This might be a hardware address problem. Add or check the media access control
(MAC) address to the server and the IP address at the server.
4-22
Netra ct Server Service Manual • February 2001
Symptom
POST detects Ecache error and a message similar to the one below is displayed:
STATUS =FAILED
TEST =Memory Addr w/ Ecache
SUSPECT=U5201 and U5202
MESSAGE=Mem Addr line compare error
addr 00000000.00000000
exp 00000000.00000000
obs 88888888.88888888
Action
● This might be a mounting issue with the CPU Mylar film, socket, or heatsink
which could have occurred during transportation or due to severe vibration.
Contact Sun s Enterprise Services Solution Center.
Caution – Any attempt to disassemble or replace the aforementioned devices will
void the warranty.
4.8.7
OpenBoot PROM On-Board Diagnostics
There are several OBP variables specific to the Netra ct server, such as:
■
pcia-probe-list—Probes the bus that runs the first ethernet port (front
connection) and standard I/O devices (by default: 1, 2)
■
pcib-probe-list—Probes the bus that runs the second ethernet port (rear
connection) (by default: 1, 2, 3)
■
cpci-probe-list—Probes the bus that runs connections to all cPCI slots in the
ct400 or ct800 (by default: 0, 1, 2, 3, 4, 5, 6, 7, 8, 9, a, b, c, d, e, f)
Chapter 4
Troubleshooting the System
4-23
The following section describes the OBP on-board diagnostics. To execute the OBP
on-board diagnostics, the system must be at the ok prompt. The OBP on-board
diagnostics are listed as follows:
■
■
■
■
4.8.7.1
watch-clock
watch-net and watch-net-all
probe-scsi
test alias name, device path, -all
watch-clock
The watch-clock command reads a register in the NVRAM/TOD chip and
displays the result as a seconds counter. During normal operation, the seconds
counter repeatedly increments from 0 to 59 until interrupted by pressing any key on
the PS/2 keyboard. The following identifies the watch-clock output message.
ok watch-clock
Watching the seconds register of the real time clock chip
It should be ticking once a second
Type any key to stop
49
ok
4.8.7.2
watch-net and watch-net-all
The watch-net and watch-net-all commands monitor Ethernet packets on the
Ethernet interfaces connected to the system. Good packets received by the system
are indicated by a period (.). Errors such as the framing error and the cyclic
4-24
Netra ct Server Service Manual • February 2001
redundancy check (CRC) error are indicated with an X and an associated error
description. CODE EXAMPLE 4-3 identifies the watch-net output message and
CODE EXAMPLE 4-4 identifies the watch-net-all output message.
CODE EXAMPLE 4-3
watch-net Output Message
ok watch-net
Hme register test --- succeeded.
Internal loopback test -- succeeded.
Transceiver check -Using Onboard Transceiver - Link Up. passed Using Onboard
Transceiver - Link Up. Looking for Ethernet Packets.
. is a Good Packet. X is a Bad Packet.
Type any key to stop.
..................................................
................................................................
................................................................
........................................................
ok
CODE EXAMPLE 4-4
watch-net-all Output Message
ok watch-net-all
/pci@1f,0/pci@1,1/network@1,1
Hme register test --- succeeded.
Internal loopback test -- succeeded.
Transceiver check -- Using Onboard Transceiver - Link Up. passed
Using Onboard Transceiver - Link Up.
Looking for Ethernet Packets.
. is a Good Packet.
X is a Bad Packet.
Type any key to stop. ........ ........
........................................................
................................................................
................................................................
....................................
ok
Chapter 4
Troubleshooting the System
4-25
4.8.7.3
probe-scsi
The probe-scsi command transmits an inquiry command to SCSI devices
connected to the system unit on-board SCSI interface. If the SCSI device is connected
and active, the target address, unit number, device type, and manufacturer name is
displayed. CODE EXAMPLE 4-5 identifies the probe-scsi output message.
CODE EXAMPLE 4-5
probe-scsi Output Message
ok probe-scsi
Primary UltraSCSI bus:
Target 0 Unit 0 Disk SEAGATE ST32272W 0876
Target 6
Unit 0 Removable Read Only device TOSHIBA CD-ROM XM-6201TA1037
ok
4.8.7.4
test alias name, device path, -all
The test command, combined with a device alias or device path, enables a device
self-test program. If a device has no self-test program, the message: No selftest
method for device name is displayed. To enable the self-test program for a device,
type the test command followed by the device alias or device path name. TABLE 4-5
lists test alias name selections, a description of the selection, and preparation.
TABLE 4-5
4-26
Selected OBP On-Board Diagnostic Tests
Type of Test
Description
Preparation
test screen
Tests system video graphics
hardware and monitor.
Diag-switch? NVRAM parameter
must be true for the test to execute.
test floppy
Tests diskette drive response to
commands.
A formatted diskette must be inserted
into the diskette drive.
test net
Performs internal/external
loopback test of the system autoselected Ethernet interface.
An Ethernet cable must be attached to
the system and to an Ethernet tap or
hub or the external loopback test fails.
Netra ct Server Service Manual • February 2001
TABLE 4-5
4.8.8
Selected OBP On-Board Diagnostic Tests
Type of Test
Description
Preparation
test ttya
test ttyb
Outputs an alphanumeric test
pattern on the system serial
ports: ttya, serial port A; ttyb,
serial port B.
A terminal must be connected to the
port being tested to observe the
output.
test keyboard
Executes the keyboard self-test.
Four keyboard LEDs should flash
once and a message is displayed:
Keyboard Present.
test -all
Sequentially test systemconfigured devices containing
self-test.
Tests are sequentially executed in
device-tree order (viewed with the
show-devs command).
OpenBoot Diagnostics (OB Diag)
OpenBoot Diagnostics is an interactive tool that tests various hardware and
peripheral devices. When obdiag is typed at the ok prompt in OBP, the menu shown
in CODE EXAMPLE 4-6 is displayed on the screen.
OBDiag performs root-cause failure analysis on the referenced devices by testing
internal registers, confirming subsystem integrity, and verifying device functionality.
To run OBDiag:
1. At the ok prompt, enter obdiag.
This displays the OBDiag menu as shown in CODE EXAMPLE 4-6.
Chapter 4
Troubleshooting the System
4-27
2. At the OBDiag menu prompt, enter a number from the menu (such as 17 to enable
toggle script-debug messages).
CODE EXAMPLE 4-6
OBDiag Menu
0 .... PCI/Cheerio
1 .... EBUS DMA/TCR Registers
2 .... Ethernet
3 .... Ethernet2 <Inactive>
4 .... Parallel Port
5 .... Serial Port C (on optional I/O board) <Inactive>
6 .... Serial Port D (on optional I/O board) <Inactive>
7 .... NVRAM
8 .... Floppy
9 .... Serial port A
10 ... Serial port B
11 ... RAS
12 ... User Flash1
13 ... User Flash2
14 ... All Above
15 ... Quit
16 ... Display this Menu
17 ... Toggle Script-debug
18 ... Enable External Loopback Tests
19 ... Disable External Loopback Tests
Enter (0-14 tests, 15 -Quit, 16 -Menu) ===>
Caution – Prior to running obdiag, do not run any other OBP command that may
change the hardware state of the board. After obdiag tests are run, always reset the
system to bring it to a known state.
The user may type the relevant numbers at this point to run all or some of the tests.
If an error is detected the error message is displayed on the screen. For example, if
an error is detected while testing the floppy disk drive, a display similar to the
following message is displayed on the screen:
TEST= floppy_test
STATUS= FAILED
SUBTEST= floppy_id0_read_test
ERRORS= 1
TTF= 66
SPEED= 440 MHz
PASSES= 1
MESSAGE= Error: Recalibrate failed. floppy missing, improperly
connected, or defective.
4-28
Netra ct Server Service Manual • February 2001
Some of the individual items on the OBDiag menu are described in further detail in
the following paragraphs.
4.8.8.1
PCI/PCIO
The PCI/PCIO diagnostic performs the following:
■
vendor_ID_test: Verifies that the PCIO ASIC vendor ID is 108e.
■
device_ID_test: Verifies that the PCIO ASIC device ID is 1000.
■
mixmode_read: Verifies that the PCI configuration space is accessible as
half-word bytes by reading the EBus2 vendor ID address.
■
2_class_test: Verifies the address class code. Address class codes include
bridge device (0 x B, 0 x 6), other bridge device (0 x A and 0 x 80), and
programmable interface (0 x 9 and 0 x 0).
■
status_reg_walk1: Performs walk-one test on status register with mask 0 x 280
(PCIO ASIC is accepting fast back-to-back transactions, DEVSEL timing is 0 x 1).
■
line_size_walk1: Performs tests a through e.
■
latency_walk1: Performs walk one test on latency timer.
■
line_walk1: Performs walk one test on interrupt line.
■
pin_test: Verifies that the interrupt pin is logic-level high (1) after reset.
CODE EXAMPLE 4-7 identifies the PCI/PCIO output message.
CODE EXAMPLE 4-7
PCI/PCIO Output Message
Enter (0-14 tests, 15 -Quit, 16 -Menu) ===> 0
TEST= all_pci/PCIO_test
SUBTEST= vendor_id_test
SUBTEST= device_id_test
SUBTEST= mixmode_read
SUBTEST= e2_class_test
SUBTEST= status_reg_walk1
SUBTEST= line_size_walk1
SUBTEST= latency_walk1
SUBTEST= line_walk1
SUBTEST= pin_test
Enter (0-14 tests, 15 -Quit, 16 -Menu) ===>
4.8.8.2
EBus DMA/TCR Registers
The EBUS DMA/TCR registers diagnostic performs the following:
Chapter 4
Troubleshooting the System
4-29
■
The dma_reg_test: Performs a walking ones bit test for control status register,
address register, and byte count register of each channel. Verifies that the control
status register is set properly.
■
The dma_func_test: Validates the DMA capabilities and FIFOs. The test is
executed in a DMA diagnostic loopback mode. It initializes the data of
transmitting memory with its address, performs a DMA read and write, and
verifies that the data received is correct. This is repeated for four channels.
CODE EXAMPLE 4-8 identifies the EBus DMA/TCR registers output message.
CODE EXAMPLE 4-8
EBus DMA/TCR Registers Output Message
Enter (0-14 tests, 15 -Quit, 16 -Menu) ===> 1
TEST= all_dma/ebus_test
SUBTEST= dma_reg_test
SUBTEST= dma_func_test
Enter (0-14 tests, 15 -Quit, 16 -Menu) ===>
4.8.8.3
Ethernet
The Ethernet diagnostic performs the following:
4-30
■
my_channel_reset resets the Ethernet channel.
■
hme_reg_test performs Walk1 on the following registers set: global register 1,
global register 2, bmac xif register, bmac tx register, and the mif register.
■
MAC_internal_loopback_test performs Ethernet channel engine internal
loopback.
■
10_mb_xcvr_loopback_test enables the 10Base-T data present at the transmit
MII data inputs to be routed back to the receive MII data outputs.
■
100_mb_phy_loopback_test enables MII transmit data to be routed to the MII
receive data path.
■
100_mb_twister_loopback_test forces the twisted-pair transceiver into
loopback mode.
Netra ct Server Service Manual • February 2001
CODE EXAMPLE 4-9 identifies the Ethernet output message.
CODE EXAMPLE 4-9
Ethernet Output Message
Enter (0-14 tests, 15 -Quit, 16 -Menu) ===> 2
TEST= ethernet_test
SUBTEST= my_channel_reset
SUBTEST= hme_reg_test
SUBTEST= global_reg1_test
SUBTEST= global_reg2_test
SUBTEST= bmac_xif_reg_test
SUBTEST= bmac_tx_reg_test
SUBTEST= mif_reg_test
Test only supported for National Phy
SUBTEST= 10mb_xcvr_loopback_test
selecting internal transceiver
Test only supported for National Phy
SUBTEST= 100mb_phy_loopback_test
selecting internal transceiver
Test only supported for National Phy
SUBTEST= 100mb_twister_loopback_test
selecting internal transceiver
Test only supported for National Phy
DP83840A
DP83840A
DP83840A
DP83840A
Enter (0-14 tests, 15 -Quit, 16 -Menu) ===>
4.8.8.4
Parallel Port
The parallel port diagnostic performs the dma_read. This enables ECP mode and
ECP DMA configuration, and FIFO test mode. It transfers 16 bytes of data from the
memory to the parallel port device and then verifies that the data is in TFIFO.
CODE EXAMPLE 4-10 identifies the parallel port output message.
CODE EXAMPLE 4-10
Parallel Port Output Message
Enter (0-14 tests, 15 -Quit, 16 -Menu) ===> 4
TEST= parallel_port_test
SUBTEST= dma_read
Enter (0-14 tests, 15 -Quit, 16 -Menu) ===>
Chapter 4
Troubleshooting the System
4-31
4.8.8.5
Serial Port A
The serial port A diagnostic invokes the uart_loopback test. This test transmits and
receives 128 characters and checks the transaction validity. CODE EXAMPLE 4-11
identifies the serial port A output message.
CODE EXAMPLE 4-11
Serial Port A Output Message
Enter (0-14 tests, 15 -Quit, 16 -Menu) ===> 9
TEST= uarta_test
Enter (0-14 tests, 15 -Quit, 16 -Menu) ===>
Note – The serial port A diagnostic will stall if the TIP line is installed on serial port
A. CODE EXAMPLE 4-12 identifies the serial port A output message when the TIP line
is installed on serial port A.
CODE EXAMPLE 4-12
Serial Port A Output Message with TIP Line Installed
Enter (0-14 tests, 15 -Quit, 16 -Menu) ===> 9
TEST= uarta_test
UART A in use as console - Test not run.
Enter (0-14 tests, 15 -Quit, 16 -Menu) ===>
4.8.8.6
Serial Port B
The serial port B diagnostic is identical to the serial port A diagnostic.
CODE EXAMPLE 4-13 identifies the serial port B output message.
Note – The serial port B diagnostic will stall if the TIP line is installed on serial port
B.
CODE EXAMPLE 4-13
Serial Port B Output Message
Enter (0-14 tests, 15 -Quit, 16 -Menu) ===> 10
TEST= uartb_test
Enter (0-14 tests, 15 -Quit, 16 -Menu) ===>
4-32
Netra ct Server Service Manual • February 2001
4.8.8.7
NVRAM
The NVRAM diagnostic verifies the NVRAM operation by performing a write and
read to the NVRAM. CODE EXAMPLE 4-14 identifies the NVRAM output message.
CODE EXAMPLE 4-14
NVRAM Output Message
Enter (0-14 tests, 15 -Quit, 16 -Menu) ===> 7
TEST= nvram_test
SUBTEST= write/read_patterns
SUBTEST= write/read_inverted_patterns
Enter (0-14 tests, 15 -Quit, 16 -Menu) ===>
Chapter 4
Troubleshooting the System
4-33
4.8.8.8
All Above
The All Above diagnostic validates the system unit. CODE EXAMPLE 4-15 shows an
example of the All Above option output message.
CODE EXAMPLE 4-15
All Above Output Message
Enter (0-14 tests, 15 -Quit, 16 -Menu) ===> 14
TEST= all_pci/cheerio_test
SUBTEST= vendor_id_test
SUBTEST= device_id_test
...
SUBTEST= bmac_xif_reg_test
SUBTEST= bmac_tx_reg_test
SUBTEST= mif_reg_test
SUBTEST= mac_internal_loopback_test
selecting internal transceiver
Test only supported for National Phy DP83840A
...
SUBTEST= 100mb_twister_loopback_test
selecting internal transceiver
Test only supported for National Phy DP83840A
TEST= ethernet2_test
TEST= parallel_port_test
SUBTEST= dma_read
TEST= uarta_test
...
SUBTEST= write/read_patterns
...
ttya in use as console - Test not run.
TEST= usi_test
ttyb in use as console - Test not run.
TEST= ras_test env-monitor = disabled
SUBTEST= obd-init-i2c-test
...
TEST= flash_test
SUBTEST= flash-supported?
TEST= flash_test
SUBTEST= flash-supported?
Enter (0-14 tests, 15 -Quit, 16 -Menu) ===>
4-34
Netra ct Server Service Manual • February 2001
PART
III
Replacing Hot-Swappable FRUs
Hot Swap Software Commands
Chapter 5
Removing and Replacing Hot-Swappable Cards
Chapter 6
Removing and Replacing Hard Disk Drives and Removeable Media
Chapter 7
Removing and Replacing Hot-Swappable Subassemblies
Chapter 8
Netra ct Server Service Manual
CHAPTER
5
Hot Swap Software Commands
Certain FRUs in the Netra ct server are hot-swappable (see “Hot-Swappable FRUs”
on page 1-4). Hot swap, a key feature of the PICMG standard, means that a
CompactPCI card that meets the PICMG standard can be reliably inserted into or
extracted from a powered and operating CompactPCI platform without affecting the
other functions of the platform. The standard also defines state transitions for the
hardware and software connection processes that allow the card to be connected and
configured.
The Netra ct server allows for two models of hot swap:
■
■
Basic hot swap
Full hot swap
The models can be explained by first defining two terms:
■
Hardware connection process—the electrical connection (and disconnection) of an
I/O board.
■
Software connection process—the software management by the operating system
of the board (allocating/releasing resources, attaching/detaching device drivers,
etc).
In the basic hot swap model, the hardware connection process can be performed
automatically by the hardware, while the software connection process requires
operator assistance.
In the full hot swap model, both the hardware and the software connection process
are performed automatically.
The Netra ct server uses the cfgadm utility to support hot swapping and requires
user intervention for hardware connection in the basic hot swap mode.
5-1
5.1
Using the cfgadm Utility
You can perform the following hot swap procedures using the cfgadm utility:
■
■
■
5.1.1
Deactivate and activate hot-swappable FRUs
Enable and disable full hot swap for I/O slots in a server
Enable and disable basic hot swap for I/O slots in a server
Logging In to the Netra ct Server
In order to use the cfgadm utility, you must be able to log in to the server either
remotely, where you would log in to the Netra ct server as root through another
server on the network, or directly, where you would connect a terminal console
directly to your Netra ct server.
For more information on connecting a terminal console to your system, refer to
Appendix B.
5.1.2
Running the cfgadm Utility
For all cfgadm commands, you must know the attachment point ID for the I/O slot
that you will be working on. To list the attachment point IDs for the I/O slots in a
server, log into the server and, as root, enter the following command:
# cfgadm pci
For a Netra ct 800 server, you should get feedback similar to the following:
Ap_Id
pci_pci0:cpci_slot2
pci_pci0:cpci_slot3
pci_pci0:cpci_slot4
pci_pci0:cpci_slot5
pci_pci0:cpci_slot6
pci_pci0:cpci_slot7
pci_pci0:cpci_slot8
5-2
Type
unknown
stpcipci/fhs
stpcipci/fhs
unknown
unknown
unknown
stpcipci/fhs
Netra ct Server Service Manual • February 2001
Receptacle
empty
connected
connected
empty
empty
empty
connected
Occupant
unconfigured
configured
configured
unconfigured
unconfigured
unconfigured
configured
Condition
unknown
ok
ok
unknown
unknown
unknown
ok
For a Netra ct 400 server, you should get feedback similar to the following:
Ap_Id
pci_pci0:cpci_slot1
pci_pci0:cpci_slot2
pci_pci0:cpci_slot4
pci_pci0:cpci_slot5
Type
unknown
stpcipci/fhs
stpcipci/fhs
unknown
Receptacle
empty
connected
connected
empty
Occupant
unconfigured
configured
configured
unconfigured
Condition
unknown
ok
ok
unknown
The attachment point ID is shown in the first column of the readout; for example,
the attachment point ID for I/O slot 2 in a Netra ct 800 server would be
pci_pci0:cpci_slot2.
Note – If you get an error message after entering the cfgadm pci command, it
may mean that you did not install the envmond software from the Supplement for
Solaris Operating Environment for Sun Computer Systems CD when you installed
the Solaris operating environment onto your Netra ct server. Follow the instructions
in the Netra ct Server Installation Guide to install the envmond software onto your
Netra ct server, then return here.
To view the online help for cfgadm, as root, enter:
# cfgadm -h pci
You should get the following feedback:
PCI hotplug specific commands:
-c [connect|disconnect|configure|unconfigure|insert|remove] ap_id [ap_id...]
-x enable_slot ap_id [ap_id...]
-x disable_slot ap_id [ap_id...]
-x enable_autoconfig ap_id [ap_id...]
-x disable_autoconfig ap_id [ap_id...]
-x led[=[fault|power|active|attn],mode=[on|off|blink]] ap_id [ap_id...]
You can also view the man page for the cfgadm utility by entering man cfgadm at
the prompt.
Chapter 5
Hot Swap Software Commands
5-3
5.1.2.1
Deactivating and Activating a Hot Swappable FRU
The Netra ct servers are set to basic hot swap by default. This means that if an I/O
card becomes faulty and needs replacing, you must manually deactivate the I/O slot
using the cfgadm utility before you can remove the card, and then manually
reactivate the I/O slot after replacing the card.
To deactivate an I/O card, as root, enter:
# cfgadm -c unconfigure ap_id
where ap_id is the attachment point ID. For example, to deactivate an I/O card in
slot 4, as root, enter:
# cfgadm -c unconfigure pci_pci0:cpci_slot4
To activate an I/O card, as root, enter:
# cfgadm -c configure ap_id
where ap_id is the attachment point ID.
5.1.2.2
Enabling Full Hot Swap on I/O Slots
You can use cfgadm to enable full hot swap on an I/O slot in a server. Enabling full
hot swap on an I/O slot means that you do not have to manually deactivate or
activate the I/O card when replacing it in the server; those processes are handled
automatically by the system.
To enable full hot swap for an I/O slot in a Netra ct server, as root, enter:
# cfgadm -x enable_autoconfig ap_id
where ap_id is the attachment point ID in the server that you want to have full hot
swap enabled on. For example, to enable full hot swap for I/O slot 4, as root, you
could enter the following:
# cfgadm -x enable_autoconfig pci_pci0:cpci_slot4
5-4
Netra ct Server Service Manual • February 2001
Note – Whenever you reboot or power your server on and off, the hot swap states
revert back to the default basic hot swap state for all I/O slots. You must manually
reset the I/O slots to full hot swap after rebooting or powering your server on and
off.
Note – If you are enabling full hot swap on an I/O slot that holds an alarm card or
alarm rear transition card, you must also verify that you have the envmond software
installed and running in order for full hot swap to work on the card.
5.1.2.3
Enabling Basic Hot Swap on I/O Slots
If you’ve enabled full hot swap on an I/O slot in your Netra ct server, you can
disable full hot swap, bringing the I/O slot back to the basic hot swap state. To
disable full hot swap on an I/O slot, bringing it back to its original basic hot swap
state, as root, enter:
# cfgadm -x disable_autoconfig ap_id
5.1.2.4
Determining the Current Hot Swap State
To determine the current hot swap state for the I/O slots in your server, as root,
enter:
# prtconf -v
Chapter 5
Hot Swap Software Commands
5-5
The following screens give two example outputs:
TABLE 5-1
Example Output for Basic Hot Swap Systems
...
sysctrl, instance #0
Driver properties:
name <hotswap-mode> length <5>
value ’basic’
name <slot5-autoconfig> length
value ’disabled’
name <slot4-autoconfig> length
value ’disabled’
name <slot2-autoconfig> length
value ’disabled’
name <slot1-autoconfig> length
value ’disabled’
TABLE 5-2
<8>
<8>
<8>
Example Output for Full Hot Swap Systems
...
sysctrl, instance #0
Driver properties:
name <hotswap-mode> length <5>
value ’full’
name <slot5-autoconfig> length
value ’enabled’
name <slot4-autoconfig> length
value ’enabled’
name <slot2-autoconfig> length
value ’enabled’
name <slot1-autoconfig> length
value ’disabled’
<8>
<8>
<8>
<9>
■
If you see value ’basic’ underneath the <hotswap-mode> line (see
TABLE 5-1), then all of the I/O slots in the Netra ct server have been set to basic hot
swap. You should see value ’disabled’ for every I/O slot in the system in
this situation.
■
If you see value ’full’ underneath the <hotswap-mode> line (see TABLE 5-2),
then at least one of the I/O slots in the Netra ct server has been set to full hot
swap. You must look at the entries for individual I/O slots to determine if they
have been set to basic or full hot swap mode in this situation:
■
5-6
<8>
If you see value ’enabled’ underneath a <slot#-autoconfig> line, then
that slot is set to full hot swap. For example, in TABLE 5-2, I/O slots 5, 4, and 2
are all set to full hot swap.
Netra ct Server Service Manual • February 2001
■
If you see value ’disabled’ underneath a <slot#-autoconfig> line,
then that slot is set to basic hot swap. For example, in TABLE 5-2, I/O slot 1 is set
to basic hot swap.
Chapter 5
Hot Swap Software Commands
5-7
5-8
Netra ct Server Service Manual • February 2001
CHAPTER
6
Removing and Replacing
Hot-Swappable Cards
Caution – An energy hazard is present if any I/O slots are left uncovered. If you
remove a card from an I/O slot, you must fill it with either a replacement card or a
filler panel.
Note – When removing a hot-swappable component, allow several seconds before
inserting it or another component in that slot. Rapidly removing and inserting any
hot-swappable component might panic or hang the system.
This chapter gives procedures for the installation, removal, and replacement of
hot-swappable cards. The procedures differ somewhat between front-access and
rear-access servers, so this chapter is organized as follows:
■
■
“Front-Access Models” on page 6-2
“Rear-Access Models” on page 6-39
Consult the Netra ct Server Safety and Compliance Manual for safety information prior
to performing the procedures in this chapter.
Note – Read Chapter 3 “Handling Cards and Assemblies” before performing the
procedures in this chapter.
6-1
6.1
Front-Access Models
This section gives procedures for the installation, removal, and replacement of the
following hot-swappable cards for the front-access models of the Netra ct 400 server
and Netra ct 800 server:
■
■
“I/O Card” on page 6-2
“Alarm Card” on page 6-18
Note – The CPU card and CPU front transition card are not hot-swappable, so the
procedures for those cards are not covered in this chapter. For removal and
replacement procedures for those cards, refer to Chapter 10 “Removing and
Replacing Cold-Swappable Cards.”
6.1.1
I/O Card
These instructions apply to the installation or removal and replacement of a 6U I/O
card from the front-access model versions of the Netra ct servers.
The term I/O slot refers to any slot into which you can install an I/O card, such as a
Sun Quad FastEthernet™ card. An I/O slot is distinguished from the slot occupied
by the CPU card or alarm card. In the Netra ct 800 server, the slot occupied by a
front transition card can be occupied by an I/O card, if the front transition card is
not present. An I/O card cannot be installed in a slot meant for the CPU card or
alarm card. All the slots for I/O cards in the Netra ct server support hot swap.
6-2
Netra ct Server Service Manual • February 2001
FIGURE 6-1 shows the I/O card slots in a Netra ct 800 server.
Legend:
CPU front transition or I/O card
I/O cards only
Alarm card only
FIGURE 6-1
I/O Card Slots (Netra ct 800 Server)
Chapter 6
Removing and Replacing Hot-Swappable Cards
6-3
P5
P5
P4
P4
8
P5
7
P4
6
P5
5
P4
4
P5
P5
3
P4
2
P5
1
P5
FIGURE 6-2 shows the buses on a Netra ct 800 server.
P3
P3
P3
P3
P3
P4
P3
P4
P3
P3
P4
H.110 bus
P2
P2
P2
P2
P2
P2
P2
P2
CompactPCI bus 64-bit extension
FIGURE 6-2
6-4
Buses for the Netra ct 800 Server (Front View)
Netra ct Server Service Manual • February 2001
P1
P1
P1
P1
P1
P1
P1
P1
CompactPCI bus 32-bit @ 33 MHz
FIGURE 6-3 shows the I/O card slots in a Netra ct 400 server.
HD
D0
Legend:
FIGURE 6-3
I/O cards only
I/O Card Slots (Netra ct 400 Server)
Chapter 6
Removing and Replacing Hot-Swappable Cards
6-5
2
3
4
P5
P5
P5
5
P5
1
P5
FIGURE 6-4 shows the buses on a Netra ct 400 server.
P4
P3
P4
P3
P4
P4
P3
P3
P4
P3
H.110
bus
P2
P2
P2
P2
P2
cPCI bus 64-bit ext.
FIGURE 6-4
P1
P1
P1
P1
P1
cPCI bus 32-bit@33 MHz
Buses for the Netra ct 400 Server (Front View)
The individual I/O slots in your server will be set to either basic hot swap, the
default setting, or full hot swap, which must be set manually. Refer to Chapter 5 for
more information.
6-6
■
If you are removing and replacing a faulty I/O card in the server, first to go
“Removing an I/O Card” on page 6-7, then go to “Installing an I/O Card” on
page 6-13.
■
If you are installing a new I/O card in the server, go to “Installing an I/O Card”
on page 6-13.
Netra ct Server Service Manual • February 2001
6.1.1.1
Removing an I/O Card
Note – If you want to manually deconfigure a hot swap I/O card remotely, log into
the server and skip to Step 8 on page 6-11.
1. Perform any necessary card-specific software commands.
There are certain card-specific software commands that you might have to perform
before removing a hot-swappable I/O card. Refer to the documentation that you
received with the I/O card for any card-specific procedures before proceeding with
this procedure.
2. Attach the antistatic wrist strap.
Refer to “Attaching the Antistatic Wrist Strap” on page 1-1.
3. Locate the I/O card that you want to remove from the server.
■
■
FIGURE 6-1 on page 6-3 shows the I/O card slots in a Netra ct 800 server.
FIGURE 6-3 on page 6-5 shows the I/O card slots in a Netra ct 400 server.
4. Using a No. 2 Phillips screwdriver, loosen the two captive screws inside the card’s
ejection levers, one on top and one on the bottom (FIGURE 6-5).
FIGURE 6-5
Loosening the Ejection Lever Captive Screws
5. Unlock the ejection levers.
Caution – Only unlock the ejection levers at this point; do not unseat the I/O card
until the I/O card LEDs on the system status panel are in the proper state.
Chapter 6
Removing and Replacing Hot-Swappable Cards
6-7
Note – If the server is set to full hot-swap mode, unlocking the ejection levers
automatically starts the software driver detachment process. If you decide that you do
not want to remove the card, you must completely unseat the card, reseat it, then
lock the ejection levers again in order to start the software driver attachment process.
Simply locking the ejection levers after unlocking them will not start the driver
attachment process.
There are several different models of locking ejection levers, so the method you
would use to unlock the ejection levers will vary depending on the model of the
ejection lever used on the card; for example, one model uses red tabs at the top and
bottom to unlock the card (FIGURE 6-6). Refer to the documentation that came with
the I/O card for instructions on unlocking the card.
FIGURE 6-6
Unlocking the Ejection Levers
6. Locate the LEDs on the system status panel for the I/O card that you want to
remove to determine if the card has been deactivated.
The system status panel on each server has LEDs that show the status of the I/O
card installed in each set of the slots in that particular server. FIGURE 6-7 shows the
locations of the I/O card LEDs on the Netra ct 800 server and FIGURE 6-8 shows the
locations of the I/O card LEDs on the Netra ct 400 server. Keep in mind that some
6-8
Netra ct Server Service Manual • February 2001
I/O card slots might contain devices or cards other than I/O cards, such as a CPU
front transition card or an alarm card. See FIGURE 6-1 and FIGURE 6-3 for possible
system configurations.
Caution – Do not deactivate any other I/O cards until you see that the first I/O
card has been deactivated. Deactivating more than one card at the same time may
lead to unpredictable results.
I/O card LEDs
FIGURE 6-7
Locating the I/O Card LEDs on the System Status Panel (Netra ct 800 Server)
Chapter 6
Removing and Replacing Hot-Swappable Cards
6-9
I/O card LEDs
FIGURE 6-8
Locating the I/O Card LEDs on the System Status Panel (Netra ct 400 Server)
The amber Okay to Remove LED (
) on the system status panel tells whether the
I/O card can be safely removed or not:
Status of the
Okay to Remove LED (
Indication
Go to
On
The I/O slot that holds the
I/O card has been set to full
hot swap. You can remove
the I/O card from the slot.
Step 10 on page 6-12
Off
The I/O slot that holds the
I/O card has been set to
basic hot swap. You must
use the cfgadm utility to
deactivate the I/O card
before you can remove it.
Step 7 on page 6-10
)
7. Log into the Netra ct server.
Refer to “Logging In to the Netra ct Server” on page 5-2, then return to this
procedure.
6-10
Netra ct Server Service Manual • February 2001
8. Identify the attachment-point ID that corresponds to the I/O slot where you will
be removing the I/O card.
As root, enter:
# cfgadm pci
For a Netra ct 800 server, you should get feedback similar to the following:
Ap_Id
pci_pci0:cpci_slot2
pci_pci0:cpci_slot3
pci_pci0:cpci_slot4
pci_pci0:cpci_slot5
pci_pci0:cpci_slot6
pci_pci0:cpci_slot7
pci_pci0:cpci_slot8
Type
unknown
stpcipci/fhs
stpcipci/fhs
unknown
unknown
unknown
stpcipci/fhs
Receptacle
empty
connected
connected
empty
empty
empty
connected
Occupant
unconfigured
configured
configured
unconfigured
unconfigured
unconfigured
configured
Condition
unknown
ok
ok
unknown
unknown
unknown
ok
For a Netra ct 400 server, you should get feedback similar to the following:
Ap_Id
pci_pci0:cpci_slot1
pci_pci0:cpci_slot2
pci_pci0:cpci_slot4
pci_pci0:cpci_slot5
Type
unknown
stpcipci/fhs
stpcipci/fhs
unknown
Receptacle
empty
connected
connected
empty
Occupant
unconfigured
configured
configured
unconfigured
Condition
unknown
ok
ok
unknown
The attachment-point ID is shown in the first column of the readout; for example,
the attachment-point ID for I/O slot 4 in a Netra ct 800 server would be
pci_pci0:cpci_slot4.
Chapter 6
Removing and Replacing Hot-Swappable Cards
6-11
9. Deactivate the I/O card with the cfgadm dynamic reconfiguration software:
# cfgadm -c unconfigure ap_id
where ap_id is the attachment-point ID. For example, to deactivate the I/O card in
slot 4, as root, enter:
# cfgadm -c unconfigure pci_pci0:cpci_slot4
The amber Okay to Remove LED (
) on the system status panel for the I/O slot
should go ON, indicating that you can remove the I/O card from the slot.
Caution – Do not remove the I/O card if the amber Okay to Remove LED (
) is
unlit. The amber Okay to Remove LED tells you if you can remove a hot-swappable
card safely. Removing a hot-swappable card from an I/O slot when the amber Okay
to Remove LED is unlit might panic the system.
10. When it is safe to remove the I/O card, disconnect any cables connected to the I/O
card.
11. Press outward on the two ejection levers on the card to unseat the card from the
card cage.
12. Carefully slide the card out of the slot and place it on the electrostatic discharge
mat.
13. Secure a blank filler panel over the empty I/O slots, if necessary.
If you are not going to replace the I/O card right away, you must install a blank filler
panel over the opening to ensure proper airflow in the system. The slot filler panel is
secured to the card cage using two screws, one at the top of the filler panel, the other
at the bottom.
6-12
Netra ct Server Service Manual • February 2001
6.1.1.2
Installing an I/O Card
Caution – When moving a number of cards to different slots in the system, move
the cards one at a time. If you move multiple cards in rapid succession and at the
same time, you may panic or hang the system.
1. Attach the antistatic wrist strap.
Refer to “Attaching the Antistatic Wrist Strap” on page 1-1.
2. Remove the slot filler panel, if necessary.
The slot filler panel is secured to the card cage using two screws, one at the top of
the filler panel, the other at the bottom. Store the slot filler panel in a safe place; you
may have to use it again if you have to remove an I/O card for an extended period
of time.
3. Get the replacement I/O card from the ship kit.
4. Verify that the ejection levers are unlocked.
You will not be able to install the card properly if the ejection levers are locked.
5. Keeping the card vertical, slide the card into the slot between the two guides.
The cuts in the handle of the card must align with the square cutouts in the I/O slot.
When the card is completely seated in the card cage, the two ejection levers should
flip inward, and the notches in the ejection levers should fit smoothly in the
rectangular cutouts in the bottom and top plates.
Chapter 6
Removing and Replacing Hot-Swappable Cards
6-13
Comp
act
ETHE
PC TM
I
RN
CO
STAT
ET
M
US
ALAR
RE
RE
HD
D1
M
AD
Y
HD
D0
SET
AB
OR
T
HD
D0
micros
ystem
s
FIGURE 6-9
Aligning the Card with the Card Cage Cutouts
6. Lock the ejection levers.
There are several different models of locking ejection levers, so the method you
would use to lock the ejection levers will vary depending on the model of the
ejection lever used on the card. Refer to the documentation that came with the I/O
card for instructions on locking the ejection levers.
7. Locate the LEDs on the system status panel for the I/O card that you just installed
to determine if the card has been activated.
FIGURE 6-7 shows the locations of the I/O card LEDs on the Netra ct 800 server and
FIGURE 6-8 shows the locations of the I/O card LEDs on the Netra ct 400 server.
6-14
Netra ct Server Service Manual • February 2001
The amber Okay to Remove LED (
I/O card has been activated:
Status of the
Okay to Remove LED (
) on the system status panel tells whether the
Indication
Go to
On
The I/O slot that holds the
I/O card has been set to
basic hot swap. You must
use the cfgadm utility to
activate the I/O card.
Step 8 on page 6-15
Off
The I/O slot that holds the
I/O card has been set to full
hot swap. The card has been
activated.
Step 12 on page 6-17
)
8. Log into the Netra ct server.
Refer to “Logging In to the Netra ct Server” on page 5-2, and then return to this
procedure.
9. Identify the attachment-point ID that corresponds to the I/O slot where you
installed the I/O card.
As root, enter:
# cfgadm pci
For a Netra ct 800 server, you should get feedback similar to the following:
Ap_Id
pci_pci0:cpci_slot2
pci_pci0:cpci_slot3
pci_pci0:cpci_slot4
pci_pci0:cpci_slot5
pci_pci0:cpci_slot6
pci_pci0:cpci_slot7
pci_pci0:cpci_slot8
Type
unknown
stpcipci/fhs
unknown
unknown
unknown
unknown
stpcipci/fhs
Receptacle
empty
connected
disconnected
empty
empty
empty
connected
Chapter 6
Occupant
unconfigured
configured
unconfigured
unconfigured
unconfigured
unconfigured
configured
Condition
unknown
ok
unknown
unknown
unknown
unknown
ok
Removing and Replacing Hot-Swappable Cards
6-15
For a Netra ct 400 server, you should get feedback similar to the following:
Ap_Id
pci_pci0:cpci_slot1
pci_pci0:cpci_slot2
pci_pci0:cpci_slot4
pci_pci0:cpci_slot5
Type
unknown
unknown
stpcipci/fhs
unknown
Receptacle
empty
disconnected
connected
empty
Occupant
unconfigured
unconfigured
configured
unconfigured
Condition
unknown
unknown
ok
unknown
The attachment-point ID is shown in the first column of the readout; for example,
the attachment-point ID for I/O slot 4 in a Netra ct 800 server would be
pci_pci0:cpci_slot4. Note that the information for the card installed in I/O slot
4 in the example feedback shows it as unknown (Type), disconnected (Receptacle),
unconfigured (Occupant), and unknown (Condition). This confirms that the I/O slot
has been set to basic hot swap and that the card in the I/O slot has not yet been
activated.
10. Connect the I/O card with the cfgadm dynamic reconfiguration software:
# cfgadm -c connect ap_id
where ap_id is the attachment-point ID. For example, to connect the I/O card in slot
4, as root, enter:
# cfgadm -c connect pci_pci0:cpci_slot4
The amber Okay to Remove LED (
) on the system status panel for the I/O slot
should go OFF, indicating that the card has been connected.
11. Activate the I/O card with the cfgadm dynamic reconfiguration software:
# cfgadm -c configure ap_id
where ap_id is the attachment-point ID. For example, to activate the I/O card in slot
4, as root, enter:
# cfgadm -c configure pci_pci0:cpci_slot4
6-16
Netra ct Server Service Manual • February 2001
If you were to enter the cfgadm pci command again at this point, you should see
the fields changed for the card in I/O slot 4:
Ap_Id
pci_pci0:cpci_slot2
pci_pci0:cpci_slot3
pci_pci0:cpci_slot4
pci_pci0:cpci_slot5
pci_pci0:cpci_slot6
pci_pci0:cpci_slot7
pci_pci0:cpci_slot8
Type
unknown
stpcipci/fhs
stpcipci/fhs
unknown
unknown
unknown
stpcipci/fhs
Receptacle
empty
connected
connected
empty
empty
empty
connected
Occupant
unconfigured
configured
configured
unconfigured
unconfigured
unconfigured
configured
Condition
unknown
ok
ok
unknown
unknown
unknown
ok
12. Using a No. 2 Phillips screwdriver, tighten the two captive screws inside the card’s
ejection levers, one on top and one on the bottom.
FIGURE 6-10
Tightening the Ejection Lever Captive Screws
13. Connect to the replacement I/O card any cables that you unplugged from the
failed I/O card.
14. Perform any I/O card-specific software configuration procedures, if necessary.
Refer to the documentation that you received with your CompactPCI I/O card for
more information.
Chapter 6
Removing and Replacing Hot-Swappable Cards
6-17
6.1.2
Alarm Card
Caution – The maximum voltage that can be applied to an alarm card is 60 VDC, as
specified in UL1950 and IEC 60950. The maximum current is 500mA.
Caution – The console is directed to the TTY A port (also known as the COM 1
port) on the CPU or CPU transition card by default. As long as the console is
directed to the TTY A port on the CPU or CPU transition card, the alarm card or
alarm rear transition card is hot-swappable. If you redirect the console to rsc on the
alarm card, the alarm card is no longer hot-swappable. You must redirect console
back to the TTY A port on the CPU or CPU transition card and reboot the system if
you want the alarm card or alarm rear transition card to be hot-swappable.
There are two different types of alarm cards used in the Netra ct server:
■
■
The 6U, single-slot alarm card used in the Netra ct 800 server
The 3U, dual-slot alarm card used in the Netra ct 400 server
The I/O slot(s) that hold the alarm card in the servers is set to either basic hot swap,
the default setting, or full hot swap, which must be set manually. Refer to Chapter 5
for more information.
6.1.2.1
6-18
■
To remove and replace the 6U, single-slot alarm card used in the Netra ct 800
server, go to “Removing and Replacing an Alarm Card in the Netra ct 800 Server”
on page 6-18.
■
To remove and replace the 3U, dual-slot alarm card used in the Netra ct 400
server, go to “Removing and Replacing an Alarm Card in the Netra ct 400 Server”
on page 6-29.
Removing and Replacing an Alarm Card in the Netra ct 800
Server
■
If you are removing and replacing a faulty alarm card in the server, first to go
“Removing an Alarm Card (Netra ct 800 Server)” on page 6-19, then go to
“Installing an Alarm Card (Netra ct 800 Server)” on page 6-24.
■
If you are installing a new alarm card in the server, go to “Installing an Alarm
Card (Netra ct 800 Server)” on page 6-24.
Netra ct Server Service Manual • February 2001
Removing an Alarm Card (Netra ct 800 Server)
Note – If you want to manually unconfigure a hot-swap alarm card remotely, log in
to the server and skip to Step 10 on page 6-23.
1. Log into the Netra ct server.
Refer to “Logging In to the Netra ct Server” on page 5-2, then return to this
procedure.
2. As root, enter the following command:
# pkill -USR1 envmond
3. Change directories to the rsc directory:
# cd /usr/platform/SUNW,UltraSPARC-IIi-Netract/rsc
4. Create a backup file to record the RSC configuration settings on a remote system.
As root, enter:
# ./rscadm show > remote-filename
where remote-filename is a meaningful file name that includes the name of the server
that RSC controls.
5. Attach the antistatic wrist strap.
Refer to “Attaching the Antistatic Wrist Strap” on page 1-1.
6. Locate the alarm card for the Netra ct 800 server.
Chapter 6
Removing and Replacing Hot-Swappable Cards
6-19
Single-wide
6U alarm card
Com
pac
ETH
tPC TM
I
ERN
CO
STA
ET
M
TUS
ALA
RM
REA
Com
pac
AB
tPC TM
I
DY
ETH
RES
ERN
ET
OR
ET
T
CO
STA
M
TUS
micros
ystems
ALA
RM
REA
RES
AB
DY
ET
OR
T
micros
ystems
FIGURE 6-11
Location of Alarm Card in Netra ct 800 Server
7. Using a No. 2 Phillips screwdriver, loosen the two captive screws inside the card’s
ejection levers, one on top and one on the bottom (FIGURE 6-5 on page 6-7).
8. Unlock the ejection levers.
Caution – Only unlock the ejection levers at this point; do not unseat the alarm card
until the amber Okay to Remove LED (
) on the system status panel is in the
proper (lit) state.
Note – If the server is set to full hot-swap mode, unlocking the ejection levers
automatically starts the software driver detachment process. If you decide that you do
not want to remove the card, you must completely unseat the card, reseat it, then
lock the ejection levers again in order to start the software driver attachment process.
Simply locking the ejection levers after unlocking them will not start the driver
attachment process.
6-20
Netra ct Server Service Manual • February 2001
FIGURE 6-12
Unlocking the Ejection Levers
9. Locate the LEDs on the system status panel for the alarm card to determine if the
card has been deactivated (FIGURE 6-13).
Caution – Do not deactivate any other cards until you see that the alarm card has
been deactivated. Deactivating more than one card at the same time may lead to
unpredictable results.
Chapter 6
Removing and Replacing Hot-Swappable Cards
6-21
Alarm card slot LEDs
FIGURE 6-13
Locating the Alarm Card LEDs on the System Status Panel (Netra ct 800
Server)
The amber Okay to Remove LED (
) on the system status panel indicates whether
the alarm card can be safely removed or not:
Status of the
Okay to Remove LED (
Indication
Go to
On
The I/O slot that holds the
alarm card has been set to
full hot swap. You can
remove the alarm card from
the slot.1
Step 12 on page 6-23
Off
The I/O slot that holds the
alarm card has been set to
basic hot swap. You must
use the cfgadm utility to
deactivate the alarm card
before you can remove it.
Step 10 on page 6-23
)
1. The envmond software must be installed and running for full hot swap to work on an alarm card.
6-22
Netra ct Server Service Manual • February 2001
10. Identify the attachment-point ID that corresponds to I/O slot 8, which is the I/O
slot that holds the alarm card.
As root, enter:
# cfgadm pci
For a Netra ct 800 server, you should get feedback similar to the following:
Ap_Id
pci_pci0:cpci_slot2
pci_pci0:cpci_slot3
pci_pci0:cpci_slot4
pci_pci0:cpci_slot5
pci_pci0:cpci_slot6
pci_pci0:cpci_slot7
pci_pci0:cpci_slot8
Type
unknown
stpcipci/fhs
stpcipci/fhs
unknown
unknown
unknown
stpcipci/fhs
Receptacle
empty
connected
connected
empty
empty
empty
connected
Occupant
unconfigured
configured
configured
unconfigured
unconfigured
unconfigured
configured
Condition
unknown
ok
ok
unknown
unknown
unknown
ok
The attachment-point ID is shown in the first column of the readout; for example,
the attachment-point ID for I/O slot 8 in a Netra ct 800 server would be
pci_pci0:cpci_slot8.
11. Deactivate the alarm card with the cfgadm dynamic reconfiguration software:
# cfgadm -c unconfigure ap_id
where ap_id is the attachment-point ID for the I/O slot 8, which holds the alarm
card. For example, to deactivate the alarm card using the output given in the
example above, as root, you would enter:
# cfgadm -c unconfigure pci_pci0:cpci_slot8
The amber Okay to Remove LED (
) on the system status panel for the alarm slot
should go ON, indicating that you can remove the alarm card from the slot.
Caution – Do not remove the alarm card if the amber Okay to Remove LED (
)
is unlit. Removing a hot-swappable card from an I/O slot when the amber Okay to
Remove LED is unlit might panic the system.
12. When it is safe to remove the alarm card, disconnect any cables connected to the
card, if necessary.
Chapter 6
Removing and Replacing Hot-Swappable Cards
6-23
13. Press outward on the two ejection levers on the card to unseat the card from the
card cage.
14. Carefully slide the card out of the slot and place it on the electrostatic discharge
mat.
15. Secure a blank filler panel over the empty I/O slot, if necessary.
If you are not going to replace the alarm card right away, you must install a blank
filler panel over the opening to ensure proper airflow in the system. The slot filler
panel is secured to the card cage using two screws, one at the top of the filler panel,
the other at the bottom.
16. Determine if you are removing an alarm card from a front-access or rear-access
model server.
The same alarm card is used in both the front-access and rear-access models of the
Netra ct 800 server.
■
If you are removing an alarm card from a front-access model of the Netra ct 800
server, you do not have to remove any additional hardware.
■
If you are removing an alarm card from a rear-access model of the Netra ct 800
server, you must also remove the alarm rear transition card. Go to “Removing an
Alarm Rear Transition Card” on page 6-51.
Installing an Alarm Card (Netra ct 800 Server)
Caution – When moving a number of cards to different slots in the system, move
the cards one at a time. If you move multiple cards in rapid succession, you may
panic or hang the system.
1. Attach the antistatic wrist strap.
Refer to “Attaching the Antistatic Wrist Strap” on page 1-1.
2. Determine if you are replacing an alarm card in the front-access model of the
Netra ct 800 server or the rear-access model.
The same alarm card is used in both the front-access and rear-access models of the
Netra ct 800 server.
6-24
■
If you are replacing an alarm card in the front-access model of the Netra ct 800
server, go to Step 3.
■
If you are replacing an alarm card in the rear-access model of the Netra ct 800
server, replace the alarm rear transition card first using the instructions in
“Installing an Alarm Rear Transition Card” on page 6-53. Once you’ve completed
those instructions, return here to replace the alarm card.
Netra ct Server Service Manual • February 2001
3. Remove the slot filler panel, if necessary.
The slot filler panel is secured to the card cage using two screws, one at the top of
the filler panel, the other at the bottom. Store the slot filler panel in a safe place; you
may have to use it again if you have to remove an alarm card for an extended period
of time.
4. Get the replacement alarm card from the ship kit.
5. Verify that the ejection levers are unlocked.
You will not be able to install the card properly if the ejection levers are locked.
6. Keeping the card vertical, slide the card into the slot between the two guides.
The teeth in the handle of the card must align with the square cutouts in the I/O
slot. When the card is completely seated in the card cage, the two ejection levers
should flip inward, and the teeth in the ejection levers should fit smoothly in the
rectangular cutouts in the bottom and top plates. FIGURE 6-9 on page 6-14 shows how
to insert an I/O card into a slot; the same principle applies to an alarm card.
Note that when you plug in the alarm card, the rsc login prompt will appear on
your console terminal, if you have a console terminal attached to your server.
7. Lock the ejection levers.
8. Locate the LEDs on the system status panel for the alarm card that you just
installed to determine if the card has been activated.
FIGURE 6-13 on page 6-22 shows the location of the alarm card LEDs on the Netra ct
800 server.
The amber Okay to Remove LED (
the alarm card has been activated:
Status of the
Okay to Remove LED (
) on the system status panel indicates whether
Indication
Go to
On
The I/O slot that holds the
alarm card has been set to
basic hot swap. You must
use the cfgadm utility to
activate the card.
Step 9 on page 6-26
Off
The I/O slot that holds the
alarm card has been set to
full hot swap. The card has
been activated.1
Step 13 on page 6-27
)
1. The envmond software must be installed and running for full hot swap to work on an alarm card.
Chapter 6
Removing and Replacing Hot-Swappable Cards
6-25
9. Log into the Netra ct server.
Refer to “Logging In to the Netra ct Server” on page 5-2, and then return to this
procedure.
10. Identify the attachment-point ID that corresponds to the I/O slot 8, which holds
the alarm card.
As root, enter:
# cfgadm pci
For a Netra ct 800 server, you should get feedback similar to the following:
Ap_Id
pci_pci0:cpci_slot2
pci_pci0:cpci_slot3
pci_pci0:cpci_slot4
pci_pci0:cpci_slot5
pci_pci0:cpci_slot6
pci_pci0:cpci_slot7
pci_pci0:cpci_slot8
Type
unknown
stpcipci/fhs
unknown
unknown
unknown
unknown
unknown
Receptacle
empty
connected
disconnected
empty
empty
empty
disconnected
Occupant
unconfigured
configured
unconfigured
unconfigured
unconfigured
unconfigured
unconfigured
Condition
unknown
ok
unknown
unknown
unknown
unknown
unknown
The attachment-point ID is shown in the first column of the readout; for example,
the attachment-point ID for I/O slot 8 in a Netra ct 800 server would be
pci_pci0:cpci_slot8. Note that the information for the card installed in I/O slot
8 in the example feedback shows it as unknown (Type), disconnected (Receptacle),
unconfigured (Occupant), and unknown (Condition). This confirms that the I/O slot
has been set to basic hot swap and that the card in the I/O slot has not yet been
activated.
11. Connect the alarm card with the cfgadm dynamic reconfiguration software:
# cfgadm -c connect ap_id
where ap_id is the attachment-point ID. For example, to connect the alarm card in
slot 8, as root, enter:
# cfgadm -c connect pci_pci0:cpci_slot8
The amber Okay to Remove LED (
) on the system status panel for the I/O slot
should go OFF, indicating that the card has been connected.
6-26
Netra ct Server Service Manual • February 2001
12. Activate the alarm card with the cfgadm dynamic reconfiguration software:
# cfgadm -c configure ap_id
where ap_id is the attachment-point ID. For example, to activate the alarm card in
slot 8, as root, enter:
# cfgadm -c configure pci_pci0:cpci_slot8
If you were to enter the cfgadm pci command again at this point, you should see
the fields changed for the card in I/O slot 8:
Ap_Id
pci_pci0:cpci_slot2
pci_pci0:cpci_slot3
pci_pci0:cpci_slot4
pci_pci0:cpci_slot5
pci_pci0:cpci_slot6
pci_pci0:cpci_slot7
pci_pci0:cpci_slot8
Type
unknown
stpcipci/fhs
unknown
unknown
unknown
unknown
stpcipci/fhs
Receptacle
empty
connected
empty
empty
empty
empty
connected
Occupant
unconfigured
configured
unconfigured
unconfigured
unconfigured
unconfigured
configured
Condition
unknown
ok
unknown
unknown
unknown
unknown
ok
13. Change directories to the rsc directory:
# cd /usr/platform/SUNW,UltraSPARC-IIi-Netract/rsc
14. Restore the RSC configuration settings from the remote system.
As root, enter:
# ./rscadm set < remote-filename
where remote-filename is the file name that you used to create the backup file in Step 1
on page 6-19.
15. As root, enter the following command:
# pkill -HUP envmond
Chapter 6
Removing and Replacing Hot-Swappable Cards
6-27
16. Download the latest firmware to run on RSC:
# ./rscadm download file
For example, to download the firmware to run on RSC, you would normally enter
the following command:
# ./rscadm download ../lib/images/rscfw
It may take several minutes for the firmware to download completely.
Note – You may see the following error messages as you’re downloading the latest
firmware:
envmond[206]: heartbeat.so: Alarm card firmware not responding.
envmond[206]: heartbeat.so:Alarm Card Failed.
After approximately 60 seconds, the alarm card should go through a self-test and the
following message should appear:
envmond[206]: alarmcard.so:Alarm Card is OK.
If this message appears after approximately 60 seconds, then the firmware was
downloaded successfully and you can ignore the earlier error messages.
17. Using a No. 2 Phillips screwdriver, tighten the two captive screws inside the card’s
ejection levers, one on top and one on the bottom (FIGURE 6-10).
18. Connect to the replacement alarm card any cables that you unplugged from the
failed alarm card.
6-28
Netra ct Server Service Manual • February 2001
HD
D1
PCMCIA slot (reserved)
Alarm (DB-15)
Ethernet
COM 1
COM 2
FIGURE 6-14
6.1.2.2
Plugging in Cables in Alarm Card in Netra ct 800 Server
Removing and Replacing an Alarm Card in the Netra ct 400
Server
■
If you are removing and replacing a faulty alarm card in the server, first to go
“Removing an Alarm Card (Netra ct 400 Server)” on page 6-30, then go to
“Installing an Alarm Card (Netra ct 400 Server)” on page 6-35.
■
If you are installing a new alarm card in the server, go to “Installing an Alarm
Card (Netra ct 400 Server)” on page 6-35.
Chapter 6
Removing and Replacing Hot-Swappable Cards
6-29
Removing an Alarm Card (Netra ct 400 Server)
Note – If you want to manually unconfigure a hot swap alarm card remotely, log in
to the server and skip to Step 11 on page 6-34.
1. Log into the Netra ct server.
Refer to “Logging In to the Netra ct Server” on page 5-2, then return to this
procedure.
2. As root, enter the following command:
# pkill -USR1 envmond
3. Change directories to the rsc directory:
# cd /usr/platform/SUNW,UltraSPARC-IIi-Netract/rsc
4. Create a backup file to record the RSC configuration settings on a remote system.
As root, enter:
# ./rscadm show > remote-filename
5. Attach the antistatic wrist strap.
Refer to “Attaching the Antistatic Wrist Strap” on page 1-1.
6. Locate the double-wide 3U alarm card for the Netra ct 400 server.
6-30
Netra ct Server Service Manual • February 2001
Double-wide
3U alarm card
Com
pac
ETH
tPC TM
I
ERN
CO
STA
ET
M
TUS
ALA
RM
REA
RES
AB
DY
HD
D0
ET
OR
T
HD
D0
micros
ystems
FIGURE 6-15
Location of Alarm Card in Netra ct 400 Server
7. Using a No. 2 Phillips screwdriver, loosen the captive screw inside the card’s
ejection lever on the bottom left side.
8. Loosen the three remaining captive screws, two on the top and one on the bottom.
9. Unlock the ejection lever on the card.
Caution – Only unlock the ejection lever at this point; do not unseat the alarm card
until the alarm card LEDs on the system status panel are in the proper state.
Note – If the server is set to full hot-swap mode, unlocking the ejection levers
automatically starts the software driver detachment process. If you decide that you do
not want to remove the card, you must completely unseat the card, reseat it, then
lock the ejection levers again in order to start the software driver attachment process.
Simply locking the ejection levers after unlocking them will not start the driver
attachment process.
Chapter 6
Removing and Replacing Hot-Swappable Cards
6-31
FIGURE 6-16
Unlocking the Ejection Lever
10. Locate the LEDs on the system status panel for the alarm card to determine if the
card has been deactivated.
FIGURE 6-17 shows the locations of the alarm card slot LEDs on the Netra ct 400
server.
Caution – Do not deactivate any other cards until you see that the alarm card has
been deactivated. Deactivating more than one card at the same time might lead to
unpredictable results.
6-32
Netra ct Server Service Manual • February 2001
Alarm card slot LEDs
FIGURE 6-17
Locating the Alarm Card LEDs on the System Status Panel (Netra ct 400
Server)
The amber Okay to Remove LED (
) on the system status panel indicates whether
the alarm card can be safely removed:
Status of the
Okay to Remove LED (
Indication
Go to
On
The I/O slot that holds the
alarm card has been set to
full hot swap. You can
remove the alarm card from
the slot.1
Step 13 on page 6-34
Off
The I/O slot that holds the
alarm card has been set to
basic hot swap. You must
use the cfgadm utility to
deactivate the alarm card
before you can remove it.
Step 11 on page 6-34
)
1. The envmond software must be installed and running for full hot swap to work on an alarm card.
Chapter 6
Removing and Replacing Hot-Swappable Cards
6-33
11. Identify the attachment-point ID that corresponds to I/O slot 1, which is the I/O
slot that controls the alarm card.
As root, enter:
# cfgadm pci
For a Netra ct 400 server, you should get feedback similar to the following:
Ap_Id
pci_pci0:cpci_slot1
pci_pci0:cpci_slot2
pci_pci0:cpci_slot4
pci_pci0:cpci_slot5
Type
stpcipci/fhs
unknown
stpcipci/fhs
unknown
Receptacle
connected
empty
connected
empty
Occupant
configured
unconfigured
configured
unconfigured
Condition
ok
unknown
ok
unknown
The attachment-point ID is shown in the first column of the readout; for example,
the attachment-point ID for I/O slot 1 in a Netra ct 400 server would be
pci_pci0:cpci_slot1.
12. Deactivate the alarm card with the cfgadm dynamic reconfiguration software:
# cfgadm -c unconfigure ap_id
where ap_id is the attachment-point ID for the I/O slot 1, which holds the alarm
card. For example, to deactivate the alarm card using the output given in the
example above, as root, you would enter:
# cfgadm -c unconfigure pci_pci0:cpci_slot1
The amber Okay to Remove LED (
) on the system status panel for the alarm slot
should go ON, indicating that you can remove the alarm card from the slot.
Caution – Do not remove the alarm card if the amber Okay to Remove LED (
)
is not ON. Removing a hot-swappable card from an I/O slot when the amber Okay
to Remove LED is not on might panic the system.
13. When it is safe to remove the alarm card, disconnect any cables connected to the
card, if necessary.
14. Press outward on the ejection lever on the card to unseat the card from the card
cage.
6-34
Netra ct Server Service Manual • February 2001
15. Slide the card out of the slot and place it on the electrostatic discharge mat.
16. Secure a blank filler panel over the empty I/O slots, if necessary.
If you are not going to replace the alarm card right away, you must install a blank
filler panel over the opening to ensure proper airflow in the system. The slot filler
panel is secured to the card cage using three screws, two at the top of the filler panel,
one at the bottom.
Installing an Alarm Card (Netra ct 400 Server)
1. Attach the antistatic wrist strap.
Refer to “Attaching the Antistatic Wrist Strap” on page 1-1.
2. Remove the slot filler panel, if necessary.
The slot filler panel is secured to the card cage using thee screws, two at the top of
the filler panel, one at the bottom. Store the slot filler panel in a safe place; you may
have to use it again if you have to remove an alarm card for an extended period of
time.
3. Get the replacement alarm card from the ship kit.
4. Verify that the ejection levers are unlocked.
You will not be able to install the card properly if the ejection levers are locked.
5. Keeping the card vertical, slide the card into the slot in between the two guides.
The teeth in the handle of the card must align with the square cutouts in the I/O
slot. When the card is completely seated in the card cage, the two ejection levers
should flip inward, and the teeth in the ejection levers should fit smoothly in the
rectangular cutouts in the bottom and top plates.
Note that when you plug in the alarm card, the rsc login prompt will appear on
your console (if you have a console attached to your server).
6. Lock the ejection levers.
7. Locate the LEDs on the system status panel for the alarm card that you just
installed to determine if the card has been activated.
FIGURE 6-17 on page 6-33 shows the location of the alarm card LEDs on the Netra ct
400 server.
Chapter 6
Removing and Replacing Hot-Swappable Cards
6-35
The amber Okay to Remove LED (
the alarm card has been activated:
Status of the
Okay to Remove LED (
) on the system status panel indicates whether
Indication
Go to
On
The I/O slot that holds the
alarm card has been set to
basic hot swap. You must
use the cfgadm utility to
activate the card.
Step 8 on page 6-36
Off
The I/O slot that holds the
alarm card has been set to
full hot swap. The card has
been activated.1
Step 12 on page 6-37
)
1. The envmond software must be installed and running for full hot swap to work on an alarm card.
8. Log in to the Netra ct server.
Refer to “Logging In to the Netra ct Server” on page 5-2, and then return to this
procedure.
9. Identify the attachment-point ID that corresponds to the I/O slot 1, which controls
the alarm card.
As root, enter:
# cfgadm pci
For a Netra ct 400 server, you should get feedback similar to the following:
Ap_Id
pci_pci0:cpci_slot1
pci_pci0:cpci_slot2
pci_pci0:cpci_slot4
pci_pci0:cpci_slot5
Type
unknown
unknown
stpcipci/fhs
unknown
Receptacle
disconnected
empty
connected
empty
Occupant
unconfigured
unconfigured
configured
unconfigured
Condition
unknown
unknown
ok
unknown
The attachment-point ID is shown in the first column of the readout; for example,
the attachment-point ID for I/O slot 1 in a Netra ct 400 server would be
pci_pci0:cpci_slot1. Note that the information for the card installed in I/O slot
1 in the example feedback shows it as unknown (Type), disconnected (Receptacle),
unconfigured (Occupant), and unknown (Condition). This confirms that the I/O slot
has been set to basic hot swap and that the card in the I/O slot has not yet been
activated.
6-36
Netra ct Server Service Manual • February 2001
10. Connect the alarm card with the cfgadm dynamic reconfiguration software:
# cfgadm -c connect ap_id
where ap_id is the attachment-point ID. For example, to connect the alarm card in
slot 1, as root, enter:
# cfgadm -c connect pci_pci0:cpci_slot1
The amber Okay to Remove LED (
) on the system status panel for the I/O slot
should go OFF, indicating that the card has been connected.
11. Activate the alarm card with the cfgadm dynamic reconfiguration software:
# cfgadm -c configure ap_id
where ap_id is the attachment-point ID. For example, to activate the alarm card in
slot 1, as root, enter:
# cfgadm -c configure pci_pci0:cpci_slot1
If you were to enter the cfgadm pci command again at this point, you should see
the fields changed for the card in I/O slot 1:
Ap_Id
pci_pci0:cpci_slot1
pci_pci0:cpci_slot2
pci_pci0:cpci_slot4
pci_pci0:cpci_slot5
Type
stpcipci/fhs
unknown
stpcipci/fhs
unknown
Receptacle
connected
disconnected
connected
empty
Occupant
configured
unconfigured
configured
unconfigured
Condition
ok
unknown
ok
unknown
12. Change directories to the rsc directory:
# cd /usr/platform/SUNW,UltraSPARC-IIi-Netract/rsc
Chapter 6
Removing and Replacing Hot-Swappable Cards
6-37
13. Restore the RSC configuration settings from the remote system.
As root, enter:
# ./rscadm set < remote-filename
where remote-filename is the file name that you used to create the backup file in Step 1
on page 6-30.
14. As root, enter the following command:
# pkill -HUP envmond
15. Download the latest firmware to run on RSC:
# ./rscadm download file
For example, to download the firmware to run on RSC, you would normally enter
the following command:
# ./rscadm download ../lib/images/rscfw
It may take several minutes for the firmware to download completely.
Note – You may see the following error messages as you’re downloading the latest
firmware:
envmond[206]: heartbeat.so: Alarm card firmware not responding.
envmond[206]: heartbeat.so:Alarm Card Failed.
After approximately 60 seconds, the alarm card should go through a self-test and the
following message should appear:
envmond[206]: alarmcard.so:Alarm Card is OK.
If this message appears after approximately 60 seconds, then the firmware was
downloaded successfully and you can ignore the earlier error messages.
16. Using a No. 2 Phillips screwdriver, tighten the captive screw inside the card’s
ejection lever on the bottom left side.
17. Tighten the three remaining captive screws, two on the top and one on the bottom.
6-38
Netra ct Server Service Manual • February 2001
18. Connect to the replacement alarm card any cables that you unplugged from the
failed alarm card.
HD
D0
COM 2
COM 1
PCMCIA slot (reserved)
Alarm (DB-15)
Ethernet
FIGURE 6-18
6.2
Connectors on the Alarm Card (Netra ct 400 Server)
Rear-Access Models
This section gives procedures for the installation, removal, and replacement of the
following hot-swappable cards for rear-access models of the Netra ct 400 server and
Netra ct 800 server:
■
■
“Front I/O Card and I/O Rear Transition Card” on page 6-40
“Alarm Rear Transition Card (Netra ct 800 Server Only)” on page 6-51
Chapter 6
Removing and Replacing Hot-Swappable Cards
6-39
Note – The CPU rear transition card is not hot-swappable, so the procedures for that
card are not covered in this chapter. For installation, removal, and replacement
procedures for that card, refer to Chapter 10 “Removing and Replacing
Cold-Swappable Cards.”
6.2.1
Front I/O Card and I/O Rear Transition Card
The I/O rear transition card set includes:
■
■
The front I/O card
The I/O rear transition card
When one of these two cards fails, you must replace both the front I/O card and the
I/O rear transition card.
The front I/O card contains the ASICs for the associated I/O card and is installed
from the front of the server; however, no cables are connected to the front I/O card.
The I/O rear transition card extends the ports for a particular I/O card to the rear of
the server. The I/O rear transition card and the front I/O card must be installed in
the same slot in order for the I/O rear transition card to work. For example, if you
install an I/O rear transition card in I/O slot 3 at the rear of a Netra ct 800 server,
you must also install the accompanying front I/O card in I/O slot 3 at the front of
the server.
When one of the two cards fails, you must replace both the front I/O card and the
I/O rear transition card. FIGURE 6-19 and FIGURE 6-20 give graphical representations
of how the front I/O cards should align with the I/O rear transition cards (I/O
RTCs). Note that, if you are facing the front of the server, the I/O slots read from left
to right, whereas they read from right to left if you are facing the rear of the server.
FIGURE 6-19 shows the buses on a Netra ct 800 server and FIGURE 6-20 shows the buses
on a Netra ct 400 server.
6-40
Netra ct Server Service Manual • February 2001
P5
P5
P4
8
P4
7
P5
6
P4
5
P5
P5
4
P4
P5
3
P5
2
P5
1
P3
P3
P3
P3
P4
P3
P4
P3
P4
P3
P3
P4
H.110 bus
P2
P2
P2
P2
P2
P2
P2
P2
CompactPCI bus 64-bit extension
FIGURE 6-19
P1
P1
P1
P1
P1
P1
P1
P1
CompactPCI bus 32-bit @ 33 MHz
Buses for the Netra ct 800 Server (Front View)
Chapter 6
Removing and Replacing Hot-Swappable Cards
6-41
2
3
4
P5
P5
P5
P5
5
P5
1
P4
P3
P4
P3
P4
P4
P3
P3
P4
P3
H.110
bus
P2
P2
P2
P2
P2
cPCI bus 64-bit ext.
FIGURE 6-20
P1
P1
P1
P1
P1
cPCI bus 32-bit@33 MHz
Buses for the Netra ct 400 Server (Front View)
The individual I/O slots in your server will be set to either basic hot swap, the
default setting, or full hot swap, which must be set manually. Refer to Chapter 5
“Hot Swap Software Commands” for more information.
6-42
■
If you are removing and replacing faulty cards in the server, first to go “Removing
a Front I/O Card and I/O Rear Transition Card” on page 6-43, then go to
“Installing a Front I/O Card and I/O Rear Transition Card” on page 6-47.
■
If you are installing new cards in the server, go to “Installing a Front I/O Card
and I/O Rear Transition Card” on page 6-47.
Netra ct Server Service Manual • February 2001
6.2.1.1
Removing a Front I/O Card and I/O Rear Transition Card
Caution – You must always remove the front I/O card before removing the I/O
rear transition card. If you remove the I/O rear transition card first, you might panic
the system.
Note – If you want to manually deconfigure a hot swap I/O card remotely, log into
the server and skip to Step 7 on page 6-45.
1. Attach the antistatic wrist strap.
Refer to “Attaching the Antistatic Wrist Strap” on page 1-1.
2. Locate the front I/O card that you want to remove from the server.
■
■
FIGURE 6-1 on page 6-3 shows the I/O card slots in a Netra ct 800 server.
FIGURE 6-3 on page 6-5 shows the I/O card slots in a Netra ct 400 server.
There are labels under the I/O slots that give the I/O slot numbers for the Netra ct
800 server and Netra ct 400 server. Make a note of that I/O slot number.
3. Using a No. 2 Phillips screwdriver, loosen the two captive screws inside the front
I/O card’s ejection levers, one on top and one on the bottom (FIGURE 6-5 on
page 6-7).
4. Unlock the ejection levers.
Caution – Only unlock the ejection levers at this point; do not unseat the I/O card
until the I/O card LEDs on the system status panel are in the proper state.
Caution – If the server is set to full hot-swap mode, do not rapidly unlock and lock
the ejection levers. When you unlock the ejection lever, you will begin the software
driver detachment process. This detachment process must end before you can safely
lock the ejection levers, which begins the software drive process. If you unlock and
lock the ejection levers rapidly, you can panic or hang the system.
There are several different models of locking ejection levers, so the method you
would use to unlock the ejection levers will vary depending on the model of the
ejection lever used on the card; for example, one model uses red tabs at the top and
bottom to unlock the card (FIGURE 6-6 on page 6-8). Refer to the documentation that
came with the I/O card for instructions on unlocking the card.
Chapter 6
Removing and Replacing Hot-Swappable Cards
6-43
5. Locate the LEDs on the system status panel for the front I/O card and I/O rear
transition card that you want to remove to determine if the cards have been
deactivated.
The system status panel on each server has LEDs that shows the status of the front
I/O card and I/O rear transition card installed in each set of slots in that particular
server. FIGURE 6-7 on page 6-9 shows the locations of the I/O card LEDs on the
Netra ct 800 server and FIGURE 6-8 on page 6-10 shows the locations of the I/O card
LEDs on the Netra ct 400 server.
The amber Okay to Remove LED (
) on the system status panel tells whether the
front I/O card and I/O rear transition card can be safely removed or not:
Status of the
Okay to Remove LED (
Indication
Go to
On
The I/O slot that holds the
cards has been set to full hot
swap. You can remove the
cards from the slot.
Step 9 on page 6-46
Off
The I/O slot that holds the
cards has been set to basic
hot swap. You must use the
cfgadm utility to deactivate
the cards before you can
remove them.
Step 6 on page 6-44
)
6. Log into the Netra ct server.
Refer to “Logging In to the Netra ct Server” on page 5-2, and then return to this
procedure.
6-44
Netra ct Server Service Manual • February 2001
7. Identify the attachment-point ID that corresponds to the I/O slot where you will
be removing the cards.
As root, enter:
# cfgadm pci
For a Netra ct 800 server, you should get feedback similar to the following:
Ap_Id
pci_pci0:cpci_slot2
pci_pci0:cpci_slot3
pci_pci0:cpci_slot4
pci_pci0:cpci_slot5
pci_pci0:cpci_slot6
pci_pci0:cpci_slot7
pci_pci0:cpci_slot8
Type
unknown
stpcipci/fhs
stpcipci/fhs
unknown
unknown
unknown
stpcipci/fhs
Receptacle
empty
connected
connected
empty
empty
empty
connected
Occupant
unconfigured
configured
configured
unconfigured
unconfigured
unconfigured
configured
Condition
unknown
ok
ok
unknown
unknown
unknown
ok
For a Netra ct 400 server, you should get feedback similar to the following:
Ap_Id
pci_pci0:cpci_slot1
pci_pci0:cpci_slot2
pci_pci0:cpci_slot4
pci_pci0:cpci_slot5
Type
unknown
stpcipci/fhs
stpcipci/fhs
unknown
Receptacle
empty
connected
connected
empty
Occupant
unconfigured
configured
configured
unconfigured
Condition
unknown
ok
ok
unknown
The attachment-point ID is shown in the first column of the readout; for example,
the attachment-point ID for I/O slot 4 in a Netra ct 800 server would be
pci_pci0:cpci_slot4.
8. Deactivate the I/O cards with the cfgadm dynamic reconfiguration software:
# cfgadm -c unconfigure ap_id
where ap_id is the attachment-point ID. For example, to deactivate the I/O cards in
I/O slot 4, as root, enter:
# cfgadm -c unconfigure pci_pci0:cpci_slot4
The amber Okay to Remove LED (
) on the system status panel for the I/O slot
should go ON, indicating that you can remove the I/O cards from the slot.
Chapter 6
Removing and Replacing Hot-Swappable Cards
6-45
9. When it is safe to remove the I/O cards, press outward on the two ejection levers
on the front I/O card to unseat the card from the card cage.
Caution – Do not remove the I/O rear transition card before you’ve removed the
front I/O card. Doing so might panic the system.
10. Carefully slide the card out of the slot and place it on the electrostatic discharge
mat.
11. Go to the rear of the system and, using the I/O slot number noted in Step 2 on
page 6-43, locate the I/O rear transition card.
Caution – Make sure that you have located the I/O rear transition card that
occupies the same slot as the failed front I/O card before proceeding. If you remove
an I/O rear transition card that does not match the failed front I/O card, you will
disrupt service to a functioning I/O rear transition card.
12. Disconnect any cables connected to the I/O rear transition card, if necessary.
13. Using a No. 2 Phillips screwdriver, loosen the two captive screws inside the I/O
rear transition card’s ejection levers, one on top and one on the bottom ( FIGURE 6-5
on page 6-7).
14. Unlock the ejection levers.
15. Press outward on the two ejection levers on the card to unseat the card from the
card cage.
16. Carefully slide the I/O rear transition card out of the slot and place it on the
electrostatic discharge mat.
17. Secure blank filler panels over the empty I/O slots, if necessary.
If you are not going to replace the I/O cards right away, you must install blank filler
panels over the openings to ensure proper airflow in the system. The slot filler
panels are secured to the card cage using two screws, one at the top of the filler
panel, the other at the bottom.
6-46
Netra ct Server Service Manual • February 2001
6.2.1.2
Installing a Front I/O Card and I/O Rear Transition Card
Caution – When moving a number of cards to different slots in the system, move
the cards one at a time. If you move multiple cards in rapid succession and at the
same time, you may panic or hang the system.
1. Attach the antistatic wrist strap.
Refer to “Attaching the Antistatic Wrist Strap” on page 1-1.
2. Remove the slot filler panels, if necessary.
The slot filler panels are secured to the card cage using two screws, one at the top of
the filler panel, the other at the bottom. Store the slot filler panels in a safe place; you
may have to use them again if you have to remove I/O cards for an extended period
of time.
3. Get the replacement I/O rear transition card from the ship kit.
4. Verify that the ejection levers are unlocked.
You will not be able to install the card properly if the ejection levers are locked.
5. Go to the rear of the system and, keeping the card vertical, slide the I/O rear
transition card between the two guides (FIGURE 6-9 on page 6-14).
The teeth in the handle of the card must align with the square cutouts in the I/O
slot. When the card is completely seated in the card cage, the two ejection levers
should flip inward, and the teeth in the ejection levers should fit smoothly in the
rectangular cutouts in the bottom and top plates.
6. Lock the ejection levers.
There are several different models of locking ejection levers, so the method you
would use to lock the ejection levers will vary depending on the model of the
ejection lever used on the card. Refer to the documentation that came with the I/O
card for instructions on locking the ejection levers.
7. Connect to the replacement I/O rear transition card any cables that you unplugged
from the failed I/O rear transition card.
8. Get the replacement front I/O card from the ship kit.
9. Verify that the ejection levers are unlocked.
You will not be able to install the card properly if the ejection levers are locked.
10. Go to the front of the system and, keeping the card vertical, slide the front I/O
card between the two guides (FIGURE 6-9 on page 6-14).
Chapter 6
Removing and Replacing Hot-Swappable Cards
6-47
Make sure that you are installing the front I/O card in the same I/O slot as the I/O
rear transition card before proceeding. The cards will not operate if you do not have
them installed in the same I/O slot. There are labels under the I/O slots that give the
I/O slot numbers for the Netra ct 800 server and Netra ct 400 server.
The teeth in the handle of the card must align with the square cutouts in the I/O
slot. When the card is completely seated in the card cage, the two ejection levers
should flip inward and the teeth in the ejection levers should fit smoothly in the
rectangular cutouts in the bottom and top plates.
11. Lock the ejection levers on the front I/O card.
12. Locate the LEDs on the system status panel for the I/O cards that you just
installed to determine if the cards have been activated.
FIGURE 6-7 on page 6-9 shows the locations of the I/O card LEDs on the Netra ct 800
server and FIGURE 6-8 on page 6-10 shows the locations of the I/O card LEDs on the
Netra ct 400 server.
The amber Okay to Remove LED (
I/O cards have been activated:
Status of the
Okay to Remove LED (
) on the system status panel tells whether the
Indication
Go to
On
The I/O slot that holds the
cards has been set to basic
hot swap. You must use the
cfgadm utility to activate
the cards.
Step 13 on page 6-48
Off
The I/O slot that holds the
cards has been set to full hot
swap. The cards have been
activated.
Step 17 on page 6-50
)
13. Log into the Netra ct server.
Refer to “Logging In to the Netra ct Server” on page 5-2, and then return to this
procedure.
6-48
Netra ct Server Service Manual • February 2001
14. Identify the attachment-point ID that corresponds to the I/O slot where you
installed the I/O cards.
As root, enter:
# cfgadm pci
For a Netra ct 800 server, you should get feedback similar to the following:
Ap_Id
pci_pci0:cpci_slot2
pci_pci0:cpci_slot3
pci_pci0:cpci_slot4
pci_pci0:cpci_slot5
pci_pci0:cpci_slot6
pci_pci0:cpci_slot7
pci_pci0:cpci_slot8
Type
unknown
stpcipci/fhs
unknown
unknown
unknown
unknown
stpcipci/fhs
Receptacle
empty
connected
disconnected
empty
empty
empty
connected
Occupant
unconfigured
configured
unconfigured
unconfigured
unconfigured
unconfigured
configured
Condition
unknown
ok
unknown
unknown
unknown
unknown
ok
For a Netra ct 400 server, you should get feedback similar to the following:
Ap_Id
pci_pci0:cpci_slot1
pci_pci0:cpci_slot2
pci_pci0:cpci_slot4
pci_pci0:cpci_slot5
Type
unknown
stpcipci/fhs
stpcipci/fhs
unknown
Receptacle
empty
connected
connected
empty
Occupant
unconfigured
configured
configured
unconfigured
Condition
unknown
ok
ok
unknown
The attachment-point ID is shown in the first column of the readout; for example,
the attachment-point ID for I/O slot 4 in a Netra ct 800 server would be
pci_pci0:cpci_slot4. Note that the information for the cards installed in I/O slot
4 in the example feedback shows it as unknown (Type), disconnected (Receptacle),
unconfigured (Occupant), and unknown (Condition). This confirms that the I/O
slots have been set to basic hot swap and that the cards in the I/O slots have not yet
been activated.
15. Connect the I/O cards with the cfgadm dynamic reconfiguration software:
# cfgadm -c connect ap_id
where ap_id is the attachment-point ID. For example, to connect the I/O cards in slot
4, as root, enter:
# cfgadm -c connect pci_pci0:cpci_slot4
Chapter 6
Removing and Replacing Hot-Swappable Cards
6-49
The amber Okay to Remove LED (
) on the system status panel for the I/O slot
should go OFF, indicating that the card has been connected.
16. Activate the I/O cards with the cfgadm dynamic reconfiguration software:
# cfgadm -c configure ap_id
where ap_id is the attachment-point ID. For example, to activate the I/O cards in slot
4, as root, enter:
# cfgadm -c configure pci_pci0:cpci_slot4
If you were to enter the cfgadm pci command again at this point, you should see
the fields changed for the cards in I/O slot 4:
Ap_Id
pci_pci0:cpci_slot2
pci_pci0:cpci_slot3
pci_pci0:cpci_slot4
pci_pci0:cpci_slot5
pci_pci0:cpci_slot6
pci_pci0:cpci_slot7
pci_pci0:cpci_slot8
Type
unknown
stpcipci/fhs
stpcipci/fhs
unknown
unknown
unknown
stpcipci/fhs
Receptacle
empty
connected
connected
empty
empty
empty
connected
Occupant
unconfigured
configured
configured
unconfigured
unconfigured
unconfigured
configured
Condition
unknown
ok
ok
unknown
unknown
unknown
ok
17. Using a No. 2 Phillips screwdriver, tighten the two captive screws inside the card’s
ejection levers, one on top and one on the bottom (FIGURE 6-10 on page 6-17).
Do this for both the front I/O card and the I/O rear transition card.
18. Perform any I/O card-specific software configuration procedures, if necessary.
Refer to the documentation that you received with your CompactPCI I/O cards for
more information.
6-50
Netra ct Server Service Manual • February 2001
6.2.2
Alarm Rear Transition Card (Netra ct 800 Server
Only)
Caution – The maximum voltage that can be applied to an alarm card is 60 VDC, as
specified in UL1950 and IEC 60950. The maximum current is 500mA.
The procedures in this section describe how to remove and replace an alarm rear
transition card in a Netra ct 800 server only; there is no alarm rear transition card
option available for the Netra ct 400 server.
The alarm rear transition card for the Netra ct 800 server consists of two separate
cards:
■
■
The alarm card
The alarm rear transition card
When one of the two cards fail, you must replace both the alarm card and the alarm
rear transition card.
The alarm card is installed from the front of the Netra ct 800 server. It is the same
alarm card that is used in the front-access model of the Netra ct 800 server.
The alarm rear transition card extends the ports on the alarm card installed at the
front of the server to the alarm rear transition card installed at the rear of the server.
The alarm card must be installed in the front of the server in order for the alarm rear
transition card to work.
6.2.2.1
■
If you are removing and replacing faulty cards in the server, first to go “Removing
an Alarm Rear Transition Card” on page 6-51, then go to “Installing an Alarm
Rear Transition Card” on page 6-53.
■
If you are installing new cards in the server, go to “Installing an Alarm Rear
Transition Card” on page 6-53.
Removing an Alarm Rear Transition Card
1. Attach the antistatic wrist strap.
Refer to “Attaching the Antistatic Wrist Strap” on page 1-1.
2. Remove the alarm card from the front of the Netra ct 800 server.
Refer to “Removing an Alarm Card (Netra ct 800 Server)” on page 6-19 for those
instructions, then return here.
Chapter 6
Removing and Replacing Hot-Swappable Cards
6-51
Caution – Do not proceed with these instructions unless you have removed the
alarm card from the front of the server using those instructions. If the I/O slot
holding the alarm card is set to basic hot swap, you will have to manually deactivate
the I/O slot that holds the alarm card, and removing the alarm rear transition card
without going through those procedures might panic or hang your system.
3. After you have removed the alarm card from the front of the Netra ct 800 server,
go to the rear of the server and locate the alarm rear transition card.
The alarm rear transition card will be installed in slot 8 at the rear of the server, as
shown in FIGURE 6-21.
Front of
chassis
Midplane
Rear of
chassis
Hard disk drives
Slot 1
CPU card
CPU RTC
Slot 1
Slot 2
Front I/O card
I/O RTC
Slot 2
Slot 3
Front I/O card
I/O RTC
Slot 3
Slot 4
Front I/O card
I/O RTC
Slot 4
Slot 5
Front I/O card
I/O RTC
Slot 5
Slot 6
Front I/O card
I/O RTC
Slot 6
Slot 7
Front I/O card
I/O RTC
Slot 7
Slot 8
Alarm card
Alarm RTC
Slot 8
FIGURE 6-21
Locating the Alarm Rear Transition Card (RTC) in the Rear-Access Model of
Netra ct 800 Server (Top View)
4. Unplug any cables attached to the alarm rear transition card, if necessary.
5. Using a No. 2 Phillips screwdriver, loosen the two captive screws inside the card’s
ejection levers, one on top and one on the bottom.
6. Unlock the ejection levers on the card.
7. Press outward on the two ejection levers on the card to unseat the card from the
card cage.
8. Slide the card out of the slot and place it on the electrostatic discharge mat.
6-52
Netra ct Server Service Manual • February 2001
9. Secure blank filler panels over the empty I/O slot, if necessary.
If you are not going to replace the alarm card and alarm rear transition card right
away, you must install blank filler panels over the openings to ensure proper airflow
in the system. The slot filler panels are secured to the card cage using two screws,
one at the top of the filler panel, the other at the bottom.
6.2.2.2
Installing an Alarm Rear Transition Card
1. Attach the antistatic wrist strap.
Refer to “Attaching the Antistatic Wrist Strap” on page 1-1.
2. Remove the slot filler panel, if necessary.
The slot filler panel is secured to the card cage using two screws, one at the top of
the filler panel, the other at the bottom.
3. Get the replacement alarm rear transition card from the ship kit.
4. Verify that the ejection levers are unlocked.
You will not be able to install the card properly if the ejection levers are locked.
5. Keeping the card vertical, slide the card into the slot between the two guides
(FIGURE 6-9).
The teeth in the handle of the card must align with the square cutouts in the I/O
slot. When the card is completely seated in the card cage, the two ejection levers
should flip inward, and the teeth in the ejection levers should fit smoothly in the
rectangular cutouts in the bottom and top plates. FIGURE 6-9 on page 6-14 shows how
to insert an I/O card into a slot; the same principal applies to an alarm rear
transition card.
6. Using a No. 2 Phillips screwdriver, tighten the two captive screws inside the card’s
ejection levers, one on top and one on the bottom.
7. Lock the ejection levers on the card.
8. Plug all appropriate cables into the alarm rear transition card.
Chapter 6
Removing and Replacing Hot-Swappable Cards
6-53
Ethernet
COM 2
COM 1
Alarm
FIGURE 6-22
Connectors on the Alarm Rear Transition Card
9. Get the replacement alarm card from the ship kit.
10. Verify that the ejection levers are unlocked.
You will not be able to install the card properly if the ejection levers are locked.
11. Go to the front of the server and install the replacement alarm card in slot 8 in the
Netra ct 800 server.
Refer to “Installing an Alarm Card (Netra ct 800 Server)” on page 6-24 for those
instructions, including the power-on instructions.
6-54
Netra ct Server Service Manual • February 2001
CHAPTER
7
Removing and Replacing Hard Disk
Drives and Removeable Media
Note – When removing a hot-swappable component, allow several seconds before
inserting it or another component in that slot. Rapidly removing and inserting any
hot-swappable component might panic or hang the system.
This chapter gives procedures for the installation, removal, and replacement of hard
disk drives and removeable media. It is organized as follows:
■
■
“Hard Disk Drive” on page 7-1
“CD-ROM/DVD or DAT Drive (Netra ct 800 Server Only)” on page 7-8
Consult the Netra ct Server Safety and Compliance Manual for safety information prior
to performing the procedures in this chapter.
Note – Read Chapter 3 “Handling Cards and Assemblies” before performing the
procedures in this chapter.
7.1
Hard Disk Drive
This section tells you how to remove and replace an internal hard disk drive. An
internal hard disk drive is one that fits in a bay within a server. It is distinguished
from an external hard disk drive, which is attached by a cable that connects to an
I/O card in the server.
A hard disk drive is a hot-swappable component only if the hard disk drive is not
being used by the server. For example, if a hard disk drive is being used as the
primary boot drive, then that hard disk drive is not hot-swappable unless disk
7-1
management software is used to mirror the boot drive to a second hard disk drive
installed in the server. For that reason, a hard disk drive in a Netra ct 400 server is a
hot-swappable disk drive only if the Netra ct 400 server is running on the Solaris
operating environment over the network, and not off of the hard disk drive.
The remove and replace instructions for hot-swappable drives are covered here; the
remove and replace instructions for cold-swappable drives are covered in Chapter 11
“Removing and Replacing Cold-Swappable Subassemblies” in the section “Hard
Disk Drive” on page 11-1.
7.1.1
■
If you are removing and replacing a faulty hard disk drive in the server, first to go
“Removing a Hard Disk Drive” on page 7-2, then go to “Installing a Hard Disk
Drive” on page 7-7.
■
If you are installing a new hard disk drive in the server, go to “Installing a Hard
Disk Drive” on page 7-7.
Removing a Hard Disk Drive
Note – The instructions in this section do not cover unconfiguration procedures that
might be necessary if you are removing a hard disk drive that is under the control of
any disk management software, such as Volume Manager or Solstice DiskSuite. If
you are running disk management software on your system, refer to the
documentation that came with the disk management software for instructions on
releasing a hard disk drive from the control of the software before proceeding with
these instructions.
1. Attach the antistatic wrist strap.
Refer to “Attaching the Antistatic Wrist Strap” on page 1-1.
2. Locate the drive bay cover on your system.
The hard disk drives will be behind the drive bay cover on your system. There
would be a maximum of two hard disk drives behind the drive bay cover in a
Netra ct 800 server and one behind the drive bay cover in a Netra ct 400 server.
7-2
Netra ct Server Service Manual • February 2001
Drive bay cover, Netra ct 800 server
Drive bay cover, Netra ct 400 server
Comp
act
ETHE
PC TM
I
RN
CO
STAT
ET
M
US
ALAR
RE
RE
Comp
M
AD
HD
D0
Y
act
ETHE
PC TM
I
RN
ET
SET
AB
OR
T
CO
M
HD
D0
STAT
US
micro
system
ALAR
s
RE
RE
M
AD
Y
SET
AB
OR
T
micro
system
s
FIGURE 7-1
Drive Bay Cover Locations
3. Loosen the captive screws that hold the drive bay cover in place.
■
For the Netra ct 800 server, use a No. 1 Phillips screwdriver to loosen the four
captive screws (two on top and two on the bottom).
■
For the Netra ct 400 server, use a No. 2 Phillips screwdriver to loosen the one
captive screw on top.
4. Remove the drive bay cover.
5. Locate the hard disk drive that you want to replace.
In a Netra ct 800 server, HDD0 is the upper hard disk drive and HDD1 is the lower
hard disk drive.
Chapter 7
Removing and Replacing Hard Disk Drives and Removeable Media
7-3
6. Log in to the server and get the attachment-point IDs for the hard disk drives
installed in your server.
As root, enter:
# cfgadm -a c0
You should get feedback similar to the following:
Ap_Id
c0
c0::dsk/c0t0d0
c0::dsk/c0t1d0
c0::dsk/c0t6d0
Type
scsi-bus
disk
disk
CD-ROM
Receptacle
connected
connected
connected
connected
Occupant
configured
configured
configured
configured
Condition
unknown
unknown
unknown
unknown
In the sample feedback above, the attachment-point ID for the upper hard disk drive
(HDD 0) is c0::dsk/c0t0d0 and attachment-point ID for the lower hard disk drive
(HDD 1) is c0::dsk/c0t1d0.
7. List all mounted partitions on the disk that you want to remove.
As root, enter:
# cfgadm -c unconfigure ap_id
where ap_id is the attachment-point ID for the hard disk drive that you want to
remove. For example, to list the mounted partitions on the lower hard disk drive
(HDD 1), as root, enter:
# cfgadm -c unconfigure c0::dsk/c0t1d0
You should get feedback similar to the following:
cfgadm: Component system is busy, try again: failed to offline:
/devices/pci@1f,0/pci@1,1/scsi@2/sd@1,0
Resource
-----------------/dev/dsk/c0t1d0s7
7-4
Information
--------------------------mounted filesystem "/mnt"
Netra ct Server Service Manual • February 2001
Note – If you didn’t get any feedback after entering the command, then you do not
have any partitions mounted and the hard disk drive was successfully deactivated.
Go to Step 10 on page 7-5.
8. Unmount the mounted partition(s).
For every filesystem that was listed in the previous step, as root, enter:
# unmount filesystem
For example, using the feedback from the previous step, you would enter:
# unmount /mnt
9. Deactivate the hard disk drive.
As root, enter:
# cfgadm -c unconfigure ap_id
where ap_id is the attachment-point ID for the hard disk drive that you want to
remove. For example, to deactivate the lower hard disk drive (HDD 1), as root, enter:
# cfgadm -c unconfigure c0::dsk/c0t1d0
10. Verify that the hard disk drive has been deactivated.
As root, enter:
# cfgadm -a c0
You should get feedback similar to the following:
Ap_Id
c0
c0::dsk/c0t0d0
c0::dsk/c0t1d0
c0::dsk/c0t6d0
Type
Receptacle
scsi-bus
connected
disk
connected
unavailable connected
CD-ROM
connected
Chapter 7
Occupant
Condition
configured
unknown
configured
unknown
unconfigured unknown
configured
unknown
Removing and Replacing Hard Disk Drives and Removeable Media
7-5
Note that in the sample feedback above, the Type column for the lower hard disk
drive (c0::dsk/c0t1d0) is now unavailable, and the Occupant column now
shows it as unconfigured.
You can also use the hard disk drive (HDD) LEDs on the system status panel to
verify that the hard disk drive has been deactivated (FIGURE 7-2). The Okay to
Remove LED (
) on the system status panel for the hard disk drive should go
ON, indicating that you can remove the hard disk drive from the slot.
Hard disk drive LEDs
Removeable media drive LEDs
FIGURE 7-2
Locating the Hard Disk Drive LEDs on the System Status Panel (Netra ct 800
Server)
11. Unlatch the disk drive handle to release it.
Push down in the direction of the arrow to release the bracket handle latch.
12. Pull the bracket handle out and swing it open.
13. Continue to pivot the disk drive bracket handle against the chassis, applying mild
pressure until the drive disconnects.
14. Slide the drive out of the chassis and place it on the electrostatic discharge mat.
15. Secure the drive bay cover over the drive bays (FIGURE 7-1 on page 7-3).
You must install the drive bay cover over the drive bays to ensure proper airflow in
the system.
7-6
Netra ct Server Service Manual • February 2001
7.1.2
Installing a Hard Disk Drive
1. Attach the antistatic wrist strap.
Refer to “Attaching the Antistatic Wrist Strap” on page 1-1.
2. Remove the drive bay cover (FIGURE 7-1 on page 7-3).
3. Hold the bracket handle on the disk drive open.
4. Slide the replacement disk drive into the drive slot.
5. Gently push the drive until the locking handle engages.
6. Close the locking handle completely, using gentle downward pressure.
7. Replace the drive bay cover.
8. Log in to the server and, as root, activate the replacement hard disk drive:
# cfgadm -c configure ap_id
where ap_id is the attachment-point ID for the hard disk drive that you just installed.
For example, to activate the lower hard disk drive (HDD 1), as root, enter:
# cfgadm -c configure c0::dsk/c0t1d0
9. Verify that the hard disk drive has been activated.
As root, enter:
# cfgadm -a c0
You should get feedback similar to the following:
Ap_Id
c0
c0::dsk/c0t0d0
c0::dsk/c0t1d0
c0::dsk/c0t6d0
Type
scsi-bus
disk
disk
CD-ROM
Chapter 7
Receptacle
connected
connected
connected
connected
Occupant
configured
configured
configured
configured
Condition
unknown
unknown
unknown
unknown
Removing and Replacing Hard Disk Drives and Removeable Media
7-7
Note that in the sample feedback above, the Type column for the lower hard disk
drive (c0::dsk/c0t1d0) is now disk, and the Occupant column now shows it as
configured.
You can also use the hard disk drive (HDD) LEDs on the system status panel to
verify that the hard disk drive has been activated (FIGURE 7-2 on page 7-6). The Okay
to Remove LED (
) on the system status panel for the hard disk drive should go
OFF, indicating that the hard disk drive has been activated.
10. If your hard disk(s) are under the control of RAID software, perform the
necessary steps to bring the disks online.
11. Perform any other necessary software procedures on the hard disk drive to bring
it online, including mounting the partitions and creating filesystems.
7.2
CD-ROM/DVD or DAT Drive (Netra ct
800 Server Only)
This section tells you how to replace a CD-ROM/DVD or Digital Audio Tape (DAT)
drive in a Netra ct 800 server. CD-ROM/DVD and DAT drives are referred to as
removeable media drives. The removeable media drives are hot-swappable
components. Note that internal removeable media drives are not available for the
Netra ct 400 server.
Following are the SCSI IDs for the devices used in the removeable media module:
■
■
7-8
CD-ROM/DVD—SCSI ID 6
DAT—SCSI ID 5
■
If you are removing and replacing a faulty removeable media drive in the server,
first to go “Removing a CD-ROM/DVD or DAT Drive” on page 7-9, then go to
“Installing a CD-ROM/DVD or DAT Drive” on page 7-11.
■
If you are installing a new removeable media drive in the server, go to “Installing
a CD-ROM/DVD or DAT Drive” on page 7-11.
Netra ct Server Service Manual • February 2001
7.2.1
Removing a CD-ROM/DVD or DAT Drive
1. Attach the antistatic wrist strap.
Refer to “Attaching the Antistatic Wrist Strap” on page 1-1.
2. Log in to the server and get the attachment-point IDs for the removeable media
drive installed in your server.
As root, enter:
# cfgadm -a c0
You should get feedback similar to the following:
Ap_Id
c0
c0::dsk/c0t0d0
c0::dsk/c0t1d0
c0::dsk/c0t6d0
Type
scsi-bus
disk
disk
CD-ROM
Receptacle
connected
connected
connected
connected
Occupant
configured
configured
configured
configured
Condition
unknown
unknown
unknown
unknown
In the sample feedback above, the attachment-point ID for the removeable media
drive is c0::dsk/c0t6d0. Note that a different entry would appear under the Type
column for a DAT drive.
3. Kill the Volume Manager daemon.
As root, enter:
# /etc/init.d/volmgt stop
4. Deactivate the removeable media drive.
As root, enter:
# cfgadm -c unconfigure ap_id
where ap_id is the attachment-point ID for the removeable media drive that you
want to remove. For example, to deactivate the removeable media drive using the
feedback given above, as root, enter:
# cfgadm -c unconfigure c0::dsk/c0t6d0
Chapter 7
Removing and Replacing Hard Disk Drives and Removeable Media
7-9
5. Verify that the removeable media drive has been deactivated.
As root, enter:
# cfgadm -a c0
You should get feedback similar to the following:
Ap_Id
c0
c0::dsk/c0t0d0
c0::dsk/c0t1d0
c0::dsk/c0t6d0
Type
Receptacle
scsi-bus
connected
disk
connected
disk
connected
unavailable connected
Occupant
Condition
configured
unknown
configured
unknown
configured
unknown
unconfigured unknown
Note that in the sample feedback above, the Type column for the removeable media
drive (c0::dsk/c0t6d0) is now unavailable, and the Occupant column now
shows it as unconfigured.
You can also use the removeable media module (RMM) LEDs on the system status
panel to verify that the removeable media drive has been deactivated ( FIGURE 7-2 on
page 7-6). The Okay to Remove LED (
) on the system status panel for the
removeable media module should go ON, indicating that you can remove the
removeable media drive from the slot.
6. Using a No. 2 Phillips screwdriver, loosen the captive screw that holds the
removeable media module in place.
7. Pull the module from the system and place it on the electrostatic discharge mat.
7-10
Netra ct Server Service Manual • February 2001
FIGURE 7-3
7.2.2
Removing the Removeable Media Module from a Netra ct 800 Server
Installing a CD-ROM/DVD or DAT Drive
1. Attach the antistatic wrist strap.
Refer to “Attaching the Antistatic Wrist Strap” on page 1-1.
2. Insert the removeable media module into the server.
3. Using a No. 2 Phillips screwdriver, tighten the screw on the removeable media
module to secure it to the server.
Chapter 7
Removing and Replacing Hard Disk Drives and Removeable Media
7-11
4. Log in to the server and, as root, activate the replacement removeable media drive:
# cfgadm -c configure ap_id
where ap_id is the attachment-point ID for the removeable media drive that you just
installed. For example, to activate the removeable media drive, as root, enter:
# cfgadm -c configure c0::dsk/c0t6d0
5. Verify that the removeable media drive has been activated.
As root, enter:
# cfgadm -a c0
You should get feedback similar to the following:
Ap_Id
c0
c0::dsk/c0t0d0
c0::dsk/c0t1d0
c0::dsk/c0t6d0
Type
scsi-bus
disk
disk
CD-ROM
Receptacle
connected
connected
connected
connected
Occupant
configured
configured
configured
configured
Condition
unknown
unknown
unknown
unknown
Note that in the sample feedback above, the Type column for the removeable media
drive (c0::dsk/c0t6d0) is now CD-ROM, and the Occupant column now shows it
as configured. Note that a different entry would appear under the Type column
for a DAT drive.
You can also use the removeable media module (RMM) LEDs on the system status
panel to verify that the removeable media drive has been activated (FIGURE 7-2 on
page 7-6). The Okay to Remove LED (
) on the system status panel for the
removeable media drive should go OFF, indicating that the removeable media drive
has been activated.
6. Start the Volume Manager daemon.
As root, enter:
# /etc/init.d/volmgt start
7-12
Netra ct Server Service Manual • February 2001
CHAPTER
8
Removing and Replacing HotSwappable Subassemblies
Note – When removing a hot-swappable component, allow several seconds before
inserting it or another component in that slot. Rapidly removing and inserting any
hot-swappable component might panic or hang the system.
This chapter specifies procedures for the installation, removal, and replacement of
hot-swappable Netra ct server subassemblies. It is organized as follows:
■
■
■
■
■
■
“System Status Panel” on page 8-1
“System Controller Board” on page 8-7
“Main Air Filter” on page 8-11
“Power Supply Unit” on page 8-14
“Power Supply Unit Air Filter” on page 8-18
“Fan Tray” on page 8-22
Consult the Netra ct Server Safety and Compliance Manual for safety information prior
to performing the procedures in this chapter.
Note – Read Chapter 3 before performing the procedures in this chapter.
8.1
System Status Panel
This section tells you how to remove and replace a system status panel. The
instructions provided here apply to the removal and replacement of the system
status panel from both a Netra ct 400 server and a Netra ct 800 server.
8-1
8.1.1
Removing the System Status Panel
1. Attach the antistatic wrist strap.
Refer to “Attaching the Antistatic Wrist Strap” on page 1-1.
2. Go to the front of the Netra ct server and locate the system status panel.
The location of the system status panel in the Netra ct 800 server and Netra ct 400
server is illustrated in FIGURE 8-1.
Comp
actP
ETHE
RN
CO
STAT
CITM
ET
M
US
ALAR
RE
RE
Comp
M
AD
HD
Y
D0
actP
ETHE
RN
CITM
ET
SET
AB
OR
T
CO
M
HD
D0
STAT
US
micr
osys
tems
ALAR
RE
RE
M
AD
Y
SET
AB
OR
T
micr
osys
tems
System status panel,
Netra ct 800 server
System status panels,
Netra ct 400 servers
FIGURE 8-1
8-2
System Status Panel Locations
Netra ct Server Service Manual • February 2001
3. Using a No. 2 Phillips screwdriver, loosen the two captive screws that hold the
system status panel in place.
FIGURE 8-2 shows the location of the captive screws on the Netra ct 800 server, and
FIGURE 8-3 shows the location of the captive screws on the Netra ct 400 server.
Com
pact
ETHE
PC TM
I
RN
CO
STAT
ET
M
US
ALAR
RE
RE
mic
M
AD
Y
SET
AB
ORT
rosy
stem
s
FIGURE 8-2
Removing the System Status Panel (Netra ct 800 Server)
Chapter 8
Removing and Replacing Hot-Swappable Subassemblies
8-3
Com
HD
D0
pact
ETHE
PC TM
I
RN
CO
STAT
ET
M
US
ALAR
RE
RE
Y
SET
AB
mic
M
AD
ORT
rosy
stem
s
FIGURE 8-3
Removing the System Status Panel (Netra ct 400 Server)
4. Pull the system status panel away from the Netra ct server and place it on the
electrostatic discharge mat.
You may have to pull on the screws to remove the system status panel from the
server.
8-4
Netra ct Server Service Manual • February 2001
8.1.2
Replacing the System Status Panel
1. Attach the antistatic wrist strap.
Refer to “Attaching the Antistatic Wrist Strap” on page 1-1.
2. Carefully position the system status panel into place on the system.
FIGURE 8-4 shows how to position the panel into place on the Netra ct 800 server and
FIGURE 8-5 shows how to position the panel into place on the Netra ct 400 server.
Com
pact
ETHE
PC TM
I
RN
CO
STAT
ET
M
US
ALAR
RE
RE
Y
SET
AB
mic
M
AD
ORT
rosy
stem
s
FIGURE 8-4
Positioning the System Status Panel (Netra ct 800 Server)
Chapter 8
Removing and Replacing Hot-Swappable Subassemblies
8-5
Com
HD
D0
pact
ETHE
PC TM
I
RN
CO
STAT
ET
M
US
ALAR
RE
RE
mic
M
AD
Y
SET
AB
ORT
rosy
stem
s
FIGURE 8-5
Positioning the System Status Panel (Netra ct 400 Server)
3. Push the system status panel into place against the server, paying special attention
to the connector on the left side of the panel, making sure that the connector on
the left back of the system status panel mates fully with the system controller
board.
Note – Be careful not to press the power switch when you are pressing the left side
of the system status panel into place.
4. Using a No. 2 Phillips screwdriver, tighten the two captive screws to secure the
system status panel to the system.
FIGURE 8-2 shows the location of the captive screws on the Netra ct 800 server, and
FIGURE 8-3 shows the location of the captive screws on the Netra ct 400 server.
8-6
Netra ct Server Service Manual • February 2001
8.2
System Controller Board
This section tells you how to remove and replace a system controller board. Each
server has a single system controller board. You must remove the system status
panel before you can access the system controller board.
8.2.1
Removing the System Controller Board
Note – If another field-replaceable unit (FRU) fails in a Netra ct server, such as a fan
tray, do not remove the system controller board from the server before replacing the
failed FRU. The system will lose track of the status of the failed FRU if you remove
the system controller board before replacing the failed FRU. You must remove and
replace the failed FRU before you can remove the system controller board.
Caution – Do not remove a system controller board from the server if the amber
Okay to Remove LED (
) is ON for any I/O slot in the server. If you cannot get
the amber Okay to Remove LED to the OFF state for all the I/O slots in the server,
you can work around the situation by enabling basic hot swap on all the I/O slots
(refer to “Enabling Basic Hot Swap on I/O Slots” on page 5-5). Once you’ve enabled
basic hot swap on all I/O slots, you can safely remove the system controller board.
1. Go to the front of the system and use the system status panel to determine if the
system controller board has failed.
FIGURE 8-6 shows the locations of the system controller board LEDs on the Netra ct
800 server, and FIGURE 8-7 shows the locations of the system controller board LEDs
on the Netra ct 400 server.
Chapter 8
Removing and Replacing Hot-Swappable Subassemblies
8-7
System controller board LEDs
FIGURE 8-6
Locating the System Controller Board LEDs on the System Status Panel
(Netra ct 800 Server)
System controller board LEDs
FIGURE 8-7
Locating the System Controller Board LEDs on the System Status Panel
(Netra ct 400 Server)
2. Verify that the amber Okay to Remove LED (
server.
) is unlit for all I/O slots in the
You cannot remove the system controller board if the Okay to Remove LED is lit for
any I/O slot in the server.
8-8
Netra ct Server Service Manual • February 2001
3. Remove the system status panel as described in Section 8.1.1 “Removing the
System Status Panel” on page 8-2.
Do not remove the antistatic wrist strap after you’ve removed the system status
panel.
4. Pull down on the ejection lever to unseat the system controller board ( FIGURE 8-8).
Com
HD
D0
pact
ETHE
PC TM
I
RN
CO
STAT
ET
M
US
ALAR
RE
RE
1
mic
M
AD
Y
SET
AB
ORT
rosy
stem
s
2
FIGURE 8-8
Removing a System Controller Board
5. Slide the board out and place it on the electrostatic discharge mat.
Chapter 8
Removing and Replacing Hot-Swappable Subassemblies
8-9
8.2.2
Replacing the System Controller Board
1. Attach the antistatic wrist strap.
Refer to “Attaching the Antistatic Wrist Strap” on page 1-1.
2. Push the ejection lever all the way down.
3. Line up the system controller board with its slot using the upper and lower rails,
making sure that the component side of the board faces the left of the server.
The wide connector should be inserted first, as shown in FIGURE 8-9.
Comp
HD
D0
actP
ETHE
RN
CO
STAT
CITM
ET
M
US
ALAR
RE
RE
M
AD
Y
SET
AB
OR
T
1
micr
osys
tems
2
FIGURE 8-9
8-10
Inserting a System Controller Board
Netra ct Server Service Manual • February 2001
4. Slide the board into the slot (FIGURE 8-9).
5. Flip the ejection lever up as you slide the board into the slot to completely seat it
in the card cage.
The notch on the ejection lever should fit into the cutout.
Caution – Do not force any board into a slot; this can cause damage to the board
and system. The board should insert and seat smoothly. If it binds, remove the board
and inspect the card cage slot for any obvious obstructions.
When the board is completely seated, you should see a brief flash of light behind the
board.
■
If the light flashes on and off, and remains off, then the board is seated and
functioning properly.
■
If the light flashes on and remains on, then the board is either not seated properly
or is faulty. If the light continues to stay on after repeated attempts, then the
board is faulty.
6. Replace the system status panel, as described in Section 8.1.2 “Replacing the
System Status Panel” on page 8-5.
8.3
Main Air Filter
This section describes how to remove and replace the main system air filter. It
should be replaced every three to six months. If your server environment is
especially dirty, you may have to replace it more frequently. The part number for the
main air filter for the Netra ct 800 server is X7163A; the part number for the main air
filter for the Netra ct 400 server is X7162A.
8.3.1
Removing the Main Air Filter
1. Locate the main air filter loop(s).
FIGURE 8-10 shows the location of the main air filter loops for the Netra ct 800 server
and FIGURE 8-11 shows the location of the main air filter loop for the Netra ct 400
server.
Chapter 8
Removing and Replacing Hot-Swappable Subassemblies
8-11
Main air filter loops
Comp
actP
ETHE
RN
CO
STAT
CITM
ET
M
US
ALAR
RE
RE
M
AD
Y
SET
AB
OR
T
micr
osys
tems
FIGURE 8-10
8-12
Locating the Main Air Filter (Netra ct 800 Server)
Netra ct Server Service Manual • February 2001
Comp
HD
D0
actP
ETHE
RN
CO
STAT
CITM
ET
M
US
ALAR
RE
RE
M
AD
Y
SET
AB
OR
T
Main air filter loop
micr
osys
tems
FIGURE 8-11
Locating the Main Air Filter (Netra ct 400 Server)
2. Grasp the main air filter by the loop(s) and pull it from the server.
8.3.2
Replacing the Main Air Filter
1. Insert the main air filter in the server with the metal crossbar facing down and
push it into the slot until you feel resistance.
2. Press down on the filter and push it the rest of the way into the server.
Press firmly against the center of the main air filter to make sure it’s completely
inserted.
Chapter 8
Removing and Replacing Hot-Swappable Subassemblies
8-13
8.4
Power Supply Unit
The second power supply unit in a Netra ct 800 server is hot-swappable, as
described in Section 1.4 “FRU Categories” on page 1-4. The remaining power supply
unit in a Netra ct 800 server and the lone power supply unit in a Netra ct 400 server
are cold-swappable. If you are replacing a hot-swappable power supply unit, then
follow the instructions in this section; if you are replacing a cold-swappable power
supply unit, then go to “Power Supply Unit” on page 11-19.
Note that your Netra ct 800 server will continue to operate normally with only one
power supply unit; however, you will not have complete redundancy for the power
supplies until you replace the failed power supply unit.
8.4.1
Removing a Hot-Swappable Power Supply Unit
1. Attach the antistatic wrist strap.
Refer to “Attaching the Antistatic Wrist Strap” on page 1-1.
2. Determine the state of the power supply unit that you want to remove.
You may have to get troubleshooting information from the LEDs on the power
supply unit itself to determine its state. Refer to “Troubleshooting a Power Supply
Using the Power Supply Unit LEDs” on page 4-14 for more information.
3. Verify that the power supply unit that you want to remove is hot-swappable.
Use the power supply unit (PSU) LEDs on the system status panel to locate the power
supply unit that can be removed. FIGURE 8-12 shows the location of the power supply
unit LEDs on the Netra ct 800 server system status panel.
In a redundant system, a power supply unit is hot-swappable and can be removed
only if the amber Okay to Remove LED (
) on the system status panel is ON.
Note – Do not remove a power supply unit if the amber Okay to Remove LED (
)
on the system status panel is OFF; that means that the power supply unit is not hotswappable, and your server will be powered off if you remove that power supply
unit.
8-14
Netra ct Server Service Manual • February 2001
Power supply LEDs
FIGURE 8-12
Locating the Power Supply Unit LEDs on the System Status Panel (Netra ct
800 Server)
4. Push the purple locking mechanism up into the unlocked (
) position.
FIGURE 8-13 shows the location of the locking mechanism for a power supply unit in
a Netra ct 800 server. The two LEDs on the power supply unit should go off. In
addition, after several seconds, the amber Okay to Remove LED (
) on the system
status panel for the remaining power supply unit in the Netra ct 800 server should
go to OFF. This tells you that the remaining power supply unit is no longer hotswappable as long as you have the first power supply unit disabled.
Chapter 8
Removing and Replacing Hot-Swappable Subassemblies
8-15
Power supply unit
captive screws (silver)
FIGURE 8-13
Locking mechanism
Unlocking a Power Supply Unit
5. Using a No. 2 Phillips screwdriver, loosen the two silver captive screws at the base
of the power supply unit.
FIGURE 8-13 shows the location of the captive screws for a power supply unit on a
Netra ct 800 server.
Note – Do not loosen the black captive screws at the base of the system; those screws
hold the server in place.
6. Grasp the handle on the power supply unit, slide it out of the server and place it
on the electrostatic discharge mat.
8-16
Netra ct Server Service Manual • February 2001
FIGURE 8-14
8.4.2
Removing a Power Supply Unit
Replacing a Hot-Swappable Power Supply Unit
1. Attach the antistatic wrist strap.
Refer to “Attaching the Antistatic Wrist Strap” on page 1-1.
2. Slide the power supply unit into the slot.
3. Using a No. 2 Phillips screwdriver, tighten the two silver captive screws beneath
the power supply unit to secure the power supply unit to the server.
FIGURE 8-13 shows the location of the captive screws for the power supply unit on a
Netra ct 800 server.
4. Push the locking mechanism down into the locked (
) position.
FIGURE 8-13 shows the location of the locking mechanisms for the power supply unit
on a Netra ct 800 server.
5. Verify that the power supply unit you just installed is functioning properly.
FIGURE 8-12 shows the location of the power supply unit LEDs (PSU) on the system
status panel on the Netra ct 800 server.
Chapter 8
Removing and Replacing Hot-Swappable Subassemblies
8-17
The amber LEDs (
) on the system status panel for both power supply units in
the Netra ct 800 server should go ON. This tells you that you have two functioning,
redundant power supply units in the server, and either of them is now hotswappable.
8.5
Power Supply Unit Air Filter
This section tells you how to replace a power supply unit air filter in the Netra ct 400
server and the Netra ct 800 server. You should replace the power supply unit air
filter every three to six months. If your server environment is especially dirty, you
may have to replace it more frequently. The part number for the power supply unit
air filter for the Netra ct 800 server and the Netra ct 400 server is X7182A.
8.5.1
Removing a Power Supply Unit Air Filter
Caution – When performing the steps in this procedure, make sure that you do not
let the screwdriver enter the power supply apertures.
1. Go to the front of the system and, using a No. 2 Phillips screwdriver, unscrew the
two captive screws that hold the power supply unit air filter in place.
FIGURE 8-15 shows the location of the power supply unit air filter captive screws on
the Netra ct 800 server, and FIGURE 8-16 shows the location of the power supply unit
air filter captive screws on the Netra ct 400 server.
8-18
Netra ct Server Service Manual • February 2001
Power supply
air filter screws
FIGURE 8-15
Removing a Power Supply Unit Air Filter from a Netra ct 800 Server
Chapter 8
Removing and Replacing Hot-Swappable Subassemblies
8-19
Power supply
air filter screws
FIGURE 8-16
Removing a Power Supply Unit Air Filter from a Netra ct 400 Server
2. Remove the power supply unit air filter outer cover and set it aside.
3. Remove the power supply unit air filter.
8-20
Netra ct Server Service Manual • February 2001
Power supply unit air filter
Power supply unit air filter cover
FIGURE 8-17
Removing a Power Supply Unit Air Filter
Caution – There is an energy hazard present as long as the power supply unit air
filter is not installed. You must replace the power supply unit air filter immediately
and replace the outer cover for the safe operation of your system.
8.5.2
Replacing a Power Supply Unit Air Filter
1. Insert the power supply unit air filter (FIGURE 8-17).
2. Place the power supply unit air filter outer cover in the proper position.
3. Using a No. 2 Phillips screwdriver, tighten the two captive screws to secure the
power supply unit air filter outer cover in place.
FIGURE 8-15 shows the location of the power supply unit air filter captive screws on
the Netra ct 800 server, and FIGURE 8-16 shows the location of the power supply unit
air filter captive screws on the Netra ct 400 server.
Chapter 8
Removing and Replacing Hot-Swappable Subassemblies
8-21
8.6
Fan Tray
This section describes you how to remove and replace a fan tray in both the Netra ct
800 server and the Netra ct 400 server.
If the envmond software is installed and running, the envmond software will control
the speed of the fans, depending on the ambient air temperature. When the server is
first powered on, if the temperature is below 11˚F (44˚C), the envmond software
decreases the fan speeds of both fan trays to 75%. If the temperature rises above
133˚F (56˚C), the envmond software increases the fan speeds of both fan trays to
100%. If the temperature rises above 158˚F (70˚C), the envmond software sends out a
warning that the system is overheating. If the temperature rises above 167˚F (75˚C),
the system shuts down automatically.
Note that the temperatures above are not ambient air temperatures, but rather the
CPU temperatures that are monitored by a thermistor located under the heatsink on
the CPU card. Also, the envmond daemon controls the speed of the fans, so you
must have the envmond daemon installed and running.
If one fan tray fails, the other fan tray will kick up to 100%, regardless of the
temperature. If one fan tray fails, you must replace the failed fan tray as soon as
possible. Even though the system can run on one fan tray, if the temperature rises, a
single fan tray may not be able to cool the system properly.
If the envmond software is not installed, then the fan speeds will remain at 100%,
regardless of any changes in ambient air temperature.
8.6.1
Removing a Fan Tray
1. Go to the front of the system and use the system status panel to determine if a fan
tray has failed.
FIGURE 8-18 shows the locations of the fan tray LEDs on the Netra ct 800 server and
FIGURE 8-19 shows the locations of the fan tray LEDs on the Netra ct 400 server.
8-22
Netra ct Server Service Manual • February 2001
Fan tray LEDs
FIGURE 8-18
Locating the Fan Tray LEDs on the System Status Panel (Netra ct 800 Server)
Fan tray LEDs
FIGURE 8-19
Locating the Fan Tray LEDs on the System Status Panel (Netra ct 400 Server)
A fan tray has failed if the amber Fault LED (
) on the system status panel is ON.
2. Make a note of which fan tray has failed.
You must remove the system status panel in order to access the fan trays, and you
will not be able to determine which fan tray has failed after you’ve removed the
system status panel.
3. Remove the system status panel from the system.
Refer to “Removing the System Status Panel” on page 8-2 for those instructions.
Chapter 8
Removing and Replacing Hot-Swappable Subassemblies
8-23
4. Locate the fan tray that has failed.
■
If the Fan 1 LEDs were in a failed state on the system status panel, the upper fan
tray has failed.
■
If the Fan 2 LEDs were in a failed state on the system status panel, the lower fan
tray has failed.
FIGURE 8-20 shows the locations of the fan trays in a Netra ct 800 server and
FIGURE 8-21 shows the locations of the fan trays in a Netra ct 400 server.
Upper fan tray
(Fan 1)
Lower fan tray
(Fan 2)
FIGURE 8-20
8-24
Locating the Fan Trays in a Netra ct 800 Server
Netra ct Server Service Manual • February 2001
Upper fan tray
(Fan 1)
Lower fan tray
(Fan 2)
FIGURE 8-21
Locating the Fan Trays in a Netra ct 400 Server
5. Pull on the fan tray handle and remove the fan tray from the system.
Chapter 8
Removing and Replacing Hot-Swappable Subassemblies
8-25
FIGURE 8-22
8.6.2
Removing a Fan Tray
Replacing a Fan Tray
1. Insert the fan tray into the system, making sure the handle on the fan tray is on
the right, and press the fan tray handle to lock the fan tray into place (FIGURE 8-22).
2. Install the system status panel on the system.
Refer to “Replacing the System Status Panel” on page 8-5 for those instructions.
3. Verify that the fan tray LEDs are lit properly.
FIGURE 8-18 shows the locations of the fan tray LEDs on the Netra ct 800 server and
FIGURE 8-19 shows the locations of the fan tray LEDs on the Netra ct 400 server.
A fan tray is functioning properly if the amber Fault LED (
panel is OFF and the green Power LED ( ) is ON.
8-26
Netra ct Server Service Manual • February 2001
) on the system status
PART
IV Replacing Cold-Swappable FRUs
Removing and Replacing the Servers
Chapter 9
Removing and Replacing Cold-Swappable Cards
Chapter 10
Removing and Replacing Cold-Swappable Subassemblies
Chapter 11
Netra ct Server Service Manual
CHAPTER
9
Removing and Replacing the
Servers
This chapter specifies procedures for the installation, removal, and replacement of
the Netra ct 800 server and Netra ct 400 server. The server and the midplane are
considered a single FRU.
Consult the Netra ct Server Safety and Compliance Manual for safety information prior
to performing the procedures in this chapter.
Note – Read Chapter 3 “Handling Cards and Assemblies” before performing the
procedures in this chapter.
9.1
Servers
You can power down and remove one server without affecting the other servers in
the chassis.
9.1.1
Removing a Server
The instructions in this section cover both of these situations:
■
Removing a failed server
■
Removing a functioning server so that you can access a component behind the
server, such as a power distribution unit or a front-access cable.
9-1
1. Completely power off the Netra ct server.
Refer to “Powering Off the Server” on page 2-6 for those instructions. You must
push the purple power supply unit locking mechanism into the unlocked position
before you can remove the server.
2. Disconnect the DC input power cable(s) from the appropriate DC connectors.
For rear-access models, disconnect the DC input power cable(s) from the DC
connectors at the rear of the chassis; for front-access models, disconnect the DC
input power cable(s) from the DC connectors at the front of the chassis. Note that the
following is always true:
■
A Netra ct 800 server has two power distribution units supplying power to it.
■
A Netra ct 400 server has one power distribution unit supplying power to it.
FIGURE 9-1 shows sample server configurations and which power distribution units
would be used for each. You do not have to disconnect the DC input power cables
from any power distribution units other than the ones supplying power to server
that you want to remove; doing so will power off other servers in the chassis.
Chassis
Netra ct 400 server
PDU
DC power
source A
PDU
DC power
source B
PDU
DC power
source A
PDU
DC power
source B
Power supply unit
Netra ct 400 server
Power supply unit
Netra ct 800 server
Power supply unit
Power supply unit
FIGURE 9-1
Power Supply Units and Power Distribution Units (PDUs)
Caution – Do not attempt to remove the server from the chassis without first
performing the next step or you might damage certain major system components.
9-2
Netra ct Server Service Manual • February 2001
3. If you have a rear-access model, unseat all the rear transition cards from the server
that you are going to replace.
You do not have to completely remove the rear transition cards from the chassis; you
only need to pull them out an inch or two so that they are disengaged from the rear
of the server that you are going to replace.
4. Determine if you need to unplug the cables connected to the server and remove
all the components from the server.
■
If you are removing a faulty Netra ct 800 server or Netra ct 400 server, you must
unplug all the cables and remove all the components from the faulty server so
that you can reinstall them in the replacement server later on. Go to Step 5.
■
If you are removing a functioning Netra ct 800 server or Netra ct 400 server in
order to access a component behind the server (for example, a power distribution
unit or a front-access cable), you do not have to unplug all the cables and remove
all the components from the server. Go to Step 8.
5. Label all the cables connected to the server.
You will be disconnecting the cables from the server in the next step, and you will
want to plug the cables back into the same ports after you’ve replaced the server.
6. Unplug all cables from the cards installed in the server.
■
For rear-access models, go to the back of the chassis and unplug all the cables
from the cards installed at the rear of the chassis for the server that you are going
to replace.
■
For front-access models, go to the front of the chassis and unplug all the cables
from the cards installed at the front of the server that you are going to replace.
7. Remove all the components from the server.
You will reinstall them in the replacement server later on.
Remove the components using the instructions in the following sections, whether
you have a front-access or a rear-access model:
■
■
■
■
■
■
■
■
■
■
■
“Removing
“Removing
“Removing
“Removing
“Removing
“Removing
“Removing
“Removing
“Removing
“Removing
“Removing
a CD-ROM/DVD or DAT Drive” on page 7-9 (Netra ct 800 server)
a SCSI Termination Board” on page 11-7 (Netra ct 800 server)
the System Status Panel” on page 8-2
the System Controller Board” on page 8-7
the Main Air Filter” on page 8-11
a Fan Tray” on page 8-22
a CPU Card” on page 10-2
an Alarm Card (Netra ct 800 Server)” on page 6-19
an Alarm Card (Netra ct 400 Server)” on page 6-30
a Hard Disk Drive” on page 11-2
a Cold-Swappable Power Supply Unit” on page 11-19
Chapter 9
Removing and Replacing the Servers
9-3
Remove the following components if you have a front-access model:
■
■
■
“Removing an I/O Card” on page 6-7
“Removing the Front-Access Cable” on page 11-16
“Removing a CPU Front Transition Card” on page 10-10 (front-access models)
Remove the following components if you have a rear-access model:
■
■
■
“Removing a Front I/O Card and I/O Rear Transition Card” on page 6-43
“Removing a CPU Rear Transition Card” on page 10-27
“Removing an Alarm Rear Transition Card” on page 6-51
8. Using a No. 2 Phillips screwdriver, loosen the captive screws that secure the server
to the chassis.
9-4
■
If you are removing a Netra ct 800 server, loosen the four black captives screws at
the top of the server and the three black captive screws at the bottom of the server
(FIGURE 9-2).
■
If you are removing a Netra ct 400 server, loosen the two black captive screws at
the top of the server and the two black captive screws at the bottom of the server
(FIGURE 9-3).
Netra ct Server Service Manual • February 2001
Comp
HD
D0
actPC
ETHE
RN
CO
ITM
ET
M
HD
D0
STAT
US
ALAR
RE
RE
M
AD
Y
SET
AB
OR
T
micro
syste
ms
FIGURE 9-2
Loosening the Screws at the Top and Bottom of a Netra ct 800 Server
Chapter 9
Removing and Replacing the Servers
9-5
Comp
actPC
ETHE
RN
CO
STAT
ITM
ET
M
US
ALAR
RE
RE
M
AD
Y
SET
AB
OR
T
HD
D0
micro
syste
ms
FIGURE 9-3
Loosening the Screws at the Top and Bottom of a Netra ct 400 Server
9. Grasp the flat vertical purple handles at the lower left and middle right of the
server and slowly pull the server out of the chassis until the purple server bar at
the top of the server is visible.
10. With your right hand, grasp the purple bar at the top of the server and completely
pull the server out of the chassis using the flat vertical handle and the bar.
FIGURE 9-4 shows how to remove a Netra ct 800 server from the chassis and
FIGURE 9-5 shows how to remove a Netra ct 400 server from the chassis.
9-6
Netra ct Server Service Manual • February 2001
Comp
HD
D0
actPC
ETHE
RN
CO
ITM
ET
M
HD
D0
STAT
US
ALAR
RE
RE
M
AD
Y
SET
AB
OR
T
micro
syste
ms
FIGURE 9-4
Removing or Inserting a Netra ct 800 Server
Chapter 9
Removing and Replacing the Servers
9-7
Comp
actPC
ETHE
RN
CO
STAT
M
US
ALAR
RE
RE
HD
D1
ITM
ET
M
AD
Y
SET
AB
OR
T
HD
D0
micro
syste
ms
FIGURE 9-5
Removing or Inserting a Netra ct 400 Server
11. Set the server aside on a flat surface.
9-8
Netra ct Server Service Manual • February 2001
9.1.2
Replacing a Server
See the Netra ct Server Product Overview for combinations of Netra ct 400 server and
Netra ct 800 server supported within a chassis.
1. With your left hand, grasp the flat vertical purple handle to the left of the power
supply unit.
2. With your right hand, grasp the purple server bar at the top of the server and
insert the server into the chassis using the flat vertical handle and the server bar.
FIGURE 9-4 shows how to insert a Netra ct 800 server into the chassis and FIGURE 9-5
shows how to insert a Netra ct 400 server into the chassis.
Caution – If you have a rear-access model server, you must verify that all the
rear-access model cards have been completely unseated before proceeding with
these procedures. If you attempt to insert a server without unseating the rear-access
model cards, you will damage the connector pins on the midplane when you insert
the server.
3. Push the purple server bar at the top of the server down and gently push the
server the remaining distance into the chassis.
4. Using a No. 2 Phillips screwdriver, tighten the captive screws that secure the
server to the chassis.
■
If you are installing a Netra ct 800 server, tighten the four black captives screws at
the top of the server and the three black captive screws at the bottom of the server
(FIGURE 9-2).
■
If you are installing a Netra ct 400 server, tighten the two black captive screws at
the top of the server and the two black captive screws at the bottom of the server
(FIGURE 9-3).
5. If you have a rear-access model, reseat all the rear transition cards into the server
that you just replaced.
6. Determine if you need to connect the cables to the cards in the server and reinstall
all the components from the server.
■
If you are installing a replacement Netra ct 800 server or Netra ct 400 server, you
must connect all the cables and reinstall all the components that you removed
from the faulty server. Go to Step 7.
■
If you are installing a functioning Netra ct 800 server or Netra ct 400 server that
you had to remove in order to access a component behind the server (for
example, a power distribution unit or a front-access cable), you do not have to
connect the cables and reinstall the components. Go to Step 9.
Chapter 9
Removing and Replacing the Servers
9-9
7. Reinstall all the components that you removed from the faulty server.
Replace the following components, whether you have a front-access or a rear-access
model:
■
■
■
■
■
■
■
■
■
■
■
“Installing a CD-ROM/DVD or DAT Drive” on page 7-11 (Netra ct 800 server)
“Replacing a SCSI Termination Board” on page 11-8 (Netra ct 800 server)
“Replacing the System Status Panel” on page 8-5
“Replacing the System Controller Board” on page 8-10
“Replacing the Main Air Filter” on page 8-13
“Replacing a Fan Tray” on page 8-26
“Replacing the CPU Card” on page 10-6
“Installing an Alarm Card (Netra ct 800 Server)” on page 6-24
“Installing an Alarm Card (Netra ct 400 Server)” on page 6-35
“Replacing a Hard Disk Drive” on page 11-4
“Replacing a Cold-Swappable Power Supply Unit” on page 11-22
Replace the following components if you have a front-access model:
■
■
■
“Installing an I/O Card” on page 6-13
“Replacing a Front-Access Cable” on page 11-19
“Replacing a CPU Front Transition Card” on page 10-13 (front-access models)
Replace the following components if you have a rear-access model:
■
■
■
“Installing a Front I/O Card and I/O Rear Transition Card” on page 6-47
“Replacing a CPU Rear Transition Card” on page 10-29
“Installing an Alarm Rear Transition Card” on page 6-53
8. Plug all the cables into the server.
9. Connect the DC input power cable(s) to the DC connector(s) for the server you
just replaced.
10. Power on the server.
Refer to “Powering On the Server” on page 2-1 for those instructions.
9-10
Netra ct Server Service Manual • February 2001
CHAPTER
10
Removing and Replacing ColdSwappable Cards
Caution – An energy hazard is present if any I/O slots are left uncovered. If you
remove a card from an I/O slot, you must fill it with either a replacement card or a
filler panel.
This chapter gives procedures for the installation, removal and replacement of coldswappable cards. The procedures differ somewhat between front-access and rearaccess models, so this chapter is divided into the following sections:
■
■
“Front-Access Models” on page 10-1
“Rear-Access Models” on page 10-19
Consult the Netra ct Server Safety and Compliance Manual for safety information prior
to performing the procedures in this chapter.
Note – Read Chapter 3 “Handling Cards and Assemblies” before performing the
procedures in this chapter.
10.1
Front-Access Models
This section gives procedures for the installation, removal and replacement of the
following cold-swappable cards for front-access models of both the Netra ct 400
server and Netra ct 800 server:
■
■
■
“CPU Card” on page 10-2
“CPU Front Transition Card” on page 10-10
“CPU Shunt Card (Netra ct 800 Server Only)” on page 10-17
10-1
10.1.1
CPU Card
This section tells you how to replace a CPU card, in both a Netra ct 400 server and a
Netra ct 800 server. Both the Netra ct 400 server and the Netra ct 800 server have a
dedicated location for the card, indicated by the red card guides.
10.1.1.1
Removing a CPU Card
1. Power off the server.
Refer to “Powering Off the Server” on page 2-6 for those instructions.
2. Attach the antistatic wrist strap.
Refer to “Attaching the Antistatic Wrist Strap” on page 1-1.
3. Locate the CPU card.
In the Netra ct 800 server, the CPU card will be installed in slot 1. In the Netra ct 400
server, the CPU card will be installed in slot 3. Refer to FIGURE 10-1.
10-2
Netra ct Server Service Manual • February 2001
CPU card, slot 1 in Netra ct 800 server
CPU card, slot 3 in Netra ct 400 server
Comp
act
ETHE
PC TM
I
RN
CO
STAT
ET
M
US
ALAR
RE
RE
Comp
M
AD
Y
HD
D0
act
ETHE
PC TM
I
RN
ET
SET
AB
OR
T
CO
M
HD
D0
STAT
US
micro
system
s
ALAR
RE
RE
M
AD
Y
SET
AB
OR
T
micro
system
s
FIGURE 10-1
CPU Card Locations
4. Unplug any cables connected to the CPU card.
5. Using a No. 1 Phillips screwdriver, loosen the two captive screws inside the card’s
ejection levers, one on top and one on the bottom (FIGURE 10-2).
Chapter 10
Removing and Replacing Cold-Swappable Cards
10-3
FIGURE 10-2
Loosening the Ejection Lever Captive Screws
6. Press outward on the two ejection levers on the card to unseat the card from the
card cage.
7. Slide the card out of the slot and place it on the electrostatic discharge mat.
8. If you want to preserve the host ID on your CPU card, remove the host ID board
from the CPU card and store it in a safe location (FIGURE 10-3).
The host ID board contains the Ethernet address and host ID information. You will
place it on the replacement CPU card later on to retain your existing Ethernet
address and host ID information.
10-4
Netra ct Server Service Manual • February 2001
Host ID
J3401
J3601
J3602
Memory module
mezzanine board
FIGURE 10-3
Heatsink
Removing the Host ID Board
9. Remove any optional memory cards from the CPU card, if necessary.
10. Remove the CPU front transition card.
The CPU LED on the system status panel cannot determine if the CPU or the CPU
front transition card has failed, so you must replace both cards when one of them
fails. Go to “Removing a CPU Front Transition Card” on page 10-10 for those
instructions.
Chapter 10
Removing and Replacing Cold-Swappable Cards
10-5
10.1.1.2
Replacing the CPU Card
1. Attach a wrist strap to your wrist and to a bare metal area on the system.
2. Replace the CPU front transition card, if you have not done so already.
You must replace the CPU front transition card before you can replace the CPU card.
Go to “Replacing a CPU Front Transition Card” on page 10-13 for those instructions,
and then return here.
3. Reinstall any optional memory cards onto the replacement CPU card, if necessary.
4. If you wanted to preserve the host ID on your CPU card, install the host ID board
from the failed CPU card onto the replacement CPU card (FIGURE 10-3 on
page 10-5).
Note – The J3401 jumper shown in FIGURE 10-3 is only a mechanical stabilizer for the
host ID board. It does not contain any signals.
5. Keeping the CPU card vertical, slide the card into the slot between the two guides.
The teeth in the handle of the card must align with the square cutouts in the I/O
slot. When the card is completely seated in the card cage, the two ejection levers
should flip inward, and the teeth in the ejection levers should fit smoothly in the
rectangular cutouts in the bottom and top plates. FIGURE 10-4 shows how to insert an
I/O card into a slot; the same principal applies to a CPU card.
10-6
Netra ct Server Service Manual • February 2001
Comp
act
ETHE
PC TM
I
RN
CO
STAT
ET
M
US
ALAR
RE
RE
HD
D1
M
AD
Y
HD
D0
SET
AB
OR
T
HD
D0
micros
ystem
s
FIGURE 10-4
Aligning the Card with the Card Cage Cutouts
6. Using a No. 1 Phillips screwdriver, tighten the two captive screws inside the card’s
ejection levers, one on top and one on the bottom.
Chapter 10
Removing and Replacing Cold-Swappable Cards
10-7
FIGURE 10-5
Tightening the Ejection Lever Captive Screws
7. Make the necessary cable connections to the CPU card, if necessary.
FIGURE 10-6 shows the connectors on the CPU card. Note that the only cables that
should be connected to the CPU card would be a cable connected to the COM port
(TTY A) for the front-access model of the Netra ct 400 server and the ethernet cable
connected to the ethernet A port.
10-8
Netra ct Server Service Manual • February 2001
Ethernet A port
COM port
(TTY A)
Com
pact
ETH
ER
CO
STA
PC TM
I
NE
M
TUS
ALA
RE
RE
FIGURE 10-6
mic
RM
AD
Y
SET
AB
CP
T
OR
ros
1500
yste
T
ms
-360
Connectors on the CPU Card
8. Power on the server.
Refer to “Powering On the Server” on page 2-1 for those instructions.
9. Verify that the CPU card LEDs are lit properly.
The green Power LED ( ) for the CPU will blink for a moment while the CPU is
going through POST, then the green Power LED ( ) should go ON, which means
the CPU card is functioning properly.
Chapter 10
Removing and Replacing Cold-Swappable Cards
10-9
10.1.2
CPU Front Transition Card
This section tells how to remove and replace a CPU front transition card. This card is
present only in the front-access model of the Netra ct server.
10.1.2.1
Removing a CPU Front Transition Card
1. Power off the server.
Refer to “Powering Off the Server” on page 2-6 for those instructions.
2. Attach the antistatic wrist strap.
Refer to “Attaching the Antistatic Wrist Strap” on page 1-1.
3. Go to the front of the system and remove the CPU card, if you have not done so
already.
Because the CPU LED on the system status panel cannot determine if the CPU or the
CPU front transition card has failed, you must replace both cards when one of them
fails. Refer to “Removing a CPU Card” on page 10-2 to remove the CPU card, then
return here.
4. Locate the CPU front transition card.
FIGURE 10-7 shows the location of the CPU front transition card in a Netra ct 800
server and FIGURE 10-8 shows the location of the CPU front transition card in a
Netra ct 400 server.
10-10
Netra ct Server Service Manual • February 2001
Comp
act
ETHE
PC TM
I
RN
CO
STAT
ET
M
US
ALAR
RE
RE
M
AD
Y
HD
D0
SET
AB
OR
T
HD
D0
micro
syste
ms
FIGURE 10-7
CPU Front Transition Card Locations in a Netra ct 800 Server
Chapter 10
Removing and Replacing Cold-Swappable Cards
10-11
Comp
act
ETHE
PC TM
I
RN
CO
STAT
ET
M
US
ALAR
RE
Ejection lever
RE
M
AD
Y
HD
D0
SET
AB
OR
T
HD
D0
micro
syste
ms
FIGURE 10-8
CPU Front Transition Card Location in a Netra ct 400 Server
5. Disconnect any cables attached to the CPU front transition card.
6. Determine if you are removing the CPU front transition card from a Netra ct 800
server or from a Netra ct 400 server.
■
If you are removing the CPU front transition card from a Netra ct 800 server,
follow these instructions to completely remove the card from the server:
a. Using a No. 2 Phillips screwdriver, loosen the two captive screws inside the
card’s ejection levers, one on top and one on the bottom (FIGURE 10-2 on
page 10-4).
b. Press outward on the two ejection levers on the card to unseat the card from the
card cage.
c. Slide the card out of the slot and place it on the electrostatic discharge mat.
10-12
Netra ct Server Service Manual • February 2001
■
If you are removing the CPU front transition card from a Netra ct 400 server,
follow these instructions to completely remove the card from the server:
a. Using a No. 2 Phillips screwdriver, loosen the captive screw inside the card’s
ejection lever.
b. Flip up on the ejector lever to unseat the card from the card cage ( FIGURE 10-8).
c. Slide the card out of the slot and place it on the electrostatic discharge mat.
10.1.2.2
Replacing a CPU Front Transition Card
1. Attach the antistatic wrist strap.
Refer to “Attaching the Antistatic Wrist Strap” on page 1-1.
2. Determine if you are installing the CPU front transition card into a Netra ct 800
server or a Netra ct 400 server.
■
If you are installing the CPU front transition card into a Netra ct 800 server, follow
these instructions to completely install the card into the server:
a. Keeping the card vertical, slide the card into the slot in between the two guides
(FIGURE 10-4 on page 10-7).
The teeth in the handle of the card must align with the square cutouts in the I/O
slot. When the card is completely seated in the card cage, the two ejection levers
should flip inward, and the teeth in the ejection levers should fit smoothly in the
rectangular cutouts in the bottom and top plates. FIGURE 10-4 on page 10-7 shows
how to insert an I/O card into a slot; the same principal applies to a CPU front
transition card.
b. Lock the ejection levers.
c. Using a No. 2 Phillips screwdriver, tighten the two captive screws inside the
card’s ejection levers, one on top and one on the bottom (FIGURE 10-5 on
page 10-8).
■
If you are installing the CPU front transition card into a Netra ct 400 server, follow
these instructions to completely install the card into the server:
a. Flip the ejector lever up to a 90-degree angle (FIGURE 10-9).
Chapter 10
Removing and Replacing Cold-Swappable Cards
10-13
Ejector lever
Top of card
Front of card
FIGURE 10-9
Proper Orientation for the Ejector Lever for Netra ct 400 Server CPU Front
Transition Card
b. Keeping the card vertical, slide the card into the slot.
c. Press down on the ejector lever to seat the card into the card cage (FIGURE 10-8
on page 10-12).
d. Using a No. 2 Phillips screwdriver, tighten the captive screw inside the card’s
ejection lever.
3. Make the necessary cable connections to the CPU front transition card.
FIGURE 10-10 shows the connectors on the CPU front transition card for the Netra ct
800 server, and FIGURE 10-11 shows the connectors on the CPU front transition card
for the Netra ct 400 server. Note that the TTY A port is located on the CPU card itself
(COM port) for the Netra ct 400 server.
10-14
Netra ct Server Service Manual • February 2001
Parallel
Ethernet B
Com
HD
D1
pact
ETH
ER
CO
STA
PC TM
I
NE
TTY B
M
ALA
RE
mic
RM
AD
Y
SCSI
SET
AB
FIGURE 10-10
TTY A
TUS
RE
CP
T
OR
ros
1500
yste
T
ms
-360
Connectors on the CPU Front Transition Card (Netra ct 800 Server)
Chapter 10
Removing and Replacing Cold-Swappable Cards
10-15
SCSI
Parallel
Ethernet B
TTY B (DB9)
FIGURE 10-11
Connectors on the CPU Front Transition Card (Netra ct 400 Server)
4. After you have replaced the CPU front transition card, get the replacement CPU
card from the ship kit.
5. Go to the front of the server and install the replacement CPU card.
Refer to “Replacing the CPU Card” on page 10-6 for those instructions, then return
here.
6. Power on the server.
Refer to “Powering On the Server” on page 2-1 for those instructions.
7. Verify that the CPU LEDs on the system status panel are lit properly.
The CPU LEDs will give you diagnostic information on both the CPU and the CPU
front transition card.
The green Power LED ( ) for the CPU and CPU front transition cards will blink for
a moment while the CPU is going through POST, then the green Power LED ( )
should go ON, which means the CPU and CPU front transition cards are functioning
properly.
10-16
Netra ct Server Service Manual • February 2001
10.1.3
CPU Shunt Card (Netra ct 800 Server Only)
In the front-access model of the Netra ct 800 server, the CPU shunt card brings the
signals from the CPU card installed in I/O slot 1 to the CPU front transition card
installed in I/O slot 2. It is mounted on the midplane, accessible from the rear of the
chassis. There is no CPU shunt card for the Netra ct 400 server.
10.1.3.1
Removing a CPU Shunt Card
1. Power off the server.
Refer to “Powering Off the Server” on page 2-6 for those instructions.
2. Go to the front of the chassis and disconnect the DC input power cables from the
DC connectors that supply power to the Netra ct 800 server.
Note that you should be disconnecting two DC input power cables from the DC
connectors for a Netra ct 800 server.
3. Attach the antistatic wrist strap.
Refer to “Attaching the Antistatic Wrist Strap” on page 1-1.
4. Remove the Netra ct 800 server from the chassis.
Refer to “Removing a Server” on page 9-1 for those instructions. Note that you do
not have to unplug the cables or remove components for this procedure.
5. After you’ve removed the Netra ct 800 server from the chassis, go to the rear of the
Netra ct 800 server and locate the CPU shunt card.
Chapter 10
Removing and Replacing Cold-Swappable Cards
10-17
FIGURE 10-12
Locating the CPU Shunt Cart
6. Grasp the CPU shunt card firmly and, rocking the card slightly from side to side,
carefully pull it free from the midplane.
7. Place the CPU shunt card on the electrostatic discharge mat.
10.1.3.2
Replacing a CPU Shunt Card
1. Attach the antistatic wrist strap.
Refer to “Attaching the Antistatic Wrist Strap” on page 1-1.
2. Get the replacement CPU shunt card from the ship kit.
10-18
Netra ct Server Service Manual • February 2001
3. Go to the rear of the Netra ct 800 server and gently seat the CPU shunt card into
the midplane.
The notch in the CPU shunt card should fit into the cutout in the midplane.
4. Reinstall the Netra ct 800 server back into the chassis.
Refer to “Replacing a Server” on page 9-9 for those instructions.
5. Connect the DC input power cables to the DC connectors at the front of the
chassis.
6. Power on the server.
Refer to “Powering On the Server” on page 2-1 for those instructions.
10.2
Rear-Access Models
This section gives procedures for the installation, removal and replacement of the
following cold-swappable cards for rear-access models of both the Netra ct 400
server and Netra ct 800 server:
■
■
10.2.1
“CPU Card” on page 10-19
“CPU Rear Transition Card” on page 10-26
CPU Card
This section tells you how to replace a CPU card, in both a Netra ct 400 server and a
Netra ct 800 server. Both the Netra ct 400 server and the Netra ct 800 server have a
dedicated location for the card, indicated by the red card guides.
10.2.1.1
Removing a CPU Card
1. Power off the server.
Refer to “Powering Off the Server” on page 2-6 for those instructions.
2. Attach the antistatic wrist strap.
Refer to “Attaching the Antistatic Wrist Strap” on page 1-1.
3. Locate the CPU card.
In the Netra ct 800 server, the CPU card will be installed in slot 1. In the Netra ct 400
server, the CPU card will be installed in slot 3. Refer to FIGURE 10-1.
Chapter 10
Removing and Replacing Cold-Swappable Cards
10-19
CPU card, slot 1 in Netra ct 800 server
CPU card, slot 3 in Netra ct 400 server
Comp
act
ETHE
PC TM
I
RN
CO
STAT
ET
M
US
ALAR
RE
RE
Comp
M
AD
Y
HD
D0
act
ETHE
PC TM
I
RN
ET
SET
AB
OR
T
CO
M
HD
D0
STAT
US
micro
system
s
ALAR
RE
RE
M
AD
Y
SET
AB
OR
T
micro
system
s
FIGURE 10-13
CPU Card Locations
4. Unplug any cables connected to the CPU card.
5. Using a No. 2 Phillips screwdriver, loosen the two captive screws inside the card’s
ejection levers, one on top and one on the bottom (FIGURE 10-2).
10-20
Netra ct Server Service Manual • February 2001
FIGURE 10-14
Loosening the Ejection Lever Captive Screws
6. Press outward on the two ejection levers on the card to unseat the card from the
card cage.
7. Slide the card out of the slot and place it on the electrostatic discharge mat.
8. If you want to preserve the host ID on your CPU card, remove the host ID board
from the CPU card and store it in a safe location (FIGURE 10-3).
The host ID board contains the Ethernet address and host ID information. You will
place it on the replacement CPU card later on to retain your existing Ethernet
address and host ID information.
Chapter 10
Removing and Replacing Cold-Swappable Cards
10-21
Host ID
J3401
J3601
J3602
Memory module
mezzanine board
FIGURE 10-15
Heatsink
Removing the Host ID Board
9. Remove any optional memory cards from the CPU card, if necessary.
10. Remove the CPU rear transition card.
The CPU LED on the system status panel cannot determine if the CPU or the CPU
rear transition card has failed, so you must replace both cards when one of them
fails. Go to “Removing a CPU Rear Transition Card” on page 10-27 for those
instructions.
10-22
Netra ct Server Service Manual • February 2001
10.2.1.2
Replacing the CPU Card
1. Attach a wrist strap to your wrist and to a bare metal area on the system.
2. Replace the CPU rear transition card, if you have not done so already.
You must replace the CPU rear transition card before you can replace the CPU card.
Go to “Replacing a CPU Rear Transition Card” on page 10-29 for those instructions,
and then return here.
3. Reinstall any optional memory cards onto the replacement CPU card, if necessary.
4. If you wanted to preserve the host ID on your CPU card, install the host ID board
from the failed CPU card onto the replacement CPU card (FIGURE 10-3 on
page 10-5).
Note – The J3401 jumper shown in FIGURE 10-3 is only a mechanical stabilizer for the
host ID board. It does not contain any signals.
5. Keeping the CPU card vertical, slide the card into the slot between the two guides.
The teeth in the handle of the card must align with the square cutouts in the I/O
slot. When the card is completely seated in the card cage, the two ejection levers
should flip inward, and the teeth in the ejection levers should fit smoothly in the
rectangular cutouts in the bottom and top plates. FIGURE 10-4 shows how to insert an
I/O card into a slot; the same principal applies to a CPU card.
Chapter 10
Removing and Replacing Cold-Swappable Cards
10-23
Comp
act
ETHE
PC TM
I
RN
CO
STAT
ET
M
US
ALAR
RE
RE
HD
D1
M
AD
Y
HD
D0
SET
AB
OR
T
HD
D0
micros
ystem
s
FIGURE 10-16
Aligning the Card with the Card Cage Cutouts
6. Using a No. 2 Phillips screwdriver, tighten the two captive screws inside the card’s
ejection levers, one on top and one on the bottom.
10-24
Netra ct Server Service Manual • February 2001
FIGURE 10-17
Tightening the Ejection Lever Captive Screws
7. Make the necessary cable connections to the CPU card, if necessary.
FIGURE 10-6 shows the connectors on the CPU card. Note that the only cables that
should be connected to the CPU card would be a cable connected to the COM port
(TTY A) for the front-access model of the Netra ct 400 server and the ethernet cable
connected to the ethernet A port.
Chapter 10
Removing and Replacing Cold-Swappable Cards
10-25
Ethernet port
COM port
Com
pact
ETH
ER
CO
STA
PC TM
I
NE
M
TUS
ALA
RE
RE
FIGURE 10-18
mic
RM
AD
Y
SET
AB
CP
T
OR
ros
1500
yste
T
ms
-360
Connectors on the CPU Card
8. Power on the server.
Refer to “Powering On the Server” on page 2-1 for those instructions.
9. Verify that the CPU card LEDs are lit properly.
The green Power LED ( ) for the CPU will blink for a moment while the CPU is
going through POST, then the green Power LED ( ) should go ON, which means
the CPU card is functioning properly.
10.2.2
CPU Rear Transition Card
This section tells how to remove and replace a CPU rear transition card. This card is
present only in the rear-access model of the Netra ct server.
10-26
Netra ct Server Service Manual • February 2001
Note – The procedures in this section apply only to the rear-access model of the
Netra ct server; the procedures in this section do not apply to a front-access model of
the Netra ct server.
10.2.2.1
Removing a CPU Rear Transition Card
1. Power off the server.
Refer to “Powering Off the Server” on page 2-6 for those instructions.
2. Attach the antistatic wrist strap.
Refer to “Attaching the Antistatic Wrist Strap” on page 1-1.
3. Go to the front of the system and remove the CPU card, if you have not done so
already.
Because the CPU LED on the system status panel cannot determine if the CPU or the
CPU rear transition card has failed, you must replace both cards when one of them
fails. Refer to “Removing a CPU Card” on page 10-19 to remove the CPU card, then
return here.
4. Go to the rear of the system and locate the CPU rear transition card.
FIGURE 10-19 shows the location of the CPU rear transition card on the Netra ct 800
server, and FIGURE 10-20 shows the location of the CPU rear transition card on the
Netra ct 400 server.
Chapter 10
Removing and Replacing Cold-Swappable Cards
10-27
Midplane
Front of
chassis
Rear of
chassis
Hard disk drives
Slot 1
CPU card
CPU RTC
Slot 1
Slot 2
Front I/O card
I/O RTC
Slot 2
Slot 3
Front I/O card
I/O RTC
Slot 3
Slot 4
Front I/O card
I/O RTC
Slot 4
Slot 5
Front I/O card
I/O RTC
Slot 5
Slot 6
Front I/O card
I/O RTC
Slot 6
Slot 7
Front I/O card
I/O RTC
Slot 7
Slot 8
Alarm card
Alarm RTC
Slot 8
FIGURE 10-19
Locating the CPU Rear Transition Card in the Rear-Access Model of a
Netra ct 800 Server (Top View)
Front of
chassis
Midplane
Double-wide 3U
alarm card
Rear of
chassis
Hard disk drive
CPU card (slot 3)
CPU RTC
I/O card (slot 4)
I/O RTC
I/O card (slot 5)
I/O RTC
Cables
FIGURE 10-20
Locating the CPU Rear Transition Card in the Rear-Access Model of a
Netra ct 400 Server (Top View)
5. Unplug any cables attached to the CPU rear transition card.
6. Using a No. 2 Phillips screwdriver, loosen the two captive screws inside the card’s
ejection levers, one on top and one on the bottom (FIGURE 10-2 on page 10-4).
7. Press out on the ejection levers to unseat the card.
8. Slide the card out of the slot and place it on the electrostatic discharge mat.
10-28
Netra ct Server Service Manual • February 2001
10.2.2.2
Replacing a CPU Rear Transition Card
1. Attach the antistatic wrist strap.
Refer to “Attaching the Antistatic Wrist Strap” on page 1-1.
2. Get the replacement CPU rear transition card from the ship kit.
3. Keeping the CPU rear transition card vertical, slide the card into the slot in
between the two guides (FIGURE 10-4).
The teeth in the handle of the card must align with the square cutouts in the I/O
slot. When the card is completely seated in the card cage, the two ejection levers
should flip inward, and the teeth in the ejection levers should fit smoothly in the
rectangular cutouts in the bottom and top plates. FIGURE 10-4 on page 10-7 shows
how to insert an I/O card into a slot; the same principal applies to a CPU rear
transition card.
FIGURE 10-21
Aligning the Card with the Rear Card Cage Cutouts
Chapter 10
Removing and Replacing Cold-Swappable Cards
10-29
4. Using a No. 2 Phillips screwdriver, tighten the two captive screws inside the card’s
ejection levers, one on top and one on the bottom (FIGURE 10-5 on page 10-8).
5. Make the necessary cable connections to the CPU rear transition card.
FIGURE 10-22 shows the connectors on the CPU rear transition card for the Netra ct
800 server and FIGURE 10-23 shows the connectors on the CPU rear transition card for
the Netra ct 400 server.
Parallel
TTY A
TTY B
Ethernet A
Ethernet B
SCSI
FIGURE 10-22
10-30
Connectors on the CPU Rear Transition Card (Netra ct 800 Server)
Netra ct Server Service Manual • February 2001
Parallel
TTY A
TTY B
Ethernet A
Ethernet B
SCSI
FIGURE 10-23
Connectors on the CPU Rear Transition Card (Netra ct 400 Server)
6. After you have replaced the CPU rear transition card, get the replacement CPU
card from the ship kit.
7. Go to the front of the server and install the replacement CPU card.
Refer to “Replacing the CPU Card” on page 10-23 for those instructions, then return
here.
8. Power on the server.
Refer to “Powering On the Server” on page 2-1 for those instructions.
9. Verify that the CPU LEDs are lit properly.
The CPU LEDs will give you diagnostic information on both the CPU and the CPU
rear transition card.
The green Power LED ( ) for the CPU and CPU rear transition cards will blink for
a moment while the CPU is going through POST, then the green Power LED ( )
should go ON, which means the CPU and CPU rear transition cards are functioning
properly.
Chapter 10
Removing and Replacing Cold-Swappable Cards
10-31
10-32
Netra ct Server Service Manual • February 2001
CHAPTER
11
Removing and Replacing
Cold-Swappable Subassemblies
This chapter specifies procedures for the initial installation, removal, and
replacement of cold-swappable Netra ct server subassemblies. It is divided into the
following sections:
■
■
■
■
■
■
“Hard Disk Drive” on page 11-1
“Disk Adapter Module (Netra ct 400 Server Only)” on page 11-5
“SCSI Termination Board (Netra ct 800 Server Only)” on page 11-7
“Power Distribution Unit” on page 11-8
“Front-Access Cable (Front-Access Models Only)” on page 11-16
“Power Supply Unit” on page 11-19
Consult the Netra ct Server Safety and Compliance Manual for safety information prior
to performing the procedures in this chapter.
Note – Read Chapter 3 “Handling Cards and Assemblies” before performing the
procedures in this chapter.
11.1
Hard Disk Drive
This section tells you how to remove and replace an internal hard disk drive. An
internal hard disk drive is one that fits in a bay within a server. It is distinguished
from an external hard disk drive, which is attached by a cable that connects to an
I/O card in the server.
Though the Netra ct 400 server has one disk bay and the Netra ct 800 server has two,
the procedures for removal and replacement of a disk are the same for both types of
servers.
11-1
A hard disk drive is a cold-swappable component if it is being used by the server.
For example, if a hard disk drive is being used as the primary boot drive, then that
hard disk drive is a cold-swappable component unless disk management software is
used to mirror the boot drive to a second hard disk drive installed in the server. For
that reason, a hard disk drive in a Netra ct 400 server is a cold-swappable disk drive,
unless it is running on the Solaris operating environment over the network and not
off of the hard disk drive, in which case it becomes a hot-swappable component.
Instructions for removing and replacing a cold-swappable hard disk drive are
covered here; instructions for removing and replacing a hot-swappable hard disk
drive are covered in “Hard Disk Drive” on page 7-1.
11.1.1
Removing a Hard Disk Drive
Note – The instructions in this section do not cover unconfiguration procedures that
might be necessary if you are removing a hard disk drive that is under the control of
any disk management software, such as Volume Manager or Solstice DiskSuite. If
you are running disk management software on your system, refer to the
documentation that came with the disk management software for instructions on
releasing a hard disk drive from the control of the software before proceeding with
these instructions.
1. Complete the power off steps.
Refer to “Powering Off the Server” on page 2-6 for those instructions.
2. Attach the antistatic wrist strap.
Refer to “Attaching the Antistatic Wrist Strap” on page 1-1.
3. Locate the drive bay cover on your system.
The hard disk drives will be behind the drive bay cover on your system. There
would be a maximum of two hard disk drives behind the drive bay cover in a
Netra ct 800 server and one behind the drive bay cover in a Netra ct 400 server.
11-2
Netra ct Server Service Manual • February 2001
Drive bay cover, Netra ct 800 server
Drive bay cover, Netra ct 400 server
Comp
act
ETHE
PC TM
I
RN
CO
STAT
ET
M
US
ALAR
RE
RE
Comp
M
AD
Y
HD
D0
act
ETHE
PC TM
I
RN
ET
SET
AB
OR
T
CO
M
HD
D0
STAT
US
micro
system
s
ALAR
RE
RE
M
AD
Y
SET
AB
OR
T
micro
system
s
FIGURE 11-1
Drive Bay Cover Locations
4. Loosen the captive screws that hold the drive bay cover in place.
■
For the Netra ct 800 server, use a No. 1 Phillips screwdriver to loosen the four
captive screws (two on top and two on the bottom).
■
For the Netra ct 400 server, use a No. 2 Phillips screwdriver to loosen the one
captive screw on top.
5. Remove the drive bay cover.
6. Determine which disk drive you want to remove.
7. Unlatch the disk drive handle to release it.
Push down in the direction of the arrow to release the bracket handle latch.
8. Pull the bracket handle out and swing it open.
Chapter 11
Removing and Replacing Cold-Swappable Subassemblies
11-3
9. Continue to pivot the disk drive bracket handle against the chassis, applying mild
pressure until the drive disconnects.
10. Slide the drive out of the chassis and place it on the electrostatic discharge mat.
11. Secure the drive bay cover over the drive bays (FIGURE 11-1 on page 11-3).
You must install the drive bay cover over the drive bays to ensure proper airflow in
the system.
11.1.2
Replacing a Hard Disk Drive
1. Attach the antistatic wrist strap.
Refer to “Attaching the Antistatic Wrist Strap” on page 1-1.
2. Remove the drive bay cover (FIGURE 11-1 on page 11-3).
3. Hold the bracket handle on the disk drive open.
4. Slide the replacement disk drive into the drive slot.
5. Gently push the drive until the locking handle engages.
6. Close the locking handle completely, using gentle downward pressure.
7. Replace the drive bay cover.
8. Complete the power on steps.
Refer to “Powering On the Server” on page 2-1 for more information.
9. If you are replacing your boot disk, reinstall the Solaris operating environment.
Refer to the Netra ct Server Installation Guide for more information.
10. If your hard disk(s) are under the control of RAID software, perform the
necessary steps to bring the disks online.
11-4
Netra ct Server Service Manual • February 2001
11.2
Disk Adapter Module (Netra ct 400
Server Only)
This section describes how to remove and replace the disk adapter module in the
Netra ct 400 server. There is no field-replaceable disk adapter module in the Netra ct
800 server.
11.2.1
Removing a Disk Adapter Module
1. Remove the Netra ct 400 server from the chassis.
Refer to “Removing a Server” on page 9-1 for those instructions.
2. Remove the hard disk drive from the drive bay.
Refer to “Removing a Hard Disk Drive” on page 11-2 for those instructions.
3. Remove the two screws at the top of the disk adapter module that secure the
module to the server.
4. Pull the disk adapter module out of the Netra ct 400 server (FIGURE 11-2).
Disk adapter module
Hard disk drive
FIGURE 11-2
Removing the Disk Adapter Module
5. Facing the left side of the Netra ct 400 server, outside the server, remove the three
screws that secure the disk adapter module holder to the server (FIGURE 11-3).
Chapter 11
Removing and Replacing Cold-Swappable Subassemblies
11-5
FIGURE 11-3
Removing the Disk Adapter Module Holder
6. Remove the disk adapter module holder from the Netra ct 400 server.
11.2.2
Replacing a Disk Adapter Module
1. Insert the disk adapter module holder into the Netra ct 400 server, facing up.
2. Facing the left outside of the server, use the three screws to secure the disk
adapter module holder to the server (FIGURE 11-3).
3. Insert the disk adapter module, with the connector facing the left rear side of the
server (FIGURE 11-2).
4. Secure the disk adapter module to the server using the two screws at the top of
the disk adapter module.
11-6
Netra ct Server Service Manual • February 2001
5. Reinsert the hard disk drive in the drive bay.
Refer to “Replacing a Hard Disk Drive” on page 11-4 for those instructions.
11.3
SCSI Termination Board (Netra ct 800
Server Only)
This section describes you how to remove and replace a SCSI termination board
from the Netra ct 800 server.
11.3.1
Removing a SCSI Termination Board
1. Complete the power off steps.
Refer to “Powering Off the Server” on page 2-6 for those instructions.
2. Attach the antistatic wrist strap.
Refer to “Attaching the Antistatic Wrist Strap” on page 1-1.
3. Locate the SCSI termination board.
The SCSI termination board is located directly below the removeable media module.
SCSI termination board
FIGURE 11-4
Locating the SCSI Termination Board
Chapter 11
Removing and Replacing Cold-Swappable Subassemblies
11-7
4. Loosen the silver screw that holds the SCSI termination board in place.
5. Remove the SCSI termination board from the server.
11.3.2
Replacing a SCSI Termination Board
1. Attach the antistatic wrist strap.
Refer to “Attaching the Antistatic Wrist Strap” on page 1-1.
2. Insert the SCSI termination board into the slot beneath the removeable media
module.
3. Tighten the silver screw to secure the SCSI termination board to the server.
4. Complete the power on steps.
Refer to “Powering On the Server” on page 2-1 for more information.
11.4
Power Distribution Unit
This section tells you how to remove and replace a power distribution unit in a
chassis. Keep in mind that you must remove the server in front of the failed power
distribution unit in order to gain access to that power distribution unit; however,
you do not have to remove any other servers except for the one directly in front of
the failed power distribution unit. The power distribution unit connects directly into
the midplane and is located on the chassis, not the server (FIGURE 11-5).
11-8
Netra ct Server Service Manual • February 2001
Power distribution units
Power supply units
FIGURE 11-5
Locating the Power Distribution Units
Chapter 11
Removing and Replacing Cold-Swappable Subassemblies
11-9
11.4.1
Removing the Power Distribution Unit
1. Go to the front of the system and use the system status panel on the server to
determine which power distribution unit has failed.
The system status panel on each server has power distribution unit LED(s) that
shows the status of the power distribution unit(s) behind that particular server.
FIGURE 11-6 shows the locations of the power distribution unit LEDs on the Netra ct
800 server and FIGURE 11-7 shows the location of the power distribution unit LEDs on
the Netra ct 400 server.
Power distribution unit LEDs
FIGURE 11-6
Locating the Power Distribution Unit LEDs on the System Status Panel
(Netra ct 800 Server)
Power distribution unit LEDs
FIGURE 11-7
11-10
Locating the Power Distribution Unit LEDs on the System Status Panel
(Netra ct 400 Server)
Netra ct Server Service Manual • February 2001
A power distribution unit may have failed if a power supply is inserted, the locking
mechanism is in the locked (
) position, and the green Power LED ( ) for the
PDU is OFF.
Note – Verify the DC input power cable is plugged into the PDU before replacing
the PDU. If the DC input power cable is unplugged, plug it in and check the PDU
LEDs on the system status panel again.
2. Disconnect the DC input power cable(s) from the DC connector(s) that are
supplying power to the server with the failed power distribution unit.
FIGURE 11-8 shows how to disconnect the DC input power cables from the DC
connectors on the rear-access model and FIGURE 11-9 shows how to disconnect the
DC input power cables from the DC connectors on the front-access model.
Caution – An energy hazard is present if you do not unplug the DC input power
cable from the DC connector that supplies power to the power distribution unit that
you are replacing.
Chapter 11
Removing and Replacing Cold-Swappable Subassemblies
11-11
FIGURE 11-8
11-12
Unplugging the DC Input Power Cable From the DC Connector, Rear-Access
Model
Netra ct Server Service Manual • February 2001
Com
pac
ETH
tPC TM
I
ERN
CO
STA
ET
M
TUS
ALA
RM
REA
RES
AB
DY
HD
D0
ET
OR
T
HD
D0
micros
ystems
FIGURE 11-9
Unplugging the DC Input Power Cable From the DC Connector, Front-Access
Model
3. Perform all the necessary procedures to remove the server in front of the failed
power distribution unit, including all software power-off procedures.
You must completely remove the server directly in front of the failed power
distribution unit in order to gain access to that power distribution unit. Follow the
instructions in “Removing a Server” on page 9-1 to safely remove the server.
4. Locate the power distribution unit that you want to replace.
FIGURE 11-10 shows the location of the power distribution units looking at an empty
chassis from the front.
Chapter 11
Removing and Replacing Cold-Swappable Subassemblies
11-13
Power distribution units
FIGURE 11-10
Locating the Power Distribution Units
5. For front-access models, carefully reach into the chassis from the front and unplug
the front-access cable connected to the top of the power distribution unit inside
the chassis.
6. Carefully reach into the chassis from the front and unscrew the two captive screws
that secure the power distribution unit to the chassis (FIGURE 11-11).
11-14
Netra ct Server Service Manual • February 2001
FIGURE 11-11
Removing the Power Distribution Unit
7. Remove the power distribution unit from the chassis.
11.4.2
Replacing the Power Distribution Unit
1. Insert the power distribution unit into the slot in the chassis.
2. Tighten the two captive screws to secure the power distribution unit to the chassis
(FIGURE 11-11).
3. Plug the DC input power cable(s) into the appropriate DC connector(s).
FIGURE 11-8 on page 11-12 shows how to plug the DC input power cables into the DC
connectors on the rear-access model and FIGURE 11-9 on page 11-13 shows how to
plug the DC input power cables into the DC connectors on the front-access model.
4. Perform all the necessary procedures to reinsert the server that you removed to
access the failed power distribution unit, including all system power-up
procedures.
Refer to “Replacing a Server” on page 9-9 for those instructions.
5. Once the system is powered up, go to the system status panel and verify that the
power distribution unit LEDs are in the appropriate states.
Chapter 11
Removing and Replacing Cold-Swappable Subassemblies
11-15
FIGURE 11-6 shows the locations of the power distribution unit LEDs on the Netra ct
800 server and FIGURE 11-7 shows the locations of the power distribution unit LEDs
on the Netra ct 400 server. A power distribution unit is functioning properly if a
power supply is inserted and the green Power LED ( ) for the PDU is ON.
11.5
Front-Access Cable (Front-Access
Models Only)
The front-access cable is used to connect the power distribution unit to the power
connector at the front of the front-access models of the Netra ct 800 server and the
Netra ct 400 server.
11.5.1
Removing the Front-Access Cable
1. Perform all the necessary procedures to remove the server directly in front of the
failed front-access cable, including all software power-off procedures.
You must completely remove the server directly in front of the failed front-access
cable in order to gain access to that cable. Follow the instructions in “Removing a
Server” on page 9-1 to safely remove the server.
2. Unplug the DC input power cable from the DC connector at the front of the
chassis (FIGURE 11-12).
11-16
Netra ct Server Service Manual • February 2001
Com
pac
ETH
tPC TM
I
ER
CO
STA
NE
T
M
TUS
ALAR
RE
RE
M
AD
Y
HD
D0
SET
AB
OR
T
HD
D0
micros
ystem
s
FIGURE 11-12
Unplugging the DC Input Power Cable From the DC Connector,
Front-Access Model
Caution – An energy hazard is present if you do not unplug the DC input power
cable from the DC connector.
3. At the front of the chassis, loosen the two captive screws that secure the
front-access cable to the chassis.
Chapter 11
Removing and Replacing Cold-Swappable Subassemblies
11-17
Captive screws
Comp
act
ETHE
PC TM
I
RN
CO
STAT
ET
M
US
ALAR
RE
RE
M
AD
Y
HD
D0
SET
AB
OR
T
HD
D0
micros
ystem
s
FIGURE 11-13
Loosening the Front-Access Cable Screws
4. Reach into the chassis and gently pull the front-access cable free from the front of
the chassis.
5. Carefully reach into the chassis from the front and unplug the front access cable
connected to the top of the power distribution unit inside the chassis.
6. Unhook the front-access cable from the cable clips along the top inside the
chassis.
11-18
Netra ct Server Service Manual • February 2001
11.5.2
Replacing a Front-Access Cable
1. Carefully reach into the chassis from the front and plug one end of the front
access cable to the top of the power distribution unit inside the chassis.
2. Insert the other end of the front-access cable through the holes at the top of the
chassis (FIGURE 11-13).
3. Tighten the two captive screws to secure the cable to the chassis (FIGURE 11-13).
4. Hook the front-access cable to the cable clips along the top inside of the chassis.
5. Connect the DC input power cable to the DC connectors at the front of the chassis
(FIGURE 11-12).
6. Perform all the necessary procedures to reinsert the server that you removed to
access the failed front-access cable, including all system power-up procedures.
Refer to “Replacing a Server” on page 9-9 for those instructions.
11.6
Power Supply Unit
This section describes how to remove and replace a cold-swappable power supply
unit. A cold-swappable power supply unit would be either a single remaining power
supply unit in the Netra ct 800 server or the only power supply unit in the Netra ct
400 server.
Note – If you are replacing one power supply unit in a Netra ct 800 server and the
second power supply unit is still up and running, you can replace the failed power
supply unit without powering off the server. Refer to Chapter 8 for more
information.
11.6.1
Removing a Cold-Swappable Power Supply Unit
1. Power off the server.
Refer to “Powering Off the Server” on page 2-6 for those instructions.
2. Attach the antistatic wrist strap.
Refer to “Attaching the Antistatic Wrist Strap” on page 1-1.
Chapter 11
Removing and Replacing Cold-Swappable Subassemblies
11-19
3. Push the purple locking mechanism up into the unlocked (
) position.
FIGURE 11-14 shows the location of the locking mechanism for the power supply unit
on a Netra ct 800 server, and FIGURE 11-15 shows the location of the locking
mechanism for the power supply unit on a Netra ct 400 server. The two LEDs on the
power supply unit should go OFF.
Power supply unit
captive screws (silver)
FIGURE 11-14
11-20
Locking mechanism
Removing or Replacing a Power Supply Unit From a Netra ct 800 Server
Netra ct Server Service Manual • February 2001
Power supply unit
captive screws (silver)
FIGURE 11-15
Locking mechanism
Removing or Replacing a Power Supply Unit From a Netra ct 400 Server
4. Using a No. 2 Phillips screwdriver, loosen the two silver captive screws at the base
of the system.
FIGURE 11-14 shows the location of the captive screws for the power supply unit on a
Netra ct 800 server, and FIGURE 11-15 shows the location of the captive screws for the
power supply unit on a Netra ct 400 server.
Note – Do not loosen the black captive screws at the base of the system; those screws
hold the server in place.
5. Grasp the handle on the power supply unit (FIGURE 11-16), slide it out of the server
and place it on the electrostatic discharge mat.
Chapter 11
Removing and Replacing Cold-Swappable Subassemblies
11-21
FIGURE 11-16
11.6.2
Removing a Power Supply Unit From a Netra ct 800 Server
Replacing a Cold-Swappable Power Supply Unit
1. Attach the antistatic wrist strap.
Refer to “Attaching the Antistatic Wrist Strap” on page 1-1.
2. Slide the power supply unit into the slot.
3. Using a No. 2 Phillips screwdriver, tighten the two black captive screws to secure
the power supply unit to the server.
FIGURE 11-14 shows the location of the captive screws for the power supply unit on a
Netra ct 800 server, and FIGURE 11-15 shows the location of the captive screws for the
power supply unit on a Netra ct 400 server.
4. Push the power supply unit locking mechanism(s) down into the locked (
position.
)
FIGURE 11-14 shows the location of the locking mechanisms for the power supply unit
on a Netra ct 800 server, and FIGURE 11-15 shows the location of the locking
mechanisms for the power supply unit on a Netra ct 400 server. The green LED on
11-22
Netra ct Server Service Manual • February 2001
the power supply unit should start flashing at this point, indicating that the power
supply unit is powered on and functioning properly, but the server has not been
powered on yet.
5. Power on the server.
Refer to “Powering On the Server” on page 2-1 for more information.
6. Verify that the power supply unit you just installed is functioning properly.
The green Power LED (
should boot.
Chapter 11
) on the power supply unit should go ON and the system
Removing and Replacing Cold-Swappable Subassemblies
11-23
11-24
Netra ct Server Service Manual • February 2001
PART
V
Illustrated Parts Breakdown
Illustrated Parts Breakdown
Chapter 12
Netra ct Server Service Manual
CHAPTER
12
Illustrated Parts Breakdown
This chapter contains the illustrated parts breakdown and the part numbers for each
field-replaceable unit (FRU) in the Netra ct server.
■
■
■
“Chassis Components” on page 12-2
“Netra ct 800 Server” on page 12-4
“Netra ct 400 Server” on page 12-6
12-1
12.1
Chassis Components
TABLE 12-1 lists the FRUs for the chassis.
TABLE 12-1
FRU
Part Number
Power distribution unit
#540-4397, X7177A
Front-access cable (front-access models
only)
#530-2895, X7186A
2
Alarm rear transition card, Netra ct 800
server (rear-access models only)
#501-5611, X7176A
3
CPU rear transition card (rear-access
models only)
#501-5609, X7169A
4
I/O rear transition cards (rear-access
models only)
Varies depending on the I/O card.
Contact your local Sun service
representative for more information.
1
12-2
FRUs for the Chassis
Netra ct Server Service Manual • February 2001
4
2
3
1
FIGURE 12-1
Illustrated Parts Breakdown, Chassis and Rear-Access Model Components
Chapter 12
Illustrated Parts Breakdown
12-3
12.2
Netra ct 800 Server
TABLE 12-2 lists the FRUs for the Netra ct 800 server.
TABLE 12-2
12-4
FRUs for the Netra ct 800 Server
FRU
Part Number
1
Hard disk drive cover panel
N/A
2
Hard disk drive
Varies depending on the hard disk drive.
Contact your local Sun service
representative for more information.
3
6U I/O cards
Varies depending on the I/O card.
Contact your local Sun service
representative for more information.
3
CPU card
#501-5389
3
CPU front transition card, Netra ct 800
server, front-access model
#501-5618
3
Alarm card, Netra ct 800 server
#501-5610, X7161A
4
Netra ct 800 server and midplane
#540-4799, X7179A
5
Main air filter, Netra ct 800 server
#370-4076, X7163A
6
System status panel, Netra ct 800 server
#540-4450, X7175A
7
System controller board
#501-5612, X7168A
8
Fan tray
#540-4394, X7166A
9
Removable media module
#540-4399, X7164A
10
Power supply
#300-1445, X7167A
11
Power supply air filter
X7182A
CPU shunt card, Netra ct 800 server,
front-access model
#501-5619
SCSI termination board
#501-5616
Netra ct Server Service Manual • February 2001
8
10
5
9
4
6
7
10
11
3
2
1
FIGURE 12-2
Illustrated Parts Breakdown, Netra ct 800 Server
Chapter 12
Illustrated Parts Breakdown
12-5
12.3
Netra ct 400 Server
TABLE 12-3 lists the FRUs for the Netra ct 400 server.
TABLE 12-3
12-6
FRUs for the Netra ct 400 Server
FRU
Part Number
1
Hard disk drive cover panel
N/A
2
Hard disk drive adapter bracket
#540-4398
3
Hard disk drive
Varies depending on the hard disk drive.
Contact your local Sun service
representative for more information.
4
6U I/O cards
Varies depending on the I/O card.
Contact your local Sun service
representative for more information.
4
CPU card
#501-5389
5
Netra ct 400 server and midplane
#540-4800, X7178A
6
Main air filter, Netra ct 400 server
#370-4080, X7162A
7
Alarm card, Netra ct 400 server
#540-4406, X7160A
8
System controller board
#501-5612, X7168A
9
System status panel, Netra ct 400 server
#540-4451, X7174A
10
Fan tray
#540-4394, X7166A
11
Power supply unit
#300-1445, X7167A
12
CPU front transition card, Netra ct 400
server
#501-5624, X7172A
13
Power supply air filter
X7182A
Netra ct Server Service Manual • February 2001
10
11
6
5
12
PW
R IN
4
PS
U1
FA
SC
M
1
1
HD
D
1
FT
M
2
HD
D1
3
FA
N2
N1
5
9
7
8
3
13
4
2
FIGURE 12-3
Illustrated Parts Breakdown, Netra ct 400 Server
Chapter 12
Illustrated Parts Breakdown
12-7
12-8
Netra ct Server Service Manual • February 2001
PART
VI Appendixes, Glossary, and Index
Connector Pinouts
Appendix A
Connecting a Terminal Console to the Server
Appendix B
Error Messages
Appendix C
System Specifications
Appendix D
Upgrading CPU Memory
Appendix E
Netra ct Server Service Manual
APPENDIX
A
Connector Pinouts
This appendix gives the connector pinouts for the following Netra ct server cards:
■
■
■
■
■
■
■
“CPU Card” on page A-2
“CPU Front Transition Card, Netra ct 800 Server” on page A-5
“CPU Front Transition Card, Netra ct 400 Server” on page A-12
“CPU Rear Transition Card” on page A-17
“Alarm Card, Netra ct 800 Server” on page A-25
“Alarm Card, Netra ct 400 Server” on page A-30
“Alarm Rear Transition Card, Netra ct 800 Server” on page A-35
A-1
A.1
CPU Card
FIGURE A-1 shows the locations of the connectors on the CPU card.
Ethernet A port
COM port
TTY A (DIN8)
Com
pact
ETH
ER
CO
STA
PC TM
I
NE
M
TUS
ALA
RE
RE
FIGURE A-1
A-2
mic
RM
AD
Y
SET
AB
CP
T
OR
ros
1500
yste
T
ms
-360
Connectors on the CPU Card
Netra ct Server Service Manual • February 2001
A.1.1
Ethernet Port
The twisted pair Ethernet connector is an RJ-45 connector. The controller
auto-negotiates to either 10BASE-T or 100 BASE-T.
1
8
FIGURE A-2
RJ-45 Ethernet Connector Diagram
TABLE A-1
Ethernet Connector Pinouts, CPU Card (J2301)
Pin No.
Description
1
TXD+
2
TXD-
3
RXD+
4
Not used
5
Not used
6
RXD-
7
Not used
8
Not used
Appendix A
Connector Pinouts
A-3
A.1.2
COM Port
This port is connected logically to serial port A. It is intended to be used only for
serial output to a terminal.
Caution – Serial port A is also connected through the rear cPCI connectors. No
mechanism is provided to disable simultaneous input from the front panel and the
rear cPCI connectors. Attempts to input data from both ports will place the board in
an unknown state.
G
DCD
H
NC
C
TXD
A
DTR
FIGURE A-3
A-4
F
RTS
D
GND
E
RXD
B
CTS
CPU Card Front Panel TTYA Diagram
Netra ct Server Service Manual • February 2001
A.2
CPU Front Transition Card, Netra ct 800
Server
FIGURE A-4 shows the locations of the connectors on the CPU front transition card
(CPU FTC) for the Netra ct 800 server.
Parallel
Ethernet B
Com
HD
D1
pact
ETH
ER
CO
STA
PC TM
I
NE
TTY B
M
ALA
RE
mic
RM
AD
Y
SET
AB
FIGURE A-4
TTY A
TUS
RE
CP
T
OR
ros
1500
yste
SCSI-3
T
ms
-360
Connectors on the CPU Front Transition Card (Netra ct 800 Server)
Appendix A
Connector Pinouts
A-5
A.2.1
Parallel Port
The parallel port on the CPU front transition card for the Netra ct 800 server is a
DB-25 female receptacle.
A-6
13
1
25
14
FIGURE A-5
Parallel Connector
TABLE A-2
Parallel Port Pinouts, CPU FTC for the Netra ct 800 Server
Pin No.
Signal
Pin No.
Signal
1
STB
14
AFD
2
PD0
15
ERR
3
PD1
16
INIT
4
PD2
17
SLIN
5
PD3
18
DGND
6
PD4
19
DGND
7
PD5
20
DGND
8
PD6
21
DGND
9
PD7
22
DGND
10
ACK
23
DGND
11
BUSY
24
DGND
12
PE
25
DGND
13
SLCT
Netra ct Server Service Manual • February 2001
A.2.2
Ethernet B Port
The Ethernet B port on the CPU FTC for the Netra ct 800 server is an RJ-45 connector
for 10/100.
1
8
FIGURE A-6
RJ-45 Ethernet Connector Diagram
TABLE A-3
Ethernet B Connector Pinouts, CPU FTC for the Netra ct 800 Server
Pin No.
Description
1
TXD+
2
TXD-
3
RXD+
4
Not used
5
Not used
6
RXD-
7
Not used
8
Not used
Appendix A
Connector Pinouts
A-7
A.2.3
TTY A
The TTY A port on the CPU FTC for the Netra ct 800 server is a DB-9 male
connector.
1
5
6
A-8
9
FIGURE A-7
TTY A Connector
TABLE A-4
TTY A Port Pinouts, CPU FTC for the Netra ct 800 Server
Pin No.
Signal Name
1
DCD
2
RXD
3
TXD
4
DTR
5
GND
6
DSR
7
RTS
8
CTS
9
RI
Netra ct Server Service Manual • February 2001
A.2.4
TTY B
The TTY B port on the CPU FTC for the Netra ct 800 server is a DB9 male connector.
1
5
6
9
FIGURE A-8
TTY B Connector
TABLE A-5
TTY B Port Pinouts, CPU FTC for Netra ct 800 Server
Pin No.
Signal Name
1
DCD
2
RXD
3
TXD
4
DTR
5
GND
6
DSR
7
RTS
8
CTS
9
RI
Appendix A
Connector Pinouts
A-9
A.2.5
SCSI-3
The SCSI port on the CPU FTC for the Netra ct 800 server is a 68-pin SCSI-3
AMPLIMITE connector.
34
68
A-10
1
35
FIGURE A-9
SCSI-3 Connector
TABLE A-6
SCSI Port Pinouts, CPU FTC for Netra ct 800 Server
Pin No.
Signal
Pin No.
Signal
1
GND
35
DATA 12
2
PRES_L
36
DATA 13
3
GND
37
DATA 14
4
GND
38
DATA 15
5
GND
39
PH_L
6
GND
40
DATA 0
7
GND
41
DATA 1
8
GND
42
DATA 2
9
GND
43
DATA 3
10
GND
44
DATA 4
11
GND
45
DATA 5
12
GND
46
DATA 6
13
GND
47
DATA 7
14
GND
48
PL_L
15
GND
49
PRES_L
16
GND
50
GND
17
TERM PWR
51
TERM PWR
18
TERM PWR
52
TERM PWR
19
GND
53
GND
Netra ct Server Service Manual • February 2001
TABLE A-6
SCSI Port Pinouts, CPU FTC for Netra ct 800 Server (Continued)
Pin No.
Signal
Pin No.
Signal
20
GND
54
GND
21
GND
55
ATN_L
22
GND
56
GND
23
GND
57
BSY_L
24
GND
58
ACK_L
25
GND
59
RST_L
26
GND
60
MSG_L
27
GND
61
DEL_L
28
GND
62
CD_L
29
GND
63
REQ_L
30
GND
64
IO_L
31
GND
65
DATA 8
32
GND
66
DATA 9
33
GND
67
DATA 10
34
GND
68
DATA 11
Appendix A
Connector Pinouts
A-11
A.3
CPU Front Transition Card, Netra ct 400
Server
FIGURE A-10 shows the locations of the connectors on the CPU front transition card
(CPU FTC) for the Netra ct 400 server.
SCSI
(VHDC)
Parallel
Ethernet B
TTY B
FIGURE A-10
A-12
Connectors on the CPU Front Transition Card (Netra ct 400 Server)
Netra ct Server Service Manual • February 2001
A.3.1
SCSI (VHDC)
The SCSI port on the CPU FTC for the Netra ct 400 server is a 68-pin CHAMP very
high-density connector (VHDC). Note that a VHDC-to-SCSI 3 cable is included with
the Netra ct server (part number 530-2454-01).
TABLE A-7
SCSI Port Pinouts, CPU FTC for the Netra ct 400 Server
Pin No.
Signal
Pin No.
Signal
Pin No.
Signal
1
GND
24
GND
47
DATA 7
2
PRES_L
25
GND
48
PL_L
3
GND
26
GND
49
PRES_L
4
GND
27
GND
50
GND
5
GND
28
GND
51
TERM PWR
6
GND
29
GND
52
TERM PWR
7
GND
30
GND
53
GND
8
GND
31
GND
54
GND
9
GND
32
GND
55
ATN_L
10
GND
33
GND
56
GND
11
GND
34
GND
57
BSY_L
12
GND
35
DATA 12
58
ACK_L
13
GND
36
DATA 13
59
RST_L
14
GND
37
DATA 14
60
MSG_L
15
GND
38
DATA 15
61
SEL_L
16
GND
39
PH_L
62
CD_L
17
TERM PWR
40
DATA 0
63
REQ_L
18
TERM PWR
41
DATA 1
64
IO_L
19
GND
42
DATA 2
65
DATA 8
20
GND
43
DATA 3
66
DATA 9
21
GND
44
DATA 4
67
DATA 10
22
GND
45
DATA 5
68
DATA 11
23
GND
46
DATA 6
Appendix A
Connector Pinouts
A-13
A.3.2
Parallel Port
The parallel port on the CPU FTC for the Netra ct 400 server is an AMPLIMITE
SLIMLINE female receptacle.
A-14
13
1
26
14
Top
FIGURE A-11
Parallel Connector
TABLE A-8
Parallel Port Pinouts, CPU FTC for the Netra ct 400 Server
Pin No.
Signal
Pin No.
Signal
1
STB
14
AFD
2
PD0
15
ERR
3
PD1
16
INIT
4
PD2
17
SLIN
5
PD3
18
DGND
6
PD4
19
DGND
7
PD5
20
DGND
8
PD6
21
DGND
9
PD7
22
DGND
10
ACK
23
DGND
11
BUSY
24
DGND
12
PE
25
DGND
13
SLCT
26
DGND
Netra ct Server Service Manual • February 2001
A.3.3
Ethernet B Port
The Ethernet B port on the CPU FTC for the Netra ct 400 server is an RJ-45 connector
for 10/100.
1
8
FIGURE A-12
RJ-45 Ethernet Connector Diagram
TABLE A-9
Ethernet B Connector Pinouts, CPU FTC for the Netra ct 400 Server
Pin No.
Description
1
TXD+
2
TXD-
3
RXD+
4
Not used
5
Not used
6
RXD-
7
Not used
8
Not used
Appendix A
Connector Pinouts
A-15
A.3.4
TTY B
The TTY B port on the CPU FTC for the Netra ct 400 server is a DB-9 male connector.
1
5
6
A-16
9
FIGURE A-13
TTY B Connector
TABLE A-10
TTY B Port Pinouts, CPU FTC for the Netra ct 400 Server
Pin No.
Signal Name
1
DCD
2
RXD
3
TXD
4
DTR
5
GND
6
DSR
7
RTS
8
CTS
9
RI
Netra ct Server Service Manual • February 2001
A.4
CPU Rear Transition Card
FIGURE A-14 shows the locations of the connectors on the CPU rear transition card
(CPU RTC) for the Netra ct 800 server and FIGURE A-15 shows the locations of the
connectors on the CPU RTC for the Netra ct 400 server. The CPU rear transition card
is the same for both the Netra ct 800 server and the Netra ct 400 server; only the
location in the rear card cage differs.
Parallel
TTY A
TTY B
Ethernet A
Ethernet B
SCSI
(VHDC)
FIGURE A-14
Connectors on the CPU Rear Transition Card (Netra ct 800 Server)
Appendix A
Connector Pinouts
A-17
Parallel
TTY A
TTY B
Ethernet A
Ethernet B
SCSI
(VHDC)
FIGURE A-15
A-18
Connectors on the CPU Rear Transition Card (Netra ct 400 Server)
Netra ct Server Service Manual • February 2001
A.4.1
Parallel Port
The parallel port on the CPU RTC is an AMPLIMITE SLIMLINE female DB-25
receptacle.
13
1
25
14
FIGURE A-16
Parallel Connector
TABLE A-11
Parallel Port Pinouts, CPU RTC
Pin No.
Signal
Pin No.
Signal
1
STB
14
AFD
2
PD0
15
ERR
3
PD1
16
INIT
4
PD2
17
SLIN
5
PD3
18
DGND
6
PD4
19
DGND
7
PD5
20
DGND
8
PD6
21
DGND
9
PD7
22
DGND
10
ACK
23
DGND
11
BUSY
24
DGND
12
PE
25
DGND
13
SLCT
Appendix A
Connector Pinouts
A-19
A.4.2
TTY A
The TTY A port on the CPU RTC is a DB-9 male connector.
1
5
6
A-20
9
FIGURE A-17
TTY A Connector
TABLE A-12
TTY A Port Pinouts, CPU RTC
Pin No.
Signal Name
1
DCD
2
RXD
3
TXD
4
DTR
5
GND
6
DSR
7
RTS
8
CTS
9
RI
Netra ct Server Service Manual • February 2001
A.4.3
TTY B
The TTY B port on the CPU RTC is a DB9 male connector.
1
5
6
9
FIGURE A-18
TTY B Connector
TABLE A-13
TTY B Port Pinouts, CPU RTC
Pin No.
Signal Name
1
DCD
2
RXD
3
TXD
4
DTR
5
GND
6
DSR
7
RTS
8
CTS
9
RI
Appendix A
Connector Pinouts
A-21
A.4.4
Ethernet A Port
The Ethernet A port on the CPU RTC is an RJ-45 connector for 10/100.
1
A-22
8
FIGURE A-19
RJ-45 Ethernet Connector Diagram
TABLE A-14
Ethernet Connector Pinouts, CPU RTC
Pin No.
Description
1
TXD+
2
TXD-
3
RXD+
4
Not used
5
Not used
6
RXD-
7
Not used
8
Not used
Netra ct Server Service Manual • February 2001
A.4.5
Ethernet B Port
The Ethernet B port on the CPU RTC is an RJ-45 connector for 10/100.
1
8
FIGURE A-20
RJ-45 Ethernet Connector Diagram
TABLE A-15
Ethernet Connector Pinouts, CPU RTC
Pin No.
Description
1
TXD+
2
TXD-
3
RXD+
4
Not used
5
Not used
6
RXD-
7
Not used
8
Not used
Appendix A
Connector Pinouts
A-23
A.4.6
SCSI (VHDC)
The SCSI port on the CPU RTC is a 68-pin CHAMP very high-density connector
(VHDC). Note that a VHDC-to-SCSI 3 cable is included with the Netra ct server
(part number 530-2454-01).
TABLE A-16
SCSI Port Pinouts, CPU RTC
Pin No.
Signal
Pin No.
Signal
Pin No.
Signal
1
GND
24
GND
47
DATA 7
2
PRES_L
25
GND
48
PL_L
3
GND
26
GND
49
PRES_L
4
GND
27
GND
50
GND
5
GND
28
GND
51
TERM PWR
6
GND
29
GND
52
TERM PWR
7
GND
30
GND
53
GND
8
GND
31
GND
54
GND
9
GND
32
GND
55
ATN_L
10
GND
33
GND
56
GND
11
GND
34
GND
57
BSY_L
12
GND
35
DATA 12
58
ACK_L
13
GND
36
DATA 13
59
RST_L
14
GND
37
DATA 14
60
MSG_L
15
GND
38
DATA 15
61
DEL_L
16
GND
39
PH_L
62
CD_L
17
TERM PWR
40
DATA 0
63
REQ_L
18
TERM PWR
41
DATA 1
64
IO_L
19
GND
42
DATA 2
65
DATA 8
20
GND
43
DATA 3
66
DATA 9
21
GND
44
DATA 4
67
DATA 10
22
GND
45
DATA 5
68
DATA 11
23
GND
46
DATA 6
A-24
Netra ct Server Service Manual • February 2001
A.5
Alarm Card, Netra ct 800 Server
FIGURE A-21 shows the locations of the connectors on the alarm card for the Netra ct
800 server.
HD
D1
Slot for PCMCIA card
Alarm (DB-15)
Ethernet
COM 1
COM 2
FIGURE A-21
Connector Ports in the Alarm Card in Netra ct 800 Server
Appendix A
Connector Pinouts
A-25
A.5.1
Alarm Port
I/O connections are available through the male DB-15 alarm port.
8
1
9
A-26
15
FIGURE A-22
Alarm Port
TABLE A-17
Alarm Port Pinouts, Alarm RTC for the Netra ct 800 Server
Pin No.
Signal
1
RESET0 +
2
RESET0 -
3
RESET1 +
4
RESET1 -
5
ALARM0_NO
6
ALARM0_NC
7
ALARM0_COM
8
ALARM1_NO
9
ALARM1_NC
10
ALARM1_COM
11
ALARM2_NO
12
ALARM2_NC
13
ALARM2_COM
14
ALARM3_NO
15
ALARM3_COM
Netra ct Server Service Manual • February 2001
A.5.2
Ethernet Port
The Ethernet port on the alarm card for the Netra ct 800 server is an RJ-45 connector
for 10BASE-T.
1
8
FIGURE A-23
RJ-45 Ethernet Connector Diagram
TABLE A-18
Ethernet Connector Pinouts, Alarm Card for the Netra ct 800 Server
Pin No.
Description
Pin No.
Description
1
TXD+
5
Not used
2
TXD-
6
RXD-
3
RXD+
7
Not used
4
Not used
8
Not used
Appendix A
Connector Pinouts
A-27
A.5.3
COM 1
The COM 1 port on the alarm card for the Netra ct 800 server is a DB-9 male
connector.
1
5
6
A-28
9
FIGURE A-24
COM 1 Connector
TABLE A-19
COM 1 Connector Pinouts, Alarm Card for the Netra ct 800 Server
Pin No.
Description
1
NC
2
RXD
3
TXD
4
NC
5
Isolated GND 1
6
NC
7
RTS
8
CTS
9
NC
Netra ct Server Service Manual • February 2001
A.5.4
COM 2
The COM 2 port on the alarm card for the Netra ct 800 server is a DB-9 male
connector.
1
5
6
9
FIGURE A-25
COM 2 Connector
TABLE A-20
COM 2 Connector Pinouts, Alarm Card for the Netra ct 800 Server
Pin No.
Description
1
DCD
2
RXD
3
TXD
4
DTR
5
Isolated GND 2
6
DSR
7
RTS
8
CTS
9
NC
Appendix A
Connector Pinouts
A-29
A.6
Alarm Card, Netra ct 400 Server
FIGURE A-26 shows the locations of the connectors on the alarm card for the Netra ct
400 server.
HD
D0
COM 2
COM 1
Slot for PCMCIA card
Alarm (DB-15)
Ethernet
FIGURE A-26
A-30
Connectors on the Alarm Card (Netra ct 400 Server)
Netra ct Server Service Manual • February 2001
A.6.1
COM 2
The COM 2 port on the alarm card for the Netra ct 400 server is an RJ-45 connector.
1
8
FIGURE A-27
RJ-45 COM Connector Diagram
TABLE A-21
COM 2 Connector Pinouts, Alarm Card for the Netra ct 400 Server
Pin No.
Description
1
RTS
2
DTR
3
TXD
4
Isolated GND 2
5
Isolated GND 2
6
RXD
7
DSR
8
CTS
Appendix A
Connector Pinouts
A-31
A.6.2
COM 1
The COM 1 port on the alarm card for the Netra ct 400 server is an RJ-45 connector.
1
A-32
8
FIGURE A-28
RJ-45 COM Connector Diagram
TABLE A-22
COM 1 Connector Pinouts, Alarm Card for the Netra ct 400 Server
Pin No.
Description
1
RTS
2
NC
3
TXD
4
Isolated GND 1
5
Isolated GND 1
6
RXD
7
NC
8
CTS
Netra ct Server Service Manual • February 2001
A.6.3
Alarm Port
I/O connections are available through the male DB-15 alarm port.
8
1
9
15
Alarm Port Pinouts, Alarm Card for the Netra ct 400 Server
TABLE A-23
Pin No.
Signal
1
RESET0 +
2
RESET0 -
3
RESET1 +
4
RESET1 -
5
ALARM0_NO
6
ALARM0_NC
7
ALARM0_COM
8
ALARM1_NO
9
ALARM1_NC
10
ALARM1_COM
11
ALARM2_NO
12
ALARM2_NC
13
ALARM2_COM
14
ALARM3_NO
15
ALARM3_COM
FIGURE A-29
Alarm Port
Appendix A
Connector Pinouts
A-33
A.6.4
Ethernet Port
The Ethernet port on the alarm card for the Netra ct 400 server is an RJ-45 connector
for 10BASE-T.
1
A-34
8
FIGURE A-30
RJ-45 Ethernet Connector Diagram
TABLE A-24
Ethernet Connector Pinouts, Alarm Card for Netra ct 400 Server
Pin No.
Description
1
TXD+
2
TXD-
3
RXD+
4
Not used
5
Not used
6
RXD-
7
Not used
8
Not used
Netra ct Server Service Manual • February 2001
A.7
Alarm Rear Transition Card, Netra ct 800
Server
FIGURE A-21 shows the locations of the connectors on the alarm rear transition card
(alarm RTC) for the Netra ct 800 server.
Ethernet
COM 2
COM 1
Alarm
FIGURE A-31
Connectors on the Alarm Rear Transition Card
Appendix A
Connector Pinouts
A-35
A.7.1
Ethernet Port
The Ethernet port on the alarm RTC for the Netra ct 800 server is an RJ-45 connector
for 10BASE-T.
1
A-36
8
FIGURE A-32
RJ45 Ethernet Connector Diagram
TABLE A-25
Ethernet Connector Pinout, Alarm RTC for the Netra ct 800 Server
Pin No.
Description
1
TXD+
2
TXD-
3
RXD+
4
Not used
5
Not used
6
RXD-
7
Not used
8
Not used
Netra ct Server Service Manual • February 2001
A.7.2
COM 2
The COM 2 port on the alarm RTC for the Netra ct 800 server is a DB-9 male
connector.
1
5
6
9
FIGURE A-33
COM 2 Connector
TABLE A-26
COM 2 Connector Pinouts, Alarm RTC for the Netra ct 800 Server
Pin No.
Description
1
DCD
2
RXD
3
TXD
4
DTR
5
Isolated GND 2
6
DSR
7
RTS
8
CTS
9
NC
Appendix A
Connector Pinouts
A-37
A.7.3
COM 1
The COM 1 port on the alarm RTC for the Netra ct 800 server is a DB-9 male
connector.
1
5
6
A-38
9
FIGURE A-34
COM 1 Connector
TABLE A-27
COM 1 Connector Pinouts, Alarm RTC for the Netra ct 800 Server
Pin No.
Description
1
NC
2
RXD
3
TXD
4
NC
5
Isolated GND 1
6
NC
7
RTS
8
CTS
9
NC
Netra ct Server Service Manual • February 2001
A.7.4
Alarm Port
I/O connections are available through the male DB-15 alarm port.
8
1
9
15
Alarm Port Pinouts, Alarm RTC for the Netra ct 800 Server
TABLE A-28
Pin No.
Signal
1
RESET0 +
2
RESET0 -
3
RESET1 +
4
RESET1 -
5
ALARM0_NO
6
ALARM0_NC
7
ALARM0_COM
8
ALARM1_NO
9
ALARM1_NC
10
ALARM1_COM
11
ALARM2_NO
12
ALARM2_NC
13
ALARM2_COM
14
ALARM3_NO
15
ALARM3_COM
FIGURE A-35
Alarm Port
Appendix A
Connector Pinouts
A-39
A-40
Netra ct Server Service Manual • February 2001
APPENDIX
B
Connecting a Terminal Console to
the Server
One way to power on and off your server is to log in to the server either remotely,
where you would log in to the Netra ct server as root through another server on the
network, or directly, where you would connect a terminal console directly to your
Netra ct server. A terminal console can be an ASCII terminal, workstation, or PC
laptop.
For a direct login, the connection you use varies depending on the Netra ct server
model you have, the type of terminal console you are using, and the card that you
are connecting to:
B.1
■
If you are using an ASCII terminal to power on and off the Netra ct server, go to
“To Use an ASCII Terminal” on page B-1.
■
If you are using a Solaris workstation to power on and off the Netra ct server, go
to “To Use a Solaris Workstation” on page B-3.
■
If you are using a PC laptop to power on and off the Netra ct server, go to “To
Use a PC Laptop” on page B-5.
To Use an ASCII Terminal
1. Get the appropriate cable(s) and adapter(s) and make the necessary connections.
You may need one or more cables and adapters in order to connect the ASCII
terminal to the server. The cables and adapters you need varies, depending on the
model server you have and the card that you are connecting to.
■
If you are connecting an ASCII terminal to a CPU or CPU transition card, use the
information in TABLE B-1 to make the necessary connections.
■
If you are connecting an ASCII terminal to an alarm card or alarm rear transition
card, use the information in TABLE B-2 to make the necessary connections.
B-1
TABLE B-1
Server
Type
Connecting an ASCII Terminal to a CPU or CPU Transition Card
Serial
Port on
Terminal
TTY A Port on Netra ct Server
Adapter
Cable
Adapter
Netra ct
800 server
• Front-access model: DB-9 male on
the CPU front transition card. See
“CPU Front Transition Card, Netra ct
800 Server” on page A-5.
• Rear-access model: DB-9 male on
the CPU rear transition card. See
“CPU Rear Transition Card” on
page A-17.
Not
needed.
DB-9 female-to-DB25 male straightthrough
DB-25
female-to-DB25 female
gender
changer
DB-25
male
Netra ct
400 server
• Front-access model: DIN-8 female
on the CPU card. See “CPU Card” on
page A-2.
• Rear-access model: DB-9 male on
the CPU rear transition card. See
“CPU Rear Transition Card” on
page A-17.
Not
needed.
• Front-access model:
DIN-8 male-to-DB-25
male
• Rear-access model:
DB-9 female-to-DB25 male straightthrough
DB-25
female-to-DB25 female
gender
changer
DB-25
male
TABLE B-2
Server
Type
Connecting an ASCII Terminal to an Alarm or Alarm Rear Transition Card
Serial
Port on
Terminal
COM 1 Port on Netra ct Server
Adapter
Cable
Adapter
Netra ct
800 server
• Front-access model: DB-9 male on the
alarm card. See “Alarm Card, Netra ct
800 Server” on page A-25.
• Rear-access model: DB-9 male on the
alarm rear transition card. See “Alarm
Rear Transition Card, Netra ct 800
Server” on page A-35.
Not
needed.
DB-9 female-toDB-25 male
straightthrough
DB-25 femaleto-DB-25
female gender
changer
DB-25
male
Netra ct
400 server
• Front-access model: RJ-45 on the
alarm card. See “Alarm Card, Netra ct
400 Server” on page A-30.
• Rear-access model: Not available.
RJ-45-toDB-9
male
DB-9 female-toDB-25 male
straightthrough
DB-25 femaleto-DB-25
female gender
changer
DB-25
male
2. Access the “Set Up Menu” of the ASCII terminal and bring up the Serial
Communications section.
B-2
Netra ct Server Service Manual • February 2001
3. Set up the serial port communications parameters.
The default settings should match the values reported on the host serial port.
■
■
■
■
■
Hardwired modem connection
No parity
9600 baud
1 stop bit
8 bit data
4. Test the connection.
Verify that communication has been established to the server and the
keyboard/display of the ASCII terminal.
B.2
To Use a Solaris Workstation
1. Get the appropriate cable(s) and adapter(s) and make the necessary connections.
You may need one or more cables and adapters in order to connect a Solaris
workstation to the server. The cables and adapters you need varies, depending on
the model server you have and the card that you are connecting to.
■
If you are connecting a Solaris workstation to a CPU or CPU transition card, use
the information in TABLE B-3 to make the necessary connections.
■
If you are connecting a Solaris workstation to an alarm card or alarm rear transition
card, use the information in TABLE B-4 to make the necessary connections.
Appendix B
Connecting a Terminal Console to the Server
B-3
TABLE B-3
Server
Type
Connecting a Solaris Workstation to a CPU or CPU Transition Card
TTY A Port on Netra ct Server
Adapter
Cable
Adapter
Serial Port on
Workstation
Netra ct
800 server
• Front-access model: DB-9 male on
the CPU front transition card. See
“CPU Front Transition Card, Netra ct
800 Server” on page A-5.
• Rear-access model: DB-9 male on the
CPU rear transition card. See “CPU
Rear Transition Card” on page A-17.
Not
needed.
DB-9 female-to-DB25 male null modem
Not
needed.
DB-25
female
Netra ct
400 server
• Front-access model: DIN-8 female on
the CPU card. See “CPU Card” on
page A-2.
• Rear-access model: DB-9 male on the
CPU rear transition card. See “CPU
Rear Transition Card” on page A-17.
Not
needed.
• Front-access model:
DIN-8 male-to-DB-25
male
• Rear-access model:
DB-9 female-to-DB25 male null modem
Not
needed.
DB-25
female
TABLE B-4
Server
Type
Connecting a Solaris Workstation to an Alarm or Alarm Rear Transition Card
COM 1 Port on Netra ct Server
Adapter
Cable
Adapter
Serial Port on
Workstation
Netra ct
800 server
• Front-access model: DB-9 male on the
alarm card. See “Alarm Card, Netra ct
800 Server” on page A-25.
• Rear-access model: DB-9 male on the
alarm rear transition card. See “Alarm
Rear Transition Card, Netra ct 800
Server” on page A-35.
Not
needed.
DB-9 female-toDB-25 male
null modem
Not
needed.
DB-25
female
Netra ct
400 server
• Front-access model: RJ-45 on the alarm
card. See “Alarm Card, Netra ct 400
Server” on page A-30.
• Rear-access model: Not available.
RJ-45-toDB-9
male
DB-9 female-toDB-25 male
null modem
Not
needed.
DB-25
female
2. Check the /etc/remote file for the appropriate line.
To connect to the TTY A or COM 1 port on the workstation, check for this line:
tip -9600 /dev/ttya
B-4
Netra ct Server Service Manual • February 2001
3. Type tip hardwire at the prompt.
You should see the word connected as the response.
To disconnect the tip window, type ~. (tilde period) at the prompt.
B.3
To Use a PC Laptop
1. Get the appropriate cable(s) and adapter(s) and make the necessary connections.
You may need one or more cables and adapters in order to connect a PC laptop to
the server. The cables and adapters you need varies, depending on the model server
you have and the card that you are connecting to.
■
If you are connecting a PC laptop to a CPU or CPU transition card, use the
information in TABLE B-5 to make the necessary connections.
■
If you are connecting a PC laptop to an alarm card or alarm rear transition card, use
the information in TABLE B-6 to make the necessary connections.
TABLE B-5
Server
Type
Connecting a PC Laptop to a CPU or CPU Transition Card
Serial
Port on
PC
Laptop
TTY A Port on Netra ct Server
Adapter
Cable
Adapter
Netra c
t 800
server
• Front-access model: DB-9 male
on the CPU front transition
card. See “CPU Front Transition
Card, Netra ct 800 Server” on
page A-5.
• Rear-access model: DB-9 male
on the CPU rear transition card.
See “CPU Rear Transition
Card” on page A-17.
Not
needed.
DB-9 female-to-DB-9
female null modem
Not needed.
DB-9
male
Netra c
t 400
server
• Front-access model: DIN-8
female on the CPU card. See
“CPU Card” on page A-2.
• Rear-access model: DB-9 male
on the CPU rear transition card.
See “CPU Rear Transition
Card” on page A-17.
Not
needed.
• Front-access model:
DIN-8 male-to-DB25 male
• Rear-access model:
DB-9 female-to-DB-9
female null modem
• Front-access model:
DB-25 female-to-DB-9
female
• Rear-access model:
Adapter not needed.
DB-9
male
Appendix B
Connecting a Terminal Console to the Server
B-5
TABLE B-6
Connecting a PC Laptop to an Alarm or Alarm Rear Transition Card
COM 1 Port on Netra ct Server
Adapter
Cable
Adapter
Serial Port
on PC
Laptop
Netra ct
800 server
• Front-access model: DB-9 male on the alarm
card. See “Alarm Card, Netra ct 800 Server” on
page A-25.
• Rear-access model: DB-9 male on the alarm
rear transition card. See “Alarm Rear
Transition Card, Netra ct 800 Server” on
page A-35.
Not
needed.
DB-9 female-toDB-9 female
null modem
Not
needed.
DB-9
male
Netra ct
400 server
• Front-access model: RJ-45 on the alarm card.
See “Alarm Card, Netra ct 400 Server” on
page A-30.
• Rear-access model: Not available.
RJ-45to-DB-9
male
DB-9 female-toDB-9 female
null modem
Not
needed.
DB-9
male
Server
Type
2. Set the following connection parameters:
■
■
■
■
B-6
No parity
9600 baud
1 stop bit
8 bit data
Netra ct Server Service Manual • February 2001
APPENDIX
C
Error Messages
This appendix gives several error messages that you might see while operating or
servicing your Netra ct server, their meanings, and the actions necessary for each.
All error messages in this appendix are written to the /var/adm/messages file on
your system.
scsb Error Messages
Alarm and Slot presence state bits do not match!
page C-2
SCSB: Should NOT remove SCB(#) while cPCI Slot # is in RESET with
a possible bad board. scsb#0: Slot # Now out of Reset!
page C-3
scsb#0: ALERT! Lost HEALTHY# on Slot #, Occupant Offline scsb#0:
ALERT! Lost HEALTHY# on Slot #, Occupant Online!!!
page C-3
scsb#0: Bad (non friendly ?) Board in Slot # ? Taking it Offline.
page C-3
scsb#0: Could not Update %s LEDs. scsb#0: Could not Blink %s LEDs.
page C-4
scsb#0: hsc_board_healthy: No Slot Info.
page C-4
scsb#0: hsc_enum_intr: No Last Board Insertion Info.
page C-5
scsb#0: hsc_restore: Cannot reset disconnected slot #
page C-5
scsb0: I2C TRANSFER Failed scsb0: Error Reading Healthy# Registers
scsb#0: scsb_reset_slot: error reading Reset regs
page C-5
scsb#0: no HEALTHY# signal on slot#
page C-6
C-1
scsb#0: Reset Not Asserted on Healthy# Failed slot#
page C-6
scsb#0: slot # Occupant configured, Regained HEALTHY#! scsb#0: slot
# Occupant Unconfigured, Regained HEALTHY#!
page C-7
scsb#0: Successfully Downgraded to Basic Hotswap Mode
page C-7
scsb#0: Successfully Upgraded to Full Hotswap Mode
page C-7
Anticipated Hardware Failure
Interrupt Level 4--Not serviced
page C-8
Interrupt Level 4--Not serviced
page C-8
I2C Complaints
NO ADDERSS ACK 80
page C-9
Bus Busy Complaints
Bus busy, cleared after initiallizing
C.1
page C-10
scsb Error Messages
Alarm and Slot presence state bits do not match!
Cause
A problem was encountered when a hot swap alarm card was installed into the
server.
Action
Run prtdiag to determine the state of the I/O slot. If the alarm card is not listed
when you run prtdiag, reinsert the alarm card into the slot.
C-2
Netra ct Server Service Manual • February 2001
SCSB: Should NOT remove SCB(#) while cPCI Slot # is in RESET
with a possible bad board. scsb#0: Slot # Now out of Reset!
Cause
The system controller board was removed from the server while the amber Okay to
Remove LED was ON for an I/O slot.
Action
Enable basic hot swap on all the I/O slots in the server using the instructions in
Chapter 5 “Hot Swap Software Commands.” Once basic hot swap is enabled on all
I/O slots, it is safe to remove the system controller board from the server.
scsb#0: ALERT! Lost HEALTHY# on Slot #, Occupant Offline
scsb#0: ALERT! Lost HEALTHY# on Slot #, Occupant Online!!!
Cause
The CompactPCI card has lost its HEALTHY report.
Action
The CompactPCI card has failed or is damaged. Configure the card, and then
unconfigure it using the instructions in Chapter 6. If the error messages repeat, then
the card has failed. Replace the I/O card using the instructions in Chapter 6.
If the system has already taken the card offline because the card stopped sending a
HEALTHY signal, the following message is displayed:
scsb#0: Slot # successfully taken offline
scsb#0: Bad (non friendly ?) Board in Slot # ? Taking it
Offline.
Appendix C
Error Messages
C-3
Cause
The system has identified an I/O card that is sending repeated interrupts and has
taken it offline.
Action
Replace the I/O card using the instructions in Chapter 6 “Removing and Replacing
Hot-Swappable Cards.”
scsb#0: Could not Update %s LEDs.
scsb#0: Could not Blink %s LEDs.
Cause
An I2C error has resulted in an LED change failure. The LEDs on the system status
panel may give incorrect information as a result.
Action
Use the prtdiag tool to print the correct LED states. Remove and reinstall the
system controller board to correct the problem. Refer to “System Controller Board”
on page 8-7 for those instructions.
scsb#0: hsc_board_healthy: No Slot Info.
Cause
A disabled slot that is no longer being monitored by the system (due to errors or
user request) is having HEALTHY state changes and sending full hot swap style
interrupts to the CPU.
Action
Remove the I/O card from that slot. If the error messages repeat, set the I/O slot to
basic hot swap using the instructions in “Enabling Basic Hot Swap on I/O Slots” on
page 5-5.
C-4
Netra ct Server Service Manual • February 2001
scsb#0: hsc_enum_intr:
No Last Board Insertion Info.
Cause
A CompactPCI card that is probably damaged was installed into an I/O slot in the
system. The card has some sort of error causing it to continually interrupt the CPU
with hot swap service events when there is no change to the board’s state. The card
continually reports itself ’inserted’ after it has already been acknowledged. Since no
board is ’claiming’ the event, no slot # can be given. Also see “scsb#0: Bad (non
friendly ?) Board in Slot # ? Taking it Offline.” on page C-3.
Action
Remove the I/O card from the server using the instructions in Chapter 6 “Removing
and Replacing Hot-Swappable Cards.” If the error message repeats, the system
controller board may have failed. Try replacing the system controller board using the
instructions in “System Controller Board” on page 8-7.
scsb#0: hsc_restore:
Cannot reset disconnected slot #
Cause
The system controller board was installed in the server while the amber Okay to
Remove LED was ON for an I/O slot.
Action
Enable basic hot swap on all the I/O slots in the server using the instructions in
Chapter 5 “Hot Swap Software Commands.” Once basic hot swap is enabled on all
I/O slots, remove the system controller board from the server.
scsb0: I2C TRANSFER Failed
scsb0: Error Reading Healthy# Registers
scsb#0: scsb_reset_slot: error reading Reset regs
Appendix C
Error Messages
C-5
Cause
An error occured when the scsb driver received the retry command from the
system controller board.
Action
Retry. If the error persists, the system controller board is damaged and should be
replaced. Refer to “System Controller Board” on page 8-7 for those instructions.
scsb#0: no HEALTHY# signal on slot#
Cause
You tried to connect or configure a hot-swappable I/O card that was not reporting
itself HEALTHY. The card has failed or was not inserted properly.
Action
Remove the I/O card from the server and reinsert it, making sure the card is
completely and properly inserted into the server. If the error message repeats, then
the card has failed. Replace the I/O card using the instructions in Chapter 6
“Removing and Replacing Hot-Swappable Cards.”
scsb#0: Reset Not Asserted on Healthy# Failed slot#
Cause
You rebooted the system with a failed board. While the board is not reporting itself
HEALTHY, the OpenBoot PROM has taken it out of reset and probed it anyway.
Action
The board is probably damaged and should not be used. Unconfigure the board
manually and remove the board from the system using the instructions in Chapter 6
“Removing and Replacing Hot-Swappable Cards.”
C-6
Netra ct Server Service Manual • February 2001
scsb#0: slot # Occupant configured, Regained HEALTHY#!
scsb#0: slot # Occupant Unconfigured, Regained HEALTHY#!
Cause
A CompactPCI card is sending conflicting HEALTHY and UNHEALTHY signals.
Action
The card has failed. Replace the I/O card using the instructions in Chapter 6
“Removing and Replacing Hot-Swappable Cards.”
scsb#0: Successfully Downgraded to Basic Hotswap Mode
Cause
Basic hot swap was enabled on the system.
Action
No action is necessary.
scsb#0: Successfully Upgraded to Full Hotswap Mode
Cause
Full hot swap was enabled on the system.
Action
No action is necessary.
Appendix C
Error Messages
C-7
C.2
Anticipated Hardware Failure
C.2.1
Transient Interrupts
Message
Interrupt Level 4--Not serviced
Cause
Such a message occuring intermittently is always a result of the underlying
hardware doing something unpredictable.
Transient interrupts occur when, for example, a fan is starting to fail, and it fails long
enough to generate an interrupt and then resumes operation. By the time the fan
driver is queried, it denies the interruption because now it is functioning normally.
Action
The condition is a result of the architecture of interrupt generation and response. As
long as the generating hardware has resumed normal operation, no further action is
required.
C.2.2
Soft Hang
Message
Interrupt Level 4--Not serviced
Cause
This message, occurring continuously, signals a soft hang of the system. The
presenting symptom is the system is noticeably sluggish because it is busy
processing interrupts.
C-8
Netra ct Server Service Manual • February 2001
A soft hang occurs when a component such as a power supply sends a level high
interrupt and keeps it high. The kernel notices and polls the devices. Each device
answers negative, including the culprit power supply. Meanwhile, the CPU
continues with minimal work before returning to the querying process. This is a
serious problem because the failing component remains unidentified.
Action
Completely power the server off and then on again using the instructions in
Chapter 2. When the system boots, it always boots interrupts low (masked), and
attaches the drivers one by one. You can also use OpenBoot PROM commands to
probe the components and determine which one has failed.
C.3
I2C Complaints
Message
NO ADDERSS ACK 80
Cause
This message indicates a problem with I2C, and often it’s the pcf8584 driver that
complains, followed by the address it was trying to access (for example, NO
ADDRESS ACK 80. indicates a problem with address 80, which is the fixed address
of the system controller board.
Most of the Sun drivers print a secondary error message, but the principal error
message comes from pcf8584. The interface to this is through an ioctl, so its done
through software. This message indicates a problem, but not the severity. Sometimes
such a message is normal.
For example when a power supply is removed, the Present line goes low and the
SCB sets the bit high (interrupt. The kernel pcf8584 goes down the device line
querying for interrupts in the order in which the devices boot, each one answering.
The message 8584 NO ADDR ACK 0x9E occurs when the device is removed.
Because it happened after the driver tried to query the hardware, this spurious error
message occurs. This happens with fans and power supplies.
Appendix C
Error Messages
C-9
Action
If the error message occurs during a hot swap operation, it is erroneous and should
be ignored. If the error messge occurs during normal operation, it may indicate a
problem with the I2C device. Use envmond to troubleshoot the system using the
instructions in “Troubleshooting the System Using envmond” on page 4-7.
C.4
Bus Busy Complaints
Message
Bus busy, cleared after initiallizing
Cause
This is a transcient 12C error message.
Action
Usually no action is necessary because the system should recover from most
transcient 12C errors. If the system becomes unresponsive, completely power the
server off and then power it back on. Watch the Power-On Self-Test messages to
determine the cause for the error.
C-10
Netra ct Server Service Manual • February 2001
APPENDIX
D
System Specifications
This appendix gives the system specifications for the Netra ct server.
D.1
Physical Specifications
TABLE D-1
Physical Specifications, Netra ct Chassis
English
Metric
Width
17.5 inches
444.5 mm
Depth (default configuration, with rack mount
brackets extended)
15.75 inches
400 mm
Depth (with rack mount brackets flush against the
bottom of the chassis)
13.78 inches
350 mm
Height
20.97 inches
533.64 mm
Weight, empty
74 lbs
33.56 kg
Weight, fully-loaded
150 lbs
68.04 kg
D-1
TABLE D-2
English
Metric
Width
8.56 inches
217.5 mm
Depth
14.89 inches
378.3 mm
Height
20.18 inches
512.67 mm
Weight, fully-loaded
38 lbs
17.24 kg
TABLE D-3
D.2
Physical Specifications, Netra ct 400 Server
English
Metric
Width
4.25 inches
108 mm
Depth
14.91 inches
378.68 mm
Height
20.18 inches
512.67 mm
Weight, fully-loaded
22 lbs
9.98 kg
Electrical Specifications
TABLE D-4
D-2
Physical Specifications, Netra ct 800 Server
DC Power Requirements
Electrical Element
Requirement
Voltage (nominal)
-48 VDC, -60VDC
Input current (maximum)
14 A
Max. input surge current
17 A
Netra ct Server Service Manual • February 2001
D.3
Environmental Specifications
TABLE D-5
Environmental Specifications
Type
Location
Minimum to Maximum Range
Temperature
Operating
-5˚C to 45˚C (23˚F to 113˚F)
Nonoperating
-40˚C to 70˚C (-38˚F to 158˚F)
Short term (less than 96
consecutive hrs)
Operating
-5˚C to 55˚C (23˚F to 131˚F)
Relative humidity
(noncondensing)
Operating
5% to 93% RH
Nonoperating
93% RH max
Operating
0 ft to 13,123 ft (0m to 4000m)
Nonoperating
0 ft to 39,370 ft (0m to 12,000m)
Altitude
Declared noise emissions in accordance with ISO 9296
Chassis w/two Netra ct 800
servers
Sound power LWAd Operating
6.7 B
(1B = 10 dB)
Idle 6.7 B
Chassis w/four Netra ct 400
servers
Sound power LWAd Operating
7.1 B
(1B = 10 dB)
Idle 7.1 B
Appendix D
System Specifications
D-3
D-4
Netra ct Server Service Manual • February 2001
APPENDIX
E
Upgrading CPU Memory
This appendix gives the instructions for upgrading the CPU memory for the CPU
card in the Netra ct server.
E.1
Memory Installation
This section describes the memory configuration and installation procedure for the
CPU card.
E.1.1
Memory Configurations
TABLE E-1 shows the permissible memory configurations for the CPU card.
TABLE E-1
Permissible Memory Configurations on the CPU Card
Maximum Memory
Available
No. of Memory
Modules Supported
1 GByte (1024
MByte)
Maximum 2
Memory Module Size Options (MBytes)
The memory board to be installed first (memory
board A position) should be the one with the
larger amount of memory, for example, 512
MByte. Memory board B should be the one with
equivalent or smaller memory, for example, 64
MByte, 128 MByte, or 256 MByte. See FIGURE 6-2
for details.
E-1
TABLE E-2 shows the available memory sizes and part numbers.
TABLE E-2
E.1.2
Memory Sizes and Part Numbers
Memory Size
Memory Board Part Number
Marketing Part Number
64 MByte
501-5210
XCP1500-64
128 MBytes
501-5209
XCP-1500-128
256 MByte
501-5388
XCPMEM-256
512 MByte
501-5289
XCPMEM-512
Memory Installation Procedure
It is recommended that you read these instructions and familiarize yourself with the
memory installation procedure and rules before installing the memory. The
procedure itself is quite simple.
Memory modules are not included in the CPU card package and must be ordered
separately. Before installing a CPU card into the OEM equipment you need to install
at least one memory module on the CPU card. This procedure requires that you
remove the CPU card from the OEM equipment and place the board on a clean and
flat surface before you can begin to install the memory cards.
The CPU card supports up to two mezzanine memory modules, also referred to as
memory boards or memory cards. The first memory board (memory board A) is
installed directly onto the CPU card. The second memory board (memory board B) is
installed on top of memory board A in a piggy-back style. FIGURE E-1 illustrates the
installation procedure and the appropriate hardware for installing the memory
boards on the CPU card. The CPU card with both memory boards takes only one
CompactPCI slot.
If you have an existing memory card (memory board A) that has less memory than
the memory board that you wish to add, you need to unscrew and remove the
existing memory card because it will require reinstallation of the memory boards in
a particular order. If the boards consist of different memory sizes, the board with
greater memory must be installed first. If your CPU card has an existing memory
card that has equal or more memory, simply remove the mounting hardware and
install another memory board following the necessary steps described below.
This procedure assumes that no memory are present on the CPU card and that you
wish to install two memory boards.
If you are installing only one memory board, the nylon spacers are not needed. In
that case you can simply install the board, tighten the appropriate mounting screws
and washers directly into the metal posts (which also work as spacers). In any event
E-2
Netra ct Server Service Manual • February 2001
you need to carefully align the memory boards, press on the connectors (specially
the middle one) to make sure the memory cards are properly seated and secured
with the appropriate screws, spacers, and washers.
Follow the safety rules and the relevant steps shown below to install the memory
boards.
Caution – Follow all the safety rules set forth by the OEM equipment manufacturer
before performing this procedure. The components on the CPU card and on the
memory cards are quite sensitive to static electricity. Wear anti-static wrist strap
when handling the memory cards and during the installation. Failure to comply may
result in physical injury as well as damage to the board and equipment.
Depending on the presence of any existing memory, you may or may not have to
take all the steps.
1. Determine the size of the memory card that you wish to install or that of any
existing memory card(s) by looking at the part number printed near the middle
connector on the memory card.
Refer to TABLE E-2 for the memory size and part number. See FIGURE E-1 for the
location of the part number on the memory card that specifies the amount of
memory on a board.
2. Select screws, washers and spacers of appropriate sizes for installing the memory
card from a bag that came with the memory kit.
If you are adding two memory boards, you need to use longer screws to secure both
boards. Be careful not to let the washers, spacers, and screws fall into the chassis or
under some other components of the CPU card.
3. Position the memory board A connectors above the memory board connector
sockets on the CPU card, align them properly (making sure all the mounting holes
are concentric), and press down the connectors using your fingers until they are
seated (FIGURE E-2).
Make sure the middle connector is also properly seated.
4. If you wish to install a second memory board, skip to Step 6.
5. If you do not wish to install another memory board, tighten all four screws of
appropriate size and washers and spring washers.
Carefully hold the washers in place while installing the screws in the mounting
holes so that the washers do not come out.
6. Place the round nylon spacers on top of the mounting holes on the memory board
A so that they are aligned with the mounting holes.
Appendix E
Upgrading CPU Memory
E-3
7. Position the memory board B connectors on top of the memory board A sockets,
align them properly (making sure all the mounting holes are concentric) and the
nylon spacers are aligned.
8. Press down the connectors using your fingers until they are seated.
9. Install the mounting screws and washers (FIGURE E-2).
If you notice the nylon spacers have shifted from their respective places, move them
to their proper places before installing and tightening the screws.
10. Press down the middle connector of the memory board to make sure it has not
popped out.
Tightening of all the mounting screws does not necessarily mean that the connectors
are seated properly. It is important to perform this step.
(4X) 240-3272-xx
M2 flat washer
(4X) Phillips pan head,
stainless steel screw
2-56, 3/8" long
(4X) Nylon spacer
(4X) 240-3273-xx
M2 split lock washer
Memory part #
501-5xxx
Memory board B
501-xxxx-xx
Memory board A
501-xxxx-xx
Assembly
hardware
501-xxxx-xx
FIGURE E-1
E-4
Installing a Memory Module on the CPU Card
Netra ct Server Service Manual • February 2001
FIGURE E-2
Seating the Memory Module
Caution – Do not apply excessive pressure on any of the connectors. Applying
excessive pressure on any of the connectors may result in micro-fractures on the
CPU card and severely damage the board.
Appendix E
Upgrading CPU Memory
E-5
E-6
Netra ct Server Service Manual • February 2001
Glossary
Knowledge of the following terms and acronyms is useful in the administration of
the Netra ct server.
A
alarm card
alarms feature
An optional card that occupies a slot in the Netra ct server. The alarm card
responds to events, such as I/O card failures or excessive heat. Software that
resides on the card can take action in response to such events.
A set of features implemented in software and hardware that provide the
operator of the Netra ct server with notifications when hardware and/or
software failures occur (or when failure thresholds are being approached).
B
basic hot swap
One of the hot swap states. In the basic hot swap model, the hardware
connection process can be performed automatically by the hardware, while the
software connection process requires operator assistance. See hot swap, full hot
swap
Glossary-1
C
CompactPCI
A standard for computer boards and buses. CompactPCI is adapted from the
Peripheral Component Interconnect (PCI) Specification for industrial and/or
embedded applications requiring a more robust mechanical form factor than
desktop PCI. CompactPCI is supported by the PCI Industrial Computer
Manufacturers Group (PICMG), a consortium that uses PCI for embedded
applications.
F
field replaceable unit
(FRU)
front-access
front transition
module
full hot swap
From a service point of view, the smallest irreducible elements of a server, such
as the Netra ct server. Examples of FRUs are disk drives, I/O cards, and power
supplies. Note that a server, with all of its cards and other components, is not a
FRU. However, an empty server is.
The model of the Netra ct server that is configured so that all of the cables
come out from the front of the chassis.
Used only for the CPU in the front access models of the Netra ct server. The
CPU front transition module allows for CPU cabling from the front of the
chassis.
One of the hot swap states. In the full hot swap model, both the hardware and
the software connection process are performed automatically.
See hot swap, basic hot swap
H
hot swap
Glossary-2
Implies the ability to remove and replace cards from and in a running
computer. See full hot swap, basic hot swap
Netra ct Server Service Manual • February 2001
M
midplane
The functional equivalent of a backplane. The midplane is secured to the back
of the server. The CPU card, I/O cards and storage devices plug into the
midplane from the front, and the rear transition cards plug into the midplane
from the rear.
N
NEBS
An acronym for Network Equipment/Building System. A set of requirements
for equipment installed in telco offices. These requirements cover personnel
safety, protection of property, and operational continuity. “NEBS testing”
involves subjecting equipment to shaking (for earthquakes), fire, and other
environmental insults. There are three levels of NEBS compliance, each a
superset of the preceding. NEBS level 3, the highest level, certifies that a piece
of equipment can be safely deployed in an “extreme environment.” A telco
Central Office is considered an extreme environment.
The NEBS standards are maintained by Telcordia Technologies, Inc., formerly
Bellcore.
P
PICMG
Acronym for the PCI Inductrial Computer Manufacturers Group. (PCI stands
for Peripheral Component Interconnect.) PICMG is the group that promulgates
the CompactPCI standard.
See CompactPCI.
R
rear-access
rear transition card
The model of the Netra ct server that is configured so that all of the cables
come out from the rear of the chassis.
Used only on the rear access models of the Netra ct server. The rear transition
cards extend the connectors from the midplane to the rear of the chassis.
Glossary-3
Reliability, Availability,
Serviceability (RAS)
Refers to hardware or software features that implement or improve the
reliability, availability and serviceability of a server. For example, the Netra ct
server has a watchdog reset that prevents endless operating system “hangs”. If
the operating system enters a hung state, the watchdog reset initiates a system
reset upon the expiration of a timer. This feature is said to increase the server’s
availability. Much of the Netra ct server’s RAS functions are provided by the
alarm card and the firmware that resides on that card.
S
system status panel
system controller
board
A module designed to give feedback on the status of the key components
within the Netra ct servers. The system status panel has one set of LEDs for
each component within that particular server.
A hot-swappable component located behind the system status panel. It feeds
system status information to the system status panel, where LEDs give
feedback on the status of the key components within the Netra ct servers.
U
U
Glossary-4
A unit of measure equal to 1.75 inches.
Netra ct Server Service Manual • February 2001
Index
NUMERICS
32-bit bus
Netra ct 400 server,
Netra ct 800 server,
64-bit bus
Netra ct 400 server,
Netra ct 800 server,
B
6-6
6-4
6-6
6-4
A
air filter, main
removing, 8-11
replacing, 8-13
air filter, power supply unit
removing, 8-18
replacing, 8-21
alarm card
Netra ct 400 server
connector pinouts, A-30
removing, 6-30
replacing, 6-35
Netra ct 800 server
connector pinouts, A-25
removing, 6-19
replacing, 6-24
alarm rear transition card
connector pinouts, A-35
removing,
replacing,
6-51
6-53
buses
Netra ct 400 server,
Netra ct 800 server,
6-6
6-4
C
CD-ROM
see removeable media module
cfgadm
attachment point ID, 5-3
5-2
help, online, 5-3
feedback,
list of procedures,
5-2
man page, 5-3
cold swap
FRUs, 1-5
power supply unit
removing, 11-19
replacing, 11-22
connector pinouts
alarm card
Netra ct 400 server, A-30
Netra ct 800 server, A-25
alarm rear transition card, A-35
CPU card, A-2
CPU front transition card
Netra ct 400 server, A-12
Netra ct 800 server, A-5
CPU rear transition card, A-17
Index-1
CPU card
connector pinouts, A-2
host ID board
removing, 10-4, 10-21
replacing, 10-6, 10-23
removing, 10-2, 10-19
10-6, 10-23
troubleshooting, 4-16
replacing,
CPU front transition card
connector pinouts
Netra ct 400 server,
Netra ct 800 server,
removing, 10-10
10-27
10-29
replacing,
CPU shunt card
removing, 10-17
replacing,
10-18
DAT drive
see removeable media module
device names
hard disk drives, 1-6
1-5
Netra ct 400 server,
Netra ct 800 server,
disk adapter module
removing, 11-5
replacing,
8-22
8-26
replacing,
front-access cable
removing, 11-16
replacing, 11-19
FRU categories
cold-swappable FRUs,
descriptions,
1-6
1-5
11-6
1-5
1-4
hot-swappable FRUs,
1-4
H
H.110 bus
Netra ct 400 server,
Netra ct 800 server,
hard disk drive
cold swap
removing, 11-2
replacing, 11-4
description, 7-1
D
I/O cards,
fan tray
removing,
A-12
A-5
replacing, 10-13
CPU rear transition card
connector pinouts, A-17
removing,
F
6-6
6-4
device names, 1-6
hot swap
removing, 7-2
replacing, 7-7
host ID board
removing, 10-4, 10-21
replacing, 10-6, 10-23
hot swap
basic
activating a FRU, 5-4
deactivating a FRU, 5-4
enabling, 5-5
explanation, 5-1
descriptions, 5-1
determining current state,
E
electrical specfications,
D-2
environmental specifications, D-3
envmond
troubleshooting the system, 4-7
5-5
FRUs, 1-4
full
enabling, 5-4
explanation, 5-1
Index-2
P
power supply unit
removing, 8-14
replacing, 8-17
D-1
D-1
physical specifications,
Netra ct chassis,
power distribution unit
removing, 11-10
I
replacing, 11-15
power supply unit
cold-swappable
removing, 11-19
replacing, 11-22
hot-swappable
removing, 8-14
replacing, 8-17
LEDs, 4-14
I/O cards
device names, 1-5
front-access
description, 6-2
removing, 6-7
replacing, 6-13
rear-access
description, 6-40
removing, 6-43
replacing, 6-47
illustrated parts breakdown
Netra ct 400 server, 12-6
4-14
2-6
hardware power-down, 2-7
software power-down, 2-9
powering on the server, 2-1
troubleshooting,
powering off the server,
12-4
12-2
Netra ct 800 server,
Netra ct chassis,
L
R
logging into the Netra ct server,
5-2
removeable media module
removing, 7-9
replacing,
SCSI IDs,
removing
air filter, main,
N
Netra ct 400 server
buses, 6-6
device names,
1-6
illustrated parts breakdown,
Netra ct 800 server
buses, 6-4
device names,
12-6
1-5
illustrated parts breakdown,
Netra ct chassis
illustrated parts breakdown,
physical specifications,
7-11
7-8
D-1
12-4
12-2
8-11
air filter, power supply unit, 8-18
alarm card
Netra ct 400 server, 6-30
Netra ct 800 server, 6-19
alarm rear transition card, 6-51
CPU card,
10-2, 10-19
CPU front transition card,
CPU rear transition card,
10-10
10-27
10-17
disk adapter module, 11-5
fan tray, 8-22
front-access cable, 11-16
front-access I/O cards, 6-7
CPU shunt card,
Index-3
hard disk drive
cold-swappable, 11-2
hard disk drives
hot-swappable, 7-2
host ID board, 10-4, 10-21
power distribution unit, 11-10
power supply unit
cold-swappable, 11-19
hot-swappable, 8-14
rear-access I/O cards, 6-43
removeable media module,
server,
7-9
9-1
system controller board,
8-7
system status panel, 8-2
replacing
air filter, main, 8-13
CPU front transition card,
CPU shunt card,
replacing,
specifications
electrical, D-2
environmental,
replacing, 8-10
system status panel
removing, 8-2
10-13
10-29
power supply unit, 4-14
system
using envmond, 4-7
using Power-On Self Test (POST), 4-12
using Remote System Control (RSC), 4-14
using SunVTS test suite, 4-12
using the system status panel, 4-1
8-26
11-19
front-access I/O cards, 6-13
hard disk drive
cold-swappable, 11-4
hot-swappable, 7-7
host ID board, 10-6, 10-23
power distribution unit, 11-15
power supply unit
cold-swappable, 11-22
hot-swappable, 8-17
rear-access I/O cards, 6-47
removeable media module,
9-9
system status panel,
Index-4
7-11
8-10
8-5
Netra ct Server Service Manual • February 2001
4-1
tools required, 1-1
troubleshooting
CPU card, 4-16
10-18
11-6
system controller board,
8-5
T
front-access cable,
server,
D-3
physical, D-1
system controller board
removing, 8-7
disk adapter module,
fan tray,
9-1
9-9
troubleshooting,
10-6, 10-23
CPU rear transition card,
server
removing,
replacing,
air filter, power supply unit, 8-21
alarm card
Netra ct 400 server, 6-35
Netra ct 800 server, 6-24
alarm rear transition card, 6-53
CPU card,
S
U
upgrading memory,
E-1