1
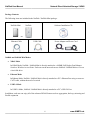
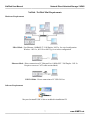
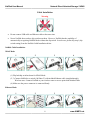
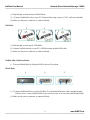
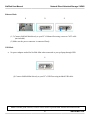
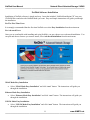
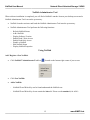
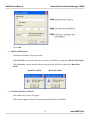
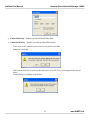
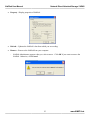
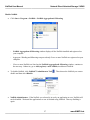
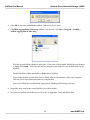
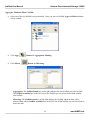
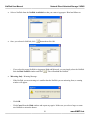
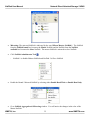
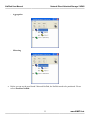
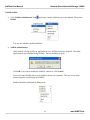
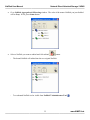
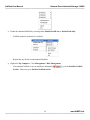
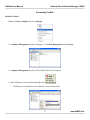
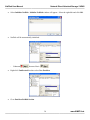
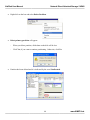
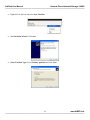
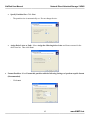
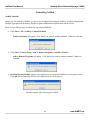
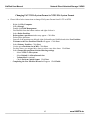
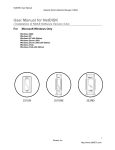
HANTZ + PARTNER The Upgrade Company! www.hantz.com User Manual For Windows 2000 / XP Software Version 2.3 NetDisk™ & NetDisk Mini™ Powered by www.ximeta.de Technology NetDisk User Manual Network Direct Attached Storage / NDAS ————————————————————————————————————————————— English HANTZ + PARTNER The Upgrade Company! www.hantz.com Software Release Statement NetDisk User Manual for Windows XP and Windows 2000, Software Version 2.3, Released November 2003, Made in the U.S.A. Trademark Statement NetDisk, NetDisk Mini and XIMETA are trademarks of XIMETA, Inc., registered in the U.S.A and other countries. All other trademarks are the property of their respective owners. Copyright Statement Copyright © 2003 XIMETA, Inc. All rights reserved world. Reproduction, translation, transformation or adaptation in any manner without prior written permission of XIMETA, Inc. is strictly prohibited. License Statement The software described in this document is furnished under a license agreement. The software may be used only in accordance with the terms of the license agreement Warranty Statement XIMETA, Inc. reserves the right to revise this publication and to make changes to the content hereof without the obligation of XIMETA, Inc. to notify any person of such revision or changes. XIMETA, Inc. provides this publication “as is” without warranty of any kind, either express or implied, including but not limited to the implied warranties of merchantability or fitness for a particular purpose. 2 www.XIMETA.de ————————————————————————————————————————————— NetDisk User Manual Network Direct Attached Storage / NDAS ————————————————————————————————————————————— Contents Introduction • • • • • NetDisk User Manual NetDisk and NetDisk Mini Models Covered By This NetDisk User Manual Main Features of NetDisk and NetDiskMini Package Contents NetDisk and NetDisk Mini Modes NetDisk / NetDisk Mini Requirements • • Hardware Requirements Software Requirements Cable Installation • • NetDisk Cable Installation o NDAS Mode o Ethernet Mode o USB Mode NetDisk Mini Cable Installation o NDAS Mode o Ethernet Mode o USB Mode NetDisk Software Installation • • For The First Time User For The Advanced User NetDisk Administrator Tool Using NetDisk • • • • Add / Register a New NetDisk Using NetDisk Changing from Read / Write to Read Only Changing from Read Only to Read / Write NetDisk Status and Mode Indicator NetDisk Administrator Tool Menu NetDisk Functions 3 www.XIMETA.de ————————————————————————————————————————————— NetDisk User Manual Network Direct Attached Storage / NDAS ————————————————————————————————————————————— Advanced NetDisk Functions • • • Aggregation Mirroring Unbind NetDisk Formatting NetDisk • • Initialize NetDisk Partition NetDisk Uninstalling NetDisk • NetDisk Uninstall Change FAT32 File System Format to NTFS File System Format Using NetDisk in Mac OS and Windows Environment Frequently Asked Questions Troubleshooting Regulatory Statements Product Warranty Additional Information and Assistance 4 www.XIMETA.de ————————————————————————————————————————————— NetDisk User Manual Network Direct Attached Storage / NDAS ————————————————————————————————————————————— Introduction Congratulations on your purchase of NetDisk / NetDisk Mini - Network Direct Attached Storage (NDAS) Solution! NetDisk User Manual This NetDisk User Manual is intended to help you install the product quickly and easily. This NetDisk User Manual shows you how to install a NetDisk / NetDisk Mini onto your Personal Computer or Ethernet Network and begin using it immediately. This NetDisk User Manual is intended for users who need to install and support one or more NetDisk / NetDisk Mini on their Personal Computer or Ethernet Network. This NetDisk User Manual assumes the user has a basic understanding of Personal Computers and Networks. NetDisk and NetDisk Mini Models Covered By This NetDisk User Manual This NetDisk User Manual includes information on the following models: NetDisk • • • NDU10-80 NDU10-120 NDU10-160 NetDisk Mini • NDU20-40 Main Features of NetDisk and NetDisk Mini • • • • • • • No power adaptor needed for NetDisk Mini when connected to your pc/laptop through USB Advanced Network Storage, Network Direct Attached Storage - NDAS External and Portable Network Storage Device Multiple Interfaces - Ethernet and USB 2.0 Aggregation Backup Mirroring 5 www.XIMETA.de ————————————————————————————————————————————— NetDisk User Manual Network Direct Attached Storage / NDAS ————————————————————————————————————————————— Package Contents The following items are included in the NetDisk / NetDisk Mini package: NetDisk Mini NetDisk Software Installation CD or Ethernet Cable USB Cable Power Adapter and Power Cord NetDisk and NetDisk Mini Modes • NDAS Mode In NDAS Mode, NetDisk / NetDisk Mini is directly attached to a 100MB/ Full Duplex Fast Ethernet Switch or Wireless Access Point. Each user on the network can use NetDisk / NetDisk Mini as if it was a local disk drive. • Ethernet Mode In Ethernet Mode, NetDisk / NetDisk Mini is directly attached to a PC’s Ethernet Port using a crossover CAT5 cable, without the need of a switch. • USB 2.0 Mode In USB 2.0 Mode, NetDisk / NetDisk Mini is directly attached to a PC’s USB 2.0 Port. In addition, each user can enjoy all of the advanced NDAS features such as aggregation, back-up, mirroring and flexible expansion 6 www.XIMETA.de ————————————————————————————————————————————— NetDisk User Manual Network Direct Attached Storage / NDAS ————————————————————————————————————————————— NetDisk / NetDisk Mini Requirements Hardware Requirements NDAS Mode - Fast Ethernet -100BASE-T / Full Duplex / 802.3u, for wired configuration. Wireless - 802.11a, 802.11b or 802.11g, for wireless configuration. Ethernet Mode - Direct connection to PC Ethernet Port -100BASE-T / Full Duplex / 802.3u. Requires crossover CAT5 cable (not included). USB 2.0 Mode - Direct connection to PC USB 2.0 Port Software Requirements May need to install USB 2.0 driver included in installation CD. 7 www.XIMETA.de ————————————————————————————————————————————— NetDisk User Manual Network Direct Attached Storage / NDAS ————————————————————————————————————————————— Cable Installation Warning • Do not connect USB cable and Ethernet cable at the same time. • Newer NetDisk does not have dip switches on them. However, NetDisk has the capability of automatically recognizing NetDisk Mode without the dip switch. In such case, please skip step 1 (dip switch setting) from the NetDisk Cable Installation below. NetDisk Cable Installation NDAS Mode 1 2 3 4 (1) Flip both dip switches down for NDAS Mode. (2, 3) Connect NetDisk to a switch (100 Base-T) with included Ethernet cable (straight through). Wireless users: Connect NetDisk to your wireless router or access point with included cable. (4) Make sure the power connector is connected firmly. Ethernet Mode 1 2 3 4 8 www.XIMETA.de ————————————————————————————————————————————— NetDisk User Manual Network Direct Attached Storage / NDAS ————————————————————————————————————————————— (1) Flip both dip switches down for NDAS Mode. (2, 3) Connect NetDisk directly to your PC’s Ethernet Port using crossover CAT5 cable (not included). (4) Make sure the power connector is connected firmly. USB Mode 1 2 3 (1) Flip both dip switches up for USB Mode. (2) Connect NetDisk directly to your PC’s USB Port using included USB cable. (3) Make sure the power connector is connected firmly. NetDisk Mini Cable Installation • Turn on NetDisk Mini by sliding On/Off Switch to ON position. NDAS Mode 1 2 3 (1, 2) Connect NetDisk Mini to a switch (100 Base-T) with included Ethernet cable (straight through). Wireless users: Connect NetDisk Min to your wireless router or access point with included cable. (3) Make sure the power connector is connected firmly. 9 www.XIMETA.de ————————————————————————————————————————————— NetDisk User Manual Network Direct Attached Storage / NDAS ————————————————————————————————————————————— Ethernet Mode 1 2 3 (1, 2) Connect NetDisk Mini directly to your PC’s Ethernet Port using crossover CAT5 cable (not included). (3) Make sure the power connector is connected firmly. USB Mode • No power adaptor needed for NetDisk Mini when connected to your pc/laptop through USB 1 (1) Connect NetDisk Mini directly to your PC’s USB Port using included USB cable. Note: From this point forward, NetDisk will be used to represent both NetDisk and NetDisk Mini. 10 www.XIMETA.de ————————————————————————————————————————————— NetDisk User Manual Network Direct Attached Storage / NDAS ————————————————————————————————————————————— NetDisk Software Installation Installation of NetDisk software is simple and easy. Insert the included “NetDisk Installation CD” into your CD-ROM Drive and select the NetDisk Mode you want. Easy and simple instructions will guide you through the installation. For The First Time Users It is strongly recommended that the first time NetDisk user select Easy Installation from the main menu. For Advanced Users Once you are comfortable with installing and using NetDisk, you may choose to use advanced installation. You can pick and choose features you want to install, select Advanced Installation from the main menu. NDAS Mode Easy Installation • Select “NDAS Mode Easy Installation” and click “next” button. The instructions will guide you through the installation. Ethernet Mode Easy Installation • Select “Ethernet Mode Easy Installation” and click “next” button. The instructions will guide you through the installation. USB 2.0 Mode Easy Installation • Select “USB 2.0 Mode Easy Installation” and click “next” button. The instructions will guide you through the installation. 11 www.XIMETA.de ————————————————————————————————————————————— NetDisk User Manual Network Direct Attached Storage / NDAS ————————————————————————————————————————————— NetDisk Administrator Tool When software installation is completed, you will find a NetDisk Launcher Icon on your desktop screen and a NetDisk Administrator Tool icon on the system tray. • NetDisk Launcher activates and loads the NetDisk Administrator Tool onto the system tray. • NetDisk Administrator Tool performs the following functions: - Refresh NetDisk Status Add a NetDisk Display Software Version Enable Read / Write Access Enable Read Only Access Disable a NetDisk Edit NetDisk Name Display NetDisk Properties Using NetDisk Add / Register a New NetDisk. • Click NetDisk™ Administrator Tool Icon • Click New NetDisk. • Add a NetDisk. located on the bottom right corner of your screen. - NetDisk ID and Write Key can be found underneath the NetDisk case. - NetDisk ID and Write Key do not contain the letter O. Please use the number 0, for all 0’s. 12 www.XIMETA.de ————————————————————————————————————————————— NetDisk User Manual Network Direct Attached Storage / NDAS ————————————————————————————————————————————— • Click Add. NetDisk Administrator. - Confirms the NetDisk you just registered. - If the Write Key was entered in the previous step, the NetDisk is registered as Read / Write Mode. - If the Write Key was not entered in the previous step, the NetDisk is registered as Read Only Mode. Read/Write Mode • Read Only Mode Found New Hardware Wizard. - This window may or may not appear. - If the window appears, follow the instructions and install the new NetDisk. 13 www.XIMETA.de ————————————————————————————————————————————— NetDisk User Manual Network Direct Attached Storage / NDAS ————————————————————————————————————————————— Windows 2000 Windows XP Windows 2000 Windows XP Please click “Yes” Please click “Continue Anyway” 14 www.XIMETA.de ————————————————————————————————————————————— NetDisk User Manual Network Direct Attached Storage / NDAS ————————————————————————————————————————————— • Registration is completed. - Click NetDisk™ Administrator Tool to see the registered NetDisk. Read/Write Mode Read Only Mode Using NetDisk Now that you have successfully installed NetDisk, it’s time to familiarize yourself on using the NetDisk. NetDisk is located in My Computer as a local drive. Drive letter and NetDisk name may vary among pc. Here are examples of uses for NetDisk. • • • • • • You can use NetDisk like a local drive on your PC. Drag and drop files to NetDisk. Copy and paste data to NetDisk. Make and delete folders. Share files and folders. Backup files to NetDisk. 15 www.XIMETA.de ————————————————————————————————————————————— NetDisk User Manual Network Direct Attached Storage / NDAS ————————————————————————————————————————————— Using NetDisk Two Basic Modes NetDisk provides users with two basic functions; Read Only and Read/Write. • Read Only Mode - Any number of users can read from a NetDisk. • Read/Write Mode - Only one user can write to a specific NetDisk at a time. - No other users can write to NetDisk, until the current Read/Write access owner passes the Read/Write access to another user. Changing from Read / Write to Read Only • Click NetDisk™ Administrator Tool Read Only. • Select Enable Read Only. - and select the NetDisk you want to change from Read/Write to The Blue Circle will change to a Green Circle indicating Read Only Mode. Blue Circle indicates Read/Write Mode Green Circle indicates Read Only Mode 16 www.XIMETA.de ————————————————————————————————————————————— NetDisk User Manual Network Direct Attached Storage / NDAS ————————————————————————————————————————————— Changing from Read Only to Read / Write • Click NetDisk™ Administrator Tool Read/Write • Select Enable Read/Write. - and select the NetDisk you want to change from Read Only to The Green Circle will change to a Blue Circle indicating Read/Write Mode. Blue Circle indicates Read/Write Mode Green Circle indicates Read Only Mode 17 www.XIMETA.de ————————————————————————————————————————————— NetDisk User Manual Network Direct Attached Storage / NDAS ————————————————————————————————————————————— NetDisk™ Status and Mode Indicator • NetDisk provides users with six basic modes. • Below is a chart describing each of the NetDisk Modes and the icons that correspond with each mode. NetDisk Color Green Blue Red Gray White Black Yellow Icon NetDisk Icon Mode/Meaning Read Only Mode • Users can only read from NetDisk. Read / Write Mode • Users can read and write to and from NetDisk. Unrecognized Mode • NetDisk cannot be used. • You can only remove this NetDisk from your computer or view its property. Disabled Mode • Disabled from your computer • NetDisk can be enabled back to Read/Write Mode or removed from the PC. Busy Mode • NetDisk is busy performing a task or an application is using NetDisk. Disconnected Mode • Not connected to the network. • Power Cord, Ethernet Cord or USB Cord is unplugged. Once the cord is connected, you can resume NetDisk use. Slave Mode • Slave disk used for aggregation and mirroring only. • You can only remove it from your computer or view its property. 18 www.XIMETA.de ————————————————————————————————————————————— NetDisk User Manual Network Direct Attached Storage / NDAS ————————————————————————————————————————————— NetDisk Administrator Tool Menu Click NetDisk™ Administrator Tool. All the registered NetDisk will be displayed on the NetDisk Administrator Tool Menu. • - NetDisk - Displays all the functionality of a specific NetDisk. - If you named your NetDisk at the registration step, the new name will be displayed in place of the word NetDisk X. Refresh Status - Updates the status of NetDisk that are connected to the network. - • If a NetDisk IS displayed with a Black Colored Circle, it means the network cable or power cable NetDisk is disconnected. This will cause operation of other NetDisk to slow down. We recommend you remove the Black NetDisk. You can remove the NetDisk by selecting the Black colored NetDisk and choosing remove. New NetDisk - Registers a new NetDisk to your computer. - Each time a new NetDisk is added, it must be registered. Found New Hardware Wizard will automatically register the new NetDisk. Some systems will register a NetDisk without going through this step. - NetDisk Name is optional - Enter NetDisk ID. - Enter Write Key; it is needed to enable write access to NetDisk. 19 www.XIMETA.de ————————————————————————————————————————————— NetDisk User Manual Network Direct Attached Storage / NDAS ————————————————————————————————————————————— - Found New Hardware Wizard - Select Install Software Automatically and click Next. Windows XP - Windows 2000 If you click Cancel, NetDisk Device Driver does not get installed and you cannot use NetDisk. o To re-install NetDisk, please follow the following steps: - To Re-Install NetDisk for Windows XP - Right click My Computer Select Manage Double click Device Manager under System Tools Double click SCSI and RAID controllers Right click XIMETA_LanscsiBus_XX (XX can be any two numbers) Select Update Driver Hardware Update Wizard will appear Select Install the software automatically and click Next Hardware Installation will appear, click Continue Anyway Hardware Update Wizard will appear again, click Finish To Re-Install NetDisk for Windows 2000 Right click My Computer Select Manage Double click Device Manager under System Tools Double click SCSI and RAID controllers Right click XIMETA_LanscsiBus_XX (XX can be any two numbers) Select Properties Select Driver tab and click Update Driver Upgrade Device Driver Wizard will appear, click Next Select Search for a suitable driver for my device and click Next Uncheck all of the optional search boxes and click Next Digital Signature Not Found window will appear, click Yes Upgrade Device Driver Wizard will appear again, select Finish 20 www.XIMETA.de ————————————————————————————————————————————— NetDisk User Manual Network Direct Attached Storage / NDAS ————————————————————————————————————————————— o Searching for new NetDisk. o Hardware Installation - This is just a warning window advising NetDisk to perform Window Logo Testing. - Click Continue. Windows XP Windows 2000 - If you click STOP Installation or No, NetDisk Device Driver does not get installed and you cannot use the NetDisk. - If you want to re-install the NetDisk, please follow the Re-Install NetDisk step in this section. o Installation is completed. o Click Finish. o New NetDisk has been added to your pc. 21 www.XIMETA.de ————————————————————————————————————————————— NetDisk User Manual Network Direct Attached Storage / NDAS ————————————————————————————————————————————— • About - Displays NetDisk Administrator version. • Exit - Exits NetDisk Administrator. - Click Yes, if you want to exit. Otherwise, click No, o NetDisk Administrator Tool can be restored by double clicking icon on the Desk Top. 22 www.XIMETA.de ————————————————————————————————————————————— NetDisk User Manual Network Direct Attached Storage / NDAS ————————————————————————————————————————————— NetDisk Functions Click NetDisk™ Administrator Tool and place the cursor on a NetDisk to view its functions. Each NetDisk has its own functions that can be performed, click on the function you want to perform: • • Disable Edit Name Enable Read Only Enable Read/Write Property Refresh Remove Disable - Disables writing and reading to and from NetDisk. - When you select Disable, a warning window will appear. If you want to disable NetDisk click OK. Otherwise, click Cancel. - If NetDisk is being used by any application, NetDisk will not disable. Wait until applications are finished using NetDisk. Then try disabling it again. - If you still cannot disable after several attempts, reboot your computer. This may occur when unknown programs are still using NetDisk. Edit Name – Changes the name of the NetDisk. - Type in the new name for the NetDisk on Edit a NetDisk window then click OK. If you do not want to change the name of the NetDisk, simply click Cancel. 23 www.XIMETA.de ————————————————————————————————————————————— NetDisk User Manual Network Direct Attached Storage / NDAS ————————————————————————————————————————————— • Enable Read Only – Enables you bak into Read Only Mode. • Enable Eead/Write – Enables you back into Read/Write Mode. - If you want to take current writer’s write access, please select Yes. Otherwise, select No. - If the current write does not release the write access you will receive a message just like the one below. Click OK then try enabling it again later. - 24 www.XIMETA.de ————————————————————————————————————————————— NetDisk User Manual Network Direct Attached Storage / NDAS ————————————————————————————————————————————— • Property - Display properties of NetDisk. • Refresh – Updates the NetDisk’s data from which you are reading. • Remove – Removes the NetDisk from your computer. - NetDisk Administrator appears when you select remove. Click OK if you want to remove the NetDisk. Otherwise, click Cancel. 25 www.XIMETA.de ————————————————————————————————————————————— NetDisk User Manual Network Direct Attached Storage / NDAS ————————————————————————————————————————————— Advanced NetDisk Functions Aggregation / Binding Aggregation is one of the two advanced features NetDisk provides. Aggregation allows users to enable multiple NetDisk units to be recognized as a single large disk drive. This feature is extremely useful where a larger storage device is needed. Please follow the steps below to aggregate NetDisk. Requirements for Aggregation / Binding: • • • • • Only two NetDisk can be bound at a time. Each NetDisk must have a Write Key. Each NetDisk must be disabled. Cannot bind NetDisk that is already bound. Two NetDisk that are being bound must be disabled or removed from all other user’s computers. Only one person, who is performing the binding, can have the NetDisk enabled on their computer. Mirroring Mirroring is another advanced feature provided with NetDisk. The purpose of mirroring is to continuously create a copy of data from one NetDisk to another NetDisk, whenever data is written to a NetDisk. Requirements for Mirroring • Each NetDisk has to have a Write Key. • Each NetDisk has to be disabled. • Cannot mirror a NetDisk that is already mirrored. • A NetDisk which you are saving the data to, must be same size or larger than the NetDisk you are copying the data from. • Two NetDisk that are being mirrored must be disabled or removed from all other user computers. Only one person, who is performing the mirroring, can have the NetDisk enabled on their computer while the mirroring is being performed. After mirroring is completed, users can enable or register the mirrored NetDisk. Mirroring and Aggregation are done exactly the same way, except for selecting Aggregation-Bind Button for the Aggregation and Mirror Button for the Mirroring. Refer to Aggregation-Bind for Mirroring. Refer to Aggregation - Unbind to undo Mirroring. 26 www.XIMETA.de ————————————————————————————————————————————— NetDisk User Manual Network Direct Attached Storage / NDAS ————————————————————————————————————————————— Disable NetDisk • Click Start > Program > NetDisk > NetDisk Aggregation & Mirroring - NetDisk Aggregation & Mirroring window displays all the NetDisk installed and registered on your computer. - Aggregate / Binding and Mirroring can proceed only if two or more NetDisk are registered on your computer. - If two or more NetDisk are listed on the NetDisk Aggregation & Mirroring window, continue to the next step. Otherwise, go to Add (register) a new NetDisk, to add more NetDisk. • To disable NetDisk, click NetDisk™ Administrator Tool disable and then select Disable. • NetDisk Administrator - If the NetDisk you selected is in use by an application or user, NetDisk will not be disabled. Wait until the applications or user is finished using NetDisk. Then try disabling it again. . Then choose the NetDisk you want to 27 www.XIMETA.de ————————————————————————————————————————————— NetDisk User Manual Network Direct Attached Storage / NDAS ————————————————————————————————————————————— • Click OK if you want to disable the NetDisk. Otherwise, click Cancel. • If NetDisk Aggregation & Mirroring window is not opened, click Start > Program > NetDisk > NetDisk Aggregation & Mirroring - Wait few seconds for the changes to take place. If the color of the disabled NetDisk has not changed to Gray, click Status. If the color still has not changed, repeat steps for every NetDisk that was not disabled. - Disabled NetDisk will be indicated by a Gray colored NetDisk. - If you cannot disable or color of the circle is White, after several attempts, reboot your computer. This may occur when unseen programs are using NetDisk. - Once two NetDisk have been disabled, Aggregation / Binding and Mirroring can begin. • Repeat the above step for the second NetDisk you want to disable. • Now that two NetDisk are disabled, you will be able to Aggregate / Bind and Mirror them. 28 www.XIMETA.de ————————————————————————————————————————————— NetDisk User Manual Network Direct Attached Storage / NDAS ————————————————————————————————————————————— Aggregate / Bind and Mirror NetDisk • Select one of the two NetDisk you just disabled. Once you select a NetDisk, Aggr and Mirror buttons will be enabled. • Click Aggr • Click Mirror Button for Aggregation / Binding. Button for Mirroring. - Aggregation: The NetDisk bound box on the right, indicates the first NetDisk you select to bind. The NetDisk Available box on the left, lists all the NetDisk you can select from to bind with the first NetDisk. - Mirroring: The NetDisk bound box on the right displays the NetDisk which the data will be mirrored from and the NetDisk Available box on the left, lists all the NetDisk you can select from to mirror the data. 29 www.XIMETA.de ————————————————————————————————————————————— NetDisk User Manual Network Direct Attached Storage / NDAS ————————————————————————————————————————————— • Select a NetDisk from the NetDisk Available box that you want to Aggregate / Bind and Mirror to: • Once you selected a NetDisk, click - • button then click OK. If you select the wrong NetDisk to Aggregate Bind and Mirrored, you can simply select the NetDisk . This will unbind the NetDisk. from the Bind NetDisk window and click Mirroring Only - Warning Message. - If the NetDisk you are mirroring to is smaller than the NetDisk you are mirroring from, a warning window will appear. - Click OK. - Click Cancel from the Bind window and repeat step again. Make sure you select a larger or same size NetDisk to mirror the data to. 30 www.XIMETA.de ————————————————————————————————————————————— NetDisk User Manual Network Direct Attached Storage / NDAS ————————————————————————————————————————————— • Formatting / Partitioning - Once the mirroring successfully starts, a NetDisk Administrator Window will appear advising you to format / partition the master NetDisk before you can use the mirrored NetDisk. - Instructions to formatting / partitioning can be found at the end of this document. But before you can format / partition a NetDisk, NetDisk has to be enabled. Please continue to the next step for further instructions on enabling and formatting / partitioning NetDisk. - Click OK. • Aggregation / Binding and Mirroring are completed. • Aggregation: The bound NetDisk is indicated by the word Aggr Master: NetDisk 1. The NetDisk from the NetDisk bound box becomes the Master NetDisk and the NetDisk from the NetDisk available box becomes the Slave NetDisk. The slave gets added to the master NetDisk. The name Master NetDisk 1 is Master plus the name of the first NetDisk. 31 www.XIMETA.de ————————————————————————————————————————————— NetDisk User Manual Network Direct Attached Storage / NDAS ————————————————————————————————————————————— • Mirroring: The mirrored NetDisk is indicated by the word Mirror Master: NetDisk 1. The NetDisk from the NetDisk bound box becomes the Master NetDisk and the NetDisk from the NetDisk available box becomes the Slave NetDisk. The master NetDisk is mirrored to slave NetDisk. • Click NetDisk Administrator Tool - • • . NetDisk 1 is disabled Master NetDisk and NetDisk 2 is Slave NetDisk. Enable the Bound / Mirrored NetDisk by selecting either Enable Read/Write or Enable Read Only. Go to NetDisk Aggregation & Mirroring window. You will notice the changes in the color of the Master NetDisk. 32 XIMETA, Inc. www.XIMETA.com ————————————————————————————————————————————— NetDisk User Manual Network Direct Attached Storage / NDAS ————————————————————————————————————————————— • - Aggregation - Mirroring Before you can use the new Bound / Mirrored NetDisk, the NetDisk needs to be partitioned. Please refer to Partition NetDisk. 33 www.XIMETA.de ————————————————————————————————————————————— NetDisk User Manual Network Direct Attached Storage / NDAS ————————————————————————————————————————————— Unbind NetDisk • Click NetDisk Administrator Tool Disable. • and select a master NetDisk you want to unbind. Then select You can only unbind a disabled NetDisk. NetDisk Administrator - If the NetDisk is being used by an application or user, NetDisk will not be disabled. Wait until applications or users finished using NetDisk. Then try disabling it again. - Click OK if you want to disable the NetDisk. Otherwise, click Cancel. - If you still cannot disable after several attempts, reboot your computer. This may occur when unseen programs are still using the NetDisk. - Disabled NetDisk is indicated by Gray circle. 34 www.XIMETA.de ————————————————————————————————————————————— NetDisk User Manual Network Direct Attached Storage / NDAS ————————————————————————————————————————————— • Go to NetDisk Aggregation & Mirroring window. The color of the master NetDisk you just disabled will be Gray. If not, press Status button. • Select a NetDisk you want to unbind and click unbind button. - The bound NetDisk will unbind into the two original NetDisk. - Two unbound NetDisk is also visible from NetDisk™ Administrator Tool . 35 www.XIMETA.de ————————————————————————————————————————————— NetDisk User Manual Network Direct Attached Storage / NDAS ————————————————————————————————————————————— • • Enable the unbound NetDisk by selecting either Enable Read/Write or Enable Read Only. - NetDisk cannot be used until it is enabled. - Repeat this step for the second unbound NetDisk. Right click My Computer. Click Management > Disk Management. - If an unbound NetDisk is not yet initialized, indicated by Section. Otherwise go to Partition NetDisk section. , go to the Initialize NetDisk 36 www.XIMETA.de ————————————————————————————————————————————— NetDisk User Manual Network Direct Attached Storage / NDAS ————————————————————————————————————————————— Formatting NetDisk Initialize NetDisk • Right click My Computer and select Manage. • Computer Management window will appear. Click Disk Management under Storage. • Computer Management window will list all the disks in the computer. • Find NetDisk you want to format and right click - NetDisk you are looking for is the unknown or not initialized disk. 37 www.XIMETA.de ————————————————————————————————————————————— NetDisk User Manual Network Direct Attached Storage / NDAS ————————————————————————————————————————————— • Select Initialize NetDisk. Initialize NetDisk window will appear. Select the right disk and click OK. • NetDisk will be automatically initialized. - Unknown becomes Basic • Right click Unallocated box then select New Partition. • Go to Partition NetDisk Section. 38 www.XIMETA.de ————————————————————————————————————————————— NetDisk User Manual Network Direct Attached Storage / NDAS ————————————————————————————————————————————— Partition NetDisk • Right click My Computer and select Manage. • Computer Management will appear. • Click Disk Management under Storage. - Disabled disk will be shown on the Computer Management. 39 www.XIMETA.de ————————————————————————————————————————————— NetDisk User Manual Network Direct Attached Storage / NDAS ————————————————————————————————————————————— • Right click on the box and select Delete Partition. • Delete primary partition will appear. • - When you delete partition, all the data on the disk will be lost. - Click Yes, if you want to continue partitioning. Otherwise, click No. Partition has been deleted and it is indicated by the word Unallocated. 40 www.XIMETA.de ————————————————————————————————————————————— NetDisk User Manual Network Direct Attached Storage / NDAS ————————————————————————————————————————————— • Right click on the box and select New Partition. • New Partition Wizard: Click next. • Select Partition Type: Select Primary partition and click Next. 41 www.XIMETA.de ————————————————————————————————————————————— NetDisk User Manual Network Direct Attached Storage / NDAS ————————————————————————————————————————————— • Specify Partition Size: Click Next. - • • The partition size is automatically set. Do not change the size. Assign Drive Letter or Path: Select Assign the following driver letter and choose a name for the drive from list. Then click Next. Format Partition: Select Format this partition with the following Settings and perform a quick format (Recommended). - Click next. 42 www.XIMETA.de ————————————————————————————————————————————— NetDisk User Manual Network Direct Attached Storage / NDAS ————————————————————————————————————————————— • Partitioning is finished. Click Finish. - You can see the partitioned disk. 43 www.XIMETA.de ————————————————————————————————————————————— NetDisk User Manual Network Direct Attached Storage / NDAS ————————————————————————————————————————————— Uninstalling NetDisk NetDisk Uninstall Before you can uninstall a NetDisk, you must close all applications using the NetDisk. NetDisk Administrator, NetDisk Aggregation & Mirroring, Windows Explorer and Internet Explorer must also be closed. There are two different ways in which you can uninstall NetDisk. • Click Start > All > NetDisk > Uninstall NetDisk. - • Click Start > Control Panel > Add or Remove Programs > NetDisk > Remove - • Windows Installer will appear. Click Yes if you want to continue uninstall. Otherwise click No. Add or Remove Programs will appear. Click Yes if you want to continue uninstall. Otherwise, click No. Problem Ejecting NetDisk appears when applications are using the NetDisk you are trying to remove. Click OK and try removing NetDisk after applications have been closed. Restart computer after removing the NetDisk. 44 www.XIMETA.de ————————————————————————————————————————————— NetDisk User Manual Network Direct Attached Storage / NDAS ————————————————————————————————————————————— Changing FAT32 File System Format to NTFS File System Format • Please follow below instructions to change File System Format from FAT32 to NTFS - - Right click My Computer. Select Manage. Double click Disk Management. Find NetDisk from the button window and right click on it. Select Delete Partition. Delete primary partition window may appear. Click Yes. Delete all the partitions. Once all of the partitions are deleted, right click unallocated NetDisk and select New Partition. Welcome to the New Partition Wizard will appear. Click Next. Select Primary Partition. Click Next. Use the given Partition size in MB. Click Next. For drive letter, use assigned drive letter or select a new drive letter. Click Next. Select Format this partition with the following settings. Select NTFS for File system Select Default for Allocation unit size. Volume label is optional. Check Perform a quick format. Click Next. Completing the New Partition Wizard will appear. Click Finish. 45 www.XIMETA.de ————————————————————————————————————————————— NetDisk User Manual Network Direct Attached Storage / NDAS ————————————————————————————————————————————— Using NetDisk in Mac OS and Windows Environment Mac OS and Windows users can easily share the same NetDisk on a local area network. • Connect NetDisk to a 100BASE-T / Full Duplex Switch. • NetDisk and computers that need to use NetDisk must be on the same subnet. • On Windows, install Windows Install CD and on Mac, install Mac Install CD. • Register NetDisk onto Windows and Mac computers. NetDisk default file system is NTFS File System Format. To share NetDisk in a Mac OS and Windows Environment, NetDisk must be formatted in FAT32 File System Format. NetDisk must be formatted to FAT32 from Windows. • Formatting NetDisk to FAT32 File System from Windows - - Right click My Computer. Select Manage. Double click Disk Management. Find NetDisk from the button window and right click on it. Select Delete Partition. Delete primary partition window may appear. Click Yes. Wait until partition is deleted. It will be indicated by the word Unallocated. Right click unallocated NetDisk and select New Partition. Welcome to the New Partition Wizard will appear. Click Next. Select Primary Partition. Click Next. Type 32768 into Partition size in MB. Click Next. For drive letter, use assigned drive letter or select a new drive letter. Click Next. Select Format this partition with the following settings. Select FAT32 for File system Select Default for Allocation unit size. Volume label is optional. Check Perform a quick format. Click Next. Completing the New Partition Wizard will appear. Click Finish. • A section of NetDisk will be partitioned in to 32 GB FAT32. • Repeat Formatting NetDisk to FAT32 File System from Windows until rest of the unallocated portion of the NetDisk is formatted. 46 www.XIMETA.de ————————————————————————————————————————————— NetDisk User Manual Network Direct Attached Storage / NDAS ————————————————————————————————————————————— Frequently Asked Questions General • What can NetDisk™ be used for? - NetDisk™ can be used with a variety of applications. It is ideal for all users that cannot afford NAS systems, such as small to medium businesses, SOHO (Small Office Home Office), workgroups, departments, schools and public institutions. NDAS technology’s convenience and low cost provides the best storage solution for home / office networking. • • • Use as storage for Personal Computer and Home Networking (Storing and sharing files, backup / archiving, etc.) Expanding storage requirements. Business primary or secondary network storage. Public institution’s storage for data archives, disclosed data, backups, and conservation of data. Multimedia storage device (MP3s, Digital Photos, Digital Video). Multi-platform networking (Simultaneous use from Macintosh, Windows, and Linux) Non-PC / Non-Computing applications (security, CCTV, techograph recording, MRI, entertainment). How is NetDisk™ different from NAS or SAN? - NetDisk is more of a low cost alternative to NAS or SAN. It is more for the users looking for lower costs and storage associated with backup / archiving. Basically, both NetDisk™ and NAS are storage devices that are implemented over a network. In NAS, the hard disk is connected to a storage server and that server is connected to a network; but in contrast, NetDisk™ utilizes NDAS technology allowing it to connect the hard disk directly to a network without a server. - NetDisk is much more cost-effective, efficient and easy to use. It also takes up less space than NAS or SAN products. What Operating Systems does NetDisk™ support? - NetDisk™ currently supports Windows XP, Windows 2000, and Mac OS. Windows ME is only supported by USB. XIMETA will release beta software for Windows 98SE, Linux Red Hat 9.0 and Multi Write Sharing. - Unsupported operating systems can still use the NetDisk through Windows File Sharing. The computer which NetDisk is installed on will have to be turned on in order for other computers to access the NetDisk. Can multiple users access the drive at the same time? 47 www.XIMETA.de ————————————————————————————————————————————— NetDisk User Manual Network Direct Attached Storage / NDAS ————————————————————————————————————————————— - • • Are there any known issues with NetDisk™? - Currently there is an issue with Hyperthreading and Dual Processors. Hyperthreading is a new technology that is associated with the new Pentium 4 Processors. We have just released a free beta version of the NetDisk™ software that addresses this issue. - There also is a compatibility issue when used with DLINK, SMC and US Robotics 802.11b wireless routers. With their 802.11b, there are no any problems. We are currently working on finding a solution. - When used with McAfee Virus Scan Professional 7.0, you must disable HAWK Script Stopper in McAfee, or disable McAfee from scanning before rebooting your computer upon installation of NetDisk software. - If Internet access is blocked after rebooting, you can do a System Restore or uninstall McAfee and internet access should be restored. More information can be provided by going to our troubleshooting section or by calling XIMETA Technical Support at 949-753-7983. Does it matter what kind of device that NetDisk™ plugs into? - • Theoretically, there is no limit. Recommended users are 2 to 20. Are the NetDisk™ drives preformatted? - • NetDisk is not dependant on any file system. The file system on Operating System that you use NetDisk with will vary. Windows 98SE and ME supports FAT32. Windows 2000/XP supports FAT32 and NTFS (default NetDisk file system) LINUX and MAC OS X have their own file system, but also support FAT32 for use with Windows as well. How many users can use a NetDisk™? - • Yes, NetDisk™ is recommended to be plugged into a 100Mb / full duplex capable switch. It can be plugged into a hub, but it is not supported and you may experience problems. What files systems are supported by NetDisk™? - • Yes, multiple users can access NetDisk™ at the same time. However, write access is only granted to only one specific user at a time. An updated driver will be provided in November, 2003, that will enable multi-write access. Yes, they are formatted with NTFS and can be reformatted and partitioned easily using your computer’s Operating System. For NDAS mode, do I need drivers installed on each PC that is using the NetDisk? 48 www.XIMETA.de ————————————————————————————————————————————— NetDisk User Manual Network Direct Attached Storage / NDAS ————————————————————————————————————————————— - • Where can I purchase NetDisk™? - • Yes, the easy to install drivers need to be loaded on each PC that needs access to NetDisk. This is unless you are using Windows Sharing. Then only one computer will have to have the software installed. The others will not need it. Currently, NetDisk can be purchased at Best Buy, Fry's Electronics, CompUSA, PCMall, and TigerDirect. For locations nearest you, contact [email protected] What type of service and warranty does NetDisk™ come with? - NetDisk™ comes with a one year limited warranty. Please note that if the device has been opened or tampered with in any way, the warranty will is void. USB • What USB version is NetDisk™ supported on? - • NetDisk™ is supported on USB 1.1 and 2.0, but 2.0 is recommended. Is the NetDisk™ application required to use USB? - No, just make sure that the dip switches on the back of the NetDisk™ are in the up position. Make sure that NetDisk is powered off before changing dip switch settings. Wireless • I would like to use wireless with my NetDisk™; is this possible? - Yes it is possible, but XIMETA recommends that you use an 802.11a or 802.11g router. 802.11b will work, but because it is only 11mbps, transfer can take extremely long because of the low bandwidth, you may see errors. If using an 802.11b router or card, we recommend that you plug your computer directly into an unused port on your wireless router or switch with an Ethernet cable when doing large file transfers. - Currently there are compatibility issue when used with various DLINK, SMC and USRobotics 802.11b products. We are working to find a solution. NetDisk does work fine when used with their 802.11g wireless products. You may also experience problems when used with Wireless Bridges due to the way that they operate. 49 www.XIMETA.de ————————————————————————————————————————————— NetDisk User Manual Network Direct Attached Storage / NDAS ————————————————————————————————————————————— Aggregation & Mirroing • What is the maximum number of NetDisk™ that support aggregation? - • Aggregation can currently be done using two (2) NetDisk™, with support for ten (10) in the future. When used with Mirroring, and one NetDisk™ goes down what happens? - The kind of mirroring done with NetDisk™ software is basic. You must format before mirroring or aggregating NetDisk™. - If one NetDisk goes down, data will still be on the other NetDisk and can be accessed, but if you want to replace the down NetDisk, you must format both NetDisk again to recreate mirror. 50 www.XIMETA.de ————————————————————————————————————————————— NetDisk User Manual Network Direct Attached Storage / NDAS ————————————————————————————————————————————— Troubleshooting General • How do I install NetDisk ™? NetDisk™ can be installed using either Ethernet or USB. Ethernet connection allows NetDisk™ to be used as a Network Storage Device; USB connection allows NetDisk to be used as a high-speed external hard drive. - To install in NDAS Mode (requires a 100 Mb / full duplex switch) - To install in Ethernet Mode (requires a cross-over cable which is not supplied) - Mode switch in the back of NetDisk should be set to USB 2.0, upward position. NetDisk must be powered off to change switch setting. Connect the Power Cable and USB Cable, from NetDisk, to power and USB port on computer, respectively. Computer should automatically recognize NetDisk. For Windows ME, Linux and MAC, NetDisk must me formatted to FAT32 or recognized file system. When adding NetDisk to my computer, why does the "ADD" button stay gray? - • Mode switch in the back of NetDisk should be set to NDAS / Ethernet, downward position, default is set to NDAS / Ethernet. NetDisk must be powered off to change switch setting. Connect the Power Cable and Cross-Over Cable, from NetDisk to power and Ethernet port on computer, respectively. Install NetDisk™ software from Installation CD down load from XIMETA website. To install in USB 2.0 Mode • Mode switch in back of NetDisk should be set to NDAS / Ethernet, downward position, default is set to NDAS / Ethernet. NetDisk must be powered off to change switch setting. Connect the Power Cable and LAN Cable, from NetDisk to power and switch respectively. Install NetDisk™ software from Installation CD down load from XIMETA website. You may not have entered values correctly. The letter "O" is not used; please verify that you have used the number "0" (zero). I have just installed NetDisk; why is the NetDisk showing up as a red color? - Try unplugging your NetDisk power cord, wait about 10 seconds, and plug it back in. If this doesn't work, try restarting your computer. 51 www.XIMETA.de ————————————————————————————————————————————— NetDisk User Manual Network Direct Attached Storage / NDAS ————————————————————————————————————————————— • • I am getting “NetDisk unplugged abnormally”? - NetDisk has lost connection to your computer. Please check your connections. Make sure that NetDisk is plugged into a 100mb/full duplex capable switch. NetDisk does not support hubs. If you have your switches uplinked to another one, try putting NetDisk and your computer on the same switch and retry. - Try setting your Ethernet Port speed / duplex settings to 100 Mb / full duplex. This can be done by: Right clicking My Network Places, click on Properties, right click on Local Area Connection and click on Properties. Then click on the Configure button next to your Ethernet Port and click on the Advanced Tab. Click on Speed & Duplex drop down menu and select 100 Mb / full duplex. - It is also possible that you have some energy saving features turned on such as Hibernation / Standby. Please check those as well. - You can try going to your Ethernet Card manufacturer and downloading the latest driver. - If using a Cable / DSL Router, try updating the firmware. - Try plugging NetDisk and computer into a different port on the switch. I have installed the NetDisk key but cannot see NetDisk in "My Computer.” What should I do? - • Why can’t my computer go into hibernation or standby? - • If you want to use your computer in hibernation or standby, you must have NetDisk disabled before that can occur. Click on the NetDisk Admin Tool on you system tray- go to your NetDisk and then you should see a menu with Disable as one of the choices. I’ve just installed NetDisk software, and now my internet does not work. - • Open up "Computer Management" by right-clicking on "My Computer.” Go to "Manage," then click on "Disk Management.” Check to see if your NetDisk is recognized. It should show up as Disk 1 or Disk 2 or a different number depending on the number of drives that you have on your computer. Right-click on the appropriate "Disk #" and click "Initialize.". Also, for Windows ME / Linux / MAC users, you will need to format disk to FAT32 for it to be recognized. This can happen when used with McAfee Virus Scan Professional 7.0; you must disable HAWK Script Stopper in McAfee, or disable McAfee from scanning before rebooting your computer upon installation of NetDisk software. I have clicked on the NetDisk Administrator Tool on my desktop and nothing happens. - The icon on the desktop is only used to launch NetDisk Administrator Tool into the system tray, if for some reason it is not in there. The icon in the system tray is used for Enabling, Disabling, Adding, Removing and switching Read / Write modes on NetDisk. 52 www.XIMETA.de ————————————————————————————————————————————— NetDisk User Manual Network Direct Attached Storage / NDAS ————————————————————————————————————————————— • I am getting a "Data has been corrupted" message on my computer when I try to open up or copy a file. What should I do? - • Windows comes with a utility called "Scan Disk.” Open up "My Computer," right-click on your NetDisk drive letter and click on "Properties.” Go to the "Tools" tab and then click on the "Check Now" button under "Error-Checking." When I try to copy something to my NetDisk, why does the following show up: “Cannot copy NetDisk Administrator: The disk is write-protected. Remove the write-protection or use another disk.”? - You do not have Read / Write access. Click on the NetDisk Icon in your bottom-right system tray. Go to your NetDisk and then click on "Enable Read/Write." • I getting this error message: “The device ‘Generic volume’ cannot be stopped right now. Try stopping the device again later.”? - Close any windows that are displaying your NetDisk and retry what you were trying to do. If you continue to get that error message, try rebooting your computer. USB • I have plugged in NetDisk to my USB port and cannot see NetDisk in My Computer. - • Please make sure that both Dip Switches on the back of NetDisk are in the “UP” position. You must power off NetDisk completely before doing so. Try plugging NetDisk into a different USB port on your computer and see if that works. If using Windows ME, Linux, or MAC, please make sure that NetDisk is formatted in a supported files system. Windows ME requires FAT32. LINUX and MAC have their own file systems, but also support FAT32 as well. It is up to you to choose the appropriate one. My NetDisk shows up as a Black dot when used with USB. - When used with USB mode, the NetDisk Software not needed, therefore you will see a Black Dot (disconnected) in the system tray as that is an indicator for NDAS (Ethernet) mode. Wireless • My NetDisk cannot be seen when used with an 802.11b wireless router. - Please check your connection speed. Although it may say that connection is “Excellent”, speed may not be the same. There is also a compatibility issue when used with DLINK, SMC and US Robotics 802.11b products. We are working to find a solution. It does work fine when used with their 802.11g wireless products. 53 www.XIMETA.de ————————————————————————————————————————————— NetDisk User Manual Network Direct Attached Storage / NDAS ————————————————————————————————————————————— • Why is my transfer speed slow? - When used with 802.11b products, transmit speed is slow, there can be errors occurring. We recommend that when doing large file transfers, that you plug your computer into a switch to do the transfer. Aggregation & Mirroing • I cannot Aggregate or Mirror NetDisk? - Please make sure that your NetDisk is disabled before mirroring or aggregating them. 54 www.XIMETA.de ————————————————————————————————————————————— NetDisk User Manual Network Direct Attached Storage / NDAS ————————————————————————————————————————————— Regulatory Statements United States (FCC) The computer equipment described in this manual generates and uses radio frequency (RF) energy. If the equipment is not installed and operated in strict accordance with the manufacturer's instructions, interference to radio and television reception might result. This equipment complies with Part 15 of the FCC Rules. Operation is subject to the following conditions: (1) This device may not cause harmful interference, and (2) this device must accept any interference received, including interference that may cause undesired operation. Part 15, Class B, of the FCC Rules, is designed to provide reasonable protection against radio and television interference in a residential installation. Although the equipment has been tested and found to comply with the allowed RF emission limits, as specified in the above cited Rules, there is no guarantee that interference will not occur in a particular installation. Interference can be determined by turning the equipment off and on while monitoring radio or television reception. The user may be able to eliminate any interference by implementing one or more of the following measures: • • • • Reorient the affected device and/or its receiving antenna. Increase the distance between the affected device and the computer equipment. Plug the computer and its peripherals into a different branch circuit from that used by the affected device. If necessary, consult an experienced radio/television technician for additional suggestions. European Community (CE) This product conforms to the following European Directive(s) and Standard(s): Application of Council Directives: • EC directive 89/336/EEC. Importer's Name: XIMETA, Inc. Type of Equipment: Information Technology Equipment. TRANSLATION: Störfestigkeit nach EN 50082-1 (89/336/EEC) wird erfüllt. XIMETA, Inc. 15251 Alton Parkway Irvine, CA 92618 55 www.XIMETA.de ————————————————————————————————————————————— NetDisk User Manual Network Direct Attached Storage / NDAS ————————————————————————————————————————————— Product Warranty XIMETA, Inc. provides a warranty for its product only if the buyer originally purchased the product from: XIMETA, or an authorized Reseller / Distributor. Limited Hardware Warranty: XIMETA warrants that the hardware portion of the XIMETA products ("Hardware") described below will be free from material defects in workmanship and materials from the date of original retail purchase of the Hardware, for the period set forth (“Warranty Period”). Limited Warranty for the Products(s) is defined as follows: Hardware (NetDisk unit, excluding power supplies) XIMETA’s sole obligation shall be to repair or replace the defective device at no charge to the original owner. Such repair or replacement will be rendered by XIMETA at an Authorized XIMETA Service Office. The replacement Hardware need not be new or of an identical make, model or part; XIMETA may in its discretion replace the defective hardware (or any part thereof) with any reconditioned product that XIMETA reasonably determines is substantially equivalent (or superior) in all material respects to the defective Hardware. The Warranty Period shall extend for an additional ninety (90) days after any repaired or replaced Hardware is delivered. If a material defect is incapable of correction, or if XIMETA determines in its sole discretion that it is not practical to repair or replace the defective Hardware, the price paid by the original purchaser for the defective Hardware will be refunded by XIMETA upon receipt of the defective Hardware. All Hardware (or any part thereof) that is replaced by XIMETA, or for which the purchase price is refunded, shall become the property of XIMETA upon replacement or refund. Limited Software Warranty: XIMETA warrants that the software portion of the product (“Software”) will substantially conform to XIMETA's then current functional specification for the Software, as set forth in the applicable documentation, from the date of original delivery of the Software for a period of ninety (90) days (“Warranty Period”), only if the Software is properly installed on approved hardware and operated as contemplated in its documentation. XIMETA further warrants that, during the Warranty Period, the magnetic media on which XIMETA delivers the Software will be free of physical defects. XIMETA’s sole obligation shall be to replace the non-conforming Software (or defective media) with Software that substantially conforms to XIMETA’s functional specifications for the Software. Except as otherwise agreed by XIMETA in writing, the replacement Software is delivered. If a material non-conformance is incapable of correction, or if XIMETA determines in its sole discretion that it is not practical to replace the non-conforming Software, the price paid by the original license for the non-conforming Software will be refunded by XIMETA; provided that the nonconforming Software (and all copies thereof) is first returned to XIMETA. The license granted respecting any Software for which a refund is given automatically terminates. What You Must Do For Warranty Service: Registration is conducted via a link on our Website (http://www.XIMETA.com). Each product purchased must be individually registered for warranty service within ninety (90) days after it is purchased and/or licensed. FAILURE TO PROPERLY TO REGISTER MAY AFFECT THE WARRANTY FOR THE PRODUCT. 56 www.XIMETA.de ————————————————————————————————————————————— NetDisk User Manual Network Direct Attached Storage / NDAS ————————————————————————————————————————————— Submitting a Claim: Any claim under this limited warranty must be submitted in writing before the end of the Warranty Period to an Authorized XIMETA Service Office. The customer must submit as part of the claim a written description of the Hardware defect or Software nonconformance in sufficient detail to allow XIMETA to confirm the same. The original product owner must obtain a Return Material Authorization (RMA) number from the Authorized XIMETA Service Office and if requested, provide written proof of purchase of the product (such as a copy of the date purchase invoice for the product) before the warranty service is provided. After an RMA number is issued, the defective product must be packaged securely in the original or other suitable shipping package to ensure that it will not be damaged in transit, and the RMA number must be prominently marked on the outside of the package. The customer is responsible for all shipping charges to and from XIMETA (No CODs allowed). Products sent COD will become the property of XIMETA Inc. Products should be fully insured by the customer and shipped to: XIMETA, Inc. 15251 Alton Parkway Irvine, CA 92618 XIMETA may reject or return any product that is not packaged and shipped in strict compliance with the foregoing requirements, or for which an RMA number is not visible from the outside of the package. The product owner agrees to pay XIMETA's reasonable handling and return shipping charges for any product that is not packaged and shipped in accordance with the foregoing requirements, or that is determined by XIMETA not to be defective or non-conforming. What is not covered: This limited warranty provided by XIMETA does not cover: Products that have been subject to abuse, accident, alteration, modification, tampering, negligence, misuse, faulty installation, lack of reasonable care, repair or service in any way that is not contemplated in the documentation for the product, or if the model or serial number has been altered, tempered with, defaced or removed; Initial installation, installation and removal of the product for repair, and shipping costs; Operational adjustments covered in the operating manual for the product, and normal maintenance; Damage that occurs in shipment, failures due to power surge, and cosmetic damage; and Any hardware, software, firmware or other products or services provided by anyone other than XIMETA. Disclaimer of Other Warranties: EXCEPT FOR THE 1-YEAR LIMITED WARRANTY SPECIFIED HEREIN, THE PRODUCT IS PROVIDED "AS-IS" WITHOUT ANY WARRANTY OF ANY KIND INCLLUDING, WITHOUT LIMITATION, ANY WARRANTY OF MERCHANTABLITY, FITNESS FOR A PARTICULAR PURPOSE AND NON-INFRINGEMENT. IF ANY IMPLIED WARRANTY CANNOT BE DISCLAIMED IN ANY 57 www.XIMETA.de ————————————————————————————————————————————— NetDisk User Manual Network Direct Attached Storage / NDAS ————————————————————————————————————————————— TERRITORY WHERE A PRODUCT IS SOLD, THE DURATION OF SUCH IIMPLIED WARRANTY SHALL BE LIMITED TO NINETY (90) DAYS. EXCEPT AS EXPRESSLY COVERED UNDER THE LIMITED WARRANTY PROVIDED HEREIN, THE ENTIRE RISK AS TO THE QUALITY, SELECTION AND PERFORMANCE OF THE PRODUCT IS WITH THE PURCHASER OF THE PRODUCT. Limitation of Liability: TO THE MAXIMUM EXTENT PERMITTED BY LAW. XIMETA IS NOT LIABLE UNDER ANY CONTRACT, NEGLIGENCE, STRICT LIABILITY OR OTHER LEGAL OR EQUITABLE THEORY FOR ANY LOSS OF USE OF THE PRODUCT, INCONVENIENCE OR DAMAGES OF ANY CHARACTER, WHETHER DIRECT, SPECIAL, INCIDENTAL OR CONSEQUENTIAL (INCLUDING, BUT NOT LIMITED TO, DAMAGES FOR LOSS OF GOODWILL, WORK STOPPAGE, COMPUTER FAILURE OR MALFUNCTION, LOSS OF IMFORMATION OR DATA CONTAINED IN, STORED ON, OR INTEGRATED WITH ANY PRODUCT RETURNED TO XIMETA FOR WARRANTY SERCIDE) RESULTING FROM THE USE OF THE PRODUCT, RELATING TO WARRANTY SERVICE, OR ARISING OUT OF ANY BREACH OF THIS LMITED WARRANTY, EVEN IF XIMETA HAS BEEN ADVISED OF THE POSSIBILITY OF SUCH DAMAGES. THE SOLE REMEDY FOR A BREACH OF THE FOREGOING LIMITED WARRANTY IS REPAIR, REPLACEMENT OR REFUND OF THE DEFECTIVE OR NON-CONFORMING PRODUCT. GOVERNING LAW: The applicable laws, that govern, interpret and enforce rights, duties, and obligations of each party arising from, or relating in any manner to, the subject matter of this Statement, without regard to conflict of laws principles, as well as Country-unique terms and competent court for this Statement are those of the country in which the warranty service is being provided. Consumers in the EUROPEAN UNION have legal rights under the applicable national legislation governing the sale of consumer goods. Such rights are not affected by the warranties provided in this Statement of Limited Warranty. WARRANTY PERIOD Unless otherwise provided by mandatory law the warranty period is one year. THE FOLLOWING TERMS APPLY TO THE COUNTRIES SPECIFIED: AUSTRIA, BELGIUM, DENMARK, FINLAND, FRANCE, GREECE, ITALY, NETHERLANDS, NORWAY, PORTUGAL, SPAIN, SWEDEN AND SWITZERLAND Except as otherwise provided by mandatory law: 1. XIMETA's liability to any damages and losses that may arise as a consequence of the fulfillment of its obligations under or in connection with this Statement of Limited Warranty or due to any other cause related to this Statement of Limited Warranty is limited to the compensation of only those damages and losses proved and actually arising as an immediate and direct consequence of the non-fulfillment of such obligations (if XIMETA is at fault) or of such cause, to a maximum amount equal to the charges the buyer paid for the product. 58 www.XIMETA.de ————————————————————————————————————————————— NetDisk User Manual Network Direct Attached Storage / NDAS ————————————————————————————————————————————— The above limitation shall not apply to damages for bodily injuries (including death) and damages to real property and tangible personal property for which XIMETA is legally liable. 2. UNDER NO CIRCUMSTANCES IS XIMETA, ITS SUPPLlERS OR RESELLERS LlABLE FOR ANY OF THE FOLLOWING, EVEN IF INFORMED OF THEIR POSSIBILlTY: 1) LOSS OF, OR DAMAGE TO, DATA; 2) INCIDENTAL OR INDIRECT DAMAGES, OR FOR ANY ECONOMIC CONSEQUENTIAL DAMAGES; 3) LOST PROFITS, EVEN IF THEY ARISE AS AN IMMEDIATE CONSEQUENCE OF THE EVENT THAT GENERATED THE DAMAGES; OR 4) LOSS OF BUSINESS, REVENUE, GOODWILL, OR ANTICIPATED SAVINGS. GERMANY The warranty for an XIMETA Product covers the functionality of the Product for its normal use and the Product's conformity to its Specifications. In case XIMETA or your reseller is unable to repair an XIMETA Product, you can alternatively ask for a partial refund as far as justified by the reduced value of the unrepaired Product or ask for a cancellation of the respective agreement for such Product and get your money refunded. During the warranty period, transportation for delivery of the failing Product to XIMETA will be at XIMETA's expense. The limitations and exclusions specified in the Statement of Limited Warranty will not apply to damages caused by XIMETA with fraud or gross negligence and for express warranty . IRELAND Except as expressly provided in these terms and conditions, all statutory conditions, including all warranties implied, but without prejudice to the generality of the foregoing all warranties implied by the Sale of Goods Act 1893 or the Sale of Goods and Supply of Services Act 1980 are hereby excluded. XIMETA is liable to no more than 1. Death or personal injury or physical damage to the owners real property solely caused by XIMETA's negligence; 2. the amount of any other actual direct damages, up to 125 percent of the charges (if recurring, the 12 months' charges apply) for the Product that is the subject of the claim or which otherwise gives rise to the claim. ITALY Unless otherwise provided by mandatory law XIMETA's liability, will be limited to the total amount the owner paid for the Product that is the subject of the claim. Unless otherwise provided by mandatory law, XIMETA and your reseller are not liable for any indirect damages, even if XIMETA or your reseller is informed of their possibility. 59 www.XIMETA.de ————————————————————————————————————————————— NetDisk User Manual Network Direct Attached Storage / NDAS ————————————————————————————————————————————— UNITED KINGDOM XIMETA is liable to no more than 1. Death or personal injury or physical damage to the owners real property solely caused by XIMETA's negligence; 2. the amount of any other actual direct damages, up to 125 percent of the charges (if recurring, the 12 months' charges apply) for the Product that is the subject of the claim or which otherwise gives rise to the claim; 3. Breach of XIMETA's obligations implied by Section 12 of the Sale of Goods Act 1979 or Section 2 of the Supply of Goods and Services Act 1982. NOTICE: These Statement has been executed in English and translated into different languages. In any case the English version shall prevail. 60 www.XIMETA.de ————————————————————————————————————————————— NetDisk User Manual Network Direct Attached Storage / NDAS ————————————————————————————————————————————— Additional Information and Assistance For additional information, frequently asked questions or troubleshooting help, please refer to the NetDisk User Manual. Assistance is also available by contacting XIMETA, Inc. Whenever you contact XIMETA, Inc. for technical support, please have the following information available: • • • • Product Name Model Serial Number Software Version How to Contact XIMETA, Inc.: Technical Support by Telephone: Technical Support: 949-753-7983 Technical Support by E-Mail: Our e-mail address for technical support is [email protected]. Technical Support on the Internet: For the latest information on NetDisk / NetDisk Mini, visit our website at www.XIMETA.com. HANTZ + PARTNER The Upgrade Company! www.hantz.com Deutschland: Tel.: 0761 / 592100 Fax: 0761 / 585228 Schweiz: Tel.: 061 / 27311-31 Fax: 061 / 27311-39 Österreich: Tel.: 01 / 51474-415 Fax: 01 / 51474-337 61 www.XIMETA.de —————————————————————————————————————————————