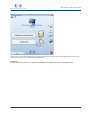
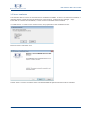
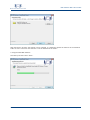
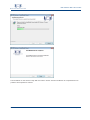
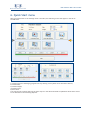
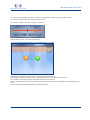
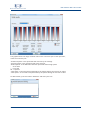
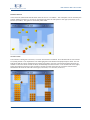
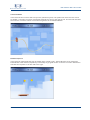
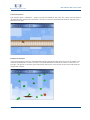
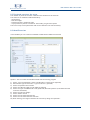
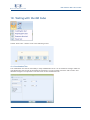
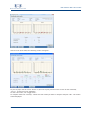
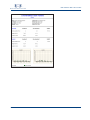
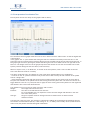
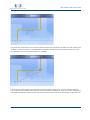
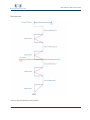
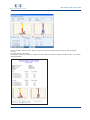
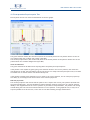
1
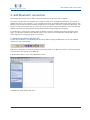
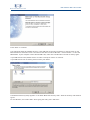
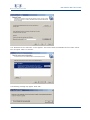
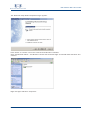
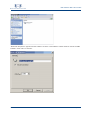
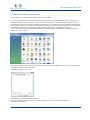
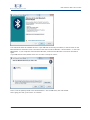
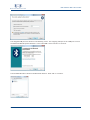
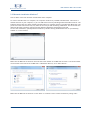
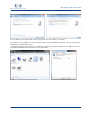
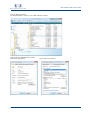
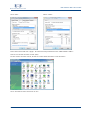
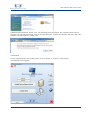
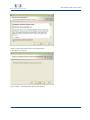
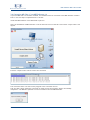
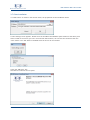
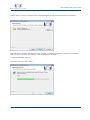
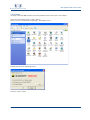
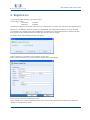
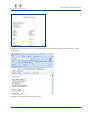
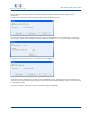
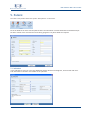
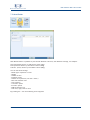
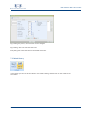
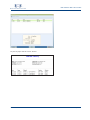
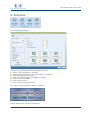
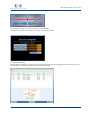
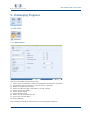
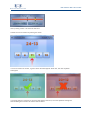
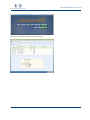
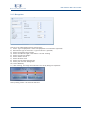
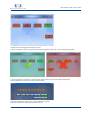
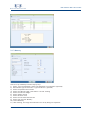
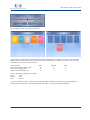
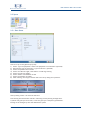
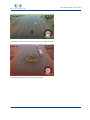
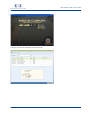
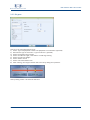
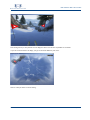
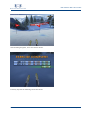
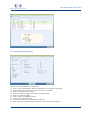
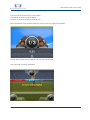
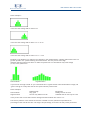
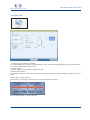
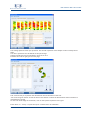
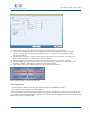
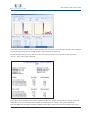
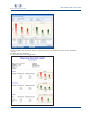
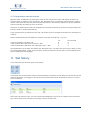
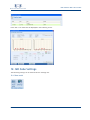
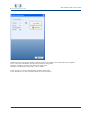
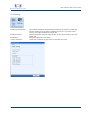
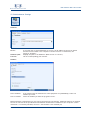
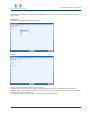
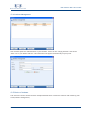
Product of:
MRS Software manual 4.4
Module MR Cube
MRS-E1206
MRS Software MR Cube module
Table of contents
1. User manual MR Cube......................................................................... 3
Add Bluetooth connection................................................................. 7
2.
2.1 Bluetooth installation Windows XP.............................................. 7
2.2 Bluetooth installation Windows Vista......................................... 12
2.3 Bluetooth installation Windows 7.............................................. 15
3. MRS Software: MR Cube module installation..........................17
3.1
3.2
3.3
3.4
3.5
3.6
3.7
3.8
Introduction............................................................................. 17
Minimal requirements: ............................................................. 17
Permissions.............................................................................. 17
Autorun.................................................................................... 20
Server Installation..................................................................... 25
Conversion MR Cube 1.3 to MRS Software 4.1........................... 28
Client Installation..................................................................... 29
Uninstall................................................................................... 32
4. Registration...........................................................................................35
5. Patient
.................................................................................................38
5.1 Indication................................................................................. 38
5.2 Extended history...................................................................... 38
6. Quick Start menu.................................................................................40
7. Rehab .................................................................................................40
7.1 Rehab....................................................................................... 40
7.2 Mixed Rehab.............................................................................43
7.3 Rehab History........................................................................... 44
8. Exercises.................................................................................................46
8.1
8.2
8.3
8.4
Functional exercises................................................................. 46
Functional exercises: the scores............................................... 50
Mixed Excercises...................................................................... 50
Exercise history........................................................................ 51
9. Challenging Programs......................................................................52
9.1 Dual Tasks................................................................................ 52
9.1.1 Mathematics.......................................................................... 52
9.1.2 Recognition........................................................................... 55
9.1.3 Memory................................................................................. 57
9.2 Sports....................................................................................... 60
9.2.1 Race game............................................................................. 60
9.2.2 Ski game............................................................................... 63
9.2.3 Football game.......................................................................66
10. Testing with the MR Cube............................................................69
10.1 Coordination Test................................................................... 69
10.2 Interpretation Coordination Test............................................. 73
10.3 Power Test.............................................................................. 75
10.4 Proprioceptive Test................................................................. 78
10.5 Interpretation Proprioceptive Test........................................... 83
9.6 Response time test................................................................... 85
10.7 Interpretation response time test............................................ 89
11. Test history.........................................................................................89
12. MR Cube Settings.............................................................................90
12.1
12.2
12.3
12.4
12.5
12.6
12.7
Show serial............................................................................. 90
Settings.................................................................................. 92
Administrator Settings............................................................ 93
Institute Management............................................................. 95
Choice of institute.................................................................. 95
Back-up database.................................................................... 96
Restore database.................................................................... 96
13. Shortcuts..............................................................................................97
2
© 2012 Monitored Rehab Systems
MRS Software MR Cube module
1.
User manual MR Cube
The MR Cube system includes:
-
MR Cube
Battery charger including manual of battery charge
Velcro tape with D-ring
Karabiner
Magnet
The MR Cube
The MR Cube exists of different parts and accessories. In the following paragraphs the working of those parts
and accessories is explained.
3
© 2012 Monitored Rehab Systems
MRS Software MR Cube module
The MR Cube cable
The MR Cube cable is the cable which makes the MR Cube measure the range of motion and the user’s position during training. The cable is guided into the MR Cube by the yellow rollers. At the end of the cable an
eye is attached which enables the user to use the MR Cube in many different ways. To pull out the cable a
minimum Force of about 5 Newton (500 gram) is needed.
IMPORTANT:
DO NOT LET THE CABLE SNAP BACK. DO NOT TRAVEL OVERRANGE (max 2.3 meter). THIS CAN CAUSE DAMAGE
TO THE MR CUBE.
The ON/OFF slide switch
At the same place where the LED'S are attached on top of the MR Cube, the ON/OFF slide switch is attached
on the side. This button is a slide switch. The On and OFF position are indicated with the lines on top of the
MR Cube.
Battery charger connector
Besides the ON/OFF slide switch, the connector for the battery charger is attached.
On top off the MRCube 4 LED’s are attached. These LED’s are:
Low battery LED
This LED will start burning if the supply voltage from the battery becomes low and the charger is not connected. After this led starts burning, the MR Cube can still be used for about one hour without the charger
being connected.
Connected LED
This LED will start burning if a connection is established between the MR Cube and the computer which runs
the MR Cube Software.
ON LED
This LED will start burning if the MR Cube is turned on. It makes no difference if the MR Cube is working with
or without the charger connected.
OFF / Charge LED
This LED will start burning if the MR Cube is turned OFF and the charger is connected. If the MR Cube is
turned on and the charger is connected, the OFF / Charge LED will not burn.
4
© 2012 Monitored Rehab Systems
MRS Software MR Cube module
The Battery Charger
The battery charger can be connected to the battery charger connector and can be used as a charger as well
as a voltage supply.
If the MR Cube is OFF and the battery charger is connected, the battery is charged and the OFF / Charge LED
will burn.
If the MR Cube is ON and the battery charger is connected, the charger is used as a voltage supply and as a
charger. In this case, only the ON LED will burn.
On the battery charger itself, another led is attached. The colors of this led will change depending on the
status of the charge cycle.
Yellow: No battery connected/Idle state
Orange: Charging
Green: Ready
Orange/Green: Error (reconnect the charger)
Warning for MR Cube users in USA: Do not use MR Cube if battery charger is connected.
The Karabiner
The karabiner can be used to attach the cable from the MR Cube to the D-ring of the Velcro tape or to other
equipment.
The Velcro tape with D-ring
The Velcro tape can be used to attach the MR Cube to a dumbbell, barbell or other equipment. Make sure
the Velcro tape cannot slide of the equipment while being used. Snapping back the cable into the MR Cube
can cause damage to the MR Cube.
5
© 2012 Monitored Rehab Systems
MRS Software MR Cube module
The magnets
The magnet with moveable hook can be attached on top of a weight stack. The eye at the end of the MR
Cube cable can be attached to the hook.
The two other magnets can be used to attach the MR Cube cable to other equipment.
IMPORTANT:
MAKE SURE THAT THE MR CUBE CABLE IS ATTACHED PROPERLY. LETTING THE CABLE SNAP BACK, CAN CAUSE
DAMAGE TO THE MR CUBE.
6
© 2012 Monitored Rehab Systems
MRS Software MR Cube module
2.
Add Bluetooth connection
Chapter will explain how to add a connection between the MR Cube and a computer.
This
To connect the MR Cube to a computer, the computer needs to be provided with Bluetooth. This can be a
default function on your computer, or you can add this function by installing a Bluetooth USB converter. The
following instructions are about installing the MR Cube on a computer which is provided with Bluetooth. The
pictures in these instructions may vary from the screens you will see during installation. This is because the
different Microsoft operating systems and the different Bluetooth configuration programs.
If the MR Cube is connected to another than the default computer, the Bluetooth pairing should be done
again. The MR Cube should be switched off before re-use. We do not recommend to use one MR Cube on
more computers according the above extra actions.
2.1 Bluetooth installation Windows XP
To start the installation, open My Bluetooth Places by double clicking the Bluetooth icon on your desktop,
taskbar or in the Control Panel.
Make sure the MR Cube is turned on and that the serial number of the MR Cube is known. The serial number
can be found at the bottom of the MR Cube.
In My Bluetooth Places, click "Add a Bluetooth Device".
The Bluetooth Setup Wizard will start:
7
© 2012 Monitored Rehab Systems
MRS Software MR Cube module
Press <Next> to continue.
The wizard will show all available devices. If your MR Cube is found by the wizard, it will be shown on the
Bluetooth Device Selection screen. The name of the device must be MR Cube +”serial number”. In this case
MRCube014. If your computer cannot find the MR Cube, make sure the MR Cube is turned on and try again.
If your MR Cube is found, double click it or select it and press <Next> to continue.
If your MR Cube is still not found, please contact your dealer.
The Bluetooth Security Setup appears. In the field “Bluetooth security code:” field the security code must be
typed.
For the MR Cube, this code is 2031. After typing the code, press <Pair Now>.
8
© 2012 Monitored Rehab Systems
MRS Software MR Cube module
The “Bluetooth Service Selection” screen appears. This screen shows the available services. Select "SerialPort" and press <Next> to continue.
The following message may appear. Press <OK>.
9
© 2012 Monitored Rehab Systems
MRS Software MR Cube module
The “Bluetooth Setup Wizard Completion Page” appears.
Press <Finish> to continue. The screen closes and the MR Cube is installed.
Open” My Bluetooth Places”. The MR Cube is shown and connected. Right click the MR Cube and select <Disconnect>.
Right click again and select "Properties".
10
© 2012 Monitored Rehab Systems
MRS Software MR Cube module
“Bluetooth Properties” appears and the COM Port is shown. This COM Port number must be used in the MRS
software. Press <OK> to continue.
11
© 2012 Monitored Rehab Systems
MRS Software MR Cube module
How to add a connection between the MR Cube and a computer.
2.2 Bluetooth installation Windows Vista
To connect the MR Cube to a computer, the computer needs to be provided with Bluetooth. This can be a
standard function on your computer, or you can add this function by installing a Bluetooth USB converter.
The following instructions are about installing the MR Cube on a computer which is provided with Bluetooth.
The pictures in these instructions may vary from the screens you will see during installation. This is because
the different Microsoft operating systems and the different Bluetooth configuration programs.
To start the installation, open My Bluetooth Places by double clicking the Bluetooth icon on your desktop,
taskbar or in Control Panel.
Make sure the MR Cube is turned on and that the serial number of the MR Cube is known. The serial number
can be found underneath the MR Cube.
In Bluetooth Devices, click <Add...>
The Add Bluetooth Device Wizard will start.
Make sure the MR Cube is turned on and select “My device is set up and ready to be found".
Press <Next> to continue.
12
© 2012 Monitored Rehab Systems
MRS Software MR Cube module
The wizard will show all available devices. If your MR Cube is found by the wizard, it will be shown on the
Bluetooth Device Selection screen. The name of the device must be MRCube +”serial number”. In this case
MRCube014. If your computer cannot find the MR Cube, make sure the MR Cube is turned on and search
again.
If your MR Cube is found, double click on it or select it and press <Next>.
Select “Use the passkey found in the documentation:” For the MR Cube, this code is 2031.
After typing the code, press <Next> to continue.
13
© 2012 Monitored Rehab Systems
MRS Software MR Cube module
The assigned COM ports are shown in the following screen. The outgoing COM port is the COM port to use in
the Monitored Rehab Systems Software. In this case COM 4. Press <Finish> to continue.
The installed MR Cube is shown in the Bluetooth Devices. Press <OK> to continue.
14
© 2012 Monitored Rehab Systems
MRS Software MR Cube module
How to add a connection between the MR Cube and a computer.
2.3 Bluetooth installation Windows 7
To connect the MR Cube to a computer, the computer needs to be provided with Bluetooth. This can be a
default function on your computer, or you can add this function by installing a Bluetooth USB converter. The
following instructions are about installing the MR Cube on a computer which is provided with Bluetooth. The
pictures in these instructions may vary from the screens you will see during installation. This is because the
different Microsoft operating systems and the different Bluetooth configuration programs.
To start the installation, open My Bluetooth Places by double clicking the Bluetooth icon on your desktop,
taskbar or in Control Panel.
Make sure the MR Cube is turned on and that the serial number of the MR Cube is known. The serial number
can be found at the bottom of the MR Cube. In Bluetooth Devices, click <Add a device>.
Make sure the MR Cube is turned on. Press <Next> to continue. Select “Enter the device's pairing code”.
15
© 2012 Monitored Rehab Systems
MRS Software MR Cube module
For the MR Cube, this code is 2031. After typing the code, press <Next> to continue.
To verify the correct COM port, open the Control Panel. Choose Hardware and Sound - Devices and printers.
Double click the MRCube01 device.
The assigned COM ports are shown in the following screen. The outgoing COM port is the COM port to use in
the Monitored Rehab Systems Software. In this case COM 4.
16
© 2012 Monitored Rehab Systems
MRS Software MR Cube module
3.
MRS Software: MR Cube module installation
Introduction
3.1
In this chapter the installation of Monitored Rehab Systems software is described. The server and the client
installation are clearly explained step by step. Keep this installation manual next to you during the installation.
A number of terms, which are used in the manual, are explained here:
Server: The computer in the network where the database is stored, it is the most important computer. The
client computers are connecting to this database.
Client: A workstation. Clients make connection with the database, which is located on the server.
Firebird Server: A program that enables the communication between MRS software and the database.
IP address: A kind of address from the computer, every computer in the network has his own IP address. (For
example 192.168.0.1)
Database path: a routing to the location where the database is stored on the hard disk. The default path is
generally: “C:\Program Files\MRS Software\Database\MRS.gdb”.
3.2 Minimal requirements:
Processor: Pentium IV or compatible AMD processor
Operating system: Windows XP/Windows Vista/Windows 7
Memory: 2048 Mb
Hard disk: 2 Gb available
Screen resolution: 1024 x 768
Graphic adaptor: ATi of Nvidia DirectX 10 comp. Vertex Shader 3.0 comp. with at least 256 MB VRAM
Extra for MR Cube: Bluetooth (onboard or USB)
3.3 Permissions
You need administrator rights to install the MRS software.
Users of the software needs permissions (full control) on the following folders:
Windows XP:
- C:\Program Files\MRS Software
- C:\Program Files\Firebird
- C:\Documents and Settings\All users\Application data\MRS
- C:\Documents and Settings\[USER]\Application data\MRS
Windows Vista/Windows 7:
- C:\Program Files\MRS Software*
- C:\Program Files\Firebird*
- C:\ProgramData\MRS
- C:\Users\[USER]\AppData\Roaming\MRS
* If you are using a 64 bit version of windows the “Program Files” folder is named:
“Program Files (x86)”.
Windows Vista/Windows 7: User Account Control (UAC) must be turned off.
17
© 2012 Monitored Rehab Systems
MRS Software MR Cube module
How to add permissions
To add permissions, browse to the “MRS Software” folder:
Right click the “MRS Software” folder
and choose properties.
Select the tab “Security”.
18
© 2012 Monitored Rehab Systems
MRS Software MR Cube module
Click <edit>.
Select “Users”
Select Full control and click <Apply>. All users have all permissions on the “MRS Software folder”.
How to turn off user account control (UAC)
To turn off user account control, browse to Control Panel and select “User Accounts”.
Click “Turn User Account Control on or off”.
19
© 2012 Monitored Rehab Systems
MRS Software MR Cube module
If Windows asks permission, choose <Yes>. The following screen will appear. The checkbox needs to be unchecked. If it is already unchecked, leave it this way. Otherwise, uncheck the checkbox and press <OK>. The
computer will ask to restart. Choose <Yes>.
3.4 Autorun
Put the installation CD in the CD-Rom player of the computer. If “Autorun” is switched on,
the following screen appears:
20
© 2012 Monitored Rehab Systems
MRS Software MR Cube module
If the screen doesn’t appear, double-click on the icon “my computer” on your desktop. Select the CD-Rom
player (generally the D-disk) and click on your right mouse button. Choose <Open> in the menu that appears.
Now double-click on the icon “Autorun.exe”.
The following software is required:
- .NET Framework 4.0
- XNA Framework 4.0
If they are not installed, press the buttons to install the software.
If you see the button Install XNA version 4.0 this means you don't have this version and you have to click this
button.
If the button Install XNA version 4.0 or Framework .Net 4.0 appears, this means you don't have this software
or correct version and you have to click this button.
The following screen will appear:
Press <Next> to continue.
21
© 2012 Monitored Rehab Systems
MRS Software MR Cube module
Check "I accept the terms in the License Agreement".
Press <Next> to continue.
Press <Install>. This installation take several minutes.
22
© 2012 Monitored Rehab Systems
MRS Software MR Cube module
The following screen will appear when the installation has been successful:
Press <Finish> to continue.
The button in the start up screen will disappear.
23
© 2012 Monitored Rehab Systems
MRS Software MR Cube module
In the menu can be chosen between the server and the client. Always start with installing the server. Click
therefore on the button <Install Server/Stand Alone>.
Attention!
Always install the server first, with a new installation or update. After this, install the clients.
24
© 2012 Monitored Rehab Systems
MRS Software MR Cube module
The software detects if there is a Firebird Server installation available. If there is an old version installed, a
message appears. Please stop the Firebird server (Control panel – Firebird service manager – Stop).
3.5 Server Installation
Press <OK> to continue the installation, a newer version of Firebird will be installed.
If “Install Server” is chosen in the autorun menu, the preparation of the installation starts:
Please check the “MR Cube” box.
Choose <Next> to select the folder where the Monitored Rehab Systems software must be installed.
25
© 2012 Monitored Rehab Systems
MRS Software MR Cube module
With the button <Change> the location can be changed. It is advised to install the software in the standard
folder. If this is chosen for this software it will be installed in the folder:
C:\Program Files\MRS software
Hereafter press the button <Next>.
26
© 2012 Monitored Rehab Systems
MRS Software MR Cube module
The installation is now almost ready. With the button <Finish> will the installation be completed and can
possible client updates be started.
27
© 2012 Monitored Rehab Systems
MRS Software MR Cube module
3.6 Conversion MR Cube 1.3 to MRS Software 4.4
If you have MR Cube 1.3 software installed, the database must be converted to the MRS Software 4.4 database. In the next steps is explained how to do this:
Install the MRS Software 4.4 as described in part 3.5.
After the installation of MRS Software 4.4 in the autorun screen of the CD a new button <Import Cube> will
appear.
Press the <Import Cube> button to start the conversion
The conversion starts. You can see the progress in the conversion screen.
This can take a while. When the conversion is ready you see the message “Import successfully
completed”. The MR Cube patients are now converted in the new MRS Software.
28
© 2012 Monitored Rehab Systems
MRS Software MR Cube module
If “Install Client” is chosen in the autorun menu, the preparation of the installation starts:
3.7 Client Installation
A client settings screen appears. Please enter the IP Address and database path. Please use the direct path
which is used on the server (you can’t use a network shared drive). You can test the connection with the
<Test> button. The <OK> button is enabled when the server can be reached.
Check the “MR Cube” box.
Hereafter the welcome screen opens:
29
© 2012 Monitored Rehab Systems
MRS Software MR Cube module
Choose <Next> to select the folder where the Monitored Rehab Systems software must be installed in.
With the button <Change> the location can be changed. It is advised to install the software in the default
folder. If this is chosen for this software it will be installed in the folder:
C:\Program Files\MRS software\
Hereafter press the button <Next>.
30
© 2012 Monitored Rehab Systems
MRS Software MR Cube module
The installation is now almost ready. With the button <Finish> will the installation be completed and can
possible client updates be started.
31
© 2012 Monitored Rehab Systems
MRS Software MR Cube module
Open the Control Panel via the <Start> button.
3.8 Uninstall
To safely removethe MRS software and avoid problems, follow the steps in this chapter.
Locate the icon “Firebird Service Manager” and double click it.
Firebird will open the following screen:
Press the <Stop> button.
32
© 2012 Monitored Rehab Systems
MRS Software MR Cube module
The red text is changing into “Stopped”. This means that Firebird is not active at this moment.
Press <Close>.
Locate the icon “Add or Remove Programs” in the control panel.
Double click on the icon.
Select “Monitored Rehab Systems Software” and press the <Remove> button.
The software is now definitely removed.
33
© 2012 Monitored Rehab Systems
MRS Software MR Cube module
4.
Registration
If you start the MRS Software, you have to log in.
You can log in with:
Username: mradmin
Password: mradmin
We advise to add your own user(s) with their own competences ( we have user, superviser and administrator)
Before use, the MR Cube software needs to be registrated. This registration is valid for one year and will
be renewed each calendar year. After installation, the software is in demo mode which is valid for 30 days.
During startup, the software shows how many days you have left to register.
At the first start, the following message will appear:
Select <Continue> if you don't want to register at this time.
Select <Obtain License Key> if you do want to register. Enter your details:
Select <Print> to print the registration form.
Select <Email> to e-mail the registration form, your local e-mail program must be opened for this action
(webbased e-mail will not work).
34
© 2012 Monitored Rehab Systems
MRS Software MR Cube module
Print Preview. You can fax this to +31 (0) 23 750 5445 or save as PDF and email as an attachment to info@
mrsystems.nl
Example of an automatically generated e-mail.
35
© 2012 Monitored Rehab Systems
MRS Software MR Cube module
After registration you will receive an e-mail from Monitored Rehab Systems (within 3 days), with a
license key.
To enter the received key, start the software and choose <Enter license key>.
The code provided by Monitored Rehab Systems can be copied/pasted in the text field under "License Key"
(do not type, it gives error messages because the difference between I, I, L, l O, 0 o are not clear enough).
Then, select the green check mark. Your software is now registered.
At the end of each calendar year you will receive (depending on your agreement with your local dealer) an
invoice for next year's license. After payment of the invoice you will automatically receive a new license key
for the following year.
If you do not register, a message "License expired" will appear frequently.
36
© 2012 Monitored Rehab Systems
MRS Software MR Cube module
5.
Patient
insert a new patient select the option “New patient” in the menu.
To
Fill in the fields of the form with the patients data. The information in these fields will be linked with all performance results of the executed test and training programs. The yellow fields are required.
5.1 Indication
In the indication screen you can enter additional patient data like the diagnosis, involved side and more.
This information is shown in the header on the printouts.
37
© 2012 Monitored Rehab Systems
MRS Software MR Cube module
Choose “Patient” - “Extended History”. Here you get an complete overview of all test-, rehab and training
programs with belonging scores from the selected patient. Every overview can be printed out. To view the
5.2 Extended history
results of one specific test double-click on a test.
38
© 2012 Monitored Rehab Systems
MRS Software MR Cube module
6.
Quick Start menu
the Quick Start in the Settings menu is checked, the following screen will appear in the tab of
When
the MR Cube.
1) Choose exercise/challenging program/test bij clicking on the yellow arrow and select button;
2) Choose side;
3) Choose weight;
4) Choose level;
5) Press start.
The exercise will continue starting the same way as in the advanced mode. Explanation about these exercises is described in the following chapters.
39
© 2012 Monitored Rehab Systems
MRS Software MR Cube module
7.
Rehab F5
the main menu “MR Cube” the first option for training is Rehab (F5).
In
7.1 Rehab
This training program ends after a number of repetitions or after a pre-set period of time.
How to set up a rehab training step by step
1) Select “type of equipment” where the computer is connected to
2) Describe the type of exercise in “type of exercise”
3) Select One side left/right, Both sides or No side (no use of legs) training
4) Select rehab type (time or number of reps)
5) Select the exercise weight
6) Select number of exercise sets
7) Select the number of repetitions
8) Select the rest time between sets
9) Select start position. Bottom starts with concentric movement, top starts with eccentric
movement
10)Select the concentric speed
11)Select the eccentric speed
12)Choose ROM acceptance. 50% means that 50% of the ROM should be done before this
repetition is count as a repetition
40
© 2012 Monitored Rehab Systems
MRS Software MR Cube module
13)This training program ends after a number of repetitions or after a pre-set period of time
14)To start the training press <OK> and press any key.
First set the range of motion by making 1 repetition:
After pressing <Enter> the exercise will start.
Displayed is the amount of repetitions (10) and the amount of sets (1).
The “Preferred” speed (orange) is set in the software for both concentric and eccentric.
The “Actual” speed (green) is the actual speed of the client/patient.
Task of the patient is to get the green ball (right side) moving with the same speed as the orange ball (left
side).
If the training is finished the following screen will appear:
41
© 2012 Monitored Rehab Systems
MRS Software MR Cube module
The graphics show the range of motion. Blue is the concentric part of the repetition,
red is the eccentric part.
“Preferred speed” is the speed that has been set by the settings.
“Average speed” is the average speed of the exercise.
“Deficit speed” is the difference between preferred and average speed.
- : is too slow
+ : is too fast
0% : is perfect
“Total work” is the total work performed by the patient during the exercise in Joules.
“Total power” is the total work performed by the patient during the exercise in Watt.
To add remarks, press the button <Remarks> and enter your text.
42
© 2012 Monitored Rehab Systems
MRS Software MR Cube module
7.2 Mixed Rehab
With Mixed rehab it is possible to plan several different exercises, with different settings, for example:
3x10 repetitions 10cm/s up and 15cm/s down (10kg)
2x5 repetitions 20cm/s up and 20 cm/s down (20kg)
1x30 sec. (Time) 15cm/s up and 20cm/s down (30kg)
You can use these settings:
- Rehab type: repetition or Time
- Weight
- Number of sets
- Duration of sets
- Number of repetitions ( not with “Time”)
- Rest time between sets
- Start position
- Concentric speed
- Eccentric speed
- ROM acceptance in %
- Side: left, right, both or none
By pressing the + icon the following screen appears:
43
© 2012 Monitored Rehab Systems
MRS Software MR Cube module
By pressing the pencil, the exercises can be changed.
By pressing <Ok> the exercises will start.
Everything else works the same as the Rehab exercises.
7.3 Rehab History
In this menu you can see all sets done in the rehab training. Double click on the rehab to see
the results.
44
© 2012 Monitored Rehab Systems
MRS Software MR Cube module
To print to paper use the “Print” button.
45
© 2012 Monitored Rehab Systems
MRS Software MR Cube module
8.
Exercises
8.1 Functional exercises
How to set up a Functional Exercise training step by step:
1) Select “type of equipment” (optional)
2) Choose the type of exercise in “type of exercise” (optional)
3) Select the speed of the exercise
4) Select one side left/right or both sides leg training
5) Select the exercise weight
6) Select number of sets
7) Select the rest time between sets
First set the range of motion by making 1 repetition:
After pressing <Enter> the exercise will start.
46
© 2012 Monitored Rehab Systems
MRS Software MR Cube module
In this exercise yellow balls will fall down from the screen “at random”. The red square can be moved by the
patient. Making concentric or eccentric movements will shift the red square to the right (concentric) or to
Random Reactive
the left (eccentric). The goal is to avoid the yellow balls.
Isometric Gate
The isometric training has concentric, eccentric and isometric moments. The red ball must fit in the isometric (hold) position. The required force is challenging both coordination and proprioceptive skills. The red
ball has to find its way by maneuvering it between the gaps in the bars. The spaces between the bars are
random. If the exercise is carried out well, the difficulty level will increase. The red ball will move higher,
giving the patient less time to spot the gates. As with the other exercises the concentric and eccentric
movements will shift the red ball to the right (concentric) or to the left (eccentric).
47
© 2012 Monitored Rehab Systems
MRS Software MR Cube module
In this exercise the red circle has to stay on the yellow line (path). The yellow line moves over the screen
at random. Concentric/eccentric movements will shift the circle to the right or left. This exercise activates
Controlled Route
the eccentric/concentric muscle control and invigorates the coordinate abilities.
Random Explosive
In this exercise yellow balls will drop at random slow, normal or fast. These balls have to be caught and
bounced back. Fast reaction (explosivity) is necessary to get good results. Concentric/eccentric movements
will shift the red plate to the left and to the right.
48
© 2012 Monitored Rehab Systems
MRS Software MR Cube module
This exercise copies “simulation”. Target is to keep the red ball on the road. The “road” moves at random
up and down with unexpected acceleration. Concentric/eccentric movements will shift the red ball to the
Controlled position
left and to the right.
Random Deceleration
In this exercise little green stars with individual changing speeds will drop down the screen at random. The
red plate symbolizes the catcher. Concentric/eccentric movements will shift the catcher to the left or to
the right. The goal is to catch the green stars before they arrive at the bottom of the screen and avoid the
unexpected red stars.
49
© 2012 Monitored Rehab Systems
MRS Software MR Cube module
8.2 Functional exercises: the scores
The number of points at the start is based on the duration of the exercise.
The end score is calculated and influenced by:
- performance
- exercise weight
- speed level (slow, medium or high)
- if you perform a perfect exercise for 10 seconds, you get bonus points
The score is kept in the patient file and can be viewed in the exercise history.
8.3 Mixed Excercises
In this window you can create an individual combination of different exercises
Option 1: how to create an individual mixed exercise training program
1) Select “type of equipment” where the MR Cube is connected to (optional)
2) Describe the type of exercise in “type of exercise” (optional)
3) Select the speed of the exercise
4) Select one side left/right or both sides leg training
5) Select the type of feedback 2D or 3D (preferred) and start position (reversed starts with
eccentric movement)
6) Select the exercise weight
7) Select number of sets
8) Select the rest time between sets
9) Select the rest time between exercises
10) After starting, the range of motion has to be set by doing one repetition:
50
© 2012 Monitored Rehab Systems
MRS Software MR Cube module
After pressing <Enter> the exercise will start automatically.
In between exercises, when there is rest time, this screen appears:
8.4 Exercise history
When a patient is selected, a concise list of all exercise programs with belonging scores will be shown. Scores and dates are shown in graphics and can be (de)selected.
51
© 2012 Monitored Rehab Systems
MRS Software MR Cube module
9.
Challenging Programs
9.1 Dual Tasks
9.1.1 Mathematics
How to set up a Math exercise step by step:
1) Select “type of equipment” where the equipment is connected to (optional)
2) Describe the type of exercise in “type of exercise” (optional)
3) Select the speed of the exercise
4) Select one side left/right, both sides or "no side" training
5) Select the exercise weight
6) Select number of sets
7) Select duration of set
8) Select the rest time between sets
9) Select your exercise: Math
10)Select difficulty
After starting, the range of motion has to be set by doing one repetition:
52
© 2012 Monitored Rehab Systems
MRS Software MR Cube module
After pressing <Enter> the exercise will start.
Choose the correct answer by moving the arrow.
If a correct answer is chosen, a green check mark will appear. After this, the next equation
will appear.
If a wrong answer is selected, a red cross will appear. After this, the next equation will appear.
After finishing the exercise the results will be shown:
53
© 2012 Monitored Rehab Systems
MRS Software MR Cube module
The preset settings are blue. The correct answers are green.
Press any key and the following results are shown:
54
© 2012 Monitored Rehab Systems
MRS Software MR Cube module
9.1.2 Recognition
How to set up a Recogition exercise step by step:
1) Select “type of equipment” where the equipment is connected to (optional)
2) Describe the type of exercise in “type of exercise” (optional)
3) Select the speed of the exercise
4) Select one side left/right, both sides or "no side" training
5) Select the exercise weight
6) Select number of sets
7) Select duration of set
8) Select the rest time between sets
9) Select your exercise: Recognition
10) Select difficulty
11) After starting, the range of motion has to be set by doing one repetition:
After pressing <Enter> the exercise will start.
55
© 2012 Monitored Rehab Systems
MRS Software MR Cube module
Choose the correct figure by moving the arrow.
If a correct figure is chosen, a green check mark will appear. After this, the next figure will appear.
If a wrong answer is selected, a red cross will appear. After this, the next figure will appear.
After finishing the exercise the results will be shown:
The preset settings are blue. The correct matches are green.
Press any key and the following results are shown:
56
© 2012 Monitored Rehab Systems
MRS Software MR Cube module
9.1.3 Memory
How to set up a Memory exercise step by step:
1) Select “type of equipment” where the equipment is connected to (optional)
2) Describe the type of exercise in “type of exercise” (optional)
3) Select the speed of the exercise
4) Select one side left/right, both sides or "no side" training
5) Select the exercise weight
6) Select number of sets
7) Select duration of set
8) Select the rest time between sets
9) Select your exercise: Memory
10) Select difficulty
11) After starting, the range of motion has to be set by doing one repetition:
57
© 2012 Monitored Rehab Systems
MRS Software MR Cube module
After pressing <Enter> the exercise will start.
Cards (colors or numbers) are laid out face up, they turn black after a number of seconds. A new card will
appear. Choose the matching card by moving the new card and place it under the correct card. If the two
cards match, the player scores one point.
Level settings:
Time (in seconds) to show cards
Retry after wrong answer
Number of questions per set
Easy
5
3
4
Normal
4
2
3
Hard
3
1
3
Time of selection is depending on speed:
Slow
2 sec.
Normal
1 sec.
Fast
0.5 sec.
If a correct match is chosen, a green check mark will appear. After this, the next new card will appear. If a
wrong answer is selected, a red cross will appear. After this, the next set of cards will appear.
58
© 2012 Monitored Rehab Systems
MRS Software MR Cube module
After finishing the exercise the results will be shown:
The preset settings are blue. The correct matches are green.
Press any key and the following results are shown:
59
© 2012 Monitored Rehab Systems
MRS Software MR Cube module
9.2 Sports
9.2.1 Race Game
How to set up a race game step by step:
1) Select “type of equipment” where the equipment is connected to (optional)
2) Describe the type of exercise in “type of exercise” (optional)
3) Select the speed of the exercise
4) Select one side left/right, both sides or no side leg training
5) Select the exercise weight
6) Select number and duration of sets
7) Select the quantity of traffic
8) After starting, the range of motion has to be set by doing one repetition:
After pressing <Enter> the exercise will start.
Start driving and avoid other vehicles. Collecting coins by driving through them.
A yellow coin gives you extra time, a red coin gives you a temporary speed boost.
Driving on the emergency lane will diminish the speed.
60
© 2012 Monitored Rehab Systems
MRS Software MR Cube module
If you touch another vehicle you will crash and you have to restart.
After finishing the game, the scores will be shown.
61
© 2012 Monitored Rehab Systems
MRS Software MR Cube module
Press any key and the following results are shown:
62
© 2012 Monitored Rehab Systems
MRS Software MR Cube module
9.2.2 Ski game
How to set up a ski game step by step:
1) Select “type of equipment” where the equipment is connected to (optional)
2) Describe the type of exercise in “type of exercise” (optional)
3) Select the speed of the exercise
4) Select one side left/right, both sides or no side leg training
5) Select the exercise weight
6) Select number of sets
7) Select rest time between sets
8) After starting, the range of motion has to be set by doing one repetition:
After pressing <Enter> the exercise will start.
63
© 2012 Monitored Rehab Systems
MRS Software MR Cube module
Start skiing and try to stay within the two flags but also to ski as fast as possible to the finish.
If you do not ski between the flags, you get 10 seconds added to your time.
After a crash you have to restart skiing.
64
© 2012 Monitored Rehab Systems
MRS Software MR Cube module
After finishing the game, the scores will be shown.
Press any key and the following results are shown:
65
© 2012 Monitored Rehab Systems
MRS Software MR Cube module
9.2.3 American Football game
How to set up a football game step by step:
1) Select “type of equipment” where the equipment is connected to (optional)
2) Describe the type of exercise in “type of exercise” (optional)
3) Select the speed of the exercise
4) Select one side left/right, both sides or no side training
5) Select the exercise weight
6) Select number and duration of sets
7) Select rest time between sets
8) Choose the outfit of the player and the opponent
9) After starting, the range of motion has to be set by doing one repetition:
66
© 2012 Monitored Rehab Systems
MRS Software MR Cube module
When confirmed, the game will start.
The aim of the game is to make a touchdown. You have to cross the field without being tackeled.
Every game you have to run 100 yards, the time to achieve this, can vary.
If you get too close to your opponent, you get tackeled. You have to start over, at the last position.
67
© 2012 Monitored Rehab Systems
MRS Software MR Cube module
The score will be shown and you can try again.
The amount of yards run will be added.
You start at the total amount of yards you ran.
When the duration time has been achieved, you get a time-out. This screen appears:
You can also see how many seconds of rest time you still have left.
This is the goal: achieving Touchdown:
68
© 2012 Monitored Rehab Systems
MRS Software MR Cube module
1
0. Testing with the MR Cube
Choose ‘Show tests’. Choose a test in the following screen:
10.1 Coordination Test
The coordination test can be done safely in early rehabilitation since it is not related to strength. With the
coordination we want to look at the quality of movement, we can see both concentric and eccentric and
absolute strength is not important. The first screen of the coordination test:
69
© 2012 Monitored Rehab Systems
MRS Software MR Cube module
amount of weight you select can be minimal. The test should always be easily achievable; you are not
The
looking for strength but for coordination. 5 or 10 kg is enough weight in most of the tests you will do.
Mode: Choose “Vertical” or “Horizontal” moving of the yellow line.
Set min/max: Where in the previous max. force test and endurance strength test the range of motion was
not so important, in the Coordination test it is extremely important to select the proper range of motion.
Make sure the foot does not come off of the foot plate when setting the Min/Max.
After starting, the range of motion has to be set by doing one repetition:
The Min value should be around “0” the max value is the end of the range. If the “min” value is not “0”
please reset the electronics (Reset button). Then make the repetition (to set min/max) again, ending in the
“min” position.
The test will start in the “min” position.
Press <Enter> to start the test.
Test instructions: keep the red crosshair on the yellow line as exact as possible. The test starts with the NonInvolved side and afterwards the Involved side.
After the test (one side) the following results will appear:
70
© 2012 Monitored Rehab Systems
MRS Software MR Cube module
After the test (both sides) the following results will appear:
To print to paper use the <Print> button. If you want a print preview on the screen use the command;
“Ctrl+p”. To add a note use <Remarks>.
To view a line chart, use <Toggle chart>.
To compare results use <Overlay>. Choose the test results you want to compare and press <OK>. The results
will be displayed.
71
© 2012 Monitored Rehab Systems
MRS Software MR Cube module
72
© 2012 Monitored Rehab Systems
MRS Software MR Cube module
Directly after the test the shape of the graphics will be shown;
10.2 Interpretation Coordination Test
First we look at the bar graphs. What we want to see in both Concentric and Eccentric is that the highest bar
is around zero.
In the graphic the “o” point means that during the test the crosshair was exactly on the blue line. In the
graph left from zero (minus region) means at during the test crosshair was at the left side of the blue line. In
the graph right from zero (plus region) means that during the test the crosshair was at the right side of the
blue line. The height of the bars in the graphs represents the amount of time the red crosshair was in that
specific position during the total test time (% exercise time).
What we expect to see, in an ideal test, is one bar at the zero position, with a score of 100% of the test
time. This ideal test result is not likely.
The above (involved) test is an example of a test result which would indicate poor coordination:
- a low bar on the “0” position means the test person was not able to keep the red crosshair at the yellow
line for a longer time
- many small bars spread left and right from the zero position means the test person was not even able to
keep the red crosshair on the yellow line but was moving around the yellow line. The more bars we see at a
bigger distance from the “0” point (left and/or right) the more moving around the yellow line was registered
and therefore less control was demonstrated.
The numbers we see on screen for both concentric and eccentric:
Weight: The weight selected for this test
Duration: The time in seconds selected for this test
For a reproducible test it is important to have the same weight and duration in the next test of the same person.
Average: We get a separate value for Average Concentric and Eccentric for both Involved
and Non-Involved
The blue line is the zero point. The average is calculated by adding all the deviations and dividing them by
the number of measurements (25 Hz). If the average is “0”, or nearby, this normally means (if also the deviation is low) the patient demonstrated good coordination.
73
© 2012 Monitored Rehab Systems
MRS Software MR Cube module
Some examples :
In this test the average will be around “0”
In this test the average will be above “0” i.e. 5 cm
In this test the average will be minus “0” i.e. -5 cm
Deviation: The deviation is a value for the variation in the measurements. A higher value means there is a
greater spread in the positions during the measurement. The test person with a high
deviation has been moving far above or under the yellow line a lot and did not stay close enough
(or on) to the yellow line.
Low Deviation
High Deviation
If you have an average around “0” you could think this is a good test but when the Deviation is high, this
“good” average is a lucky shot and the test person did not perform well.
Some examples:
Low Deviation
High Deviation
Small Average
Very good
Can not stay stable on track
Big Average
Steady, but not at track
Unstable and can not stay on track
In the perfect test we see that both the Average and the Deviation are close to “0”
The Correct position: is the amount of time the crosshair is on the yellow line expressed as an
percentage of the overall test time. The larger this percentage, the better the test person performed.
74
© 2012 Monitored Rehab Systems
MRS Software MR Cube module
10.3 Power Test
1) Select Type of equipment (optional).
2) Choose Number of repetitions or Repetitions per time. After choosing Repetitions per time fill in the Number of sets and Rest time between sets.
4) Select weight.
4) Select number of repetitions or duration of sets.
5) Select start position.
6) Set Range of Motion acceptance, this is the percentage of deviation when the software registers the repetition.
Choose <OK> to begin the test.
After starting, the range of motion has to be set by doing one repetition:
After pressing <Enter> the test will start.
75
© 2012 Monitored Rehab Systems
MRS Software MR Cube module
After finishing the test, the following screen will appear:
If the repetition of the test is activated, these results will be counted into the Total work and Total power.
Press the next tab for going to the next page.
76
© 2012 Monitored Rehab Systems
MRS Software MR Cube module
The average speed is shown per repetition. The second repetition of the fatique section is always set at
100%.
The other repetitions are calculated on this percentage.
Change legend speed can be adjusted in steps of 15 cm/s.
Press the next tab for going to the next page.
This screen shows per repetition the deceleration and acceleration of the test.
“Use x% of range of motion” shows the area of the motion in which the deceleration and acceleration is
calculated per second.
To view the visual image of the motion, click on the specific repetition in the grid.
Press <Print> or “Ctrl+p” to print the report. To add a note use <Remarks>.
77
© 2012 Monitored Rehab Systems
MRS Software MR Cube module
10.4 Proprioceptive Test
The Proprioceptive Test can be done safely in early rehabilitation since it is not related to strength. With the
Proprioceptive Test we want to look at the quality of reproducing a certain joint position.
The first screen of the Proprioceptive Test:
78
© 2012 Monitored Rehab Systems
MRS Software MR Cube module
1) Select Side: One side left/right, Both sides leg or No side (no use of legs) training.
2) The amount of weight you select can be minimal. The test should always be easily achievable;
you are not looking for strength but for proprioception. 5 or 10 kg is enough weight in most of
the tests you will do.
3) Duration rest: the amount of time the test person has to be in the rest position. The longer this
time the more difficult to re-acquire the “correct position”
4) Duration position: the amount of time the test person has to be in the “correct” position.
5) Percent of ROM: The joint position where we test proprioception, expressed in terms of the % of
the Range of Motion. We suggest a position between 30 % and 70%
6) After starting, the range of motion has to be set by doing one repetition:
After pressing <Enter> the exercise will start.
Test instructions:
- The test person is asked to replicate joint position (fixed % of the ROM) four times.
- The first and second repetition are with feedback
- The third and last repetition without feedback on the screen. We ask the test person to close their eyes in
order to prevent the use of extra visual feedback (e.g. height of weight stack, joint angles) to replicate the
joint position. The tester should give verbal cues when the test person should move from rest position to the
desired joint position and back again.
79
© 2012 Monitored Rehab Systems
MRS Software MR Cube module
The test person should move to the right vertical line before the horizontal line disappears and maintain the
crosshair on that line until the next horizontal line disappears. Repeat the same process for all four positions. Remember the last two positions have no crosshairs.
---
----
-
----
------
-
----
-->-
o
>
------
The test person should follow the hypothetical red line and be in time at the “correct” position (black circle), at this point the measurement starts and the horizontal line disappears. After two times in position the
red crosshair disappears and we ask the test person to close his/her eyes so no visual input at all is possible.
80
© 2012 Monitored Rehab Systems
MRS Software MR Cube module
Test overview:
After the test the following screen appears:
81
© 2012 Monitored Rehab Systems
MRS Software MR Cube module
To print to paper use the <Print> button. If you want a print preview on the screen use the command;
“Ctrl+p”
To add a note use <Remarks>.
To compare results use <Overlay>. Choose the test results you want to compare and press <OK>. The results
will be displayed.
82
© 2012 Monitored Rehab Systems
MRS Software MR Cube module
Directly
after the test we check the distribution of the bar graphs.
10.5 Interpretation Proprioceptive Test
The green and blue marker (first and second) show us the actual position of the patient relative to the correct position when the crosshair was present (reps 1&2).
The red and purple marker (first and second) show us the actual position of the patient relative the correct
position after the crosshair disappeared (reps 3&4).
Green and blue bar:
The green and blue bar do NOT tell us anything about the quality of Proprioception!!
If the patient is not capable of getting the green and blue marker in the correct position, this means the
coordination is not OK. This information tells us that we are not ready to do a Proprioceptive test; but rather
we should train to achieve better coordination ability first.
If the patient has both green and blue bar on or close to the correct position, we can interpret proprioceptive ability by reviewing the size and location of the red and purple bar.
Red and purple bar:
The red and purple bar tell us how well the patient can re-acquire the correct joint position (learned with
the green and blue bar). The bars should be as high as possible, meaning a long time at a specific position,
ideally in the neighborhood of the correct position. If you observe many small bars, the patient was moving
around during the test time and uncertain about the correct position. In the graphical view, it may not always be possible to see all the bars, so we refer to the data including average and deviation.
83
© 2012 Monitored Rehab Systems
MRS Software MR Cube module
In the above picture you see that the green and blue bar are on the correct position. Both the red and purple
bar are moving during the test through a wider range of motion as expected.
To print to paper use the <Print> button. If you want a print preview on the screen use the command;
“Ctrl+p”. Press <OK> to get a preview.
In the above printed numbers the correct position was 80, both visible markers have an average of 80 and
essentially no (or 0,1) deviation which is what we would expect of a person with good coordination.
The non visible first movement average was 83,47 which tells us that the test person overshot the correct
84
© 2012 Monitored Rehab Systems
MRS Software MR Cube module
position 3,47 cm to the right.
The non visible second movement average of 83,67 is 3,67 cm less than the expected position, but the deviation of 3,67 indicates the test person had uncertainty about their joint positioning.
The numbers in a good test :
In this case the correct position was 80 and both the green bars and the red bars are in the correct position
(average 80) and without any deviation (stable during the test).
This is the best score possible.
10.6 Response time test
The Response Time test is designed to measure the test person’s reaction time using an unexpected movement and their ability to finely control the weight after moving it.
85
© 2012 Monitored Rehab Systems
MRS Software MR Cube module
The Start Position corresponds to the specific location (expressed as a percentage) within the full range of
motion where the test will be performed.
Weight: Use 5 to 10 kg’s for the performance of this test
Choose <OK> to begin the test.
After starting, the range of motion has to be set by doing one repetition:
After pressing <Enter> the test will start.
86
© 2012 Monitored Rehab Systems
MRS Software MR Cube module
Instruct the patient to move the orange circle into the empty box. When the circle is relocated to the center
of the box, the box will turn green. After a couple of seconds (the time varies), the box will randomly move
to either the left or right of its initial position. The patient should be instructed to relocate the circle into
the box at the new position as fast as possible. The time that it takes for the test person to react and initiate movement of the circle is the “Response Time”.
When the circle is properly located in the box, the box turns green. It is essential to control and hold that
new position so that the box remains green. The time for this to occur is designated the “Time to Finish”.
The test administrator must then click the <Next Measurement> button or the “Enter” key on the keyboard.
Each side is tested three times. (unless we are using the Back extension or Abdominal Crunch
machines).
After three measurements are collected for the non-involved side, the following screen appears:
87
© 2012 Monitored Rehab Systems
MRS Software MR Cube module
To print to paper use the <Print> button. If you want a print preview on the screen use the command;
“Ctrl+p”
To add a note use <Remarks>.
To view a line chart, use <Toggle chart>.
88
© 2012 Monitored Rehab Systems
MRS Software MR Cube module
Response Time: is defined as the time that it takes for the test person to react and initiate movement of
10.7 Interpretation response time test
the stick figure in response to the moved box. The “Response Time” is sometimes represented as a negative
number. This means that the test person initiated movement in the direction opposite of the box movement
before eventually relocating the circle to the box.
Total time: is defined as the total time elapsed from the initial movement of the box to the point where the
box has turned to red and remained red.
Three repetitions are performed for each side. The results are then averaged to facilitate the calculation of
a deficit.
Deficit: Defined as the percent difference relative to the Non-Involved side, e.g. 5 sec
If there is no deficit the value is 0%
If the Involved side is 20% slower it will say “20%”
If the involved side is 20% faster (not expected) it say’s “-20%
Inv
5
-
6
-
4
-
Non involved
5
5
5
Clinical Relevance of the Data: The smaller the “Response Time”, the faster the test person’s ability to react
to unexpected demands. Longer “Time to Finish” durations may mean less fine motor control abilities necessary for holding the moved weight.
11. Test history
In the main menu you find the option "Test history":
In this menu you can find all the tests the selected patient performed. You will either see all the tests on the
machine selected or (use toggle) to see all tests the patient performed on all machines (if they are connected to a network).
Select the test and press <OK>, the test results will be displayed. If you want to compare tests of the same
type, select the first test and use F12 (overlay) to select the other test.
89
© 2012 Monitored Rehab Systems
MRS Software MR Cube module
Press <OK>. The results will be displayed in the following screen.
12. MR Cube Settings
The following settings can be found under the 'Settings' tab.
12.1 Show serial
90
© 2012 Monitored Rehab Systems
MRS Software MR Cube module
COM Port: select the comport where the electronics of the machine are connected to the computer.
Force: value force should be moving if the machine is being used.
Distance: should be moving if the machine is being used.
Direction: the direction of the cable, "up" or "down".
Press <Connect> to start communication with the electronics.
Press <Disconnect> to stop communication with the electronics.
91
© 2012 Monitored Rehab Systems
MRS Software MR Cube module
12.2 Settings
Enable Synchronization: Enable Anti Alias: Enable Blur: Screen resolution: This enables or disables synchronization between the monitor refresh rate
and the drawing of the graphics. Enabling this will try to prevent screen
tearing, but might decrease the frame rate.
When enabled this improves image quality at the cost of a minor hit in the
frame rate.
background with blur (not sharp).
choose the resolution of your screen to optimize your view.
92
© 2012 Monitored Rehab Systems
MRS Software MR Cube module
12.3 Administrator Settings
Database
Server: Database path:
Protocol: If you work with a central database on a server, the IP-address of the server should
be entered in this field. If the computer is used as a server or stand alone, the
setting is "localhost".
displays the path to the database. (Both local or on a server).
TCP or local depending your network.
Modules:
Select modules:
Start in module:
If the software will be used also for other equipment or FysioRoadmap, select the
modules you need.
select the module you want the program to start.
Minimal software requirements: For the proper functioning of the software, additional software is required.
Here is an overview of the specifications and whether the software is installed on your computer. (Green
checkmark = succesfully installed, red cross = the software is not installed yet)
93
© 2012 Monitored Rehab Systems
MRS Software MR Cube module
Languages
Refresh: after installing extra software while MRS Software is still in use, use the refresh button to update
the overview.
Select your language and restart the software.
Device
Device: select what kind of machine you are using
COM port: select the COM port where the electronics of the machine are connected to the computer.
DEMO: If there is no connection to electronics, but you want to see a demonstration of the software and use
your mouse instead, use this option.
Use Quickstart: Select this option if you want to use the quickstart menu.
94
© 2012 Monitored Rehab Systems
MRS Software MR Cube module
12.4 Institute Management
One institute equals one administration in your software. Select the line <Wijzig Instituut> and choose
<Edit>. Fill in your details and save. This information will appear automatically on your prints.
12.5 Choice of institute
This function is used to switch between multiple administrations. Choose the institute and confirm by password (Institute management).
95
© 2012 Monitored Rehab Systems
MRS Software MR Cube module
12.6 Back-up database
Select at "Backup path" the desired path to store the database. Click the button <Backup>.
If the backup is complete, a green text "backup done" will be shown.
12.7 Restore database
To restore the database choose the correct file and <Restore>. Restart the software.
This operation will erase all data from the MRS Software and replaces it with data from the backup.
96
© 2012 Monitored Rehab Systems
MRS Software MR Cube module
1
3. Shortcuts
F2 New Patient
F3 Edit Patient
F4 Select Patient
F5 Rehab
F6 Functional exercises
F7 Coordination test
F8 Isometric training
F10 Administrator settings
F11 Test history
Ctrl H Extended history
97
© 2012 Monitored Rehab Systems
Monitored Rehab Systems B.V.
Claes Tillyweg 2 | 2031 CW Haarlem | The Netherlands
Phone: +31 (0)23 750 5444 | Fax: +31 (0)23 750 5445
www.mrsystems.nl | [email protected]


![English [2012v1]](http://vs1.manualzilla.com/store/data/005666127_1-015c2c1b906ab908850f1f1f8721a849-150x150.png)