1
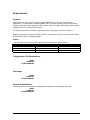
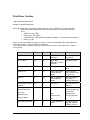
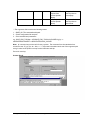
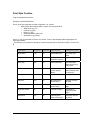
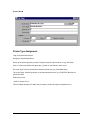
BARZ_OUT Pro
Installation and Setup manual
For Use with Oracle Applications
Document Revision 1.3
Unibar, Inc.
[email protected] www.unibar.com - 800 731-6044
TABLE OF CONTENTS
REQUIREMENTS ...................................................................................................................................3
PURPOSE:.................................................................................................................................................3
USERS:.....................................................................................................................................................3
CONFIGURATION FILE DEVELOPMENT:........................................................................................................3
DEVELOPER: .............................................................................................................................................3
SYSTEM ADMINISTRATOR: .........................................................................................................................3
OPERATING SYSTEM INSTALLATION STEPS...................................................................................4
ORACLE SETUP STEPS .......................................................................................................................4
PRINT DRIVER CREATION ...................................................................................................................5
PRINT STYLE CREATION .....................................................................................................................7
PRINTER TYPE ASSIGNMENT .............................................................................................................8
REPORT DESIGN STEPS....................................................................................................................10
SIGN-OFF CHECKLIST .......................................................................................................................10
FILE LISTING .......................................................................................................................................11
APPENDIX ............................................................................................................................................12
Requirements
Purpose:
This document is to be used as a guide for installing BARZ_OUT Pro for use through Oracle
applications. It includes steps for installing BARZ_OUT Pro on the operating system and for setting
up print drivers within Oracle application object library. It will also explain report design steps required
by BARZ_OUT Pro for barcoded field output.
The Oracle instructions were written originally for Oracle 8i; they apply as well for Oracle 11i.
Additional information on the use of BARZ_OUT Pro can be found in the user manual that is included
with the BARZ_OUT Pro software package.
Users:
<Identify which functional users and/or department will utilize this barcoded reports >
NAME
DEPARTMENT
PHONE NUMBER
Configuration File Development:
NAME:
COMPANY:
PHONE NUMBER:
Developer:
NAME:
COMPANY:
PHONE NUMBER:
System Administrator:
<Identify who will be responsible for installing printer information into applicable instances>
NAME:
COMPANY:
PHONE NUMBER:
BARZ_OUT Pro Setup Steps
Page 3
Operating system installation steps
A directory needs to be created for the BARZ_OUT Pro software to be installed in:
e.g. /usr/local/bin/unibar/barzoutpro
Install BARZ_OUT Pro software into the new directory
Permissions need to be set to allow read and execute on the directory and files for the
development group and Oracle applications (if they are distinct). Write permission needs to be
given to whoever will setup the configuration (cfg) files.
DEVELOPER
A configuration file needs to be created from the sample.cfg file for every printer type that will be
used. This file determines the barcode types, density, size, etc. that will be used for each printer.
Once this file(s) is created then barcode reports should be designed using the control character
sets define within it. The naming convention for these files will be the printertype.cfg, e.g.
HPLASER.cfg or EPSONLQ.cfg.
Note: See Appendix A for configuration file content.
Oracle setup steps
Determine which printer types you will be using to print barcode reports on. Printer types available
are EPSONLQ, EPSONFX, IBMPRO9, IBMPRO24 and HPLASER or printers compatible with
these types. Printers used should already be installed in Oracle, if not, contact your System
Administrator to do so.
Create a print driver for each printer type and orientation that will be used. This will enable Oracle
to pipe the report output file through the BARZ_OUT Pro program. BARZ_OUT Pro will then pipe
the output to the printer specified at runtime.
* Refer to Print Driver Creation for more details. * Requires System Administration Responsibility
Create a new print style for each style that will be used. That is, if you will be using portrait reports
with barcode, then you will need a ‘Portrait Barcode’ style.
* Refer to Print Style Creation for more details. * Requires System Administration Responsibility
Assign the new print style and driver to the printer types that you will be using.
* Refer to Printer Type Assignment for more details. * Requires System Administration
Responsibility
The Internal Concurrent manager may need to be bounced if these new print styles have been
used and then changed for them to take effect. Contact your DBA.
Design reports as specified in Report Design steps. When these reports are registered, assign
the style needed and make it required. E.g. A portrait report with barcode will have the new style
‘Portrait Barcode’ assigned to it at registration time.
Run reports with barcode style.
BARZ_OUT Pro Setup Steps
Page 4
Print Driver Creation
Login as System Administrator.
Navigate to Install/Printer/Driver
Query up the user driver type that you wish to duplicate. E.g. ‘PORTRAIT for Printer HPLJ4SI’
• Make note of the following four fields, they will need to be the same within your new
driver.
• SRW Driver (e.g. HPP)
• Platform (e.g. Dec Alpha)
• Initialization (e.g. /eE/e&10o2a7C/e(s0t0p11H/e&a5L) – Cut and paste to avoid errors
• Reset (e.g. /eE)
Hit the (+) key on the toolbar to insert a new record. Insert in the following fields as appropriate for
each driver needed. ***Check if /eE/e&1 should be &l.
*The following is an example of setting up a portrait barcode driver for HPLJ4SI printers. Refer to
screen shot A
Field Name
Required?
QuickPick
Value to Enter
Description of value
Driver Name
Yes
No
PORTRAITHPLJ4S
I Barcode
This is the
Drivername.
Driver Name
Yes
No
PORTRAIT
Barcode for Printer
HPLJ4SI
User Driver Name
Description
No
No
Portrait Barcode
Description of the
driver
SRW Driver
No
No
HPP (Copied from
current portrait
driver)
SRW driver that
Oracle Reports uses
for reference
Platform
No
Yes
Null (Copied from
current portrait
driver)
This is the platform
that oracle is
currently residing on.
Driver Method (radio
buttons)
Yes
No
Command
Specifies execution
method
Driver
MethodParameters
No
No
Spool File
Null
Standard Input
Yes(checked)
Program Name
Arguments(important)
BARZ_OUT Pro Setup Steps
Specifies details of
how the program will
be executed
Standard Input
MUST be checked
null
No
No
Page 5
** See explanation
below
Tell Oracle how to
send the output file
to BARZ_OUT Pro
Initialization
No
No
/eE/e&10o2a7C…(
Copied from
current portrait
driver)
String that Oracle
send to printer to
format page
Reset
No
No
/eE (Copied from
current portrait
driver)
String that Oracle
send to printer to
reset format
** The arguments field contains the following values:
1. BARZ_OUT Pro executable with path.
2. Printer configuration file and path
3. Print command and parameters
e.g. $XYZ_FND_TOP//bzp –CFG/$XYZ_FND_TOP/bin /HPLASER.cfg |lp –c d$PROFILES$.PRINTER –n$PROFILES$.CONC_COPIES
Note: ‘lp’ command may not be valid for every system. The command from the standard driver
should be used. E.g. lp, lpr, etc. Also, a “ -l “ may need to be added at the end of the argument print
string in order for the printer to accept control characters with lpr.
Press the save key.
Screen Shot A.
BARZ_OUT Pro Setup Steps
Page 6
Print Style Creation
Login as System Administrator.
Navigate to Install/Printer/Driver
Query up the user style that you wish to duplicate, e.g., Portrait
• Make note of the following fields to copy to your new print driver.
• SRW Driver (e.g. P)
• Columns (e.g. 80)
• Rows (e.g. 65)
• Suppress Header (radio box)
• Orientation (e.g. portrait)
Hit the (+) key on the toolbar to insert a new record. Insert in the following fields as appropriate for
each style needed.
*The following is an example of setting up a portrait barcode style for all printers. Refer to screen shot
B
Field Name
Required?
QuickPick
Value to Enter
Description of value
Style Name
Yes
No
Portrait Barcode
This is the style
name
Sequence
Yes
No
(A unique
sequence number)
Sequence Number
User Style
Yes
No
Portrait Barcode
Style name that
users will pick from
at print time
SRW Driver
No
No
P (Copied from
current portrait
driver)
SRW driver that
Oracle Reports uses
for reference
Description
No
No
Portrait Barcode
Description of style
Columns
Yes
No
80 (copied from
current style)
Specifies columns
per page
Rows
Yes
No
65 (copied from
current style)
Specifies rows per
page
Suppress header
No
No
Yes(radio button)
Tell printer to
suppress header
page)
Orientation
Yes
No
Portrait(copied
from current style)
Orientation that will
be printed
BARZ_OUT Pro Setup Steps
Page 7
Screen Shot B
Printer Type Assignment
Login as System Administrator.
Navigate to Install/Printer/Driver
Query up the printer type that you wish to assign the printer style and driver to (e.g. HPLJ4SI)
Click on a field in the details then press the (+) button on the toolbar to insert a row.
Go to the ‘Style’ field and quickpick the desired barcode style (e.g. Portrait Barcode)
Tab to the ‘Driver’ field and quickpick on the desired barcode driver (e.g. PORTRAIT Barcode for
printer HPLJ4SI)
Submit this record.
* Refer to screen shot C
This will enable developers to attach this print style to a barcode report at registration time
BARZ_OUT Pro Setup Steps
Page 8
Screen Shot C
Report Design Steps
For Developer use:
BARZ_OUT Pro Setup Steps
Page 9
When designing a report that will have a field barcoded, you must add the control character (triggers)
as specified in the configuration file in front of the desired field. This will create an output like
~T1000-001~.
An example field using the sample configuration file from Appendix A would be: ~XLT222 Plus~!
Everything after the ‘~’ and before the ‘~!’ will be converted to a barcode at runtime. The barcode
would be 3_of_9, high density, 1/8” tall, printed horizontally with no human readable text.
Note: It is important to put conditions on the leading and trailing characters that do not print them if
the source field returns null. In reports 2.0 or higher, you can add code to the format trigger to both
fields that keep it from printing when the source field is null
e.g. FUNCTION F_source_fieldformat_trigger return boolean is
BEGIN
IF :c_source_column IS NULL THEN RETURN(FALSE);
ELSE RETURN(TRUE):
END IF;
END;
If the report is written in SQL*Plus then a decode statement can be added to the leading and trailing
characters.
E.g. DECODE(source_column, null, null, ‘~’)||source_column||DECODE(source_column,null, null,’~!’)
A
Sign-Off Checklist
TASK
Install BARZ_OUT Pro software
Assign Permissions
Create configuration files
Determine Printer types needed
Create print drivers for each printer type
Create print styles for all printers
Assign styles and drivers to printer types
Acceptance & Sign Off – Sysadmin
Acceptance & Sign Off – Report Lead
BARZ_OUT Pro Setup Steps
ASSIGNMENT
Page 10
DATE COMPLETED
File Listing
File Name
File Location
Instance
Version Description
Bzp
3.0
BARZ_OUT pro executable
Bzp.cfg
1.0
BARZ_OUT Pro configuration template
Manual.txt
1.3
BARZ_OUT Pro manual
Unibar.key
1.0
BARZ_OUT Pro license key
Custom cfg’s
1.0
Custom cfg files by printer type
BARZ_OUT Pro Setup Steps
Page 11
Appendix
A. Sample.cfg file content
#################################################################
# BARZ_OUT PRO -- CONFIG FILE
#
# Up to ten barcode types can be defined in Barz_Out Pro.
# Six barcode styles are defined in this sample.
# All config options are listed following the sixsamples.
#
# '#' are comments, remove comment character to set an option
# NOTE!!! if more than one option is available then the last one
# set is used.
#
# Standard defaults should be set in this file and used for
# reporting purposed at each site. If more than ten options are
# needed, another cfg file can be created and associated with a
# new print driver. e.g. Portrait Barcode 1 and
# Portrait Barcode 2. Each report will have it's associated style
# required at registration time.
#
# Each Printer type will also need an individual cfg file and
# associated driver set up. E.G. HPLASER.cfg and EPSONFX.cfg
#
#################################################################
#################################################################
# FIRST, SETUP THE PRINTER INFORMATION
#################################################################
-HPLASER
-AllBins
-8LPI
-10CPI
#################################################################
# SETUP THE FIRST BARCODE TYPE 3_of_9 small
#################################################################
-LTrigger=~
-TTrigger=~!
-3_OF_9
-Horizontal
-HEIGHT18
-HIGH
-TextNone
-NoCheckSum
#################################################################
# SETUP A SECOND BARCODE TYPE 3_of_9 large
#################################################################
-NEXTBARCODE
-LTrigger=&&
-TTrigger=
-3_OF_9
-Horizontal
BARZ_OUT Pro Setup Steps
Page 12
-HEIGHT13
-HIGHigh
-TextNone
-NoCheckSum
#################################################################
# SETUP A THIRD BARCODE TYPE CODE128 small
#################################################################
-NEXTBARCODE
-LTrigger=@@
-TTrigger=
-CODE128
-Horizontal
-HEIGHT18
-HIGH
-TextNone
-NoCheckSum
#################################################################
# SETUP A FOURTH BARCODE TYPE CODE128 large
#################################################################
-NEXTBARCODE
-LTrigger=$$
-TTrigger=
-CODE128
-Horizontal
-HEIGHT13
-HIGH
-TextNone
-NoCheckSum
#################################################################
# SETUP A FIFTH BARCODE TYPE 3_of_9 small w/checksum
#################################################################
-NEXTBARCODE
-LTrigger=$@
-TTrigger=
-3_OF_9
-Horizontal
-HEIGHT18
-HIGH
-TextNone
-CheckSum
#################################################################
# SETUP A SIXTH BARCODE TYPE 2_of_5 small w/checksum
#################################################################
-NEXTBARCODE
-LTrigger=%%
-TTrigger=
=2_OF_5
-Horizontal
-HEIGHT18
-HIGH
-TextNone
-CheckSum
BARZ_OUT Pro Setup Steps
Page 13
#################################################################
# THAT'S IT !
#################################################################
#################################################################
# OTHER AVAILABLE OPTIONS FOLLOW ...
#################################################################
#################################################################
# SET BARCODE TYPE
#################################################################
#-3_OF_9
#-2_OF_5
#-EXT_3_OF_9
#-CODE128
#-UPC_A
#-UPC_E
#-POSTNET
#################################################################
# SET BARCODE ORIENTATION
#################################################################
#-Horizontal
#-Vertical
#################################################################
# SET BARCODE HEIGHT - use only with 6 lpi
#################################################################
#-HEIGHT16
#-HEIGHT13
#-HEIGHT12
#-HEIGHT23
#-HEIGHT56
#-HEIGHT1
#-HEIGHT15
#-HEIGHT2
#-HEIGHT25
#-HEIGHT3
#-HEIGHT35
#-HEIGHT4
#-HEIGHT45
#-HEIGHT5
#-HEIGHT55
#-HEIGHT6
#################################################################
# SET BARCODE HEIGHT - use only with 8 lpi
#################################################################
#-HEIGHT18
#-HEIGHT14
#-HEIGHT38
#-HEIGHT12
#-HEIGHT58
#-HEIGHT34
#-HEIGHT78
#-HEIGHT1
#-HEIGHT15
#-HEIGHT2
#-HEIGHT25
#-HEIGHT3
#-HEIGHT35
#-HEIGHT4
BARZ_OUT Pro Setup Steps
Page 14
#-HEIGHT45
#-HEIGHT5
#-HEIGHT55
#-HEIGHT6
#################################################################
# SET DENSITY
#################################################################
#-HIGH
The high density has thin bars.
#-MEDIUM
#-LOW
The low density has wide bars.
#################################################################
# SET TEXT PRINTING
#################################################################
#-TextNone
#-TextBelow
#-TextAbove
### Left and Right are for Vertical Orientation Only
#-TextLeft
#-TextRight
#################################################################
# SET CHECKSUM
#################################################################
#-NoCheckSum
#-CheckSum
#################################################################
# SET LEADING TRIGGER
#################################################################
#-LTrigger=~
The leading trigger is non-blank
#
Up to five characters long
#################################################################
# SET TRAILING TRIGGER
#################################################################
#-TTrigger=##
Use only to specified Non-blank trigger.
#################################################################
# SET PRINTER TYPE
#################################################################
#-EPSONLQ
#-EPSONFX
#-IBMPRO9
#-IBMPRO24
#-HPLASER
#################################################################
# SET PRINTER BIN
#################################################################
# -AllBins
#-UpperTray
#-ManualTray
#-ManualEnv
#-LowerTray
#-EnvFeeder
#################################################################
# SET LINES PER INCH
#################################################################
#-6LPI
#-8LPI
#################################################################
# SET CHARACTERS PER INCH
#################################################################
#-7CPI
#-10CPI
#-12CPI
BARZ_OUT Pro Setup Steps
Page 15
#-17CPI
#-25CPI
##################################################################
# Use to start parms for next bar code type if multiples are used
#################################################################
#
#-NEXTBARCODE
BARZ_OUT Pro Setup Steps
Page 16