1
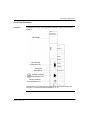
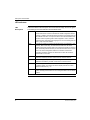
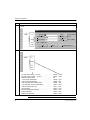
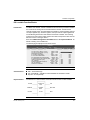
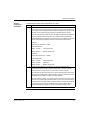
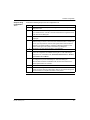
Quantum Automation Series
Network Option Module for
LonWorks
31002028 01
840 USE 109 00
Version 3.0
2
840 USE 109 00 May 2001
Table of Contents
About the Book . . . . . . . . . . . . . . . . . . . . . . . . . . . . . . . . . . . . . . . 5
Chapter 1
Description of NOL Module . . . . . . . . . . . . . . . . . . . . . . . . . . . . . 7
At a Glance . . . . . . . . . . . . . . . . . . . . . . . . . . . . . . . . . . . . . . . . . . . . . . . . . . . . . . 7
Description and Performance Factors. . . . . . . . . . . . . . . . . . . . . . . . . . . . . . . . . . 8
Connectors and Push-buttons. . . . . . . . . . . . . . . . . . . . . . . . . . . . . . . . . . . . . . . . 9
Front Panel Illustration . . . . . . . . . . . . . . . . . . . . . . . . . . . . . . . . . . . . . . . . . . . . 11
LED Indicators. . . . . . . . . . . . . . . . . . . . . . . . . . . . . . . . . . . . . . . . . . . . . . . . . . . 12
Before You Begin . . . . . . . . . . . . . . . . . . . . . . . . . . . . . . . . . . . . . . . . . . . . . . . . 14
Chapter 2
Hardware Installation . . . . . . . . . . . . . . . . . . . . . . . . . . . . . . . . . 17
At a Glance . . . . . . . . . . . . . . . . . . . . . . . . . . . . . . . . . . . . . . . . . . . . . . . . . . . . .
Proper Configuration and Mounting of an NOL Module in a LonWorks Network
Mounting NOL Module in Backplane. . . . . . . . . . . . . . . . . . . . . . . . . . . . . . . . . .
Cable Connections . . . . . . . . . . . . . . . . . . . . . . . . . . . . . . . . . . . . . . . . . . . . . . .
Power Up and Power Down . . . . . . . . . . . . . . . . . . . . . . . . . . . . . . . . . . . . . . . .
Module Status . . . . . . . . . . . . . . . . . . . . . . . . . . . . . . . . . . . . . . . . . . . . . . . . . . .
Chapter 3
Software Configuration . . . . . . . . . . . . . . . . . . . . . . . . . . . . . . . 23
At a Glance . . . . . . . . . . . . . . . . . . . . . . . . . . . . . . . . . . . . . . . . . . . . . . . . . . . . .
Overview of Configuration Process . . . . . . . . . . . . . . . . . . . . . . . . . . . . . . . . . . .
DX Loadable Function Blocks . . . . . . . . . . . . . . . . . . . . . . . . . . . . . . . . . . . . . . .
Using Modsoft or Concept for I/O Mapping . . . . . . . . . . . . . . . . . . . . . . . . . . . . .
Installing NOL Configuration Tool . . . . . . . . . . . . . . . . . . . . . . . . . . . . . . . . . . . .
Chapter 4
23
24
29
31
34
Maintenance . . . . . . . . . . . . . . . . . . . . . . . . . . . . . . . . . . . . . . . . 37
At a Glance . . . . . . . . . . . . . . . . . . . . . . . . . . . . . . . . . . . . . . . . . . . . . . . . . . . . .
Wink Error Code Identification. . . . . . . . . . . . . . . . . . . . . . . . . . . . . . . . . . . . . . .
Removing and Replacing the Module . . . . . . . . . . . . . . . . . . . . . . . . . . . . . . . . .
Upgrading Firmware in the Module . . . . . . . . . . . . . . . . . . . . . . . . . . . . . . . . . . .
When to Use Reset and Service Buttons . . . . . . . . . . . . . . . . . . . . . . . . . . . . . .
840 USE 109 00 May 2001
17
18
19
20
21
22
37
38
39
40
41
3
Appendices
. . . . . . . . . . . . . . . . . . . . . . . . . . . . . . . . . . . . . . . . . . . . . . . 43
At a Glance . . . . . . . . . . . . . . . . . . . . . . . . . . . . . . . . . . . . . . . . . . . . . . . . . . . . . 43
Appendix A
Specifications. . . . . . . . . . . . . . . . . . . . . . . . . . . . . . . . . . . . . . . 45
At a Glance . . . . . . . . . . . . . . . . . . . . . . . . . . . . . . . . . . . . . . . . . . . . . . . . . . . . . 45
General Specifications . . . . . . . . . . . . . . . . . . . . . . . . . . . . . . . . . . . . . . . . . . . . . 46
Agency Approvals . . . . . . . . . . . . . . . . . . . . . . . . . . . . . . . . . . . . . . . . . . . . . . . . 47
Index
4
. . . . . . . . . . . . . . . . . . . . . . . . . . . . . . . . . . . . . . . . . . . . . . . 49
840 USE 109 00 May 2001
About the Book
At a Glance
Document Scope
This manual covers the installation, operation, and maintenance of the Quantum
Automation Series Network Option Module for LonWorks® (NOL). The NOL module
provides connectivity between a Modicon Quantum controller and a control network
based on Echelon’s LonWorks® technology.This manual does not include a
comprehensive discussion of LonWorks® or of the Quantum Automation Series
Programmable Logic Control family. Refer to documentation from Echelon®
Corporation to learn more about LonWorks® technology. For information on the
Quantum products, see the section below on related documentation.
Validity Note
This is the second version of this manual. It is a guide to the application of the
Quantum NOL module as an interface between Quantum controllers and a
LonWorks network.
Related
Documents
840 USE 109 00 May 2001
Title of Documentation
Reference Number
Modicon TSX Quantum Automation Series Hardware Reference
Guide
840 USE 100 00
Modicon Ladder Logic Block Library User Guide
840 USE 101 00
Modicon ModLink User Guide
890 USE 129 00
Modicon ModLink User Guide
890 USE 129 00
Modicon Programmer User Guide
890 USE 129 00
Modbus Protocol Reference Guide
PI-MBUS-300
Concept User Manual
372 SPU 440 01
5
Product Related
Warnings
User Comments
6
We welcome your comments about this document. You can reach us by e-mail at
[email protected]
840 USE 109 00 May 2001
Description of NOL Module
1
At a Glance
Purpose
This chapter gives a functional description of the NOL module. In addition, there are
discussions on performance and interaction with applications, and connectors and
indicators. Finally, tips and cautions for the startup phase.
What’s in this
Chapter?
This chapter contains the following topics:
Topic
Description and Performance Factors
Connectors and Push-buttons
Front Panel Illustration
840 USE 109 00 May 2001
Page
8
9
11
LED Indicators
12
Before You Begin
14
7
Description of NOL Module
Description and Performance Factors
Functional
Description
The NOL module provides connectivity between a Modicon Quantum controller and
a control network based on Echelon’s LonWorks® technology. Some of the features
are:
l module operates as a fully-functional node on a LonWorks network
l can operate as a passive or active participant on a LonWorks network
l conforms to requirements of LonMark Interoperability Guidelines, Version 3.0,
l
l
l
l
l
NOL
Performance and
Effect on Your
Application
8
including conformance to guidelines for layers 1 - 7 of the ISO/OSI reference
model.
supports up to 240 SNVTs with up to 31 bytes per SNVT
supports user-defined network variables (CNVTs)
compatible with Quantum Automation Series controllers, communicates to
controller across backplane
multiple modules can operate on local or remote Quantum backplanes using
standard I/O mapping techniques
uses 3150 Neuron Chip
The data throughput of the NOL module depends on a number of factors.
Performance depends on the number of network variables that have been
configured. The LonWorks network traffic will also affect the NOL module
throughput. When you are designing applications you must consider this factor as it
relates to scan times and required update rates for the contacts and registers used
in the ladder logic program.
840 USE 109 00 May 2001
Description of NOL Module
Connectors and Push-buttons
RS-232
Configuration
Port
LonWorks
Communications
Ports
This is a 9 pin, D-shell, female, RS-232 compatible serial port wired in a 3 wire DTE
configuration; see the following table. Data transmit, data receive, and signal ground
are supported; no hardware handshake signals are presented. The port is
configured at a fixed rate of 9600 baud, 8 data bits, 1 stop bit, and no parity. This
port is used to download configuration and new firmware to the module. It can be
direct connected to the communications port of a PC with a cable which swaps
transmit and receive signals. The port supports the XMODEM protocol along with an
ASCII terminal based command processor for configuration of downloads to the
module. Modbus cables make a suitable connection between a PC serial port and
the Configuration port on a NOL module. The following ModBus cables are
available: 990 NAA 263 20, 990 NAA 263 50.
Pin Number
Signal
Pin Number
Signal
1
N/C (not connected)
6
N/C
2
RXD receive data
7
N/C
3
TXD transmit data
8
N/C
4
N/C
9
N/C
5
signal ground
The Primary and Auxiliary ports are wired in parallel for flexibility. They are both
standard interfaces to LonWorks networks. Wiring polarity concerns are minimized
due to the polarity insensitivity of the twisted pair LonWorks transceivers.
Primary LonWorks Communications Port This is the primary interface for wiring into
a LonWorks network. The connector is a two position 5.08 mm screw terminal.
Auxiliary LonWorks Communications Port This is the auxiliary interface for wiring
into a LonWorks network. The connector is an eight position RJ-45 socket.
(Reference Echelon Engineering Bulletin 174, "Junction Box and Wiring Guidelines
for Twisted Pair LonWorks Networks")
Service Pin
push-button
840 USE 109 00 May 2001
Provides stimulus for LonWorks network installation. Depressing this switch causes
the Service LED to illuminate, and forces the Neuron Chip in the module to output
its unique 48-bit ID and program ID. See the network management tool
documentation for more information.
9
Description of NOL Module
Reset pushbutton
10
Performs a hardware reset of the module. The module needs to be reset after new
firmware has been downloaded. This push-button allows you to reset the unit
without removing it from the backplane. The button is recessed and requires a paper
clip or similar tool for activation.
840 USE 109 00 May 2001
Description of NOL Module
Front Panel Illustration
Illustration
This illustration provides a front panel view of the NOL module connectors and
indicators.
140
NOL 91120
I/F to LonWorks‚NET
LED Display
Neuron ID
Domain
Subnet 1
RS-232 Serial
Configuration Port
Subnet 2
Node ID
Service Pin
Reset Button
Executive Version
Auxilliary LonWorks
Communication Port*
Primary LonWorks
Communications Port
*Not intended to be connected to any public telecommunications network. See
declaration on Telecommunications Declaration , p. 20.
840 USE 109 00 May 2001
11
Description of NOL Module
LED Indicators
LED
Descriptions
12
There are 6 LEDs on the front panel. The service LED is orange; the rest are green.
The meanings of the LED Indicators are described below:
Active
Indicates the state of module configuration. When lit, the Active LED signifies
that the module has received a valid network variable configuration and I/O
mapping. In addition, this LED indicates the module is communicating with the
DX Loadable at the CPU. You expect to see the Active LED illuminated when
the NOL module is operating with a valid configuration. If not lit, either the
module requires configuration and mapping or it is not communicating with the
CPU by way of the DX Loadable.
Ready
Indicates the module has passed internal diagnostics and initialization. Upon
powerup, after a short delay, the module should make this LED active,
indicating the module is either ready to be configured or transfer into an active
state. The Ready LED will blink once per second if the module has no internal
errors, but needs a configuration loaded. If a module is inserted into a
backplane and Ready LED does not illuminate, the Wink LED should be
observed for an error code.
MsgIn
Flashes briefly (10 ms) when an update message for a bound network
variable is received by the NOL module from the LonWorks network.
MsgOut
Flashes briefly (10 ms) when an update message for a bound network
variable is transmitted by the NOL module to the LonWorks network.
Wink
Flashes briefly when the NOL module receives a wink message from the
LonWorks network. This LED is also used to display internal error codes
defined in Maintenance, p. 37.
Srvc
Indicates status of LonWorks network service. It is normally Off in a running
system. Flashing means module is in an unconfigured state on the LonWorks
network.
840 USE 109 00 May 2001
Description of NOL Module
LED Indicator
Status
The LEDs indicate the status of the NOL module, as shown in the following table:
The following table shows what the status of each NOL Module LED Indicator
means.
LED
Color
Powered Up
Powered Up
Not Configured
Not Configured
Not Programmed Not Programmed
Normal
Operation
Error
Condition
Configured
Programmed
840 USE 109 00 May 2001
Ready
Green
Blink
On
On
Off
Active
Green
Off
Off
On
Msg In
Green
Off
Off
Blink
Msg Out
Green
Off
Off
Blink
See the
description
in [LED
Descriptio
ns, p. 12
Wink
Green
Off
Off
Blink on
command.
Blink/See
description
inLED
Descriptio
ns, p. 12
Srvc
Yellow
Off
Blink
Off
See the
description
in LED
Descriptio
ns, p. 12
13
Description of NOL Module
Before You Begin
Items Included
with Product
The NOL module and this user’s guide are sold separately. The following list
describes what items are included with the product shipment.
l NOL module with the Read Me First sheet, part number 043512579.
The Quantum Network Option Module for LonWorks User Guide must be ordered
separately. Included with the manual is a set of 3.5 inch diskettes containing:
l
l
l
l
Other
Components
Required for
Operation
14
NSUP.exe DX Loadable Function Block software
NOL DX Loadable Function Block software
NOL Configuration Tool software
Modsoft Help file for NOL loadable
You will need the following items to install and use the NOL module in a Quantum
control system. Refer to the Quantum Automation Series Hardware Reference
Guide for complete information on Quantum modules and related items.
l
l
l
l
l
l
l
Quantum backplane
Quantum CPU module
Quantum power supply module
cabling to connect modules to related hardware and peripherals
LonWorks compliant network management software
PC running Windows 95 or Windows 98
Modsoft version 2.4 or Concept 2.2 or greater
840 USE 109 00 May 2001
Description of NOL Module
Modsoft
Programming
Software
Modsoft Programming Software Version 2.4 for DOS is an integrated tool for
programming, testing and documentation of Modicon Programmable Logic
Controller programs. This software is used to I/O map and zoom into the DX
Loadable of the NOL module. See the following figures.
The figure below shows the Modsoft I/O Map Screen
Utility
F1
NOL_REL 1
ClrDrop
F3
Type : Local I/O
Drop Hold Up Time : 3
Number of Inputs
: 864
Slot
101
102
103
104
105
106
107
108
109
110
111
112
113
114
115
116
Holdtme
F4
Drop
F6
F5
QUANTUM I/O MAP
Head-Slot : 0
Drop 1
x100 ms Module Status Reg :
Number of Outputs :
Module
CPS 114 xx
CPU 424 0x
CRP 93x 00
NOM 2xx 00
DAI 540 00
DAO 842 10
Input Ref
AVI 030 00
300056-300064
NOL 911 xx
NOL 911 xx
300001-300016
300017-300032
AVO 020 00
DDI 853 00
ATI 030 00
100017-100048
300065-300074
840 USE 109 00 May 2001
Output Ref
100001-100016
000129-000144
QUANTUM
F7 Lev 8
F8
OFF
Quit
F9
Available : 383
0
592
Description
AC PS 115/230V 10A
CPU 2MB 2xMB+
RIO HEAD S908
Modbus/Modbus-Plus
AC IN 115V 16x1
AC OUT 100-230V 4x4
AN IN 8CH BIPOLAR
400001-400016
400017-400032
400056-400059
I/F to LonWorks
I/F to LonWorks
AN OUT 4CH VOLT
DC IN 10-60V 4x8
TC IN 8CH
15
Description of NOL Module
The following figure shows the Modsoft I/O Zoom Screen
Utility
F1
PlcOps
F2
Hex
Dec
F3
F4
Bin
I / O MAP INPUT BASE . (3xxxxx) . . . . . . . : 400101 INT32
I / O MAP OUTPUT BASE . (3xxxxx) . . . . . : 400101 INT32
ENABLED HEALTH BITS . . . . . . . . . . . . . . . .: NO
# OF INPUT REGISTERS . . . . . . . . . . . . . .. : 400106 UNIT
# OF OUTPUT REGISTERS . . . . . . . . . . . . .: 400107 UNIT
# OF DISCRETE INPUT REGISTERS . . . . .: 400108 UNIT
# OF DISCRETE OUTPUT REGISTER . . .. .: 400109 UNIT
CONFIG CHECKSUM (CRC) . . . . . . . . . . . . . : 400110 UNIT
NOL VERSION . . . . . . . . . . . . . . . . . . . . . . . . : 400111 UNIT
MODULE FIRMWARE VERSION . . . . . . . . . . . : 400112 UNIT
NOL DX VERSION . . . . . . . .. . . . . . . . . . . . . .: 400113 UNIT
MODULE DX VERSION . . . . . . . . . . . . . . . . . : 400114 UNIT
Concept
Programming
Software
16
Quit
GoTo
DX Zoom Editor
DATA TRANSPORT
F7
Lev 8
F8 ON
300001
400001
DEC
DEC
2
2
1
1
879E
0102
0111
0101
0101
DEC
DEC
DEC
DEC
HEX
HEX
HEX
HEX
HEX
F9 R1
See Software Configuration, p. 23 for more information on Concept programming
software. Please contact Schneider Automation for availability.
840 USE 109 00 May 2001
Hardware Installation
2
At a Glance
Purpose
This chapter describes the configuration and mounting of an NOL module; proper
cable connections; power up and power down procedures; and module status
indicators.
What’s in this
Chapter?
This chapter contains the following topics:
Topic
Proper Configuration and Mounting of an NOL Module in a LonWorks Network
840 USE 109 00 May 2001
Page
18
Mounting NOL Module in Backplane
19
Cable Connections
20
Power Up and Power Down
21
Module Status
22
17
Hardware Installation
Proper Configuration and Mounting of an NOL Module in a LonWorks Network
Transceiver
Types
Media Types and
Network
Termination
The NOL module supports three twisted pair media types with different network
topologies or data transfer speeds. The module is offered in three models for
different transceiver types.
NOL Model
Number
Transceiver
Type
Configuration
Rate
140 NOL 911 00
TP/FTT-10
free topology, twisted pair
78,000 bits per second
140 NOL 911 10
TP/XF-78
linear topology, twisted
pair, transformer isolated
78,000 bits per second
140 NOL 911 20
TP/XF-1250
linear topology, twisted
pair, transformer isolated
1.25 million bits per
second
The type of cable you choose affects the length of the network as well as
performance characteristics of the network, including bit error rate and maximum
baud rate. You must decide which type of cabling will best fit your application. Cost
and performance are the two deciding factors.
The NOL module must be terminated properly in a LonWorks network. The type of
termination depends on the topology and specific architecture of your network. See
http://www.lonmark.org for more information. Go to the User Guide section. Select
"LonMark Technical Information" and review Version 3.0 of LonMark Layer 1-6
Interoperability Guide.
Note: your network will not operate properly without the correct terminations.
18
840 USE 109 00 May 2001
Hardware Installation
Mounting NOL Module in Backplane
Mounting the
Module
840 USE 109 00 May 2001
The NOL module can be installed into any unused slot on a Quantum backplane.
Refer to the Quantum Automation Series Hardware Reference Guide for
complete information about various Quantum modules and backplanes and
requirements for a Quantum system.
19
Hardware Installation
Cable Connections
Making
Connections
For logic application programming, connect a programming cable from the Quantum
CPU module to the PC where you will be running the Modsoft or Concept software.
For NOL configuration, connect a Modbus cable (990 NAA 263 20 or 990 NAA 263
50) from the RS-232 port on the NOL module to the PC where you will be running
the Configuration Tool.
Connect the appropriate cable from the LonWorks communications port on the
module (either Primary or Auxiliary) to the LonWorks network. You must choose the
twisted pair cable to match the transceiver type in your module. Refer to LonWorks
topology documentation.
Telecommunications
Declaration
Following is the Telecommunications Declaration
Schneider Automation
Network Option Module
One High Street
North Andover, MA 01845
DECLARES THAT:
The Quantum Automation Series Network Option Module for LonWorks
NOL Model Numbers:
140 NOL 911 00
TP/FT-10
140 NOL 911 10
TP/XF-78
140 NOL 911 20
TP/XF-1250
are not intended to be connected to a public telecommunications network.
The connection of such equipment to a public telecommunications network in a
European Community Member State will be in violation of the national law
implementing Directive 91/263/EEC on the approximation of the laws of the Member
States concerning telecommunication terminal equipment, including the mutual
recognition of their conformity.
20
840 USE 109 00 May 2001
Hardware Installation
Power Up and Power Down
Power Up
Initialization
When Power is turned on to a local backplane it takes approximately 10 seconds for
the Quantum CPU to come on-line and begin processing the NOL module’s data.
On a Remote I/O backplane the RIO interface takes approximately 5 seconds to
power up. If an NOL module is hotswapped or installed in a rack that has power on,
the module itself takes approximately 1 second to initialize. Refer to LED Indicators,
p. 12 for proper power up LED indications.
Upon power up all input and output SNVT data from the LonWorks network is
initialized to a zero state. Data transfer to and from the NOL module is not performed
until after the NOL block is solved in the logic program, and a data transfer
handshake is established between the NOL module and the logic function block. At
that time if no new messages have been received by the NOL module, the initial zero
states of the SNVTs will be transferred to the controller’s 4x data table, and the data
from the 4x data table will be written to the NOL module. Any non-zero SNVT data
will be flagged as having changed state and will trigger a message to be sent out on
the LonWorks network.
CAUTION
Loss of Data Hazard
When the NOL module is power cycled, all SNVT data within the NOL
module is zeroed. No output SNVTs with a zero value on power up will
be written to the Lonworks Network. The SNVTs in the NOL module are
set up to utilize the standard change of state message processing.
Failure to observe this precaution can result in injury or
equipment damage.
Power Down
Sequence
When power to the backplane is lost, any outstanding (untransmitted) LonWorks
messages will be lost.
The NOL block in the Quantum CPU will set to 0 all input registers that are I/O
mapped to the NOL module. Output registers will be set to reflect the initialization
sequence which re-establishes the handshake with the module.
The first 16 registers in the NOL logic block will retain the initial information that was
previously received from the NOL module. All input SNVT data is retained in the
controller’s 4x data table.
The only indication of a problem with the module would be seen by monitoring the
Quantum controller’s I/O module status bit, or by using a timer programmed off the
NOL block’s middle output to act as a time-out in communication to the NOL module.
840 USE 109 00 May 2001
21
Hardware Installation
Module Status
Health Bits
Each network variable within the NOL module can be configured to support a "health
bit" in the 4x register space. The NOL module supports health bits to determine that
LonWorks nodes are operational. Health bits are supported for incoming messages
and the LonWorks Acknowledge Message Service for outgoing messages. It is the
responsibility of the PLC programmer to properly configure and monitor the health
bit information.
See NOL.exe DX Loadable, p. 29 for information on using health bits.
Module
Identification
A configuration checksum is provided in the NOL module and transferred to the NOL
function block that is derived from the configuration file loaded into the NOL module.
It is the responsibility of the PLC programer to properly monitor this value, along with
the standard Quantum I/O module health bits, to detect any unauthorized or
unexpected change or replacement of the NOL module.
CAUTION
Data Transfer Hazard
There is a potential for improper network data transfer if an NOL module
is swapped with a differently configured module.
Failure to observe this precaution can result in injury or
equipment damage.
22
840 USE 109 00 May 2001
Software Configuration
3
At a Glance
Purpose
This chapter gives an overview of the configuration process, as well as discussions
on: the DX Loadable Function Blocks; the use of Modsoft or Concept for I/O
Mapping; and the installation and use of the NOL Configuration Tool.
What’s in this
Chapter?
This chapter contains the following topics:
840 USE 109 00 May 2001
Topic
Page
Overview of Configuration Process
24
DX Loadable Function Blocks
29
Using Modsoft or Concept for I/O Mapping
31
Installing NOL Configuration Tool
34
23
Software Configuration
Overview of Configuration Process
Procedures
The software configuration process to prepare the NOL module for operation
consists of the following four major steps.
Step
24
Action
1
Use the Windows 95 compatible NOL Configuration Tool to make the NOL
module "LonWorks ready." This includes identifying network variables, both
standard and custom, and linking them to controller register addresses.
2
Use a LonWorks compliant network management tool, such as MetraVision, to
install the NOL module on the LonWorks network and perform binding of network
variable types.
3
Use the Modsoft or Concept Programming software to load the NSUP.exe DX
Loadable Function Block.
4
Use the Modsoft or Concept Programming software to load the NOL.exe DX
Loadable Function Block and establish the I/O map between the NOL module
and the Quantum controller.
840 USE 109 00 May 2001
Software Configuration
Configuration
Overview Using
Modsoft
The following outlines the configuration of the NOL Module, using Modsoft.
Step
1
Action
Add loadables to controller configuration in the order shown (NSUP then NOL)
in the following figure.
F1
F3
NOL
F
F4
0X Loadable Configuration
2
840 USE 109 00 May 2001
Name
Rev
Size
NSUP
196
3072
1f
NOL
196
6600
2f
Opcode
Add NOL modules into I/O map.
Utility
QUANTUM
Quit
ClrDrop Holdtme ASCPort Drop
F4
F6
F7 Lev 8 F8 OFF F9
F1
NOL
F3
F5
QUANTUM I/O MAP
Available: 472
Head-Slot: 0 Drop: 1
Type: Local I/O
x100 ms Module Status Reg :
300017-300019
Drop Hold Up Time : 3
Number of Inputs : 256
Number of Outputs :
264
Rack Slot
Module Input Ref
Description
Output
Ref
1 01 CPS 124 xx
AC PS 115 / 230V RED
1 02 CPU 424 0x
CPU 2MB 2xMB+
1 03 NOE 211 00
ENET TCP / IP (twsp)
1 04 NOA 611 00 300100-300366 400100-400363 IBUS / S Master
000017-000024 RELAY OUT 8x1 NO/NC
1 05 DRC 830 00
1 06 NOL 911 xx 300001-300016 400001-400016 I/F to LonWorks
25
Software Configuration
Step
3
Action
Add function block to logic section of controller (Note the Loadable DX Zoom
Configuration).
NOL
000001
400001
400002
NOL
#00200
lity
NOL
HEX
F3
Dec
F4
Bin
GoTo
DATA TRANSPORT
I/O MAP INPUT BASE . (3xxxxx).........: 400002
I/O MAP OUTPUT BASE . (3xxxxx).......: 400004
ENABLE HEALTH BITS.........................:
NO
# OF INPUT REGISTERS.......................: 400007
# OF OUTPUT REGISTERS...................: 400008
# OF DISCRETE INPUT REGISTERS.....: 400009
# OF DISCRETE OUTPUT REGISTERS.: 400010
CONFIG CHECKSUM (CRC)...................: 400011
NOL VERSION.......................................:
400012
MODULE FIRMWARE VERSION............: 400013
NOL DX VERSION.................................:
400014
MODULE DX VERSION..........................:
400015
UNIT
UNIT
UNIT
UNIT
UNIT
UNIT
UNIT
UNIT
UNIT
Multiple NOL modules will require multiple instances of the loadable, although
the NOL.exe loadable is only loaded into the controller one time.
000002
I/O
I/O
400002
NOL
#00200
NOL
400001
NOL
000001
NOL
CPU
Utility
F1
PS
4
INT32
INT32
400001
400002
NOL
#00300
26
840 USE 109 00 May 2001
Software Configuration
Configuration
Overview Using
Concept
Step
The following is an overview of the configuration process, using Concept.
Action
1 The first step in Concept Configuration is to add of loadables to controller configuration.
Loadable
Bytes Available: 746040
Bytes Used: 0
Installed:
Available:
@3is V196
CHS V208
NOL V196
NSUP V196
ULEX V196
Install
Remove
Unpack...
Edit
OK
Cancel
Help
2 Next, add NOL module into the I/O map.
Pick list
of modules
Module
Drop
Module: 5
Bits In: 288
ASCII Port # none
Status Table:
Clear
Slot
840 USE 109 00 May 2001
Bits In: 256
Bits Out: 288
Prev
Module
Next
Detected
In Ref
In End
Bits Out: 8
Delete
Params
Cut
Copy
Out Ref
Out End
Past
Description
ACPS 115/230V 10A
RIO DROP S908
AC IN 24V 4x8
DC OUT 24V 4x8
I/F to LonWorks
27
Software Configuration
Step
Action
3 Add function block to logic section of controller, adding register assignments as required in all three node
locations.
NOL
000001
#0
400500
NOL
# 200
Top Node:
Lookup...
Const (0-9999) 4x
Middle Node:
Lookup...
Dest 4x
Bottom Node:
Lookup...
Const (0-9999)
NOL - Loadable DX
OK
Cancel
Variable declarations...
4 This figure shows the Loadable DX Zoom Configuration of function block
000001
#0
400500
NOL
# 200
28
I/O MAP INPUT BASE . (3xxxxx) . . . . . . . . . . . . . . . :
I/O MAP OUTPUT BASE . (3xxxxx) . . . . . . . . . . . . :
ENABLED HEALTH BITS . . . . . . . . . . . . . . . . . . . . . . :
# OF INPUT REGISTERS . . . . . . . . . . . . . . . . . . . . . .:
# OF OUTPUT REGISTERS. . . . . . . . . . . . . . . . . . . . .:
# OF DISCRETE INPUT REGISTERS. . . . . . . . . . . . . :
# OF DISCRETE OUTPUT REGISTERS. . . . . . . . . . . :
CONFIG CHECKRUN (CRC) . . . . . . . . . . . . . . . . . . . . :
NOL VERSION . . . . . . . . . . . . . . . . . . . . . . . . . . . . . . . :
400002 INT32
400004 INT32
NO
400007 UNIT
400008 UNIT
400009 UNIT
400010 UNIT
400011 UNIT
400012 UNIT
MODULE FIRMWARE VERSION . . . . . . . . . .. . . . . . :
NOL DX VERSION . . . . . . . . . . . . . . . . . . . . . . . . . . . . :
MODULE DX VERSION . . . . . . . . . . . . . . . . . . . . . . . . :
400013 UNIT
400014 UNIT
400015 UNIT
840 USE 109 00 May 2001
Software Configuration
DX Loadable Function Blocks
Introduction
The NSUP.exe and NOL.exe DX Loadable Function blocks are provided to facilitate
the movement of the large amount of data between the NOL module and the
controller register space. The NOL Module is mapped for 16 input registers (3X) and
16 output registers (4X). Of these registers, two input and two output registers are
for handshaking between the NOL Module and the DX Loadable. The remaining
fourteen input and fourteen output registers are used to transport the data. See the
DX Zoom screen in the figure below.
Refer to the Modsoft Programmer User Manual or the Concept User Manual for
details of loading a DX Loadable file.
The following figure displays the DX Zoom Screen
y
F2
Hex
F3
Dec
F4
MODSOFT
Bin
GoTo
DX Zoom Editor
I/O MAP INPUT BASE . (3xxxxx) .... : 400002 INT32
I/O MAP OUTPUT BASE. (3xxxxx) .... : 400004 INT32
ENABLE HEALTH BITS ..................... : YES
# OF INPUT REGISTERS................... : 400007 UNIT
# OF OUTPUT REGISTERS................ : 400008 UNIT
# OF DISCRETE INPUT REGISTERS... : 400009 UNIT
# OF DISCRETE OUTPUT REGISTERS. : 400010 UNIT
CONFIG CHECKSUM (CRC)................. : 400011 UNIT
NOL VERSION................................... : 400012 UNIT
MODULE FIRMWARE VERSION........... : 400013 UNIT
NOL DX VERSION...............................: 400014 UNIT
MODULE DX VERSION........................ : 400015 UNIT
F7
Lev 8
F8 OFF
0
0
DEC
DEC
0
0
0
0
0000
0000
0000
0000
0000
DEC
DEC
DEC
DEC
HEX
HEX
HEX
HEX
HEX
Characteristics
l Size - Three Nodes high
l PLC Compatibility - available as a downloadable for all Quantum CPUs.
l Opcode - 1F Hex (default)
Representation
The following is a representation of the Block structure NOL.exe DX Loadable
Enable
840 USE 109 00 May 2001
Function #
NOL
Initialized
Register
block
Unused
Count
Q
F
OK
New data
Error
29
Software Configuration
Inputs
l Enable - enables the NOL function
l Initialize - causes the NOL to re-sync with the module
l Unused - not used
Outputs
l OK - set when enabled and no error
l New data - set for one sweep when the entire data block from the module has
been written to the register area
l Error - Set when an error condition exists
Top Node
Content
Function number selects the function of the NOL block. Function 0 transfers data to/
from the module. Any other function number yields an error.
Middle Node
Content
Defines the starting register for a block of 16+ registers used by the loadable
function.
CAUTION
Operational Hazard
When the NSUP loadable is not installed, or is installed after the NOL
loadable, or is installed in a Quantum PLC with an older executive than
specified in Middle Node Content, p. 30, all three outputs turn on,
regardless of the input states.
Failure to observe this precaution can result in injury or
equipment damage.
Bottom Node
Content
30
Defines the total number of registers required by the function block. This value must
be set to a value equal to or greater than the number of data registers required to
transfer and store the network data being used by the NOL module. If the count
value is not large enough for the required data, the error output will be set. See the
example in Bottom Node Content, p. 30
840 USE 109 00 May 2001
Software Configuration
Using Modsoft or Concept for I/O Mapping
Overview and
Requirements
The Modsoft or Concept Programming Software is used to I/O map the NOL Module
to the Quantum CPUs 3x (input) and 4x (output) register space. Refer to the Modsoft
Programmer User Manual or the Concept User Manual in the section on I/O
Mapping for information on how to perform I/O mapping.
NOL Register
Definitions
The NOL module can be configured for up to 240 network variables inclusive of all
array elements, and has a maximum of 7440 registers available for storing network
variable data.
All standard network variable types (SNVTs) are supported. SNVT_switch and
SNVT_lev_disc are the only types of network variables that can be declared for
storing data in the discrete input and discrete output data areas. User defined
custom network variables (CNVTs) are also supported, with a maximum data length
of 31 bytes each.
The only other setting is to ’Enable Health Bits’. If this is set to yes, then the next 16
registers following the first 16 configuration/status registers will be reserved for the
SNVTs health bit status. Refer to Health Bits, p. 22 and Steps to Configuring Health
Bits, p. 33 for further information on using health bits. The MSB of the first register
of the health bit data table holds the health bit for the first SNVT defined in the XIF
file and continues consecutively for each SNVT defined.
The actual SNVT data is stored in a table of consecutive registers starting with the
17th register defined by the middle register of the NOL block, if the health bit
parameter is set to no. Or in the 33rd register if the health bit parameter is set to yes.
Data is stored in 4 groups, discrete inputs stored first, followed by register inputs,
discrete outputs, and then register outputs. These groups of data are set up
consecutively and start on word boundaries. Discrete data starts with the MSB as
the first bit of data, which follows Modicon controllers standard format of numbering
discrete data in registers as bits 1-16 (MSB-LSB).
Example of SNVT data storage:
If a .xif file were loaded into the NOL module that defined 18 discrete input SNVTs,
with 2 input register SNVTs, 8 discrete output SNVTs, and 3 register output SNVTs,
the data table would be configured as follows:
840 USE 109 00 May 2001
31
Software Configuration
The following table shows an example of SNVT Data Storage configuration
Register SNVT MSB
LSB
4x + 16* disc.
input
1
2
3
4
5
6
7
8
9
10 11 12 13 14 15
16
4x + 17
disc.
input
17
18
X
X
X
X
X
X
X
X
X
4x + 18
reg.
input
Word Data...
4x + 19
reg.
input
Word Data...
4x + 20
disc.
output
4x + 21
reg.
output
Word Data...
4x + 22
reg.
output
Word Data...
4x + 23
reg.
output
Word Data...
1
2
3
4
5
6
7
8
X
X
X
X
X
X
X
X
X
X
X
X
X
*4x refers to the middle register in the NOL block. An offset of 16 exists if the health
bits parameter is set to No.
Note: If the defined SNVT is a structure of byte data then the "packed" parameter
in the.xif configuration file determines if each byte is stored in one word (low order
byte), or is packed as two bytes per word (high order then low order).
32
840 USE 109 00 May 2001
Software Configuration
Steps to
Configuring
Health Bits
The following two steps may be performed in any order.
Step
1
Action
Enable the health bits on the NOL DX Zoom screen. The middle value of the NOL
function block sets the starting register for the NOL function block’s data table. The
first 16 registers hold configuration data and status information for the function block
(this data can be programmed and monitored via the NOL DX Zoom screen).
When the health bits are enabled, the next 16 registers following the configuration
and status registers hold the health bits. The LonWorks network variable data
immediately follows the health bits (if the health bits are not enabled the LonWorks
network variable data immediately follows the configuration and status data).
Example 1:
middle value of NOL block = 400001
Health bits Disabled
400001 - 400016........ Configuration data
400017 - 400xxx........ Network variable data
Example 2:
middle value of NOL block = 400001
Health bits Enabled
400001 - 400016........ Configuration data
400017 - 400032........ Health bits
400033 - 400xxx........ Network variable data
2
Program the PLC ladder logic necessary to act upon the health bits. Each
programmable network variable (network variable index 4 and above) has an
associated health bit. Note index 0-3 are reserved for network variables.
The health bits are stored in the order of the network variable indexes with the first
bit being the most significant bit of the first health bit register. The bit will be set if the
associated network variable is "healthy" and reset otherwise.
The input variable is "healthy" if an update has been received since the last module
reset, and is not cleared unless the NOL module is reset or stops communicating to
the NOL DX block. An output network variable is "healthy" if the most recent attempt
to propagate the value across the LonWorks network was successful. When a
change of state fails to propagate on the network, the Health status is reset.
840 USE 109 00 May 2001
33
Software Configuration
Installing NOL Configuration Tool
System
Requirements
The following table shows System Requirements for the NOL Configuration Tool
Minimum
Recommended
IBM PC or compatible with a 486, 33 MHz
microprocessor
IBM PC or compatible with a Pentium, 75
MHz or higher microprocessor
4 MB RAM
16 MB RAM
VGA monitor (640x480 resolution)
SVGA monitor (1024x768 resolution)
Microsoft Windows 3.1 or Windows 95
Microsoft Windows 3.1 or Windows 95
Note: The NOL Configuration Tool should not be used with Windows NT.
Installing the
Software
Perform the following steps to install the NOL Configuration Tool.
Step
Action
1
Start Windows, if it is not running.
2
Insert Program Disk 1 into your 3.5" disk drive.
3
From the Program Manager File menu, select Run.
4
In the Command Line box, enter the following:
a:\setup
and click OK.
Substitute a:\ with the appropriate drive designation for your 3.5" disk drive. The
system loads the Configuration Tool installation program.
5
Using the NOL
Configuration
Tool
34
Follow instructions on the screen.
Use the Configuration Tool to establish the logical database of network variables for
the NOL module. Select the variable types from the NV Attributes dialog box and
specify the starting index into the type of variable that will be used. The following
procedure outlines the steps involved in using the Configuration Tool. Refer to the
chapter on Configuration Tool Menu Descriptions for information on all of the Menus
and Commands in the Configuration Tool.
840 USE 109 00 May 2001
Software Configuration
Steps to Using
Configuration
Tool
840 USE 109 00 May 2001
Perform the following steps to use the configuration tool.
Step
Action
1
Start the Configuration Tool by double-clicking the icon. See Starting the
Configuration Tool.
2
Enter a name in the File Info dialog box. The name can be entered in the Text box
or the Hexadecimal box. Click OK. This name will become the Program ID for the
.xif file. See File Info Dialog Box
3
On the Main menu screen, click the Add NV button. The NV Attributes dialog box
is displayed.
4
You must now define your network variables by entering information in the NV
Attributes dialog box. Enter a name for the first variable and select a variable type
from the Type drop-down list. Enter the start register location and the direction
information. See Adding, Modifying, or Deleting a Network Variable. For User
Defined variable types, see Specify User Defined Type Dialog Box.
5
Repeat Step 4 for each network variable in your application.
6
Once you have completed identifying all of your network variables, you must save
the file. The Configuration Tool defaults to saving as an .xif file. See Saving a
Configuration File, in 840USE109 00, Quantum Automation Series - Network
Option Module for LonWorks.
7
Set the communications parameters by selecting Settings from the Comm menu.
This configures the port for downloading the .xif file. See Setting the
Communication Parameters in 840USE109 00, Quantum Automation Series Network Option Module for LonWorks .
8
Use the Communications menu selection "Load Disk File" to load the .xif file.
9
Use a network management tool to install the NOL module on the LonWorks
network and perform network variable binding. Refer to your network management
tool documentation for complete instructions on this process.
35
Software Configuration
36
840 USE 109 00 May 2001
Maintenance
4
At a Glance
Purpose
This chapter explains the aspects of maintenance, including Wink Error Code
Identification; removal and replacement of, and upgrade of Firmware for the NOL
module. The chapter concludes with a discussion on when to use reset and service
buttons.
What’s in this
Chapter?
This chapter contains the following topics:
840 USE 109 00 May 2001
Topic
Page
Wink Error Code Identification
38
Removing and Replacing the Module
39
Upgrading Firmware in the Module
40
When to Use Reset and Service Buttons
41
37
Maintenance
Wink Error Code Identification
Interpreting
Error LEDs
The Wink LED on the front of the module is used to display error conditions. The
LED will blink from one to four times, depending on the error condition.
l
l
l
l
38
one blink means the module is in the bootloader
two blinks means there is an error in writing to flash
three blinks means there is an error in initializing the LonWorks interface
four blinks means there is an error in the module configuration
840 USE 109 00 May 2001
Maintenance
Removing and Replacing the Module
Cautions and
Procedures
An unconfigured module must go through I/O mapping, configuring with an .xif file,
and binding before it can function on the network.
CAUTION
Operational Hazard
The module can support the electrical requirements of being removed
while power is on ("hot swap"), but a replacement module will not
function properly until it is loaded with the same configuration (.xif file)
as the module it is replacing. Proper network installation and bindings
are also required for correct operation.
Failure to observe this precaution can result in injury or equipment
damage.
MetraVision Network Management software provides a replace function that will
automatically bind the SNVTs of the new module to the same network SNVTs for
which the previous module was configured. It is required that you set the node
replacement options in the Option/Project Setup/Network menu to "Don’t Download
Application" for this function to work with the NOL module.
CAUTION
Data Loss Hazard
When the NOL module is power cycled, all SNVT data within the NOL
module is zeroed. No output SNVTs with a zero value on power up will
be written to the LonWorks Network if the SNVTs in the NOL module are
set up to utilize the standard change of state message processing. Only
modules set up to utilize the SCPTs (Standard Configuration Property
Types) Min_Send_Time parameter will receive an initial zero value
written to the network.
Failure to observe this precaution can result in injury or equipment
damage.
840 USE 109 00 May 2001
39
Maintenance
Upgrading Firmware in the Module
Where to Get the
Firmware
Upgrade File
Contact Schneider Automation at 1-800-468-5342 or
via the WWW at http://www.modicon.com.
The following table outlines the Firmware Download procedure:
1
Connect the PC to the NOL module with a Modbus (Null Modem) cable.
2
Using Windows Terminal software, configure the PC’s port for 9600 baud, 8 data
bits, no parity, one stop bit, with no flow control.
3
After hitting <CR> twice, the NOL module should respond with: >OK.
4
Enter the passcode command: P @P3817 <CR>.
5
Enter: R BOOTLOADER<cr>.
The NOL should respond with: BOOT>
6
Enter: X NEWCODE<cr>
7
Initiate XMODEM download of the new Intel HEX file for the NOL. From the
terminal emulator’s Transfers Menu selection, select Send Binary File. From File
Select, select the NOL’s HEX firmware file and click OK. The Wink LED will flash
during the download.
8
When the transfer has completed, reset the NOL module, or cycle power on the
rack to initialize the module with the new firmware.
The NOL will respond by sending C’s to the terminal.
How to Check
Module Firmware
Revision Number
40
The following is the procedure for checking the module firmware revision number
1
Connect the PC to the NOL module with a Modbus cable (990 NAA 26320 or
990 NAA 263 50).
2
Configure the Windows terminal software to 9600 baud, no parity, and one stop
bit.
3
Type: V <CR>
4
The module will respond with the firmware revision number
840 USE 109 00 May 2001
Maintenance
When to Use Reset and Service Buttons
Reset Button
The Reset button can be used if the module requires a reset. The button is recessed,
so you must use a pencil or other similar tool to access the button. The Reset button
will perform a power-up reset of the module.
Service Pin
The Service Pin is used to send a message from the module to the LonWorks
network. You may press this push-button during the installation process using your
network management tool. The message that is sent out identifies the NOL module
to the LonWorks network manager.
If you are using MetraVision as a network manager, you can enter the Neuron ID
number instead of pressing the Service pin.
840 USE 109 00 May 2001
41
Maintenance
42
840 USE 109 00 May 2001
Appendices
At a Glance
Purpose
Appendix A gives specifications and agency approvals for the Quantum NOL
Module.
What’s in this
Appendix?
The appendix contains the following chapters:
Chapter
A
840 USE 109 00 May 2001
Chapter Name
Specifications
Page
45
43
Appendices
44
840 USE 109 00 May 2001
A
Specifications
At a Glance
Overview
Appendix A gives specifications and approvals for the NOL Module.
What’s in this
Chapter?
This chapter contains the following topics:
840 USE 109 00 May 2001
Topic
Page
General Specifications
46
Agency Approvals
47
45
Specifications
General Specifications
Specifications
Table
For your reference, the general specifications for the NOL Module are provided
here.
The following table outlines General NOL Module Product Specifications
Operating Temperature Range 0°C to +60°C
Storage Temperature Range
Operating Humidity Range
-40°C to +85°C
20 - 95% (validated at 20 - 95%) Non- Condensing at 0 60°C.
Ventilation
Convection only
Shock
15g Half Sine, 11 millisecond duration
Vibration
IEC68-2-6, Sinusoidal 10Hz to 150Hz (Operating).075mm
Amplitude, 1.0g 10 Sweeps.
Flammability
PCB Material UL-94V0. UL Recognized Components
Radiated Emissions
Compliance to EN55011, Class A.
Conducted Emissions
All systems AC mains tested per EN55011, Class A,
Group 1.
ESD Immunity
Compliance to IEC1000-4-2, 8kV air discharge, 4kV
contact discharge, both polarities.
Radiated RF Susceptibility
Compliance to IEC1000-4-3, 80MHz to 1,000MHz: 10V/m
test level, 80% AM @ 1 kHz. Also 1.89 GHz PM @ 100 Hz,
50% Duty Cycle.
Conducted RF Susceptibility
Compliance to IEC 1000-4-6, Table 1, Test Level 3. Use of
ferrite clamp preferred.
Fast Transient Susceptibility
Compliance to IEC1000-4-4, Table 1, Test Level 3.
Capacitive clamp preferred for use on communications
ports.
Electrical Surge Susceptibility
Compliance to IEC 1000-4-5, Table 1, Installation Class
3.5 surges each line, line-line and line-Earth. Use of
capacitive test clamp preferred.
Voltage Dips, Interruptions, and
Voltage Variations
Compliance to IEC 1000-4-11. Voltage deviations to be
applied to system AC mains input line.
The following table provides electrical specifications:
46
Input voltage
Module requires +5.1VDC +4%, -3% from the Quantum backplane for
operation. No external power required.
Power
Consumption
Module will consume 250 milliamps typical, with 400 milliamps maximum
(surge at power up) from the Quantum backplane.
840 USE 109 00 May 2001
Specifications
Agency Approvals
Requirements
The NOL module is designed to comply with the following regulatory agency
requirements:
l
l
l
l
l
UL 508 - Industrial Control Equipment (Safety)
CSA C22.2 No. 142-M1987 - Process Control Equipment
Factory Mutual, Class 1, Division 2 FM3611
European EMC Directive, CE Mark
CISPR 22, EN55022, Class A - Limits and Methods of measurement of EMI of
industrial, scientific, and medical radio frequency equipment
l LonMark Compliance
CE Compliance
840 USE 109 00 May 2001
When installed in any specified, fully compliant system, the complete system will
meet the requirements of the EMC Directive (89/336/EEC, EN55011, EN50082-1,
EN50082-2, and all applicable annexes to date), and the Low Voltage Directive (73/
23/EEC and all applicable annexes to date). EMC Directive compliance is
determined by satisfactory completion of Quantum EMC Test Plan, and by
incorporation into the Quantum Technical Construction File. Primary standards for
LVD compliance are: IEC 1131-1, IEC 1131-2, IEC 1010-1, and IEC 950 (applicable
portions only).
47
Specifications
48
840 USE 109 00 May 2001
Index
A
H
Active LED, 12
Auxiliary LonWorks Communications Port, 9
health bits, 22, 31, 33
C
CE compliance, 47
CNVTs
support for, 8
Concept
configuration overview, 27
Configuration Tool
installing, 34
overview for using, 34
system requirements, 34
I
I/O mapping, 31
items, included with product, 14
L
DX Loadable function blocks, 29
DX Zoom screen, 29
LED
Active, 12
MsgIn, 12
MsgOut, 12
Ready, 12
Srvc, 12
Wink, 12
LonWorks
communications ports on module, 9
network termination, 18
E
M
Error LEDs, interpreting, 38
MetraVision, 39, 41
Modbus cable, 20
Modsoft
introduction, 15
MsgIn LED, 12
MsgOut LED, 12
D
F
firmware
upgrading, 40
function blocks
introduction, 29
840 USE 109 00 May 2001
49
Index
N
W
NOL module
agency approvals, 47
cable connections, 20
configuration checksum, 22
data throughput, 8
functional description, 8
general specifications, 46
model numbers, 20
register definitions, 31
removing and replacing, 39
transceiver types, 18
NOL.exe DX loadable, 29
Wink error code, 38
Wink LED, 12
P
power down sequence, 21
Primary LonWorks Communications Port, 9
R
Read Me First sheet, 14
Ready LED, 12
Reset push-button, 10, 41
RS-232 Configuration Port, 9
S
Service Pin push-button, 9, 41
SNVTs
register definitions, 31
status at power cycle, 21
support for, 8
software configuration, 24
Srvc LED, 12
start-up sequence, 21
T
Telecommunications Declaration, 20
transceiver types
TP/FTT-10, 18
50
840 USE 109 00 May 2001