1
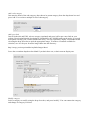
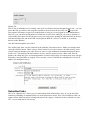
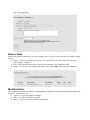
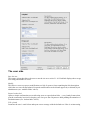
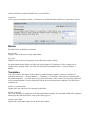
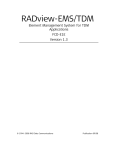
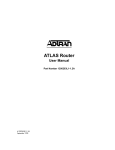
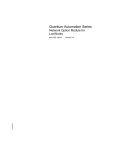
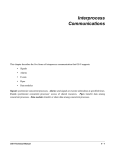
Web Links V 1.1 module documentation
Function
The Web Links module is used to create a links section for your website. It is typically used to create a
directory to other relevant websites, but you could use it to link to anything really (music, software,
publications, whatever). Links can be organized into categories and sub-categories. Users can
optionally be allowed to 'rate' existing links or to submit new ones.
Install/uninstall
Follow the standard installation process, no special measures are necessary. Extract the 'mylinks' folder
into the xoops_root/modules directory. Install the module through the control panel (Admin -> System
Module -> Modules). If you need instructions on installing modules refer to the XOOPS Operations
Manual.
Operating instructions
The Web Links module is immediately functional after installation. However, it is a good idea to take a
look at the module's configuration options and make sure that you are happy with the way it is set up.
Don't forget to ensure that relevant user groups have access rights to the module and (if in use) its
blocks. Information on setting group access rights is available in the XOOPS Operations Manual.
If you are planning to have a lot of links then it is probably useful to create some categories and/or
subcategories to organise them. However, it is not necessary - you can post links without assigning a
category.
The Web Links administration menu
Configuration options are as follows:
Preferences
Module config options
Select the number of hits
for links to be marked as
popular
Select the maximum
number of new links
displayed on top page
Select the maximum
number of links
displayed in each page
Allow anonymous users
to post links ?
Auto approve new links
without admin
intervention ?
Would you like to
display the linked page
within a frame ?
Select yes to display
screenshot images for
each link
An icon
will be displayed next to links that reach a
certain threshold of clicks. You can set the threshold at
various levels ranging from 5 to 1000. Default is 100.
The index page of the Web Links module displays the most
recently added links. How many do you want to show ? There
are several options ranging from 5 to 50. Default is 10.
If you have a lot of links in a category the page can get very
long. You can choose to 'break up' a long list by limiting the
number of links displayed on a page. Choose between 5-50
(default is 10). If there are more, a series of 'next page' links
will be displayed at the bottom.
Yes or no (default).You can optionally allow users to submit
links to your site (via the ‘submit’ sublink in the main menu).
In a community site this can be a useful way to gather
information.
Yes or no (default). Do you want user-submitted links to be
automatically published ? If so, select 'yes', but note that this
leaves your site open to spamming by robots, antisocial
individuals and people trying to sell things. If you select 'no'
then user submissions will be held in the 'submitted links'
section of the administration menu pending approval by an
administrator (see below). This gives you a chance to review
whether the link is useful or appropriate, fix the spelling and
formatting. It is useful to make the 'waiting contents' block
(system module) visible to administrators on the user side of
your website so that you can easily see when links are
submitted.
Yes or no (default). The default behaviour is to open the
linked site in a new window. The advantage of opening the
linked site in a frame is that you retain your logo / some
navigation features back to your own site. The downside is
that a lot of people really hate frames (particularly people that
surf the web on mobile devices).
Yes or no (default). Do you want to display screenshots of
each linked site ? Note that this option won't do anything
unless you actually prepare the screen grabs for each link and
save them in the right folder on your website (see 'add a new
link' below).
Maximum allowed width Enter a width in pixels, the default is 140. If the screenshot is
of each screenshot image wider than permitted it will be resized down when displayed,
which is inefficient in terms of file size and page loading
times. It is best to manually resize your screenshots to match
the intended display size, prior to uploading them.
Comment rules
Users can optionally be allowed to post comments on links.
You can control the handling of comments here. Options
include:
• Disable comments - turn it off.
• Comments are always approved (default) - user comments
will automatically be published. Comments are often used
as an ad-hoc discussion forum betweeen users. Adding a
layer of 'editorial approval' can slow or kill the discussion,
so many sites choose to allow comments to be posted
freely, in a similar manner to a discussion forum. This is
the least 'spam secure' option. Note that you can prevent
anonymous users from posting comments separately (see
'allow anonymous post in comments ?' below).
• Comments by registered users are always approved - but
comments posted by anonymous users (if allowed) will be
held pending approval by an administrator.
• All comments need to be approved by administrator - the
most spam-secure option, but also the slowest - not a good
choice if you are trying to promote discussion.
Allow anonymous post
Yes or no (default). Standard practice on community sites is
in comments ?
to require users to register before they are allowed to post
comments for security reasons, as this gives you some options
for dealing with antisocial individuals. However, you can
allow unregistered users to post comments if you wish (select
'yes').
Enable notification
The notification system allows registered members to
'subscribe' to different kinds of events on the website. An
example of an event could be the addition of a new link in a
particular category (kinds of events are detailed below).
When an event occurs subscribers will automatically be
notified via an email or personal message, depending on the
preference set in their personal profile, which will contain a
direct link to the relevant page. This allows members to track
topics of interest without having to monitor the website
constantly. It is also a very useful tool for administrators.
Members can subscribe to events wherever the ‘Notification
Options’ block is displayed on a page. There are several
options for how this block is displayed:
•
Disable notification – turn it off. The Notification Options
block will not be accessible within this module.
•
Enable specific events
Enable only block-style – the Notification Options block
(actually part of the System module) can be freely
positioned on the page just like any other block (through
Administration => System => Blocks).
• Enable only ‘inline-style’ – the notification options block
will be displayed in a fixed position at the bottom of the
page, below the module contents. It cannot be moved.
• Enable notification (both styles) – the Notification
Options block will be available both at the bottom of the
page and as an independently positioned block.
Administrators can control they type of notification events
that members may subscribe to. Select the options that you
would like to appear in the Notification Options block (CTRL
+ click to select multiple). The available notification options
are:
• Global: New category - when any new category is
created.
• Global: Modify link requested - when a user submits an
amendment to a link. This is of most use to
administrators, so that amendments can be dealt with
quickly.
• Global: New link submitted - when a user submits a new
link (if user submissions enabled). Of most use to
administrators responsible for moderating user
submissions.
• Global: New link - when any new link is posted.
• Category: New link submitted - when a user submits a
new link in a particular category (if user submissions
enabled). Of most use to administrators.
• Category: New link - when a new link is posted in a
particular category.
• Category: Bookmark - this option does not generate
notification messages. However, the category will be
listed as a 'bookmark' in the member's notification options
(accessed via the user menu), making it easy to return to
the category.
• Link: Comment added - when a comment is posted on a
particular link.
• Link: Comment submitted - when a user submits a
comment on a particular link. As above, of most use to
administrators when moderation is enabled.
• Link: Bookmark - this just lists an individual link in a
member's notification options, no notification messages
will be sent.
Add/Edit Links
This page of the administration interface is divided into five sections, each with its own submit button
(variously labelled 'add' or 'modify'. Here is what you can do:
Add a main category
To create top-level categories to organise your links, simply enter the name of the category in the text
field and simply press 'add'. You can, if you wish, display a category image or icon next to it, by
entering the link to the image in the box below. You can link to any image, so if you are using
consistent categories throughout your site you could link to an icon housed in another module, but if
you wanted to make the Web Links module fully independent it is probably a good idea to place a copy
of any icons used in the XOOPS_root/modules/mylinks/images folder, or upload them to the image
manager (System module => Images).
The 'Image URL' box indicates that there is an 'option' to resize images down to 50 pixels in width, but
actually there is actually no way to turn this off through the admin interface and it tends to make icons
look fuzzy and ugly. If you use icons here it is best to design some that 'work' visually at 50 pixels in
the first place, and resize them manually.
Add a sub-category
Just enter the name of the sub-category, then choose its parent category from the drop-down box and
press 'add'. You can have multiple levels of subcategory.
Add a new link
Just fill in the title and URL, select a category (optional) and press 'add' to put a new link on your
website. Bear in mind that the description is searchable by the XOOPS main search engine, so a good
description will help your visitors find the link easily. You can, optionally, display a screenshot of the
site using the drop down box to pick the appropriate image. To make a screenshot available for
selection, save it with your favourite image editor into the directory:
http://xoops_root/xoops/modules/mylinks/images/shots/
Leave the screenshot dropdown box blank if you don't have one, or don't want to display one.
Modify category
Select a category to modify using the drop down box, and press 'modify'. You can rename the category
and change its category icon here.
Modify link
This is sort of redundant as it is actually a lot easier to edit links directly through the user side - you can
next to the
locate the link you want to edit using the search box, then click on the red 'edit' icon
'Description' field name to open it for modification (so long as you are logged in as an administrator).
However, you can enter the ID number of a link here to open it for editing if you want to. Problem is,
you probably don't know the ID (for the record, you can get it by opening an individual link on the user
side and looking at the end of the URL for the pattern '&lid=X', where X is the ID, or by looking
directly in the database.
Just edit links through the user side ☺
The 'modify link' form is nearly identical to the 'add link' form shown above. Make your changes then
select the 'modify' button. There is also a 'delete' button if you wish to remove the link entirely, and a
'cancel' button to abandon your edits. However, there is some additional information displayed about
'Link Votes'. This displays the total number of votes, and for registered users: Who voted, their IP
number, the rating they gave, a timestamp and the overall average rating. For anonymous users only the
IP number, rating and date are logged. Users can only vote for each link once (though this is tied to IP
address for anonymous users).
Submitted links
This is an ‘editorial area’ where you view and manage links submitted by users. If you do not allow
automatic publishing of submitted links (set in the preferences menu), they will be held here until you
approve them. Make any desired changes then press the ‘approve’ button to make it publish it on your
site – or you can delete it, if necessary.
Broken links
Broken link reports submitted by users are displayed here. There are three options for dealing with the
reports.
• Ignore - if the broken link report is false (it’s a good idea to check because they often are),
select ‘ignore’ to delete it.
• Edit - opens the link description so that you can amend it, eg. change the URL.
• Delete – be careful ! This permanently deletes the report and the link from your database.
Modified links
User-proposed amendments to links are managed here. Both the current and proposed descriptions are
displayed. Your options are:
• Approve – accept the proposed change.
• Edit – revise the description yourself.
• Ignore – reject (delete) the proposed amendment.
The user side
Rate this site
This opens a form that allows the user to rate the site on a scale of 1-10. Each link displays the average
user rating and number of votes.
Modify
This allows a user to request a modification to a link. It opens a form containing the link description,
which the user can edit and submit. Proposed modifications are held until approved (or deleted) by an
administrator (see ‘modified links’ above).
Report broken link
Opens a simple confirmation screen allowing users to report broken links – a very handy features that
gets the community involved in keeping your site up to date. Reports are held pending the attention of
an administrator (see ‘broken links’ above).
Tell a friend
Launches the user’s email client and opens a new message with the default text ‘Here is an interesting
website link I have found at XOOPS Site: <relevant URL>’.
Comments
Users can post comments on links, if comments are enabled for this module (see ‘preferences’ above).
Blocks
The Web Links module has two blocks:
Recent links
Displays a list of the most recently added links.
Top links
Displays a list of the most frequently visited links (by number of hits).
By default both blocks display 10 links with a title length of 25 characters. These settings can be
configured by clicking on the ‘edit’ link for each block in Administration => System module =>
Blocks.
Templates
You can customise the layout of the module by modifying the templates, which are available in
Administration menu => System Module => Templates => Web Links. Note that you cannot modify
the default templates – you must make a copy first (clone them). This ensures you can always fall back
to the original templates. See the Operations Guide for more details about templates. The Web Links
templates are:
mylinks_brokenlink.html
Displays the user-side form for reporting broken links.
mylinks_link.html
This is the template for displaying each individual link description. It is included within other templates
that display the link descriptions, such as the index page etc.
mylinks_index.html
Displays the main (index) page for the Web Links module.
mylinks_modlink.html
Displays the user-side form to request amendment of a link description.
mylinks_ratelink.html
Displays the user-side form to ‘Rate this site’.
mylinks_singlelink.html
Displays a page with a single link description (for example, when a link is selected from the ‘recent
links’ block).
mylinks_submit.html
Displays the user-side form to enter / submit new link descriptions.
mylinks_topten.html
Displays the ‘Top ten’ links in each category. It is called by the ‘Popular’ and ‘Top Rated’ sublinks in
the main menu. The contents are ordered according to hits or user ratings, depending on which sublink
was selected.
mylinks_viewcat.html
This template displays the contents of a category (links and subcategories).
mylinks_block_new.html
Displays the Recent Links block.
mylinks_block_top.html
Displays the ‘Top Links’ block.
Miscellaneous notes
When the Web Links module is being viewed there are two sublinks accessible in the main menu:
Top Rated sublink
This displays a list of the top 10 links in each category as ranked by users (see ‘Rate this site’ above).
The average rating and number of hits and votes is also displayed.
Popular
As above, except that it displays the top 10 links according to the number of hits.
Other notes - managing notifications
Members can view and edit their notification subscriptions through the ‘Notifications’ link in the User
Menu. This displays a list of a members currently active notifications and allows them to be deleted.
Module credits
The Web Links module was written by Kazumi Ono, aka ‘Onokazu’.