1
MobileFast SyncStudio
A Complete Mobile Database Synchronization Solution
User Manual
Release 1.61, May 2014
Copyright © 2014 by MobileFast Corporation – All rights reserved
Page 1 of 65
Edition Notes - Release 1.61, May 2014
Trademarks SyncStudio ® is a registered trademark of MobileFast Corporation (MobileFast).
The SyncStudio ® logo in its entirety and all other trademarks on this manual pertaining to
services, products, or marketing statements are owned or licensed by MobileFast. Any other
product names, logos, brands, company names, and other trademarks featured or referred to
within this document are the property of their respective trademark holders.
Copyright Notice MobileFast Corporation owns the content of this manual in its entirety,
including but not limited to pictures, logos, trademarks, and resources.
© Copyright 2014 MobileFast Corporation. All rights reserved. Electronically published by
MobileFast Corporation in the United States of America.
Manual Usage MobileFast authorizes its customers to download and print this manual for
professional information purposes only. MobileFast expressly prohibits the usage, copy,
storage, distribution, modification, or printing of this manual or its content for any other
purpose without its written consent.
Document Printing For best results, print this document in color, on letter size paper (8.5 x 11
inches), double sided. If using A4 paper (210 x 297 mm), configure your printer to scale the
content accordingly.
Disclaimer MobileFast Corporation believes that the information contained in this manual is
accurate in all respects. However, MobileFast assumes no responsibility for any error or
omissions in this document. MobileFast reserves the right to revise this document and to make
changes from time to time in the content hereof without obligation of MobileFast to notify any
person or company of such revision or changes. This does not constitute in any way a
commitment by MobileFast to make such changes. MobileFast may issue a revision of this
manual or a new edition of it to incorporate such changes.
Document Revision The SyncStudio User Manual, Rev. 1.61, supersedes all previous versions
of this manual. Discard any older versions and replace with this version.
Page 2 of 65
Table of Contents
About SyncStudio ........................................................................................................................4
Licensing........................................................................................................................................9
Database Sync Configuration .................................................................................................11
Database Provisioning .............................................................................................................15
The Database Provisioning Process ............................................................................................. 16
Automatic Schema Synchronization ............................................................................................ 17
Avoiding changes that break synchronization ......................................................................... 18
Stranded Client Records .................................................................................................................. 19
Preventing Schema Synchronization Errors ............................................................................... 21
Some Notes about SQLite................................................................................................................ 22
General Design Considerations ..................................................................................................... 24
Code Generation ........................................................................................................................25
Sync Server Deployment ..........................................................................................................28
User Maintenance ......................................................................................................................30
Reports .........................................................................................................................................32
Filtering Data ..............................................................................................................................36
Simple Filtering .................................................................................................................................. 36
Advanced Filtering............................................................................................................................. 38
The Standard SyncStudio Android Client ............................................................................42
The Device Log ................................................................................................................................... 48
Sample Code – SyncStudio Android Open Source synchronization apps ................... 51
SyncStudio Sync Client (Basic4Android Project) ....................................................................... 51
SyncStudio Sync Client (JAVA/Eclipse Project) .......................................................................... 51
Class Library API Reference – Basic4Android and Java ...................................................52
The Basic4Android .JAR API ............................................................................................................ 53
Synchronization Example ................................................................................................................ 56
Handling Synchronization Events ................................................................................................. 57
The Profile Database......................................................................................................................... 58
Getting at the Database Location ................................................................................................. 59
The JAVA .JAR API .............................................................................................................................. 60
Page 3 of 65
About SyncStudio
SyncStudio is a powerful software tool for mobile app developers. With SyncStudio developers
can create a complete mobile database synchronization solution in minutes rather than weeks
or months.
Built atop a significantly enhanced customized version of the Microsoft Sync FrameworkTM
SyncStudio leverages and expands this reliable SDK with unique patented technology and a
user-friendly wizard style interface. With SyncStudio we have taken all the complication and
tediousness out of the Microsoft Sync Framework and totally insulate the developer from having
to learn anything about it. Sync configuration, database provisioning, automatic code
generation, compilation, IIS Deployment, user management and more is all taken care of. Our
users don’t even need to know C# or how to use Visual Studio.
Completing the solution we provide our universal sync client JAVA class libraries and the
sample code developers need to get their Android apps synchronizing databases fast.
In the future SyncStudio will also support iOS, Windows Phone, Windows and Win RT clients and
database servers like MySQL, Oracle, Maria DB and others.
True Data Synchronization
SyncStudio is a full bi-directional synchronization solution based on the Microsoft Sync
Framework. Unlike simple data replication or custom created REST web services; SyncStudio
only exchanges new and altered records between the client and the server. This means both
databases are maintained in a synchronized state with only the minimum needed bytes flowing
back and forth. SyncStudio renders custom or home-built sync and custom data transfer code
completely unnecessary. Change tracking is handled automatically on the server side and at the
client the developer’s application has full control to flag records that have been changed,
created or deleted so that SyncStudio knows what to do.
Auto-Magic Client Database
The first time a SyncStudio empowered app synchronizes it will download the database schema
from the server and create the client-side database file automatically. This local DB file will be
complete with all the tables, fields and indexes that were defined at the server. Any server side
field types that are not supported in SQLite are automatically translated to the most compatible
equivalent.
During subsequent synchronizations SyncStudio will always validate the local database schema
against the server. If any schema changes are detected they are automatically applied.
DB Schema Synchronization
Database structures are not static once created. They change over time as new features are
added to a solution or due to customer requested modifications. Pushing these schema
changes out to 10’s or 1000’s of mobile clients has always been a nightmare; until now.
SyncStudio delivers Database Schema synchronization out of the box. Any changes made to the
database structures at the server will be automatically propagated to all the mobile clients the
next time they synchronize. Best of all, these schema changes do not break the synchronization
or force the user to lose un-synced data. Tables and fields can be added as needed to the App
Page 4 of 65
and these changes seamlessly flow to the devices when they connect. This feature alone will
substantially lower the maintenance and upgrade effort required to support a mobile database
application.
Large Databases Live Here
SyncStudio was built for mobile database synchronization. It fully understands the physical
memory constraints of mobile environments and how to deal with them. By properly managing
memory usage SyncStudio can easily sync large databases with tens or even hundreds of
thousands of records.
Transaction Commit/Rollback
SyncStudio has full transactional support at the Sync session level (across multiple transmission
batches) —all data changes will be applied under a single transaction, which will either succeed
or fail.
Some synchronization solutions ONLY implement commit/roll-back at the batch level.
Consequently, any errors during a multi-batch synchronization could leave the databases in a
corrupted state. This won’t happen with SyncStudio.
Android Class Libraries (.JAR)
The SyncStudio solution includes a device side universal synchronization client in the form of a
Java class library. Any developer that wants to build database synchronization directly into their
application would add this class library to their solution.
Once incorporated our .JAR handles all aspects of the synchronization and frees the developer
to focus on building his app.
Stand-Alone Sync Client
SyncStudio also includes a free app that can be used as a stand-alone synchronization utility.
Rather than adding our Class Library into their application a developer can choose to use this
stand-alone sync client and leave his app untouched. Also, we provide source code to our
stand-alone app so the developer could use it as a starting point for adding sync features into
his solution. With this approach the total client-side development effort using our free Android
client is also zero.
The SyncStudio SMC
The SyncStudio SMC (Sync Management Console) is the Windows application where the
developer creates the synchronization project. Here is where they specify the tables and fields
to sync with SQLite on the devices. They can set sync direction, conflict resolution, filters and
user access privileges. The SMC is an extremely easy to use (wizard like) tool that guides the
developer step-by-step through the process. Its features include automated database
provisioning, automated code generation and compilation of custom sync component library
and automated deployment to IIS.
Page 5 of 65
Sync Schema Configuration
The SyncStudio SMC allows the developer to specifically select which tables and fields he wants
to sync with the device. He also has full control (without programming) to define the direction
in which data will flow and how conflicts will be handled. The ability to enable data filtering on
a table by table basis is also available.
Data Filtering
SyncStudio supports both simple and complex data filtering. Developers and system admins
can control which records are synced to each device on a table-by-table basis.
Database Provisioning
The SyncStudio SMC automatically handles the provisioning (and de-provisioning) of the server
side SQL database; making all the changes necessary for synchronization to work. The
developer simply chooses the tables and fields he wants to sync with SQLite and we take care of
the rest. All needed and appropriate tracking tables, triggers and other objects are added to
the selected SQL DB automatically.
Code Generation
The SyncStudio SMC will automatically generate and compile the .NET code for a custom WPF
Synchronization Web Service. The result is a ready to go .NET .DLL that is specific to the
selections of tables and fields made by the developer. Once this uniquely created .DLL is
deployed to IIS everything is ready to start synchronizing data. With the SyncStudio SMC
developers have absolutely ZERO custom coding on the server-side.
Automated IIS Deployment
The SyncStudio SMC will automatically deploy the sync project to IIS. The developer simply
chooses the folder were the various files will be copied to and presses one button. IIS is then
configured with the appropriate virtual folder, application pool, etc. to enable synchronization.
Reporting and Logging
SyncStudio has a full synchronization logging feature, both at the client and the server. Using
the Reporting features in the SMC the developer or system admin can review sync stats and
other info.
Page 6 of 65
SyncStudio Projects
To automate a synchronization process you first create a new SyncStudio project. A SyncStudio
Project defines the tables, fields and indexes that are to be synchronized between your
Database Server and your mobile clients.
To create a new SyncStudio Project select File New Project in the main menu and enter a
Project Name. Project Names cannot have any spaces—use the underscore character instead of
a space—and can only contain the characters a-z, A-Z, 0-9 plus the underscore character (_).
SyncStudio Projects are created under the SyncStudio Projects folder, which will be located in
\SyncStudio\Projects (directly off the root directory of the target drive. Each Project has its own
sub-directory, with the name of the directory being the same as the name of the project.
Page 7 of 65
Note: You should never have two SyncStudio Projects target the same database—they will
interfere with each other. You can have as many projects as you want targeting the same
database server, though, so long as each project targets a different database.
Once you create your new Project you need to connect to the Database Server. To do this please
select the Database Server, enter the Database Name and select either Windows Authentication
or SQL Server Authentication and click on the “Connect” button.
If you select SQL Server Authentication you will need the User ID and Password of your SQL
Server user account. Regardless of which authentication method you select the user account
needs to be able to modify the Database Schema, as we will need to add a number of tables,
triggers and stored procedures to the database structures.
WARNING: PLEASE DO NOT ATTEMPT TO USE AN SQL DATABASE THAT HAS PREVIOUSLY BEEN
PROVISIONED OR USED WITH STANDARD MICROSOFT SYNC FRAMEWORK. ONLY USE DATABASES
WITH SYNCSTUDIO THAT ARE CLEAR OF THIRD PARTY SYNC RELATED OBJECTS OR ARE NEW
AND HAVE NOT ALREADY BEEN ALTERED BY OTHER SYNCHRONIZATION TOOLS. IT IS LIKELY
THAT SYNCSTUDIO PROVISIONING WILL FAIL IF ATTEMPTED WITH DB ALREADY PROVISIONED BY
SOME OTHER TOOL.
Page 8 of 65
Licensing
When SyncStudio is installed on a machine for the first time it will operate as an unregistered
evaluation. In this mode synchronization will be limited to 1 mobile user, 5 table and function for 72
hours.
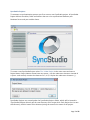
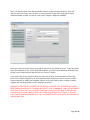
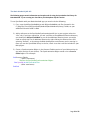
First time users may request a free 14 day evaluation license via our licensing screen. You can find our
licensing screen on the main menu of SyncStudio under the Help Menu.
To receive your SyncStudio License file please complete the form in the center of the screen and click
“Request License”.
Note about “Your Email” -
Page 9 of 65
If you have purchased a license of SyncStudio please use the same email address you used with the
purchase. Otherwise we will not be able to match up the request to a purchase and won’t be able to
send a license. Please visit our website (http://www.dbsyncstudio.com) for prices and purchase options.
Note about “Purchase Conf. # If you have already purchased your license of SyncStudio then you will have received an email
confirmation. Depending on if you purchased at our website or from a partner the format of the email
might be different. Find the Confirmation number or invoice number and enter it in this field. If you
can’t find it, no worries, we’ll figure it out using your email address.
Note about the License File –
The SyncStudio license file is generated on a machine by machine basis. It is specific to the machine for
which it is created and will not work on any other machine. Please only perform the “Request License”
from the machine which will be used for synchronization with the devices. In other words, the machine
/ server that will be running Internet Information Server (IIS) and hosting the SyncStudio sync web
services.
If in the future you need to change the machine that is hosting the sync then you will need to request a
different license file and the current license will be disabled. SyncStudio licenses are created specific to:
-
The machine
The number of users
The SQL Server
The number of SQL databases being synced within the same server
For a fixed period of time.
It is a requirement that the machine hosting the sync services have an Internet connection so that
SyncStudio can perform license validation.
Page 10 of 65
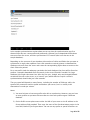
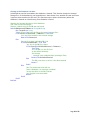
Database Sync Configuration
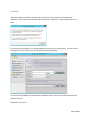
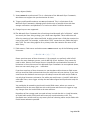
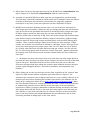
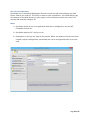
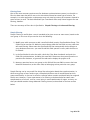
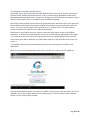
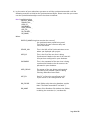
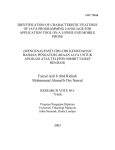
SyncStudio has allows you to select which tables and fields will be synchronized. This
information is saved into your Sync Project file. When you select the Database Articles tab on
the left-side menu you will see a list of the tables in the database. Select which tables need to
be synced by checking them off, as shown in the figure.
By default, when you select a table for the first time only the primary key fields will be selected.
You then use the right-hand panel to select additional fields or Check All.
When you try to leave this section of SyncStudio you will be prompted to save your changes.
Page 11 of 65
Important Notes:
1) You cannot synchronize a table that does not have a primary key. This is a limitation of
the Microsoft Sync Framework, which uses the fields in the primary key to uniquely
identify a record. Tables that do not have a primary key will be shown highlighted in red
in the SyncStudio and you will not be able to select them for synchronization. In any
event, having a table without a primary key is probably not a good database design
practice.
Please note that having a unique index or a unique constraint is not the same thing as
having a primary key—if you do not have a primary key the sync will fail, regardless of
whether you have unique indexes or constrains or not.
2) You do not have to synchronize all the fields in a table, but you must synchronize all the
fields that make up the primary key. Failure to follow this rule will cause the sync to fail.
The same thing goes for any fields that are part of any Index that is being synchronized:
you have to synchronize every field that is part of an index that is being synchronized,
otherwise the client will not be able to create and maintain the index and the sync will
fail.
3) Please keep in mind that fields that are not selected for synchronization will not be
present in the client-side table. The client-side version of the tables will have only the
fields than you select for synchronization in the SyncStudio. You client-side application
needs to know which fields are present in the client-side version of your database.
4) Fields that are not selected for synchronization should always either allow null values or
provide a default value for the field or the sync will fail. The reason is that whenever a
new record is created at the client and uploaded to the server the client will not be
providing values for fields that are not being synced. If you do not allow nulls and do
not provide a default value for the field this will trigger a server-side error and abort the
sync.
5) Client-side data types are not guaranteed to be exactly the same as their Server-side
equivalents. The reason is that in client-side database systems such as Sqlite the set of
supported data types will, in general, be very different from the MS SQL Server
equivalent. SyncStudio will attempt to find the closest match for each field that is being
synchronized, though. For example, all the Integer data types in MS SQL Server will be
mapped to the Integer data type in Sqlite, regardless of the length of the server-side
field; likewise, all the floating-point numeric data types in MS SQL Server will be mapped
into the SQLite Real data type, and all character strings in SQL Server will become TEXT
data types in SQLite.
6) Some special data types cannot be synchronized because of lack of support in the
Microsoft Sync Framework. Some examples of data types that cannot be synchronized
are the geography and geometry data types in SQL Server. You will not be able to select
these fields in the UI. In any event, most of the client-side databases such as Sqlite
simply have no equivalents for these special data types other than storing them as
Page 12 of 65
binary objects (blobs).
7) Views cannot be synchronized. This is a limitation of the Microsoft Sync Framework,
which does not support the synchronization of views.
8) Triggers and Stored Procedures are not synchronized. This is a limitation of the
Microsoft Sync Framework, although given the diversity of possible client-side data
storage mechanisms and platforms it is hard to see how it could be otherwise.
9) Foreign keys are not supported.
10) The Microsoft Sync Framework has a few things that Microsoft calls “infelicities”—which
are exactly the same thing as bugs, just a little more dignified. These infelicities will
affect the naming of your tables and fields. A table cannot have a field that contains the
name of the table. For example, a table called “TYPE” cannot have any fields that begin
with TYPE. The same thing applies for a primary index that contains the name of the
table. Sorry.
11) Table names, Field names and Index names cannot contain any of the following special
characters:
~!@#$%^&*(){}/;'"|\
Please note that some of these characters, $ for example, are perfectly valid in field
names for many database systems, such as MS SQL Server. However, they cannot be
used in table, index or field names that are intended for synchronization because of
limitations in the architecture of the Microsoft Sync Framework. As we explained above,
these are not exactly bugs, just … infelicities!
If you have used any of these characters in your database table schema or field names
and you need the table synchronized then you really have only two choices: if you have
control over the database structures you can always rename the table and/or fields to
use only legal characters; otherwise, for tables you could create a “parallel” table with a
valid table name, use a trigger to keep the two tables aligned and synchronize only the
new table.
You could also do something similar with invalid field names, where you create an
additional field in the same table but with a valid name and then use a trigger to copy
any changes from the invalid field to the new valid one.
Regardless of the strategy used you need to keep in mind that this is a hard limitation,
as invalid table and/or field names will cause your synchronization to fail. The
SyncStudio user interface will try to prevent you from selecting tables and/or fields with
invalid names whenever possible.
Page 13 of 65
12) Tables can be marked as Upload-Only, Download-Only or Bi-Directional (both Upload and
Download). The default is Bi-Directional, where any changes in the server will be sent to
the client and vice-versa.
Upload-Only tables are meant to be used to collect data from the clients but not to send
or replicate any server data back to the client device.
Download-Only tables are meant for data that should never be changed at the client.
Some examples of common download-only tables are tax rates and tables with codes,
which the client needs to use but should not be able to change.
Please note that we do not have any way of preventing your client-side application from
actually changing the contents of the records in a Download-Only table. What happens in
this case is that the SyncStudio client will simply ignore the changes at the client—i.e.,
the changes will not be sent to the server.
Likewise, you could manually add a new record or modify an existing record in an
Upload-Only table at the server, but these changes will not be propagated back to the
clients.
For all the obvious reasons your client-side code should always be written so as to not
allow any changes to download-only tables, to avoid confusion and the possibility of
data-dependent errors that are very hard to reproduce and debug.
13) Any time that you make changes to either the database structure or to the tables and
fields that need to be synchronized you must re-provision your database. There is a
complete section of database provisioning later in this document. Please read it
carefully, as the provisioning process has the potential for affecting both your
application and your users.
14) For every Synchronization Project SyncStudio creates a binary file with a .dbp extension
that contains all the information about your project configuration. The configuration file
is not human-readable; please do not attempt to make any changes to this file outside
of SyncStudio—otherwise your project will fail to load.
Page 14 of 65
Database Provisioning
SyncStudio requires that you “Provision” your database for sync operations. Provisioning adds a
tracking table to each table that is selected for synchronization, plus a number of triggers and
stored procedures. When you are ready to provision your database as per the selections made
under Database Articles click the Provision button.
SyncStudio will start processing and making the needed changes to your database. When it’s
done it will display the following.
WARNING: PLEASE DO NOT ATTEMPT TO USE AN SQL DATABASE THAT HAS PREVIOUSLY BEEN
PROVISIONED OR USED WITH STANDARD MICROSOFT SYNC FRAMEWORK. ONLY USE DATABASES
WITH SYNCSTUDIO THAT ARE CLEAR OF THIRD PARTY SYNC RELATED OBJECTS OR ARE NEW
AND HAVE NOT ALREADY BEEN ALTERED BY OTHER SYNCHRONIZATION TOOLS. IT IS LIKELY
THAT SYNCSTUDIO PROVISIONING WILL FAIL IF ATTEMPTED WITH DB ALREADY PROVISIONED BY
SOME OTHER TOOL.
Page 15 of 65
The Database Provisioning Process
Provisioning prepares your database for synchronization by adding change-tracking tables and
the metadata that is required to manage the synchronization process in the form of metadata
tables, triggers and stored procedures. After provisioning, every table that is selected for
synchronization will have a companion tracking table, plus a set of triggers and stored
procedures. SyncStudio has a Database Provisioning feature to simplify the provisioning and
de-provisioning of your database, but as a developer you need to be very much aware of the
issues involved in re-provisioning databases, particularly large ones. This topic is covered in full
this section and you should read it carefully because it may have an impact in your application
and your user experience.
The basic concepts that you need to consider are that whenever you want to make changes to
your data structures you will have to first de-provision the database, make whatever changes
are needed and then re-provision your database; that de-provisioning and re-provisioning a
database is an all-or-nothing process, and that you cannot re-provision a database that is
already provisioned—it needs to be de-provisioned first.
You can provision and de-provision a database as often as you want. However, this is not
something that you want to do often! The reason is that when you de-provision a database it
loses any memory of the state of the clients. That means that when the clients sync after a deprovision/re-provision cycle SyncStudio must send them all the records again, as it does not
know which records need to be synced. Depending on the size of your database, this might
take quite some time and use much bandwidth.
Essentially, de-provisioning and re-provisioning a database is something that should only be
done when there are changes to the database structure.
Tip: some developers add a number of “reserved” fields and even whole tables to their database
structures on the first release of their product, set them to synchronize but leave these fields
blank or null. So long as you do not change the field names, lengths or data types you can then
use them later for enhancements, new features, etc. without having to de-provision and reprovision the database. Considering the possible disruption to the users caused by the deprovisioning of a large database this may be a good alternative for you to consider.
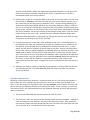
If you change the schema of your database (i.e., if you add, change or delete tables, fields or
indexes) you must de-provision and re-provision the server, but only if the changes apply to
tables that are being synchronized. Adding, changing or deleting tables that are not being
synchronized (and which you do not need to synchronize) does not require a de-provision/reprovision cycle.
If you change the tables and/or fields that are being synchronized you have to de-provision and
re-provision the database—even if the database structure itself has not changed—and you must
re-generate and re-deploy the server-side code. Failure to follow this rule will almost certainly
break the synchronization process, as the database structures will no longer correspond to the
server-side code. Your data should still be protected because of the full transaction support in
SyncStudio, but you are running the risk that some synchronization sessions may not fail even
if the database structures have changed, because of data-dependent factors. To repeat: if you
change the database structures or if you change which fields and/or tables are being
Page 16 of 65
synchronized you have to de-provision, re-provision, re-generate and re-deploy the server side
code.
When you de-provision, change the structure of your database and then re-provision the
database using the new database schema you do not have to manually make the same
modifications on the client side. SyncStudio has an Automated Schema Synchronization feature
that will take care of this for you, providing that the changes that you made to the database
schema do not break the synchronization. There is a more complete description of which
changes will break synchronization in the next section below.
The current version of SyncStudio does not support Foreign Keys. This is a limitation of the
Microsoft Sync Framework, which does not support Foreign Keys either. We will try to lift this
limitation in future releases, but for now if you have foreign keys in your database you have to
modify your data structures so as to eliminate all foreign keys—otherwise it is almost certain
that you will experience sync failures, because the order of uploading of the tables might cause
the foreign-key table—i.e., the “parent” table that contains the foreign keys—to be sent to the
server during an upload after the “child” table that references it. When this happens your data
will not be corrupted, as we operate under a full session-level transaction, but the sync will fail.
In MS SQL Server you will notice that you cannot make changes to the database structures when
a table is provisioned for synchronization. This means that in MS SQL Server you have to deprovision, exit the SyncStudio, make whatever changes are required to your database schema,
then re-open the SyncStudio, verify the configuration to make sure that the appropriate tables
and fields are being synced, re-provision the database, re-generate the code and re-deploy.
We are aware that some developers do try to manually change the table structures and
synchronization-related stored procedures on the server side to avoid having to de-provision a
database for minor changes. In our opinion this is such a dangerous process and so prone to
failure that we cannot recommend it. SyncStudio has been designed with a Database Schema
Synchronization feature precisely to simplify the task of upgrading your database to support
new fields and features in your code, but the architecture of the Microsoft Sync Framework
basically requires us to force the de-provisioning and re-provisioning of the database, and also
forces us to re-send all the records to the client after a de-provisioning. Please note that we will
not provide support for problems in a database in which the synchronization data structures
and/or stored procedures have been manually altered—in this case we will simply instruct you
to de-provision, re-provision and re-try the sync!
Automatic Schema Synchronization
The Microsoft Sync Framework does not make any provisions for automating the process of
aligning the client database schema to match changes to the server—in a standard MS Sync
Framework installation the developer is responsible for updating the client tables as needed.
SyncStudio has a fully automated Database Schema Synchronization feature. Any changes that
you make to the server’s database structures will be propagated to the clients the next time
that they synchronize their devices.
Page 17 of 65
If the changes that you make to your database structures do not “break” the synchronization
process—more on this below—the changes will be handled transparently. However, please do
keep in mind that any changes to the server database schema will always require a deprovisioning and re-provisioning cycle, which will force your clients to perform a full download.
Avoiding changes that break synchronization
Most changes to your database structure will not “break” the synchronization process. The
following kinds of changes do not break the synchronization and will be handled transparently
by the SyncStudio Schema Synchronization process:
1) Add a new table or set an existing table to be synchronized that was not being synced
before. In this case the client will first create the new table structure and then download
the appropriate records from the server as defined by your data filtering configuration
for the table.
2) Delete an existing table or change a table that is being synchronized so that it will no
longer be synced. The client-side software will automatically delete the client-side table.
Please note that in this case any “dirty” or new records that might exist at the client will
be lost (silently, the user will not receive any messages). This is necessary because when
you drop a table from the sync there will no longer be any code on the server side to
receive the changed records from the client.
3) Add a new field to a table. This change will not break the synchronization process
providing that you either allow nulls or that you define the default value for this field.
4) Increasing the length of a string-type field.
5) Delete an existing field from a table or stop synchronizing an existing field. In this case
the client-side table will be modified to omit the field. As with table deletions, whatever
data existed in the deleted field will be discarded at the client, including data that had
changed at the client but had not yet been sent to the server. The change will be done
silently—the user will not be informed or receive any messages.
6) Add a new Index to a table. The client-side code will add the new index.
7) Delete an existing index from a table. The client side code will delete the index.
Some changes will “break” the automated Database Schema synchronization process, however,
and you should always try to avoid making these changes:
1) Changing the data type of a field. Changing from a string to a numeric, for example, will
likely break the synchronization process. SyncStudio does not attempt to perform
automatic type coercion. If you absolutely need to change the data type of a field the
best solution is to first have all your clients sync, then stop the service, de-provision the
database, create a new field with the correct data type and convert the data yourself, reprovision the database, re-create the server-side code, re-deploy and restart the service
and finally have all the clients sync again so that they get the updated data structures
Page 18 of 65
and the converted data. While this might seem somewhat involved it is still much less
effort than having to manually convert all the clients, as would be the case with a
standard Microsoft Sync Service solution.
2) Reducing the length of a string-type field at the server to the point where it is too small
for data that is already at the client. This will fail at the server-side on a future sync if
the record that has the long string is marked as “dirty”. Please note the following: for
Android and other Java-enabled platforms the client-side database is SQLite. In SQLite
there is no concept of a fixed-length string/text field; string fields can hold string data
of any length, regardless of the nominal “size” of the field. Server-side databases like MS
SQL Server, however, do have the concept of fixed-length string fields. If you use fixedlength strings at the server side—perhaps the most common database design ever!—
your client-side application is responsible for making sure that the user does not enter
strings that are too long for the server-side field.
3) Changing the name of a field may cause problems or not, but it is data-dependent. In
this situation the client-side software will interpret the change not as a rename but as
the deletion of the old field plus the addition of a field with the new name—in other
words, you will lose the contents of the old field at the client, and the new field values
will be nulls, which is probably not what you wanted when you renamed the field. If you
really need to change a field name the best alternative is to first have all your clients
sync, then stop the service, de-provision the database, add a new field to the table with
the desired name, copy the old values to the new field yourself, delete the old field on
the server, re-provision the database, re-generate the server code so that it will
understand the new field name, re-deploy the service to IIS and then have the clients resync.
4) Adding a new field to a table or choosing to synchronize an existing field that was not
synced before will fail if the field does not allow null values and does not provide a
server-side default.
Stranded Client Records
Whenever a SyncStudio client performs a synchronization the very first thing that happens is
that we have the client compare the data structures at the server with those already at the
client. If the data structures are different the client will attempt to synchronize the client-side
data structures (the Database Schema) with those of the server. If your changes are such that
they do not “break” the synchronization then the following sequence of events will take place
under a transaction:
1) The client will download the new data structures from the server.
2) The client will “save” the contents of any existing tables that have changed—tables that
have no changes are not affected—but only if the tables have either “dirty” deleted or
new records. Tables that have changed at the server but where the client does not have
any un-synced “dirty” records do not need to be saved.
Page 19 of 65
3) The client will then create the new tables, fields and indexes for the tables that have
changed so as to replicate the same structures received from the server.
4) The client will then attempt to insert the “saved” records into the new (empty) data
structures. As we mentioned before, this will only work if your changes are such that
they do not “break” the synchronization. If this process works then the client side ends
up with the old data in the new structures, including the “dirty” flags. If the process fails
the client will attempt to roll-back the transaction and abort the sync. Please note that
not all client-side databases have full support for rolling back changes to data
structures, so this feature works on a “best efforts” basis. Again, the best way to avoid
this type of issue is to make sure that your database schema changes do not break the
synchronization.
5) If everything works and the Schema Synchronization phase completes without errors the
client will then upload the changed records to the server, still under the same
transaction.
6) If the upload completes without errors then the client performs a complete download of
all the server records, still under the same transaction—this is required because in order
to change your database schema you first had to de-provision the server, which causes it
to “forget” all knowledge about the state of the clients. So far as the server is concerned,
following a de-provisioning the client has no data at all and needs to get a complete
download. This is simply a side-effect of the architecture of the Microsoft Sync
Framework. If the upload fails, either because of a communication error or because of a
server-side error the client will attempt to roll-back the transaction and the entire sync
will fail.
7) Finally, if the download completed without errors both the client and the server commit
the transaction; otherwise both sides will roll-back the transaction and the sync fails.
Reading through the description above you will understand that the possibility exists of having
“stranded” records at the client, which explains the title of this section. Stranded records can
happen if you make changes to your database structures that break the synchronization
process, and where there are either new records or “dirty” records at the client—still in the old
data structures—but where the automated Schema Synchronization process is unable to convert
the old records to the new data structures.
In this case you have the following options:
1) If none of your clients was able to synchronize you could restore a copy of the database
before the changes, restore the old Sync Service code and re-think your Schema changes
(you did make a backup of the old database and sync code, of course …). You can tell if
the clients were able to synchronize by looking at the server Sync Log.
2) If only some of your clients were able to synchronize but not all of them then the
situation is worse, because now you cannot restore the old database and sync code
without affecting some clients. If this happens your best option is probably to have the
Page 20 of 65
clients that were not able to synchronize copy the client-side database from the device
and send it to you—and then put together some code yourself to extract the stranded
records and apply the updates to the new database structure.
3) Finally, if everything fails you can always have the clients delete the local database in
their devices and re-sync. This means that you will lose any “dirty” or new or deleted
client records but now the client will simply get the new data structures from the server
together with a full download, and at least will be able to continue working. The
SyncStudio stand-alone client has a utility menu option that allows the user to delete the
local database (train your clients to use this feature with care!).
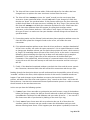
Preventing Schema Synchronization Errors
For all the obvious reasons you should always try to architect your schema changes so as to not
break the synchronization process. Aside from following the rules above, a really good way to
ensure that the changes will work is to do the following:
1) Create a copy of the table that is being modified in your development database. For this
example we will assume you have a table called “TEST” that has three fixed-length
character fields: FIELD_1, FIELD_2 and FIELD_3. In your server you will create a new
empty table called “TEST_2” with the same structure plus a new field called “FIELD_4”.
Make sure that FIELD_4 either accepts null values or it has a default value defined.
2) Run the following SQL Statement in your server:
INSERT INTO TEST_2 (FIELD_1, FIELD_2, FIELD_3) SELECT FIELD_1, FIELD_2, FIELD_3
FROM TEST
From the statement above you will see that we are inserting the old records into the new
structure. The fields in the INSERT part of the statement need to be only those that are present
in both the old and the new data structures; the fields of the SELECT part of the statement
follow the same rule. If this statement works in your development server you should be
reasonably safe in making the schema change, providing that there are no data-dependent
errors that happen at run-time because of issues such as different field lengths between the two
data structures, for example—those you will have to analyze yourself.
You can test deleting a field, for example, with a statement like:
INSERT INTO TEST_2 (FIELD_1, FIELD_3) SELECT FIELD_1, FIELD_3 FROM TEST
Notice that we left FIELD_2 out. This simulates deleting FIELD_2 from the new table structure.
Page 21 of 65
Some Notes about SQLite
If your client-side database is SQLite (such as in Android clients) please remember that the data
typing rules of SQLite are very different from those of MS SQL Server. SQLite has a very
interesting feature that lets you store any type of data into any field, regardless of the
“nominal” field type. Additionally, SQLite has no concept of “fixed” field length for strings, and
will do automatic modification of data types as required.
Finally, one more warning about SQLite: this database program has a number of HARD LIMITS
that need to be respected:
1) Maximum number of columns in a table is 2,000. This one is not too bad, as anyone
that has more than 2,000 columns in a table should have their head examined. However
if you are considering using a table with many fields, let’s say 1,000 or so, please keep
this in mind:
“There are places in the SQLite code generator that use algorithms that are O(N²)
where N is the number of columns […] so with a large number of columns sqlite
will
run very slowly” (see http://www.sqlite.org/limits.html)
2) Maximum length of a record is 1 Megabyte. This is a bad one, because there are many
situations in which you have text/blob type fields where the user supplies some
unknown, but possibly large, amount of text or binary data—e.g., images—which will
make the SyncStudio client fail if the 1 Megabyte limit is exceeded. Please note that this
has nothing to do with us, it is a limitation of SQLite that we have zero control over. The
bottom line is that you have to prevent any situation in which a single row can be longer
than 1 Megabyte yourself.
3) SQLite does not have direct support for date data types (for more information please see
http://www.sqlite.org/datatype3.html). In SQLite dates can be stored in one of three
ways: as ISO8601 strings ("YYYY-MM-DD HH:MM:SS.SSS"), as Real numbers or as
Integers. SyncStudio treats dates as strings, which is the most general representation
and allows the largest range of date values—both real and integer representation of
dates support only a restricted range. However, if you are going to manipulate or create
date values in your client side code you need to ensure that your date strings contain a
valid date value in the ISO8601 format (YYYY-MM-DD HH:MM:SS.SSS) to avoid triggering
synchronization errors (for more information on the ISO8601 standard please see
http://en.wikipedia.org/wiki/ISO_8601). Please note that SyncStudio automatically
performs the conversion from the MS SQL Server date data types into the ISO8601 string
format and back—you simply use date data types at the server and the ISO8601 string
date data types at the client.
4) SQLite does not have a Boolean data type. In SQLite Boolean values are stored as
integers, with zero being false and one being true. In SyncStudio we automatically
convert the MS SQL Server bit data type to an integer (0=false, 1=true) and back into a
bit value for the upload.
Page 22 of 65
5) SQLite does not have a data type equivalent for the MS SQL Server uniqueidentifier data
type (a unique id). In SyncStudio uniqueidentifier fields are stored as text.
6) A number of special MS SQL Server data types are not supported for synchronization.
This limitation is generally imposed by the Microsoft Sync Framework rather than SQLite.
Examples of data types that cannot be synchronized are: geography, geometry,
hierarchyid. In any event, these data types have no direct equivalent in SQLite.
7) MS SQL Server and other database systems have a rich set of numeric data types for
both integer and real numbers. SQLite has only one Integer data type and one Real data
type. On the client side SyncStudio will convert all the MS SQL Server integer data types
to SQLite Integers and all the data types that can have decimals to SQLite Reals.
However, please keep in mind that in SQL Server the various Integer and Real data types
have different lengths, and therefore different ranges of valid values. In SQLite Integer
fields are stored as 8-byte Long Integers and Real values are 8-byte IEEE floating point
numbers. There is simply nothing in SQLite that will stop you from storing a 10-digit
number, for example, into a field that is defined as a one-byte “tinyint” data type on the
server side, which accepts only integer values from 0 to 255. When you try to upload
this 10-digit value SQL Server will most definitely stop you, though—and the sync will
fail. The same thing applies with all the other numeric data types—you are responsible
for keeping track of the minimum and maximum allowed values for every field on the
client side.
Tip: developers that have control over their server-side data structures might decide to
minimize this issue by using only bigint (8-byte Integers) and either the real or float data
types at the server. Developers that do not have control over their server-side data
structures will spend long days coding the necessary data validation and very long and
anxious nights debugging obscure—and entirely avoidable—data-dependent sync
problems.
8) SQLite allows you to store any data type into any field, regardless of the “nominal” data
type of the field, and will perform automatic type conversions as required. The
automatic type conversion rules in SQLite have been very, very carefully crafted so as to
maximize the uncertainty regarding the final data type stored in the database (for the
details of this coding feat please refer to http://www.sqlite.org/datatype3.html). When
the Client Database Schema is created SyncStudio will make a valiant and spirited effort
to automatically translate from the MS SQL Server data types to the corresponding
equivalents in SQLite. So long as you choose to behave sensibly and observe the same
data typing rules as MS SQL Server in your own client-side code the sync will work just
fine. However, if your client-side code uses this feature of SQLite to store mixed data
types in the same column you will for sure break the synchronization, and in rather
interesting and hard to debug ways at that. Your choice.
Page 23 of 65
General Design Considerations
SyncStudio acts as a bridge between your database system, the Microsoft Sync Framework and
the database on the Mobile Clients. This means that we need to abide by all the constraints of
every component in the sequence, and therefore that we can support only the set of features
that will not “break” anything in this chain. When designing your server-side database you need
to keep the following limitations in mind:
1) Do not use Foreign Keys in your SQLite client database, even if the version of SQLite on
the device supports them. Old versions of SQLite do not support Foreign Keys, and the
MS Sync Framework does not consider foreign key relationships when selecting the
order of records during a download.
The problem here is that on a download it is perfectly possible that a “child” record will
be sent to the device before the corresponding “parent” record that has the Foreign Key,
and that will cause SQLite to trigger an error, which will cause the transaction to fail,
which will abort the sync. The exact same thing applies to triggers on the client side that
try to impose data integrity rules similar in concept to a Foreign Key. Bottom line: do
not use Foreign Keys or Triggers in your client database.
2) SyncStudio will create the client-side database schema for you, and will attempt to keep
the client database schema aligned with your server. The good news here is that our
Automatic Schema Synchronization feature should save you a very substantial amount of
maintenance work, that you do not have to invest any time or coding effort in creating
and updating the database schema on the clients and that most schema changes will be
transparent to the user. The bad news is that any changes that you make to the clientside schema will be overridden whenever the server schema changes, and that the
client-side synchronization code depends on a number of custom synchronization tables
that are kept by the client—which you should never touch or change in any way.
Whenever we create or update the database schema on the client we will create all the
corresponding table structures and indexes; triggers and stored procedures are not
replicated, however. Additionally, due to the lack of support for the ALTER TABLE
statement in SQLite whenever a table structure changes we are forced to drop the old
table and re-create the new table structure from scratch. This means that any client-side
triggers, constraints and/or indexes that you create manually will be deleted when the
old table is deleted. Bottom line: do not make any custom changes to the client-side
database schema; in SyncStudio the idea is that you control the structure of the clientside database by making changes to the server-side and setting them to synchronize.
3) There are substantial differences between the MS SQL Server data types and the SQLite
data types. As a general rule, if you have control over the server-side database design it
is always best to stick with a sub-set of data types that is common to both. Otherwise,
you client-side code must be aware of the server-side data types on a field-by-field basis.
Bottom line: if possible try to use only the data types that are defined in SQLite.
4) The Microsoft Sync Framework imposes a number of limitations on what characters can
be used as part of a table name or a field name. Some table and field names that are
Page 24 of 65
perfectly valid in both MS SQL Server and SQLite are not valid for synchronization. This
is a limitation imposed by the design of the MS Sync Framework and we do not have any
way to override it or compensate for it. Your server-side database structure needs to
comply with the MS Sync Framework field naming rules or SyncStudio will not be able to
operate on your database. Bottom line: make sure that your field names are valid Sync
Framework Identifiers.
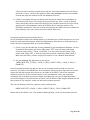
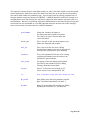
Code Generation
Once you have defined your project configuration and provisioned your database server for
synchronization you are ready to have SyncStudio generate all the server-side code for you.
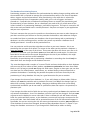
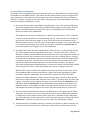
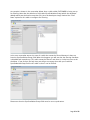
Click on the Code Generation button on the left-hand menu to bring up the Sync Server Code
Generation screen shown below, and then click on the button labeled “Generate Server Code”:
First select the version of the .NET Framework that it is to be targeted. We currently support
3.5, 4.0 and 4.5 and will add supported targets as new versions of the .NET Framework are
released. Note: you need to ensure that the version of the .NET framework you select matches
the one in the web server where the synchronization project will be deployed. Once you select
the target framework, click on the button labeled Generate Server Code.
When you do this you will receive a message that alerts you to the fact that the new server-side
code will override—and replace—any existing code. If you want to save the previous version of
Page 25 of 65
the code you should copy the contents of the project’s build directory somewhere else before
creating the new code.
Page 26 of 65
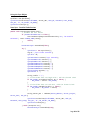
Note: SyncStudio produces compiled code, not source. After you create the server-side code the
build directory in your project folder will contain the following directories and files:
\bin
\bin\SyncStudioService.dll
\bin\Microsoft.Synchronization.Services.dll
DataScopeSyncService.svc
DefaultScopeSyncService.svc
Web.config
All the files above are required for deployment. Please do not make manual changes to any of
these files (except for the Web.config database connection, as described below) or your
synchronization project will not work correctly.
The project creates a default Web.config file. The connection string to the database is inside
this Web.config under the tag “SyncStudioCn”.
<add name="SyncStudioCn" connectionString="Server=YOURSERVER\YOURDBNAME;
Database=YOURDBNAME; Integrated Security=SSPI; Connection Timeout=30;"
providerName="System.Data.SqlClient"/>
To deploy the new synchronization server code to IIS please click on the “Sync Server
Deployment” tab on the left side of the SyncStudio.
Page 27 of 65
Sync Server Deployment
SyncStudio has an automated deployment feature to move the code and configure your Web
Service code to run under IIS. This utility is there for your convenience—you could always copy
the contents of the Build directory in your project to a virtual directory that you create in IIS
yourself and manually configure IIS.
Notes:
1) SyncStudio needs to run in an Application Pool that is configured to use the .NET
Framework Version 4.x.
2) SyncStudio requires IIS 7 and up to run.
3) Deployment is the very last stage in the process. Before you deploy to IIS you must have
created a project configuration, provisioned your server and generated the server-side
code.
Page 28 of 65
Notes:
1) SyncStudio needs to run in an Application Pool that is configured to use the .NET
Framework Version 4.x. We create one called “SyncStudioAppPool” and configure as
needed.
2) SyncStudio requires IIS 7 and up to run.
3) The project will be deployed to the Default Web Site (unless you change it).
4) The project will be deployed to a directory in wwwroot.
Page 29 of 65
User Maintenance
SyncStudio has a separate authentication mechanism; our users are not related to Windows
users or to SQL Server users. Every user (i.e., client device) in your system must have an entry
in the SyncStudio User Table with a unique User ID in order for it to be able to synchronize.
You can configure any number of users in your user table, but the system will not operate if
there are more users than you are licensed for (Important: if your license allows you to have
only 10 users and you configure 11 users the sync will stop working for all the users, not just
the 11th one). Demo Licenses (what you get when you download the SyncStudio demo) allow
only 3 users—please do not configure more than 3 users for a demo license or you will receive
an error message during the synchronization test.
At a minimum, a user has to have a unique User ID and a non-empty password. Optionally, you
can store a Device ID and a Client Version (this should be the version # of your own client-side
application, not the SyncStudio Client), but these fields are there for your own information—we
do not use them for either authentication or synchronization.
For this test we will be configuring three users, with User Id’s USER1, USER2 and USER3.
First, click on the tab called “User Maintenance” on the left then click on the
in at least the User Id and Password fields, click
button and fill
button. Repeat this for USER2 and USER3.
At the end your screen should look like this:
Page 30 of 65
Very Important, Please Note:
Your users cannot share User Ids. Every user in SyncStudio must have a different User Id,
otherwise they will interfere with each other and they will not be able to synchronize.
If two of your users accidentally use the same User Id (and Password) they will interfere with
each other and will not be able to synchronize. If this happens the only recourse is to have both
of them delete the local database (you will lose any pending transactions), enter the appropriate
User Id and Password for each one in their respective devices and re-synchronize, which will
require a full download.
Please note that this should never happen during normal usage because every user should not
only have a unique User Id, but also their secret password, which they should never give to
anyone else.
Additionally, sharing User Ids is a violation of the SyncStudio licensing terms, since we license
this product on a per-user basis. In other words, it is not allowed (or possible) to buy a 5 user
license and then have 100 users by giving everyone the same User Id and password—it will fail,
your users will lose any transactions that have been entered but not uploaded to the server and
will be forced to re-synchronize with a full download.
Page 31 of 65
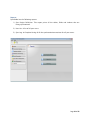
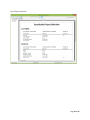
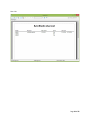
Reports
SyncStudio has the following reports:
1) Sync Project Definition. This report prints all the tables, fields and indexes that are
being synchronized.
2) User List. A list of all your users.
3) Sync Log. A Complete listing of all the synchronization sessions for all your users.
Page 32 of 65
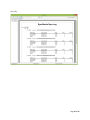
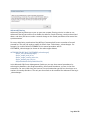
Sync Project Definition
Page 33 of 65
User List
Page 34 of 65
Sync Log
Page 35 of 65
Filtering Data
One of the most common requirements for database synchronization systems is to be able to
filter the data rows that will be sent to the client device based on some type of criteria. For
example, in a sales application a salesperson may only need to receive the customers located in
some territory or area. The basic Microsoft Sync Framework offers only limited support for row
filtering, however.
There are two ways to filter data in SyncStudio: Simple Filtering and Advanced Filtering.
Simple Filtering
Simple Filtering is useful when a row is intended to be given to one or more users, based on the
user group. In this case all you need to do is the following:
1) Modify your table structure to add a new field called (exactly) SyncStudioUserGroup. This
field must be nvarchar 20. Make the same change (add this new field) to every table that
will need filtering. Please note that SyncStudio will not automatically make changes to
your database structures—you need to add this field yourself to every table that has to
be filtered.
2) In the SyncStudio UI select the table, check the Filter Rows checkmark and mark the
fields for synchronization, including this new field. Please note that you will need to reprovision the database, re-generate the code and re-deploy the project to IIS.
3) Now any rows that have a user group in this field will be sent ONLY to users that have
identified themselves (at the client side) as belonging to that particular user group.
Simple filtering can be very useful for things like subscription-based data synchronization, in
which every group of user needs to get a completely different set of records based on their
group membership. It also can be used in scenarios where records can/should only be assigned
to one user. However, if your requirement is for filtering to be done based on some more
complicated set of criteria, such as a user being in some combination of region, territory, etc.
then you should consider using Advanced Filtering instead, as described in the next section
below.
Page 36 of 65
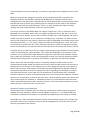
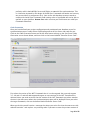
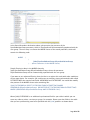
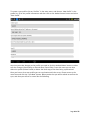
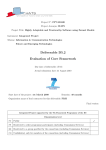
An example is shown in the screenshot below. Here a table called CUSTOMERS is being set-up
for filtering. Note that the table has a field called SyncStudioUserGroup (which the developer
added) which was declared as nvarchar (20). Here the developer simply checked the “Filter
Rows” option for this table to configure the filtering.
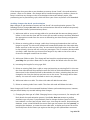
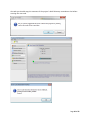
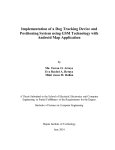
In the next screenshot we see the case of a table that cannot be filtered because it does not
have the SyncStudioUserGroup field. When this happens you will see that the filtering checkbox
is disabled and instead says “This table cannot be filtered” and there is a help icon next to the
checkbox. If you click on the help icon you will get a message that tells you to add the
SyncStudioUserGroup field to this table so that it can be filtered.
Please note that the SyncStudioUserGroup field must be set to synchronize.
Page 37 of 65
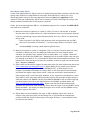
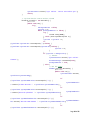
Advanced Filtering
Advanced Filtering allows you to set up your own custom filtering criteria. In order to use
Advanced Filtering you need to first enable the table for Simple Filtering, exactly as described
above, and then you have to make a manual change to the stored procedures that control the
synchronization.
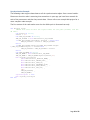
For every table being synchronized the MS Sync Framework will create a number of stored
procedures. The one you need to modify is called <Your Table Name>_selectchanges. For
example, for a table called CUSTOMERS so the stored procedure will be:
CUSTOMERS_selectchanges (as shown in the code snippet below):
ALTER PROCEDURE [dbo].[CUSTOMERS_selectchanges]
@sync_min_timestamp BigInt,
@sync_scope_local_id Int,
@sync_scope_restore_count Int,
@sync_update_peer_key Int,
@SyncStudioUserGroup NVarChar(20)
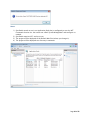
In the Microsoft SQL Server Management Studio you can see these stored procedures by
selecting the database, then Programmability, then Stored Procedures, as seen in the next
screenshot. For every table that you have set for synchronization you will see that there are a
number of stored procedures. The only one that needs to be modified for Advanced Filtering is
_selectchanges.
Page 38 of 65
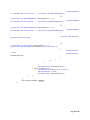
In the Stored Procedure declaration above, please notice the presence of the
SyncStudioUserGroup parameter, which in SyncStudio will be automatically populated with the
user group. The next step is to locate the WHERE clause of the stored procedure, which will
contain the following code:
WHERE
(
(
[side].SyncStudioUserGroup=@SyncStudioUserGroup
) . . . (other statements in the WHERE clause)
Simple filtering is done in the WHERE clause by
[side].SyncStudioUserGroup=@SyncStudioUserGroup, where the parameter
@SyncStudioUserGroup will be automatically populated with the user group.
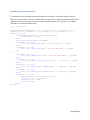
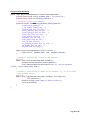
If you want to use advanced filtering then the idea is to replace this code with other conditions
of your own choice. For example, you could create an auxiliary (non-synchronized) table called
FILTERSETTINGS that contains two fields: USERGROUP and FILTERCODE. You could then modify
that portion of the WHERE clause to be something like:
([side].FILTERCODE IN (SELECT FILTERCODE FROM FILTERSETTINGS WHERE
USERGROUP=@SyncStudioUserGroup) OR EXISTS(SELECT FILTERCODE FROM FILTERSETTINGS
WHERE (USERGROUP=@SyncStudioUserGroup AND FILTERCODE='ALL'))
Where [side].FILTERCODE is an additional synchronized field in your table in which you can
store any arbitrary value, a territory or group, for example. Please note that fields in the table
that you are synchronizing need to be prefixed with the [side] qualifier as shown above.
Page 39 of 65
The code snippet above, which assumes that your table has an additional synchronized field
called FILTERCODE, will filter based on the contents of the FILTERCODE field and the
associations made in the FILTERSETTINGS table between the USERID and FILTERCODE fields.
For example, assume that the FILTERSETTINGS table has the following rows:
Row #1:
Row #2:
Row #3:
Row #4:
Row #5:
USERGROUP=GROUP1, FILTERCODE=SALES
USERGROUP=GROUP2, FILTERCODE=SALES
USERGROUP=GROUP3, FILTERCODE=OPSUS
USERGROUP=GROUP4, FILTERCODE=OPSEU
USERGROUP=GROUP5, FILTERCODE=ALL
In this case the code snippet above will send any records with field FILTERCODE=SALES to
USERGROUP1 and USERGROUP2, records with FILTERCODE=OPSUS will be sent to USERGROUP3,
records with FILTERCODE=OPSEU will be sent to USERGROUP4 and finally USERGROUP5 is
marked as “ALL” so it will get all the records.
Some important things to keep in mind when you use Advanced Filtering:
1) Generally, you will need to enable the table for Simple Filtering. The reason for this
requirement is that Simple Filtering will provide the stored procedure with the USER
GROUP of the user that is being synchronized, which will allow you to create your own
code to determine what records need to be sent to that particular user. Note: the USER
GROUP is specified at the client.
2) The stored procedures described above are created during the database provisioning
phase. This means that when you set a new table for filtering you must make the
changes in the SyncStudio and then de-provision and re-provision the database in order
for the stored procedures to be generated, before you can make any custom changes.
Please read notes (3) and (4) below regarding these changes.
3) When you de-provision and re-provision a database your custom code will not be
preserved, so you will have to manually add the changes yourself. If you use Advanced
Filtering you should always make a backup of the database, or at least script the stored
procedures and save them before you de-provision, as the de-provisioning process will
erase all custom changes.
4) If you have a database that has been fully provisioned for synchronization, with all the
appropriate tables marked for Simple (i.e., Row-based) Filtering and then you decide to
use Advanced Filtering for one or more tables that are currently being synchronized and
filtered, and this is the only change that you are making (i.e., no other changes to the
data structures, no new/altered synchronized tables or fields, etc.) then you do not
need to de-provision and re-provision the database. The reason is that since you did not
change the structure of any tables or fields the synchronization code will remain the
Page 40 of 65
same. However, if you also need to make any other changes to the schema, such as
adding a new synchronized table or any new fields then the de-provisioning and reprovisioning is mandatory, and you will have to manually re-apply any custom changes
that you may have made to the _selectchanges stored procedures.
Future releases of SyncStudio will add more filtering functionality to our product, for
example, to keep track of these custom changes to the stored procedures.
Page 41 of 65
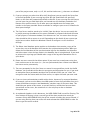
The Standard SyncStudio Android Client
SyncStudio comes with two Standard/Sample Android Clients that can be used to synchronize
the device with multiple SyncStudio Servers. One is created using a development tool called
Basic4Android (B4A) and the other is created in straight Java via the Eclipse environment. Source
code for both sample clients is included in your installation package.
Our sample clients provide a front end to the SyncStudio JAVA .JAR library that is the client side
of our solution and the one that actually handles all interaction and synchronization with the
server. You may use our sample client application as is, modify either to fit your needs or
simply incorporate our .JAR into your Android applications.
Please keep in mind when using our sample Clients that they cannot access private SQLite
databases. In Android a private database can only be accessed by the application that created
it. In practical terms this means that if you decide to use our sample Android Client you will
have to keep your SQLite database in a public folder (like on an SD card) where our client can
access it.
If you would rather have a private database then you must incorporate our .JAR into you
application.
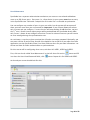
When you start the SyncStudio B4A sample Client you will see a screen like the following:
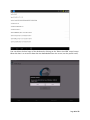
Click the Android Menu button and select the “Profiles” menu option. This will show a list of the
available sync server profiles (which will be initially empty). The next figure shows a sample
Profile List with a few profiles created:
Page 42 of 65
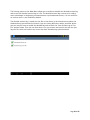
If you click on any of the profiles you will see the details of that particular profile, as shown in
the next figure:
From the profile edit menu you can save any changes that you make to the profile, delete the
profile and you also have the option of deleting the local copy of the server data.
Page 43 of 65
To create a new profile click on “Profiles” in the main menu, and then on “New Profile” in the
profile list, fill-in the profile information and then click on the Android menu button and select
“Save Profile”.
Any time you make changes to the profile you need to click the Android Menu button to either
save the changes (Save Profile) or discard them (Cancel Edit). From this menu you can also
delete the profile (Delete Profile) or delete the local copy of the data being synchronized.
Once you have at least one profile you can synchronize with the server. Please return to the
main form and click the “Sync Now” button. When you do that you will be asked to confirm the
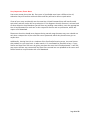
sync, and then you will see a screen like the following:
Page 44 of 65
In the sample synchronization session above we can see that the synchronization app first
detected that this was a new profile and performed a Schema Sync to download the database
structures from the server, and then synchronized 237 records (that is all that was in the
sample database).
Depending on the structure of your database (the number of tables and fields that you want to
synchronize) it might take anywhere from a few seconds to several minutes to download the
database structures from the server and create the corresponding SQLite data structures at the
client. Please be patient!
For a new profile (and also whenever you delete the local database) the client will be forced to
perform a complete download of all the records in the server (filtered if needed). For large
databases this might take some time. After the first sync, though, only new/changed/deleted
records will be sent to the server, so a “normal” sync (which does not require a schema
synchronization) should take just a few seconds.
The sync speed will depend on many factors, including the number of fields per table, the
speed of the connection and the speed and load on your server, but it is usually in the
thousands of records per minute.
Notes:
1) You need to have at least one profile to be able to synchronize. However, you can have
as many profiles as you want. Please make sure that each profile targets a different
database.
2) On the Profile screen please enter either the URL of your server or the IP address in the
Server Address field provided. Then enter the name of the Synchronization project in the
next field, labeled “Sync Project Name.” Do not use any spaces or special characters as
Page 45 of 65
part of the project name, only a-z, A-Z, 0-9 and the Underscore (_) character are allowed.
3) If you are using a port other than 80 or 443 (http/https) you can specify the Server Port
in the field provided. If you are using http (Port 80) you should leave the port field
blank, as the client will automatically default to Port 80. If you are using Port 443 (https)
you can leave the port field blank also, and instead use the checkbox provided at the
bottom of the profile screen. For all other ports you should enter the custom port
number in the space provided. Please remember to configure your server’s firewall to let
these ports through.
4) The Sync Server machine needs to be “visible” from the device. You can test easily this
by simply entering the address of the server (followed by a forward slash and the name
of your project) in a browser window; if the browser can “see” the server then the sync
client should be able to access it as well. Depending on the details of your system you
might have to either disable the Windows Firewall or configure it to let the device
through.
5) The Delete Local database option applies to the database that contains a copy of the
server data, not to the database that contains the synchronization profiles. When you
delete the local database all the synchronization logs for that database are deleted as
well (the reason is that the logs reside in the database that is being deleted). If you need
to preserve the sync logs you should make a copy of the log table somewhere else in
your device.
6) Please use some care with the delete option! If your user has created new entries that
have not been sent to the server (i.e., are not synchronized) then a Delete Local DB will
lose these entries permanently.
7) The user passwords for the Sync Server are stored in encrypted form inside the Profile
database; the SyncStudio client does the encryption and decryption for you. If you need
to manipulate these passwords outside of the SyncStudio Client you can “clone” the
encryption code that comes with the Client source, or replace this with your own code.
8) If you run into synchronization trouble with a device, because of a corrupted database,
for example, you can use the Delete Local DB option to force the SyncStudio client to recreate the database structures and download a complete copy of the server data. This
should be your option of last resort, as you will lose any records that have not been
synced back to the server, but sometimes it is the only way to clear a database
corruption issue.
9) As explained elsewhere in this document, the USER GROUP field is used for filtering. The
short version of filtering is that a user will get all the data records that match the
contents of their USER GROUP field, plus all the records of tables that are not filtered. If
you are using filtering then your users will need to know their USER GROUP in order for
them to get the correct records.
Page 46 of 65
10) Do not use Auto-Increment Fields in your database! This might be the #1 issue that
people have when they try to synchronize databases. An auto-Increment field is an
Integer field that will basically add 1 to the field contents. When this is done at the
server (under a lock) the database will take care of preventing two users from creating
the same number. However, when it is done at the client (for a new record) the clientside database does not have any way of knowing what numbers have been used already.
When two users try to create and then synchronize a new record with the same key you
will have an error.
Page 47 of 65
The Device Log
The SyncStudio Standard Android Client maintains a complete log of all the synchronization
sessions. The synchronization log is kept as part of the database being synchronized (i.e., the
log for a particular database is inside a table in the local database). Please note that this means
that if you delete the local copy of the database you will also be deleting the synchronization
log for that database.
If you click the Logs tab after selecting a profile you will see a list of all the synchronization logs
collected by this device for that particular profile, as shown in the following figure:
Clicking on any of the log entries will show the details for that synchronization session, as
shown in the next figure.
The Session Id is a unique identifier and it corresponds to the Session Id that is kept at the
server. If you have synchronization issues with some device, or if you want to know how many
records were synchronized and in which tables you can compare this log against the one kept
by the SyncStudio synchronization server to help diagnose issues.
Page 48 of 65
You can delete the local copy of the database by clicking on the “Delete Local DB” menu button.
What this does is to erase the data that was downloaded from the server (not the profile itself).
Page 49 of 65
The Settings option on the Main Menu allows you to enable or disable the detailed session log,
and to save the detailed session log to a file. The detailed session log is mean to be used to
assist a developer in diagnosing communication or synchronization issues; it is not useful for
an end-use and it is not enabled by default.
The detailed session log is saved to a text file on the device in the same directory where the
database being synchronized is located. If you are having difficulties with a particular device
you can ask your user to enable the detailed log and to check the “Save Session Log to Text
File” options below. Then you can have them try a sync session and send/e-mail you the sync
log text file, which will contain any errors that were found during synchronization.
Page 50 of 65
Sample Code – SyncStudio Android Open Source synchronization apps
SyncStudio Sync Client (Basic4Android Project)
If you use the Basic4Android RAD Tool for your development you can open the source to our sample
client application located in the following folder:
C:\Program Files (x86)\SyncStudio\Android\Basic4Android\Sample Client
This is the actually published version of our stand-alone sync client. Reviewing it should give you a good
understanding of how to use the B4A version of our synchronization class library.
SyncStudio Sync Client (JAVA/Eclipse Project)
If you use Eclipse or other JAVA development environment for Android you can open a sample client
application located in the following folder:
C:\Program Files (x86)\SyncStudio\Android\Java\Sample Client
This is a simple straight forward example of a stand-alone sync application. This project has a very basic
interface and is not intended to be a finished app you can give to a user. However, reviewing it should
give you a good understanding of how to use the JAVA version of our synchronization class library.
Page 51 of 65
Class Library API Reference – Basic4Android and Java
SyncStudio has an API in the form of two class libraries (.JAR). One .JAR works with the
Basic4Android (B4A - http://www.basic4ppc.com/) RAD development environment and another
.JAR is for standard Java (i.e., a native Java app created using Eclipse or similar development
environment and running on an Android device). These Class Libraries are intended for
developers that want to have complete control over the synchronization process, including the
ability to provide their own user interface.
If you do not require a specific user interface, and your application database can be kept in a
public directory (SD card for example) then you might consider using our stand-alone
SyncStudio Sync Client to synchronize your data. This will free you from having to write code to
interface to our class libraries.
Download at:
https://play.google.com/store/apps/details?id=com.syncstudioB4A.client
If however your app needs to have a private database then you need to use one of our class
libraries to synchronize—the reason is that in Android private databases are not visible to other
applications. This means that the standard SyncStudio Android client would not be able to “see”
your private database or your app would not be able to see the public database created by our
standard sync app.
We provide sample clients written in B4A and Java that you can use as a start to develop your
own synchronization user interface (See above). The sample B4A application provided is actually
a complete, generic synchronization client that can be used to maintain multiple
synchronization profiles, synchronize with multiple servers, has full logging capabilities and
maintains the profile information for multiple SyncStudio servers.
The sample JAVE client is much more rustic and simple and is intended only as an example.
Page 52 of 65
The Basic4Android .JAR API
The following pages contain information and sample code for using the SyncStudio class library for
Basic4Android. If you are using our class library for JAVA please skip this section.
To use SyncStudio with your Basic4Android app you need to do the following:
1) First, copy the dbSyncStudioB4A.jar and dbSyncStudioB4A.xml files (located in the
C:\Program Files (x86)\SyncStudio\Android\Basic4Android\Library\ folder) to your
additional libraries folder in B4A.
2) Add a reference to the SyncStudio Synchronization API Jar. In your project select the
“Libs” tab; if you have copied the .jar and .xml files to the additional libraries directory
you should see dbSyncStudioB4A as one of the additional libraries (note: you might
need to refresh the list of additional libraries by right-clicking the libraries area and
selecting “Refresh”, or by exiting the B4A development environment and re-starting it).
Once you see the SyncStudio library in the list, check it so that it will be included in your
B4A project.
3) Create a Synchronization Object in the Process Globals section of your Main activity (or
any other activity of your choice). The Synchronization Object needs to be a Process
Global object. For example:
Sub Process_Globals
… (other statements)
'Declare the SyncStudio Synchronization Object:
Dim SyncObj As dbSyncStudioClient
… (other statements)
End Sub
Page 53 of 65
4) In the section of your code where you want to call the synchronization add a call like
following example to initialize the Synchronization Object. Please note that you cannot
use the synchronization object until it has been initialized:
Main.SyncObj.Initialize _
(PROFILE_NAME, _
SERVER_URL, _
USER_ID, _
PASSWORD, _
USER_GROUP, _
USE_SSL, _
DB_FOLDER, _
DB_NAME)
Where:
PROFILE_NAMEString that contains the name of
the synchronization profile being used.
This field is for your reference only and
can be left blank.
SERVER_URL
This is the URL of the Synchronization server
where you deployed your project
USER_ID
This is the ID of the user that is being
Synchronized. Needs to be one of the User Id’s
that you have configured in your database.
PASSWORD
This is the password of the user that is being
synchronized. Needs to be the same as the
password in your database.
USER_GROUP
The group of the user being synchronized.
This field is only needed if you are doing
Filtering. Otherwise leave blank.
USE_SSL
Send “Y” to force the use of https or “N”
if your server is not configured for SSL.
DB_FOLDER
Path (folder only) where the database resides
Note: The folder name MUST end with “/”
DB_NAME
Name of the Database file (without the folder)
including the extension (i.e, testdata.db).
Page 54 of 65
5) To start the synchronization call:
SyncObj.startSync
Or if your object is declared in the Main Activity and you are calling it from some other
activity:
Main.SyncObj.startSync
6) The SyncStudio Synchronization Object will raise events as it performs the
synchronization. All the events have the same format, so you need only one event
handler, which must have the signature in the example below:
Sub SyncStudio(eventName As String, param1 As String, _
param2 As String, param3 As String, param4 As String, _ param5 As
String, param6 As String, param7 As String)
Where:
param1
Number of Schema Records
param2
Number of Records Uploaded
param3
Number of Records Downloaded
param4
Downloaded Records Inserted
param5
Downloaded Records Updated
param6
Downloaded Records Deleted
param7
Blank or Error Code
Page 55 of 65
Synchronization Example
The following code snippet shows how to call the synchronization object from a menu handler.
Please note that this code is assuming that somewhere in your app you have form controls for
each of the parameters and that they contain data. Please refer to our sample B4A project for a
more complete code example.
The first section of the code makes sure that the folder path is formatted correctly:
Sub mnuSync_Click
'Makes Sure that we have the right format for the path (folder) and the
db name:
Dim Suffix As String
Suffix = "/"
Dim TMP_DB_FOLDER As String
TMP_DB_FOLDER = Main.EditProfile_DB_FOLDER
If TMP_DB_FOLDER.StartsWith (Suffix) = False Then
TMP_DB_FOLDER = Suffix & TMP_DB_FOLDER
End If
If TMP_DB_FOLDER.SubString2(TMP_DB_FOLDER.Length1,TMP_DB_FOLDER.Length) <> Suffix Then
TMP_DB_FOLDER = TMP_DB_FOLDER & Suffix
End If
Dim TMP_DB_NAME As String
TMP_DB_NAME = Main.EditProfile_DB_NAME
TMP_DB_NAME = TMP_DB_NAME.Replace(Suffix,"")
Main.SyncObj.Initialize _
(Main.EditProfile_PROFILE_NAME, _
Main.EditProfile_SERVER_URL, _
Main.EditProfile_USER_ID, _
Main.EditProfile_PASSWORD.Trim, _
Main.EditProfile_USER_GROUP, _
Main.EditProfile_USE_SSL, _
"N", _
TMP_DB_FOLDER, _
TMP_DB_NAME)
SyncInProgress = True
Main.SyncObj.startSync
End Sub
Page 56 of 65
Handling Synchronization Events
To handle the events properly you need to look first at param7, which will contain either a
blank or an error code. If param7 is blank then we simply have a regular synchronization status
update telling you how many records have been synchronized so far. If param7 is not blank
then there is a synchronization error.
'Sync Event Handler
Sub dbsyncstudio(eventName As String, param1 As String, param2 As String,
param3 As String, param4 As String, param5 As String, param6 As String,
param7 As String)
If eventName.ToUpperCase = "SYNC FINISHED" Then
SyncInProgress = False
End If
Label_SYNC_ACTIVITY.Text = eventName
If param1 <> "*" Then
Label_SYNC_SCHEMA_RECS.Text = "Schema Records: " & param1
End If
If param2 <> "*" Then
Label_SYNC_UPLOAD_RECS.Text = "Records Uploaded: " & param2
End
If
If param3 <> "*" Then
Label_SYNC_DOWNLOAD_RECS.Text = "Records Downloaded: " & param3
End If
If param4 <> "*" Then
Label_SYNC_DOWNLOAD_RECS_INSERTED.Text = " Inserted: " & param4
End If
If param5 <> "*" Then
Label_SYNC_DOWNLOAD_RECS_UPDATED.Text = " Updated: " & param5
End If
If param6 <> "*" Then
Label_SYNC_DOWNLOAD_RECS_DELETED.Text = " Deleted: " & param6
End If
If param7 <> "" Then
Msgbox(param7, "Synchronization Failed")
Log("Sync Error: " & param7)
SyncInProgress = False
Activity.Finish
End If
End Sub
Page 57 of 65
The Profile Database
The SyncStudio Sample Android Client keeps a separate database with the server profiles. A
Server Profile includes all the information that is needed to contact a synchronization server,
including the profile name, the URL of the server, the User Id and Password for that server, the
User Group (for filtering), Y/N flag that indicates the use of SSL, plus the folder where the
database resides and the name (including extension but no folder) of the database file. The
following code is used to create the Profile Database:
'Create a new SyncStudio Profile Database
Sub CreateDb
Try
SQLobj.Initialize(DbFolder, DbName, True)
Dim fldMap As Map
fldMap.Initialize
fldMap.Put("PROFILE_ID", DBUtils.DB_INTEGER)
fldMap.Put("PROFILE_NAME", DBUtils.DB_TEXT)
fldMap.Put("SERVER_URL", DBUtils.DB_TEXT)
fldMap.Put("USER_ID", DBUtils.DB_TEXT)
fldMap.Put("PASSWORD", DBUtils.DB_TEXT)
fldMap.Put("USER_GROUP", DBUtils.DB_TEXT)
fldMap.Put("USE_SSL", DBUtils.DB_TEXT)
fldMap.Put("DB_FOLDER", DBUtils.DB_TEXT)
fldMap.Put("DB_NAME", DBUtils.DB_TEXT)
DBUtils.CreateTable(SQLobj, "PROFILES", fldMap, "PROFILE_ID")
Return True
Catch
Return False
End Try
End Sub
Page 58 of 65
Getting at the Database Location
In Android we need to know where the database is located. This function checks the Internal
Storage first. If the database is not located there it then checks for a writable SD card and if one
is present then searches the SD card. This function returns either the directory where the
database is located or a blank string if no database is found.
'Returns the location (directory) of the database
'(SD Card or Internal Storage)
'Returns a blank string if the DB was not found.
Sub GetDBLocation(FileName As String) As String
Dim TargetDir As String
'Check to see if we have the file in the internal storage first:
If File.Exists(File.DirInternal , FileName) = True Then
'Yes, the DB is located in the internal storage
Return File.DirInternal
Else
'No, see if we have a writable SD Card
If File.ExternalWritable = True Then
'Yes. See if the DB file is there:
If File.Exists(File.DirDefaultExternal , FileName) = _
True Then
'Yes, the DB is in the SD Card
'in the default directory
'for the app
' <storage card>/Android/data/<package>/files/
Return File.DirDefaultExternal
Else
'The DB is not there at all (or it has been moved)
Return ""
End If
Else
'No. This means we either do not
'have a database (1st time app is loaded)
'or that the DB is in the SD Card but
'the SD Card is not accessible.
Return ""
End If
End If
End Sub
Page 59 of 65
The JAVA .JAR API
The following pages contain information and sample code for using the SyncStudio class library for
JAVA. If you are using our class library for B4A please skip this section.
To use SyncStudio with your JAVA app you need to do the following:
1) First, if you want, copy the DbSyncStudioJavaLib.jar file (located in the C:\Program Files
(x86)\SyncStudio\Android\Java\Library\) to your preferred location for third party .JAR
files.
2) Add our JAR to your project..
You can add our .JAR in eclipse by right clicking on the Project --> Build Path -->
Configure Build Path. Under Libraries tab, click Add External JARs and go find our Jar in
whatever path you stored it.
3) Add an import
import com.dbsyncstudio.client.SyncClient
4) Declare object variable inside the java client class
private SyncClient syncClient;
Please note that you can open our sample sync client project in Eclipse and study how we use
the .JAR. When you do you will likely have to update the build paths for the various JARs so that
they will match your system.
Page 60 of 65
The important thing to keep in mind when using our .JAR is that when called it must be passed
several parameters. Where the values for these come from are up to you but we recommend
they not be hard coded in a production app. You can hard code for testing purposes but in a
live app consider using the concept of a PROFILE. A PROFILE would be created in the app via a
configuration screen and thereby you could enter values for these params and store them in a
local database. We don’t recommend storing the PROFILE data in the same DB that the app will
create and sync via SyncStudio as if the DB is deleted then you also lose the profile settings.
Later in this section is sample code for a PROFILE database.
ProfileName
String that contains the name of
the synchronization profile being used.
This field is for your reference only and
can be left blank.
Server_URL
This is the URL of the Synchronization server
where you deployed your project
User_Id
This is the ID of the user that is being
Synchronized. Needs to be one of the User Id’s
that you have configured in your database.
Password
This is the password of the user that is being
synchronized. Needs to be the same as the
password in your database.
User_Group
The group of the user being synchronized.
This field is only needed if you are doing
Filtering. Otherwise leave blank.
Use_SSL
Send “Y” to force the use of https or “N”
if your server is not configured for SSL.
"N"
This is default param that must always be sent.
Db_Folder
Path (folder only) where the database resides
Note: The folder name MUST end with “/”
Db_Name
Name of the Database file (without the folder)
including the extension (i.e, testdata.db).
Page 61 of 65
Using the Sync Object
syncClient = new SyncClient();
syncClient.Initialize(ProfileName, Server_URL, User_Id, Password, User_Group,
Use_SSL, "N", Db_Folder, Db_Name);
syncClient.startSync();
Start Sync - Detailed Code Section
public void startProgress(View view) {
// Disable the SYnc button
if (haveProfileSelected == false) {
Toast.makeText(DbSyncStudioJavaActivity.ctx, "No Profile
Selected!", Toast.LENGTH_LONG).show();
return;
}
buttonStartSync.setEnabled(false);
try {
syncClient = new SyncClient();
Log.d("","Sync Client Started");
syncTick = 0;
syncStatusText.setText("Sync Started");
syncSchemaEntries.setText("");
syncUploadEntries.setText("");
syncDownloadEntries.setText("");
syncDownloadInserts.setText("");
syncDownloadUpdates.setText("");
syncDownloadDeletes.setText("");
syncErrorFlag.setText("");
syncCounter = "";
String suffix = "/";
// If the folder does not begin with / add the forward slash
if (Db_Folder.startsWith(suffix, 0) == false) {
Db_Folder = suffix + Db_Folder;
}
// If the folder does not end with / add the forward slash
if (Db_Folder.endsWith(suffix) == false) {
Db_Folder = Db_Folder + suffix;
}
String Server_URL =
Server_Port, Use_SSL);
MakeURL(Server_Address, Server_Project,
syncClient.Initialize(ProfileName, Server_URL, User_Id,
Password, User_Group, Use_SSL, "N", Db_Folder, Db_Name);
syncClient.startSync();
} catch (Exception e1) {
buttonStartSync.setEnabled(true);
Page 62 of 65
}
syncStatusText.setText("Sync Failed - Cannot Initialize Sync");
return;
// synchronization status monitor thread
Runnable runnable = new Runnable() {
@Override
public void run() {
try {
exitSyncMonitor = false;
syncTick = 0;
while (exitSyncMonitor == false) {
try {
Thread.sleep(1000);
} catch (InterruptedException e) {
}
syncTick = syncTick + 1;
if
(syncClient.syncCounter.contentEquals("")==false) {
if
(syncClient.syncCounter.contentEquals(syncCounter)==false) {
syncTick = 0;
}
}
if (syncTick > maxSyncTicks) {
// Timeout
syncStatusText.setText("Sync Failed Timeout");
buttonStartSync.setEnabled(true);
exitSyncMonitor = true;
} else {
// Get the stats
handler.post(new Runnable() {
@Override
public void run() {
syncStatusText.setText(
syncClient.syncStatusMsg);
(!syncClient.syncSchemaEntries.contentEquals("*")) {
s.setText("Schema Records: " + syncClient.syncSchemaEntries);
(!syncClient.syncUploadEntries.contentEquals("*")) {
if
syncSchemaEntrie
}
if
s.setText("Records Uploaded: " + syncClient.syncUploadEntries);
}
if
(!syncClient.syncDownloadEntries.contentEquals("*")) {
ies.setText("Records Downloaded: " + syncClient.syncDownloadEntries);
}
if
(!syncClient.syncDownloadInserts.contentEquals("*")) {
syncUploadEntrie
syncDownloadEntr
Page 63 of 65
rts.setText("Records Inserted: " + syncClient.syncDownloadInserts);
}
if
(!syncClient.syncDownloadUpdates.contentEquals("*")) {
tes.setText("Records Updated: " + syncClient.syncDownloadUpdates);
}
if
(!syncClient.syncDownloadDeletes.contentEquals("*")) {
tes.setText("Records Deleted: " + syncClient.syncDownloadDeletes);
}
syncDownloadInse
syncDownloadUpda
syncDownloadDele
syncErrorFlag.setText(s
yncClient.syncErrorFlag);
((!syncClient.syncErrorFlag.contentEquals("")) ||
(syncClient.syncStatusMsg.contentEquals("Sync Finished")) )
if
{
= true;
exitSyncMonitor
buttonStartSync.
setEnabled(true);
}
});
}
}
}
buttonStartSync.setEnabled(true);
} catch (Exception e) {
syncStatusText.setText("Sync Failed");
exitSyncMonitor = true;
buttonStartSync.setEnabled(true);
}
}
}
};
new Thread(runnable).start();
Page 64 of 65
Create Profiles Database
public class DbSyncStudioOpenHelper extends SQLiteOpenHelper {
private static final String DATABASE_NAME = "syncstudio.db";
private static final int DATABASE_VERSION = 1;
// Database creation sql statements
protected static final String DATABASE_CREATE_PROFILES =
"create table profiles " +
"(_id integer primary key, " +
"profile_name text not null, " +
"server_address text not null, " +
"server_project text not null, " +
"server_port text not null, " +
"user_id text not null, " +
"password text not null, " +
"user_group text not null, " +
"use_ssl text not null, " +
"is_selected_profile text not null, " +
"db_folder text not null, " +
"db_name text not null);";
public DbSyncStudioOpenHelper(Context context) {
super(context, DATABASE_NAME, null, DATABASE_VERSION);
}
// Method is called during creation of the database
@Override
public void onCreate(SQLiteDatabase database) {
database.execSQL(DATABASE_CREATE_PROFILES);
Toast.makeText(DbSyncStudioJavaActivity.ctx, "Profile Database
Created", Toast.LENGTH_LONG).show();
}
// Method is called during an update of the database, e.g. if you increase
// the database version
@Override
public void onUpgrade(SQLiteDatabase database, int oldVersion,
int newVersion) {
database.execSQL("DROP TABLE IF EXISTS profiles");
onCreate(database);
}
}
Page 65 of 65