1
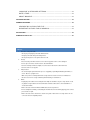
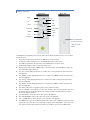
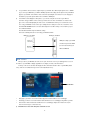
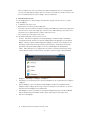
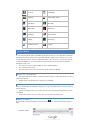
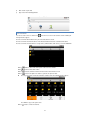
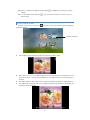
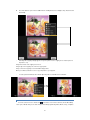
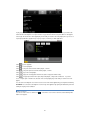
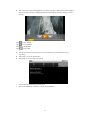
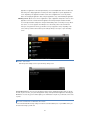
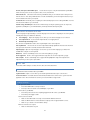
WeWeb
User Manual
Thanks for purchasing another innovative product from our company!
Before you begin to use your WeWeb, read the Quick Start Guide and this User Manual. This manual
contains user guide, product introduction, cautions and other useful information, which will help you take
full advantage of features in your WeWeb.
We will not be responsible for loss of or damage to your personal data as well as any other consequential
loss as a result of the improper use of the product’s hardware or software, or caused by the product
repair or any other unexpected incidents.
We shall not be responsible for any loss resulting from misunderstanding this manual and we shall not be
liable to third party for any loss or damage connected with using this product.
Information in this document is copyrighted and no part of this manual may be reproduced or distributed
without the written permission of our company.
Information in this manual including contents of product features and specifications is subject to change
without notice as updates may be made.
CONTENTS
PACKAGE CONTENTS
OVERVIEW
REMOTE CONTROL
PRODUCT FEATURES
POWER SUPPLY
TURNING ON/OFF WEWEB
CONNECTING TO HDTV
HOME SCREEN
LAUNCHER
USING SD CARD
CONNECTING TO NETWORKS
INPUTTING CHARACTERS ON A WEBPAGE
BROWSE INTERNET
VISIT HD VIDEO WEBSITES
SEARCH
FILE MANAGER
GALLERY/PHOTO VIEWER
MUSIC PLAYER
VIDEO PLAYER
CALCULATOR
WEATHER FORECAST
DOWNLOADING FILES
EMBEDDED THIRD PARTY APPLICATIONS
!"
WIRELESS & NETWORKS
SOUND SETTING
SCREEN SETTING
APPLICATIONS SETTINGS
PRIVACY SETTINGS
SD CARD & MACHINE STORAGE SETTINGS
LANGUAGE & KEYBOARD SETTINGS
DATE & TIME
ABOUT MACHINE
#
$
!%
&
!
UPGRADE BY COPYING THE FILE
IMPORTANT NOTICES FOR UPGRADING
&
!
# &
!
Cautions
1.
Protection of the power cable
• Do not plug or unplug the power cable with wet hands.
• Keep the power cable away from heating devices.
• Do not put heavy items on the power cable or the unit.
2.
Storage
• Disconnect the power when the device is unused for long periods of time or if it is damaged.
• Do not expose the unit to extreme moisture, dust and vibrations.
• Store the unit away from direct sunlight, excessive heat, fire and extreme cold environments.
• Store the unit in a cool, dry place.
3.
Data protection
• .Do not interrupt the power while in the process of upgrading or uploading/downloading the firmware, to
avoid
data loss or program error.
• Make sure power is not interrupted when the storage card is inserted or removed, to avoid data loss.
• Do not insert or remove storage card during file downloading, to avoid data loss.
4.
Others
• Unplug the power cable before cleaning the device. Wipe the unit with a soft piece of dry cloth. Do not let
any liquid or foreign substance be inserted inside the unit that could result in a short circuit with fire or
electrocution hazards.
• When connect the unit and TV with the HDMI cable, disconnect power first.
• Do not attempt disassembling or remodeling the unit. When the unit is not working properly, please contact
professionals for repair.
• When connect the unit to other devices, read the user guide of other devices for safety cautions. Do not
connect the unit to incompatible products.
Before Using WeWeb
PACKAGE CONTENTS
Here’s what you should find inside the box:
WeWeb
Two AAA batteries for remote control
Remote control
Power adapter
HDMI cable
This Quick Start Guide
OVERVIEW
HDMI port. Connects to HDTV (supports up to 1080p)
USB Host port
Power Socket
RJ45 network port. Connects to network cable.
Power socket. Connects to power adapter.
Two USB Host ports.
Connect to USB mouse,
USB keyboard, USB hard
drive etc.
SD card slot
Remote control signal sensor. Do not block.
Parts
USB Host Port (total 3)
HDMI Port
RJ45 Network Port
Description
Connect to USB mouse, USB keyboard or mobile Hard Drive etc.
Connects to HDTV (supports up to 1080P)
Connect to network cable to surf the web
Power Socket
Round DC socket; connects to power adapter
SD Card Slot
Insert SD card into the slot. You can play files on the SD card.
Remote control signal sensor
Do not block IR receiver, so that you can use the remote control properly.
REMOTE CONTRO L
Front View
Power
Left
Down
Volume Up
HOME
Prev
Play/Pause
Back View
Up
Right
OK
Return
Volume Down
Search
Menu
Next
Press and slide down
to remove the cover in
order to insert the
battery.
Your WeWeb can be controlled by remote control as well as wired or wireless keyboard and mouse. It is convenient,
fast and easy to use.
The left mouse button functions the same as the OK button on the remote control.
The right mouse button functions the same as the RETURN button on the remote control.
The middle mouse button has the same function as the MENU button on the remote control.
Double click the right mouse button to return to the Home screen.
When the system is running, press POWER button on the remote control to put your WeWeb into sleep mode,
press Power button again to wake it up.
Press UP to scroll the display up when there is a scroll bar. Press UP to view the previous picture in the Photo
View application.
Press DOWN to scroll the display down when there is a scroll bar. Press DOWN to view the next picture in the
Photo View application.
Press LEFT to scroll the display left when there is a scroll bar. Press LEFT to view the previous picture in the
Photo View application.
Press RIGHT to scroll the display right when there is a scroll bar. Press DOWN to view the next picture in the
Photo View application.
Press OK to confirm. If there is a popped-out options menu, confirm the operation.
Press
RETURN to open the previous screen you were working on. If the onscreen keyboard is open, closes
the keyboard. If there is a popped-out options menu, cancel the operation. The Return button has the same
function as the right mouse button.
Press VOLUME UP to increase the volume of the system, in any application.
Press VOLUME DOWN to decrease the volume of the system, in any application.
Press
HOME button to return to the Home screen at any time, in any application.
Press MENU button to open a menu with items that affect the current screen or application. Not all screens have
options menus; if you press Menu on a screen that has no options menu, nothing happens. Some screens have
more options menu items than can fit in the main menu; you click More to open a menu of additional items.
Press
SEARCH button to open Google search in any application. On the Home screen, opens Google search
for searching your WeWeb and the web. In many applications, opens a search box for searching within the
application.
Press PREV to play the previous track/chapter in the audio/video applications. Long press this button to fast
reverse. These controls work on the preinstalled audio/video players. Please note that the button controls on
other audio/video players downloaded by the users may conflict with the preinstalled audio/video players.
Press PLAY/PAUSE to play or pause audio/video playback in audio/video applications.
Press NEXT to play the next track/chapter in the audio/video applications. Long press this button to fast forward.
These controls work on the preinstalled audio/video players. Please note that the button controls on other
audio/video players downloaded by the users may conflict with the preinstalled audio/video players.
PRODUCT FEATURES
WeWeb is an internet-connected television platform. Combining TV, PC, the entire web, and applications, WeWeb
brings a new experience into your living room.
Android 2.2 OS: Surf and search the entire web as well as a great variety of Android applications. Android OS is
flexible and intuitive, which allows the users to install and uninstall the applications to meet their individual needs.
Online entertainment: enjoy online music, pictures, games and more. You can watch online the high-definition
videos and listen online to the newest and hottest music.
Supports both Wi-Fi and RJ45 network port.
HDMI output (supports up to 1080p): the perfect companion to your HDTV. Supports 1080p video decoding.
Easy to use: Your WeWeb can be controlled by remote control as well as wired or wireless keyboard and mouse.
It is convenient, fast and easy to use.
Blue tooth: Transfer files via Bluetooth; connect to Bluetooth keyboard.
Video playback: HD theatre; support SWF (FLASH), 3GPP, MOV, MP4 formats.
Music playback: support OGG, MP2, M4A, MID, MP3, WAV, AMR, WMA formats.
High resolution pictures: Your WeWeb can support BMP, JPG, PNG, GIF formats and bring you stunningly clear
images.
Expandable memory: You can use SD card for increased storage space.
Firmware upgrading: You can upgrade all the software through SD card.
Quick Guide
POW ER SUPPLY
Plug one end of the power adaptor into the unit’s DC socket, and the other end of the power adaptor to the power
source. Then you can start to use your WeWeb.
TURNING ON/OFF W EW EB
Power on: Plug the power adapter to the power source, and then connect the power adapter to the power socket
of your WeWeb. The system runs automatically, the starting logo appears and then the Home screen displays.
Power off: Disconnect the power source and the unit will turn off.
When the system is running, press Power button on the remote control or the main unit to put your WeWeb into
sleep mode, press Power button again to wake it up.
CO NNECTING TO HDTV
1)
Connect one end of the HDMI cable to your WeWeb, the other end to your HDTV.
2)
Turn on your WeWeb and your HDTV.
3)
Use your HDTV’s remote control to setup the inputs of your HDTV. Go to Menu>Inputs/signal sources > HDMI2
(if you connect your WeWeb to your HDTV’s HDMI2 port)>Finish the setting, then the picture from your WeWeb
appears on your HDTV. Some HDTV’s remote control has Inputs/Signal sources button. You can simply press
this button to pop out the options and then choose HDMI1 or HDMI2 port.
4)
Some HDTVs cannot display the entire picture, so you need to setup the screen ratio of your HDTV as
automatic. Using your HDTV’s remote control, go to Menu->Screen->Press arrow buttons to select the ratio
type-> Choose automatically display the entire screen. Your WeWeb also allows you to customize the screen
size. Using your WeWeb’s remote control, go to Settings>Screen setting>set screen size > Customize > Press
LEFT/UP/RIGHT/DOWN buttons to select the desired option> Press OK to change > Press Return to pop out
the confirmation window.
Note that different HDTVs may have different settings.
Refer to the following instruction for connecting your WeWeb to HDTV.
HDMI port of the HDTV
HDMI port of WeWeb
HDMI port setting of your HDTV
should correspond to the HDMI
port connection between your
HDTV and WeWeb
HO ME SCREEN
When you turn on your WeWeb, the Home screen opens. The Home screen is your starting point to access all
the features on your WeWeb. It displays application icons, widgets, shortcuts, and other features.
At the top of the screen, the Status bar displays the time, information about the status of your WeWeb (Status
icons), and icons for notifications that you have received (Notification icons).
•
Drag apps to your Home screen: Click & hold an app in the Launcher until its icon is scaled bigger.
•
Rearrange your Home screen: Click & hold an item and when its icon is scaled bigger, drag it where you want.
•
Remove items: Click & hold an item and when its icon is scaled bigger, drag it to the Trash Can icon (The
Launcher icon changes to a Trash Can icon).
1)
Switch Home screens/ View other parts of the Home screen:
There are multiple Home screens. The small dots at the lower left and right of the Home screen indicate which
screen you’re viewing. Swipe left or right to switch. You can also press the small dots to view the extensions to the
Home screen which provide more space for widgets, shortcuts, and other items.
2)
Customize the Home Screen:
You can add application icons, shortcuts, widgets, and other items to any part of the Home screen. You can also
change the wallpaper.
a)
To add an item to the Home screen:
•
Open the Home screen where you want to add the item.
•
Press Menu on the remote control (or the right mouse button) and click Add. Or just click & hold an empty location
on the Home screen. If there are no empty spots on the Home screen, Add is dimmed; you must delete or move
an item before you can add another item, or switch to another Home screen.
•
In the menu that opens, click the type of item to add.
You can add the following types of items to the Home screen.
o
Shortcuts: Add shortcuts to applications, a bookmarked webpage, a destination in Maps, a Gmail label, a
music playlist, and many other items. The shortcuts available depend on the applications you have installed.
o
Widgets:
Add any of a variety of miniature applications (widgets) to your Home screen, including a clock, a
music player, a picture frame, the Google search bar, a power manager, a calendar that shows upcoming
appointments, and a News & Weather widget. You can also download widgets from Android Market.
o
Folders:
Add a folder where you can organize Home screen items, or folders that contain all your contacts,
contacts with phone numbers, or starred contacts. Your folders’ contents are kept up to date automatically.
o
Wallpapers: Click Gallery, Live wallpapers, or Wallpapers.
Click Gallery to use a picture that you have copied to your WeWeb. You can crop the picture before setting it as
a wallpaper.
Click Live wallpapers to open a scrolling list of animated wallpapers installed on your WeWeb. Some live
wallpapers change according to the time of day, in response to clicking the screen, tell the time, or offer other
information. Some live wallpapers have a Settings button.
Click Wallpapers to open a screen where you can sample the wallpaper images that come with your WeWeb.
Slide the miniature images left and right to view the samples. Click a sample to view a larger version.
Click Save or Set wallpaper.
b)
To drag an item from the Launcher to the Home screen
• Click & hold the item you want to move, until it is scaled bigger. Don’t lift your finger.
• The system automatically comes back to the Home screen and the item displays on the Home screen.
• Drag the item to where you want it, and then lift your finger.
c)
To move an item on the Home screen
• Click & hold the item you want to move, until it is scaled bigger. Don’t lift your finger. Drag the item to a
new location on the screen.
• Pause at the edge of the screen to drag the item onto another Home screen pane.
• When the item is where you want it, lift your finger.
d)
To remove an item from the Home screen
• Click & hold the item you want to remove, until it is scaled bigger. Don’t lift your finger. The Launcher icon
changes to a Trash Can icon.
• Drag the item to the Trash Can icon.
• When the icon turns red, lift your finger.
LAUNCHER
Click the Launcher icon
1)
on the right side of the screen to view all installed applications.
To open an application: On the Home screen, click the Launcher icon to open Launcher. Move the cursor
using remote control or mouse to the desired application, then press OK on the remote control or click the
left mouse button to open the application.
2)
To switch to a recently used application: Press & hold the Home button. A small window opens, with
icons of applications that you’ve used recently. Click an icon to open its application. Or press Back to return
to the current application.
Preinstalled Applications:
Icon
Description
Icon
Description
Adobe reader
Angry Birds
Bluetooth file transfer
Browser
Calculator
E-mail
Facebook
File Manager
Fruit Ninja
Gallery (Photo viewer)
Audio Player
Office Suite
Online Music
Online Video
Rockplayer
Internet Search
Settings
Video Player
Weather Forecast
YouTube
Using your WeWeb
USING SD CARD
You can safely insert the SD card into your WeWeb any time when the unit is on or off. Gently slide the card into the
SD card slot until you hear a ticking sound. “Preparing SD card” will be displayed on the status bar for one second.
You can safely remove the SD card from your WeWeb any time the unit is turned off. If you need to remove the SD
card while your WeWeb is on, you must unmount the storage card form the device first, to prevent corrupting or
damaging the storage card.
•
Press Home, press Menu , and press Settings, to open the Settings application.
•
Press SD card & device storage.
•
Click Unmount SD card. You can now safely remove the SD card from your WeWeb.
CO NNECTING TO NETW ORKS
•
Wi-Fi: When Wi-Fi signal is available, Use Wireless & Network settings to configure and manage connections to
networks by using Wi-Fi.
•
Network: Plug the network cable into the network port of your WeWeb.
INPUTTING CH ARACTERS O N A W EBPAGE
When you visit HD websites or directly browse web pages, you may need to input characters. There are two ways to
input the characters.
•
Press the arrow buttons on the remote control to move the cursor, and then click the input field to pop out the
soft keyboard.
•
Use the wired or wireless mouse to move the cursor. It is very similar to operating your PC.
BROW SE INTERNET
After connecting to networks through Wi-Fi or network cable, click
below.
Input website address
icon, then the browser interface appears as
•
Press the right mouse button to close the browser and return to the Home screen.
•
Press RETURN on the remote control to close the browser and return to the Home screen.
•
Press the middle mouse button or MENU on the remote control to pop out the options menu.
•
Long press the left mouse button or double click the left mouse button to display the zoom in and zoom out
controls.
VISIT H D VI DEO W EBSITES
There are lot of HD video websites for viewing, searching for, and uploading videos. Your WeWeb comes with
YouTube application. You can browse, search for, view, upload, and rank YouTube videos on your WeWeb with the
YouTube application.
•
To open YouTube, click the YouTube icon in the Launcher or on the Home screen.
•
On a YouTube screen, click a video to play it.
•
Press RETURN to stop playback and return to the videos list.
•
Press MENU to turn captions on or off and to rank, read comments, share, flag as inappropriate, and interact
with the video in other ways. For details about these features, visit the YouTube web site.
•
You can change the settings for YouTube on your WeWeb. To change YouTube settings, return to the YouTube
home screen, press MENU, and click Settings.
SEARCH
Use remote control or mouse to click the icon
on the Home screen, then the search interface appears as below.
After you have input the search term into the search box, you can click with the mouse or remote control to select one
of three search modes.
1)
All: Search the web and applications
2)
Web: Search only the web
3)
Apps: Search the installed applications
FILE MANAGER
Use remote control or mouse to click the icon
on the Home screen or in the Launcher, then the following file
manager interface appears.
The files stored in the internal flash memory are under /mnt/sdcard or /sdcard.
The files stored in the external SD card are under /mnt/sdcard/external-sdcard or /sdcard/external-sdcard.
The files stored in the external USB mass storage device (USB hard drive, USB stick etc.) are under /HDD/HDD1.
Press
button to add a folder, then input the folder name and click OK.
Press
button to delete all the folders.
Press
button to switch the folder view modes between list view and icon view.
Press
button or the right mouse button to go back to the previous folder.
Press any of the folders to view the folders/files under this folder. The following interface appears.
Press MENU to pop out the options menu.
Press
button to refresh the folder list.
When there is something on the clipboard, the Paste button
is highlighted. Press this button to copy the
folder/file.
Choose a file and then click the More button
to pop out a window, and then you can rename, copy, cut,
delete the folder.
GALLERY/PHOTO VIEW ER
Use remote control or mouse to click the icon
on the Home screen or in the Launcher, and the following photo
view interface appears.
An album of the photos
Click an album to open it and view its contents. Click a picture in an album to view it.
Click a Zoom icon to zoom in or out. When the picture is zoomed in, drag the picture to view parts that are not in
view. When the picture is zoomed to fit in the window, Press Left or Right to view the next or previous picture in
the album.
Click Slideshow button to watch a slide show of the pictures in the album. Click a picture to end the slideshow.
Press MENU button to display the options menu, including the Share button (the firmware can be upgraded), the
Delete button and the More button.
Press More button to open a menu of additional items, including Details, Set as wallpaper, Crop, Rotate Left and
Rotate Right.
o
Click Crop. The cropping rectangle appears on top of the picture. Use the cropping tool to select the portion of
the picture to crop.
Drag from the inside of the cropping tool to move it.
Drag an edge of the cropping tool to resize it to any proportion.
Drag a corner of the cropping tool to resize it with fixed proportions.
When you’re finished, click Save to save a copy of the picture as you cropped it.
o
To rotate a picture: Click Rotate left or Rotate right. The picture is saved with the new orientation.
MUSIC PLAYER
Use remote control or mouse to click the icon
on the Home screen or in the Launcher, then the Music library
screen opens, with tabs that you can click to view your music library organized by Artists, Albums, Songs, or Playlists.
To play music, click a song in your library to listen to it or while viewing a list of tracks in an album, press Menu and
click PLAY ALL. The Playback screen opens and the song you clicked or the first song in the album or other playlist
starts to play. The tracks in the current playlist play in order until you reach the end of the playlist (unless you choose a
repeat option). Otherwise, playback stops only if you stop it, even when you switch applications.
Click
to pause playback.
Click
to resume playback.
Click
to skip to the next track in the album, playlist, or shuffle.
Click
to skip to the previous track in the album, playlist, or shuffle.
Click
to open the current playlist.
Click
to play the current playlist in shuffle mode (tracks are played in random order).
Click
to toggle repeat mode: Don’t repeat, Repeat the playlist, or Repeat the current track. If you don'
t
choose a repeat option or shuffle mode, the tracks in the current playlist play in order until you reach the end of the
playlist.
You can return to the Playback screen from most other screens in the Music application by pressing Menu and clicking
PLAYBACK. You can return to the Playback screen from any other application by opening the Notifications panel and
clicking the ongoing music notification.
VIDEO PLAYER
Use remote control or mouse to click the icon
album screen appears.
on the Home screen or in the Launcher, and the following Video
Click a video file to open the following playback screen and the video plays. Click the video to view the playback
controls for pausing, resuming, and skipping backward and forward. Drag the slider to go directly to a section of
the video.
Click
to pause playback.
Click
to resume playback.
Click
to skip backward
Click
to skip forward
Click SD card or HDD to view the video files on SD card (external memory) or HDD (internal memory)
respectively.
Click History to see the list of played videos.
Click Settings to open the setting screen as below.
Remove all history played recently to get more space.
Remove cached thumb files in SD card to reduce the file list loading time.
CALCULATOR
Use remote control or mouse to click the icon
on the Home screen or in the Launcher, and the following
Calculator screen appears.
Drag to switch between basic and
advanced screens.
Enter numbers and arithmetic operators on the basic screen.
Press Menu and Click Advanced panel or Drag the basic screen to the left to open the advanced screen. Press Menu
and Click Basic panel or Drag the advanced screen to the right to switch back to the basic screen.
Click & hold the Calculator’s display to open the Edit text menu where you can copy what you’ve entered and access
other tools.
Click CLEAR to delete the last number or operator you entered. Click & hold CLEAR to delete everything in the
display.
Press Up or Down to view your previous operations. Previous operations are entered in the display, where you can
work with them. Clear the history by pressing Menu and Clicking Clear history.
W EATHER FORECAST
Use remote control or mouse to click the Weather Forecast widget on your Home screen or click its icon
in the
Launcher.
•
First select the country, and then select the city. The weather forecast of this city displays in the Weather
•
Check Auto-refresh to have Weather update information automatically, at the frequency you set with Refresh
Forecast widget on your Home screen.
interval. Uncheck to update the weather only when you press Menu and Click Refresh. For automatic refresh to
work, you must also have Background Data turned on in the Settings application. (Settings->Accounts & sync
settings screen->Background data). Unchecking this setting can save battery power and lowers (but does not
eliminate) data use.
•
Click Refresh interval to set how often to update the weather automatically, if Auto-refresh is checked. You can
select 4 hours, 8 hours, 12 hours or one day. More frequent updates trade the convenience of current
information for increased data use and decreased battery life between charges.
•
Click Temperature Scale to select the Celsius temperature scale or Fahrenheit.
DOW NLO ADING FILES
You can download files and even applications from web pages. The files that you download are stored on your SD
card.
Warning! Applications downloaded from the web can be from unknown sources. To protect your WeWeb and personal
data, download applications only from trusted sources, such as Android Market.
To download a file
Different webpages offer different mechanisms for downloading pictures, documents, applications, and other files.
Click & hold an image or a link to a file or to another webpage. In the menu that opens, click Save.
If the file is in a format supported by an application on the WeWeb, it is downloaded to your SD card.
To cancel a download
If you change your mind about downloading a file, or start downloading one by accident, you can cancel the download
in progress.
1)
2)
Press Menu and click More > Downloads.
Click & hold an item in the list and in the menu that opens, click Cancel download. Or press Menu again and
click Cancel all downloads.
To view the files you’ve downloaded
Press Menu and click More > Downloads. The files you’ve downloaded are listed in order. Click a file to open it.
To delete a file you’ve downloaded
1)
Press Menu and click More > Downloads. The files you’ve downloaded are listed in order.
2)
Click & hold the file you want to delete from your SD card.
3)
Click Delete.
4)
Click OK.
The file is permanently deleted from the SD card.
EMBEDD ED THIRD PARTY APPLI CATIONS
Rockplayer is an embedded platform and a high-performance all-format video player.
Click Rocklayer and select the files on the SD card to play video.
Rockyplayer supports the following audio formats: avi, mkv, rmvb, mp4, mov, wmv, asf, wma, wav, mpg, ts, mpadvd
au, mp3, mid, ivf, aiff, ogm, ogg, cda, flic, d2v, aac, roq, flac, drc, dsm, swfpls, pmp.
Rockyplayer supports the following video formats: AAC, AC3, DTS, FLV4, LPCM, ALAW, ULAW, MPEG Audio,
MPEG-1,MPEG-2, Real Video, Real Audio, Vorbis, AVC, VC1, XVID, DIVX, SVQ, Theora Bink.
Settings
Use remote control or mouse to click the icon
on your Home screen or in the Launcher. The following
settings are available for configuration:
“Wireless & networks”
“Sound settings”
“Screen settings”
“Applications settings”
“Privacy settings”
“SD card & machine storage settings”
“Language & keyboard settings”
“Date & time settings”
“About machine”
W IRELESS & NETW O RKS
Wi-Fi:
Check to
turn on Wi-Fi so you
can connect to
Bluetooth: Check
Wi-Fi networks.
to turn on
Bluetooth so you
can connect to
Bluetooth devices.
Wi-Fi settings: Click to open Wi-Fi settings screen as below.
Encrypted network
When click an encrypted network, enter the security key.
Ethernet settings: Click to open Ethernet settings screen as below.
If you choose ‘Automatically obtain IP address’, then you don'
t need to input IP address, subnet mask and
the default gateway.
If you choose to use Static IP, you can use IP settings to enter an IP address and other network settings
manually. Click the input field to pop out the soft keyboard, so you can input the data. You can also
use the wired keyboard to input the data directly.
Press OK to confirm.
SOUND SETTING
Click Sound in the Settings screen to adjust volume level.
SCREEN SETTING
If the picture cannot be displayed properly, go to Settings>Screen setting>set screen size > Customize > Press
LEFT/UP/RIGHT/DOWN buttons to select the desired option> Press OK to change > Press Return to pop out the
confirmation window.
APPLICATIONS SETTING S
Click Applications in the Settings screen to open the Applications settings screen.
Unknown sources: Check to permit installation of applications that you obtain from web sites, email, or other
locations other than Android Market.
Warning! To protect your WeWeb and personal data, download applications only from trusted sources, such
as Android Market.
Manage applications: Opens a list of all the applications and other software installed on your WeWeb, along
with their sizes. Click the tabs to show only downloaded applications, only running applications, all
applications or applications on SD card. By default, they are sorted in alphabetical order. Press Menu and
click Sort by size to display applications in order by size. Click an application to open its Application Info
screen. Depending on the application and where it came from, its Application Info screen may include
buttons for managing the application’s data, forcing the application to stop, and uninstalling the application.
Running services: Opens a list of services—applications or parts of applications that provide services to other
applications or that run even when their main application isn’t running. Examples include the Android
onscreen keyboard and the small portion of Google Talk that always listens for incoming messages. Above
each service, one or more gray bars show what processes the running service needs and how much
memory it’s using (how much memory you would recover if you stopped the service). Depending on the
service, when you click it in the list it either opens a dialog in which you can stop it or opens its Settings
screen.
PRIVACY SETTINGS
Click Privacy in the Settings screen to open the Privacy settings screen.
Factory data reset: Erases all of your personal data from internal storage, including information about your Google
Account, any other accounts, your system and application settings, and any downloaded applications. Resetting your
WeWeb does not erase any system software updates you’ve downloaded or any files on your SD card, such as music
or photos.
SD CARD & MACHINE STORAGE SETTINGS
Use the SD Card & Machine Storage settings to monitor the used and available space on your WeWeb and on your
SD card and to manage your SD card.
SD card, Total space and Available space
Lists the amount of space on any SD card installed in your WeWeb
and the amount you have used to store photos, videos, music, and other files.
Unmounts the SD card from your WeWeb so that you can format the card or safely remove it
Unmount SD card
when the unit is on. This setting is dimmed if there is no SD card installed, if you have already unmounted it, or if you
have mounted the SD card on your computer.
Format SD card Permanently erases everything on an SD card and prepares it for use with your WeWeb. You must
unmount an SD card before you can format it.
Internal storage, Available space The amount of internal storage used by the operating system, its components,
applications (including those you downloaded there), and their permanent and temporary data.
LANGUAG E & KEYBOARD SETTINGS
Use the Language & Keyboard settings to select the language for the text and for configuring the onscreen keyboard,
including words that you’ve added to its dictionary.
Opens the Language screen, where you can select the language to use for the text.
Select language
Select input method You can select the input method to use for typing the text.
Android Keyboard settings screen
The correction and capitalization features affect only the English version of the keyboard.
Auto-capitalization
Check to have the onscreen keyboard automatically capitalize the first letter of the first word
after a period, the first word in a text field, and each word in name fields.
Input languages
Opens the Input Languages screen, where you can check the languages you want to have
available when using the onscreen keyboard.
Quick fixes
Check to automatically correct some common misspellings as you type.
Show suggestions
Auto-complete
Check to show suggested words in a strip above the onscreen keyboard as you type.
Check to automatically enter a suggested word, highlighted in orange in the strip above the
keyboard, when you enter a space or punctuation.
DATE & TIME
Use the Date & Time settings to set date, time zone, time, time format, date format.
ABOUT MACHINE
About Machine includes information about your WeWeb.
Legal information Opens a screen where you can obtain legal information about open source licenses.
Version information Lists details about the model number, Android version, Kernel version, system version and
application version. These information are useful if you need to work with our support team.
Troubli ng s hooti ng
1.No signal on the HDTV
•
Check if the HDMI cable is securely connected.
•
Check if you have selected the correct HDMI input on your HDTV.
2.Cannot turn on your WeWeb.
•
Check if the power connector has completely plugged into the DC socket of your WeWeb.
•
Check if the power supply is stable.
3.Cannot connect to network
•
Make sure the network cable is securely connected and the Ethernet works well.
•
Make sure Wi-Fi network is connected and the security key for the encrypted network is correct.
•
Make sure you select the correct IP address settings.
4.Remote control does not respond.
•
Make sure the batteries are good.
•
Press and slide down the cover on the back of the remote control. Insert batteries into the remote control.
Take note that there is a small hole on the left which is beside ‘Pair”. Insert a slender object into the small
hole and press for one second, and the red light in the middle will flash briefly, then the remote control and
your WeWeb are paired.
5.Some HDTVs cannot display the entire picture.
Setup the screen ratio of your HDTV as automatic. Follow these steps: Menu->Screen->Press arrow
buttons to select the ratio type-> Choose automatically display the entire screen.
Firmware upgradi ng
UPGRAD E BY COPYING THE FI LE
1.
Insert your SD Card into your computer SD Card slot or into a SD Card Reader slot then plug the reader into your
computer USB drive.
2.
Create a “UpdateKit” directory under the root directory of the SD card. Please note that the name of the directory
is case sensitive. If it already exits, empty this directory.
3.
Copy the upgrade pack ‘android.osk’ to UpdateKit. Please note that android.osk are all in lower case.
4.
Insert the SD card into your WeWeb.
5.
Open FileManager in the Home Screen or Launcher. Go to ‘/mnt/sdcard/external-sdcard’, long press ‘UpdateKit’
to pop out a window and select ‘copy’.
6.
Go to ‘/data’ (This folder is in the internal memory of your WeWeb), Press Menu button and select ‘paste’. Then
7.
Wait for a short period of time until the copy is complete. Unplug your WeWeb and then plug it back to restart
8.
The upgrading takes about 5 minutes. During the upgrading process, the green LED indicator on your WeWeb
the UpdateKit folder and the upgrade pack ‘android.osk’ under this folder will be pasted here.
your WeWeb. Then the upgrading will start automatically.
stays on. When the upgrading is complete, the green light flashes. If the upgrading fails, the light turns off.
9.
After the upgrading is complete and the green light flashes, please unplug your WeWeb and then plug it back to
restart your WeWeb.
IMPORTANT NOTICES FOR UPGRADING
Make sure power is not interrupted during the upgrading process. In case power is interrupted, you need to
upgrade your WeWeb again.
The upgrade starts automatically as long as there is the upgrade pack ‘android.osk’ under /data/UpdateKit. And
‘android.osk’ will automatically be deleted after the upgrading is finished no matter whether the upgrading is
successful or not. If the upgrading is not successful, you need to download the upgrade pack again and
complete the upgrading.
For successful upgrading, the upgrade pack ‘android.osk’ must ensure its validity, completeness and
correctness.
Validity: The upgrade will not start if the ID of ‘android.osk’ is not for a specified serial number.
Completeness: If the file copy process is interrupted, the ‘android.osk’ will not be complete, and the upgrade will
not start automatically.
Correctness: During the upgrading process, the system will read every file in the upgrade pack and calculate
and compare checksum. If there is checksum error with a file, the system will skip updating this file.
The folder name ‘UpdateKit’ and the upgrade pack name ‘android.osk’ are fixed and case sensitive.
Specifications
System
Product type
Computer and TV combined
Main chipset
Samsung S5PV210
Processor Main Frequency
1GHz
RAM
DDR2-512MB
Memory
INAND 2GB or 4GB
Expandable memory
Insert SD card or connect USB hard drive
OS
Android 2.2
Main features and functions
Android applications
A great variety of Android applications and games
Internet browser
Browse the web
HD video support
1080p, 720p, 480p
Media player
Play local HD videos, music and view photos
Online video
Connect to internet and watch video online
Online audio
Connect to internet and listen to music online
Blue tooth
Transfer files via Bluetooth; connect to Bluetooth keyboard, mouse
Firmware upgrading
Upgrade the firmware via SD card
Connectors and Ports
USB port
3 x USB host ports
SD card slot
1 x SD card slot
RJ45 network port
Can connect to network by plugging network cable into RJ45 network port
HDMI port
Can connect to HDTV
Others
Unit size
170mm(L)x111mm(W)x30mm(D)
Remote Control
Support 2.4G wireless remote control
Power voltage
12V DC adaptor
Summ ary of useful ti ps
1.
To switch Home screens: There are multiple Home screens. The small dots at the lower left and right of the
Home screen indicate which screen you’re viewing. Press the small dots to view the extensions to the Home
screen which provide more space for widgets, shortcuts, and other items.
2.
To switch applications: Press & hold the Home button. A small window opens, with icons of applications that
you’ve used recently. Click an icon to open its application. Or press Back to return to the current application.
3.
4.
To switch language input methods: Press & hold the left corner of the soft keyboard.
To open the Notifications panel: The Status bar appears at the top of every screen. It displays icons indicating
that you’ve received notifications (on the left) and icons indicating the phone’s status (on the right), along with the
current time. To open the Notifications panel, drag the Status bar down from the top of the screen. On the Home
screen, you can also press Menu and click Notifications.
5.
Working with Home screen:
•
To add an item to the Home screen: Press Menu and click Add.
•
To drag an item from the Launcher to the Home screen: Click & hold the item you want to move, until it
vibrates. Don’t lift your finger. The system automatically comes back to the Home screen and the item
displays on the Home screen. Drag the item to where you want it, and then lift your finger.
•
To move an item on the Home screen: Click & hold the item you want to move, until it vibrates. Don’t lift
your finger. Drag the item to a new location on the screen. Pause at the edge of the screen to drag the item
onto another Home screen pane. When the item is where you want it, lift your finger.
•
To remove an item from the Home screen: Click & hold the item you want to remove, until it vibrates.
Don’t lift your finger. The Launcher icon changes to a Trash Can icon. Drag the item to the Trash Can icon.
When the icon turns red, lift your finger.
6.
Working with Menus: There are two kinds of Android menus: options menus and context menus.
•
Options menus contain tools that apply to the activities of the current screen or application, not to any
specific item on the screen. You open options menus by pressing the Menu button. Not all screens have
options menus; if you press Menu on a screen that has no options menu, nothing happens.
•
Context menus contain tools that apply to a specific item on the screen. You open a context menu by
clicking & holding an item on the screen. Not all items have context menus. If you click & hold an item that
has no context menu, nothing happens.
Declaration of Conformity
The product Devo WeWeb (model 9000J-MSD-SACC) is in compliance with the essential
requirements and other relevant provisions of Directive 2004/108/EC (Elettromagnetic
Compatibility).
Devo WeWeb (model 9000J-MSD-SACC) is also in compliance with the requirements of
Directive 2002/95/CE (RoHS) on the Restrictions of the Use of Certain Hazardous Substances
in Electrical and Electronic Equipments.
WARRANTY CERTIFICATE
This warranty is valid from the date of purchase.
NOTE: Warranty is valid only if this Warranty Certificate is presented with a proof of purchase
within the lawful validity period.
a)
b)
c)
d)
e)
f)
g)
h)
If the product proves to be defective, customer must bring the product together with a proof of
purchase and this warranty certificate to the dealer where the product was purchased. The
customer shall transport the product to the dealer at his own risk and shall be responsible for
any cost incurred in transporting the product.
The warranty does not cover following events (letters from “a” to “h” ) and the customer will be
required to pay repair charge for following events even if they occur within the warranty period.
any defect occurring by mishandling, careless or improper storage.
any defect due to repair, modification, cleaning, etc., performed by anyone other than
authorized service centre.
Any defect or damage due to transport, fall, shock, etc. after purchase of product.
Any defect or damage due to sand, mud, fire, earthquake, flood damage, thunderbolt and any
other natural disaster.
Any defect due to exhausted batteries.
When this warranty certificate is not returned with the product.
When proof of purchase is not presented with this warranty certificate.
When alterations have been made to this certificate and/or to the proof of purchause regarding
the date of purchase, customer’s name, dealer’s name and the serial number.
This warranty applies to the product only and does not apply to any other accessory equipment.
Warranty for customer not buying the product for professional use is valid for 2 years from the
date of purchase.
Warranty for customers using the product for professional use is valid for 1 year from the date
shown on invoice.
Warranty on batteries is valid for six months from the date of purchase
WASTE DISPOSAL
Conforming to the Directive 2002/96/EC this appliance must not be disposed of with other household
waste. This appliance must be disposed by an authorized waste treatment or collection point for the
recycling of waste electrical and electronic equipment. Incorrect disposal of this type of waste product
can damage the environment and cause problems to health due to hazardous substances produced by
electrical and electronic equipments.
Imported by:
FARES SRL – www.fares.it