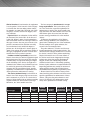
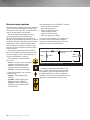
1
Medical Equipment
Quality Assurance:
Inspection Program Development
and Procedures
J. Tobey Clark
Director, Instrumentation & Technical Service,
Faculty, Biomedical Engineering/School of Engineering
Michael Lane
Associate Director, Instrumentation & Technical Services
Leah Rafuse
Clinical Engineer, Instrumentation & Technical Services
Instrumentation & Technical Services
University of Vermont
280 East Avenue, Suite 2
Burlington, VT 05401
Chapter 1:
Introduction.............................................................................................. 2
Chapter 2:
Definitions................................................................................................ 3
Chapter 3:
Using a Risk-Based Assessment for Establishing a
Medical Equipment Maintenance Program....................................... 5
Chapter 4:
General Procedures...............................................................................11
Chapter 5:
Electrical Safety.................................................................................... 24
Chapter 6:
Equipment Inspection Procedures.................................................... 37
General Equipment........................................................................................................ 38
Apnea Monitor.................................................................................................................41
Aspirator.......................................................................................................................... 45
Cardiac Output Unit........................................................................................................ 49
Central Station Monitoring System.............................................................................. 52
Compression Unit........................................................................................................... 55
Defibrillator..................................................................................................................... 59
Electrocardiograph......................................................................................................... 65
Electrosurgical Unit........................................................................................................ 69
Enteral Feeding Pump................................................................................................... 73
External Pacemaker....................................................................................................... 77
Fetal Monitor................................................................................................................... 80
Hypo/Hyperthermia Unit............................................................................................... 84
Infant Incubator.............................................................................................................. 88
Infusion Pump................................................................................................................. 94
Non-Invasive Blood Pressure Monitor......................................................................... 99
Patient Monitor............................................................................................................. 103
PCA Pump.......................................................................................................................110
Phototherapy Unit.........................................................................................................116
Pneumatic Tourniquet...................................................................................................119
Pulse Oximeter.............................................................................................................. 123
Radiant Warmer............................................................................................................ 127
Sphygmomanometer.....................................................................................................131
Therapeutic Stimulator................................................................................................ 134
Therapeutic Ultrasound................................................................................................137
Ventilator........................................................................................................................141
Appendix 1: Standards.............................................................................................. 147
IEC 60601-1..................................................................................................................147
IEC 62353......................................................................................................................147
NFPA 99......................................................................................................................... 148
The Joint Commission.................................................................................................. 148
©University of Vermont, Rev. 2 – Confidential
1
CHAPTER 1: Introduction
The purpose of this document is to provide
guidance in establishing and managing a medical equipment quality assurance (QA) program
and to present detailed procedures for inspection, preventive maintenance, safety evaluation,
and performance testing.
The target audiences for this publication
are those responsible for establishing and
managing medical equipment QA program,
and staff performing inspections and device
testing. Readers should have a basic technical background and some exposure to medical
equipment in healthcare. The book does not
provide background information on clinical or
technical concepts or medical equipment principles of operation.
Medical equipment QA is part of an overall medical equipment management program
for a healthcare facility or system. A complete
program also includes corrective maintenance
or repair, equipment control, asset management,
health care technology planning, education,
and activities directed toward improving medical device-related patient safety.
The publication is organized into four primary
sections:
• A glossary of terms
• Background information on establishing and
managing a program including goals, methods, device inclusion and rating criteria, and
standards
• General and device-specific procedures and
forms for inspection, preventive maintenance, safety evaluation, and performance
testing
• An appendix with reference information
Forms, tables, diagrams, illustrations, and photos
are used to aid in the understanding of the
content.
The publication takes into consideration
the advances in device reliability, reduced
preventive maintenance requirements, and
internal device surveillance (self test) along
with changes in standards. Due to the ongoing
efforts at global harmonization, international
standards are used and referenced where
applicable, such as electrical safety testing
references IEC 62353.
Acknowledgements
The publication was funded by a grant from Fluke
Electronics Corporation (FEC). A number of diagrams,
illustrations and figures were provided by FEC as was
test equipment used in many of the photographs.
2
©University of Vermont, Rev. 2 – Confidential
CHAPTER 2: Definitions
A meaningful preventive maintenance program
requires consistent terminology. This section
contains practical definitions of terms used in
this manual.
Adverse event: Sometimes referred to as
a device incident. An event or circumstance
arising during care that could have or did lead
to unintended or unexpected harm, loss, or
damage.
Calibration: The process of determining the
accuracy of a device by comparing it to a known
measurement standard. The device is then
adjusted to agree with the standard within a
recommended tolerance. Minor adjustments to
achieve the specified accuracy are considered
part of the calibration process. Major readjustments and parts replacement are considered
repairs and are not included in the calibration
process.
Class I medical equipment: Electrical
medical equipment with accessible conductive
parts or internal conductive parts protectively
grounded in addition to basic insulation.
Class II medical equipment: Electrical
medical equipment that uses double insulation
or reinforced insulation for protection against
electric shock in addition to basic insulation.
Clinical equipment: Medical equipment
used for diagnosis, treatment, or monitoring of
a patient. Clinical equipment is further broken
down to life-support and non-life-support
equipment.
Clinical risk: The risk associated with the
clinical use of the equipment, taking into
account how invasive the equipment is to the
patient.
Corrective maintenance: Also known as
repair. Corrective maintenance entails isolating
the cause of the device failure. Affected components are adjusted or replaced to restore normal
function. A performance inspection is performed
following corrective maintenance before the
device is placed back into service to ensure
proper operation of the device.
Device inclusion: How a device is used
determines whether or not to include the device
on the managed inventory. The device inclusion
categories include clinical equipment, utilities equipment, and general equipment. Most
equipment on the inventory will be classified as
clinical equipment.
Electrical safety testing: Testing of equipment to assure it is electrically sound to avoid
the possibility of microshock. Electrical safety
testing involves testing the ground wire resistance, current leakage to the chassis, and
current leakage to the patient leads.
Equipment inventory: A record of medical equipment used in a facility. The inventory
may include equipment that does not receive
scheduled maintenance as well as managed
equipment for tracking purposes.
Estimated time: The estimated amount of
time needed to perform the scheduled maintenance. The estimated time includes the
time from test set up to the conclusion of the
maintenance.
Exception testing: Following scheduled
performance inspections, only failures are
documented. Equipment that has not been
documented as needing repair or adjustment
is assumed to be safe and ready for use. This
method of testing is useful when performing
preventive maintenance and performance
inspections on a large number of devices.
General equipment: Equipment that cannot
be classified as either clinical or utilities
equipment.
Incoming inspection: A performance test
performed on a piece of medical equipment
before being put into use to verify the safety of
the device.
Life support equipment: Medical equipment
that takes over a function of the human body
and whose loss will cause immediate death.
©University of Vermont, Rev. 2 – Confidential
3
Maintenance interval: Also referred to
as testing frequency or the length between
scheduled maintenance. Most commonly, the
maintenance interval is given as a length of
time (i.e. every 6 months), but can also be given
in hours of equipment operation (i.e. every
10,000 hours).
Managed inventory: A record of medical
equipment used in the facility that only includes
equipment requiring scheduled maintenance.
Mean time between failures: The average
time between failures of a device or system.
This is used as an indication of reliability.
Nosocomial infection: An infection contracted by a patient during a hospital stay.
Performance inspection: A procedure to
ensure a device operates appropriately. The
device should meet safety and performance
requirements of regulatory agencies, the healthcare facility, and the manufacturer. Performance
inspections will vary by device type and each
device type should have a written procedure
that includes the characteristics that are tested,
how to test them, and acceptable operational
limits. Performance inspections are performed
periodically to ensure proper operation of
devices prior to being put into service for the
first time, after a repair, or anytime the operation
of the device is questioned.
Physical risk: The risk associated with
device failure.
Preventive maintenance (PM): Periodic
procedures to reduce the risk of device failure.
The maintenance interval may be based on time
(e.g. every 12 months) or operational usage (e.g.
every 1,000 hours). Preventive maintenance
is designed to ensure continuous operation of
equipment. Preventive maintenance tasks may
include replacing parts, lubricating, and adjusting. Preventive maintenance excludes tasks
normally carried out by the user.
Problem avoidance probability: The likelihood of a device to fail, based on historic
data related to medical equipment repair and
maintenance.
4
©University of Vermont, Rev. 2 – Confidential
Procedure: Maintenance tasks that need to
be completed for effective performance testing
and preventive maintenance.
Quality assurance: A systematic process of
checking to see whether a product or service is
meeting specified requirements.
Regulatory requirements: Specific criteria
that must be met as set forth in codes and
standards. Regulatory requirements often
have the power of law behind them from a
governing body.
Repair: Also known as Corrective Maintenance. Entails isolating the cause of the device
failure and replacing or adjusting affected
components to restore normal function. A
performance inspection is performed following
corrective maintenance before the device
is placed back into service to ensure proper
operation of the device.
Risk assessment: The identification and
quantification of possible hazards. A risk assessment involves a numerical scoring system to
quantify the amount of risk.
Risk management: A process by which
possible hazards are identified and assessed.
Procedures are put into place to minimize the
risks from the identified hazards.
Standards: Also referred to as codes. Guideline documentation of practices agreed upon by
industrial, professional, or governmental organizations. The standard will usually establish
a specific value used for evaluation compliance
with the standard.
Utilities equipment: Equipment that supports
medical equipment, life support, infection control, environmental, communication, or critical
utility systems.
User checks: Also known as operator checks.
Performance checks on medical equipment that
can be performed by the clinical user. These
are often simple operational checks that do not
require the use of tools or test equipment.
CHAPTER 3: Using a risk-based
assessment for establishing a medical
equipment maintenance program
Goals of the maintenance program
The University of Vermont has developed a
risk-based
system for determining the mainteThe goal of any medical equipment maintenance
nance
frequency.
Intervals are established for
program is to ensure that medical equipment
equipment
inspection
based on risk, requireis safe, accurate, and ready for patient use.
ments,
logistics,
and
history.
Written criteria are
Quality assurance is achieved with periodic
used
to
identify
risks
associated
with medichecks of the equipment. The purpose of estabcal
equipment
per
the
Maintenance
Strategy
lishing risk-based maintenance intervals is to
Worksheet.
The
risks
include
equipment
provide high-quality, cost-effective inspections
function, physical risks associated with use, and
based on risk and function, historical data on
equipment history as it relates to patient safety.
problems found, and the effect of maintenance
Life support equipment is specifically identified
on the reduction of problems.
and receives the highest priority for actions.
The PM/Inspection procedures should be
The risk criterion is divided into five categobased on need that includes the maintenance
ries:
clinical function, physical risk, problem
requirements of the device, risk classification,
avoidance
probability, incident history, and regdevice function, and history of incidents. Mainulatory
or
manufacturer
requirements. Devices
tenance and performance inspections do not
are
given
a
score
for
each
of these categories.
prevent random failures, particularly related to
The
scores
for
each
category
are added up and a
electronic equipment and low risk devices do
total
score
is
given
for
each
device
type. Mainnot need performance verification at the same
tenance
strategies
are
determined
based
on
frequency or intensity of higher risk devices.
the
total
score.
A
combined
score
of
13
or
more
Medical equipment should be evaluated to
is
justification
for
semiannual
testing,
a
score
determine how often testing should be perof 9-12 is justification for annual testing, and
formed. If a device is not tested often enough,
a score of 8 or less is justification for less than
it may fail before the next scheduled mainteannual testing, either bi-annual or no scheduled
nance or give erroneous results. If a device is
testing, depending on clinical application. The
tested too frequently, time that could be better
result is a more cost-effective test program that
spent maintaining other equipment is wasted.
The biomedical professional’s job is to achieve a will result in improved patient care through less
balance between the time and effort needed for equipment downtime and more dollars for direct
patient care activities.
periodic functional testing and the safe use
The risks identified are used to assist in deterof medical equipment.
mining the strategies for maintenance, testing,
and inspection of medical equipment. In addiRisk-based inspection intervals
tion, the identified risks are used to guide the
In order to maintain an efficient maintenance
development of training and education programs
program, the frequency of inspection must be
for staff that use or maintain equipment. All
determined. Effort should be spent on equipmedical equipment is screened at the time of
ment where testing is likely to have an impact
delivery and appropriate training and testing
on the continued safe operation of the medical
of new equipment takes place prior to use on
device.
patients.
©University of Vermont, Rev. 2 – Confidential
5
New device type
added to inventory
The risk assessment should be done for
each new device type during the incoming
inspection when the device is added to the
inventory. The device will then have a testing frequency assigned. After this is done,
the maintenance history of the device should
be monitored in order to evaluate the effectiveness of the maintenance program. The
process is shown in Figure 1.
Complete
Maintenance
Strategy
Worksheet
Assign
inspection
frequency
Inspection
frequency may
be too low
Accumulate
device
history
Inspection
frequency may
be too high
Evaluate
device
history
Yes
Frequent failures or
problems found
during testing?
No
No
Infrequent failures
and no problems found
during testing?
No
Infrequent
failures, some minor
repairs or adjustments
needed during
testing?
Yes
Device has efficient
testing frequency
Figure 1.
6
©University of Vermont, Rev. 2 – Confidential
Yes
Maintenance strategy worksheet
Rating system for risk-based inspections
University of Vermont Technical Services Program
Most device types have been evaluated and classified for test frequency already.
For new device types, use the scoring system to evaluate the frequency of testing.
Criteria: Choose one rating from each category
Clinical function
No patient contact
Device may make contact with patient but function is non-critical
Device is used for patient diagnosis, or direct monitoring
Device is used to deliver direct treatment to the patient
Device is used for a life support
Physical risk
Device poses no appreciable risk due to failure
Device failure will result in low risk
Device failure will result in inappropriate therapy, misdiagnosis, or loss of monitoring
Device failure could result in severe injury to, or death of, patient or user
Problem avoidance probability
Maintenance or inspection would not impact reliability of the device
Common device failure modes are unpredictable or not very predictable
While common device failure modes are not very predictable, device history indicates that
TSP testing frequently detects problems
Common device failure is predictable and can be avoided by preventive maintenance
Specific regulatory or manufacturers requirements dictate preventive maintenance or testing
Incident history
No significant history
A significant history of incidents exists
Manufacturers/regulatory requirements for specific schedules
No requirements
There are requirements for testing independent of a numerical rating system
Total Score:
Assignment: 0.0x 0.5x 1x 2x 3x 4x (times per year tested)
Weight
Score
1
2
3
4
5
1
2
3
4
1
2
3
4
5
1
2
1
2
A combined score of 13 or more is justification for semiannual testing.
A combined score of 9-12 is justification for annual testing.
A combined score of 8 or less is justification for less than annual testing (either bi-annual or no scheduled testing, depending on clinical application).
Anesthesia machines and vaporizers are recommended for testing three times per year.
Some blood delivery devices such as warmers may be required to be tested four times per year based on AABB or CAP requirements.
Maintenance strategy assignment
Maintenance Program
Warranty: Attach coverage
Full manufacturers service contract
Manufacturers service contract with first look by TSP
CAPP contract with first look by TSP
TSP scheduled maintenance and repair
Hospital scheduled maintenance and repair
TSP repair on failure only
User maintenance only
Replace on failure only
Check
Ends
Comment
Completed by:__________________________________________________________ Date:_ ____________________________________
©University of Vermont, Rev. 2 – Confidential
7
Clinical function is how invasive the equipment
is to the patient. At the low end of this category
is a device that does not make patient contact,
for example, an exam light. The high end of this
category is a device used for life support, such
as a ventilator.
Physical risk is an evaluation of what will be
the outcome if the device fails. At the low end
is low risk; failure is more of an inconvenience
than actual harm such as an otoscope. Failure of
this type of device does not pose a threat to the
patient’s outcome and the clinician can easily
use an alternate device with little impact to
patient care. At the high end is severe injury or
death of the patient such as ventilator. Failure of
this type of equipment can have a serious detrimental effect on the patient’s outcome.
Problem avoidance probability is based on
historic data related to medical equipment repair
and maintenance. The low end of this category
is maintenance or inspection having no impact
on the reliability of the device; the high end is
common device failures are predictable and can
be avoided by preventive maintenance. This
category also has an additional level, specific
regulatory or manufacturer’s requirements that
dictate preventive maintenance or testing.
The device incident history is also based on
historic data. This category only has two scores,
and is answered as yes or no. If a device had a
history of being involved in an incident resulting
in patient harm, the device would score high.
Otherwise, the device would score low.
Device Type
Ventilator
Electrosurgical unit
Infusion pump
Pulse oximeter
Exam table
8
Clinical
Function
5
4
4
3
2
©University of Vermont, Rev. 2 – Confidential
Physical
Risk
4
4
3
3
2
The last category is manufacturer’s or regulatory requirements. This is also either yes or
no. If the device has a specific requirement for
maintenance or testing, the device would score
high, otherwise the device would score low. The
chart shown gives the scores from the maintenance strategy worksheet for a few medical
devices.
To illustrate the application of the Maintenance Strategy Worksheet, two examples are
given below, outlining the use of the worksheet.
The first example is the pulse oximeter; the
second is the electrosurgical unit.
The pulse oximeter is a device used for noninvasive monitoring of blood oxygen levels. The
clinical function category would score 3 because
the device is used for direct patient monitoring.
Physical risk would score 3 because failure of
the device would cause inappropriate therapy,
perhaps not giving the patient supplemental
oxygen, and/or loss of monitoring. Problem
avoidance would score 2. Historically speaking,
failures of pulse oximeters are unpredictable and
impending problems are usually not uncovered
during periodic testing. Both incident history
and manufacturer/regulatory requirements score
1. Historic data does not show a history of incidents involving pulse oximeters and there are no
specific requirements for maintenance of these
devices. This gives the pulse oximeter a total
score of 10. Based in the maintenance worksheet, this is justification for annual testing.
Problem
Avoidance
Probability
4
2
2
2
2
Incident
History
2
2
2
1
1
Manufacturer
or Regulatory
Requirements
2
1
1
1
1
Total
Score
17
13
12
10
8
Testing
Frequency
Semiannual
Semiannual
Annual
Annual
Bi-annual
The electrosurgical unit is a device that uses
high-frequency electric current for cutting or
destroying tissue. The clinical function category
would score 4 because the device is used for
direct treatment of the patient. Physical risk
would score 4 because failure of the device
could cause severe injury to the patient. Problem
avoidance would score 2. Historically speaking,
failures of electrosurgical units are unpredictable and impending problems are usually not
uncovered during periodic testing. Incident
history would score 2. Historical data reveals
that electrosurgical units have been involved
with patient incidents. Manufacturer/regulatory requirements would score 1, as there are
no specific requirements for maintenance of
these devices. This gives the electrosurgical unit
a total score of 13. Based in the maintenance
worksheet, this is justification for semiannual
testing.
As it can be seen from the previous examples, devices that have more risk associated
with them need more maintenance than other
devices. In the example, electrosurgical units
will receive maintenance twice per year based
on a risk assessment, while pulse oximeters will
receive maintenance once per year.
One should note that devices were scored as
generic device type only and are not modelspecific. The risk criterion is used as a tool for
determining maintenance intervals. If a specific
model has testing or maintenance requirements
different from other devices of the same type,
the maintenance schedule can be adjusted on a
case-by-case basis.
Evaluating the effectiveness of the
maintenance program
Every maintenance program should be periodically evaluated for effectiveness. Performance
standards for medical equipment management should support the efforts of hospitals to
manage health care technology for the purpose
of improving the quality of care, containing the
cost of health care delivery, and improving the
safety of patients, hospital staff, and visitors.
Tracking device histories is useful for evaluating
the effectiveness of the maintenance program. A
computerized system is especially useful for this
task, as different types of equipment problems
will need to be tracked.
Maintenance inspection intervals should be
reviewed annually, to make changes as justified,
as well as following any changes in regulations
or guidelines. The review is done by analyzing the data generated from the maintenance
history. To facilitate analysis, coding in the computerized maintenance management system on
the types of problems encountered is required.
The University of Vermont uses a system where
a work order is generated for every maintenance
event of a device. The work orders are coded
by type of maintenance event and the work
order types categorize the service performed.
Work order types for maintenance, user errors,
no problem found, recalls, upgrades, and other
risk categories are tracked through the equipment problem summaries. These summaries are
available for reporting to the Safety Committee to improve patient care and create a safe
environment.
Devices that frequently have problems found
during the periodic performance inspection
or that have a high failure rate in between
inspections may need to have more frequent
inspections. Likewise, as the reliability of medical devices improves, fewer problems are found
during functional testing. In addition, newer
technology often requires fewer scheduled
parts for replacement as electronic controls are
replacing mechanical systems. For example,
anesthesia machines are beginning to use
electronically-controlled flow controls instead of
the traditionally used mechanical needle valve
assemblies. Electronically controlled devices
tend to be more accurate and do not have parts
that wear like mechanical systems do. These
devices may no longer continue to benefit from
frequent inspections.
©University of Vermont, Rev. 2 – Confidential
9
In addition to tracking problems found during
functional testing, other types of device problems should be tracked. Device problems that
cannot be reproduced and perceived problems
arising from incorrect use are indicators that
clinical staffs need additional education on the
proper use of these devices. For example, if it is
noticed that there is a high incidence of work
orders with no problems found for patient monitors, the clinical staff may need to be retrained
on the proper operation of the monitors. Devices
that have been abused may indicate the need
for additional staff education or a change in
clinical protocol such as equipment storage or
cleaning. Device failures that could have been
prevented with proper maintenance, such as
tubing and filters that need to be changed in a
ventilator indicate that the maintenance schedule should be reevaluated or that additional
technical education is needed.
10
©University of Vermont, Rev. 2 – Confidential
Performance standards should be clear and
reasonable, as well as ensure that local regulations are met. The most obvious example of a
performance standard is the functional testing completion rate. The University of Vermont
has found a realistic goal for the functional test
completion rate is 95 % of clinical devices with
100 % of life support devices. Other performance
standards should be developed, such as the
number of use error related problems and damaged devices.
If an evaluation finds the goals are not met, an
action plan should be developed to address the
problems. The underling cause of the problem
must be discovered and then steps to solve the
problem must be taken. After a plan has been
implemented, the plan should be monitored to
determine progress and evaluate whether or not
the plan was effective.
CHAPTER 4: General procedures
Inventory control
Location: This may be entered as the owner
department
or a physical location. The equipUnderstanding what devices are in the facility in
ment
location
is used to find the equipment
order to provide a quality maintenance program
for
maintenance.
Also, the location is useful
is critical. Inventory data is used for a variety of
to
break
up
the
maintenance
schedules by
applications including establishing a maintedepartment.
nance schedule, tracking medical device hazards
Maintenance history: A record should be
and recalls, and deciding when to replace aging
kept
of all maintenance performed on equipequipment.
ment, including scheduled maintenance, repairs,
software upgrades, and incident investigations.
Using a computerized medical
Dates of service should be included in this
equipment management system
history.
A computerized medical equipment manageWork coding: For benchmarking and trendment system is a useful tool in keeping track of
ing, the type of maintenance being performed
the device inventory and maintenance hison the equipment is required. The University of
tory. There are several programs commercially
Vermont uses a work order coding system where
available, but whatever software is chosen, the
a work order is generated for each maintenance
following information should be tracked.
event and a work order type is assigned to each
Basic device information: Any medical
work order. A sample of work order types are
equipment management software should track
listed in the table on page 12.
basic device information. At a minimum, the
Work order coding is important in measuring
device type, manufacturer, model, and serial
the success of the maintenance program and
number should be tracked. This information is
for identifying areas that need to be addressed.
essential to the maintenance program.
For example, if there are a lot of work orders
Clinical use: The clinical use of a device
indicating use error for a device, the trend may
should be documented. Equipment used for life
indicate the clinical staff needs to be trained in
support needs to be given a higher priority for
the proper use of the equipment. Below is an
maintenance. Additionally, regulations on life
example of the use of trending data to identify
support devices may be different. In the United
equipment with a high percentage of use error.
States, the Joint Commission requires equipment As a benchmark, equipment with a use error
used for life support to have a 100 % completion per device of greater than 10 % needs to be
rate for scheduled maintenance.
addressed. In this example, hypo/hyperthermia
units have a use error percentage of around
12 %. Further investigation will need to be done
as to why the failures occur.
©University of Vermont, Rev. 2 – Confidential
11
Work order types for corrective maintenance
Work Order Type
08-REPR-MAINT
09-REPR-RAND
10-REPR-USR ERR
11-REPR-DAMAGED
12-REPR-NO PROB
14-RE-REPAIR
18-TR-RAND B
19-TR-RAND C
23-TR MAINT B
24-TR-MAINT C
60-PLANNED
57-NOT TESTED
58-FT AFTER 57
63-TR B - NFR
64-TR C - NFR
65-TR A - NFR
Other work order types
15-INCOMING P
16-INCOMING F
25-FT ADD P
26-FT ADD F
27-FT NO ADD P
28-FT NO ADD F
30-PROD ALERT
33-RECALL MOD
37-INCIDENT INV
44-CALIBRATION
59-INV DELETE
12
Definition
Device failure could have been prevented with maintenance, such as replacing tubing
Device failure could not be prevented
Device failure was caused by improper clinical use
Device failure was caused by abuse
Reported failure could not be reproduced
Device failed for the same problem within 30 days of being repaired previously
A minor problem found during the scheduled performance testing
A major problem found during the scheduled performance testing
A minor problem found during the scheduled performance inspection that could have been
prevented with maintenance
A major problem found during the scheduled performance inspection that could have been
prevented with maintenance
Planned maintenance
Device not tested during the regularly scheduled performance inspection
Device that missed its regularly scheduled inspection has received a performance inspection
A minor problem found during the scheduled performance testing that does not require follow up
A major problem found during the scheduled performance testing that does not require follow up
Scheduled maintenance (e.g. battery replacement) was not performed, no additional follow up is
necessary
Device passes initial performance inspection performed before the device is put into service
Device does not pass initial performance inspection
Device passes initial performance inspection performed after the device is already in service
Device does not pass initial performance inspection and has already been in service
Device passes initial performance inspection but will not be added to the inventory
Device that will not be added to the inventory does not pass initial performance inspection
A recall or alert has been issued for a device
Work done in answer to a recall, such as a software upgrade or parts replacement
Investigation of an incident involving the device
Device requires calibration
Device is taken off of the inventory
©University of Vermont, Rev. 2 – Confidential
Deciding which devices to put on the
inventory
All major device classes should be assessed for
inclusion based on function, risk, maintenance
requirements, historical incidents, and regulaThe process to determine what devices will be
managed as part of the equipment management tions and each device type should be evaluated.
system is crucial to the success of the system. All Evaluations should be performed on new device
types as they arrive at the hospital. All equipdevices must be evaluated to determine if they
ment used in the hospital should be evaluated
should be managed.
regardless of ownership. Most commonly,
The University of Vermont uses three major
devices will fall into the clinical classification. A
classifications of devices: clinical, utilities, and
maintenance schedule should be determined for
general. Within the clinical classification, two
these devices based on the risk criteria dissubgroups will be identified: life support and
cussed in Chapter 3.
non-life-support. Other equipment may be
Device inclusion must be performed and
inventoried and tracked for financial or other
documented
prior to any equipment use preferreasons but is not included in this process.
ably
during
the
technology planning stage prior
Clinical equipment is any equipment used for
to
arrival
at
the
facility. This process should be
treatment, monitoring, or diagnosis of patients.
utilized
for
owned,
rented, loaned, demonstraLife support equipment is clinical equipment
tion
or
leased
equipment.
that takes over a function of the body and will
The factors must include function, risk, maincause immediate, within minutes, death if
tenance
requirements, and history of incidents.
removed. Under this definition a ventilator will
The
University
of Vermont has developed a
be considered life support equipment, whereas
Device
Inclusion
Worksheet to facilitate this
a hemodialysis machine is not considered life
process.
support. Even though the hemodialysis machine
takes over the function of the kidney, removal
of the patient from hemodialysis will not cause
immediate death.
% Errors Per Device Type Per Quarter
User Error and No Problem Found Work Orders By Device Type
(Excludes Devices With Inventory Count <15)
p,
In
cu
ba
Pu
m
on
A
to
r,
In
Fe
f
a
ta
El
l M nt
ec
on
tro
ito
ca
r
rd
io
M
gr
o
a
De nito ph
Ce
r,
fib
W
nt
NI
ar
ril
ra
BP
m
la
lS
er
to
ta
r
,
,P
Ra
tio
ac
di
n
er
an
M
on
t,
In
ito
fa
rin
nt
g
Co
S
m
y
Pu
s
pr
te
m
es
m
p,
En sion
te
Un
ra
it
lF
ee
M
di
on
ng
ito
r,
SP
O2
Ve
nt
In
ila
fu
to
El
si
r
ec
on
tro
Pu
su
m
rg
p
ic
al
Un
it
In
Hy
po
/H
yp
fu
si
er
th
er
m
ia
Un
PC
it
13.00 %
12.00 %
11.00 %
10.00 %
9.00 %
8.00 %
7.00 %
6.00 %
5.00 %
4.00 %
3.00 %
2.00 %
1.00 %
0.00 %
Figure 2.
©University of Vermont, Rev. 2 – Confidential
13
Device inclusion worksheet
Device information
Device type
Manufacturer
Model
Serial number
Control number
Owner
Department
Tester
Prev maint
Tests/year
Hosp
Vendor
MD
Other
Hosp
Hosp
1x
TSP
TSP
2x
Mfr
Mfr
3x
User
User
4x
Inclusion assessment
The intent is to capture all powered devices that by function, physical risk, maintenance requirements, or a history
of incidents or safety problems should be managed as a part of the medical equipment management system. Some
devices have a borderline inclusion between medical equipment and utilities, so tests for inclusion in the utilities
management program are included.
1: Life support equipment
Would failure of this device result in immediate death of the patient? And
Is the powered device used for direct patient treatment or care?
Yes
Yes
No
No
An answer of “Yes” to both of the above questions indicates that the device should be managed in the medical equipment inventory as a life support device.
2: Medical equipment
Is the powered device used for direct patient treatment or care?
Does the powered device provide diagnostic/monitoring information used in treatment?
Does this powered device come in contact with the patient?
Yes
Yes
Yes
No
No
No
An answer of “Yes” to any of the above three questions indicates that the device should be included in the medical equipment management program and
be inventoried under those provisions.
3: Utilities equipment
Does this device facilitate life support functions?
Does this device support infection control systems?
Does this device support facility environmental systems?
Does this device support critical facility utility systems?
Does this device support essential communications systems?
Yes
Yes
Yes
Yes
Yes
No
No
No
No
No
If the device fails to meet the medical equipment requirements, but there are any “Yes” answers to the utilities equipment questions, the device should be included
in the utilities equipment management program.
4: Clinical and physical risk
Does the device pose risk to the patient or staff when used in the facility?
Would failure or loss of use of the device adversely affect the deliver of health care?
Does this product or class of device have a history of incidents or safety recalls?
5: Maintenance requirements
Does the device require periodic inspection in order to ensure safe delivery of care?
Does the device require periodic performance testing to ensure safe delivery of care?
Does the device require periodic preventive care to ensure safe delivery of care?
Yes
Yes
Yes
No
No
No
Yes
Yes
Yes
No
No
No
If the device fails to meet the requirements for Medical or Utilities Equipment, but there are “YES” answers to the above questions in Clinical and Physical risk or
Maintenance Requirements, the device should be managed on a general equipment inventory with preventive maintenance or testing as appropriate.
Management program assignment
This device will be assigned as Life Support Equipment
This device will be assigned as Medical Equipment
This device will be assigned as Utilities Equipment
This device will be assigned as General Equipment
This device will be NOT be included in any equipment management program
Yes
Yes
Yes
Yes
Yes
No
No
No
No
No
Completed by:__________________________________________________________ Date:_ ____________________________________
14
©University of Vermont, Rev. 2 – Confidential
Incoming inspections
The initial test for a new piece of equipment
prior to the use in patient care is called the
Incoming Inspection. This inspection serves to
ensure the equipment passes all performance
and safety requirements prior to use. This is
typically the most rigorous test performed of all
inspections. A test form should be used to document test results. Incoming inspections should
be done on all medical equipment, regardless of
whether owned, rented, leased, loaned, or on
demonstration equipment.
Each device should be evaluated per the
Device Inclusion Worksheet to determine the
inventory classification. All medical equipment
determined to be on a management program
needs to receive a performance and safety test
prior to patient use. Working with clinical staff
is required to ensure all medical equipment
receives an incoming inspection, including demo
equipment brought in by vendors.
If the equipment passes the inspection, the
device should be entered into the hospital’s
inventory. Inspection labels, warranty labels,
and battery labels are also placed on the device
when appropriate. The equipment can now be
placed into service.
If the device does not pass the inspection, it
is not placed into service and the deficiencies
are noted. Many devices receiving an incoming
inspection are covered under warranty. In this
case, the vendor should be contacted to either
exchange or repair the equipment. The equipment should not be placed into service until it
can successfully pass the incoming inspection.
Incoming inspection of temporary
medical equipment
Temporary medical equipment is equipment
that is not owned by the hospital, and which is
either used for patient care on a sporadic basis,
or which will be used for a limited amount of
time at the facility, typically 90 days or less.
Such equipment may include rental equipment,
a sales demo, or patient owned equipment.
Temporary medical equipment needs to be
properly maintained just as hospital owned
equipment does to protect the safety of the
patient.
All medical equipment needs to undergo an
incoming inspection. Medical equipment that
will be at the facility for a single time of 90 days
or less does not need to be added to the equipment inventory, although a record should be
kept of the initial incoming inspection. Equipment that will be at the facility for longer than
90 days should be added to the equipment
inventory to be tracked just like hospital-owned
equipment.
Equipment that will be brought repeatedly to
the facility, such as a rental device, will need to
have an incoming inspection and be added to
the inventory. Additionally, the vendor should be
required to certify that each time the device is
brought to the facility, the equipment has been
maintained, and that the device is safe and
ready for use. The University of Vermont uses
the following Vendor Safety Certification Form to
ensure these devices are safe and ready for use
when they are brought into the facility.
©University of Vermont, Rev. 2 – Confidential
15
Vendor Safety Certification Form
Medical equipment often is provided to facilities for use as loaners, demonstration, rental
or lease. It is sometimes not possible for the
hospital or its biomedical equipment agent to
adequately test these devices before they are
used clinically. As a prerequisite to patient use of
devices that cannot be fully tested by the hospital, the hospital requires the vendor to provide
a certification that the device(s) is/are safe for
use at the facility for a specific period of time or
under specific circumstances of use.
Clinical Use Prohibited Without This Certification
Hospital:________________________________________________________________________________
Department:____________________________________________________________________________
Manager:________________________________________________ Date:_________________________
Device Description:_ _____________________________________________________________________
Vendor:__________________________________________________ Contact:_ _____________________
Serial Numbers of All Devices:_____________________________________________________________
Intended Use of the Device:_______________________________________________________________
Dates of Use: Start:________________________________________ Stop:_________________________
Vendor completes this part:
����� This vendor certifies this device is provided to the facility in safe and useable condition, and is FDA
approved for the intended clinical procedure(s). This vendor has or will test the device for proper
function prior to clinical use, but after arrival at the facility. Training will be provided to staff on
safe use and potential risks.
����� This device is an investigational device for which FDA approval does not exist as of yet. The device
will not be used clinically until all hospital investigational review board approval is received.
Training will be provided on safe use and potential risks.
����� This equipment is provided repeatedly to the hospital and is maintained by the vendor. It is
checked between assignments to different facilities, and records of maintenance are provided
annually to the facility. Ongoing performance and safety testing is provided, and the vendor
certifies that the device is safe for use as provided at delivery.
����� Non-hospital employees who will be delivering and/or operating the equipment are appropriately
trained and qualified to be transporting, setting up, and operating the equipment.
Note any special conditions:_ _____________________________________________________________
_______________________________________________________________________________________
Vendor Signature:_ ______________________________________ Date:_________________________
Facility Signature:_______________________________________ Date:_________________________
16
©University of Vermont, Rev. 2 – Confidential
Documentation
most commonly because the equipment could
not be physically located. The equipment may
Documentation is very important to any mainalso miss an inspection if it is being used on a
tenance program. Tracking what maintenance
patient and cannot be removed or if the equiphas been performed is impossible if there is no
documentation. All maintenance, scheduled and ment has been sent out for repair.
Every effort should be made to locate and
unscheduled, should be recorded in the equipinspect
equipment marked as ‘Not Tested’
ment history.
and
working
with clinical staff to locate this
The University of Vermont uses documentation
equipment
will
be required. A list of missing
by exception to report the results of scheduled
equipment
should
be sent to the department so
performance inspections. Documentation by
that
the
staff
can
keep
watch for the missing
exception is the process of documenting failequipment.
A
protocol
should
be established
ures only. A work order is completed only for
for
clinical
staff
when
they
find
the equipment.
those devices that fail to meet a routine, schedIf
possible,
the
equipment
should
be set aside
uled inspection against safety, performance or
for
testing.
Designating
a
storage
area
for this
quality assurance criteria. Devices that pass
purpose
is
desired.
the scheduled inspection criteria are rendered
At the University of Vermont, a work order is
acceptable and do not require written test forms
created
for devices that were not tested during
or additional work orders.
their
scheduled
test round. The work order is
All incoming inspections, other additions to
left
open
for
up
to
thirty days while biomediinventory, and devices that have undergone
cal
equipment
technicians
attempt to locate
corrective maintenance should have a docuthe
equipment.
During
this
time, nursing staff
mented PM/inspection form and work order
is
asked
to
assist
in
locating
the equipment. A
completed.
notice is sent to the department manager with
a list of equipment that needs to be located for
Locating missing equipment
inspection. If nursing staff locates the missing
As stated above, the University of Vermont uses equipment, the equipment is set aside, if posa system of documentation by exception. A
sible, until it can be inspected and biomedical
work order needs to be opened for each probpersonnel are notified.
lem noted during the scheduled test round.
Once the equipment has been inspected,
The work order coding system contains specific another work order is created to show that the
work order types for problems encountered
equipment received its scheduled maintenance.
during scheduled maintenance.
This work order has a type that indicates a
One work order type ‘Not Tested’ is parfunctional test following a ‘Not Tested’ work
ticularly useful. This work order type is used
order. Again, the coding system is important, as
to mark equipment that did not receive its
it allows these types of maintenance events to
scheduled inspection. Equipment may miss its
be identified.
scheduled inspection for a variety of reasons,
©University of Vermont, Rev. 2 – Confidential
17
HNICAL
HNICAL
HNICAL
EC
T
T
EC
EC
HNICAL
EC
T
T
Name________________ Date__________
ES ED BY
Biomedical Engineering Dept
ELECTRICAL SAFETY TEST
Completed by__________________________
Date__________________________________
Inspection Due_________________________
UAL BE269
NON-HOSPITAL OWNED
EQUIPMENT
BATTERY REPLACED
Date____________ By____________
Date Due_______________________
TSP-UVM ANESTHESIA
VAPORIZER PROGRAM
OUTPUT VERIFICATION
DONE___________ DUE________ BY________
OVERHAUL/REMANUFACTURER
DONE_______________ DUE_______________
CENTRIFUGE PERFORMANCE TEST
Setting Cent Tach Photo Tach
RPM
RPM
RPM
MAX
RPM
Timer
Stopwatch
Date
By
Due
Control #
UAL BE305
Figure 3. Label samples.
©University of Vermont, Rev. 2 – Confidential
DA E DUE
M
PERFORMANCE TESTED BY
TECHNICAL SERVICES PROGRAM
Electrical Safety Tested
18
RVICES
• U
VM •
Date______________ By_____________
Next Inspection Due_____________________
Inspection labels that include a next inspection due date are especially useful. Clinical staff
should be trained that if they find a piece of
equipment with an outdated inspection sticker,
they should put the equipment aside if possible
and contact biomedical personnel.
Care should be taken to ensure labels are
not placed over important information, such as
warnings, contraindications, and instructions.
SE
O G RA
• U
VM •
M
QUARTERLY
• U
VM •
PR
O G RA
TESTED BY
TESTED BY
M
RVICES
DATE DUE
PR
SE
RVICES
DATE DUE
SEMI ANNUAL
M
ANNUAL
• U
VM •
SE
O G RA
TESTED BY
O G RA
EC
RVICES
DATE DUE
PR
M
B -ANNUAL
• U
VM •
O G RA
TESTED BY
SE
T
RVICES
DATE DUE
PR
SE
PR
Labels are an easy and effective way to communicate information about medical equipment.
The University of Vermont uses a variety of
labels to indicate specific data necessary for
technology management, regulatory requirements, and for safety. Labels may be used for
performance inspections—bi-annual, annual,
semiannual and general, battery installation, specific calibration, warranty, hazards
and warnings, and upgrade or recall data. In
addition, a unique identifier control number is
placed on each piece of equipment for ease of
device tracking. The following are examples of
these labels:
Control number tags are made of aluminum
and attached with a permanent adhesive.
These tags need to be rugged in order to stand
up to repeated cleaning and disinfecting of the
equipment. Other labels are made of a material
that allows them to be peeled off and replaced.
Labels that require written information should
be filled in using permanent marker, to avoid
fading of the ink.
HNICAL
Labels
Biomedical Engineering Dept
BE702
This equipment is
under warranty.
Beginning__________ Ending__________
UAL BE282
DEFECTIVE
DO NOT USE
DATE: ____________________
BY: ______________________
DO NOT REMOVE
THIS LABEL
BE203
Forms
The checklist has an option for each maintenance
task as either passed, failed, or not
Testing checklists should be developed for each
applicable.
Devices that have maintenance
device type. These lists are useful because they
tasks
that
fail
should not be put back into seroutline recommended maintenance procedures
vice
until
the
problem
has been corrected.
and provide numerical criteria for quantitative
The
not-applicable
category
is necessary
tests.
as
the
maintenance
checklists
are generic by
The maintenance checklists should be filled
device
type
and,
since
device
operation
varies
out during an incoming inspection or testing
from
model
to
model,
not
every
maintenance
following a repair. The University of Vermont
task can be performed on every device. For
uses documentation by exception policy and
does not fill out a maintenance checklist for the example, the centrifuge maintenance checklist
includes timer accuracy, operation of the brake,
successful completion of a scheduled perforand alarm activation. High-end centrifuges will
mance inspection. Maintenance forms can be
either paper or electronic format. Placing main- have all of these functions. However, simpler
centrifuges may not have these functions to be
tenance checklists on a handheld device such
tested. This doesn’t mean the device is unsafe
as a PDA that can be filled out electronically
to use, it simply means the equipment does not
may be useful.
The maintenance forms should contain infor- have those functions.
Every maintenance task that needs to be
mation on what equipment is being inspected,
performed
on every device can be included on
the date the inspection occurs, and who is to
the
maintenance
checklist. Device function and
perform the inspection. A list of maintenance
operation
vary
greatly
by model and manutasks should be broken down by subsystem
facturer.
Reference
to
the
equipment’s service
and numerical criteria given for quantitative
manual
for
any
additional
maintenance tasks is
tests. For example, the measured flow rate of an
required.
A
sample
form
for
Infusion Pumps is
infusion pump should be within 10 % of the set
shown
on
page
20.
rate. This criterion appears on the test form next
to the task for flow rate accuracy.
©University of Vermont, Rev. 2 – Confidential
19
Infusion pump procedure
Estimated time: 45 minutes
Equipment information
Control number:____________________________________ Hospital:_ __________________________________________
Manufacturer:______________________________________ Model:_____________________________________________
Serial number:_ ____________________________________ Location:___________________________________________
Test information
Technician:________________________________________ Date:_______________________________________________
Test type: Incoming_ ________ Post repair_________
Test equipment needed:ISA 601 Electrical Safety Analyzer
20 cc or larger syringe
IDA4 Plus Infusion Device Analyzer 3 way stopcock
Tubing set for infusion pump
Tubing and connectors to connect to IDA 4 Plus
Reservoir to connect to tubing set (bag or bottle)
Test Result
Pass
Fail
N/A
Physical condition
Device is clean and decontaminated
No physical damage to case, display, mounts, cart, or components
Switches and controls operable and correctly aligned
Display intensity adequate for daytime use
Control numbers, labeling, and warnings present and legible
Inlets and hoses
Power cord, accessory cables, charger
Filters and vents clean
Electrical safety
Ground wire resistance
Chassis leakage
Patient leakage current
Patient lead leakage current – isolation test
(mains on patient applied part)
Insulation test (optional) 500 V
< 0.3 W
< 100 µA NC
< 500 µA SFC
< 100 µA B and BF
< 10 µA CF
< 100 µA BF
< 10 µA CF
< 2 MW
Preventive maintenance
Clean flow detector
Replace battery every 24 months
Complete model-specific preventive maintenance
Performance testing
Verify unit operates on battery
Pole clamp function
Flow rate accuracy
Volume accuracy
Infusion complete/KVO
Occlusion detection pressure
Piggyback infusion
Alarm function
Complete model-specific performance testing
20
©University of Vermont, Rev. 2 – Confidential
± 10 %
± 10 %
± 1 psi
Safety
In order to service equipment, removing
the
cover is necessary. This will expose more
Maintaining and inspecting medical equipment
electrical
hazards. Jewelry, such as rings and
involves a number of risks, including electrical
watches,
should
be removed to avoid accidenand mechanical hazards. Many maintenance
tal
contact
with
electrical
components. Power
tasks include precautions to minimize theses
should
be
removed
from
the
equipment during
risks. Always follow manufacturer’s guidelines
the
repair
process
whenever
possible. As many
for safety precautions during specific tests.
tests
as
possible
should
be
performed
without
Being aware of potential hazards will allow
power
to
the
equipment,
for
example,
using
an
risks to be minimized.
ohmmeter
to
check
semiconductors
for
a
short
Electrical hazards: Electricity poses a
circuit. If you must test a live circuit, be caresignificant hazard for biomedical personnel.
ful not to accidentally cause a short with your
Not only are you exposed to electrical hazards
test leads, as this can cause damage to compoduring a repair, but also while testing medical
equipment for electrical safety. Electrical safety nents. Also be aware that capacitors can store
a charge even after the equipment has been
testing requires the simulation of faults and
unplugged for some time.
extra caution should be taken.
If a circuit board needs to be moved from
Electrical safety testing should be done before
their
mountings, insulating material should be
performance testing. The continuity between
placed
between the board and anything that
the chassis and the ground pin on the plug
may
cause
a short. Adjustments to potentiomshould be confirmed first; this is the primary
eters
should
be made with insulated tools.
protection against electrical shock to equipment
Use
caution
while handling static sensitive
users. Check the power cord for frayed instalcomponents,
as
even small amounts of static
lation or exposed wires. Damaged power cords
electricity
can
cause
damage to the composhould be replaced immediately.
nents.
Use
an
anti-static
wrist strap to avoid
Testing should never be performed on equipdamage
to
sensitive
components.
ment that is in use on a patient. As stated
Mechanical hazards: Mechanical and
above, electrical safety testing simulates
pneumatic
assemblies pose hazards as well and
electrical faults and can expose the patient to
should
be
given
appropriate caution. Moving
dangerous voltages and currents. Work with
parts
can
cause
injuries
such as cuts and
clinical staff is necessary to either disconnect
crushed
fingers.
Unsecured
fittings on pneuthe equipment from the patient or to arrange
matic
systems
can
blow
off
under
pressure and
a time to test the equipment when it is not
become
projectiles.
Compressed
gases
also pose
in use. The electrical safety analyzer should
fire,
as
well
as
suffocation
hazards.
be plugged into a properly grounded outlet to
When inspecting equipment with moving
prevent a shock hazard while testing a piece of
parts,
for example, irrigation units and elecdefective equipment.
tric
beds,
fingers, and clothing should be kept
Line voltage is used during lead isolation
away
from
the moving parts. Maintenance such
testing. This test should only be performed with
as
visually
inspecting for wear, cleaning, and
test equipment that has been designed for safe
lubrication
should be done with the equipment
application of the voltage to the patient leads.
powered
off,
and unplugged if possible. Jewelry
Do not touch the leads during lead isolation
should
be
removed
to avoid getting caught on
testing, as this may cause a shock.
moving parts and loose clothing, such as ties,
should be secured.
©University of Vermont, Rev. 2 – Confidential
21
Compressed gas cylinders pose unique hazards and should be handled carefully. Oxidizing
gases such as oxygen and nitrous oxide pose a
serious fire hazard. Additionally, gases such as
nitrogen, nitrous oxide, and carbon dioxide are
a suffocation hazard in large amounts.
Damage to the cylinder valve can have
catastrophic effects. The cylinder will rapidly
discharge its contents, possibly causing a
suffocation or fire hazard and as the cylinder discharges, will become a projectile. Care
should be taken to never drop a gas cylinder. If
a cylinder for a piece of equipment is removed,
the cylinder should be laid down on the floor. A
cylinder standing on end is easily knocked over.
Do not drag, roll, or slide cylinders, as this can
damage the valve.
Combustible substances such as oil and
grease should not be used with compressed
gas. Likewise, you should not handle cylinders,
hoses, regulators, or other gas system components with oily hands or gloves. Oxidizing gases
such as oxygen and nitrous oxide will ignite
violently when combined with a heat source,
such as an electrical spark or even frictional
heat caused by gas moving through narrow
hoses, and a combustible fuel.
Make sure connections to high pressure systems are secure. High pressure gas can cause
connectors to become projectiles. To avoid
connectors from suddenly disconnecting, use
threaded or positive locking connectors. Do not
use friction fittings, as they will not stand up to
a high pressure.
Infection control: Another risk inherent to
maintaining medical equipment is biological
hazards. Infection control guidelines need to be
followed in order to prevent both contracting
diseases and to avoid the spread of nosocomial infections. The easiest and most effective
method to prevent the spread of infection is
with proper hand washing. Hand washing
should be performed before eating, after
handling soiled equipment, after removal of
gloves, after the end of a shift before you leave
the facility, and any time hands are obviously
soiled.
22
©University of Vermont, Rev. 2 – Confidential
Food and drinks should be kept away from
benches, shelves, and other areas where potentially contaminated medical equipment is being
serviced or stored. Applying cosmetics and
handling contact lenses should also be avoided
in these areas.
Equipment should only be inspected or
repaired after it has been disinfected. Clinical
staff should be educated on the proper way to
disinfect equipment and what type of disinfectant to use. Certain disinfectants can cause
damage to equipment such as breaking down
the plastics used for the outer case and causing the case to become brittle. Check with the
equipment’s user manual or the manufacturer
for instructions on how to disinfect equipment
and what disinfectants can be used safely.
If work must be done on equipment that has
not been cleaned, wear personal protective
equipment such as gloves, mask, and gown.
Disinfect the work area when done and wash
hands thoroughly after removing the protective
equipment.
The Blood borne Pathogen Standard became
a federal regulation in the United States
enforced by the Occupational Health and Safety
Administration (OSHA) on March 6, 1992. The
purpose of the regulation is to limit occupational exposure to blood and other potentially
infectious materials. The focus of the mandate
is to utilize universal precautions and work
practice controls to reduce the exposure risk
to HIV, hepatitis and other infectious diseases.
Biomedical equipment technicians are specifically mentioned as an at-risk group due to their
work on medical equipment that may be contaminated. The regulation states: “Equipment
which may become contaminated with blood
or other potentially infectious materials shall
be examined prior to servicing or shipping,
and shall be decontaminated as necessary”
(Paragraph (d)(2)(xiv). The only exception in the
standard is if decontamination of the equipment
is not feasible. In this case, a biohazard label,
and a description of the contamination must be
placed on the device.
At the University of Vermont, all staff with
occupational exposure to blood borne pathogens, BBP, receive initial training before
exposure to the BBP environment and annual
refresher training. The hepatitis B vaccine is
provided to staff upon completion of the initial
BBP training. Universal precautions, a method
of infection control in which all blood and body
fluids are treated as if known to be infectious
for HIV, HBV and other blood borne pathogens,
and engineering/work practice controls are
used to limit occupational exposure to blood
and other potentially infectious materials.
Tuberculosis is a serious bacterial infection
that can spread from individual to individual
through the air and may scar lungs, kidneys,
bones, or the brain. Tuberculosis is highly
contagious and can be fatal, though it is usually
curable with medication.
At the University of Vermont, every staff
member who performs work in a healthcare is
tested using the PPD Mantoux skin test prior to
work in the environment, with clinical follow
up is required for a positive test result. Staff are
tested annually thereafter for the presence of
the TB virus.
Storage
Equipment that is not used every day is often
put into a storage room. Equipment should be
cleaned before being put into storage. Equipment that has a battery should be stored
plugged in to keep a charge on the battery.
Equipment in active storage will need to
have scheduled maintenance like other equipment, even if it has not been used since the last
performance inspection. Regularly scheduled
performance inspections Ensure the equipment
is safe and ready for use.
Cleaning equipment
Medical equipment needs to be cleaned to
prevent the spread of inspections and also to
keep the equipment in operational condition.
For example, residue from adhesive tape can
make displays difficult to read. The manufacturer’s cleaning procedures in the equipment’s
operation manual should always be followed to
prevent damage caused by cleaning.
Some cleaners may damage equipment. The
University of Vermont has found problems
associated with cleaning solutions, including
cracked and brittle cases on equipment and
degradation of panel membranes. In this case,
work order trending revealed a high percentage
of ‘damaged’ work orders for infusion pumps.
Upon further investigation, it was found that the
cleaning solution that was being used to disinfect the pumps between patients was causing
the plastic cases to turn brittle and crack.
Working with the manufacturer of the pumps,
a recommendation for a suitable disinfectant
was made.
Always check the equipment operation
manual in the proper way to disinfect the
equipment. The manual should list the preferred cleaning method and what cleaners
can be used. Also be aware that cleaners can
sometimes discolor, etch, or soften materials
such as plastics often used in equipment cases.
Always test cleaners in an inconspicuous area
before using.
©University of Vermont, Rev. 2 – Confidential
23
CHAPTER 5: Electrical safety
Electrical safety is an area of concern related to
medical devices. Electrical shock can cause disruptions during healthcare procedures, injury,
and death. Physiological effects range from a
tingling sensation to serious burns and electrocution. Excitable human tissue is very sensitive
to current in the frequency range of electrical
power systems worldwide—50-50 Hertz. Figure
4 shows the effects of current flowing from one
skin contact point to another. Macroshock is the
term applied when electrical current is applied
externally.
The electrical safety issue takes on added
significance related to electrically-susceptible
patients. For cardiac procedures, electrically
conductive catheters may be placed into the
heart while the patient is connected to medical equipment. The skin is a high electrical
resistance, but internal body components such
as blood and muscle are a low electrical resistance. Currents as low as 20 microamps can
cause ventricular fibrillation in experiments
conducted with dogs when a conductor made
direct contact to the heart. Microshock is the
term used to describe direct shocks to the cardiac muscle.
From the data for macroshock and microshock, limits have been established for leakage
current. These limits are contained in various
standards worldwide. In the case of equipment
designed for low resistance, direct contact with
patients including indwelling catheters, electrical isolation design techniques are applied
to reduce the current flowing to the patient to
microamperes even at line voltage levels. Even
under device failure or short circuit conditions,
the patient is protected from microshock. These
techniques may utilize isolation transformers
and optical circuits. Thus, electrical safety standards specify low microampere limits for direct
patient contact equipment.
Burns
Cardiac fibrillation
Muscle contraction, suffocation
Let-go current
Sensitivity limit
1 mA
10 mA
100 mA
1A
Figure 4. Effects of current flowing from one skin contact point to another.
24
©University of Vermont, Rev. 2 – Confidential
10 A
100 A
To reduce leakage current to negligible levels,
chassis grounding is utilized to shunt any leakage or fault current to ground—not to the patient
or staff. Figure 5 shows pictorially and schematically the hazard current from the electrical
failure being safety shunted to ground through
this alternative pathway. Effective grounding
can only be achieved with very low resistance
pathways to ground on the order of tenths of an
ohm. Grounding is another measurement specified in electrical safety standards for medical
devices.
The basic electrical safety tests are:
1. Visual inspection of cables, plugs and
connectors
2.Measurement of ground wire resistance
3.Measurement of chassis and patient lead/
contact isolation
Other tests may be required depending upon
the country, state/province/department, or
local codes.
230 V
50 Hz
Fuses
230 V
10 Ω
~22 A
~11 V
0.5 Ω
~22 A
0.5 to 200 kΩ
.055 to 22 mA
Figure 5. Hazard current from electrical failure being safety shunted to ground through an
alternative pathway.
©University of Vermont, Rev. 2 – Confidential
25
Electrical safety standards
The terminology used in IEC 60601.1 includes
Protective earth resistance
Earth leakage current
Enclosure leakage current
Patient leakage current
Patient auxiliary current
Mains on applied part (MAP)
Electrotechnical Commission (IEC) based in
Europe are organizations that provide standards
worldwide in partnership with the World Trade
Organization. These standards include those
for electromedical equipment. There are general and specific standards for medical device
electrical safety.
The primary standard for medical devices
has been IEC 60601. General requirements for
protection against electric shock hazards are
covered in IEC 60601.1, Section 3.
To represent the impedance of a patient, the
test load in Figure 6 has been developed.
Leakage current measuring devices use this
impedance circuit for measurements.
Electrical safety standards have been developed •
•
in the United States, European countries, and
other parts of the world. The standards differ in •
•
criteria, measurements, and protocol.
•
The International Organization for Stan•
dardization (ISO) and the International
In this standard, each instrument
has a class.
• Class I – Live part covered by basic
insulation and protective earth
• Class II – Live part covered by
double or reinforced insulation
• Class IP – Internal power supply
Each patient applied part or patient
lead has a type.
• Type B – Patient applied part
earthed
• Type BF – Patient applied part
floating (surface conductor)
• Type CF – Patient applied part
floating for use in direct contact
with the heart
26
©University of Vermont, Rev. 2 – Confidential
10,000 Ω
0.015 µF
Input
1,000 Ω
Figure 6. Impedance of a patient test load.
Leakage measurements (IEC 60601.1, Section 3, Clause 19 limits have been developed
for equipment types and measurements. NC
is normal conditions and SFC is single fault
conditions. Some of the measurements are only
applicable to manufacturer design testing.
Millivoltmeter
Leakage
current (µA)
Type B NC
SFC
Type BF NC
SFC
Type CF NC
SFC
Earth
leakage
current
mA
5
10
5
10
5
10
Enclosure
leakage
current
(µA)
100
500
100
500
100
500
Patient
Patient
Patient leakage
leakage
leakage
current mains
current AC current DC
on applied
(µA)
(µA)
(µA)
100
10
—
500
50
—
100
10
—
500
50
5000
10
10
—
50
50
50
Other important points about IEC 60601.1
are the use of up to 25 amperes AC for protective earth testing, leakage current is measured
at 110 % of mains voltage, and performance of
dielectric strength/insulation testing.
A new IEC standard is used for medical
device testing in hospitals. IEC standards 62353
applies to testing of medical equipment and
medical electrical systems, which comply with
IEC 60601-1. IEC 62353 was developed because
IEC 60601.1 is a type-testing standard with no
risk management criteria and is impractical for
testing in the hospital environment.
IEC 62353 tests include those prior to use on
patients, during schedule periodic testing, and
after repair. Thus, this standard is for hospitals and does not address equipment design.
In Annex E of the document, the manufacturer
is requested to provide information on testing
interval and procedure based on risk, typical
usage, and device history. Minimum interval
requirements for life support and other critical
equipment is set at 24 months.
In the United States, there are several primary
and secondary organizations setting standards:
1.National Fire Protection Association
(NFPA) - NFPA 99, Standard for Healthcare
Facilities is the primary standard addressing
electrical safety testing affecting healthcare
institutions. Other publications are NFPA 70,
National Electrical Code, and NFPA 70E,
Electrical Safety in the Workplace.
Patient
auxiliary
current
(µA)
100
500
100
500
10
50
Patient
Patient
auxiliary
auxiliary
current DC current AC
(µA)
(µA)
10
100
50
500
10
100
50
500
10
10
50
50
2.Association for the Advancement of Medical Instrumentation (AAMI) - ANSI/AAMI
ES1, Safe Current Limits for Electromedical
Apparatus is another commonly accepted
standard.
3.Underwriters Laboratories (UL) - UL544,
Medical Equipment requirements is a standard for manufacturers, not hospitals.
These standards may be referenced by accreditation, code or regulatory organizations such as
the Joint Commission, Occupational Health and
Safety Administration or other organizations
monitoring healthcare institutions in the United
States. The Appendices describe the above
standards and test setups.
Global harmonization of standards has lead to
the development of world wide standards. After
the deadlines below, equipment must be certified to the IEC60601-1 standard or the device
cannot be sold in that country.
• USA uses UL2601-1
– The deadline was December 31, 2004
• Europe uses EN60601-1
– The deadline was June 13, 1998
• Canada uses CAN/CSA-C22.2 No. 601.1-M90
– The deadline was January 1, 2000
©University of Vermont, Rev. 2 – Confidential
27
Electrical safety testing
Testing requirements and sequence
according to IEC 62353 Annex C are
shown below. Only measurement
equipment that meets IEC 61010-1
should be used.
The sequence outlined in Figure
7 should be followed. For example,
protective earth resistance should
be measured prior to leakage current measurements.
Start
Selection of the test
see 4.1
Visual inspection
Insulation resistance
Functional test
see 5.2
Protective earth resistance
see 5.3.1
Leakage current
see 5.3.3
see 5.4
Reporting of results
see 5.1
Evaluation
see 5.3.2
see 5.2
Check and prepare
for normal use
see 5.2
Figure 7. Testing requirements and sequence according to IEC 62353 Annex C.
General connections to an electrical safety
analyzer (ESA) are shown in Figure 8. Consult
the operational manual for specifics for your ESA.
Documentation requirements for IEC 62353
include:
• Identification of the testing group (hospital
department, independent service organization, manufacturer)
• Names of the persons, who performed the
testing and evaluation(s)
• Identification of the equipment/system (e.g.
type, serial number, inventory number) and
the accessories tested
• Tests and measurements
• Date, type, and outcome/results of
– Visual inspections
– Measurements (measured values,
measuring method, measuring equipment)
– Functional testing according to 5.4
• Concluding evaluation
• Date and signature of the individual who
performed the evaluation
Computerized record-keeping systems are
greatly preferred for data storage, search,
review, and analysis. Note the device fields
must be standardized.
To protective
earth or
enclosure
R
N
Pro
01
N
RN
ON
S
2
5
8
0
3
6
Figure 8. General connections to an electrical safety analyzer.
28
©University of Vermont, Rev. 2 – Confidential
Electrical safety procedure
Estimated time: 5 minutes
Equipment information
Control number:____________________________________ Hospital:_ __________________________________________
Manufacturer:______________________________________ Model:_____________________________________________
Serial number:_ ____________________________________ Location:___________________________________________
Test information
Technician:________________________________________ Date:_______________________________________________
Test type: Incoming_ ________ Post repair_________
Test equipment needed:Fluke Biomedical ESA620 or equivalent
Test Result
Pass
Fail
N/A
Physical condition
Device is clean and decontaminated
No physical damage to case, display, mounts, cart, or components
Switches and controls operable and correctly aligned
Display intensity adequate for daytime use
Control numbers, labeling, and warnings present and legible
Fuse rating is appropriate
Power cord, accessory cables, charger, patient cables, connectors
Integrity of mechanical parts
Electrical safety
Ground wire resistance
Current in µA
Equipment leakage – alternative method
For accessible conductive parts of Class I equipment connected or not connected to the protective earth conductor
For Class II ME equipment
Equipment leakage – direct or different method
Equipment leakage current for accessible conductive parts
of Class I ME equipment connected or not connected to the
protective earth conductor
Equipment Leakage current for Class II ME equipment (NC)
Applied part leakage current – alternative method (a.c.)
Applied part leakage current of applied part
Applied part leakage current – direct method (a.c.)
Total patient leakage current mains voltage on applied part
Insulation test (optional) 500 V dc applied
Criteria IEC 62353
0.3 W
Applied part
Type
Type
Type
B
BF
CF
1000
1000
1000
500
500
500
500
500
500
100
100
100
—
< 5000
< 50
—
5000
< 2 MW
100
Tested by:_ ________________________________________ Date:_______________________________________________
©University of Vermont, Rev. 2 – Confidential
29
To grounded portion
of enclosure
Figure 9. ESA601 connected to a device under test.
Physical condition
Verify the case integrity and look for damage.
Ensure the device is not contaminated. Check
the controls, indicators, and displays. Verify
the labeling is appropriate, not damaged and
legible. Check the fuse has the proper rating.
Visually inspect the power cord, plug, any
cables, connectors, chargers, or other external
connections. Verify any mechanical parts are in
good condition.
Electrical safety analyzer (ESA) setup
Place controls in startup mode (e.g. ESA 620
function switch to OFF). Insert measurement
cables into the ESA. Plug the ESA into the
power receptacle and turn on. Ensure the line
voltage is appropriate as read from the ESA.
Note: All tests below should be performed with the device
OFF and ON. The highest reading should be documented or
used for exception reporting.
30
©University of Vermont, Rev. 2 – Confidential
Typical electrical safety test set-up.
DEVICE UNDER TEST
DUT_L1
S5
L1
APPLIED
PART
L2
OPEN
MAINS
DUT_L2
L2
S1
EARTH
OPEN
PE
S2
GREEN
TERMINAL
FE
DUT_PE
S3
CONDUCTIVE PART
CURRENT
SOURCE
1 A DC
_
TEST LEAD
OHM
+
RED TERMINAL
Figure 10. Protective earth resistance test configuration.
Switch
Diagram Reference ESA601 Name
S1
Neutral
S2
Polarity
S3
Earth
S5
—
Ground wire resistance
Action
—
—
Open
—
Insert the medical equipment electrical power
plug into the ESA power receptacle. If this is a
permanently-wired device, a ground connection at the same potential as the device under
test needs to be located. A ground wire must be
attached to the ESA ground input. Devices that
are located in rooms with isolated power should
be tested on grounded distribution systems.
Zero the test lead resistance by connecting
the RED lead to the ESA ground point (e.g.
ESA 601—PE TEST POINT) and pressing the
Zero button.
Attach the RED ground lead to the device
under test (DUT) chassis grounding point.
Activate the control for ground wire resistance
measurement and record the reading or document by exception only.
©University of Vermont, Rev. 2 – Confidential
31
DEVICE UNDER TEST
DUT_L1
APPLIED
PART
+
DUT_L2
500 V
_ DC
MD
MEG
OHMS
DUT_PE
EARTH
OPEN
FE
CONDUCTIVE PART
S3
PE
Figure 11. Mains insulatioin resistance test configuration.
Insulation tests
Remove the red test lead from the chassis
grounding point. Switch the function switch to
measure insulation first from earth ground, then
from the patient applied part.
32
©University of Vermont, Rev. 2 – Confidential
Switch
Diagram Reference ESA601 Name
S3
Earth
Action
Open
DEVICE UNDER TEST
DUT_L1
S5
L1
APPLIED
PART
L2
OPEN
MAINS
DUT_L2
L2
S1
S2
EARTH
OPEN
DUT_PE
FE
S3
CONDUCTIVE PART
MD
µA
APPLIED PART
PE
S4
Figure 12. Earth leakage current test configuration.
Switch
Diagram Reference ESA601 Name
S1
Neutral
S2
Polarity
S3
Earth
Applied parts
S4
selection knob
S5
—
Earth electrical leakage current
Action
Variable
Variable
Open
Variable
—
Measure the earth leakage current by switching the function switch to the Earth Leakage
setting and following the ESA procedure. Make
measurement without the red lead attached to
the device. The measurement should be made
under Normal and Reverse Polarity. Ensure the
ESA is not quickly switched between Normal
and Reverse Polarity. Record the reading or
document by exception.
©University of Vermont, Rev. 2 – Confidential
33
DEVICE UNDER TEST
DUT_L1
S5
L1
APPLIED
PART
L2
OPEN
MAINS
DUT_L2
L2
S1
S2
EARTH
OPEN
DUT_PE
FE
S3
CONDUCTIVE PART
MD
TEST LEAD
µA
APPLIED PART
PE
S4
Figure 13. Enclosure leakage current test configuration.
Chassis electrical leakage current
Measure the chassis leakage current following
the ESA procedure. Make measurement with
the red lead attached to the device. The
measurement should be made under Normal
and Reverse polarity. Ensure the ESA is not
quickly switched between Normal and Reverse
polarity. Record the reading or document by
exception only.
Switch
Diagram Reference ESA601 Name
S3
Earth
Chassis/enclosure leakage current test.
34
©University of Vermont, Rev. 2 – Confidential
Action
Open
DEVICE UNDER TEST
DUT_L1
S5
L1
APPLIED
PART
MAINS
L2
OPEN
DUT_L2
L2
S2
S1
EARTH
OPEN
DUT_PE
FE
S3
CONDUCTIVE PART
LEAD SELECT
MD
PE
µA
S4
Figure 14. Patient leakage current test configuration.
Switch
Diagram Reference ESA601 Name
S1
Neutral
S2
Polarity
S3
Earth
Applied parts
S4
selection knob
S5
—
Patient applied part leakage current
Action
Variable
Variable
Variable
Variable
—
Ensure the patient applied leads are attached to
the appropriate connectors on the ESA (e.g. see
Figure 8) per the ESA manual. Switch the function switch to Patient Lead Leakage or Applied
Parts Leakage per the ESA instructions. Make
measurements with the red lead attached to
the device. The measurement should be made
under Normal and Reverse polarity. Ensure
the ESA is not quickly switched between
Normal and Reverse polarity. The test should
be performed by selecting all leads connected
together and individual leads measured in
respect to ground. Record the reading or document by exception only.
Chassis/enclosure leakage current test.
©University of Vermont, Rev. 2 – Confidential
35
DEVICE UNDER TEST
DUT_L1
S5
L1
APPLIED
PART
L2
OPEN
MAINS
DUT_L2
L2
S1
S2
EARTH OPEN
DUT_PE
FE
S3
CONDUCTIVE PART
TEST LEAD
RED TERMINAL
PE
S6
1:1.1
MD
L1
µA
LEAD SELECT
L2
ISOLATION
TRANSFORMER
S4
Figure 15. Mains on applied parts leakage current test configuration.
Lead isolation test/mains on applied
parts leakage
This test applies the power line or mains
voltage to the patient applied parts so caution should be taken in not to come in contact
with the patient applied parts during this test.
Ensure the Patient Applied Leads are attached
to the appropriate connectors on the ESA (e.g.
see Figure 8) per the ESA manual. Switch the
function switch to Patient Lead Leakage or
Applied Parts Leakage per the ESA instructions. Make measurements with the RED lead
attached to the device. The measurement
should be made under Normal and Reverse
polarity. Ensure the ESA is not quickly switched
between Normal and Reverse polarity. The test
should be performed by selecting ALL leads
connected together and individual leads measured in respect to ground. Record the reading
or document by exception only.
36
©University of Vermont, Rev. 2 – Confidential
Switch
Diagram Reference ESA601 Name
S1
Neutral
S2
Polarity
S3
Earth
S4
M.A.P./500 V
S5
—
Applied parts
S6
selection knob
Return to service
Before returning to use, return any controls that
were adjusted to their original settings. Plug in
the power cord to ensure the battery remains
charged.
Action
Closed
Variable
Closed
Variable
—
Variable
CHAPTER 6: Equipment
inspection procedures
This section contains preventive maintenance
and inspection procedures for common medical equipment. Each procedure will list the
necessary test equipment, estimated time for
inspection, and an inspection check list that
can be used for documentation. The checklist is
broken up into four categories, physical condition, electrical safety, preventive maintenance,
and performance inspection. A test form for
general equipment is given for reference.
©University of Vermont, Rev. 2 – Confidential
37
General equipment procedure
Estimated time: 20 minutes
Equipment information
Control number:____________________________________ Hospital:_ __________________________________________
Manufacturer:______________________________________ Model:_____________________________________________
Serial number:_ ____________________________________ Location:___________________________________________
Test information
Technician:________________________________________ Date:_______________________________________________
Test type: Incoming_ ________ Post repair_________
Test equipment needed:ISA 601 Electrical Safety Analyzer (or equivalent)
Other equipment as necessary
Test Result
Pass
Fail
N/A
Physical condition
Device is clean and decontaminated
No physical damage to case, display, mounts, cart, or components
Switches and controls operable and correctly aligned
Display intensity adequate for daytime use
Control numbers, labeling, and warnings present and legible
Inlets and hoses
Power cord, accessory cables, charger
Filters and vents clean
Electrical safety
Ground wire resistance
Chassis leakage
Patient leakage current
Patient lead leakage current – isolation test
(mains on patient applied part)
Insulation test (optional) 500 V
Preventive maintenance
Calibrate to manufacturer’s specifications
Check all fluid levels
Replace battery every 24 months
Clean exterior
Lubricate as required
Complete model-specific preventive maintenance
Performance testing
Verify unit operates within manufacturer’s specifications
Operates on battery power
Audible alarms
Visual alarms
Remote alarms
Complete model-specific performance testing
38
©University of Vermont, Rev. 2 – Confidential
< 0.3 W
< 100 µA NC
< 500 µA SFC
< 100 µA B and BF
< 10 µA CF
< 100 µA BF
< 10 µA CF
< 2 MW
Physical condition and electrical safety are
general maintenance requirements that apply
to all medical equipment. This information will
appear on all checklists and should be performed during all inspections. These general
maintenance tasks will not be discussed in the
specific device procedures.
• Display intensity adequate for daytime
•
Physical condition
These tasks check the physical condition of the
equipment. These tasks should be performed for
all medical equipment.
• Device is clean and decontaminated:
Ensure the equipment has been cleaned
following patient use. Examine the exterior of the unit for cleanliness. If there are
signs of blood or other spilled liquids, the
device should be cleaned per the hospital’s
equipment disinfection policy and the manufacturer’s approved cleaning instructions.
• No physical damage to case, display,
mounts, cart, or components: Examine
the device for general physical condition.
Ensure plastic housings are intact and that
all assembly hardware is present and tight.
Examine the exterior for cracks and chips.
Check that shelves and brackets are secure.
Check the condition of castors and ensure
they turn and swivel as appropriate. Check
the operation of the brakes.
• Switches and controls operable and correctly aligned: Ensure all switches, buttons,
knobs, and other controls are operable. Verify
knobs are properly aligned with markings on
the control panel.
•
•
•
use: Verify all lights, LEDs, and displays
can be easily seen in ambient light. Displays
should be able to be read easily under
normal operating conditions.
Control numbers, labeling, and warnings present and legible: Ensure all control
numbers, device labels, warning labels, or
other labels can be easily read. Verify control
numbers and inspection stickers do not cover
up any cautions, warning labels, or other
device information.
Inlets and hoses: Check the condition of all
external tubing and hoses. Ensure they are
not cracked or kinked. Check the general
condition of the connectors. Look for damage
such as stripping or cross threading. Verify
that connectors are tight.
Power cord, patient and accessory cables,
charger: Check the physical condition of the
power cord. Look for cuts, frayed wires, and
missing insulation. Check the physical condition of the plug, looking for bent or loose
prongs. Ensure strain reliefs are intact. Check
the physical condition of cables, looking for
frayed wires and loose or bent connections.
Ensure connections are clean and free of corrosion and build up such as gel or hair. Verify
that disposable accessories are within their
expiration dates.
Filters and vents clean: Ensure filters and
vents are free of dust and other build up. Pay
special attention to cooling fans. Clean or
replace filters as necessary.
©University of Vermont, Rev. 2 – Confidential
39
Electrical safety
Preventive maintenance
These tasks check the electrical safety of the
equipment and are important to prevent a shock
to the patient. Follow the procedures given in
Chapter 5, Electrical Safety. Measure ground
wire resistance, chassis leakage. Measure
current leakage to patient leads if applicable.
Electrical safety should be checked for all
medical equipment.
• Device specific tasks
Preventive maintenance and performance
inspection include maintenance tasks and
testing criteria that are specific for each
device type. These tasks should be performed in addition to the general physical
and electrical safety tests.
As a general guideline, rechargeable batteries should be replaced every 24 months.
Certain batteries in low-use situations such
as automatic external defibrillators may last
longer. The manufacturer battery replacement schedule should be followed if provided
in the documentation. Electrical safety
checks should be performed following a battery replacement. Always verify the operation
of the device before replacing the battery. A
functional test should be performed following
battery replacement.
Complete model-specific preventive maintenance: Refer to the monitor’s service manual
for preventive maintenance tasks specific to the
device. Complete the preventive maintenance
per manufacturer’s procedure.
These procedures are written for general device
types. Check the equipment’s service manual
for any additional model-specific tests and
maintenance.
40
©University of Vermont, Rev. 2 – Confidential
Performance inspection
Complete model-specific performance
testing: Refer to the service manual for performance inspection tasks specific to the device.
Complete the performance inspection per
manufacturer’s procedure.
Returning the device to service: Upon
completion of maintenance, all controls should
be returned to their previous clinical settings. Return all alarm limits adjusted during
the functional test to their original locations.
Adjust the alarm volume to an audible level.
The alarms should be able to be heard easily in
the normal operating environment. If the device
will not immediately be returned to use, make
sure the power cord is plugged in to ensure the
battery remains charged and the equipment is
ready for use.
Apnea monitor
Apnea is defined as the absence of breathing.
An apnea monitor is designed to detect this
condition. The apnea monitor senses by measuring changes in the electrical impedance of
the thoracic cavity during respiration. Typically,
electrodes are attached to the patient with lead
wires connected to the monitor. The monitor
will usually display the patient’s heart rate and
respiration rate, with the limits of these parameters adjustable by the user. An audible alarm
will sound when the alarm limits are exceeded
or if the monitor or when an apnea condition is
detected. These types of monitors are typically
used to monitor high-risk infants.
Recommended functional test frequency:
semiannual.
Sample risk assessment
Criteria – choose 1 rating from each category
Clinical function
No patient contact
Device may make contact with patient but function is non-critical
Device is used for patient diagnosis, or direct monitoring
Device is used to deliver direct treatment to the patient
Device is used for a life support
Physical risk
Device poses no appreciable risk due to failure
Device failure will result in low risk
Device failure will result in inappropriate therapy, misdiagnosis, or loss of monitoring
Device failure could result in severe injury to, or death of, patient or user
Problem avoidance probability
Maintenance or inspection would not impact reliability of the device
Common device failure modes are unpredictable or not very predictable
While common device failure modes are not very predictable, device history indicates that TSP
testing frequently detects problems
Common device failure is predictable and can be avoided by preventive maintenance
Specific regulatory or manufacturers requirements dictate preventive maintenance or testing
Incident history
No significant History
A significant history of incidents exists
Manufacturers/regulatory requirements for specific schedules
No requirements
There are requirements for testing independent of a numerical rating system
Total Score:
Assignment: 0.0x 0.5x 1x 2x 3x 4x (times per year tested)
Weight
Score
1
2
3
4
5
3
1
2
3
4
4
1
2
3
3
4
5
1
2
1
2
2
1
13
2
©University of Vermont, Rev. 2 – Confidential
41
Apnea monitor procedure
Estimated time: 25 minutes
Equipment information
Control number:____________________________________ Hospital:_ __________________________________________
Manufacturer:______________________________________ Model:_____________________________________________
Serial number:_ ____________________________________ Location:___________________________________________
Test information
Technician:________________________________________ Date:_______________________________________________
Test type: Incoming_ ________ Post repair_________
Test equipment needed:ISA 601 Electrical Safety Analyzer (or equivalent)
MPS450 Multiparameter Simulator (or equivalent)
Stopwatch or watch with a second hand
Test Result
Pass
Fail
N/A
Physical condition
Device is clean and decontaminated
No physical damage to case, display, mounts, cart, or components
Switches and controls operable and correctly aligned
Display intensity adequate for daytime use
Control numbers, labeling, and warnings present and legible
Inlets and hoses
Power cord, accessory cables, charger
Filters and vents clean
Electrical safety
Ground wire resistance
Chassis leakage
Patient leakage current
Patient lead leakage current – isolation test
(mains on patient applied part)
Insulation test (optional) 500 V
< 0.3 W
< 100 µA NC
< 500 µA SFC
< 100 µA B and BF
< 10 µA CF
< 100 µA BF
< 10 µA CF
< 2 MW
Preventive maintenance
Replace battery every 24 months
Complete model-specific preventive maintenance
Performance testing
Verify unit operates on battery
Heart rate accuracy
Respiratory rate accuracy
Apnea alarm function
Apnea alarm delay time
60 BPM rejection of ECG artifact
Alarm function
Complete model-specific performance testing
42
©University of Vermont, Rev. 2 – Confidential
±5%
±5%
± 20 %
Physical condition
Set the heart rate on the MPS450 to 120 bpm.
Press
‘1’ (NSR), and then use the soft keys
Check the physical condition of the device, as
marked
‘UP’ and ‘DOWN’ to change the heart
described in the General Equipment Procedure.
rate to 120 bpm.
Set the respiration rate to 60 breaths/min.
Electrical safety
Press ‘2’ (RESP) and then use the soft keys to
Perform electrical safety checks as described in change the respiration rate.
Chapter 5, Electrical Safety. Check ground wire
The heart rate and respiration rate should
resistance, chassis leakage, and lead leakage.
be within 5 % of the set rates. For a simulated
heart rate of 120 bpm, the displayed rate should
Preventive maintenance
be between 114 bpm and 126 bpm. For a resReplace battery: The battery should be
piration rate of 60 breaths/min, the displayed
replaced every 24 months. Replace if necessary. respiration rate should be between 57 breaths/
Complete model-specific preventive mainmin and 63 breaths/min.
tenance: Refer to the monitor’s service manual
Apnea alarm function: On the MPS450,
for preventive maintenance tasks specific to the press the button marked ‘2’ (RESP). To simulate
device. Complete the preventive maintenance
an apnea condition, press the rightmost soft
per manufacturer’s procedure.
key button ‘APNE’. Use the soft keys marked
‘PREV’ and ‘NEXT’ to cycle through the apnea
Performance inspection
durations and select ‘CONTINUOUS’. Press the
soft key labeled ‘RUN’ to start the apnea condiVerify unit operates on battery: Check that
the ac power indicator is lit up when the power tion. To stop the apnea condition and return to
normal respiration, press the soft key labeled
cord is plugged into an outlet. Unplug the ac
‘STOP’. The alarm should sound for an apnea
power cord and perform the remainder of the
condition. Most monitors will alarm within
functional test on battery power. The ac power
30 seconds.
indicator should go out when the power cord
Apnea alarm delay time: Simulate an apnea
is unplugged and the battery indicator should
light up. Be sure to plug the power cord back in condition as described in the step above. Set
the apnea duration to continuous. Start the
at the conclusion of the test.
apnea simulation by pressing the soft key
Heart rate accuracy, respiratory rate
accuracy: Connect the patient leads to the lead labeled ‘RUN’ and begin timing on the stopwatch. Stop timing when the apnea alarm
connectors on the MPS450. The respiratory
sounds. Press the soft key labeled ‘END’ to
signal from the MPS450 is sent to the left
return to normal respiration and silence the
arm (LA) lead on the default setting. Change
alarm. Compare the actual time for the alarm to
the respiratory signal to the left leg (LL) if
sound with the monitor’s alarm delay. The time
necessary. From the main menu, press ‘0’
should be with 20 % of the delay setting. For
(SETUP), press the leftmost blue arrow key for
an apnea delay of 30 seconds, the alarm should
‘RESP’, and then again for ‘LEAD’. This will
sound within 36 seconds.
toggle the respiratory lead from LA to LL. For
most purposes, the respiratory lead can be left
on left arm.
©University of Vermont, Rev. 2 – Confidential
43
60 bpm rejection of ECG artifact: This test
checks the coincidence circuit designed to
reject detected breaths that may be erroneously
detected QRS complexes from the ECG signal.
Press ‘2’ (RESP) to enter the Respiration
menu on the MPS450. Set the respiration rate
to 60 breaths/min. Press ‘1’ (NSR) to enter the
Normal Sinus Rhythm menu. Set the heart
rate to 60 bpm. The monitor should alarm. Set
the heart rate back to 120 bpm.
Alarm function: Check that all alarms are
functional and that the volume is adequately
loud. Ensure appropriate visual indicators are
functioning.
Check heart rate and respiration rate alarms
separately. Note the alarm settings on the monitor. Press ‘1’ (NSR) on the MPS450 to enter the
Normal Sinus Rhythm menu on the MPS450.
Bring the heart rate down to just below the
monitor’s low heart rate limit. The alarm should
sound. Increase the heart rate above the low
alarm point. Clear the alarm if necessary.
Increase the heart rate to just above the high
heart rate limit. Note that the alarm sounds
when the heart rate increases beyond the high
alarm limit. Set the heart rate back to 120 bpm
and clear any alarms.
Press ‘2’ (RESP) to enter the Respiration
menu. Repeat the process for the respiration
rate as done for the heart rate above. Ensure
44
©University of Vermont, Rev. 2 – Confidential
the monitor alarms when the respiration rate
falls below the set low respiration limit and
above the high respiration limit. Set the respiration rate to 60 breaths/min and clear any
alarms.
Check the function of the accidental power off
alarm. Apnea monitors used on infants are often
equipped with a ‘sibling alarm’ that sounds
when the monitor is turned off accidentally.
These monitors will require a key sequence
to power off without sounding an alarm, such
as holding the reset button while turning the
power off. Check the operator’s manual for the
device’s specific operation. To check the alarm,
press the power button without performing the
power-off button sequence. The monitor should
shut down, but an alarm will sound. Follow the
instructions in the operator’s manual to clear
this alarm.
Complete model-specific performance
testing: Refer to the service manual for performance inspection tasks specific to the device.
Complete the performance inspection per
manufacturer’s procedure.
Return to service: Before returning to use,
return any alarms that were adjusted to their
original settings. Ensure the volume of the
audible alarms is loud enough to be heard in
normal operating conditions. Plug in the power
cord to ensure the battery remains charged.
Aspirator
An aspirator is sometimes known as a suction
pump or a vacuum. It uses suction to remove
gas, fluid, tissue, or other materials from a
body cavity. An aspirator typically consists of a
suction pump, a collection container, tubing, a
pressure gauge, and a means for adjusting the
vacuum pressure. The motorized suction pump
creates a vacuum in the suction tubing. When
the tubing is inserted into a body cavity, material is sucked through the tubing and deposited
into the collection container.
Recommended functional test frequency:
annual.
Sample risk assessment
Criteria – choose 1 rating from each category
Clinical function
Weight
No patient contact
1
Device may make contact with patient but function is non-critical
2
Device is used for patient diagnosis, or direct monitoring
3
Device is used to deliver direct treatment to the patient
4
Device is used for a life support
5
Score
4
Physical risk
Device poses no appreciable risk due to failure
1
Device failure will result in low risk
2
Device failure will result in inappropriate therapy, misdiagnosis, or loss of monitoring
3
Device failure could result in severe injury to, or death of, patient or user
4
2
Problem avoidance probability
Maintenance or inspection would not impact reliability of the device
1
Common device failure modes are unpredictable or not very predictable
2
While common device failure modes are not very predictable, device history indicates that TSP
testing frequently detects problems
3
Common device failure is predictable and can be avoided by preventive maintenance
4
Specific regulatory or manufacturers requirements dictate preventive maintenance or testing
5
2
Incident history
No significant history
1
A significant history of incidents exists
2
1
Manufacturers/regulatory requirements for specific schedules
No requirements
1
There are requirements for testing independent of a numerical rating system
2
1
Total Score:
10
Assignment: 0.0x 0.5x 1x 2x 3x 4x (times per year tested)
1
©University of Vermont, Rev. 2 – Confidential
45
Aspirator procedure
Estimated time: 20 minutes
Equipment information
Control number:____________________________________ Hospital:_ __________________________________________
Manufacturer:______________________________________ Model:_____________________________________________
Serial number:_ ____________________________________ Location:___________________________________________
Test information
Technician:________________________________________ Date:_______________________________________________
Test type: Incoming_ ________ Post repair_________
Test equipment needed: ISA 601 Electrical Safety Analyzer (or equivalent) DPM 4 Pressure Meter (or equivalent)
Stopwatch or watch with a second hand Tubing and connectors to connect to DPM 4
Test Result
Pass
Fail
N/A
Physical condition
Device is clean and decontaminated
No physical damage to case, display, mounts, cart, or components
Switches and controls operable and correctly aligned
Display intensity adequate for daytime use
Control numbers, labeling, and warnings present and legible
Inlets and hoses
Power cord, accessory cables, charger
Filters and vents clean
Electrical safety
Ground wire resistance
Chassis leakage
Patient leakage current
Patient lead leakage current – isolation test
(mains on patient applied part)
Insulation test (optional) 500 V
< 0.3 W
< 100 µA NC
< 500 µA SFC
< 100 µA B and BF
< 10 µA CF
< 100 µA BF
< 10 µA CF
< 2 MW
Preventive maintenance
Replace battery every 24 months
Replace filters
Lubricate motor
Complete model-specific preventive maintenance
Performance testing
Verify unit operates on battery
Vacuum gauge accuracy
Maximum vacuum
Thoracic, low volume:
Emergency, surgical, tracheal, uterine:
Breast pump:
Vacuum rise time
Thoracic:
Emergency, Surgical, Tracheal:
Uterine:
Breast pump:
Complete model-specific performance testing
46
©University of Vermont, Rev. 2 – Confidential
± 10 %
> 40 mmHg
> 400 mmHg
> 200 mmHg
< 4 sec/30 mmHg
< 4 sec/300 mmHg
< 3 sec/30 mmHg
< 2 sec/150 mmHg
Physical condition
Performance inspection
Check the physical condition of the device, as
described in the General Equipment Procedure.
Verify unit operates on battery: Check that
the ac power indicator is lit when the power
cord is plugged into an outlet. Unplug the ac
power cord and perform the remainder of the
Electrical safety
Perform electrical safety checks as described in functional test on battery power. The ac power
Chapter 5, Electrical Safety. Check ground wire indicator should go out when the power cord
is unplugged and the battery indicator should
resistance and chassis leakage.
light. Be sure to plug the power cord in at the
conclusion of the test.
Preventive maintenance
Vacuum gauge accuracy: Turn on the DPM 4.
Replace battery: The battery should be
The DPM 4 defaults to pressure units in mmHg.
replaced every 24 months. Replace if necessary.
If the pressure gauge is in another unit, press
Replace filters: Inspect filters and replace as
the soft key labeled ‘UNIT’ and then select the
necessary. Refer to the device service manual
desired units. Most aspirators measure vacuum
for filter replacement.
in mmHg. The DPM 4 should read ‘0.0’ mmHg
Lubricate motor: Follow the manufacturer’s
when the pressure port is open to atmosphere.
instructions in the service manual for lubricatConnect the aspirator to the pressure port on
ing the pump motor. Not all motors will need to
the front of the DPM 4. This connector is a male
be lubricated.
leur lock connector. The connection from the
Complete model-specific preventive mainaspirator should come from the port intended for
tenance: Refer to the monitor’s service manual
the patient tubing.
for preventive maintenance tasks specific to the
Turn on the aspirator and adjust the vacuum
device. Complete the preventive maintenance
to a low setting. Slowly increase the vacuum
per manufacturer’s procedure.
across its range up to the maximum setting.
Compare the vacuum gauge reading with the
measured vacuum from the DPM 4. The gauge
reading should be within 10 % of the measured vacuum. For a vacuum gauge reading of
300 mmHg, the measured vacuum should be
between 270 mmHg and 330 mmHg.
Maximum vacuum: Disconnect the suction
tubing from the DPM 4 and occlude the suction
tubing. The tubing can be occluded with a stopcock in the off position or by simply covering the
tubing with your thumb. Adjust the suction to its
maximum setting. The accuracy of the vacuum
gauge must be verified prior to this test. The
values on the test form are guidelines based on
common practice. Refer to the aspirator’s operator manual for its actual performance capability.
If the measured vacuum is low, look for air leaks,
particularly in collection bottle caps and hoses.
Release the occlusion on the tubing.
Verifying aspirator vacuum accuracy with the DPM 4.
©University of Vermont, Rev. 2 – Confidential
47
Vacuum rise time: With the aspirator set to
its maximum setting, occlude the suction tubing.
Use a stopwatch or a watch with a second
hand to measure the time it takes to reach the
vacuum level indicated on the test form. Thoracic aspirators should reach 30 mmHg in less
than 4 seconds. Emergency, surgical, or tracheal
aspirators should reach 300 mmHg in less than
4 seconds. Uterine aspirators should reach
300 mmHg in less than 3 seconds. Breast pumps
should reach 150 mmHg in less than 2 seconds.
Again, these are general guidelines based on
48
©University of Vermont, Rev. 2 – Confidential
common practice. Refer to the aspirator’s operator manual for its actual performance capability.
Complete model-specific performance
testing: Refer to the service manual for performance inspection tasks specific to the device.
Complete the performance inspection per
manufacturer’s procedure.
Return to service: Before returning to use,
return the suction setting to its original setting.
Plug in the power cord to ensure the battery
remains charged.
Cardiac output unit
A cardiac output unit measures the volume of
blood pumped by the heart during a period of
time, typically measured in liters per minute
(L/min). Cardiac output represents the volume
of blood that is delivered to the body is an
indicator of overall cardiac status and tissue
perfusion. Blood flow from the heart is measured using the thermal dilution technique in
which a cold solution is injected upstream of
the heart and the temperature differential is
monitored on the downstream side. A balloon
catheter is inserted through the heart. The
temperature of the surrounding blood is
measured through a thermistor located near
the tip of the catheter. Once the catheter is
inserted, ice water is injected through the
catheter and emerges from a small hole approximately 12 inches before the end of the catheter.
The cardiac output unit processes the signal
from the thermistor and displays a thermal
dilution curve from which cardiac output and
other hemodynamic parameters such as stroke
volume can be derived.
Recommended functional test frequency:
annual.
Sample risk assessment
Criteria – choose 1 rating from each category
Clinical function
No patient contact
Device may make contact with patient but function is non-critical
Device is used for patient diagnosis, or direct monitoring
Device is used to deliver direct treatment to the patient
Device is used for a life support
Physical risk
Device poses no appreciable risk due to failure
Device failure will result in low risk
Device failure will result in inappropriate therapy, misdiagnosis, or loss of monitoring
Device failure could result in severe injury to, or death of, patient or user
Problem avoidance probability
Maintenance or inspection would not impact reliability of the device
Common device failure modes are unpredictable or not very predictable
While common device failure modes are not very predictable, device history indicates that TSP
testing frequently detects problems
Common device failure is predictable and can be avoided by preventive maintenance
Specific regulatory or manufacturers requirements dictate preventive maintenance or testing
Incident history
No significant history
A significant history of incidents exists
Manufacturers/regulatory requirements for specific schedules
No requirements
There are requirements for testing independent of a numerical rating system
Total Score:
Assignment: 0.0x 0.5x 1x 2x 3x 4x (times per year tested)
Weight
Score
1
2
3
4
5
3
1
2
3
4
1
2
3
2
3
4
5
1
2
1
1
2
1
10
1
©University of Vermont, Rev. 2 – Confidential
49
Cardiac output monitor procedure
Estimated time: 20 minutes
Equipment information
Control number:____________________________________ Hospital:_ __________________________________________
Manufacturer:______________________________________ Model:_____________________________________________
Serial number:_ ____________________________________ Location:___________________________________________
Test information
Technician:________________________________________ Date:_______________________________________________
Test type: Incoming_ ________ Post repair_________
Test equipment needed:ISA 601 Electrical Safety Analyzer (or equivalent)
MPS450 Multiparameter Simulator (or equivalent)
Cardiac output adapter box Cables to connect to cardiac output monitor
Test Result
Pass
Fail
N/A
Physical condition
Device is clean and decontaminated
No physical damage to case, display, mounts, cart, or components
Switches and controls operable and correctly aligned
Display intensity adequate for daytime use
Control numbers, labeling, and warnings present and legible
Inlets and hoses
Power cord, accessory cables, charger
Filters and vents clean
Electrical safety
Ground wire resistance
Chassis leakage
Patient leakage current
Patient lead leakage current – isolation test
(mains on patient applied part)
Insulation test (optional) 500 V
< 0.3 W
< 100 µA NC
< 500 µA SFC
< 100 µA B and BF
< 10 µA CF
< 100 µA BF
< 10 µA CF
< 2 MW
Performance testing
Verify accuracy of blood temperature
Verify cardiac output accuracy
Complete model-specific performance testing
50
©University of Vermont, Rev. 2 – Confidential
37 °C ± 0.2 °C
Physical condition
Check the physical condition of the device, as
described in the General Equipment Procedure.
Electrical safety
Perform electrical safety checks as described in
Chapter 5, Electrical Safety. Check ground wire
resistance and chassis leakage.
Performance inspection
Verify accuracy of blood temperature: Adjust
the settings on the cardiac output monitor as
follows. Set the catheter type/size to Baxter
Edwards, 93a-131-7f. Set the calibration coefficient to 0.595. Set the injectate volume to
10 cc. Set the injectate temperature to 24 °C.
Connect the cardiac output box to the
‘CO/TEMP’ port on the right hand side of the
MPS450. Connect the blood temperature thermistor cable from the cardiac output monitor to
the small 4 pin connector on the cardiac output
adapter. Connect the injectate temperature from
the cardiac output monitor to the large 4-pin
connector on the cardiac output box located just
above the resistance trimpot.
Turn on the MPS450. Press the button labeled
‘8’ (‘CO’) to enter the cardiac output menu.
The blood temperature displayed on the cardiac output monitor should read 37 °C ± 0.2 °C.
Verify cardiac output accuracy: With the
cardiac output monitor and MPS450 set up as
above, enter the cardiac output menu on the
MPS450 by pressing ‘8’ (CO). Press the soft key
labeled ‘INJ’ to toggle the injectate temperature
between 0 °C and 24 °C. Set the injectate temperature to 24 °C.
Turn the trimpot on the cardiac output box
until the injectate temperature on the cardiac
monitor reads 24 °C.
The simulated flow rate on the MPS450 can
be set to 2.5 L/min, 5.0 L/min and 10.0 L/min
by pressing the soft keys labels ‘PREV’ and
‘NEXT’ to scroll through the values. The cardiac output should be checked at each of these
settings.
Set the volume on the MPS450 to 2.5 L/min.
Initiate a cardiac output measurement on the
monitor. Press the soft key labeled ‘RUN’ on the
MPS450 to start the simulation. If you need to
end the simulation before the cardiac output
calculation is complete, press the soft key
labeled ‘STOP’. Repeat this measurement for the
5.0 L/min and 10.0 L/min rates.
Complete model-specific performance
testing: Refer to the service manual for performance inspection tasks specific to the device.
Complete the performance inspection per
manufacturer’s procedure.
Return to service: Before returning to use,
return the cardiac output monitor to its original
settings.
Connecting the cardiac output monitor to the MPS450.
©University of Vermont, Rev. 2 – Confidential
51
Central station
ECG strips. Bedside monitors will be connected
to the central station computer through the
Central stations are monitors that are designed
hospital’s network. If telemetry transmitters are
to be positioned in a central location, usually
at a nurse’s station and consolidate information used for remote monitoring, an antenna system
and receivers will be necessary for receiving
from individual bedside and telemetry monitors. The central station usually displays an ECG the radio signal. Central stations are used for
waveform for each patient being monitored, and remote monitoring of patients in one or more
also any alarms that are triggered. Central sta- areas of a hospital. They do not replace bedside
tions typically consist of one or more displays, a monitors.
computer that runs the central station, speakers Recommended functional test frequency:
annual.
for audible alarms, and a recorder for printing
Sample risk assessment
Criteria – choose 1 rating from each category
Clinical function
No patient contact
Device may make contact with patient but function is non-critical
Device is used for patient diagnosis, or direct monitoring
Device is used to deliver direct treatment to the patient
Device is used for a life support
Physical risk
Device poses no appreciable risk due to failure
Device failure will result in low risk
Device failure will result in inappropriate therapy, misdiagnosis, or loss of monitoring
Device failure could result in severe injury to, or death of, patient or user
Problem avoidance probability
Maintenance or inspection would not impact reliability of the device
Common device failure modes are unpredictable or not very predictable
While common device failure modes are not very predictable, device history indicates that TSP
testing frequently detects problems
Common device failure is predictable and can be avoided by preventive maintenance
Specific regulatory or manufacturers requirements dictate preventive maintenance or testing
Incident history
No significant history
A significant history of incidents exists
Manufacturers/regulatory requirements for specific schedules
No requirements
There are requirements for testing independent of a numerical rating system
Total Score:
Assignment: 0.0x 0.5x 1x 2x 3x 4x (times per year tested)
52
©University of Vermont, Rev. 2 – Confidential
Weight
Score
1
2
3
4
5
3
1
2
3
4
1
2
3
2
3
4
5
1
2
1
1
2
1
10
1
Central station monitoring
system procedure
Estimated time: 35 minutes
Equipment information
Control number:____________________________________ Hospital:_ __________________________________________
Manufacturer:______________________________________ Model:_____________________________________________
Serial number:_ ____________________________________ Location:___________________________________________
Test information
Technician:________________________________________ Date:_______________________________________________
Test type: Incoming_ ________ Post repair_________
Test equipment needed:ISA 601 Electrical Safety Analyzer (or equivalent)
MPS450 Multiparameter Simulator (or equivalent)
Index 2 SpO2 Simulator (or equivalent)
Vacuum or canned air for clearing dust from cooling fans
Test Result
Pass
Fail
N/A
Physical condition
Device is clean and decontaminated
No physical damage to case, display, mounts, cart, or components
Switches and controls operable and correctly aligned
Display intensity adequate for daytime use
Control numbers, labeling, and warnings present and legible
Inlets and hoses
Power cord, accessory cables, charger
Filters and vents clean
Electrical safety
Ground wire resistance
Chassis leakage
Patient leakage current
Patient lead leakage current – isolation test
(mains on patient applied part)
Insulation test (optional) 500 V
< 0.3 W
< 100 µA NC
< 500 µA SFC
< 100 µA B and BF
< 10 µA CF
< 100 µA BF
< 10 µA CF
< 2 MW
Preventive maintenance
Clean dust from cooling fans
Complete model-specific preventive maintenance
Performance testing
Verify display is clear and legible
Verify monitoring capabilities of hard wired monitors
Verify monitoring capabilities of telemetry transmitters
Verify recorder accuracy
Verify operation of alarms
Complete model-specific performance testing
±4%
©University of Vermont, Rev. 2 – Confidential
53
Physical condition
the left side MPS450. Press ‘1’ (NSR) to enter the
normal sinus rhythm menu. Set the heart rate to
Check the physical condition of the device, as
described in the General Equipment Procedure. 80 bpm. If the telemetry has SpO2 capabilities,
connect the finger probe to the Index 2 Pulse
Oximeter Simulator as described in the Pulse
Electrical safety
Oximeter Procedure.
Perform electrical safety checks as described in
Ensure that a battery is installed in the
Chapter 5, Electrical Safety. The central station
telemetry transmitter. Admit a test patient on
will not be able to be removed from power for
this telemetry channel. Verify that the central
testing and will need to be tested as permastation displays the ECG rhythm and heart rate.
nently installed medical equipment.
Discharge the test patient when finished. The
process will need to be repeated for each telemPreventive maintenance
etry transmitter.
Clean dust from cooling fans: The computVerify recorder accuracy: With a test patient
ers that run central station monitoring systems
admitted to the central station and the ECG
are often situated under desks. As the cooling
leads connected to the MPS450 as above, press
fans accumulate a lot of dust and debris, they
‘1’ (NSR) on the MPS450. Set the heart rate
can become clogged and lead to overheating
to 60 bpm. Initiate strip record on the central
of the computer system. Use a small vacuum or
station.
a canned air to remove dust from the fans and
Measure the distance between the peaks
vents. A vacuum is preferred over compressed
of the QRS complex. With a recorder speed of
air, as it will not blow dust around the patient
25 mm/sec, the QRS peaks should be between
care area.
24 mm and 26 mm apart.
Complete model-specific preventive mainVerify operation of alarms: Check that all
tenance: Refer to the monitor’s service manual
alarms are functional and that the volume is
for preventive maintenance tasks specific to the adequately loud. Ensure that appropriate visual
device. Complete the preventive maintenance
indicators are functioning.
per manufacturer’s procedure.
Note the alarm settings on the central station. Press ‘1’ (NSR) to enter the Normal Sinus
Performance inspection
Rhythm menu. Bring the heart rate down to just
Verify display is clear and legible: The monitor below the monitor’s low heart rate limit. The
should be clear and bright enough to read. Look alarm should sound. Increase the heart rate
above the low alarm point. Clear the alarm if
for distortion around the edges of the screen.
necessary. Increase the heart rate to just above
Verify monitoring capabilities of hardthe high heart rate limit. Verify that the alarm
wired monitors: Connect the MPS450 to a
sounds when the heart rate increases beyond
monitor following the instructions given in the
Patient Monitor procedure. At a minimum simu- the high alarm limit. Set the heart rate back to
late a heart rate and respiration. Attach the ECG 80 bpm and clear any alarms.
Complete model-specific performance
lead wires to the lead connectors on the left
testing:
Refer to the service manual for perforside of the MPS450. The MPS450 will default to
mance
inspection
tasks specific to the device.
a normal sinus rhythm of 80 bpm.
Complete
the
performance
inspection per
Admit a test patient in this bed on the central
manufacturer’s
procedure.
station. Verify that the central station displays
Return to service: Discharge any test
the ECG wave, heart rate, and other monitored
patients.
Return any alarms that were adjusted
parameters. Discharge the test patient.
to
their
original
settings. Ensure the volume of
Verify monitoring capabilities of telemetry
the
audible
alarms
is loud enough to be heard
transmitters: Connect the ECG leads of the
in
normal
operating
conditions.
telemetry transmitter to the lead connections on
54
©University of Vermont, Rev. 2 – Confidential
Compression unit
Compression units are designed to apply and
release pressure on a patient’s limbs in order to
facilitate the return of blood through the veins.
They are used to reduce the risk of deep vein
thrombosis during long periods of immobilization, which can lead to pulmonary embolism.
Compression units are also used during and
immediately following surgery to minimize
venous stasis. A compression unit typically
consists of an air compression pump, a pressure control mechanism, a timing mechanism,
tubing, and cuffs that wrap around the patient’s
limbs. Air is pumped through the tubing into
the cuffs until the pressure inside the cuff
reaches a set pressure. The cuff remains
inflated at the set pressure for a set period of
time. Pressure is then relieved from the cuff and
the cuff remains deflated for another set period
of time. The compression unit will continuously
repeat this cycle of inflation and deflation.
Recommended functional test frequency:
annual.
Sample risk assessment
Criteria – choose 1 rating from each category
Clinical function
No patient contact
Device may make contact with patient but function is non-critical
Device is used for patient diagnosis, or direct monitoring
Device is used to deliver direct treatment to the patient
Device is used for a life support
Physical risk
Device poses no appreciable risk due to failure
Device failure will result in low risk
Device failure will result in inappropriate therapy, misdiagnosis, or loss of monitoring
Device failure could result in severe injury to, or death of, patient or user
Problem avoidance probability
Maintenance or inspection would not impact reliability of the device
Common device failure modes are unpredictable or not very predictable
While common device failure modes are not very predictable, device history indicates that TSP
testing frequently detects problems
Common device failure is predictable and can be avoided by preventive maintenance
Specific regulatory or manufacturers requirements dictate preventive maintenance or testing
Incident history
No significant history
A significant history of incidents exists
Manufacturers/regulatory requirements for specific schedules
No requirements
There are requirements for testing independent of a numerical rating system
Total Score:
Assignment: 0.0x 0.5x 1x 2x 3x 4x (times per year tested)
Weight
1
2
3
4
5
1
2
3
4
1
2
Score
4
2
2
3
4
5
1
2
1
1
2
1
10
1
©University of Vermont, Rev. 2 – Confidential
55
Compression unit procedure
Estimated time: 20 minutes
Equipment information
Control number:____________________________________ Hospital:_ __________________________________________
Manufacturer:______________________________________ Model:_____________________________________________
Serial number:_ ____________________________________ Location:___________________________________________
Test information
Technician:________________________________________ Date:_______________________________________________
Test type: Incoming_ ________ Post repair_________
Test equipment needed:ISA 601 Electrical Safety Analyzer (or equivalent)
DPM 4 Pressure Meter (or equivalent)
Stopwatch or watch with a second hand
Tubing and connectors to connect to DPM 4
Compression set
PVC pipe to attach compression set to
Test Result
Pass
Fail
N/A
Physical condition
Device is clean and decontaminated
No physical damage to case, display, mounts, cart, or components
Switches and controls operable and correctly aligned
Display intensity adequate for daytime use
Control numbers, labeling, and warnings present and legible
Inlets and hoses
Power cord, accessory cables, charger
Filters and vents clean
Electrical safety
Ground wire resistance
Chassis leakage
Patient leakage current
Patient lead leakage current – isolation test
(mains on patient applied part)
Insulation test (optional) 500 V
< 0.3 W
< 100 µA NC
< 500 µA SFC
< 100 µA B and BF
< 10 µA CF
< 100 µA BF
< 10 µA CF
< 2 MW
Preventive maintenance
Replace battery every 24 months
Complete model-specific preventive maintenance
Performance testing
Verify unit operates on battery
Pressure accuracy
Timing cycle accuracy
Alarm function
Complete model-specific performance testing
56
©University of Vermont, Rev. 2 – Confidential
±2%
±2%
Physical condition
functional test on battery power. The ac power
indicator should go out when the power cord
Check the physical condition of the device, as
described in the General Equipment Procedure. is unplugged and the battery indicator should
light. Be sure to plug the power cord in at the
conclusion of the test.
Electrical safety
Pressure accuracy: A tubing set that can
Perform electrical safety checks as described in connect to the compression unit and to the DPM
Chapter 5, Electrical Safety. Check ground wire 4 will be needed for this test. A simple test set
resistance and chassis leakage
can be constructed from a disposable compression set. Cut the tubing a short distance from
Preventive maintenance
the connector for the compression unit. Insert a
Replace battery: The battery should be
luer connector into the tubing to connect to the
replaced every 24 months. Replace if necessary. DPM 4. If the compression set has multiple inflaComplete model-specific preventive maintion tubes, occlude the remaining open tubing
tenance: Refer to the monitor’s service manual
using tie-wraps.
for preventive maintenance tasks specific to the
Connect the test set to the compression unit.
device. Complete the preventive maintenance
The DPM 4 defaults to pressure units in mmHg.
per manufacturer’s procedure.
If the pressure gauge is in another unit, press
the soft key labeled ‘UNIT’ and then select the
Performance inspection
desired units. Most compression units measure
pressure in mmHg. The DPM 4 should read
Verify unit operates on battery: Check that
‘0.0’ mmHg when the pressure port is open to
the ac power indicator is lit when the power
atmosphere. Connect the test set to the pressure
cord is plugged into an outlet. Unplug the ac
port of the DPM 4.
power cord and perform the remainder of the
Start the compression cycle on the compression unit. Measure the reading using the DPM
4 and compare this value with the display on
the compression unit. If the compression unit
has multiple settings, measure the pressure
readings throughout its range. The pressure
displayed on the compression unit should be
within 2 % of the pressure measured on the
DPM 4. For a pressure reading of 45 mmHg, the
measured pressure should be between
44 mmHg and 46 mmHg.
Testing pressure accuracy of a compression unit with the DPM 4.
©University of Vermont, Rev. 2 – Confidential
57
Timing cycle accuracy: Disconnect the
DPM 4 and test tubing from the compression
unit and connect a complete compression set.
For testing, attach the compression set to a
piece of PVC pipe or other rigid pipe to simulate a limb. Start the compression cycle. Use a
stopwatch or a watch with a second hand to
measure the length of time the pressure is held.
When the compression unit deflates, measure
the length of time before the next inflation.
Compare the measured times to the compression unit’s setting. The measured time should
be within 2 % of the set time.
58
©University of Vermont, Rev. 2 – Confidential
Alarm function: Check that all alarms are
functional and that the volume is adequately
loud. Ensure that appropriate visual indicators
are functioning.
Complete model-specific performance
testing: Refer to the service manual for performance inspection tasks specific to the device.
Complete the performance inspection per
manufacturer’s procedure.
Return to service: Before returning to use,
return the compression cycle setting to its original setting. Plug in the power cord to ensure
the battery remains charged.
Defibrillator
Defibrillators deliver electric impulse to the
heart through the chest wall in order to restore
a normal rhythm in patients experiencing ventricular fibrillation or ventricular tachycardia.
The high electrical energy stops the independent action of the individual muscle fibers, so
that the natural pacemaker of the heart can
take over. A set charge is generated and is
delivered through a set of paddles or disposable
defibrillation electrodes through the chest wall.
The defibrillator’s output energy is typically
selectable from 0 J to 360 J. Most defibrillators
also include an electrocardiograph to monitor the patient’s rhythm. Some defibrillators
include a pacer function. Electrical impulses
are delivered to the heart, causing the heart to
contract. This is used for emergency treatment
of asystole, severe bradycardia, implantable
pacemaker failure, or other conditions requiring
emergency cardiac pacing.
Recommended functional test frequency:
semiannual.
Sample risk assessment
Criteria – choose 1 rating from each category
Clinical function
No patient contact
Device may make contact with patient but function is non-critical
Device is used for patient diagnosis, or direct monitoring
Device is used to deliver direct treatment to the patient
Device is used for a life support
Physical risk
Device poses no appreciable risk due to failure
Device failure will result in low risk
Device failure will result in inappropriate therapy, misdiagnosis, or loss of monitoring
Device failure could result in severe injury to, or death of, patient or user
Problem avoidance probability
Maintenance or inspection would not impact reliability of the device
Common device failure modes are unpredictable or not very predictable
While common device failure modes are not very predictable, device history indicates that TSP
testing frequently detects problems
Common device failure is predictable and can be avoided by preventive maintenance
Specific regulatory or manufacturers requirements dictate preventive maintenance or testing
Incident history
No significant history
A significant history of incidents exists
Manufacturers/regulatory requirements for specific schedules
No requirements
There are requirements for testing independent of a numerical rating system
Total Score:
Assignment: 0.0x 0.5x 1x 2x 3x 4x (times per year tested)
Weight
1
2
3
4
5
Score
4
1
2
3
4
4
1
2
2
3
4
5
1
2
1
2
2
1
13
2
©University of Vermont, Rev. 2 – Confidential
59
Defibrillator procedure
Estimated time: 30 minutes
Equipment information
Control number:____________________________________ Hospital:_ __________________________________________
Manufacturer:______________________________________ Model:_____________________________________________
Serial number:_ ____________________________________ Location:___________________________________________
Test information
Technician:________________________________________ Date:_______________________________________________
Test type: Incoming_ ________ Post repair_________
Test equipment needed:ISA 601 Electrical Safety Analyzer (or equivalent)
Impulse 4000 Defibrillator and Pacer Analyzer (or equivalent)
MPS450 Multiparameter Simulator (or equivalent)
Ohmmeter (Can be part of a multimeter, such as the Fluke 73 series digital multimeter)
Cables and connectors to connect defibrillator to analyzer
Test Result
Pass Fail N/A
Physical condition
Device is clean and decontaminated
No physical damage to case, display, mounts, cart, or components
Switches and controls operable and correctly aligned
Display intensity adequate for daytime use
Control numbers, labeling, and warnings present and legible
Inlets and hoses
Power cord, accessory cables, charger
Filters and vents clean
Electrical safety
Ground wire resistance
< 0.3 W
Chassis leakage
< 100 µA NC, < 500 µA SFC
Patient leakage current
< 100 µA B and BF, < 10 µA CF
Patient lead leakage current – isolation test (mains on patient applied part) < 100 µA BF, < 10 µA CF
Insulation test (optional) 500 V
< 2 MW
Preventive maintenance
Replace battery every 24 months
Verify electrodes, gel and paddles are stored with the defibrillator and are within expiration dates
Verify proper time and date, correct if necessary
Complete model-specific preventive maintenance
continued on page 61
60
©University of Vermont, Rev. 2 – Confidential
continued from page 60
Test Result
Pass Fail N/A
Performance testing
Verify unit operates on battery
Paddle continuity
Heart rate accuracy
Recorder speed
Verify operation of alarms
Output accuracy
Output energy at maximum setting for 10 charge cycles
Charge time after 10 discharge cycles
Energy after 60 sec of full charge
Internal discharge function
Synchronizer operation
Pacer output accuracy
Pacer rate accuracy
Demand-mode sensitivity
Complete model-specific performance testing
≤ 0.15 W
±5%
±4%
± 15 %
± 15 %
≤ 15 sec
≥ 85 %
≤ 60 msec
± 10 %
±5%
©University of Vermont, Rev. 2 – Confidential
61
Physical condition
Paddle continuity: Connect the ohmmeter
between
a paddle and the appropriate pin on
Check the physical condition of the device, as
the
paddle
connector. The resistance should
described in the General Equipment Procedure.
not be higher than 0.15 W. Repeat for the other
paddle. This step can be skipped if only disposElectrical safety
able paddles are used.
Perform electrical safety checks as described in
Heart rate accuracy: Connect the ECG leads
Chapter 5, Electrical Safety. Check ground wire to the lead connectors on the Impulse 4000. On
resistance, chassis leakage, and lead leakage.
the Impulse 4000, press F3 ‘ECG’ to enter the
ECG menu. Press F1 ‘NORM’ to select a normal
Preventive maintenance
sinus rhythm. Press F2 ‘60’ to set the heart
Replace battery: The battery should be
rate to 60 bpm. On the defibrillator, set the ECG
replaced every 24 months. Replace if necessary. source to Lead II.
Verify electrodes and defibrillator gel or disposThe heart rate should be within 5 % of the
able paddles are stored with the defibrillator
set rate. For a simulated heart rate of 60 bpm,
and are within expiration dates: Verify that
the displayed rate should be between 57 bpm
ECG electrodes are stored with the unit. If hard and 63 bpm. Set the heart rate on the Impulse
paddles are used, verify that defibrillator gel is
4000 bpm to 120 bpm. The displayed heart rate
stored with the unit. The conductive gel should should be between 114 bpm and 126 bpm.
be for use with defibrillators and lotion, skin
Recorder speed: Set the heart rate on the
lubricant, or ultrasound gel should not be used. Impulse 4000 bpm to 60 bpm. Record a strip on
If hard paddles are not used, verify that disthe defibrillator. Measure the distance between
posable pads are stored with the unit. Check
the peaks of the QRS complex. With a recorder
the expiration date on the electrodes, gel, and
speed of 25 mm/sec, the QRS peaks should be
disposable paddles.
between 24 mm and 26 mm apart.
Verify proper time and date. Correct if
Verify operation of alarms: Check that all
necessary: Verify the time and date displayed
alarms are functional and that the volume is
on the defibrillator is correct. If the time and
adequately loud. Ensure appropriate visual indidate is not displayed on the defibrillator monicators are functioning.
tor, print a strip from the recorder. The time and
Note the alarm settings on the defibrillator.
date should appear on the printed strip. Correct Set the low limit to 35 bpm and the high limit
the time and date as necessary.
155 bpm. The alarm limits may not be able to
Complete model-specific preventive mainbe set to these exact values, depending on the
tenance: Refer to the monitor’s service manual
defibrillator. If that is the case, set the alarm
for preventive maintenance tasks specific to the limits to the next closest value, keeping the low
device. Complete the preventive maintenance
limit above 30 bpm and the high limit below
per manufacturer’s procedure.
160 bpm.
Press F3 ‘ECG’ on the Impulse 4000 to enter
Performance inspection
the ECG menu. Press F1 ‘NORM’ to select a
normal sinus rhythm. Set the heart rate to
Verify unit operates on battery: Check that
30 bpm. The alarm should sound. Increase
the ac power indicator is lit when the power
the heart rate to 80 bpm and clear the alarm
cord is plugged into an outlet. Unplug the ac
if necessary. Set the heart rate to 160 bpm.
power cord and perform the remainder of the
Verify that the alarm sounds when the heart
functional test on battery power. The ac power
rate increases beyond the high alarm limit. Set
indicator should go out when the power cord
the heart rate back to 80 bps and clear any
is unplugged and the battery indicator should
alarms. Return the alarm limits to their previous
light. Be sure to plug the power cord in at the
settings.
conclusion of the test.
62
©University of Vermont, Rev. 2 – Confidential
Output accuracy: Connect the defibrillator
paddles to the paddle contacts on the Impulse
4000. The Apex contact is on the right and the
Sternum contact is on the left.
If disposable paddles are being used, you will
need a test set to connect from the defibrillator cable to the Impulse 4000. A simple test set
can be made from a set of disposable paddles.
Cut the pads off of the set leaving the connector and two lengths of wire. Strip the ends of
the wires and install banana plugs. Insert the
banana plugs into the paddle contacts of the
Impulse 4000. Connect the test set to the defibrillator cable.
With the Impulse 4000 set to a heart rate of
80 bpm, set the ECG source on the defibrillator
to paddles. View the ECG trace on the defibrillator. If the trace appears upside down, reverse
the paddle connections.
Return to the main menu of the Impulse
4000. Press F1 ‘DEFIB’ to enter the defibrillator
menu. Press F1 ‘ENERGY’ then F2 ‘HIGH’. The
high setting is for energy output up to 1000 J;
the low setting is for measuring 50 J and below.
Measure the energy output of the defibrillator
throughout its range. At a minimum, measure
the output at the lowest setting, a mid level
setting, and the highest setting. The output
should be within 15 % of the set energy level.
At 360 J, the energy output should be between
306 J and 414 J.
Measuring defibrillator power output.
Output energy at maximum setting for
10 charge cycles: Set the energy on the
defibrillator to the maximum setting. Charge
the defibrillator and then discharge into the
Impulse 4000. Repeat this charge and discharge cycle 10 times. On the tenth shock, the
energy output should still be within 15 % of the
setting.
Charge time after 10 charge cycles: Measure the charge time on the maximum energy
setting after 10 discharge cycles. From the
‘DEFIB’ menu on the Impulse 4000, select F3
‘MEXE’. Press F2 ‘HIGH’ for the high energy
range. Connect the defibrillator paddles to the
paddle contacts on the Impulse 4000. Press
F3 ‘START’ and immediately start charging the defibrillator. When the defibrillator
is fully charged, immediately discharge into
the Impulse 4000. The energy output and the
charge time will be displayed. The charge time
should not exceed 15 s.
Energy after 60 sec of full charge: Charge
the defibrillator at its maximum setting. Wait
60 seconds and then discharge into the Impulse
4000. The output should be at least 85 % of the
energy setting. At a setting of 360 J, the output
should be at least 306 J.
Internal discharge function: The defibrillator should have a method of discharging stored
energy. Some models have a button on the
front panel for this function. Others release the
energy after a set time or when the defibrillator is turned off. Check the service manual
for specific operation of the internal discharge
function. Charge the defibrillator and do not
discharge. Allow the energy to be discharged
internally. Attempt to discharge into the Impulse
4000. Verify that no energy has been delivered.
Sychronizer operation: Set the ECG source
on the defibrillator to Lead II. Put the defibrillator into synch mode. Return to the main menu
of the Impulse 4000. Press F1 ‘DEFIB’ to enter
the defibrillator menu. Press F2 ‘CARDIO’ for the
cardioversion menu and then F2 ‘HIGH’. Press
F1 ‘NSR’ for a normal sinus rhythm. Charge
the defibrillator. Press and hold the discharge
button(s) on the defibrillator. The delay time
should not be more than 60 mSec.
©University of Vermont, Rev. 2 – Confidential
63
Pacer output accuracy: Connect the ECG
leads to the lead connectors on the MPS450.
Set the heart rate on the MPS450 to 60 bpm.
Press ‘1’ (‘NSR’), and then use the soft keys
marked ‘UP’ and ‘DOWN’ to change the heart
rate to 60 bpm. On the defibrillator, set the ECG
source to Lead II.
Connect the pacing cable to the defibrillator
if necessary. You will need a test set to connect
the pacing cable to the Impulse 4000. A test
set can be made from the disposable pads as
described previously.
From the main menu of the Impulse 4000,
press F2 ‘PACER’. Press F1 ‘INT50W’ to select
the internal 50 W test load. Press F1 ‘PULSE’
to enter the pacer measurement mode. Set the
pacing rate on the defibrillator to 120 ppm.
Set the defibrillator output to the minimum
setting and start pacing. The ECG wave form
should display pacing spikes at approximately
the mid point between QRS peaks and on top
of QRS peaks. The impulse 4000 will display
the pacer output amplitude in mA. Measure the
pacer output over its entire range. The measured output should be within 10 % of the set
output. For an amplitude setting of 100 mA,
the measured output should be between 90 mA
and 110 mA.
***IMPORTANT***
DO NOT TOUCH THE PADDLE
CONTACTS ON THE IMPULSE 4000
WHILE THE DEFIBRILLATOR PACER
IS ON. TURN THE PACER OFF
BEFORE ADJUSTING OR REMOVING
CONNECTIONS.
Pacer rate accuracy: While measuring pacer
output, the Impulse 4000 also displays the
pulse rate. The measured pulse rate should
be within 5 % of the set rate. For a rate of
120 ppm, the pulse rate should be between
114 ppm and 126 ppm. Set the heart rate on
the MPS450 to 30 bpm. Measure the pulse rate
throughout its range.
Demand-mode sensitivity: Set the heart rate
on the MPS450 to 60 bpm. Turn on demand
mode on the defibrillator pacer if necessary.
64
©University of Vermont, Rev. 2 – Confidential
Adjust the pulse rate on the pacer to just below
60 ppm. The output should stop. No output
should be measured on the Impulse 4000 and
pacing spikes should not appear on the ECG
trace. Adjust the pulse rate to just above
60 ppm. Pacing should start again.
Connect the ECG leads to the Impulse 4000.
From the Pacer menu, press F3 ‘DEMAND’. With
the pacer in demand mode, press F1 ‘START’.
The Impulse 4000 will display the calculated
underdrive and overdrive ECG rates.
A havertriangle waveform will be displayed
on the ECG trace. Pacing spikes should appear
on the ECG trace. Press F2 ‘OVER’ to select the
overdrive ECG rate. Verify that the pacing stops
with this higher rate. Turn off the pacer and
return the output and rate to their previous
settings.
Return to service: Before returning to use,
return any alarms that were adjusted to their
original settings. Ensure the volume of the
audible alarms is loud enough to be heard in
normal operating conditions. Ensure the pacer
is turned off and that any settings that were
adjusted are returned to their original settings.
Plug in the power cord to ensure the battery
remains charged and ready for use.
Complete model-specific performance
testing: Refer to the service manual for performance inspection tasks specific to the device.
Complete the performance inspection per
manufacturer’s procedure.
Measuring pacer output with the Impulse 4000.
Electrocardiograph
from 12 groups of leads. These are commonly
An electrocardiograph (ECG) records the electri- referred to as 12 lead ECGs. In addition, diagcal activity of the heart over time by measuring nostic ECGs typically contain an interpretation
function, where the measured signals of the
the changes of electrical potential caused by
electrical activity of the heart muscle during the cardiac activity are analyzed using an internal
heartbeat. Leads affixed to the patient transmit algorithm. Diagnostic ECGs do not usually have
heart rate alarms. An ECG monitor will have 3
the electrical signal to the processor, which
or 5 lead wires and is used for monitoring as
then produces a graph of the amplitude of the
opposed to diagnosis. ECG monitors will have
signal versus time as the electrocardiogram.
adjustable heart rate alarms.
The electrocardiogram is used particularly in
Recommended functional test frequency:
diagnosing abnormalities of the heart. Diagannual.
nostic ECGs typically have 10 physical lead
wires but measures the electrical potential
Sample risk assessment
Criteria – choose 1 rating from each category
Clinical function
No patient contact
Device may make contact with patient but function is non-critical
Device is used for patient diagnosis, or direct monitoring
Device is used to deliver direct treatment to the patient
Device is used for a life support
Physical risk
Device poses no appreciable risk due to failure
Device failure will result in low risk
Device failure will result in inappropriate therapy, misdiagnosis, or loss of monitoring
Device failure could result in severe injury to, or death of, patient or user
Problem avoidance probability
Maintenance or inspection would not impact reliability of the device
Common device failure modes are unpredictable or not very predictable
While common device failure modes are not very predictable, device history indicates that TSP
testing frequently detects problems
Common device failure is predictable and can be avoided by preventive maintenance
Specific regulatory or manufacturers requirements dictate preventive maintenance or testing
Incident history
No significant history
A significant history of incidents exists
Manufacturers/regulatory requirements for specific schedules
No requirements
There are requirements for testing independent of a numerical rating system
Total Score:
Assignment: 0.0x 0.5x 1x 2x 3x 4x (times per year tested)
Weight
Score
1
2
3
4
5
3
1
2
3
4
1
2
3
2
3
4
5
1
2
1
1
2
1
10
1
©University of Vermont, Rev. 2 – Confidential
65
Electrocardiograph procedure
Estimated time: 25 minutes
Equipment information
Control number:____________________________________ Hospital:_ __________________________________________
Manufacturer:______________________________________ Model:_____________________________________________
Serial number:_ ____________________________________ Location:___________________________________________
Test information
Technician:________________________________________ Date:_______________________________________________
Test type: Incoming_ ________ Post repair_________
Test equipment needed:ISA 601 Electrical Safety Analyzer (or equivalent)
MPS450 Multiparameter Simulator (or equivalent)
Test Result
Pass
Fail
N/A
Physical condition
Device is clean and decontaminated
No physical damage to case, display, mounts, cart, or components
Switches and controls operable and correctly aligned
Display intensity adequate for daytime use
Control numbers, labeling, and warnings present and legible
Inlets and hoses
Power cord, accessory cables, charger
Filters and vents clean
Electrical safety
Ground wire resistance
Chassis leakage
Patient leakage current
Patient lead leakage current – isolation test
(mains on patient applied part)
Insulation test (optional) 500 V
< 0.3 W
< 100 µA NC
< 500 µA SFC
< 100 µA B and BF
< 10 µA CF
< 100 µA BF
< 10 µA CF
< 2 MW
Preventive maintenance
Replace battery every 24 months
Clean rollers and paper guides
Lubricate motor and paper drive mechanism
Verify proper time and date. Correct if necessary
Complete model-specific preventive maintenance
Performance testing
Verify unit operates on battery
Heart rate accuracy
Amplitude accuracy
Recorder speed
Paper cue
Alarm function
Complete model-specific performance testing
66
©University of Vermont, Rev. 2 – Confidential
±5%
±5%
±4%
Physical condition
Clean rollers and paper guides: Inspect the
rollers
and paper guides and remove any debris.
Check the physical condition of the device, as
Check
for
bits of torn paper caught in the rollers.
described in the General Equipment Procedure.
Lubricate motor and paper drive mechanism: Follow the manufacturer’s instructions
Electrical safety
in the service manual for lubricating the motor
Perform electrical safety checks as described in and paper drive mechanism. Not all motors will
Chapter 5, Electrical Safety. Check ground wire need to be lubricated.
resistance, chassis leakage, and lead leakage.
Complete model-specific preventive maintenance: Refer to the monitor’s service manual
Preventive maintenance
for preventive maintenance tasks specific to the
Replace battery: The battery should be
device. Complete the preventive maintenance
replaced every 24 months. Replace if necessary. per manufacturer’s procedure.
Verify proper time and date. Correct if necessary: Verify that the time and date displayed Performance inspection
on the electrocardiograph is correct. If the time Verify unit operates on battery: Check that
and date is not displayed on the monitor, print
the ac power indicator is lit when the power
a strip from the recorder. The time and date
cord is plugged into an outlet. Unplug the ac
should appear on the printed strip. Correct the
power cord and perform the remainder of the
time and date as necessary.
functional test on battery power. The ac power
indicator should go out when the power cord
is unplugged and the battery indicator should
light. Be sure to plug the power cord in at the
conclusion of the test.
Heart rate accuracy: Connect the patient
leads to the lead connectors on the MPS450. Set
the heart rate on the MPS450 to 60 bpm. Press
‘1’ (NSR), and then use the soft keys marked
‘UP’ and ‘DOWN’ to change the heart rate to
60 bpm.
The heart rate should be within 5 % of the
set rate. For a simulated heart rate of 60 bpm,
the displayed rate should be between 57 bpm
and 63 bpm. Set the heart rate on the MPS450
to 120 bpm. The displayed heart rate should be
between 114 bpm and 126 bpm.
Electrocardiograph with leads connected to MPS450.
©University of Vermont, Rev. 2 – Confidential
67
Amplitude accuracy: With the patient leads
connected to the MPS450, input a normal sinus
rhythm by pressing ‘1’ (NSR). Press the soft key
marked ‘SEL’ to select AMPL. Use the soft keys
marked up and down to change the amplitude
to 1.0 mV. Set the sensitivity on the electrocardiograph to 20 mm/mV. Record a strip on the
electrocardiograph.
Measure the height of the QRS peak. The
measured amplitude should be within 5 % of
the set amplitude. For an amplitude setting of
1 mV and a sensitivity of 20 mm/mV, the peak
height should be between 19 mm and 21 mm.
Recorder speed: Set the heart rate on the
MPS450 to 60 bpm. Record a strip on the electrocardiograph. Measure the distance between
the peaks of the QRS complex. With a recorder
speed of 25 mm/sec, the QRS peaks should be
between 24 mm and 26 mm apart.
Paper cue: Verify the operation of the paper
cue, if equipped. Initiate a page advance on
the electrocardiograph. The paper should stop
at the beginning of the next page. If the paper
does not stop or stops at an incorrect location,
ensure the correct paper is being used with the
electrocardiograph. Clean the optical sensor if
necessary.
68
©University of Vermont, Rev. 2 – Confidential
Verify operation of alarms: Check that all
alarms are functional and that the volume is
adequately loud. Ensure that appropriate visual
indicators are functioning. Electrocardiographs
designed for diagnosis usually do not include
hear rate alarms.
Note the alarm settings on the monitor. Press
‘1’ (NSR) to enter the Normal Sinus Rhythm
menu. Bring the heart rate down to just below
the monitor’s low heart rate limit. The alarm
should sound. Increase the heart rate above
the low alarm point. Clear the alarm if necessary. Increase the heart rate to just above the
high heart rate limit. Note that the alarm sounds
when the heart rate increases beyond the high
alarm limit. Set the heart rate back to 60 bpm
and clear any alarms.
Complete model-specific performance testing: Refer to the service manual for performance
inspection tasks specific to the device. Complete
the performance inspection per manufacturer’s
procedure.
Return to service: Before returning to use,
return any alarms that were adjusted to their
original settings. Ensure the volume of the audible alarms is loud enough to be heard in normal
operating conditions. Plug in the power cord to
ensure the battery remains charged.
Electrosurgical unit
Electrosurgical units (ESU) use electrical
energy for cutting tissue and for controlling
bleeding by causing coagulation using a highfrequency electric current. Tissue resistance
to the high-frequency, high-density current
results in a heating effect that causes tissue
destruction. Electrical current is delivered and
received through cables and electrodes. The
electrodes may be activated by either a switch
on the hand piece holding the electrode, or by
a footswitch. An ESU may use a monoploar or
a bipolar mode. In monoplar mode, electrical
current is delivered to the patient by an active
cable and electrode and returns to unit through
a return electrode. In bipolar mode, two electrodes, typically the tips of a pair of forceps or
scissors, serve as the equivalent of the active
and dispersive leads in the monopolar mode.
Recommended functional test frequency:
semiannual.
Sample risk assessment
Criteria – choose 1 rating from each category
Clinical function
No patient contact
Device may make contact with patient but function is non-critical
Device is used for patient diagnosis, or direct monitoring
Device is used to deliver direct treatment to the patient
Device is used for a life support
Physical risk
Device poses no appreciable risk due to failure
Device failure will result in low risk
Device failure will result in inappropriate therapy, misdiagnosis, or loss of monitoring
Device failure could result in severe injury to, or death of, patient or user
Problem avoidance probability
Maintenance or inspection would not impact reliability of the device
Common device failure modes are unpredictable or not very predictable
While common device failure modes are not very predictable, device history indicates that TSP
testing frequently detects problems
Common device failure is predictable and can be avoided by preventive maintenance
Specific regulatory or manufacturers requirements dictate preventive maintenance or testing
Incident history
No significant history
A significant history of incidents exists
Manufacturers /regulatory requirements for specific schedules
No requirements
There are requirements for testing independent of a numerical rating system
Total Score:
Assignment: 0.0x 0.5x 1x 2x 3x 4x (times per year tested)
Weight
1
2
3
4
5
Score
4
1
2
3
4
4
1
2
2
3
4
5
1
2
1
2
2
1
13
2
©University of Vermont, Rev. 2 – Confidential
69
Electrosurgical unit procedure
Estimated time: 20 minutes
Equipment information
Control number:____________________________________ Hospital:_ __________________________________________
Manufacturer:______________________________________ Model:_____________________________________________
Serial number:_ ____________________________________ Location:___________________________________________
Test information
Technician:________________________________________ Date:_______________________________________________
Test type: Incoming_ ________ Post repair_________
Test equipment needed:ISA 601 Electrical Safety Analyzer (or equivalent)
QA-ES II Electrosurgery Analyzer (or equivalent)
Cables and connectors to connect ESU to QA-ES II
Test Result
Pass
Fail
N/A
Physical condition
Device is clean and decontaminated
No physical damage to case, display, mounts, cart, or components
Switches and controls operable and correctly aligned
Display intensity adequate for daytime use
Control numbers, labeling, and warnings present and legible
Inlets and hoses
Power cord, accessory cables, charger
Filters and vents clean
Electrical safety
Ground wire resistance
Chassis leakage
Patient leakage current
Patient lead leakage current – isolation test
(mains on patient applied part)
Insulation test (optional) 500 V
< 0.3 W
< 100 µA NC
< 500 µA SFC
< 100 µA B and BF
< 10 µA CF
< 100 µA BF
< 10 µA CF
< 2 MW
Preventive maintenance
Replace filters as necessary
Complete model-specific preventive maintenance
Performance testing
Inspect dispersive electrode
Operation of footswitch
Output power
Return electrode monitor
Alarms
Complete model-specific performance testing
70
©University of Vermont, Rev. 2 – Confidential
± 15 %
Physical condition
Performance inspection
Check the physical condition of the device, as
described in the General Equipment Procedure.
Inspect dispersive electrode: Inspect reusable
dispersive electrodes for cracks, bends, burn
marks, severe scratching, or a build up of gel.
Electrodes should be smooth and clean to allow
the maximum contact area to the patient.
Operation of footswitch: Check the physical
condition of the footswitch. Ensure the footswitch does not stick in the on position. Both
cut and coagulation mode should be able to be
activated from the footswitch.
Output power: Connect the monopolar active
electrode of the ESU to the red ‘VAR. LOAD’
connector on the QA-ES II. Connect the dispersive electrode of the ESU to the black ‘VAR.
LOAD’ connector on the QA-ES II.
Put the QA-ES II in continuous mode. From
the main menu, press F2 ‘KNOB PARAM’ until
an asterisk (*) appears beside Mode. Turn the
encoder knob until ‘Cont. Oper’ appears on
the screen. Press F2 to adjust the test load. An
asterisk should appear by Load on the screen.
Use the encoder knob to select the load resistance. Check the ESU’s service manual for the
appropriate load resistance.
Press F3 ‘START’ to start measuring the
energy output. Put the ESU in cut mode and set
the energy output to minimum. Activate the ESU
and measure the energy output on the screen of
the QA-ES II.
Adjust the ESU output to its maximum cut setting. Measure the output on the QA-ES II in cut
mode according to the table below. The actual
output should be within 15 % of the set output.
For an output setting of 300 W, the measured
output should be between 225 W and 345 W.
Measure the output at 75 %, 50 %, and 25 % of
the maximum setting.
Repeat the output measurements with the
ESU in coagulation mode according to the table
below. Start with the minimum setting and
then outputs at 100 %, 75 %, and 25 % of the
maximum setting. All measurements should be
within 15 % of the set output.
Electrical safety
Perform electrical safety checks as described in
Chapter 5, Electrical Safety. Check ground wire
resistance and chassis leakage
Preventive maintenance
Replace filters: Inspect filters and replace as
necessary. Refer to the device service manual
for filter replacement.
Complete model-specific preventive maintenance: Refer to the monitor’s service manual
for preventive maintenance tasks specific to the
device. Complete the preventive maintenance
per manufacturer’s procedure.
***IMPORTANT***
DO NOT TOUCH THE CABLES AND
CONNECTORS FROM THE ACTIVE
OR DISPERSIVE ELECTRODES
WHILE THE ESU IS ACITVE. DO
NOT ALLOW CABLES OR CONNECTORS TO COME IN CONTACT WITH
CONDUCTIVE SURFACES SUCH
AS METAL TABLES. DEACTIVATE
THE ESU BEFORE ADJUSTING OR
REMOVING CONNECTIONS.
ESU with handpiece connected to QA-ES II.
©University of Vermont, Rev. 2 – Confidential
71
Test mode
Cut
Coagulation
Power setting
% of max
Setting
100 %
300 W
75 %
225 W
50 %
150 W
25 %
75 W
100 %
120 W
75 %
90 W
50 %
60 W
25 %
30 W
Output (± 15 %)
Low
High
255 W
345 W
191.3 W
258.8 W
127.5 W
172.5 W
63.8 W
86.3 W
102 W
138 W
76.5 W
103.5 W
51 W
69 W
25.5 W
34.5 W
Remove the monopolar electrode from red
‘VAR. LOAD’ connector on the QA-ES II and the
dispersive electrode from the black connector.
Connect the ESU bipolar active electrode to the
red ‘VAR LOAD’ connector. Connect the return
of the bipolar electrode to the black ‘VAR LOAD’
connector. The dispersive cable will need to
remain connected to the ESU to avoid activating
Test mode
Cut
Coagulation
Power setting
% of max
Setting
100 %
50 W
75 %
37.5 W
50 %
25 W
25 %
12.5 W
100 %
50 W
75 %
37.5 W
50 %
25 W
25 %
12.5 W
72
©University of Vermont, Rev. 2 – Confidential
Fail
the return electrode alarm. Be sure the dispersive electrode is placed on a non-conductive
surface where the electrode will not come
into contact with anyone. The load resistance
may need to be adjusted for bipolar operation.
Repeat the output measurements detailed above
for both cut and coagulation modes according
to the table below.
Output (± 15 %)
Low
High
42.5 W
57.5 W
31.9 W
43.1 W
21.3 W
28.8 W
10.6 W
14.4 W
42.5 W
57.5 W
31.9 W
43.1 W
21.3 W
28.8 W
10.6 W
14.4 W
Return electrode monitor: Connect the
dispersive electrode to the ESU and connect
the two wires of the dispersive electrode to
the red and black ‘VAR.LOAD’ connectors of the
QA-ES II. To make a quick test set from a disposable dispersive electrode, cut the electrode
from the cable and separate the two wires in
the dispersive cable. Strip the wires and attach
banana plug connectors.
Press F2 ‘KNOB PARAM.’ on the QA-ES II until
the asterisk appears next to Mode. Use the
encoder knob to select REM test and then press
enter to select the test. Press F2 ‘KNOB PARAM’
to select Delay. Turn the encoder knob to set the
delay to 3000 ms.
Press F3 ‘START’ on the QA-ES II. The load
resistance will start at 10 W and gradually
increase. Press F3 ‘STOP’ to stop the test when
Test results
Reading
Pass
Test results
Reading
Pass
Fail
the alarm sounds. The return electrode alarm
should also sound if the dispersive cable is
disconnected from the ESU. The ESU should not
activate when the return electrode monitor is
alarming.
Verify operation of alarms: Simulate any
alarm conditions. Check that all alarms are
functional and that the volume is adequately
loud. Ensure that appropriate visual indicators
are functioning.
Complete model-specific performance
testing: Refer to the service manual for performance inspection tasks specific to the device.
Complete the performance inspection per
manufacturer’s procedure.
Return to service: Before returning to use,
return any settings that were adjusted to their
original settings.
Enteral feeding pump
Enteral feeding pumps are used in patients
without gastrointestinal complications who
are unable or unwilling to consume adequate
nutrients. Feeding solutions are delivered to
the patient through temporary or surgically
implanted feeding tubes. The pumps accurately
control the flow of liquid feeding solutions
that are administered enterally, through the
digestive tract. These pumps will utilize a pump
mechanism such as a rotary peristaltic pump,
linear peristaltic pump, or a volumetric pump.
Most pumps record the dose rate, dose settings,
and infused volume in the memory. Audible and
visual alarms alert the user to flow changes or
malfunctions.
Recommended functional test frequency:
annual.
Sample risk assessment
Criteria – choose 1 rating from each category
Clinical function
No patient contact
Device may make contact with patient but function is non-critical
Device is used for patient diagnosis, or direct monitoring
Device is used to deliver direct treatment to the patient
Device is used for a life support
Physical risk
Device poses no appreciable risk due to failure
Device failure will result in low risk
Device failure will result in inappropriate therapy, misdiagnosis, or loss of monitoring
Device failure could result in severe injury to, or death of, patient or user
Problem avoidance probability
Maintenance or inspection would not impact reliability of the device
Common device failure modes are unpredictable or not very predictable
While common device failure modes are not very predictable, device history indicates that TSP
testing frequently detects problems
Common device failure is predictable and can be avoided by preventive maintenance
Specific regulatory or manufacturers requirements dictate preventive maintenance or testing
Incident history
No significant history
A significant history of incidents exists
Manufacturers/regulatory requirements for specific schedules
No requirements
There are requirements for testing independent of a numerical rating system
Total Score:
Assignment: 0.0x 0.5x 1x 2x 3x 4x (times per year tested)
Weight
1
2
3
4
5
1
2
3
4
1
2
Score
4
1
2
3
4
5
1
2
1
1
2
1
10
1
©University of Vermont, Rev. 2 – Confidential
73
Enteral feeding pump procedure
Estimated time: 20 minutes
Equipment information
Control number:____________________________________ Hospital:_ __________________________________________
Manufacturer:______________________________________ Model:_____________________________________________
Serial number:_ ____________________________________ Location:___________________________________________
Test information
Technician:________________________________________ Date:_______________________________________________
Test type: Incoming_ ________ Post repair_________
Test equipment needed:ISA 601 Electrical Safety Analyzer (or equivalent)
20 cc or larger syringe
IDA 4 Plus Infusion Device Analyzer (or equivalent)
3 way stopcock
Tubing set for feeding pump
Tubing and connectors to
Reservoir to connect to tubing set (bag or bottle)
connect to IDA 4 Plus
Test Result
Pass
Fail
N/A
Physical condition
Device is clean and decontaminated
No physical damage to case, display, mounts, cart, or components
Switches and controls operable and correctly aligned
Display intensity adequate for daytime use
Control numbers, labeling, and warnings present and legible
Inlets and hoses
Power cord, accessory cables, charger
Filters and vents clean
Electrical safety
Ground wire resistance
Chassis leakage
Patient leakage current
Patient lead leakage current – isolation test
(mains on patient applied part)
Insulation test (optional) 500 V
< 0.3 W
< 100 µA NC
< 500 µA SFC
< 100 µA B and BF
< 10 µA CF
< 100 µA BF
< 10 µA CF
< 2 MW
Preventive maintenance
Clean flow detector
Replace battery every 24 months
Complete model-specific preventive maintenance
Performance testing
Verify unit operates on battery
Pole clamp function
Flow rate accuracy
Volume accuracy
Occlusion detection pressure
Alarm function
Complete model-specific performance testing
74
©University of Vermont, Rev. 2 – Confidential
± 10 %
± 10 %
± 1 psi
Physical condition
Flow rate accuracy: Fill the infusion reservoir
with a 1 % detergent solution in de-ionized
Check the physical condition of the device, as
water.
Prepare a 1 % stock solution of detergent
described in the General Equipment Procedure.
such as Cole-Parmer Micro-90 in volume using
de-ionized water. The solution may be stored in
Electrical safety
a closed vessel for up to 6 months. This solution
Perform electrical safety checks as described in should then be diluted 10:1 with de-ionized
Chapter 5, Electrical Safety. Check ground wire water for daily use. If the water used causes too
resistance and chassis leakage.
much foaming, a 20:1 dilution is recommended.
Do not use tap water or solutions intended for
Preventive maintenance
patient use, as these may harm the transducers
Clean flow detector: Inspect the flow detector
in the IDA 4 Plus.
on the feeding pump. Clean any debris from the
Connect the feeding tubing to the reservoir.
flow sensor.
Prime the set so there is no air in the tubing.
Replace battery: The battery should be
With the tubing draining into a container or
replaced every 24 months. Replace if necessary. sink, open the flow control mechanism on the
Complete model-specific preventive maintubing set. Hold the reservoir high enough
tenance: Refer to the monitor’s service manual
above the tubing so that fluid flows through the
for preventive maintenance tasks specific to the tubing under the force of gravity. Allow fluid to
device. Complete the preventive maintenance
flow through the tubing until no air bubbles can
per manufacturer’s procedure.
be seen in the tubing. Insert the set into the
feeding pump. Connect the three-way stopcock
Performance inspection
to the channel 1 port on the IDA4 Plus. Connect the patient feeding tubing to one port of
Verify unit operates on battery: Check that
the stopcock. Fill the syringe with the detergent
the ac power indicator is lit when the power
solution and connect this to the other port of
cord is plugged into an outlet. Unplug the ac
the stopcock. Connect a piece of tubing to the
power cord and perform the remainder of the
drain port of channel 1 and run the tubing into
functional test on battery power. The ac power
a container to catch the used solution.
indicator should go out when the power cord
From the main menu of the IDA 4 Plus, use
is unplugged and the battery indicator should
the arrow keys to highlight ‘SETUP’ under
light. Be sure to plug the power cord in at the
channel 1 and then press ‘ENT’. Use the arrow
conclusion of the test.
keys to highlight ‘FLOW’ and press ‘ENT’.
Pole clamp function: Check the physical
Select ‘PRIME’. Close the stopcock port concondition of the pole clamp. The pole clamp
nected to the feeding tubing, leaving the ports
should be securely fastened to the feeding
to the syringe and the IDA 4 Plus open. Inject
pump. The clamp mechanism should move
the solution in the syringe into the IDA 4 Plus
freely. The pole clamp should secure the feeduntil ‘START’ appears on the screen. Select
ing pump to the IV pole.
‘AutoSTART’. The IDA 4 Plus will start the flow
test when it detects flow from the pump. Close
the port to the syringe, leaving the ports to the
tubing and the IDA 4 Plus open.
©University of Vermont, Rev. 2 – Confidential
75
Set the flow rate on the feeding pump to
60 mL/hr and set the dose to 10 mL. Start the
feeding pump. When the pump alarms complete, select ‘END’ on the IDA 4 Plus to end the
test. At this rate and volume, the dose should
be complete in approximately 10 minutes. Clear
the alarm on the pump. The measured flow
rate should be within 10 % of the set rate. For
a flow rate of 60 mL/hr, the flow rate should be
between 54 mL/hr and 66 mL/hr. Set the flow
rate on the pump to 120 mL/hr and the dose
to 10 mL. Repeat the flow test at the higher
flow rate.
The IDA 4 Plus is equipped with four channels to analyze infusion devices. Four pumps
can be run simultaneously.
Volume accuracy: Set up the feeding pump
and the IDA 4 Plus as described previously in
Flow Rate Accuracy. The IDA 4 Plus will measure flow rate and volume simultaneously. The
delivered volume should be within 10 % of the
set volume. For a set volume of 10 mL, the measured volume should be within 9 mL and 11 mL.
Occlusion detection pressure: From the
channel set up menu on the IDA 4 Plus, select
‘OCCLUSION’. Prime the IDA 4 Plus with the
syringe if necessary. Set the flow rate on the
feeding pump to 100 mL/hr. Set the volume to
10 mL or more so that the volume will not be
delivered before the test is complete. Start the
pump. Select ‘START’ on the IDA 4 Plus. Select
‘END’ on the IDA 4 Plus when the pump alarms
occlusion. Note the pressure at which the pump
alarms. Compare the measured pressure to the
occlusion pressure of the pump. The occlusion
pressure will be specific to the model. Check
the service manual for the specific pressure.
The measured occlusion pressure should be
within 1 psi of the pump’s occlusion pressure.
For an occlusion pressure of 20 psi, the measured pressure should be between 19 psi and
21 psi.
76
©University of Vermont, Rev. 2 – Confidential
Alarm function: Check that all alarms are
functional and that the volume is adequately
loud. Ensure appropriate visual indicators are
functioning.
Set the rate on the pump to 100 mL/hr and
set the volume to 100 mL. Start the pump.
Occlude the tubing between the reservoir and
the pump. The tubing can be occluded either
by closing a clamp attached to the tubing or
by pinching the tubing with a set of hemostats
or pliers. The pump should alarm upstream
occlusion.
Clear the alarm and restart the pump. Occlude
the tubing after the pump. The pump should
alarm downstream occlusion. Clear the alarm.
If the pump is equipped with an air detector
introduce air into the tubing. This can be done
by turning the reservoir upside down until a
bubble of air is pulled through the tubing. Turn
the reservoir right side up. When the air bubble
gets to the pump, the pump should alarm air in
line. Clear the alarm. Remove the tubing from
the pump and prime the set so that there is no
air in the tubing. Reinsert the tubing set into
the pump and restart the pump.
Simulate an empty container situation either
by turning the reservoir upside down so that
no fluid can get to the tubing, or by removing
the tubing from the reservoir. The pump should
alarm when no fluid flow is detected.
Complete model-specific performance
testing: Refer to the service manual for performance inspection tasks specific to the device.
Complete the performance inspection per
manufacturer’s procedure.
Return to service: Before returning to use,
return any settings that were adjusted to their
original settings. Ensure the volume of the
audible alarms is loud enough to be heard in
normal operating conditions. Plug in the power
cord to ensure the battery remains charged.
External pacemaker
External pacemakers electric impulse to the
heart through the chest wall in order to temporary pacing of the heart. External pacemakers
consist of electronic circuitry that controls the
pulse rate and output current and a two lead
cable used to connect it to disposable adhesive
electrodes. Electrical impulses are delivered
to the heart, causing the heart to contract. All
chambers of the heart are stimulated simultaneously. External pacemakers are used to
assist in resuscitation, correct arrhythmias such
as asystole or bradycardia, or to temporarily
pace during procedures that may induce these
arrhythmias.
Recommended functional test frequency:
semiannual.
Sample risk assessment
Criteria – choose 1 rating from each category
Clinical function
No patient contact
Device may make contact with patient but function is non-critical
Device is used for patient diagnosis, or direct monitoring
Device is used to deliver direct treatment to the patient
Device is used for a life support
Physical risk
Device poses no appreciable risk due to failure
Device failure will result in low risk
Device failure will result in inappropriate therapy, misdiagnosis, or loss of monitoring
Device failure could result in severe injury to, or death of, patient or user
Problem avoidance probability
Maintenance or inspection would not impact reliability of the device
Common device failure modes are unpredictable or not very predictable
While common device failure modes are not very predictable, device history indicates that TSP
testing frequently detects problems
Common device failure is predictable and can be avoided by preventive maintenance
Specific regulatory or manufacturers requirements dictate preventive maintenance or testing
Incident history
No significant history
A significant history of incidents exists
Manufacturers/regulatory requirements for specific schedules
No requirements
There are requirements for testing independent of a numerical rating system
Total Score:
Assignment: 0.0x 0.5x 1x 2x 3x 4x (times per year tested)
Weight
Score
1
2
3
4
5
5
1
2
3
4
4
1
2
2
3
4
5
1
2
1
2
2
1
14
2
©University of Vermont, Rev. 2 – Confidential
77
External non-invasive
pacemaker procedure
Estimated time: 20 minutes
Equipment information
Control number:____________________________________ Hospital:_ __________________________________________
Manufacturer:______________________________________ Model:_____________________________________________
Serial number:_ ____________________________________ Location:___________________________________________
Test information
Technician:________________________________________ Date:_______________________________________________
Test type: Incoming_ ________ Post repair_________
Test equipment needed:ISA 601 Electrical Safety Analyzer (or equivalent)
SigmaPace 1000 External Pacemaker Analyzer (or equivalent)
Cables and connectors to connect pacemaker to analyzer
Test Result
Pass
Fail
N/A
Physical condition
Device is clean and decontaminated
No physical damage to case, display, mounts, cart, or components
Switches and controls operable and correctly aligned
Display intensity adequate for daytime use
Control numbers, labeling, and warnings present and legible
Inlets and hoses
Power cord, accessory cables, charger
Filters and vents clean
Electrical safety
Ground wire resistance
Chassis leakage
Patient leakage current
Patient lead leakage current – isolation test
(mains on patient applied part)
Insulation test (optional) 500 V
< 0.3 W
< 100 µA NC
< 500 µA SFC
< 100 µA B and BF
< 10 µA CF
< 100 µA BF
< 10 µA CF
< 2 MW
Preventive maintenance
Replace battery every 24 months
Complete model-specific preventive maintenance
Performance testing
Verify unit operates on battery
Rate accuracy
Output accuracy
Pulse width
Alarm function
Complete model-specific performance testing
78
©University of Vermont, Rev. 2 – Confidential
±5%
± 10 %
± 10 %
Physical condition
Check the physical condition of the device, as
described in the General Equipment Procedure.
range. The measured output should be within
10 % of the set output. For an output setting
of 100 mA, the measured output should be
between 90 mA and 110 mA.
Electrical safety
Perform electrical safety checks as described in
Chapter 5, Electrical Safety. Check ground wire
resistance, chassis leakage, and lead leakage.
Preventive maintenance
***IMPORTANT***
DO NOT TOUCH EXPOSED
CONNECTORS WHILE THE
PACEMAKER IS ON. TURN THE
PACER OFF BEFORE ADJUSTING
OR REMOVING CONNECTIONS.
Replace battery: The battery should be
replaced every 24 months. Replace if necessary.
Complete model-specific preventive maintenance: Refer to the monitor’s service manual
Rate accuracy: While measuring pacer
for preventive maintenance tasks specific to the output, the SigmaPace 1000 also displays the
device. Complete the preventive maintenance
pulse rate. The measured pulse rate should be
per manufacturer’s procedure.
within 5 % of the set rate. For a rate of 80 ppm,
the pulse rate should be between 84 ppm and
Performance inspection
76 ppm. Slowly adjust the pulse rate on the
Verify unit operates on battery: Check that
pacemaker and measure the pulse rate throughthe ac power indicator is lit when the power
out its range.
cord is plugged into an outlet. Unplug the ac
Pulse width: While measuring pacer output,
power cord and perform the remainder of the
the SigmaPace 1000 will display the pulse
functional test on battery power. The ac power
width. Typical pulse widths are between
indicator should go out when the power cord
0.5 mSec to 2.0 mSec. Measure the pulse
is unplugged and the battery indicator should
width across its range. The measured pulse
light. Be sure to plug the power cord in at the
width should be within 10 % of the set width.
conclusion of the test.
For a pulse width of 2.0 mSec, the measured
Output accuracy: Connect the pacemaker
pulse width should be between 1.8 mSec and
to the input jacks on the front of the analyzer.
2.2 mSec.
Power on the analyzer and press F1, ‘NONINV’,
Verify operation of alarms: Simulate any
to select non-invasive pacing. Press F3, ‘BRAND’ alarm conditions. Check that all alarms are
to cycle through the available manufacturers.
functional and that the volume is adequately
The preset test load will appear for each manu- loud. Ensure that appropriate visual indicators
facturer. If necessary, press F4, LOAD’, to adjust
are functioning.
the test load. Refer to the pacemaker’s manual
Complete model-specific performance testfor the proper load. Press F1, ‘NEXT’, once the
ing: Refer to the electrosurgical unit’s service
proper manufacturer and test load have been
manual for performance inspection tasks speselected.
cific to the device. Complete the performance
Set the pacing rate on the pacemaker to
inspection per manufacturer’s procedure.
80 ppm. Set the pacemaker output to the miniReturn to service: Before returning to use,
mum setting and start pacing. The SigmaPace
return any settings that were adjusted to their
1000 will display the pacer output amplitude
original settings. If equipped with a power
in mA. Measure the pacer output over its entire cord or charger, plug in to ensure the battery
remains charged and ready for use.
©University of Vermont, Rev. 2 – Confidential
79
Fetal monitor
transducer. During invasive monitoring, electrodes are placed on the scalp or other exposed
Fetal monitors measure fetal heart rate and
skin of the fetus to measure the fetal heart
maternal uterine contractions during labor to
rate. Intrauterine pressure is measured directly
assess the progress of labor and the health of
through a pressure transducer located on a
the mother and fetus. Fetal monitors may use
catheter that is inserted into the uterus. Fetal
non-invasive or invasive methods for monitoring. For non-invasive monitoring, measurements monitors may have additional monitoring capaare taken from transducers placed on the moth- bilities, such as maternal heart rate and blood
er’s abdomen. An ultrasound transducer is used pressure.
to measure the fetal heart rate. Uterine contrac- Recommended functional test frequency:
annual.
tions are measured using a tocodynamometer
Sample risk assessment
Criteria – choose 1 rating from each category
Clinical function
No patient contact
Device may make contact with patient but function is non-critical
Device is used for patient diagnosis, or direct monitoring
Device is used to deliver direct treatment to the patient
Device is used for a life support
Physical risk
Device poses no appreciable risk due to failure
Device failure will result in low risk
Device failure will result in inappropriate therapy, misdiagnosis, or loss of monitoring
Device failure could result in severe injury to, or death of, patient or user
Problem avoidance probability
Maintenance or inspection would not impact reliability of the device
Common device failure modes are unpredictable or not very predictable
While common device failure modes are not very predictable, device history indicates that TSP
testing frequently detects problems
Common device failure is predictable and can be avoided by preventive maintenance
Specific regulatory or manufacturers requirements dictate preventive maintenance or testing
Incident history
No significant History
A significant history of incidents exists
Manufacturers/regulatory requirements for specific schedules
No requirements
There are requirements for testing independent of a numerical rating system
Total Score:
Assignment: 0.0x 0.5x 1x 2x 3x 4x (times per year tested)
80
©University of Vermont, Rev. 2 – Confidential
Weight
Score
1
2
3
4
5
3
1
2
3
4
1
2
3
2
3
4
5
1
2
1
1
2
1
10
1
Fetal monitor procedure
Estimated time: 30 minutes
Equipment information
Control number:____________________________________ Hospital:_ __________________________________________
Manufacturer:______________________________________ Model:_____________________________________________
Serial number:_ ____________________________________ Location:___________________________________________
Test information
Technician:________________________________________ Date:_______________________________________________
Test type: Incoming_ ________ Post repair_________
Test equipment needed:ISA 601 Electrical Safety Analyzer (or equivalent) Cables to connect fetal monitor to
PS320 Fetal Simulator (or equivalent)
analyzer
MFH-1 Mechanical Fetal Heart (or equivalent)
Stopwatch or clock with second hand
Ultrasound gel
Test Result
Pass
Fail
N/A
Physical condition
Device is clean and decontaminated
No physical damage to case, display, mounts, cart, or components
Switches and controls operable and correctly aligned
Display intensity adequate for daytime use
Control numbers, labeling, and warnings present and legible
Inlets and hoses
Power cord, accessory cables, charger
Filters and vents clean
Electrical safety
Ground wire resistance
Chassis leakage
Patient leakage current
Patient lead leakage current – isolation test
(mains on patient applied part)
Insulation test (optional) 500 V
< 0.3 W
< 100 µA NC
< 500 µA SFC
< 100 µA B and BF
< 10 µA CF
< 100 µA BF
< 10 µA CF
< 2 MW
Preventive maintenance
Replace battery every 24 months
Clean rollers and paper guides
Lubricate motor and paper drive mechanism
Verify proper time and date, correct if necessary
Complete model-specific preventive maintenance
Performance testing
Verify unit operates on battery
Fetal heart rate accuracy
Maternal heart rate accuracy
Intrauterine pressure accuracy
Recorder speed (3 cm/min)
Alarm function
Complete model-specific performance testing
±5%
±5%
±2%
±4%
©University of Vermont, Rev. 2 – Confidential
81
Physical condition
Performance inspection
Check the physical condition of the device, as
described in the General Equipment Procedure.
Verify unit operates on battery: Check that
the ac power indicator is lit when the power
cord is plugged into an outlet. Unplug the ac
power cord and perform the remainder of the
Electrical safety
Perform electrical safety checks as described in functional test on battery power. The ac power
Chapter 5, Electrical Safety. Check ground wire indicator should go out when the power cord
is unplugged and the battery indicator should
resistance, chassis leakage, and lead leakage.
light. Be sure to plug the power cord in at the
conclusion of the test.
Preventive maintenance
Fetal heart rate accuracy: If the fetal moniReplace battery: The battery should be
tor uses fetal scalp electrodes, connect the
replaced every 24 months. Replace if necessary.
ECG cable to the connectors on the side of the
Clean rollers and paper guides: Inspect the
PS320. Use the fetal up and down buttons to
rollers and paper guides and remove any debris.
set a fetal heart rate of 120 bpm. The displayed
Check for bits of torn paper caught in the rollers.
heart rate should be within 5 % of the set rate.
Lubricate motor and paper drive mechaFor a simulated heart rate of 120 bpm, the
nism: Follow the manufacturer’s instructions
displayed rate should be between 114 bps and
in the service manual for lubricating the motor
126 bps.
and paper drive mechanism. Not all motors will
Connect the ultrasound cable from the
need to be lubricated.
ultrasound connector on the fetal monitor to
Verify proper time and date, correct if
the US1 port of the PS320. If the fetal monitor
necessary: Verify the time and date displayed
is equipped with two ultrasound inputs, conon the monitor is correct. If the time and date is
nect a second ultrasound cable to the US2 port
not displayed on the monitor, print a strip from
of the analyzer. As above, the displayed heart
the recorder. The time and date should appear
on the printed strip. Correct the time and date
as necessary.
Complete model-specific preventive maintenance: Refer to the monitor’s service manual
for preventive maintenance tasks specific to the
device. Complete the preventive maintenance
per manufacturer’s procedure.
Testing ultrasound transducers with the MFH-1 Fetal Heart Simulator.
82
©University of Vermont, Rev. 2 – Confidential
rate should be within 5 % of the set rate. For a
simulated heart rate of 120 bpm, the displayed
rate should be between 114 bps and 126 bps.
Disconnect the cables from the PS320 analyzer.
To test the operation of the ultrasound transducers, connect the MFH-1 Fetal Heart Simulator
to the US1 port of the PS320 analyzer. The
analyzer will need to be used with the battery
eliminator, as the MFH-1 cannot run on battery
power. Connect an ultrasound transducer to the
fetal monitor. Place the transducer face up on a
flat surface and coat with ultrasound gel. Place
the MFH-1 on top of the transducer with the
simulation window facing the transducer. The
fetal heart rate will be displayed on the monitor
and should be within 5 % of the set rate. For a
simulated heart rate of 120 bpm, the displayed
rate should be between 114 bpm and 126 bpm.
Repeat this process for each ultrasound transducer. Remove the MFH-1 from the PS320.
Maternal heart rate accuracy: Connect the
ECG cable to the connectors on the side of the
PS320. Use the maternal up and down buttons
to set a maternal heart rate of 60 bpm. The displayed heart rate should be within 5 % of the
set rate. For a simulated heart rate of 60 bpm,
the displayed rate should be between 57 bpm
and 63 bpm.
Intrauterine pressure accuracy: Connect
the TOCO cable from the TOCO connector on the
fetal monitor to the TOCO port of the PS320. Use
the TOCO button to scroll through the available
settings. The displayed intrauterine pressure
should be within 2 % of the set pressure. For
a simulated pressure of 50 mm, the displayed
pressure should be between 49 mm and 51 mm.
Recorder speed: Record a strip on the fetal
monitor. Use the mark function on the recorder
to place a mark on the paper. Use a stopwatch
or clock to time 150 seconds (2.5 minutes).
Place another mark on the paper. Measure the
distance between the marks. With a recorder
speed of 3 cm/min, the marks should be
between 72 mm and 78 mm.
Verify operation of alarms: Check that all
alarms are functional and that the volume is
adequately loud. Ensure that appropriate visual
indicators are functioning.
Note the alarm settings on the monitor. Adjust
the fetal heart rate on the PS320 down to just
below the monitor’s low heart rate limit. The
alarm should sound. Increase the fetal heart
rate above the low alarm point. Clear the alarm
if necessary. Increase the fetal heart rate to just
above the high heart rate limit. Note that the
alarm sounds when the heart rate increases
beyond the high alarm limit. Set the fetal heart
rate back to 120 bpm and clear any alarms.
Repeat the process for the maternal heart rate
alarm.
Complete model-specific performance
testing: Refer to the service manual for performance inspection tasks specific to the device.
Complete the performance inspection per
manufacturer’s procedure.
Return to service: Before returning to use,
return any alarms that were adjusted to their
original settings. Ensure the volume of the
audible alarms is loud enough to be heard in
normal operating conditions. Clean ultrasound
gel from the transducers. Plug in the power cord
to ensure the battery remains charged.
©University of Vermont, Rev. 2 – Confidential
83
Hypo/hyperthermia unit
Hypo/hyperthermia units regulate a patient’s
temperature using circulating water. By adjusting the temperature of the water, the patient
may be either heated or cooled. These devices
typically consist of a water reservoir, a heating element, a cooling system, a pump for
circulating water, and a blanket designed for
water circulation. The units will also have a
thermostat and circuitry for maintaining a set
temperature.
Recommended functional test frequency:
annual.
Sample risk assessment
Criteria – choose 1 rating from each category
Clinical function
No patient contact
Device may make contact with patient but function is non-critical
Device is used for patient diagnosis, or direct monitoring
Device is used to deliver direct treatment to the patient
Device is used for a life support
Physical risk
Device poses no appreciable risk due to failure
Device failure will result in low risk
Device failure will result in inappropriate therapy, misdiagnosis, or loss of monitoring
Device failure could result in severe injury to, or death of, patient or user
Problem avoidance probability
Maintenance or inspection would not impact reliability of the device
Common device failure modes are unpredictable or not very predictable
While common device failure modes are not very predictable, device history indicates that TSP
testing frequently detects problems
Common device failure is predictable and can be avoided by preventive maintenance
Specific regulatory or manufacturers requirements dictate preventive maintenance or testing
Incident history
No significant history
A significant history of incidents exists
Manufacturers/regulatory requirements for specific schedules
No requirements
There are requirements for testing independent of a numerical rating system
Total Score:
Assignment: 0.0x 0.5x 1x 2x 3x 4x (times per year tested)
84
©University of Vermont, Rev. 2 – Confidential
Weight
1
2
3
4
5
1
2
3
4
1
2
Score
4
3
2
3
4
5
1
2
1
1
2
1
11
1
Hypo/hyperthermia unit procedure
Estimated time: 35 minutes
Equipment information
Control number:____________________________________ Hospital:_ __________________________________________
Manufacturer:______________________________________ Model:_____________________________________________
Serial number:_ ____________________________________ Location:___________________________________________
Test information
Technician:________________________________________ Date:_______________________________________________
Test type: Incoming_ ________ Post repair_________
Test equipment needed:ISA 601 Electrical Safety Analyzer (or equivalent)
DPM 4 with temperature probe (or equivalent)
Water flow meter
Tubing and connectors to connect flow meter
Test Result
Pass
Fail
N/A
Physical condition
Device is clean and decontaminated
No physical damage to case, display, mounts, cart, or components
Switches and controls operable and correctly aligned
Display intensity adequate for daytime use
Control numbers, labeling, and warnings present and legible
Inlets and hoses
Power cord, accessory cables, charger
Filters and vents clean
Electrical safety
Ground wire resistance
Chassis leakage
Patient leakage current
Patient lead leakage current – isolation test
(mains on patient applied part)
Insulation test (optional) 500 V
< 0.3 W
< 100 µA NC
< 500 µA SFC
< 100 µA B and BF
< 10 µA CF
< 100 µA BF
< 10 µA CF
< 2 MW
Preventive maintenance
Inspect and clean reservoir
Lubricate motor
Complete model-specific preventive maintenance
Performance testing
Fluid level
Flow rate
Temperature accuracy
High temperature protection
Low temperature protection
Temperature probe accuracy
Alarms
Complete model-specific performance testing
± 1 ºC
≥ 43 ºC
≤ 1 ºC
± 1 ºC
©University of Vermont, Rev. 2 – Confidential
85
Physical condition
Check the physical condition of the device, as
described in the General Equipment Procedure.
Electrical safety
Perform electrical safety checks as described in
Chapter 5, Electrical Safety. Check ground wire
resistance and chassis leakage.
Preventive maintenance
Inspect and clean reservoir: Empty the water
reservoir. Check for cracks and leaks. Inspect
the condition of rubber seals and replace as
necessary. Clean any debris or mineral build up
from the reservoir. Refill the reservoir tank with
distilled water. Do not fill with tap water, as
this may cause mineral build up in the device.
Lubricate motor: Follow the manufacturer’s
instructions in the service manual for lubricating the pump motor. Not all motors will need to
be lubricated.
Complete model-specific preventive maintenance: Refer to the monitor’s service manual
for preventive maintenance tasks specific to the
device. Complete the preventive maintenance
per manufacturer’s procedure.
Flow rate: Connect a blanket to the hypo/
hyperthermia unit. Connect a water flow meter
between the outlet of the hypo/hyperthermia
unit and the inlet of the blanket. Check the service manual for flow rate specifications.
Temperature accuracy: Connect the temperature probe to the Temp connector on the
side of the DPM 4. If the temperature units need
to be changed, press the soft key labeled ‘UNIT’
on the DPM 4 and then use the menu scroll
keys until ‘C/F’ is displayed. Press the soft key
labeled ‘C/F’ to toggle between the Celsius and
Fahrenheit scales.
Connect a blanket to the hypo/hyperthermia
unit. Insert the temperature probe into the
water reservoir to measure the temperature of
the circulating water. Set the temperature of the
hypo/hyperthermia unit to its lowest setting.
Allow the water temperature to stabilize. Repeat
the temperature measurement with a midrange
temperature and the maximum temperature
setting. The measured temperature should be
within 1 °C of the set temperature. For a set
temperature of 42 °C, the measured temperature
should be between 41 °C and 43 °C.
Performance inspection
Fluid level: Ensure there is an adequate water
level in the reservoir. There should be sufficient
water for circulating throughout the blanket, but
the water reservoir should not be overfilled.
Testing water temperature with the DPM 4.
86
©University of Vermont, Rev. 2 – Confidential
High temperature protection: Connect a
blanket to the hypo/hyperthermia unit and
insert the temperature probe into the water
reservoir. Set the temperature on the hypo/
hyperthermia unit to its maximum setting.
If the hypo/hyperthermia unit is equipped
with a patient temperature probe, expose the
temperature probe to room air. The temperature
of the circulating water should increase until the
hypo/hyperthermia unit alarms temperature.
Note the temperature at which the alarm sounds
on the DPM 4. Check the service manual for the
specific high temperature limit and compare this
value with the measured temperature. The measured temperature should be within 1 °C of the
high temperature limit. For a high temperature
limit of 44 °C, the measured high temperature
should be between 43 °C and 45 °C.
If the hypo/hyperthermia is not equipped
with a patient temperature probe, follow the
manufacturer’s procedure for overriding the
thermostat.
Low temperature protection: If the hypo/
hyperthermia unit is equipped with a low
temperature alarm, set the temperature on the
hypo/hyperthermia unit to its lowest setting.
If the hypo/hyperthermia unit is equipped
with a patient temperature probe, expose the
temperature probe to room air. The temperature
of the circulating water should decrease until
the hypo/hyperthermia unit alarms low temperature. Note the temperature at which the alarm
sounds on the DPM 4. Check the service manual
for the specific low temperature limit and compare this value with the measured temperature.
The measured temperature should be within
1 °C of the low temperature limit.
If the hypo/hyperthermia is not equipped
with a patient temperature probe, follow the
manufacturer’s procedure for overriding the
thermostat.
Temperature probe accuracy: Fill a container with warm water at about 30 °C. Insert
the temperature probe from the hypo/hyperthermia unit and the temperature probe from
the DPM 4 into the water. The temperature displayed on the hypo/hyperthermia unit should
be within 1 °C of the temperature measured
on the DPM 4. For a temperature of 30 °C, the
displayed temperature should be between 29 °C
and 31 °C.
Alarm function: Check that all alarms are
functional and that the volume is adequately
loud. Ensure that appropriate visual indicators
are functioning.
If the hypo/hyperthermia unit is equipped
with a low reservoir alarm, drain the reservoir
to below the low water level. Run the hypo/
hyperthermia unit. The low reservoir alarm
should sound. Fill the reservoir with distilled
water until the alarm clears.
Complete model-specific performance
testing: Refer to the service manual for performance inspection tasks specific to the device.
Complete the performance inspection per
manufacturer’s procedure.
Return to service: Before returning to use,
return any settings that were adjusted to their
original settings. Ensure the volume of the
audible alarms is loud enough to be heard in
normal operating conditions. If the hypo/hyperthermia unit is going to be used in the near
future, Ensure there is an adequate water level
in the reservoir. If the hypo/hyperthermia unit
will not be used soon, drain the water from the
reservoir.
©University of Vermont, Rev. 2 – Confidential
87
Infant incubator
Infant incubators provide a closed controlled
environment to maintain appropriate temperature, humidity, and oxygen levels for infants
and are used mainly for premature infants
and other newborns that cannot regulate their
body temperature by themselves. Infant incubators typically consist of a clear removable
plastic hood with a mattress, a heater, a fan for
circulating warm air, and temperature controls.
Temperature sensors may measure air temperature inside the incubator, the infant’s body
temperature through a skin probe, or both. Most
incubators also include humidity controls and a
means for adjusting oxygen levels.
Recommended functional test frequency:
annual.
Sample risk assessment
Criteria – choose 1 rating from each category
Clinical function
No patient contact
Device may make contact with patient but function is non-critical
Device is used for patient diagnosis, or direct monitoring
Device is used to deliver direct treatment to the patient
Device is used for a life support
Physical risk
Device poses no appreciable risk due to failure
Device failure will result in low risk
Device failure will result in inappropriate therapy, misdiagnosis, or loss of monitoring
Device failure could result in severe injury to, or death of, patient or user
Problem avoidance probability
Maintenance or inspection would not impact reliability of the device
Common device failure modes are unpredictable or not very predictable
While common device failure modes are not very predictable, device history indicates that TSP
testing frequently detects problems
Common device failure is predictable and can be avoided by preventive maintenance
Specific regulatory or manufacturers requirements dictate preventive maintenance or testing
Incident history
No significant history
A significant history of incidents exists
Manufacturers/regulatory requirements for specific schedules
No requirements
There are requirements for testing independent of a numerical rating system
Total Score:
Assignment: 0.0x 0.5x 1x 2x 3x 4x (times per year tested)
88
©University of Vermont, Rev. 2 – Confidential
Weight
1
2
3
4
5
Score
4
1
2
3
4
4
1
2
2
3
4
5
1
2
1
1
2
1
12
1
Infant incubator procedure
Estimated time: 120 minutes
Equipment information
Control number:____________________________________ Hospital:_ __________________________________________
Manufacturer:______________________________________ Model:_____________________________________________
Serial number:_ ____________________________________ Location:___________________________________________
Test information
Technician:________________________________________ Date:_______________________________________________
Test type: Incoming_ ________ Post repair_________
Test equipment needed: ISA 601 Electrical Safety Analyzer (or equivalent)
INCU incubator analyzer (or equivalent)
Stopwatch or watch with a second hand
Heat Gun
Test Result
Pass
Fail
N/A
Physical condition
Device is clean and decontaminated
No physical damage to case, display, mounts, cart, or components
Switches and controls operable and correctly aligned
Display intensity adequate for daytime use
Control numbers, labeling, and warnings present and legible
Inlets and hoses
Power cord, accessory cables, charger
Filters and vents clean
Electrical safety
Ground wire resistance
Chassis leakage
Patient leakage current
Patient lead leakage current – isolation test
(mains on patient applied part)
Insulation test (optional) 500 V
< 0.3 W
< 100 µA NC
< 500 µA SFC
< 100 µA B and BF
< 10 µA CF
< 100 µA BF
< 10 µA CF
< 2 MW
Preventive maintenance
Clean cooling vents and filters
Inspect and clean ducts, heater, and fans
Inspect gaskets for signs of deterioration
Inspect port closures and port sleeves
Replace battery every 24 months
Complete model-specific preventive maintenance
continued on page 90
©University of Vermont, Rev. 2 – Confidential
89
Infant incubator procedure
Estimated time: 120 minutes
continued from page 89
Test Result
Pass
Fail
N/A
Performance testing
Verify unit operates on battery
Fan operation
Warm up time
Air temperature accuracy
Skin temperature accuracy
Temperature overshoot
Relative humidity
Air flow
Air temperature alarms
Skin temperature alarms
High temperature protection
Noise level
Alarm function
Complete model-specific performance testing
90
©University of Vermont, Rev. 2 – Confidential
± 20 %
± 1 ºC
± 0.3 ºC
± 2 ºC
± 10 %
≤ 0.35 m/s
≤ 40 °C
≤ 60 dB normal conditions
≤ 80 dB alarm activated
≥ 80 dB alarm activated,
3 m from incubator
Physical condition
Check the physical condition of the device, as
described in the General Equipment Procedure.
Electrical safety
Perform electrical safety checks as described in
Chapter 5, Electrical Safety. Check ground wire
resistance and chassis leakage.
Preventive maintenance
Clean cooling vents and filters: Inspect vents
and air filters. Use a portable vacuum to clean
dust from air ducts. Clean or replace filters
as necessary. Ensure that filters are installed
properly.
Inspect gaskets for signs of deterioration:
Check rubber or plastic gaskets and seals for
signs of deterioration. Replace as necessary.
Inspect port closures and port sleeves:
Inspect port doors and iris seals for proper
closure. Inspect the port gloves for holes or
other signs of wear.
Replace battery: The battery should be
replaced every 24 months. Replace if necessary.
Complete model-specific preventive maintenance: Refer to the monitor’s service manual
for preventive maintenance tasks specific to the
device. Complete the preventive maintenance
per manufacturer’s procedure.
Performance inspection
Verify unit operates on battery: Check that
the ac power indicator is lit when the power
cord is plugged into an outlet. Unplug the ac
power cord and perform the remainder of the
functional test on battery power. The ac power
indicator should go out when the power cord
is unplugged and the battery indicator should
light. Be sure to plug the power cord in at the
conclusion of the test.
Fan operation: Inspect the fan blades for
damage. Look for chips, warping, melting, and
missing blades. Ensure there is adequate clearance around the fan assembly. Look for signs of
rubbing around the fan housing. Lubricate the
fan motor per the manufacturer’s specification.
Follow the manufacturer’s instructions in the
service manual for lubricating the pump motor.
Not all motors will need to be lubricated.
Warm-up time: With the incubator at room
temperature, set the incubator temperature for
12 ºC above ambient temperature (typically
36 ºC). Use a stopwatch to time how long it
takes for the temperature to stabilize. The measured warm-up time should be within 20 % of
the manufacturer’s specified warm-up time. For
a warm-up time of 30 minutes, the measured
warm up time should be within 24 minutes and
36 minutes.
INCU inside incubator.
©University of Vermont, Rev. 2 – Confidential
91
Air temperature accuracy: Set the incubator temperature to 32 ºC. Place the INCU in the
center of the incubator. Place the T1 and T3
temperature probes so that they are placed vertically in opposite corners. Place the T2 probe in
the center holder. Attach the air flow sensor and
rotate the sensor so that it is perpendicular to
the air flow within the incubator. If the incubator is equipped with a skin temperature probe,
place the skin probe in close proximity to the
T2 sensor. Allow the incubator temperature to
stabilize. Press the ‘SELECT’ button on the INCU
to cycle through the readings. The measured
air temperature should be within 1 ºC of the set
temperature. For a set temperature of 32 ºC the
measured temperature should be between 31 ºC
and 33 ºC.
Set the temperature on the incubator to 36 ºC
and allow the temperature to stabilize. Repeat
the temperature measurements at 36 ºC.
Skin temperature accuracy: Place the skin
temperature probe in close proximity to the T2
sensor on the INCU. Allow the incubator temperature to stabilize. The measured temperature
on the T2 sensor should be within 0.3 ºC of the
displayed skin temperature on the incubator.
For a displayed skin temperature of 36.0 ºC,
the measured temperature should be between
35.7 ºC and 36.3 ºC.
Temperature overshoot: From a stabilized
incubator temperature of 32 ºC, increase the
incubator temperature to 36 ºC. Allow the
temperature to stabilize. During temperature
stabilization, the temperature in the incubator
should not overshoot the set temperature by
more than 2 ºC. For a set temperature of 36 ºC,
the incubator temperature should not exceed
38 ºC during temperature stabilization.
Relative humidity: If the incubator is
equipped with a display for relative humidity, note the relative humidity measured on the
INCU. The measured relative humidity should be
within 10 % of the displayed relative humidity.
For a displayed relative humidity of 50 %, the
measured relative humidity should be between
45 % and 55 %.
Air flow: With the INCU placed in the center
of the incubator, rotate the air flow sensor so
that it is perpendicular with the airflow in the
incubator. Note the air velocity measurement
on the INCU. The air velocity should not exceed
0.35 m/s.
Air temperature alarms: Set the incubator
temperature to 36 ºC and allow the temperature to stabilize. Open the incubator hood to
room air. Verify that the low temperature alarm
sounds. Close the incubator and allow the temperature to stabilize at 36 ºC. Use a heat gun to
increase the air temperature. Note the temperature at which the alarm sounds.
***CAUTION***
DO NOT USE THE AIR FLOW SENSOR IN
THE PRESENCE OF OXYGEN. THE SENSOR
USES A HOT-WIRE TECHNIQUE FOR AIR
VELOCITY MEASUREMENT AND MAY
BECOME A SOURCE OF IGNITION.
Placement of air flow sensor.
92
©University of Vermont, Rev. 2 – Confidential
Skin temperature alarms: Adjust the skin
temperature set point on the incubator to 36
ºC. Place the sensor in the incubator and allow
the temperature to stabilize. Remove the skin
temperature sensor from the incubator and
verify that the low temperature alarm sounds.
Place the skin temperature sensor in a cup of
warm water. Ensure the water is warm enough
to activate the high temperature alarm.
High temperature protection: Set the incubator temperature to its maximum setting and
allow the temperature to stabilize. Use a heat
gun to blow hot air into the incubator to raise
the temperature above the maximum setting.
Note the temperature at which the over temperature alarm activates.
Noise level: With the incubator running and
the INCU placed in the center of the incubator,
measure the sound level inside the incubator.
Press the ‘SELECT’ button on the INCU to cycle
through the measurements until the sound
level is displayed. All ports and doors should be
closed for this measurement. The sound level
within the incubator should not exceed 60 dB.
The most common cause of high sound levels in
the incubator is a noisy fan assembly. Activate
an alarm. The sound level in the incubator with
the alarm sounding should not exceed 80 dB.
Remove the INCU from the incubator and
place it 3 m from the front of the incubator.
Activate an alarm on the incubator and measure the sound level with the INCU. The alarm
should be at least 80 dB at this distance.
Alarm function: Check that all alarms are
functional and that the volume is adequately
loud. Ensure that appropriate visual indicators
are functioning.
Unplug the temperature probe from the incubator. The disconnected probe alarm should
activate. If the incubator is equipped with
alarms for an open or short circuited temperature probe, use open and short circuited probe
plugs to test these alarms. Disconnect the skin
temperature probe and connect the probe plugs.
The appropriate alarms should activate.
Unplug the incubator to simulate a power failure. The power failure alarm should activate.
Complete model-specific performance
testing: Refer to the service manual for performance inspection tasks specific to the device.
Complete the performance inspection per
manufacturer’s procedure.
Return to service: Before returning to use,
return any settings that were adjusted to their
original settings. Ensure the volume of the
audible alarms is loud enough to be heard in
normal operating conditions. Plug in the power
cord to ensure the battery remains charged.
©University of Vermont, Rev. 2 – Confidential
93
Infusion pump
for propelling the infusate. Adjustable settings
control the flow rate and volume to be infused.
Audible and visual alarms alert the user to flow
changes or malfunctions. Most infusion pumps
include a memory function that records does
settings and alarms.
Infusion pumps deliver controlled and accurate infusion of liquids to a patient through
intravenous, epidural, or subcutaneous routes.
These pumps may utilize a peristaltic pump
mechanism, a volumetric pump mechanism that
repeatedly compresses a specific amount of fluid Recommended functional test frequency:
annual.
into a cassette, or a syringe driven mechanism
Sample risk assessment
Criteria – choose 1 rating from each category
Clinical function
No patient contact
Device may make contact with patient but function is non-critical
Device is used for patient diagnosis, or direct monitoring
Device is used to deliver direct treatment to the patient
Device is used for a life support
Physical risk
Device poses no appreciable risk due to failure
Device failure will result in low risk
Device failure will result in inappropriate therapy, misdiagnosis, or loss of monitoring
Device failure could result in severe injury to, or death of, patient or user
Problem avoidance probability
Maintenance or inspection would not impact reliability of the device
Common device failure modes are unpredictable or not very predictable
While common device failure modes are not very predictable, device history indicates that TSP
testing frequently detects problems
Common device failure is predictable and can be avoided by preventive maintenance
Specific regulatory or manufacturers requirements dictate preventive maintenance or testing
Incident history
No significant history
A significant history of incidents exists
Manufacturers/regulatory requirements for specific schedules
No requirements
There are requirements for testing independent of a numerical rating system
Total Score:
Assignment: 0.0x 0.5x 1x 2x 3x 4x (times per year tested)
94
©University of Vermont, Rev. 2 – Confidential
Weight
1
2
3
4
5
1
2
3
4
1
2
Score
4
3
2
3
4
5
1
2
1
2
2
1
12
1
Infusion pump procedure
Estimated time: 45 minutes
Equipment information
Control number:____________________________________ Hospital:_ __________________________________________
Manufacturer:______________________________________ Model:_____________________________________________
Serial number:_ ____________________________________ Location:___________________________________________
Test information
Technician:________________________________________ Date:_______________________________________________
Test type: Incoming_ ________ Post repair_________
Test equipment needed:ISA 601 Electrical Safety Analyzer (or equivalent)
Tubing set for infusion pump
IDA 4 Plus Infusion Device Analyzer (or equivalent)
20 cc or larger syringe
Reservoir to connect to tubing set (bag or bottle)
3 way stopcock
Tubing and connectors to connect to IDA 4 Plus
Test Result
Pass
Fail
N/A
Physical condition
Device is clean and decontaminated
No physical damage to case, display, mounts, cart, or components
Switches and controls operable and correctly aligned
Display intensity adequate for daytime use
Control numbers, labeling, and warnings present and legible
Inlets and hoses
Power cord, accessory cables, charger
Filters and vents clean
Electrical safety
Ground wire resistance
Chassis leakage
Patient leakage current
Patient lead leakage current – isolation test
(mains on patient applied part)
Insulation test (optional) 500 V
< 0.3 W
< 100 µA NC
< 500 µA SFC
< 100 µA B and BF
< 10 µA CF
< 100 µA BF
< 10 µA CF
< 2 MW
Preventive maintenance
Clean flow detector
Replace battery every 24 months
Complete model-specific preventive maintenance
Performance testing
Verify unit operates on battery
Pole clamp function
Flow rate accuracy
Volume accuracy
Infusion complete/KVO
Occlusion detection pressure
Piggyback infusion
Alarm function
Complete model-specific performance testing
± 10 %
± 10 %
± 1 psi
©University of Vermont, Rev. 2 – Confidential
95
Physical condition
Flow rate accuracy: Fill the infusion reservoir
with a 1 % detergent solution in de-ionized
Check the physical condition of the device, as
water.
A 1 % stock solution of detergent such
described in the General Equipment Procedure.
as Cole-Parmer Micro-90 should be prepared
in volume using de-ionized water; this may be
Electrical safety
stored in a closed vessel for up to 6 months.
Perform electrical safety checks as described in The solution should then be diluted 10:1 with
Chapter 5, Electrical Safety. Check ground wire de-ionized water for daily use. If the water used
resistance and chassis leakage.
causes too much foaming, a 20:1 dilution is
recommended. Do not use tap water or solutions
Preventive maintenance
intended for patient use, as these may harm the
Clean flow detector: Inspect the flow detector
transducers in the IDA 4 Plus.
on the infusion pump. Clean any debris from
Connect the infusion tubing to the reserthe flow sensor.
voir. Prime the set so that there is no air in
Replace battery: The battery should be
the tubing. With the tubing draining into a
replaced every 24 months. Replace if necessary. container or sink, open the flow control mechaComplete model-specific preventive mainnism on the tubing set. Hold the reservoir high
tenance: Refer to the monitor’s service manual
enough above the tubing so that fluid flows
for preventive maintenance tasks specific to the through the tubing under the force of gravity.
device. Complete the preventive maintenance
Allow fluid to flow through the tubing until no
per manufacturer’s procedure.
air bubbles can be seen in the tubing. Insert the
set into the infusion pump. Connect the threePerformance inspection
way stopcock to the channel 1 port on the IDA
4 Plus. Connect the patient infusion tubing to
Verify unit operates on battery: Check that
one port of the stopcock. Fill the syringe with
the ac power indicator is lit when the power
the detergent solution and connect this to the
cord is plugged into an outlet. Unplug the ac
other port of the stopcock. Connect a piece of
power cord and perform the remainder of the
tubing to the drain port of channel 1 and run
functional test on battery power. The ac power
the tubing into a container to catch the used
indicator should go out when the power cord
solution.
is unplugged and the battery indicator should
light. Be sure to plug the power cord in at the
conclusion of the test.
Pole clamp function: Check the physical
condition of the pole clamp. The pole clamp
should be securely fastened to the infusion
pump. The clamp mechanism should move
freely. The pole clamp should secure the infusion pump to the IV pole.
Infusion pump connected to the IDA 4 Plus.
96
©University of Vermont, Rev. 2 – Confidential
From the main menu of the IDA 4 Plus, use
the arrow keys to highlight ‘SETUP’ under
channel 1 and then press ‘ENT’. Use the arrow
keys to highlight ‘FLOW’ and press ‘ENT’. Select
‘PRIME’. Close the stopcock port connected to
the infusion tubing, leaving the ports to the
syringe and the IDA 4 Plus open. Inject the
solution in the syringe into the IDA 4 Plus until
‘START’ appears on the screen. Select ‘AutoSTART’. The IDA 4 Plus will start the flow test
when it detects flow from the pump. Close the
port to the syringe, leaving the ports to the
tubing and the IDA 4 Plus open.
Set the flow rate on the infusion pump to
60 mL/hr and set the dose to 10 mL. Start the
infusion pump. When the pump alarms complete, select ‘END’ on the IDA 4 Plus to end the
test. At the set rate and volume, the dose should
be complete in approximately 10 minutes. Clear
the alarm on the pump. The measured flow
rate should be within 10 % of the set rate. For
a flow rate of 60 mL/hr, the flow rate should be
between 54 mL/hr and 66 mL/hr. Set the flow
rate on the pump to 120 mL/hr and the dose
to 10 mL. Repeat the flow test at the higher
flow rate.
The IDA 4 Plus is equipped with four channels to analyze infusion devices. Four pumps
can be run simultaneously.
Volume accuracy: Set up the infusion pump
and the IDA 4 Plus as described previously in
Flow Rate Accuracy. The IDA 4 Plus will measure flow rate and volume simultaneously. The
delivered volume should be within 10 % of the
set volume. For a set volume of 10 mL, the measured volume should be within 9 mL and 11 mL.
Infusion complete/KVO: At the conclusion
of an infusion, the infusion pump should alarm
‘infusion complete’ or ‘KVO’. If the pump alarms
‘KVO’ it is supplying a very low flow rate in
order to keep the vein open if another infusion
needs to be given. Measure the KVO rate using
the ‘FLOW’ function on the IDA 4 Plus.
Set up the infusion pump with a high flow
rate and low volume, such as 300 mL/hr and
2 mL. Start the pump and allow the infusion to
complete. When the infusion is complete, do not
stop the pump, instead silence the alarm and
let the pump run. Enter the ‘FLOW’ screen on
the IDA 4 Plus to measure the KVO rate. Several
minutes may be required for the analyzer to be
able to measure the low rate. The measured
rate should be within 10 % of the infusion
pump’s KVO rate. For a KVO rate of 1 mL/hr, the
measured rate should be between 0.9 mL/hr
and 1.1 mL/hr.
Occlusion detection pressure: From the
channel set up menu on the IDA 4 Plus, select
‘OCCLUSION’. Prime the IDA 4 Plus with the
syringe if necessary. Set the flow rate on the
infusion pump to 100 mL/hr. Set the volume to
10 mL or more so that the volume will not be
delivered before the test is complete. Start the
pump. Select ‘START’ on the IDA 4 Plus. Select
‘END’ on the IDA 4 Plus when the pump alarms
occlusion. Note the pressure at which the pump
alarms. Compare the measured pressure to the
occlusion pressure of the pump. The occlusion
pressure will be specific to the model. Check
the service manual for the specific pressure.
The measured occlusion pressure should be
within 1 psi of the pump’s occlusion pressure.
For an occlusion pressure of 20 psi, the measured pressure should be between 19 psi and
21 psi.
Piggyback infusion: From the channel set
up menu on the ID A4 Plus, select ‘DUAL FLOW’.
Prime the IDA 4 Plus with the syringe if necessary. Use the arrow keys to enter the flow rates
and volumes to be tested. Enter 60 mL/hr for the
secondary rate, 10 mL for the secondary volume,
12 0mL/hr for the primary rate, and 10 mL
for the primary volume. Select ‘AutoSTART’ to
start the flow measurements when flow is first
detected.
©University of Vermont, Rev. 2 – Confidential
97
On the infusion pump, set the primary rate for
120 mL/hr and the primary volume to 10 mL.
Set the piggyback flow rate to 60 mL/hr and the
piggyback volume to 10 mL. Start the piggyback
infusion.
The IDA 4 Plus will display the rate and
volume for the piggyback infusion as ‘FLOW 1’.
When the piggyback infusion is completed, the
infusion pump should automatically switch over
to the primary infusion, and will usually sound
an audible tone. The rate and volume for the
primary infusion is displayed on the IDA 4 Plus
as ‘FLOW 2’. The delivered flow rates and volumes should be within 10 % of their set rates.
Alarm function: Check that all alarms are
functional and that the volume is adequately
loud. Ensure that appropriate visual indicators
are functioning.
Set the rate on the pump to 100 mL/hr and
set the volume to 100 mL. Start the pump.
Occlude the tubing between the reservoir and
the pump. The tubing can be occluded either
by closing a clamp attached to the tubing or
by pinching the tubing with a set of hemostats
or pliers. The pump should alarm upstream
occlusion.
Clear the alarm and restart the pump. Occlude
the tubing downstream from the pump. The
pump should alarm downstream occlusion.
Clear the alarm.
98
©University of Vermont, Rev. 2 – Confidential
If the pump is equipped with an air detector,
introduce air into the tubing. Turn the reservoir upside down until a bubble of air is pulled
through the tubing. Turn the reservoir right side
up. When the air bubble gets to the pump, the
pump should alarm air in line. Clear the alarm.
Remove the tubing from the pump and prime
the set so that there is no air in the tubing.
Reinsert the tubing set into the pump and
restart the pump.
Simulate an empty container situation either
by turning the reservoir upside down so that
no fluid can get to the tubing, or by removing
the tubing from the reservoir. The pump should
alarm when no fluid flow is detected.
Complete model-specific performance
testing: Refer to the service manual for performance inspection tasks specific to the device.
Complete the performance inspection per
manufacturer’s procedure.
Return to service: Before returning to use,
return any settings that were adjusted to their
original settings. Ensure the volume of the
audible alarms is loud enough to be heard in
normal operating conditions. Plug in the power
cord to ensure the battery remains charged.
Non-invasive blood pressure monitor the cuff is deflated, transducers measure presA non-invasive blood pressure (NIBP) monitor
measures and displays blood pressure using
external sensors. These devices consist of an
inflatable cuff, hose, pressure sensors, processor, and a display. Typically, NIBP monitors
use an oscillometric method to measure blood
pressure. The cuff is attached to a patient’s arm
and then inflated until blood flow is stopped. As
sure fluctuations. The monitor then processes
the information from the pressure transducers
and displays the systolic, diastolic, and mean
pressure, typically in mmHg (millimeters of
mercury). Most NIBP monitors will also display
heart rate.
Recommended functional test frequency:
annual.
Sample risk assessment
Criteria – choose 1 rating from each category
Clinical function
No patient contact
Device may make contact with patient but function is non-critical
Device is used for patient diagnosis, or direct monitoring
Device is used to deliver direct treatment to the patient
Device is used for a life support
Physical risk
Device poses no appreciable risk due to failure
Device failure will result in low risk
Device failure will result in inappropriate therapy, misdiagnosis, or loss of monitoring
Device failure could result in severe injury to, or death of, patient or user
Problem avoidance probability
Maintenance or inspection would not impact reliability of the device
Common device failure modes are unpredictable or not very predictable
While common device failure modes are not very predictable, device history indicates that TSP
testing frequently detects problems
Common device failure is predictable and can be avoided by preventive maintenance
Specific regulatory or manufacturers requirements dictate preventive maintenance or testing
Incident history
No significant history
A significant history of incidents exists
Manufacturers/regulatory requirements for specific schedules
No requirements
There are requirements for testing independent of a numerical rating system
Total Score:
Assignment: 0.0x 0.5x 1x 2x 3x 4x (times per year tested)
Weight
Score
1
2
3
4
5
3
1
2
3
4
1
2
3
2
3
4
5
1
2
1
1
2
1
10
1
©University of Vermont, Rev. 2 – Confidential
99
Non-invasive blood pressure
monitor procedure
Estimated time: 25 minutes
Equipment information
Control number:____________________________________ Hospital:_ __________________________________________
Manufacturer:______________________________________ Model:_____________________________________________
Serial number:_ ____________________________________ Location:___________________________________________
Test information
Technician:________________________________________ Date:_______________________________________________
Test type: Incoming_ ________ Post repair_________
Test equipment needed: ISA 601 Electrical Safety Analyzer (or equivalent) BP Pump2 NIBP Analyzer (or equivalent)
Stopwatch or watch with a second hand PVC pipe to attach tourniquet cuff to
Tubing and connectors to connect to DPM 4
Test Result
Pass
Fail
N/A
Physical condition
Device is clean and decontaminated
No physical damage to case, display, mounts, cart, or components
Switches and controls operable and correctly aligned
Display intensity adequate for daytime use
Control numbers, labeling, and warnings present and legible
Inlets and hoses
Power cord, accessory cables, charger
Filters and vents clean
Electrical safety
Ground wire resistance
Chassis leakage
Patient leakage current
Patient lead leakage current – isolation test
(mains on patient applied part)
Insulation test (optional) 500 V
< 0.3 W
< 100 µA NC, < 500 µA SFC
< 100 µA B and BF, < 10 µA CF
< 100 µA BF, < 10 µA CF
< 2 MW
Preventive maintenance
Check condition of tubing, cuffs, and hoses
Clean recorder paper compartment, rollers and paper guides
Lubricate motor and paper drive mechanism
Verify proper time and date, correct if necessary
Replace battery every 24 months
Complete model-specific preventive maintenance
Performance testing
Verify unit operates on battery
Leak test
Static pressure accuracy
Pressure relief test
Dynamic pressure accuracy
Heart rate accuracy
Auto interval time
Stop/Cancel/Deflate
Recorder operation
Alarm function
Complete model-specific performance testing
100
©University of Vermont, Rev. 2 – Confidential
≤ 15 mmHg/min
± 3 mmHg
≤ 330 mmHg
± 10 mmHg
±5%
± 10 %
≤ 10 sec
Physical condition
Check the physical condition of the device, as
described in the General Equipment Procedure.
Electrical safety
Perform electrical safety checks as described in
Chapter 5, Electrical Safety. Check ground wire
resistance and chassis leakage.
Complete model-specific preventive maintenance: Refer to the monitor’s service manual
for preventive maintenance tasks specific to the
device. Complete the preventive maintenance
per manufacturer’s procedure.
Performance inspection
Verify unit operates on battery: Check that
the ac power indicator is lit when the power
cord is plugged into an outlet. Unplug the ac
Preventive maintenance
power cord and perform the remainder of the
Check condition of tubing, cuffs, and hoses:
functional test on battery power. The ac power
Inspect hoses and cuffs for signs of wear. Look
indicator should go out when the power cord
for holes, cracks, and dry rot. Ensure that all
is unplugged and the battery indicator should
connections are secure.
light. Be sure to plug the power cord in at the
Clean recorder paper compartment, rollconclusion of the test.
ers, and paper guides: Inspect the rollers and
Leak test: Connect a hose and cuff to the
paper guides and remove any debris. Check for NIBP monitor. Place the cuff around a piece of
bits of torn paper caught in the rollers.
PVC pipe or other sturdy cylindrical object to
Lubricate motor and paper drive mechasimulate placement on a limb. Connect a piece
nism: Follow the manufacturer’s instructions
of tubing to the pressure port on the BP Pump 2.
in the service manual for lubricating the motor
Connect a tee to this tubing and attach tubing
and paper drive mechanism. Not all motors will and connectors. Connect the two legs of the
need to be lubricated.
tee between the hose and the cuff of the NIBP
Verify proper time and date. Correct if nec- monitor.
essary: Verify that the time and date displayed
Place the NIBP monitor in service mode to
on the monitor is correct. If the time and date is perform the leak test. Select ‘LEAK TEST’ on the
not displayed on the monitor, print a strip from
BP Pump 2. Press ‘SETUP’ to change the test
the recorder. The time and date should appear
pressure set point. Use the number keys to enter
on the printed strip. Correct the time and date
a test pressure of 250 mmHg and then press
as necessary.
‘ENT’. Press the soft key labeled ‘START’ on the
Replace battery: The battery should be
analyzer to start the test. Allow the test to run
replaced every 24 months. Replace if necessary. for at least 30 seconds and then press the soft
key labeled ‘STOP’ to end the test. The leak rate
should be less than 15 mmHg/min.
Static pressure accuracy: With the NIBP
monitor in service mode, select ‘Static Pressure’
on the BP Pump 2. Press the soft key labeled
‘SOURCE’. Set the test pressure on the analyzer
to 200 mmHg. Start the test by pressing the
soft key labeled ‘START’. Compare the pressure
displayed on the NIBP monitor with the measured pressure displayed on the analyzer. The
measured pressure should be within 3 mmHg of
the displayed pressure. For displayed pressure
of 200 mmHg, the measured pressure should be
between 197 mmHg and 203 mmHg.
Testing a NIBP monitor with the BP Pump 2.
©University of Vermont, Rev. 2 – Confidential
101
Pressure relief test: Place the NIBP monitor
into service mode. Select ‘PRESSURE RELIEF’
on the BP Pump 2 and set the test pressure to
380 mmHg. Press the soft key labeled ‘START’
to start the test. Once the high-pressure relief
valve is triggered on the NIBP monitor, the monitor will vent the pressure from the cuff. Note the
pressure at which the relief valve is triggered.
The over pressure limit should be less than
330 mmHg. Check the service manual for the
exact value.
Dynamic pressure accuracy: Place the NIBP
monitor into the normal operating mode. Select
‘STANDARD BP’ on the BP Pump 2. Press the
soft key labeled ‘OPTIONS’ on the BP Pump 2 to
cycle through the available preset blood pressure
simulations. Select a blood pressure of 120/80 on
the analyzer.
Initiate a blood pressure measurement on the
NIBP monitor. The displayed pressure should be
within 10 mmHg of the set pressure. For a set
blood pressure of 120/80, the systolic pressure
should be between 110 mmHg and 130 mmHg
and the diastolic pressure should be between
70 mmHg and 90 mmHg. Repeat the measurements for a blood pressure of 200/150 and a
blood pressure of 80/50.
Heart rate accuracy: With the NIBP monitor
in normal operating mode, select ‘STANDARD BP’
on the BP Pump 2. Set the simulated blood pressure to 120/80. The simulated heart rate will be
80 bpm. Initiate a blood pressure measurement
on the NIBP monitor. The displayed heart rate
should be within 5 % of the set heart rate. For
a simulated heart rate of 80 bpm, the displayed
heart rate should be between 76 bpm and
84 bpm.
Auto interval time: Select a standard blood
pressure on the BP Pump 2 of 120/80. Put the
NIBP into automatic mode with an interval of
5 minutes. Use a stopwatch or a watch with
a second hand to measure the length of time
between BP measurements. The measured time
should be within 10 % of the set interval. For a
set interval of 5 minutes, the measured interval
should be between 4 minutes 30 seconds and
5 minutes 30 seconds.
Stop/Cancel/Deflate: Initiate a blood pressure
measurement on the NIBP monitor. Allow the cuff
to inflate. Stop the measurement on the monitor.
The cuff should deflate in less than 10 seconds.
102
©University of Vermont, Rev. 2 – Confidential
Recorder operation: After taking some blood
pressure measurements, print the results with
the recorder. Ensure the recorder prints clearly
and legibly. If the date and time is present on
the recorded strip, Ensure the date and time is
accurate.
Alarm function: Check that all alarms are
functional and that the volume is adequately
loud. Ensure that appropriate visual indicators
are functioning.
Select ‘STANDARD BP’ on the BP Pump 2.
Press the soft key labeled ‘OPTIONS’ on the BP
Pump 2 and set the simulated blood pressure to
200/155 mmHg. Set the high alarm limits on the
NIBP monitor lower than the simulated pressures. Set the high systolic alarm to 195 mmHg,
the high diastolic alarm to 150 mmHg, the high
mean pressure alarm to 160 mmHg, and the high
heart rate alarm to 75 bpm. Initiate a blood pressure measurement on the NIBP monitor. The high
alarms should activate.
If the high heart rate alarm was unable to be
set at a low enough value, set the alarm for its
lowest value. Select ‘PATIENT CONDITIONS’ on
the BP Pump 2. Use the ‘OPTIONS’ soft key to
cycle through the available simulations until the
heart rate is high enough. The ‘MILD EXERCISE’
simulation has a heart rate of 120 bpm.
Clear the alarms on the NIBP monitor and
return the alarm limits to their original settings.
Select ‘STANDARD BP’ on the BP Pump 2 and
set the simulated blood pressure to 60/30. Set
the low alarm limits on the NIBP monitor higher
than the simulated pressures. Set the low systolic alarm to 65 mmHg, the low diastolic alarm
to 35 mmHg, the low mean pressure alarm to
45 mmHg, and the low heart rate alarm to
85 bpm. Initiate a blood pressure measurement
on the NIBP monitor. The high alarms should
activate.
Complete model-specific performance testing: Refer to the service manual for performance
inspection tasks specific to the device. Complete
the performance inspection per manufacturer’s
procedure.
Return to service: Before returning to use,
return any settings that were adjusted to their
original settings. Ensure the volume of the
audible alarms is loud enough to be heard in
normal operating conditions. Plug in the power
cord to ensure the battery remains charged.
Patient monitor
parameters are able to be measured, and a
single model may have several possible configPatient monitors measure and display physiurations. Most commonly these monitors display
ologic parameters reflecting a patient’s clinical
at least ECG waveforms, SpO2, and blood prescondition. These monitors may sometimes be
referred to as vital signs monitors. Patient moni- sure. Each component of the monitor should be
tested to Ensure the device is accurate.
tors contain circuitry to acquire and process
Recommended functional test frequency:
information from physiological sensors, such
annual.
as electrodes, catheters, and transducers. The
monitors are usually customizable as to what
Sample risk assessment
Criteria – choose 1 rating from each category
Clinical function
No patient contact
Device may make contact with patient but function is non-critical
Device is used for patient diagnosis, or direct monitoring
Device is used to deliver direct treatment to the patient
Device is used for a life support
Physical risk
Device poses no appreciable risk due to failure
Device failure will result in low risk
Device failure will result in inappropriate therapy, misdiagnosis, or loss of monitoring
Device failure could result in severe injury to, or death of, patient or user
Problem avoidance probability
Maintenance or inspection would not impact reliability of the device
Common device failure modes are unpredictable or not very predictable
While common device failure modes are not very predictable, device history indicates that TSP
testing frequently detects problems
Common device failure is predictable and can be avoided by preventive maintenance
Specific regulatory or manufacturers requirements dictate preventive maintenance or testing
Incident history
No significant history
A significant history of incidents exists
Manufacturers/regulatory requirements for specific schedules
No requirements
There are requirements for testing independent of a numerical rating system
Total Score:
Assignment: 0.0x 0.5x 1x 2x 3x 4x (times per year tested)
Weight
Score
1
2
3
4
5
3
1
2
3
4
1
2
3
2
3
4
5
1
2
1
1
2
1
10
1
©University of Vermont, Rev. 2 – Confidential
103
Patient monitor procedure
Estimated time: 50 minutes
Equipment information
Control number:____________________________________ Hospital:_ __________________________________________
Manufacturer:______________________________________ Model:_____________________________________________
Serial number:_ ____________________________________ Location:___________________________________________
Test information
Technician:________________________________________ Date:_______________________________________________
Test type: Incoming_ ________ Post repair_________
Test equipment needed:ISA 601 Electrical Safety Analyzer (or equivalent)
MPS450 Multiparameter Simulator (or equivalent)
BP Pump 2 NIBP Analyzer (or equivalent)
Index 2 SpO2 Analyzer (or equivalent)
Stopwatch or watch with a second hand
Cables to connect to MPS450
Tubing and connectors to connect to BP Pump 2
PVC pipe to attach BP cuff to
Gas with a known quantity of CO2
Test Result
Pass
Fail
N/A
Physical condition
Device is clean and decontaminated
No physical damage to case, display, mounts, cart, or components
Switches and controls operable and correctly aligned
Display intensity adequate for daytime use
Control numbers, labeling, and warnings present and legible
Inlets and hoses
Power cord, accessory cables, charger
Filters and vents clean
Electrical safety
Ground wire resistance
Chassis leakage
Patient leakage current
Patient lead leakage current – isolation test
(mains on patient applied part)
Insulation test (optional) 500 V
< 0.3 W
< 100 µA NC
< 500 µA SFC
< 100 µA B and BF
< 10 µA CF
< 100 µA BF
< 10 µA CF
< 2 MW
continued on page 105
104
©University of Vermont, Rev. 2 – Confidential
Patient monitor procedure
Estimated time: 50 minutes
continued from page 104
Test Result
Pass
Fail
N/A
Preventive maintenance
Check condition of tubing, cuffs, and hoses
Clean recorder paper compartment, rollers and paper guides
Lubricate motor and paper drive mechanism
Verify proper time and date, correct if necessary
Replace battery every 24 months
Complete model-specific preventive maintenance
Performance testing
Verify unit operates on battery
Heart rate accuracy
Amplitude accuracy
Recorder speed
Respiration rate accuracy
Leak test
Static pressure accuracy
Pressure relief test
Dynamic pressure accuracy
Auto interval time
Stop/Cancel/Deflate
SpO2 accuracy
Invasive pressure accuracy
Temperature accuracy
Carbon dioxide concentration accuracy
Alarm function
Complete model-specific performance testing
±5%
±5%
±4%
±5%
≤ 15 mmHg/min
± 3 mmHg
≤ 330 mmHg
± 10 mmHg
± 10 %
≤ 10 sec
±3%
±5%
± 0.3 C
± 0.4 vol %
©University of Vermont, Rev. 2 – Confidential
105
Physical condition
is unplugged and the battery indicator should
light. Be sure to plug the power cord in at the
Check the physical condition of the device, as
described in the General Equipment Procedure. conclusion of the test.
Heart rate accuracy: Connect the patient
leads
to the lead connectors on the MPS450.
Electrical safety
Set the heart rate on the MPS450 to 60 bpm.
Perform electrical safety checks as described in Press ‘1’ (‘NSR’), and then use the soft keys
Chapter 5, Electrical Safety. Check ground wire marked ‘UP’ and ‘DOWN’ to change the heart
resistance and chassis leakage.
rate to 60 bpm.
The heart rate should be within 5 % of the
Preventive maintenance
set rate. For a simulated heart rate of 60 bpm,
Check condition of tubing, cuffs, and hoses:
the displayed rate should be between 57 bpm
Inspect hoses and cuffs for signs of wear. Look
and 63 bpm. Set the heart rate on the MPS450
for holes, cracks, and dry rot. Ensure that all
to 120 bpm. The displayed heart rate should be
connections are secure.
between 114 bpm and 126 bpm.
Clean recorder paper compartment, rollAmplitude accuracy: With the patient leads
ers, and paper guides: Inspect the rollers and
connected to the MPS450, input a normal
paper guides and remove any debris. Check for sinus rhythm by pressing ‘1’ (‘NSR’). Press the
bits of torn paper caught in the rollers.
soft key marked ‘SEL’ to select AMPL. Use the
Lubricate motor and paper drive mechasoft keys marked up and down to change the
nism: Follow the manufacturer’s instructions
amplitude to 1.0 mV. Set the sensitivity on the
in the service manual for lubricating the motor
electrocardiograph to 20 mm/mV. Record a strip
and paper drive mechanism. Not all motors will on the electrocardiograph.
need to be lubricated.
Measure the height of the QRS peak. The
Verify proper time and date. Correct if nec- measured amplitude should be within 5 % of
essary: Verify that the time and date displayed the set amplitude. For an amplitude setting of
on the monitor is correct. If the time and date is 1 mV and a sensitivity of 20 mm/mV, the peak
not displayed on the monitor, print a strip from
should be between 19 mm and 21 mm.
the recorder. The time and date should appear
Heart rate alarms: Set the high heart rate
on the printed strip. Correct the time and date
alarm on the monitor to 120 bpm. Set the low
as necessary.
heart rate alarm on the monitor to 40 bpm.
Replace battery: The battery should be
Adjust the heart rate on the MPS450 to
replaced every 24 months. Replace if necessary. 140 bpm. The high rate alarm should activate.
Complete model-specific preventive mainReturn the heart rate on the MPS450 to
tenance: Refer to the monitor’s service manual
60 bpm and clear the alarm. Adjust the heart
for preventive maintenance tasks specific to the rate on the MPS450 to 30 bpm. The low rate
device. Complete the preventive maintenance
alarm should activate. Return the heart rate on
per manufacturer’s procedure.
the MPS450 to 60 bpm and clear the alarm.
Return the alarm limits on the monitor to their
Performance inspection
original settings.
Recorder speed: Set the heart rate on the
Verify unit operates on battery: Check that
MPS450
to 60 bpm. Record a strip on the electhe ac power indicator is lit when the power
trocardiograph.
Measure the distance between
cord is plugged into an outlet. Unplug the ac
the
peaks
of
the
QRS complex. With a recorder
power cord and perform the remainder of the
speed
of
25
mm/sec,
the QRS peaks should be
functional test on battery power. The ac power
between
24
mm
and
26 mm apart.
indicator should go out when the power cord
106
©University of Vermont, Rev. 2 – Confidential
Respiration rate accuracy: Set the respiration rate on the MPS450 to 20 breaths/min.
Press ‘2’ (‘RESP’) and then use the soft keys
to change the respiration rate. The respiration
rate should be within 5 % of the set rate. For a
simulated respiration rate of 20 breaths/min,
the displayed rate should be between
19 breaths/min and 21 breaths/min.
Respiration alarms: Set the high respiration
rate alarm on the monitor to 60 breaths/min.
Set the low respiration rate alarm on the monitor to 20 bpm. Adjust the respiration rate on the
MPS450 to 80 breaths/min. The high rate alarm
should activate. Bring down the respiration rate
on the MPS450 to 30 breaths/min and clear
the alarm. Adjust the respiration rate on the
MPS450 to 15 bpm. The low rate alarm should
activate. Bring down the respiration rate on the
MPS450 to 20 breaths/min and clear the alarm.
Return the alarm limits on the monitor to their
original settings.
To simulate an apnea condition, press the soft
key button ‘APNE’. Use the soft keys marked
‘PREV’ and ‘NEXT’ to cycle through the apnea
durations and select ‘CONTINUOS’. Press the
soft key labeled ‘RUN’ to start the apnea condition. To stop the apnea condition and return to
normal respiration, press the soft key labeled
‘STOP’. The alarm should sound for an apnea
condition. Most monitors will alarm within
30 seconds.
Leak test: Connect a hose and cuff to the
NIBP monitor. Place the cuff around a piece of
PVC pipe or other sturdy cylindrical object to
simulate placement on a limb. Connect a piece
of tubing to the pressure port on the BP Pump 2.
Connect a tee to this tubing and attach tubing
and connectors. Connect the two legs of the
tee between the hose and the cuff of the NIBP
monitor.
Place the NIBP monitor in service mode to
perform the leak test. Select ‘LEAK TEST’ on the
BP Pump 2. Press ‘SETUP’ to change the test
pressure set point. Use the number keys to enter
a test pressure of 250 mmHg and then press
‘ENT’. Press the soft key labeled ‘START’ on the
analyzer to start the test. Allow the test to run
for at least 30 seconds and then press the soft
key labeled ‘STOP’ to end the test. The leak rate
should be less than 15 mmHg/min.
Static pressure accuracy: With the NIBP
monitor in service mode, select ‘STATICPressure’ on the BP Pump2. Press the soft key
labeled ‘SOURCE’. Set the test pressure on the
analyzer to 200 mmHg. Start the test by pressing the soft key labeled ‘START’. Compare the
pressure displayed on the NIBP monitor with
the measured pressure displayed on the analyzer. The measured pressure should be within
3 mmHg of the displayed pressure. For displayed pressure of 200 mmHg, the measured
pressure should be between 197 mmHg and
203 mmHg.
Pressure relief test: Put the NIBP monitor
into service mode. Select ‘PRESSURE RELIEF’
on the BP Pump 2 and set the test pressure to
380 mmHg. Press the soft key labeled ‘START’
to start the test. The test will end when the
high-pressure relief valve is triggered on the
NIBP monitor and the monitor vents the pressure from the cuff. Note the pressure at which
the relief valve is triggered. The over pressure
limit should be less than 330 mmHg. Check the
manufacturer’s service manual for the exact
value.
Dynamic pressure accuracy: Place the NIBP
monitor into the normal operating mode. Select
‘STANDARD BP’ on the BP Pump 2. Press the
soft key labeled ‘OPTIONS’ on the BP Pump 2 to
cycle through the available preset blood pressure simulations. Select a blood pressure of
120/80 on the analyzer.
Initiate a blood pressure measurement on the
NIBP monitor. The displayed pressure should be
within 10 mmHg of the set pressure. For a set
blood pressure of 120/80, the systolic pressure
should be between 110 mmHg and 130 mmHg
and the diastolic pressure should be between
70 mmHg and 90 mmHg. Repeat the measurements for a blood pressure of 200/150 and a
blood pressure of 80/50.
©University of Vermont, Rev. 2 – Confidential
107
Auto interval time: Select a standard blood
pressure on the BP Pump 2 of 120/80. Put the
NIBP into automatic mode with an interval of
5 minutes. Use a stopwatch or a watch with
a second hand to measure the length of time
between BP measurements. The measured time
should be within 10 % of the set interval. For a
set interval of 5 minutes, the measured interval
should be between 4 minutes 30 seconds and
5 minutes 30 seconds.
Stop/Cancel/Deflate: Initiate a blood pressure measurement on the NIBP monitor. Allow
the cuff to inflate. Stop the measurement on the
monitor. The cuff should deflate in less than
10 seconds.
NIBP alarms: Select ‘STANDARD BP’ on
the BP Pump 2. Press the soft key labeled
‘OPTIONS’ on the BP Pump 2 and set the simulated blood pressure to 200/155. Set the high
alarm limits on the NIBP monitor lower than
the simulated pressures. Set the high systolic
alarm to 195 mmHg, the high diastolic alarm to
150 mmHg, and the high mean pressure alarm
to 160 mmHg. Initiate a blood pressure measurement on the NIBP monitor. The high alarms
should activate. Clear the alarms on the monitor and return the alarm limits to their original
settings.
Select ‘STANDARD BP’ on the BP Pump 2 and
set the simulated blood pressure to 60/30. Set
the low alarm limits on the NIBP monitor higher
than the simulated pressures. Set the low systolic alarm to 65 mmHg, the low diastolic alarm
to 35 mmHg, and the low mean pressure alarm
to 45 mmHg. Initiate a blood pressure measurement on the NIBP monitor. The low alarms
should activate.
O2 accuracy: Attach a finger probe to the
pulse oximeter. Place the finger sensor on the
finger simulator of the Index 2 simulator. From
the main menu of the Index 2, press the soft key
labeled ‘MORE’ for the second menu and then
press the soft key labeled ‘MAKE’. Use the plus
and minus keys to scroll through the available
makes. Select the make of the pulse oximeter to
be tested. When the correct make appears on
the screen, press the ‘ESC’ key to return to the
main menu.
108
©University of Vermont, Rev. 2 – Confidential
From the main menu, press the soft key
labeled ‘SIM’ to enter the simulation mode.
Begin a manual simulation by pressing the
soft key labeled ‘MAN’. Use the plus and minus
keys to adjust the O2 level and heart rate. Set
the heart rate to 60 bpm to match the heart
rate from the MPS450. Adjust the O2 level on
the Index 2 to 96 %. Initiate a measurement on
the pulse oximeter. The displayed SpO2 value
should be within 3 digits of the set value. For
a simulated SpO2 of 96 %, the displayed value
should be between 93 % and 99 %.
SpO2 alarms: Set the high O2 alarm on the
pulse oximeter to 98 %. Set the low O2 alarm
to 90 %. Set the Index 2 for a manual simulation with the SpO2 at 96 % and the heart rate
80 bpm. Initiate a measurement on the pulse
oximeter. Adjust the SpO2 on the Index 2 to
100 %. The high O2 alarm on the pulse oximeter should activate. Bring the SpO2 back down
to 96 % and clear the alarm. Adjust the SpO2 on
the Index 2 to 88 %. The low O2 alarm on the
pulse oximeter should activate. Bring the SpO2
back to 96 % and clear the alarm.
Set the high heart rate alarm on the pulse
oximeter to 120 bpm and set the low heart rate
alarm to 60 bpm. Adjust the heart rate on the
Index 2 to 125 bpm. The high heart rate alarm
should activate. Return the heart rate to 80 bpm
and clear the alarm. Adjust the heart rate on
the Index 2 to 55 bpm. The low heart rate alarm
should activate. Return the heart rate to 80 bpm
and clear the alarm. Return all alarm limits to
their original settings.
Invasive pressure accuracy: Set the blood
pressure transducer sensitivity on the MPS450
according to manufacturer requirements. Press
the button labeled ‘0’ (‘SETUP’) to access the
set up menu. Press the soft key labeled ‘BP
SENSE’ and then use the soft keys to toggle the
sensitivity between 5 µV/V/mmHg and
40 µV/V/mmHg.
Press the key labeled ‘3’ (‘BP’) to enter the
blood pressure menu on the MPS450. Press
the ‘BP1’ soft key and then press ‘ZERO’ to zero
the channel if necessary. Connect the invasive
blood pressure cable to the BP1 port on the side
of the MPS450.
Press the ‘DYNA’ soft key to start a dynamic
pressure simulation. Select an arterial pressure
of 120/80. Press ‘RUN’ to begin the simulation.
The pressure displayed on the monitor should
be within 5 % of the set pressure. For a simulated pressure of 120/80, the displayed systolic
pressure should be between 114 mmHg and
126 mmHg and the diastolic pressure should be
between 76 mmHg and 84 mmHg.
Invasive pressure alarms: Set the highpressure alarm limits on the monitor lower
than 120/80. Set the high systolic alarm limit
to 115 mmHg and the high diastolic alarm limit
to 75 mmHg. The high alarms should activate.
Clear the alarms on the monitor and return the
alarm limits to their original settings.
Set the low-pressure alarm limits on the
monitor higher than 120/80. Set the low
systolic alarm limit to 125 mmHg and the low
diastolic alarm limit to 85 mmHg. The low
alarm should activate. Clear the alarms on the
monitor and return the alarm limits to their
original settings.
Temperature accuracy: Connect the temperature cable to the CO/TEMP port on the side
of the MPS450. Press the key labeled ‘7’
(‘TEMP’) to start the temperature simulation.
Use the up and down keys to set the temperature to 37 ºC. The temperature displayed on the
monitor should be within 0.3 ºC of the set temperature. For a simulated temperature of 37 ºC,
the displayed temperature should be between
36.7 ºC and 37.3 ºC.
Temperature alarms: Set the high temperature alarm on the monitor to 38 ºC and set the
low temperature alarm to 34 ºC. Adjust the
temperature on the MPS450 to 40 ºC. The high
alarm should activate. Return the temperature
on the MPS450 to 37 ºC and clear the alarm.
Adjust the temperature on the MPS450 to 24 ºC.
The low temperature alarm should activate.
Return the temperature on the MPS450 to
37 ºC and clear the alarm.
Carbon dioxide concentration accuracy:
Connect the gas canister to the patient sample
line of the monitor. Inject the gas into the
sample line. The displayed CO2 concentration
should be within 0.4 vol% of the gas sample.
For a gas sample with 5.0 % CO2, the monitor
should display a CO2 concentration between
4.6 % and 5.4 %.
Carbon dioxide alarm: Set the high carbon
dioxide alarm limit on the monitor to below the
CO2 concentration of the test gas. Inject the gas
into the patient sample tubing. The high CO2
concentration alarm should activate. Return the
alarm limit to its original setting and clear the
alarm.
Alarm function: Check that all alarms are
functional and that the volume is adequately
loud. Ensure that appropriate visual indicators
are functioning.
Complete model-specific performance
testing: Refer to the service manual for performance inspection tasks specific to the device.
Complete the performance inspection per
manufacturer’s procedure.
Return to service: Before returning to use,
return any settings that were adjusted to their
original settings. Ensure the volume of the
audible alarms is loud enough to be heard in
normal operating conditions. Plug in the power
cord to ensure the battery remains charged.
©University of Vermont, Rev. 2 – Confidential
109
PCA pump
PCA, patient controlled analgesic, pumps are
infusion pumps that deliver an analgesic drug
on when requested by the patient. These
pumps typically utilize tubing designed specifically for use with PCA infusion pumps, which
is then connected to an infusion catheter or
other infusion device such as an implanted
infusion port. PCA pumps can typically be programmed to deliver in one of three ways, as a
continuous infusion, as a demand dose only, or
as a continuous infusion with a demand dose. A
demand dose is initiated by the patient pressing
a button. A predetermined amount of the drug is
delivered rapidly as a bolus. PCA pumps have a
timing function that allows a ‘lockout interval’,
to prevent an overdose of the analgesic.
Recommended functional test frequency:
annual.
Sample risk assessment
Criteria – choose 1 rating from each category
Clinical function
No patient contact
Device may make contact with patient but function is non-critical
Device is used for patient diagnosis, or direct monitoring
Device is used to deliver direct treatment to the patient
Device is used for a life support
Physical risk
Device poses no appreciable risk due to failure
Device failure will result in low risk
Device failure will result in inappropriate therapy, misdiagnosis, or loss of monitoring
Device failure could result in severe injury to, or death of, patient or user
Problem avoidance probability
Maintenance or inspection would not impact reliability of the device
Common device failure modes are unpredictable or not very predictable
While common device failure modes are not very predictable, device history indicates that TSP
testing frequently detects problems
Common device failure is predictable and can be avoided by preventive maintenance
Specific regulatory or manufacturers requirements dictate preventive maintenance or testing
Incident history
No significant history
A significant history of incidents exists
Manufacturers/regulatory requirements for specific schedules
No requirements
There are requirements for testing independent of a numerical rating system
Total Score:
Assignment: 0.0x 0.5x 1x 2x 3x 4x (times per year tested)
110
©University of Vermont, Rev. 2 – Confidential
Weight
1
2
3
4
5
1
2
3
4
1
2
Score
4
3
2
3
4
5
1
2
1
2
2
1
12
1
PCA pump procedure
Estimated time: 45 minutes
Equipment information
Control number:____________________________________ Hospital:_ __________________________________________
Manufacturer:______________________________________ Model:_____________________________________________
Serial number:_ ____________________________________ Location:___________________________________________
Test information
Technician:________________________________________ Date:_______________________________________________
Test type: Incoming_ ________ Post repair_________
Test equipment needed:ISA 601 Electrical Safety Analyzer (or equivalent)
IDA 4 Plus Infusion Device Analyzer (or equivalent)
PCA trigger interface
Tubing set for PCA pump
Reservoir to connect to tubing set (bag, bottle, or syringe)
20 cc or larger syringe
3 way stopcock
Cable to connect PCA trigger interface to PCA pump
Tubing and connectors to connect infusion set to IDA4 Plus
Tubing and connectors to connect to IDA 4 Plus
Test Result
Pass
Fail
N/A
Physical condition
Device is clean and decontaminated
No physical damage to case, display, mounts, cart, or components
Switches and controls operable and correctly aligned
Display intensity adequate for daytime use
Control numbers, labeling, and warnings present and legible
Inlets and hoses
Power cord, accessory cables, charger
Filters and vents clean
Electrical safety
Ground wire resistance
Chassis leakage
Patient leakage current
Patient lead leakage current – isolation test
(mains on patient applied part)
Insulation test (optional) 500 V
< 0.3 W
< 100 µA NC
< 500 µA SFC
< 100 µA B and BF
< 10 µA CF
< 100 µA BF
< 10 µA CF
< 2 MW
continued on page 112
©University of Vermont, Rev. 2 – Confidential
111
PCA pump procedure
Estimated time: 45 minutes
continued from page 111
Test Result
Pass
Fail
N/A
Preventive maintenance
Clean flow detector
Replace battery every 24 months
Complete model-specific preventive maintenance
Performance testing
Verify unit operates on battery
Door lock
Pole clamp function
Load dose
Flow rate accuracy
Volume accuracy
PCA dose
Lock out interval
Dose limit
KVO rate
Occlusion detection pressure
Alarm function
Complete model-specific performance testing
112
©University of Vermont, Rev. 2 – Confidential
± 10 %
± 10 %
± 10 %
± 10 %
±5%
± 10 %
± 1 psi
Physical condition
Load dose: Fill the reservoir with a 1 % detergent
solution in de-ionized water. Prepare a 1 %
Check the physical condition of the device, as
stock
solution of detergent such as Cole-Parmer
described in the General Equipment Procedure.
Micro-90 in volume using de-ionized water;
this may be stored in a closed vessel for up to
Electrical safety
6 months. This solution should then be diluted
Perform electrical safety checks as described in 10:1 with de-ionized water for daily use. If the
Chapter 5, Electrical Safety. Check ground wire water used causes too much foaming, a 20:1
resistance and chassis leakage.
dilution is recommended. Do not use tap water
or solutions intended for patient use, as these
Preventive maintenance
may harm the transducers in the IDA 4 Plus.
Clean flow detector: Inspect the flow detector
Connect the infusion tubing to the reseron the PCA pump. Clean any debris from the
voir. Prime the set so that there is no air in
flow sensor.
the tubing. With the tubing draining into a
Replace battery: The battery should be
container or sink, open the flow control mechareplaced every 24 months. Replace if necessary. nism on the tubing set. Hold the reservoir high
Complete model-specific preventive mainenough above the tubing so that fluid flows
tenance: Refer to the monitor’s service manual
through the tubing under the force of gravity.
for preventive maintenance tasks specific to the Allow fluid to flow through the tubing until no
device. Complete the preventive maintenance
air bubbles can be seen in the tubing. Insert
per manufacturer’s procedure.
the set into the pump. Connect the three-way
stopcock to the channel 1 port on the IDA 4
Performance inspection
Plus. Connect the patient infusion tubing to one
port of the stopcock. Fill the syringe with the
Verify unit operates on battery: Check the
detergent solution and connect the syringe to
ac power indicator is lit when the power cord
the other port of the stopcock. Connect a piece
is plugged into an outlet. Unplug the ac power
of tubing to the drain port of channel 1 and run
cord and perform the remainder of the functhe tubing into a container to catch the used
tional test on battery power. The ac power
solution.
indicator should go out when the power cord
Connect the PCA trigger interface box to the
is unplugged and the battery indicator should
connector on the back of the IDA 4 Plus. Attach
light. Be sure to plug the power cord in at the
a cable from channel 1 of the trigger output to
conclusion of the test.
the patient dose cable port on the PCA pump. If
Door lock: Inspect the door assembly.
multiple PCA pumps are to be tested simultaneEnsure the door swings smoothly and locks
ously, additional pumps can be connected to the
with the key.
other channels on the interface box.
Pole clamp function: Check the physical
From the status screen on the IDA 4 Plus,
condition of the pole clamp. The pole clamp
select
‘UTIL’ to enter the utilities menu and then
should be securely fastened to the pump. The
select
‘TEST PARAMATERS’ from the utilities
clamp mechanism should move freely. The pole
menu.
Use the arrow keys to adjust the PCA Pre
clamp should secure the pump to the IV pole.
Trig
Time
to 60 seconds. This is the time prior
Ensure the pole clamp cannot be released when
to
the
expiry
of the lock out interval that the
the pump is locked.
IDA 4 Plus will begin attempting to trigger the
PCA dose.
©University of Vermont, Rev. 2 – Confidential
113
Return to the main set-up screen and use the
arrow keys to select ‘SETUP’ under channel 1.
Use the arrow keys on the set-up menu to select
‘PCA’. Use the arrow keys to enter the basal
flow rate, total volume, bolus volume, lockout
time, and loading dose to be tested. Enter a
basal flow rate of 15 mL/hr. Enter a total volume
of 20 mL. Enter a bolus volume of 1 mL. Enter
a lockout time of 5 minutes 0 seconds. Enter a
loading dose of 1 mL. After the test information
is entered, the PCA test screen will appear. Use
the arrow keys to highlight ‘PRIME’. Close the
stopcock port connected to the infusion tubing,
leaving the ports to the syringe and the IDA
4 Plus open. Inject the solution in the syringe
into the IDA 4 Plus until ‘START’ appears on the
screen. Select ‘AutoSTART’. The IDA 4 Plus will
start the flow test when it detects flow from the
pump. Close the port to the syringe, leaving the
ports to the tubing and the IDA 4 Plus open.
Set up the PCA pump as entered on the IDA 4
Plus. Set the continuous flow rate to 15 mL/hr,
the bolus volume to 1 mL, the lockout time to
5 minutes, and the loading dose to 1 mL. If
the PCA pump has a dose limit, set the limit to
2 mL.
Start the pump. The loading dose will appear
on the PCA test screen. Verify that the actual
bolus volume is within 10 % of the set volume.
For a dose of 1 mL, the measure volume should
be between 0.9 mL and 1.1 mL.
The IDA 4 Plus is equipped with four channels to analyze infusion devices. Four pumps
can be run simultaneously.
Flow rate accuracy: Continue to run the PCA
pump as described above. The IDA 4 Plus will
display the basal flow rate. Allow the pump to
deliver at least 10 mL and then compare the
measured flow rate to the set rate. The measured flow rate should be within 10 % of the set
rate. For a flow rate of 15 mL/hr, the measured
flow rate should be between 13.5 mL/hr and
16.5 mL/hr.
114
©University of Vermont, Rev. 2 – Confidential
Volume accuracy: Continue to run the PCA
pump as described above. The IDA 4 Plus will
display the total volume delivered. Allow the
pump to deliver at least 10 mL and then compare the measured volume displayed on the
analyzer to the volume displayed on the pump.
The measured volume should be within 10 %
of the pump volume. For a volume of 10 mL, the
measured volume should be between 9 mL and
11 mL.
PCA dose: Continue to run the PCA pump as
described above. The IDA 4 Plus will display
the delivered bolus volume. Allow the pump to
deliver a bolus and then compare the measured
volume displayed on the analyzer to the set
volume. Verify that the actual bolus volume is
within 10 % of the set volume. For a dose of
1 mL, the measure volume should be between
0.9 mL and 1.1 mL.
Lock out interval: Continue to run the PCA
pump as described above. The IDA 4 Plus will
attempt to trigger a PCA dose 60 seconds before
the lock out time expires. Allow the PCA pump
to deliver at least 2 doses. The interval time will
be displayed on the IDA 4 Plus. The measured
interval time should be within 5 % of the set
lock out interval. For a lock out interval of
5 minutes, the measured interval time should
be between 4 minutes 45 seconds and 5 minutes 15 seconds.
Dose limit: Continue to run the PCA pump
as described above and allow it to deliver
20 mL. When the pump reaches the dose limit,
the dose limit alarm should activate. The pump
should no longer deliver the continuous rate,
nor allow any boluses. The pump may continue
to deliver a KVO rate.
KVO rate: When the PCA pump reaches its
dose limit, it will go into a KVO rate to supply
a very low flow rate in order to keep the vein
open if another infusion needs to be given.
Measure the KVO rate using the ‘FLOW’ function
on the IDA 4 Plus.
Allow the pump to reach its dose limit, but do
not stop the pump. Instead, silence the alarm
and let the pump run. Enter the ‘FLOW’ screen
on the IDA 4 Plus to measure the KVO rate. It
may take several minutes for the analyzer to
be able to measure the low rate. The measured
rate should be within 10 % of the infusion
pump’s KVO rate. Check the service manual for
the exact rate. For a KVO rate of 1 mL/hr, the
measured rate should be between 0.9 mL/hr
and 1.1 mL/hr.
Occlusion detection pressure: From the
channel set up menu on the IDA 4 Plus, select
‘OCCLUSION’. Prime the IDA 4 Plus with the
syringe if necessary. Set the flow rate on the
PCA pump to 15 mL/hr and start the pump.
Select ‘START’ on the IDA 4 Plus. Select ‘END’
on the IDA 4 Plus when the pump alarms occlusion. Note the pressure at which the pump
alarms. Compare the measured pressure to the
occlusion pressure of the pump. The occlusion
pressure will be specific to the model. Check
the service manual for the specific pressure.
The measured occlusion pressure should be
within 1 psi of the pump’s occlusion pressure.
For an occlusion pressure of 20 psi, the measured pressure should be between 19 psi and
21 psi.
Alarm function: Check that all alarms are
functional and that the volume is adequately
loud. Ensure that appropriate visual indicators
are functioning.
Set the continuous rate on the pump to
15 mL/hr. and start the pump. Occlude the
tubing between the reservoir and the pump.
The tubing can be occluded either by closing
a clamp attached to the tubing or by pinching
the tubing with a set of hemostats or pliers. The
pump should alarm upstream occlusion.
Clear the alarm and restart the pump. Occlude
the tubing after the pump. The pump should
alarm downstream occlusion. Clear the alarm.
If the pump is equipped with an air detector,
introduce air into the tubing. This can be done
by turning the reservoir upside down until a
bubble of air is pulled through the tubing. Turn
the reservoir right side up. When the air bubble
gets to the pump, the pump should alarm air in
line. Clear the alarm. Remove the tubing from
the pump and prime the set so that there is no
air in the tubing. Reinsert the tubing set into
the pump and restart the pump.
Simulate an empty container situation either
by turning the reservoir upside down so that
no fluid can get to the tubing, or by removing
the tubing from the reservoir. The pump should
alarm when no fluid flow is detected.
Complete model-specific performance
testing: Refer to the service manual for performance inspection tasks specific to the device.
Complete the performance inspection per
manufacturer’s procedure.
Return to service: Before returning to use,
return any settings that were adjusted to their
original settings. Ensure the volume of the
audible alarms is loud enough to be heard in
normal operating conditions. Plug in the power
cord to ensure the battery remains charged.
©University of Vermont, Rev. 2 – Confidential
115
Phototherapy unit
to break down the bilirubin. A photo oxidation
process causes the converts water-insoluble
Phototherapy units irradiate patients with light
to produce beneficial bioeffects. Most commonly, bilirubin to water-soluble compounds that can
be excreted. Most commonly, phototherapy units
these devices are used to treat hyperbiliruare seen as overhead units that apply the light
binemia, jaundice, in newborns. Phototherapy
units for this purpose are sometimes referred to radiation from a lamp. Phototherapy units are
also available as pad or blanket with a separate
as bili lights. Blue light, typically with a wavelight source connected by a fiberoptic cable.
length between 420 nm and 480 nm, is used
Recommended functional test frequency:
annual.
Sample risk assessment
Criteria – choose 1 rating from each category
Clinical function
No patient contact
Device may make contact with patient but function is non-critical
Device is used for patient diagnosis, or direct monitoring
Device is used to deliver direct treatment to the patient
Device is used for a life support
Physical risk
Device poses no appreciable risk due to failure
Device failure will result in low risk
Device failure will result in inappropriate therapy, misdiagnosis, or loss of monitoring
Device failure could result in severe injury to, or death of, patient or user
Problem avoidance probability
Maintenance or inspection would not impact reliability of the device
Common device failure modes are unpredictable or not very predictable
While common device failure modes are not very predictable, device history indicates that TSP
testing frequently detects problems
Common device failure is predictable and can be avoided by preventive maintenance
Specific regulatory or manufacturers requirements dictate preventive maintenance or testing
Incident history
No significant history
A significant history of incidents exists
Manufacturers/regulatory requirements for specific schedules
No requirements
There are requirements for testing independent of a numerical rating system
Total Score:
Assignment: 0.0x 0.5x 1x 2x 3x 4x (times per year tested)
116
©University of Vermont, Rev. 2 – Confidential
Weight
1
2
3
4
5
1
2
3
4
Score
4
3
1
2
3
3
4
5
1
2
1
1
2
1
12
1
Phototherapy unit procedure
Estimated time: 20 minutes
Equipment information
Control number:____________________________________ Hospital:_ __________________________________________
Manufacturer:______________________________________ Model:_____________________________________________
Serial number:_ ____________________________________ Location:___________________________________________
Test information
Technician:________________________________________ Date:_______________________________________________
Test type: Incoming_ ________ Post repair_________
Test equipment needed:ISA 601 Electrical Safety Analyzer (or equivalent)
DALE40 Phototherapy Radiometer (or equivalent)
Stopwatch or watch with a second hand
Test Result
Pass
Fail
N/A
Physical condition
Device is clean and decontaminated
No physical damage to case, display, mounts, cart, or components
Switches and controls operable and correctly aligned
Display intensity adequate for daytime use
Control numbers, labeling, and warnings present and legible
Inlets and hoses
Power cord, accessory cables, charger
Filters and vents clean
Electrical safety
Ground wire resistance
Chassis leakage
Patient leakage current
Patient lead leakage current – isolation test
(mains on patient applied part)
Insulation test (optional) 500 V
< 0.3 W
< 100 µA NC
< 500 µA SFC
< 100 µA B and BF
< 10 µA CF
< 100 µA BF
< 10 µA CF
< 2 MW
Preventive maintenance
Inspect bulbs
Complete model-specific preventive maintenance
Performance testing
Timer accuracy
Output accuracy
± 0.5 %
≥ 4.5 µW/cm2/nm
(≥ 198 µW/cm2 @ 44 nm bandwidth)
≤ 40 µW/cm2/nm
(≤ 1760 µW/cm2 @ 44 nm bandwidth)
Alarm function
Complete model-specific performance testing
©University of Vermont, Rev. 2 – Confidential
117
Physical condition
Check the physical condition of the device, as
described in the General Equipment Procedure.
Electrical safety
Perform electrical safety checks as described in
Chapter 5, Electrical Safety. Check ground wire
resistance and chassis leakage.
Preventive maintenance
Inspect bulbs: Inspect the phototherapy unit
for broken or burned out bulbs. Replace as
necessary.
Complete model-specific preventive maintenance: Refer to the monitor’s service manual
for preventive maintenance tasks specific to the
device. Complete the preventive maintenance
per manufacturer’s procedure.
Performance inspection
Timer accuracy: Set the timer for 2 minutes.
Initiate treatment and begin timing with the
stopwatch. Initiate phototherapy treatment and
begin timing with a stopwatch or a watch with
a second hand. The treatment timer should
sound within 5 % of the measured time. For a
118
©University of Vermont, Rev. 2 – Confidential
set time of 120 seconds, the actual measured
time should be between 114 seconds and
126 seconds. Verify that treatment stops when
the timer stops.
Output accuracy: Initiate a phototherapy
treatment. Place the photodetector probe facing
the light about 18 inches (45.7cm) from the light
source. The irradiance will be displayed on the
Dale40. The measured irradiance should be
between 198 µW/cm2 and 1760 µW/cm2. Refer
to the phototherapy unit’s service manual for
the unit’s output range.
Alarm function: Check that all alarms are
functional and that the volume is adequately
loud. Ensure that appropriate visual indicators
are functioning.
Complete model-specific performance
testing: Refer to the service manual for performance inspection tasks specific to the device.
Complete the performance inspection per
manufacturer’s procedure.
Return to service: Before returning to use,
return any settings that were adjusted to their
original settings. Ensure the volume of the
audible alarms is loud enough to be heard in
normal operating conditions.
Pneumatic tourniquet
Tourniquets are used to prevent blow flow to
a limb during surgery. A pneumatic tourniquet
consists of an inflatable cuff, an air pump,
pressure sensors, and a processor to control
cuff pressure. The cuff is placed on the limb
proximal to the operative site. The cuff is then
inflated to a preset pressure, occluding vessels
and arteries and preventing blow flow past the
cuff. The pneumatic tourniquet measures and
displays the cuff pressure and inflation time.
The cuff itself is typically dual chambered,
allowing for alternation of the pressure site.
Recommended functional test frequency:
semiannual.
Sample risk assessment
Criteria - choose 1 rating from each category
Clinical function
No patient contact
Device may make contact with patient but function is non-critical
Device is used for patient diagnosis, or direct monitoring
Device is used to deliver direct treatment to the patient
Device is used for a life support
Physical risk
Device poses no appreciable risk due to failure
Device failure will result in low risk
Device failure will result in inappropriate therapy, misdiagnosis, or loss of monitoring
Device failure could result in severe injury to, or death of, patient or user
Problem avoidance probability
Maintenance or inspection would not impact reliability of the device
Common device failure modes are unpredictable or not very predictable
While common device failure modes are not very predictable, device history indicates that TSP
testing frequently detects problems
Common device failure is predictable and can be avoided by preventive maintenance
Specific regulatory or manufacturers requirements dictate preventive maintenance or testing
Incident history
No significant history
A significant history of incidents exists
Manufacturers/regulatory requirements for specific schedules
No requirements
There are requirements for testing independent of a numerical rating system
Total Score:
Assignment: 0.0x 0.5x 1x 2x 3x 4x (times per year tested)
Weight
1
2
3
4
5
1
2
3
4
Score
4
4
1
2
3
3
4
5
1
2
1
2
2
1
14
2
©University of Vermont, Rev. 2 – Confidential
119
Pneumatic tourniquet procedure
Estimated time: 35 minutes
Equipment information
Control number:____________________________________ Hospital:_ __________________________________________
Manufacturer:______________________________________ Model:_____________________________________________
Serial number:_ ____________________________________ Location:___________________________________________
Test information
Technician:________________________________________ Date:_______________________________________________
Test type: Incoming_ ________ Post repair_________
Test equipment needed:ISA 601 Electrical Safety Analyzer (or equivalent) Squeeze bulb with bleed valve
DPM 4 Pressure Meter (or equivalent)
Tubing and connectors to connect
Stopwatch or watch with a second hand
to DPM 4
PVC pipe to attach tourniquet cuff to
Test Result
Pass
Fail
N/A
Physical condition
Device is clean and decontaminated
No physical damage to case, display, mounts, cart, or components
Switches and controls operable and correctly aligned
Display intensity adequate for daytime use
Control numbers, labeling, and warnings present and legible
Inlets and hoses
Power cord, accessory cables, charger
Filters and vents clean
Electrical safety
Ground wire resistance
Chassis leakage
Patient leakage current
Patient lead leakage current – isolation test
(mains on patient applied part)
Insulation test (optional) 500 V
< 0.3 W
< 100 µA NC
< 500 µA SFC
< 100 µA B and BF
< 10 µA CF
< 100 µA BF
< 10 µA CF
< 2 MW
Preventive maintenance
Check condition of tubing, cuffs, and hoses
Replace battery every 24 months
Complete model-specific preventive maintenance
Performance testing
Verify unit operates on battery
Verify function of control valve
Controller stability
Cuff pressure accuracy
Timer accuracy
Maximum cuff pressure
Complete model-specific performance testing
120
©University of Vermont, Rev. 2 – Confidential
± 10 mmHg after 15 min
±5%
± 2 min after 15 min
≤ 550 mmHg or
manufacturer’s specification
Physical condition
Verify function of control valve: Connect
hoses
and cuffs to the pneumatic tourniquet.
Check the physical condition of the device, as
Place
the
cuffs around a piece of PVC pipe
described in the General Equipment Procedure.
or other sturdy cylindrical object to simulate
placement on a limb. Inflate the proximal cuff.
Electrical safety
Ensure the tourniquet is able to hold pressure.
Perform electrical safety checks as described in Inflate the distal cuff. Again, Ensure the tourChapter 5, Electrical Safety. Check ground wire niquet is able to hold pressure and then deflate
resistance and chassis leakage.
the cuff. Inflate both cuffs together. Hold the
pressure for a short time and then deflate. If the
Preventive maintenance
tourniquet has multiple channels, repeat the
Check condition of tubing, cuffs, and hoses:
test for each channel.
Inspect hoses and cuffs for signs of wear. Look
Controller stability: Attach a 3-way connecfor holes, cracks, and dry rot. Ensure that all
tor to the pressure port on the DPM 4. Attach a
connections are secure.
squeeze ball to one leg of the connector. Ensure
Replace battery: The battery should be
the bleed valve on the squeeze ball is closed.
replaced every 24 months. Replace if necessary. Attach another 3-way connector to the other
Complete model-specific preventive mainleg. Connect the remaining two legs between
tenance: Refer to the monitor’s service manual
the hose and the cuff of the tourniquet.
for preventive maintenance tasks specific to the
Set the pressure on the pneumatic tourniquet
device. Complete the preventive maintenance
to 400mmHg and inflate the cuff. Allow the
per manufacturer’s procedure.
pressure to stabilize for 15 minutes. After
15 minutes, the pressure should be between
Performance inspection
390 mmHg and 410 mmHg.
Cuff pressure accuracy: Set the pressure on
Verify unit operates on battery: Check that
the pneumatic tourniquet to 200 mmHg and
the ac power indicator is lit when the power
inflate the cuff. Observe the pressure for at least
cord is plugged into an outlet. Unplug the ac
two minutes to Ensure the pressure remains
power cord and perform the remainder of the
stable. The displayed pressure should be within
functional test on battery power. The ac power
5 % of the measured pressure. For a displayed
indicator should go out when the power cord
pressure of 200 mmHg, the measured pressure
is unplugged and the battery indicator should
should be between 190 mmHg and 210 mmHg.
light. Be sure to plug the power cord in at the
Set the cuff pressure to 450 mmHg and repeat
conclusion of the test.
the measurement. At this setting, the measured
pressure should be between 427.5 mmHg and
472.5 mmHg.
©University of Vermont, Rev. 2 – Confidential
121
Timer accuracy: Inflate the cuff on the
pneumatic tourniquet. Use a stopwatch or a
watch with a second hand to measure the
elapsed time. Allow the cuff to remain inflated
for 15 minutes. The elapsed time displayed on
the tourniquet should be between 13 and
17 minutes.
Maximum cuff pressure: Set the pressure
on the pneumatic tourniquet to its maximum
setting. Inflate the cuff and allow the pressure to stabilize. Use the squeeze ball to slowly
increase the pressure in the cuff until the
pressure relief valve vents the pressure in the
cuff. Note the pressure at which the relief valve
is triggered. The over pressure limit should be
less than 550 mmHg. Check the manufacturer’s
service manual for the exact value.
122
©University of Vermont, Rev. 2 – Confidential
Alarm function: Check that all alarms are
functional and that the volume is adequately
loud. Ensure that appropriate visual indicators
are functioning.
Inflate the tourniquet cuff. Slowly open the
bleed valve on the squeeze ball to simulate a
leak. The tourniquet leak alarm should activate.
Complete model-specific performance
testing: Refer to the service manual for performance inspection tasks specific to the device.
Complete the performance inspection per
manufacturer’s procedure.
Return to service: Before returning to use,
return any settings that were adjusted to their
original settings. Ensure the volume of the
audible alarms is loud enough to be heard in
normal operating conditions. Plug in the power
cord to ensure the battery remains charged.
Pulse oximeter
A pulse oximeter non-invasively measures the
oxygen saturation of a patient’s blood. A pulse
oximeter consists of a red and an infrared light
source, photo detectors, and probe to transmit
light through a translucent, pulsating arterial
bed, typically a fingertip or earlobe. Oxygenated hemoglobin (O2Hb) and deoxygenated
hemoglobin (HHb) absorb red and infrared light
differently. The percent saturation of hemoglobin in arterial blood can be calculated by
measuring light absorption changes caused by
arterial blood flow pulsations.
Recommended functional test frequency:
annual.
Sample risk assessment
Criteria – choose 1 rating from each category
Clinical function
No patient contact
Device may make contact with patient but function is non-critical
Device is used for patient diagnosis, or direct monitoring
Device is used to deliver direct treatment to the patient
Device is used for a life support
Physical risk
Device poses no appreciable risk due to failure
Device failure will result in low risk
Device failure will result in inappropriate therapy, misdiagnosis, or loss of monitoring
Device failure could result in severe injury to, or death of, patient or user
Problem avoidance probability
Maintenance or inspection would not impact reliability of the device
Common device failure modes are unpredictable or not very predictable
While common device failure modes are not very predictable, device history indicates that TSP
testing frequently detects problems
Common device failure is predictable and can be avoided by preventive maintenance
Specific regulatory or manufacturers requirements dictate preventive maintenance or testing
Incident history
No significant history
A significant history of incidents exists
Manufacturers/regulatory requirements for specific schedules
No requirements
There are requirements for testing independent of a numerical rating system
Total Score:
Assignment: 0.0x 0.5x 1x 2x 3x 4x (times per year tested)
Weight
Score
1
2
3
4
5
3
1
2
3
4
1
2
3
2
3
4
5
1
2
1
1
2
1
10
1
©University of Vermont, Rev. 2 – Confidential
123
Pulse oximeter procedure
Estimated time: 20 minutes
Equipment information
Control number:____________________________________ Hospital:_ __________________________________________
Manufacturer:______________________________________ Model:_____________________________________________
Serial number:_ ____________________________________ Location:___________________________________________
Test information
Technician:________________________________________ Date:_______________________________________________
Test type: Incoming_ ________ Post repair_________
Test equipment needed:ISA 601 Electrical Safety Analyzer (or equivalent)
Index 2 SpO2 Analyzer (or equivalent)
Test Result
Pass
Fail
N/A
Physical condition
Device is clean and decontaminated
No physical damage to case, display, mounts, cart, or components
Switches and controls operable and correctly aligned
Display intensity adequate for daytime use
Control numbers, labeling, and warnings present and legible
Inlets and hoses
Power cord, accessory cables, charger
Filters and vents clean
Electrical safety
Ground wire resistance
Chassis leakage
Patient leakage current
Patient lead leakage current – isolation test
(mains on patient applied part)
Insulation test (optional) 500 V
< 0.3 W
< 100 µA NC
< 500 µA SFC
< 100 µA B and BF
< 10 µA CF
< 100 µA BF
< 10 µA CF
< 2 MW
Preventive maintenance
Clean recorder paper compartment, rollers and paper guides
Lubricate motor and paper drive mechanism
Verify proper time and date, correct if necessary
Replace battery every 24 months
Complete model-specific preventive maintenance
Performance testing
Verify unit operates on battery
Heart rate accuracy
SpO2 accuracy
Recorder operation
Alarm function
Complete model-specific performance testing
124
©University of Vermont, Rev. 2 – Confidential
±5%
±3%
Physical condition
Check the physical condition of the device, as
described in the General Equipment Procedure.
Electrical safety
Perform electrical safety checks as described in
Chapter 5, Electrical Safety. Check ground wire
resistance and chassis leakage.
Preventive maintenance
Clean recorder paper compartment, rollers, and paper guides: Inspect the rollers and
paper guides and remove any debris. Check for
bits of torn paper caught in the rollers.
Lubricate motor and paper drive mechanism: Follow the manufacturer’s instructions
in the service manual for lubricating the motor
and paper drive mechanism. Not all motors will
need to be lubricated.
Verify proper time and date. Correct if necessary: Verify that the time and date displayed
on the monitor is correct. If the time and date is
not displayed on the monitor, print a strip from
the recorder. The time and date should appear
on the printed strip. Correct the time and date
as necessary.
Replace battery: The battery should be
replaced every 24 months. Replace if necessary.
Complete model-specific preventive maintenance: Refer to the monitor’s service manual
for preventive maintenance tasks specific to the
device. Complete the preventive maintenance
per manufacturer’s procedure.
Performance inspection
Verify unit operates on battery: Check that
the ac power indicator is lit when the power
cord is plugged into an outlet. Unplug the ac
power cord and perform the remainder of the
functional test on battery power. The ac power
indicator should go out when the power cord
is unplugged and the battery indicator should
light. Be sure to plug the power cord in at the
conclusion of the test.
Heart rate accuracy: Attach a finger probe
to the pulse oximeter. Place the finger sensor
on the finger simulator of the Index 2 simulator.
From the main menu of the Index 2, press the
soft key labeled ‘MORE’ for the second menu
and then press the soft key labeled ‘MAKE’. Use
the plus and minus keys to scroll through the
available makes. Select the make of the pulse
oximeter to be tested. When the correct make
appears on the screen, press the ‘ESC’ key to
return to the main menu.
Pulse oximeter connected to Index 2 SpO2 simulator.
©University of Vermont, Rev. 2 – Confidential
125
From the main menu, press the soft key
labeled ‘SIM’ to enter the simulation mode.
Begin a manual simulation by pressing the soft
key labeled ‘MAN’. Use the plus and minus keys
to adjust the O2 level and heart rate. Set the
heart rate to 80 bpm. Turn on the pulse oximeter and initiate a measurement. The displayed
heart rate should be within 5 % of the set heart
rate. For a simulated heart rate of 80 bpm, the
displayed heart rate should be between 76 bpm
and 84 bpm.
O2 accuracy: Adjust the O2 level on the Index
2 to 96 %. Initiate a measurement on the pulse
oximeter. The displayed SpO2 value should be
within 3 % of the set value. For a simulated
SpO2 of 96 %, the displayed value should be
between 93 % and 99 %.
Recorder operation: After taking some
O2 measurements, print the results with the
recorder. Ensure the recorder prints clearly
and legibly. If the date and time is present on
the recorded strip, Ensure the date and time is
accurate.
Alarm function: Check that all alarms are
functional and that the volume is adequately
loud. Ensure that appropriate visual indicators
are functioning.
Set the high O2 alarm on the pulse oximeter
to 98 %. Set the low O2 alarm to 90 %. Set the
Index 2 for a manual simulation with the SpO2
126
©University of Vermont, Rev. 2 – Confidential
at 96 % and the heart rate 80 bpm. Initiate a
measurement on the pulse oximeter. Adjust
the SpO2 on the Index 2 to 100 %. The high O2
alarm on the pulse oximeter should activate.
Bring the SpO2 back down to 96 % and clear
the alarm. Adjust the SpO2 on the Index 2 to
88 %. The low O2 alarm on the pulse oximeter
should activate. Bring the SpO2 back to 96 %
and clear the alarm.
Set the high heart rate alarm on the pulse
oximeter to 120 bpm and set the low heart rate
alarm to 60 bpm. Adjust the heart rate on the
Index 2 to 125 bpm. The high heart rate alarm
should activate. Return the heart rate to 80 bpm
and clear the alarm. Adjust the heart rate on
the Index 2 to 55 bpm. The low heart rate alarm
should activate. Return the heart rate to 80 bpm
and clear the alarm. Return all alarm limits to
their original settings.
Complete model-specific performance
testing: Refer to the service manual for performance inspection tasks specific to the device.
Complete the performance inspection per
manufacturer’s procedure.
Return to service: Before returning to use,
return any settings that were adjusted to their
original settings. Ensure the volume of the
audible alarms is loud enough to be heard in
normal operating conditions. Plug in the power
cord to ensure the battery remains charged.
Radiant warmer
probe. Typically, the radiant warmer is set
to a temperature and a temperature probe is
attached to the infant’s skin. The heater will
turn on while the infant’s skin temperature is
below the set temperature. When the skin temperature reaches the set temperature, the heater
turns off.
Radiant warmers provide thermal stability to
infants. They are used to provide thermal support to newborns and critically ill infants and
also for infants undergoing long procedures in
a cool environment. Unlike incubators, radiant warmers are not enclosed, allowing direct
Recommended functional test frequency:
access to the infant. These devices typically
consist of an overhead heater and a temperature semiannual.
Sample risk assessment
Criteria – choose 1 rating from each category
Clinical function
No patient contact
Device may make contact with patient but function is non-critical
Device is used for patient diagnosis, or direct monitoring
Device is used to deliver direct treatment to the patient
Device is used for a life support
Physical risk
Device poses no appreciable risk due to failure
Device failure will result in low risk
Device failure will result in inappropriate therapy, misdiagnosis, or loss of monitoring
Device failure could result in severe injury to, or death of, patient or user
Problem avoidance probability
Maintenance or inspection would not impact reliability of the device
Common device failure modes are unpredictable or not very predictable
While common device failure modes are not very predictable, device history indicates that TSP
testing frequently detects problems
Common device failure is predictable and can be avoided by preventive maintenance
Specific regulatory or manufacturers requirements dictate preventive maintenance or testing
Incident history
No significant history
A significant history of incidents exists
Manufacturers/regulatory requirements for specific schedules
No requirements
There are requirements for testing independent of a numerical rating system
Total Score:
Assignment: 0.0x 0.5x 1x 2x 3x 4x (times per year tested)
Weight
1
2
3
4
5
1
2
3
4
Score
4
4
1
2
3
3
4
5
1
2
1
2
2
1
14
2
©University of Vermont, Rev. 2 – Confidential
127
Radiant warmer procedure
Estimated time: 35 minutes
Equipment information
Control number:____________________________________ Hospital:_ __________________________________________
Manufacturer:______________________________________ Model:_____________________________________________
Serial number:_ ____________________________________ Location:___________________________________________
Test information
Technician:________________________________________ Date:_______________________________________________
Test type: Incoming_ ________ Post repair_________
Test equipment needed:ISA 601 Electrical Safety Analyzer (or equivalent)
INCU incubator analyzer (or equivalent)
Test Result
Pass
Fail
N/A
Physical condition
Device is clean and decontaminated
No physical damage to case, display, mounts, cart, or components
Switches and controls operable and correctly aligned
Display intensity adequate for daytime use
Control numbers, labeling, and warnings present and legible
Inlets and hoses
Power cord, accessory cables, charger
Filters and vents clean
Electrical safety
Ground wire resistance
Chassis leakage
Patient leakage current
Patient lead leakage current – isolation test
(mains on patient applied part)
Insulation test (optional) 500 V
< 0.3 W
< 100 µA NC
< 500 µA SFC
< 100 µA B and BF
< 10 µA CF
< 100 µA BF
< 10 µA CF
< 2 MW
Preventive maintenance
Clean vents and filters
Replace battery every 24 months
Complete model-specific preventive maintenance
Performance testing
Verify unit operates on battery
Fan operation
Temperature accuracy
Temperature alarms
Alarm function
Complete model-specific performance testing
128
©University of Vermont, Rev. 2 – Confidential
± 0.3 ºC
Physical condition
Performance inspection
Check the physical condition of the device, as
described in the General Equipment Procedure.
Verify unit operates on battery: Check that
the ac power indicator is lit when the power
cord is plugged into an outlet. Unplug the ac
power cord and perform the remainder of the
Electrical safety
Perform electrical safety checks as described in functional test on battery power. The ac power
Chapter 5, Electrical Safety. Check ground wire indicator should go out when the power cord
is unplugged and the battery indicator should
resistance and chassis leakage.
light. Be sure to plug the power cord in at the
conclusion of the test.
Preventive maintenance
Fan operation: Inspect the fan blades for
Clean vents and filters: Inspect vents and air
damage. Look for chips, warping, melting, and
filters. Clean or replace filters as necessary.
missing blades. Ensure there is adequate clearEnsure that filters are installed properly.
ance around the fan assembly. Look for signs of
Replace battery: The battery should be
rubbing around the fan housing. Lubricate the
replaced every 24 months. Replace if necessary.
fan motor per the manufacturer’s specification.
Complete model-specific preventive mainFollow the manufacturer’s instructions in the
tenance: Refer to the monitor’s service manual
service manual for lubricating the pump motor.
for preventive maintenance tasks specific to the
Not all motors will need to be lubricated.
device. Complete the preventive maintenance
per manufacturer’s procedure.
INCU placed in radiant warmer.
INCU with radiant warmer adapter.
©University of Vermont, Rev. 2 – Confidential
129
Temperature accuracy: Set the warmer temperature to 34 ºC. Place the INCU in the center
of the incubator. Place the T1 and T3 temperature probes so that they are placed vertically
in opposite corners. Clip the T2 probe to the
underside of the radiant baby adapter. Place
the radiant baby adapter on top of the INCU and
align it with the heater in the warmer.
Place the skin temperature probe from the
warmer in close proximity to the T2 sensor.
Allow the temperature to stabilize. Press the
‘SELECT’ button on the INCU to cycle through
the readings. Place the skin temperature probe
in close proximity to the T2 sensor on the INCU.
Allow the incubator temperature to stabilize.
The measured temperature on the T2 sensor
should be within 0.3 ºC of the displayed skin
temperature on the incubator. For a displayed
skin temperature of 34 ºC, the measured
temperature should be between 33.7 ºC and
34.3 ºC. Repeat the temperature measurements
at 36 ºC and 38 ºC.
Temperature alarms: Adjust the temperature
set point on the warmer to its maximum setting. Place the sensor in the warmer and allow
the temperature to stabilize. Remove the skin
temperature sensor from the warmer and allow
it to cool. Verify that the low temperature alarm
activates. Place the skin temperature sensor
130
©University of Vermont, Rev. 2 – Confidential
back in the warmer and allow the temperature to stabilize. Hold the sensor close to the
heater. Verify that the high temperature alarm
activates.
Alarm function: Check that all alarms are
functional and that the volume is adequately
loud. Ensure that appropriate visual indicators
are functioning.
Unplug the temperature probe from the incubator. The disconnected probe alarm should
activate. If the incubator is equipped with
alarms for an open or short circuited temperature probe, use open and short circuited probe
plugs to test these alarms. Disconnect the skin
temperature probe and connect the probe plugs.
The appropriate alarms should activate.
Unplug the incubator to simulate a power failure. The power failure alarm should activate.
Complete model-specific performance
testing: Refer to the service manual for performance inspection tasks specific to the device.
Complete the performance inspection per
manufacturer’s procedure.
Return to service: Before returning to use,
return any settings that were adjusted to their
original settings. Ensure the volume of the
audible alarms is loud enough to be heard in
normal operating conditions. Plug in the power
cord to ensure the battery remains charged.
Sphygmomanometer
A sphygmomanometer is a device for measuring blood pressure. It consists of an inflatable
cuff, an inflation bulb with a one way valve,
and a pressure meter. The pressure meter may
be either a mercury manometer or an aneroid
gauge, although many healthcare institutions
no longer allow the use of mercury. Typically,
the cuff is placed around the patient’s arm
and then inflated until the artery is occluded.
The cuff is then deflated slowly while a clinician uses a stethoscope to listen for Korotkoff
sounds, the sound of blood flow through the
artery, at the brachial pulse. The pressure at
which the first sound is heard as the cuff is
deflating is the systolic pressure. The pressure
at which sounds are no longer heard is the
diastolic pressure.
Recommended functional test frequency:
annual.
Sample risk assessment
Criteria – choose 1 rating from each category
Clinical function
No patient contact
Device may make contact with patient but function is non-critical
Device is used for patient diagnosis, or direct monitoring
Device is used to deliver direct treatment to the patient
Device is used for a life support
Physical risk
Device poses no appreciable risk due to failure
Device failure will result in low risk
Device failure will result in inappropriate therapy, misdiagnosis, or loss of monitoring
Device failure could result in severe injury to, or death of, patient or user
Problem avoidance probability
Maintenance or inspection would not impact reliability of the device
Common device failure modes are unpredictable or not very predictable
While common device failure modes are not very predictable, device history indicates that TSP
testing frequently detects problems
Common device failure is predictable and can be avoided by preventive maintenance
Specific regulatory or manufacturers requirements dictate preventive maintenance or testing
Incident history
No significant history
A significant history of incidents exists
Manufacturers/regulatory requirements for specific schedules
No requirements
There are requirements for testing independent of a numerical rating system
Total Score:
Assignment: 0.0x 0.5x 1x 2x 3x 4x (times per year tested)
Weight
Score
1
2
3
4
5
3
1
2
3
4
2
1
2
3
3
4
5
1
2
1
1
2
1
10
1
©University of Vermont, Rev. 2 – Confidential
131
Sphygmomanometer procedure
Estimated time: 5 minutes
Equipment information
Control number:____________________________________ Hospital:_ __________________________________________
Manufacturer:______________________________________ Model:_____________________________________________
Serial number:_ ____________________________________ Location:___________________________________________
Test information
Technician:________________________________________ Date:_______________________________________________
Test type: Incoming_ ________ Post repair_________
Test equipment needed:DPM 4 Pressure Meter (or equivalent)
Stopwatch or watch with a second hand
Tubing and connectors to connect to DPM 4
PVC pipe to attach cuff to
Test Result
Pass
Fail
N/A
Physical condition
Device is clean and decontaminated
No physical damage to case, display, mounts, cart, or components
Switches and controls operable and correctly aligned
Display intensity adequate for daytime use
Control numbers, labeling, and warnings present and legible
Inlets and hoses
Power cord, accessory cables, charger
Filters and vents clean
Preventive maintenance
Check condition of tubing, cuffs, and hoses
Complete model-specific preventive maintenance
Performance testing
Gauge zero
Leak test
Pressure accuracy
Complete model-specific performance testing
132
©University of Vermont, Rev. 2 – Confidential
± 1 mmHg
≤ 15 mmHg/min
± 3 mmHg
Physical condition
Check the physical condition of the device, as
described in the General Equipment Procedure.
Electrical safety
Perform electrical safety checks as described in
Chapter 5, Electrical Safety. Check ground wire
resistance and chassis leakage.
Preventive maintenance
Check condition of tubing, cuffs, and hoses:
Inspect hoses and cuffs for signs of wear. Look
for holes, cracks, and dry rot. Ensure that all
connections are secure.
Complete model-specific preventive maintenance: Refer to the monitor’s service manual
for preventive maintenance tasks specific to the
device. Complete the preventive maintenance
per manufacturer’s procedure.
Performance inspection
Gauge zero: With no pressure in the cuff,
read the pressure on the gauge of the sphygmomanometer. The gauge should read between
-1 mmHg and 1 mmHg. Discard aneroid gauges
that cannot be reset to zero.
Leak test: Place the cuff around a piece of
PVC pipe or other sturdy cylindrical object to
simulate placement on a limb. Connect a piece
of tubing to the pressure port on the DPM 4.
Connect a tee to this tubing and attach tubing
and connectors. Connect the two legs of the
tee to between the hose and the cuff of the
sphygmomanometer. Close the bleed valve and
use the cuff’s squeeze ball to inflate the cuff to
the maximum pressure indicated on the gauge.
After 1 minute, read the pressure indicated
on the gauge. The pressure should not have
dropped more than 15mmHg in 1 minute.
Pressure accuracy: Inflate the cuff to until
200 mmHg is read on the DPM 4. Read the
pressure on the sphygmomanometer gauge.
The pressure on the gauge should be within
3 mmHg of the true pressure measured on
the DPM 4. For a pressure of 200 mmHg, the
gauge should read between 197 mmHg and
203 Hg. Repeat the pressure measurement for
120 mmHg and 60 mmHg.
Complete model-specific performance
testing: Refer to the service manual for performance inspection tasks specific to the device.
Complete the performance inspection per
manufacturer’s procedure.
Return to service: Before returning to use,
return any settings that were adjusted to their
original settings. Ensure the volume of the
audible alarms is loud enough to be heard in
normal operating conditions. Plug in the power
cord to ensure the battery remains charged.
©University of Vermont, Rev. 2 – Confidential
133
Therapeutic stimulator
Therapeutic stimulators cause controlled muscular contractions by applying electrical stimuli
to nerves that control muscle activity. They are
typically used during physical therapy for pain
management and to reduce swelling. These
devices consist of a pulse generator, intensity
controls, and a timer. A controlled electrical
current is delivered to the muscles through
electrodes applied to the patient’s skin. Therapeutic stimulators are often used in conjunction
with therapeutic ultrasound.
Recommended functional test frequency:
annual.
Sample risk assessment
Criteria – choose 1 rating from each category
Clinical function
No patient contact
Device may make contact with patient but function is non-critical
Device is used for patient diagnosis, or direct monitoring
Device is used to deliver direct treatment to the patient
Device is used for a life support
Physical risk
Device poses no appreciable risk due to failure
Device failure will result in low risk
Device failure will result in inappropriate therapy, misdiagnosis, or loss of monitoring
Device failure could result in severe injury to, or death of, patient or user
Problem avoidance probability
Maintenance or inspection would not impact reliability of the device
Common device failure modes are unpredictable or not very predictable
While common device failure modes are not very predictable, device history indicates that TSP
testing frequently detects problems
Common device failure is predictable and can be avoided by preventive maintenance
Specific regulatory or manufacturers requirements dictate preventive maintenance or testing
Incident history
No significant history
A significant history of incidents exists
Manufacturers/regulatory requirements for specific schedules
No requirements
There are requirements for testing independent of a numerical rating system
Total Score:
Assignment: 0.0x 0.5x 1x 2x 3x 4x (times per year tested)
134
©University of Vermont, Rev. 2 – Confidential
Weight
1
2
3
4
5
1
2
3
4
1
2
Score
4
3
2
3
4
5
1
2
1
2
2
1
12
1
Therapeutic stimulator procedure
Estimated time: 25 minutes
Equipment information
Control number:____________________________________ Hospital:_ __________________________________________
Manufacturer:______________________________________ Model:_____________________________________________
Serial number:_ ____________________________________ Location:___________________________________________
Test information
Technician:________________________________________ Date:_______________________________________________
Test type: Incoming_ ________ Post repair_________
Test equipment needed:ISA 601 Electrical Safety Analyzer (or equivalent)
Oscilloscope such as Fluke 199XRAY
Stopwatch or watch with a second hand
Test Result
Pass
Fail
N/A
Physical condition
Device is clean and decontaminated
No physical damage to case, display, mounts, cart, or components
Switches and controls operable and correctly aligned
Display intensity adequate for daytime use
Control numbers, labeling, and warnings present and legible
Inlets and hoses
Power cord, accessory cables, charger
Filters and vents clean
Electrical safety
Ground wire resistance
Chassis leakage
Patient leakage current
Patient lead leakage current – isolation test
(mains on patient applied part)
Insulation test (optional) 500 V
< 0.3 W
< 100 µA NC
< 500 µA SFC
< 100 µA B and BF
< 10 µA CF
< 100 µA BF
< 10 µA CF
< 2 MW
Preventive maintenance
Inspect leads and electrodes
Complete model-specific preventive maintenance
Performance testing
Output accuracy
Timer accuracy
Alarm function
Complete model-specific performance testing
± 10 %
± 10 sec
©University of Vermont, Rev. 2 – Confidential
135
Physical condition
the stimulator and adjust the output to 20 mA.
Read the current measured on the scope. The
Check the physical condition of the device, as
described in the General Equipment Procedure. measured current should be within 10 % of the
set current. With a set current of 10 mA, the
measured current should be between 9 mA and
Electrical safety
11 mA. Repeat the measurement for 25 mA,
Perform electrical safety checks as described in 50 mA, and 100 mA.
Chapter 5, Electrical Safety. Check ground wire
Timer accuracy: Set the treatment timer on
resistance and chassis leakage.
the stimulator for 1 minute. Start the stimulator
and begin timing with a stopwatch or a watch
Preventive maintenance
with a second hand. The treatment timer should
Inspect leads and electrodes: Inspect leads
sound between 50 seconds and 70 seconds.
and electrodes for signs of wear such as frayed Verify that the there is no output after the
wires or broken strain reliefs. Inspect electrodes timer stops.
for corrosion or a build up of conductive gel.
Alarm function: Check that all alarms are
Clean if necessary.
functional and that the volume is adequately
Complete model-specific preventive mainloud. Ensure that appropriate visual indicators
tenance: Refer to the monitor’s service manual
are functioning.
for preventive maintenance tasks specific to the
Remove one of the electrode cables from the
device. Complete the preventive maintenance
scope probe, being careful not to touch the
per manufacturer’s procedure.
exposed electrode. Verify that the electrode
disconnection alarm activates.
Performance inspection
Complete model-specific performance
testing: Refer to the service manual for perforOutput accuracy: Connect the scope probe
mance inspection tasks specific to the device.
to channel A of the oscilloscope. Press the
Complete the performance inspection per
‘SCOPE’ button on the 199XRAY to enter oscilloscope mode. Press the ‘A’ button on the scope manufacturer’s procedure.
Return to service: Before returning to use,
to access the settings for channel A. Press the
return any settings that were adjusted to their
F3 (‘PROBE A’) and set the probe type to curoriginal settings. Ensure the volume of the
rent. Connect the stimulator electrode cable to
audible alarms is loud enough to be heard in
the scope probe. Set the simulator to a Rusnormal operating conditions.
sian waveform with a continuous cycle. Start
136
©University of Vermont, Rev. 2 – Confidential
Therapeutic ultrasound
Therapeutic ultrasounds deliver ultrasonic
waves that penetrate tissues and cause thermal
and non-thermal effects and are typically used
to speed healing in soft tissue injuries. Energy
from the sound waves is absorbed and causes
heating in the tissue, resulting in an increase in
blood flow, which speeds healing and reduces
swelling. Sound waves also cause a cavitational
effect from the vibration of the tissue, causing
microscopic air bubbles to form. The air bubbles transmit the vibrations and stimulate cell
membranes. Therapeutic ultrasounds consist of
a radio frequency generator, usually 1 MHz to
3 MHz, an intensity controller, and an applicator
containing a piezoelectric transducer.
Recommended functional test frequency:
annual.
Sample risk assessment
Criteria – choose 1 rating from each category
Clinical function
No patient contact
Device may make contact with patient but function is non-critical
Device is used for patient diagnosis, or direct monitoring
Device is used to deliver direct treatment to the patient
Device is used for a life support
Physical risk
Device poses no appreciable risk due to failure
Device failure will result in low risk
Device failure will result in inappropriate therapy, misdiagnosis, or loss of monitoring
Device failure could result in severe injury to, or death of, patient or user
Problem avoidance probability
Maintenance or inspection would not impact reliability of the device
Common device failure modes are unpredictable or not very predictable
While common device failure modes are not very predictable, device history indicates that TSP
testing frequently detects problems
Common device failure is predictable and can be avoided by preventive maintenance
Specific regulatory or manufacturers requirements dictate preventive maintenance or testing
Incident history
No significant history
A significant history of incidents exists
Manufacturers/regulatory requirements for specific schedules
No requirements
There are requirements for testing independent of a numerical rating system
Total Score:
Assignment: 0.0x 0.5x 1x 2x 3x 4x (times per year tested)
Weight
1
2
3
4
5
1
2
3
4
Score
4
3
1
2
3
3
4
5
1
2
1
1
2
1
12
1
©University of Vermont, Rev. 2 – Confidential
137
Therapeutic ultrasound procedure
Estimated time: 25 minutes
Equipment information
Control number:____________________________________ Hospital:_ __________________________________________
Manufacturer:______________________________________ Model:_____________________________________________
Serial number:_ ____________________________________ Location:___________________________________________
Test information
Technician:________________________________________ Date:_______________________________________________
Test type: Incoming_ ________ Post repair_________
Test equipment needed:ISA 601 Electrical Safety Analyzer (or equivalent)
UW5 Ultrasound wattmeter (or equivalent)
Stopwatch or watch with a second hand
Test Result
Pass
Fail
N/A
Physical condition
Device is clean and decontaminated
No physical damage to case, display, mounts, cart, or components
Switches and controls operable and correctly aligned
Display intensity adequate for daytime use
Control numbers, labeling, and warnings present and legible
Inlets and hoses
Power cord, accessory cables, charger
Filters and vents clean
Electrical safety
Ground wire resistance
Chassis leakage
Patient leakage current
Patient lead leakage current – isolation test
(mains on patient applied part)
Insulation test (optional) 500 V
< 0.3 W
< 100 µA NC
< 500 µA SFC
< 100 µA B and BF
< 10 µA CF
< 100 µA BF
< 10 µA CF
< 2 MW
Preventive maintenance
Inspect sound head
Complete model-specific preventive maintenance
Performance testing
Verify unit operates on battery
Output accuracy
Duty cycle
Timer accuracy
Alarm function
Complete model-specific performance testing
138
©University of Vermont, Rev. 2 – Confidential
± 20 %
± 10 sec
Physical condition
Performance inspection
Check the physical condition of the device, as
described in the General Equipment Procedure.
Output accuracy: Ensure the UW5 is level
before testing. If necessary, level the UW5 using
the adjustable leveling jacks on the underside
of the unit. Place the transducer cone on the
mounting pin in the transducer well. Fill the
transducer well with 850 ml ± 50 ml de-ionized
and degassed water. The water should be at
room temperature. Turn on the UW5 and allow
at least 5 minutes for it to stabilize at room
temperature. Press the ‘ZERO’ button to zero the
wattmeter.
Place the appropriately sized centering ring
over the transducer well. Place the sound head
in the transducer well so that it is centered and
vertical. The sound head should be completely
coupled with water.
Start the ultrasound with a continuous duty
cycle and bring the output to the maximum
setting. Measure the ultrasound output on the
UW5. The measured output should be within
20 % of the set output. For a set output of
20 W, the measured output should be between
16 W and 24 W. Repeat this measurement for
all frequencies.
Duty cycle: Start an ultrasound treatment at
10 W and a continuous (100 %) duty cycle.
The output on the UW5 should be approximately
10 W. Adjust the duty cycle to 50 %. The ultrasound output on the wattmeter should fall to
50 % of the output setting, or 5 W. Cycle
through all of the available duty cycles and
verify the output.
Timer accuracy: Set the treatment timer on
the stimulator for 1 minute. Start the stimulator
and begin timing with a stopwatch or a watch
with a second hand. The treatment timer should
sound between 50 seconds and 70 seconds.
Verify that the there is no output after the
timer stops.
Electrical safety
Perform electrical safety checks as described in
Chapter 5, Electrical Safety. Check ground wire
resistance and chassis leakage.
Preventive maintenance
Inspect sound head: Inspect the sound head
for signs of wear such as frayed wires or broken
strain reliefs. Look for corrosion or a build up of
conductive gel. Clean if necessary.
Complete model-specific preventive maintenance: Refer to the monitor’s service manual
for preventive maintenance tasks specific to the
device. Complete the preventive maintenance
per manufacturer’s procedure.
Measuring ultrasound power output with the UW5.
©University of Vermont, Rev. 2 – Confidential
139
Alarm function: Check that all alarms are
functional and that the volume is adequately
loud. Ensure that appropriate visual indicators
are functioning.
Disconnect the sound head cable from the
ultrasound. Verify that the sound head disconnection alarm activates.
Complete model-specific performance
testing: Refer to the service manual for performance inspection tasks specific to the device.
Complete the performance inspection per
manufacturer’s procedure.
Remove the water from the transducer well of
the UW5 when the measurements are complete.
Using the drain tube located in the bottom front,
140
©University of Vermont, Rev. 2 – Confidential
completely drain the well. Remove the drain
tube from its storage clip. Holding the tube end
over a container, pinch the tube just in front of
the stopper with one hand while pulling the
stopper out with the other. Remove the stopper and allow the water to drain completely.
The UW5 should be fully drained before being
stored. This will prevent bacterial growth and
other potential water related damage.
Return to service: Before returning to use,
return any settings that were adjusted to their
original settings. Ensure the volume of the
audible alarms is loud enough to be heard in
normal operating conditions.
Ventilator
Ventilators mechanically move air into and
out of the lungs, to provide respiration for a
patient who is physically unable to breathe,
or is breathing insufficiently. Most ventilators
use positive pressure to gas to the lungs. These
devices typically consist of a breathing circuit,
a control system, monitors, alarms, and a source
of gas, either an internal compressor or external
connections for compressed gas cylinders or the
hospital gas wall outlets.
Recommended functional test frequency:
semiannual.
Sample risk assessment
Criteria – choose 1 rating from each category
Clinical function
No patient contact
Device may make contact with patient but function is non-critical
Device is used for patient diagnosis, or direct monitoring
Device is used to deliver direct treatment to the patient
Device is used for a life support
Physical risk
Device poses no appreciable risk due to failure
Device failure will result in low risk
Device failure will result in inappropriate therapy, misdiagnosis, or loss of monitoring
Device failure could result in severe injury to, or death of, patient or user
Problem avoidance probability
Maintenance or inspection would not impact reliability of the device
Common device failure modes are unpredictable or not very predictable
While common device failure modes are not very predictable, device history indicates that TSP
testing frequently detects problems
Common device failure is predictable and can be avoided by preventive maintenance
Specific regulatory or manufacturers requirements dictate preventive maintenance or testing
Incident history
No significant history
A significant history of incidents exists
Manufacturers/regulatory requirements for specific schedules
No requirements
There are requirements for testing independent of a numerical rating system
Total Score:
Assignment: 0.0x 0.5x 1x 2x 3x 4x (times per year tested)
Weight
Score
1
2
3
4
5
5
1
2
3
4
4
1
2
3
4
5
1
2
1
2
4
2
2
17
2
©University of Vermont, Rev. 2 – Confidential
141
Ventilator procedure
Estimated time: 50 minutes
Equipment information
Control number:____________________________________ Hospital:_ __________________________________________
Manufacturer:______________________________________ Model:_____________________________________________
Serial number:_ ____________________________________ Location:___________________________________________
Test information
Technician:________________________________________ Date:_______________________________________________
Test type: Incoming_ ________ Post repair_________
Test equipment needed:ISA 601 Electrical Safety Analyzer (or equivalent)
VT PLUS HF Ventilator Analyzer (or equivalent)
Test lung (such as ACCULUNG)
Hoses and connectors to connect to VT PLUS HF
Test Result
Pass
Fail
N/A
Physical condition
Device is clean and decontaminated
No physical damage to case, display, mounts, cart, or components
Switches and controls operable and correctly aligned
Display intensity adequate for daytime use
Control numbers, labeling, and warnings present and legible
Inlets and hoses
Power cord, accessory cables, charger
Filters and vents clean
Electrical safety
Ground wire resistance
Chassis leakage
Patient leakage current
Patient lead leakage current – isolation test
(mains on patient applied part)
Insulation test (optional) 500 V
< 0.3 W
< 100 µA NC,
< 500 µA SFC
< 100 µA B and BF
< 10 µA CF
< 100 µA BF
< 10 µA CF
< 2 MW
Preventive maintenance
Clean vents and filters
Replace tubing
Replace battery every 24 months
Complete model-specific preventive maintenance
continued on page 143
142
©University of Vermont, Rev. 2 – Confidential
Ventilator procedure
Estimated time: 50 minutes
continued from page 142
Test Result
Pass
Fail
N/A
Performance testing
Verify unit operates on battery
Gas cylinders and regulators
Hoses, tubing, and connectors
Volume accuracy
Respiration rate
I:E ratio
Pressure accuracy
PEEP
O2 accuracy
Alarm function
Complete model-specific performance testing
± 10 %
± 10 %
±2%
©University of Vermont, Rev. 2 – Confidential
143
Physical condition
yokes. Disconnect hoses from the hospital’s gas
system. With the ventilator turned off, open
Check the physical condition of the device, as
described in the General Equipment Procedure. each cylinder. Note the pressure in each cylinder. Replace any cylinders with less than
500 psi. Close the cylinders. The pressure
Electrical safety
should remain steady on the cylinder gauges.
Perform electrical safety checks as described in
Hoses, tubing, and connectors: Check
Chapter 5, Electrical Safety. Check ground wire the condition of external hoses, tubing, and
resistance and chassis leakage.
connectors. Check for signs of wear such as
cracking or dry rot. Ensure all connectors are
Preventive maintenance
tight.
Clean vents and filters: Inspect vents and air
Volume accuracy: Turn on the VT PLUS HF
filters. Clean or replace filters as necessary.
and allow it to warm up. Ensure that all hoses
Ensure that filters are installed properly.
are disconnected from the analyzer and then
Replace tubing: Replace internal tubing and press the soft key to zero the pressure and flow.
filters as necessary. Follow the manufacturer’s
Press ‘8’ (‘SETUP’) on the analyzer to enter the
guidelines for tubing replacement.
setup menu. Use the arrow keys to highlight
Replace battery: The battery should be
‘Gas Settings’ and then press the ‘MODIFY’ soft
replaced every 24 months. Replace if necessary. key. Use the arrow keys to highlight ‘GAS TYPE’
Complete model-specific preventive mainand press the ‘MODIFY’ soft key to select the
tenance: Refer to the monitor’s service manual
gas used in the ventilator. Most commonly, air
for preventive maintenance tasks specific to the or O2 will be used. Enter the gas temperature,
device. Complete the preventive maintenance
ambient temperature, and relative humidity of
per manufacturer’s procedure.
the gas as necessary. To change the settings,
Performance inspection
Verify unit operates on battery: Check that
the ac power indicator is lit when the power
cord is plugged into an outlet. Unplug the ac
power cord and perform the remainder of the
functional test on battery power. The ac power
indicator should go out when the power cord
is unplugged and the battery indicator should
light. Be sure to plug the power cord in at the
conclusion of the test.
Gas cylinders and regulators: Check the
condition of gas cylinders and regulators.
Remove each cylinder and verify that the index
pins are present on the cylinder yoke. Verify
that cylinders have the correct color coding and
labeling and that the cylinders are within their
expiration dates. Replace the cylinders in their
Ventilator and test lung connected to the VT PLUS HF.
144
©University of Vermont, Rev. 2 – Confidential
highlight the parameter and then press the
‘MODIFY’ soft key. Enter the new value using
the number keys on the front of the analyzer
and then press the ‘ENTER’ soft key. Press the
‘BACK’ soft key to return to the measurement
screen on the analyzer. Match the VT PLUS HF
correction mode setting to that used by the
ventilator manufacturer (usually found in the
ventilator service manual).
Connect a patient breathing circuit to the
ventilator. Connect the Y piece of the patient
tubing to the high flow inlet on the right side of
the VT PLUS HF analyzer. Set up the test lung
(such as ACCULUNG) resistance and compliance
settings by selecting a pair of resistance and
compliance settings that most closely matches
the patients served by the hospital owning the
ventilator (e.g. resistance = Rp20, compliance =
C20). Connect the test lung to the flow exhaust
on the left side of the analyzer.
Enter the volume screen on the analyzer by
pressing ‘2’ (‘VOLUME’). Set up the ventilator
with a tidal volume of 200 mL, a breath rate of
25 breaths/min, and an inspiration to expiration ratio of 1:2 and start the ventilator. The
ventilator may take a few breaths to stabilize
the delivered volume. The measured volume
should be within 10 % of the set volume. For a
set tidal volume of 200 mL, the measured tidal
volume should be between 180 mL and 220 mL.
Repeat the measurement with a tidal volume of
1300 mL and a rate of 8 breaths/min. The tidal
volume should be between 1170 mL and
1430 mL.
Respiration rate: Set up the VT PLUS HF
analyzer and the ventilator as described above.
The respiration rate can be read on the volume
screen of the analyzer.
I:E ratio: Set up the VT PLUS HF analyzer and
the ventilator as described above. The inspiration to expiration ratio can be read on the
volume screen of the analyzer.
Pressure accuracy: Press ‘1’ (‘PRESSURE’)
on the VT PLUS HF to switch to the pressure
screen. If the ventilator has a pressure control
mode, enter a pressure of 40 cmH2O and a rate
of 6breaths/min, otherwise enter a tidal volume
of 1000 mL and a rate of 6 breaths/min. Start
the ventilator. Compare the pressure measured
on the analyzer with the pressure displayed on
the ventilator. The measured pressure should
be within 10 % of the displayed pressure. For a
displayed pressured of 40 cmH2O, the measured
pressure should be between 36 cmH2O and
44 cmH2O.
PEEP: Put the ventilator into volume control
mode with a tidal volume of 1000 mL and a
rate of 6 breaths/min. Begin ventilating. Watch
the pressure airway pressure gauge during
ventilation. Following expiration, the pressure
gauge should return to zero. Set the PEEP
(post expiratory end pressure) to 10 cmH 2O.
The airway pressure gauge should drop to
10 cmH2O following expiration instead of
returning to zero. Measure the actual PEEP
using the VT PLUS HF. PEEP is displayed on the
pressure screen.
©University of Vermont, Rev. 2 – Confidential
145
O2 accuracy: Before measuring oxygen concentration using VT PLUS HF, Ensure the sensor
displays the oxygen concentration at 100 % O2.
If not, perform the oxygen calibration according
to the VT PLUS HF operator’s manual.
If possible, remove the O2 sensor from the
breathing circuit and allow the sensor to sit in
room air for approximately 5 minutes. The O2
reading in room air should be 21 %. Calibrate
the sensor according to the ventilator manufacturer’s recommended procedure if possible.
Return the sensor to the breathing circuit.
Set up the ventilator with a tidal volume of
1000 mL, a breath rate of 6 breaths/min, and
an inspiration to expiration ratio of 1:2 and start
the ventilator. Press ‘3’ (‘O2’) on the VT PLUS HF
to switch to the O2 screen. The O2 percentage
is displayed on the VT PLUS HF. Compare this
value to the value displayed on the ventilator.
The measured O2 percentage should be within
2 digits of the displayed value. In 100 % O2,
the measured oxygen percentage should be at
least 98 %.
Alarm function: Check that all alarms are
functional and that the volume is adequately
loud. Ensure that appropriate visual indicators
are functioning.
Remove the O2 sensor from the breathing
circuit and expose it to room air. Set the low O2
alarm to 30 %. Verify that the alarm activates.
Return the O2 sensor to the breathing system
and return the alarm to its previous setting.
146
©University of Vermont, Rev. 2 – Confidential
Close the O2 cylinder and disconnect the
pipeline. The low O2 pressure alarm should
activate. Reconnect the pipeline and clear the
alarm. Repeat this for other gases if necessary.
Set up the ventilator with a tidal volume of
1000 mL, a rate of 6 breaths/min, and an I:E
ratio of 1:2 and start the ventilator. Note the
maximum airway pressure during ventilation.
Set the high pressure limit about 10 cmH 2O
below the peak inspiratory pressure. If the
Peak inspiratory pressure is 40 cmH2O, set the
high pressure limit to 30 cmH2O. Verify that
the ventilator immediately stops delivering the
breath when the pressure limit is reached and
allows the breath to be exhaled. Verify that the
alarm activates. Return the high alarm limit to
its previous setting and clear the alarm.
Disconnect the inspiratory limb of the patient
circuit from the ventilator. The low pressure
alarm should activate.
Complete model-specific performance
testing: Refer to the service manual for performance inspection tasks specific to the device.
Complete the performance inspection per
manufacturer’s procedure.
Return to service: Before returning to use,
return any settings that were adjusted to their
original settings. Ensure the volume of the
audible alarms is loud enough to be heard in
normal operating conditions. Plug in the power
cord to ensure the battery remains charged.
Standards are used to give a baseline
APPENDIX 1: Standards
performance that needs to be met in order to
ensure the safe use of medical equipment.
A medical equipment maintenance program
needs to meet or exceed all local standards.
All relevant standards should be reviewed to
ensure program compliance. The following
Chapter discusses some standards that biomedical personnel should be familiar with.
IEC 60601-1
The International Electrotechnical Commission,
IEC, is a worldwide organization that promotes global standardization in the electronics
industry. IEC 60601-1, titled Medical electrical equipment - Part 1: General requirements
for basic safety and essential performance,
addresses the issues of safely designing medical equipment and serves as the foundation for
safe manufacturing practices. This standard is
mainly used in the design and manufacture of
medical equipment.
In 2005, the third edition of 60601-1 was
published. The object of the standard is to provide general requirements for safety of medical
devices and to provide the basis for more specific standards. This edition combines product
requirements with manufacturing processes
such as risk management. This edition also
addresses the concept of essential performance,
parts of the equipment operation that directly
affect the safety of the patient and operators.
The rationale behind the standard is to identify specific hazards associated with medical
equipment and to define an acceptable level of
risk for each hazard. Additionally, it provides
an objective test to determine if the risks have
been acceptably minimized, while avoiding
requirements defining how to minimize risks.
This standard is not intended to be used
alone, as it addresses general safety issues
applied broadly across medical equipment. More
specific standards need to be applied to specific
types of medical equipment. The 60601 family
of standards contains collateral and particular standards. Collateral standards contain
requirements in addition to the parent standard.
These standards are general in nature, like the
parent standard, and are applicable to all medical equipment. Particular standards contain
requirements that are exceptions to the parent
and collateral standards. These types of standards are specific to a device type. IEC 60601
is the parent standard. Collateral standards are
labeled as 60601-1-xx and particular standards
are labeled as 60601-2-xx, with xx representing a specific document.
IEC 60601-1 is mainly used by manufacturers
of medical equipment. Medical equipment that
is manufactured to this standard has been subjected to rigorous safety and performance tests
and has met quality assurance specifications.
IEC 62353
IEC 62353 is an international standard published by the International Electrotechnical
Commission, a worldwide organization that
promotes global standardization in the electronics industry. The standard deals with the
testing of medical equipment before first use,
after servicing, or periodic safety inspections.
The standard specifies how to test for electrical safety and gives limits for acceptable
measurements. Specific tests for measuring the
protective earth resistance, leakage current,
applied part leakage current, and insulation
resistance are outlined. These terms are
defined as:
Protective earth resistance: Sometimes
referred to as ground wire resistance. Resistance between any conductive part of the
equipment and the protective connector of
the main power supply plug, the protective
connector of the appliance inlet, or the protective conductor permanently connected to the
supply mains.
Equipment leakage current: Current flowing from the supply mains to earth through
the protective earth conductor and accessible
conductive parts.
©University of Vermont, Rev. 2 – Confidential
147
Applied part leakage current: Sometimes
referred to as lead leakage. The current flowing
from the supply mains and accessible conductive parts to the applied parts, or patient leads.
Insulation resistance: The resistance of
the insulation between the supply mains and
protective earth, the supply mains and accessible conductive parts, or the supply mains and
the patient leads. The insulation resistance is
calculated by applying a voltage and measuring
the resulting current.
IEC 62353 sets specific limits for electrical
safety testing. The protective earth resistance
should not exceed 300 mW. Leakage current for
Class I medical equipment should not exceed
500 µA using the direct measurement method;
leakage current for Class II medical equipment
should not exceed 100 µA.
Electrical safety testing is discussed in detail
in Chapter 5 of this manual, Electrical Safety.
IEC 62353 goes on to further specify that safety
related functions of the equipment are to be
inspected. The standard does not specify which
functions need to be tested or how often, only
that the device functionality should be tested.
The standard also specifies that safety inspections need to be documented.
NFPA 99
The National Fire Protection Agency is an
international organization that advocates the
consensus of codes and standards for fire, electrical, and building safety. NFPA building codes
have been adopted in the United States. The
standard NFPA 99, Standard for Health Care
Facilities, establishes criteria to minimize the
risk of fire, explosion, and electrical hazards in
health care facilities.
NFPA 99 covers nearly all aspects of fire
safety in the hospital environment including
building electrical systems, vacuum and gas
148
©University of Vermont, Rev. 2 – Confidential
systems, and emergency management. It is
important to note that this is a voluntary standard. However, many localities have adopted
NFPA 99 as part of their fire codes.
NFPA 99 includes a Chapter on electrical
equipment that is of particular interest to biomedical equipment technicians. This Chapter
specifically covers the performance, maintenance, and testing of electrical equipment used
within the hospital. Numerical criteria are given
for electrical safety testing. NFPA 99 section
8.4 states that the ground wire resistance of
medical equipment should be less than 0.5 W. It
goes on to say that the chassis leakage current
should not exceed 300 µA.
The Joint Commission
The Joint Commission is a regulatory body
that evaluates and accredits health care
organizations in the United States. The Joint
Commission’s mission is to improve the safety
and quality of healthcare provided to the public.
Currently, a system of unannounced surveys is
used to promote continued compliance of the
Joint Commission’s regulations.
The Joint Commission releases National
Patient Safety Goals annually relating to pertinent healthcare quality issues. The National
Patient Safety Goals are eventually rolled into
the Joint Commission’s regulations. The Joint
Commission’s regulations include a Chapter on the Environment of Care. This Chapter
specifically deals with medical equipment, its
maintenance, and how to minimize its risk. One
common benchmark that is used in the United
States is the completion of scheduled maintenance. The Joint Commission requires that
100 % of life support equipment receive its
scheduled maintenance and that at least 90 %
of non-life support equipment receive its scheduled maintenance.
Author’s biographical information
J. Tobey Clark, MSEE CCE, is the Director,
Instrumentation and Technical Service, at
the University of Vermont. He leads the
Technical Services Program, a 26 hospital
shared service clinical engineering program
serving Vermont, upstate New York, and
northern New Hampshire. Tobey also directs
the Instrumentation & Model Facility (IMF)
which designs, develops, fabricates and
services custom research instruments for
the University of Vermont community. He
has a faculty appointment in the School of
Engineering and the College of Nursing
and Health Sciences where he teaches
medical instrumentation courses. Tobey is
involved in a number of professional activities
including serving as a board member of the
ACCE Healthcare Technology Foundation
and as an advisor to the World and Pan
American Health Organizations. He was the
2002 recipient of the Clinical/Biomedical
Engineering Career Achievement award
from the Association for the Advancement
of Medical Instrumentation and the 2008
Professional Achievement in Management
award from the American College of Clinical
Engineering. Tobey is currently supported by
several grants related to medical technology
education and international clinical
engineering exchange.
Michael W. Lane, MBA, is the Associate
Director, Instrumentation and Technical
Services, at the University of Vermont.
He manages the operations of Technical
Services Program, a 26 hospital shared
service clinical engineering program serving
Vermont, upstate New York, and northern
New Hampshire. He holds Certification as a
Quality Manager from the American Society
for Quality. Michael is a member of the
Vermont Council for Quality and serves as a
state examiner for Performance Excellence.
Michael is a member of the Association for the
Advancement of Medical Instrumentation
and of the American Society for Field
Service Managers.
Leah Rafuse, BSME, is a clinical engineer
with Technical Services Program, a 26
hospital shared service clinical engineering
Program, at the University of Vermont. Leah is
responsible for clinical engineering services
for eight hospitals in upstate New York. Leah
is a graduate of the University of Vermont’s
engineering program. Prior to taking over
clinical engineering services in New York,
Leah worked with Technical Services Program
as a biomedical equipment technician,
specializing in anesthesia equipment.
©2009 Fluke Biomedical.
1/2009 3276553 C-EN-N Rev A