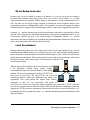
1
Using Communication
Technology to Enhance
Rehabilitation Services
A Solution Oriented Manual
Edward Lemaire, PhD
Institute for Rehabilitation Research and Development
Terry Fox Mobile Clinic
The Rehabilitation Centre, Ottawa, Ontario, Canada
Version 2.0
Using
Communication
Technology
Services:
A Solution Oriented User Manual
to
Enhance
Rehabilitation
© 1998-2001 by Edward Lemaire and The Rehabilitation Centre (Ottawa). Reproduction or publication
of the content in any manner, without express permission of the copyright holders, is prohibited. The
copyright holders take no responsibility for the use of any of the materials or methods described in this
book, or for the products thereof.
Questions regarding the content of this manual should be addressed to:
Institute for Rehabilitation Research and Development
The Rehabilitation Centre
505 Smyth Road
Ottawa, Ontario, Canada
K1H 8M2
Contents
Acknowledgments . . . . . . . . . . . . . . . . . . . . . . . . . . . . . . . . . . . . . . . . . . . . . . . . . . . . . . . . . . . . . . v
Introduction . . . . . . . . . . . . . . . . . . . . . . . . . . . . . . . . . . . . . . . . . . . . . . . . . . . . . . . . . . . . . . . . . . . 1
Why Use Telehealth Technology? . . . . . . . . . . . . . . . . . . . . . . . . . . . . . . . . . . . . . . . . . . . . . 2
Evolving technology . . . . . . . . . . . . . . . . . . . . . . . . . . . . . . . . . . . . . . . . . . . . . . . . . 3
Telehealth as a Clinical Tool . . . . . . . . . . . . . . . . . . . . . . . . . . . . . . . . . . . . . . . . . . . . . . . . . 4
Who is the client? . . . . . . . . . . . . . . . . . . . . . . . . . . . . . . . . . . . . . . . . . . . . . . . . . . . . . . . . . 5
How far Must you be away before you are doing Telehealth? . . . . . . . . . . . . . . . . . . . . . . . . 7
So, What About the Technology? . . . . . . . . . . . . . . . . . . . . . . . . . . . . . . . . . . . . . . . . . . . . . 7
Telephone . . . . . . . . . . . . . . . . . . . . . . . . . . . . . . . . . . . . . . . . . . . . . . . . . . . . . . . . 7
Desktop / Computer Conferencing . . . . . . . . . . . . . . . . . . . . . . . . . . . . . . . . . . . . . . 8
Live Video . . . . . . . . . . . . . . . . . . . . . . . . . . . . . . . . . . . . . . . . . . . . . . . . . . . . . . . . 9
Motion Video Capture . . . . . . . . . . . . . . . . . . . . . . . . . . . . . . . . . . . . . . . . . . . . . . 10
Still Image Capture . . . . . . . . . . . . . . . . . . . . . . . . . . . . . . . . . . . . . . . . . . . . . . . . . 10
Whiteboard . . . . . . . . . . . . . . . . . . . . . . . . . . . . . . . . . . . . . . . . . . . . . . . . . . . . . . 11
File Transfer . . . . . . . . . . . . . . . . . . . . . . . . . . . . . . . . . . . . . . . . . . . . . . . . . . . . . . 12
Chat . . . . . . . . . . . . . . . . . . . . . . . . . . . . . . . . . . . . . . . . . . . . . . . . . . . . . . . . . . . 12
Application Sharing . . . . . . . . . . . . . . . . . . . . . . . . . . . . . . . . . . . . . . . . . . . . . . . . 13
Internet and Other Connections . . . . . . . . . . . . . . . . . . . . . . . . . . . . . . . . . . . . . . . 13
Choosing the System Components . . . . . . . . . . . . . . . . . . . . . . . . . . . . . . . . . . . . . . . . . . . . . . . . . 15
Who will you be connecting to? . . . . . . . . . . . . . . . . . . . . . . . . . . . . . . . . . . . . . . . . . . . . . 15
How will you be connecting? . . . . . . . . . . . . . . . . . . . . . . . . . . . . . . . . . . . . . . . . . . . . . . . 15
Internet . . . . . . . . . . . . . . . . . . . . . . . . . . . . . . . . . . . . . . . . . . . . . . . . . . . . . . . . . 16
Direct Modem Connection . . . . . . . . . . . . . . . . . . . . . . . . . . . . . . . . . . . . . . . . . . . 17
Local Area Network . . . . . . . . . . . . . . . . . . . . . . . . . . . . . . . . . . . . . . . . . . . . . . . 17
What do I need to buy? . . . . . . . . . . . . . . . . . . . . . . . . . . . . . . . . . . . . . . . . . . . . . . . . . . . 18
Computer Hardware . . . . . . . . . . . . . . . . . . . . . . . . . . . . . . . . . . . . . . . . . . . . . . . 18
Computer Software . . . . . . . . . . . . . . . . . . . . . . . . . . . . . . . . . . . . . . . . . . . . . . . . 19
Video Camcorder . . . . . . . . . . . . . . . . . . . . . . . . . . . . . . . . . . . . . . . . . . . . . . . . . 19
Speaker Phone . . . . . . . . . . . . . . . . . . . . . . . . . . . . . . . . . . . . . . . . . . . . . . . . . . . 20
Communication Link . . . . . . . . . . . . . . . . . . . . . . . . . . . . . . . . . . . . . . . . . . . . . . . 20
Computer Selection . . . . . . . . . . . . . . . . . . . . . . . . . . . . . . . . . . . . . . . . . . . . . . . . . . . . . . 21
Video Capture Card . . . . . . . . . . . . . . . . . . . . . . . . . . . . . . . . . . . . . . . . . . . . . . . . . . . . . 21
Other Factors to Consider . . . . . . . . . . . . . . . . . . . . . . . . . . . . . . . . . . . . . . . . . . . . . . . . . 22
Standards . . . . . . . . . . . . . . . . . . . . . . . . . . . . . . . . . . . . . . . . . . . . . . . . . . . . . . . 22
i
All Systems are not created equal . . . . . . . . . . . . . . . . . . . . . . . . . . . . . . . . . . . . . . 22
What do you know about the company? . . . . . . . . . . . . . . . . . . . . . . . . . . . . . . . . . 23
Check List . . . . . . . . . . . . . . . . . . . . . . . . . . . . . . . . . . . . . . . . . . . . . . . . . . . . . . . . . . . . . 23
Setting Up the Communication System . . . . . . . . . . . . . . . . . . . . . . . . . . . . . . . . . . . . . . . . . . . . . . 27
Room Setup . . . . . . . . . . . . . . . . . . . . . . . . . . . . . . . . . . . . . . . . . . . . . . . . . . . . . . . . . . . . 27
Computer Hardware . . . . . . . . . . . . . . . . . . . . . . . . . . . . . . . . . . . . . . . . . . . . . . . . . . . . . 28
Sound Card . . . . . . . . . . . . . . . . . . . . . . . . . . . . . . . . . . . . . . . . . . . . . . . . . . . . . . 29
Video Capture Card . . . . . . . . . . . . . . . . . . . . . . . . . . . . . . . . . . . . . . . . . . . . . . . 30
Modem . . . . . . . . . . . . . . . . . . . . . . . . . . . . . . . . . . . . . . . . . . . . . . . . . . . . . . . . . 31
Graphics Card . . . . . . . . . . . . . . . . . . . . . . . . . . . . . . . . . . . . . . . . . . . . . . . . . . . . 31
Video Cameras . . . . . . . . . . . . . . . . . . . . . . . . . . . . . . . . . . . . . . . . . . . . . . . . . . . . . . . . . 32
Computer Software . . . . . . . . . . . . . . . . . . . . . . . . . . . . . . . . . . . . . . . . . . . . . . . . . . . . . . 32
System Testing . . . . . . . . . . . . . . . . . . . . . . . . . . . . . . . . . . . . . . . . . . . . . . . . . . . . . . . . . . 33
Live Video Test . . . . . . . . . . . . . . . . . . . . . . . . . . . . . . . . . . . . . . . . . . . . . . . . . . . 33
Whiteboard Test . . . . . . . . . . . . . . . . . . . . . . . . . . . . . . . . . . . . . . . . . . . . . . . . . . 33
Connect to Another Site . . . . . . . . . . . . . . . . . . . . . . . . . . . . . . . . . . . . . . . . . . . . . 34
Audio Test . . . . . . . . . . . . . . . . . . . . . . . . . . . . . . . . . . . . . . . . . . . . . . . . . . . . . . . 34
Using the Communication System . . . . . . . . . . . . . . . . . . . . . . . . . . . . . . . . . . . . . . . . . . . . . . . . . . 37
How do I connect to someone? . . . . . . . . . . . . . . . . . . . . . . . . . . . . . . . . . . . . . . . . . . . . . 37
Internet . . . . . . . . . . . . . . . . . . . . . . . . . . . . . . . . . . . . . . . . . . . . . . . . . . . . . . . . . 38
Direct Modem Connection . . . . . . . . . . . . . . . . . . . . . . . . . . . . . . . . . . . . . . . . . . . 39
Local Area Network . . . . . . . . . . . . . . . . . . . . . . . . . . . . . . . . . . . . . . . . . . . . . . . 39
Is it safe to run Telehealth encounters over the Internet? . . . . . . . . . . . . . . . . . . . . . . . . . . . 39
Potential Security Risks . . . . . . . . . . . . . . . . . . . . . . . . . . . . . . . . . . . . . . . . . . . . . 39
Coding Client Data . . . . . . . . . . . . . . . . . . . . . . . . . . . . . . . . . . . . . . . . . . . . . . . . . 40
Security Software . . . . . . . . . . . . . . . . . . . . . . . . . . . . . . . . . . . . . . . . . . . . . . . . . . 40
Informed Consent . . . . . . . . . . . . . . . . . . . . . . . . . . . . . . . . . . . . . . . . . . . . . . . . . 41
How do I see the other person? . . . . . . . . . . . . . . . . . . . . . . . . . . . . . . . . . . . . . . . . . . . . . 41
Live Video . . . . . . . . . . . . . . . . . . . . . . . . . . . . . . . . . . . . . . . . . . . . . . . . . . . . . . . 42
Still Image . . . . . . . . . . . . . . . . . . . . . . . . . . . . . . . . . . . . . . . . . . . . . . . . . . . . . . . 42
File Photo . . . . . . . . . . . . . . . . . . . . . . . . . . . . . . . . . . . . . . . . . . . . . . . . . . . . . . . 43
How can I let other people see me? . . . . . . . . . . . . . . . . . . . . . . . . . . . . . . . . . . . . . . . . . . 43
How can I see a client in another room? . . . . . . . . . . . . . . . . . . . . . . . . . . . . . . . . . . . . . . . 44
What are my options for talking to people at the remote site? . . . . . . . . . . . . . . . . . . . . . . . 45
How can I assess a client’s walking style? . . . . . . . . . . . . . . . . . . . . . . . . . . . . . . . . . . . . . . 46
Media Player . . . . . . . . . . . . . . . . . . . . . . . . . . . . . . . . . . . . . . . . . . . . . . . . . . . . . 48
Motion Analysis Tools . . . . . . . . . . . . . . . . . . . . . . . . . . . . . . . . . . . . . . . . . . . . . . 48
Full Gait Analysis . . . . . . . . . . . . . . . . . . . . . . . . . . . . . . . . . . . . . . . . . . . . . . . . . . 49
ii Communication Technology for Rehabilitation
How would I assess a person with a brace? . . . . . . . . . . . . . . . . . . . . . . . . . . . . . . . . . . . . 50
Make the Connection . . . . . . . . . . . . . . . . . . . . . . . . . . . . . . . . . . . . . . . . . . . . . . . 50
Enter Encounter Data into a Database . . . . . . . . . . . . . . . . . . . . . . . . . . . . . . . . . . . 51
Start the Live Video . . . . . . . . . . . . . . . . . . . . . . . . . . . . . . . . . . . . . . . . . . . . . . . . 52
Open the Whiteboard . . . . . . . . . . . . . . . . . . . . . . . . . . . . . . . . . . . . . . . . . . . . . . . 52
Make Suggestions . . . . . . . . . . . . . . . . . . . . . . . . . . . . . . . . . . . . . . . . . . . . . . . . . 52
Capture and Send Video Clip . . . . . . . . . . . . . . . . . . . . . . . . . . . . . . . . . . . . . . . . . 53
Recheck During the On-Site Visit . . . . . . . . . . . . . . . . . . . . . . . . . . . . . . . . . . . . . . 54
Can I use the conferencing system as a telephone? . . . . . . . . . . . . . . . . . . . . . . . . . . . . . . . 54
Can I give a presentation using the conferencing system? . . . . . . . . . . . . . . . . . . . . . . . . . . . 54
Prepare Slides in Advance . . . . . . . . . . . . . . . . . . . . . . . . . . . . . . . . . . . . . . . . . . . 54
Use Graphics Whenever Possible . . . . . . . . . . . . . . . . . . . . . . . . . . . . . . . . . . . . . . 55
Use Video Clips to Show Motion . . . . . . . . . . . . . . . . . . . . . . . . . . . . . . . . . . . . . . 56
Save Presentation as Whiteboard File . . . . . . . . . . . . . . . . . . . . . . . . . . . . . . . . . . . 56
Pre-send Whiteboard and Data Files . . . . . . . . . . . . . . . . . . . . . . . . . . . . . . . . . . . 56
Use the Whiteboard Tools . . . . . . . . . . . . . . . . . . . . . . . . . . . . . . . . . . . . . . . . . . . 57
Use Chat to Keep Notes . . . . . . . . . . . . . . . . . . . . . . . . . . . . . . . . . . . . . . . . . . . . 58
Use Live Video to See Participants . . . . . . . . . . . . . . . . . . . . . . . . . . . . . . . . . . . . . 58
Are there any other factors to consider when doing a remote consultation? . . . . . . . . . . . . . 58
Don’t forget that a client is at the other end of the line . . . . . . . . . . . . . . . . . . . . . . . 58
Try not to focus on the equipment . . . . . . . . . . . . . . . . . . . . . . . . . . . . . . . . . . . . . . 59
Start the Whiteboard first . . . . . . . . . . . . . . . . . . . . . . . . . . . . . . . . . . . . . . . . . . . . 59
Motion Analysis . . . . . . . . . . . . . . . . . . . . . . . . . . . . . . . . . . . . . . . . . . . . . . . . . . . . . . . . . . . . . . . 61
Camera Placement . . . . . . . . . . . . . . . . . . . . . . . . . . . . . . . . . . . . . . . . . . . . . . . . . . . . . . . 62
Camera Settings . . . . . . . . . . . . . . . . . . . . . . . . . . . . . . . . . . . . . . . . . . . . . . . . . . . . . . . . . 62
Frame Rate . . . . . . . . . . . . . . . . . . . . . . . . . . . . . . . . . . . . . . . . . . . . . . . . . . . . . . . . . . . . 62
Lighting . . . . . . . . . . . . . . . . . . . . . . . . . . . . . . . . . . . . . . . . . . . . . . . . . . . . . . . . . . . . . . . 63
Video Compression . . . . . . . . . . . . . . . . . . . . . . . . . . . . . . . . . . . . . . . . . . . . . . . . . . . . . . 63
Analysis Tools . . . . . . . . . . . . . . . . . . . . . . . . . . . . . . . . . . . . . . . . . . . . . . . . . . . . . . . . . . 64
Media Player . . . . . . . . . . . . . . . . . . . . . . . . . . . . . . . . . . . . . . . . . . . . . . . . . . . . . 64
Motion Analysis Tools . . . . . . . . . . . . . . . . . . . . . . . . . . . . . . . . . . . . . . . . . . . . . . 64
Video Clip Check List . . . . . . . . . . . . . . . . . . . . . . . . . . . . . . . . . . . . . . . . . . . . . . . . . . . . 66
Appendix A – Glossary . . . . . . . . . . . . . . . . . . . . . . . . . . . . . . . . . . . . . . . . . . . . . . . . . . . . . . . . . 67
Computer Terms . . . . . . . . . . . . . . . . . . . . . . . . . . . . . . . . . . . . . . . . . . . . . . . . . . . . . . . . 67
Communication Systems . . . . . . . . . . . . . . . . . . . . . . . . . . . . . . . . . . . . . . . . . . . . . . . . . . . 71
Whiteboard Terms . . . . . . . . . . . . . . . . . . . . . . . . . . . . . . . . . . . . . . . . . . . . . . . . . . . . . . . 72
Appendix B – Video Conferencing Products . . . . . . . . . . . . . . . . . . . . . . . . . . . . . . . . . . . . . . . . . . 73
iii
Contact information . . . . . . . . . . . . . . . . . . . . . . . . . . . . . . . . . . . . . . . . . . . . . . . . . . . . . . 73
Appendix C – Step-by-Step Instructions . . . . . . . . . . . . . . . . . . . . . . . . . . . . . . . . . . . . . . . . . . . . 75
1.0 Setting up your system . . . . . . . . . . . . . . . . . . . . . . . . . . . . . . . . . . . . . . . . . . . . . . . . . 75
1.1 NetMeeting . . . . . . . . . . . . . . . . . . . . . . . . . . . . . . . . . . . . . . . . . . . . . . . . . . . 76
1.2 WINIPCFG.EXE . . . . . . . . . . . . . . . . . . . . . . . . . . . . . . . . . . . . . . . . . . . . . . 77
1.3 Internet Connection (Dialer) . . . . . . . . . . . . . . . . . . . . . . . . . . . . . . . . . . . . . . 78
2.0 Connecting to your Internet Service Provider . . . . . . . . . . . . . . . . . . . . . . . . . . 78
3.0 Starting NetMeeting . . . . . . . . . . . . . . . . . . . . . . . . . . . . . . . . . . . . . . . . . . . . . . . . . . 79
4.0 Connecting to Another Site . . . . . . . . . . . . . . . . . . . . . . . . . . . . . . . . . . . . . . . . . . . . . 79
5.0 Sending and Receiving Live Video . . . . . . . . . . . . . . . . . . . . . . . . . . . . . . . . . . . . . . . . 81
5.1 Setting the Live Video Size and Quality . . . . . . . . . . . . . . . . . . . . . . . . . . . . . . 82
5.2 Seeing Yourself . . . . . . . . . . . . . . . . . . . . . . . . . . . . . . . . . . . . . . . . . . . . . . . . 82
6.0 Starting the Whiteboard . . . . . . . . . . . . . . . . . . . . . . . . . . . . . . . . . . . . . . . . . . . . . . . . 82
6.1 Inserting a Picture in the Whiteboard . . . . . . . . . . . . . . . . . . . . . . . . . . . . . . . . 82
6.2 Drawing Free Hand . . . . . . . . . . . . . . . . . . . . . . . . . . . . . . . . . . . . . . . . . . . . . 84
6.3 Adding Text . . . . . . . . . . . . . . . . . . . . . . . . . . . . . . . . . . . . . . . . . . . . . . . . . . 84
6.4 Drawing a Straight Line . . . . . . . . . . . . . . . . . . . . . . . . . . . . . . . . . . . . . . . . . . 84
6.5 Drawing Squares and Circles . . . . . . . . . . . . . . . . . . . . . . . . . . . . . . . . . . . . . . 84
6.6 Enlarging an Image . . . . . . . . . . . . . . . . . . . . . . . . . . . . . . . . . . . . . . . . . . . . . 85
6.7 Erasing Images . . . . . . . . . . . . . . . . . . . . . . . . . . . . . . . . . . . . . . . . . . . . . . . . 85
6.8 Pointing . . . . . . . . . . . . . . . . . . . . . . . . . . . . . . . . . . . . . . . . . . . . . . . . . . . . . . 85
6.9 Adding Whiteboard Pages . . . . . . . . . . . . . . . . . . . . . . . . . . . . . . . . . . . . . . . . 85
7.0 Typing a Conversation / Keeping Notes (Chat) . . . . . . . . . . . . . . . . . . . . . . . . . . . . . . 86
8.0 Video Clips . . . . . . . . . . . . . . . . . . . . . . . . . . . . . . . . . . . . . . . . . . . . . . . . . . . . . . . . . 86
8.1 Capturing a Video Clip with Asymetrix DVP Capture . . . . . . . . . . . . . . . . . . . 86
8.2 Capturing a Video Clip with PictureWorks Live . . . . . . . . . . . . . . . . . . . . . . . . 87
8.2 Compressing a Video Clip with XingMPEG Encoder . . . . . . . . . . . . . . . . . . . . 90
Appendix D – Bibliography . . . . . . . . . . . . . . . . . . . . . . . . . . . . . . . . . . . . . . . . . . . . . . . . . . . . . . 93
iv Communication Technology for Rehabilitation
Acknowledgments
This manual borrows freely from the experiences and knowledge of the Terry Fox Mobile Clinic at The
Rehabilitation Centre (Ottawa), Arnprior and District Memorial Hospital, Hawkesbury General Hospital,
and Cornwall General Hospital. Other important groups who have contributed to the development of lowbandwidth Telehealth are the Institute for Rehabilitation Research and Development and the Prosthetics
and Orthotics Service at The Rehabilitation Centre (Ottawa).
Individual acknowledgment must be given to Yvon Boudrias and Gayle Greene. These two clinicians are
essential to The Rehabilitation Centre’s Outreach Team and have made numerous contributions to the
development and implementation of distance communication practice. Patricia O’Neill is also
acknowledged for her technological and procedural insights. Key community contributors are Linda Buttle
(Arnprior), Andrée Campbell (Hawkesbury), and Bonnie Destounis (Cornwall).
v
1
Introduction
This manual was written to help rehabilitation professionals use commercially available communication
technologies to provide rehabilitation services. In the following chapters you will learn about common
communication tools, setting up communication links, using communication tools in clinical practice, and
setting up remote service programs. Since this book deals with concepts instead of technical requirements,
you should keep a copy of your system’s user manual as an accompaniment to this guide.
In a broad sense, communication technology relates to hardware and software that help people see, hear,
and collaborate. These technologies range from telephone – FAX – digital satellite controlled robotics.
New communication tools can allow a health care provider to talk to a specialist over a wrist-watch size
cellular phone or hold a video conference with a team of experts. These applications are often referred to
as Telehealth or Telerehabilitation (tele is the Latin word for at a distance). Unfortunately, most health care
facilities do not have the financial, human, or technical resources to make these high-tech dreams a reality.
Since we would like health care providers to apply the information from this book in their practices, our
earlier definition of communication technology must be refocused. Our Telehealth applications will involve
Introduction 1
personal computers, the Internet, and regular telephone lines. This setup provides a cost effective and
universally accessible means for resolving rehabilitation related issues. If properly executed, people with
physical disabilities should be able to access rehabilitation services at the right time, at the right place, and
at the right cost. Even after reading this paragraph, some people still ask why a communication technology
approach is necessary. The next section is for these people.
Why Use Telehealth Technology?
Generally, Telehealth systems help to bring expertise into communities where specialists are not available.
The field of rehabilitation is a good example of expertise-centralization since specialized rehabilitation
services are often limited to urban centres. People in smaller communities must travel to an urban centre
for treatment or, if the program is available, take advantage of mobile-outreach services.
There are many benefits for providing specialized physical rehabilitation services at a central location; such
as, having direct client-specialist contact, having access to the appropriate equipment, having access to a
full rehabilitation team, and having the opportunity to access other disability-related services. Unfortunately,
there are many cases where this approach is not effective.
Travel is the main obstacle to the centralized services approach. In northern climates, a client may be
unable to travel to the urban centre during periods of severe weather. Travel may also be unadvised for
people in the later stages of some illnesses. Visits to the central rehabilitation centre can also be expensive
due to transportation, accommodation, and inpatient costs.
While these logistical arguments are easiest to support, the main reason for limiting client travel is not related
to weather or economics. The primary reason for decentralized services is that “most people do not want
to go to the big city”. If health is to be client-focussed and service-oriented, the goal to serve people in
their community must be observed. In addition to providing better service for the client, community-based
health care can have a positive impact on the client’s family and the local health care community.
Mobile outreach services are an effective means of providing physical rehabilitation in remote locations. In
these cases, a team of rehabilitation specialists travels from community to community to provide clinical and
education services. While this model has been proven to be effective, the sporadic intervals between site
visits makes each encounter critical and client follow-up limited. Communication technology can help make
the outreach service model more efficient, more timely, and more cost effective.
A distance communication system could allow a rehabilitation specialist to consult with local health care
providers without direct physical contact. Most of the time, these consultations would not be susceptible
to poor weather, client location (i.e., at home, in a nursing home, or in a community hospital), or long
distances between sites. By providing on-line consultations, in addition to on-site visits, rehabilitation
services for people in non-urban areas should greatly improve.
2
Communication Technology for Rehabilitation
The best use of Telehealth technology to increase efficiency and decrease frustration is performing followup assessments over the communication system. Clients often complain that they travelled for hours to
have a 10 minute check-up with the specialist. These brief follow-up appointments are ideal Telehealth
applications since the client has already been evaluated by the specialist, the problem area is well identified,
and the specialist is looking for specific information to confirm that treatment is progressing as planned.
Evolving technology
Traditional remote rehabilitation services involve telephone conversations between the rehabilitation
specialist, the remote clinician, and/or the client. These conversations can be augmented by sending a FAX,
mailing patient information between centres, and/or mailing a video tape. This communication strategy
suffers from a lack of immediate visual feedback, relatively long delays for detailed information exchange,
and potential lapses in confidentiality (i.e., access to the clinic’s FAX machine). In addition, follow-up
sessions are extremely difficult to perform without visual feedback during the remote appointment.
A computer distance communication system allows community health care professionals and rehabilitation
specialists to exchange verbal, visual, and technical information about the client. Digital assessment
information can also help improve the efficiency and cost effectiveness of mobile outreach services by
streamlining resources; such as, planning for a more cost-effective treatment, ensuring that all required
equipment is present during an on-site visit, and only bringing essential personnel to the remote site.
Communication technology can be used to complete
assessment questionnaires and clinical information
sheets over the communication link. The
questionnaire / clinical information could be
discussed on-line without having to wait for a
FAX or letter to be sent and received. Also,
immediate information exchange is
important for medical conditions with a
rapid rate of progression since information
on a referral may change between the time the document is received and the mobile clinic visit. A distance
communication system would make the referral review process more efficient and reduce the chance of onsite problems due to changes in the client's status.
The main way that Telehealth systems can improve outreach services is to provide continuity of care
between on-site visits. For many outreach services, a one to six-month time lag can exist between trips to
a community. Communication technology can be used to follow-up on active cases and resolve issues that
arise between visits.
Introduction 3
The field of physical rehabilitation has specific needs that require computer video conferencing technology.
For example, a telephone conversation may be inadequate when addressing clinical problems in orthotics,
physiotherapy, and occupational therapy,. In these cases, the rehabilitation specialist cannot see the
assistive device, how the person moves, or how the person interacts with their environment. Explaining a
procedure to the remote clinician, without drawing or demonstrating the technique, may also be difficult.
A computer distance communication system allows remote clinicians to:
1.
2.
3.
4.
show the problem over a video link,
annotate the video or graphic image,
send the client file over the computer-telecommunications link,
verbally describe the problem over a telephone line.
By interacting with the remote site, the rehabilitation specialist could:
1. request additional information,
2. determine the required intervention,
3. describe how to proceed using graphic annotation tools, verbal instructions, and/or a
video image or clip describing the procedure,
4. use pre-developed educational aids to describe the best way to proceed.
Until recently, the high cost or inadequate capabilities of computer communication technology made the
digital service goal inaccessible; however, recent developments have reduced the cost of distance
communication systems to a level that is compatible with most medical clinics. Also, the proliferation of
Internet service providers makes the task of connecting remote sites to rehabilitation centres easier and
more cost-effective.
Telehealth as a Clinical Tool
Communication technologies can improve physical rehabilitation services for many people with disabilities.
Fields such as physical medicine, physiotherapy, occupational therapy, prosthetics, orthotics, and
rehabilitation engineering may use these systems in a similar way. Clinicians in these fields routinely perform
a physical assessment, analyse client motion, deal with skin problems, and/or deal with an assistive device.
The following orthotic example shows how a communication system can be used to perform a remote
bracing assessment.
The field of orthotics benefits from using a communication system since modifications to an orthosis may
be required within the first month after dispensing. In the mobile outreach scenario, these modifications are
not made until the next visit. During this time, the client may be unable to take advantage of the many
benefits of independent mobility. With adequate training, minor orthosis modifications are made by the
4
Communication Technology for Rehabilitation
remote clinician under the direction of an orthotist. The video link can be used to make sure that the
changes have not altered the function of the orthosis. Upon the next visit the orthotist reassesses the changes
and makes any final modifications.
For successful orthotic distance communication, a remote clinician should be able to :
•
•
•
•
contact a rehabilitation specialist for a client assessment involving video images, motion
analysis, on-line questionnaires, and verbal communication (consultation),
contact an orthotist for specific information on a client's brace,
get audio/visual instructions on how to adjust an orthosis or correct a problem,
make the adjustments and show the orthotist the result.
An orthotist at the central rehabilitation centre could,
•
•
•
view a video of the client walking, climbing stairs, etc. as a remote assessment of
orthosis function (diagnostic service) – other rehabilitation specialists could be brought
in to assist with this assessment,
compare images of modified and unmodified orthoses to verify the changes,
provide expertise to a series of remote sites.
The application of “dial-up Internet” technology for speech pathology, psychology, and social work is more
difficult since the small and slow live video may not give enough information to detect subtleties during an
interview. In some cases a digital video clip could be used to complete an assessment. Improvements in
the live video communication tools will greatly enhance the usefulness of desktop conferencing for remote
psychological and sociological assessments.
Who is the client?
Telehealth is unique because the client is not necessarily the end-user of the health care encounter (i.e., the
patient). While the entire consultation process should be patient-centred, the Telehealth component
typically assists the local health care provider. The local health care provider is the hub of an on-line
consultation. This professional will interact with the patient, the specialist, and the technology to solve the
clinical issue. Since the Telehealth system is being used to support the rural professional, the remote
clinician becomes the client.
The expertise of the local health care provider can vary widely. For physical rehabilitation, a rural therapist
may consult with another therapist that has specialized expertise with a type of disability. The rural
therapists may also consult with other rehabilitation disciplines; such as, the rural physiotherapist consulting
with a prosthetist. In these cases, the health care professionals all have previous expertise with physical
rehabilitation – on therapist is just taking advantage of another therapist’s experience.
Introduction 5
The local health care professional is the centre of a Telehealth encounter - interacting with
the patient, the specialist, and the technology.
Encounters could also occur between nurses and rehabilitation specialists. These encounters may involve
a health care professional with little rehabilitation experience, but substantial health care experience. A
specialist can take advantage of the nurses medical background; however, communication problems could
occur due to terminology discrepancies between disciplines or from differences in clinical experiences.
Telehealth encounters with health care workers that have minimal medical training should be handled with
care. The specialist must ensure that instructions are delivered with minimal medical-jargon, that detailed
instruction be given, and that the conferencing system be used to ensure that the instructions are being
correctly implemented.
There are some cases where the patient is the client in a Telehealth encounter. For example, some
psychological assessments are completed in a secure room where the psychologist completes an interview
6
Communication Technology for Rehabilitation
directly with the patient. Other examples include patient access to on-line education and Telehealth-based
follow-up in the home.
Other clients for Telehealth encounters are administrators. Telehealth conferencing systems are ideal tools
for holding meetings or collaborating to complete a report. When not being used for clinical encounters,
administrative use of the Telehealth system can help justify the on-going system costs.
How far Must you be away before you are doing
Telehealth?
Most people think of Telehealth as using technology to communicate over great distances. While this is an
appropriate use of the technology, communication systems can also be used locally. Hospital resources are
minimal in many smaller communities; therefore, staff are very busy dealing with clients within their own
facility. These community hospitals are also expected to assist people in nursing homes or chronic care
facilities. If a sole-charge therapist must leave their hospital, drive to the chronic care facilities, finish the
consultations, and then drive back to the hospital, hours of work can be lost within the hospital. This losttime is at the expense of the clients who can travel to the hospital.
By installing a Telehealth link between the communityhospital and the chronic care facilities, the sole-charge
therapist could complete on-line consultations while still being available to the hospital clients and staff. Even
a distance of 10 km between facilities would rationalize the use of a Telehealth system. The added benefit
to the chronic care facility is that their staff can access on-line continuing education materials and consult
with specialists without having to transfer the client to the community hospital.
So, What About the Technology?
Telephone
The telephone is a common, but underrated, communication technology. With the availability of conference
calls, voice mail, and good quality global audio connections, the plain old telephone system (POTS) is the
first line of defence for handling clinical questions. Unfortunately, rehabilitation consultations often require
visual feedback before an informed decision can be made. Recent technologicaladvancements in computer
graphics, engineering, video production, and Internet communications can be used to provide visual
feedback and multimedia clinical interactions. Computer systems that provide these features are often
referred to as computer conferencing systems or desktop conferencing systems.
Introduction 7
Common desktop video conferencing tools.
Desktop / Computer Conferencing
Personal computer-based conferencing systems are the most cost effective way of sharing video and audio
information between sites. Even the lowest cost, new, personal computers are capable of handling live
video and sharing software applications. In fact, the main limitation for desktop conferencing is the
telecommunication line capacity – not the capabilities of the computer system. Desktop computer
conferencing systems should handle most of the tasks associated with a remote consultation; however, highend video conferencing systems are currently required to display full-screen, television like, video.
Most desktop conferencing products have the same basic function set; such as,
•
•
•
•
•
•
8
show live video from the other site,
capture and display still images,
annotate images on a shared work space,
jointly use a computer program,
transfer data files between sites,
type a conversation (Chat).
Communication Technology for Rehabilitation
The number of functions available on your systems depends on your computer hardware and software.
Almost all desktop conferencing solutions can display still images, receive audio and live-video, provide
a share work space, and allow you to type messages between sites. Let’s have a closer look at these
conferencing features.
Live Video
In an ideal world, your desktop communication system would show full screen / full motion video images
from the connected site. Unfortunately, current low-bandwidth technology cannot transfer the enormous
amount of information required for television-like video (Table 1). Even though full motion / live video is
not available for low-bandwidth systems, smaller and slower video images are still useful during a
rehabilitation assessment.
Standard Video
High Bandwidth
Low Bandwidth
Low Bandwidth
Screen size
Full
Full
Half
Quarter
Frame rate
30 fps
24 – 30 fps
0.5 – 2 fps
10 – 15 fps
Image Quality
Excellent
Very Good
Good
Below Average
Table 1: Video parameters for various connections and settings (fps = frames per second).
One of the often overlooked benefits of slower, but good quality, live video is the ability to humanize this
technically oriented communication medium. Pilot studies have shown that satisfaction with the remote
consultation process is higher when the client and the rehabilitation specialist can see each other at the start
of an assessment. Slow-moving video can be used to monitor a procedure; such as, limb measurements,
range of motion testing, and assistive device setup. The specialist can also pick up some visual cues by
looking at the client.
When using the communication system for education sessions, live video is useful for monitoring the
participants (i.e., make sure that most people are still in the room), demonstrating clinical techniques, or
providing a visual link with the instructor. New camera technology helps the educator by automatically
rotating the remote camera to focus on the person speaking, often called voice activated positioning, or by
providing camera remote control features that work with the conferencing system.
Introduction 9
Motion Video Capture
Most physical rehabilitation applications deal with motion. Whether walking, wheeling, grasping, or talking,
clinicians must be able to assess how the body moves. To deal with the limitations of low-bandwidth video,
people at the remote site can make a digital video clip of the client. To capture digital video, you must insert
a video capture card into your computer and connect the card to a video camera. Input from the camera
is converted into a computer format and saved on the hard disk as a data file. When using a good video
capture card on a relatively
fast computer, full screen
video can be captured at 24
fps, the frame rate for
motion pictures, or 30 fps,
the frame rate for video
tape.
Digital video capture software
With the proper software, a
video data file can be played
back on any other computer
system. Although video data
files can be very large – a
large, good quality video
clip is usually preferable to a
small, poor quality clip (file
size increases as video
quality increases). New
video compression
techniques make it easier to
produce a good quality
video clip that takes up
much less disk space.
Once the video clip has been saved, the data can be transferred to the rehabilitation specialist by attaching
the file to an email message or by using the File-Transfer tool in a conferencing system. The specialist can
view the video clip at full speed, step through the clip frame by frame, make measurements, and discuss
video images with people at the remote site.
Still Image Capture
A photo quality image can be obtained by using the still image capture tools that come with your video
capture card. With good lighting and a high colour setting you can take a digital snapshot of the client to
10
Communication Technology for Rehabilitation
assess skin problems, assistive device condition, static positioning, etc. These images can be opened in the
common Whiteboard or can be sent between sites as a data file. To have a good quality on-screen image,
computer graphics must be set to 24 or 32 bit colour. A low colour setting makes an image too grainy for
clinical use.
Whiteboard
Microsoft NetMeeting Whiteboard.
One of the most useful desktop conferencing features is the Whiteboard. This common work space is
shared by all people that are connected to the conference. The Whiteboard program includes a series of
drawing tools, pointing tools, image capture tools, text tools, and image import tools. Any image or drawing
that is displayed in the Whiteboard is seen by all participants. This is very important for discussing captured
images, pre-defined images, or drawing a picture to describe an idea.
Introduction 11
File Transfer
Many conferencing systems have a built-in file transfer function that will enable you to send data files
between sites without exiting the conferencing program. This is useful for sending video clips, still images,
or database records. The file transfer option can also be used to send word processing documents or
spreadsheets between sites for later discussion. Email is a good way to send data files between sites
because you can send a file without having to make a conferencing system connection; however, you must
have an account setup with your Internet provider to take advantage of Email.
File transfer window from NetMeeting 3.0.
A direct modem to modem connection can also
be used to send files between sites. This method
can result in the fastest file transfer rate; however,
setup can be tricky. A modem to modem transfer
does not require a Public Internet connection.
This can save some Internet connect time but
may require you to pay long distance charges for
the call.
Chat
Chat is the easiest conferencing tool to use. With
Chat you can send typed messages to all
participants in the conference. If you are
connecting to someone with only one telephone
line and no audio capability on their computer,
you can use Chat to communicate during an online consultation. Typing a conversation is not as
12
Communication Technology for Rehabilitation
NetMeeting Chat window.
efficient or effective as talking; however, successful consultations have been completed with the Chat tool.
Chat does not use much of the available bandwidth; therefore, it is a good tool when you are working with
a very slow data connection.
Another good use for Chat is to take notes during a meeting or a consultation. Since all participants can
enter text into the Chat window and see the message list, mutually agreed upon notes are created as the
encounter progresses. After the meeting, all sites can save the contents of their Chat window for later
reference. Even if you have live audio, the Chat window can be used to ensure correct spelling of names,
addresses, or words.
Application Sharing
A new addition to desktop video conferencing systems is application sharing. If both parties agree to share
a software application, the central and remote sites can take turns using the keyboard and mouse to run
a shared program. For example, clinicians at the remote site can share a database program that is running
on the central rehabilitation computer. By taking control of the keyboard and pointing device, the clinicians
can write client informationdirectly into the host database. The central rehabilitation specialist can then take
control of the keyboard, review the information, and add any additional notes to the client record.
Application sharing is also useful for system training, troubleshooting, and working on reports. Future uses
of this tool could include running diagnostic tests at the remote site from the central rehabilitation site.
Internet and Other Connections
One of the main factors that affect communication system performance is the type of connection you have
between computers. Currently, one simple phrase can guide your choice of computer connection – faster
is better. A common analogy is that more water can pass through a large pipe than through a small pipe.
Similarly, more data can be transmitted through a higher capacity communication line. By obtaining a fast
data line, or by running your conferencing system on a network (LAN), live video quality will improve
dramatically and file transfers will take less time. You will also be able to do more things at once without
filling the pipe. These types of systems are often referred to as high-bandwidth.
While a fast connection will increase performance, these data lines are more expensive to install, have
higher monthly rates, and are generally only available in large urban areas. For many, a telephone line is the
only available method for remote communication. Most conferencing systems allow a site – to – site
connection over a telephone line. A regular telephone connection can be called low-bandwidth. In some
cases, this provides optimal function; however, noise in long-distance telephone lines can cause the system
to frequently lose the connection.
A local call to an Internet provider can result in a more reliable connection since data lines for Internet
traffic are often better than long-distance telephone lines. People with a faster Internet connection can take
Introduction 13
advantage of the better performance while still being able to connect to people with a slower
communication link. An Internet connection also has the advantages of allowing multipoint conferencing
(i.e., more than two people hooked into the meeting).
A major influence on low-bandwidth conferencing is data compression. Instead of increasing data-line
capacity, video images and other data can be mathematically compressed before transmitting the
information. This data is uncompressed at the receiving site. Compression can reduce the amount of
information that is transmitted by more than 50 percent, thereby sending more information through a smaller
pipe. As new compression standards are implemented, we will have better low-bandwidth communication
performance.
14
Communication Technology for Rehabilitation
2
Choosing the System Components
Many desktop conferencing systems are coming onto the market. While competition leads to better
products, a user must evaluate many different systems before deciding whichproducts are appropriate. This
chapter will identify factors that you should consider.
Who will you be connecting to?
If you plan on connecting to sites that have already installed conferencing systems, you may not have many
choices when selecting communication methods. To ensure compatibility, all conference participants should
use the same software. You can probably connect with a person who is using software fromanother vendor
if both software products are standards-based; however, the ability to successfully connect in this manner
remains largely untested.
How will you be connecting?
Choosing the System Components 15
If all participants have agreed to install the same software, you must now choose the type of data
connection. In a rural setting, you may be limited by the available communication links. For example, many
communities have regular telephone lines but no local Internet provider. Other areas may have access to
high-speed data lines. Since different conferencing systems are available for different connection types, you
should ensure that your software and hardware are compatible with the local facilities. The most popular
computer-connecting technologies are the Internet, direct modem, and LAN (Local Area Network). The
following sections describe each of these options.
Internet
The Internet has many advantages, and some disadvantages, for making a conferencing connection. First,
you need to have an account with an Internet service provider. For a fee, these companies provide the
means of linking your computer to the Internet. After you have followed the Internet provider’s instructions
and connected to the Internet, you can use email, desktop conferencing, Web browsers, FTP, and Telnet
software to interact with other computers and people.
If you are making a local telephone call to connect to the Internet, you will not have to pay long distance
charges while connected to a remote site. You must pay for your Internet connect time. Internet data lines
are generally of better quality than POTS long distance lines; therefore, if you can dial a local number to
connect to the Internet you may have a faster and more reliable connection. A more reliable data line will
allow you use the conferencing system without losing your connection and having to restart the
communication software. As telecommunication technologies advance, high-speed data line costs and
capabilities decrease. Therefore, if you are using a system that supports
Internet connections you will only have to install a faster data line to
improve desktop conferencing performance (i.e., you will not have
to buy – and learn how to use – a whole new conferencing
package).
An advantage of using an Internet link is that more than two people
can join an on-line meeting. Some software packages can run a
multi-point meeting from any computer that is properly setup for
desktop conferencing. Other software packages require all participants to
connect to a central computer that distributes information from – and – to all
participants. The special multi-point conferencing software ensures that the
Whiteboard, audio, and video information is shared between sites. If you have a fast, dedicated computer
with a high-bandwidth data connection, you may want to use the central computer option. For most users,
the costs and effort needed to set up such a system offset any increased functionality. New Internet-based
conferencing systems can effectively set up a multi-point meeting without additional hardware or software
requirements.
16
Communication Technology for Rehabilitation
Direct Modem Connection
In some cases you may be unable to connect to the Internet. If so, you are not up the river without a
keyboard. Many desktop conferencing systems allow you to make a direct modem – to – modem
connection between two computers. In these instances, one computer is set up to automatically receive
calls. The other site can call the waiting computer by entering the remote telephone number in the
communication software’s dialling/calling window. The computers are connected through the desktop
conferencing software (regular modem communications software cannot make an appropriate connection).
A modem – to – modem connection can give the best performance since the two computers have a direct
data link. When computers are linked through the Internet, data can take a roundabout route on its way
to the remote computer and back to the central computer. Unfortunately, modem – to – modem
connections can be more susceptible to poor telephone line quality than Internet connections. Only two sites
can be connected together with a direct modem connection.
Local Area Network
Desktop conferencing systems come alive when run on a LAN. Since the data transfer rate on a network
is muchfaster than standard modems (over 300 times faster), live video, audio, and multi-tasked operations
improve drastically. Communications between facilities will also improve if your LAN has a fast, dedicated,
digital connection to the Internet. If the remote person has a slower link, system performance will decrease
to match the capacity of the remote system. LAN connections can also be used
for multi-point meetings.
While the Internet, Direct-Modem, and LAN methods are useful
in the appropriate situation, many modern desktop
communication systems can work with all three of these linking
methods. The Internet communication protocol (TCP/IP) can
also work over most LAN’s. By using TCP/IP, you can use the
conferencing software within your organization and outside your
organization. Your system should also support direct modem
connections so that you can communicate with people in
technologically isolated areas. With some additional software, you can simulate a TCP/IP connection
between two computers that are linked by modem. While this will allow any conferencing system that
supports the TCP/IP protocol to communicate with sites that do not have access to the Internet (i.e., no
local Internet provider), an optimized modem – to – modem communication option will usually have much
better performance.
Choosing the System Components 17
In summary, you should consider the following points when choosing the type of computer connection to
use:
• What are the available data line options for each community? You should ensure that
your system supports the lowest connection level. The lowest level is usually a direct
modem – to – modem connection.
• Are the people to whom you will be connecting already using a conferencing system?
If yes, you need to choose a system that is compatible with their connection protocol.
• Since the Internet protocol (TCP/IP) can be setup to work in a variety of situations,
your conferencing system should support this connection method.
What do I need to buy?
An unfortunate reality of the world we live in is that, eventually, someone has to pay. This person will be
very happy if your distance communication system can exist within the financial constraints of your
organization. If you have an unlimited budget, you can install high-bandwidth video conferencing systems
at every site, install and connect the systems with high-speed data lines, hire the technical support staff, and
pay the monthly maintenance and data connection costs. The developers of this manual are not so lucky;
therefore, they developed a lower-cost approach. The following sections outline the costs, but not the
amounts, that you can expect when setting up and using a low-bandwidth system.
Computer Hardware
Desktop video conferencing systems can push a personal computer to its limits. If you are buying a new
computer, you should purchase the best computer that you can. A cheaper computer may initially work;
however, desktop communication systems are evolving very rapidly and may outpace your computer’s
capabilities in an unreasonably short time. Since
consumer-level computer hardware tends to improve
every six months, you should check the video
conferencing software’s recommended configuration to
obtain a price/performance level that suits both your
needs and your financial situation. For best performance,
the computer hardware configuration should exceed the
software’s recommendations.
In addition to purchasing your computer, you will need
to buy various components. A video capture card is
needed to transfer video images into a format that the
Internal modem.
computer can understand. You will also need a fast
modem for connecting to each other or to the Internet. Since many video capture cards use your
18
Communication Technology for Rehabilitation
computer’s processor, memory, and hard disk during video capture, you should ensure that you have the
required computer configuration to capture good quality video clips (i.e., 24 fps, 640x480, 16 bit).
Computer Software
The main piece of computer software that you must obtain is the video conferencing program. Appendix
B lists a few good choices that can fit any budget. In fact, Microsoft NetMeeting is currently available at
no charge. The new trend is to incorporate essential video conferencing capabilities in personal computer
operating systems and Internet browsers. Specialty software can be purchased to support special
applications of high-bandwidth data lines.
Database software may also be required to support on-line assessments. Ideally, evidence-based standards
of practice will be used to develop stand-alone assessment database programs. A series of programs can
be loaded onto the computer at the central rehabilitation site so that a clinician can enter information from
an assessment directly into the appropriate database. Unfortunately, few databases that are being
distributed. You may have to build your own database application – using a program such as Access,
dBASE, or Paradox.
Numerous image programs are available to help organize the images and video clips that are saved during
each on-line encounter. In fact, the product list is too long to mention here. Many shareware programs can
be downloaded from the Internet and then used to view, organize, catalogue, print, compress, and email
your images. While you do not need image organizing software to participate in an on-line assessment, the
number of images on your computer’s hard disk will increase with each session. If you do not have some
mechanism for keeping track of these files, and recording which files related to each client, you may not
be able to find the correct image for future comparisons or for additions to a client’s paper file.
Image compression software can be used to reduce
file sizes before a group of images are archived.
You can use software such as PKZIP® or
WinZip® to reduce the data file’s size and
then copy the file to one, or more, floppy
disks. The image files must be
uncompressed before they can be used
again.
Video Camcorder
Many types of camcorders are available on
the market (i.e., video cameras that
allow you to record and playback live
Useful camcorder features.
Choosing the System Components 19
motion). Since you will be placing the camcorder on your desk, you may want to consider a palmcorder
since this class of camcorder is much smaller than a typical camera. Hi8 palmcorders provide good quality
images and good quality sound. A camcorder with a low LUX rating helps since these cameras work well
in low light conditions, such as a clinic.
Useful camcorder features include a manual exposure adjustment, both manual and automatic focus, and
a light that attaches directly to the camera. You will also have to purchase a small tripod to hold the
camcorder on a desk and to allow appropriate camera positioning when capturing still and motion video
images. The camcorder video-out connectors should also check to make sure that they are compatible with
your video capture card (i.e., if your video capture card only has an S-VHS connector, you need to have
an S-VHS connector on your camcorder).
Good audio quality is essential for a successful on-line consultation. Since clinicians need to use their hands
to operate the computer and interact with the client, a regular telephone is not the best option for verbal
interactions. Fortunately, speaker phones have improved to the point where good audio quality is achieved
at a reasonable cost.
Speaker Phone
An appropriate speaker phone will provide good audio quality within a 3m distance from the receiver.
Good audio quality refers to both the sound you hear and the
sound you send. The phone should be full-duplex (i.e., send and
receive sounds at the same time). It may also be advisable to
have a speaker phone that can connect to your computer’s
sound card so that you can use the phone through the
conferencing systems audio channel (only if you have a fast
Internet connection – over 56Kbps for data transmission).
Inexpensive speaker phones are generally inadequate for on-line
rehabilitation consultations. Most of the sub $100.00 telephones
that we have tested require that the person who is talking sit very
Audio-conferencing speaker phones close to the microphone. Also, these phones do not have very
are ideal for on-line rehabilitation powerful speakers (i.e., you have to sit near the phone to hear
the other person).
consultations.
Communication Link
All telecommunication lines have some associated costs. The amount can vary depending on where you
are connecting. For modem – to – modem connections, you may have to pay any long distance rates. There
are no other expenses beyond the regular monthly costs for a standard telephone line. An Internet account
20
Communication Technology for Rehabilitation
requires that a monthly rate be paid to an Internet service provider. Since you do not have to pay long
distance rates when connecting over the Internet, this method may be less expensive than a direct modem
connection. You must pay long distance rates if your Internet service provider is outside your local dialling
area. A LAN connection can be more expensive, since you must buy a special network card to connect
to the network. There are also associated costs for maintaining the LAN and, perhaps, costs for connecting
the LAN to the Internet.
Computer Selection
A desktop conferencing computer must be able to concurrently handle incoming data from the other site,
video decompression and compression, video display, coordinating Whiteboard events, play sound, and
save pertinent information. To accomplish these tasks, you need a computer with a fast CPU, a large
screen, a fast video card, a large and fast hard disk, and a lot of RAM. The computer should also have at
least five expansion slots since you will be inserting a variety of expansion cards (video card, video capture
card, sound card, modem, network card, etc.). A 17 inch, or larger, monitor is also recommended since
you often have many windows open during an on-line session. A larger monitor is also easier to see when
you have more than one person around the computer. This will be the most expensive component of your
conferencing system. Make sure to check the monitor’s image quality before you purchase a system
because you will be basing your clinical decisions on these images.
Video Capture Card
The video capture card is an essential component of a desktop video conferencing system. This hardware
card plugs into your computer and provides a link between the computer and a video input source (i.e.,
camera, camcorder, VCR, television, etc.). Better quality capture cards perform more of the image
processing and, therefore, can provide a video clip that has larger images, better quality images, and a
faster frame rate. Recent increases in computer processing power have allowed video capture card
manufacturers to pass some of the image processing work onto the CPU. This has resulted in video capture
hardware that is reasonably priced but still effective. The minimum requirements for the video capture card
are:
•
•
•
•
•
plugs into a PCI slot (inside your computer)
can capture video clips at 640x480 resolution, 24 frames/second, 15bit colour
can capture 24bit still images
comes with video capture and editing software
compatible with your video conferencing software
Choosing the System Components 21
Other Factors to Consider
Standards
International standards are finally available for desktop video conferencing. As vendors update their
products to support these standards, you should be able to connect with other people without worrying
about which software product they are using. Currently, your system should support the H.323 or H.324
standards for audio and video conferencing and the T.120 standard for data conferencing.
The H.323 standard works for any device on the Internet, although H.323 devices must at least support
audio communications. The data communication part of this standard provides a uniform way for different
software to establish calls, exchange information, and terminate calls. The video part of the standard defines
how video should be compressed and formatted. To improve video efficiency, only changes between video
frames are sent between sites. This technique results in less data being sent over the Internet connection
and, therefore, better video quality at fast Internet connect speeds.
The H.324 standard is similar to H.323 except that the standard focuses on simultaneously sharing video,
voice, and data over modem connections. Once a 28.8 Kbps modem connection has been established, the
H.324 standard defines how digital video and voice compression technologies are used to convert sounds
and images into a digital signal. The H.324 standard defines how these signals are compressed to fit within
the data rate allowed by regular modem connections.
The T.120 standard provides protocols for software to identify multiple sites on the Internet, manage a
conference with these participants, and simultaneously share data between participants. The main
applications that use T.120 are the Whiteboard, File Transfer, and Application Sharing.
The video compression standards that support the M-JPEG and MPEG file types are also evolving. New
video capture cards and video playback chips are being produced that greatly enhance the ability to
compress digital video files with little loss in image quality.
All Systems are not created equal
Many video conferencing products are on the market; however, not all products have the same capabilities.
While you will not need every video conferencing feature to complete many types of on-line consultations,
it is nice to have a full arsenal of communication tools available. Currently, there are a few features that you
must have: an interactive-multipage whiteboard, live video, good quality still image capture, standardsbased Internet connection, and application sharing. File transfer and chat capabilities are welcome, although
these features can be added through separate software programs.
22
Communication Technology for Rehabilitation
For education applications, a few features can greatly enhance the presentation process. Netscape’s
CoolTalk allows the users to synchronize their web browsers so that all participants can view the same web
pages. Unfortunately, this cannot be done directly in the Whiteboard. You will need a multipage
Whiteboard program to allow you to easily move from slide to slide during the presentation. It is also
advisable to have a Whiteboard program that can pre-load the slides, thereby saving download time during
the presentation.
What do you know about the company?
Many small, and large, companies are releasing video conferencing products. Since this is a very fast
moving technological area, we can expect to see many companies closing or failing to keep up with
technological advances. Even a company as big as IBM has abandoned their own video conferencing
initiatives and started to incorporate Intel’s Proshare system into their corporate strategy.
To protect your time and monetary investments, you should examine the company as carefully as you
examine their products. Items to consider are:
• How long has the company been working on video conferencing systems?
• Is the company committed to long-term development of video conferencing systems?
• Is video conferencing tied into the companies corporate strategy (i.e., how easy is it for
the company to abandon development)?
• Does the company have a good history of supplying upgrades and adhering to
standards?
• Does the company have a good reputation for quickly fixing software problems?
• Does the company have good customer support (telephone support, on-line support,
Web page with driver downloads)?
Check List
You can use the Table 2 as a checklist for assembling the system components.
Choosing the System Components 23
DISTANCE COMMUNICATION COMPONENT CHECKLIST
ITEM
Computer
DESCRIPTION
Runs Microsoft Windows (95, 98, NT)
Fast CPU (Pentium II 233 or better)
Large hard disk (Over 4Gb)
At least 32Mb RAM
At least a 17" monitor (1024 x 768 x 24bit colour,
75Hz refresh rate)
Fast video card with optimization for digital video
playback (AVI and MPEG)
CDROM (any speed)
16-bit sound card with full duplex (or better)
Modem (33.6 Kbps or better)
Video Capture Card
Plugs into your computer’s PCI bus
Able to capture live video at 640x480, 24 fps, 15 bit
(check capabilities for your computer’s capabilities –
CPU, hard disk speed, RAM, etc.)
Comes with video capture and video editing software
Works with conferencing software that use H.323, H.263
standards (check with video capture card company for
compatibility before purchasing card)
Microsoft NetMeeting
Download latest version from Microsoft
(www.microsoft.com)
DirectX Drivers
Download from Microsoft to handle audio/video
playback (www.microsoft.com)
Motion Analysis Tools
Obtain software from The Rehabilitation Centre
(www.rohcg.on.ca/cag/mat/)
24
Communication Technology for Rehabilitation
U
ITEM
Internet Account
DESCRIPTION
U
Allows you to consistently get a connect speed of at least
28Kbps
No busy signals when you try and connect to the Internet
service provider
The Internet service provider has enough capacity to
handle the video conferencing system (i.e., there is no
bottleneck at the provider’s connection that will reduce
the quality and reliability of the video conferencing
connection)
Camcorder
Palmcorder (Hi8 ro Digital)
Manual exposure adjustment
External light attachment
Low LUX rating
Manual and automatic focus
Speaker phone
Full duplex
3 metre range
Can plug into your computer’s sound card (not essential)
Good sound quality (low noise, good volume, etc.)
Two telephone lines
One clean telephone line for the modem (do not use a
line that runs through a switchboard or PBX phone
system- use a direct line)
Modem line is setup for an analog phone (i.e., modem
will not work with lines for digital phones)
One regular telephone line for the speaker phone
Table 2: Components selection guidelines.
Choosing the System Components 25
26
Communication Technology for Rehabilitation
3
Setting Up the Communication System
Even though desktop video conferencing products have different characteristics, there are some common
setup considerations. In this section we will look at hardware installation, possible equipment layouts, and
lighting.
Room Setup
When preparing for a rehabilitation consultation, you should consider how your clinic space will be setup
before installing any computer hardware. Ideally, the assessment room should have space for a plinth, a
computer workstation, a standing assessment area, and space for at least four people to interact.
Wheelchair access should also be provided in the assessment area.
Ideally, this room will be wide enough for a video camera to be positioned at a right angle to the plinth area.
With this setup, the remote clinician can evaluate the client’s range of motion as the remote clinician
manipulates the client’s limbs.
Choosing the System Components 27
A walkway is needed to video the client while moving; however, this does not have to be the same space
as the remote assessment room. The computer workstation should be set up so that you can send video
images from the standing area and the plinth without disconnecting the video camera. The speaker-phone
should be positioned to allow normal voice communication while interacting with the client (i.e., in the
standing area and from the plinth). Due to the importance of lighting for capturing good quality still images,
additional lighting should be available (i.e., camcorder accessory light, spot lights, flourescent desk lamp,
etc.).
Room setup considerations.
Computer Hardware
A good rule to follow for computer hardware is to buy a system with everything pre-installed. If something
does not work you can have your computer retailer fix the problem. Unfortunately, the fast changing world
of desktop conferencing will likely require you to do some hardware configurations to keep up with the
28
Communication Technology for Rehabilitation
evolving technologies. Some tasks you may have to perform include installing a new card in the computer,
reconnecting wires, and installing software drivers.
When installing new hardware, you should review the installation procedures before removing the card from
the packaging. New Plug-and-Play cards should not require additional setup; however, some hardware
may require that you manually change a setting on the card before installation. When you understand the
installation procedure, you can unplug the computer, take the cover off, and remove the metal piece from
a slot at the back of the computer. Before handling the card, you should touch any metal object. This will
help to remove static charges that can damage the electronics on the card. After the card has been pressed
into the appropriate slot, you can secure the card with a screw. Replace the cover on the computer before
continuing.
Before restarting the computer, connect the peripheral devices to the new card. This includes microphones,
speakers, video cameras, or telephone lines. When a computer with Windows 95, 98, or 2000 has been
restarted it should detect the new hardware and then try to find an appropriate software driver. A software
driver is a program that tells the operating system (Microsoft Windows) how to interact with the new
hardware. Usually you must insert a diskette or
CD-ROM that comes with the card and tell
Microsoft Windows the location of the
driver file. When this file has been
installed, the computer should restart. If
the computer is still working well, you can
install any additional software that came
with the cards; such as, video recording / editing software
or communication software.
A video conferencing computer will need various add-on cards
to transmit audio and video. These components are often called a
Sound Card, Video Capture Card, Modem, and possibly a Graphics Card.
Sound Card
The Sound Card has inputs for a microphone, speakers, and possibly Line-In and Line-Out inputs for
connecting equipment like tape decks and stereo amplifiers. Better sound recording qualityis often obtained
by plugging the microphone into the Line-In input. When these items are connected you should be able to
record your voice and hear sound from the other site. If you are having problems you could check the
following:
• Are the microphone and/or speakers plugged in?
• If your speakers require a power source, check to ensure that the power cord is
plugged in or that the batteries have power.
Choosing the System Components 29
• Run the audio setup feature in your conferencing program. Most programs have an
automatic setup feature that will adjust your audio settings as you speak into the
microphone.
• Ensure that audio has not been disabled and that the volume is not too low. In
NetMeeting, you can stop sending and/or receiving audio by checking boxes in the
audio section of the Current Calls screen. To use audio, both boxes should have a
check mark. The volume sliding controls should not be set completely on the left since
this is the lowest volume setting.
• Are you using Full Duplex? The Full Duplex setting lets you speak and hear at the same
time. Without this option you must wait until the other person has stopped speaking
before you start. Also, background noise may interfere with spoken words. To use Full
Duplex, you must have a Sound Card the supports this mode. Next, you must have
installed software drivers that support Full Duplex mode (if your current drivers do not
support Full Duplex, contact the company who made the card to get new drivers).
Finally, ensure that Full Duplex is selected in your conferencing system. For
NetMeeting, you must select Options from the Tools menu. In Options, select the
Audio tab. The Audio screen has an Enable Full Duplex audio setting that must be
checked.
Video Capture Card
A video capture card can have many different input/output configurations. Most cards have an RCA
connector that allows you to plug the Video Out connector on a camcorder into the video card’s Video
In connector. The Video-In input is often coloured yellow. Some video capture cards will also have an
Audio In connector so that you can connect any audio source. For most inexpensive video capture cards,
you must use your Sound Card to capture audio. Your capture card may also have a S-VHS connector.
S-VHS is usually the best choice since video quality is superior and audio is included on the same line.
If the video capture card has been installed correctly, you should be able to see preview video images in
NetMeeting or record video by running a video capture program. You should consider these factors when
recording and capturing video clips:
• Make sure that the subject is well lit from beside or behind the camera. Lighting is so
important that I will mention it a over and over and over. In most situations, a strong
light that fits on top of your camcorder can be used to make good video clips. A few
test recordings should be made to find the best lighting configuration (preferably before
seeing your first Telehealth client).
• Record in Uncompressed, Full Frames mode. A typical personal computer is not fast
enough to compress a video clip while it is being recorded on the hard disk.
Compressing while recording usually results in a series of frames being skipped. To
30
Communication Technology for Rehabilitation
record a video clip at 30 fps, without losing frames, you should record without
compression. You can compress the video file later.
• The smaller the image – faster the frame rate. Since less information has to be captured,
a smaller image will let you record faster without surpassing the capabilities of your
computer system. A full screen (640 x 480) video clip may only work at 10 – 15 fps.
A faster computer can work at a faster frame rate.
• Use a tripod. A tripod not only frees up your hands but it reduces camera movement.
A conferencing system’s live video image improves if the camera is stationary. Video
compression also dramatically improves since areas on the video that do not change
from frame – to – frame do not have to be saved. You will also need a stationary
camera for some motion analysis tests.
Modem
Many problems encountered with modem operation are due to problems with the phone line or
conferencing software – not the modem. To ensure that your modem is working well, you should
periodically check to see if the manufacturer has released an improved driver. In many cases, modem
improvements occur with the controlling software and not the actual card.
If your modem is working well, you should hear the modem dialling the other site. When the other site has
answered the call, you will hear a high-pitched whine as your modem communicates with the remote
modem. If you cannot connect, you should check that the telephone cable is plugged from the wall jack
to the correct location on the computer. The phone cable may have been disconnected and then
reconnected to the modem’s telephone-input and not the line-in input. Another common setup problem
occurs when the wrong communication port has been selected in the Windows Control Panel (ex., COM3
instead of COM4).
Graphics Card
A graphics card connects your computer to a monitor. The graphics card processes all on-screen images,
even the live video images. An ideal graphics card can accommodate at least 1024x768 screen resolution
with 24 bit colour and a screen refresh rate over 70Hz. More expensive graphics cards are better at
processing complex graphics, use faster memory, have more memory, have a better graphics processor,
and/or are optimized for specific functions (MPEG video playback, output to television, etc.). While 24 bit
colour is appropriate for most applications, some users find that 32 bit colour images are better for viewing
subtle differences in shade; for example, assessing tissue colour around a wound or pressure sore.
Choosing the System Components 31
Video Cameras
You can connect three different types of video cameras to a conferencing system. A camcorder is the best
option since you can move the camera to other locations, such as the client’s room, to tape relevant images
and then play the tape back through the conferencing system. Camcorders may also have better zoom
features and may work better in low light conditions. You must have a video capture card to connect a
camcorder to your computer.
Less expensive video cameras, that do not have taping capabilities, are also available. These cameras
connect directly to the video capture card and are usually much smaller than a camcorder. These cameras
can sit on top of the computer monitor or can sit on the desktop. You can usually change the focus on these
cameras and, in some instances, change the aperture settings.
CCD video cameras can provide a high quality, high
resolution video image; however, these units are
expensive and do not have taping capabilities. Some
CCD cameras require conversion hardware to allow
them to be plugged into a computer capture card.
If you are using a notebook computer, you will probably
not have a video capture card. In these cases you can
use a video camera that attaches to the computer’s
printer and keyboard ports. Testing with the
Quickcam® unit has shown that these video capture/cameras are adequate for remote video conferencing;
however, a camcorder with a good video capture card can obtain better still images and video captures.
Since these small cameras are connected to a portable computer, you can move the computer and camera
to any location. Another benefit of these camera units is that they can connect to any IBM compatible
personnel computer, thereby providing a backup option for the main video conferencing system.
Three types of video cameras (not to
scale). Left to right: Quickcam®,
camcorder, CCD camera.
Computer Software
Once your computer hardware has been successfully installed, you can install the software. Commercial
desktop conferencing software has informative installation procedures that you can access by running a
Setup program. The Setup program will lead you through the software installation process. It is often a
good idea to choose the Typical settings and not change the suggested directory’s names.
Starting distance communication software is made easier by creating a folder on your desktop called
Telehealth. Shortcuts to the most commonly used programs can be placed into this folder; such as, your
32
Communication Technology for Rehabilitation
conferencing software, Internet connect program, WINIPCFG.EXE, and the video capture program.
Please refer to Microsoft Windows Help for instructions on creating Folders and Shortcuts.
You should also create a folder called the Telehealth Files that holds images and video clips related to
your on-line sessions. If you deal with numerous remote sites, you should create separate folders for each
community within the Telehealth Files folder.
System Testing
When the software and hardware have been installed, you can run some tests to make sure the system is
working well. The following items should be checked before connecting to another site.
Live Video Test
To check the live video images you should turn on your video camera and make sure that the camera is
connected to the video capture card. Live video should be displayed in a separate window. For
NetMeeting, these video images are located in the My Video window. If you do not see a video image you
can:
• recheck the connection between the camera and the
computer,
• look into the camera’s viewfinder to ensure that the
camera is working,
• check your conferencing program’s video controls to
ensure that live video is “turned on” (a common error
is setting the video source to S-VHS instead of
Composite),
• quit the conferencing program and run any test
software that comes with your video capture card to
make sure that the video card is working.
Whiteboard Test
NetMeeting’s Live Video
window.
Open the Whiteboard in your conferencing system. You should be able
to draw in the Whiteboard, Select a Window into the Whiteboard, and Select an Area (a live video image
is a good test) into the Whiteboard. If these features do not work, you should check to ensure that you
have enough available memory (RAM) and system resources to run the conferencing system. If the
Whiteboard still does not function properly, you can try re-installing the conferencing software.
Choosing the System Components 33
Connect to Another Site
Some companies provide a site that you can use to test your new installation. Ideally, you should try
connecting to a site that you plan to communicate with in the future. This site should have a functional and
fully tested conferencing system. It is helpful to have a second telephone line available so that you can talk
to each other while testing the communication link.
When you know the other site’s IP address or modem telephone number, you can enter this information
into the computer and initiate a call. The other site’s computer system should be waiting to receive your call
before you try to connect. If you cannot connect to the other site you may check the following:
•
•
•
•
have you typed in the IP address or telephone number correctly,
are you still connected to the Internet,
is there a dial tone on the modem’s telephone line,
is your modem connected to an analog telephone line (many hospital telephone systems
have digital phones that use digital lines – these lines will not work with a modem).
If you are using a network (LAN) to connect to the Internet you may have a Firewall system that can
interfere with video conferencing. A Firewall is a security layer around a network that stops unwanted
access to your network files. Unfortunately, a Firewall can also stop the transmission of data from
conferencing systems. If you can connect between computers on your Network but cannot connect to
outside sites, you should talk to your Network Administrator about configuring the Firewall to work with
your conferencing software.
Once you have a connection with the other site, you should check each conferencing feature. Generally,
you should ensure that the local and remote live video work, the Whiteboard can send and receive
graphics/images, you can transfer files between sites, and you can run a Chat session.
Audio Test
Now that you are connected to another site, you can check the system’s audio capabilities. To start, you
should talk to the other person in a normal voice (i.e., do not shout). If the system has been properly
configured you should be able to hear people at the other site and they should be able to hear you. If you
are having audio problems in NetMeeting, you can set the audio volumes manually or re-run the audio setup
wizard.
When you can verbally communicate over the conferencing system, you can try two additional tests. First,
have the person at the other site talk while you are talking. If audio is set to full-duplex you should be able
to hear the other person while you are speaking. If the sound breaks up during this test you should check
34
Communication Technology for Rehabilitation
the settings in your conferencing package to ensure that audio is set to Full Duplex. You may also have
to load new audio driver software for your sound card (available from the sound card manufacturer).
The maximum distance that you can be away from the computer and still be understood should also be
checked. This test can be done by moving away from the computer while talking. You could also move
to your assessment table and check to see if the person at the remote site can hear your voice. If the table
is too far away, you can change the audio volume settings or move the table closer to the microphone and
speakers.
Choosing the System Components 35
36
Communication Technology for Rehabilitation
4
Using the Communication System
This section will answer some common questions that arise when implementing a distance communication
system. The examples used in this section are based on the Microsoft Windows 95 / 98 / NT / 2000
operating system and Microsoft NetMeeting. Other communication products such as Enhanced CUSEEME, Person-to-Person, CoolTalk, and various Internet video phones have some, or all, of the features
described in this chapter. Please consult your user’s manual or on-line help for specific information on your
system.
How do I connect to someone?
Before you can communicate you must establish a link between your computer system and the other
person’s computer. While there are various ways to connect computers, the most popular are Internet,
direct modem connections, and LAN (Local Area Network).
Using the Communication System 37
Internet
First, you need to have an account with an Internet service provider. Your Internet provider should supply
the necessary software and instructions to configure your computer for Internet access. Since each provider
will have their own setup parameters and procedures, follow their guidelines to make your Internet
connection.
Once you have linked your computer to the
Internet, you can start your communication
software. Before you can call someone you must
know their Internet address (often called IP
Address). This address can look like 198.96.156.1
or 198.234.1.243. In Windows 95 and 98, a
program called WINIPCFG.EXE can display your
IP address. WINIPCFG is usually found in the
/windows/system directory. If you run this program
after making your Internet connection, a window
with your current Internet address will appear. Most
Internet providers assign you a different IP address
each time you connect. Enter your current IP
address in the dialling/calling section of the
WINIPCFG.
conferencing software and initiate the call. If the call
is successful, your conferencing software will either show your current connection status or display a
message confirming that you are connected.
Another option exists in NetMeeting 3.0 for finding your IP
address. When you select About Windows NetMeeting
from the Help menu your IP address and is listed at the
bottom of the window.
An advantage of using an Internet link is that more than two
people can join an on-line meeting. To add more participants
to a NetMeeting have the new participant connect to the
Internet, initiate a call to your IP address, and answer the
on-screen question to let the new participant join the
meeting. Other software packages require all participants to
connect to a central computer that distributes information
from – and – to all participants. The conferencing software
ensures that Whiteboard, audio, and video information are
shared between sites.
38
Communication Technology for Rehabilitation
Using NetMeeting to locate your IP
address.
While a public Internet connection has many advantages, there is a chance that someone could intercept
a data stream as it passes through cyberspace. While this scenario is beyond the capabilities of most
people, data security is an important element of any health-related encounter. Your Telehealth initiative
should address the issues of confidentiality and data security by implementing client information coding
systems, using network security software, and obtaining informed consent from each client.
Direct Modem Connection
Many desktop conferencing systems allow you to make a direct modem – to – modem connection between
two computers. In these cases, set the conferencing software on one computer to automatically receive
calls. At the other site, enter the remote telephone number in the communication software’s dialling/calling
window. The software should inform you when the link has been established.
A direct modem connection can also be established by using the Windows 95/98 Dial-Up Server feature.
After you have installed the Dial-Up Server, you can setup your computer to wait for a call from any other
site. The remote site can connect to you in the same manner as they connect to an Internet Service
Provider. Once the link has been established, you can run your Internet-based conferencing software.
Local Area Network
Before connecting to someone else on your LAN, you must find their computer’s address. You may have
to talk to your LAN administrator to find the address since it will vary depending on the network
configuration. Most software will work with a TCP/IP or IPX address. Enter the address of the person you
wish to contact in the dialling/calling section of the conferencing software and initiate the call. The software
should confirm that you are connected or start showing status information about the current meeting. Multipoint meetings can also be run over a LAN by using the same procedure that was described in the Internet
section.
Is it safe to run Telehealth encounters over the
Internet?
One of the advantages of the public Internet, as opposed to a closed network running Internet protocol,
is the ability to access information from almost anywhere on the planet. This capability also raises important
issues concerning client information security. Before we examine ways to protect your client’s right to
privacy, we should look at the factors that make Internet-based Telehealth information vulnerable.
Potential Security Risks
Using the Communication System 39
The most vulnerable client information are the records stored on your computer’s hard disk. Once you are
connected to the Internet, a malicious hacker (i.e., someone who tries to break into your system and access
your data and/or programs) could use your data-link to connect to your computer and download
information onto his/her computer. You may not be aware that information is being taken and, even if you
discover a problem, finding the person who accessed your computer will be very difficult. Information that
resides on a computer is more vulnerable when you have a persistent Internet connection – since people
can try and break into your system at any time. Information that would reside on your computer includes
video clips, still images, and database records.
Most computer conferencing tools stream data through the Internet, as opposed to storing information on
a computer. Streaming refers to reading data from the local computer and immediately sending the
information to the remote site. Examples of streamed data include live-video, live-audio, and drawing on
the Whiteboard. To steal streamed information, the hacker would have to intercept the data packets as
they work their way through the Internet and reassemble the packets on their computer. While this is
theoretically possible, the task would be difficult to accomplish since the data packets may not take the
same path through the Internet. The most likely scenario would be that the hacker would steal the
information as it passes to, and from, your Internet service provider.
The third option to consider involves email. Some small clinics may use the free email services that are
offered by many large web sites. Client information that is sent to one of these email addresses likely resides
on the web site’s computer long after you have read the message. Since you have no control over how
information is stored and protected, your client’s information may be vulnerable.
These three scenarios paint a bleak picture for people who want control of their personal information;
however, there are many ways to minimize security risks. These methods include coding client information,
using network security software, and obtaining informed consent.
Coding Client Data
One of the easiest ways to protect client information is to assign a code number for each Telehealth
encounter and use this code for all client-oriented data. Since the client’s identifying information (name,
address, etc.) does not have to be transferred between sites during an on-line session, most images used
for a physical rehabilitation consultation will remain anonymous. The low-bandwidth Telehealth system
outlined in this book uses a separate telephone line for audio; therefore, the telephone line can be used to
verbally set the encounter code and discuss sensitive client data. The security risks of discussing health care
issues over the telephone are generally considered acceptable.
Security Software
40
Communication Technology for Rehabilitation
New security software will be essential for the fight to protect personal information. Many of the same
technologies that are being used to provide secure bank transactions over the Internet are being integrated
into Telehealth systems and personal computer operating systems. These methods include:
• SSL (Secure Sockets Layer) protocol for point-to-point connections with a web site,
• virtual private networks for secure communications between Internet addresses,
• data encryption to protect data transferred between sites,
• user authentication to ensure that you are connecting with the correct site,
• password protection to ensure that you are connecting with the correct person.
Informed Consent
If there is a level of risk beyond conventional client record security, each client should be informed of the
potential problems and sign a consent form. This process will help protect the rights of the client and the
health care providers since the client is making an informed decision that the Telehealth encounter is more
important than the risk of unauthorized access to their personal information. The consent forms should be
kept with the client’s clinic file. There is no legal precedent to ensure that a Telehealthconsent form will help
during litigation.
How do I see the other person?
There are many ways to see the person on the other end of a conferencing link. The tools that you use will
depend on your available hardware, connection speed, image quality requirements, and the clinical reason
for seeing the other person. Though there is more than one option for viewing images from another site,
you should remember the following guidelines when using any video-based imaging methods:
• Good lighting is essential when trying to capture a quality video image. Even though
video cameras can function in low light, image quality degrades under these conditions.
As well, the light source must be behind or beside the camera. A separate light that fits
on top of your camcorder is ideal for taking good video pictures.
• Use a tripod to hold the camera. Besides freeing your hands to work with the client or
to work with the computer system, having a static background can improve video
compression. There is always some hand movement when holding a camera.
• If you cannot get the camera in a good position, disconnect the camcorder from the
computer and move the camera into a better location. Since you are using a camcorder,
you can save the images on videotape (i.e., regular videotaping). After recording,
reconnect the camcorder and play the video back through the conferencing system.
• Instead of connecting a camcorder to a video capture card, some conferencing systems
can use inexpensive computer digital video cameras. These cameras cannot record to
tape and must be connected to a computer to work; therefore, you must ensure that
Using the Communication System 41
your computer and camera are in a good location before starting a consultation session
because you cannot move the camera beyond the connecting cable’s length. Location
problems are minimized if the video camera is connected to a notebook computer since
you can move both the computer and camera to take a video clip at another location
or from another viewpoint. However, you may have to disconnect the modem, and
therefore the conferencing link, before moving the computer and camera into a good
video capturing location.
• Since the live video, video clip, and still video capture all use the same video hardware,
you are only able to run one video software application at a time. Therefore, you may
have to exit your conferencing software first when using another program to grab a
video clip or take a high quality still image (avoid hardware conflicts). When you have
finished capturing video, you should exit the video capture program before reestablishing the conferencing system’s live video.
• Most video camcorders automatically shut off after five minutes. If you cannot disable
this feature, you can put a blank tape in the camcorder and keep Record on during the
on-line session. The camcorder will not turn off while recording. You can rewind the
tape after the session and reuse it for the next consultation.
Live Video
You can use live video to see small, continuously updating, pictures of people at the other site. First, you
should ensure that you have the required equipment to capture video. You need to have a video capture
card installed in your computer and a video camera attached to the card. If this equipment is attached
before you start the communication software or initiate a call, the conferencing system can start sending
video when the between-site connection is established. Low-bandwidth systems have a 1 – 3 second delay
between movement at the central site and the video image at the remote site. You may have to press a play
button, similar to the button on a VCR or camcorder, on the video windows to start sending images.
Still Image
If small and/or low quality live video images are not sufficient for your needs, you can capture a high quality
still image and share the picture between sites by using the Whiteboard. With proper lighting, a large colour
image can show details that may be missed with live video. To ensure that you are capturing the correct
still image, you can use live video to preview the remote situation and decide what are the main areas of
interest. The live video can be paused at the correct point by the rehabilitation specialist to show the remote
clinician the view that would benefit from a high quality still. The remote clinician can then grab a series of
still images for discussion.
42
Communication Technology for Rehabilitation
In some cases, still images may be the only tool available for sharing images. In this case, starting with a
picture of the whole problem area is better because the specialist can use the Whiteboard to circle areas
that require a closeup.
File Photo
Some low-end conferencing systems do not let you share live video; however, they do let you attach a
picture of yourself that can be accessed by others during the call. While not as good as live video, a file
photo may help add a humanizing element to the encounter by letting the remote client and clinician see your
face.
How can I let other people see me?
The same tools used to see people at the remote site are used to see you.
Using the Communication System 43
Using the Whiteboard to examine critical areas.
How can I see a client in another room?
You may be in the situation where a client cannot be easily moved into the location where the conferencing
computer has been setup. If you have a camcorder connected to your video capture card, you can
disconnect the camera and video-tape the client in their room (i.e., regular videotaping). When you have
taped the required information, return to the conferencing computer and reattach the camcorder to the
capture card. The video can be played while the other site watches in a Live Video window. If the quality
44
Communication Technology for Rehabilitation
of the Live Video image is not good enough, you can capture portions of the video tape and save them on
the computer’s hard disk. The resulting video data file can be sent to the other site by using the File
Transfer tool.
What are my options for talking to people at the remote
site?
The easiest way to talk between sites is to use a separate telephone line for audio. A good quality speakerphone is helpful since a clinician can use both hands to position a client or take a video clip while still being
able to talk to the specialist. Also, the client, clinician, and any other supporting personnel can interact with
the specialist as a group. Low quality speaker-phones can cause problems since they may not have enough
range, they may run in half-duplex mode, and they may not filter out background noise. Table 3 outlines
some requirements when selecting a speaker-phone.
A telephone headset can also be used to allow two way communication while keeping your hands free.
While this may work at the central rehabilitationsite, the headset wires may become bothersome and it may
become difficult to pass the headset between people at the remote site. While not ideal, a regular telephone
will usually allow you to complete an assessment.
If you have only one telecommunications line, you can use the conferencing system to send audio between
sites. You must connect a microphone and speakers to the sound card in your computer to use this feature.
The conferencing system compresses the microphone input and sends sound through the data line to the
other site. The receiving site decompresses and plays the sound through the speakers. If you have enough
bandwidth, this method of audio communication works well. You have the advantage of only paying for
one communication line for both audio, video, and data transfer. However, low-bandwidth connections can
produce audio problems when using Live Video, Whiteboard, and/or File Transfer tools at the same time.
You can saturate the data line when using multiple conferencing applications at the same time (i.e., no more
room in the data line to send a continuous stream of audio data). A non-continuous data stream will cause
the sound to break up so that you cannot hear every word at the other end of the line. To deal with this
problem you could use a separate telephone line for audio, limit the number of tools you use at the same
time, or use Chat to type messages.
Using the Communication System 45
ITEM
Range
Interaction
Sound card
compatible
SPECIFICS
2 – 3 metres
You should be able to talk to and hear each other
when working with the client away from the
computer system. The client may be lying down on a
bed near the speaker-phone.
Full duplex
A full duplex speaker-phone will allow a person to
speak while still being able to hear sound through the
phone.
Can connect to a
computer’s sound card
If you want to use the Internet phone features in the
conferencing software, you may want to connect the
speaker-phone to your Sound card for improved
audio communications.
Some speaker-phones try and reduce the effect of
background noise on the conversation. This could be
useful in a clinical environment.
Noise
reduction
Automatic
gain
DESCRIPTION
Change the volume
automatically
Some phone systems will automatically adjust the
audio sending or receiving volume to compensate for
the distance you are away from the phone.
Table 3: Speaker-phone considerations.
How can I assess a client’s walking style?
Low-bandwidth communication systems are not able to send a satisfactory live video image for assessing
motion. Standard video runs at a rate of 30 fps and movie film runs at 24 fps. Both these frame rates trick
your eyes into seeing motion, even though you are only looking at a series of still pictures. When you drop
below 20 fps, the motion effect degrades and the motion appears choppy. Since a low-bandwidth system
usually sends live-video at approximately one frame per second, you cannot use live video for most motion
analyses.
Now that a strong case has been made for not using live video for motion analysis, here is the flip-side. In
some instances you can pick out the information you need from a live video feed. First, by increasing video
compression and decreasing image size you can increase the live video frame rate up to approximately 10
fps (this process also decreases image quality). You may be able to see if the client is dragging their toes
46
Communication Technology for Rehabilitation
during swing, check body position, or check on assistive device orientations. Unfortunately, you cannot
replay the motion since live video is not saved on the computer’s hard disk.
If you cannot use live video how are you
supposed to examine client motion? The
answer does not rest with your conferencing
system but with the software that comes with a
video capture card. Most capture cards have
video capture and editing software included. If
not, you can purchase video capture and editing
software that works with the AVI file format
from most computer stores. You can use this
software to save the output from a video
camera on the computer’s hard disk. The
capture process usually involves looking in a
preview video window to ensure that the
picture quality and settings are correct. You
then click the mouse on a record button to start
saving video. After the file has been saved you
can look at the video clip in the preview
window or by using Media Player, RealPlayer,
or Active Movie programs.
Grabbing a video is very easy; however, the
following guidelines can help obtain a good
quality clip:
Viewing a video clip in Media Player.
• Good lighting leads to good video. A strong light source directed at the subject from
above or beside the camera will produce images with better colour balance and better
clarity. The video camera shutter will also be smaller. A smaller shutter is good since
it will lead to less blurring during fast motion. If the shutter is too open, the subject’s
arms and legs may appear blurred or extra wide.
• Do not capture video at less than 320x240 resolution (half screen). You need a large
enough image to see details during a proper motion assessment. The 320x240 or
640x480 settings should be large enough for movement analysis. To be safe, always
capture video at 30 fps.
• Do not capture video at less than 15 fps. Since you are capturing a series of pictures
that represent the client’s walking style, you do not want to miss important events
because you did not capture enough images. For example, you may capture images
before and after heel-strike but not at the critical moment. A slow walking client’s gait
could be analysed at 15 fps. Preferred frame rates are 20, 24, or 30 fps.
Using the Communication System 47
• You can achieve better frame rated by capturing uncompressed video. You can usually
compress the video later.
• Do not capture too much video before and after the activity. You can save time when
sending the video clip through the communication link by saving a smaller video clip.
The ideal clip will only contain the activity in question; such as, two to four walking
strides.
After capturing the video clip you should compress the file before sending it through the link. Video
compression can reduce the file size by a factor of eight while maintaining adequate image quality. This will
greatly reduce the time it takes to send a video file to the other site. Cinepak and Indeo compression
formats are included withmost video software. Recent tests at The Rehabilitation Centre (Ottawa, Canada)
have shown that Indeo takes less time to compress video files while still achieving comparable file sizes.
After you have compressed the file save it with a different file name so that, if necessary, you can go back
to the original clip. You should also play the new clip to ensure that the image quality is still good. If
compression has resulted in poor video quality, you should recompress the originalfile withdifferent settings
(lower compression / higher quality). Even with compression, a long digital video clip can take up to an
hour to send between sites.
The completed video clip can be sent to the other site by using the File Transfer tool in your desktop
conferencing package, Internet Email, or modem – to – modem file transfer. If you have file transfer
capability in your conferencing package and you are already connected, the File Transfer tool is the
easiest method to use. If you are sending the file during off-hours, Email is a good alternative since people
at the other site do not have to be connected to receive the file. Unfortunately some email systems do not
work with large data files, and all digital video files are large.
Now that the data file is at the other site, the consulting clinician can look at the video. Digital video clips
can be used with many motion analysis assessment programs.
Media Player
Microsoft Window’s Media Player is an effective tool for playing AVI video files. The controls are the
same as a standard VCR. You can play, pause, and stop the video clip at any point. In addition you can
step through the clip frame by frame. The ability to step through a video clip allows you to examine specific
moments in the gait cycle, see how much a foot is clearing the ground, or look at posture. You can also see
the time interval from the beginning of the clip. This time can be used to calculate stride times. By changing
the video properties you can enlarge or reduce the video window. Increasing the video size give you a
much larger, but poorer quality, image. A Media Player video image can be copied into the Whiteboard
for discussion.
Motion Analysis Tools
48
Communication Technology for Rehabilitation
Motion Analysis Tools is a software program that was written at The Rehabilitation Centre (Ottawa,
Canada) to help perform clinical analyses of digital video. With this software, you can load multiple video
clips, step through the clip, measure joint angles, calculate stride intervals, stride length, walking speed,
measure distances, and enlarge the image. You can also superimpose a grid over the video to give some
perspective when looking at body position. As with Media Player, you can copy the current Motion
Analysis Tools window into the Whiteboard for discussion. These additional assessment tools are useful
for quantitative comparisons between the client’s results and normal results and when performing pre/post
treatment evaluations. Because of the added functions, Motion Analysis Tools is the preferred method for
quick clinical motion analysis.
The Whiteboard is a useful tool for discussing problems areas in the client’s walking style. Since many
Whiteboard programs allow you to create multiple pages, you could copy critical images onto separate
pages when discussing the client’s walking problems. With this method, you can quickly switch back and
forth between images without having to continually reload pictures through the communication link. The
Whiteboard drawing tools should be used to circle critical areas and draw correct limb positioning.
Full Gait Analysis
If you require extensive analysis of the client’s motion, you can use a high end biomechanics analysis
systems, such as the Ariel Performance Analysis System, that take AVI file input. Much more time is
needed to complete a full biomechanical video analysis; however, this information is very useful for
describing the clients motion and identifying discrepancies in their walking style. You will probably work
with a clinical gait laboratory to complete such an analysis.
Using the Communication System 49
Using Motion Analysis Tools to view different positions in
the gait cycle.
How would I assess a person with a brace?
This section describes how you could use distance communication technology to complete a remote
orthotic assessment. There is not one way to use a conferencing system for rehabilitation consultations;
however, this example provides a structure on which you can build. In this case we have a client who is
experiencing discomfort at the proximal end of her ankle foot orthosis (AFO). Microsoft NetMeeting is
being used as the communication program.
Make the Connection
Before starting the assessment, both sites should be on-line and the equipment should be functioning. This
is a good time to greet the remote clinician and discuss any relevant information before the client arrives.
The remote clinician is your physical link during the assessment. A good rapport between the rehabilitation
specialist and the remote clinician makes the entire process run more smoothly. Both sites may want to have
technical assistance handy when making the connection.
50
Communication Technology for Rehabilitation
Databases can be used during an on-line consultation.
Enter Encounter Data into a Database
By using the document sharing tools, the remote clinician and rehabilitation specialist can work together to
complete an assessment database form. This process involves opening the database program, sharing the
database between sites, and selecting collaborate so that both participants can take turns running the
database program. The remote clinician could have connected to the central site to enter this information
before the appointment. An information database that is specific to the problem area, in this case orthotics,
can help make the on-line assessment process more efficient since the client’s information is stored in a
database in one step, the database can be worded to reduce confusion between varying disciplines (i.e.,
physiotherapy terminology versus orthotics terminology), and both sites can refer to the information during
the assessment. To conserve bandwidth, you should stop sharing the database before continuing.
Using the Communication System 51
Start the Live Video
Live video is useful when starting an assessment. You can see the client and/or the clinician as you discuss
the problem, and these people can also see you. Being able to see people at the other end of the line adds
a personal element to this technology mediated consultation. The specialist could also pick up visual cues
concerning the client’s condition.
You can also use the live video to get an idea of where the problem is occurring. Ask the remote clinician
to turn the video camera and focus it on the area where the client is experiencing difficulty, in this case the
proximal rim of the AFO. The client should then point to the area of concern. Since the video will only be
updating at one frame per second, the client should hold their finger on the problem area until you can see
it in the video window. You can pause the live video at this point.
Open the Whiteboard
The Whiteboard is your main visual communication tool. You will be using it to discuss all images used in
the assessment. Now that you have a paused live video image of the area in question you can copy this
image into the Whiteboard. In NetMeeting, you can click the Select Window button in the Whiteboard and
the click on the video window. For a large video image, you can detach the video window and then change
the window or video properties. When you have a good image in the Whiteboard you can turn off livevideo to conserve bandwidth.
Make Suggestions
After further discussion with the client and the remote clinician, you can mark off an area of interest on the
Whiteboard and ask the remote clinician to capture a large image of the area. Using the still image capture
software, the clinician can capture the image and then transfer picture into the Whiteboard. Drawing tools
can be used by both sites to discuss the problem. In this case, the AFO brim is digging into the client’s calf.
For relief, the specialist describes how to make a small modification to the AFO while using the Whiteboard
to draw how the modified shape should look.
The remote clinician will make the changes as outline by the rehabilitation specialist and then capture
another still image to show the result. When the modified AFO looks good, the specialist needs to ensure
that the AFO still functions correctly.
52
Communication Technology for Rehabilitation
Desktop view of a Telehealth session involving an ankle foot orthosis.
Capture and Send Video Clip
The remote clinician will capture a video clip of the client walking and send the clip to the rehabilitation
specialist (refer to Chapter 5 for hints on taking motion video). The specialist can use Motion Analysis
Tools to step through the video and measure ankle joint angles at critical points in the gait cycle. These
angles can be compared with the AFO design parameters or with pre-modification data. If the AFO is not
functioning well, the modification process should be redone.
Using the Communication System 53
Recheck During the On-Site Visit
Since changes have been made to the AFO, the rehabilitation specialist should check the AFO during the
next visit to the remote community. Sometimes, the minor modifications made during an on-line session will
be sufficient for the short-term but more extensive revisions will be needed during an on-site visit.
Can I use the conferencing system as a telephone?
Many conferencing systems will allow you to use your Internet connection as a telephone. If you have a
sound card, a microphone, and speakers, you can communicate with people at other sites. Since you can
increase the speaker volume and increase the microphone sensitivity, you can use an Internet phone
connection as a speaker phone system during an on-line session.
Unfortunately, the sound quality during these verbal communication sessions is not as good as a regular,
long distance telephone call. If you are using other Internet communication features while talking you may
miss some words of the conversation. Since a limited amount of information can pass through the pipe in
a low-bandwidth connection, the Whiteboard or video transfer activity can fill the data line so that an audio
transmission does not transmit to the other site. Due to the potential problems with Internet audio
communications, it is a good idea to have a second telephone line ready to ensure high quality verbal
communications during the consultation.
Can I give a presentation using the conferencing
conferencing system?
Desktop conferencing systems are ideal for giving presentations to individuals or small groups. By
connecting to multiple sites at the same time, you can give a presentation to a series of small communities.
However, since you will not be physically present during the presentation, additional factors must be
considered when giving a remote presentation:
Prepare Slides in Advance
Though the Whiteboard can be used for drawing during a presentation, you will be more effective if you
have previously created good quality slides that are related to the course content. A program such as Corel
Presentations, Harvard Graphics, or Microsoft Power Point, should be used to create these slides;
however, you can also use the Whiteboard to layout the information. Presentation software helps provide
a consistent approach for describing your ideas. A few points to remember when creating your slides
include:
54
Communication Technology for Rehabilitation
• Do not overload a slide with information. If necessary, use two or more slides to
describe a point.
• Only put 6 – 8 words on a line.
• Do not use small font sizes. Small fonts make it difficult for more than one person to
read the screen.
• Use high contrast colours (ex., blue background and white or yellow text).
• Use graphics to help illustrate a point or just to add some interest/humour to your
presentation.
Besides providing a visual means of describing a concept, prepared slides help keep you on track and
organized during your presentation.
Use Graphics Whenever Possible
Since you will not be at the remote site to give the presentation, you must provide other visual cues to
make your point. Possible graphics include data charts to describe numerical results or trends, clip art
drawings to draw attention to the idea being presented (such as showing a drawing of a person with bent
knees when presenting on lifting technique), or descriptive photographs.
You can create your own photographs by capturing a still video image, saving the image as a bitmap file,
and loading the bitmap into the presentation software. You can also select the video window into a new
page in the Whiteboard when you want to incorporate a picture into an on-line presentation.
Using video clips to show motion for a wheelchair transfer.
Using the Communication System 55
Use Video Clips to Show Motion
Many techniques in physical rehabilitation require motion. While these movements may be easy to
demonstrate, they are often hard to describe. To show these techniques to people at the site, you can use
your video capture card to save clips of important movements onto the computer’s hard disk. At an
appropriate time in the presentation, you can instruct the remote participants to run the video clip. The
participants can stop and step through the clip to better understand the motion. If the participants have
questions about the clip, they can select individual frames into the Whiteboard for discussion.
Save Presentation as Whiteboard File
When you have setup your presentation using presentation software you are ready to convert the slides into
a Whiteboard file. Most presentation software cannot save to the Whiteboard format; however, you can
save your presentation as a series of bitmap images. These bitmaps can then be loaded directly into the
Whiteboard software or selected into the Whiteboard from a graphics program (Paintbrush, Corel Paint,
etc.). Each slide should be saved as a separate Whiteboard page.
The Whiteboard file size can be greatly reduced by using the Whiteboard tools to create your slides. This
re-layout process involves using the Whiteboard’s text, background colour, and shape drawing features
to create most of the slide’s content. Bitmap images can still be inserted into each slide; however, these
images will now be only a fraction of the former bitmap size (i.e., since the bitmap will not include text and
background). File size can also be reduced by using graphic images that are as small as possible but still
large enough for your audience to see from a distance. By reducing the file size, the time required to load
the slides is greatly reduced since less information has to be passed through the pipe.
Pre-send Whiteboard and Data Files
It may take an hour to send a large Whiteboard file between sites. A series of video clips may take even
longer. To make things run more efficiently during the on-line session, you should connect to the remote
sites well before the start of the presentation and load the Whiteboard file. This is accomplished by
connecting, running the Whiteboard program, and loading the file. The images are automatically sent to all
the sites connected to the conference.
You should also pre-send video clips, word processing documents, software, and any other digital aids
that you will be using during the presentation. The File Transfer tool can be used to send these files to all
participants. File transfers should be completed before loading the Whiteboard file.
56
Communication Technology for Rehabilitation
Use the Whiteboard Tools
Remember that you have many drawing, pointing, and screen capturing tools in the Whiteboard program.
These tools should be used to highlight information on your slides during a presentation. You can also use
these tools to make quick sketches that describe a concept. The remote sites should also be encouraged
to use the annotation tools to describe their questions.
You may also want to capture and share a still video image to help answer questions during the session.
For example, you could capture a still image of the body position during a wheelchair transfer. You could
also capture a picture from a reference text.
Whiteboard slide from an on-line presentation.
Using the Communication System 57
Use Chat to Keep Notes
The Chat window is a good tool for keeping notes during an on-line presentation. In fact, participants from
multiple sites can all add messages to the Chat window, thereby providing lecture notes that surpass what
one participant might record. The presenter can also use the Chat windows to add important notes that the
participants can read later (i.e., paste pre-written text into the Chat windows and then send the message
to all participants). When the presentation has finished, all participants can save and print the notes.
Use Live Video to See Participants
Live video is useful for monitoring the participants in an on-line presentation. At the start of the presentation,
the video camera can be moved from person to person so that the presenter can greet the people at the
remote site. During this process, the presenter should write down the participant’s names for use during
the session. When the video camera has been returned to its position beside the computer, zoom out as far
as possible so that the presenter can see the group. The presenter’s camera should be centred on his/her
face.
If you notice that people are sitting far away from the computer, ask them to move as close as possible to
the monitor (so that everyone can see and be heard). You should also be looking for body postures that
would indicate attentiveness or fatigue. The live video function can also be used to monitor practice sessions
or to demonstrate a motion. For example, the participants might turn the video camera so that it sends
images of two people attempting a wheelchair transfer. The instructor can give feedback on their technique
and use the live video to demonstrate modifications to the movement.
Are there any o ther factors to consider when doing a
remote consultation?
Don’t forget that a client is at the other end of the line
During an on-line consultation, the specialist is usually helping the remote clinician solve a clinical problem.
Since the video system does not show the whole room, focussing all your attention on the remote clinician
is very easy. It is important to recognize and interact with the client as well as the remote clinician. This
interaction will result in a richer experience for the client and may result in the discovery of important
information that only the client can provide.
58
Communication Technology for Rehabilitation
Try not to focus on the equipment
When people are starting to use distance communication systems, they may focus on the communication
equipment when doing an on-line consultation. Remember that the hardware and software are just tools
to help you interact with other people.
Start the Whiteboard first
Starting the Whiteboard first greatly reduces the time needed to load a Whiteboard file (i.e., your
presentation slides or pre-assessment images) on all participant’s systems. If live video is started first, the
video stream takes up much of the available bandwidth, thereby slowing down the process of sending
Whiteboard data between sites. Once the Whiteboard file has been received, live video can be started
without harming Whiteboard efficiency.
Using the Communication System 59
60
Communication Technology for Rehabilitation
5
Motion Analysis
Motion analysis is useful in many areas of physical rehabilitation. For example, clinicians can assess walking
style, wheelchair propulsion characteristics, life skills performance (climbing stairs, lifting, working in the
kitchen, etc.), range of motion, and dynamic muscular strength. Many methods have been developed to
accomplish a relevant motion analysis. These methods vary in complexity from watching a person walk to
computer-aided 3D kinetic movement analyses.
For regular clinical assessments, visual cues and walking speed data are often used to gauge a client’s
progress. If a gait laboratory is available, this information can be augmented with joint range of motion and
stride length data. Most modern gait laboratories use video cameras to capture the motion and then, using
proprietary hardware/software, process and analyse the trial. This video-based approach fits well withlowbandwidth video conferencing.
When discussing human motion, a video clip of the client must be saved in the computer and then sent to
the central rehabilitation site. While this process adds a time delay to the assessment process, many useful
measures can be taken from the video clip that cannot be obtained by just looking at the client. These
Motion Analysis 61
measures include stride lengths, joint angles, walking speed, and foot clearance. Video clips can also be
played back at various speeds, re-played to check observations, and used to compare pre and post
treatment effects.
Although digital video clip analysis can enhance a rehabilitation assessment, working with a good quality
video clip is important. The following sections will discuss issues related to obtaining and analysing a client
video clip.
Camera Placement
To obtain accurate angular measurements, video camera positioning and image clarity is important. The
video camera should be placed at a right angle to the plane of motion;
for example, a camera facing a person could record lateral arm
raises - a camera at the side could record hip flexion. The farther
out of line, the larger the measurement error. Ideally,
the camera should be on a tripod that is far enough
back to capture the entire movement.
Camera Settings
If the camera has an adjustable shutter, increase
the shutter speed until there is no blurring due to
Video camera placement when capturing
movement. At regular walking speeds, the shutter
video clips.
should be set between 1/100 and 1/500. If
available, use the camera remote to minimize camera movement from pressing the record button. A faster
shutter speed will reduce the amount of light that reaches the video tape. You may need additional lighting
if the picture becomes too dark.
Frame Rate
A North American video camera collects video images at a rate of 30 fps. This frame rate is appropriate
to capture people walking at a slow or normal pace. If the frame rate is too slow, you may miss important
details during the walking stride. For example, if the frame rate in your video capture software is set to five
fps you may only capture an image of the person in the swing phase and then in mid-stance. You would
have missed the entire heel strike event and the transition to foot flat.
For a slow walker, a frame rate of 15 fps may be adequate for motion analysis. Ideally, you will have a
frame rate between 24 and 30 fps (movie film is captured at a rate of 24 fps). The main factors that
62
Communication Technology for Rehabilitation
influence the frame rates that your system can handle are the video capture card, the computer speed, and
the amount of available hard disk space.
A good video capture card can capture at 640x480 size, 24 bit image, at 30 fps. To obtain these rates,
most reasonablely priced video capture cards require a computer with a fast CPU (more than 166 MHz).
Another consideration is the amount of hard disk space that is available to store the video clip. An
uncompressed 10 second video clip can take over 40 Mb of space on a hard disk. If you reduce the video
size and/or frame rate you will reduce the space needed for the video clip. You also need less time to
transfer a smaller video clip between sites. Slower computers should still be able to capture a 320x240
image at 24 fps. This setting is a good compromise between image size, frame rate, and video clip size.
For some video capture cameras, such as the Quickcam, the frame rate is dependant on the amount of light.
If the subject is well lit, you will get the best performance from the video capture device. Lighting levels do
not usually affect frame rates on systems with a camcorder that plugs into a dedicated capture card.
Lighting
As was mentioned earlier in this manual, lighting is one of the most important factors when dealing with
images, whether still or moving. Generally, a strong light from beside or behind the camera that is directed
toward the client will produce a good video clip. A video camera light that attaches to the top of your
camcorder is a good light source for capturing video clips.
Ideally, the area behind the client should be uncluttered and painted with a neutral, dark colour. This
background setup may not be possible in a clinical setting; however, it is very important that the subject
does not move in front of a light or window. A light that is directed from behind the client, and into the
camera, will make the client look dark and will greatly reduce the image detail.
Video Compression
After you have captured your video clip you should compress the video file. Video Compression is a
method for reducing the size of the video clip by leaving out redundant information and applying
mathematicalformulas for representing individual pictures. Common video compression schemes are Indeo
and Cinepak. Either of these compression formats will reduce the size of your AVI video clip while
maintaining adequate quality. Since image quality decreases as compression increases, you must find a
setting that gives you a good image while minimizing the file size. An 80 to 90 percent compression setting
can be selected for most motion video clips.
Motion Analysis 63
Two improved video compression methods, MPEG and MPEG II, are just emerging on the market.
MPEG compression produces much smaller file sizes while maintaining good image quality; however, fast
computer graphics processing is required to create and play MPEG files. Personal computers that can store
and play MPEG II files should be coming on the market within the next few years.
Analysis Tools
Media Player
A variety of tools are available to analyse video
clips. One readily available tool is the Media
Player program that comes with Microsoft
Windows. This program is usually found in the
Accessories – Multimedia folder. Media player
version 6 and 7 lets you play and AVI video
clip and shuttle to different points in the clip.
Features such stepping through the video
frame-by-frame, and determine the timing of
critical points in the gait cycle have been
removed from these newer versions of
MediaPlayer. The Media Player controls are
similar to a cassette player.
Media Player program window.
Motion Analysis Tools
The Motion Analysis Tools program is a clinical gait
analysis program that can be used to analyse MPEG
video, Quicktime video, AVI video, or Windows
bitmap images. Motion Analysis Tools can be used to:
Motion Analysis Tools.
64
Communication Technology for Rehabilitation
• simultaneous display multiple
video clips and images (compare
before/after, compare with normal
motion, etc.),
• play or step through video clips,
• create video snapshots,
• superimpose a grid over the video
or bitmap image,
• calculate joint angles,
• calculate stride timing, stride length, and walking speed,
• print images and summaries.
To measure stride length and walking speed you must place a scale factor, such as a metre stick, in the
video field. The program uses this scale factor to calculate the relationship between distance in reality and
distance on a computer screen. To calculate the scale factor, you use Motion Analysis Tools to measure
the distance between two fixed landmarks located in the plane of motion on the video clip (i.e., the ends
of the metre stick, marks on the floor, etc.). Do move the camera while filming the motion because the scale
factor changes as a camera is moved.
Measuring the scale factor.
Motion Analysis Tools can create individual snapshots from the video clip. These still images are useful
when comparing body positioning at different instances in the gait cycle. This program can also calculate
clinical range of motion measurements. If you do not have an experienced person helping you perform the
remote assessment, you can have the remote clinician perform the range of motion test movements while
the video camera records the process. Later, the remote clinician can grab segments of the video tape that
Motion Analysis 65
contain the desired motion and send them to the central site. You can measure joint angles and distances
in the camera plane directly off the video clip.
Video Clip Check List
The procedure for making a video clip can be straight forward; however, certain guidelines should be
followed to capture a clip that is useful for motion analysis. You can use Table 4 to help with the video clip
creation process.
VIDEO CLIP CHECK LIST
ITEM
Ensure that you have good
lighting
DESCRIPTION
Optimally, attach a spotlight to the top of the camera.
If you do not have a spotlight accessory for the camera, position
a light beside, and slightly behind, the camera
Do not place a light behind the subject. Do not video the subject
with the camera pointing toward a window.
Camera position
Film at a right angle to the plane of motion
Don’t move the camera, if you pan the camera you will not be
able to calculate stride length (use a tripod)
Position the camera far enough back to capture at least one
stride
Calibration
Put scale factor in the plane of motion (i.e., mark a 1m distance
on the floor along the walkway, hold a metre stick up just before
the subject walks, etc.)
The measurement scale will not be correct if the subject is
walking toward you. To have an accurate calibration factor in the
coronal plane factor, you must have an object of known length
beside the subject in at least one frame.
Table 4: Video taping guidelines.
66
Communication Technology for Rehabilitation
U
Appendix A – Glossary
Computer Terms
AVI
A video file format for Microsoft Windows based computer systems. AVI stands
for Audio Video Interlaced
Bandwidth
A measure of the information carrying capacity of a communications channel; the
higher the bandwidth, the greater the amount of information which can be carried.
Bit
Stands for binary digit. It is the smallest possible unit of information making up a
character or a word in digital code, and is represented as either "on" or "off' by the
numbers "0" or "1." An electronic string of bits represents letters and symbols.
Bitmap
A means of representing pictures of photographs as a series of numbers. These
numbers can be saved on disk, used to display the image on screen, or print the
image.
Broadband
Communications which are capable of carrying a wide range of frequencies.
Broadcast television, cable television, microwave, and satellite are examples of
broadband technologies.
Byte
A set of eight bits, which is normally the smallest number of bits required for
representing an alphanumerical character in the computer's memory.
Channel
A communication path established between two or more institutions.
Compression
A mathematical technique for reducing the size of computer data files. Different
techniques are used for different types of data. For example, Cinepak, Indeo, and
MPEG are digital video compression protocols. GIF and JPEG protocols can
compress digital pictures. ZIP is a general data file compression method.
Dial-up
The process of establishing a temporary connection over the switched telephone
network .
Driver
A software program that tells the operating system (Windows 95) how to interact
with specific hardware (printer, graphics card, modem, etc.)
Email
Electronic mail. A computerized method of sending typed messages, data or
programs to other computer users with an Internet email address.
Glossary 67
Encryption
A mathematical transposition of a file or data stream so that it cannot be deciphered
at the receiving end without the proper key. Encryption is a security feature that
assures that only the parties who are supposed to be participating in a video
conference or data transfer are able to do so.
Folder
A window on the desktop that can contain programs, data, or other folders. A
folder is a visual representation of a directory on the disk.
Frame Rate
Frames per second (fps ) displayed on a video monitor. A frame rate of 25-30 fps
is consider 'full motion' and is what most broadcast video operates at. A frame rate
of 15 fps is noticeably 'jerky'. Slower frame rates may be inadequate for gait and
motion observations and analysis.
Full Duplex
A communication channel over which both transmission and reception are possible
in two directions at the same time. A standard telephone line is a full duplex system
because people on either end of the connect can simultaneously speak while
listening to sounds coming from the other end.
H.320
H.324
A standard for multimedia video-conferencing. Products that support this standard
should be able to connect and share live audio and video. H.324 is specially
designed for dial-up modem connections.
A hacker is a person who breaking into computer systems for the thrill, as a
challenge, or as a job (i.e., to test security systems). It is against hacker ethics to
alter any data aside from the logs that are needed to clean their tracks.
Hacker /
Cracker
A cracker is a person who breaks into computer systems to copy, destroy, or alter
information. The term Cracker was coined ca. 1985 by hackers in defence against
journalistic misuse of the term Hacker. Hackers consider themselves to have more
programming ability, Internet expertise, and experience with UNIX or other
multi-user operating systems than a cracker.
Intranet
A "private Internet" that employs the TCP/IP communications protocols used over
the Internet. An intranet may be linked to the public Internet.
Internet
A worldwide network which connects many computer systems. Using the Internet,
you can send electronic mail, get programs or data files, access electronic meeting
places (Usenet), or tour a virtual museum.
JPEG
JPEG (Joint Photographic Experts Group) refers to an algorithm for digital
processing still images. This group defined a compression standard that is used for
most pictures on the Internet.
68
Communication Technology for Rehabilitation
Kbs or Kbps
Kilobits (1000 bits) per second. Kbs is a way of reporting the rate of data
transmission.
LAN
Local Area Network. An interconnection of more than one computer. Once the
computers are linked, they can share data files, email, printers, and any other
computer data. Computers on a LAN are usually in the same building, although the
LAN can be connected to the Internet so that all the computers can share the same
Internet line.
Light Tables
A type of folder that displays multimedia files (pictures, sounds, video clips) as a
series of small slides. These slide images can be viewed full size, edited, and
organized within the folder.
LUX
A unit of illumination. Generally, lighting levels of 1000-3500 lux are satisfactory for
Telehealth applications, while newer "low lux" cameras produce quality pictures at
levels as low as 750 lux. Having a lux level above 1000 enables the camera to keep
more of the image in focus, since the trade-off for low light conditions is lower depth
of field.
Microsoft
Windows 95
A microcomputer operating system. This software replaced DOS (MS-DOS) as
the underlying system for running computer programs. Windows 95 has a graphical
interface, allows more than one program to run at once, and includes many software
features and programs.
Network
Networks allow computers to transmit and receive data. The technologies required
to enable computer communications include: connecting devices (optical fibre, coax
cable, microwaves, etc.), switches, controllers, routers, gateway, PBX's
communications protocols, tools for network management, network services and
security features.
Real Time
Sends and receives audio / video / data simultaneously, without more than a fraction
of a second delay. Applications that are transmitted within a few seconds are
sometimes called near real time.
Store and
Forward
Captured audio clips, video clips, still images, or data that is transmitted or received
at a later time (sometimes no more than a minute). Email is a store-and-forward
system. Enables communication without concurrent participant involvement.
Glossary 69
T1
A digital carrier capable of transmitting 1.544 Mbps of electronic information. It is
the general term for a digital carrier available for high volume, voice, data, or
compressed video traffic. T1 is a standard for transmission that is accepted in North
America. Fractional T1 or sub T1 tariffs are rates for bandwidths between 56 Kbps
and 1.544 Mbps, such as 384 Kbps or ½ a T1.
T3
A carrier of 45 Mbps bandwidth. One T3 channel can carry 28 T1 channels.
Transmission of both voice and data digital signals at speeds of 44.736 Mbps and
higher.
T.120
A standard for audio and graphics exchange, supporting higher resolutions and
pointing and annotation (which the H.320 standard does not).
TCP/IP
Transmission Control Protocol / Internet Protocol. The most popular open-standard
protocols used in data networks today. The Internet Protocol is used to route
packets of data on a network.
Virtual Private Private, software defined network dedicated to connecting two or more high
Network
volume, long distance client sites.
(VPN)
70
Communication Technology for Rehabilitation
Communication Systems
Chat
The utility that allows the exchange of text messages and the recording of those
messages as an audit trail.
Internet
Provider
A company that gives you access to the Internet (for a fee). Generally, you connect
to the company’s computer by using a modem and, when the correct parameters
and passwords are entered, you have a connection to the Internet.
Mirror
Within the Chalkboard utility, the command used to show a selected window on the
caller's display screen to the other participants during communication.
Multipoint
Conferencing
A computer conference that involves more than one participant (i.e., more than one
computer being linked to the conference). You need an Internet or LAN connection
to setup a multipoint conference.
POTS
Plain Old Telephone System
Still Image
Capture
The utility that converts video images to computerized pictures
A hardware adapter that plugs into your computer to capture video images. These
Video Capture video images can be saved as a digital video clip, displayed immediately on-screen,
Card
or sent through a conferencing system to be displayed on another person’s
computer screen.
Whiteboard
The utility with which you can enter text, draw simple graphics, and import the
contents of other windows or bitmap files within a multiuser conference.
Glossary 71
Whiteboard Terms
Lock Contents
This feature stops other participants in a conference from moving or adding
objects to the Whiteboard.
Remote Pointer
Activating the remote pointer places a small hand picture on the
Whiteboard. This hand can be move around the screen by using the mouse
to clicking and drag the picture to a new location. Each site in the
conference has a different coloured hand.
Select Area
A method for copying an area of the screen into the Whiteboard. Select the
area you want to copy by clicking on the top left side of the area and
dragging the cursor to the bottom right side. A picture of the area within the
rectangle is automatically copied into the Whiteboard and shared with all
conference participants.
Select Window
A method for copying the contents of a window into the Whiteboard.
Select the window you want to copy by clicking anywhere within the
window. A picture of the window contents is automatically copied into the
Whiteboard and shared with all conference participants.
Synchronize
72
When the Whiteboard is synchronized the scroll bars on all Whiteboards in
the conference move at the same time - thereby making sure that all
participants are looking at the same area.
Communication Technology for Rehabilitation
Appendix B – Video Conferencing
Products
Contact information
Microsoft NetMeeting
Microsoft Canada, Inc.
320 Matheson Blvd. West
Mississauga, Ontario, L5R3R1, Canada
Phone: 800-563-90484
Web: www.microsoft.com
Quickcam
Logitech Canada
Sales Office
5025 Orbitor Dr., Bldg. 6, Suite 200
Mississauga, Ontario, L4W 4Y5, Canada
Phone: 800-231-7717
Web: www.quickcam.com
Proshare
Intel of Canada, Ltd.
2650 Queensview Drive, Suite 250
Ottawa, Ontario, K2B 8H6, Canada
Phone: 1-800-628-8686
Web: www.intel.com
Enhanced CU-SEEME
White Pine Software
542 Amherst Street
Nashua, NH 03063, USA
Phone: 603-886-9050
Fax: 603-886-9051
Email: [email protected]
Web: www.wpine.com
The Rehabilitation Centre
The Rehabilitation Centre
505 Smyth Road
Ottawa, Ontario, Canada, K1H 8M2
Phone: 613-737-7350
Fax: 613-737-7056
Email: [email protected]
Web: www.rohcg.on.ca/mobile/mclinhom.html
Videum Conference Pro
Winnov
1043 Kiel Court
Sunnyvale, CA, 94089 USA
Phone: 888-494-6668
Fax: 408-744-0174
Email: [email protected]
Web: www.winnov.com
Low Bandwidth Products 73
Live
Video
Live
Audio
White
Board
File
Transfer
NetMeeting
CU-SEEME
Proshare
Video phones
Table 5: Conferencing systems tools
74
Communication Technology for Rehabilitation
Chat
Application
Sharing
Appendix C – Step-by-Step Instructions
This section provides step-by-step instructions on how to run the software during an on-line rehabilitation
consultation. While the content has been organized to mimic a typical consultation, you can refer to any of
the following sections to accomplish a specific task. For general information on using NetMeeting, please
refer to the Official Microsoft NetMeeting Book
1.0 Setting up your system
1. Start the computer.
2. Create a new folder on the desktop called Telehealth (see Microsoft Windows help for instructions).
You will use this folder organise the programs we use during an on-line session.
3. Make shortcuts to NetMeeting, WINIPCFG.EXE, Internet Dialer, Big Picture Video Kit, and Xing
MPEG Encoder.
Windows 95 desktop.
Step-by-Step Instructions 75
1.1 NetMeeting
1.
2.
3.
4.
5.
Open the Telemedicine folder by double clicking on the Telehealth icon (on the desktop).
Click the right mouse button on the Start button and select Explore.
Double click the left mouse button on the Program Files folder.
Double click the left mouse button on the NetMeeting folder.
Drag the Conf.exe file, using the left mouse button, from the “Contents of NetMeeting” box into the
Telemedicine folder. A Shortcut to Conf.exe is created. Conf.exe is the main program file for
NetMeeting..
6. Rename Shortcut to Conf.exe to NetMeeting.
Using Explorer to identify the NetMeeting file (Conf.exe).
76
Communication Technology for Rehabilitation
1.2 WINIPCFG.EXE
1. In Explorer, double click the left mouse button on the Windows folder.
2. Drag the Winipcfg.exe file, using the left mouse button, from the “Contents of Windows” box into the
Telemedicine folder. A Shortcut to Winipcfg.exe is created.
Using Explorer to identify the WINIPCFG file.
Step-by-Step Instructions 77
1.3 Internet Connection (Dialer)
1. In Explorer, double click the left mouse button on the My Computer folder.
2. Double click the left mouse button on the Dial-Up Networking folder.
3. Drag the appropriate dial-up file (Sympatico.exe in our example), using the left mouse button, from
the “Contents of Dial-Up Networking” box into the Telemedicine folder. A Shortcut to Sympatico
is created (your dial-up name will be used instead of Sympatico).
Using Explorer to identify the Internet
Connection (Dialer) file
2.0 Connecting to your Internet Service Provider
1. Double click on the icon related to your Internet Service Provider (on your desktop).
2. A Connect To dialog box will appear
a. If necessary, enter your User name and Password
b. If your computer has been properly configured, you can click on the Save password box so that
you will not have to enter the password every time you connect
c. The Phone number is the telephone number for your Internet Service Provider
d. After you select the Connect button, your modem will automatically call your service provider
(a status box will show you how the connection is progressing)
3. When you have connected, an icon is added to your Task Bar. This icon either looks like a
box with two lights or two computers linked by a small line. To check your connection status,
double click on the connect icon.
78
Communication Technology for Rehabilitation
3.0 Starting NetMeeting
1. There are three ways of starting NetMeeting: from your Telemedicine folder (on the desktop), from
the Windows Quick Launch bar, and from the Windows Start Menu.
a. Starting NetMeeting from the Telemedicine folder
i. Open the Telemedicine folder
ii. Double click the left mouse button on the NetMeeting icon
b. Starting NetMeeting from the Windows Quick Launch bar
i. Click on the NetMeeting icon on the Quick Launch bar
c. Starting NetMeeting from the Windows Start Menu
i. Click the left mouse button on the Start Menu icon
ii. Move the cursor over Programs
iii. Move the cursor over to Microsoft NetMeeting and click the left mouse button
2. The NetMeeting program will start. You may want to press on NetMeeting’s Stop button to ensure
that NetMeeting is not trying to connect to a directory server.
4.0 Connecting to Another Site
1. Phone the other site using your telephone (i.e., regular telephone call – not NetMeeting). While
discussing any initial issues, one of you will need to enter the other site’s Internet address to make a
NetMeeting connection..
2. If the other site is calling you,
a. Select About Windows NetMeeting from the Help menu.
b. Read the IP Address, at the bottom-left of the window, to the other person
Finding your IP address in NetMeeting 3
Step-by-Step Instructions 79
3. If the other site is calling you and you cannot see your IP address in the About NetMeeting window,
a. Open the Telemedicine folder and then double click on WINIPCFG.EXE.
b. Your IP Address is shown in the IP Configuration window.
c. Give the person your IP Address.
d. Select OK to close the IP Configuration window.
WINIPCFG information window.
4. If you are calling the other site,
a. Select the Call button (from the NetMeeting Toolbar)
b. The New Call dialog box will open. Ensure that Call using is set to Automatic
c. Ask the other site for their IP Address and then enter this number into the Address box.
d. Select the Call button
5. The connection status can be monitored in the Microsoft NetMeeting window’s status bar.
6. An Accept dialog box will appear at the site that is being called (i.e., the site that gave the IP Address).
Select Accept to complete the connection.
7. When the connection is completed, NetMeeting will switch to the Current Call configuration (i.e.,
video showing, Toolbar with Whiteboard and Chat showing, etc.). The top of the NetMeeting
windows will say Microsoft NetMeeting - 1 Connection.
8. To improve NetMeeting efficiency and live video quality, remove the two checkmarks in the Audio
configuration section.
80
Communication Technology for Rehabilitation
Main NetMeeting window.
5.0 Sending and Receiving Live Video
1. To check if a site can send and/or receive video,
a. Move the mouse over the site name in the Participant List and click the right mouse button
b. A Properties windows will appear that displays the site’s audio and video status
2. To send live video, click on the Play button in the NetMeeting window.
a. If you do not see images in the video window, verify that the video camera is turned on, unlocked,
and connected properly to the computer.
3. You may have to click the Play button to receive live video.
a. To automatically receive video at the start of a call
i. Move the mouse over the live video area and click the right mouse button
ii. Select “Automatically receive video at the start of each call” from the “Sending and receiving
video” section in the Options window.
4. The small video size should be selected when sending live video.
Step-by-Step Instructions 81
5.1 Setting the Live Video Size and Quality
1. To open the Video Options, move the cursor onto the live video area and click the right mouse button.
2. The Send image size area is used to select a small, medium, or large image. Video quality should be
set to Better quality (i.e., the Video quality slider should be positioned all the way to the right).
5.2 Seeing Yourself
1. One way of seeing yourself is to click on the Picture-in-Picture button
(beside the Play button). Your video images are displayed in the bottom right
corner of the live video area.
a. Click on the Picture-in-Picture button again to turn off this feature.
2. The other way of seeing yourself is to select M y Video (New Window)
from the View menu. A new video window appears that shows your video
images.
My Video window.
6.0 Starting the Whiteboard
1. Stop live video by clicking the Play/Pause button. Turning off live video components will improve the
speed at which the Whiteboard can share images between sites.
2. Select the Whiteboard button (from the NetMeeting Toolbar).
a. A Whiteboard will automatically open and will be shared with the other site. While the
Whiteboard is being shared, a message saying Finding other whiteboards in the meeting will
appear. You must wait for the system to finish this task before moving on.
b. When the Whiteboard is ready the title bar will say Untitled - Whiteboard - using whiteboard
with 1 other(s).
6.1 Inserting a Picture in the Whiteboard
1.
2.
3.
4.
5.
6.
To improve performance, you can deactivate audio and video (refer to Starting the Whiteboard).
Open the My Video window (refer to Seeing Yourself).
If required, change the video image size to large (refer to Setting the Live Video Size and Quality).
Move the camera until you get the desired image in the My Video window.
Select the Whiteboard window.
To insert the entire My Video window:
a. Click on the Select Window button.
b. Move the cursor over the My Video window and click the left mouse button. This will insert a
picture of the My Video window into all the Whiteboards.
7. To insert a section of the My Video window into the Whiteboard:
a. Click on the Select Area button.
82
Communication Technology for Rehabilitation
b.
c.
d.
Move the cursor over the My Video window and click and hold the left mouse button at the top
left corner of the area to be inserted.
As you drag the cursor diagonally across the screen a dashed box will appear. When the area to
be inserted is within the box, release the left mouse button.
This will insert the selected area into all Whiteboards in the conference.
A sample whiteboard image.
Step-by-Step Instructions 83
6.2 Drawing Free Hand
1.
2.
3.
4.
5.
Click on the Pen button.
Select the desired colour by clicking on one of the coloured squares at the bottom of the Whiteboard.
By clicking on one of the lines below the Toolbar, you will select the line thickness.
As you move into the drawing area the cursor turns into a pen.
To draw a line:
a. Move the cursor to the start position.
b. Click and hold the left mouse button.
c. Drag the mouse to make your drawing.
d. When you are finished, release the left mouse button.
6.3 Adding Text
1.
2.
3.
4.
Click on the Text button.
Select the desired colour by clicking on one of the coloured squares at the bottom of the Whiteboard.
Move the cursor to where you want to start entering text and click the left mouse button.
As you type in your text, the text is displayed in all Whiteboards.
6.4 Drawing a Straight Line
1.
2.
3.
4.
5.
Click on the Line button.
Select the desired colour by clicking on one of the coloured squares at the bottom of the Whiteboard
By clicking on one of the lines below the Toolbar, you will select the line thickness.
As you move into the drawing area the cursor turns into a cross hair.
To draw a line:
a. Move the cursor to the start position.
b. Click and hold the left mouse button.
c. Drag the mouse to the end of the line and release the left mouse button.
6.5 Drawing Squares and Circles
1.
2.
3.
4.
5.
84
Click on the Unfilled Rectangle or the Unfilled Ellipse button.
Select the desired colour by clicking on one of the coloured squares at the bottom of the Whiteboard.
By clicking on one of the lines below the Toolbar, you will select the line thickness.
As you move into the drawing area the cursor turns into a cross hair.
To draw a figure:
a. Move the cursor to the top left hand corner of the figure.
b. Click and hold the left mouse button.
c. Drag the mouse to the bottom right hand corner of the figure.
Communication Technology for Rehabilitation
d.
When you are finished, release the left mouse button.
6.6 Enlarging an Image
1. Click on the Zoom button.
2. The picture will be magnified by a factor of two.
6.7 Erasing Images
There are two ways of erasing an image:
1. Using the keyboard
a. Click on the image you want to erase. When selected, a dotted line will appear around the image.
b. Press on the Delete key (on the keyboard).
2. Using the Eraser tool
a. Click on the Eraser button.
b. As you move into the drawing area a negative sign appears beside the cursor.
c. Click on the image to be erased.
6.8 Pointing
1. Click on the Remote Pointer On button.
2. A hand appears in the centre of the Whiteboard (each site has a different coloured hand).
3. Click and drag your Remote Pointer (hand) to the desired position.
6.9 Adding Whiteboard Pages
1. Click on the Add Page button at the bottom right hand corner of the Whiteboard.
2. If an image is selected by another site you will not be able to add a page. Ask the person at the other
site to click on a blank area on the Whiteboard to deselect the image.
3. You can move between pages by clicking on the Previous Page or Next Page buttons.
Step-by-Step Instructions 85
7.0 Typing a Conversation / Keeping Notes (Chat)
1. Select the Chat button (from the NetMeeting Toolbar).
a. A Chat window will automatically open and will be shared with the other site. When Chat is ready
the title bar will say Untitled - Chat - in use by 1 other(s).
2. To send a message to all participants in your
session, click your mouse inside the Message
area and then type your comment. When you
have finished, press the Enter or Return key or
click the mouse on the “moving paper” icon
(beside the Message area) to send the message.
3. You can send a private message to one site
by selecting the desired site on the Send To area.
You must change the Send To setting before you
send the message.
4. To save a record of the chat session, select
File:Save and then follow the standard windows
file saving procedure. The session is saved as an
ASCII text file. Any word processor can be used
to review this information.
Chat window.
8.0 Video Clips
8.1 Capturing a Video Clip with Asymetrix DVP Capture
1. Select Bigpicture from the Start Menu or from the Telemedicine folder.
2. Select Videofun from the Bigpicture menu window and then select Asymetrix DVP Capture – Still
and Motion Capture.
3. Turn on your camcorder and press play. You should see the video playing in the DVP capture
program’s live window. If you cannot see the live video, make sure that the camcorder is connected
Bigpicture menu window.
to the video capture card. You can also check the video connection settings in the Options:Video
Source menu.
86
Communication Technology for Rehabilitation
4. Position the video tape a few seconds before the start of the activity (i.e., using forward and rewind
on the camcorder). Press stop.
5. Check the video settings by selecting Video Format from the Options menu.
a. Typical settings are ½ (320x240) and 15 bit RGB.
6. Check the video compression settings by selecting Video Compression from the Options menu.
a. Compression should be set to Full Frames (Uncompressed).
7. Check the video capture settings by selecting Settings from the Capture menu.
a. Frames / second should be set to either 20, 24, or 30 (the higher the number – the smoother the
video)
b. Capture audio should not be selected (i.e., no check mark).
8. Position the mouse over the Capture Video button.
9. Press play on the camcorder.
10. Click the Capture Video button at the start of the activity.
11. When the activity has completed, click the Stop button (or press the Esc key).
12. Stop the camcorder.
13. Save the video clip by selecting Save Captured Video As ... and following the standard Windows
save file procedure. Remember where you saved the video clip since you will need to access this file
for compression and for transmission to other sites.
Digital Video Producer (DVP) capture program.
8.2 Capturing a Video Clip with PictureWorks Live
Step-by-Step Instructions 87
1. Start PictureWorks Live.
2. Make sure that the mode is set to Video by either:
a. Clicking on the video camera icon.
b. Selecting Video from Change Mode on the Camera menu.
3. Select Camera Setup from the Camera menu.
a. Select the Video Recording tab.
b. Set “Recording Type” to Continuous.
c. Set “Frames/second” to 30.
d. Change“Auto stop continuous recording after” to a value that is greater than the estimated video
clip length.
e. In most cases, remove the checkmark from “Record Sound”
f. Select Done .
4. Set the camcorder to the beginning of the activity.
PictureWorks Live main window.
88
Communication Technology for Rehabilitation
5. Press Record in PictureWorks Live.
6. Press play on the camcorder.
7. When the activity has been completed, press the Stop button
a. The Record button changes to Stop when recording.
8. The first image in the captured video clip is displayed in the Preview Area. Double click on the vide
image in the Preview Area to open the clip.
9. Set the start and end points for the video clip:
a. Position the video clip to the start of the activity (using the play and pause buttons or the “Position”
scrolling tool. Click the Start Selection button to set the start point.
b. Position the video clip to the end of the activity. Click the End Selection button to set the end
point.
c. Verify the video clip settings by clicking on the Play Selection button, moving the clip to the start,
and pressing the Play button.
10. Select Save As... from the File menu
11. Click on the Compress... button on the bottom right of the Save As window.
12. Select Indeo® video 5.11 and click the OK button.
13. Select the appropriate folder, enter a filename, and click the Save button to save the video clip.
Step-by-Step Instructions 89
PictureWorks Live video window.
8.2 Compressing a Video Clip with XingMPEG Encoder
1.
2.
3.
4.
Select XingMPEG Encoder from the Start Menu or from the Telemedicine folder.
Click the New button to start a new compression job.
Select Match Source from the Stream Profile window. Click the Next> button.
Select Video Only from the Source and Target Files Window. Use the Browse... button locate your
AVI video clip. If necessary, change the Target Filename to a descriptive name for the video clip. Click
the Finish button.
5. Make sure that the job you just created should be highlighted in the Job Queue.
6. Click the Encode button. Your job’s progress is shown in the preview window.
7. After the clip has been encoded as a MPEG file, you can review the clip in the Preview window.
90
Communication Technology for Rehabilitation
Xing MPEG Encoder.
Step-by-Step Instructions 91
92
Communication Technology for Rehabilitation
Appendix D – Bibliography
AllenA. (1997) Practising Oncology Via Telemedicine. Journal of Telemedicine and Telecare, 3(2), 6370.
Artunuan J. (1997) Rehab Gets Wired: Telemedicine Links Providers to Patients. Rehab Management,
August/September, 54.
Ball C., McLaren P. (1997) The Tele-assessment of Cognitive State: A Review. Journal of Telemedicine
and Telecare, 3(3), 126-131.
Ballis U.J. (1997) Telemedicine and Pathology. Clinics in Laboratory Medicine, 17(2), 245-261.
Bare L., Elford D.R., Cukor P. (1997) Telepsychiatry at Forty: What Have We Learned. Harvard Review
of Psychiatry, 5(1), 7-17.
Bellazzi R., Riva A., Larizza C., Fiocchi S., Stefanelli M. (1998) A Distributed System for Diabetic Patient
Management. Computer Methods and Programs in Biomedicine, 56, 93-107.
Biden E.D. (1998) Internet Based Interactive Video. Canadian Medical and Biological Society
Newsletter, 33(2), 18.
Boland G. (1998) Telemedicine in Practice. Seminars in Nuclear Medicine, 28(2), 145-157.
Burghgraeve P., De Maeseneer J. (1995) Improved Methods for Assessing Informaiton technology in
Primary Health Care and an Example from Telemedicine. Journal of Telemedicine and Telecare, 1,
157-164.
Cheung S.T., Davies R.F., Smith K., Marsh R., Sherrard H., Keon W.J.(1998) The Ottawa Telehealth
Project. Telemedicine Journal, 4(3):259-66.
Cook B. (1997) Telemedicine’s For-Profit Future. Healthcare Technology Management, April, 32-35.
Crolla D.A. (1998) Health Care Without Walls: Responding to Telehealth’s Emerging Legal Issues.
Health Law in Canada, 19(1), 1-32.
Crump W.J. and Pfeil T. (1995) A Telemedicine Primer: An Introduction to the Technology and an
Overview of the Literature. Archives of Family Medicine, 4, 796-803.
Low Bandwidth Products 93
Doarn C.R., Nicogossian A.E., Merrell R.C. (1998) Applications of Telemedicine in the United States
Space Program. Telemedicine Journal, 4(1), 19-30.
Fisk M.J. (1995) A Comparison of Personal Response Services in Canada and the UK. Journal of
Telemedicine and Telecare, 1, 145-156.
Gilbride D., Breithaupt B., Hoehle R. (1996) The Use of the Internet to Support Both On- and OffCampus Learners in Rehabilitation Education. Rehabilitation Education, 10(1), 47-62.
Greene G., Lemaire E.D. (1999) An Evolution in Outreach Service Delivery Through Computer Distance
Communication. In: Rural Rehabilitation: A Modern Perspective, ed. T.S. Smith, Bow River Publishing,
Amaudville, 195-214.
Jackson J.E.F. (1995) A Survey of a Canadian On-line Substance Abuse Prevention Initiative for
Adolescents and Young Adults. Journal of Telemedicine and Telecare, 1, 217-223.
Jennett P. (1999) Evaluating Telehealth. Caring Through Technology, Spring, 1-2.
Jennett P. (1995) The Use of Advanced Computer Technology to Enhance Access to Health Care and
to respond to Community Needs: The Results of the Evaluation of a Technology-Based Clinical
Consultation Service. MEDINFO 95 Proceedings, eds. Greenes et al., 1479-1481/
Kelly W.T. (1998) Trends in Telemedicine. Science Advisory Board - www.scienceboard.net,
November.
Kim H. (1999) The Long View: Selling Providers on Telerehab. Teamrehab Report, April, 15-19.
Kim H. (1999) Tips for Implementing a Homecare Telerehab Program. www.teamrehab.com, April.
Lemaire E. (1998) Distance Communication Enhances O&P Practice. Biomechanics, 5(5).
Lemaire E.D., Jeffreys Y. (1998) Low-Bandwidth Telemedicine for Remote Orthotic Assessment.
Prosthetics and Orthotics International, 22, 155-167.
Lemaire E.D., Jeffreys Y., Morazain G., Greene G. (1997) A Model for Remote Orthotic Assessment
using Distance Communication Technology. Saudi Journal of Disability and Rehabilitation, 3(1), 1-14.
Lemaire E.D. (1993) Distance Education Technology for Prosthetic CAD/CAM Instruction. Journal of
Prosthetics and Orthotics, 5(3), 36-41.
94
Communication Technology for Rehabilitation
Lowitt M.H., Kessler I.I., Kauffman C.L., Hooper F.J., Siegel E., Burnett J.W. (1998) Teledermatology
and In-Person Examinations: A Comparison of Patient and Physician Perceptions and Diagnostic
Agreement. Archives of Dermatology, 134(4), 471-476.
Macedonia C. (1997) Three-Dimensional Ultrasound and Image-Directed Surgery: Implications for
Operating Room Personnel. Seminars in Perioperative Nursing, 6(2), 133-136.
Malagodi M., Schmeler M.R., Shapcott N.G., Pelleschi T. (1998) The use of Telemedicine in Assistive
Technology Service Delivery: Results of a Pilot Study. Technology: Special Interest Section Quarterly,
8(1), 1-4.
Marchese B. (1997) It’s a Small World After All. Healthcare Technology Management, September, 2830.
Maclean, J.R. (1996) Telemedicine and the Nurse: The Benefit or Burden of New Technology. Journal
of Telemedicine and Telecare, 2 (Suppl. 1), 54-56.
McLeod C. (1999) N.B. Takes High-Tech Heart Care into Patients’ Homes. Canadian Healthcare
Manager, June/July, 9.
Ontario Hospital Association (1998) Background Paper on Telehealth.
Ontario Hospital Association (1998) Telehealth: A Survey of the Legal Issues.
O’Reilly M. (1999) Is Internet-based Disease Management on the Way? Canadian Medical
Association Journal, 160(7), 1039.
Pareras L.G., Martin-Rogrigues J.G (1996) Neurosurgery and the Internet: A Critical Analysis and a
Review of Available Resources. Neurosurgery, 39(1), 216-232.
Perednia D.A. (1995) Telemedicine System Evaluation and a Collaboration Model for Multi-Centered
Research. Journal of Medical Systems, 19(3), 287-294.
Prerost S. (1998) Some Issues Regarding Telemedicine Evaluation: Australian Experience. European
Telemedicine, London, Kensington Publications Ltd., 28-30.
Preston J., Brown F.W., Hartley B. (1992) Hospital and Community Psychiatry, 43(1), 25-32.
Rafuse J. (1994) University of Alberta Program Links Northern Hepatitis Patients with Southern
Consultants. Canadian Medical Association Journal, 151(5), 654-655.
Low Bandwidth Products 95
Reddy S., Niewiadomska-Bugaj M., Reddy Y.V., Gafalvy H.C., Jagannathan V., Raman R., Srinivas K.,
Shank R., Davis T., Friedman S. (1997) Experiences with ARTEMIS - An Internet-Based Telemedicine
System. Proceedings AMIA Annual Fall Symposium, 759-763 .
Rinde E., Nordrum I., Nymo B.J. (1993) Telemedicine in Rural Norway. World Health Forum, 14, 7177.
Robb N. (1997) Telemedicine May Help Change the Face of Medical Care in Eastern Canada. Canadian
Medical Association Journal, 156(7), 1009-1011.
Satava R.M. (1995) Virtual Reality and Telepresence for Military Medicine. Computers and Biological
Medicine, 25(2), 229-236.
Scheck A. (1998) Going the Distance: Developments in Communications technology Bring Telemedicine
to Rehab. Teamrehab Report, November, 30-40.
Sisk J.E., Sanders J.H. (1998) A Proposed Framework for Economic Evaluation of Telemedicine.
Telemedicine Journal, 4(1), 31-7.
Stanberry B. (1998) Legal and Ethical Issues in European Telemedicine. European Telemedicine,
London, Kensington Publications Ltd., 20-25.
Summers B. (1998) Official Microsoft NetMeeting Book. Microsoft Press, Redmond.
TecKnowledge Healthcare Systems Inc. (1997) Executive Summary: Remote Specialist Consultation
and Continuing Medical Education System Pilot Project, prepared for the Nova Scotia Department
of Health, March.
Temkin A.J., Ulicny G.R., Vesmarovich S.H. (1996) TeleRehab: A Perspective of the Way Technology
is Going to Change the Future of Patient Treatment. Rehab Management, February/March, 28-30.
Ulicny G., Temkin A., Vesmarovich S. (1996) Telemedicine: Does it Have a Place in Rehab? TeamRehab
Report, May, 19-22.
Wootton R.. (1998) Telemedicine: An Introduction. European Telemedicine, London, Kensington
Publications Ltd., 10-12.
Yogesan K., Constable I.J., Eikelboom R.H., van Saarloos P.P. (1998) Tele-ophthalmic Screening Using
Digital Imaging Devices. Australian & New Zealand Journal of Ophthalmology, 26 (Suppl. 1), 9-11.
96
Communication Technology for Rehabilitation