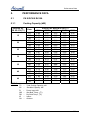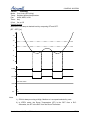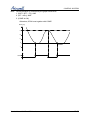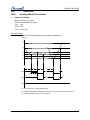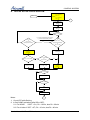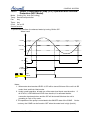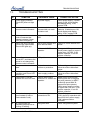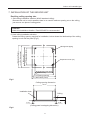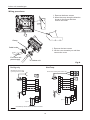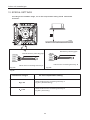
1
CN Fixed RPM Series REFRIGERANT R410A REV: 01 HEATPUMP Oct 2008 LIST OF EFFECTIVE PAGES LIST OF EFFECTIVE PAGES Note: Changes in the pages are indicated by a “Revision#” in the footer of each effected page (when none indicates no changes in the relevant page). All pages in the following list represent effected/ non effected pages divided by chapters. Dates of issue for original and changed pages are: Original ....... 0 ........ 1 October 2008 Total number of pages in this publication is 127 consisting of the following: Page No. Revision No. # Page No. Title…………………………..0 A………………………………0 i……………………………….0 1-1 ~ 1-3……………………..0 2-1 ~ 2-4……………………..0 3-1……..……………………..0 4-1 ~ 4-2……………………..0 5-1 ~ 5-6……………………..0 6-1 ~ 6-6……………………..0 7-1 ~ 7-4……………………..0 8-1 …….……………………..0 9-1 ~ 9-3……………………..0 10-1.…………………………..0 11-1 …………………………..0 12-1 ~ 12-47..………………..0 13-1 ~ 13-2……………………0 14-1 ~14-9……………………0 Appendix A…………………..0 z Zero in this column indicates an original page. Service Manual-CN Fixed RPM series Revision No. # Page No. Revision No. # Table of Contents Table of Contents 1. INTRODUCTION-----------------------------------------------------------------------------------------1-1 2. PRODUCT DATA SHEET----------------------------------------------------------------------------- 2-1 3. RATING CONDITIONS---------------------------------------------------------------------------------3-1 4. OUTLINE DIMENSIONS-------------------------------------------------------------------------------4-1 5. PERFORMANCE DATA---------------------------------------------------------------------------- ---5-1 6. PRESSURE CURVES----------------------------------------------------------------------------------6-1 7. SOUND LEVEL CHARACTERSTICS---------------------------------------------------------------7-1 8. ELECTRICAL DATA------------------------------------------------------------------------------------ 8-1 9. WIRING DIAGRAMS------------------------------------------------------------------------------------9-1 10. REFRIGERATION DIAGRAMS-------------------------------------------------------------------- -10-1 11. TUBING CONNECTIONS-------------------------------------------------------------------------- --11-1 12. CONTROL SYSTEM---------------------------------------------------------------------------------- 12-1 13. TROUBLESHOOTING--------------------------------------------------------------------------------13-1 14. EXPLODED VIEWS AND SPARE PARTS LISTS------------------------------------------- -14-1 15. APPENDIX A------------------------------------------------------------------------------------------- -15-1 Service Manual-CN Fixed RPM series Introduction 1. Introduction 1.1 General The CN Fixed RPM Cassette type split air conditioner has the same appearance and structure with CN DCI model. It comprise RC (heat pump) models, as follows: CN 9, CN 12, CN 18 1.2 Main Features The CN Fixed RPM series benefits from the most advanced technological innovations, namely: x R410A refrigerant x High COP x Precharged refrigerant x Low Sound level for both Indoor and Outdoor x 60 x60 cm dimenstion designed for integration in suspended ceilings x New grille, modern style with elegant lines in line with every interior decor , 2 panels optional available (hard ceiling / Suspended ceiling) x Motorized air distribution flaps x Very slim profile 219mm at size 9-12, and 270mm at size 18 x Option of fresh air intake, and air distribution to adjacent room x Integrated condensate pump with a lift of 1m Max. x Up to 15 m pipe length between indoor and outdoor units x Up to 7 m vertical high between indoor and outdoor units x Heating operation at outdoor temprature down to -9°C x Built in over-flow protection against the condensate water x Easy installation and service. x Fan speed can be adjusted by air flow compensation setting according to different installation height (Field option) Service Manual-CN Fixed RPM series 1-1 Introduction 1.3 Indoor Unit The indoor unit is cassette type indoor unit, and can be easily fitted to many types of residential and commercials applications. It includes: x Coil with hydrophilic aluminum fins. x Motorized air flap (two step motors) x Advanced electronic control box assembly x Low sound level of the indoor fan 1.4 Control The microprocessor indoor controller, and an infrared remote control, supplied as standard, provide complete operating function and programming. For further details please refer to the Operation Manual, Appendix A. 1.5 Outdoor Unit The outdoor units can be installed as floor or wall mounted units by using a wall supporting bracket. The metal sheets are protected by anti- corrosion paint work allowing long life resistance. All outdoor units are pre-charged. For further information please refer to the Product Data Sheet, Chapter 2. It includes : x Compressor mounted in a soundproofed compartment . x Axial fan. x Outdoor coil with hydrophilic louver fins for RC units. x Outlet air fan grill. x Service valves” flare” type connection. x Interconnecting wiring terminal block. Service Manual-CN Fixed RPM series 1-2 Introduction 1.6 Tubing Connections Flare type interconnecting tubing to be produced on site. For further details please refer to the Installation Manual, Chapter 10. 1.7 Accessories Remote Control Panel 625x625 for gird ceiling Panel 725x725 for hard ceiling 1.8 Inbox Documentation Each unit is supplied with its own installation manual, operation manual and Remote Controller operation manual. 1.9 Matching Table In addition the listed outdoor units can be matched with other types of indoor units such as Lex,Alpha. For further information please refer to the relevant Service Manual. Service Manual-CN Fixed RPM series 1-3 PRODUCT DATA SHEET 2. PRODUCT DATA SHEET Model Indoor Unit Model Outdoor Unit Installation Method of Pipe Characteristics Units Btu/hr kW kW W/W Capacity (4) Power input (4) EER (Cooling) or COP(Heating) (4) Energy efficiency class V Ph Hz A Power supply Rated current Power factor Prated (IDU) Prated (IDU+ODU) INDOOR Condenstate drain tube I.D Dimensions Net Weight Package dimensions Packaged weight Units per pallet Stacking height H/M/L H/M/L Min H/M/L H/M/L WxHxD WxHxD RPM m3/hr Pa dB(A) dB(A) l/hr mm mm kg mm kg units units Refrigerant control Compressor type,model Fan type & quantity OUTDOOR Fan speeds Air flow Sound power level Sound pressure level(3) Dimensions Net Weight Package dimensions Packaged weight Units per pallet Stacking height Heating 9380 2.75 0.81 3.40 A 9720 2.85 0.74 3.85 A 220-240 1 50 3.7 0.96 35 1350 3.7 0.96 W W A A Starting current Circuit breaker rating Fan type & quantity Fan speeds Air flow (1) External static pressure Sound power level (2) Sound pressure level(3) Moisture removal Cooling Only 9380 2.75 0.81 3.40 A CN-9 GCN-9 Flared Cooling 3.4 0.96 16.6 10 Centrifugal x 1 650/550/450 490/400/320 0 48/45/43 36/33/31 0.92 16 575X575X219(625X625X40/725X725X40) 12.9(2.2/2.7) 681X681X297(700X700X103/800X800X103) 16.2(3.4/4.2) 12 6levels Capillary tube Rotary Toshiba(GMCC) PA103X1C-4FZDE1 Propeller(direct) x 1 H H H H WxHxD WxHxD RPM m3/hr dB(A) dB(A) mm kg mm kg Units units Refrigerant type Standard charge Additional charge kg(7.5m) Liquid line Connections between Suction line units Max.tubing length Max.height difference In.(mm) In.(mm) m. m. Operation control type Heating elements (Option) Others 750 1370 61 51 830x545x245 32 31 880x600x320 34 33 9 3 levels 4m L kW R410 0.97 10m: +0g; 10m L 1/4"(6.35) 3/8"(9.53) Max.15 Max.7 15m: +50g Remote control N/A (1)Airflow in ducted units;at nominal external static pressure. (2)Sound power in ducted units is measured at air discharge. (3)Sound pressure level measured at 1-meter distance from unit. (4)Rating conditions in accordance to ISO 5151 and ISO 13253 (for ducted units). (5)The declared value's tolerance is in accordance with Eurovent. Service Manual-CN Fixed RPM series 2-1 PRODUCT DATA SHEET Model Indoor Unit Model Outdoor Unit Installation Method of Pipe Characteristics Capacity (4) Power input (4) EER (Cooling) or COP(Heating) (4) Energy efficiency class Power supply OUTDOOR INDOOR Rated current Power factor Prated (IDU) Prated (IDU+ODU) Starting current Circuit breaker rating Fan type & quantity Fan speeds H/M/L Air flow (1) H/M/L External static pressure Min Sound power level (2) H/M/L Sound pressure level(3) H/M/L Moisture removal Condenstate drain tube I.D Dimensions WxHxD Net Weight Package dimensions WxHxD Packaged weight Units per pallet Stacking height Refrigerant control Compressor type,model Fan type & quantity Fan speeds H Air flow H Sound power level H Sound pressure level(3) H Dimensions WxHxD Net Weight Package dimensions WxHxD Packaged weight Units per pallet Stacking height Refrigerant type Standard charge Additional charge Liquid line Connections between Suction line units Max.tubing length Max.height difference Operation control type Heating elements (Option) Others Units Btu/hr kW kW W/W V Ph Hz A W W A A RPM m3/hr Pa dB(A) dB(A) l/hr mm mm kg mm kg units units RPM m3/hr dB(A) dB(A) mm kg mm kg Units units kg(7.5m) In.(mm) In.(mm) m. m. kW CN-12 GCN-12 Flared Cooling Heating Cooling Only 11090 11940 11090 3.25 3.50 3.25 1.04 0.98 1.04 3.12 3.50 3.12 B B B 220-240 1 50 4.7 4.5 4.7 0.96 0.96 0.96 35 1400 24 10 Centrifugal x 1 650/550/450 490/400/320 0 48/46/44 36/34/32 1.35 16 575X575X219(625X625X40/725X725X40) 12.9(2.2/2.7) 681X681X297(700X700X103/800X800X103) 16.2(3.4/4.2) 12 6levels Capillary tube Rotary,Panasonic,5PS132EAC22 Propeller(direct) x 1 830 1450 63 53 830x545x245 33 32 880x600x320 35 34 9 3 levels R410A 0.96 4mLin10m:+0g 10m<Lin15m:+50g 1/4"(6.35) 3/8"(9.53) Max.15 Max.7 Remote control N/A (1)Airflow in ducted units;at nominal external static pressure. (2)Sound power in ducted units is measured at air discharge. (3)Sound pressure level measured at 1-meter distance from unit. (4)Rating conditions in accordance to ISO 5151 and ISO 13253 (for ducted units). (5)The declared value's tolerance is in accordance with Eurovent. Service Manual-CN Fixed RPM series 2-2 PRODUCT DATA SHEET Model Indoor Unit Model Outdoor Unit Installation Method of Pipe Characteristics Capacity (4) Power input (4) EER (Cooling) or COP(Heating) (4) Energy efficiency class Power supply OUTDOOR INDOOR Rated current Power factor Prated (IDU) Prated (IDU+ODU) Starting current Circuit breaker rating Fan type & quantity Fan speeds H/M/L Air flow (1) H/M/L External static pressure Min Sound power level (2) H/M/L Sound pressure level(3) H/M/L Moisture removal Condenstate drain tube I.D Dimensions WxHxD Net Weight Package dimensions WxHxD Packaged weight Units per pallet Stacking height Refrigerant control Compressor type,model Fan type & quantity Fan speeds H Air flow H Sound power level H Sound pressure level(3) H Dimensions WxHxD Net Weight Package dimensions WxHxD Packaged weight Units per pallet Stacking height Refrigerant type Standard charge Additional charge Liquid line Connections between Suction line units Max.tubing length Max.height difference Operation control type Heating elements (Option) Others Units Btu/hr kW kW W/W V Ph Hz A W W A A RPM m3/hr Pa dB(A) dB(A) l/hr mm mm kg mm kg units units RPM m3/hr dB(A) dB(A) mm kg mm kg Units units CN-18 ONG3-17 Flared Cooling Heating Cooling Only 17400 18420 17400 5.10 5.40 5.10 1.66 1.61 1.66 3.07 3.35 3.07 B C B 220-240 1 50 7.5 7.3 7.5 0.96 0.96 0.96 55 2150 32 15 Centrifugal x 1 750/650/550 680/580/490 0 52/49/47 41/39/37 2.40 16 575X575X270(625X625X40/725X725X40) 15.2(2.2/2.7) 681X681X348(700X700X103/800X800X103) 18.7(3.4/4.2) 12 6 levels Capillary tube Rotary,TOSHIBA PA200X2CS-4KT1 Propeller(direct) x 1 910 2160 65 54 795x610x290 43 42 970x650x394 46 45 9 3 levels R410A 1.28kg kg(7.5m) 4m Length In.(mm) In.(mm) m. m. kW 10m: +0g; 10m Length 1/4"(6.35) 1/2"(12.7) Max.15 Max.7 Remote control N/A 15m: +100g (1)Airflow in ducted units;at nominal external static pressure. (2)Sound power in ducted units is measured at air discharge. (3)Sound pressure level measured at 1-meter distance from unit. (4)Rating conditions in accordance to ISO 5151 and ISO 13253 (for ducted units). (5)The declared value's tolerance is in accordance with Eurovent. Service Manual-CN Fixed RPM series 2-3 Product Data Sheet Optional accessory Panel 625x625(Optional accessory) Dimensions (H x L x D) Weight Package Dimensions (H x L x D) Package Weight Units per pallet Stacking height Panel 725x725(Optional accessory) Dimensions (H x L x D) Weight Package Dimensions (H x L x D) Package Weight Units per pallet Stacking height Service Manual-CN Fixed RPM series mm kg mm kg units units For all the models 625x625x40 2.2 700x700x103 3.4 20 10 levels mm kg mm kg units units For all the models 725x725x40 2.7 800x800x103 4.2 10 10 levels 2-4 Rating Conditions 3. RATING CONDITIONS Rating conditions in accordance with ISO 5151 and ISO 13253 (for ducted units). Cooling: Indoor: 27oC DB 19oC WB Outdoor: 35 oC DB Heating: Indoor: 20oC DB 6oC WB Outdoor: 7oC DB Operating Limits R410A Upper limit Cooling Lower limit Upper limit Heating Lower limit Voltage Service Manual-CN Fixed RPM series Indoor Outdoor 32oC DB 23oC WB 46oC DB 21oC DB 15oC WB 21oC DB 27oC DB 24oC DB 18oC WB -9oC DB -10oC WB 10oC DB 198 – 264 V 3-1 Outline Dimensions 4. OUTLINE DIMENSIONS 4.1 Indoor Unit: CN 9/12/18 Unit Main unit Insulation Front Step Front width Front height Effective Height Model A B C D E H CN 9/12 CN 18 219 270 2 2 9 9 625/725 625/725 40 40 230 281 Service Manual-CN Fixed RPM series 4-1 Outline Dimensions 4.2 Outdoor Unit: GCN 9/12 R410A 4.3 Outdoor Unit: ONG3-17 R410A Service Manual-CN Fixed RPM series 4-2 Performance Data 5. PERFORMANCE DATA 5.1 CN 9/GCN 9 R410A 5.1.1 Cooling Capacity (kW) Entering Air DB OD Coil(oC) Data TC SC PI TC SC PI TC SC PI TC SC PI TC SC PI TC SC PI TC SC PI 15 20 25 30 35 40 46 Entering Air WB/DB ID Coil(oC) 15/21 2.86 0.58 0.58 2.83 2.02 0.62 2.72 0.56 0.67 2.55 0.54 0.73 2.35 0.50 0.78 2.13 0.47 0.85 1.85 0.43 0.93 17/24 3.02 0.62 0.58 3.00 2.14 0.62 2.91 0.60 0.68 2.74 0.58 0.73 2.55 0.55 0.80 2.32 0.52 0.86 2.04 0.47 0.94 19/27 3.16 0.65 0.58 3.14 2.26 0.63 3.08 0.64 0.68 2.97 0.62 0.74 2.80 0.60 0.81 2.58 0.57 0.87 2.30 0.53 0.96 21/29 3.30 0.63 0.58 3.28 2.20 0.63 3.22 0.63 0.69 3.08 0.61 0.75 2.94 0.59 0.82 2.72 0.56 0.88 2.44 0.52 0.97 23/32 3.42 0.64 0.58 3.39 2.25 0.63 3.33 0.64 0.69 3.19 0.64 0.75 3.05 0.62 0.82 2.83 0.59 0.89 2.55 0.55 0.98 LEGEND TC SC PI WB DB ID OU – – – – – – – Total Cooling Capacity, kW Sensible Capacity, kW Power Input, kW Wet Bulb Temp., (oC) Dry Bulb Temp., (oC) Indoor Outdoor Service Manual-CN Fixed RPM series 5-1 Performance Data 5.1.2 Heating Capacity (kW) ENTERING AIR DB ID COIL(Oc) 15 20 25 ENTERING WB OD COIL(oC) TH Pl TH Pl TH Pl -10 1.45 0.57 1.39 0.60 1.34 0.64 -7 1.56 0.58 1.50 0.61 1.45 0.65 -2 1.65 0.59 1.60 0.62 1.54 0.66 2 2.01 0.62 1.93 0.66 1.84 0.70 6 2.84 0.66 2.75 0.71 2.66 0.75 10 3.08 0.70 3.00 0.75 2.92 0.80 15 3.33 0.73 3.25 0.79 3.17 0.84 20 3.51 0.75 3.43 0.82 3.33 0.88 LEGEND TH PI WB DB ID OU 5.1.3 – – – – – – Total Heating Capacity, kW Power Input, kW Wet Bulb Temp., (oC) Dry Bulb Temp., (oC) Indoor Outdoor Capacity Correction Factor Due to Tubing Length Cooling TOTAL TUBING LENGTH 3m 7.5m 10m 15m 20m 25m 30m 40m 50m 1.03 1 0.984 0.953 --- --- --- --- --- * Minimum recommended tubing length between indoor and outdoor units is 3m. Heating TOTAL TUBING LENGTH 3m 7.5m 10m 15m 20m 25m 30m 40m 50m 1.06 1 0.962 0.886 --- --- --- --- --- * Minimum recommended tubing length between indoor and outdoor units is 3m. Service Manual-CN Fixed RPM series 5-2 Performance Data 5.2 CN 12/GCN 12 R410A 5.2.1 Cooling Capacity (kW) Entering Air DB OD Coil(oC) Data TC SC PI TC SC PI TC SC PI TC SC PI TC SC PI TC SC PI TC SC PI 15 20 25 30 35 40 46 Entering Air WB/DB ID Coil(oC) 15/21 3.32 0.89 0.75 3.28 2.34 0.81 3.15 0.86 0.87 2.96 0.82 0.94 2.73 0.77 1.02 2.47 0.72 1.10 2.15 0.65 1.20 17/24 3.51 0.94 0.75 3.48 2.49 0.81 3.38 0.93 0.88 3.19 0.89 0.95 2.96 0.84 1.03 2.70 0.79 1.11 2.37 0.72 1.22 19/27 3.67 0.99 0.75 3.64 2.63 0.81 3.58 0.98 0.89 3.45 0.96 0.96 3.25 0.92 1.05 2.99 0.87 1.13 2.67 0.82 1.24 21/29 3.84 0.97 0.75 3.80 2.55 0.82 3.74 0.96 0.89 3.58 0.94 0.97 3.41 0.91 1.06 3.15 0.86 1.14 2.83 0.80 1.26 23/32 3.97 0.99 0.75 3.93 2.61 0.82 3.87 0.99 0.89 3.71 0.98 0.98 3.54 0.95 1.06 3.28 0.90 1.15 2.96 0.84 1.27 LEGEND TC SC PI WB DB ID OU – – – – – – – Total Cooling Capacity, kW Sensible Capacity, kW Power Input, kW Wet Bulb Temp., (oC) Dry Bulb Temp., (oC) Indoor Outdoor Service Manual-CN Fixed RPM series 5-3 Performance Data 5.2.2 Heating Capacity (kW) ENTERING AIR DB ID COIL(Oc) 15 20 25 ENTERING WB OD COIL(oC) TH Pl TH Pl TH Pl -10 1.81 0.80 1.74 0.85 1.67 0.90 -7 1.95 0.82 1.88 0.87 1.81 0.91 -2 2.07 0.83 2.00 0.88 1.93 0.93 2 2.52 0.87 2.42 0.93 2.31 0.98 6 3.55 0.94 3.45 1.00 3.33 1.06 10 3.86 0.99 3.76 1.06 3.66 1.13 15 4.17 1.03 4.07 1.11 3.97 1.18 20 4.40 1.06 4.30 1.15 4.17 1.24 LEGEND TH PI WB DB ID OU 5.2.3 – – – – – – Total Heating Capacity, kW Power Input, kW Wet Bulb Temp., (oC) Dry Bulb Temp., (oC) Indoor Outdoor Capacity Correction Factor Due to Tubing Length Cooling TOTAL TUBING LENGTH 3m 7.5m 10m 15m 20m 25m 30m 40m 50m 1.03 1 0.981 0.946 --- --- --- --- --- * Minimum recommended tubing length between indoor and outdoor units is 3m. Heating TOTAL TUBING LENGTH 3m 7.5m 10m 15m 20m 25m 30m 40m 50m 1.05 1 0.974 0.922 --- --- --- --- --- * Minimum recommended tubing length between indoor and outdoor units is 3m. Service Manual-CN Fixed RPM series 5-4 Performance Data 5.3 CN 18/ONG3-17 R410A 5.3.1 Cooling Capacity (kW) Entering Air DB OD Coil(oC) Data TC SC PI TC SC PI TC SC PI TC SC PI TC SC PI TC SC PI TC SC PI 15 20 25 30 35 40 46 Entering Air WB/DB ID Coil(oC) 15/21 5.25 1.50 1.18 5.20 3.71 1.27 5.00 1.46 1.37 4.69 1.38 1.49 4.33 1.30 1.61 3.91 1.21 1.73 3.40 1.10 1.90 17/24 5.56 1.59 1.18 5.51 3.94 1.28 5.36 1.56 1.39 5.05 1.49 1.51 4.69 1.42 1.63 4.27 1.33 1.76 3.76 1.22 1.93 19/27 5.82 1.67 1.18 5.77 4.16 1.29 5.67 1.65 1.40 5.46 1.61 1.53 5.15 1.55 1.66 4.74 1.47 1.79 4.22 1.37 1.97 21/29 6.08 1.64 1.19 6.03 4.04 1.29 5.92 1.62 1.41 5.67 1.58 1.54 5.41 1.53 1.67 5.00 1.44 1.81 4.48 1.35 1.99 23/32 6.28 1.66 1.19 6.23 4.13 1.30 6.13 1.66 1.41 5.87 1.65 1.54 5.61 1.59 1.68 5.20 1.51 1.82 4.69 1.41 2.01 LEGEND TC SC PI WB DB ID OU – – – – – – – Total Cooling Capacity, kW Sensible Capacity, kW Power Input, kW Wet Bulb Temp., (oC) Dry Bulb Temp., (oC) Indoor Outdoor Service Manual-CN Fixed RPM series 5-5 Performance Data 5.3.2 Heating Capacity (kW) ENTERING AIR DB ID COIL(Oc) 15 20 25 ENTERING WB OD COIL(oC) TH Pl TH Pl TH Pl -10 2.76 1.27 2.65 1.35 2.55 1.42 -7 2.97 1.30 2.86 1.38 2.76 1.45 -2 3.15 1.32 3.05 1.40 2.94 1.48 2 3.83 1.38 3.68 1.47 3.52 1.56 6 5.41 1.49 5.25 1.59 5.07 1.69 10 5.88 1.57 5.72 1.68 5.57 1.79 15 6.35 1.64 6.20 1.76 6.04 1.88 20 6.69 1.69 6.54 1.83 6.35 1.97 LEGEND TH PI WB DB ID OU 5.3.3 – – – – – – Total Heating Capacity, kW Power Input, kW Wet Bulb Temp., (oC) Dry Bulb Temp., (oC) Indoor Outdoor Capacity Correction Factor Due to Tubing Length Cooling TOTAL TUBING LENGTH 3m 7.5m 10m 15m 20m 25m 30m 40m 50m 1.04 1 0.977 0.930 --- --- --- --- --- * Minimum recommended tubing length between indoor and outdoor units is 3m. Heating TOTAL TUBING LENGTH 3m 7.5m 10m 15m 20m 25m 30m 40m 50m 1.05 1 0.974 0.923 --- --- --- --- --- * Minimum recommended tubing length between indoor and outdoor units is 3m. Service Manual-CN Fixed RPM series 5-6 Pressure Curves 6. PRESSURE CURVES 6.1 Model: CN9/GCN 9 R410A 6.1.1 Cooling Service Manual-CN Fixed RPM series 6-1 Pressure Curves 6.1.2 Heating Service Manual-CN Fixed RPM series 6-2 Pressure Curves 6.2 Model: CN12/GCN 12 R410A 6.2.1 Cooling Service Manual-CN Fixed RPM series 6-3 Pressure Curves 6.2.2 Heating Service Manual-CN Fixed RPM series 6-4 Pressure Curves 6.3 Model: CN18/ONG3-17 R410A 6.3.1 Cooling Service Manual-CN Fixed RPM series 6-5 Pressure Curves 6.3.2 Heating Service Manual-CN Fixed RPM series 6-6 Sound Level Characteristices 7. SOUND LEVEL CHARACTERISTICS 7.1 Indoor unit 7.1.1 Sound Pressure Level Figure 1 7.1.2 Soud Pressure Level Spectrum (Measured as Figure 1) FAN SPEED LINE HI ME LO Service Manual-CN Fixed RPM series 7-1 Sound Level Characteristices Service Manual-CN Fixed RPM series 7-2 Sound Level Characteristices 7.2 Outdoor unit 7.2.1 Sound Pressure Level Figure 2 7.2.2 Soud Pressure Level Spectrum (Measured as Figure 2) Service Manual-CN Fixed RPM series 7-3 Sound Level Characteristices Service Manual-CN Fixed RPM series 7-4 Electrical Data 8. ELECTRICAL DATA Option(When outdoor unit have the terminal L) NOTE Power wiring cord should comply with local laws and electrical regulations requirements. Service Manual-CN Fixed RPM series 8-1 Wiring Diagrams 9. WIRING DIAGRAMS 9.1 Indoor Unit: CN 9/12/18 Service Manual-CN Fixed RPM series 9-1 Wiring Diagrams 9.2 Outdoor Unit: GCN 9 R410A/GCN 12 R410A/ONG3-17 R410A Service Manual-CN Fixed RPM series 9-2 Wiring Diagrams 9.3 Connections between indoor unit and outdoor unit Service Manual-CN Fixed RPM series 9-3 Refrigeration Diagrams 10. REFRIGERATION DIAGRAMS 10.1 Cooling Mode 10.2 Heating Mode Service Manual-CN Fixed RPM series 10-1 Tubing Connections 11. TUBING CONNECTIONS When the outdoor unit is installed above the indoor unit an oil trap is required every 5m along the suction line at the lowest point of the riser. In case the indoor unit is installed above the outdoor, no trap is required. Service Manual-CN Fixed RPM series 11-1 CONTROL SYSTEM 12. 12.1 CONTROL SYSTEM Electronic Control Introduction The electronic control information is designed for service application, and is common to the following groups of air-conditioners: ST/RC Group -Cooling only/ cooling and heating by heat pump SH Group -Cooling and heating by heat pump and supplementary heater. RH Group -Cooling, heating by heaters only. Jumpers Settings 0 = Open Jumper (disconnect jumper). 1 = Close Jumper (connect jumper). Self test Jumper - J1 OPERATION J1 SELF-TEST NORMAL 1 0 Group Jumper - J2, J6 GROUP J2 J6 ST 1 0 RC 0 0 SH 0 1 RH 1 1 Service Manual-CN Fixed RPM series 12-1 CONTROL SYSTEM Model selection Jumper - J8, J3, J4 and J5 MODEL J8 J3J4J5 WNG 7/9/12/14 MBX WMF PX NFC ALPHA EMD/ELD CN 1 1 1 1 1 1 1 1 000 001 010 011 100 101 110 111 Reserved P2000 WMN4 PXD WAX APLPHA17 NKN WNG 18/24 0 0 0 0 0 0 0 0 000 001 010 011 100 101 110 111 Water Source Heat Pump Jumper - J7 (Cf.:. Sect 7.1) J7 Unit Type 0 Normal Fix-RPM 1 Water Source Heat Pump (WSHP) Note: 1. J9 & J10 are software jumpers stored in the EEPROM. Service Manual-CN Fixed RPM series 12-2 CONTROL SYSTEM 12.2 LEGEND 12.2.1 Abbreviations AC A/C ANY CLOCK COMP CPU ELUM E²PROM, EEP HE HPC H/W ICP ICT IF, IFAN IR LEVEL1 LEVEL2/3 LEVEL4 Max Min min NA OCP OCT OF, OFAN OPER Para. RAT RC R/C RCT RH RT RV SB, STBY sec Sect SH SPT ST -Alternate Current - Air-Conditioner - ON or OFF status - ON/OFF Operation Input, (dry contact) - Compressor - Central Processing Unit - Extended Louver Upward Movement (Software Jumper) - Erase Enable Programmable Read Only Memory - Heating Element - High Pressure Control - Hardware - Indoor Condensation Pump - Indoor Coil Temperature (RT2) sensor - Indoor Fan - Infra Red - Normal Water Level - Medium/High Water Level - Overflow Level - Maximum - Minimum - Minute (time) - Not Applicable - Outdoor Condensation Pump - Outdoor Coil Temperature (RT3) sensor - Outdoor Fan - Operate - Paragraph - Return Air Temperature (RT1) sensor - Reverse Cycle (Heat Pump) - Remote Control - Remote Control Temperature - Resistance Heater - Room Temperature (i.e. RCT in IFEEL mode, RAT otherwise) - Reversing Valve - Stand-By - Second (time) - Section - Supplementary Heater - Set Point Temperature - Standard (a Model with Cooling Only) Service Manual-CN Fixed RPM series 12-3 CONTROL SYSTEM S/W TEMP W/O T - Software - Temperature - Without -The difference between SPT and RT. In Heat Mode: T=SPT-RT In Cool/Dry/Fan Mode: T= RT –SPT 12.2.2 List of A/C Models Model Type NFC Ceiling Mounted NKN Wall Mounted CN 12.2.3 Cassette List of A/C Groups The following table defines the different A/C groups, and the applicable operation modes for each group. Operating Mode ST RH RC SH Fan Yes Yes Yes Yes Cool (3) Yes Yes Yes Yes Heat (3) No Yes (1) Yes Yes (2) Dry (3) Yes Yes Yes Yes Auto Cool/Heat (3) No Yes (1) Yes Yes (2) Notes: 1. Heating is done by electric heaters. 2. Heating is done by Compressor (Heat Pump), and by electric heaters. Service Manual-CN Fixed RPM series 12-4 CONTROL SYSTEM 12.3 GENERAL FUNCTIONS FOR ALL MODELS 12.3.1 COMP operation For each Mode including POWER OFF & SB, a Min time delay of 3 min before COMP restarting, excluding DEICING Mode The Min operation time of COMP under different operating conditions is Operation Mode Min operation time of COMP Heat, Cool or Auto Modes Fan, Dry, Overflow, Protection modes, or mode change 3 min. ignored 12.3.2 IFAN operation Min time interval between IFAN speed change in AUTOFAN Mode, is 30 sec. Min time interval between IFAN speed change in H/M/L Mode is 1 sec. IFAN speed in Heat/Cool Autofan Mode is determined according to the following table: Where 'T IFAN Speed 'T t 2 2 t 'T t 1 1 t 'T HIGH MED LOW In Heat Mode: In Cool Mode: T=SPT-RT T= RT –SPT Note: 1. In Heat Mode, the rules in section 4.0.3 have the higher priority. 2. The table above can be represent by a hysteresis curve which will minimize the switching of the IFAN relay and will minimize the change in IFAN speed: IFAN speed H M L 1 Service Manual-CN Fixed RPM series 2 3 T [oc] 12-5 CONTROL SYSTEM 12.3.3 OFAN operation Min time interval between OFAN ON/OFF state change is 30 sec. In general, OFAN starts together with COMP. 12.3.4 HE operation Minimum Heaters ON or OFF time is 30 sec. Heaters can be activated only if IFAN is on. In RH group, HE-1 and HE-2 will be activated only when COMP is not operating, except in Dry Mode. 12.3.5 Protections High pressure protection is applicable to all operating modes. Deicing control is valid in Heat and Auto Heat Mode only. Defrosting control is valid in Dry, Cool, Heat and Auto Modes. No reset after protection modes. 12.3.6 Thermistors operation Return air Temp. is detected by RAT (RT1) in normal Mode, or by RCT (R/C sensor) in I-FEEL Mode. Indoor Coil Temp. is detected by ICT (RT2). Outdoor Coil Temp. is detected by OCT (RT3). Similarly, in the Indoor Units of a WMQ/T system, 4.7k Ohm (5%) resistors must be connected to the OCT ports to disable the “Thermistor Temp reading doesn’t change” error checking. Definition of thermistor faults: a. Thermistor is disconnected The thermistor reading is below -30oc. b. Thermistor is shorted The thermistor reading is over 75oc. c. Thermistor Temp reading doesn’t change (irrelevant for RT1) (i) This test is performed only once after a unit is switched from OFF/STBY to operation. At the first occurrence of 10 min continuous COMP operation, the current ICT & OCT are compared with those when the COMP was switched from OFF to ON 10 min before. If the 'T is less than 3oc, the thermistor is regarded as defective. (ii) The ICT and OCT no-change error can be disabled together by connecting a 4.7 k or 3.9 k ohm resistor (5%) to the OCT connector. These resistors are equivalent to a thermistor at 43+/-1oc and 48+/-1oc respectively. (iii) Connecting a 4.7k resistor to the ICT connector will disable the ICT no-change error only. Service Manual-CN Fixed RPM series 12-6 CONTROL SYSTEM Cases for disabling thermistor short/disconnected detection 1. The detection of thermistor faults (a) and (b) above, are disabled when Deicer Protection is started. The detection will be enabled again only after (1) the deicing is completed, and (2) COMP has been restarted and operated for 30 sec. 2. When all the following conditions are fulfilled: a. 4.7K Ohm resistor is connected on the OCT b. IFAN is OFF c. Compressor is ON d. ICT < -30 (disconnected) This condition come to detect and prevent IFAN operation in Deicer in multi spilt units. Handling the thermistor faults in a COMP unit i. ICT/OCT thermistor is disconnected or shorted - The invalid thermistor temperature is replaced by 43oc, so that the unit can continue the normal operation. All protections related to that faulty thermistor will be disabled. For example, in case of any ICT fault, the ICT high pressure protection in Heat Mode and ICT defrost protection in Cool Mode will not operate anymore. The same is also applied to the OCT fault. There is an EEPROM option that, when the OCT thermistor is not connected, the buzzer will be ON continuously until the user turn off the alarm by (i) switching the unit to STBY using a R/C, or (ii) pressing the mode switch once. Once the alarm is turned OFF, it will not be active again unless the unit is reset. ii. RAT thermistor is disconnected or shorted – The RAT will be derived from the ICT by using the equations : Heat Mode: RAT=ICT/2.3 Cool Mode: RAT=ICT*4 Notes: 1. In case of Shorted/Disconnected thermistor failure, the STBY LED will be blinking until the fault condition is corrected. In case of “Temp No change” fault the STBY LED will never blink. 2. User can use the system diagnostics function to find out the nature of the thermistor faults. Notes: 1. As in the COMP unit, the STBY LED will be blinking to indicate a thermistor fault. And, the user can use the system diagnostics function to find out the nature of the fault. Service Manual-CN Fixed RPM series 12-7 CONTROL SYSTEM Recover from the thermistor faults 1. ICT/OCT/RAT is disconnected or shorted – The fault status will be cleared automatically when the connection is back to normal. 2. ICT/OCT reading doesn’t change The ICT no-change error is cleared automatically if a 3oc change in ICT is detected afterward. Similarly, the OCT no-change error is cleared by a change in OCT. This faults can also be cleared by switching the unit from STBY mode to operate mode, or when the unit is reset (e.g. reset by power interrupt). 12.4 COOLING MODE 12.4.1 a. Cooling Mode – General Room Temperature, RT, is detected by x RAT in normal operation, or b. x RCT (R/C sensor) in I-FEEL mode. The resolution of RT is 1oc. x RT is activating COMP if (RT > SPT), and x RT is stopping COMP if (RT =< SPT). c. Indoor Coil Temp is detected by ICT (RT2). d. Outdoor Coil Temp is detected by OCT (RT3). e. OFAN OPERATIONS x OFAN starts together with COMP in general. Service Manual-CN Fixed RPM series 12-8 CONTROL SYSTEM 12.4.2 Cooling Mode: Cool, Auto (at Cooling) Temp: Selected desired temperature. Fan: HIGH, MED, LOW Timer: Any I Feel: On or Off Control function Maintains room temp at desired level by comparing RT and SPT. (RT - SPT) [oc] +3 +2 +1 0 -1 -2 ON COMP OFF ON OFAN OFF USER FAN SPEED IFAN ON RV OFF Note: 1) IFAN is always running at High, Medium or Low speed selected by user. 2) In IFEEL mode, the Room Temperature (RT) is the RCT from a R/C. Otherwise, the RT is the RAT from the Room Thermistor. Service Manual-CN Fixed RPM series 12-9 CONTROL SYSTEM 12.4.3 Cooling with Autofan Mode: Cool, Auto (at cooling) Temp: Selected desired temperature Fan: Auto Timer: Any I Feel: On or Off Control function Maintains room temp at desired level and controls the IFAN speed for optimal comfort. (RT - SPT) [oc] +3 +2 +1 0 -1 -2 ON COMP OFF ON OFAN OFF H IFAN M L ON RV OFF Service Manual-CN Fixed RPM series 12-10 CONTROL SYSTEM 12.5 HEATING MODE 12.5.1 1. Heating Mode – General In heating Mode, temp. compensation schedule will be activated for wall mounted, ducted models, and ceiling mounted (i.e. NKN, CN, and NFC) according to the following table: SPT Add to SPT I-FEEL ON I-FEEL OFF [oc] 0 oc 0 oc 18 d SPT d 27 27 < SPT d 30 +2 oc +3 oc Notes : 1) compensation will be activated in Forced operation modes 2. RV is OFF in RH group. 3. IF operating rules (a) As a general rule for RC and SH groups, when COMP is ON, excluding protection modes, IFAN will be switched ON if x ICT > 35oc x at the 30 second (4) after the COMP is switched ON. case, the IFAN will be started at low speed (5). or In this IFAN Speed Any Low Stop 30 35 40 ICT [oc] Notes : . 1) In SH or RC group, if HE is set to OFF due to low ICT, IFAN will be switched to LOW and will be turned OFF after 30 sec. 2) An exception to this rule is the Back-up mode for SH group. 3) 3) If the IFAN is turned ON by the 30 seconds operation, its minimum operation time before stopping due to low ICT temperature is 60 sec. Service Manual-CN Fixed RPM series 12-11 CONTROL SYSTEM (b) In RC and SH groups, whenever COMP & HE are both OFF, excluding protection modes, IFAN operation will be according to the following: In other models IFAN will operate in low speed for 30 sec and then stop. If COMP is OFF for more than 3 minutes and IFEEL Mode is inactive, IFAN will operate in low speed according to the following graph: IFAN (Low Speed) (c) 4. In RH group, IFAN starts when HE starts. When HE switches to OFF, IFAN switches to LOW for 30 sec and then stops. HE operation (a) For all Groups, HE can be ON only when IFAN is ON. (b) For all Groups, HE switches to OFF when ICT > 50 oc, and is activated again when ICT d 45oc. (c) In SH or RC group, HE operation is limited by the following graph: HE ON OFF General : For WAX : 30 15 35 20 40 45 50 ICT [oc] (d) Back-up mode for SH group After COMP has been working for 5 minutes, HE & IFAN are activated even if the ICT is still below 35oc. This situation is called Back-up Mode. Both HE & IFAN will work in Back-up Mode until the ICT reaches 35oc. Then, the operation goes on in the usual mode Service Manual-CN Fixed RPM series 12-12 CONTROL SYSTEM 12.5.2 Heating, RC or SH Group Mode: Heat, Auto (at heating) Temp: Selected desired temperature Fan: HIGH, MED, LOW Timer: Any I Feel: On or Off Control function Maintains room temp. at desired level by comparing RAT or RCT to SPT. (RT - SPT) [ oc] +2 +1 0 -1 -2 -3 ON COMP (WVL) OFF ON HE1 OFF ON HE2 OFF H/M/L IFAN L OFF Note 1 Note 2 ON RV OFF Service Manual-CN Fixed RPM series 12-13 CONTROL SYSTEM 12.5.3 Heating, RC or SH Group with Autofan Mode: Heat, Auto (at heating) Temp: Selected desired temperature Fan: Auto Timer: Any I Feel: On or Off Control function Maintains room temp at desired level by controlling COMP, IFAN and OFAN. (RT - SPT) [ o c] +2 +1 0 -1 -2 -3 ON COMP OFF ON HE1 OFF ON HE2 OFF H M IFAN L OFF Note 1 Note 2 ON RV OFF Service Manual-CN Fixed RPM series 12-14 CONTROL SYSTEM Note: OFAN operation is controlled by the graph below when 1. (RAT t SPT – 2oc), AND 2. (ICT t 45oc), AND 3. (COMP is ON) Otherwise, OFAN runs together with COMP. OCT [oc] +3 +2 +1 0 -1 ON OFAN OFF Service Manual-CN Fixed RPM series 12-15 CONTROL SYSTEM 12.6 AUTOMATIC COOLING OR HEATING 12.6.1 Automatic Cooling or Heating - General 1. 2. Switching-temperature between Cooling and Heating is SPT r 3oc. Autofan in Automatic Cooling and Heating Mode will activate “Cooling with Autofan Mode” and“Heating with Autofan Mode” respectively. 3. When the Auto Mode is started with SPT +/-0oc, the unit will not select Auto Heat or Auto Cool mode immediately. Instead, the unit will be in a temporary Fan Mode with IFAN operating at low speed. The proper Auto Heat mode or Auto Cool will be started whenever the RT reaches SPT-1oc or SPT+1oc respectively. 4. For RC & SH units, Mode change between Auto Heat & Auto Cool Modes are possible only after the COMP has been OFF during the last T minutes. 5. Mode Change time, T Auto Cool to Auto Heat 3 min Auto Heat to Auto Cool 4 min When unit is changed form Cool/Dry mode to Auto Mode, the unit will continue to operate at (Auto) Cool Mode until the conditions for switching from Auto Cool to Auto Heat are satisfied. Similarly, when unit is changed from Heat Mode to Auto Mode, the unit will continue to operate at (Auto) Heat Mode until the conditions for switching from Auto Heat to Auto Cool are satisfied. Service Manual-CN Fixed RPM series 12-16 CONTROL SYSTEM 12.6.2 Mode: Temp: Fan: Timer: I Feel: Auto Cooling or Heating, RC or SH Groups Auto Selected desired temperature Any Any On or Off Control function Maintains room temp at desired level by selecting between cooling and heating modes. (RT - SPT) [ oc] +3 +2 +1 0 -1 -2 -3 Auto Heat Mode ON COMP & OFAN Auto Cool Mode Auto Heat Mode > 4 min > 3 min (3) (3) OFF ON HE1 OFF (5) ON HE2 OFF H/M/L/OFF IFAN H/M/L/OFF L/OFF USER FAN SPEED L/OFF L/OFF > 3 min ON RV H/M/L/OFF > 2 min (4) (4) OFF Service Manual-CN Fixed RPM series 12-17 CONTROL SYSTEM 12.7 Dry Mode 12.7.1 Dry, ST or RC group Mode: Dry Temp: Selected desired temp Fan: Low (automatically selected by software) Timer: Any I FEEL: Any Control function Reduce room humidity with minimum temp. fluctuations by operating in Cool Mode with low speed IFAN. (RT - SPT) [ oc] +2 +1 0 10 20 40 30 50 Time [min] -1 -2 DRY-ON DRY DRY-OFF LOW IFAN OFF 5 minutes COMP ON time ON COMP & OFAN OFF Max 15 minutes ON HE1 & HE2 3.5 min Note1 Max 15 minutes 6 min Note 2 OFF ON RV OFF Notes : 1. When Dry is ON, the COMP is forced OFF for 3.5 min (longer than the 3 min Min COMP-Off time) after every 15 min of continuous COMP operation. 2. When Dry is OFF, the COMP is forced ON for 6 min (longer than the 3 min Min COMP-On time) after every 15 min of continuous COMP OFF time. Service Manual-CN Fixed RPM series 12-18 CONTROL SYSTEM 3. When Dry is changed from ON to OFF or vice versa, the limits mentioned in (1) & (2) are ignored. The COMP operation is only controlled by the 3 min Min OFF time and 1 min Min ON time. 4. In Dry Mode, IFAN is LOW when COMP is ON, and is OFF when COMP is OFF. 5. HEs are always OFF in Dry Mode. Service Manual-CN Fixed RPM series 12-19 CONTROL SYSTEM 12.7.2 Dry, SH Mode: Dry Temp: Selected desired temp. Fan: Low (automatically selected by software) Timer: Any I FEEL: Any Control function Reduce room humidity with minimum Temp. fluctuations by operating in Cool Mode with low speed IFAN and HE. (RT - SPT) [ oc] +2 +1 0 10 20 30 40 50 Time [min] -1 -2 LOW IFAN OFF ON COMP & OFAN OFF ON HE1 OFF ON HE2 OFF ON RV OFF Notes : 1) HP and Defrost protections are the same as in Cool Mode. 2) IFAN is operating continuously at low speed. 3) For MBX model, HE1 and HE2 will be activated simultaneously as the HE1 above. Service Manual-CN Fixed RPM series 12-20 CONTROL SYSTEM 12.8 12.8.1 1. Protection Cooling Mode Protections Indoor Coil Defrost Mode: Cooling, Dry, Auto Temp: Selected desired temp. Fan: Any Timer: Any I Feel: On or Off Control Function Protect the indoor coil from ice formation at low ambient temperature. ICT [oc] +14 +5 +2 +1 0 -1 t1 t2 t3 t1 ON OFAN OFF ON COMP OFF ON IFAN OFF t1 = 5 min minimum for each COMP starting t2 = OFAN cycling (alternate between ON and OFF every 30 sec) for 20 min maximum t3 = COMP and OFAN stop for 10 min minimum Service Manual-CN Fixed RPM series 12-21 CONTROL SYSTEM High Pressure Protection Mode: (Auto) Cooling or Dry Temp: Selected desired temp. Fan: Any Timer: Any I Feel: On or Off Control Function To protect the COMP from the high pressure built-up in the outdoor coil during normal cooling operation, by switching OFF the IFAN and COMP. 2. O C T [ o c] 68 HPC4 HPC3 HPC2 HPC1 A ny COMP C O M P is forced O F F O FF A ny OFAN ON O F A N follow operation of COMP O FA N is forced O N A ny IF A N L IF A N forced to LO W ON OPER LE D B link Service Manual-CN Fixed RPM series 12-22 CONTROL SYSTEM Note: 1. The ICT is also monitored during Cool and Dry mode, in case the RV control circuit is faulty. Whenever ICT reaches 70oc, which indicates a high pressure in the indoor coil, the COMP will be forced off automatically. The COMP can be turned on again only after the ICT is under 70oc again and after the 3 min COMP ON delay time. The OPER LED will not blink in this case. 2. Parameters values: Parameter Regular Water Source Heat Fix-RPM unit Pump Unit HPC1 52 38 HPC2 55 42 HPC3 61 45 HPC4 66 48 3. Low Condensing Protection Mode: (Auto) Cooling or Dry Temp: Selected desired temp. Fan: Any Timer: Any I Feel: On or Off Enabled only in WSHP units type (Disabled for all other unit types). Unit: Control Function To protect the COMP from Low condensing pressure built-up in the outdoor coil during normal cooling operation, by switching OFF the COMP. Any (On/Off/Blink) Any (ON/OFF) Blink Forced OFF 6 Service Manual-CN Fixed RPM series 8 OCT 12-23 CONTROL SYSTEM 12.8.2 1. Heating Mode Protections Outdoor coil Deicing Mode: Temp: Fan: Timer: I FEEL: (excluding RH Group) Heating, Auto (at heating) Selected desired Temp Any Any Any Control function Protects the Outdoor coil from ice formation by controlling COMP & RV operation. Scope This new deicer is designed to operate at extreme temp conditions. be triggered from: The deicing cycle could 1. OCT temp and time between two consecutive deicing cycles. 2. Detection of ice forming by change of the OCT temp. Both algorithms adjust the time between deicing cycles to optimize the A/C performance. The algorithm will automatically increase the time between deicing cycles and reduce the deicing cycle as needed. Service Manual-CN Fixed RPM series 12-24 CONTROL SYSTEM A. DEICER ACTIVATION ALGORITHM For WSHP DI = 20 (or 10) DT = 1 All others: DI = 40 (or 10) DT = 5 COMP to ON 1 Activate DDt setting Routine Start counting TLD DTF = 0 OCT < DOC ? No Yes DDT and DTF information from Deicing Dynamic Threshold setting routine No TLD > DI & OCT < DST (during last 3 minutes) DTF=1 & OCT < DDT (during last 3 minutes) & ICT < 40 deg No Yes Yes Deicer activation; TLD=DI; (see Notes) Deicer activation (see Notes) LDT > DT + TimeD LDT < DT-TimeD or LDT < DTmin No Yes Yes DI = TLD - DIT DI = TLD + DIT No No If (TLD>DI) then TLD=DI; DI = TLD; DI < DImin Yes DI = DImin No DI > DImax Yes DI = DImax DT = LDT Notes: 1 1. Count LDT while Deicing 2. In first COMP activation (after SB or OFF), 2.1. For WSHP: if OCT < 5oc, DI = 10 min, else DI = 20 min 2.2. For all other: if OCT < 0oc, DI = 10 min, else DI = 40 min. Service Manual-CN Fixed RPM series CONTROL SYSTEM B. Deicer Dynamic Threshold Setting Routine The following routine run continuously while A/C is working in Heat Mode. the routine outputs Deicing Dynamic Threshold (DDT) and Deicer Threshold Flag (DTF) to the main Deicer routine. 1st COMP start, OR deice complete Yes No Reset TLD cnt to 0 DTF = 0 IFAN/OFAN speed change Yes No Reset SCT cnt to 0 DTF = 0 TLD > TST AND SCT > SCD Yes No DDT = OCT - TempD DTF = 1 DDT and DTF information to main algorithm Service Manual-CN Fixed RPM series 12-26 CONTROL SYSTEM C. Deicing procedure OCT [oc] WSHP 15 Others 12 0 DOC DST (DDT) 3 min 3 min 36s max 12 min. 36s ON COMP OFF DI (note 1) DI (note 2) ON OFAN OFF 30s 30s ON RV DT OFF RC or WAX units all SH units except WAX ANY IFAN L IFAN is forced to Low Speed ON HE ANY HEs are forced ON ANY IFAN Note 3 OFF ANY HE OFF HEs are forced OFF ON OPER LED BLINK Notes : 1. In the following Deicing cycles, the time interval between two Deicing cycles activation is between 30 to 80 min. 2. For RC group, HEs are forced OFF. IFAN operation is as in Heat Mode, Sect 4.0.3.a, i.e. IFAN will be set to OFF when ICT<30oc. Service Manual-CN Fixed RPM series 12-27 CONTROL SYSTEM For WAX, the IFAN is simply forced OFF. 4. For SH group, HEs are forced ON and IFAN is forced to operate in Low speed, regardless of the ICT and difference between RAT & SPT. D. Definitions of Variables and Parameters Variable Definitions: Variable Time_from_Last_Deic Details Abv Time that RV is ON TLD er Comments Time from last Deicer or from SB Deicer_Interval Time interval before the next deicing DI cycle Deicing_Time Actual time that RV is OFF DT Last_Deicing_Time Time of last deicing cycle LDT Deicing_Dynamic_Thr OCT threshold to start Deicing cycle DDT OCT - Temp_Delta Deicer_Threshold_Fla Indication of a valid dynamic threshold DTF 0 = ref temp NOT set g temp Speed_Change_Time Time from last speed change eshold 1 = ref temp set SCT r Parameters to be stored in the EEPROM: Variable Details Temp_Stabilization_Time OCT temp stabilization time Minimal_Deicer_Interval Min. time between two Abv Default TST 20 min DImin 30 min DImax 80 min DOC WSHP: +2oc consecutive deicing cycles Maximal_Deicer_Interval Max. time between two consecutive deicing cycles Deicing_Operating_Condition OCT temp threshold to enable Others: -2oc deicing cycles Deicing_Static_Threshold OCT Static threshold to start DST o Others: -8 c Deicing cycle Temp_Delta Temp delta to identify a WSHP: +2oc o TempD 3c TimeD 1 min DTmin 1 min change from the steady state temp Time_Delta Time difference to identify a change in deicing duration Minimum_Deicing_Time Minimum time for actual deicing (RV is OFF) Service Manual-CN Fixed RPM series 12-28 CONTROL SYSTEM Deicer_Incremental_Time An unit change in the deicer time DIT 10 min Speed_Change_Delay Delay from last IFAN speed SCD 5 min change Definition of parameters in the EEPROM : Abv. EEP Addr Details TST Addr-1AH-NXXX 0-fH DImin Addr-18H-XXNN 00-ffH Î time from 0 to 255 minutes 1eH DImax Addr-18H-NNXX 00-ffH Î time from 0 to 255 minutes 50H DOC Addr-19H-XXXN 0-fH Î temperature from -7 to 8 degree C 5 DST Addr-19H-XXNX 0-fH Î temperature from 0 to -15 degree C 8 TempD Addr-19H-XNXX 0-fH Î temperature from 0 to 15 degree C 3 TimeD Addr-19H-NXXX 0-fH Î time from 0 to 15 minutes 1 DTmin Addr-1AH-XXXN 0-fH Î time from 0 to 15 minutes 1 DIT Addr-1AH-XXNX 0-fH Î time from 0 to 15 minutes 0aH SCD Addr-1AH-XNXX 0-fH Î time from 0 to 15 minutes 5 Î time from 0 to 30 minutes Default 0aH Note: In the EEP Addr Field x X is don’t care nibble x N is data nibble for setting Service Manual-CN Fixed RPM series 12-29 CONTROL SYSTEM 2. Outdoor coil Deicing (excluding RH Group) Mode: (Auto) Heating Fan: Any Timer: Any I Feel: On or Off Control Function Protect the Compressor from high pressure by switching OFF the OFAN and COMP. ICT [oc] 67 66 61 55 52 Any COMP Off COMP is forced OFF Any OFAN Off OFAN is force Off ON OPER LED BLINK Notes: 1. IFAN, HE1 and HE2 will be activated according to the relevant Heating Mode Sect. 2. In case of any malfunction in the relay control circuit, the OCT is also monitored during Heating mode. Whenever OCT reaches 70oc, which indicates a high pressure in the outdoor coil, the COMP will be forced off automatically. The COMP can be turned on again only after the 3 min COMP ON delay and the OCT is under 70oc. The OPER LED will not blink in this case. Service Manual-CN Fixed RPM series 12-30 CONTROL SYSTEM 3. High Evaporating Protection Mode: Heating, Auto (at heating) Temp: Selected desired temp. Fan: Any Timer: Any I Feel: On or Off Enabled only in WSHP units type Unit: types). (Disabled for all other unit Control Function To protect the COMP from High Evaporating pressure built-up in the outdoor coil during normal heating operation, by switching OFF the COMP. Oper LED COMP Status Any (On/Off/Blink) Any (ON/OFF) Blink Forced OFF 30 Service Manual-CN Fixed RPM series 32 OCT 12-31 CONTROL SYSTEM 12.8.3 Indoor Condensation Pump (ICP) Operation and Overflow Protection (NFC Model) Mode: Cooling, Dry, Auto (at Cooling) Temp: Desired temp selected Fan: Any Timer: Any I Feel: On or Off Control function: To prevent the overflow of condensed water by turning ON the ICP. Water Level LEVEL4 LEVEL2&3 LEVEL1 ON ICP OFF ANY COMP & OFAN Filter : Oper PXD : NFC P2000 MBX OFF BLINK NORMAL Notes: 1. When water level reaches LEVEL 4, ICP will be turned ON even if the unit is in SB mode, Heat, and Auto Heat modes. 2. Under normal operation, at least one of the water level inputs must be active. all LEVEL1, LEVEL2&3 and LEVEL4 are inactive, it is assumed that the connection has been broken and the ICP will be turned ON when the unit is operating in Cool or Dry mode. If 3. The operation of the pump is not related to the ON/OFF state of the COMP. On the contrary, the COMP can be forced to OFF when the water level is high (level 4). Service Manual-CN Fixed RPM series 12-32 CONTROL SYSTEM 12.8.4 Condensation Pump (CN/NKN models only) Mode: Cool, Dry, Auto Temp: Selected desired temperature Fan: Any Timer: Any I FEEL: Any Control function: Prevent Condensed water from Overflowing. Overflow when unit is ON Overflow Water Level Overflow when unit is OFF Normal ON OPER LED OFF BLINK ON COMP (WVL) COMP/WVL is forced OFF OFF ON PUMP OFF 8 min 8 min 1 min Notes: 1. The switch used for water level detection is closed under normal condition, and is open when water overflow. 4. The “Overflow” condition can activate the water pump in SB and operating modes. Service Manual-CN Fixed RPM series 12-33 CONTROL SYSTEM 12.9 Mode: Temp. Fan: Timer: I Feel: Timer Any Selected desired temp Any Timer On, Timer Off On or Off Control function 1. Starts or stops the unit operation after pre-set time. If RC-1 is used, the timer setting will be (0.5 - 24 Hr) from the moment the timer is set. The minimum resolution is 30 minutes. If RC-2 or later version of remote controls is used, the timer setting will be (0:00 23:50) real time with 10 minutes resolution. 2. After power failure, all pre-set timers are cleared. The system is forced to STBY mode and the Timer LED indicator is blinked to indicate the situation. The LED keeps blinking until the timer settings can be reloaded from a R/C message. Note: If all timers are inactive, the system will not be forced OFF after the power failure. The last OPER/STBY status will be loaded from the EEP instead. 3. When the A/C receives any valid message from a R/C, the current ON/OFF timer settings will be replaced by the new timer settings in the R/C message. Note: The following timer related operations will not affect the A/C operating mode (Heat/Cool/Auto/Dry/Fan) setting. x Set ON/OFF timer x Clear ON/OFF timer x R/C ON Timer is time-up x R/C OFF Timer is time-up E.g. When a STBY A/C unit (with Cool Mode setting in its EEP) is turned on by the ON-TIMER of a R/C with heat mode setting, the A/C will start in Cool Mode. Service Manual-CN Fixed RPM series 12-34 CONTROL SYSTEM 12.10 I Feel Mode Mode: Temp: Fan: Timer: I Feel: Any Selected desired Temp. Any On or Off On Control function: Maintains room temp by comparing RAT to RCT sensor at the R/C. Depending on the version of the R/C (RC1, 2, 3 or 4), a R/C in IFEEL mode will automatically send out its RCT (in I-FEEL data) with a time interval from 0 to 6 minutes continuously. The ELCON will blink the OPER LED to acknowledge the reception of this I-FEEL data but the buzzer is not activated. Notes: 1. The I-Feel function is cancelled when an ELCON unit is turned OFF OR after a power interrupt. 2. An ELCON will enter I-FEEL Mode automatically when it receives any I-FEEL data from any R/C. 3. If an ELCON is in I-FEEL Mode and no I-FEEL data has been received from the R/C for more than 4 min (6 min for RC4 short IFEEL messages), the I-FEEL mode would be suspended. And, the temp is replaced by the RAT from the local thermistor. As soon as a new I-FEEL data is received from the R/C, the I-FEEL mode will be resumed (same as the case described in Note 2). 4. There are 3 different format of I-FEEL data x the 32-bits data format of RC-1 x the 34-bits data format of RC-2, RC-3 and RC-4 (in RC-2 compatible mode) x the 12-bits data format of stand-alone temperature sensor and RC-4 (in RC-4 mode) 5. The formats of the R/C data are provided in the Appendix section. 12.11 Air flow direction control Mode: Any Temp: Selected desired temp. Fan: Any Timer: On or Off. I Feel: On or Off. Control function Service Manual-CN Fixed RPM series 12-35 CONTROL SYSTEM Control airflow direction by setting the Horizontal or Vertical louvers to Auto-swing or User-position modes. According to the ELCON models, the louvers are driven by AC Swing Motor or DC Step Motor which operations are defined in Section 10.1 and 10.2 respectively. 12.11.1 AC-Swing Motor operation 1.General Operations of Louvers driven by AC-Swing Motor (i) The louvers, which are driven by AC-Swing motor, turn from right to left (move horizontally). (ii) The louvers are stopped automatically when the units are switched to SB. (iii) The last Auto-swing status is always stored in the EEPROM and can be restored when the unit is switched from SB to operation mode or when the power to the unit is switched ON. (1) (iv) The louver is stopped when the IFAN is OFF (e.g. in Heat Mode or deicing). Normal louver operation will be resumed when IFAN is turned ON again. (v) When RC2 or compatible remote is use For all models, tthe AC swing motor works in Auto-swing or Manual Positioning Mode together with the DC Step Motor. Therefore, the vertical louver can be driven by either AC motor or step motor. No change in jumper setting is necessary. For NFC, the AC swing motor is always stopped. 2.Controlling the louvers driven by AC-Swing Motor by using a R/C Operation Auto-swing ON/OFF Manual positioning Activated by the Horizontal Swing Operation with button in the R/C. RC4 The ON/OFF status of the swing N . A. motor is the same as that shown on the LCD display of the R/C. Operation with RC2 Activate by the Auto-swing button in Activated by the Manual or RC3 compatible the R/C. Positioning button in the R/C. The ON/OFF status of the swing Each pressing will set the relay ON motor is the same as that shown on for 2 sec, then the relay is turned the LCD display of the R/C. OFF automatically. Activated by go-home button in the Activated by the Manual Operation with R/C. Positioning button in the R/C. RC1, RC1/W Change relay position from ON to Each pressing will set the relay ON OFF, or OFF to ON for each for 2 sec, then the relay is turned pressing. OFF automatically. remote control (2) 1. The Auto-swing is turned OFF whenever the Operation Button of the RC2/RC3 is pressed. Therefore, if the unit is turned ON by a RC2 or RC3, the unit will be ON with Auto-swing cancelled. 2. Such as a RC4 remote controller in RC2 compatible mode. Service Manual-CN Fixed RPM series 12-36 CONTROL SYSTEM 12.11.2 DC Stepping-Motor operation Caution: All the louver angles or louver positions mentioned in this specification are the rotation angles of the stepping motors. They are NOT necessary equal to the rotation angles of the louvers. List of models with stepping motor and the Swing-angle limits of these models: A/C models w/ step motor Total Anlge (Max_Swg) Travel at Auto Swing, Limit in User (Auto_Swg_Limit) Position mode LockAngle MTR closing Heat Mode Other modes (User_Swg_Limit) direction (1) NFC CN NKN 110o o 40 o 45 60-110o o 5-40 o 5-42 60-110o o 5-40 o 5-42 60-110o o 5-40 o 5-45 5o A o C o C 5 5 Note: 1. The Motor Direction is defined to be the rotation direction (Clockwise | Anticlockwise) when the louver is closing. (Viewed from the top of the motor.) 2. The Auto_Swg_Limit of WMF is 60-60o. Therefore, its Auto-swing operation is disabled, and the louver will only stay at the 60o position. The louver position reset (Cf.: 10.2.1 (x)) would be disabled in this case, to prevent unnecessary louver movement. 3. The Max_Swg angle is an independent mechanical angle (by the step motor taking into account the gears transmission) of the product (ROM value). 4. Travel at Auto Swing angles are 4 independent parameters set under this mode (EEPROM values). 5. The user angles are the same as the cooling Auto Swing Angles. 6. For LockAngle, refer to the rule from Operation to STBY. 1.General Operations of Louvers driven by DC Stepping Motor (i) The louver position is defined by the angular position of the stepping motor. When the louver is completely closed, the motor position is defined to be 0o. When the louver is completely opened, the motor position is defined to be the Total Angle (Max_Swg). (ii) Max Swg of the motors are model dependent as shown in the table above. (iii) If the louver is in Auto-swing mode, it would move to-and-fro continuously within the Auto_Swg_Limit except the 1st swing cycle (see (iv) below). Both the upper and lower limits are determined by the type of models and current operating mode as shown in the table above. (iv) When a step motor start to operate in Auto-swing mode, the motor will move between the User_Swg_Limit during the 1st swing cycle. The purpose of this operation is to let the user set the “louver user position” by using only the swing button (e.g. the Vertical Swing Button in RC-4). In the following cycles, the motor will move between the Auto_Swg_Limit. Service Manual-CN Fixed RPM series 12-37 CONTROL SYSTEM (v) The Louver is closed automatically when a unit is turned to SB or in the initialisation stage after a power failure. When the initialisation stage after the power failure is completed, the louver would stay at the closed position or resume the last louver operation (i.e. Auto-swing or User-position mode). It depends on whether the unit would stay in STBY mode or restart the last operating mode from the EEPROM. The current operation of the step motor (Auto-swing or User-position mode) and the step motor position in User-position mode, are stored in the EEPROM. (vi) Each step of the stepping motor consists of 8 states (Cf. Sect 10.3.2). To guarantee a large enough torque, the duration of each state is 9.75ms. Therefore, the duration of each step cycle is 78 ms (=9.75ms x8). (vii) Each step of the stepping motor is equivalent to 0.703o. (360o/2048 phases) x (8 states per step) x (4 phases / 8 states) = 0.703o (viii) Default ELUM is 5o for all models by default (Cf. Sect. 15.2). (ix) When user presses the Manual Positioning Button in a R/C, the louver will move 10 steps (7o) and then stop automatically. (x) To ensure the louver will stay at the correct range of Auto-swing angle, a “position reset in Auto-swing” is performed once for every 8 auto-swing cycle (xi) Summary of different type of Louver movement : Note 1. 2. 3. 4. Status Action The louver is closed by an angular movement of Louver-Reset (Max_Swg + ELUM) to ensure that it will be closed (after power failure completely. The louver position counter is then reset to or power up) 0o. Any further louver movement will be relative to this angle. The louver is closed by moving toward the (0o – From OPER to SB LockAngleo) position. The louver position counter is then reset to 0o. Any further louver movement will be relative to this angle. If the unit is turned ON by the R/C, the louver will enter Auto-swing mode or User-position according to the setting From SB to OPER in the R/C. If the unit is turned ON by CLOCK, internal On-Timer or the emergency Mode Button, the last louver operation is resumed. When the louver leaves the SB (closed) position, it is always open to (MAX_SWG + ELUM) and reset the louver position counter to MAX_SWG before carries on with the normal louver operations. “Louver-Reset” first. Then, if the unit would stay in SB mode, the louver would remain closed. After power failure Otherwise, “from SB to OPER”, then continue with the last Service Manual-CN Fixed RPM series 12-38 CONTROL SYSTEM or Reset 5. From mode to mode 6. Travel angle at Auto-Swing Position Reset in Auto-Swing Manual Positioning Movement Total movement 7. 8. 9. operating mode before the power failure. All the louver control information will be restored from the EEPROM. If the louver is stationary (not in Auto-swing), it will automatically go to the default position of the new mode. That is open to the Max position of the Auto_Swing_Limit. If the louver is in Auto-swing mode, it will continue to move between the Auto_Swing_Limit of the new mode. Refer to the table in Sect 10.2. The louver is open to the maximum plus the ELUM angle. 10 steps (= 7o) per action (in the direction of last rotation). The position of louver is limited by the User_Swg_Limit. Total movement from close to open position is Max_Swg, refer to the table in Sect 10.2. 2.Model Dependent Operations of Louvers driven by DC Stepping Motor NFC model: These are the only models with two independent louvers: x the horizontal louver which is driven by an AC motor, and x the vertical louver which is driven by a DC stepping motor Since the RC2 or RC3 can support only one louver, the user must use a RC4 or RC1 to control the operation of the two louvers of a NFC. If RC2/RC3 is used, only the vertical louver is controllable, the AC motor is always stopped. Service Manual-CN Fixed RPM series 12-39 CONTROL SYSTEM 3.Controlling the Louvers driven by DC Stepping Motor by using a R/C Operation Operation with RC4 Operation with RC2 or RC3 Operation with RC1 or RC1W Autoswing and User-position modes Manual positioning These modes are activated by the Vertical swing button and Horizontal swing button in the R/C. The Vertical and Horizontal buttons are used to control the operation of the independent Vertical and Horizontal louvers respectively. Although there is no Manual positioning button in the R/C for fine adjustment of the louver position, the user can still use the Auto-swing buttons to set the User Louver Position. Whenever the Auto-swing mode is cancelled, the last louver position is saved in the EEP as the user louver position. The Auto-swing and User-position modes are selected alternatively for each pressing of the swing button. The modes are activated by the Auto-swing button in the R/C. The Auto-swing and User-position modes are selected alternatively for each pressing of this button. Activated by the Manual-positioning button in the R/C. Each time this button is pressed, the louver would move 7o. Then, the louver would stop and stay at User-position mode. Auto-swing mode is activated by the Activated by the Manual-positioning button in the R/C. Auto-swing button in the R/C. Each time this button is pressed, When the Go-Home button is the louver would move 7o. Then, activated, the louver would go to the the louver would stop and stay at completely open position. Then the User-position mode. louver would stop and stay at User-position mode. Notes: 1). In the Manual positioning process, when the louver reaches the limits defined by User_Swg_Limit, the direction of the louver movement is reversed automatically. 2). The Auto-swing mode is cancelled (go to User-position Mode) in the following conditions: x The unit is turned ON/OFF by the operation button in the R/C x The OFF timer in the R/C reaches the pre-set OFF time. The Auto-swing mode is reserved in the following conditions: x The unit is turned ON/OFF by the CLOCK control x The unit is turned ON by the ON Timer of the R/C x The unit is turned ON/OFF by the mode button on the display board Service Manual-CN Fixed RPM series 12-40 CONTROL SYSTEM 12.12 Forced operation Forced operation allows units to start, stop and operate in Cooling or Heating in pre-set temperature according to the following table: Forced operation mode Pre-set Temp for : NKN , CN, NFC, Cooling 22qC Heating 26qC Note: 1. While under the forced operation, the temperature compensation schedule (Cf.: Sect 4.0.1) is disabled. 2. The forced operation is activated when the mode button on the Display Board is used to switch the unit to Cool or Heat mode. 3. The IFAN is always set to Autofan Speed in forced operation. Service Manual-CN Fixed RPM series 12-41 CONTROL SYSTEM 12.13 SLEEP Mode: Temp: Fan: Timer: I Feel: Any Set – desired temperature selected Any Interact with Sleep Timer as described in sect 12.2 On or Off The Sleep mode is activated by using the sleep button on the R/C. In Sleep Mode, the unit will automatically adjust the SPT to turn up/down the room temperature (RT) gradually to provide maximum comfort to the user in sleep. Sleep is treated as TIMER function. function. 12.13.1 Therefore, the TIMER LED is activated similar to TIMER SPT adjustment in Sleep Mode 1. In cool, auto cool or dry modes, the SPT adjustment is positive (from 0 to +3oc). 2. In heat or auto heat modes, the SPT adjustment is negative (from 0 to -3oc). 3. In other modes, there is no SPT adjustment. 4. The SPT adjustment is cancelled when the Sleep mode is cancelled. RT 7 Hours Sleep operation for Normal Sleep Mode Unit is turned to SB after Sleep SPT+3 Cool, Dry modes SPT+2 SPT+1 SPT SPT-1 SPT-2 Heat mode SPT-3 Start Sleep 1 2 3 4 5 6 7 8 Time [Hr] Note: If Off-timer is active, the unit may go to SB before or after 7 hours of sleep operation. Service Manual-CN Fixed RPM series 12-42 CONTROL SYSTEM 12.13.2 Time adjustment in Sleep Mode In 10V6, the user can make use of the Off-Timer to extend the Sleep Time from 7 hours to 12 hour (max). The operation of the new “Extended Sleep Mode” is illustrated by the graphs below. Case 1 is the Standard Sleep Mode, which is the only sleep mode in previous version of MCU. The A/C unit simply works for 7 hours, then goes to SB. Case 2 is the new Extended Sleep Mode. If an active Off-Timer is set to turn off the A/C between 7-12 hour, relative to the starting of Sleep, the Sleep time is extended. And, instead of going to SB at the 7th hour, the A/C will work until reaching the Off-time. Case 3 is an exception to case 2. The Sleep Mode will not be extended to the Off-Time when the Off-Timer is preceded by an On-Timer, which is also between 7-12 hour. Case 1 : Standard Sleep Mode Condition : Off-timer is not set or is beyond 12 hour. Oper SB Start Sleep 2 4 6 7 8 10 6 7 8 10 12 Time [Hr] 12 Time [Hr] 12 Time [Hr] Case 2 : Extended Sleep Mode Condition : Off-timer is set at 7-12 hour. Oper SB Start Sleep 2 4 Off-timer Case 3 : Exception to Case 2 Condition : Off-timer is set at 7-12 hour On-timer is set at 7-12 hour and before Off-timer Oper SB Start Sleep 2 4 Service Manual-CN Fixed RPM series 6 7 8 10 On-timer Off-timer 12-43 CONTROL SYSTEM 12.14 Clogged Air filter Filter LED ON after 512 HR or as set in the EEPROM Addr-11H-XXXN. Filter LED is turned OFF, and the Filter Timer is restarted by pressing the reset button. Service Manual-CN Fixed RPM series 12-44 CONTROL SYSTEM 12.15 ON UNIT INDICATORS AND CONTROLS STAND BY INDICATOR Lights up during STBY mode. Turns off during operaiton mode. The STBY LED blinks only in the following cases: Fault #1, #2, #4, #5, #8, and #9 The STBY LED will NEVER blink in the following cases: Fault 7, 11, and 12 (temp does not change). 1. Lights up during operation (turns off during STBY mode) OPERATION INDICATOR TIMER INDICATOR 2. Blinks for 300 ms, to announce that a R/C infrared signal has been received and stored. 3. Blinks continuously during x OCT High Pressure Protection Mode (Cf.: Sect 7.1.2) x ICT High Pressure Protection Mode (Cf.: Sect. 7.2.2) x Deicing in Heating Mode (Cf.: Sect. 7.2.1) x Water Over Flow in CN/NKN/NFC Model (Cf.: Sect. 7.5) Lights up during Timer and Sleep operation. 1. Lights up when Air Filter needs to be cleaned. FILTER INDICATOR 2. Blinks during Water Over Flow in MBX/P2000 models. (Cf.: Sect. 7.3) COOLING INDICATOR 1. Lights up when system is switched to Cool Mode by using the Mode Switch on the unit. 2. Show the thermistor status in Diagnostic Mode (Cf.: Sect. 23) HEATING INDICATOR 1. Lights up when system is switched Heat Mode by using the Mode Switch on the unit. 2. Show the thermistor status in Diagnostic Mode (Cf.: Sect. 23) MODE BUTTON (Cool, Heat, SB) 1. Use to cycle the operation mode of the A/C unit among COOL, HEAT and SB modes, without using the R/C. Every time this switch is pressed, the next operation mode is selected, in this order : SB Î Cool Mode Î Heat Mode Î SB Î ... 3. Press this button continuously for 5 sec or more to start the Diagnostic Mode (Cf.: Sect 23) 4. Whenever the filter LED is on, short pressing on the Mode will reset the filter timer and turns off the Filter LED RESET / FILTER BUTTON 1. When the Filter LED is ON, press to turn off the Filter LED after a clean filter has been reinstalled. 2. When the Filter LED is OFF, use this button to enable/disable the buzzer announcer. Service Manual-CN Fixed RPM series 12-45 CONTROL SYSTEM 12.16 0= 1= CLOCK RANDOM DELAY FROM 0 TO 2.5 SECONDS Clock Switch Open Clock Switch close The Clock is activate according to the following table: A/C STATE (before clock is changed) CLOCK STATE (before clock is changed) CLOCK ACTION (clock is changed) A/C NEW STATE (after clock is changed) ON 1 0 OFF OFF 0 1 ON OFF by interrupt (1) 1 0 OFF ON by interrupt (1) 0 1 ON Notes : 1. Clock can be interrupted by : 2 x R/C - POWER ON/OFF Push-button. x R/C - TIMER. x R/C - SLEEP. x A/C - MODE SWITCH. Any change in the CLOCK level during the first 6 sec after the system reset is ignored. Service Manual-CN Fixed RPM series 12-46 CONTROL SYSTEM 12.17 SYSTEM DIAGNOSTICS Pressing Mode button for 5-10 seconds in SB or any other operation mode will activate diagnostic mode by the acknowledgment of 3 short beeps and lighting of COOL and HEAT LEDs. In diagnostic mode, system problems will be indicated by blinking of Heat & Cool LEDs. The coding method will be as follow: Heat led will blink 5 times in 5 seconds, and then will be shut off for the next 5 seconds. Cool led will blink during the same 5 seconds according to the following table: No Problem ż ż ż ż ż 1 RT1 is disconnected ż Ɣ Ɣ Ɣ Ɣ 2 RT1 is shorted ż Ɣ Ɣ Ɣ ż 3 (Reserved) ż Ɣ Ɣ ż Ɣ 4 RT2 is disconnected Ɣ ż Ɣ Ɣ Ɣ 5 RT2 is shorted Ɣ ż Ɣ Ɣ ż 6 (Reserved) Ɣ ż Ɣ ż Ɣ 7 RT2 temp reading doesn’t change Ɣ ż Ɣ ż ż 8 RT3 is disconnected Ɣ Ɣ ż Ɣ Ɣ 9 RT3 is shorted Ɣ Ɣ ż Ɣ ż 10 (Reserved) Ɣ Ɣ ż ż Ɣ 11 RT3 temp reading doesn’t change Ɣ Ɣ ż ż ż 12 RT2 & RT3 temp reading doesn’t change Ɣ ż ż ż ż ż - ON, Ɣ - OFF Notes: 1. If faults occur in more than one thermistor (except case number 12 on the table above), only one fault will be indicated according to the following order: RT3, RT2, RT1. 2. A/C will jump out to normal mode if sending a command by the R/C in the system diagnostics mode. If this command from the R/C contain a Group ID, this ID will become the new Group ID of the ELCON unit. Service Manual-CN Fixed RPM series 12-47 TROUBLESHOOTING 13. No. TROUBLESHOOTING SYMPTOM PROBABLE CAUSE 1 Power supply indicator (Red LED) does not light up. No power supply. 2 Unit does not respond to remote control command. Remote control command did not reach the indoor unit. 3 Unit responds to remote control command but operate indicator (Green LED) does not light up. Indoor fan does not start (louvers are opened and Green LED lights up). Problem with display PCB. 4 Change to COOL MODE and check. Problem with PCB or capacitor. Change to HIGH speed and check power supply to motor is higher than 130 VAC. If OK replace capacitor, if not OK replace controller. Replace controller. PCB problem. Compressor stops during operation and Green LED remains on. Compressor is ON but outdoor fan does not work. Electronic control or power supply problem. 9 Unit works in wrong mode (cool instead of heat or heat instead of cool). Electronics or power connection to RV. 10 All components are operating properly but no cooling or heating. Refrigerant leak. 6 7 8 Check power supply. If power supply is OK, check display and display wiring, if OK, replace PCB. Check remote control batteries. If batteries are OK, check display and display wiring, if OK, replace PCB. Replace display PCB. Unit in HEAT MODE and coil is still not warm. Indoor fan works when unit is OFF, and indoor fan speed is not changed by remote control command. Compressor does not start. 5 CORRECTIVE ACTION Electronics control problem or protection. Problem with outdoor electronics or outdoor fan capacitor. Service Manual-CN Fixed RPM series Perform diagnostics, and follow the actions described below. Perform diagnostics, and follow the actions described below. Switch unit to COOL mode, HIGH speed with 16 degrees set point (summer) or HEAT mode high speed with 30 degrees set point (winter). Check power supply to motor is higher than 130 VAC. If OK replace capacitor, if not OK replace controller. Check RV power connections. If OK, check RV operation with direct 230 VAC power supply, if OK, replace outdoor controller. Check refrigeration system. 13-1 TROUBLESHOOTING No. SYMPTOM 11 One of the protections is activated and compressor is stopped with no apparent reason. Compressor motor is noisy and no suction is present. Control problem or refrigeration system problem. Perform diagnostics to detect active protection, and take action accordingly. Wrong phase order to compressor. Check compressor phase order. Water leakage from indoor unit. Freezing of outdoor unit in HEAT Mode and outdoor unit base is blocked with ice. Unit operates with wrong fan speeds or wrong frequency. Filter LED comes ON after 512 hours of operation Indoor unit drainage tube is blocked. Check and open drainage tube. Connect base heater. Wrong jumper settings. Perform diagnostics to obtain unit model or if operating by EEPROM parameters. Replace air-filter. Press the RESET button. 12 13 14 15 16 PROBABLE CAUSE Clogged air-filter Service Manual-CN Fixed RPM series CORRECTIVE ACTION 13-2 EXPLODED VIEWS AND SPARE PARTS LISTS 14. EXPLODED VIEWS AND SPARE PARTS LISTS 14.1 EXPLODED VIEWS(CN 9/12/18) Service Manual-CN Fixed RPM series 14-1 EXPLODED VIEWS AND SPARE PARTS LISTS 17 Service Manual-CN Fixed RPM series 14-2 EXPLODED VIEWS AND SPARE PARTS LISTS 14.2 EXPLODED VIEWS(GCN 9/12) Service Manual-CN Fixed RPM series 14-3 EXPLODED VIEWS AND SPARE PARTS LISTS 14.3 EXPLODED VIEWS(ONG3-17) Service Manual-CN Fixed RPM series 14-4 EXPLODED VIEWS AND SPARE PARTS LISTS 14.4 Spare part list of Intdoor Unit:CN 9&12 Airwell No. 1 2 3 4 4 5 6 7 8 9 10 11 12 13 14 14 15 16 17 17 18 19 20 21 23 24 25 26 28 29 30 31 32 33 34 35 36 37 38 39 41 42 43 49 50 51 52 57 59 61 62 63 64 64 72 73 74 75 Part No. 453189500 453189900 453192700 465720163 465720169 465080003 462350089 453192600 465800084 453189700 453191300 465360021 466010002 453191600 453191700 470250017 470250004 466100018R 465020104 465020105 433050 455013705R 464250066 467300128R 467300223R 232299 4519813 470250006 464750006 436670R 464750003 464750002 464750004 467420022 453189600 465340022 453190600 465340040 465080002 465800089 465800090 465360028 464600087 463750123 463750122 464250047 470120020 465120005 453195100 465800091 465440018 453190000 465360022 465360032 467450000 455000108 464200028 4520416 Name Grille Filter Assy. Water-Level Switch Front Plate Assy. 625x625 /CN Airwell Front Plate Assy. 725x725 /CN Airwell Display Cover Evaporator welding Assy./CN 9/12 Fixed R410A Pump CN Drain Pipe Assy/CN. Horizontal Flap Drain pan Assy Support/Grill Clasp Centrifugal Fan Low Height) CN60x60 EPS 1 / Front Frame EPS 2 / Front Frame Air Outlet/Front Frame 725X725 EPS 3/Front Frame Metal Motor 13W 750/650/550/450RPM Front Frame 625x625) (Airwell)./CN Front Frame 725x725) (Airwell)./CN STEP MOTOR Power Cord Without Plug/3G/1.5/2100 Fixing Plate/Pump Assy. Display Board/CN Controller / CN Fixed RPM Indoor Sensor BLACK Thermistor room EPS/Air Housing Low Height) Controll Box1 Assy. R/C RC4-RCL 974-670-00 Cover/Controll Box 1 Controll Box 2/CN Cover/Controll Box 2 8 Poles Terminal Block/CN Fixed Grille Clasp Cover1 /Front Plate Cover2 /Front Plate Cover3 /Front Plate Cover4 /Front Plate Support 1/lever Assy/CN Support 2/lever Assy./CN Orienting Support/Lever Base Plate Assy./CN Fixed Liquid Pipe Assy. /6.35 Gas Pipe Assy./9.53 Fixing Plate/Evaporator (Low height) Cushion Rubber/CN Fixed Air Intake Panel/Low Drain Jam Linkage Assy./Flap/CN connect Shaft/Motor Linkage /Flap Support/Step Motor Support/Step Moter 2 Transformer/Input230V/Output12.4V 0.5A Double patch Capacitor for fan motor 2uF Motor Support/CN fixed Defrost cable EXPORT UNITS Service Manual-CN Fixed RPM series Quantity 1 1 1 1 1 1 1 1 1 4 1 2 1 3 4 4 1 1 1 1 2 1 1 1 1 1 1 1 1 1 1 1 1 1 2 1 1 1 1 4 4 6 1 1 1 2 4 1 1 2 2 2 1 1 1 1 1 1 14-5 EXPLODED VIEWS AND SPARE PARTS LISTS 14.5 Spare part list of Intdoor Unit:CN 18 Airwell No. 1 2 3 4 4 5 6 7 8 9 10 11 12 13 14 14 15 16 17 17 18 19 20 21 23 24 25 26 28 29 30 31 32 33 34 35 36 37 38 39 41 42 43 49 50 51 52 57 59 61 62 63 64 64 72 73 74 75 Part No. 453189500 453189900 453192700 465720163 465720169 465080003 462350090 453192600 465800084 453189700 453191300 465360021 453189300 453191600 453191700 470250017 470250004 466100019R 465020104 465020105 433050 455013705R 464250066 467300128R 467300223R 232299 4519813 453191800 464750006 436670R 464750003 464750002 464750004 467420022 453189600 465340022 453190600 465340040 465080002 465800089 465800090 465360028 464600087 463750124 463750120 453188400 470120020 453190900 453195100 465800091 465440018 453190000 465360022 465360032 467450000 455000108 464200028 4520416 Name Grille Filter Assy. Water-Level Switch Front Plate Assy. 625x625 /CN Airwell Front Plate Assy. 725x725 /CN Airwell Display Cover Evaporator welding Assy./CN 17 Fixed R410A Pump CN Drain Pipe Assy/CN. Horizontal Flap Drain pan Assy Support/Grill Clasp Centrifugal Fan High)CN60X60 EPS 1 / Front Frame EPS 2 / Front Frame EPS /Air Outlet/Front Frame 725X725 EPS 3/Front Frame Metal Motor 27W 850/750/650/550RPM Front Frame 625x625) (Airwell)./CN Front Frame 725x725) (Airwell)./CN STEP MOTOR Power Cord Without Plug/3G/1.5/2100 Fixing Plate/Pump Assy. Display Board/CN Controller / CN Fixed RPM Indoor Sensor BLACK Thermistor room EPS/Air Housing (high) Controll Box1 Assy. R/C RC4-RCL 974-670-00 Cover/Controll Box 1 Controll Box 2/CN Cover/Controll Box 2 8 Poles Terminal Block/CN Fixed Grille Clasp Cover1 /Front Plate Cover2 /Front Plate Cover3 /Front Plate Cover4 /Front Plate Support 1/lever Assy/CN Support 2/lever Assy./CN Orienting Support/Lever Base Plate Assy./CN Fixed Liquid Pipe Assy. /6.35 Gas Pipe Assy./12.7 Fixing Plate/Evaporator high) Cushion Rubber/CN Fixed Air Intake Panel (high) Drain Jam Linkage Assy./Flap/CN connect Shaft/Motor Linkage /Flap Support/Step Motor Support/Step Moter 2 Transformer/Input230V/Output12.4V 0.5A Double patch Capacitor for fan motor 2uF Motor Support/CN fixed Defrost cable EXPORT UNITS Service Manual-CN Fixed RPM series Quantity 1 1 1 1 1 1 1 1 1 4 1 2 1 3 4 4 1 1 1 1 2 1 1 1 1 1 1 1 1 1 1 1 1 1 2 1 1 1 1 4 4 6 1 1 1 2 4 1 1 2 2 2 1 1 1 1 1 1 14-6 EXPLODED VIEWS AND SPARE PARTS LISTS 14.6 Spare part list of Outdoor Unit:GCN 9 R410A Airwell No. 1 2 3 5 6 7 8 9 10 11 12 13 14 16 17 18 19 20 21 22 24 25 26 27 28 29 30 31 34 34 34 35 36 37 Part No. 4522551 4523441 464600053 455000108 464160018 4519300 455000502 201019 461000004 461010004 4519251 4518022 204107 4522765R 464860002 463750214 4510677 391498 460170001R 469100003 4516637 461600076 4518951 4520071 4516857 453086200 4514588 236179 464770001 464770007 464800000 462000032 4516158 436358 Name Grille A of GCN Front panel A Painting assy Painting Base ASSY. Double patch Capacitor for fan motor 2uF Partition plate/GCZ 9/12 Nut M5 L Compressor Capacitor With Screw 25uF (CBB65) Nut M8 Liquid Valve 1/4" R410A Gas Valve 3/8" R410A Axial Fan OD=400 Cap. Clip Cable clip Nylon Motor of outdoor (670/750rpm) Motor Support Assy. Check Valve Assy. /2.6x1.4x(800+800)/GCN 9 R410A/PA103 Nut With Flange M8 -D=24 GB6187-86 Wire assy Compressor Assy./ PA103X1C-4FZDE1(Toshiba) Insulation Felt/ Compressor Out sensor Black 4-Way Valve Assy./GCN 9 R410A/PA103X1C 4-W valve SHF-4H for R410A 4-W valve coil for R410A BIG SIDE COVER Side Plate Painting Assy./Right 5 Poles terminal block 2 Poles terminal block Rear Plate/Left Painting Assy Rear Plate/Right Painting Assy/GCZ 9/12 Guard Net/ODU Painting Assy Condenser/GCZ 12 Cover panel Painting assy L. lifter Service Manual-CN Fixed RPM series Quantity 1 1 1 1 1 1 1 1 1 1 1 1 1 1 1 1 3 1 1 1 1 1 1 1 1 1 1 1 1 1 1 1 1 1 14-7 EXPLODED VIEWS AND SPARE PARTS LISTS 14.7 Spare part list of Outdoor Unit:GCN 12 R410A Airwell No. 1 2 3 5 6 7 8 9 10 11 12 13 14 16 17 18 19 20 21 22 24 25 26 27 28 29 30 31 34 34 34 35 36 37 Part No. 4522551 4523441 464600085 455000108 464160018 4519300 455000503 201019 461000004 461010004 4519251 4518022 204107 466100029R 464860002 463750215 4510677 391498 460150005R 469100003 4516637 461600077 4518951 4520071 4516857 453086200 4514588 236179 464770001 464770007 464800000 462000032 4516158 436358 Name Grille A of GCN Front panel A Painting assy Base Plate Painting assy/GCN 12 R410A /Panisonic Double patch Capacitor for fan motor 2uF Partition plate/GCZ 9/12 Nut M5 L Compressor Capacitor With Screw 30uF (CBB65) Nut M8 Liquid Valve 1/4" R410A Gas Valve 3/8" R410A Axial Fan OD=400 Cap. Clip Cable clip Nylon Metal Motor /Outdoor Unit/GCN 7 Israel 2008 Motor Support Assy. Check Valve Assy. /2.6x1.4x(600+500)/GCN 12 R410A/5PS132 Nut With Flange M8 -D=24 GB6187-86 Wire assy Compressor Assy./ 5PS132EAC22 Panasonic Insulation Felt/ Compressor Outdoor sensor Black 4-Way Valve Assy./GCN 12 R410A/5PS132 4-W valve SHF-4H for R410A 4-W valve coil for R410A BIG SIDE COVER Side Plate Painting Assy./Right 5 Poles terminal block 2 Poles terminal block Rear Plate/Left Painting Assy Rear Plate/Right Painting Assy/GCZ 9/12 Guard Net/ODU Painting Assy Condenser/GCZ 12 Cover panel Painting assy L. lifter Service Manual-CN Fixed RPM series Quantity 1 1 1 1 1 1 1 1 1 1 1 1 1 1 1 1 3 1 1 1 1 1 1 1 1 1 1 1 1 1 1 1 1 1 14-8 EXPLODED VIEWS AND SPARE PARTS LISTS 14.8 Spare part list of Outdoor Unit: ONG3-17 R410A No. 1 2 3 4 5 6 7 8 9 10 11 12 13 14 15 16 17 18 19 20 21 22 23 24 26 27 28 29 30 31 32 33 34 35 36 37 38 Part No. 433218 433221 464860054 4519251 4520171R 4527203 464600001 4527202 455000506 453012700 4524176 4524595 455000001 4514588 204107 236179 4516637 463600000 469270002 463230014 4510677 4519987 460000000 433229 4519606 461600001 4518952 4520071 433228 4526298 462300003 4519614 4519300 433225 4519607 470120001 453121300 Name Front Panel A Air Inlet Ring-420 Painting Insulation Plate Assy/ONG Axial Fan OD=400 Fan Motor (910rpm) Motor Support Base Plate Painting Assy. Partition Plate Compressor Capacitor With Screw 45uF (CBB65) Electric Panel 1/4" Liqiud Valve(R410A) 1/2" Gas Valve for ONG R410A single patch Capacitor for fan motor 2uF (CBB61S) 5 Poles terminal block Cable clip Nylon 2 Poles terminal block Out sensor Black Capillary Assy Insulation Rub+Felt/Compressor 2-Way Strainer Nut With Flange M8 -D=24 GB6187-86 Wire assy Compressor Assy./ GMCC PA200X2CS-4KT1 Valve Cover Right side panel (painting plate) 4-Way Valve Assy. 4-W valve SHF-7H for R410A 4-W valve coil for R410A Back Side Net Bridge Condenser Assy. Painting Top Cover Nut M5 L Handle Left Side Panel Painting Plate Rubber Cushion /Base Plate Install. Accessory Service Manual-CN Fixed RPM series Quantity 1 1 1 1 1 1 1 1 1 1 1 1 1 1 1 1 1 1 1 1 3 1 1 1 1 1 1 1 1 1 1 1 1 1 1 4 1 14-9 APPENDIX A APPENDIX A INSTALLATION AND OPERATION MANUAL Service Manual-CN Fixed RPM series 15-1 Installation manual AIR CONDITIONER CASSETTE English Indoor unit cassette type Part Number: 468050324/01 Indoor unit cassette type 10. REFRIGERANT TUBING..............................................................................................17 11. PANEL INSTALLING....................................................................................................19 12. SPECIAL SETTINGS...................................................................................................22 13. FINAL TASKS...............................................................................................................23 1 Indoor unit cassette type 1. REQUIRED TOOLS FOR INSTALLATION WORK 2. SAFETY PRECAUTIONS Installation should be in accordance with local and national electrical and building fire safety regulations or codes. WARNING 2 Indoor unit cassette type 10) Do not install the unit at place where leakage of flammable gas may occur. In case gas leaks and accumulates at surrounding of the unit, it may cause fire. 11) Carry out drainage piping as mentioned in installation instructions. If drainage is not perfect, water may enter the room and damage the furniture. 12) For appliances with supplementary heaters, the minimum clearance from the appliance to combustible is 50cm other wise, it will cause fire. ATTENTION 1) Selection of the installation location. Select an installation location which is rigid and strong enough to support or hold the unit, also for easy maintenance and repair. 2) Power supply connection to the room air conditioner. Connect the power supply cord of the room air conditioner to the mains using one of the following method. Power supply point shall be the place where there is ease for access for the power disconnection in case of emergency. In some countries, permanent connection of this room air conditioner to the power supply is prohibited. 3) Do not release refrigerant. Do not release refrigerant during piping work for installation, reinstallation and during repairing a refrigeration parts. Take care of the liquid refrigerant. it may cause frostbite. 4) Installation work. It may need two people to carry out the installation work. 5) Do not install this appliance in a laundry room or other location where water may drip from the ceiling, etc. 6) The temperature of refrigerant circuit will be high, please keep the interconnection cable away from the copper tube. 3 Indoor unit cassette type 3. INSTALLATION/SERVICE TOOLS (Only for R410A product) CAUTION New Refrigerant Air Conditioner Installation THIS AIR CONDITIONER ADOPTS THE NEW HFC REFRIGERANT (R410A) WHICH DOES NOT DESTROY OZONE LAYER. R410A refrigerant is apt to be affected by impurities such as water, oxidizing membrane, and oils because the working pressure of R410A refrigerant is approx. 1.6 times of refrigerant R22. Accompanied with the adoption of the new refrigerant, the refrigeration machine oil has also been changed. Therefore, during installation work, be sure that water, dust, former refrigerant, or refrigeration machine oil does not enter into the new type refrigerant R410A air conditioner circuit. To prevent mixing of refrigerant or refrigerating machine oil, the sizes of connecting sections of charging port on main unit and installation tools are different from those used for the conventional refrigerant units. Accordingly, special tools are required for the new refrigerant (R410A) units. For connecting pipes, use new and clean piping materials with high pressure fittings made for R410A only, so that water and/or dust does not enter. Moreover, do not use the existing piping because there are some problems with pressure fittings and possible impurities in existing piping. Changes in the product and components In air conditioners using R410A, in order to prevent any other refrigerant from being accidentally charged, the service port diameter size of the outdoor unit control valve (3 way valve) has been changed. (1/2 UNF 20 threads per inch) In order to increase the pressure resisting strength of the refrigerant piping, flare processing diameter and opposing flare nuts sizes have been changed. (for copper pipes with nominal dimensions 1/2 and 5/8) New tools for R410A New tools for R410A Applicable to R22 model Changes Gauge manifold As the working pressure is high, it is impossible to measure the working pressure using conventional gauges. In order to prevent any other refrigerant from being charged, the port diameters have been changed. Charge hose In order to increase pressure resisting strength, hose materials and port sizes have been changed (to 1/2 UNF 20 threads per inch). When purchasing a charge hose, be sure to confirm the port size. Electronic balance for refrigerant charging As working pressure is high and gasification speed is fast, it is difficult to read the indicated value by means of charging cylinder, as air bubbles occur. Torque wrench (nominal dia. 1/2, 5/8) The size of opposing flare nuts have been increased. Incidentally, a common wrench is used for nominal diameters 1/4 and 3/8. Flare tool (clutch type) By increasing the clamp bar's receiving hole size, strength of spring in the tool has been improved. Gauge for projection adjustment Used when flare is made by using conventional flare tool. 4 Indoor unit cassette type Connected to conventional vacuum pump. It is necessary to use an adapter to prevent vacuum pump oil from flowing back into the charge hose. The charge hose connecting part has two ports -- one for conventional refrigerant (7/16 UNF 20 threads per inch) and one for R410A. If the vacuum pump oil (mineral) mixes with R410A a sludge may occur and damage the equipment. Vacuum pump adapter Gas leakage detector Exclusive for HFC refrigerant. Incidentally, the "refrigerant cylinder" comes with the refrigerant designation (R410A) and protector coating in the U.S's ARI specified rose color (ARI color code: PMS 507). Also, the "charge port and packing for refrigerant cylinder" requires 1/2 UNF 20 threads per inch corresponding to the charge hose's port size. 4. ACCESSORIES Shape Name Installation template Qty Used for 1 Full scale paper template for installation Drain hose 1 Adaptor for drainage Insulation 1 Insulation for drainage Hose clamp 1 Securing drain hose Pipe insulation 2 Insulation for gas and liquid tubes Washer 8 For suspension bolts Bolt 4 For installation template Bolt 4 For attaching the panel Clamp 6 For securing insulation Sealing material 2 Sealing specified air outlets Remote controller with batteries 1 For operating the unit Remote control bracket 1 Wall mounting of the remote control Screws Dowels 2 Wall mounting of remote control bracket Outdoor unit drain connector 1 Outdoor unit water drain Mounting pads 4 Padding of outdoor unit bottom support Low voltage cable 1 Signal transmission 5 Indoor unit cassette type Cable ties Manual 2 Securing wires in the indoor and outdoor unit 3 Remote control manual Operating manual Installation manual 5. OPTIONAL ACCESSORIES Name Used for Panel 625X625 Gird ceiling installation Panel 725X725 Hard ceiling installation Note: Decoration panel is separated from unit when packaging, select proper panel for different installation situation. 6. LOCATION OF THE INDOOR AND OUTDOOR UNITS This air conditioner has the optional 2-way/3-way air discharging according to installation location. Use sealing material in accessory parts to seal the related air outlets. Air flow direction (example) 4-way direction (Default) 3-way direction 2-way direction Indoor unit 1. Do not install the cassette in a room where gasses, acids or inflammable products are stored, in order to avoid damage to the aluminum and copper evaporators and the internal plastic parts. 2. Do not install the cassette in a workshop or a kitchen. Oil vapor attracted by the treated air could form deposits on the cassette evaporators and modify their performance or damage the cassette's internal plastic parts. 3. Do not install the cassette in a laundry, or a room where steam is produced. 4. The appliance must be positioned so that the plug is accessible. 5. Installing the cassette will be easier with the use of a fork lift truck. Use the packing base by placing it between the cassette and the truck forks. 6. It is recommended to install the cassette, as far as possible, in the centre of the room, in order to optimize treated air distribution. 7. For the chosen location, check that the distribution grilles can be removed and that there is sufficient space available for maintenance and repairs. 6 Indoor unit cassette type Outdoor unit 1. The location must allow easy servicing and provide good air circulation as shown in fig 4. 2. The unit may be suspended from a wall by a bracket (Optional) or located in a free standing position on the floor (preferably slightly elevated). 3. If the unit is suspended, ensure that the bracket is firmly connected and the wall is strong enough to withstand vibrations. 4. Unit location should not disturb neighbors with noise or exhaust air stream. 5. Place the mounting pads under the unit legs. 6. Refer to figure 4 for allowed installation distances. When the unit is installed on a wall, install the drain connector hose and drain plug as shown in fig1 and fig2. Fig.1 Fig.2 1. Bottom of outdoor unit 2. Drain connector Drain installation Example Fig 2 Fig 1 1 2 7 Indoor unit cassette type Fig.3 9000Btu/h 12000Btu/h 18000Btu/h 15 7 Fig.4 Note: No additional charge is required. Fig. 4 Mounting pads (x4) 8 Indoor unit cassette type 7. INSTALLATION OF THE INDOOR UNIT Deciding ceiling opening size 1. Gird ceiling installation situation (60x60 standard ceiling): Because this unit is a mini-cassette, there is no need to make an opening cut on the ceiling, just remove one piece of ceiling panel. Caution! Under this installation situation, Panel 625x625 is recommended 2. Hard ceiling installation situation: Create the ceiling opening required for installation, below shows the relationship of the ceiling opening to unit and the panel (Fig 5) (Suspension bolt) Suspension hook (x4) 531 unit) 578 (Indoor opening) 585-680 (Ceiling 725 (Decoration Panel) Refrigerant piping 531(Suspension bolt pitch) (Indoor unit) 578 585-680 (Ceiling opening) 725 (Decoration panel) Fig.5 Ceiling opening dimension 585-680 Installation hook 22.5 22.5 (Ceiling-panel overlapping dimension) Fig.6 9 (91) Ceiling Indoor unit cassette type Caution Under this installation situation, Panel 725X725 is recommended; the maximum ceiling opening size is 680mm. Pay attention that there must be a overlapping between panel and ceiling. (Fig 6) Installing the indoor unit (Suspension bolt pitch) 531 585-680 (Ceiling opening dimension) 1. Use installation template (supplied with the panel) when deciding the suspension bolt position.Fig.7 and table 1 show the dimensions relationship. (Suspension bolt pitch) 531 585-680 Fig.7 Table 1 Length Type 9000 Btu/h 12000 Btu/h 18000 Btu/h Wide tube A (Ceiling opening dimension) B C D E 230 160 115 169 91 281 160 115 169 91 Narrow tube ø1 50 Drain port 31 E C B D A Suspension hook mm 2. Tubing and wiring must be prepared beforehand inside the ceiling when suspending the unit. 10 Indoor unit cassette type 10-12 mm Ouer 15 mm 3. The length of suspension bolts must be appropriate for a distance between the bottom of the bolt and the bottom of the unit of more than 15mm as shown in Fig.8 Supplied bolt Full-scale installation diagram (Supplied with the unit) Fig.8 4. In order to prevent a possible looseness, it is recommended to use 3 hexagonal nuts (Prepared on site) and 2 washers (accessory) for each suspension bolt. Pay attention that 2 nuts will be used in the lower side.(Fig.9) 5. Adjust the distance between the unit and the ceiling bottom to 10~12mm. Tighten all the nuts on the suspending bolts.(Fig.9) Suspension bolt Nuts and washers (Use for upper and lower) 2 nuts 10-12 mm Fig.9 11 Suspension hook Indoor unit cassette type Duct installation 1. Side openings are provided for installing separate ducts for outside air intake and treated air distribution to an adjacent room. 2. Use a punch to remove the knock-down openings on the casing. Use a knife to make the suitable opening on the polystyrene behind the casing. Knock-down opening for outside air Knock-down opening for distributing air to adjacent room ø1 ø1 00 50 Fig.10 TAKE CARE not to damage the heat exchanger coil located behind the openings. 3. Plug the gaps between the ducts and the opening edge with anti-condensation insulation. 4. Use material which can withstand a continuous operating temperature of 60 . The ducts can be of the flexible type with a spring core or of corrugated aluminum, covered inside with an insulating material (12 to 25 mm thick glass fiber). 5. When the installation is finished, all the surfaces of the non-insulated ducts must be covered with anti-condensation insulation material (6mm thick expanded polystyrene or expanded neoprene). Fireproofing classification: M1. IF THE ABOVE INSTRUCTIONS ARE NOT FOLLOWED, CONDENSATE FLOWS WILL BUILD UP. 6. Distributing air to an adjacent room requires the corresponding panel air outlets to be sealed by using the sealing material (Accessory) 7. A decoration grille must be fitted in the partition between the air conditioned room (where the cassette is installed) and the adjacent room. Decoration Grille Fig.11 12 Indoor unit cassette type 8. CONDENSATE HOSE CONNECTION Drain hose connection 1. Use standard hard PVC pipe (19mm) for the drain pipe. 2. Use the drain hose (Accessory) to change the direction. 3. Insert the drain hose until it connects the drain port very well, and then secure it tightly with the hose clamp(Accessory)( Fig.12) 4. After checking the drainage, wrap the drain hose with the insulation and clamps (Accessory). ( Fig.12) Drain clamp (accessory) Drain port Drain hose (accessory) Hard PVC pipe Insulation (accessory) Connected by hose connector (Prepared on site) Hard PVC pipe Fig.12 Caution! 1. Do not raise the drain pipe higher than 1m, or else there will be water leak risk.(Fig.13) 2. Make sure the drain pipe has a downward gradient (no less than 1/100) and there are no water traps (Fig.13). 3. To hold the drain pipe, space bracket every 1 to 1.5m.(Fig.13) Ceiling Bracket 1 1.5m Drain hose (accessory) 1m 1/100 gradient or more Clamp (accessory) Fig.13 13 Indoor unit cassette type Check the drainage 1. After wiring and drain piping are completed, check the drainage according to the following procedure. If necessary, prepare a bucket and cloth to catch and wipe up the water spilled out. 2. Connect the AC 220V~240V power to the terminal blocks (L, N terminals) inside the electrical box. 3. Slowly inject about 1,000 cc of water into the drain pan.(Fig.14) 4. Operate the unit in cooling mode. Check the drainage through the transparent drain port to see if any drain leakage happens. 5. When the check is finished, do not forget to cut off the power input. 100 mm Drain port Water (approx. 1000cc) Air outlet Plastic container for water intake Fig.14 Caution! During this operation, the fan will start working. So pay attention to the rotating fan. Finish the drainage work. After checking the drainage, make sure that heat insulation is wrapped around the indoor drain pipe to avoid any dew condensation. (The material should have M1 fireproofing classification) 14 Indoor unit cassette type 9. ELECTRICAL CONNECTION BETWEEN INDOOR AND OUTDOOR UNIT Electrical requirements Electrical wiring and connections should be made by qualified electricians and in accordance with local electrical codes and regulation. The air conditioner units must be grounded. The air conditioner unit must be connected to an adequate power outlet from a separate branch circuit protected by a time delay circuit breaker, as specified on unit's nameplate. Voltage should not vary beyond ±10% of the rated voltage. 1. To connect the indoor unit to the outdoor unit uses the following electrical cables. Electrical connections: CAPACITY 3G,1.0 3G,1.5 Cable between indoor and outdoor unit (ST model) mm 2 4G,1.0 4G,1.5 Cable between indoor and outdoor unit (RC model) mm 2 5G,1.0 5G,1.5 3G,1.0 3G,1.5 5G,1.0 5G,1.5 6G,1.0 6G,1.5 mm mm 2 Cable between indoor and outdoor unit (ST model) mm 2 Cable between indoor and outdoor unit (RC model) mm 2 Power cord Power supply from outdoor unit 18000 Btu/h 2 Power cord Power supply from indoor unit 9000/12000 Btu/h Low voltage cable (option) mm 2 2G,0.5 2. Prepare the cable ends for the power input and for the cables between outdoor and indoor units as shown in figure 15a and 15b respectively. 3. Connect the cable ends to the terminals of the indoor and outdoor units, as shown in fig 16. 4. Secure the multiple wire power cable with the cable clamps. Notes: The wire color code can be selected by the installer. Power input cable Cable between indoor and outdoor units Fig.15a Fig.15b Fig.15 A. OUTDOOR B. INDOOR 15 Indoor unit cassette type Wiring procedures 1. Remove the three screws 2. Move the cover along the direction shown in the figure and then remove the cover Clamp Cable locker 1. Remove the two screws 2. Lift the cover towards you and then remove the cover For indoor unit power supply To outdoor unit Fig.16 Heat Pump Cooling only Replace the sensor wire by dummy sensor 4.7K Ù Sensor wire coming from indoor unit 9 8 6 5 5 4 4 N 3/N L L ~230V - 50HZ L ~230V - 50HZ ~230V - 50HZ 6 5 5 4 4 N 3/N L L N N Optional 6 L L Optional N Connected only when the outdoor unit have the terminal L 16 ~230V - 50HZ 6 L N Indoor unit cassette type 10. REFRIGERANT TUBING Connect the indoor to the outdoor unit The indoor unit contains a small quantity of nitrogen. Do not unscrew the nuts from the unit is supplied with sufficient refrigerant charge (R410A). Refer to outdoor unit nameplate. To prevent crushing, bend tubes using a bending tool. NOTE: Use R410A refrigerant type copper tubing only. 1. Open the valve cover. 2. Use tubing diameter that corresponds to the tubing diameter of the indoor and outdoor units. Note that the liquid and suction tubes have different diameters. (See tube size, torque tightening table.) 3. Place flare nuts on tube ends before preparing them with a flaring tool. Use the flare nuts that are mounted on the supplied outdoor and indoor units. 4. Connect the all ends of the tubing to the indoor and outdoor units. Notice the sign. All ends should correspond one by one. 5. Insulate each tube separately, and their unions, with at least 6 mm thick of insulation. Wrap the refrigerant tubing, drain hose and electric cables together with a vinyl tape (UV protected). Fig.18 1 2 3 4 Caution! When unscrewing the valve caps, do not stand in front of them or the spindles at any time, as the system is under pressure. 5 6 7 8 9 10 11 12 Fig.17 Tightening torques of unions and valve caps: Fig.17 1. Indoor unit 2. Liquid tube (small dia.) 3. Suction tube (large dia.) 4. Plugs 5. Flare nuts 6. Tubing between units 7. Suction tube 8. Liquid tube 9. Outdoor unit 10. Flare nuts 11. Suction valve (large) 12. Liquid valve (small) TUBE SIZE TORQUE Liquid line 1/4” 15-20 N.M. Suction line 3/8” 30-35 N.M Suction line 1/2” 50-54N.M. Suction line 5/8” 75-78N.M. 17 Fig.18 1.Wrench 2.Torque wrench 3.Union Fig.19 Fig.19 To prevent refrigerant leakage, coat the flared surface with refrigeration oil Fig.20 Fig.20 1.Suction valve 2.Service port 3.Liquid valve 4.Union Indoor unit cassette type Do the vacuum of the refrigeration tubes and the indoor unit After connecting the unions of the indoor and outdoor units, purge the air from the tubes and indoor unit as follows: 1. Connect the charging hoses with a push pin to the low side of the charging set and the service port of the suction valve. Be sure to connect the end of the charging hose with the push pin to the service port. 2. Connect the center hose of the charging set to a vacuum pump. 3. Turn on the power switch of the vacuum pump, turn off the high side switch and make sure that the needle in the needle in the gauge moves from 0 MPa (0cm Hg) to -0.1MPa (-76cm Hg). Let the pump run for fifteen minutes. 4. Close the valve of the low side of the charging set and turn off the vacuum pump. Note that the needle in the gauge should not move after approximately five minutes. 5. Not any problem for five minutes, turn on the power switch of the vacuum pump and open the valve of the low side of the charging set. 6. Disconnect the charging hose from the vacuum pump and from the service ports of the suction valve. 7. Tighten the service port caps of suction valve. 8. Redo 1 to 7 for other indoor units. 9. Remove the valve caps from all valves, and open them using a hexagonal Allen wrench. 10.Remount valve caps from all of the valves. 11.Check for gas leaks from all the connecting position. Test with electronic leak detector or with a sponge immersed with soapy water for bubbles. Note For additional charge of various tubing lengths, refer to outdoor unit nameplate. Fig.21 1. Charging set 5. Cap 9. Liquid valve 2. Vacuum pump 6. Suction valve 10. Indoor unit 3. Outdoor unit 7. Service port * 11. Suction flare connection 4. Service port 8. Cap 12. Liquid flare connection * In some models only 18 Indoor unit cassette type 11. PANEL INSTALLING Removing the grille: 1. To open the grille, rotate the grille lock counterclockwise from horizontal position to vertical position.(fig.22) Rotate about 90 Grille lock Fig.22 2. With the grille fully opened, remove the grille along the direction shown in Fig.23. Fig.23 Temporary installation of the panel 1. Install two bolts (Accessory) onto the main unit (the corner of refrigerant tubing side and the opposite corner).The detail is shown in Fig.24. Pay attention that leave 15-20mm bolt unscrewed so as to hang the panel easily 19 Indoor unit cassette type Refrigerant tubing corner Drain tubing corner 15-20 (mm) Unit Bolts Bolts Fig.24 2. Attach the panel to the main unit, twist the panel to make sure that the two bolts mentioned above are screwed into the cavity on the panel. Thus the panel can keep balance with the two bolts. 3. Pay attention that the TUBE and DRAIN marks on the ceiling panel are in the correct positions on the unit. 4. Tighten all bolts (the previously two installed bolts as well as the two remaining bolts.) to secure the panel. 5. Pay attention that there should be no gaps between the unit and the ceiling panel, or between the ceiling panel and the ceiling. Wiring of panel 1. Connect the 12Pin cable connector from the ceiling panel to the relative connector which comes out of the control box. Fig.25 Caution! If this connector is not connected, the display will not work. Make sure the cable is connected securely. 2. Connect the 5Pin cable connector from the ceiling panel to the relative connector comes out of the control box.(Fig.25) Caution! If this connector is not connected, the louver will not work. Make sure the cable is connected securely. 20 Indoor unit cassette type Display cable connector (12pin) Louver motor cable (5pin) 5pin connector from panel 12pin connector from panel 5pin connector from unit body 12pin connector from unit body Fig.25 Attaching the grille 1. To attach the grille, refer to the section removing the grille and follow the steps in reverse order. 2. The panel is designed so that the grille can be installed into the panel in 4 directions. Select the convenient direction for service. 21 Indoor unit cassette type 12. SPECIAL SETTINGS According to the installation height, the air flow compensation setting should follow below instruction: Floor Black PVC protecting pipe White Translucent PVC protecting pipe Orange Red White Black Blue Red Blue Indoor motor connecting wire assy. B Indoor motor connecting wire assy. A Fig.26a Fig.26b Fig.26 Installation Height Air flow compensation setting H 3.3m Use the indoor motor connecting wire assy.A Fig.26a (Default setting) H 3.3m Use the indoor motor connecting wire assy.B Fig.26b (Accessory) 22 Indoor unit cassette type 13. FINAL TASKS 1. Check all valve caps and ensure that they had been tightened properly. Close the valve cover. 2. Fill gaps on the wall between hole sides and tubing with sealer. 3. Attach wiring and tubing to the wall with clamps where necessary. 4. Operate the unit for no less than 5 minutes at heating or cooling mode. 5. Explain filter removal, cleaning and installation. 6. Operate the air conditioner together with the customer and explain all functions. 7. Give the operating and installation manuals to the customer. 23 PROTECTION 468100326 upward and downward direction to spread the heating mode, the air conditioner’s the R410A & R407C DB[°C] WB[°C] DB[°C] WB[°C] R22 DB[°C] WB[°C] DB[°C] WB[°C] 3 Dummy function(just for diagnostic test ) Lights up in red when the units is connected to power and ready to receive the remote control commands. Lights up in green during operations. Blinks when compressor is stopped as a result of a thermodynamic protection. 4 Only a qualified service technician is allowed to perform the maintenance. When cleaning the filter, make sure the main power should be cut off. Or else fingers touching the electrical parts or rotating fan by mistake can lead to body injury. To remove the air filters, open the front panel by rotating the 2 locks counterclockwise from horizontal to vertical position, pull out the filters, and clean them by washing in warm soapy water and dry thoroughly. Align and fit the filters in place. Close the panel by rotating the lock to horizontal position. If your air conditioner is provided with a filter cleaning indicator, a light blinks when filter cleaning is needed. In this case, remove the filters as indicated above, clean them and press the RESET button to turn OFF the indicator. Air filter Pull Wipe the unit with a soft dry cloth or clean it using a vacuum cleaner. Do not use hot water or volatile materials which could damage the surface of the air conditioner. Make sure there are no obstacles blocking the flow of inlet or outlet air, in both indoor and outdoor units. Make sure the power is properly connected. Indoor unit and remote control must be at least 1 meter away from a TV, radio or any other home electronic appliance. Protect the inner unit from direct sun or lighting. 7