1
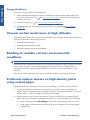
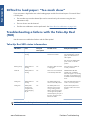
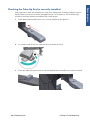
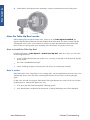
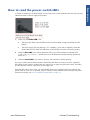
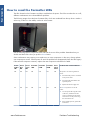
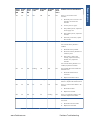
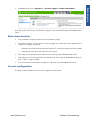
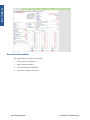
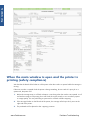
Troubleshooting
To better help our customers - this DesignJet Z6200 series
troubleshooting page is simply a guide / additional information for your convenience, as you search for
assistance in repairing your machine. Although this information is provided for your convenience it is
recommended, for the most part, that a technician inspects your office equipment.
It is recommended to consult with a professional when ordering your printer part(s).
Chapter contents
Troubleshooting
Printer education and training
Firmware update
Print-quality troubleshooting
Troubleshooting system error codes
Performing a service test on a failed assembly
Performing the necessary service calibrations
The printer does not power on
The printer continuously rejects printheads
A new maintenance cartridge is incorrectly detected as ‘used’
Cover sensors are not working
Shop with us while you troubleshoot.
* HP oem parts
* HP LaserJet maintenance kits
.........printer
* Toners for your
* HP fuser assembly units
* HP fuser kit 110v & 220v
* Parts assemblies for printers
* Service maintenance parts
* Color laserJet printers
* LaserJet printers and parts
* Hard to find officejet parts
* Hard to find deskjet parts
User-friendly SmartSearch!
The Line Sensor has problems detecting paper
Troubleshooting paper jams and printhead crashes
Troubleshooting paper, scan axis and Rewinder Motor shutdown
Vacuum suction much lower at high altitudes
Banding at variable extreme environmental conditions
Printhead crashes/smears on high-density prints using coated paper
Banding due to ink cartridge replacement while printing
34-inch Rice Paper not supported
Worm marks on HP Coated Paper with light area fills
Solving paper-handling problems
Difficult to load paper: “Too much skew”
www.Partshere.com
Partshere Troubleshooting
Troubleshooting
Printer education and training
Before any attempt is made to troubleshoot the printer, you must have the relevant training on the HP
Designjet Z6200 Photo printer series. If you are not trained on this printer, please contact HP Education
or HP Training to enquire about becoming ‘HP Service Qualified’ for this printer.
Firmware update
The first step to take when trying to clear an error with the printer is to check that the firmware installed
in the printer is the latest available. Firmware updates often include fixes for common problems, and
simply updating the firmware can often resolve the problem. New firmware can be downloaded here:
http://www.hp.com/go/designjet/downloads
USB firmware update
If it is not possible to perform a firmware update using the Embedded Web Server (for instance, if the
printer has a System Error and the Embedded Web Server is inaccessible), it is still possible to do it
using a USB flash drive.
1.
Turn off the printer.
2.
Ensure that your USB flash drive contains a valid FMW firmware file and no other files.
3.
Connect the USB flash drive to the USB host port on the Formatter.
4.
Turn on the printer and follow the instructions on the front panel.
Forced firmware update
When the printer is started for the first time, it may automatically request a firmware update in order to
fix some known issues. You can respond in one of the following ways.
●
Use the USB flash drive provided in the box with the printer.
When a firmware update is requested, you should find a USB flash drive in the box, containing
the new FMW firmware file. Follow the instructions in the flier accompanying the USB flash drive.
NOTE: The USB flash drive is provided only to update the printer's firmware. No other uses of
the USB flash drive are supported.
NOTE: If the USB flash drive is not in the printer box, or fails to work properly, then download
the firmware instead.
●
Download the FWM firmware file from the HP Web site.
Store the file in a standard USB flash drive with no other files. Connect the flash drive to the
formatter's USB host port to perform the firmware update, following the instructions on the front
panel.
●
Skip the firmware update.
If you cannot find the USB flash drive and you have no Internet connection, you can skip the
forced firmware update temporarily by pressing the OK key on the front panel three times, and the
printer will continue with the initialization sequence. Make sure that the firmware update is
performed later. The printer will request the firmware update every time that it starts, until the
update is performed.
ENWW
www.Partshere.com
Printer education and training
Partshere Troubleshooting
3
Troubleshooting
Print-quality troubleshooting
Whenever a print-quality problem appears, it is advisable to print the Diagnostic Print to help diagnose
the problem. The Diagnostic Print will help you differentiate between possible printhead errors and
other problems such as incorrect front-panel selection, driver or RIP configuration or mechanical
problems. For more information on solving print-quality problems, see Print quality on page 146.
Troubleshooting system error codes
System error codes on page 38 contains a list of system error codes and their respective descriptions
and recommended corrective actions. Try only one recommended action at a time and check whether
the error code has disappeared.
If you have an error code which is not documented in this Service Manual or you have an error which
you cannot resolve, then report the error to the HP Response Center or the nearest HP Support Office.
When reporting the error, have the following information ready:
●
Model and serial number of the printer.
●
Which firmware revision the printer is using (see Note below). Check firmware in Utilities /
Statistics / Code rev.
●
The complete error number.
NOTE: When reporting the system error code, make sure that you supply the full error code and
the firmware version. Without this information, HP support personnel cannot help you.
●
The service configuration print.
●
The current configuration sheet.
●
Which software application the customer is using (name, version, etc.).
Performing a service test on a failed assembly
If possible, always perform a Service Test on the component/assembly that you are about to replace,
just to make sure that is the component/assembly that has failed.
NOTE: If the test on that component/assembly passes, you should NOT replace it.
For information on the Service Tests and how to use them see Service tests and utilities on page 84.
Performing the necessary service calibrations
Is the printer calibrated correctly after replacing a component? For information on the Service
Calibrations and how to use them, see Service calibrations on page 123.
NOTE: Remember that certain calibrations are required even if an assembly has been disassembled
only to gain access to another assembly or component.
4
Chapter 1 Troubleshooting
www.Partshere.com
ENWW
Partshere Troubleshooting
Troubleshooting
The printer does not power on
To resolve printer power-up problems, do the following:
1.
Check that the power cord is connected correctly to the printer and to the power socket.
2.
Check that the power switch at the rear of the printer is in the on position.
3.
Check that the front-panel cable is correctly connected to the Electronics Module. Also make sure
that the front-panel cable is not damaged.
4.
Check to see if any of the LEDs on the power switch are on. If any of the LEDs are on, then see
How to read the power switch LEDs on page 13 for more information.
The printer continuously rejects printheads
To resolve printhead rejection problems, do the following:
1.
Clean the flex contacts on the Printhead and in the Carriage Assembly using the Carriage
Interconnect Wiper (see Carriage Interconnect Wiper on page 82) and try again.
2.
If all the Printheads are rejected (for each Printhead, the status message on the Front Panel does
not show 'OK') then perform the Carriage Assembly Test
Carriage Assembly test
on page 90..
A new maintenance cartridge is incorrectly detected
as ‘used’
This can occur if the printer has detected the previous Maintenance Cartridge was nearly full, and
when a new Maintenance Cartridge is installed the front panel displays an error that the cartridge is
‘used’. To resolve the problem, manually reset the counter of the Maintenance Cartridge
Reset Life
Counters on page 108.
Cover sensors are not working
To resolve cover sensor problems, do the following:
1.
Check whether the sensor cable is damaged or not connected correctly.
2.
Replace the faulty sensor.
The Line Sensor has problems detecting paper
To resolve Line Sensor paper detection problems, do the following:
1.
Check the type of paper that is being used: the Line sensor may have problems detecting
transparent paper or some types of Non-HP paper. Try loading white HP paper into the printer
and check whether the Line Sensor detects it.
2.
Excessive ink deposits on the Platen surface can fool the sensor by reflecting the light. Clean the
Print Platen.
ENWW
www.Partshere.com
The printer does not power on
Partshere Troubleshooting
5
Troubleshooting
3.
Clean the Encoder Strip
4.
The Line Sensor is not calibrated correctly. Perform the Line Sensor Calibration
calibration on page 131.
5.
The Line Sensor is damaged or faulty. Replace the Line Sensor
on page 353.
See Clean the Encoder Strip on page 422.
See Line Sensor
See Line Sensor Assembly
Troubleshooting paper jams and printhead crashes
NOTE: If you were using HP Coated Paper when the problem occurred, see also Printhead crashes/
smears on high-density prints using coated paper on page 8.
Paper jams and printhead crashes are grouped together because in many cases a paper jam causes
the paper to lift up into the Carriage path and cause a printhead crash, which means that many paper
jams are reported as printhead crashes.
Question
Answer
Did the paper jam occur when loading paper?
If paper jams have occurred previously, some pieces of paper
may still be stuck in the paper path. Clear the paper path.
NOTE: Customers often store used rolls without protecting
them from office environmental conditions; when exposed to
high humidity, the paper edges tend to curl. This curling can
cause paper jams when paper is loaded by feeding paper in
without lifting the Media Lever. In these conditions, to avoid
paper jams, the recommendation is to load paper by lifting
the Media Lever and aligning the paper manually, following
the instructions on the front panel.
Is the customer using non-HP paper?
The use of non-HP paper can easily be the cause of paper
jams and printhead crashes—especially printhead crashes,
because HP paper is specially formulated to avoid cockle, one
of the primary causes of head crashes. If the paper is not HPapproved, advise the customer to use HP paper and check to
see if the problem is now solved.
TIP: When clearing a paper jam, sometimes paper is stuck in the paper path. To clear this, you must
lift the Media Lever and insert thicker paper into the paper path to push out the paper that is still stuck
there.
Troubleshooting paper, scan axis and Rewinder
Motor shutdown
If a shutdown occurs, you will get the message “Switch Power Off” followed by one of these messages:
●
Check Maintenance Cartridge Path
●
Check Paper Path
●
Check Printhead Path
NOTE: A shutdown in each path will require different steps to resolve the problem as explained
below. In each case, make sure that you power off the printer before trying to resolve the problem.
6
Chapter 1 Troubleshooting
www.Partshere.com
ENWW
Partshere Troubleshooting
Troubleshooting
Also check that the Rewinder Motor moves easily (without friction) with the printer turned off.
Maintenance cartridge path
Open the right door of the printer and check for any visible obstacles restricting the movement of the
Service Station. Manually move the Service Station, checking for smooth and free movement.
Paper path
To resolve paper path problems, do the following:
1.
Open the Window and check for any visible obstacles restricting the movement of the Drive Roller.
Make sure that the mylar is not damaged. If there is a wrinkled mass of paper inside the paper
path, lift the Pinch wheels (using the Paper Load Handles) and clear the obstruction.
2.
If this shutdown happens at the end of a Roll of Paper, it could be because the paper is stuck
firmly to the Roll. Lift the Pinch wheels (using the Paper Load Handles) and pull the paper clear.
3.
Replace the spindle if broken.
4.
Perform the Paper Drive Test to obtain further information on the problem
on page 87.
Paper Drive test
Printhead path
When a shutdown occurs in the Printhead path, you will get the message “Switch Power Off / Check
Printhead Path (*). The (*) will be a number, which will give an indication on where the failure
occurred.
PWM shutdown
To resolve a PWM shutdown, do the following:
1.
Clean Slider Rods and Apply Oil along the complete axis of the Slider Rods. After applying the
See Scan Axis test on page 87 and check that the values are
Oil, perform the Scan-Axis Test
within the given limits.
2.
Clean the Encoder Strip
3.
Perform the Scan-Axis Test to obtain further information on the problem
on page 87.
See Clean the Encoder Strip on page 422.
Scan Axis test
Velocity shutdown
To resolve a velocity shutdown, do the following:
1.
Open the Window and check for any visible obstacles restricting the movement of the Carriage
Assembly. Try and move the Carriage Assembly manually, checking for smooth and free
movement.
2.
Check that the Encoder Strip is clean. If necessary, clean Encoder Strip using a damp cloth.
ENWW
www.Partshere.com
Troubleshooting paper, scan axis and Rewinder Motor shutdown
Partshere Troubleshooting
7
Troubleshooting
Energy shutdown
To resolve an energy shutdown, do the following:
1.
Clean Slider Rods and Apply Oil along the complete axis of the Slide Rods. After applying the
Oil, perform the Scan-Axis Test
See Scan Axis test on page 87 and check that the values are
within the given limits.
2.
Clean the Encoder Strip
3.
Perform the Scan-Axis Test to obtain further information on the problem
on page 87.
See Clean the Encoder Strip on page 422.
Scan Axis test
Vacuum suction much lower at high altitudes
At altitudes above 3,000 meters, the vacuum force holding down the paper will be lower, therefore the
paper will not be held in place properly causing:
●
Ink Smearing on the Paper.
●
Printhead crashes against the Paper.
●
Roll Paper loading problems (low probability).
Banding at variable extreme environmental
conditions
NOTE: This problem is only applicable if the OMAS is disabled.
Since the Accuracy Calibration has been done at normal environmental conditions, printing in extreme
environmental conditions will cause banding because the advance of the Drive Roller does not
correspond to the same conditions that the calibration was done in. To solve the problem, try the
following:
Perform the Accuracy Calibration in the new environmental conditions (see Using your printer).
Printhead crashes/smears on high-density prints
using coated paper
High-density prints can cause cockle mainly on HP Coated Paper. This causes two main problems:
8
1.
Cockling in the borders - Because the printer places too much ink on the Coated Paper, the
borders of the print become raised, causing the Printhead to crash against the paper. To solve the
problem, add a 15 mm white margin to the edges of the images.
2.
Cockling within the print - If the printer places too much ink within the print, the paper starts to
ripple, causing the Printhead to smear against the paper. To solve the problem, try the following:
●
Check in the Front Panel if Ink Limiting is ON or OFF. If Ink Limiting is OFF, turn it ON.
●
Avoid using HP Coated Paper for high-density prints. As a substitute, use HP Heavyweight
Coated Paper.
Chapter 1 Troubleshooting
www.Partshere.com
ENWW
Partshere Troubleshooting
Troubleshooting
Banding due to ink cartridge replacement while
printing
Someone has removed an Ink Cartridge while the printer was printing, which has caused the printer to
stop. If the user does not replace the Ink Cartridge immediately, when the printer starts to print again, a
band will appear in the position where the printing restarted. This is because the wet ink interacts with
the dried ink on the paper causing the band to appear. To solve the problem, try the following:
●
Do not remove an Ink Cartridge while the printer is printing. Only replace/remove Ink Cartridges
between prints.
●
If the Ink Cartridge was replaced due to the “Empty” status on the Front Panel, then advise the
customer to replace the Ink Cartridge when the “Very Low” status is showing on the Front Panel.
●
Reprint the file (without removing the Ink Cartridge).
34-inch Rice Paper not supported
The roll width is 34 inches (non-standard), and the pinch wheels can't control the edge of the paper,
causing ink smears and printhead crashes.
Worm marks on HP Coated Paper with light area
fills
Light bands (S-shaped) in the direction of the media axis when light area fills are printed, causing an
unacceptable print-quality defect.
●
Print the Service Configuration Print and check whether the ambient humidity is very low (below
30%). Increasing humidity may help to reduce the severity of the problem.
NOTE: The paper is causing the problem and not the printer. Do not attempt to replace printer parts
to solve this problem.
Solving paper-handling problems
The front panel keeps indicating that paper Is misaligned or incorrectly positioned.
●
The roll may be loaded the wrong way. The paper should load over the roll toward you.
●
Check that the paper is correctly loaded onto the spindle.
●
The paper may be loaded at an angle. The right-hand edge must be aligned with the blue line on
the Print Platen.
NOTE: Ensure that the paper is wrapped tightly on the roll. This is a very important step to
remember because if this is not done, the paper may be loaded at an angle, causing the paper to
be rejected.
●
The Line Sensor may be malfunctioning. See The Line Sensor has problems detecting paper
on page 5.
ENWW
www.Partshere.com
Banding due to ink cartridge replacement while printing
Partshere Troubleshooting
9
Troubleshooting
Difficult to load paper: “Too much skew”
If you encounter a high failure rate when loading paper and the Front Panel reports “Too Much Skew”
it is likely that:
●
The encoder strip must be cleaned (this can be carried out by the customer using the User
Maintenance Kit).
●
The Line Sensor must be cleaned.
●
The Blue Line calibration must be performed. See Platen blue line calibration on page 140.
Troubleshooting a failure with the Take-Up Reel
(TUR)
Use this section to troubleshoot failures with the Take-Up Reel.
Take-Up Reel LED status information
LED status
Issue
Print job
interrupted
Possible cause
Print job interrupted?
Blinking quickly
Take-Up Reel not
winding
Yes
Sensor beam blocked for
more than 3 seconds
Ensure the Take-Up Reel sensors
are not blocked by a strip of
paper, the collection bin or
other objects.
Also ensure the Take-Up Reel
power switch is in the On
position.
Blinking slowly
Take-Up Reel not
winding
No
The sensor cables are loose
or unplugged
Ensure the sensor cables are
correctly connected.
Solid red
Take-Up Reel not
winding
No
There is too much resistance
on the Take-Up Reel motor
ENSURE THAT THE TUR
Spindle Lever is CLOSED!
Ensure the paper is not winding
too tightly. A loop-shaping core
should be inserted and hanging
down.
Solid green
Take-Up Reel not
winding
No
The Take-Up Reel power
switch is in the Off position
Ensure the Take-Up Reel power
switch is in the On position.
Solid green
Take-Up Reel
winding in the
wrong direction,
and not stopping
the job.
No
The Take-Up Reel wind
direction switch is in the
wrong winding position.
After 3 seconds, the printer
will recognize the problem
and interrupt the print job. In
this case, see the first error
listed in this table.
Flip the Take-Up Reel winddirection switch to the correct
position.
NOTE: If the LED is flashing but there is no message on the front panel, restart the printer.
10
Chapter 1 Troubleshooting
www.Partshere.com
ENWW
Partshere Troubleshooting
Troubleshooting
Checking the Take-Up Reel is correctly installed
Many system error codes are displayed as a result of the Take-Up Reel not being installed correctly or
because parts have moved or become dislodged from their correct positions. This troubleshooting
procedure checks the mechanical installation of the Take-Up Reel.
1.
Check that the Take-Up Reel sensor unit is correctly installed on the right foot.
2.
To correctly install the foot, the wheel has to be positioned as shown.
3.
Check the cables linking the sensors to the Take-Up Reel Motor Assembly are correctly connected.
ENWW
www.Partshere.com
Troubleshooting a failure with the Take-Up Reel (TUR)
Partshere Troubleshooting
11
Troubleshooting
4.
Check that the Take-Up Reel motor assembly is correctly connected to the rear of the printer.
How the Take-Up Reel works
When selecting the front panel's Paper menu, if there is no line Take-Up Reel installed, this
indicates that the Take-Up Reel has not been enabled at the front panel. This does not mean that the
Take-Up Reel will not work; it just means that, if there is a paper jam detected by the Take-Up Reel,
there will be no warning system error displayed on the front panel. The printer will not stop.
How to install the Take-Up Reel
From the Paper menu > Take-Up Reel > Enable Take-Up Reel. After this is done, you will notice
the following differences:
●
In case of Take-Up Reel Paper jam system error, a warning is reported on the front panel, and the
printer pauses.
●
The cutter is disabled between jobs.
●
When unloading the paper, the front panel will ask you to cut the paper manually.
How it works
When the bottom of the 'loop shaper' is low enough and it cuts the signal between the two sensors, the
Take-Up Reel starts to move the motor until the signal between the two sensors is passing through
again.
If, after a few seconds of turning the Take-Up Reel, the signal between two sensors is still cut, the TakeUp Reel reports a 'Take-Up Reel paper jam' error:
12
●
In all cases, the LED of the Take-Up Reel is blinking quickly.
●
If the Take-Up Reel is enabled at the front panel, a Take-Up Reel paper jam will be displayed.
Chapter 1 Troubleshooting
www.Partshere.com
ENWW
Partshere Troubleshooting
Troubleshooting
How to read the power switch LEDs
In certain circumstances, the LEDs located on top of the power switch (located at the rear of the printer)
indicate the status of power supply to the printer.
1.
When only the Amber LED is On:
●
The printer has been switched Off from the Front Panel (after having pressed the On/Off
button).
●
The Power Supply Unit only delivers a 5 V “Standby”; power that is needed to restart the
printer after the Front Panel On/Off button is pressed (the Formatter will start the printer).
2.
When the Blue LED is On: Deliver standard “ATX” power for the Electronics Module PCAs
(+12V, +5V, -5V, -12V, etc...). All the functions of the Electronics Module are fully operational
(EWS, etc...).
3.
When the Green LED is On: Deliver “analog” 24V and 36V to enable printing.
If you turn on the printer at the front panel, and the Blue LED does not come on, there is a problem.
Turn off the printer using the switch at the rear, then turn it on again using the same switch. If the Blue
LED still does not come on, replace the Power Supply Unit.
If the Blue LED comes on this time, you will probably see an error reported on the front panel as the
printer starts up. If no error is reported, but you continue to have problems when turning on the printer
from the front panel, see How to read the Formatter LEDs on page 14.
ENWW
www.Partshere.com
How to read the power switch LEDs
Partshere Troubleshooting
13
Troubleshooting
How to read the Formatter LEDs
The LEDs located on the Formatter can help to troubleshoot the printer. The LEDs can either be on or off;
different combinations can indicate different problems.
The following image shows the three Formatter LEDs, which are numbered from the top down: number I
at the top, number II in the middle, number III at the bottom.
Use the following table to interpret the LEDs and find the source of the problem. Remember that you
should read these LEDs when you push the Power button.
Some combinations may require you to replace two or more components. In this case, always replace
one component at a time. Test the printer to see if the problem has disappeared (check the LEDs again).
If the same LED sequence continues, replace the next component indicated in the table.
Power
amber
LED
Power
blue
LED
Power
green
LED
Formatter
I LED
Formatter
II LED
Formatter
III LED
Front
panel
status
Problem and recommendations
Off
Off
Off
Off
Off
Off
Off
The printer is not receiving electrical
power.
On
14
Off
Off
Chapter 1 Troubleshooting
www.Partshere.com
Off
Off
Off
Off
1.
Ensure that the printer is connected
to the power outlet.
2.
Ensure that the outlet delivers the
expected power.
3.
Replace the Power Supply Unit.
The Power key fails to turn on the
printer.
1.
Turn the printer off using the switch
at the rear, and disconnect the
power cord. Reconnect the power
cord and turn on the printer using
the switch at the rear.
2.
If the problem persists, replace the
Front Panel.
ENWW
Partshere Troubleshooting
Power
blue
LED
Power
green
LED
Formatter
I LED
Formatter
II LED
Formatter
III LED
Front
panel
status
Problem and recommendations
Off
On
Off
Off
Off
Off
Off
There is a power failure in the
Formatter.
Off
On
Off
On
Off
Off
Off
1.
Reseat the power connector in the
Formatter, and remove the
Formatter.
2.
Turn the printer on again.
3.
If the problem persists, replace the
Power Supply Unit.
4.
If the problem persists, replace the
Formatter.
5.
If the boot process starts, replace
the Formatter.
Troubleshooting
Power
amber
LED
The Formatter BIOS is unable to start.
If an external Memory Module is
installed:
1.
Reseat the Memory Module.
2.
Remove the Memory Module and
restart the printer.
3.
If the printer is able to start
normally, replace the Memory
Module. If not, replace the
Formatter.
If an external Memory Module is not
installed, replace the Formatter.
Off
On
Off
Flashing
Off
Off
Off
The Formatter BIOS cannot detect the
Hard Disk Drive.
1.
Reseat the Hard Disk Drive
connectors.
2.
Replace the Hard Disk Drive.
Off
On
Off
On
Flashing
Off
Off
The operating system has experienced a
fatal error. Replace the Hard Disk Drive.
Off
On
Off
On
On
Off
Off
There is a communication failure in the
Formatter.
1.
Reseat the Formatter.
2.
Replace the Formatter.
Off
On
Off
On
On
Flashing
Off
There is an initialization failure in the
Formatter. Replace the Formatter.
Off
On
Off
On
On
On
Off
There is an initialization failure in the
Front Panel.
ENWW
www.Partshere.com
1.
Reseat the Front Panel cable.
2.
Replace the Front Panel.
How to read the Formatter LEDs
Partshere Troubleshooting
15
Troubleshooting
If the front panel turns on and then stops
If the power-up process stops while the front panel is displaying a number, respond as follows.
1.
If the printer's Power-Up process stops when the front panel is displaying the number 17, this
indicates that there is a problem with the file system on the printer's Hard Disk Drive, so the printer
is checking the whole file system and making any necessary corrections. This problem can arise
when there has been a power cut while the printer was switched On, or if there is a physical
problem with the Hard Disk Drive.
Checking the whole file system normally takes about half an hour (but could take much longer).
There is nothing that can be done to speed up the file checking process. If you turn Off the printer
during the checking process, the file system check will restart whenever you turn it On again
If you experience this problem repeatedly when there has been no power cut, then this could
mean that the Hard Disk Drive is faulty. In this case, replace the Hard Disk Drive
See Hard Disk
Drive (HDD) on page 340.
2.
If the printer's start-up process stops when the front panel is displaying any other number between
1 and 30, then try the following:
●
Turn the power off at the rear of the printer and disconnect the power cord. Reconnect the
power cord and turn on the printer.
●
If the printer continues to stop during the power-up process, replace the Hard Disk Drive
See Hard Disk Drive (HDD) on page 340.
How to interpret the Service Information Pages
The Service Information Pages contain the following information:
●
Current Configuration
●
Current Information
●
Usage Information
●
Event Logs
●
Calibration Status
●
Connectivity Configuration
●
All Pages
It is possible to print the Service Information Pages either through the Front Panel or through the
Embedded Web Server:
●
16
Front Panel:
icon > Service information prints.
Chapter 1 Troubleshooting
www.Partshere.com
ENWW
Partshere Troubleshooting
Troubleshooting
●
Embedded Web Server: Support tab > Service support > Printer information.
Even if the printer cannot print, the Information Pages are still accessible through the Embedded Web
Server.
Main characteristics
●
Only available in English (except the current information page).
●
From the Front Panel, you can choose to print ALL pages or just select the specific pages that are
needed. If ALL pages are printed:
◦
Nesting is turned ON automatically (and turned OFF once all the pages have been printed).
◦
Nesting cannot be mixed with other jobs in the queue.
●
Each page can be printed from the Web browser when using the Embedded Web Server.
●
Each page can be sent by e-mail from the Web Browser when using the Embedded Web Server
(File ⇒ Send ⇒ Page by E-mail).
●
You can see the same information through the Front Panel or the Embedded Web Server.
Current configuration
This page contains full details of the current configuration of the printer.
ENWW
www.Partshere.com
How to interpret the Service Information Pages
Partshere Troubleshooting
17
Troubleshooting
Current information
This page contains the following information:
18
●
Current Printer Configuration
●
Paper Loaded Information
●
Current Printhead Kit Information
●
Current Ink Cartridge Information
Chapter 1 Troubleshooting
www.Partshere.com
ENWW
Partshere Troubleshooting
Troubleshooting
The first two lines are available at the beginning of each Service Information Page and contains
standard information (like Service ID, firmware version).
Printer usage information
This page contains the following information:
●
Printer Usage
●
Usage per Printhead Slot
●
Usage per Cartridge Slot
●
Media Usage per Paper Type
●
Component Usage
●
Spittoon Usage
●
Preventive Maintenance Usage
ENWW
www.Partshere.com
How to interpret the Service Information Pages
Partshere Troubleshooting
19
Troubleshooting
Media used sections
●
Total media used in the printer
●
Media used for each media type
NOTE: If the Hard Disk Drive is replaced, the media used for each media type will be set to
zero.
Printhead section
The Printheads section displays the Printhead usage per slot.
●
Total Insertions: This is linked with the crane of the Ink Supply Tubes. When the Ink Supply
Tubes are replaced, the total insertions will be reset to zero.
Cartridge section
The Ink Cartridges section displays the ink usage per cartridge.
Preventive maintenance section
Once the value reaches 100%, the corresponding Preventive Maintenance Kit should be used. For
further details, see Preventive maintenance on page 418.
20
Chapter 1 Troubleshooting
www.Partshere.com
ENWW
Partshere Troubleshooting
Troubleshooting
Component usage
One cycle is counted when the Carriage makes one movement to the left of the printer and then returns
to the right.
Spittoon section
This section contains information on the different Spittoons located in the printer.
Event logs
This page contains the following information:
●
Last 20 System Error Codes (which prevented the printer from booting)
●
Last 20 System Warnings (which did not prevent the printer from booting, but which required the
user to acknowledge the problem)
●
Printhead Error log
System/Warning error
●
The Line and Internal Code do not provide much information, but are useful in the case of
escalating a problem to the division (different internal error codes can point to the same error
code (e.g. 01.10:10)).
●
Media Usage (in square meters) and Date (from the printer’s Internal Clock (RTC)) help you to
understand if the printer has been used (media usage) and how much time has passed since the
last error.
Printhead error log
●
Printheads ago: History of the last three Printheads used (’0’ represents the current Printhead used).
●
Status:’0’ = Working,’1’ = No Printhead Detected,’2’ = Replace,’4’ = Reseat,’8’ = Remove.
●
% Ink Used: Percentage of the warranty life (1200 ml).
●
Error Code: Specific error code generated by the printer when the Printhead has been replaced.
●
Max Recovery:
◦
0: No manual Printhead recovery has been performed on the Printhead.
◦
1 or higher: At least one Printhead recovery has been performed.
ENWW
www.Partshere.com
How to interpret the Service Information Pages
Partshere Troubleshooting
21
Troubleshooting
Calibration status
This page contains the following information:
22
●
General Calibrations (performed by service engineers)
●
Media-specific Calibrations (performed by the customer)
●
Printer Status Codes
Chapter 1 Troubleshooting
www.Partshere.com
ENWW
Partshere Troubleshooting
●
Printhead Alignment relates to the Printhead Alignment which changes to ‘pending’ when a
Printhead is replaced and the Printhead Alignment has not been performed.
NOTE: When a component is replaced, the corresponding calibration is not automatically set to
‘NOT DONE‘. This is because the printer does not know that there is a new part installed.
●
Drop Detector relates to the Drop Detector or Service Station calibration.
●
Line Sensor relates to the Line Sensor Calibration.
Media-specific calibrations
This section shows the following for each type of media:
●
Media Name
●
Color calibration and date
●
Paper Advance calibration and date
Printer status codes
This section shows status codes for the following:
●
Nozzle Health
●
Media Advance Calibration
●
Printhead Alignment
●
Closed Loop Color Calibration
These codes may be useful to detect potential print-quality issues. Several suggested actions are linked
with these codes, and are displayed in the Embedded Web Server and the front panel.
Connectivity configuration
This page contains full details of the current configuration of the printer.
ENWW
www.Partshere.com
How to interpret the Service Information Pages
Partshere Troubleshooting
23
Troubleshooting
General calibrations
Troubleshooting
When the main window is open and the printer is
printing (safety compliance)
We describe the details of the behavior of the printer when the window is opened while the carriage is
moving.
If the main window is opened while the printer is doing something, be it a swath of a print job or a
system task, the printer will:
24
1.
Before the carriage stops, it will finish whatever it was doing when the window was opened. It will
not finish an image it was printing, but it will finish the current swath, so as to avoid any impact
on image quality. If it was performing a system task it will finish it before stopping.
2.
If the carriage finishes on the left side of the printer, the carriage will always slowly move to the
right side of the printer.
3.
The printheads will be placed in their 'capping' positions.
Chapter 1 Troubleshooting
www.Partshere.com
ENWW
Partshere Troubleshooting
●
If the printer is printing an image when the window is opened: The carriage will not stop
immediately, the printer will finish the swath and then stop. If the cover is then closed, the printer
will start to print from the position it was stopped.
●
If the printer is cutting the media: The carriage finishes the cutting procedure.
●
If the printer is checking the SKEW while loading the media: During the skew check, the printer
does small movements of the carriage on the right side of the printer, and also moves the media
when needed. This procedure checks that the edge of the media is moving laterally or not. If the
window is opened while the printer is checking the media SKEW, the printer will complete the
skew procedure (and it will continue well after the window has been opened). This is the only case
when the printer will not stop the carriage at the end of a lateral movement (as a swath).
The safety system in place is designed to detect an object in the path of the carriage as it moves across
the printer, any object encountered will cause the system to shut down the driver motor in the carriage.
This method of ensuring safety is considered sufficient by the regulatory agencies that inspect and
assess the product prior to its placement in the market. The window and its switch are considered a
‘supplementary’ safety feature, and as such the behavior of the switch has been adjusted as a trade off
between the level of safety provided and the printer’s functionality.
How to troubleshoot the 79:04 system error
●
Introduction on page 25
●
Possible causes on page 25
●
Troubleshooting based on symptoms on page 32
Introduction
The System error 79:04 is a generic firmware error (equivalent to a blue screen in Windows). It’s the
System Error that the printer will display when an unknown exception occurs that cannot be pointed to
by any specific subsystem of the printer.
Since this is a generic error, there can be multiple causes behind it. This document will cover the most
probable causes behind a system error 79:04 and will recommend the most efficient troubleshooting
steps to resolve customer issues.
One important point to mention is that, although 79:04 system errors can be caused by a hardware
malfunction, the vast majority of 79:04 system errors are pure software or firmware issues. In these
cases the issue can only be solved by determining the root cause and implementing a solution. The
solution can usually be applied by either correctly configuring a selection, updating the printer’s
firmware/software that is being used or by fixing an error in the code).
Possible causes
Since the 79:04 system error is a generic error, the number of possible causes behind it is large. The
majority can be grouped, however, into the following groups:
ENWW
www.Partshere.com
How to troubleshoot the 79:04 system error
Partshere Troubleshooting
25
Troubleshooting
Here are some different scenarios of what happens when the window is opened:
Troubleshooting
Job related SE79:04
A specific print job that is not correctly formatted for the printer or that is not correctly processed by it
can trigger a 79:04 system error.
The incorrect format or processing can come from two sources:
• Incorrect commands in the job itself. For example, a PS job with some commands that do not have the
correct PS format.
• Issues applying to the settings in the job
Cause
Solution
79:04 caused by a print job always have the same symptoms:
When a job consistently generates a 79:04 system error, it is
either because of a issue in the printer’s firmware or because
of a defect in the job itself (when it has been generated by
3rd party SW). In order to identify the cause and find out a
solution, these issues should always be immediately escalated
to the GBU through the GCC.
●
1.
The job is received by the printer and starts to
process.
2.
In the middle of the processing, the printer stops
and displays 79:04.
3.
4.
5.
The printer will display the 79:04 system error
again immediately after restart. This is due to the
fact that the printer will try to reprint the job,
which is pending in the queue, after restart.
After the second restart, the printer will start up
normally
If the same job is sent again, it will always
produce a 79:04 system error
These types of 79:04 system errors are normally caused by
jobs that have been generated by 3rd party applications (RIPs,
3rd party drivers, files exported by an application to PS, PDF,
HP-GL/2, RTL, … or any other format supported by the
printer). Jobs generated by HP drivers will not normally
generate 79:04 system errors, since the output that our drivers
generate is very controlled and has been designed taking into
consideration the characteristics of our printer’s language
interpreters.
Also, there are a set of workarounds and short term solutions
that can be tested in order to get the customer up and running
in the shortest possible time:
1.
Send the job using a variety of different settings. Many
times, the issue is caused by a combination of the job
contents combined with some specific setting(s).
2.
If the customer is sending the file directly to the printer,
try using the HP driver instead.
3.
If the issue is occurring when printing through the HP
PostScript driver from an application with PS
passthrough, try changing the options in the application
so that it prints PS as raster (the option is typically
located in the 'Advanced' options of the application’s
printing dialog).
There is an exception to this general rule: there are certain
applications that can generate their own PS code (Adobe
PhotoShop, Adobe Illustrator, Adobe Acrobat, Corel Draw,
Freehand, QuarkXpress, …). When used with a PS driver,
these applications generate the output PS themselves, instead
of using the driver’s rendering capabilities. This is known as
PostScript pass-through. So, when using an HP PostScript
driver together with an application that has PS passthrough
capabilities, the PS code that comes into the printer has not
been rendered by the HP driver, and, should the source file
contain any PS commands that are not correctly processed by
the printer, a 79:04 system error could occur even though an
HP driver is being used.
26
Chapter 1 Troubleshooting
www.Partshere.com
ENWW
Partshere Troubleshooting
Troubleshooting
Data related SE79:04
HP Designjet printers have Hard Disks and non-volatile memories that contain data bases and files that
can be modified with user data. Some examples include:
• The printer’s queue
• The hard drive partitions that contain user jobs
• The data base that stores the printer settings
• The data base that stores accounting information
Some of this data is accessed by the printer at start up, and some others are accessed as needed.
If any of this fields contains corrupt data or data with characters or values that cannot be correctly
processed by the printer, a 79:04 system error may occur.
Cause
Solution
There are two different types of symptoms for data related
79:04 system errors:
Many times, data related 79:04 errors are resolved by means
of hardware intervention. Since data is stored in physical
components (RAM, EEROM and Hard Disk), replacing these
components with new ones which are empty usually solves the
problem. However, there are quicker and more effective
solutions to these types of errors:
●
1.
2.
When the corrupt data is accessed during start
up:
a.
The printer will display a 79:04 during the
start up process
b.
Switching the printer off and on again will
not solve the issue. The printer will continue
displaying the 79:04 system error until the
corrupt data has been cleared through a
service procedure.
1.
When the corrupt data is accessed during normal
printer operation:
a.
The printer will start up normally
b.
When the data is accessed (for example
while printing, while navigating the queue
or when changing some settings), the printer
displays a 79:04 system error
c.
The printer can restart normally
d.
When the data is accessed again (typically,
under the same conditions as in step “b”),
the 79:04 system error is displayed again.
ENWW
www.Partshere.com
2.
3.
Clear all information that has been introduced by the
user using the standard tools available in the printer:
a.
Delete all jobs from the queue (from the Front Panel
or the EWS)
b.
Reset to factory defaults to clear the user’s
configurations and calibrations
c.
Delete any non-standard paper preset in the printer
(both the ones that have been created by the user
and the ones that have been installed as OMES
profiles through the EWS or the HP Utility)
If step 1 did not resolve the issue, you can use Service
Tools to clear additional information that could be
causing the issue:
a.
Start the printer in Diagnostics Boot Mode
b.
Perform an EEROM reset
If step 2 did not resolve the issue, it is possible to
completely clear the information on the Hard Disk and
the different EEROMs, leaving them in an equivalent
state to a new part:
a.
Access the Service Utilities Menu
b.
In the Secure Disk Wipe menu, set the Sanitize level
to “Unsecure mode”
c.
Execute the Disk Wipe. This takes 45-75 minutes
and it will completely clear all partitions in the Hard
Disk which contain user data, including the partition
where the Operating System is installed. After the
disk wipe has completed, a backup firmware
version will automatically be installed from a
How to troubleshoot the 79:04 system error
Partshere Troubleshooting
27
Troubleshooting
Data related SE79:04
HP Designjet printers have Hard Disks and non-volatile memories that contain data bases and files that
can be modified with user data. Some examples include:
• The printer’s queue
• The hard drive partitions that contain user jobs
• The data base that stores the printer settings
• The data base that stores accounting information
Some of this data is accessed by the printer at start up, and some others are accessed as needed.
If any of this fields contains corrupt data or data with characters or values that cannot be correctly
processed by the printer, a 79:04 system error may occur.
Cause
Solution
backup partition to allow the unit to start up. This
firmware version is very old.
d.
The firmware in the printer should be updated to the
latest official version as soon as the printer has
restarted.
After step “c”, any 79:04 which is caused by corrupt
data in the printer will be solved.
NOTE: It is possible that the corrupt data came to be in
the printer as a consequence of some activity in the
customer’s workflow. In this case, it is possible that the
issue will happen again. In these cases, it is very
important to understand the sequence of events in the
customer’s workflow that led to the error occurring. Once
the error can be traced in the customer’s workflow,
escalate the issue to the GBU (through the GCC). This is
done to implement any changes in the printer’s firmware
that can prevent these issues occurring again.
28
Chapter 1 Troubleshooting
www.Partshere.com
ENWW
Partshere Troubleshooting
Troubleshooting
Network related SE79:04
Most HP Designjet printers have built-in networking capabilities. Network settings can be set manually,
but in the majority of cases, they are obtained automatically from the printer. These settings include
many different fields, such as IP address and subnet mask, available gateways, host and domain
names, etc.
In some cases, there can be issues in the firmware that can cause a certain value in one of these fields to
be interpreted incorrectly, and this can lead to a 79:04 system error.
Cause
Solution
There is no single set of symptoms that can absolutely pinpoint
a network related 79:04 system error. However, the following
guidelines can be applied:
In the majority of cases, these issues will be due to an issue in
the printer’s firmware. As soon as the conditions where the
issue happens can be understood, it should be escalated to
the GBU through the GCC.
●
●
It can happen at start up or when accessing the Network
Configuration section of the FP
In both cases, repeating the action with the LAN cable
disconnected does not cause the 79:04 to occur
At the same time, the following short term solutions and
workarounds can help the customer to get up and running in
the shortest possible time:
1.
Disconnect the network cable to be able to boot the
printer and change network settings
2.
In the Network configuration menu in the Front Panel,
disable any protocols that you are not using, including
IPv6, SNMP and WebServices.
3.
If step “2” does not work, try setting a manual
configuration of the device:
4.
ENWW
www.Partshere.com
a.
Enter the correct subnet mask and an IP in the valid
range
b.
In the GateWay field, set the same value as in the
IP address field
c.
Do not set a host name or a domain name
If step “3” does not work and the customer is using the
network card which is part of the printer, try using an
accessory Jetdirect card instead.
How to troubleshoot the 79:04 system error
Partshere Troubleshooting
29
Troubleshooting
User Interaction related SE79:04
In some cases the printer may not react as expected when a certain set of conditions coincide. In these
cases, if the printer doesn’t know how to react, it may simple display a 79:04 system error and force a
restart. Some examples (not real) that can help to illustrate this:
• An error occurs when a job is cancelled when it is at the “Finishing print” state and when the queue is
disabled
• An error occurs if the Window is opened while the printer is checking the printheads
These errors will most likely only happen in very specific corner cases that have not been identified
during the development or the qualification of the printer, so normally, they do not severely impact the
customer, as they do not affect their regular working flows.
30
Cause
Solution
The symptoms here are as numerous as the number of
possible interactions between the user and the printer. In any
case, it’s possible to identify the steps that caused the error to
occur and avoid them as the steps will always be the same
with no variance.
The recommended action plan in these cases is to identify the
previous steps that caused the error and:
1.
Escalate the issue to the GBU through the GCC in order
to have it corrected in the firmware.
Important: An major element in determining the error is
what the state the printer was in at the time the error was
displayed. Actions the user has made when the printer is
drying for example can produce an error, whereas the same
action when the printer is doing something else (or is idle)
may not produce any errors.
2.
Recommend to the customer that they try to avoid the
same steps to prevent the issue
3.
If the conditions that cause the error are in the customer’s
regular workflow, try to identify a different way of
achieving the same result out of the printer.
Chapter 1 Troubleshooting
www.Partshere.com
ENWW
Partshere Troubleshooting
Troubleshooting
Random SE79:04: Concurrence issues and memory leaks
Some 79:04 errors can happen randomly when the printer is being heavily used. However, it’s
impossible to find a single set of conditions that reproduce the problem. It just happens from time to
time, without a defined pattern.
These random 79:04 can have two different types of root causes:
• Memory leaks: Before a program is executed, it allocates the memory it will need. After the execution
is complete, the allocated memory is freed to be used by other programs. If the allocation or the release
of the memory are not properly programmed, every time the program is executed some memory will be
incorrectly labeled (either as used or as free). This is known as a memory leak. When a program with a
memory leak is executed a lot, the memory becomes progressively full (since it is not properly freed).
When the leak becomes too big, the printer is left ‘out of memory’ to execute new processes and a
79:04 is triggered.
• Concurrence issues: There are certain resources that can be accessed by multiple programs or by
multiple executions of the same program (what is known as multiple threads). Access to these resources
must be correctly controlled to prevent unexpected behavior. Issues caused by an incorrect control of
these resources are concurrence issues.
In the following you have a simple example: let’s imagine that there is a counter that controls the
communication between the Jetdirect card and the printer’s firmware. Whenever a new packet of
information is sent by the Jetdirect card to the printer, the counter increases. When the printer receives
the packet and processes it correctly, the counter decreases. Another process checks the counter from
time to time to see its value and take conclusions from it. If the counter is near 0, it means that the
printer is processing correctly, and if it grows too big, it may mean that there is a bottleneck somewhere
and maybe the Jetdirect card throughput is decreased to control its speed to the printer. However, if the
access to this counter is not properly controlled, undesirable effects may happen: in a real environment,
a Jetdirect card processes thousands of information packets per second, so this counter is updated
frequently, both by the Jetdirect and the printer. If at a certain point the Jetdirect and the printer try to
access the counter at the same time and the code is not prepare to handle this, it may happen that the
Jetdirect cannot increase the counter because the printer is writing to it, and what’s worse, that it does
not realize this fact. If this happens a few times each second, it may happen that the counter is
decreasing faster than it’s increasing and that at a certain point it has a negative value. And then, what
will the process that is checking this counter do? Most likely, the process will not be prepared to react to
a negative value and will launch an exception that will trigger a 79:04 system error.
Cause
Solution
This type of 79:04 always occurs in heavy load conditions, so
the symptoms will always be similar to this pattern:
Random 79:04 errors are, by far, the most complex ones to
diagnose and to fix. The only solutions available in these
cases are:
●
●
●
●
A printer that is being heavily used (printing a project or
in a reprographics environment) produces 79:04 errors
randomly, forcing the user to restart.
1.
After restarting, the printer can be used without any
issues for an extended period of time, but if the workload
is consistently high, a random error will occur again.
Identify the root cause (either in the files or in the
firmware) and fix it in the code, which requires the
intervention of the GBU
2.
The error can never be associated with a specific file.
The file that was being printed when the error occurred
the last time can be printed without issues after restart.
And a file that has been printed without issues several
times can trigger the error in the future.
Test any options available to modify the customer’s
workflow and see if any combination of them solves the
issue
In both cases, a profound understanding of the customer’s
workflow is necessary. In particular, the information that is
needed is:
This error is very dependant of the workflow the customer
has. The most common user workflows have been
extensively tested both by HP and by our beta sites, so it
is highly unlikely to see random 79:04 issues in these
cases. These random issues tend to occur in very specific
corner cases, and cannot be reproduced unless the exact
conditions of the workflow are replicated. They normally
happen when sending files generated by external
applications (RIPs, 3rd party drivers, etc.).
ENWW
www.Partshere.com
●
Printer front panel settings
●
Application that is being used; RIP or driver that is being
used
●
Application/RIP/Driver settings
●
Type of output files this application, RIP or driver is
generating
●
Some sample files that are representative of what the
customer is using
Operating
System
to troubleshoot
● How
the 79:04 system error
Partshere Troubleshooting
●
Method of connection to the printer
●
A description of the normal flow when the issue occurs
31
Troubleshooting
Hardware related SE79:04
Hardware is, by far, the least likely cause of a 79:04 system error. Replacing hardware components
does not normally fix the issue and increases the total turn around time in finding a workable solution.
In some cases, a failure in a component in the printer’s electronics may cause a 79:04 system error,
since the printer’s electronics are involved in the execution of the firmware and the processing of jobs. It
needs to be noted, however, that hardware failures in the electronics tend to produce specific system
errors that point directly to the component that is failing.
Some HW causes that could be behind a 79:04 error are:
• Defective clusters in the Hard Disk drive. If these clusters are used to execute the firmware or to
process a job, they may produce a 79:04. It needs to be noted however, that most 79:04 errors that are
resolved by an HDD replacement are in fact, data related 79:04 that could have been solved more
efficiently and quickly following the steps in Section 3.
• Defective memory segments. If the RAM memory has some defective segments, a 79:04 may occur
when these segments are used.
• Intermittent defects in the electronic components that are involved in the processing of a job: Carriage
PCA, Trailing cable, Formatter and Print Mech. This is a highly unlikely cause, since defects in these
components will produce subsystem specific errors.
Cause
Solution
There’s no single set of symptoms behind hardware related
79:04 system errors. The most usual ones, however are:
In the following procedure perform each step as it appears in
the list and only move on to the next step once you are sure
the 79:04 error has not been cleared:
●
●
79:04 during start up. Restarting the printer may or may
not solve the problem
1.
79:04 while processing or printing a job. Restarting the
printer and printing the same job does not always
produce the error.
Restart the printer in Diagnostics Boot mode and execute
the service tests to validate the functionality of all the
electronics components
◦
Execute the troubleshooting for “data related”
system errors, refer to page 3, Data related
SE79:04
2.
Replace the memory
3.
Replace the HDD
4.
Escalate the issue before replacing any additional parts.
Troubleshooting based on symptoms
This section will describe which troubleshooting steps to perform for a 79:04 system error based on the
symptoms of the issue. Perform each step as it appears in the list and only move on to the next step
once you are sure the 79:04 error has not been cleared.
32
Chapter 1 Troubleshooting
www.Partshere.com
ENWW
Partshere Troubleshooting
●
Restart the printer twice. If the system error has been caused by a job in an incorrect format,
restarting twice will clear the error (the first time after restart, the printer will attempt to print the job
again, and this will cause the error to re-appear). If restarting the printer twice solves the issue,
then it is an issue related to the job and you should refer to Job related SE79:04 on page 26.
●
Update the printer’s firmware. Even if the currently installed firmware version is the latest one,
reinstall it. Since the printer cannot start normally, you will need to update the firmware while
booting the printer in Diagnostics Boot Mode. For this, a special file and a special update process
will be needed. You can find the specific information for the printer model you are troubleshooting
on page 13, Appendix A .
●
Disconnect the network cable and restart the printer. If this solves the problem, then it is a network
related 79:04 and you should follow the guidelines for this type of 79:04, refer to Network
related SE79:04 on page 29.
1.
Remove all cartridges, printheads and printhead cleaners (if available). Unload the media. Restart
the printer. If the printer can start normally, insert the consumables one by one until you isolate the
one that is causing the error. Do NOT insert any of the replaced consumables in another printer.
2.
Restart the printer in Diagnostics Boot Mode and perform the “Electronics test”. If an electronic
component is identified as faulty, replace it.
●
Restart the printer in Diagnostics Boot Mode and Reset the EEROM. If the issue is solved by
this, this is a data related 79:04 system error and you should follow the guidelines, refer to
Data related SE79:04 on page 27.
3.
If the unit has been used for some time and suddenly has started to show this behavior, replace
the Hard Disk Drive (it may be included with the Formatter in some models).
4.
If the issue is new and the issue happens since the first boot, do NOT replace the HDD.
5.
If none of the previous steps solved the issue, escalate the issue with the following information:
●
Unit information: S/N, P/N, accessories
●
Conditions where the problem occurs and conditions prior to the first occurrence of the
problem
●
The results of the previous 8 steps
●
The System Error detailed information (this can be obtained by pressing CANCEL + Down)
●
The printer logs.
Front panel displays 79:04 during printer operation – not while sending jobs
1.
Restart the printer.
2.
Update the printer’s firmware. Even if the currently installed firmware version is the latest one,
reinstall it.
3.
Reset the printer to factory defaults.
4.
In order to narrow the scope of the issue, try the following:
a.
Disable the queue
b.
Disable any unused network protocols
ENWW
www.Partshere.com
How to troubleshoot the 79:04 system error
Partshere Troubleshooting
33
Troubleshooting
Front panel displays 79:04 at start-up
Troubleshooting
c.
Disable SNMP and WebServices (if they are available in the printer)
d.
Disable “Sleep mode” from the Service Utilities menu
e.
Delete any Paper Presets that you may have uploaded or created using the printer
Spectrophotometer.
5.
Restart the printer in Diagnostics Boot Mode and perform the “Electronics test”. If an electronic
component is identified as faulty, replace it.
6.
Restart the printer in Diagnostics Boot Mode and Reset the EEROM. If the issue is solved by this,
this is a data related 79:04 system error and you should follow the guidelines for this type error,
refer to Data related SE79:04 on page 27.
7.
Format the Hard Disk drive. To do so, you will need to start the printer normally, enter the Service
Utilities menu and then the Secure Disk Erase option. Set the Erase method to “Fast Erase” and
then perform the disk erase process. This will take 45-75 minutes and will erase all user
information from the disk, resolving any issue caused by corrupt data. After the erase process, a
firmware update will be required. If this solves the issue, this is a data related 79:04 system error
and you should follow the guidelines for this type of 79:04, refer to Data related SE79:04
on page 27.
8.
Try to identify the combination of settings or actions that led to the system error and try to reach
the same result with a different combination. Escalate the issue to fix the original problem.
9.
If none of the previous steps could solve the issue, escalate it with the following information:
●
Unit information: S/N, P/N, accessories
●
Conditions where the problem occurs and conditions prior to the first occurrence of the
problem
●
The result of the previous 8 steps
●
The printer information pages (either printed and faxed or obtained through the Embedded
Web Server)
●
The System Error detailed information (it can be obtained by pressing CANCEL + Down)
●
The printer logs.
Front panel displays 79:04 while printing
●
A. While printing a single job on page 34
●
B. Random 79:04 during continuous printing on page 36
A. While printing a single job
The error happens after a single job is sent. It’s easy to identify which job that has produced the error,
since every time that this same job is sent, the error is replicated.
34
1.
Restart the printer twice (after the first restart, the printer will show the 79:04 system error again,
since the printer will attempt to reprint the last job in the queue, which is the one that caused the
issue)
2.
If you are using an HP driver, update the driver to the latest version
Chapter 1 Troubleshooting
www.Partshere.com
ENWW
Partshere Troubleshooting
4.
5.
Troubleshooting
3.
Update the printer’s firmware. Even if the currently installed firmware version is the latest one,
reinstall it. Send the job using different print settings. The following ones can be helpful:
a.
Try sending the job without selecting a paper preset in the driver
b.
Try changing the Image Quality settings
c.
If you are using the HP-GL/2 driver, try the option “Send job as bitmap”
d.
If you are using the PS driver, try using the HP-GL/2 driver instead
e.
If you are using the PS driver from an Adobe application (or any other application that can
handle PS), try changing the application’s print settings so that the PS is generated as Raster.
Try the following Front Panel settings:
a.
Change the Print Language option in the Front Panel from “Automatic” (which is the default
setting) to the language that is being printed (PS, HP-GL/2, …)
b.
Queue = OFF
c.
Start Printing = After processing
d.
For PS SKUs, try changing the encoding setting (“Automatic” by default) to Binary or ASCII
If you are using a 3rd party application that does not print through the HP driver, try modifying the
printing workflow by:
a.
Using an HP driver
b.
Changing the settings in the application’s printing dialog
6.
If you are using an accessory Jetdirect card, try using the internal network connector or USB (if
available).
7.
Escalate the issue, providing the following information:
●
Unit information: S/N, P/N, accessories
●
Conditions where the problem occurs and conditions prior to the first occurrence of the
problem.
●
The result of the previous 7 steps
●
The printer information pages (either printed and faxed or obtained through the Embedded
Web Server)
●
The System Error detailed information (it can be obtained by pressing CANCEL + Down)
●
Information on the workflow:
◦
Operating System
◦
Application
◦
Driver
◦
Settings in the driver and the application
◦
Settings in the printer
◦
Connection method and settings:
ENWW
www.Partshere.com
How to troubleshoot the 79:04 system error
Partshere Troubleshooting
35
Troubleshooting
●
●
The original file along with the information on how to reproduce the issue
●
A print to file that can reproduce the issue
The printer logs.
B. Random 79:04 during continuous printing
The error does not happen with a single job. It happens randomly during continuous printing, normally
while the printer is managing a heavy load (printing a project or in a reprographics environment).
This type of error is caused either by memory leaks or by concurrence issues in the printer’s firmware.
They normally happen in unusual environments where these memory leaks or concurrence issues that
have not been detected during qualification have occurred. These issues cause the printer to crash at a
completely random moment during printing, and are not associated to a specific job.
Because of this, troubleshooting these issues is normally quite complex.
1.
Restart the printer twice (after the first restart, the printer will show the 79:04 system error again,
since the printer will attempt to reprint the last job in the queue. If the issue continues occurring
randomly, continue troubleshooting
2.
If you are using an HP driver, update the driver to the latest version
3.
Update the printer’s firmware. Even if the currently installed firmware version is the latest one,
reinstall it.
4.
Try the following changes in the workflow:
5.
6.
36
a.
Change the Print Language option in the Front Panel from “Automatic” (which is the default
setting) to the language that is being printed (PS, HP-GL/2, …)
b.
Queue = OFF
c.
Start Printing = After processing
d.
For PS SKUs, try changing the encoding setting (“Automatic” by default) to Binary or ASCII
e.
If you are using the HP-GL/2 driver, try sending the job as a bitmap
If you are using a 3rd party application that does not print through the HP driver, try modifying the
printing workflow by:
a.
Using an HP driver
b.
Changing the settings in the application’s printing dialog
Escalate the issue with the following information:
●
Unit information: S/N, P/N, accessories
●
The printer information pages (either printed and faxed or obtained through the Embedded
Web Server)
●
The System Error detailed information (it can be obtained by pressing CANCEL + Down)
●
Information on the workflow:
◦
Operating System
◦
Application
Chapter 1 Troubleshooting
www.Partshere.com
ENWW
Partshere Troubleshooting
Driver
◦
Settings in the driver and the application
◦
Settings in the printer
◦
Connection method and settings
Troubleshooting
●
◦
Exact information on how to replicate the environment that reproduces the issue, including
some example files that can be sent to the printer to replicate a heavy load environment.
These files will need to be:
◦
Original application files, if the issue happens printing from an application through our
driver
◦
Print to files if the issue happens when printing from a third-party application.
ENWW
www.Partshere.com
How to troubleshoot the 79:04 system error
Partshere Troubleshooting
37