1
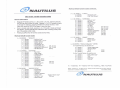
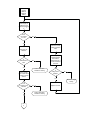
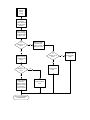
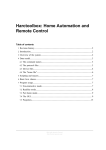
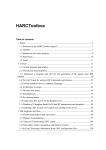
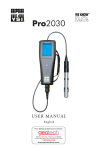
~IV"A..'T.L.'S
SM916 14 digit serial numbers.
Note: SM916 serial numbers are similar to the St.irmaster 2400PS Stepper
SIN: #14001071231001
14001
A
07 12
c
B
31
001
D
E
A. Is the machine 10 number:
14001 = Dom, t IOV, Un boxed
14002 = Dom, H OV, Boxed
14003 = Int'l
14002 = Dom, tl OV, TV Ready, Boxed
14004 = Dom, t IOV, TV Ready, Un boxed
B. Year machine was made :
07 = 2007
C. Month machine was made:
12 = December
D. Day the machine was made :
31 = 31st day of the month
E. Machine number of the work order:
001 =
l SI
machine for work orde r #xuxx
TROUBLE SHOOTING GUIDE FOR ALTERNATORS ON STEPMILLS
Title:
Date:
Stair Master Alternator
Troubleshooting
June 3, 2008
Product:
Nautilus Step Mills
Distributed By:
Gary Pendleton
We are seeing a number of Step Mills with intermittent or no resistance when stepping. Many times the
problem is solved by replacing the alternator brushes or the alternator itself. Nautilus has provided
some troubleshooting pointers to assist us in trouble shooting Step Mill resistance problems.
Nautilus has also requested that after following the troubleshooting procedures and we find a bad
alternator, that we return failed alternators to them for analysis. See page 4 of this Setvice Note for
alternator return instructions.
1. No Resistance When Stepping
•
Remove the right side panel to view the Relay board LEDs.
•
Begin moving the staircase.
•
All three LEDs on the relay board are lit but there is no resistance.
o
Replace Alternator brushes or Alternator.
2. Intermittent Resistance
•
Begin moving the staircase.
Page 10f4
TROUBLE SHOOTING GUIDE FOR ALTERNATORS ON STEPMILLS
•
Staircase grabs at high speed on!y and Field LED lights momentarily then
goes out.
•
Replace Load resistor.
3. No Resistance and No Field light.
•
Begin moving the staircase.
•
Staircase freewheels and Field LED doesn't light.
•
Perform Tach test by entering diagnostics.
•
If there is no Tach signal sensed on console
o
Check for .6 to .7 volts AC at the W-4 (Tach) terminal of the alternator.
o
If no voltage, remove the blue Tach wire -from the alternator, while staircase is moving.
o
•
Touch the Tach wire to the Field terminal.
•
If the Field LED lights, Replace the alternator.
If the voltage checks good, remove the blue connector from the W-4 (Tach) terminal of
the alternator. Lightly scrape the connector and re-install. Re-check.
o
If sti ll bad, replace the console.
p~:~i1,-;;- Tach
Relay/Resistor Assembly
Output
Relay Assembly
(while)
W-2
0
o
W-5
w-}
wwW- I
o
o
Main Cable Assembly
Page2of4
TROUBLE SHOOTING GUIDE FOR ALTERNATORS ON STEPMILLS
4.
Staircase has Resistance but Fre'ewheels when Quick Start or Program is Entered.
•
Replace console.
5. Staircase has resistance but is choppy during exercise.
•
Inspect Main Cable for Corrosion at all connections.
•
Check load Resistor for a reading of .5-.6 Ohms.
•
Replace alternator brushes or alternator.
6. Relay board tests.
•
Disconnect the main cable from relay board J1 terminal.
•
With power on, place jumper across GND/BLK and RLY/RED test points.
o
•
With power on, place jumper across +/WHT and FlO/BRN test points.
o
•
Relay LED should light.
Field LED should light.
With power on, place jumper on +/WHT and with the other end touch the ALT/C,
FLD/NC, and RES/NO.
o
•
Field LED should light.
If any of these jumps fail replace relay board and or power supply.
000
o
Relay Board Test Points
Page30f4
TROUBLE SHOOTING GUIDE FOR ALTERNATORS ON STEPMILLS
7. Other Points
•
Remember the only signal that will prevent the Field LED from lighting on the relay board is the
Tach Signal on the blue wire. The console must receive an rpm signal to activate the field current
to the alternator that is PWM controlled.
•
If you suspect the alternator, disconnect all the wires and check the resistance across the field
terminal and the alternator housing; a typical Presto lite Alternator should read around 4 Ohms.
•
The Field LED on the relay board will flicker at higher speed levels. This is the PWM signal from
the console to the field terminal of the alternator to control resistance / speed. If you
experience full resistance through all levels and the field light doesn't flicker; replace the
console.
•
Always perform mechanical troubleshooting in addition to electrical trouble shooting for
resistance problems.
8.
Alternator return instructions
Failed alternators are to be returned to:
NO LONGER APPLIES after
Sportsmith becoming support
center. 6/24/10 ss mkl
Joe Polaro
Southeast Service Manager!
Field Quality & Reliability Specialist
55 Westwood Drive
Ruckersville, Virginia 22968
Please include in the package the Step Mill Serial Number, the number of miles and number of hours.
Include the failure symptoms and ship the alternators complete, do not remove the brushes.
Ship the complete alternator via UPS using account number 7R4A03.
Page4of4
Perform
general
SM916
electrical
testing
Confirm external
power supply is
installed in a live
outlet and plugged
in
Does
the console
turn on?
No
Yes
Remove 4 screws
holding console to
mast
Step onto the
staircase
Is
Stiff resistance
Felt?
Carefully tip
console forward
and measure
voltage from pins 1
and 10 of interface
connector
No
Yes
Perform Alternator /
Resistance Testing
On the console,
press "Quick Start"
to enter a manual
workout
Is
Voltage 10V or
Greater?
No
Yes
Perform Voltage
Testing
Is an
increase in step
rate felt?
Yes
2
No
Replace console
Perform Alternator /
Resistance Testing
1
Does
the step rate feel
smooth?
No
Yes
Increase levels to
increase step rate
Does
Step rate
Increase?
No
Yes
Perform Alternator /
Resistance Testing
Stop climbing, and
press stop twice if
workout results
are desired
SM916 Is Operating
Properly!
Perform
Voltage
Testing
Remove right side
of machine’s
plastics referenced
to the front of the
staircase
With a voltmeter,
measure voltage
from 23545 PCB’s
J2 pins 1 nd 2
Is
Voltage 10V or
more?
No
Measure voltage
at power entry
point of 21768
cable, pins 1 and 2
Yes
Is
Voltage 10V or
more?
Measure voltage
on 23545's J1 pins
4 and 5
Yes
Is
Voltage 10V or
more?
Replace 21768
cable
No
Yes
Resolve continuity
issue with
interface cables
leading to console,
part numbers
21769 and 27831
Perform general SM916
electrical testing
Replace 23545
PCB
No
Replace 12V
external power
supply
Alternator / Resistance Testing
To minimize the complexity of the flowchart, this section will best be described in terms of system theory.
The colored connections to the alternator are as follows:
White-B+, Alternator output voltage
Brown-Field, Alternator Control Current
Black-Ground, Alternator return
Blue-Tachometer, velocity signal back to console
Resistance over gravity is performed by the alternator in the SM916. When the console senses a user with staircase movement, the console should be enabling
full field current to the alternator. Field current is provided from the external power supply, through the console, into the 23545 and wired into the alternator’s field
terminal. Under this condition, the console should also be driving the 23545's J1 pin 1 low, switching the .5ohm load resistor onto the alternator’s B+.
The alternator’s B+ should rise as a result of field current, but its voltage will depend on the weight of the user and resulting velocity. Resistance is achieved by
the oppositions of internal magnetic fields when field current is applied. The user’s weight will affect the alternator’s RPM under this condition, and under full field
current conditions the voltage is not controlled. But, with the large gear ratio and full field current applied, the resistance should be maximum, and the step rate
should be minimum.
Once a user starts a workout, the console controls the alternator’s field current attempting to maintain the desired step rate. This signal is Pulse Width Modulated
(PWM) from 0V to 12V, the level of the loaded external supply. If the step rate is fast, the console will deliver field current longer, if the step rate is slow, it will
deliver less field current.
The only situation where no field current would be be present during a workout, is if a very light weight person was attempting to achieve a step rate that could not
be achieved by their weight overcoming the frictional resistance of the system. In this case, the console would keep field current off, or no induced resistance.
During workouts the alternator’s B+ increases as a function of speed and user weight. For high level workouts with heavy weight users, B+ levels of 20V could be
witnessed.
If no resistance is felt, regardless of whether the console is powered, remove the plastic shroud on the right side (with respect to the staircase entry). The 23545
PCB should be visible, along with the load resistor, and alternator. Prior to proceeding with tests below, perform continuity checks on the alternator connections,
load resistor connections, and confirm these connections are secure into the 23545 PCB. Confirm the load resistor measures .5ohm.
Power entry is at the bottom of the unit. The 12V 2.5A supply enters via cable part number 21768, and enters into the 23545 PCB via J2. LED2 indicates power
is present, but 12V should still be confirmed with a volt meter. Power and control interface to the console is provided at location J1. The cable to the console is
made up of two sections for assembly, part numbers 21769 and 27831. 12V is provided up to the console at J1 pin 4, and GND pin 5.
In addition to alternator field current, the console controls the loading of the alternator’s B+ with the .5ohm resistor which is switched by the 23545's relay. When
the console detects a user has stepped on the staircase, it immediately applies full field current, and turns on the power relay to load B+ with .5ohm. LED1 is an
indicator the console is attempting to close the relay, but this should be confirmed with a VOM.
If no resistance is felt, confirm 10V to 12V is being applied to the alternator’s field. This should always be present once a user is detected, and before a workout
has begun. Confirm the additional load is being switched also, which is controlled by a low voltage on J1 pin 1. The operation of the power relay can be
confirmed by unplugging the unit, and removing the console connection at J1. Install external power again, and an ohmmeter should show continuity from B+ to
field on the 23545's terminal strip. With a test jumper, connect J1 pin 1 to J1 pin 5, and the ohmmeter should now show continuity from the terminal strip’s B+ to
RES. If this test passes with no resistance felt, and full field current has been confirmed, replace the alternator. If the above test fails, replace the 23545 PCB. If
no field current is detected, or LED1 does not light when a user steps on the staircase, check the interface cable continuity to the console. If this checks, replace
the console.
If no increase in step rate is detected when instructed by the console, confirm the field line is not at 12V continuously. If the field is continuously at 12V, the
console’s field control has probably shorted.