1
ITW Dynatec
An Illinois Tool Works Company
31 Volunteer Drive
Hendersonville, TN 37075 USA
Telephone 615.824.3634
FAX 615.264.5222
ITW Dynatec GmbH
Industiestrasse 28
D-40822 Mettmann, Germany
Telephone 49.2104.915.0
FAX 49.210.2104.915.111
OPERATIONS & SERVICE MANUAL
Manual 20-36
Revised 9/15/07
ITW Dynatec K.K.
Daiwashinagawa Bldg., 7-15 Konan, 3-Chome
Minata-Ku, Tokoyo 108 Japan
Telephone 81.3.3450.5901
FAX 81.3.3450.8405
Adhesive Application Solutions • ISO 9001 Certified
DYNAMELT® M SERIES ADHESIVE SUPPLY UNIT
OPERATIONS AND SERVICE MANUAL
Model DM M35 DCL
Software V5.11M and up with Expanded DynaControl
For an online copy of this manual, go to www.itwdynatec.com/manuals.htm
IMPORTANT ! - READ ALL INSTRUCTIONS BEFORE OPERATING THIS EQUIPMENT
It is the customer’s responsibility to have all operators and service personnel read and understand
this information. Contact your ITW Dynatec customer service representative for additional copies.
NOTICE! Please be sure to include the serial number of your application system
each time you order replacement parts and/or supplies. This will enable us to
send you the correct items that you need.
ITW Dynatec Service Parts Direct Dial: 1-800-538-9540
ITW Dynatec Technical Service Direct Dial: 1-800-654-6711
Moving Forward Through Technology™
Page ii
Revised 12/04
ITW Dynatec
An Illinois Tool Works Company
Adhesive Application Solutions
c. 2000
DYNAMELT M35 DCL ASU Manual 20-36
Table of Contents Page iii
Revised 4/06
c. 2000
DYNAMELT M ASU Manual 20-36
TABLE OF CONTENTS
Chapter 1 Safety Precautions
Chapter - Page #
Electrical . . . . . . . . . . . . . . . . . . . . . . . . . . . . . . . . . . . . . . . . . . . . . . . . . . . . . . . . . . . . . . . . . . . . . . . . .
High Temperatures . . . . . . . . . . . . . . . . . . . . . . . . . . . . . . . . . . . . . . . . . . . . . . . . . . . . . . . . . . . . . . . . . .
High Pressure . . . . . . . . . . . . . . . . . . . . . . . . . . . . . . . . . . . . . . . . . . . . . . . . . . . . . . . . . . . . . . . . . . . . . .
Protective Covers . . . . . . . . . . . . . . . . . . . . . . . . . . . . . . . . . . . . . . . . . . . . . . . . . . . . . . . . . . . . . . . . . . .
Eye Protection & Protective Clothing . . . . . . . . . . . . . . . . . . . . . . . . . . . . . . . . . . . . . . . . . . . . . . . . . . .
Safe Installation and Operation . . . . . . . . . . . . . . . . . . . . . . . . . . . . . . . . . . . . . . . . . . . . . . . . . . . . . . . .
Treatment for Burns From Hot Melt Adhesives . . . . . . . . . . . . . . . . . . . . . . . . . . . . . . . . . . . . . . . . . . .
Service . . . . . . . . . . . . . . . . . . . . . . . . . . . . . . . . . . . . . . . . . . . . . . . . . . . . . . . . . . . . . . . . . . . . . . . . . . .
Explosion/ Fire Hazard . . . . . . . . . . . . . . . . . . . . . . . . . . . . . . . . . . . . . . . . . . . . . . . . . . . . . . . . . . . . . .
Lockout/ Tagout . . . . . . . . . . . . . . . . . . . . . . . . . . . . . . . . . . . . . . . . . . . . . . . . . . . . . . . . . . . . . . . . . . . .
1-1
1-1
1-1
1-1
1-2
1-2
1-2
1-3
1-3
1-3
Chapter 2 Description & Specifications
Description . . . . . . . . . . . . . . . . . . . . . . . . . . . . . . . . . . . . . . . . . . . . . . . . . . . . . . . . . . . . . . . . . . . . . . . .
Specifications . . . . . . . . . . . . . . . . . . . . . . . . . . . . . . . . . . . . . . . . . . . . . . . . . . . . . . . . . . . . . . . . . . . . . .
Installation Dimensions . . . . . . . . . . . . . . . . . . . . . . . . . . . . . . . . . . . . . . . . . . . . . . . . . . . . . . . . . . . . . .
Total System Wattage Capacity . . . . . . . . . . . . . . . . . . . . . . . . . . . . . . . . . . . . . . . . . . . . . . . . . . . . . . . .
Main Circuit Breaker Determination . . . . . . . . . . . . . . . . . . . . . . . . . . . . . . . . . . . . . . . . . . . . . . . . . . . .
Definition of ASU Code . . . . . . . . . . . . . . . . . . . . . . . . . . . . . . . . . . . . . . . . . . . . . . . . . . . . . . . . . . . . .
2-1
2-2
2-4
2-5
2-5
2-6
Chapter 3 Installation & Start Up
Placing the DYNAMELT ASU . . . . . . . . . . . . . . . . . . . . . . . . . . . . . . . . . . . . . . . . . . . . . . . . . . . . . . . .
To Open/ Close Panel Box Door . . . . . . . . . . . . . . . . . . . . . . . . . . . . . . . . . . . . . . . . . . . . . . . . . . . . . . .
Installation . . . . . . . . . . . . . . . . . . . . . . . . . . . . . . . . . . . . . . . . . . . . . . . . . . . . . . . . . . . . . . . . . . . . . . . .
User Connections . . . . . . . . . . . . . . . . . . . . . . . . . . . . . . . . . . . . . . . . . . . . . . . . . . . . . . . . . . . . . . . . . . .
Printed Circuit Board Location Diagram . . . . . . . . . . . . . . . . . . . . . . . . . . . . . . . . . . . . . . . . . . . . . . . . .
Hose/ Head Electrical & Adhesive Connections (illustration) . . . . . . . . . . . . . . . . . . . . . . . . . . . . . . . . .
Electrical Connections & Filter Manifold Arrangement, Maximum Hose/ Head Configuration (illus.) .
Adding Adhesive . . . . . . . . . . . . . . . . . . . . . . . . . . . . . . . . . . . . . . . . . . . . . . . . . . . . . . . . . . . . . . . . . . .
Changing the Adhesive Formula . . . . . . . . . . . . . . . . . . . . . . . . . . . . . . . . . . . . . . . . . . . . . . . . . . . . . . .
Field Installation of Controller Options . . . . . . . . . . . . . . . . . . . . . . . . . . . . . . . . . . . . . . . . . . . . . . . . . .
Adjusting the Pressure Relief Valve . . . . . . . . . . . . . . . . . . . . . . . . . . . . . . . . . . . . . . . . . . . . . . . . . . . . .
Pump Enable (Ready) Thermostat Calibration . . . . . . . . . . . . . . . . . . . . . . . . . . . . . . . . . . . . . . . . . . . .
Calibration of the Optional Voltage Tachometer . . . . . . . . . . . . . . . . . . . . . . . . . . . . . . . . . . . . . . . . . . .
Installation of the Optional Tach Generator or DC Tracking Signal . . . . . . . . . . . . . . . . . . . . . . . . . . . .
Calibration of the Optional Tach Generator or DC Tracking Signal . . . . . . . . . . . . . . . . . . . . . . . . . . . .
Level Control, Capacitive, Sensor with Amp . . . . . . . . . . . . . . . . . . . . . . . . . . . . . . . . . . . . . . . . . . . . .
Typical Start Up and Shut Down Procedures . . . . . . . . . . . . . . . . . . . . . . . . . . . . . . . . . . . . . . . . . . . . .
Storage and Disposal of the Application System . . . . . . . . . . . . . . . . . . . . . . . . . . . . . . . . . . . . . . . . . . .
3-1
3-2
3-2
3-3
3-4
3-6
3-6
3-7
3-7
3-7
3-8
3-10
3-11
3-12
3-13
3-14
3-15
3-16
Chapter 4 DynaControl Controller Set-Up
Temperature Control Functions in General . . . . . . . . . . . . . . . . . . . . . . . . . . . . . . . . . . . . . . . . . . . . . . .
Defining DynaControl Temperature Control Terms . . . . . . . . . . . . . . . . . . . . . . . . . . . . . . . . . . . . . . . .
Error Indication and Alarms . . . . . . . . . . . . . . . . . . . . . . . . . . . . . . . . . . . . . . . . . . . . . . . . . . . . . . . . . .
Optional System Status Lights . . . . . . . . . . . . . . . . . . . . . . . . . . . . . . . . . . . . . . . . . . . . . . . . . . . . . . . . .
Settings for a Typical Operation . . . . . . . . . . . . . . . . . . . . . . . . . . . . . . . . . . . . . . . . . . . . . . . . . . . . . . .
System Values that are Factory Programmed (not customer accessible) . . . . . . . . . . . . . . . . . . . . . . . . .
Customer Programmable Values Preset at the Factory . . . . . . . . . . . . . . . . . . . . . . . . . . . . . . . . . . . . . .
4-1
4-1
4-4
4-6
4-6
4-7
4-7
Page iv Table of Contents
Revised 4/06
c. 2000
DYNAMELT M ASU Manual 20-36
Default Settings of the DynaControl Controller . . . . . . . . . . . . . . . . . . . . . . . . . . . . . . . . . . . . . . . . . . .
Helpful Tips for the User . . . . . . . . . . . . . . . . . . . . . . . . . . . . . . . . . . . . . . . . . . . . . . . . . . . . . . . . . . . . .
Serial Protocol . . . . . . . . . . . . . . . . . . . . . . . . . . . . . . . . . . . . . . . . . . . . . . . . . . . . . . . . . . . . . . . . . . . . .
EtherNet/IP Adapter Option . . . . . . . . . . . . . . . . . . . . . . . . . . . . . . . . . . . . . . . . . . . . . . . . . . . . . . . . . . .
4-8
4-9
4-10
4-13
Chapter 5 Programming of DynaControl Controller
Controller Safety Consideration . . . . . . . . . . . . . . . . . . . . . . . . . . . . . . . . . . . . . . . . . . . . . . . . . . . . . . . .
Software Version . . . . . . . . . . . . . . . . . . . . . . . . . . . . . . . . . . . . . . . . . . . . . . . . . . . . . . . . . . . . . . . . . . .
Display & Keypad Reference . . . . . . . . . . . . . . . . . . . . . . . . . . . . . . . . . . . . . . . . . . . . . . . . . . . . . . . . . .
Basic Programming Sequence: Quick Reference . . . . . . . . . . . . . . . . . . . . . . . . . . . . . . . . . . . . . . . . . . .
Controller Setup . . . . . . . . . . . . . . . . . . . . . . . . . . . . . . . . . . . . . . . . . . . . . . . . . . . . . . . . . . . . . . . . . . . .
Turning the Controller On . . . . . . . . . . . . . . . . . . . . . . . . . . . . . . . . . . . . . . . . . . . . . . . . . . . . .
Language Selection . . . . . . . . . . . . . . . . . . . . . . . . . . . . . . . . . . . . . . . . . . . . . . . . . . . . . . . . . .
Temperature Scale Selection . . . . . . . . . . . . . . . . . . . . . . . . . . . . . . . . . . . . . . . . . . . . . . . . . . .
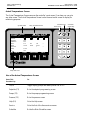
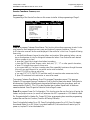
Actual Temperatures Screen . . . . . . . . . . . . . . . . . . . . . . . . . . . . . . . . . . . . . . . . . . . . . . . . . . . . . . . . . .
Use of the Actual Temperatures Screen . . . . . . . . . . . . . . . . . . . . . . . . . . . . . . . . . . . . . . . . . . . . . . . . . .
Programming Sequence . . . . . . . . . . . . . . . . . . . . . . . . . . . . . . . . . . . . . . . . . . . . . . . . . . . . . . .
Monitoring . . . . . . . . . . . . . . . . . . . . . . . . . . . . . . . . . . . . . . . . . . . . . . . . . . . . . . . . . . . . . . . . .
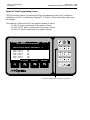
Setpoints Programming Screen . . . . . . . . . . . . . . . . . . . . . . . . . . . . . . . . . . . . . . . . . . . . . . . . . . . . . . . .
Use of the Setpoints Programming Screen . . . . . . . . . . . . . . . . . . . . . . . . . . . . . . . . . . . . . . . . . . . . . . . .
Programming . . . . . . . . . . . . . . . . . . . . . . . . . . . . . . . . . . . . . . . . . . . . . . . . . . . . . . . . . . . . . . .
Monitoring . . . . . . . . . . . . . . . . . . . . . . . . . . . . . . . . . . . . . . . . . . . . . . . . . . . . . . . . . . . . . . . . .
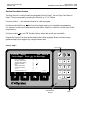
Motor Programming Screen . . . . . . . . . . . . . . . . . . . . . . . . . . . . . . . . . . . . . . . . . . . . . . . . . . . . . . . . . . .
Use of the Motor Programming Screen . . . . . . . . . . . . . . . . . . . . . . . . . . . . . . . . . . . . . . . . . . . . . . . . . .
Programming . . . . . . . . . . . . . . . . . . . . . . . . . . . . . . . . . . . . . . . . . . . . . . . . . . . . . . . . . . . . . . .
Monitoring . . . . . . . . . . . . . . . . . . . . . . . . . . . . . . . . . . . . . . . . . . . . . . . . . . . . . . . . . . . . . . . . .
Optional Clutch Programming Screen . . . . . . . . . . . . . . . . . . . . . . . . . . . . . . . . . . . . . . . . . . . . . . . . . . .
Use of the Optional Clutch Programming Screen . . . . . . . . . . . . . . . . . . . . . . . . . . . . . . . . . . . . . . . . . .
Programming . . . . . . . . . . . . . . . . . . . . . . . . . . . . . . . . . . . . . . . . . . . . . . . . . . . . . . . . . . . . . . .
Monitoring . . . . . . . . . . . . . . . . . . . . . . . . . . . . . . . . . . . . . . . . . . . . . . . . . . . . . . . . . . . . . . . . .
Optional Pressure (PSI/BAR) Programming Screen . . . . . . . . . . . . . . . . . . . . . . . . . . . . . . . . . . . . . . . .
Use of the Optional Pressure (PSI/BAR) Programming Screen . . . . . . . . . . . . . . . . . . . . . . . . . . . . . . .
Programming . . . . . . . . . . . . . . . . . . . . . . . . . . . . . . . . . . . . . . . . . . . . . . . . . . . . . . . . . . . . . . .
Monitoring . . . . . . . . . . . . . . . . . . . . . . . . . . . . . . . . . . . . . . . . . . . . . . . . . . . . . . . . . . . . . . . . .
Service Functions Screens . . . . . . . . . . . . . . . . . . . . . . . . . . . . . . . . . . . . . . . . . . . . . . . . . . . . . . . . . . . .
Service Page 1 . . . . . . . . . . . . . . . . . . . . . . . . . . . . . . . . . . . . . . . . . . . . . . . . . . . . . . . . . . . . . . . . . . . . .
High/ Low Temperature Deviation . . . . . . . . . . . . . . . . . . . . . . . . . . . . . . . . . . . . . . . . . . . . . .
Standby Temperature . . . . . . . . . . . . . . . . . . . . . . . . . . . . . . . . . . . . . . . . . . . . . . . . . . . . . . . . .
Standby/ Sleep Setup . . . . . . . . . . . . . . . . . . . . . . . . . . . . . . . . . . . . . . . . . . . . . . . . . . . . . . . . .
Setpoint Limitation . . . . . . . . . . . . . . . . . . . . . . . . . . . . . . . . . . . . . . . . . . . . . . . . . . . . . . . . . .
Temperature Offset . . . . . . . . . . . . . . . . . . . . . . . . . . . . . . . . . . . . . . . . . . . . . . . . . . . . . . . . . .
Sequential Heating . . . . . . . . . . . . . . . . . . . . . . . . . . . . . . . . . . . . . . . . . . . . . . . . . . . . . . . . . . .
Temperature Scale . . . . . . . . . . . . . . . . . . . . . . . . . . . . . . . . . . . . . . . . . . . . . . . . . . . . . . . . . . .
Change Security Lock . . . . . . . . . . . . . . . . . . . . . . . . . . . . . . . . . . . . . . . . . . . . . . . . . . . . . . . .
Service Page 2 . . . . . . . . . . . . . . . . . . . . . . . . . . . . . . . . . . . . . . . . . . . . . . . . . . . . . . . . . . . . . . . . . . . . .
Customer Zone Names . . . . . . . . . . . . . . . . . . . . . . . . . . . . . . . . . . . . . . . . . . . . . . . . . . . . . . . .
Power On Configuration . . . . . . . . . . . . . . . . . . . . . . . . . . . . . . . . . . . . . . . . . . . . . . . . . . . . . .
Factory Defaults . . . . . . . . . . . . . . . . . . . . . . . . . . . . . . . . . . . . . . . . . . . . . . . . . . . . . . . . . . . . .
Keypad Locking . . . . . . . . . . . . . . . . . . . . . . . . . . . . . . . . . . . . . . . . . . . . . . . . . . . . . . . . . . . . .
PC Link . . . . . . . . . . . . . . . . . . . . . . . . . . . . . . . . . . . . . . . . . . . . . . . . . . . . . . . . . . . . . . . . . . .
Language . . . . . . . . . . . . . . . . . . . . . . . . . . . . . . . . . . . . . . . . . . . . . . . . . . . . . . . . . . . . . . . . . .
5-1
5-1
5-2
5-4
5-5
5-5
5-5
5-5
5-6
5-6
5-7
5-7
5-8
5-9
5-9
5-9
5-10
5-11
5-11
5-11
5-12
5-13
5-13
5-13
5-13
5-15
5-15
5-15
5-16
5-16
5-17
5-17
5-17
5-17
5-18
5-18
5-18
5-18
5-19
5-19
5-19
5-20
5-20
5-20
5-20
c. 2000
DYNAMELT M ASU Manual 20-36
Table of Contents Page v
Revised 4/06
LCD Contrast . . . . . . . . . . . . . . . . . . . . . . . . . . . . . . . . . . . . . . . . . . . . . . . . . . . . . . . . . . . . . . .
System Logbook . . . . . . . . . . . . . . . . . . . . . . . . . . . . . . . . . . . . . . . . . . . . . . . . . . . . . . . . . . . .
Change Security Lock . . . . . . . . . . . . . . . . . . . . . . . . . . . . . . . . . . . . . . . . . . . . . . . . . . . . . . . .
Service Page 3 . . . . . . . . . . . . . . . . . . . . . . . . . . . . . . . . . . . . . . . . . . . . . . . . . . . . . . . . . . . . . . . . . . . . .
Programming at Main Scheduler Screen . . . . . . . . . . . . . . . . . . . . . . . . . . . . . . . . . . . . . . . . . . . . . . . . .
Use of the Main Scheduler Screen . . . . . . . . . . . . . . . . . . . . . . . . . . . . . . . . . . . . . . . . . . . . . . . . . . . . . .
Programming of 7-Day Scheduler . . . . . . . . . . . . . . . . . . . . . . . . . . . . . . . . . . . . . . . . . . . . . . . . . . . . . .
Use of the 7-Day Scheduler Screen . . . . . . . . . . . . . . . . . . . . . . . . . . . . . . . . . . . . . . . . . . . . . . . . . . . . .
Programming . . . . . . . . . . . . . . . . . . . . . . . . . . . . . . . . . . . . . . . . . . . . . . . . . . . . . . . . . . . . . . .
Up/ Downloading Instructions: Controller to Remote PC (PC Link) . . . . . . . . . . . . . . . . . . . . . . . . . . .
5-20
5-20
5-20
5-21
5-22
5-23
5-24
5-25
5-25
5-26
Chapter 6 Preventive Maintenence
General Cleaning . . . . . . . . . . . . . . . . . . . . . . . . . . . . . . . . . . . . . . . . . . . . . . . . . . . . . . . . . . . . . . . . . . .
Preventive Maintenance Schedule . . . . . . . . . . . . . . . . . . . . . . . . . . . . . . . . . . . . . . . . . . . . . . . . . . . . . .
Outlet Filter . . . . . . . . . . . . . . . . . . . . . . . . . . . . . . . . . . . . . . . . . . . . . . . . . . . . . . . . . . . . . . . . . . . . . . .
Outlet Filter Manifold (illustration) . . . . . . . . . . . . . . . . . . . . . . . . . . . . . . . . . . . . . . . . . . . . . . . . . . . .
Hose Fittings . . . . . . . . . . . . . . . . . . . . . . . . . . . . . . . . . . . . . . . . . . . . . . . . . . . . . . . . . . . . . . . . . . . . . .
Fasteners . . . . . . . . . . . . . . . . . . . . . . . . . . . . . . . . . . . . . . . . . . . . . . . . . . . . . . . . . . . . . . . . . . . . . . . . .
Filter Shutoff Cleaning or Replacement . . . . . . . . . . . . . . . . . . . . . . . . . . . . . . . . . . . . . . . . . . . . . . . . . .
Pump Shaft Leak . . . . . . . . . . . . . . . . . . . . . . . . . . . . . . . . . . . . . . . . . . . . . . . . . . . . . . . . . . . . . . . . . . .
Summary of Preventive Manintenance Schedule . . . . . . . . . . . . . . . . . . . . . . . . . . . . . . . . . . . . . . . . . . .
Flushing the System . . . . . . . . . . . . . . . . . . . . . . . . . . . . . . . . . . . . . . . . . . . . . . . . . . . . . . . . . . . . . . . .
6-1
6-1
6-1
6-2
6-3
6-3
6-3
6-4
6-4
6-5
Chapter 7 Troubleshooting
General Troubleshooting Notes . . . . . . . . . . . . . . . . . . . . . . . . . . . . . . . . . . . . . . . . . . . . . . . . . . . . . . . .
Preliminary Checks . . . . . . . . . . . . . . . . . . . . . . . . . . . . . . . . . . . . . . . . . . . . . . . . . . . . . . . . . . . . . . . . .
Error Messages . . . . . . . . . . . . . . . . . . . . . . . . . . . . . . . . . . . . . . . . . . . . . . . . . . . . . . . . . . . . . . . . . . . . .
Hose/ Applicator Troubleshooting Tip . . . . . . . . . . . . . . . . . . . . . . . . . . . . . . . . . . . . . . . . . . . . . . . . . . .
Motor Speed Control PC Board Re-set . . . . . . . . . . . . . . . . . . . . . . . . . . . . . . . . . . . . . . . . . . . . . . . . . .
High-Temperature Redundant Overtemp Thermostat . . . . . . . . . . . . . . . . . . . . . . . . . . . . . . . . . . . . . . .
Pump Enable Thermostat . . . . . . . . . . . . . . . . . . . . . . . . . . . . . . . . . . . . . . . . . . . . . . . . . . . . . . . . . . . . .
Lithium Battery on PC Boards . . . . . . . . . . . . . . . . . . . . . . . . . . . . . . . . . . . . . . . . . . . . . . . . . . . . . . . . .
Handling Printed Circuit Boards . . . . . . . . . . . . . . . . . . . . . . . . . . . . . . . . . . . . . . . . . . . . . . . . . . . . . . .
CPU Printed Circuit Board & Layout Illustration . . . . . . . . . . . . . . . . . . . . . . . . . . . . . . . . . . . . . . . . . .
Display CPU Printed Circuit Board & Layout Illustration . . . . . . . . . . . . . . . . . . . . . . . . . . . . . . . . . . .
Motor Control Interface Printed Circuit Board & Layout Illustration . . . . . . . . . . . . . . . . . . . . . . . . . . .
Motor Speed Control Printed Circuit Board & Layout Illustration . . . . . . . . . . . . . . . . . . . . . . . . . . . . .
48-Zone Power Printed Circuit Board & Layout Illustration . . . . . . . . . . . . . . . . . . . . . . . . . . . . . . . . . .
Optional Clutch Printed Circuit Board & Layout Illustration . . . . . . . . . . . . . . . . . . . . . . . . . . . . . . . . .
Optional RS232/485 Printed Circuit Board & Layout Illustration . . . . . . . . . . . . . . . . . . . . . . . . . . . . . .
Optional Pressure (PSI) Printed Circuit Board & Layout Illustration . . . . . . . . . . . . . . . . . . . . . . . . . . .
Heater and Sensor Resistance Values . . . . . . . . . . . . . . . . . . . . . . . . . . . . . . . . . . . . . . . . . . . . . . . . . . . .
Resistance Tables . . . . . . . . . . . . . . . . . . . . . . . . . . . . . . . . . . . . . . . . . . . . . . . . . . . . . . . . . . . . . . . . . . .
Error Indication Alarm Troubleshooting Guide . . . . . . . . . . . . . . . . . . . . . . . . . . . . . . . . . . . . . . . . . . . .
Adjustable Adhesive Pressure Relief Valve . . . . . . . . . . . . . . . . . . . . . . . . . . . . . . . . . . . . . . . . . . . . . . .
Operation of the ASU’s Gear Pump . . . . . . . . . . . . . . . . . . . . . . . . . . . . . . . . . . . . . . . . . . . . . . . . . . . . .
Troubleshooting the ASU Pump . . . . . . . . . . . . . . . . . . . . . . . . . . . . . . . . . . . . . . . . . . . . . . . . . . . . . . .
Gear Pump Troubleshooting Guide . . . . . . . . . . . . . . . . . . . . . . . . . . . . . . . . . . . . . . . . . . . . . . . . . . . . .
7-1
7-1
7-1
7-1
7-1
7-2
7-2
7-2
7-3
7-4
7-5
7-6
7-7
7-9
7-10
7-10
7-11
7-12
7-13
7-14
7-22
7-23
7-24
7-25
Page vi Table of Contents
Revised 4/06
c. 2000
DYNAMELT M ASU Manual 20-36
Chapter 8 Disassembly & Re-assembly Procedures
Disassembly Procedures . . . . . . . . . . . . . . . . . . . . . . . . . . . . . . . . . . . . . . . . . . . . . . . . . . . . . . . . . . . . .
To Remove the Access Doors . . . . . . . . . . . . . . . . . . . . . . . . . . . . . . . . . . . . . . . . . . . . . . . . . . . . . . . . .
To Open the Junction Box . . . . . . . . . . . . . . . . . . . . . . . . . . . . . . . . . . . . . . . . . . . . . . . . . . . . . . . . . . . .
Sensor or Thermostat Replacement . . . . . . . . . . . . . . . . . . . . . . . . . . . . . . . . . . . . . . . . . . . . . . . . . . . . .
To Remove the Manifold Cover . . . . . . . . . . . . . . . . . . . . . . . . . . . . . . . . . . . . . . . . . . . . . . . . . . . . . . . .
Heater Replacement . . . . . . . . . . . . . . . . . . . . . . . . . . . . . . . . . . . . . . . . . . . . . . . . . . . . . . . . . . . . . . . . .
To Access the RTD Sensor in the Optional Drop-in Grid . . . . . . . . . . . . . . . . . . . . . . . . . . . . . . . . . . . .
To Access the Electrical Components Inside the Panel Box . . . . . . . . . . . . . . . . . . . . . . . . . . . . . . . . . .
Fuse Replacement . . . . . . . . . . . . . . . . . . . . . . . . . . . . . . . . . . . . . . . . . . . . . . . . . . . . . . . . . . . . . . . . . .
Printed Circuit Board Replacement . . . . . . . . . . . . . . . . . . . . . . . . . . . . . . . . . . . . . . . . . . . . . . . . . . . . .
To Access the Pump or Motor . . . . . . . . . . . . . . . . . . . . . . . . . . . . . . . . . . . . . . . . . . . . . . . . . . . . . . . . .
Motor Removal . . . . . . . . . . . . . . . . . . . . . . . . . . . . . . . . . . . . . . . . . . . . . . . . . . . . . . . . . . . . . . . . . . . .
Pump Removal . . . . . . . . . . . . . . . . . . . . . . . . . . . . . . . . . . . . . . . . . . . . . . . . . . . . . . . . . . . . . . . . . . . . .
Pump Seal (O-ring) Replacement . . . . . . . . . . . . . . . . . . . . . . . . . . . . . . . . . . . . . . . . . . . . . . . . . . . . . .
Re-assembly Procedures & Cautions . . . . . . . . . . . . . . . . . . . . . . . . . . . . . . . . . . . . . . . . . . . . . . . . . . . .
8-1
8-1
8-1
8-2
8-2
8-2
8-2
8-3
8-3
8-3
8-4
8-4
8-5
8-5
8-5
Chapter 9 Available Options & Accessories
Pressure Gauge Kit . . . . . . . . . . . . . . . . . . . . . . . . . . . . . . . . . . . . . . . . . . . . . . . . . . . . . . . . . . . . . . . . . .
Pre-PSI and Post-PSI Transducers . . . . . . . . . . . . . . . . . . . . . . . . . . . . . . . . . . . . . . . . . . . . . . . . . . . . . .
Drop-in Grids . . . . . . . . . . . . . . . . . . . . . . . . . . . . . . . . . . . . . . . . . . . . . . . . . . . . . . . . . . . . . . . . . . . . . .
High Temperature Heater Groups . . . . . . . . . . . . . . . . . . . . . . . . . . . . . . . . . . . . . . . . . . . . . . . . . . . . . .
Filter Options & Accessories . . . . . . . . . . . . . . . . . . . . . . . . . . . . . . . . . . . . . . . . . . . . . . . . . . . . . . . . . .
Level Control . . . . . . . . . . . . . . . . . . . . . . . . . . . . . . . . . . . . . . . . . . . . . . . . . . . . . . . . . . . . . . . . . . . . . .
Pump Options & Accessories . . . . . . . . . . . . . . . . . . . . . . . . . . . . . . . . . . . . . . . . . . . . . . . . . . . . . . . . .
Gear Motor Options . . . . . . . . . . . . . . . . . . . . . . . . . . . . . . . . . . . . . . . . . . . . . . . . . . . . . . . . . . . . . . . . .
Return (Re-circulating) Hoses . . . . . . . . . . . . . . . . . . . . . . . . . . . . . . . . . . . . . . . . . . . . . . . . . . . . . . . . .
Electric Clutch Kit . . . . . . . . . . . . . . . . . . . . . . . . . . . . . . . . . . . . . . . . . . . . . . . . . . . . . . . . . . . . . . . . . .
DynaControl Options . . . . . . . . . . . . . . . . . . . . . . . . . . . . . . . . . . . . . . . . . . . . . . . . . . . . . . . . . . . . . . . .
Recommended Service Parts List . . . . . . . . . . . . . . . . . . . . . . . . . . . . . . . . . . . . . . . . . . . . . . . . . . . . . . .
9-1
9-1
9-1
9-1
9-1
9-1
9-2
9-2
9-3
9-3
9-3
9-5
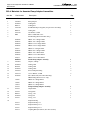
Chapter 10 Component Illustrations & Bills of Material
Chapter Format . . . . . . . . . . . . . . . . . . . . . . . . . . . . . . . . . . . . . . . . . . . . . . . . . . . . . . . . . . . . . . . . . . . .
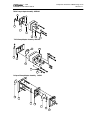
Pressure Relief & High Temperature FIlter Block Assembly . . . . . . . . . . . . . . . . . . . . . . . . . . . . . . . . .
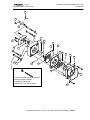
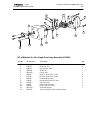
Typical Electrical Panel Box Assembly . . . . . . . . . . . . . . . . . . . . . . . . . . . . . . . . . . . . . . . . . . . . . . . . . .
Cabinet Assembly . . . . . . . . . . . . . . . . . . . . . . . . . . . . . . . . . . . . . . . . . . . . . . . . . . . . . . . . . . . . . . . . . .
Drive Assemblies . . . . . . . . . . . . . . . . . . . . . . . . . . . . . . . . . . . . . . . . . . . . . . . . . . . . . . . . . . . . . . . . . . .
Melt & Grid Assemblies . . . . . . . . . . . . . . . . . . . . . . . . . . . . . . . . . . . . . . . . . . . . . . . . . . . . . . . . . . . . .
Gear Pumps . . . . . . . . . . . . . . . . . . . . . . . . . . . . . . . . . . . . . . . . . . . . . . . . . . . . . . . . . . . . . . . . . . . . . . .
Pump Adapter Assemblies . . . . . . . . . . . . . . . . . . . . . . . . . . . . . . . . . . . . . . . . . . . . . . . . . . . . . . . . . . . .
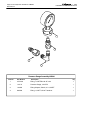
Pressure Gauge Kit . . . . . . . . . . . . . . . . . . . . . . . . . . . . . . . . . . . . . . . . . . . . . . . . . . . . . . . . . . . . . . . . . .
10-1
10-2
10-4
10-8
10-10
10-12
10-14
10-22
10-24
In addition to the assemblies listed above, this chapter may also contain illustrations for other optional
assemblies ordered with your ASU.
c. 2000
DYNAMELT M ASU Manual 20-36
Table of Contents Page vii
Revised 4/06
Chapter 11 System Schematics & Engineering Drawings
Hose Schematic: all models . . . . . . . . . . . . . . . . . . . . . . . . . . . . . . . . . . . . . . . . . . . . . . . . . . . . . . . . . . .
Head Schematic: all models . . . . . . . . . . . . . . . . . . . . . . . . . . . . . . . . . . . . . . . . . . . . . . . . . . . . . . . . . . .
Flow Diagram, Outlet Filter Manifold/ Cross Channel . . . . . . . . . . . . . . . . . . . . . . . . . . . . . . . . . . . . . .
Typical Hydraulic Schematic . . . . . . . . . . . . . . . . . . . . . . . . . . . . . . . . . . . . . . . . . . . . . . . . . . . . . . . . . .
Optional System Status Lights . . . . . . . . . . . . . . . . . . . . . . . . . . . . . . . . . . . . . . . . . . . . . . . . . . . . . . . . .
Optional Level Control . . . . . . . . . . . . . . . . . . . . . . . . . . . . . . . . . . . . . . . . . . . . . . . . . . . . . . . . . . . . . .
Optional Electric Clutch . . . . . . . . . . . . . . . . . . . . . . . . . . . . . . . . . . . . . . . . . . . . . . . . . . . . . . . . . . . . . .
Grounding Diagram . . . . . . . . . . . . . . . . . . . . . . . . . . . . . . . . . . . . . . . . . . . . . . . . . . . . . . . . . . . . . . . . .
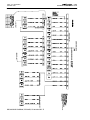
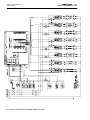
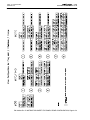
Power Wiring Diagram, 240v . . . . . . . . . . . . . . . . . . . . . . . . . . . . . . . . . . . . . . . . . . . . . . . . . . . . . . . . .
Signal Wiring Diagram, 4Hose/4 Head, 240v . . . . . . . . . . . . . . . . . . . . . . . . . . . . . . . . . . . . . . . . . . . . .
Power Wiring Diagram, 380v . . . . . . . . . . . . . . . . . . . . . . . . . . . . . . . . . . . . . . . . . . . . . . . . . . . . . . . . .
Instruction Sheet for Pump & Zone Configuration . . . . . . . . . . . . . . . . . . . . . . . . . . . . . . . . . . . . . . . . .
Special Dynamelt M ASU Schematics . . . . . . . . . . . . . . . . . . . . . . . . . . . . . . . . . . . . . . . . . . . . . . . . . . .
11-2
11-3
11-4
11-5
11-5
11-6
11-7
11-8
11-9
11-10
11-12
11-13
end of chapter
Appendix
Optional Dynatec/ Zenith Standard Accuracy Gear Pumps . . . . . . . . . . . . . . . . . . . . . . . . . . . . . . . . . . .
Optional Dynatec/ Zenith High Accuracy Gear Pumps . . . . . . . . . . . . . . . . . . . . . . . . . . . . . . . . . . . . . .
Optional Zenith Melt Spinning Pumps . . . . . . . . . . . . . . . . . . . . . . . . . . . . . . . . . . . . . . . . . . . . . . . . . .
High Accuracy Pump Performance Chart . . . . . . . . . . . . . . . . . . . . . . . . . . . . . . . . . . . . . . . . . . . . . . . .
Pressure Transducer . . . . . . . . . . . . . . . . . . . . . . . . . . . . . . . . . . . . . . . . . . . . . . . . . . . . . . . . . . . . . . . . .
Electric Clutch . . . . . . . . . . . . . . . . . . . . . . . . . . . . . . . . . . . . . . . . . . . . . . . . . . . . . . . . . . . . . . . . . . . . .
Optional TSHA Pumps . . . . . . . . . . . . . . . . . . . . . . . . . . . . . . . . . . . . . . . . . . . . . . . . . . . . . . . . . . . . . .
Appendix 1
Appendix 15
Appendix 28
Appendix 34
Appendix 35
Appendix 37
Appendix 39
Page viii Table of Contents
Revised 4/06
ITW Dynatec
An Illinois Tool Works Company
c. 2000
DYNAMELT M ASU Manual 20-36
Page 1-1
Revised 1/07
ITW Dynatec c. 1997
ALL MODELS
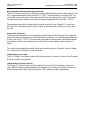
Chapter 1
SAFETY PRECAUTIONS
All operators and service personnel must read
and understand this manual before operating
or servicing equipment.
All maintenance and service on this equipment must be performed by trained technicians.
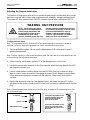
Electrical
DANGER
HIGH VOLTAGE
Dangerous voltages exist at several points in this
equipment. To avoid personal injury, do not touch
exposed connections and components while input
power is on. Disconnect, lockout and tag external
electrical power before removing protective panels.
A secure connection to a reliable earth ground is
essential for safe operation.
A disconnect switch with lockout capability must be
provided in the line ahead of the unit. Wiring used to
supply electrical power should be installed by a
qualified electrician.
High Temperatures
WARNING
HOT
SURFACE
Severe burns can occur if unprotected skin comes in
contact with molten adhesive or hot application system
parts.
Safety glasses, gloves and long- sleeved clothing must
be worn whenever working with or around adhesive
application systems.
High Pressure
WARNING
HIGH PRESSURE
PRESENT
To avoid personal injury, do not operate the equipment
without all covers, panels and safety guards properly
installed.
To prevent serious injury from molten adhesive under
pressure when servicing the equipment, disengage the
pumps and relieve the adhesive system’s hydraulic
pressure (e.g., trigger the heads, hand-held applicators,
and/or other application devices into a waste container)
before opening any hydraulic fittings or connections.
IMPORTANT NOTE: Even when a system’s pressure
gauge reads “0” psig, residual pressure and trapped air
can remain within it causing hot adhesive and pressure
to escape without warning when a filter cap or a hose
or hydraulic connection is loosened or removed. For
this reason, always wear eye protection and protective
clothing.
Either of the two High Pressure symbols shown may be
used on equipment.
Page 1-2
Revised 3/97
ITW Dynatec c. 1997
ALL MODELS
Protective Covers
WARNING
DO NOT OPERATE
WITHOUT GUARDS
IN PLACE
Keep all guards in place!
To avoid personal injury, do not operate the application
system without all covers, panels and safety guards
properly installed.
Eye Protection & Protective Clothing
WARNING
EYE PROTECTION
REQUIRED
PROTECTIVE
CLOTHING
REQUIRED
It is very important that you PROTECT YOUR EYES
when working around hot melt adhesive equipment!
Wear safety glasses with side shields which conform to
ANSI Z87.1 or EN166.
Failure to wear safety glasses could result in severe eye
injury.
It is important to protect yourself from potential burns
when working around hot melt adhesive equipment.
Wear protective gloves and long-sleeved, protective
clothing to prevent burns that could result from contact
with hot material or hot components.
Always wear steel-reinforced safety shoes.
Safe Installation and Operation
To avoid possible failure of hoses, make sure all hoses
are routed to avoid kinking, tight radius turns (8” or
less) and abrasive contact. Hot-melt hoses should not
have prolonged contact with heat-absorbing surfaces
such as cold floors or metal troughs. These
heat-absorbing surfaces can alter adhesive flow and
cause incorrect calibration. Hoses should never be
covered with materials that prevent heat dissipation,
such as insulation or sheathing.
Read this manual before applying electrical power to
the equipment. Equipment may be damaged by
incorrect electrical connections.
Do not use adhesive that is dirty or that may be
chemically contaminated. Doing so can cause system
clogging and pump damage.
When adhesive hand-held applicators or other movable
applicators are used, never point them at yourself or at
any other person. Never leave a hand-held applicator’s
trigger unlocked when not actually in use.
Do not operate the hopper or other system components
without adhesive for more than 15 minutes if the
temperature is 150 degrees C (300 degrees F) or more.
To do so will cause charring of the residual adhesive.
Never activate the heads, hand-held applicators and/ or
other application devices until the adhesive’s
temperature is within the operating range. Severe
damage could result to internal parts and seals.
Treatment for Burns From Hot Melt Adhesives
Burns caused by hot melt adhesive must be treated
at a burn center.
Care should be used when working with hot melt
adhesives in the molten state. Because they rapidly
solidify, they present a unique hazard.
Even when first solidified, they are still hot and can
cause severe burns. When working near a hot melt
application system, always wear safety gloves, safety
glasses and long-sleeved, protective clothing.
Page 1-3
Revised 1/07
ITW Dynatec c. 1997
ALL MODELS
Always have first-aid information and supplies
available.
Call a physician and/or an emergency medical
technician immediately.
Service
Refer all servicing to qualified personnel only.
Explosion/ Fire Hazard
Never operate this unit in an explosive environment.
Use cleaning compounds recommended by ITW
Dynatec or your adhesive supplier only. Flash points
of cleaning compounds vary according to their composition, so consult with your supplier to determine the
maximum heating temperatures and safety precautions.
Lockout/ Tagout
Follow OSHA 1910.147 (Lockout/ Tagout Regulation)
for equipment’s lockout procedures and other important lockout/ tagout guidelines.
Be familiar with all lockout sources on the equipment.
Even after the equipment has been locked out, there
may be stored energy in the application system, particularly in the capacitors within the panel box. To ensure
that all stored energy is relieved, wait at least one minute before servicing electrical capacitors.
Use of PUR (Polyurethane) Adhesives
PUR adhesives emit fumes (MDI and TDI) that can be
dangerous to anyone exposed to them. These fumes
cannot be detected by the sense of smell. ITW Dynatec
strongly recommends that an exhaust hood or system
be installed over any PUR system.
Consult with your adhesive manufacturer for specifics
about required ventilation.
CAUTION: Because of the nature of PUR
adhesives to strongly bond in the presence
of moisture, care must be taken to prevent
them from curing inside Dynatec equipment. If PUR
adhesive solidifies in a unit, the unit must be replaced.
Always purge old PUR adhesive from the system per
your adhesive manufacturer’s instructions and timetable. ALLOWING PUR ADHESIVE TO CURE IN A
UNIT VOIDS ITW DYNATEC’S WARRANTY.
In This Manual
WARNINGS and CAUTIONS are found throughout
this manual.
WARNINGS mean that failure to observe the specific
instructions may cause injury to personnel.
CAUTIONS mean that failure to observe the specific
instructions may damage the equipment.
Page 1-4
Revised 3/97
ITW Dynatec
An Illinois Tool Works Company
Adhesive Application Solutions
ITW Dynatec c. 1997
ALL MODELS
c. 2000
DYNAMELT M ASU Manual 20-36
Description & Specifications Page 2-1
Revised 10/00
Chapter 2
DESCRIPTION AND SPECIFICATIONS
Description
The DYNAMELTÒ M Series adhesive supply units (ASU) are computer-controlled hot-melt supply
units designed on metric standards. Their control panels, with choice of display languages, provide
comparative data of all setpoints, motors, etc. on a few convenient, comprehensive display screens.
The Dynamelt M Series ASUs are available in three cabinet sizes and offer four hopper sizes. The
Dynamelt M 35 uses a microprocessor temperature control to closely control the temperature of hotmelt adhesive for up to 4 hoses and 4 heads. Temperature setpoints are operator-selected for up to
16 zones and the system automatically provides warnings and alarms for operator errors and system
malfunctions.
The Dynamelt/ DynaControl system provides accurate, proportionate temperature control for the
hopper, hoses and applicators. Sequential heating delays may be programmed for turn-on of the
hoses and heads. A “standby” temperature may be programmed so that the temperature zones can
be maintained at a lower temperature when the ASU is not in active use, enabling rapid return to
normal operation. The seven-day scheduler allows programmable automatic startup and shutdown
of the ASU throughout the workweek.
With these flexible temperature programming features, the Dynamelt system increases adhesive life
by eliminating prolonged high adhesive temperatures. It reduces energy consumption and brings the
system up to normal operating temperatures in the shortest possible time.
A four-layered, shielded CPU board protects the microprocessor from external interference. The
temperature control can interlock the parent machine with preselected adhesive temperatures so that
production automatically begins when adhesive temperatures are correct for the application. All
system temperature values can easily and quickly be programmed. An optional remote control panel
gives control and monitoring flexibility.
Digital readout of system conditions is provided. A security code can restrict access to system programming and parameters. The CPU monitors the electronic circuitry and provides alarms for error
conditions.
The Dynamelt M ASU uses an extremely dependable gear pump(s) to assure a smoother and higher
precision flow. The single or dual pumps are driven by individual drives.
The Dynamelt’s teflon-coated hopper accepts adhesive in all popular forms, including pellets, slugs
and blocks. The ASU can accomodate air-actuated automatic applicators (heads), electric applicators, hand-held applicators and/or special applicators. Options available include pressure gauge,
drop-in grid, pendant control, adhesive level control, digital pressure readout and electric clutch.
Page 2-2 Description & Specifications
Revised 10/00
c. 2000
DYNAMELT M ASU Manual 20-36
Specifications
Environmental:
Storage/ shipping temperature . . . . . . . . . . . . . . . . . . . . . . . . . . . . . -40° C to 70°C (-40° F to 158°F)
Ambient service temperature . . . . . . . . . . . . . . . . . . . . . . . . . . . . . . . -7° C to 50°C (20° F to 122°F)
Noise emission . . . . . . . . . . . . . . . . . . . . . . . . . . . . . . . . . . . . . . . . . . < 60 dbA at 1 meter (39 inches)
Physical:
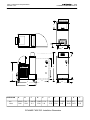
Dimensions . . . . . . . . . . . . . . . . . . . . . . . . . . . . . . . . . . see dimensional layouts on following pages
Number of heads/ hoses . . . . . . . . . . . . . . . . . . . . . . . . . . . . . . . . . . . . . . . . . . . . . 1 to 4 heads/ hoses
Number of return hoses or auxillary zones . . . . . . . . . . . . . . . . . . . . . . . . . . . . . . . . . . . . . . . . 1 to 4
Number of hopper temperature zones . . . . . . . . . . . . . . . . . . 2 or 3 (add 1 for optional drop-in grid)
Number of pumps/ motors . . . . . . . . . . . . . . . . . . . . . . . . . . . . . . . . . . . . . . . . . . . . . . . . . . . . . 1 or 2
Number of standard drop-in grids . . . . . . . . . . . . . . . . . . . . . . . . . . . . . . . . . . . . . . . . . . . . . . . . . . . 1
Number of (optional) drop-in grids . . . . . . . . . . . . . . . . . . . . . . . . . . . . . . . . . . . . . . . . . . . . . . . . . . 1
Gear pumps . . . . . . . . . . . . . . . . . . . . . . . . . . . . . . . . . . . . . . . . . . . . . . . . . . . . . 2.92 cc/rev standard
Enclosure . . . . . . . . . . . . . . . . . . . . . . . . . . . . . . . . . . styled, durable metal,dust and splatter resistant
Hose connections . . . . . . . . . . . . . . . . . . . . . . . . . . . . universal 15-pin Amphenol connectors at asu,
wrench-secured fluid fittings (#6 JIC)
Hopper (tank) capacity . . . . . . . . . . . . . . . . . . . . . . . . . . . . . . . . . . . . . . . . . . . . . . . . . . . 35 kg/ 77 lb
Hopper construction . . . . . . . . . . . . . . . . . . . . . . . machined welded aluminum, Teflon impregnated
Filtration . . . . . . . . . . . . . . . . . . . . . . . . . . . . . hopper bottom screen, large pleated pump outlet filter
Weight of base unit, empty . . . . . . . . . . . . . . . . . . . . . . . . . . . . . . . . . . . . . . . . . . . . . . . . . . . . . . tbd
Adhesive form . . . . . . . . . . . . . . . . . . . . . . . . . . . . . . . . . . . . . . . . . . . . . . . . . . . . accepts most forms
Electrical:
Supply voltage . . . . . . . . . . . . . . . . . . . . . . . . . . . . . . . . . . . . . . . . . . . . 200-240 VAC/ 3p/ 50-60 Hz
380-400 VAC/ 3p (“Wye”, “Y” or 5-wire connection)/ 50-60 Hz
Minimum supply amperes . . . . . . . . . . . . . . . . . . . . . . . . . . . . . . . . . . . . . . . . see circuit breaker size
Power consumption: hopper and drop-in-grid . . . . . . . . . . . . . . . . . . . . . . . . . . . . . . . . . . 7500 watts
Hopper heater type . . . . . . . . . . . . . . . . . . . . . . . . . . . . . . . . . . . . . . . . . . . . . . . . . . . . . cast-in tubular
Temperature control . . . . . . . . . . . . . . . microprocessor-based proportional integral derivitive (PID)
Temperature sensors . . . . . . . . . . . . . . . . . . . . . . . . . . . . . . . . . . . . 100 Ohm Platinum RTD standard
120 Ohm Nickel RTD optional
Electrical connectors . . . . . . . . . . . . . . . . . . . . . . . . . . . . . . . . . . . . . . . durable, latching connectors
Motor . . . . . . . . . . . . . 1/4 hp, alternating current TEFC* motor, direct drive, horizontal orientation
Maximum current available for each hose or head . . . . . . . . . . . . . . . . . . . . . . . . . . . . . . . 10 ampere
* totally enclosed, fan cooled
c. 2000
DYNAMELT M ASU Manual 20-36
Description & Specifications Page 2-3
Revised 5/03
Performance:
Adhesive temperature control range . . . . . . . . . . . . . . . . . . . . . . . . 40°C to 232°C (100°F to 450°F)
Standby adhesive temperature range . . . . . . . . . . . . . . . . . . up to 80°C (150°F) lower than setpoint
Hopper ready adhesive temperature deviation (factory set/ field adjustable) ± 20°C (36°F) from setpoint
Over-temperature cutoff for hopper . . . . . . . . . . . . . . . . . . . . . . . . . . . . . . . . . . . . . . . 232°C (450°F)
Adhesive viscosity . . . . . . . . . . . . . . . . . . . . . . . . . . . . . . . . . . . . . . . . . . . . 500 to 50,000 centipoise
Warm-up time, full hopper . . . . . . . . . . . . . . . . . . . . . . . . . . . . . . . . . . . . . . . approximately 0.5 hour
Typical adhesive melt rate (depends on adhesive used) . . . . . . . . . . . . . . 18-65 kg/hr (40-143 lb/hr)
Adhesive pressure . . . . . . . . . . . . . . . . . . . . . . . . . . . . . . . . . . . . . up to 68 bar (1000 psi) maximum
DynaControl Temperature Control:
Controller power board . . . . . . . . . . . . . . . . . . . . . . . . . . . . . . . . . . . 48 zones, modular construction
Display type . . . . . . . . . . . . . . . . . . . . . . . . . . . . . . . . . . . . . . . . . . . . . . . . . . . graphic, liquid crystal
Temperature control zones (DM35) . . . . . . . . . . . . . . . . . . . . . . 16 maximum with solid state relays
Power output . . . . . . . . . . . . . . . . . . . . . . . . . . . . . . . . . . . . . . . . . . . . . . . . . . . . . hopper: 5000 watt
hose: 1200
applicator head: 1200 watt
auxiliary: 2000 watt
Solid state relay . . . . . . . . . . . . . . . . . . . . . . . . . . . . . . . . . . . . . . . . . . . . . . . . . . . . . . . . . . 3-15 VDC
Line speed inputs . . . . . . . . . . . . . . . . . . . . . . . . . . . . . . . . . . . . . . . . . . . . . . . . . . . . . . . . . . . . 1 to 2
Other:
Display languages . . . . . . . . . . . . . . English, French, German, Spanish, Swedish, Italian, Japanese,
Portugese and Dutch
Operator interface . . . . . . . . . . . . . . . . . . . . . . . . . . . . . . . . . multi-zone, liquid crystal display with
alpha/numeric keyboard and function keys
Temperature standby . . . . . . . . . . . . . . . . . . . . . . . . . . . . . . . . . . . . . . . . . . . . . . . . . . . . . . . . . . . yes
High and low temp alarms . . . . . . . . . . . . . . . . . . . . . . . . . . . . . . . . . . . . . . . . . . . . . . . . . . . . . . . yes
Ready interlock . . . . . . . . . . . . . . . . . . . . . . . . . . . . . . . . . . . . . . . . . . . . . . . . . . . . . . . . . . . . . . . yes
Password protection . . . . . . . . . . . . . . . . . . . . . . . . . . . . . . . . . . . . . . . . . . . . . . . . . . . . . . . . . . . . yes
Sequential heating . . . . . . . . . . . . . . . . . . . . . . . . . . . . . . . . . yes (hopper, hose, head staged heating)
Sensor open alarm . . . . . . . . . . . . . . . . . . . . . . . . . . . . . . . . . . . . . . . . . . . . . . . . . . . . . . . . . . . . . yes
RS232 and RS485 communications capable . . . . . . . . . . . . . . . . . . . . . . . . . . . . . . . . . . . . . . . . . yes
Line Speed Tracking . . . . . . . . . . . . . . . . . . . . . . . . . . . . . . . . . . . . . . . . . . . . . . . . . . . . . . . . . . . yes
Seven-day scheduler . . . . . . . . . . . . . . . . . . . . . . . . . . . . . . . . . . . . . . . . . . . . . . . . . . . . . . . . . . . yes
CE approval granted . . . . . . . . . . . . . . . . . . . . . . . . . . . . . . . . . . . . . . . . . . . . . . . . . . . . . . . . . . . yes
c. 2000
DYNAMELT M ASU Manual 20-36
Page 2-4 Description & Specifications
Revised 11/02
F
H
B
E
D
J
A
L
G
C
B
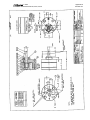
K
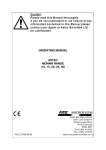
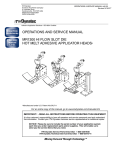
DIMENSION
mm
inches
A
B
C
D
E
863.60
34.00
560
22.05
800.10
31.5
1346.2 177.8
53.00 7.00
F
G
336.55 558.80
13.25 22.00
H
J
228.60
9.00
782.32 878
30.80 34.57
DYNAMELT M35 DCL Installation Dimensions
K
L
107.2
4.22
Description & Specifications Page 2-5
Revised 10/00
c. 2000
DYNAMELT M ASU Manual 20-36
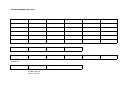
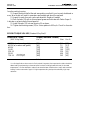
Total System Wattage Capacity
MAXIMUM WATTAGE
M35
Hopper + High Temp Heater
6000 w
Pre-Melt
2500w
Optional Drop-in Grid
2500w
Up to 4 Hose Zones
(1200 w each)
4800 w
Up to 4 Applicator Zones
(1200 w each)
4800 w
Up to 4 AUX Zones
(2000 w each)
8000 w
Maximum System Wattage:
28,600 w
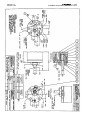
Main Circuit Breaker Determination
Main circuit breakers vary depending on each unit’s system configuration. ITW Dynatec typically
determines the main circuit breaker by the mains load for a system, which, by codes, should be
125% to 150% of the maximum load. If a customer later modifies his system (by adding heads,
hoses, auxiliary outputs, etc.), the main breaker may need to be upgraded to reflect the increase in
load.
To determine your existing main circuit breaker, first determine if the ASU has been modified
and the breaker upgraded accordingly. If not, and the breaker is original to the ASU, you will find
the main circuit breaker listed in the Panel Box Assembly (PBA) section of the indented bill of
materials inserted at the back of this manual. The main circuit breaker is the largest amperage circuit breaker listed in that bill of materials.
c. 2000
DYNAMELT M ASU Manual 20-36
Page 2-6 Description & Specifications
Revised 4/06
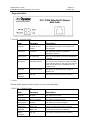
Definition of Code: DYNAMELT DM 35 ASU w. DynaControl Controller
ASU Code: M X X D X # X X X / # X X X
1GA S / 1ZLS
M 3 5 D N
X D # P X -- XX, X, X . . .
2 D 2 P 2 -- F1 G C
Code Power
Code PN
Base Unit
35 106049 35kg (77 lb) Hopper
D
2
240V/ 3P Delta/ no neutral
3
380V/ 3P Star/ neutral only
Motor/ Drive Groups (1/ pump)
# =Total number of drives
DynaControl Controller
Code PN
Drive Setup
# Drives
# Front
Grids
N
n/a
G
804634 Add Drop-in Grids
O
n/a
1 drive
2 “
Standard
# Rear
1
1
0
1
Omit Drop-in Grids
Code PN
Qty. Code PN
Pump(s)
# = Quantity of each Type of Pump
GAS 100860 Dynatec 1.54cc single
GBS 100861 Dynatec 3.18cc single
Panel Box Assembly
PA 806456 1 drive, 2 hose/ 2 head/ 2 auxilliary, 240v
PB 806457 1 drive, 2 hose/ 2 head/ 2 auxilliary, 380v
PC 806458 2 drive, 4 hose/ 4 head/ 4 auxilliary, 240v
PD 806459 2 drive, 4 hose/ 4 head/ 4 auxilliary, 380v
GCS 100862 Dynatec 4.5cc single
GAD 100863 Dynatec 1.54cc dual
GBD 100864 Dynatec 3.18cc dual
Code PN
Options
ZLS 084E372 Zenith 0.160cc single
D
Digital Pressure Readout
ZDS 084E428 Zenith 0.297cc single
E
107945 Electric Clutch Kit
ZES 084E374 Zenith 0.584cc single
Fx Filter Selection
ZFS 084E430 Zenith 1.168 single
F1 101246 40 mesh outlet filter
ZGS 084E434 Zenith 2.92cc single
F2 101247 100 mesh outlet filter (Standard)
SHS 108875 S&P 8.5cc single
ZLD 084E387 Zenith 0.160cc dual
ZDD 084E388 Zenith 0.297cc dual
ZED 084E 389 Zenith 0.584cc dual
ZFD 084E432 Zenith 1.168 dual
SGD 108874 S&P 2.92cc dual
SPC Special Pump (see sales order)
F3 106273 150 mesh outlet filter
G
805641 Analog Pressure Gauge Kit
K
N06642 Signal Isolator
L
802886 One-Point Level Control Assy
P
107643 Remote Display Kit
Q
108475 RS232/485 Communication
R
108313 Digital RPM Readout
Y
108425 Handgun Trigger Kit
Z
106103 Drain Valve
Installation Page 3-1
Revised 4/01
c. 2000
DYNAMELT M ASU Manual 20-36
Chapter 3
INSTALLATION
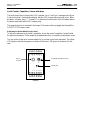
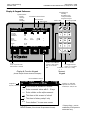
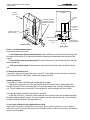
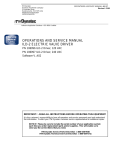
Placing the DYNAMELT M ASU
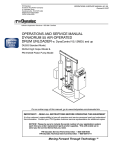
The DYNAMELTÒ M SERIES ASU can stand alone on flat surfaces. The main electrical power
and the serial communication connections come in from below the unit and connect under the DynaControl keypad, so access is needed there.
For installation dimensions, see illustration on page 2-4.
Hopper Lid
Controller Keypad
Access
Door
Keylock
Panel
Box
Main Disconnect
Switch
Panel Box
Keylock
Panel Box
Manifold
Cover
Hose/ Head
Electrical
Connections
The DYNAMELT M35 DCL ASU
Page 3-2 Installation
Revised 4/01
c. 2000
DYNAMELT M ASU Manual 20-36
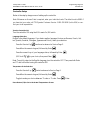
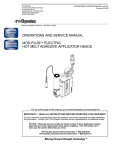
Re-read Chapter 1 “Safety Precautions” before performing any installation procedures. All installation procedures must be performed by qualified, trained technicians.
“ON”
Position
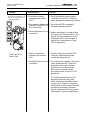
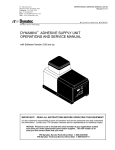
To Open/ Close Panel Box Door
1. With the key supplied, unlock the panel box door.
“Reset”
Position
2. Turn the main disconnect switch counterclockwise
to “Reset” while pushing the tab clockwise with your thumb.
3. Pull door open.
4. To close: Turn switch to “ON”. Hold door closed
while turning swith to “Reset” and then back to “ON”.
Lockout Safety
5. Lock the panel box door with the key.
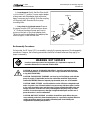
Installation
T
After the DYNAMELT M SERIES ASU has been properly
positioned, the following general sequence should be followed
for installation:
RI
P
Tab
ON
O
F
F
R
E
S
E
T
1. Make sure that incoming line power to the ASU and
that the unit’s main disconnect switch are turned OFF.
Main Disconnect Switch
DANGER HIGH VOLTAGE
Disconnect and lock out input power to the application system, using the
lockout safety illustrated above, before starting any installation procedures.
Make sure there is no electrical power on the leads you will be connecting.
2. Within the panel box assembly: Connect 3 electrical leads with the appropriate voltage to the
main circuit breaker and connect one electrical lead to the ground (PE) terminal (see diagram
following).
380v ASUs only: In addition to above, connect one lead to the neutral terminal.
CAUTION: Grounding conductors never carry electrical current. The use of a neutral
conducting wire as earth ground is incorrect and may cause damage to the controller.
cont.
Installation Page 3-3
Revised 6/01
c. 2000
DYNAMELT M ASU Manual 20-36
3. At installation, the customer must make the following terminal connections into the ASU’s
printed circuit boards (PCBs). The boards do not need to be removed from the ASU in order to
make connections.
See the detailed layout on the next page for locations, and refer to the detailed layout drawings
of the PCBs in Ch. 7, if needed.
Terminal
Circuit
Location
Required connections for standard 240 vac ASU:
PE
Input Power from Main Power 240vac
Ground
Main Power Switch/L1, L2, L3
Terminal rail
Required connections for 380 vac ASU:
N, PE
Input Power, from Main Power, 380 vac
Neutral, Ground
Main Power Switch/L1, L2, L3
Terminal rail
Non-essential connections; connect if feature is desired:
R1, R2
Normally Open Ready (parent machine interlock)
A1, A2
E1, E2
P1, P2
P3, P4
Normally Closed Alarm (controller display alarms)
External Standby (controller standby mode)
Program Select 1&2 (controller program selection)
Program Select 3&4
”
”
”
Power On Output
Power PCB/ JS4/ pins 1 & 2 and
Power PCB/ JS2/ pins 1 & 2
CPU PCB/ X1/ pins 1 & 2
CPU/ X4/ connect 5 and 9 or 10
CPU/ X4/ connect 1 to 9 or 10**
CPU/ X4/ connect 7 to 9 or 10**
Power PCB/ JS1/ pins 1 & 2
Options: Make connections for the following if installed on your ASU:
S1, S2
H1, H2
Tachometer (line speed tracking)
Hand-Held Applicator, Footswitch
Low Adhesive Level (output alarm)
Pressure Transducer(s) (1 to 4 transducers)
Pressure Transducer(s) (high & low psi alarms)
Clutch Customer Enable (for motor 1)
Clutch Customer Enable (for motor 2)
Ribboncable RS232/485 Communication
MCI*/ X3/ 0 (ground) & 10 (+)
MCI*/ X3/ TR
CPU PCB/ X1/ pins 3 & 4
PSI PCB/ X1, X2, X3, X4
PSI PCB/ X6
Clutch PCB/ JS1/ pins 1 & 2
Clutch PCB/ JS1/ pins 3 & 4
Display CPU PCB
* MCI = Motor Control Interface PC Board
** Program Selection Table
User Connections
P1/P2
Pin 1
P3/P4
Pin 7
open
closed
open
closed
open
open
closed
closed
Program #
= Program 1
= Program 2
= Program 3
= Program 4
Page 3-4 Installation
Revised 6/01
c. 2000
DYNAMELT M ASU Manual 20-36
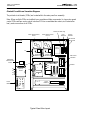
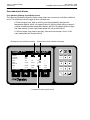
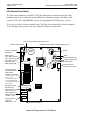
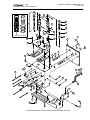
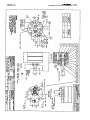
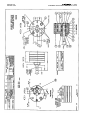
Printed Circuit Board Location Diagram
The printed circuit boards (PCBs) are located within the main panel box assembly.
Note: When multiple PCBs are installed to accomodate multiple components (ie, two motor speed
control PCBs and two motor control interface PCBs to accomodate two motors, as illustrated below), make connections to all PCBs.
Neutral (for 380v only)
Motor Speed Control
Drive 1
Motor Speed Control
Drive 2
Fuse
Terminals
Ground
Terminals
Main Ground
(PE)Terminal
Side Panel
Level
Control
X3
Motor
Control
interface 1
L1 L2 L3
RS232/485
Communication
Board
X1
X2
X3
X4
Motor
Control
interface 2
X6 X1
Pressure
Board
CPU Board
JS1
JS4
Power Board
JS2
X4
JS1
Clutch
Board
L1 L2 L3
Circuit
Breakers
Typical Panel Box Layout
Main Circuit
Breaker
Contactor
c. 2000
DYNAMELT M ASU Manual 20-36
Installation Page 3-5
Revised 4/01
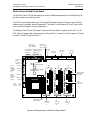
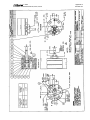
4. The adhesive hoses are connected at the rear cover (see illustration on page 3-6). Each hose is
connected at both an adhesive port and an electrical connect. Make your electrical hose
connections at the numbered connects above the filter manifolds. Route hoses so that there is at
least an eight-inch radius at any bend. Do not hang hoses without proper support. Do
not crimp, clamp, squeeze or tie hoses.
Two feed hose adhesive ports are located at the bottom of each filter manifold. When making
hose connections, use the numbered guides shown on the illustration to coordinate; ie. when
using one hose make your hookup to electrical connection #1 and adhesive port #1. When
using two heads/ hoses, hookup hose/ head #1 to electrical connection #1 and adhesive port #1,
then hookup hose/ head #2 to electrical connection #2 and adhesive port #2, etc.
Two return hose adhesive ports are located at the top of each filter manifold. Use the illustration
to coordinate adhesive port and electrical connections as above. Return hoses are designated as
“auxiliary” ports.
5. Connect (optional) PSI transducers at the PSI ports labeled on the filter manifold. Position them
from left to right across the manifolds as shown in the lower illustration on page 3-6.
Transducers measuring adhesive pressure before it enters the filter use the ports stamped “Pre
PSI” and transducers measuring pressure after the filter use the ports stamped “Post PSI”.
Transducers must be wired into the pressure printed circuit board.
Units not using transducers may use either a PSI port or a feed hose port to mount a (optional)
pressure gauge. If all ports are in use, the pressure gauge may be installed in line with a hose.
Refer to the hose and applicator manuals for further details on these items.
Page 3-6 Installation
Revised 4/01
c. 2000
DYNAMELT M ASU Manual 20-36
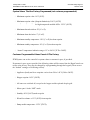
Filter Nut
Hose/ Head
Electrical
Connections
A1
Auxiliary
#1
A2
Auxiliary
#2
F1
#1
Closeable Cross
Channel
F2
#2
Tamper Proof Screw
Bleed Valve Port
Heater Channel
Retainer Plate
RTD Sensor Channel
Purge Drain
Hose/ Head Electrical and Adhesive Connections
Electrical
A1
A2
Up to Two Filter Blocks with
up to 8 Adhesive Ports
A4
A3
PSI 1 PSI 2
PSI 3 PSI 4
A4
F1
F3
A1
A2
F2
A3
F4
F1
F2
Electrical
F3
Adhesive supplied
by motor/pump #1
Adhesive supplied
by motor/pump #2
Note:
Always connect Auxiliary (Return)
Hose #1 (A1) to Auxiliary Electrical
Connect #1 (A1), Feed Hose #1
(F1) to Feed Electrical Connect #1
(F1), etc. as described on page 3-3.
F4
Up to Two Filter Blocks with up to 8 Adhesive Ports
Dynamelt M35: Electrical Connection and Filter Manifold Arrangement for Maximum
Head/ Hose Configuration
c. 2000
DYNAMELT M ASU Manual 20-36
Installation Page 3-7
Revised 11/01
Adding Adhesive
The adhesive level in the melt tank should be maintained at 13mm to 100mm (1/2” to 4”) from the top of
the hopper. Where applications demand a high output volume of adhesive, add small amounts of adhesive frequently. Adding large amounts of adhesive to an almost empty hopper will lower the temperature of the adhesive in the hopper and may cause the ASU to fall below its READY setpoint.
Changing the Adhesive Formula
If a different adhesive formulation from the one being currently used is needed, the system will have to
be flushed if the two formulations are incompatible. See Chapter 6 of this manual for the proper flushing
procedure. When in doubt about adhesive compatibility, flush your system.
Field Installation of Controller Options
Customers who choose to modify their adhesive supply unit with ITW Dynatec manufactured options
should assure that only qualified technicians perform such installations. The installation of options that
require specific procedures and/ or calibration are outlined in this chapter.
Before controller options are installed, always turn the controller’s main power switch OFF. In most
cases, turning the controller OFF will assure that the controller will retain its programmed parameters
and configuration. Re-booting is not necessary.
Page 3-8 Installation
Revised 4/01
c. 2000
DYNAMELT M ASU Manual 20-36
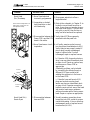
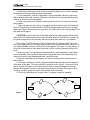
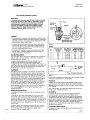
Adjusting the Pressure Relief Valve
The function of the pressure relief valve is to protect the gear pump(s) and the pump drive components from overload and to protect other components from potentially damaging pressure levels.
The system will allow pressures up to 1000 PSI, however, typical factory settings are 500 PSI.
WARNING HIGH PRESSURE
NOTE: The following procedure
will require the hot melt adhesive
to be at a high temperature and
the application system to have
substantial pressure. Safety
glasses, insulated gloves and long-
sleeved protective clothing must be worn
to prevent the possibility of serious injury
from the molten adhesive. Refer to
Chapter 1 and the section entitled
“SAFETY PRECAUTIONS” for further
details and First Aid information.
To Adjust Pressure Relief:
Note: This adjustment should be done with a melt pressure gauge or a pressure transducer
installed. Failure to use proper equipment can result in excessive pressure levels.
1. Turn the application system ON and raise the temperatures of all components to normal
operating temperatures.
Note: Position a bucket or other waste receptacle under the applicator(s) so that adhesive will be
collected during the adjustment procedure.
2. At the controller, set the motor speed to “0” so that the gearmotor is not turning.
3. Locate the pressure relief assembly on the filter manifold (where the hoses attach to the ASU)
and remove the access cover.
4. Position a heat-resistant container below the manifold. With a hex key screwdriver (allen
wrench), slowly loosen the manifold’s two purge set screws (do not attempt to remove them).
Allow adhesive and pressure to escape out of the manifold. Adhesive will drain into the
container.
5. Remove the adjustment screw cap (see diagrams below) and loosen the jam nut. Turn the
adjustment screw counter-clockwise until it is two turns from being completely out of the filter
plug.
Note: if the adjustment screw comes out of the filter plug, be prepared for some adhesive to flow
out of the screw hole.
cont.
Screw cap
Jam nut
Adjustment screw
Turning the adjustment screw
counterclockwise opens the
outlet and decreases the
pressure to the hose.
Turning the adjustment screw
clockwise closes the outlet
and increases the pressure to
the hose.
c. 2000
DYNAMELT M ASU Manual 20-36
Installation Page 3-9
Revised 4/01
6. At the controller, turn the motor ON to its maximum operating speed.
7. Actuate (open) the valves on the applicator(s) in order to fill them with adhesive and purge air
from the system.
8. Close the valves (those openend in the last step) to stop the flow of adhesive.
9. Using a wrench, turn the adjustment screw clockwise to increase the pressure to the
applicator(s).
CAUTION: Approach desired pressure with caution. DO NOT TURN THE ADJUSTMENT
SCREW COMPLETELY CLOCKWISE (BOTTOMING IT INTO THE PLUG), since this
would shut off the pressure relief channel and could cause extensive damage to the
pump, motor and seals. Be aware that the higher the adjusted pressure, the more sensitive the
adjustment is (i.e., at higher pressures, smaller adjustments to the screw will make larger
changes to actual pressure).
10. After desired pressure is achieved, tighten the jam nut down onto the adjustment screw and
lock it in place.
11. Replace and tighten the adjustment screw cap.
12. While the motor is operating at maximum speed, observe the adhesive flow from the
applicator(s).
13. Reduce the motor speed, in increments of about 10%, until the adhesive flow begins to decrease.
Note: Though the speed of the motor is reduced, there will be no change in the amount of adhesive flow
coming out of the applicator. This is because the pressure relief is designed to allow only a maximum
adhesive pressure regardless of the motor speed past a certain point.
Then, increase motor speed in smaller increments (1 to 5%) until adhesive flow returns to the
desired amount.
Note: This is the optimum point of operation for the motor, pump and pressure relief. It will also facilitate the best system performance and reduce wear on these components.
The application system is now adjusted for normal operation.
14. Re-tighten the two purge screws and re-install the access cover.
Page 3-10 Installation
Revised 4/01
c. 2000
DYNAMELT M ASU Manual 20-36
Pump Enable (Ready) Thermostat Calibration
The Pump Enable (Ready) Thermostat is preset to 132°C (270°F), unless the customer has specified
a different preset temperature on his original ASU order. Generally, the pump enable thermostat is
set approximately 30°C (50°F) lower than the application setpoint. If a different temperature is desired, use the following procedure to re-calibrate the thermostat.
CAUTION: DO NOT set the pump enable thermostat lower than the softening
point of your adhesive or pump damage may result.
As an example: the operator desires to lower the preset Pump Ready temperature to 107°C (225°F).
1. At the controller keypad, set the hopper temperature setpoint to the temperature at which you
want the pump to start, i.e. 107°C (225°F).
Hopper
2.
Use the key to unlock the side door, then remove it, being carefull not
to pull out the ground wire attached.
3.
Wait for the hopper temperature to stabilize at 107°C (225°F), then:
Pump EnableThermostat
a. For thermostats with purple & black wire leads or tan leads:
turn the thermostat’s adjustment screw counter-clockwise to increase
the temperature (or clockwise to decrease it) until the pump’s
mo.tor begins turning Adjust no further.
b. For thermostats with tan (with tracer) wire leads: turn the thermostat’s adjustment screw
clockwise to increase the temperature (or counter-clockwise to decrease
it) untilthe pump’s. motor begins turning Adjust no further.
4.
Replace the side door.
5.
At the keypad, re-set the hopper temperature setpoint to its correct “run” temperature.
Installation Page 3-11
Revised 6/01
c. 2000
DYNAMELT M ASU Manual 20-36
Calibration of the Optional Voltage Tachometer
A voltage tachometer allows the system operator to monitor gear pump motor speed from the
controller. This information is useful since the amount of glue dispensed per product can be varied by adjusting the motor rpm (an increase in rpm = an increase in glue dispensed).
DANGER
HIGH VOLTAGE
WARNING
HOT SURFACE
Dynamelt systems use electrical power that can be life threatening and hot-melt adhesives that
can cause serious burns. Be sure to read and follow the safety procedures in Chapter 1 of this
manual. Only qualified persons accustomed to working with live electrical circuits should perform this procedure on the Dynamelt system.
Calibration Procedure
1. Turn the application system ON and raise the temperatures of all components to normal
operating temperatures.
2. Turn main power OFF and open the panel box door. Restore power to the ASU.
3. At the controller keypad, verify normal operation in AUTO, STOP and MANUAL modes
(refer to “Motor Control Programming” in Chapter 5 if needed).
4. At the controller keypad, set motor speed to MANUAL mode and to 100% full speed.
5. With an external tachometer, measure the motor RPM.
6. On the Motor Control Interface PCB, turn the MAX ADJUST potentiometer until the RPM of
the external tachometer reads 1800 rpm.
7. Calibration of this motor is complete. If additional motors are used on your application
system, repeat the above procedure for each motor.
8. Close the panel box door and restore application system to normal operation.
Page 3-12 Installation
Revised 4/01
c. 2000
DYNAMELT M ASU Manual 20-36
Installation of the Optional Tach Generator or a DC Tracking Signal
The installation of a tach generator or a similar DC tracking signal allows speed tracking of the
gear pump through voltage following. Multiple motor boards may be wired in parallel to the tach
generator. On the controller, voltage following is referred to as the “AUTO” Mode of the motor
control.
Installation Procedure
DANGER HIGH VOLTAGE
Dynamelt systems use electrical power that can be life threatening. Disconnect
and lock out input power to the application system before starting any
installation procedures.
1. Disconnect and lockout input power to the application system.
2. Open the panel box and locate the Motor Control Interface Board (see layout illustrtion in
Chapter 7). The device will be connected to the “0” and “10” terminals on X3.
3. A. To install a tach generator:
i. If, when facing the shaft on the tach generator, the rotation of the shaft is clockwise,
connect the black lead wire to the “0” terminal and connect the white lead wire to “10”.
or
ii. If, when facing the shaft on the tach generator, the rotation of the shaft is counter-clockwise,
connect the black lead wire to the “10” and connect the white lead wire to “0”.
iii. Verify that the gear pump motor is running at full speed when set to 100% in MANUAL
mode. The output of the tach generator can be adjusted, depending on the application, but it
must be at least 10 VDC to obtain full adhesive gear pump speed.
Note: under no conditions will the motor ever run faster than this speed (100% Manual).
B. To install a similar DC tracking device (not a tach generator):
Connect the DC tracking voltage signals to the terminals so that the negative lead is connected
to “0” and the positive lead is connected to “10”.
Note: the tracking voltage must be at least 0-10 VDC, but not more than 0-25 VDC.
4. Close the ASU’s panel box door.
5. Re-connect input power and restore the application system to normal operation.
Procede to “Calibration of the Optional Tach Generator or DC Tracking Signal”.
c. 2000
DYNAMELT M ASU Manual 20-36
Installation Page 3-13
Revised 4/01
Calibration of the Optional Tach Generator or DC Tracking Signal
After installation of a tach generator (or a similar DC tracking signal), the device must be calibrated at the DynaControl controller.
Prior to calibration, turn the application system ON and allow all components to warm up to normal operating temperatures (above ready temperatures).
1. Perform the following sequence at the controller keypad for each motor:
a. Go to Motors screen.
b. Choose AUTO mode. Press Enter.
c. Scroll to Min % and enter a value of “0”. Press Enter.
d. Scroll to Max % and enter a value of “100”. Press Enter.
2. Energize the parent line (tracking signal) to its full speed (at least 10 VDC at the “0” and “10”
terminals at X3 on the Motor Control Interface printed circuit board).
3. On the Motor Control Interface printed circuit board (see illustration in Chapter 7) locate and
adjust the web speed scaling potentiometer (VR1) clockwise until the “SET %” is below 99.8.
Then adjust counter-clockwise until it equals 99.8%.
4. The system is now calibrated so that full parent machine speed corresponds to full speed of the
gear pump.
The amount of adhesive dispensed can now be adjusted by trimming the pump RPM at the AUTO
menu of the controller by adjusting the “MAX %” value down from the factory default of 100%.
Adjusting the “MIN %” value corresponds to the pump speed when the parent line is stopped (0.0
volts at the “0” and “10” terminals). In most applications, the factory default (MIN % = 0) is
used.
Page 3-14 Installation
Revised 11/02
c. 2000
DYNAMELT M ASU Manual 20-36
Level Control, Capacitive, Sensor with Amp
The level control device informs the ASU’s operator, via a “Level Low” message on the DynaControl controller’s System Status display, that the ASU’s hopper adhesive level is low. When
the alarm activates, press “C” to reset it. You then have five minutes to refill the hopper before
the alarm reactivates and the ASU’s pumps stop.
The capacitive sensor is mounted in the hopper. The sensor cable is plugged into the amplifier.
DO NOT CUT the sensor cable.
Adjustment of the PN N08122 Level Control
To adjust the adhesive level control’s sensitivity, access the control’s amplifier, located inside
the panel box assembly. On the amplifier (diagrammed below) is a sensitivity adjustment screw.
Turn the screw clockwise to increase sensitivity (or counter-clockwise to decrease). The yellow
LED lights to indicate the presence of adhesive. When the LED goes out, the alarm will activate.
1
2
3
Sensor
Connect
4
5
6
Sensitivity Adjustment Screw
min
S
max
Yellow LED
7
8
9
10
Amplifier
11 12
c. 2000
DYNAMELT M ASU Manual 20-36
Installation Page 3-15
Revised 4/06
Typical Start-Up and Shut Down of the DYNAMELT M Application System
The following simplified sequence assumes that the DynaControl Controller has been programmed.
Start Up Procedures
1. Fill the ASU’s hopper with clean hot-melt adhesive to within a couple of centimeters (inches)
of the top of the hopper. Close the hopper lid immediately to prevent contaminants from
falling in. (Cover your bulk supply of adhesive to prevent contaminants also.)
2. Switch ON the Main Disconnect (the circuit breaker located on the panel box).
3. At the DynaControl keypad, press the controller’s F1 button, if prompted to do so.
4. Allow adequate time (approximately 20-30 min.) for the adhesive to melt and the temperatures
of the temperature zones to stabilize. Monitor the System Status display to see when “Heat
Up” changes to “Ready”. Undertemp arrows will blink until the temperature zones are up to
ready temperature.
5. When temperatures are ready, the pump and motor are enabled to pump adhesive.
At the pump screen:
Select Auto or Manual Mode. Select desired pump, press Enter.
a. If Pump is in Auto Mode: Adhesive will begin to pump when the production line begins
to operate.
b. If Pump is in Manual Mode:
i. Press Manual (F1). Press Enter.
ii. Enter desired speed value. Press Enter.
iii. Scroll to select next pump (if applicable). Repeat steps i thru iii until all pumps are
programmed.
Adhesive will begin to pump once the pump enable thermostat closes and “Ready” condition
is attained.
Shut Down Procedures
At the pump screen:
1. If Pump is in Auto Mode:
a. Press STOP or STOP ALL (F3).
b. Turn OFF the Main Disconnect Switch.
2. If Pump is in Manual Mode:
a. Press STOP or STOP ALL (F3).
b. Turn OFF the Main Disconnect Switch.
3. If 7-Day Scheduler is in use: Turn ON and OFF with the Controller On/Off pushbutton.
Note: Except in the case of the 7-Day Scheduler, use of the Main Power Switch to turn the unit
OFF will avoid unexpected ASU activation in the event of a power outtage.
Page 3-16 Installation
Revised 4/06
c. 2000
DYNAMELT M ASU Manual 20-36
Storage and Disposal of the DYNAMELT M Application System
Temporary Storage of the Unit
1. Flush the adhesive application system with flushing fluid (PN L15653), following the
instructions detailed in chapter 6 of this manual.
2. Clean or replace both the outlet filter and the primary filter, following instructions detailed
in chapter 6.
3. Shut OFF all pressure and power sources.
4. Release residual air pressure (if applicable).
5. Remove all residual adhesive and wipe components clean.
6. Remove all air lines (if applicable) and all power supply cables.
7. Pack the unit in a corrosion-proof manner.
8. Store the unit in such a way that it is protected from damage.
Disposal of the Unit
1. Shut OFF all pressure and power sources.
2. Release residual air pressure (if applicable).
3. Remove all residual adhesive.
4. Remove all air and adhesive hoses and all power supply cables.
5. Dismantle all components and sort into mechanical and electrical components.
6. Arrange for all components to be recycled.
ITW Dynatec c. 2000
DYNAMELT M ASU Manual 20-36, 20-37 and 20-38
Controller Setup Page 4-1
Revised 10/00
Chapter 4
DynaControlä CONTROLLER SET-UP
Temperature Control Functions in General
The DynaControl microprocessor-based proportional temperature control in the ASU performs a
number of functions that help to maintain adhesive setpoints in all temperature zones of the DYNAMELTÒ system. It maintains permanent system values (fixed proportional and integration values that
have been programmed at the factory, such as the maximum temperature setpoint). It enables the user
to program temperature settings and heater on/off sequencing that are appropriate to a specific application. It displays all programmed values, and it includes self-diagnostic malfunction alerts and
failure alarms. Note: Some DynaControl functions are direct temperature conversions between degrees Celsius and Fahrenheit. Other parameters are independently selected values.
Defining DynaControl Temperature Control Terms
Adhesive Temperature Control Range
The temperature limits within which the ASU, hoses and applicators may be programmed and maintained.
CPU Module
The central processing unit (CPU) of the microprocessor temperature control.
Cold Start
When the ASU resets itself to default setting due to either a malfunction or to a deliberately initiated
cold start procedure. When the ASU is turned ON via the Main Power Disconnect Switch.
Default Settings
The factory-set programmable system values that will be in effect if the user does not enter new values. The controller will revert to its defaults whenever it is reset. The DynaControl controller’s defaults are listed in this chapter.
Error Indication Alarms
Alarms which indicate that the programmed over-temperature values have been exceeded for one or
more hopper, hose or head zones. Alarms may also indicate an open or short-circuited sensor.
Mechanical High-Temperature Protection
A mechanical, redundant thermostat located on the hopper which turns OFF the system at 232°C
(450°F).
Microprocessor-based Proportional Temperature Control
The built-in control system that controls, monitors and displays all system temperature values.
cont.
Page 4-2 Controller Setup
Revised 10/00
ITW Dynatec c. 2000
DYNAMELT M ASU Manual 20-36, 20-37 and 20-38
Over-Temperature Setpoint
The programmable temperatures that will cause alarms (blinking up and down display arrows) to
occur when those temperatures are exceeded. Power is not disconnected, the READY contact opens
and the alarm contact opens. If an external alarm has been connected, it will activate. The over-temp
setpoint is the upper limit of the ready temperature range of each zone.
PC Link
Also referred to as remote I/O interface, this is a DynaControl controller option that allows monitoring and programming from a customer-provided PLC (programmable logic controller) or a PC (personal computer).
P-I Loop
A temperature control loop which bases heater output proportional (P) to the difference betweeen
setpoint and actual temperature and combines it mathematically with a time (I = integral) factor.
Power I/O PCBs
The Power I/O printed circuit board (PCB) provides control signals to, and monitoring signals from,
all the temperature zones in the ASU’s system. The ASU’s hopper, hoses and applicators are controlled by the Power I/O PCB.
Pump Enable Temperature
The pump enable temperature protects the pump, pump shaft, motor and motor control board from
damage by not allowing the pump to activate until a low limit (the programmed pump enable temperature) is achieved.
RTD Sensors
The standard Dynamelt system uses 100-ohm platinum resistance temperature detector sensors for
all temperature controls. As an option, the unit can be configured for 120-ohm nickel sensors.
Ready Temperature
The programmable temperature, on gear pump models, which allows the ASU pump to turn ON.
The default ready temperature range is a deviation of ± 20°C (± 36°F) from the setpoint. The setpoint minus the deviation is the low limit of the range, and the setpoint plus the deviation is the high
limit of the range.
Recipe
A program recipe is a set of temperature setpoints and parameters which the user has programmed
and wishes to store in the controller for future use. Up to four recipes may be stored in the DynaControl controller.
Sequential Heating
The heating sequence which allows the slower-heating hopper to reach operating temperature without unnecessary use of electricity for faster-heating hoses and applicators. Sequential heating is the
time period during which the hoses and applicators remain OFF while the hopper (and optional
drop-in grids) heats up. Hoses and applicators may be independently programmed. If hopper temperature is above ready temperature when the ASU is turned ON, the hose and applicator cont.
ITW Dynatec c. 2000
DYNAMELT M ASU Manual 20-36, 20-37 and 20-38
Controller Setup Page 4-3
Revised 5/01
sequence is bypassed and they will be turned ON. The heat up sequence is restored after Standby
is turned from ON to OFF. Sequential heating is not needed for most applications and can delay
total system warm-up time.
Standby Condition
The system condition where the ASU, hose and head temperatures are maintained at predetermined reduced temperature values. Standby temperatures are set lower than setpoint temperatures
in order to reduce adhesive degradation and energy consumption when the system is temporarily
inactive, and to permit rapid system warm-up when run condition is selected.
Setpoint
A programmable temperature that has been selected for hopper, hoses, applicators or auxiliary
zones.
Setpoint Limitation
This is a universal maximum temperature for all zones. The programmer cannot program a temperature setpoint higher than the setpoint limitation.
System Logbook
This is the controller’s record-keeping function. It contains the DynaControl’s list of the last
1,000 controller events, its Data Logger which records the last 1000 lines of selected actual temperatures and a counter which records the system’s elapsed hours.
Temperature Zone Enable
The temperature zone enable allows the operator to disable unused temperature zones in such a
way that they do not ever appear on the controller’s display and heating is switched OFF.
Temperature Zone Offset
Due to the separation between the heaters and sensors in some systems, the controller can be programmed to display a temperature for a zone which is different from the sensor’s actual temperature. The temperture zone offset mathematically corrects for these temperature differences. Each
zone may have an individual offset.
Page 4-4 Controller Setup
Revised 5/01
ITW Dynatec c. 2000
DYNAMELT M ASU Manual 20-36, 20-37 and 20-38
Error Indication & Alarms
Error Indication (Blinking Up and Down Arrows)
The following illustration shows the display screen when one or more error indication conditions
occur. The conditions that will trigger an error indication are:
a. When a hopper, hose, head or auxiliary zone has exceeded its selected overtemperature setpoint, which is the setpoint plus its high/low alarm setting, or when it
is below its selected under-temperature setpoint, which is the setpoint minus its high/
low alarm setting. In these cases, heater power will not be switched off.
b. When a hopper, hose, head or auxiliary zone sensor has an open circuit. In this
case, heater power will be switched off.
Blinking up arrow indicates overtemp.
SYSTEM: Alarm
Actuals ° F
Blinking down arrow indicates undertemp.
Tue. 3:36 PM
Next Page Press C
1.
1
300
299
300
2.
2
310
Hose
Head
Aux Zone
274
HOLD
273
HOLD
251
HOLD
?
?
Pump
%
MANU
MANU
STOP
STOP
Premelt
Progmelt
Filterblock
SETPOINTS
HOLD
PUMP
HOLD
3.
3
4.
4
HOLD
PRESSURE
>
SYM
ABC DEF
GHI
JKL
MNO
PRS
TUV
WXY
?
HOLD
HELP
<
Delete
Enter
“?” indicates no sensor (open circuit).
C
>
ABC/123
ITW Dynatec c. 2000
DYNAMELT M ASU Manual 20-36, 20-37 and 20-38
Controller Setup Page 4-5
Revised 11/02
Error Alarms (Message Window)
The display of a message window, as illustrated below, signifies an error alarm. The operator’s response to an error alarm is to press “F4” and to troubleshoot.
If a sensor error alarm or an overtemperature alarm occurs during operation, the controller will
switch off internal power to the heaters and an appropriate error alarm display will appear.
Pressing the “F4” function key acknowledges the error. If several zones display alarms, each must
be acknowledged by pressing “F4”. The alarm display is switched off and the controller then
switches off the faulty zone until the ASU is ready for operation again.
When the actual temperature exceeds the setpoint limitation (plus a tolerance) the overtemperature
alarm window is displayed and main power is switched off.
Examples of Error Alarms
The Overtemperature Alarm indicates that the named
zone has exceeded its programmed setpoint limitation.
The controller will shut off power to the heaters. Press
F4 and troubleshoot the problem.
Overtemperature
Zone Name
##
The Sensor Failure Alarm can indicate either a sensor
open or a sensor short. Sensor open is accompanied by
a blinking up arrow on the actual temperatures display
screen. Sensor short is accompanied by a blinking down
arrow. Press F4 to reset the error message and then either
a. manually turn the zone OFF (via Setpoints F1/ indicated zone/ On/Off F3), or b. troubleshoot the problem.
Zone Name
The Hopper Overtemp Alarm indicates that adhesive
temperatures in the ASU’s hopper have exceeded the
setting of the mechanical (redundant) thermostat.
Press F4 and troubleshoot the problem.
Hopper Overtemp
The Communication Error Alarm indicates an internal
failure, unrelated to zone temperatures. Call ITW
Dynatec for assistance.
Sensor Failure
##
Communication error
Page 4-6 Controller Setup
Revised 10/00
ITW Dynatec c. 2000
DYNAMELT M ASU Manual 20-36, 20-37 and 20-38
Optional System Status Lights
This tri-color stack light eases remote monitoring of the system’s status.
The lower, white light illuminates when the system is turned ON. The
middle, green light indicates that the system has warmed up to temperature
setpoints (“ready”). The upper, red light illuminates only in an alarm
condition and is accompanied by an audible alarm. The audible alarm is
housed within the upper (black) section of the stack.
The status lights may be wired to indicate either high/low temperature, low
adhesive level or open/short sensor. See Chapter 11 for wiring diagram.
Audible
Alarm
Red
Alarm
Green
System
Ready
White
Power
“ON”
Settings for a Typical Operation
Note: The values given here are approximate settings for a typical packaging operation. The values
you choose will be based on the type of equipment and adhesive you are using and the nature of
your particular operation.
If Application Temperature is 177°C (350°F):
∙
Hose and head temperature: 177°C (350°F).
∙
Hopper setpoint temperature: 163°C (325°F).
∙
Hi/ Lo limit deviation: 12°C (20°F).
∙
ASU operating range: 149°C to 177°C (300°F to 350°F).
∙
Standby condition temperature (deviation): 30°C (50°F).
∙
Hopper over-temperature setpoint : 177°C (350°F)
∙
Mechanical thermostat (for the hopper) over-temperature: 219°C (425°F)
For most operations, temperature fluctuations will be very small and of short duration. For these
reasons, the settings above are recommended.
ITW Dynatec c. 2000
DYNAMELT M ASU Manual 20-36, 20-37 and 20-38
Controller Setup Page 4-7
Revised 10/00
System Values That Are Factory Programmed (not customer programmable)
∙
Minimum setpoint value: 10°C (50°F).
∙
Maximum setpoint value (Setpoint limitation): 218°C (425°F).
”
”
” for high temp mode enabled ASUs: 232°C (450°F)
∙
Maximum alarm deviation: 50° (C or F).
∙
Minimum alarm deviation: 5° (C or F).
∙
Maximum standby temperature: 150° (C or F) less than setpoint.
∙
Minimum standby temperature: 30° (C or F) less than setpoint.
∙
“Actual” temperature indication range: 0°C to 260°C (32°F to 500°F).
Customer Programmable Values Preset At The Factory
ITW Dynatec can set the controller’s system values to customer’s specs, if provided.
If customer’s specs are not provided, the following values will be entered into the DynaControl controller at the factory. They may be changed by reprogramming through the keypad. (These are not
the “default” settings, see following section).
∙
Applicator (head) and hose setpoints: varies from 138 to 149°C (280 to 300°F).
∙
Hopper setpoint: 143°C (290°F).
∙
All zones are switched off, except for the hopper and the optional drop-in grid.
∙
Motor rpm: 0 in the “OFF” mode.
∙
Standby: 80°C (140°F) under setpoint.
∙
Hi and low alarms: ± 12°C (20°F) from setpoint.
∙
Pump enable temperature: 132°C (270°F).
Page 4-8 Controller Setup
Revised 10/00
ITW Dynatec c. 2000
DYNAMELT M ASU Manual 20-36, 20-37 and 20-38
Default Settings of the DynaControl Controller
Default settings are the manufacturer’s preset values to which the system will return if the DynaControl is subjected to an internal memory reset (also referred to as a “re-boot”). While you can
change your programmed values to anything within the system’s limits, the default settings cannot
be changed.
Defaults
∙
Language: English
∙
Setting for Customer Access Code: “9999”.
∙
Temperature setpoint for each zone: -- -- --
∙
Hopper ready temperature: 135°C (270°F).
∙
Over-temperature limit: Your chosen setpoint limitation + 10° C or F.
For example: if your setpoint limitation is 218°C (425°F), then your over-temp limit = 228°C (435°F).
∙
Standby temperature for all zones: 80°C (140°F) lower than programmed setpoints.
∙
Hi/ lo limit deviation for all temperature zones: ± 20°C (36°F).
∙
Temperature zone offset: 0°C (0°F).
∙
Sequential heating: first hopper zones, then hose/ head zones and auxiliary zones.
∙
Setpoint limitation: 218°C (425°F).
∙
Minimum pump speed: 0% of full speed.
∙
Maximum pump speed: 100% of full speed.
∙
Proportional Integral values (P-I values): for Premelt, Hopper and Filterblock temperature
zones, P = 15 and I = 3. For all other zones, P = 12 and I = 2
ITW Dynatec c. 2000
DYNAMELT M ASU Manual 20-36, 20-37 and 20-38
Controller Setup Page 4-9
Revised 11/01
Helpful Tips for the User
∙
When the ASU is turned ON, all temperature setpoints and other operating parameters will
be exactly where they were when the ASU was turned off.
∙
When the ASU is turned ON, all system heaters go ON if the automatic heater startup is
enabled and if setpoints are programmed unless sequential heatups have been set. However, if
hopper temperature is above ready temperature when the ASU is turned ON, all hose and
head sequential heatups will be bypassed and hoses and heads will be turned ON.
∙
If the system is turned OFF and then ON again, the standby condition will be disabled.
Page 4-10 Controller Setup
Revised 9/02
ITW Dynatec c. 2000
DYNAMELT M ASU Manual 20-36, 20-37 and 20-38
Serial Protocol for RS232 and RS485 Options, V5.00 d & up
Specifications
-- RS232C, no handshake
-- RS485, 4 wires
-- baud rate 1200¼57600 baud
-- character format 8 databits + 1 startbit + 1 stopbit
-- parity: no parity check
General information
-- DynaControl is always slave. The controller is only reacting when addressed by a master.
-- DynaControl is only responding when own slave address is received.
Slave address is programmable via front panel (PC--LINK Setup).
-- Multi--digit values are transferred most significant digit first, each digit is ASCII coded.
-- Used control characters:
STX 02
Start of Text
ETX 03
End of Text
EOT 04
End of Transmission
ENQ 05
Enquiry
ACK 06
Positive Acknowledge
NAK 15
Negative Acknowledge
Structure of commands
-- Master transmits to DynaControl:
EOT, addr, opcode, 0..n data bytes, ENQ
-- DynaControl responds:
STX, 1...n data bytes, ETX
Address Setting
Each telegram sent to the DynaControl contains the slave address.
DynaControl is only responding if the received address matches the programmable address.
Examples:
Controller address = 37
1.
Write temperature setpoints
Zone 3 = 250_F
Zone 4 = 280_F
Zone 5 = 300_F
Zone 6 = 350_F, but temporarily not in use
EOT , 3 , 7 , F , 0 , 3 , 0 , 2 , 5 , 0 , 0 , 2 , 8 , 0 , 0 , 3 , 0 , 0 , 1 , 3 , 5 , 0 , ENQ
| 37 | | 3 |
250
|
280
|
300
| 350 / Off |
note: adding 1000 to the setpoint will deactivate this zone.
2.
Read actual temperatures
EOT , 3 , 7 , d , 0 , 0, ENQ
| 37 | | 00 |
note: zone number 00 will request information of all available zones
Controller Setup Page 4-11
Revised 7/01
ITW Dynatec c. 2000
DYNAMELT M ASU Manual 20-36, 20-37 and 20-38
Return String:
STX , 0 , 2 , 3 , 5 , 0 , 2 , 4 , 4 , 1 , 9 , 9 , 9 0 , 2 , 3 , 5 ¼¼¼.ETX
--> zone 1 is 235_F, zone 2 is 244_F , zone 3 has no sensor attached ¼.
Note: 1999 indicates open sensor,0999 indicates sensor short circuit
3.
Read actual pump speed
EOT , 3 , 7, e , 0 , 0 , ENQ request the speed of all pumps
Return String:
STX , 0 , 8, 5 , 0 , 0 , 6 , 6 , 4 , ETX
--> System has 2 pumps, pump1: 85.0Rpm, pump2: 66.4Rpm
4.
Read System Status
EOT, 3 , 7 , f , ENQ
Return String:
STX , F , ETX
--> ‘F’ = 46hex
Bit wise:
07
Always!
16
05
04
03
12
11
00
No setback, normal mode
Controller is on
Enable thermostat closed
Hopper not empty
No low temper. = Ready
No high temper.
5.
Read status of all temperature zones
EOT , 3 , 7 , l , 0 , 0 , ENQ
Return String:
STX , 0 , 2 , 2 , 3 , 1 , 1 , 7, 7, ¼¼.ETX
è
zone 1:
is not used (0)
è
zone 2&3:
heating, but below setpoint window (2)
è
zone 4:heating and ready (3)
è
zone 5&6:
waiting due to heat up sequence (1)
è
zone 7&8:
no sensor attached (7)
cont.
DynaControl Version V5M Serial Protocol
Version: V5.00e
Date: 09.27.01
Opcode
Parameter
Syntax*
Return String
Function
Option
0x41 / 'A'
zz.n*dddd
ACK / NAK
write temperature setpoints °C (10 to 232) , will switch to Celsius
1 zone / multiple zones
0x46 / 'F'
zz.n*dddd
ACK / NAK
write temperature setpoints °F (50 to 450), will switch to Fahrenheit
1 zone / multiple zones
0x61 / 'a'
zz
dddd (n*dddd)
read temperature setpoints
1 zone / all zones
0x64 / 'd'
zz
dddd (n*dddd)
read actual temperature (1999 = open sensor, 0999 = shorted sensor)
1 zone / all zones
0x42 / 'B'
zz.n*dd
ACK / NAK
write temperature tolerance window (5 to 50 degree)
1 zone / multiple zones
0x62 / 'b'
zz
dd (n*dd)
read temperature tolerance window
1 zone / all zones
0x43 / 'C'
zz.n*dddd
ACK / NAK
write pump speed setpoint (0.0 to 100.0%)
1 pump / multiple pumps
0x63 / 'c'
zz
dddd (n*dddd)
read pump speed setpoint (0.0 to 100.0%)
1 pump / all pumps
0x65 / 'e'
zz
dddd (n*dddd)
read actual pump speed (0.0 to 150.0 Rpm)
1 pump / all pumps
0x6c / 'l'
zz
dddd (n*dddd)
read line speed input (0.0 to 100.0%)
1 pump / all pumps
0x67 / 'g'
zz
dddd (n*dddd)
read pressure transducer (0.0 to 150.0BAR / 0 to 1500PSI, 2000= open transd.)
1 transducer / all transd.
0x50 / 'P'
zz.n*dddd
ACK / NAK
write pressure alarm value (0.0 to 150.0BAR / 0 to 1500PSI
1 transd. / multiple transd.
0x70 / 'p'
zz
dddd (n*dddd)
read pressure alarm value (0.0 to 150.0BAR / 0 to 1500PSI)
1 transducer / all transd.
0x4d / 'M'
zz.n*d
ACK / NAK
write pump mode ('S'=Stop, 'M'=Manual, 'A'=Automatic)
1 pump / multiple pumps
0x6d / 'm'
zz
n*d
read pump mode ('S'=Stop, 'M'=Manual, 'A'=Automatic)
1 pump / all pumps
0x66 / 'f'
n.a.
sys-data 1
read system status 1 (see note 1)
0x6a / 'j'
n.a.
sys-data 2
read system status 2 (see note 2)
0x69 / 'i'
zz
n*d
read status of temperature zone (see note 3)
0x48 / 'H'
d
ACK
0x52 / 'R'
d
ACK / NAK
set active program number (1 to 4)
0x72 / 'r'
n.a.
d
read active program number (1 to 4)
0x4c / 'L'
n.a.
ACK / NAK
reset error message
1 zone / all zones
set system mode (see note 4)
*1: System status: Bit0=Setback active, Bit1=Controller on, Bit2= Enable thermostat active, Bit3= Low Level, Bit4= Low Temp.,Bit5=High,Temp., Bit6= always 1
*2: System status: Bit0= scheduler avtive, Bit6= always 1
*3: Zone status: 0=off, 1=wait, 2= heat up, 3= ready, 4= low temp., 5= high temp. , 6= sensor short circuit, 7= sensor open
*4: System mode: Bit0= SetbackOn/Off, Bit1= Heat up sequence yes/no, Bit2= Scheduler active yes/no, Bit3= controller On/Off
*: zz: zone number 01 to max. or 00 for all zones, dddd: four digit data, dd: two digit data, d: one digit data or character
13ITW Dynatec c. 2005
DYNAMELT M ASU Manuals 20-36, 20-37, 20-38
Page 4-13
Revised 8/05
PN 112224 M Series DynaControl EtherNet/IP Adapter Option, V1.06
General
This optional adapter provides an EtherNet/IP connection for Dynamelt M Series hot melt ASUs.
This connection makes it possible to monitor and control the basic functions of the hot melt unit
from a remote PLC or PC.
This adapter uses an ODVA approved module. In order to fully operate, the Dynamelt M must
be equipped with firmware rev. V5.15M or later.
Basic Features:
-
10/100 Mbit/s
DHCP/BootP
Access to basic process parameters
Local and remote access
Watchdog signal
Page 4-14
Revised 8/05
ITW Dynatec c. 2005
DYNAMELT M ASU Manuals 20-36, 20-37, 20-38
Installing the EtherNet/IP-Adapter in a ControlLogix5000 System
These installation steps assume that RSLogix5000 and ControlLogix5000 with an EtherNet/IP
module/bridge (1756 ENBT or similar) are set up and working properly.
1. Connect the Dynatec Hot melt unit (ASU) to the Ethernet network using a standard RJ45cable.
2. Start RsLogix5000 with a new or existing project. Set to “Offline” mode.
3. Add the EtherNet/IP-Adapter to the PLC Configuration:
- Start by right clicking the EtherNet/IP module/bridge in the configuration
- Select “New Module”
- Select “Generic Ethernet Module”
- Press OK
4. Configure the EtherNet/IP-Adapter:
- Enter the name of the module. (for example “Dynatec_Melter”. If you desire to import
the controller tags provided on the CD-ROM, the module name must be exactly
“Dynatec_Melter”. See step #6 following).
- Set Comm Format to “Data-INT”, since all data are 16-bit words
- Set Connection Parameter Assembly Instance to 100 for Input and 150 for Output
- Set Size for 180 input/ 80 output (16 bit)
- Set the Configuration Instance to 1 but the size to 0 since this instance is not supported
- Set the IP-Address to 192.168.23.180. For more details about IP-Address see the following
section, “Changing the IP-Address”
- Press Next >
- On next dialog, select Requested Packet Interval: 100ms
- Do not Inhibit Module
- Press Finish >>. On the main screen you should see the ETHERNET-MODULE under
the I/O Configuration
- Select “ Go Online” from the “Communications” menu
- Select “ Download” in the next window
- Confirm the Download
5. Checking the I/O Tags
After successful configuration of the EtherNet/IP-Adapter, it is possible to access the
input/output data. There are three Controller Tags: “Dynatec Melter: C”, “Dynatec Melter: I”
and “Dynatec Melter: O”. The input/output tags consist of 180/ 80 words each.
“Dynatec Melter: C” is the configuration tag (not used).
“Dynatec Melter: I”
is the data coming from the Dynatec hot melt unit
“Dynatec Melter :O” holds the data going to the hot melt unit.
The definitions of the data tags are explained on the last pages of this section.
15ITW Dynatec c. 2005
DYNAMELT M ASU Manuals 20-36, 20-37, 20-38
Page 4-15
Revised 8/05
6. Importing Controller Tags
The CD-ROM that is provided with the EtherNet/IP option contains a pre-defined controller tag
table. In order to save time, this table may be imported.
- In the RSLogix5000 go offline
- Select Tools -> Import Tags
- Select the “Dynatec-Controller-Tags_DMM. CSV” from the CD-ROM
- Click Import
- If the import was successful, the Report Window in the lower part of the screen should
indicate 242 imported tags.
- Go online again
- Go back to the controller tag screen and verify the tags.
Details on the Communication
General Information
The In- and Out- data table (Controller Tags) contain all parameters for a maximum equipped
hot melt machine. In most of the cases, only parts of the parameters are needed.
The temperature zones are logically organized, first all premelt zones, progmelt zones (=
hopper), then filter blocks up to the auxiliary zones. The number of actually available zones
depends on the type of machine.
-
Setting LocalAccessTemps to 1 allows the user to make changes to the temperature
setpoints on the hotmelt unit. The PLC can read the changes from the corresponding INwords but the temperatures in the OUT area will not be effective on the hot melt unit.
-
Setting LocalAccessTemps to 0 switches the control back to PLC control. All
temperature OUT-words will be transferred to the hot melt unit. A local change of
temperature setpoints is not possible since the PLC will instantly overwrite the entry.
-
LocalAccessMotors controls the access to pump settings analog to the description above.
-
After a local change of setpoints, the PLC first must read the new setpoints before
switching back to PLC control.
-
It is not possible to deactivate a temperature zone locally on the hot melt unit since the
PLC always sends the ZoneEnable/Disable information.
Zones Enabling/Disabling
Temperature zones that are temporarily not used can be remotely deactivated by setting a
corresponding value to OUT-word 70 to 75. Each bit of this word represents one temperature
zone. Bit0 = zone1, Bit1 = zone2 etc. Setting the bit will activate the zone. Resetting will
deactivate the zone.
Pump Control
There are several ways to control pump speed:
1. Manual Mode:
the pump speed can be programmed locally on the hot melt machine. In
order to allow this mode, the OUT-word 50 (for pump 1) must be set to 77
Page 4-16
Revised 8/05
ITW Dynatec c. 2005
DYNAMELT M ASU Manuals 20-36, 20-37, 20-38
(ASCII “M”). Local Access PUMP (OUT-word 63) does not have to be
set.
2. Automatic Mode: the pump speed is controlled via a 0 to 10V signal, connected to the hot
melt machine. In order to activate this mode, the OUT-word 50 (for pump
1) must be set to 65 (ASCII “A”).
The pump speed, which follows the line speed can be read in IN-word 134
(for pump 1). This value shows 0.1% resolution.
3. Stop Mode:
The pump is stopped.
4. Bus Mode:
the pump speed is controlled via OUT-word 56 (for pump 1). Out-word 50
(for pump 1) must be set to 66 (ASCII “B”). On the keypad of the hot melt
machine, the pump speed can be fine tuned by using the min. and max.
scaling, similar to the Automatic Mode.
The speed setting must be transmitted in increments of 0.1% (0 to 1000 =
0.0 to 100.0%).
Adhesive Level Indication
Word 142/ 143 (142 = single hopper/ 142 & 143 = dual hopper) shows the state of the optional
adhesive level control. A 0 indicates the level is O.K. and a 1 indicates a low-level situation.
This signal is an instantaneous non-latched indication.
In order to avoid local low-level indications, which have to be reset on the keypad, the low-level
detection should be disabled in the customer set-up menu of the Dynamelt M hot melt unit.
Zone Status Indication
The status of all temperature zones can be read in IN-word 146 to 175. This information is bit-wise
coded and organized in zone type.
Examples:
IN-word 146:
IN-word 150:
IN-word 156:
IN-word 159:
IN-word 167:
IN-word 175:
0003h 0 0 0 0 . 0 0 0 0 . 0 0 0 0 . 0 0 0 0 . 0 0 1 1
003Fh 0 0 0 0 . 0 0 0 0 . 0 0 0 0 .0 0 1 1 .1 1 1 1
003Fh 0 0 0 0 . 0 0 0 0 . 0 0 0 0 . 0 0 0 0 . 1 1 1 1
0001h 0 0 0 0 . 0 0 0 0 . 0 0 0 0 . 0 0 0 0 . 0 0 0 1
0020h 0 0 0 0 . 0 0 0 0 . 0 0 0 0 .0 0 1 0 .0 0 0 0
0011h 0 0 0 0 . 0 0 0 0 . 0 0 0 0 . 0 0 0 1 .0 0 0 1
premelt 1& 2 are switched ON
6 heads are switched ON
4 heads are in waiting position
the progmelt (hopper) is heating
hose 6 is ready
auxiliary zones 1 & 5 show alarm
17ITW Dynatec c. 2005
DYNAMELT M ASU Manuals 20-36, 20-37, 20-38
Page 4-17
Revised 8/05
Identification Word
OUT-word 79 is used as an identification word. This word must be set to a certain value to
validate the communication. If this word is set differently, the hot melt unit will not accept the
OUT area although the IN-area will show proper values. Dynamelt M hot melt units require IDword set to 68.
Examples for a typical communication
Initializing:
Set OUT 76 to 1 :
Set OUT 79 to 68 :
Set OUT 77 to 0 :
4-Hose Operation:
6-Hose Operation:
Switches the controller on
Identifies the communication
No standby, normal mode
Set OUT 73 to 15 :
Set OUT 74 to 15 :
Set OUT 73 to 63 :
Set OUT 74 to 63 :
Check Ready Condition:
Check Alarm Condition:
is
Hoses 1 to 4 are switched ON
Heads 1 to 4 are switched ON
Hoses 1 to 6 are switched ON
Heads 1 to 6 are switched ON
Compare IN 146 with 164
Compare IN 147 with 165
Compare IN 148 with 166
Compare IN 149 with 167
Compare IN 150 with 168
Compare IN 151 with 169: If all comparisons are equal, the system
is ready
Read In 170 to 175
If any word does not equal 0, an alarm
present
Changing the IP-Address
The EtherNet/IP-Adapter will be factory set to 192.168.23.180 but the DHCP/BOOTP function is
enabled. That means the module will request a new IP-address after power up. If this request is not
serviced, the old IP-address will be valid.
There are several ways to change the IP-address. In any case, a PC must be connected to the
module, either directly via crossover cable or via hub/switch to the network with the module.
Configuration Program ‘Anybus IPconfig’
On the EtherNet/IP support disc you will find a configuration tool to change the IP-Address.
Start the Anybus IPconfig installation program. Follow the instructions on the screen.
Once the configuration tool is running, press the scan button to search for any DynatecEtherNet/IP modules. If a module is detected, it will show up in the window. Double clicking on
it will allow changing the settings for this Module.
Page 4-18
Revised 8/05
ITW Dynatec c. 2005
DYNAMELT M ASU Manuals 20-36, 20-37, 20-38
Using the Configuration File
The file ethcfg.cfg can be used to change the IP-address. This method is possible only if the
actual IP-address is known (e.g. the factory set 192.168.23.180), See also section “Configuration
File”.
- Open a FTP connection to the module (e.g. Windows Explorer™ FTP://192.168.23.180)
- Locate the ethcfg.cfg
- Copy this file to a folder on your PC
- Open the file with any text editor
- Change the IP-address
- Save the file using the same name
- Copy the file back to the module
- Re-cycle power on the module (hot melt unit)
Note: If the configuration file ethcfg.cfg is not found, the module will automatically activate a
DHCP/BOOTP request.
Using the BootP-Server Function
The BOOTP-Server comes with the RSLinx Tools of the Rockwell Automation™ Software or
can be downloaded as a stand-alone application. Version V2.3.2 or newer allows to change the
IP-address of the EtherNet/IP module.
Note: The EtherNet/IP module only requests an IP-address assignment for approx. 30 sec.
If this request is not serviced within this time (by entering the desired IP-address in the relation
list) the module’s power (hot melt machine) must be re-cycled.
19ITW Dynatec c. 2005
DYNAMELT M ASU Manuals 20-36, 20-37, 20-38
Page 4-19
Revised 8/05
Diagnostic LED’s
PN 112224 EtherNet/IP-Adapter
MAC-Addr.
1. Net Stat. = Network Status
State
Summary
Description
Steady Off
No power or no IP
address
The module has no power or no IP address has
been assigned.
Steady Green
Connected
The module has at least one established
EtherNet/IP connection.
Flashing Green
No connections
There are no EtherNet/IP connections established to
the module.
Flashing Red
Connection Timeout
One or more of the connections in which this module
is the target has timed out. This state is only left if all
timed out connections are re-established or if the
module is reset.
Steady Red
Duplicate IP Address
The module has detected that its IP address is
already in use
Flashing
Green/Red
Self-Test
The module is performing a power on self test
2. Active
This led flashes green each time a packet is received or transmitted.
3. Mod. Stat. = Module Status
State
Summary
Description
Steady Off
No power
The module has no power.
Steady Green
Device operational
The module is operating correctly.
Flashing Green
Standby
The module has not been configured.
Flashing Red
Minor Fault
A minor recoverable fault has been detected
Steady Red
Major Fault
A major internal fault has been detected
Flashing
Green/Red
Self-Test
The module is performing a power on self test
Page 4-20
Revised 8/05
ITW Dynatec c. 2005
DYNAMELT M ASU Manuals 20-36, 20-37, 20-38
4. Link = Link Activity
Color
State
Green
On
Description
The module has a link
Off
The module does not sense a link
Configuration File
The EtherNet/IP module contains a file (ethcfg.cfg) that is read by the module at start up. This
file defines the network properties of the module. Any text editor can be used to edit the
parameters.
Note: It is very important to follow the exact syntax specification, otherwise the module might
have problems interpreting it, which can result in a faulty or non-expected behavior.
The file can be uploaded and after modification, downloaded using the FTP function.
(e.g. open a Windows Explorer window. Type ‘FTP://192.168.23.180’)
The format of the file is shown as follows:
FORMAT
EXPLANATION
[IP address]
IP Address
192.168.23.180
[Subnet mask]
Subnet mask
255.255.255.0
[Gateway address]
Gateway address
0.0.0.
[DHCP/BOOTP]
DHCP/BootP
ON
ON - Enabled
OFF – Disabled
[SPEED]
Speed
Auto
Auto – Default. Auto Negotiation will be used.
100 – Forces the module to operate at 100Mbit/s only
10 – Forces the module to operate at 10Mbit/s only
21ITW Dynatec c. 2005
DYNAMELT M ASU Manuals 20-36, 20-37, 20-38
FORMAT
EXPLANATION
[Duplex]
Duplex
Auto
Auto – Default. Auto negotiation will be used.
Page 4-21
Revised 8/05
Full – Forces the module to operate at full duplex only
Half - Forces the module to operate at half duplex only
[SMTP address]
SMTP server/ login settings
0.0.0.0
[SMTP username]
SMTP server/ login settings
username
[SMTP password]
SMTP server/ login settings
password
[DNS1 address]
Primary and Secondary DNS
0.0.0.0
[DNS2 address]
Primary and Secondary DNS
0.0.0.0
[Domain name]
Domain Name (Optional)
hms.se
[Host name]
Host Name (Optional)
Dynacontrol - EtherNet/IP
Data Table
IN-Area (Dynacontrol to PLC)
Word
Address
0
1
2
3
4
5
6
7
8
9
10
11
12
13
14
15
16
17
18
19
20
21
22
23
24
25
26
27
28
29
30
31
32
33
34
35
36
37
38
39
40
41
42
43
44
45
46
47
48
49
50
51
52
53
54
55
56
57
58
59
60
61
Function
Reserved
Reserved
Setpoint Premelt 1
Setpoint Premelt 2
Setpoint Premelt 3
Setpoint Premelt 4
Setpoint Premelt 5
Setpoint Premelt 6
Setpoint Progmelt 1
Setpoint Progmelt 2
Setpoint Progmelt 3
Setpoint Filterblock 1
Setpoint Filterblock 2
Setpoint Filterblock 3
Setpoint Hose 1
Setpoint Hose 2
Setpoint Hose 3
Setpoint Hose 4
Setpoint Hose 5
Setpoint Hose 6
Setpoint Hose 7
Setpoint Hose 8
Setpoint Hose 9
Setpoint Hose 10
Setpoint Hose 11
Setpoint Hose 12
Setpoint Head 1
Setpoint Head 2
Setpoint Head 3
Setpoint Head 4
Setpoint Head 5
Setpoint Head 6
Setpoint Head 7
Setpoint Head 8
Setpoint Head 9
Setpoint Head 10
Setpoint Head 11
Setpoint Head 12
Setpoint Auxiliary 1
Setpoint Auxiliary 2
Setpoint Auxiliary 3
Setpoint Auxiliary 4
Setpoint Auxiliary 5
Setpoint Auxiliary 6
Setpoint Auxiliary 7
Setpoint Auxiliary 8
Setpoint Auxiliary 9
Setpoint Auxiliary 10
Setpoint Auxiliary 11
Setpoint Auxiliary 12
Motor Mode 1
Motor Mode 2
Motor Mode 3
Motor Mode 4
Motor Mode 5
Motor Mode 6
Motor Speed 1
Motor Speed 2
Motor Speed 3
Motor Speed 4
Motor Speed 5
Motor Speed 6
Zone Name
Date: 08.11.05
Page 1 of 5
Version: V5.15a
Valid Range
100°F - 425°F
S' (83) = Stop
'M' (77) = Manual ( Local manual speed)
'A' (65) = Auto (0 to 10V)
'B' (66) = Bus (EtherNet/IP: OUT 56 to 61)
0 to 1000 = 0.0 to 100.0%
[500 = 50.0%]
(Local manual speed)
Dynacontrol - EtherNet/IP
Data Table
IN-Area (Dynacontrol to PLC)
Word
Address
62
63
64
65
66
67
68
69
70
71
72
73
74
75
76
77
78
79
80
81
82
83
84
85
86
87
88
89
90
91
92
93
94
95
96
97
98
99
100
101
102
103
104
105
106
107
108
109
110
111
112
113
114
115
116
117
118
119
120
121
122
123
Function
Pressure Channel 1
Pressure Channel 2
Pressure Channel 3
Pressure Channel 4
Pressure Channel 5
Pressure Channel 6
Pressure Channel 7
Pressure Channel 8
Pressure Channel 9
Pressure Channel 10
Pressure Channel 11
Pressure Channel 12
Actual Temp. Premelt 1
Actual Temp. Premelt 2
Actual Temp. Premelt 3
Actual Temp. Premelt 4
Actual Temp. Premelt 5
Actual Temp. Premelt 6
Actual Temp. Progmelt 1
Actual Temp. Progmelt 2
Actual Temp. Progmelt 3
Actual Temp. Filterblock 1
Actual Temp. Filterblock 2
Actual Temp. Filterblock 3
Actual Temp. Hose 1
Actual Temp. Hose 2
Actual Temp. Hose 3
Actual Temp. Hose 4
Actual Temp. Hose 5
Actual Temp. Hose 6
Actual Temp. Hose 7
Actual Temp. Hose 8
Actual Temp. Hose 9
Actual Temp. Hose 10
Actual Temp. Hose 11
Actual Temp. Hose 12
Actual Temp. Head 1
Actual Temp. Head 2
Actual Temp. Head 3
Actual Temp. Head 4
Actual Temp. Head 5
Actual Temp. Head 6
Actual Temp. Head 7
Actual Temp. Head 8
Actual Temp. Head 9
Actual Temp. Head 10
Actual Temp. Head 11
Actual Temp. Head 12
Actual Temp. Auxiliary 1
Actual Temp. Auxiliary 2
Actual Temp. Auxiliary 3
Actual Temp. Auxiliary 4
Actual Temp. Auxiliary 5
Actual Temp. Auxiliary 6
Actual Temp. Auxiliary 7
Actual Temp. Auxiliary 8
Zone Name
Date: 08.11.05
Page 2 of 5
Version: V5.15M
Valid Range
0 to 1500 PSI
(requires digital pressure readout option)
0 to 500°F (1999 = open sensor / 999 = shorted sensor)
Dynacontrol - EtherNet/IP
Date: 08.11.05
Page 3 of 5
Data Table
IN-Area (Dynacontrol to PLC)
Word
Address
124
125
126
127
128
129
130
131
132
133
134
135
136
137
138
139
140
141
142
143
144
145
146
147
148
149
150
151
152
153
154
155
156
157
158
159
160
161
162
163
164
165
166
167
168
169
170
171
172
173
174
175
176
177
178
179
Function
Premelts On/Off
Progmelts On/Off
Filterblocks On/Off
Hoses On/Off
Heads On/Off
Aux. Zones On/Off
Premelts Waiting
Progmelts Waiting
Filterblocks Waiting
Hoses Waiting
Heads Waiting
Aux. Zones Waiting
Premelts Heating
Progmelts Heating
Filterblocks Heating
Hoses Heating
Heads Heating
Aux. Zones Heating
Premelts Ready
Progmelts Ready
Filterblocks Ready
Hoses Ready
Heads Ready
Aux. Zones Ready
Premelts Alarm
Progmelts Alarm
Filterblocks Alarm
Hoses Alarm
Heads Alarm
Aux. Zones Alarm
Watchdog
Valid Range
Zone Name
Actual Temp. Auxiliary 9
Actual Temp. Auxiliary 10
Actual Temp. Auxiliary 11
Actual Temp. Auxiliary 12
Actual Pump Speed 1
Actual Pump Speed 2
Actual Pump Speed 3
Actual Pump Speed 4
Actual Pump Speed 5
Actual Pump Speed 6
Line Speed 1
Line Speed 2
Line Speed 3
Line Speed 4
Line Speed 5
Line Speed 6
Controller ON/OFF
Standby ON/OFF
Adhes. Level Status 1
Adhes. Level Status 2
Version: V5.15M
0 to 1500 = 0.0 to 150.0 RPM
(requires RPM readout option)
0-1000 = 0 to 100.0% (0 to 10V)
0 = Controller is OFF / 1 = Controller is ON
0 = Normal Mode / 1 = Standby is active
0 = Level is OK / 1 = Level is low
Bit0 to Bit 5
Bit0 to Bit2
Bit0 to Bit2
Bit0 to Bit11
Bit0 to Bit11
Bit0 to Bit11
(requires level control option)
0 = Zone is OFF / 1 = Zone is ON
0 = Zone is not waiting / 1 = Zone is waiting
Each zone is
represented by the
corresponding bit in
these words
0 = Zone is not heating / 1 = Zone is heating
0 = Zone is not ready/ 1 = Zone is ready
0 = Zone has no alarm / 1 = Zone has alarm
Signal toggles every 0.5sec. (0/1)
Dynacontrol - EtherNet/IP
Data Table
OUT-Area (PLC to Dynacontrol)
Word
Address
0
1
2
3
4
5
6
7
8
9
10
11
12
13
14
15
16
17
18
19
20
21
22
23
24
25
26
27
28
29
30
31
32
33
34
35
36
37
38
39
40
41
42
43
44
45
46
47
48
49
50
51
52
53
54
55
56
57
58
59
60
61
Function
Reserved
Reserved
Setpoint Premelt 1
Setpoint Premelt 2
Setpoint Premelt 3
Setpoint Premelt 4
Setpoint Premelt 5
Setpoint Premelt 6
Setpoint Progmelt 1
Setpoint Progmelt 2
Setpoint Progmelt 3
Setpoint Filterblock 1
Setpoint Filterblock 2
Setpoint Filterblock 3
Setpoint Hose 1
Setpoint Hose 2
Setpoint Hose 3
Setpoint Hose 4
Setpoint Hose 5
Setpoint Hose 6
Setpoint Hose 7
Setpoint Hose 8
Setpoint Hose 9
Setpoint Hose 10
Setpoint Hose 11
Setpoint Hose 12
Setpoint Head 1
Setpoint Head 2
Setpoint Head 3
Setpoint Head 4
Setpoint Head 5
Setpoint Head 6
Setpoint Head 7
Setpoint Head 8
Setpoint Head 9
Setpoint Head 10
Setpoint Head 11
Setpoint Head 12
Setpoint Auxiliary 1
Setpoint Auxiliary 2
Setpoint Auxiliary 3
Setpoint Auxiliary 4
Setpoint Auxiliary 5
Setpoint Auxiliary 6
Setpoint Auxiliary 7
Setpoint Auxiliary 8
Setpoint Auxiliary 9
Setpoint Auxiliary 10
Setpoint Auxiliary 11
Setpoint Auxiliary 12
Pump Mode 1
Pump Mode 2
Pump Mode 3
Pump Mode 4
Pump Mode 5
Pump Mode 6
Set Speed Pump 1
Set Speed Pump 2
Set Speed Pump 3
Set Speed Pump 4
Set Speed Pump 5
Set Speed Pump 6
Zone Name
Date: 08.11.05
Page 4 of 5
Version: V5.15M
Valid Range
100°F - 425°F
only active if Local Access Temps. O.Data[62] is set to 0
S' (83) = Stop
'M' (77) = Manual ( Local manual speed)
'A' (65) = Auto (0 to 10V)
'B' (66) = Bus (EtherNet/IP: OUT 56 to 61)
0 to 1000 = 0.0 to 100.0%
[500 = 50.0%]
only active when pump in in Bus-Mode
Dynacontrol - EtherNet/IP
Data Table
OUT-Area (PLC to Dynacontrol)
Word
Address
62
63
64
65
66
67
68
69
70
71
72
73
74
75
76
77
78
79
Function
Local Access Temps.
Local Access Pumps
Premelts On/Off
Progmelts On/Off
Filterblocks On/Off
Hoses On/Off
Heads On/Off
Aux. Zones On/Off
Controller ON/OFF
Standby ON/OFF
Identification Word
Zone Name
all temp. zones
all pumps
Each zone is
represented by the
corresponding bit in
these words
Date: 08.11.05
Page 5 of 5
Version: V5.15M
Valid Range
set to 1 enables setpoint changes on keypad
to 0 enables setpoint changes via EtherNet/IP
Bit0 to Bit 5
Bit0 to Bit2
Bit0 to Bit2
each bit: 1 = zone enabled
Bit0 to Bit11
Bit0 to Bit11
Bit0 to Bit11
set to 0 to switch off / set to 1 to switch on
set to o for normal mode / set to 1 for standby mode
DM-M: 68, has to be set to validate communication
set
Programming Page 5-1
Revised 5/01
ITW Dynatec c. 2000
DYNAMELT M ASU Manual #20-36, 20-37, 20-38
Chapter 5
PROGRAMMING INSTRUCTIONS
FOR DynaControlä CONTROLLER WITH EXPANDED KEYPAD V.5.00c & UP
Controller Safety Consideration
DANGER HIGH VOLTAGE
Never open the control panel without switching off the main disconnect switch
to ensure that it is disconnected from its power source.
The printed circuit boards should always be carefully removed. DO NOT handle the boards except
by their edges. Read the section on PCBs in Chapter 7 of this manual for further cautions.
Software Version
You can determine the software version of your controller by noting it when it comes up on the
Help Screen or on the display at startup:
* * * ITW Dynatec * * *
M-Control V 5.00c
Current Software Version
Page 5-2 Programming
Revised 12/02
ITW Dynatec c. 2000
DYNAMELT M ASU Manual #50-13, 20-36, 20-37, 20-38
Display & Keypad Reference
System Status:
Ready
Heat up
Alarm
Standby
Scheduler Key:
Standby
Day/Date Clock
7-Day Scheduler
Program Recipes
Scheduler Active Indicator
Day of Week
Time of Day
On/Off Key & LED
Service Key
Numeric Entry Keys
SYSTEM: Alarm
Actuals ° F
Premelt
Progmelt
Filterblock
Hose
Head
Aux Zone
Pump
Tue. 3:36 PM
Next Page Press C
1.
1
300
299
300
2.
2
310
274
HOLD
273
HOLD
3.
3
4.
4
251
HOLD
?
>
?
HOLD
SETPOINTS
PUMP
PRESSURE
ABC DEF
GHI
JKL
MNO
PRS
TUV
WXY
?
AUTO
%
SYM
CLEAR
<
Delete EnEnDelete
terter
C
>
ABC/123
Arrow Symbol = use to enter
Keys a space, colon, dash,
dot, “Q” or “Z” into
text
Continued
< >
“%” or
“RPM” if optional actual
RPM readout is installed
Enter
0 = toggle from numeric (1,2,3) to alphabetic (A,B,C) entry
Numeric
Keypad
Display & Function Keypad
(Actual Temps Screen shown as example)
current software version
Program #:
P1, P2, P3 or P4
SYSTEM: Alarm
Tue.
P#
*** M-Control *** V5.00c
3:36 PM
C
1, 2, 3
Press Enter to activate or confirm
Enter a numeric value with 0 - 9 keys
A,B,C
Enter a letter on the alpha-numeric
Flashing “C” indicates
optional serial communication (PC Link) is ON
This item or this screen is locked
F
This item is factory setup* only
< > Press button C to see more zones
HELP Screen (F4 on Actual Temperatures Screen)
* Factory Setup = can be
modified by ITW Dynatec’s
technicians only
Programming Page 5-3
Revised 5/01
ITW Dynatec c. 2000
DYNAMELT M ASU Manual #20-36, 20-37, 20-38
Display Reference, cont.
Condition of Pump Enable Thermostat
Black box = item is selected for programming
System Status Line
Zone Names
SYSTEM: Alarm Lo
SETPOINTS °F
1
2
300
301
299--------------299
380
Premelt
Progmelt
Filterblock
Hose
Head
Aux Zone
Information lines
Numeric Entry
Keys
Tue. 3:36 PM
Next Page Press C
274
------
273
------
3
4
251
-----------
273
-----------
INFO: UPPER PREMELT GRID
Set: 300°F Act: 300°F Tol:±30°F
Function keys:
Scroll Up, Down or Right
“Return” to last screen
Go to “Pressure” screen
Go to “Pump” screen
Toggle “On/Off”
“All _ _ _” = all in category
“ABC/abc” = letter case
“Clear” an alarm or message
“Copy” = copy word(s) to a clipboard
“Paste” = paste copied words into text
“CLR Line” = clear entire line
>
Zo: 1
1, 2, 3
RETURN
Screen continues,
press “C” to view
Zone Status:
### = Temperature
HOLD = In priority queue,
waiting for release
= Over temp
= Under temp
-- -- -- = Off
? = no sensor
Zo: # = this is the
controller’s identification # for each zone
Programming entry:
1,2,3 = numeric only
A,B,C = alpha only
Function keys:
F1, 2, 3, 4
Setpoint Programming Screen
Dashed line (------) indicates Progmelts are
linked (models M70/140/210 only)
For illustrations of the screens of the Dual Hopper ASUs, see pages 5-28 & 29.
SYSTEM: Ready
Tue. 3:36 PM
Press Enter and Select Mode
Set
Pump Mode
%
1 MANU.
2 AUTO.
3 STOP
User-chosen name
Function key:
“Manual”, “Automatic” or
“Stop” = pump modes
“Restart” pump
“All Stop” = stop all pumps
5.0
Min
%
Max
%
5.0
80.0
Actual
RPM
RUN
RUN
RUN
INFO: RIGHT PUMP
MANUAL
AUTOMATIC
90.5
87
Mtr 1
STOP Delete
RETURN
Enter
Arrow
Motor Programming Screen
Keys
Pump Programming Screen
Actual RPM =
optional display
(tach generator
required)
Lock = this screen is
locked from further
programming
Page 5-4 Programming
Revised 4/06
ITW Dynatec c. 2000
DYNAMELT M ASU Manual #50-13, 20-36, 20-37, 20-38
Basic Programming Sequence: Quick Reference
Follow the screen-by-screen steps outlined in the remainder of this chapter for complete setup and
programming instructions. Thereafter, use this page as a “quick reference”.
Press
Turn Controller On
x2, 6 Language Selection
x1, 8 Temperature Scale Selection
F4
Actual Temperatures:
F1 To Program Setpoints
F2 To Program Pump/ Motor(s)
F2 To Program Optional Clutch(es)
F3 To Program Optional Pressure Transducers
x1
x2
End
Service Page 1:
1 = High Low Temperature Deviation
2 = Setback Temperature
3 = Setback/ Sleep Setup
4 = Setpoint Limitation
6 = Temperature Offset
7 = Sequential Heating
8 = Temperature Scale
9 = Change Security Lock or Access Code
Service Page 2:
1 = Customer Zone Names
2 = Power On Configration
3 = Factory Defaults
4 = Keypad Locking
5 = PC Link
6 = Language
7 = LCD Contrast
8 = System Logbook
9 = Change Security Lock
To Program Scheduler
1 = Manual Standby Activation
2 = Time & Date Clock
3 = Program 7-Day Scheduler
4 = Select Program Recipes
5 = Manual Scheduler Activation
Programming Page 5-5
Revised 5/01
ITW Dynatec c. 2000
DYNAMELT M ASU Manual #20-36, 20-37, 20-38
Controller Setup
Below is the step-by-step process of setting up the controller.
Note: Whenever an Access Code is required, enter your individual code. The default code is 9999. If
you have lost your code, call ITW Dynatec Customer Service: 1-800-538-9540 (in the USA) or contact your local repsentative.
Turn the Controller ON
Turn the controller ON using the ASUs main On/ Off switch.
Language Selection
English is the default language. If you desire another language (choices are German, French, Italian, Spanish, Swedish, Portugese, Japanese and Dutch), make your selection:
Press the Service Key
two times to advance to Service Page 2.
Press #6 on the numeric keypad, followed by Enter
.
Press the numeric key of your language choice, followed by Enter
(OR Scroll
to your choice, then press Enter
.
.
Note: To quickly return to the English language, turn the controller OFF. Then press both Enter
and “9” and hold while turning the controller ON.
Temperature Scale Selection
Press the Service Key
twice to advance to Service Page 1.
Press #8 on the numeric keypad, followed by Enter
.
Toggle to make your choice between °C scale or °F scale. Press
Press Return (F4) to Go to the Actual Temperatures Screen
Enter.
Page 5-6 Programming
Revised 5/01
ITW Dynatec c. 2000
DYNAMELT M ASU Manual #20-36, 20-37, 20-38
Actual Temperatures Screen
The Actual Temperatures Screen serves as the controller’s main menu. From here you can go to
any other screen. The Actual Temperatures Screen is also the most useful screen to display for
monitoring purposes.
System Status
SYSTEM: Alarm
Actuals ° F
2.
2
301
Hose
Head
Aux Zone
274
HOLD
273
HOLD
Pump
%
AUTO
78.0
SETPOINTS
PUMP
Service Key
3.
3
4.
4
251
HOLD
?
PRESSURE
>
?
SYM
ABC DEF
GHI
JKL
MNO
PRS
TUV
WXY
?
HELP
<
Delete
Enter
C
>
ABC/123
Pump Info Lines
Use of the Actual Temperatures Screen
Press This
Function Key
Controller
On/Off Key
Tue. 3:36 PM
Next Page Press C
1.
1
300
299
300
Premelt
Progmelt
Filterblock
Scheduler Key
7-Day Scheduler Active
To:
On/Off
Toggle display, pumps and heaters power ON or OFF
Setpoints (F1)
Go to the setpoints programming screen
Pumps (F2)
Go to the pumps programming screen
Pressure (F3)
Go to the pressure screen
Help (F4)
Go to the Help screen.
Service
Go to the first of the three service screens
Scheduler
Go the the Main Scheduler screen
ITW Dynatec c. 2000
DYNAMELT M ASU Manual #20-36, 20-37, 20-38
Programming Page 5-7
Revised 5/01
Use of the Actual Temperatures Screen, cont.
Programming Sequence (details
on following pages)
1. Press Setpoints. After programming all of your temperature setpoints, return to the Actual Temperatures Screen.
2. Press Pumps. After programming all pumps and optional clutch(es), return to the Actual Temperatures Screen.
3. Press Pressure if optional pressure transducers are installed on ASU. After setting limits for all
pressure transducers, return to the Actual Temperatures Screen.
4. Press Scheduler Key to program the following functions: Standby, Time & Date Clock, 7-Day
Scheduler and/ or Program Recipes.
5. Press Help to view the Help screen (illustrated on page 5-2).
Monitoring:
1. System Status display describes system status as one of the following:
a. System Heat up: power is ON but zone temperatures have not risen to setpoint range.
b. System Ready: all zones have reached setpoint temperatures.
c. Alarm: a temperature zone is out of its setpoint tolerance range. An overtemp alarm is indicated by an upwards arrow next to a temperature. An undertemp alarm is indicated by a downwards arrow next to a temperature.
d. Alarm Lo: the pump enable thermostat (undertemp thermostat) is preventing operation due
to a low temperature condition.
e. Standby: the system is in a programmed standby state.
2. Actual Temperatures or Zone Status of all zones is displayed:
a. ###: a three-digit number indicates a zone’s actual temperature.
b. HOLD: zone is waiting for release. Temperatures have not risen to setpoint range.
c. Arrow up: zone is over temperature.
d. Arrow down: zone is under temperature.
e. ?: there is no sensor. Zone needs troubleshooting.
f. >: there are more temperature zones not seen on the current display. To view them, press C
on the numeric keypad (bottom row, first key).
3. 7-Day Scheduler Active display shows that the 7-Day Scheduler is programmed and in use.
4. Pump Info Lines indicate pump mode (”Auto” on the illustration on page 5-6) and external reference percent or set speed percent.
5. If the optional Actual RPM display (shown on page 5-3) is installed, actual pump rpm may be
monitored.
Page 5-8 Programming
Revised 5/01
ITW Dynatec c. 2000
DYNAMELT M ASU Manual #20-36, 20-37, 20-38
Setpoints Programming Screen
SYSTEM: Alarm Lo
°F
°F 11. 1
Arrow
SETPOINTS
SETPOINTS
Keys
Premelt
Progmelt
Filterblock
300
350
380
Hose
Head
Aux Zone
275
275
2.
2
300
275
275
Tue. 3:36 PM
Next Page Press C
2
3
4
3.
4.
3
4 >
275
275
------
275
275
INFO: UPPER PREMELT GRID
Set: 300°F Act: 300°F Tol:±30°F
Zo: 1
SYM
ABC DEF
GHI
JKL
MNO
PRS
TUV
WXY
RETURN
<
Delete
Zone Info Lines
Enter
C
>
ABC/123
Controller identification number for zone
Programming Page 5-9
Revised 5/01
ITW Dynatec c. 2000
DYNAMELT M ASU Manual #20-36, 20-37, 20-38
Use of the Setpoints Programming Screen
Each of the temperature zones is programmed individually by using the function keys as follows:
Press This
Function Key
To:
Scroll Up, Down or Right (F1, 2, 3)
Select each zone’s setpoint
Return (F4)
Return to the Actual Temperatures Screen
(Enter)
Enter a numeric value
All -- -- -- (F1)
All zones in a category (ie, All Hoses, All Heads, etc.)
On/Off (F3)
Toggle a zone on or off
Clear (F4)
Eliminate an error message or alarm
Programming
1. Scroll to the first temperature zone setpoint you desire to program.
2. On the numeric keypad, enter the desired setpoint value.
3. Press Enter
.
4. Scroll to the next setpoint to be programmed and repeat steps 2 and 3.
Notes:
a. To turn a zone OFF: scroll to zone, press Enter to select, press ON/OFF (F3).
b. When turning a switched-off zone back ON, it will retain its previous setpoint.
c. To change all zones in a category (ie, all hoses, or all aux zones, etc.): scroll to one item in
that category, enter desired value, then press F1 (this does not apply to zones which are turned
OFF).
Monitoring
1. “Zo #”: the number which appears here is the controller’s identification number for this zone.
This number cannot be changed by user.
2. The Zone Info Lines indicate the user-defined zone name (programmed on Service Page 2,
menu item 1), the zone’s setpoint, the zone’s actual temperature, the zone’s tolerance (programmed
on Service Page 1, menu item 1) and the zone’s identification number.
Page 5-10 Programming
Revised 5/01
ITW Dynatec c. 2000
DYNAMELT M ASU Manual #20-36, 20-37, 20-38
Pump Programming Screen
Optional
RPM
Display
SYSTEM: Ready
Tue. 3:36 PM
Press Enter and Select Mode
Arrow
Keys
Pump Mode
1 MANU.
2 AUTO.
3 STOP
Set
%
78.0
5.0
Min
%
Max
%
5.0
80.0
Actual
RPM
RUN
RUN
HOLD
Mtr 1
INFO: RIGHT PUMP
MANUAL
AUTOMATIC
90.5
87
1, 2, 3
STOP
SYM
ABC DEF
GHI
JKL
MNO
PRS
TUV
WXY
RETURN
<
Delete
Enter
Alternative programming function keys:
STOP ALL
CLUTCHES RE-START
RETURN
C
>
ABC/123
ITW Dynatec c. 2000
DYNAMELT M ASU Manual #20-36, 20-37, 20-38
Programming Page 5-11
Revised 5/01
Use of the Pump(s) Programming Screen
Each of the pump(s) is programmed individually by using the function keys as follows:
Press This
Function Key
To:
Scroll Up or Down (F1, 2)
Select a pump.
Stop All (F3)
To stop all pumps in system
Re-Start (F4)
To re-start all pimps
Manual (F1)
Choose Manual Mode for the selected pump
Automatic (F2)
Choose Automatic Mode for the selected pump
Stop (F3)
Choose Stop Mode for the selected pump
Clutches (F2)
Go to the Clutch Programming Screen (if clutches are installed)
Return (F4)
Return to the Actual Temperatures Screen
(Enter)
Enter a numeric value
Programming
1. Scroll to select a pump. Press Enter.
2. Press Manual, Automatic or Stop as desired pump mode. Press Enter.
3. If in Manual mode, enter pump speed ##.# in the Set % column:
a. Use numeric keypad to enter desired rpm value.
b. Press Enter.
4. If in Automatic:
a. Scroll to Min % to program minimum pump speed. Enter value as described above.
Note: typically, at 0 volts, this value will be between 0 and 10% (default = 0%).
b. Scroll to Max % to program maximum pump speed. Enter value as described above.
Note: typically, at 10 volts, this value will be between 0 and 100%, depending on motor
installed on ASU (default = 100%).
5. Scroll to select next pump to be programmed. Repeat steps 2 thru 5 until all pumps are programmed.
6. If clutches are installed on ASU, Press Clutches (F2) to program (see next page).
Monitoring
1. RUN indicates the pump/ motor is enabled.
2. HOLD indicates that the controller is preventing the pump/ motor from running, due to a low
temperature, a standby condition, etc.
2. The Info Line indicates the user-defined name for the selected pump (programmed on Service
Page 2, menu item 1).
3. If the optional Actual RPM display is installed, actual pump rpm may be monitored. With this
option, the RUN/HOLD column is eliminated. The Actual RPM display is also seen on the Actual
Temperatures Screen.
Page 5-12 Programming
Revised 5/01
ITW Dynatec c. 2000
DYNAMELT M ASU Manual #20-36, 20-37, 20-38
Optional Clutch Programming Screen
The Clutch screen is active, as a subset of the Pump Programming Screen, only if clutches are
installed on your ASU. It is reached by Pressing F2 “Clutches” on the Pump Screen (seen on previous pages).
The number of clutches on the ASU will equal the number of motors:
For DM 35: there is a maximum of two pumps/ clutches
For DM 70/ 140: there is a maximum of four pumps/ clutches
For DM 210: there is a maximum of six pumps/ clutches
SYSTEM : Ready
Tue.
Press Enter and Select Mode
Arrow
Keys
3:36 PM
Switch Clutches ON/OFF with button 1 . . 6
Pump - Clutch 1
Pump - Clutch 2
Pump - Clutch 3
Pump - Clutch 4
Pump - Clutch 4
Pump - Clutch 6
ON
ON
OFF
OFF
OFF
OFF
RE-START
1, 2, 3
STOP ALL
SYM
ABC DEF
GHI
JKL
MNO
PRS
TUV
WXY
RETURN
<
Delete
Enter
C
>
ABC/123
Turn Clutch ON/OFF using numeric keys 1 thru 6
Programming Page 5-13
Revised 5/01
ITW Dynatec c. 2000
DYNAMELT M ASU Manual #20-36, 20-37, 20-38
Use of the Optional Clutch Programming Screen
Press This
Function Key
To:
Re-start (F2)
Turn ON all clutches at once
Stop All
Turn OFF all clutches
Return (F4)
Return to the Pump Screen
Programming
1. To turn individual clutches On or Off, toggle individually on the numeric keypad.
Monitoring
1. On/ Off status of each clutch is indicated.
Optional Pressure (PSI/ BAR) Programming Screens
The two Pressure Programming screens are active only if pressure transducers (sensors) are
installed on your ASU. They are reached by Pressing F3 “Pressure” on the Actual Temperatures
Screen.
The number of pressure transducers on the ASU will vary per ASU:
For DM 35: there is a maximum of four pressure transducers
For DM 70/ 140: there is a maximum of eight pressure transducers
For DM 210: there is a maximum of twelve pressure transducers
cont.
Pressure Screen #1
SYSTEM :
Arrow
Keys
Pressure
Sensor
1
2
3
4
Ready
Tue.
3:36 PM
PSI (BAR)
Act.
100
100
?
100
PR.LIMITS
Pre Filter Pump 1
Post Filter Pump 1
Pre Filter Pump 2
Post Filter Pump 2
SETUP
SYM
ABC DEF
GHI
JKL
MNO
PRS
TUV
WXY
RETURN
<
Delete
Enter
C
>
ABC/123
Page 5-14 Programming
Revised 5/01
ITW Dynatec c. 2000
DYNAMELT M ASU Manual #20-36, 20-37, 20-38
Optional Pressure (PSI/ BAR) Programming Screens, cont.
Pressing “Setup” (F3) on Screen 1 brings up a message screen:
Access Code: ________
Pressure Sensor Type: max.
Bar/PSI
PSI/BAR
Calibrat.
RETURN
System depressurized ?
CONFIRM
RETURN
Pressure Screen #2
SYSTEM :
Arrow
Keys
Pressure
Sensor
1
2
3
4
Ready
PSI (BAR)
Act.
100
100
?
100
Tue.
Alarm
Low
3:36 PM
PSI (BAR)
High
10
10
10
110
500
90
500
500
1, 2, 3
HI <--> LO
SYM
ABC DEF
GHI
JKL
MNO
PRS
TUV
WXY
RETURN
<
Delete
Enter
C
>
ABC/123
ITW Dynatec c. 2000
DYNAMELT M ASU Manual #20-36, 20-37, 20-38
Programming Page 5-15
Revised 5/01
Use of the Optional Pressure Programming Screens
Press This
Function Key
To:
Pr. Limits (F2)
Go to Pressure Screen #2 to set low and high alarms
Setup
Enter access code in order to advance to calibration
(F3)
Return (F4)
Return to the Actual Temperatures Screen
Scroll Up or Down (F1 or F2)
Select each sensor (transducer)
Hi <--> Lo ((F3)
Select the screen’s high or low column
Bar/PSI (F1)
Choose pressure scale
Calibrat. (F2)
Calibrate all transducers
Programming
1. The names of the pressure transducers (shown on the preceeding page as “Pre Filter Pump 1”,
etc.) are programmed at Service Page 2, Function #1 (see page 5-19).
2. On Pressure Screen #1, press Pr. Limits (F2) to advance to Pressure Screen #2. Use the Scroll
keys to select a Low or High limit for the first pressure transducer (sensor) to be programmed. Use
the numeric keypad to enter your desired value. Press Enter. Repeat until all desired pressure
transducers are programmed with Low and High pressure limits. Use Hi<-->Lo (F3) to move between columns as necessary.
3. Press Return (F4) to return to Pressure Screen #1. Press Setup (F3). On the first message screen,
enter your four-digit access code. On the second message screen, enter the maximum Bar/PSI value of the pressure transducer(s) installed on your ASU.
4. Press Bar/PSI (F1) to choose display in Bar or PSI.
5. Press Calibrat (F2) to calibrate all the pressure transducers installed. The controller will ask,
“System depressurized ?”, press Confirm (F3).
Note: Before confirming, verify that all transducers are at “0” pressure. Pumps must be turned
OFF and time allowed for system pressure to drop to “0”.
The controller will display “Waiting”. After a few seconds, the Pressure Screen will appear and, in
its last column, will list if each pressure transducer has “Passed” or “Failed” the calibration.
(Note: “Failed” indicates a problem with the transducer or the Pressure PCB.)
6. Press Return (F4) to return to Pressure Screen.
7. Press Return (F4) again to return to Actual Temperatures Screen.
Monitoring
1. Actual pressure values may be monitored for each transducer on either screen.
2. Over pressure or Under pressure arrows indicate conditions.
3. A question mark ? indicates that no transducer is installed, or that installation is not complete
for this transducer position.
Page 5-16 Programming
Revised 7/02
ITW Dynatec c. 2000
DYNAMELT M ASU Manual #20-36, 20-37, 20-38
Service Functions Screens
The three Service Function Screens are designated Service Page 1, Service Page 2 and Service
Page 3. They are accessed by pressing the Service Key 1, 2 or 3 times.
Functions coded ---- are active and require no code to program.
Functions coded with a key
are locked and require entry of a code before programming.
For example, as seen on the diagrammed screen below, Setpoint Limitation is locked from further
programming.
Functions coded
F
are ITW Dynatec factory setups and are not user accessible.
Program the Service Functions as described on the following pages. Many functions are programmed simply by a toggle or by a single numeric entry.
Service Page 1
Service Key
SYSTEM : Ready
Page 1 Press
Tue. 3:36 PM
for Next Page
Arrow
Service
Keys
Hi/Lo Temperature
Standby Temperature
Standby/ Sleep Setup
Setpoint Limitation
N/A
Temperature Offset
Sequential Heating
°C / °F
Change Security Lock
.
1
2
3
4
5
6
7
8
9
CODE
----------
SYM
ABC DEF
-------------
GHI
JKL
MNO
PRS
TUV
WXY
1, 2, 3
RETURN
<
Delete
Enter
Alpha/Numeric
Keypad
C
>
ABC/123
Enter
ITW Dynatec c. 2000
DYNAMELT M ASU Manual #20-36, 20-37, 20-38
Programming Page 5-17
Revised 7/02
Service Functions Screens, Page 1 cont.
Function #
Press #1 to program High/ Low Temperature Deviation. Enter a numeric value for the first zone
selected. Press Enter to confirm. Scroll to next desired zone and repeat until all zones are programmed. Then Press Return (F4) to return to menu. Note: after entering one value in any category, you may press All xxx. (F1) to change all the items in that category.
The High/ Low Temperature Deviation is a range (±) representing the high and low temperature
limits of each setpoint. During operation, these limits activate the error alarms which alert the operator to over-temp and under-temp conditions in the temperature zones. The smallest deviation
programmable is ±5° (C or F) and the largest is ± 50°.
Press #2 to program Standby Temperature. Enter a numeric value for each category. Press Enter.
Press Return (F4). Note: if the same Standby Temperature is desired for all zones: enter the value
in the first row, then press Enter.
The Standby Temperature is a reduction in temperature by which all the temperature zones will be
reduced in a standby condition. For example, if the hopper setpoint is 275° and you program a 100
degree standby temperature, the controller will reduce the hopper temperature to 175°. Numerically, the controller will accept any standby temperature within the range of -30°C and -150°C (-30°F
and -150°F).
Press #3 to program Standby Time Delay and Sleep Mode. Enter a numeric value for the time
delay. Press Enter. Toggle (press F1 or F2) to Sleep Mode. Enter a numeric value for Sleep Mode
Delay. Press Enter. Press Return (F4).
The Standby Time Delay allows programming of a delay from the time the “external standby” terminals (for connection, see Chapter 3) are connected until the ASU enters its standby mode. The
time delay selected must be in the range from 0:00 (which represents an immediate entry into
standby, i.e. no delay) to 18.0 hours.
The Sleep Mode may be activated only during Standby. It becomes activated after a programmed
length of time (0.1 to 18.0 hours). During Sleep Mode all heaters are turned OFF and the motors
are stopped. The display reads “F1 to Start Heating” when in Sleep Mode. To disable the Sleep
Mode, press Disable (F3).
Standby and Sleep Mode work together. For example, if you program a Standby of 1 hour and a
Sleep Mode of 3 hours, the ASU enters Standby one hour after the external contact is closed. The
ASU enters Sleep Mode three hours after entering Standby.
Press #4 to program Setpoint Limitation. Enter a numeric value. Press Enter. Press Return (F4).
The Setpoint Limitation is a universal maximum temperature for all temperature zones (ie, the
overtemperature limit). The controller will not allow the operator to program a higher setpoint
than the value of the setpoint limitation. The default setpoint limitation is 218°C (425°F). The selectable range for the setpoint limitation is 40°C - 232°C (100°F - 450°F).
Function #5 is not active in the present controller configuration. No programming is possible.
Page 5-18 Programming
Revised 7/02
ITW Dynatec c. 2000
DYNAMELT M ASU Manual #20-36, 20-37, 20-38
Service Functions Screens, Page 1 cont.
Press #6 to program Temperature Offset. Enter a numeric value for the first zone selected.
Press Enter. Scroll to next desired zone and repeat until all zones are programmed. Press Return
(F4). Note: to enter a negative value, enter the value, then press Negative (F3).
The Temperature Zone Offset is a mathematical factor which compensates for differences in temperature between the placement of the system’s heaters and sensors. An offset is often used for
large applicator heads, printrolls, printwheels or other custom devices. Usually no offset is required for standard heads. The offset may be programmed up to ± 50 degrees (C or F) of the
zone’s temperature.
Press #7 to program Sequential Heating. Scroll to choose one of the three selections: No sequence,
First all hopper zones or Hold electric head. Press Confirm (F3).
Sequential heating allows you to choose the heating order of the temperature zones, so that zones
requiring more time to heat up to temperature can be programmed to begin heating before others.
In the case of the “Hold Electric Head” selection, programming of a reduced temperature for ten
minutes allows for the stabilization of the electric valves.
a. A “No sequence” designation means that all temperature zones will begin to heat immediately
after the ASU is powered on.
b. “First all hopper zones” means that the hose/ head/ auxiliary zones do not begin heating until
all hopper zones have reached the low limit of their setpoints. Zones which are switched OFF are
not applicable.
c. “Hold Electric Heads at xxx F for 10 minutes” applies to systems utilizing electric applicators
only. After choosing this selection and programming the temperature (to the softening point of
your adhesive, see your adhesive manufacturer), the controller holds all electric heads at the operator-selected temperature for ten minutes before releasing them to operating setpoint.
The controller’s default heating sequence for the Dynamelt ASU is first all hopper zones. This allows the larger mass of adhesive in the hopper to begin heating immediately.
Press #8 to program Temperature Scale. Program directly on the menu screen by pressing #8 key
to choose between Centigrade or Fahrenheit. Press Return (F4).
Press #9 to Change Security Lock for Service Page 1. Enter your access code. Press Enter. Scroll
F1 or F2 to select desired function. Press F3 to Lock or Unlock function from programming. Repeat for each desired function.
To Change Your Access Code: Scroll F1 or F2 to select “Change Access Code”. Enter your desired new access code. Press Enter to Confirm. Press Return (F4).
Press Service Key to advance to Service Page 2.
Programming Page 5-19
Revised 11/01
ITW Dynatec c. 2000
DYNAMELT M ASU Manual #20-36, 20-37, 20-38
Service Functions Screens, cont.
Service Page 2
Programming of the Service Functions on this screen is similar to the programming of Page 1.
SYSTEM : Ready
Page 2
Press
Arrow
Service
Keys
Customer Zone Names
PowerOn Configuration
Factory Defaults
Keypad Locking
PC Link
Language
LCD Contrast
System Logbook
Change Security Lock
.
Tue. 3:36 PM
for Next Page
1
2
3
4
5
6
7
8
9
CODE
-------------------------
1, 2, 3
RETURN
Function #
Press #1 to program Customer Zone Names. This function allows the programmer to enter his desired name for each temperature zone, pump and (optional) pressure transducer. This upto-20-character name will be the name displayed in the controller’s Info Lines. Program following
these rules:
a. use the Alpha/Numeric keypad to enter letters and numbers. When entering letters, use one,
two or three presses of a key to distinguish between the letters. Press Enter after each desired
letter or number is in place.
b. press the 0 (zero) key to toggle from letters to numbers,
c. press the SYM key to enter a space, colon, dash, dot, “Q”, “Z” or other special characters,
d. press F1 to toggle from upper to lower case,
e. you cannot back up. If an error is made, press Enter repeatidly to advance through the name
loop until you reach the point for correction and re-write as desired,
f. press CLR LINE to clear an entire line,
g. you may COPY (F2), PASTE (F3) and then modify to save time when names are similar,
h. press F4 to advance to the next motor or zone to be named.
To program Customer Zone Names: Press F1 to program Temperature zones, F2 to program
Pumps or F3 to program Pressure Transducers. Scroll to the first item to be named. Press Enter to
allow naming. Using the Alpha/Numeric keypad and following the rules given above, spell out
name as desired. Press F1, F2 or F3 to select another item to name. Repeat until all items are
named as desired. Press F4 again to Return to Service Page 2 screen.
Press #2 to program Power On Configuration. This function gives the user the choice of having the
heaters and pumps come on (or remain off) whenever the ASU is powered on. USA default is both
On. European default is Heaters On, Pumps Off. Note: programming here overrides programming
made at the next Service Function (Function #3 Factory Defaults).
Press 1 to toggle the heaters On or Off. Press 2 to toggle the pumps On or Off. Press 3 to toggle
the external inputs On or Off. Note: if you select heaters Off, the controller will remind you, at
power on, to press F1 to turn the heaters On.
Page 5-20 Programming
Revised 12/02
ITW Dynatec c. 2000
DYNAMELT M ASU Manual #50-13, 20-36, 20-37, 20-38
Service Functions Screens, Page 2 cont.
Press #3 to program Factory Defaults.
CAUTION: Factory Default programming is not essential. If done improperly, it can cause re-programming of setpoints to be necessary. If you are satisfied with your ASU’s setup, you may leave
Factory Defaults unprogrammed.
Upon entering this screen, the “ASU Type” (model) of your melter will be displayed. Use this
screen to program the quantity of hoses, quantity of premelt grids and quantity of pumps installed
on your ASU, if desired. It is o.k. to leave these items unchanged or with “?” selected.
Scroll (F1) to the line you wish to amend (ie, hose, premelt, pump). Press Change (F2) repeatedly
to view the list of possibilities for this line. Press Change until your desired quantity is displayed.
Repeat until all lines are programmed.
Then, Scroll (F1) to Configure EU/ US. Press Change (F2) to toggle between EU Setup or US
Setup for setpoints and parameters* if required.
Press Load (F3). Then press Confirm (F1). Press Return (F4) to return to menu.
*Choosing EU or US reloads all factory setpoints and parameters as follows:
EU (European) Setup = Temperature scale is Centigrade, pressure is measured in BAR, pumps are
in STOP mode at startup and heaters are active at startup.
US (United States) Setup = Temperature scale is Fahrenheit, pressure is measured in PSI, pumps
start in the mode they were left in at shutdown and heaters are active at startup.
Press #4 to program Keypad Locking. Scroll to either Temperature Settings or Pump Settings.
Press F3 to toggle Locked or Free. Scroll to other setting and press F3 to toggle Locked or Free.
Press F4 to Return to menu.
Selecting Locked prevents further programming to either temperature setpoints or pumps. Selecting Free allows further programming.
Press #5 to program optional PC Link (serial communication). Scroll to select either:
“Load: from Computer to this Controller” or
“Save: From this Controller to Computer.
Press F1 to Load. Press F2 to Save. Press F3 to Configure BAUD rate or FIFO. The message
“Waiting” indicates the controller/ computer is processing data. The message “Transmission
Done” indicates the computer/ controller has completed transmission. Press F4 to Return to menu.
The DynaControl is capable of bi-directional data transfer of all system parameters to a remote
computer. If this option is installed on your ASU, program it at this step. To program your remote
computer, see page 5-27. When PC Link is installed and the external serial communication is ON,
a flashing “C” appears at the upper right of the HELP screen.
Press #6 to program Language. Scroll to desired language. Press F4 to Return to menu.
Press #7 to program LCD-Contrast. Press F1 (+) to increase contrast or F2 (--) to decrease contrast
of display. Press F4 to Return to menu.
Programming Page 5-21
Revised 5/01
ITW Dynatec c. 2000
DYNAMELT M ASU Manual #20-36, 20-37, 20-38
Service Functions Screens, Page 2 cont.
Press #8 to program System Logbook. The System Logbook has the following functions:
1. System Logbook: a list of the last 1,000 controller events. Use F1 and F2 to move forward or
backward thru the logbook. Use F3 Configuration to choose to log “all system data” or “errors
only”.
2. Data Logger: a list of the last 1,000 lines of actual temperatures for up to five selected zones.
The time interval at which these temperatures are recorded is programmable. The first screen of the
Data Logger is the actual data list. Move through the data by pushing F1 Forward or F2 Backward.
To program, press F3 Configure. The Data Logger programming screen is seen below. Use the arrows to select a desired function. Use the numeric keypad to enter zone numbers or the time interval
(in 1/10ths of a minute). Press Enter to confirm your choices. Toggle to select Mode.
SYSTEM :
Arrow
Keys
Ready
Select Zones:
2
Tue.
4
12
20
3:36 PM
34
Enter Time Interval: 0.1 min.
Mode Run/Stop: RUN
.
Premelt 1
name of the selected zone (Zone #2)
RETURN
3. Elapsed Hours: the number of hours that the system has been running. Not resettable.
Press #9 to Change Security Lock for Service Page 2. Enter your 4-digit access code. Press Enter.
Press F1 or F2 to select desired function. Press F3 to Lock or Unlock function from programming.
Repeat for each desired function. Press Return (F4). Press Return (F4) again to go to Actual Temp
Screen.
Service Page 3
All of the functions on Service Page 3 are ITW Dynatec-accessible only. No operator programming
is possible.
SYSTEM : Ready
Page 3 Press
Tue. 3:36 PM
for Next Page
Arrow
Service
Keys
Zone Arrangement
PI Loop Setup
Split Hopper Setup
Gear Ratio
RPM Display Yes/No
Pump/Clutch Yes/No
Level Control Yes/No
I/O Troubleshooting
Change Security Lock
.
1
2
3
4
5
6
7
8
9
CODE
F
F
F
F
F
F
F
F
1, 2, 3
RETURN
Page 5-22 Programming
Revised 5/01
ITW Dynatec c. 2000
DYNAMELT M ASU Manual #20-36, 20-37, 20-38
Programming at Main Scheduler Screen
The Main Scheduler Screen functions include Standby, Date & Time Clock, 7-Day Scheduler and
Program Recipes.
Press the Scheduler Key to advance to the Main Scheduler Screen.
Main Scheduler Screen
Scheduler Key
SYSTEM :
Arrow
Keys
Ready
Tue.
Activate/ Deactivate Standby
Change Time & Date
Program Scheduler
Select Recipes
Activate/ Deactivate Scheduler
.
3:36 PM
1
2
3
4
5
1, 2, 3
SYM
ABC DEF
GHI
JKL
MNO
PRS
TUV
WXY
RETURN
<
Delete
Enter
C
>
ABC/123
ITW Dynatec c. 2000
DYNAMELT M ASU Manual #20-36, 20-37, 20-38
Programming Page 5-23
Revised 11/01
Use of the Main Scheduler Screen
Function #
Press #1 to manually activate or deactivate Standby. Press Press F4 to return to the Main Scheduler
screen. Note: use of this key will override a programmed Standby.
Press #2 to program the time-of-day and date-of-year clock. Press F1 or F2 to change a selected
item, press F3 to select another item. Press Press F4 to return to the Main Scheduler screen.
Press #3 to program the 7-Day Scheduler. See programming details and screen on following page.
Press #4 to select an active recipe (1-4). Use F1 or F2 to select recipe #1, 2, 3 or 4. Press F3 to Confirm. Press F4 to return to the Main Scheduler screen.
Up to four separate setpoint recipes (programs) can be programmed and stored in the controller,
though only one recipe is active at any given time. Setpoints may differ from one recipe to another.
When switching between recipes, the new recipe’s setpoints take over, so there may be error alarms
if the new recipe’s unused temperature zones are turned on.
The program recipes are referred to as: Recipe 1, Recipe 2, Recipe 3 and Recipe 4.
To create a Recipe: advance to the Main Scheduler Screen and press #4. Use F1 or F2 to choose a
recipe number (for this example, say #2). Press F3 to confirm. Press F4, then press F4 again to go to
the Actual Temperatures Screen. Program all controller setpoints and functions as outlined on page
5-4. When all programming is completed, Recipe #2 is created.
Press #5 to activate or deactivate the 7-Day Scheduler. Press F4 to return to the Main Scheduler
screen.
Press F4 to return to the Actual Temperatures Screen.
Shortcuts
1. To activate or de-activate the Scheduler from the the Actual Temperatures Screen (Main Menu):
toggle by pressing and holding the Service (wrench) Key for five seconds.
2. To activate or de-activate Standby from the the Actual Temperatures Screen (Main Menu): toggle
by pressing and holding the Scheduler (clock) Key for five seconds.
Page 5-24 Programming
Revised 5/01
ITW Dynatec c. 2000
DYNAMELT M ASU Manual #20-36, 20-37, 20-38
Programming of 7-Day Scheduler
7-Day Scheduler
The Seven-Day Scheduler allows the operator to program main power ON and OFF times which
coincide with his daily production schedule throughout the work week. Up to ten “events” may be
scheduled. An event is a specific day and time or every day at the same time.
An ASU which has an active seven-day scheduler should be turned ON at the main power switch.
It should not be turned off by the main power switch while the scheduler is active. To turn the
ASU OFF (temporarily overriding the scheduler), use the DynaControl On/ Off keypad icon.
In the event of a power outage, or a manually switched main power ON, an active scheduler overrides the “Power On Heater Start” parameter. That is, if the scheduler is in “Switch ON” at the
time of a power ON, the heaters will be turned ON. Likewise, if the scheduler is in “Switch OFF”
at the time of a power ON, the heaters will be turned OFF.
When the seven-day scheduler is programmed and active, the scheduler icon on the controller
screen flashes continuously.
7-Day Scheduler Screen
7-Day Scheduler Active Indicator
SYSTEM : Ready
#
Action
Arrow
Event
Keys
1
2
3
4
5
6
7
8
9
10
Standby
Switch On
Standby
Switch On
Switch Off
-- -- -- --- -- -- --- -- -- --- -- -- --- -- -- --
Day
Tue.
Mon-Fri
Mon-Fri
Mon-Fri
Mon-Fri
Mon-Fri
Mon-Fri
Everyday
Monday
Tuesday
Wednesday
Thursday
Keypad On/ Off
3:36 PM
Time
5:00am
6:00am
11:30am
12:30pm
6:00pm
SYM
ABC DEF
GHI
JKL
MNO
PRS
TUV
WXY
RETURN
<
Delete
Enter
C
>
ABC/123
Enter
Programming Page 5-25
Revised 5/01
ITW Dynatec c. 2000
DYNAMELT M ASU Manual #20-36, 20-37, 20-38
Use of the 7-Day Scheduler Programming Screen
Press This
Function Key
To:
Scroll Up, Down or Right (F1, 2, 3)
Select an individual action, day or time
Return (F4)
Return to the Main Scheduler Screen
(Enter)
Programming
Enter a chosen selection
1. Press F3 to scroll to the Action column. Then scroll to the first event you desire to program.
2. Press Enter
until the desired Action [ie, Standby, Switch On, Switch Off or -- -- -- (no event)]
is displayed.
3. Scroll (F3) to the Day column.
4. Press Enter until the desired Day (ie, Mon--Fri, Everyday or any individual day) is displayed.
5. Scroll (F3) to the Time column.
6. Press Enter to display the time you desire the event to start. Enter hour, minutes and am/ pm individually.
7. Repeat steps 1 through 6 for each event desired.
8. Press F4 to return to Main Scheduler screen.
ITW Dynatec c. 2000
DYNAMELT M ASU Manual #20-36, 20-37, 20-38
Programming Page 5-26
Revised 10/01
Up/Downloading Instructions: Controller to Remote PC (PC Link)
The Upload/ Download functions are used to transfer system information and data from or to the
DynaControl. To do this, the DynaControl must be connected to an external PC or PLC via a serial cable. The data format is an ASCII text with TAB-delimited data. This text can be created
with standard word-processing programs or spreadsheet applications and up or downloaded via
terminal programs. Both functions are ‘on--demand’-functions, i.e. they must be started on the
DynaControl keypad.
Hardware Hookup
Remove the controller mounting bracket from the ASU via four screws accessed from inside the
panel box assembly. Using a standard serial extension cable (Male/Female DB9) (if necessary,
utilize a DB25 to DB9 adapter), connect either of the DynaControl controller’s serial ports (on
the Display CPU PCB, see illustration on page 7-5) to the remote computer’s COM1 or COM2.
Download Instructions
Download = Transfer data from an external PC to DynaControl
1. DynaControl must be connected to a PC via a Null--Modem--Cable.
2. Start the terminal program on PC.
3. Start PC Link on DynaControl (Function #5 on Service Page 2).
4. If necessary, select Configuration (F3) and change baudrate, than re-enter Function #5.
5. Address setting is not used.
6. Press LOAD (F1).
7. Send ASCII file on terminal program.
8. DynaControl screen should list all received lines.
9. Press RETURN to exit service mode.
10. Customer zone text (command *Text) requires the zone number (temperatures: 1-48, pumps
49-54, pressure 55-66).
Download File Format
The downloaded ASCII text is line-oriented. Pages 29 and 30 show all possible line commands.
Each line starts with ‘*’ and the command, following a number of parameters, depending on the
command. Each parameter must be separated with a horizontal tab (char # 09h). A tab-character
must be placed after the last parameter in each line.
Examples:
1. Downloading data for the first filterblock zone
*Filterblock [tab] 1 [tab] 325 [tab] 30 [tab] 0 [tab] ON [tab]
This will set the first filterblock to a setpoint of 325 degrees, tolerance = 30, no offset, zone is
switched ON.
2. *Text [tab] 50 [tab] Pump 1, Factory Side
This will program the customer pump name for motor #2 (which could be pump #1!) with the
string: “Pump 1, Factory Side”
cont.
Page 5-27 Programming
Revised 10/01
ITW Dynatec c. 2000
DYNAMELT M ASU Manual #20-36, 20-37, 20-38
Important Note: the last command in the download file must be *End#
Notes:
The command lines may be arranged in random order.
Maximum file length is 5000bytes.
Each data field may have a comment text ([tab] Setpoint:325F [tab] = [tab] 325 [tab]).
The DynaControl list screen indicates the commands in abbreviated form.
A ‘?’ after the command on the DynaControl list screen indicates a wrong parameter.
‘ER” indicates unknown command or syntax error.
If downloading system info using the *System command, the controller does not check
for validity of the parameters.
Upload Instructions
The upload function will send an ASCII file to the external PC/PLC. The file contains all
zone-related information. The size of the file depends on the number of zones, pumps
and pressure transducers.
The data format is similar to the download file.
Example:
¼..
*PREME. 1
¼..
*PUMP
2
410 35
--5
M
100 900
850
ON
Premelt #1: setpoint 410, tolerance 35, offset –5, zone is ON
Pump #2: manual mode with 85.0%, min. speed for automatic 10.0%, max. speed 90.0%
Customer zone names will be indicated with: *TXT--TE for temperature zones
*TXT--PU for Pumps
*TXT--PR for Pressure transducers
1. DynaControl must be connected to a PC via a Null--Modem--Cable.
2. Start terminal program on PC.
3. Start PC Link on DynaControl (Function #5 on Service Page 2).
4. If necessary, select Configuration (F3) and change baudrate, then re-enter Function #5.
5. Address setting is not used.
6. Start “Capture Textfile” at terminal program.
7. Press SAVE (F2).
8. Stop and close file on terminal program.
9. Press RETURN to exit service mode.
Line Commands (page 1 of 2)
*Premelt
No#
Setpoint
Tolerance
Offset
On/Off
*Progmelt
No#
Setpoint
Tolerance
Offset
On/Off
*Filterblock
No#
Setpoint
Tolerance
Offset
On/Off
*Hose
No#
Setpoint
Tolerance
Offset
On/Off
*Head
No#
Setpoint
Tolerance
Offset
On/Off
*Aux Zone
No#
Setpoint
Tolerance
Offset
On/Off
1--12
*Pressure
No#
Min--Pressure
1--12
*Pump
No#
*Text
No#
Temp.:1--48
Pumps: 49--54
Press.: 55--66
5--50
0--50
ON / OFF
Max--Pressure
0--1500
Mode
1--6
0--100.0%
50--450
0--1500
Manual%
Manu/Auto/Stop
Customer Name
20 characters
0--100.0%
Automatic--Min%
0--100.0%
Automatic--Max%
Line Commands (page 2 of 2)
*System
1
Setback Premelt
Setback Progmelt
Setback Filterblock Setback Hose
Setback Head
Setback Aux.Zone
*System
2
Setback General
3
Power--On Heater
0/1 (1 = Start)
*System
4
*System
5
*System
6
*System
7
PI--Loop Premelt
(High= I Low= P)
Gear Ratio Motor. 1
Rpm--Displayn
(0/1)
Zone# Premelt 1
PI--Loop Progmelt
(High= I Low= P)
Gear Ratio Motor 2
Pump--Clutches
(Bit0¼Bit5, Bit7)
Zone# Premelt 2
Heat up Sequence
(0,1,2)
Keypad Lock
Temp.Settings 0=
free, 1= locked
PI--Loop Filterblo.
(High= I Low= P)
Gear Ratio Motor 3
Level Control
(0/1)
Zone# Premelt 3
°C / °F
(°C=0, °F=1)
Configuration Lock
Page 1 Bit0¼Bit7,
1= lock
PI--Loop Head
(High= I Low= P)
Gear Ratio Motor
5
Pressure Sensortype
Zone# Premelt 5
Spare
*System
Setpoint
Limitation
Power--On Motor
0/1 (1 = Start)
*System
8
*System
9
Zone#
Progmelt 1
Zone# Filterblo. 1
Zone# Progmelt Zone# Progmelt Zone# Progmelt Zone# Progmelt Zone# Progmelt
2
3
4
5
6
Zone# Filterblo. 2 Zone# Filterblo. 3 Zone# Filterblo. 4 Zone# Filterblo. 5 Zone# Filterblo. 6
*System
10
Zone# Hose 1
Zone# Hose 2
Zone# Hose 3
Zone# Hose 4
Zone# Hose 5
Zone# Hose 6
*System
11
Zone# Hose 7
Zone# Hose 8
Zone# Hose 9
Zone# Hose 10
Zone# Hose 11
Zone# Hose 12
*System
12
Zone# Head 1
Zone# Head 2
Zone# Head 3
Zone# Head 4
Zone# Head 5
Zone# Head 6
*System
13
Zone# Head 7
Zone# Head 8
Zone# Head 9
Zone# Head 10
Zone# Head 11
Zone# Head 12
*System
14
Zone# Aux.Zo. 1
Zone# Aux.Zo. 2
Zone# Aux.Zo. 3
Zone# Aux.Zo. 4
Zone# Aux.Zo. 5
Zone# Aux.Zo. 6
*System
15
Zone# Aux.Zo. 7
Zone# Aux.Zo. 8
Zone# Aux.Zo. 9
Zone# Aux.Zo.10
Zone# Aux.Zo. 11
Zone# Aux.Zo. 12
*System
16
Motor# Pump 1
Motor# Pump 2
Motor# Pump 3
Motor# Pump 4
Motor# Pump 5
Motor# Pump 6
Electr.Head Hold
Temp.
Keypad Lock Motor Settings 0=
free, 1= locked
PI--Loop Hose
(High= I Low= P)
Gear Ratio Motor
4
Bar/PSI
(Bar=0, PSI=1)
Zone# Premelt 4
Configuration Lock
Page 2 Bit0...Bit7,
1 =lock
PI--Loop Aux Zone
(High= I Low= P)
Gear Ratio Motor
6
Active Recipe
(1¼4)
Zone# Premelt 6
Preventive Maintenance Page 6-1
Revised 9/00
c. 2000
DYNAMELT M ASU Manual 20-28 and 20-36
Chapter 6
PREVENTIVE MAINTENANCE
Note: Re-read Chapter 1 “Safety Precautions” before performing any maintenance procedures. All
maintenance procedures must be performed by qualified, trained technicians.
General Cleaning
The DYNAMELTÒ M SERIES ASU enclosure is finished with an extremely durable polyurethane
paint. The enclosure may be cleaned with a variety of industrial cleaners following manufacturers’
directions. To prevent discoloration or deterioration of the ASU’s finish, avoid prolonged contact
with strong solvents.
The molded plastic handles may be cleaned with mineral spirits.
Preventive Maintenence Schedule
The Dynamelt M ASU requires little maintenance. The hopper is fitted with a coarse screen to prevent large debris from entering the system. Normally this screen does not require cleaning. The
ASU parts that require regular, periodic maintenance are as follows:
Outlet Filter
The outlet filter should be replaced monthly during the first few months of operation. After you
gain experience with your system, you can determine how often you need to replace it. The outlet
filter is located on the outlet filter manifold on the hose connection panel of the ASU. See illustration of the outlet filter on page 6-2.
Use the following procedure to replace the outlet filter.
cont.
WARNING HIGH PRESSURE
Turn the motor OFF and trigger the applicators to relieve adhesive pressure
before performing any outlet filter maintenance.
WARNING
Avoid splashing hot adhesive. The filter screen will be covered with hot
adhesive and must be handled with proper tools. Position a heat-resistant
container under the manifold before proceeding.
Page 6-2 Preventive Maintenance
Revised 3/01
c. 2000
DYNAMELT M ASU Manual 20-28 and 20-36
Adjustment Screw Cap
Flat Surface
O-ring PN A69X133
Filter Plug
O-ring PN 069X275
Spring
Spring Clip
Filter Basket
PN 101246/ 40 mesh
PN 101247/ 100 mesh
Roll Pin in Groove
Roll Pin
Slide in “Locked” Position
Slide in “Open” Position
Outlet Filter Manifold
Purge Set Screw
Purge Drain
Purge Set Screw
Purge Drain
Outlet Filter Manifold (located at the Hose Connection Panel)
1. The system should be at operating temperature before starting this procedure.
2. Before proceeding, verify that the motor(s) is turned OFF and the applicators have been
triggered to relieve pressure.
3. Remove the Manifold Access Cover by unscrewing one screw. Then lift up and off.
4. Position a heat-resistant container below the manifold. With a hex key screwdriver (allen
wrench), slowly loosen the manifold’s two purge set screws (do not attempt to remove them).
Allow adhesive and pressure to escape out of the manifold. Adhesive will drain into the
container.
5. Wearing insulated gloves, push down on the adjustment screw cap with sufficient force to
release the slide. While holding the cap down, pull the slide forward until the groove stops
the roll pin.
Note: If the cap moves “up” before the slide opens fully, this is an indication that there is
c. 2000
DYNAMELT M ASU Manual 20-28 and 20-36
Preventive Maintenance Page 6-3
Revised 9/00
still pressure in the system. Stop and verify that the motor/ pump is turned OFF and the
applicator’s valves are open before proceeding. Then repeat step 5.
6. Pull the cap and the filter plug up and out of the filter cavity. Due to adhesive and the o-ring
seals, there will be some resitance before the plug exits the cavity.
Note: the filter basket hangs from the plug by a spring clip. If the filter pulls free of the
spring clip and remains in the cavity, use a hooked tool to extract it.
7. Pull the filter basket free from the spring clip. The filter should be inspected and replaced as
needed. Note the char and debris inside the filter basket.
8. Before replacing the filter basket, inspect the two o-rings on the filter plug. Replace any cut
or damaged o-ring. Apply hi-temp lubricant (PN 001U002) to a new o-ring before installing.
CAUTION: The condition of the lower o-ring (PN 069X275) is especially critical to
maintaining system pressure. A cut or scuffed (scratched) o-ring can allow
system pressure to escape.
9. Replace or re-install the filter basket onto the spring clip. Push the filter onto the clip. The
clip should straddle the wire bar located inside the hole at the top of the filter.
10. Lower the filter basket and the filter plug back into the filter cavity.
11. Position the two flat surfaces at the top of the filter plug parallel to the movement of the
slide. The slide will not return to its operating (locked) position unless these flat surfaces are
aligned properly. If necessary, twist the plug to align.
12. Re-tighten the two purge screws.
Hose Fittings
All hose fittings should be checked for tightness after every three months of operation.
Fasteners
After the first ten hours of operation, check all set screws, socket head and cap screws for tightness.
Thereafter, re-check all fasteners after every three months of operation.
Filter Shutoff Cleaning or Replacement
See the illustrations in Chapter 10 (Melt & Grid Assembly) for location of the filter shutoff assembly.
1. Pump all the adhesive out of the hopper.
2. Lower the temperature of the application system to the adhesive’s softening point.
cont.
c. 2000
DYNAMELT M ASU Manual 20-28 and 20-36
Page 6-4 Preventive Maintenance
Revised 3/01
WARNING HOT SURFACE
The ASU will still be hot for this procedure. Use insulated gloves and protective
clothing when removing the filter shutoff.
3. Open the two access doors located at the sides of the ASU. Do not pull out the ground
wires attached. The filter shutoff assembly is located on the side of the hopper.
4. Wearing gloves, use a wrench to unscrew the filter shutoff nut and pull the filter shutoff
assembly out.
5. a. Replace the clogged filter shutoff assembly, or
b. Emerse the assembly in flushing fluid (PN L15653) to loosen contaminants. Remove
assembly from fluid and use a hot air gun (if necessary) and rags to clean all contaminants
from it.
6. Apply a coat of anti-sieze compound onto the threads of the filter shutoff nut before
re-inserting into the ASU.
7. Replace the filter shutoff o-ring. Lubricate the new o-ring with lube (PN N07588).
8. When re-installing the filter assembly, turn the filter’s cut out hole toward the pump.
Align the filter shutoff knob in its “open” position. Note: each filter shutoff is stamped “I”
(open) and “0” (closed) to show position.
9. Close the access doors. Restore the ASU to normal operation.
Pump Shaft Leak
There is a cutout in the baseplate, directly below the pump shaft(s), which will allow adhesive from
a leaking pump to exit the ASU. Inspect the area under the baseplate cutout every month for adhesive. A leaking pump shaft indicates a worn pump seal. See instructions in Chapter 8 for replacement of this seal.
Summary of Preventive Maintenance Schedule
Monthly (or as experience dictates)
1. Inspect outlet filter basket. Replace as required.
2. Check for leaking adhesive under the baseplate, caused by a worn pump seal. Replace as required.
Every Three Months (or as experience dictates)
1. Check all hose fittings for tightness.
2. Check all fasteners for tightness.
3. Inspect filter shutoff. Clean or replace as required.
Preventive Maintenance Page 6-5
Revised 9/00
c. 2000
DYNAMELT M ASU Manual 20-28 and 20-36
Flushing the System
Contaminated adhesive, accumulation of residue in the system and hopper, or changing the adhesive
formulation may require the system to be flushed. To flush the system, have at least 6 liters (1.5 gallons) of flushing fluid on hand (PN L15653) per hopper. Repeat this procedure for each hopper of a
dual hopper ASU.
WARNING
The flushing fluid will splash easily. Wear protective clothing, gloves and
a face shield to prevent severe burns.
1. Pump out as much of the molten adhesive from the hopper as possible.
2. Reduce the ASU’s pump pressure to zero.
Note: the hose used in the following process is merely for the convenience of depositing flushing
fluid. This procedure does not have to be repeated for each hose in the system.
3. Disconnect one of the supply hose’s adhesive feed from its applicator head. Do not
disconnect the electrical power to the head (since that would disable the pump). Put the hose
in a secured position within a container which will catch the used flushing fluid.
4. Add flushing fluid to the hopper and allow approximately fifteen minutes for it to reach
hopper temperature. Carefully stir the flushing fluid to mix with any adhesive remaining in
the hopper.
5. Slowly increase the pump pressure. Pump about half of the fluid through the hopper, pump
and adhesive supply hose into the flushing container.
WARNING
Avoid splashing the flushing fluid from the end of the hose.
6. Reduce the pump speed to zero.
7. Remove the outlet filter and replace the basket following the procedures outlined in the
”Outlet Filter” section of this chapter.
8. Add new adhesive to the hopper and allow it to reach application temperature.
9. Slowly increase motor speed to the pump.
10. Actuate each of the heads until all the flushing fluid is removed and a steady stream of new
adhesive flows.
cont.
Page 6-6 Preventive Maintenance
Revised 3/01
c. 2000
DYNAMELT M ASU Manual 20-28 and 20-36
11. Re-adjust the pump speed for the desired flow.
12. Re-fill the hopper with adhesive. The system is now ready for production.
ITW Dynatec c. 2000
DYNAMELT M ASU Manual #20-36, 20-37 and 20-38
Troubleshooting Page 7-1
Revised 4/01
Chapter 7
TROUBLESHOOTING
General Troubleshooting Notes
DANGER
HIGH VOLTAGE
WARNING
HOT SURFACE
Dynamelt systems use electrical power that can be life threatening and hot-melt adhesives that
can cause serious burns. Re-read Chapter 1 “Safety Precautions” before performing any troubleshooting or repair procedures. All troubleshooting and repair procedures must be performed by qualified, trained technicians.
CAUTION: Printed circuit boards (PCBs) are prone to damage from static
electrical charges during handling. Read “Handling Printed CIrcuit Boards” in
this chapter before handling or attempting service on Dynamelt’s PCBs.
The Dynamelt’s DynaControl includes malfunction self-diagnostics, alerts and error indication
alarms. The error indication alarms (the alarms displayed on the DynaControl readout) are triggered
whenever there is a sensor failure and whenever there is an over-temperature condition. The operation of the error indication alarms is described in Chapter 4 of this manual.
Preliminary Checks: Verify the following before proceeding:
1. The ASU is switched on.
2. The ASU is supplied with power.
3. The ASU is supplied with pneumatic air.
4. Pneumatic and electrical connections are correct.
5. Adhesive is in the hopper.
Error Messages:
See Ch. 4 for complete instructions on Error Alarms and Messages.
Sensor Failure on Zone # = temperature zone “#” has an open or shorted sensor.
Overtemperature on Zone # = temperature zone “#” has exceeded setpoint limitation.
Communication Error = indicates a serious problem which requires service by Dynatec.
Hopper Overtemp = hopper temperatures have exceeded their thermostat’s setting.
Hose/ Applicator Troubleshooting Tip
Hose or applicator problems can be isolated by electrically connecting the applicator and hose to an
alternate socket on the ASU. If the malfunction goes with the applicator and hose, the problem will
usually be in the applicator or hose that was moved. If the malfunction does not move with the applicator and hose, the problem is probably in the ASU.
Motor Speed Control PC Board Re-set
Anytime the AC drives’s Motor Speed Control printed circuit board must be re-set due to line
surges or over-currenting the motor, turn the ASU OFF by the main power switch and wait at least
20 seconds before attempting to re-start. This will allow the pcb to re-set. See the table on page 7-7
to troubleshoot.
Page 7-2 Troubleshooting
Revised 4/01
ITW Dynatec c. 2000
DYNAMELT M ASU Manual #20-36, 20-37 and 20-38
High-Temperature Redundant Overtemp Thermostat
The ASU includes a mechanical (redundant) overtemp thermostat that acts as a safety backup. If the
ASU’s hopper temperature should exceed 232°C (450°F), the thermostat will cause the ASU’s circuit breaker to open and power to the hopper and all hoses and heads will be cut off. The mechanical thermostat must be manually re-set after the hopper temperature falls below 204°C (400°F).
The overtemp thermostat is located behind the motor access door (see Chapter 8). To reset: turn
OFF the ASU’s main power switch, push the center of the thermostat’s insulator to re-set, restart
the ASU.
Pump Enable Thermostat
The pump enable thermostat is a low-temperature safety feature of the Dynamelt ASU designed to
prevent the pump from powering on before the adhesive is molten. It is a cartridge thermostat and it
is factory set at 135°C (275°F). The thermostat is adjustable so that operators using adhesives with
extraordinarily high or low melting points can tailor the low-temp setting to their production’s
needs.
To access the pump enable thermostat, follow the instructions given in Chapter 8. Refer to Chapter
3 for instructions on calibration of this thermostat.
Lithium Battery on CPU PCB
The CPU Printed Circuit Board contains a lithium battery which serves no function in the Dynamelt
M Series controller configuration.
Lithium Battery on Display CPU PCB
The Display CPU Board contains a lithium battery. The normal life of this battery is about ten
years. When the battery needs replacement, the scheduler’s clock does not function, but other controller features remain intact. Return the board to ITW Dynatec for battery replacement.
ITW Dynatec c. 2000
DYNAMELT M ASU Manual #20-36, 20-37 and 20-38
Troubleshooting Page 7-3
Revised 4/01
Handling Printed Circuit Boards (PCBs)
The Dynamelt ASU and DynaControl controller utilize several printed circuit boards (PCBs). These
boards are extremely sensitive to electrostatic charges. When working near or with any PCBs, the
following procedures must be followed to avoid damage to them.
DANGER HIGH VOLTAGE
Before unplugging connectors from the I/O PCBs, ground yourself to the
ASU by touching any available unpainted cool metal surface, mounting
screws, etc. This will avoid electrical discharge to the PCB assembly when you are removing and replacing connectors.
CAUTION: Printed circuit boards (PCBs) should be handled using the following
procedures:
1. Wear a wrist grounding strap. If a grounding strap is not available, frequently touch a
bare metal part of the ASU (unpainted frame, mounting screw, etc.) to safely discharge
any electrostatic buildup on your body.
2. Handle a PCB by its edges only. Don’t grip a PCB across its surface.
3. When removed from the ASU, each PCB must be individually packaged inside a
metallized, static drain envelope. Do not place the removed PCB on a table, counter,
etc. until it has first been placed in or on a static drain envelope.
4. When handing a PCB to another person, touch the hand or wrist of that person to
eliminate any electrostatic charge before you hand the PCB to him.
5. When unwrapping a PCB from its static drain envelope, place the envelope on a
grounded, nonmetallic surface.
6. To cushion PCBs for shipment, use only static-drain bubble pack. Do not use foam
peanuts or bubble pack not known to be static draining.
The following pages detail the Dynamelt M Series PCBs.
Page 7-4 Troubleshooting
Revised 10/07
ITW Dynatec c. 2000
DYNAMELT M ASU Manual #20-36, 20-37 and 20-38
CPU Printed Circuit Board
The CPU board contains the controller’s CPU chip (built into the board) and optional 7-Day
Scheduler chip. It also contains the optional Memory Card Reader interface and ribbon cable
connection. The CPU chip (EPROM) can only be reprogrammed at ITW Dynatec’s factory.
The Low Level relay is fixed at normally open. The High/ Low Alarm relay is fixed at normally
closed. During normal operation, the two red indicator lights are always ON.
Triac control for Hopper, Head/ Hose 1 & 2
EPROM (not removable or programmable by user)
PC/PLC Serial Channel
BT1
X5 X6
X9
Relay outputs:
1&2 = alarm contacts
3&4 = low level contacts
Audible
Alarm
+
Battery
--12A
+12A
+12D
+ 5D
Connect to Operator
Panel PCB
1
2 X1
3
4
Flat cable connect to
Auxiliary PCB or
Relay Output PCB
IC5
1 = Program Select 1 (1/2) Input
2, 4, 6, 8 = +12V
3 = Low Level Detect Input
5 = External Setback Input
7 = Program Select 2 (3/4) Input
9&10 = Ground
X11
J2
S4
S3
S2
S1
J1
X4
1
2
3
4
5
6
7
8
9
10
Flat cable connect
to Power PCB
(cutout)
(cutout)
J6
X3
Sensor Inputs for
Head/ Hose 3 & 4
X2
Sensor Inputs for
Head/ Hose 5 & 6
and Aux 1, 2 & 3
X7
Sensor Inputs for
Hopper &
Head/ Hose 1 & 2
(Dynatec factory use)
Dip switches
X16
ON
Flat cable connect
to optional Memory
Card Reader
Terminal connections:
LEDs
Optional Scheduler chip
X14
Sensor Input for channel 16
Layout of Components on CPU Board
Flat cable connect
to optional motor board
Troubleshooting Page 7-5
Revised 4/06
ITW Dynatec c. 2000
DYNAMELT M ASU Manual #20-36, 20-37 and 20-38
Display CPU Printed Circuit Board
The Display CPU PCB contains the controller’s CPU module, scheduler battery, serial ports and optional connections. It is located directly behind the controller’s display panel within its mounting
bracket (or within the remote pendant assembly (option), if applicable).
When downloading software updates, use the download serial port seen at the lower right of the illustration. While downloading, the J1 jumper is moved temporarily to its #1 position.
To configure the number of (optional) pressure transducers on an ASU, use the dip switches (shown
below beneath the expansion board) and the following chart. There are four transducers per PSI
PCB and a maximum of three PSI PCBs per ASU. Note: PSI not available on APS models.
On the RS-Com board, both the J1 and
J2 jumpers must be in upper position for
485 and both in lower position for 232.
1
2
3
0
# of PSI PCBs
1
2
Connect to opt.
Expansion Board
(for Serial Communication)
3
off
on
off
on
off
off
on
on
on = APS OFF = nornal
Optional Expansion Board
Optional RS232 Serial Connect
(use for PLC/ PC Link)
CAUTION! FOR
EXPANSION
BOARD CONNECT ONLY
Optional RS485 Serial Connect (use for PLC/ PC Link)
J1 J2
1
Scheduler
Battery
Reset
Download
Reset
ON
Dip Switches to configure
# of opt. PSI PCBs (only
switches #1 & 2 are used)
or APS model
Switch #
J1
SW2 SW1
Download Jumper
Software Download Port
Connect to
CPU PCB
Layout of Components on Display CPU PCB
Page 7-6 Troubleshooting
Revised 1/03
ITW Dynatec c. 2000
DYNAMELT M ASU Manual #20-36, 20-37 and 20-38
Motor Control Interface Printed Circuit Board
For each motor on the ASU, there is a Motor Control Interface PCB and a Motor Speed Control
PCB. The Motor Control Interface PCB (diagrammed below) connects directly to the CPU PCB.
The Motor Speed Control PCB (diagrammed on the following page) connects via a spade connector
to the Motor Control Interface PCB. Up to two motor’s pcbs may be connected to one CPU PCB.
Each Motor Control Interface PCB’s jumpers should be set as follows: the J1 and J2 jumpers should
always be set in the M1 position diagrammed below for motor #1, #3 and #5. For motor #2, #4 and
#6, jumpers J1 and J2 are set in the M2 position (opposite from those diagrammed below). The M/S
selection jumper must be set in the “M” position. The J3 jumper is always set as shown below.
“MAX” speed adjusting pot: This pot adjusts the maximum output voltage of the motor speed control board. It is factory preset to full pump motor rpm (100%). Normally, this pot does not need adjustment. Turning clockwise increases the voltage. To verify adjustment, set the motor to “manual”
mode and to 100% speed. Then adjust the pot to desired maximum speed (±5%).
NOTE: Do not attempt to use the MAX pot adjustment to trim the line speed to a given value.
Proper automatic line speed following is accomplished with correct motor programming into the
controller (see Chapter 5).
“ENCODER” connections: the optional Digital RPM Readout’s encoder is installed onto these
board connections.
MAX Speed Adjustment potentiometer
M1
Motor
M2
J2
Flat cable connect to
CPU PCB at J1
X2
J1
En
En
X1
Transformer Fuse
F1
J3
M
S
X4
Web
Transformer
X5
L1
240 VAC input
10
0
VR1
X3
N
P
0
5
TR
TR
10
0
X2 connections are internal and not
for customer’s use:
0-5 VDC speed reference
Ground
not used
Pump enable
Pump enable
Encoder pulse
not used
Ground
Encoder supply voltage
Handgun trigger input &
pump enable
Handgun trigger input &
pump enable
0-10 VDC input, web speed,
msx. 40v
Web Speed Scaling potentiometer
Factory Set, Do Not Adjust
Layout of Components on Motor Control Interface Board
Troubleshooting Page 7-7
Revised 1/03
ITW Dynatec c. 2000
DYNAMELT M ASU Manual #20-36, 20-37 and 20-38
Motor Speed Control Printed Circuit Board
The Motor Speed Control PCB is connected to the Motor Control Interface Board via spade connctors P1 and P2. P3 is not used.
The three jumpers (FSR, J1 and A/M) are factory set, do not change. The J1 jumper is always set in
the upper position. The A/M Jumper is always present.
“CL” adjusting pot: The current limit (CL) adjustment will limit the maximum current available to
the AC pump motor during overload. This will protect the motor from damage. The setting is factory set to deliver 100% of the rated horsepower for the ASU. When the motor load exceeds the current limit value, the Status LED (light) will illuminate red (indicating an overload condition). Turning clockwise increases the current limit value; turning counter-clockwise decreases it. The current
limit is factory preset, so no adjustment is necessary.
“ACC” and “DEC/B” adjusting pots: These pots change the time required for the pump motor to
accelerate (ACC) or de-accelerate. Turning full counter-clockwise equals 0.3 seconds. Turning full
clockwise equals 20.0 seconds. Factory default for either pot is 10.0 seconds.
cont.
J1 Jumper
A/M Jumper = Auto/ Manual
PWR = Power LED. Green = unit is ON
FSR Jumper & connection to drive
enable of Motor Interface PCB
Spade connectors (3) from Motor
Interface PCB
Potentiometers:
Factory Set, Do Not Adjust
CL = Current Limit
P1
P2
P3
Line L2
AC L1
MAX = inactive
Spade connectors
(2) to incoming
Main Power
MIN = Minimum RPM
W
DEC/B = Decelerate
Motor V
ACC = Accelerate
Spade Connectors
(3) to Motor
U
COMP = IR Comp
ST = Status Led. Red/ yellow/ green. See table below.
ST LED Color
State
Function
ST LED Color
State
Function
Green
Slow Flash
Normal Operation
Red/Yellow
Quick Flash
Undervoltage
Red
ON
Current Limit
Red/Yellow
Slow Flash
Overvoltage
Red
Quick Flash
Overload
Yellow
ON
Stop
Red
Slow Flash
Short Circuit
Layout of Components on Motor Drive Board
Page 7-8 Troubleshooting
Revised 7/01
ITW Dynatec c. 2000
DYNAMELT M ASU Manual #20-36, 20-37 and 20-38
“MIN” adjusting pot: This pot adjusts the minimum speed of the pump motor when it is enabled.
The pot is factory preset to exactly zero RPM when the speed setting is 0.00% full scale. Turning
clockwise increases the minimum RPM above zero RPM when the motor is enabled. This adjustment can be utilized to “creep” the motor (also referred to as “auto preload”) so that positive adhesive pressure is always maintained in the system.
Troubleshooting Page 7-9
Revised 9/01
ITW Dynatec c. 2000
DYNAMELT M ASU Manual #20-36, 20-37 and 20-38
48-Zone Power Printed Circuit Board
The 48-Zone Power PCB has the capacity to monitor adhesive temperatures for multiple hoses, applicators, hoppers and auxillary zones.
The LEDs for each temperature zone (1 through 48 illustrated below) will flash on and off as their
heaters output to maintain setpoint temperature. The Power On and Hopper LEDs will light continuously once the hopper(s) are up to temperature.
The settings of the JP1 and JP2 jumpers correspond to the number of hoppers on the ASU. For an
ASU with one hopper, both jumpers must be set to position 1-2 (shown). For two hoppers, JP1 must
be set at 1-2 and JP2 must be set at 2-3.
Jumper JP1
1&2 = 1 hopper
2&3 = 3 hoppers
Low temperature
thermostats for
Hoppers 1, 2
Jumper JP2:
1&2 = 1 hopper
2&3 = 2 hoppers
High temperature
thermostats for
Hoppers 1, 2
12 11 10 9 8 7 6
5
4 3
2
Connect to
CPU 1 at
Connect to
X16
Clutch pcb
System
Ready
outputs to
customersupplied
PLC
System 1
System
Ready
(snubbed)
power
outputs
System 1
System 2
Future
{
{
JS1
{
JS4
JS5
3
1
JP1
{
{
LED
LED
LED
LED
{
{
Future {
1
3
CPU 1
CPU 2
Hopper 2 Ready
Future
F1
System 2
Input
Power
240 VAC
{
Transformer
L1
L2/N
PE
JS3
JH1
JF2
Transformer Fuse
(5x20 1 amp)
JF7
JF6
JF1
JP2
Power ON
Hopper 1 Ready
JS2
Connect to
CPU 3 at
X16
1
JF5
Power ON
for PLC
Power ON
contactor
Connect to
CPU 2 at
X16
Connect to
CPU 1 at
J6
16
15
14
13
12
11
10
9
8
7
6
5
4
3
2
1
JH2
CPU 3
32
31
30
29
28
27
26
25
24
23
22
21
20
19
18
17
JH3
JF4
JF3
Connect to
CPU 2 at
J6
Connect to
CPU 3 at
J6
Layout of Components on 48-Zone Power Board
48
47
46
45
44
43
42
41
40
39
38
37
36
35
34
33
Solid state relay
driver outputs
(1 per zone)
LED:
Green = zone
is heating
Page 7-10 Troubleshooting
Revised 6/01
ITW Dynatec c. 2000
DYNAMELT M ASU Manual #20-36, 20-37 and 20-38
Optional Clutch Printed Circuit Board
The Clutch PCB allows installation of up to six (optional) clutches on the ASU.
The dip switches (SW1) are turned ON to reflect the number of clutches on the system.
Green LED = clutch is activated
Relay
Clutch 1
Clutch 2
Clutch 3
Clutch 4
Clutch 5
Clutch 6
JS1
#6
clutch #5
#4
#3
#1
#2 clutch
JS2
Green LED = System Power ON
Clutch Coil Leads Connects
Customer Enable Switches:
for a footswitch, hand-held
applicator, etc.
JF1
ON
Board
Fuse
F1
SW1
JS3
Connect to 48-Zone
Power Board at JF1
1
6
{
L1 L2
240 VAC Input
Layout of Components on Clutch Board
Dip Switches:
1 clutch = switch #1 is ON
2 clutches = switch #1 & 2 are ON
3 clutches = switch #1, 2 & 3 are ON
4 clutches = switch #1, 2, 3 & 4 are ON
5 clutches = switch #1, 2, 3, 4 & 5 are ON
6 clutches = all switches are ON
Optional RS232/485 Printed Circuit Board
Pin Configuration:
RS232
2 RxD
3 TxD
5 Gnd
S Shield
RS485
3 TxB
4 TxA
8 RxB
9 RxA
S Shield
(Pins not listed are not used)
5
4
3
2
1
9
8
7
6
Shield
Ribboncable connect to
Display CPU PCB
Layout of Components on Communication Board
Troubleshooting Page 7-11
Revised 4/01
ITW Dynatec c. 2000
DYNAMELT M ASU Manual #20-36, 20-37 and 20-38
Optional Pressure (PSI) Printed Circuit Board
Each Pressure (PSI) PCB on the ASU allows the controller to monitor up to four pressure transducers. The DM35 ASU can accept one PSI PCB (four transducers), the DM70/140 ASUs can accept
up to two PSI PCBs (up to eight transducers) and the DM210 ASU can accept up to three PSI PCBs
(up to 12 transducers). Each CPU board can accomodate one PSI PCB.
The 8 pairs of terminals at the top edge of the board (as seen below) are for the high and low alarm
outputs of the relays. The eight jumpers for the high/ low alarm output relays (E1 thru E8) are factory set to Normally Open (default) and are illustrated below in default position.
The leads from the pressure transducers are connected at the left of the board (as seen below).
Note: the quantity of pressure transducers on an ASU is configured at the dip switches on the Display CPU PCB.
High & Low Alarm Outputs
4 High 4 Low 3 High 3 Low
2 High 2 Low 1 High 1 Low
X6
E6
E5
E4
E3
E2
NO
NC
E8
E7
Jumpers for
High/Low Alarms:
Normally Open (default)=
no alarm/ no continuity
Normally Closed =
no alarm/ has continuity
E1
Input connections
from Transducers:
X1
Transducer #1
Flat cable to
CPU PCB
X2
Transducer #2
Transducer #3
Transducer #4
Green LED = Board
logic power is OK
X3
X5
X4
Layout of Components on Pressure Board
Page 7-12 Troubleshooting
Revised 5/02
ITW Dynatec c. 2000
DYNAMELT M ASU Manual #20-36, 20-37 and 20-38
Heater and Sensor Resistance Values
The resistance values given in the four tables on the following page will aid in troubleshooting
when a sensor or heater malfunction is suspected. The “Temperature Sensor Resistance” table gives
values for various temperatures. If you know the approximate temperature of the suspected sensor,
you can check to see if the sensor resistance approximates the value given in the table by unplugging the affected head or hose connection and measuring resistance across the affected pins (see
wiring diagram in Chapter 11 for pin numbers).
DANGER HIGH VOLTAGE
Disconnect input power to the application system before disconnecting/
re-connecting electrical connections. Make sure there is no electrical power on
the leads you will be connecting.
The “Nominal Hose Heater Resistance” table gives the heater resistance for hoses. A suspected hose
heater problem can be quickly isolated by measuring hose heater resistance and comparing it to the
correct resistance for your hose length and voltage as shown.
The “Nominal Head Heater Resistance” table gives values for several different head wattages. A
suspected head heater problem can be isolated by measuring head heater resistance and comparing
it to the resistance for the appropriate wattage of your system.
The “Nominal Hopper Heater Resistance” table gives heater resistance for the hopper heaters of
each Dynamelt M Series model and for the (optional) drop-in grids.
The “Nominal Filter Manifold Heater Resistance” table gives heater resistance for the heater located
in the (optional) filter manifold/ pressure relief block. The heater inside the manifold varies depending on the number of filter manifolds mounted on the ASU, therefore resistance varies also.
Troubleshooting Page 7-13
Revised 10/00
c. 2000
DYNAMELT M ASU Manual 20-36, 20-37 and 20-38
Temperature
°F
°C
32
50
68
86
104
122
140
158
176
194
212
230
248
268
284
302
320
338
356
374
392
410
428
Hose Length
Meters Feet
Resistance
in Ohms
0
10
20
30
40
50
60
70
80
90
100
110
120
130
140
150
160
170
180
190
200
210
220
1.2
1.8
2.4
3
3.7
4.9
7.3
100
104
108
112
116
119
123
127
131
135
139
142
146
150
154
157
161
164
168
172
176
180
183
Resistance
in Ohms
4
6
8
10
12
16
24
323-358
201-223
155-172
120-133
102-114
75-84
51-57
Nominal Hose Heater Resistance
for DynaFlex Hoses
Watts
Resistance in Ohms
200
270
350
500
700
288
213
165
115
82
Nominal Head Heater Resistance
Note: Resistance is measured at
ambient temperature (20°C/ 68°F).
Temperature Sensor Resistance
(0.00385 PT 100 RTD)
Model :
M35
M70/ 140
M210
Qty. Hopper Heaters
Max. # of Drop-in Grids
Resistance (Ohms) for each Hopper Heater
Resistance (Ohms) for each Drop-in Grid Heater
1
2
11.5
23
2
4
11.5
23
3
6
11.5
23
Nominal Hopper Heater Resistance in Ohms
# of Filter Manifolds
on ASU
1
2
3
4
5
6
Model:
M35
115.2
51.6
not available
not available
not available
not available
M70/ 140
M210
115.2
51.6
38.4
28.8
not available
not available
115.2
51.6
38.4
28.8
TBD
186
Nominal Filter Manifold Heater (optional) Resistance in Ohms
c. 2000
DYNAMELT M ASU Manual 20-36, 20-37 and 20-38
Page 7-14 Troubleshooting
Revised 10/00
Error Indication Alarm Troubleshooting Guide
The operation of error indication alarms is described in Chapter 4. When checking for correct
equipment operation in the following guide, be aware that all heaters will go off immediately after
an error indication alarm occurs if the operator takes no action. With the exception of the fuses,
there are no user-replaceable parts on the printed circuit boards. If there is a non-fuse failure on any
of the PCBs, the PCB must be replaced.
DANGER HIGH VOLTAGE
Some of the procedures in the following Troubleshooting Guide require potentially dangerous electricity to be present. Only qualified service personnel should
perform these procedures.
Problem
Possible Cause
Solution
Hopper (tank)
Overtemp
1. Setpoints have been
programmed without
enough deviation.
1. Re-program setpoints, allowing a
larger deviation between the high
and low limits.
2. Hopper sensor
inoperative.
2. Replace hopper sensor if resistance
does not comply with the resistance
table in this chapter.
3. Hopper control solid state 3. a. Verify that the relay is not shorted by
relay inoperative.
removing all of its output wires and
verifying that resistance is greater than
zero.
Hopper Sensor
Solid State
Relay
Solid State
Relay
b. Verify condition of relay by disconnecting, then re-connecting properly.
Then, when Temperature Zone is OFF,
use a VOM AC voltmeter to verify that
240 volts are not present at the heater
terminal.
Troubleshooting Page 7-15
Revised 10/00
c. 2000
DYNAMELT M ASU Manual 20-36, 20-37 and 20-38
Problem
Possible Cause
Hopper Sensor Open
Solution
1. Verify that hopper sensor cable is
1. Sensor cable has become
unplugged from CPU PCB
properly connected on X14 on the CPU
PCB.
2. Inoperative hopper sensor.
2. Replace hopper sensor if resistance
does not comply with resistance table
in this chapter.
1. Short-circuit caused by
debris where sensor plugs
into CPU PCB.
1. Verify that sensor plug is clean and
correctly connected on X14 on the CPU
PCB.
2. Pinched sensor lead wire.
2. Visually inspect sensor lead wire for
break, kink, damage, etc. If no obvious
damage, use an ohmmeter to measure
continuity from the sensor lead to the
plug at the CPU PCB. Repair or replace
any damaged wire.
3. Inoperative hopper sensor.
3. Replace hopper sensor if resistance
does not comply with resistance table
in this chapter.
Hopper Sensor
Hopper Sensor Short
CPU PCB
X14
c. 2000
DYNAMELT M ASU Manual 20-36, 20-37 and 20-38
Page 7-16 Troubleshooting
Revised 10/00
Problem
Possible Cause
Solution
Hopper Heater Open
1.Disconnection in hopper
heater circuit.
1. Inspect hopper heater wiring for
proper connections.
Hopper
Sensor
2. Disconnection between
2. Verify that all connections are properly
Power PCB and CPU PCB. made on the CPU PCB.
3. Hopper circuit breaker
tripped.
3. Refer to the schematic in Chapter 11
to locate the hopper circuit breaker. If
it is tripped, do not re-set it without
checking for causes. Visually
and electrically inspect for a shortcircuit to ground in the hopper heater
circuit. This will be limited to between
the hopper control relay and the hopper
heater.
4. Open hopper heater
element.
4. At the terminal rail: use an ohmmeter
to measure resistance across H3A and
N (380v) or across H3A and H3B
(240v). See the resistance table
in this chapter for normal resistance
values. Infinitely high reisistance
values indicate an open heating element
which must be replaced.
Hopper
Heater Wire
Thermostat
Hopper Circuit Breaker
NOTE A: DM70/140 models If the ASU has a second heater, measure
may have up to two hopper this heater’s resistance across H15A and
heaters.
N (380v) or across H15A and H15B
(240v) as outlined above.
NOTE B: DM210 models
If the ASU has a second heater, see Note
may have up to three hopper A. If the ASU has a third heater, measure
heaters.
this heater’s resistance across H27A and
N (380v) or across H27A and H27B
(240v) as outlined above.
(Optional) Drop-in
Grid Overtemp Heater
2500w
Grid
Sensor
Leads
1. Setpoints have been
programmed without
enough deviation.
1. Re-program setpoints, allowing a
larger deviation between the high
and low limits.
2. Grid sensor inoperative.
2. Examine grid sensor assembly
for intermittent break in sensor lead.
Remove sensor bulb from grid.
Replace grid sensor if resistance does
not comply with the resistance table
in this chapter.
Troubleshooting Page 7-17
Revised 10/00
c. 2000
DYNAMELT M ASU Manual 20-36, 20-37 and 20-38
Problem
Possible Cause
3. Grid control solid state
relay inoperative.
(Optional) Drop-In
Grid Sensor Open
(Optional) Drop-in
Grid Sensor Short
3. Use a clamp-on ammeter to monitor
current. Replace inoperative solid state
relay.
1. Sensor cable has become 1. Verify that grid sensor cable is
unplugged from CPU PCB. properly connected at X14 on the
CPU PCB.,
2. Disconnection between
Power PCB and the CPU
PCB.
2. Verify that all connections are properly
made on the CPU PCB.
3. Drop-in grid sensor
inoperative.
3. Replace sensor if resistance does
not comply with the resistance table
in this chapter.
1.Verify that sensor plug is clean and
1. Short-circuit caused by
correctly connected at X14 on the
debris where sensor plugs
CPU PCB.
into CPU PCB.
2. Pinched sensor lead wire.
2. Visually inspect sensor lead wire for
break, kink, damage, etc. If no obvious
damage, use an ohmmeter to measure
continuity from the sensor lead to the
plug at X14 on the Power PCB. Repair
or replace any damaged wire.
3. Drop-in grid sensor
inoperative.
3. Replace sensor if resistance does
not comply with the resistance table
in this chapter
CPU PCB
X14
Solution
c. 2000
DYNAMELT M ASU Manual 20-36, 20-37 and 20-38
Page 7-18 Troubleshooting
Revised 10/00
Problem
Possible Cause
(Optional) Drop-in
Grid Heater Open
Heater
Leads
2500w
Grid
Sensor
Solution
1. Disconnection in grid’s
heater circuit.
1. Inspect grid’s heater wiring for
proper connections.
2. Disconnection between
Power PCB and solid
state relay.
2. Verify that the Power PCB is properly
connected to the solid state relay.
3 Drop-in grid circuit
breaker tripped.
3. Refer to the schematic in Chapter 11
to locate the grid’s circuit breaker. If
it is tripped, do not re-set it without
checking for causes. Visually
and electrically inspect for a shortcircuit to ground in the grid’s heater
circuit. This will be limited to between
the grid’s control relay and the grid’s
heater.
4. At the terminal rail, use an ohmmeter
to measure resistance as follows:
For 1 grid: H1A & N (380v)
H1A & H1B (240v)
NOTE: The DM35 ASU may
For 2nd grid: H2A & N (380v)
have 1 or 2 grids. The
H2A & H2B (240v)
DM70/140 ASU may have
For 3rd grid: H13A & N (380v)
from 1 to 4 grids.
H13A & H13B (240v)
The DM210 ASU may have
For 4th grid: H14A & N (380v)
from 1 to 6 grids.
H14A & H14B (240v)
For 5th grid: H25A & N (380v)
H25A & H25B (240v)
For 6th grid: H26A & N (380v)
4. Open drop-in grid heater
element.
See the resistance table in this chapter
for normal resistance values. Infinitely
high reisistance values indicate an open
heating element which must be
replaced.
Troubleshooting Page 7-19
Revised 10/00
c. 2000
DYNAMELT M ASU Manual 20-36, 20-37 and 20-38
Problem
Hose/ Head
(No.) Overtemp
Note: Vertical configuration is for
DM 35 only. Larger ASUs are
arranged horizontally.
Possible Cause
1. Hose/ Head setpoints
incorrectly programmed.
1. Re-program setpoints to allow a
larger deviation.
2. Inoperative or shorted
hose/ head triac or dual
solid state relay.
2. Refer to the schematic in Chapter 11 to
locate the correct head/ hose triac or
relay. Use a clamp-on ammeter to monitor hose/ head current. If current does
not cycle on and off, then the triac or
relay has failed and must be replaced.
Aux.
#1
Aux.
#2
Solution
3. Disconnection between the 3. Verify that all PCBs are properly
Power PCB’s and the CPU
mounted inside the panel box.
board’s flat cables.
#1
4. Hose/ Head sensor circuit
inoperative.
#2
b. If hose-to-ASU plug and socket are
okay, hose may have intermittent short
or open circuit. Repair or replace hose,
hose harness or Power PCB as
appropriate.
Alternately, problem can be isolated
by connecting the effected hose to a
different ASU hose socket to tell
whether the problem is in the hose or
in the Power PCB.
Sensor
Heater
c. If head-to-hose and hose-to-ASU
plugs and sockets are okay, head
sensor may have an intermittent short
or open circuit. Examine connections
inside the service block area of the head
and monitor head sensor resistance
with an ohmmeter while flexing sensor
leads. Repair or replace as appropriate.
Plug
Sensor &
Heater
Hose/ Head (No.)
Sensor Open
4. a. Visually examine socket connection where hose/ head attaches to ASU.
Verify that pins are properly seated. If
pins or plug housing are damaged,
repair or replace hose. If socket
is damaged, repair or replace harness.
1. Disconnection between
hose and ASU.
1. Visually examine connection where
hose plugs into ASU socket for proper
contact and seating. If pins or housings
are damaged, repair or replace hose or
hose harness (in ASU).
c. 2000
DYNAMELT M ASU Manual 20-36, 20-37 and 20-38
Page 7-20 Troubleshooting
Revised 10/00
Problem
Note: Vertical configuration is for
DM 35 only. Larger ASUs are
arranged horizontally.
Aux.
#1
Aux.
#2
#1
Possible Cause
Solution
2. Hose sensor harness
unplugged from Power
PCB.
2. Verify that effected hose is properly
connected to Power PCB. Replace or
repair damaged hose harness as necessary.
3. Disconnection between the 3. Verify that all PCBs are properly
Power PCB’s and the CPU
mounted inside the panel box.
PCB’s flat cables.
4. Hose/ Head sensor circuit
inoperative.
4. Replace head sensor if resistance does
not comply with resistance table in this
chapter. Use hose schematic to check
hose sensor at ASU socket. Repair or
replace hose, hose harness or Power
PCB as appropriate.
1. Debris at connection
between hose/ head and
ASU.
1. Visually inspect hose plug and ASU
socket for cleanliness and proper
contact and seating of pins.
2. Hose/ Head sensor circuit
inoperative.
2. a. Using the hose schematic, check hose
sensor resistance at ASU socket. An
ohmmeter can be used to isolate a
pinched wire in the hose harness.
When cause is isolated, replace
hose, hose harness or Power PCB as
appropriate.
#2
Hose/ Head (No.)
Sensor Short
b. If head-to-hose and hose-to-ASU
plugs and sockets are okay, head
sensor may have an intermittent short
or open circuit. Examine connections
inside the service block area of the head
and monitor head sensor resistance
with an ohmmeter while flexing sensor
leads. Repair or replace as appropriate.
Troubleshooting Page 7-21
Revised 10/00
c. 2000
DYNAMELT M ASU Manual 20-36, 20-37 and 20-38
Problem
Hose/ Head (No.)
Heater Open
Possible Cause
Solution
1. Disconnection between
hose/ head and ASU.
1. Visually examine effected hose plug
and ASU socket for cleanliness and
proper contact and seating. Refer to
the wiring diagram for pin identification. The problem can be isolated by
plugging the effected hose/ head into
another ASU socket. If the new hose
number is then displayed as malfunctioning, the problem is in the hose that
was moved. Repair or replace hose,
head or ASU hose harness as
appropriate.
2. Disconnection between
2. Check connection. Verify that solid
solid state relay and
state relay is operative: check schematic
Power PCB or inoperative
in Chapter 11 for relay location. Use a
relay.
clamp-on ammeter to monitor hose/
Head current. If current does not cycle
on and off, the relay has failed and must
be replaced.
Sensor
Heater
3. Disconnection between
cartridge heater and cable
assembly inside head.
3. Visually inspect wiring inside head.
Verify that cartridge heater leads are
properly connected in the service
block area.
4. Inoperative hose/ head
circuit breaker.
4. Refer to schematic in Chapter 11 for
location of circuit breaker. If it is
found to be tripped, do not re-set it
without first finding cause. Visually
inspect and use an ohmmeter to check
for a possible short circut to ground in
the hose/ head heater circuit.
5. Open hose/ head heater
element.
5. Use an ohmmeter to measure hose/
head heater resistance. See resistance
table in this chapter for resistance
values. Infinitely high resistance indicates an open heater element.
6. Open wiring inside ASU.
6. Visually inspect ASU wiring and use
an ohmmeter and the wiring diagram
to locate open wires in head heater
circuit. Repair or replace ASU hose
head harness or other ASU wiring as
necessary.
Plug
Sensor &
Heater
c. 2000
DYNAMELT M ASU Manual 20-36, 20-37 and 20-38
Page 7-22 Troubleshooting
Revised 10/00
Adjustable Adhesive Pressure Relief Valve
Dynamelt pumps are outfitted with a high-pressure relief valve located on the outlet filter manifold.
The valve is adjustable and it does not affect adhesive pressure under normal operating conditions.
The adjustable pressure relief valve is factory set at 34 bar (500 psi) for Dynamelt M gear pumps.
When adhesive pressure exceeds the set limit, the pressure forces the valve to move away from its
seat, compressing the spring and allowing adhesive to flow back to the hopper. This adhesive flow
reduces pressure. When the pressure falls below the set limit, the spring forces the valve against its
seat, cutting off adhesive flow. The check valve, seen below, is not instrumental in pressure relief. It
serves as an overflow valve, preventing adhesive from flowing out of the hopper when the filter
plug is removed.
Normally Closed (Unrelieved):
In the drawing below, the pressure relief valve is
closed.
Open (Relieved):
In this drawing, pressure has exceeded the setting
of the valve, causing it to open and discharge
adhesive to the hopper.
Adjustment
Screw Cap
Check Valve
Check Valve
Pressure
Relief
Valve
Spring
return
to
hopper
Pressure
Relief
Valve
from
pump
return
to
hopper
Filter
Basket
from
pump
to
hose
Adhesive flow through
filter block to hose
to
hose
Adhesive flow through
filter block to hose
Operation of the Adjustable Adhesive Pressure Relief Valve
c. 2000
DYNAMELT M ASU Manual 20-36, 20-37 and 20-38
Troubleshooting Page 7-23
Revised 10/00
Operation of the ASU’s Gear Pump
Manual or Automatic Pump Operation
Choose “Manual”, “Stop” or “Automatic” gear pump operation via the “Motor” pushbutton (see
icon above) on the controller’s keypad. When the Dynamelt’s pump is to be operated manually (that
is, without a line following signal), the manual mode is used to control pump speed (and adhesive
output). For the gear pump to be operated in the automatic mode, a tach generator, or equivalent (attached to the parent conveyor line) must be provided and the following set-up procedure should be
performed:
1. The tach generator or the signal isolator must be adjusted so that the voltage from the speed
controller is 0 to 10 VDC (but not more than +10 VDC when the conveyor is at maximum
speed). This voltage is measured at either X3 on the Motor Control Interface PCB (for a tach
generator) or at terminals 9 (+) and 10 (-) of the Signal Isolator Board.
2. The “Automatic” setting then changes pump speed for any given 0 to +10 VDC incoming
tachometer signal. Voltage will vary given production speed.
The motor speed can be adjusted (trimmed) in automatic mode by setting maximum and minimum
percent of full speed values on the controller’s keypad. MAX % of Full Speed will be the true motor
speed at 10 volts input. This value cannot exceed 100%.
To make the motor speed adjustment, follow the programming instructions in Chapter 5.
Pump Output Adjustment
When the adhesive in the ASU’s hopper has reached a temperature high enough for the pump to operate safely, the controller will place the hopper in “Ready” condition and power will be supplied to
the pump. The pump is self-priming.
Pump output is adjusted by the motor speed control on the controller’s keypad. However, if less
pressure is needed, maximum pressure of the pump can be decreased (or increased) by adjusting the
pressure relief valve installed on the pump output manifold. To change the setting of this valve, refer to instructions in Chapter 3.
The relief valve is factory set at 34 bar (500 psi) for Dynamelt M gear pumps.
Page 7-24 Troubleshooting
Revised 10/00
c. 2000
DYNAMELT M ASU Manual 20-36, 20-37 and 20-38
Troubleshooting the ASU’s Gear Pump
No special tools are needed for working on the ASU pump. See Chapter 8 of this manual for diaassembly/ assembly procedures for the ASU pump, and Chapter 10 for locating pump parts on the
component illustrations (exploded-view drawings).
Gear Pump Priming/ Start-Up
The pump is self priming.
CAUTION: DO NOT continue to run the pump if no glue is coming out. This could
damage the pump since it uses the glue as a lubricant. Stop and troubleshoot.
Troubleshooting Page 7-25
Revised 10/00
c. 2000
DYNAMELT M ASU Manual 20-36, 20-37 and 20-38
Gear Pump Troubleshooting Guide
WARNING HOT SURFACE & ADHESIVE
Some of the procedures in the following Troubleshooting Guide require working
near hot adhesive. Be sure to wear protective gloves, safety glasses and clothing
and use proper tools for handling hot melt components.
Note: Each motor and Motor Interface PCB in the system can run independently (or dependently). Each Motor Interface PCB may have its own operating parameters. Therefore, each motor
and Motor Interface PCB should be troubleshot independently.
Problem
Possible Cause
Solution
Pump doesn’t operate
in “Manual” mode,
power light doesn’t
light.
1. Motor On/Off is OFF at
the controller keypad.
1. Check keypad setting.
2. Hopper temperature is
below ready setpoint.
2. Pump cannot operate until hopper has
reached “ready” condition. Verify that
hopper has reached ready. Re-program
hopper operating setpoint and ready
setpoint if necessary.
3. No incoming electrical
power.
3. Check to see if ASU temperature
control is operating. If not, check
for presence of incoming supply
voltage.
1. “Manual” motor is set at
zero (at the keypad).
1. Re-program motor.
ON/OFF Led
Pump doesn’t operate
in “Manual” mode,
power light is ON,
hopper is at “ready”
condition.
2. If pump On/Off is being
2. Check condition of the remote switch
controlled by a remote
(the hand-held applicator).
switch (i.e., a hand-held,
applicator), the switch or
switch circuit may be open.
3. Low temp alarm.
3. Verify that ASU is warmed up and that
hopper temperature is above the factoryset pump enable temperature.
4. Faulty Motor Control
Interface Board.
4. If the board is faulty it must be
replaced.
c. 2000
DYNAMELT M ASU Manual 20-36, 20-37 and 20-38
Page 7-26 Troubleshooting
Revised 6/01
Problem
Possible Cause
Solution
Pump doesn’t operate
in “Auto” mode,
power light is ON,
hopper is at ready
conditon.
1. Parent machine is not
running.
1. Check parent machine.
2. Re-program motor.
2. “Auto” motor is set at
zero (at controller keypad).
3. No incoming line
following signal.
X3
Motor Control Interface PCB
3. Check for presence of 0 to 10 VDC
control signal at X3 of Motor Control
Interface PCB. If signal is not present,
check connection at X3 and tachometer
drive connections. If control signal is
present there, the problem is within the
ASU.
4. Internal ASU connections 4. Check for the presence of 0 to 10 VDC
control signal at X3 of Motor Control
or Motor Control Interface
Interface PCB. Check ASU connections
PCB inoperative.
(S1 & S2). If the signal is not present, the
problem is in the connection. If the signal is
present there, the problem is most likely a
faulty Motor Control Interface Board.
Pump runs but there is
no adhesive output.
Low or inconsistent
adhesive output.
5. System is not ready, temperatures are too low.
5. Verify that ASU is warmed up and that
hopper temperature is above the low
temperature thermostat.
1. ASU is out of adhesive.
1. Add adhesive to hopper.
2. If pump has been serviced
and leads reversed, pump
will run with no output.
2. Check pump wiring to schematic.
1. Filter(s) clogged.
1. Remove and inspect filter basket
and primary filter.
2. Adhesive used is too
viscous.
2. Verify that system components are
at appropriate temperatures and that
the selected adhesive is correct for
the application.
3. Clogged hose.
3. Inspect hose for kinks or internal
plugs of debris or char. Clean or
replace hoses as necessary.
4. Clogged applicators.
4. Inspect applicators for plugged
nozzles or filters. Clean or repair
applicators as necessary.
Filter Basket
Troubleshooting Page 7-27
Revised 10/00
c. 2000
DYNAMELT M ASU Manual 20-36, 20-37 and 20-38
Problem
Adhesive leak at pump
shaft seal.
Seal Assembly
Rear Plate
O-ring
Possible Cause
Solution
5. The fixed pressure relief
valve is opening.
5. When fully closed (clockwise) and
all applicators are off, adhesive
pressure should be around 34 bar
(500 psi). If it is significantly less,
the pressure relief valve should be
replaced.
6. Inoperative lower o-ring
in filter plug is allowing
pressure to escape.
6. Replace o-ring. Follow diagram and
instructions in Chapter 6 for “Outlet
Filter” to locate the o-ring.
1. Pump seal is incorrectly
positioned inside the seal
and bearing assembly.
1. Remove seal and bearing from pump.
Verify that all components are
correctly positioned.
2. Pump seal inoperative.
2. Remove seal from pump, inspect it
and replace it if worn or damaged.
Be sure there are no burrs or other
sharp edges on pump shaft or on
installation tools that could damage
a new seal.
Adhesive leak at pump- 1. O-ring in pump’s rear
to-hopper interface.
plate is inoperative.
1.Remove seal from pump, inspect it
and replace it if worn or damaged. Be
sure there are no burrs or other sharp
edges on the rear plate o-ring groove
that could damage a new o-ring.
2. Pump assembly screws are 2. Verify that all four pump screws are
tightly assembled to the hopper.
missing or loose.
3. Helicoil insert pulled out
of hopper.
3. Remove pump and inspect hopper.
Repair or replace hopper as necessary.
Page 7-28 Troubleshooting
Revised 10/00
ITW Dynatec
An Illinois Tool Works Company
Adhesive Application Solutions
c. 2000
DYNAMELT M ASU Manual 20-36, 20-37 and 20-38
Disassembly & Re-assembly Page 8-1
Revised 4/01
c. 2000
DYNAMELT M ASU Manual 20-36
Chapter 8
DISASSEMBLY & RE-ASSEMBLY PROCEDURES
Note: Re-read Chapter 1 “Safety Precautions” before performing any disassembly procedures. All
disassembly and repair procedures must be performed by qualified, trained technicians.
Disassembly Procedures
Note: Use the exploded-view drawings referenced with each procedure in conjunction with the instructions outlined in this chapter. Read the “cautions” on page 8-4 before re-assembling the ASU.
To Remove the Access Doors
There are two access doors, one on either side of the ASU. Use the key to unlock the door, then lift
it off, being careful not to pull off the ground wire attached. Remove the ground wire and re-attach
when the door is re-installed. These doors allow access to: the motor, pump, junction box, (optional)
drop-in grids, filter shutoff and (optional) ball valve.
To Open Junction Box
The junction box is on the right-hand side of the hopper. Within the juction box are the thermostats,
heater terminals and the hopper sensor. The junction box cover is removed via the two screws at the
bottom of the cover.
Panel Box
Assembly
Access
Door
Keylock
Filter Shutoff Assembly
Ball Valve Assembly
(option)
Filter Manifold
Junction Box
Over-Temp Reset
Thermostat
Pump Enable
Thermostat
Manifold Cover
c.2000
DYNAMELT M ASU Manual 20-36
Page 8-2 Disassembly & Re-assembly
Revised 9/00
Hopper
Junction
Box cover
Junction
Box
Cutouts for conduit
connectors for filter
manifold heater and
sensor.
Over Temp
Reset
Thermostat
Cutouts for drop-in
grid assembly
Filter Shutoff
Junction Box
Hopper Sensor
Port
Heater
Terminals
Pump EnableThermostat Port
Side View
Sensor or Thermostat Replacement
Remove the junction box cover.
a. Over-Temperature Thermostat Replacement: Remove the two screws and slip the terminals and
the hopper ground wire off of the thermostat before removing the thermostat from the base of the
hopper.
b. Pump Enable Thermostat Replacement: Disconnect two wires from the terminal strip and slide
the thermostat out.
c. RTD Sensor Replacement: Disconnect two wires from the terminal strip and slide the sensor
out.
To Remove the Manifold Cover
Unscrew its captive screw and slide cover up and off. Cover allows access to the hose connections
on the filter manifold, outlet filters, heaters and the pressure relief.
Heater Replacement
One heater is located in the heater plate underneath the hopper:
Remove the access door. Use a hex head socket wrench to remove the six heater plate bolts
through the holes drilled in the base plate. Disconnect the heater wires. Slide the old heater plate
out. Connect heater wires to new plate. Slide new plate in place and fasten with the six bolts.
One cartridge heater is located under the filter manifold:
At the rear of the ASU, remove the filter manifold cover. Remove the cover located at the end of
the heater retainer plate (4 screws). Disconnect heater wires from the terminal rail. Loosen the heater retainer plate and slide the cartridge heater out.
To Access the RTD Sensor in the Optional Drop-in Grid
Remove the access door. Remove the screws on the drop-in grid’s junction box cover in order to
remove the cover. Disconnect the sensor from the terminal strip inside the junction box and slide the
sensor out of its adapter.
c. 2000
DYNAMELT M ASU Manual 20-36
Disassembly & Re-assembly Page 8-3
Revised 4/06
To Access Electrical Components inside the Panel Box
Verify again that the main power is OFF. On the outside of the panel box, use the main disconnect switch to open panel box door (see Chapter 3 for instructions for opening door).
a. Fuse Replacement: Fuses are located in the upper right corner of the inside of the panel box
assembly. The following printed circuit boards are fused: Motor Control Interface, Power I/O and
the optional Clutch board.
b. Printed Circuit Board Replacement: Reference the section entitled “Handling Printed Circuit Boards” in Chapter 7. The PCBs are located in the panel box assembly. Refer to detailed layout in Chapter 3.
The PCBs snap into and out of their standoffs. To remove: place your fingertips under one corner
of the PCB and pull out firmly from the standoff. Repeat for each corner of the PCB.
Note: aside from fuses and the Lithium battery on the M Series CPU PCB (see Chapter 7), there
are no replaceable parts on the PCBs.
c.2000
DYNAMELT M ASU Manual 20-36
Page 8-4 Disassembly & Re-assembly
Revised 9/00
To Access the Pump or Motor
DANGER HOT SURFACE & HIGH VOLTAGE
If the pump is not operable but the heating system will function, raise the
temperature of the application system to the operating temperature to aid in the
pump disassembly process. Otherwise, a heat gun or other controlled heating
method is recommended to melt hardened hot melt material. Never use a torch
or an open flame on any of the components of the application system. Once the
system is up to temperature, disconnect all incoming power before proceeding.
Remove access door(s) using the key, being careful not to pull off the ground wires attached.
Turn OFF the filter shutoff valve by turning it to its closed “0” position.
a. Motor Removal: Disconnect the wires leading to the motor. Unscrew the hex nut on the
cord grip. Slide the wires through the fitting. Remove the four bolts which attach the motor to the
mounting bracket. Slide the motor out of the ASU.
For re-assembly: torque should be approximately 1.8 Nm (16 foot/lbs) at room temperature.
With hopper at 177°C (350°F), the maximum allowable torque on screws is 4.1 Nm (36 foot/lbs).
Panel Box
Assembly
Motor Mounting Bolts
Motor
Disassembly & Re-assembly Page 8-5
Revised 4/01
c. 2000
DYNAMELT M ASU Manual 20-36
b. Pump Removal: Verify that the filter shutoff
is in its closed “0” position. Loosen motor adapter
plate screws and slide adapter plate with motor
away from pump and coupling. Slide the coupling
off the pump shaft. Remove the four pump
mounting bolts.
c. Pump Seal (O-ring) Replacement: Remove
the pump from the ASU (see instructions above,
“b”). Remove the external pump seal from its
groove on the back of the pump adapter plate
(this is the seal located between the adapter plate
and the hopper). Install the new seal.
Shaft Key
coupling
Pump
Motor
Adapter
Plate
Screws
Re-Assembly Procedures
Unless noted, the M Series ASU’s re-assembly is simply the reverse sequence of the disassembly
procedures. However, the following precautions should be followed (whenever they apply) for
proper re-assembly:
WARNING HOT SURFACE
It order to protect personnel and equipment, it is important to replace all
insulation whenever it is removed from the ASU.
CAUTION: In general, all O-RINGS AND SEALS should be replaced whenever
hot-melt equipment is re-assembled. All new o-rings should be lubricated with
o-ring lube (PN N07588).
CAUTION: TAPERED PIPE THREADS are found on air line fittings used with the
pump air supply (if applicable) and on the outlet filter manifold. Apply thread
sealant (PN N02892) whenever tapered pipe threaded parts are re-assembled.
CAUTION: SOME FITTINGS used for adhesive on the ASU have straight threads
and o-ring seals. Use of thread sealant is not necessary with these parts, but the
o-ring seals should be clean and lubricated. Tighten straight-threaded parts and
fittings until their shoulders are firmly seated against the pump body (or other
surface). Excessive torque may damage straight-threaded parts and the use of
power wrenches is not recommended
CAUTION: HOT-MELT RESIDUE should be cleaned from parts before they are
re-assembled, particularly from threaded parts. As a precaution against adhesive
residue preventing proper re-assembly, threaded parts should always be
re-tightened at operating temperature.
Page 8-6 Disassembly & Re-assembly
Revised 9/00
ITW Dynatec
An Illinois Tool Works Company
Adhesive Application Solutions
c.2000
DYNAMELT M ASU Manual 20-36
c. 2000
DYNAMELT M ASU Manual 20-36
Options & Accessories Page 9-1
Revised 7/02
Chapter 9
AVAILABLE OPTIONS & ACCESSORIES
Pressure Gauge Assembly PN 805641
An optional analog pressure gauge can be mounted on the outlet filter manifold. Reading the adhesive pressure at the manifold, rather than in-line on a hose, allows for more precise monitoring of
system pressure. It is also useful for troubleshooting and maintenance.
The gauge is installed at one of the adhesive ports on the manifold. Fittings and adapter are included
in the assembly.
Pre-PSI & Post-PSI Transducers PN 800225; Transducer Assembly PN 108825
A pressure transducer is an electronic probe that allows the melted adhesive’s pressure to be processed by the ASU’s control system. They are used to monitor system operating pressures and their
limits. The Pre-PSI transducer measures adhesive pressure in the filter manifold before the filter
basket. The Post-PSI transducer measures the pressure after the filter basket. By comparing the two
readings, the operator can determine if the filter basket is clogged.
Drop-in Grids PN 104802
The drop-in grid is an extra heated grid(s) which is installed near the bottom of the ASU’s hopper.
The additional grid(s) allows faster melting of adhesive for applications requiring higher melt rates
and higher volumes of adhesive. When installed, the drop-in grid becomes an auxiliary temperature
zone on the controller.
High-Temperature Heater Groups
More accurate temperature control may be gained by using a High-Temp Heater Group in the filter
manifold/ pressure relief block. A heater and sensor are contained inside the block and become their
own temperature zone on the controller. Six groups are available depending on the number of filter
manifolds on the ASU.
Filter Options and Accessories:
40 Mesh Outlet Filter PN 101246
Some situations do not call for a fine mesh outlet filter. A “clean” adhesive or one with a long pot
life are examples. Systems utilizing lower temperatures or systems running in a clean environment
can also utilize a 40 mesh filter. Standard equipment on Dynamelt is a 100 mesh filter (PN 101247).
Level Control PN N08122
This device informs the operator, via a message on the DynaControl’s readout, that the hopper’s
adhesive level is low. It may also be wired to stop production, turn on an alarm light or signal, or
signal a PLC.
Baseplate Standoff PN 109585
When casters are not desired on the ASU, baseplate standoffs may be used to make the unit stationary. The standoff features a flange on its bottom to allow spot welding and it is open in the center to
allow bolt-through mounting.
c. 2000
DYNAMELT M ASU Manual 20-36
Page 9-2 Options & Accessories
Revised 9/07
Pump Options and Accessories:
Gear Pumps
For higher tolerances and precision, several gear pumps are available for the Dynamelt. Gear pumps
give better service for continuous applications or applications which require more control over the volume of adhesive pumped. Gear pumps available are:
Single Pumps:
PN 100860: 1.54 cc/rev single, standard accuracy gear pump
PN 100861: 3.2 cc/rev single, standard accuracy gear pump
PN 100862: 4.5 cc/rev single, standard accuracy gear pump
PN 109690: 10 cc/rev single, standard accuracy gear pump
PN 108875: 8.5 cc/rev single, high accuracy gear pump
PN 084E374: 0.584 cc/rev single, high accuracy gear pump
PN 084E376: 1.752 cc/rev single, high accuracy gear pump
PN 084E428: 0.297 cc/rev single, high accuracy gear pump
PN 084E430: 1.168 cc/rev single, high accuracy gear pump
PN 084E434: 2.920 cc/rev single, high accuracy gear pump
Dual Pumps:
Note: all dual pumps require PN 102049, see below.
PN 100863: 1.54 cc/rev dual, standard accuracy gear pump
PN 100864: 3.18 cc/rev dual, standard accuracy gear pump
PN 084E389: 0.584 cc/rev dual, high accuracy gear pump
PN 084E432: 1.168 cc/rev dual, high accuracy gear pump
PN 108874: 2.920 cc/rev dual, high accuracy gear pump
Feinpruf Gear Pumps
Feinpruf pumps are commonly used in the European marketplace.
Gear Pump Repair Kit PN 103151
Contains the following items needed to repair the PNs 100860 thru 100864 gear pumps:
PN
Description
Qty.
PN
Description
Qty.
N00198
018X031
069X061
O-ring
Ball Bearing
Seal
2
5
1
069X064
078F017
078I001
O-ring
Ring, Clip
Key, Woodruff
3
4
1
Gear Motor Options
Lenze DC Motors PN 103843
These European 1/4 hp motors are equipped with tachometer feedback and a closed loop control. They
are required for the Actual Digital RPM Readout option.
DC Motors PN 101418
These 1/4 hp American motors are rated at 83 rpm, 180v.
c. 2000
DYNAMELT M ASU Manual 20-36
Options & Accessories Page 9-3
Revised 9/01
Return (re-circulating) Hoses
Available on all models. Use of return hoses allows higher adhesive pressures from the head to the
substrate because the head is “overfed” adhesive. The overflow adhesive is re-circulated to the hopper.
Electric Clutch PN 105729; Clutch Kit PN 107945
An electric clutch is available for the Dynamelt M35 ASU. A clutch relieves adhesive pressure
quickly in applications where there are periods of time when adhesive is not being applied.
DynaControl Options:
Pendant Control Panel PN 107643
The pendant control option gives the DynaControl keypad mobility via a 9 meter (30 ft), 6 meter
(20 ft) or 3 meter (10 ft) cable. The Pendant Control Panel replaces the standard display panel.
Pressure Display PN 108388
The pressure board option enables the controller to read and display adhesive pressure PSI values in
the outlet filter manifold. The option consists of a PSI printed circuit board which is used with a
pressure reading device (transducer or gauge) mounted on the filter manifold.
Actual Digital RPM Readout PN 107946
This option provides a controller readout for actual motor or pump revolutions per minute. No additional programming is necessary. Installation on an encoder is required.
System Status Lights PN 104280
Remote monitoring of system status is made easier with this tri-color light. The stack light is
mounted on a 6”x 6” box, which is itself mounted on a stand with a 10’ cable. Wired into the controller, the lights illuminate to indicate “Power On”, “Ready” and “Alarm”. An audible signal accompanies the “Alarm” light. The alarm may be wired to indicate either high/low temperature, low
adhesive level or open/short sensor.
Line Speed Tracking Options
Line speed tracking is a standard feature of the M Series ASUs which allows the speed of the motor
and ASU to follow the speed of a production line via a reference voltage input. When operated as
the standard feature, a 0-10v signal from a PLC or a similar line speed output device is utilized.
However, it may also be operated utilizing one of the following optional devices:
PN 015D050 Tach Generator: a mechanically operated device which produces a reference voltage
that allows the ASU’s gear pump to track a parent machine’s production line speed.
PN N06642 Signal Isolator: a device which conditions a parent machine’s production line’s DC
speed reference voltage to allow the ASU’s gear pump to track line speed.
Page 9-4 Options & Accessories
Revised 4/06
c. 2000
DYNAMELT M ASU Manual 20-36
Serial Communication (PC Link/ Remote I/O Interface) PN 108475
Bi-directional data transfer to a remote computer is available for the controller. The ASU’s standard
RS232 serial port connection allows remote interface up to 50 meters from the DynaControl controller. The RS485 serial port connection offers remote interface over a much longer distance. Either
connection enables all system parameters to be monitored and/ or controlled from the remote station.
Ethernet/ IP Adapter Kit: PN 112224
This kit adapts the DMM ASU for an Ethernet network so that all system parameters can be transmitted and received, allowing full remote operation of the ASU.
Options & Accessories Page 9-5
Revised 10/05
c. 2000
DYNAMELT M ASU Manual 20-36
Recommended Service Parts List
Category
Part No.
Description
Electrical:
103184
048I016
102762
108566
036B103
104166
036B015
102411
048H384
036A170
036A079
109857
108256
107440
106149
106395
110090
107438
106147
Fuse GDC4 (terminal rail)
Fuse KTK 15 (terminal rail)
Fuse, 1 amp (motor control interface pc board)
Fuse, T6.3AL 5x20, fast (pc boards)
RTD Sensor, PT
Over-Temp Thermostat & Insulator Assy.
Pump Enable Thermostat
Boot, Insulator
Solid State Relay, Dual
Heater, 500w (for 1 filter block)
Heater, 1000w (for 2 filter blocks)
CPU Printed Circuit Board, V5
Control Assy. (w. PCB)
48-Zone Power (I/O) PC Board
Auxiliary RTD PC Board (optional)
Motor Speed Control AC Drive Board
Motor Control Interface PC Board
Optional Clutch PC Board
Optional Pressure PC Board
O-rings:
N00181
A69X133
N00185
N00187
069X275
N00199
103770
103771
807729
069X061
see IBOM
O-ring 014 (outlet filter/ manifold)
O-ring 124 (outlet filter/ manifold)
O-ring 018 (outlet filter/ manifold)
O-ring 020 (outlet filter/ manifold)
O-ring 122 (outlet filter/ manifold)
O-ring 114 (outlet filter/ manifold)
O-ring 5-005 (outlet filter/ manifold)
O-ring 5-254 (outlet filter/ manifold)
Pump Shaft Seal (Zenith/ TSHA pump models)
Pump Shaft Seal (optional ITW Dynatec pumps)
Pump Adapter O-rings
Filters:
101247
101246
109482
105967
Filter Basket, 100 mesh
Filter Basket, 40 mesh (optional)
Filter Basket, 200 mesh (optional)
Filter Shutoff Assembly, Left
Misc:
N07588
L15653
001U002
102717
101340
106313
108012
Lubricant, O-ring
Kit, Flushing Fluid, 1 gallon
Hi-Temp Lubricant, tube
Check Valve (pressure relief)
Motor Brushes, Baldor (optional DC motor)
Motor Brushes, Lenze (optional Lenze motor)
Filter/ Pressure Relief Plug Assembly
Qty.
4
2
5
5
1
1
1
1
8
1
1
1
1
1
1
1
1
1
1
8 + 6 per manifold
2 per manifold
2 per manifold
2 per manifold
2 per manifold
2 per manifold
2 per manifold
2 per manifold
2 per pump
2 per pump
1 of ea. per pump
2 per manifold
2 per manifold
2 per manifold
1
2
1
1
1
2 per motor
2 per motor
1
Page 9-6 Options & Accessories
Revised 10/00
ITW Dynatec
An Illinois Tool Works Company
Adhesive Application Solutions
c. 2000
DYNAMELT M ASU Manual 20-36
Component Illustrations Page 10-1
Revised 3/05
c. 2000
DYNAMELT M ASU Manual #20-36
Chapter 10
COMPONENT ILLUSTRATIONS & BILLS OF MATERIAL
WARNING
All parts must be periodically inspected and replaced if worn or broken. Failure
to do this can affect equipment’s operation and can result in personal injury.
Chapter Format
This chapter contains the component illustrations (exploded-view drawings) for each assembly of
the DYNAMELT M SERIES ASU. These drawings are useful for finding part numbers as well as
for use when maintaining or repairing the unit.
Note: most common nuts, bolts and fasteners can be obtained locally at your hardware store. Specialty fasteners are available by contacting Dynatec’s Customer Service.
Page 10-2 Component Illustrations & BOM’s
Revised 08/06
c. 1999
DYNAMELT M ASU Manual All Models
Bill of Materials for Pressure Relief & High Temp. Filter Block Assembly #102710
(Items from Heater Control Groups: 103571, 103572, 103573, 103574 are also
Included in this illustration and bill of material.)
Item No.
1
2
3
4
5
6
7
8
9
10
11
12
13
14
15
16
17
18
19
20
21
22
23
24
25
26
27
28
29
30
31
32
33
34
35
36
37
38
39
40
41
42
43
44
45
46
Part Number
102710
N00181
N00185
N00753
N00187
N00754
103626
102712
102717
NPN
803173
108928
112667*
A78A282*
N02969*
105099
N07429
006G112*
012E002*
109244*
109245*
112666*
104733
078D027*
101246
102711
102713
102714*
102715
N04349
102716
102718*
102719*
103770
103771
103571
103572
103573
103574
036A170
036A079
102149
036A077
036E032
036B103
107754
107645
106156
104163
101833
104852
N00199*
107751
N06883
103570
Note:
Description
Filter Block Top Assembly
O-ring, 014
O-ring, 018
1/8 NPT Level Seal Plug
O-ring, 020
1/4 NPT Level Seal Plug
3/8 BSPP Plug
Filter Block Insulator Plate
Check Valve, .655 Cart, 1 way
M8-1.25 x 90 SHC Screw
1/2 BSPP Plug (803984 #06, 804155 #08, 803142 #12 hose fitting)
Manifold Sub Assembly
O ring, 124
#0 x 1/8 Drive Screw
Pin Spring .125 x 1
M8 x 25 SHC Screw
M8-1.25 x 30mm
Cap, Adjustment Screw
Pressure Relief Spring
Pressure Relief Adjustment Screw
Bullet, Hi-Pressure
O-ring, 122
Plug, Pressure Transducer, 1/2-20
3/4-16 Jam Nut
Filter Basket, 40 Mesh
Filter Block
Filter Block Heater Retainer Plate
Pressure Relief/ Filter Plug
Filter Plug Retainer Slide
Pin, Spring, .250 x .875
Slide Housing Frame
Filter Pull Clip
Filter Preload Wave Spring
O-ring, 5-005
O-ring, 5-254
Heater Control Section 240v, 1 block
Heater Control Section 240v, 2 block
Heater Control Section 240v, 3 block
Heater Control Section 240v, 4 block
Heater,5/8 x 5”, 240v, 500w (used with 1 Filter Block Assembly)
Heater, 5/8 x 10”, 240v, 1000w (used with 2 Filter Block Assemblies)
Heater, 5/8 x 15”, 240v, 1500w (used with 3 Filter Block Assemblies)
Heater,5/8 x 20”,240v,2000w (Used with 4 Filter Block Assemblies)
Sensor Adapter
Temperature Sensor
Cover, Hi-Temp Sensor & Heater Section
Conduit, 10”
M4 x 6mm SHSS
M6 x 25mm SHC Screw
10-32 x 1/2 Tamper Proof screw
M10 x 12 cone, Relief, Set Screw
O-ring, 114
Conduit Fitting (located in junction box)
Jam Nut (located in junction box)
M5 x 8 x 6, CUD SH Set Screw
*These items are included in 108012 Plug Assembly
Qty.
1
6
2
1
2
3
2
1
2
6
2
1
2
6
2
2
6
2
2
2
2
2
4
2
2
1
1
2
2
2
1
2
2
2
2
1
1
1
1
1
1
1
1
1
2
2
2
2
1
1
1
Component Illustrations & BOM’s Page 10-3
Revised 6/03
c. 1999
DYNAMELT M ASU Manual All Models
43
26
11
16
13
22
18
31
20
12
30
Plug Assembly 108012
17
2
19
15
23
7
1
29
28
1
27
5
8
4
1
24
33
6
39
44
9
5
21
3
5
33 6
10
38
21
10
42
41
21
41
42
25
14
37
34
46
35
36
40
Component Illustration: Filter & Pressure Relief Assembly # 102710
45
c. 1999
DYNAMELT M ASU Manual #20-36
Page 10-4 Component Illustrations & BOM’s
Revised 9/02
Bill of Materials for Typical Electrical Panel Box Assembly 107715
Item No.
Part Number
Description
Qty.
1
802102
Mounting Bracket
1
2
3
107625
802626
Bezel
Heat Sink
1
2
4
5
102328
103377
Panel Box Lock Kit
Wire duct, 1.5” W x 3” H
2
3
6
103378
103439
Wire duct, 2” w x 3”H
Wire Duct Cover, 1.5.”
3
3
103438
Wire Duct Cover, 2.25”
3
7
8
104387
107891
Rotary Handle & Shaft
Bracket, Circuit Breaker
1
1
9
10
104387
104761
Mechanical, Operator, Circuit Breaker
Circuit Breaker
1
1
11
12
802850
107890
Panel Box
Insert Panel
1
1
13
14
048H384
107993
SSR Dual 40A, 240VAC
Memory Card Assembly (option)
3--8
1
15
16
102326
109770
Cover, Memory Card
Pendant Control Assembly (option
1
1
Continued on pages 6 thru 7.
Component Illustrations & BOM’s Page 10-5
Revised 9/00
c. 1999
DYNAMELT M ASU Manual #20-36
3
2 1
16
Optional Pendant Control
7
14
4
15
11
13
3
9
10
7
12
5
6
c. 1999
DYNAMELT M ASU Manual #20-36
Page 10-6 Component Illustrations & BOM’s
Revised 3/03
Bill of Materials for Typical Electrical Panel Box Assembly 107715 (Cont. from pg. 4)
Item No.
Part Number
17
Description
Qty.
Terminal Rail
1
18
19
102762
103183
1 Amp Fuse
Fuse Block, Lever Open
4
4
20
21
103184
Fuse, GDC4, 250VAC
Terminal Rail
3
1
22
23
109857
103069
Control Processor Board (CPU)
Circuit Breaker, CB,16A,63F,415V,1P,SPCL
1
22
24
103070
Circuit Breaker, CB,20A,63F,415V,1P,SPCL
2
25
26
104193
10062
Ground, Small Dual
Level Control
1
4
27
28
105252
107892
End Plate for105251
Side Panel Insert
1
1
29
30
105254
103663
End Plate for105253
Ground BUS
6
1
31
32
105256
106978
End Stop
Filter, RFI (EMI)
4
1
33
34
048H383
048E162
Contactor, 90A, 3Pole, 480V, 230VCOIL
Stand-off
1
4-8
35
36
110090
804713
Motor Control Interface
Ground Block
1
1
37
38
107033
106395
Motor Choke, RFI/EMI, 30 AC
Motor Speed Control
1-2
1-2
39
106111
M4 x 0.7 x 12 Button head
6-12
40
41
107440
106147
Power Board
Pressure Board
1
1
42
43
107438
Clutch Board
KBSI Board
1
1--2
44
45
107466
107893
2 Amp Fuse
Eprom Chip
1
1
46
47
107922
108256
Ribbon Cable Assm., 15PinM, 9 PinF Serial, 8 conductor crimp-on
Control Assembly
1
1
48
107891
Cable Assembly Bracket
1
Component Illustrations & BOM’s Page 10-7
Revised 9/02
c. 1999
DYNAMELT M ASU Manual #20-36
26
43
30
Drive One
17
38
28
39
37
42
25
20
19
44
27
29 31
41
Backside Of Control Panel
or Pendant Control
48
35
Drive Two
34
18
32
39
46
22
47
45
2
18
21
36
23
24
40
29
10
9
7
33
8
c. 1999
DYNAMELT M ASU Manual 20-36
Page 10-8 Component Illustrations & BOM’s
Revised 9/02
Bill of Materials for DYNAMELT M35 Series Cabinet Assembly
Item No.
1
2
3
4
5
6
7
8
9
10
11
12
13
14
15
16
17
18
19
20
21
22
23
24
25
26
27
28
29
30
31
32
33
34
35
36
37
38
39
40
41
42
43
44
45
46
Part Number
101843
105880
106186
106184
107890
108128
106187
105882
106183
802805
802102
106110
103115
101074
103866
107393
106111
101304
104279
105111
106066
104662
106324
106237
106112
105060
109585
106048
106772
106773
105152
106892
105117
106236
106876
106319
105865
105101
106769
106770
106771
101842
804749
805042
804532
N02145
078C013
078C017
804526
N01829
078D008
Description
Handle, Side Panel
Panel, Top, Bracket
Access Cover
Rear Cover M35
Manifold Cover
Manifold Cover , Hi Flow Only
Base Plate M70/140
Top Panel M70/140
Heat Barrier, Panel Box, M70
Panel Box
DCL Mounting Bracket
M5 Hex Nut
Swivel Caster
Receptacle
Bracket, Connector Bank, Amphenol
3/8-16 Kep nuts
M4 x 12 BHC Screw
Blank Plate, Dual
Blank Plate, Single
M3 Hex Nut
M5 x 16mm HHC Screw
M6 x 16mm SHC Screw
M6 Flat Washer
M8 Star Washer
M8 x 12mm HHC screw
M8 Hex Nut
Stand-off Option
Lid Assembly
Inner Hinge
Outer Hinge
M3 x 6mm PHLC Screw
M3 Flat washer
M4 x 8 Pan Head Screw
M4 Star Washer
Retaining Clip
M6 Star Washer
M6 Hex Nut
M6 x 16mm HHC Screw
Hinge (Attached to hopper lid)
Lid Hopper
Heat Deflector, M35/70
Collar, Hopper, M35/70
Handle, Hopper, Lid
Front Panel Kit (Option)
Transformer Option
Base Plate Transformer Extention
3/8-16 x 1.25 SHC Screw (Transformer extention hardware)
3/8 Flat washer (Transformer extention hardware)
3/8 Lock Washer (Transformer extention hardware)
Transformer (not Shown)
3/8-16 x 3 HHC Screw (transformer hardware not shown)
3/8-16 Hex Nut (transformer hardware not shown)
Qty.
4
1
2
1
1
1
1
1
1
1
4
4
4 or 8
1 or 2
4
16 or 32
0, 1 or 3
0 or 4
0, 4 or 8
4
6
6
8
4
4
4
1
2
2
6
6
4
4
2
4
4
2
2
1
1
1
1
1
1
4
4
4
1
4
4
Component Illustrations & BOM’s Page 10-9
Revised 9/02
c. 1999
DYNAMELT M ASU Manual 20-36
35 34
36
41
27
29
10
30
29
38
39
2
28
29
11
20
9
40
35
34
31 32 33 37
21
22
34
7
19
17
18
16
13
3
8
21
22
34
14
4
25
23
42
5
44
45
3
46
15
26
6
Stand-off Option
Note: without the transformer option
the casters attach to the base plate.
With the transformer option the casters
attach to the transformer frame. Stand-off
option attaches to Base plate only.
12
15 12
43
Component Illustration: DM M35 Cabinet Assembly
23
24
1
Page 10-10 Component Illustrations & BOM’s
Revised 9/02
c. 1999
DYNAMELT M ASU Manual #20-36
Bill of Materials for AC Dual Drive 107943 & AC Single Drive Assembly PN 107942
Item No.
Part Number
1
2
3
4
5
6
7
8
101156
107602
102172
107941
106389
Description
Qty.
103518
107401
M6-1,0 x 20mm SHC Screw
M8 x 1,25 x 40mm
Coupling, Jaw, .50/.75 Sahft
Motor Bracket
Motor, 1/4 HP, 20:1, AC
Pump (See Your Order For Part Number)
M10 x 30mm SHC Screw
M10 Nut
4
4
1
1
1
1
4
4
9
10
11
12
13
14
15
16
17
18
19
20
21
22
107946
104648
105101
N00688
N00697
107077
104647
N00853
N00692
104649
N06006
103470
106111
103121
104651
Digital RPM Readout Kit (Option)
Encoder bracket
M6--1.0 x 16mm HHC
1/4 Flat Washer
1/4 Spring Lock Washer
Encoder Assembly, DM SBC
Encoder Mount Arm
4-40 x .375 Fil Head Screw
#04 Spring Lock Washer
Encoder Drive Wheel
O-ring, -224
M3-0.5 x 5mm Flat Point Set Screw
M4-0.7 x 12mm Button Head Screw
M4-0.7 Hex Nut
Torsion Spring, .56 OD x .063d
1
2
3
2
1
1
4
4
1
1
1
1
2
1
23
24
25
26
27
28
107945
103435
103436
106071
103121
105865
N00053
N06946
Electric Clutch Kit (Option used in place of Coupling)
Clutch
Power Supply
M4 x 25 mm SHC Screw
M4 x 0.7 Nut
M6 x 1.0 Nut
Terminal Butt, 16-14 GA, Insulation (Not Shown)
Terminal Spade, 22-18 GA, #6, Insulation (Not Shown)
1
1
1
2
1
1
2
2
Dual Qty.
8
4
2
1
2
2
8
8
Component Illustrations & BOM’s Page 10-11
Revised 9/02
c. 1999
DYNAMELT ASU M Manual #20-36
5
Digital RPM
Readout Option
5
9
22
3
14
1
6
13
18
15
16
20 17
21
19
11
10
12
5
5
1
Digital RPM Readout Option
3
6
or
or
2
7 8
23
Electric Clutch Option in
place of coupling
25
4
28
26
27
24
Component Illustration: DYNAMELT AC Drive Assembly 107942 & 107943
Page 10-12 Component Illustrations & BOM’s
Revised 3/07
c. 1999
DYNAMELT M ASU Manual All M35 Models
Bill of Materials for DYNAMELT M35 Melt & Grid Assemblies.
Item No.
1
2
3
4
5
6
7
8
9
10
11
12
13
Part Number
Qty.
1
1
1
2
1
1
6
12
6
18
18
1
1
1
1
45
46
47
48
49
084Q465
069X064
012G009
104072
N00754
105968
805216
105149
N00192
108297
N00181
106103
Pump Enable Thermostat, N.O. 1/2 Dia.
Pump Enable Thermostat, N.C. 1/2 Dia.
Temperature Sensor
Hopper Support
Hopper, Assy.
Heater Plate
Spacer
M8 x 30mm HHC Screw
M6 x 30 SHC Screw
Flat Washers, 1/4
Lock Washer, 1/4
Filter Shut-off Plug (used in place of or opposite Filter Shut-off)
O-ring, -912
Junction Box Assembly
Junction Box, Prog-Melt, M70/ 140
Cover, Junction Box,
Bushing, Plastic Cap, 1/2”
Terminal Rail, 11.5”
Block, Terminal
Terminal
M4 x8
1/2 Sealtite Connector
Plastic Bushing
Conduit,1/2”Sealtite,20”
Over Temp. Switch Assembly (Sold as an assembly only)
Insulator, Over Temp Thermostat
Overtemp Reset Thermostat
M4 X 6mm Pan Head
Grid Group
O-ring, -014
Flange
Cover
Temperature Sensor
Sensor Adapter
Cast Heater
5/16 ID Conduit
O-ring
M4-0. 70 x 10mm SHC Screw
M8 x 35mm SHC Screw
10-24 x 3/16 SHS Screw
Filter Block (see your order for part number)
Pump (see your order for part number)
Pump Block Off Assembly
O-ring, #-041
Block-off Plate
M10 x 100 Stud
Level Seal Plug
Filter Shutoff Assembly, Alim, TFE
Grid Block Off Assembly (Option)
Block off Plate
O-ring, #-032
M8 x 20mm HHC Flange Screw
O--ring, #014
Ball Valve Assembly (Option)
50
51
52
105097
107392
072X093
M6 x 30mm SHSet Screw
M8 Nut With Washer
1/2 NPT Level Seal Plug
1
6
2
14
15
16
17
18
19
20
21
22
23
24
25
26
27
28
29
30
31
32
33
34
35
36
37
38
39
40
41
42
43
44
036B015
036B013
N07958
106189
105883
105881
L00006
108298
N07370
N00686
N00697
103749
N00210
108827
105885
106001
048J018
107441
107604
N05889
107389
048J015
048J018
108828
104166
104165
104164
103538
Description
N00181
104696
003E023
036B103
106174
104802
107645
N00192
102446
N07416
078A055
2
1
22
3
2
1
1
1
1
1
1
1
1
4
1
1
1
1
1
1’
1
2
4
1
1-2
1
1
1
4
2
1
1
1
1
4
4
1
Component Illustrations & BOM’s Page 10-13
Revised 3/07
c. 1999
DYNAMELT M ASU Manual All M35 Models
46
48 47
45
Grid Block-off Option
30
31
50
44
32
27
5
52
34
28
12
13
49
36
35
38
29
52
37
43
33
2
16
22
23
21
25 26
14
24
42
3
1
40
41
15
6
39
10
17 18 19 20
10 11
8
11
9
7
8
51
8
10
11
4
51
to base plate
Page 10-14 Component Illustrations & BOM’s
Revised 9/00
c. 1999
DYNAMELT M ASU Manual 20-36
Bill of Materials for 1.54 cc / Rev. , Single Gear Pump Assembly # 100860
Bill of Materials for 3.2 cc / Rev. , Single Gear Pump Assembly # 100861
Part Number
#100860 / #100861
Description
1
012D079 / 012D077
Drive Shaft
1
2
078I001
Key, Woodruff
1
3
101626
M5 x 12 SHC Screw
4
4
069X160
Seal Retainer & Bearing Housing
1
5
069X061
Lip Seal
1
6
018X041
Bearing Sleeve
2
7
100866
Front Plate Assembly
1
8
012D080 / 012D078
Driven Gear Shaft
1
9
018X031
Ball, 1/8” Diameter ( See illustration for quantity)
2-4
10
012C020 / 012C019
Drive Gear, 1.54 cc/rev
2
11
069X064
Pump Seal
2
12
078F017
Shaft Retaining Ring
4
13
018X041
Bearing Sleeve, Rear Plate
2
14
100865
Rear Plate Assembly
1
15
100908
M4 x 25 SHC Screw
2
16
104775/ 104776
M10-1.5 x 75mm/ 80mm
4
17
NPN
M10 Flat Washer
4
Item No.
/ 100867
Qty.
Component Illustrations & BOM’s Page 10-15
Rev. C Eng: JW Revised 9/00
c. 1999
DYNAMELT M ASU Manual 20-36
Pump # 100860 has one bearing in this Shaft
Pump # 100861 has two bearing in this shaft
9
2
1
7
3
6
12
8
10
4
13
5
11
14
16
17
9
10
11
Pump # 100861 has two bearing in this Shaft
Pump # 100860 has one bearing in this shaft
15
In some cases the pumps are mounted
with the following hardware:
104158 M10 Flange Nut
104042 M10-1.5 x 100 All Thread
Component Illustration: 1.54 cc / Rev, Single Gear Pump Assembly #100860
c. 1999
DYNAMELT M ASU Manual 20-36
Page 10-16 Component Illustrations & BOM’s
Revised 9/00
Bill of Materials for 4.50 cc / Rev. , Single Gear Pump Assembly # 100862
Item No.
Description
Part Number
Qty.
1
012D072
Drive Shaft
1
2
078I001
Key, Woodruff
1
3
101626
M5 x 12 SHC Screw
4
4
069X160
Seal Retainer & Bearing Housing
1
5
069X061
Lip Seal
1
6
018X041
Bearing Sleeve
2
7
100868
Front Plate Assembly
1
8
012D073
Driven Gear Shaft
1
9
018X031
Ball, 1/8” Diameter
4
10
012C018
Drive Gear, 4.5 cc/rev
2
11
069X064
Pump Seal
2
12
078F017
Shaft Retaining Ring
4
13
018X041
Bearing Sleeve, Rear Plate
2
14
100865
Rear Plate Assembly
1
15
100908
M4 x 25 SHC Screw
2
16
104776
M10-1.5 x 80mm
4
17
NPN
M10 Flat washer
4
c. 1999
DYNAMELT M ASU Manual 20-36
2
Component Illustrations & BOM’s Page 10-17
Revised 9/00
9
1
7
3
6
12
8
10
4
5
13
11
14
16
17
9
10
11
In some cases the pumps are mounted
with the following hardware:
104158 M10 Flange Nut
104042 M10-1.5 x 100 All Thread
15
Component Illustration: 4.50 cc / Rev, Single Gear Pump Assembly #100862
Page 10-18 Component Illustrations & BOM’s
Revised 9/00
c. 1999
DYNAMELT M ASU Manual 20-36
Bill of Materials for 1.54 cc / Rev. , Dual Gear Pump Assembly # 100863
Item No.
Part Number
Description
Qty.
1
012D083
Drive Shaft
1
2
078I001
Key, Woodruff
1
3
101626
M5 x 12 SHCS
4
4
069X160
Seal retainer & Bearing Housing
1
5
069X061
Lip Seal
1
6
018X041
Bearing Sleeve
2
7
100866
Front Plate Assembly
1
8
012D082
Driven Gear Shaft
1
9
018X031
Ball, 1/8” Dia.
3
10
012C020
Pump Gear, 1.5 cc/Rev
4
11
069X064
O-ring, -041
3
12
078F017
Shaft Retaining Ring
4
13
018X041
Bearing Sleeve, rear Plate
2
14
100865
Rear Plate Assembly
1
15
101692
M4 x 35 SHCS
2
16
NPN
M10-1.5 x 85mm SHC Screw
4
17
100869
Middle Plate
1
18
N00198
O-ring, -113
2
19
NPN
M10 Flat Washer
4
Component Illustrations & BOM’s Page 10-19
Revised 9/00
c. 1999
DYNAMELT M ASU Manual 20-36
9
2
1
7
3
6
12
8
11
10
4
17
5
18 10
13
11
14
16 19
9
10
10
11
In some cases the pumps are mounted
with the following hardware:
104158 M10 Flange Nut
104073 M10-1.5 x 10⁵ All Thread
15
Component Illustration: 1.54 cc / Rev, Dual Gear Pump Assembly #100863
Page 10-20 Component Illustrations & BOM’s
Revised 8/02
c. 1999
DYNAMELT M ASU Manual 20-28
2
9
1
In some cases the pumps are mounted
with the following hardware:
104158 M10 Flange Nut
104073 M10-1.5 x 10⁵ All Thread
7
3
6
12
8
11
10
4
17
5
18
10
13
11
14
16
9
19
10
10
11
Bill of Materials for 3.2 cc / Rev. ,
Dual Gear Pump Assembly # 100864
Item No.
1
2
3
4
5
6
7
8
9
10
11
12
13
14
15
16
17
18
19
Part Number
012D088
078I001
101626
069X160
069X061
018X041
100867
012D087
018X031
012C019
069X064
078F017
018X041
100865
101691
NPN
100870
N00198
NPN
15
Description
Qty.
Drive Shaft
Key, Woodruff
M5 x 12 SHCS
Seal retainer & Bearing Housing
Lip Seal
Bearing Sleeve
Front Plate Assembly
Driven Gear Shaft
Ball, 1/8” Dia.
Drive Gear, 4.5 cc/Rev
O-ring, -041
Shaft Retaining Ring
Bearing Sleeve, rear Plate
Rear Plate Assembly
M4 x 40 SHCS
M10-1.5 x 85mm
Middle Plate
O-ring, -113
M10 Flat Washer
1
1
4
1
1
2
1
1
5
4
3
4
2
1
2
4
1
2
4
Component Illustrations & BOM’s Page 10-21
8/02
c. 1999
DYNAMELT M ASU Manual 20-28
10
2
5
1
11
4
6
12
9
3
5
13
8
7
Bill of Materials for 10cc Single Gear Pump Assembly # 109690
Item No.
1
2
3
4
5
6
7
8
9
10
11
12
13
14
Part Number
018X031
078F017
078I001
069X061
069X064
100908
101626
109685
109686
109689
109687
109688
069X160
001U002
Description
Ball bearing, 1/8 Dia.
Snap ring, 1/2”
Key Woodruf, #404
Shaft Seal
O-ring, -041
M4-0.7 x 25mm SHC Screw
M5-0.8 x 12mm SHC Screw
Pump Body10cc Rev
Rear Bearing Plate 10cc Rev.
Gear 10cc Rev
Drive Shaft 10cc/ 20cc
Driven shaft, 10cc/20cc
Shaft seal retainer
Dow Corning 112 Lubricant (Not Shown)
Qty.
6
4
1
1
2
2
4
1
1
2
1
1
1
Page 10-22 Component Illustrations & BOM’s
Revised 4/05
c. 1999
DYNAMELT M ASU Manual All Models
Bill of Materials for Assorted Pump Adapter Assemblies
Item No.
Part Number
Description
Qty.
084E406
TSHA Pump Adapter Assembly
1
1
2
012G024
069X058
Pump Adapter
O--Ring #28
1
1
3
4
N00179
069X274
O--Ring #12
Seal Dual Pump to Progmelt (not part of this assembly)
2
1
5
6
N00190
078C130
O-Ring #24
3/8 Washer, 3/4 OD
1
4
7
NPN
M10 x 85mm SHC screw
4
084E428
Zenith Pump (Shown For REf. Only)
THSA .297 cc Single Outlet
084E374
084E430
THSA .584 cc Single Outlet
THSA 1.168 cc Single Outlet
084E434
108875
THSA 2.292 cc Single Outlet
THSA 8.5 cc Single Outlet
084E438
084E389
THSA 30.0 cc Single Outlet
THSA .584 cc Dual Outlet
084E432
108874
THSA 1.168 cc Dual Outlet
THSA 2.292 cc Dual Outlet
9
084E419
012G027
Zenith Pump Adapter Assembly
Adapter, Z Pump
1
1
10
11
069X064
N01010
O-Ring, #041
O-Ring, #021
1
1
12
069X270
O-Ring, #025
2
13
14
078A618
078C141
Screw, Pump Mounting
7/16 ss Washer, 3/4 OD
4
4
15
16
069X289
Drive Shaft Seal (shown For REf Only)
THSA Pump (Shown for ref. only)
1
110289
110290
THSA 20 cc Single Outlet
THSA 30 cc Single Outlet
110291
103923
THSA 45 cc Single Outlet
Feinpruef Pump Adapter Assembly
1
17
18
103624
103924
Adapter Plate
O-ring Plate
1
1
19
20
N00181
069X270
O-ring, -014
O-ring-025
4
1
21
22
102927
O-ring, -133
Feinpruef Pump
1
103917
Feinpruef Pump .3 cc
103918
103919
Feinpruef Pump 1.2 cc
Feinpruef Pump 2.4 cc
104351
Coupling Half (Not Shown, See drive Section)
8
Component Illustrations & BOM’s Page 10-23
Revised 7/03
c. 1999
DYNAMELT M ASU Manual #20-36
THSA Pump Adapter Assembly 084E406
5
3
4
1
2
8
6
7
THSA Pump Adapter Assembly 084E419
11
16
12
9
10
15
14
13
Feinpruef Pump Adapter Assembly
103923
21
17
19
18
20
19
22
c. 1999
DYNAMELT M ASU Manual #20-36
Page 10-24 Component Illustrations & BOM’s
Revised 3/01
2
3
4
1
Pressure Gauge Assembly-805641
Item No.
Part Number
Description
Qty.
1
072X118
Fitting, 1/4 NPTM x #6 JIC x 90
1
2
101174
Pressure Guage, 1000 PSI
1
3
104325
Fitting Adapter, Swivel, 6J x 1/4 MPT
1
4
805632
Fitting, 1/4 NPT 1/2-20 Tranducer
1
Schematics Page 11-1
Revised 6/01
c. 2000
DYNAMELT M ASU Manual 20-36
Chapter 11
SCHEMATICS &
ENGINEERING DRAWINGS
Drawing:
Found on:
Hose Schematic, ASU to Applicator
page 11-2
Applicator Head Schematic
page 11-3
Flow Diagram, Outlet Filter Manifold
page 11-4
Typical Hydraulic Schematic
page 11-5
Optional System Status Lights Schematic
page 11-5
Optional Level Control Schematic
page 11-6
Optional Electric Clutch Schematic
page 11-7
Grounding Diagram, CE Mark
page 11-8
Power Wiring Diagram, 240v
page 11-9
Signal Wiring Diagram, 4Hose/4Head, 240v
page 11-10
Power Wiring Diagram, 380v
page 11-12
Instruction Sheet for Pump & Zone Configuration
page 11-13
Special ASU Schematics (if applicable)
end of chapter
Page 11-2 Schematics
Revised 7/07
HOSE SCHEMATIC PN 101082 REV. G
ASU to Applicator
c. 2000
DYNAMELT M ASU Manual 20-36
c. 2000
DYNAMELT M ASU Manual 20-36
Schematics Page 11-3
Revised 10/00
Notes:
1. ALL WIRE MIL-W-22759/10 OR 12, MINIMUM 600 VOLTS, 260 DEG. C
2. SOLENOID(S) VOLTAGE AND TIMING METHOD DEPENDS ON APPLICATION.
3. RTD WILL BE PLATINUM 100 OHM.
HEAD SCHEMATIC PN 103117 REV. B
Page 11-4 Schematics
Revised 10/00
c. 2000
DYNAMELT M ASU Manual 20-36
Function of Outlet Filter Manifold’s Closeable Cross Channel
A Closeable Cross Channel Plug is located inside the Outlet Filter Manifold to prevent adhesive
flow between the two outlet filters when a dual pump is in use.
When a single pump is used, ITW Dynatec removes the Cross Channel Plug.
When changing an ASU from a single to a dual pump, or vice versa, consult ITW Dynatec for
complete instructions.
Check Valve
Adhesive Return Port*
Adhesive In Port*
When Cross
Channel Plug is
removed, one
adhesive outlet
must be plugged.
Closeable Cross
Channel Plug
Cross Channel
Plug is removed thru
port on side of manifold.
Adhesive
Outlet To
Hose
Adhesive
Outlet To
Hose
FLOW DIAGRAM, OUTLET FILTER MANIFOLD
* The second Adhesive In and Adhesive
Return ports are not shown.
Schematics Page 11-5
Revised 10/00
c. 2000
DYNAMELT M ASU Manual 20-36
Transducer
Filter
Basket
Gauge
Bypass
Pump
Motor
TYPICAL HYDRAULIC SCHEMATIC: Single Pump, Motor, Bypass, Filter, optional Transducer & optional
Pressure Gauge
WIRING DIAGRAM FOR PN 108266 OPTIONAL SYSTEM STATUS LIGHTS
Page 11-6 Schematics
Revised 10/00
LEVEL CONTROL SCHEMATIC PN 802972 REV. A
c. 2000
DYNAMELT M ASU Manual 20-36
c. 2000
DYNAMELT M ASU Manual 20-36
Schematics Page 11-7
Revised 10/00
SCHEMATIC PN 804370 Rev. A FOR PN 107945 OPTIONAL ELECTRIC CLUCH KIT
Page 11-8 Schematics
Revised 10/01
GROUNDING DIAGRAM, CE MARK, PN 804704 REV. E
c. 2000
DYNAMELT M ASU Manual 20-36
c. 2000
DYNAMELT M ASU Manual 20-36
Schematics Page 11-9
Revised 6/01
PN 107938 POWER WIRING DIAGRAM, DM35 DCL, 240V
Schematics Page 11-11
Revised 7/07
c. 2000
DYNAMELT M ASU Manual 20-36
See previous page
PN 107937 DM35 DCL SIGNAL WIRING DIAGRAM, 4HOSE/4 HEAD, 200-240V, Page 2 of 2
Page 11-12 Schematics
Revised 6/01
PN 107939 POWER WIRING DIAGRAM, DM35 DCL, 380V
c. 2000
DYNAMELT M ASU Manual 20-36
c. 2000
DYNAMELT M ASU Manual 20-36
Schematics Page 11-13
Revised 7/07
PN 108534 Rev. C INSTRUCTION SHEET FOR PUMP & ZONE CONFIGURATION, Page 1 of 3
Page 11-14 Schematics
Revised 7/07
c. 2000
DYNAMELT M ASU Manual 20-36
PN 108534 Rev. C INSTRUCTION SHEET FOR PUMP & ZONE CONFIGURATION, Page 2 of 3
c. 2000
DYNAMELT M ASU Manual 20-36
Schematics Page 11-15
Revised 7/07
PN 108534 Rev. C INSTRUCTION SHEET FOR PUMP & ZONE CONFIGURATION, Page 3 of 3
Page 11-16 Schematics
Revised 12/02
ITW Dynatec
An Illinois Tool Works Company
Adhesive Application Solutions
c. 2000
DYNAMELT M ASU Manual 20-36
Appendix 1
Revised 3/01
c. 2000
DYNAMELT M ASU Manual 20-36, 20-37, 20-38
DYNATEC/ ZENITH STANDARD ACCURACY GEAR PUMPS
INSTALLATION, CARE & MAINTENANCE MANUAL
PN 084E427, 084E429, 084E431, 084E433, 084E435, 084E437
Part Number
Material
Type/Accuracy
Output/Rev
Shaft Seal PN
084E427
Nodular Iron
Single/ Standard
0.29cc
069X251
084E429
Nodular Iron
Single/ Standard
1.17cc
069X251
084E431
Nodular Iron
Dual/ Standard
1.17cc
069X251
084E433
Nodular Iron
Single/ Standard
2.92cc
069X251
084E435
Nodular Iron
Dual/ Standard
2.92cc
069X251
084E437
Nodular Iron
Single/ Standard
8.5cc
069X251
Thoroughly read and understand this entire manual before installation and
operation of pump.
Note: The instructions given herein cover the description, installation, operation and
maintenance of subject equipment. Dynatec and Zenith reserve the right to make engineering refinements that may not be reflected in this bulletin.
Manual revised 8/94
Appendix 2
Revised 10/00
c. 2000
DYNAMELT M ASU Manual 20-36, 20-37, 20-38
INTRODUCTION
In 1926, Zenith Pumps was appoached by the synthetic fiber industry to design a pump to
provide a precise, pulseless, repeatable flow and assure better quality control. The options
then were the same as those in the chemical process industry today: diaphragm, lobe, coarse
gear, piston, plunger and screw pumps. Each had problems with pulsation, flow inaccuracies, multiple seal areas and slippage, which required constant calibration, high maintenence
and extended downtimes.
Zenith Pumps met the challenge and designed a rotary external gear pump of unique precision and simplicity. Manufacturing techniques were developed to hold tolerances to
.00005”, and an internal pressure relief mechanism assured reliable precision metering. The
pump’s simple design of only three moving parts - two metering gears and a drive shaft provided long life and easy maintenance.
For years since, chemical engineers have relied on Zenith to provide precision fluid handling solutions for their most difficult pumping applications. Zenith gear pumps can be
found wherever precise, pulseless, repeatable metering of fluids is required.
BENEFITS
High Accuracy
Stable, repeatable flows are assured even under varying conditions of pressure, viscosity and
temperature.
High Temperature Capability
Operating temperatures to 450 degrees F (232 degrees C).
Maximum Life
Only three moving parts; components are through-hardened tool and die steels to 56 HRc or
better. The bodies are cast nodular iron. Replaceable sleeve bearings for low-cost rebuilds.
High Volumetric Efficiency
Maximum efficiency is achieved with optimum operating clearances and assured under
pressure by built-in alignment pins.
Minimum Pulsation
Unique design offers virtually pulseless flow without valves or flexible elements to hinder
performance.
Precision Construction
Ground and lapped components for close control of operating clearances.
c. 2000
DYNAMELT M ASU Manual 20-36, 20-37, 20-38
Appendix 3
Revised 3/01
SPECIFICATIONS
Pump Type: Rotary external spur gear, single stream.
Rotation: Clockwise
Operating Speed: 3 - 120 rpm depending upon application conditions and fluid viscosity.
Temperature: To 450 degrees F (232 degrees C)
OPERATION
All Dynatec/ Zenith High Accuracy Pumps are rear ported. Fluid enters the pump through a
port drilled into the rear side plate (the side opposite the drive shaft). The fluid fills the exposed gear tooth volumes and is transported around the outer diameter of the gear pocket.
As the gears mesh together, the fluid is displaced in a very precise amount out through the
discharge port that is drilled alongside the inlet port in the rear plate.
Since these pumps are not self-priming, a flooded suction is usually the minimum inlet pressure required. However, when high-viscosity fluids are used, more time is required to fill the
tooth volumes. As a result, the inlet pressure must be increased, or the gears must rotate at a
slower speed to ensure complete volume filling and to prevent cavitation.
Dynatec/ Zenith pumps rely on the metered fluid for lubrication of internal bearing areas.
The pump should never be allowed to run dry or be allowed to run with non-lubricating
fluids such as water. Because of the close clearances in the bearing areas, lack of sufficient
lubrication can cause pump seizure or some other catastrophic failure.
Slippage will occur across the faces of the gears from the high-pressure side to the low-pressure side. The amount of slippage depends on four factors: fluid viscoisty, speed, differential
pressure and pump clearances. Under reasonably stable operating conditions, slippage is repeatable and predictable and pump operation can be adjusted to compensate.
The Standard Accuracy Pumps are designed for high-temperature and high-pressure operation. As such, operating temperatures to 450 degrees F can be achieved.
INSTALLATION
Pumps should be carefully unpacked to make sure that the shipment is complete. If any
items are missing or damaged, the freight carrier and Dynatec should be notified immediately.
While the pump is composed of steel, it is a precision instrument. Dropping the pump or hitting with a non-yielding material can cause serious damage to the components. All materials
cont.
are through-hardened to maximum hardness resulting in brittle material. Treat
Appendix 4
Revised 10/00
c. 2000
DYNAMELT M ASU Manual 20-36, 20-37, 20-38
them as you would any other precision gauging instrument.
Dynatec/ Zenith pumps are shipped filled with a rust preventive oil. Flush the oil throughly
with a cleaning solvent. It may be necessary to disassemble the seal arrangement to remove
all traces of the oil, but disassemble only if necessary.
After flushing, the pump should be lubricated internally for start-up purposes. Pour a suitable
high-temperature lubricant (silicone oil) into the inlet port. Rotate the metering gears until
lubricant appears at the discharge port.
Mount the pump to a block with a flatness of true flat to .0001” convex and a surface finish of
4 to 8 rms to prevent leakage between the pump and block. Mounting bolts should be a Grade
8 or better. Make sure mounting bolts are lubricated with a high-temperature anti-seize compound such as DAG Dispersion #154. Bolts should be alternatively torqued in even increments up to Dynatec’s recommended limit for the bolt size used. See Table 1 on page 10 for
torque values.
The following is a brief “standard” installation procedure. For any special applications, considerations or simply to ask our advice, please contact Dynatec.
TO PREPARE THE PUMP FOR USE:
1. Always flush out the plumbing system before connecting the pump.
2. Filters should be installed prior to the pump inlet that filter ideally to half the pump running clearances.
3. Turn pumps by hand before running. Pumps should turn freely.
4. Engage the outer drive shaft carefully, making sure that it does not bottom in the slot of the
coupling* and that it is aligned within one degree angular and .005” parallel with the true
pump drive axis. (*Note: the coupling is the rotating member of the seal and depends on the
internal operating pressure of the pump to force it forward and effect a seal against the carbon
or metal seal plate.)
5. Tighten the mounting bolts and coupling housing screws to Dynatec recommended torque
at room temperature.
6. Make sure fluid is in the pump before starting.
7. Start pump slowly and, if possible, run it with a lubricating fluid.
8. When satisfactory operation is achieved, the pump and system may be gradually brought
up to normal process speeds and pressures.
9. If at any time during operation the pump does not appear to be running smoothly, stop the
pump immediately to avoid any serious internal damage.
CLEANING, INSPECTION AND REPAIR
REMEMBER: Dynatec/ Zenith metering pumps are made for exacting duty. In order to develop the high pressure demanded, the clearance between the metering gears and their housing
must be as small as possible, yet large enough to allow adequate lubrication. All parts are machined to extreme accuracy; critical dimensions are held between one and two ten-thousanths
cont.
of an inch (.0001”/ .0002”). Because of these close running clearances,
c. 2000
DYNAMELT M ASU Manual 20-36, 20-37, 20-38
Appendix 5
Revised 3/01
these pumps require careful maintenence and handling, especially of component parts. The
slightest burr, nick or particle of foreign matter can cause scoring or even seizure. These
pumps are precision instruments; you can’t keep them too clean. Please treat them with care,
and if it’s at all possible, set aside a separate clean area for pump maintenance.
To clean High Accuracy Metering Pumps, place them in a suitable furnace and gradually heat
in an inert atmosphere for the initial hour to prevent flashing of the polymer. Time at temperature will be related to the pump size and the degree of polymer contamination and should be
determined by trial. Note: Careful control of he furnace temperature (700 degrees F max.)
and atmosphere is critical. Should the temperature exceed the original tempering temperature,
the steel hardness will draw back and the dimensional stability of the pump may be upset.
Another acceptable cleaning method is to immerse the pump in a fluidized bed cleaning bath.
The bath shold be heated to a temperature that is sufficient to carburize the polymer. The carburization process usually takes between 3 and 12 hours, depending on the polymer type,
temperature, pump size and furnace load.
CAUTION: Avoid exposing the pump to thermal shock when using this method of cleaning.
After gradually cooling to room temperature, the pump should be thoroughly flushed in a
clean solvent. It may be necessary to disassemble the seal arrangement to remove polymer
ash.
If present, always replace the carbon seal plate after pump burnout. If the pump was performing satisfactorily when removed from service and still turns freely after burnout, pressure test
it and add a high-temperature lubricant to prepare it for return to service. To store for future
use, simply add a rust preventative oil.
It is recommended that pump users institute a program of dimensional inspection of critical
parts in order to keep maintenence and operting costs at a minimum. By noting the performance of a pump immediately before removing it from service and correlating the performance to measured component wear, the user can establish the maximum wear limits for the
pump’s critical components. Further, he can predict the service life of the pump and schedule
his down-time accordingly.
As with any other Dynatec pump, high accuracy pumps may be returned to Dynatec for complete rehabilitation as necessary. This procedure may be desirable if only a few pumps are
involved. If a large number of pumps are to be maintained at the user’s plant, it may be
worthwhile to have key personnel attend a maintenance seminar at the Zentih factory to view
the manufacturing, gauging and assembly techniques involved in producting the pumps.
Please contact Dynatec (at 1-800-538-9540) for further information on these items.
Appendix 6
Revised 10/00
c. 2000
DYNAMELT M ASU Manual 20-36, 20-37, 20-38
STANDARD ACCURACY PUMP DISASSEMBLY
If pumps are to be disassembled on a regular basis, we recommend that you establish a pump
room with all the necessary tools and equipment for disassembly and cleaning with a separate
“clean” area for assembly, testing and storing of rebuilt pumps.
If maintenence is required due to low delivery or seizure, the following procedure is recommended for disassembly.
NOTE: Be sure to note the location and orientation of all parts to ensure correct re-assembly.
Refer to assembly drawing (located in the back of this manual) for your correct pump type.
1. Remove the seal arrangement.
2. Remove all binder screws.
3. Remove pins (10) and arbor (5) with an arbor press in the direction which
disengages the press fit in the shortest distance.
NOTE: Dowels and arbors for the standard accuracy pumps are press fit in the gear/ rear
plate.
4. Separate the plates by pry slots that are available in the pump. Great care should be
taken not to scratch or damage the internal pump surface when prying the plates apart.
5. After disassembly, clean all components in a non-destructive solvent.
6. Wash components in an ultrasonic cleaning tank and air dry. Be careful not to bang
parts together.
7. Inspect all parts for nicks, burrs, score marks and other signs of wear. The plates and
faces of the gears may be hand blocked on 600 grit paper and any nicks, burrs or sharp edges
can be lightly removed with a honing stone. Be careful not to round off the edges of the gear
teeth while lapping.
CAUTION: Since the thickness relationship between the metering gears and the gear/
rear plate is critical to metering performance, and the gear/ rear plate is non-wearing on its
sides, lapping these components is not necessary and should not be done under any circumstances.
Place a layer of 600 Grit Emery Cloth on a lapping block or plate-a granite flat is suitable. Apply light pressure to the component and turn it in a figure-8 fashion (as shown in Figure 1) approximately five times until a smooth finish appears. Turning in a circular fashion,
or other non-uniform motion, may cause the ground holes to lose their perpendicularity to the
faces.
Always use clean, lint-free rags and compressed air to clean components. Paper towels
are not acceptable; they may leave small pieces of paper and dust on the components. Use
chemical brushes to clean between gear teeth, bores and reliefs.
8. Replace sleeve bearings as necessary and hone in the plate to the original new part
specifications.
9. After each resurfacing, carefully gauge the area between the inlet and discharge ports
at the mesh of the gears. This area, commonly referred to as the “throat”, is the most critical
cont.
part of the plate. Scoring or wear marks here will allow increased slippage from the
c. 2000
DYNAMELT M ASU Manual 20-36, 20-37, 20-38
Appendix 7
Revised 3/01
high-pressure discharge port section across the throat to the lower inlet port, reducing efficiency. Therefore, carefully gauge this area for flatness after each resurfacing.
10. After all components are “hospital clean”, the pump is ready for assembly.
Figure 1
STANDARD ACCURACY PUMP RE-ASSEMBLY
NOTE: During and between each re-assembly step, manually turn the metering gears to ensure that they are free turning. If binding occurs at any time, determine the cause and correct
it immediately. A tiny nick, burr or foreign particle can extensively damage a valuable pump
component. Never use force in re-assembling or turning a Dynatec pump. If properly aligned,
the pieces will fit easily into place and the pump will turn freely. Re-assemble as follows:
1. After all worn parts have been re-finished or replaced, all parts should be throughly
cleaned in a solvent and dried.
2. Using the driven gear (5) as an up-righting fixture, carefully locate the arbor (7) over
its press-fit hole in the gear/ rear plate. Smoothly drive the arbor into its hole with the help of
an appropriate arbor press.
3. Place the gear/ rear plate (1) with the arbor in position in a soft-jaw vise or holding
fixture.
4. Slip together the driving metering gear (6), drive shaft (4), key (8) and retaining rings
(21). Position in the front of the gear/ rear plate.
5. Place the driven metering gear on its arbor and carefully mesh with the drive metering
gear.
6. NOTE: Repeat steps 3 through 5 for four-gear pumps.
7. Position the front side plate (3).
8. Rotate the gears to ensure free rotation.
9. Press the roll pins (41) into place.
10. Lubricate the binder screws (23) with DAG dispersion #154 or a similar heat resistant lubricant and install. Torque the screws in even increments to the manufacturer’s recommended limit. It is especially important to rotate the gears frequently during this operation.
11. Re-assemble the seal arrangement, making sure the sealing surfaces are perfectly
clean and free of scratches, nicks or burrs. When a carbon seal plate is used, always use a new
carbon seal that has been lightly polished on 600 grit paper. When using a carbon seal, the
coupling housing screws (27) should be torqued to the manufacturer’s recommended limit.
For pumps with a compensation packing seal, be sure all old packing is removed cont.
c. 2000
DYNAMELT M ASU Manual 20-36, 20-37, 20-38
Appendix 8
Revised 10/00
from the packing housing.
12. Inspect the drive shaft at the seal area making sure that it is not scored, shouldered or
worn. Worn shafts will result in premature seal leakage and should be replaced.
13. Inspect lip seals for wear, cracks and abrasions. Replace if needed.
14. Pack lip seals (15) with a silicone-based grease and lubricate with Parker Super-OLubricate or an equivalent silicone-based oil.
15. Install lip seals (15) into seal housing (9) as shown.
16. Tighten seal housing screws (22) in a cross pattern to 60 lbs./in. Check for free rotation.
SCREW TORQUE VALUES (Standard Alloy Steel)*
Screw Size & Thread
(UNC Alloy Steel)
#10-24 (w/ carbon seal gasket)
#10-24 (w/o carbon seal gasket)
#12-24
1/4-20
5/16-18
3/8-16
into aluminum
block (hopper)
7/16-14
Torque (Lubricated Threads)
Lbs.-in.
Nxm
Lbs.-ft.
[50]
[64]
[120]
[150]
[305]
[360]
[480]
[4.2]
[5.3]
[10]
[12.5]
[25]
[30]
[40]
5.7
7.2
13.6
16.9
33.9
40.6
54.2
Table 1
*In critical applications where control of bolt preload is important, the torque-tension relation should be
determined by experimenting on the actual parts involved (including thread lubricants). At elevated
temperatures, it is often desirable to reduce screw stress because of deformation (creep) under sustained
loading. Screws constructed of type H-11 high-temperature alloy steel provide extremely high creep
resistance.
Appendix 9
Revised 3/01
c. 2000
DYNAMELT M ASU Manual 20-36, 20-37, 20-38
TROUBLESHOOTING GUIDE
Trouble
Probable Cause
Remedy
Pump will not turn.
1. Low pump temperature.
Check temperature sensor
and control loop for
proper setting/ operation.
Allow sufficient heat-up
time.
2. Drive malfunction.
Verify drive is powered.
Check to assure all alarm
circuits are clear.
Check drive motor current
and speed settings.
Check all drive couplings.
3. Process conditions changed.
Check process conditions
for proper melt temperature, pressures, viscosities
and materials.
4. Entrained particle.
Return pump to ITW Dynatec
for repair.
5. Possible internal damages.
Return pump to ITW Dynatec
for repair.
1. Worn seal plate.
Return pump to ITW Dynatec
for repair.
2. Insufficient inlet pressure.
Increase inlet pressure.
3. Worn lip seal.*
Replace lip seal.
1. Worn gear(s).
Return pump to ITW Dynatec.
for repair.
2. Worn bearings.
Return pump to ITW Dynatec.
for repair.
3. Process conditions changed.
Consult factory for
clearance recommended
on new process conditions.
Excessive seal
assembly leakage
Reduced pump efficiency
* A minor seal leak or weep is not abnormal and may be desirable for lubricating the seal surfaces.
Appendix 10
Revised 10/00
c. 2000
DYNAMELT M ASU Manual 20-36, 20-37, 20-38
c. 2000
DYNAMELT M ASU Manual 20-36, 20-37, 20-38
Appendix 11
Revised 3/01
Appendix 12
Revised 10/00
c. 2000
DYNAMELT M ASU Manual 20-36, 20-37, 20-38
c. 2000
DYNAMELT M ASU Manual 20-36, 20-37, 20-38
Appendix 13
Revised 3/01
Appendix 14
Revised 10/00
ITW Dynatec
An Illinois Tool Works Company
Adhesive Application Solutions
c. 2000
DYNAMELT M ASU Manual 20-36, 20-37, 20-38
Appendix 15
Revised 3/01
c. 2000
DYNAMELT M ASU Manual 20-36, 20-37, 20-38
DYNATEC/ ZENITH HIGH ACCURACY GEAR PUMPS
INSTALLATION, CARE & MAINTENANCE MANUAL
PN 084E428, 084E430, 084E432, 084E434, 084E436
Part Number
Material
Type/Accuracy
Output/Rev
Shaft Seal PN
084E428
Tool Steel
Single/ High
0.297cc
069X251
084E430
Tool Steel
Single/ High
1.168cc
069X251
084E432
Tool Steel
Dual/ High
1.168cc
069X251
084E434
Tool Steel
Single/ High
2.920cc
069X251
084E436
Tool Steel
Dual/ High
2.920cc
069X251
Thoroughly read and understand this entire manual before installation and
operation of pump.
Note: The instructions given herein cover the description, installation, operation and
maintenance of subject equipment. Dynatec and Zenith reserve the right to make engineering refinements that may not be reflected in this bulletin.
Manual revised 8/94
Appendix 16
Revised 10/00
c. 2000
DYNAMELT M ASU Manual 20-36, 20-37, 20-38
INTRODUCTION
In 1926, Zenith Pumps was appoached by the synthetic fiber industry to design a pump to
provide a precise, pulseless, repeatable flow and assure better quality control. The options
then were the same as those in the chemical process industry today: diaphragm, lobe, coarse
gear, piston, plunger and screw pumps. Each had problems with pulsation, flow inaccuracies, multiple seal areas and slippage, which required constant calibration, high maintenence
and extended downtimes.
Zenith Pumps met the challenge and designed a rotary external gear pump of unique precision and simplicity. Manufacturing techniques were developed to hold tolerances to
.00005”, and an internal pressure relief mechanism assured reliable precision metering. The
pump’s simple design of only three moving parts - two metering gears and a drive shaft provided long life and easy maintenance.
For years since, chemical engineers have relied on Zenith to provide precision fluid handling solutions for their most difficult pumping applications. Zenith gear pumps can be
found wherever precise, pulseless, repeatable metering of fluids is required.
BENEFITS
High Accuracy
Stable, repeatable flows are assured even under varying conditions of pressure, viscosity and
temperature.
High Temperature Capability
Operating temperatures to 550 degrees F (288 degrees C).
Maximum Life
Only three moving parts; components are through-hardened tool and die steels to 62 HRc or
better. Replaceable sleeve bearings for low-cost rebuilds.
High Volumetric Efficiency
Maximum efficiency is achieved with optimum operating clearances and assured under
pressure by built-in alignment dowels.
Minimum Pulsation
Unique design offers virtually pulseless flow without valves or flexible elements to hinder
performance.
Precision Construction
Ground and lapped components for close control of operating clearances.
c. 2000
DYNAMELT M ASU Manual 20-36, 20-37, 20-38
Appendix 17
Revised 3/01
SPECIFICATIONS
Pump Type: Rotary external spur gear, single stream.
Rotation: Clockwise
Operating Speed: 3 - 120 rpm depending upon application conditions and fluid viscosity.
Temperature: To 550 degrees F (288 degrees C)
DESIGN
Dynatec/ Zenith High Accuracy Metering Pumps consist of two gears rotating in mesh within a closely fitted housing that is comprised of three plates. The center gear plate fits closely
around the outside diameter of the metering gears. The front and rear plates sandwich the
center plate and restrict axial movement of the gears. Power is transmitted to the gears by
the drive shaft which is a through shaft. Shaft sealing is accomplished with a high temperature cup seal.
High-accuracy pumps are precision instruments requiring skilled and careful maintenence.
Constructed of high-quality tool and die steels such as AISI D2, M2, M4 and CPM-M4, or
other high-performance alloys, they are tempered after heat treatment to hardnesses ranging
from HRc 58 to HRc 64. Since the thermal expansion rates for all three steels are almost
identical and are otherwise entirely compatible, it is possible to combine them so as to take
advantage of their best qualities in the most economical way.
The Type D2 tool steel is often selected for the side and center plates as it offers good abrasion resistance and it is the most economical of the three steels we most commonly use.
Type D2 will also provide a higher degree of corrosion resistance than M2 or M4.
The portion of the side plate subject to the most wear is the shaft bearing hole, which has an
easily replaceable, inexpensive sleeve bearing that can be made of the extremely wear resistant Type M4 tool steel. Types M2 and CPM-M4 steels are commonly used for the metering
gears, drive shaft and universal seal coupling, due to their superior torsional strength and
abrasion resistance for these items that are the most critical to proper metering performance.
OPERATION
All Dynatec/ Zenith High Accuracy Pumps are rear ported. Fluid enters the pump through a
port drilled into the rear side plate (the side opposite the drive shaft). The fluid fills the exposed gear tooth volumes and is transported around the outer diameter of the gear pocket.
As the gears mesh together, the fluid is displaced in a very precise amount out through the
cont.
discharge port that is drilled alongside the inlet port in the rear plate.
Appendix 18
Revised 10/00
c. 2000
DYNAMELT M ASU Manual 20-36, 20-37, 20-38
Since these pumps are not self-priming, a flooded suction is usually the minimum inlet pressure required. However, when high-viscosity fluids are used, more time is required to fill the
tooth volumes. As a result, the inlet pressure must be increased, or the gears must rotate at a
slower speed to ensure complete volume filling and to prevent cavitation.
Dynatec/ Zenith pumps rely on the metered fluid for lubrication of internal bearing areas. The
pump should never be allowed to run dry or be allowed to run with non-lubricating fluids
such as water. Because of the close clearances in the bearing areas, lack of sufficient lubrication can cause pump seizure or some other catastrophic failure.
Slippage will occur across the faces of the gears from the high-pressure side to the low-pressure side. The amount of slippage depends on four factors: fluid viscoisty, speed, differential
pressure and pump clearances. Under reasonably stable operating conditions, slippage is repeatable and predictable and pump operation can be adjusted to compensate.
The High Accuracy Pumps are designed for high-temperature and high-pressure operation.
As such, operating temperatures to 550 degrees F can be achieved.
INSTALLATION
Pumps should be carefully unpacked to make sure that the shipment is complete. If any items
are missing or damaged, the freight carrier and Dynatec should be notified immediately.
While the pump is composed of steel, it is a precision instrument. Dropping the pump or hitting with a non-yielding material can cause serious damage to the components. All materials
are through-hardened to maximum hardness resulting in brittle material. Treat them as you
would any other precision gauging instrument.
Dynatec/ Zenith pumps are shipped filled with a rust preventive oil. Flush the oil throughly
with a cleaning solvent. It may be necessary to disassemble the seal arrangement to remove
all traces of the oil, but disassemble only if necessary.
After flushing, the pump should be lubricated internally for start-up purposes. Pour a suitable
high-temperature lubricant (silicone oil) into the inlet port. Rotate the metering gears until
lubricant appears at the discharge port.
Mount the pump to a block with a flatness of true flat to .0001” convex and a surface finish of
4 to 8 rms to prevent leakage between the pump and block. Mounting bolts should be a Grade
8 or better. Make sure mounting bolts are lubricated with a high-temperature anti-seize compound such as DAG Dispersion #154. Bolts should be alternatively torqued in even increments up to Dynatec’s recommended limit for the bolt size used. See Table 1 on page 26 for
torque values.
The following is a brief “standard” installation procedure. For any special applications, concont.
siderations or simply to ask our advice, please contact ITW Dynatec.
c. 2000
DYNAMELT M ASU Manual 20-36, 20-37, 20-38
Appendix 19
Revised 3/01
TO PREPARE THE PUMP FOR USE:
1. Always flush out the plumbing system before connecting the pump.
2. Filters should be installed prior to the pump inlet that filter ideally to half the pump running clearances.
3. Turn pumps by hand before running. Pumps should turn freely.
4. Engage the outer drive shaft carefully, making sure that it does not bottom in the slot of the
coupling* and that it is aligned within one degree angular and .005” parallel with the true
pump drive axis. (*Note: the coupling is the rotating member of the seal and depends on the
internal operating pressure of the pump to force it forward and effect a seal against the carbon
or metal seal plate.)
5. Tighten the mounting bolts and coupling housing screws to Dynatec recommended torque
at room temperature.
6. Make sure fluid is in the pump before starting.
7. Start pump slowly and, if possible, run it with a lubricating fluid.
8. When satisfactory operation is achieved, the pump and system may be gradually brought
up to normal process speeds and pressures.
9. If at any time during operation the pump does not appear to be running smoothly, stop the
pump immediately to avoid any serious internal damage.
CLEANING, INSPECTION AND REPAIR
REMEMBER: Dynatec/ Zenith metering pumps are made for exacting duty. In order to develop the high pressure demanded, the clearance between the metering gears and their housing
must be as small as possible, yet large enough to allow adequate lubrication. All parts are machined to extreme accuracy; critical dimensions are held between one and two ten-thousanths
of an inch (.0001”/ .0002”). Because of these close running clearances, these pumps require
careful maintenence and handling, especially of component parts. The slightest burr, nick or
particle of foreign matter can cause scoring or even seizure. These pumps are precision instruments; you can’t keep them too clean. Please treat them with care, and if it’s at all possible, set aside a separate clean area for pump maintenance.
To clean High Accuracy Metering Pumps, place them in a suitable furnace and gradually heat
in an inert atmosphere for the initial hour to prevent flashing of the polymer. Time at temperature will be related to the pump size and the degree of polymer contamination and should be
determined by trial. Note: Careful control of he furnace temperature (950 degrees F max.)
and atmosphere is critical. Should the temperature exceed the original tempering temperature,
the steel hardness will draw back and the dimensional stability of the pump may be upset.
Another acceptable cleaning method is to immerse the pump in a fluidized bed cleaning bath.
The bath shold be heated to a temperature that is sufficient to carburize the polymer. The carburization process usually takes between 3 and 12 hours, depending on the polymer type,
cont.
temperature, pump size and furnace load.
Appendix 20
Revised 10/00
c. 2000
DYNAMELT M ASU Manual 20-36, 20-37, 20-38
CAUTION: Avoid exposing the pump to thermal shock when using this method of cleaning.
After gradually cooling to room temperature, the pump should be thoroughly flushed in a
clean solvent. It may be necessary to disassemble the seal arrangement to remove polymer
ash.
If present, always replace the carbon seal plate after pump burnout. If the pump was performing satisfactorily when removed from service and still turns freely after burnout, pressure test
it and add a high-temperature lubricant to prepare it for return to service. To store for future
use, simply add a rust preventative oil.
It is recommended that pump users institute a program of dimensional inspection of critical
parts in order to keep maintenence and operting costs at a minimum. By noting the performance of a pump immediately before removing it from service and correlating the performance to measured component wear, the user can establish the maximum wear limits for the
pump’s critical components. Further, he can predict the service life of the pump and schedule
his down-time accordingly.
As with any other Dynatec pump, high accuracy pumps may be returned to Dynatec for complete rehabilitation as necessary. This procedure may be desirable if only a few pumps are
involved. If a large number of pumps are to be maintained at the user’s plant, it may be
worthwhile to have key personnel attend a maintenance seminar at the Zentih factory to view
the manufacturing, gauging and assembly techniques involved in producting the pumps.
Please contact Dynatec (at 1-800-538-9540) for further information on these items.
HIGH ACCURACY PUMP DISASSEMBLY
If pumps are to be disassembled on a regular basis, we recommend that you establish a pump
room with all the necessary tools and equipment for disassembly and cleaning with a separate
“clean” area for assembly, testing and storing of rebuilt pumps.
If maintenence is required due to low delivery or seizure, the following procedure is recommended for disassembly.
NOTE: Be sure to note the location and orientation of all parts to ensure correct re-assembly.
Refer to assembly drawing (located in the back of this manual) for your correct pump type.
1. Remove the seal arrangement.
2. Remove all binder screws.
3. Remove dowels (10) and arbor (5) with an arbor press in the direction which
disengages the press fit in the shortest distance.
NOTE: Dowels and arbors for the high accuracy pumps are press fit in the rear front plate (1)
cont.
and slip fit in the center (2) and side plates (3).
c. 2000
DYNAMELT M ASU Manual 20-36, 20-37, 20-38
Appendix 21
Revised 3/01
4. Separate the plates by pry slots. Great care should be taken not to scratch or damage
the internal pump surface when prying the plates apart.
5. After disassembly, clean all components in a glass bead blast cabinet to remove any
debris remaining after heat cleaning. Alternative, non-destructive cleaning methods such as
water jet or solvents are also acceptable.
6. Wash components in an ultrasonic cleaning tank and air dry. Be careful not to bang
parts together.
7. Inspect all parts for nicks, burrs, score marks and other signs of wear. The plates and
faces of the gears may be hand blocked on 400/600 grit paper and any nicks, burrs or sharp
edges can be lightly removed with a honing stone. Be careful not to round off the edges of the
gear teeth while lapping.
CAUTION: Since the thickness relationship between the metering gears and the center
plate is critical to metering performance, and the center plate is non-wearing on its sides, lapping these components is not necessary and should not be done under any circumstances.
Place a layer of 400 Grit Emery Cloth on a lapping block or plate-a granite flat is suitable. Apply light pressure to the component and turn it in a figure-8 fashion (as shown in Figure 1) approximately ten times until a smooth finish appears. Turning in a circular fashion, or
other non-uniform motion, may cause the ground holes to lose their perpendicularity to the
faces.
Always use clean, lint-free rags and compressed air to clean components. Paper towels
are not acceptable; they may leave small pieces of paper and dust on the components. Use
chemical brushes to clean between gear teeth, bores and reliefs.
8. Replace sleeve bearings as necessary and hone in the plate to the original new part
specifications.
9. After each resurfacing, carefully gauge the area between the inlet and discharge ports
at the mesh of the gears. This area, commonly referred to as the “throat”, is the most critical
part of the plate. Scoring or wear marks here will allow increased slippage from the highpressure discharge port section across the throat to the lower inlet port, reducing efficiency.
Therefore, carefully gauge this area for flatness after each resurfacing.
10. After all components are “hospital clean”, the pump is ready for assembly.
Figure 1
Appendix 22
Revised 10/00
c. 2000
DYNAMELT M ASU Manual 20-36, 20-37, 20-38
HIGH ACCURACY PUMP RE-ASSEMBLY
NOTE: During and between each re-assembly step, manually turn the metering gears to ensure that they are free turning. If binding occurs at any time, determine the cause and correct
it immediately. A tiny nick, burr or foreign particle can extensively damage a valuable pump
component. Never use force in re-assembling or turning a Dynatec pump. If properly aligned,
the pieces will fit easily into place and the pump will turn freely. Re-assemble as follows:
1. After all worn parts have been re-finished or replaced, all parts should be throughly
cleaned in a solvent and dried.
2. Using the driven gear (7) as an up-righting fixture, carefully locate the arbor (5) over
its press-fit hole with the help of an appropriate arbor press.
3. Place the rear side plate (3) with the arbor in position in a soft-jaw vise or holding fixture.
4. Slip together the driving metering gear (6), drive shaft (4), key (8) and retaining ring.
Position in the front of the side plate by installing the drive shaft through the bearing (49).
5. Place the driven metering gear on its arbor and carefully mesh with the drive metering
gear.
6. Carefully lower the center plate (2) over the gears.
NOTE: Repeat steps 5 and 6 for four-gear pumps, placing the middle plate between gear
plates.
7. Position the front side plate (1).
8. Rotate the gears to ensure free rotation.
9. Press the dowels (10) into place moving in the direction of the shortest press distance.
(Usually from the rear side of the pump.)
10. Lubricate the binder screws (47, 48) with DAG dispersion #154 or a similar heat resistant lubricant and install. Torque the screws in even increments to the manufacturer’s recommended limit. It is especially important to rotate the gears frequently during this operation.
11. Re-assemble the seal arrangement, making sure the sealing surfaces are perfectly
clean and free of scratches, nicks or burrs. When a carbon seal plate is used, always use a new
carbon seal that has been lightly polished on 400/600 grit paper. When using a carbon seal,
the coupling housing screws (27) should be torqued to the manufacturer’s recommended limit. For pumps with a compensation packing seal, be sure all old packing is removed from the
packing housing.
12. Inspect the drive shaft at the seal area making sure that it is not scored, shouldered or
worn. Worn shafts will result in premature seal leakage and should be replaced.
13. Pack lip seals (15) with a silicone-based grease and lubricate with Parker Super-OLubricate or an equivalent silicone-based oil.
14. Install lip seals into seal housing (22) as shown.
15. Tighten seal housing screws to 60 lbs./in. Check for rotation.
Appendix 23
Revised 3/01
c. 2000
DYNAMELT M ASU Manual 20-36, 20-37, 20-38
SCREW TORQUE VALUES (Standard Alloy Steel)*
Screw Size & Thread
(UNC Alloy Steel)
#10-24 (w/ carbon seal gasket)
#10-24 (w/o carbon seal gasket)
#12-24
1/4-20
5/16-18
3/8-16
into aluminum
block (hopper)
7/16-14
Torque (Lubricated Threads)
Lbs.-in.
Nxm
Lbs.-ft.
[50]
[64]
[120]
[150]
[305]
[360]
[480]
[4.2]
[5.3]
[10]
[12.5]
[25]
[30]
[40]
5.7
7.2
13.6
16.9
33.9
40.6
54.2
Table 1
*In critical applications where control of bolt preload is important, the torque-tension relation should be
determined by experimenting on the actual parts involved (including thread lubricants). At elevated
temperatures, it is often desirable to reduce screw stress because of deformation (creep) under sustained
loading. Screws constructed of type H-11 high-temperature alloy steel provide extremely high creep
resistance.
TROUBLESHOOTING GUIDE
Trouble
Probable Cause
Remedy
Pump will not turn.
1. Low pump temperature.
Check temperature sensor
and control loop for
proper setting/ operation.
Allow sufficient heat-up
time.
2. Drive malfunction.
Verify drive is powered.
Check to assure all alarm
circuits are clear.
Check drive motor current
and speed settings.
Check all drive couplings.
3. Process conditions changed.
Check process conditions
for proper melt temperature, pressures, viscosities
and materials.
4. Entrained particle.
Return pump to ITW
Dynatec for repair.
cont.
c. 2000
DYNAMELT M ASU Manual 20-36, 20-37, 20-38
Appendix 24
Revised 10/00
TROUBLESHOOTING GUIDE, continued
Trouble
Excessive seal
assembly leakage
Reduced pump efficiency
Probable Cause
Remedy
5. Possible internal damages.
Return pump to ITW Dynatec
for repair.
1. Worn seal plate.
Return pump to ITW Dynatec
for repair.
2. Insufficient inlet pressure.
Increase inlet pressure.
3. Worn lip seal.*
Replace lip seal.
1. Worn gear(s).
Return pump to ITW Dynatec
for repair.
2. Worn bearings.
Return pump to ITW Dynatec
for repair.
3. Process conditions changed.
Consult factory for
clearance recommended
on new process conditions.
* A minor seal leak or weep is not abnormal and may be desirable for lubricating the seal surfaces.
c. 2000
DYNAMELT M ASU Manual 20-36, 20-37, 20-38
Appendix 25
Revised 3/01
Appendix 26
Revised 10/00
c. 2000
DYNAMELT M ASU Manual 20-36, 20-37, 20-38
c. 2000
DYNAMELT M ASU Manual 20-36, 20-37, 20-38
Appendix 27
Revised 3/01
Appendix 28
Revised 10/00
ITW Dynatec
An Illinois Tool Works Company
Adhesive Application Solutions
c. 2000
DYNAMELT M ASU Manual 20-36, 20-37, 20-38
c. 2000
DYNAMELT M ASU Manual 20-36, 20-37, 20-38
ZENITH MELT SPINNING PUMPS MANUAL
Covers ITW Dynatec part numbers:
084E374 0.584cc, single pump
084E376 1.752cc, single pump
084E388 0.297cc, dual pump
084E389 0.58cc, dual pump
084E411* 20cc, single, high flow
084E412* 30cc, single, high flow
084E413* 45cc, single, high flow
*available on models DM 70/140/210 only
Pump PNs 084E374 thru 084E389 use PN 069X251 pump shaft seal.
Pump PNs 084E411 thru 084E413 use PN 069X289 pump shaft seal.
Appendix 29
Revised 3/01
Appendix 30
Revised 10/00
c. 2000
DYNAMELT M ASU Manual 20-36, 20-37, 20-38
c. 2000
DYNAMELT M ASU Manual 20-36, 20-37, 20-38
Appendix 31
Revised 3/01
Appendix 32
Revised 10/00
c. 2000
DYNAMELT M ASU Manual 20-36, 20-37, 20-38
c. 2000
DYNAMELT M ASU Manual 20-36, 20-37, 20-38
Appendix 33
Revised 3/01
100
90
084E434
084E436
2.92 cc/rev
80
70
084E376
1.752 cc/rev
60
084E430
084E432
1.168 cc/rev
50
VOLUMETRIC EFFICIENCY %
c. 2000
DYNAMELT M ASU Manual 20-36, 20-37, 20-38
HIGH ACCURANCY PUMP PERFORMANCE
40
30
084E374
084E389
.584 cc/rev
084E388
084E428
.297 cc/rev
084E387
.160 cc/rev
Appendix 34
Revised 10/00
20
10
.01
.02
.05
VOLUMETRIC EFFICIENCY FACTOR
.10
DP
mN
.2
.5
D P = DIFFERENTIAL PRESSURE (PSI)
m = APPARENT VISCOSITY (CENTIPOISES)
N = RPM
1.0
Appendix 35
Revised 10/00
c. 2000
DYNAMELT M ASU Manual 20-36
PN 800225 Pressure Transducer (used in PN 800260 Pressure Transducer Assy.)
(page 1 of 2 pg. pasteup of PN 800225)
Note: Transducers installed on
ITW Dynatec ASUs have been
factory calibrated.
cont.
Appendix 36
Revised 10/00
c.2000
DYNAMELT M ASU Manual 20-36
c. 2000
DYNAMELT M ASU Manual 20-36
Appendix 37
Revised 10/00
Appendix 38
Revised 10/00
c.2000
DYNAMELT M ASU Manual 20-36
Appendix 39
Revised 4/06
c. 2000
DYNAMELT M ASU Manual 20-36
TOOL-STEEL HIGH ACCURACY GEAR PUMPS
USER’S GUIDE
Pump #
Identifier
Displacement
Type
108863
108864
108865
108866
108867
108868
108869
108870
108871
108872
108873
108874
108875
110290
110291
TSHA*
TSHA*
TSHA*
TSHA*
TSHA*
TSHA*
TSHA*
TSHA*
TSHA*
TSHA*
TSHA*
TSHA*
TSHA*
TSHA*
TSHA*
0.160 cc rev.
0.160 cc rev.
0.297 cc rev.
0.297 cc rev.
0.584 cc rev.
0.584 cc rev.
1.168 cc rev.
1.168 cc rev.
1.752 cc rev.
2.920 cc rev.
4.500 cc rev.
2.920 cc rev.
8.500 cc rev.
30.0 cc rev.
45.0 cc rev.
single
dual
single
dual
single
dual
single
dual
single
single
dual
dual
single
single
single
# Gears
2
4
2
4
2
4
2
4
2
2
4
4
2
2
2
# Plates
3
5
3
5
3
5
3
5
3
3
5
5
3
3
3
Shaft Seal #
807729
807729
807729
807729
807729
807729
807729
807729
807729
807729
807729
807729
808680
808680
808680
* Tool Steel, High Accuracy
Customer should read and thoroughly understand this
manual before installation and operation of pump.
If necessary, any Dynatec pump requiring maintenance can be returned
to the factory for complete repair and overhaul. Please contact our Rebuild
Department for further details.
Appendix 40
Revised 3/05
c.2000
DYNAMELT M ASU Manual 20-36
Description
ITW Dynatec’s metering gearpumps are manufactured to precise tolerances. To retain their high
performance, these pumps must be carefully installed and maintained. These pumps are CE (Declaration of Conformity) rated.
Health & Safety
Dismantling
Internal components are precisely machined and have sharp edges and corners. These features are
essential to the accurate metering performance. Particular care must be exercised when handling
these components.
Cleaning
Cleaning fluids and methods are subject to strict Health and Safety regulations. Avoid contact
with skin, do not inhale fumes and protect eyes.
Operation
Pump outlet pressure and speed limits are dependant on fluid viscosity and throughput. Pump inlet pressure is an important feature for lubrication and fluid homogeneity. Materials for pump
construction are important for corrosion and wear resistance. Consult ITW Dynatec for detailed
applications. Normally the pumps are single or dual output. Typical speed ranges are 10-90 rev/
min.
Flushing
To avoid contamination of process fluid, the pump should be flushed out to remove test oil. Precaution must also be taken to flush out pumps at plant shutdown, since congealed fluid can cause
seizure.
Filtration
Unless fluid purity can be guaranteed (especially from metal fragments), filtration must be
installed before pump inlet, to avoid damage to pump internals.
Note: The following guide is for general purposes only. Due allowance must be made for any special features.
Installation
Ensure pump is free from protective packing materials and rotates freely.
Pump Drive
Drive alignment is very important. Ensure backlash is 0.1mm (0.004”) to avoid shock or radial
load. In the event of driveshaft connection, two flexible components must be incorporated into
each driveshaft to allow for misalignment. These flexible components must have the capacity to
distort over the misalignment range while ensuring that any radial load is minimal. Do not allow
Appendix 41
Revised 4/06
c. 2000
DYNAMELT M ASU Manual 20-36
shaft to put end thrust on the pump.
Rotation
Ensure drive rotates in correct direction (generally counter-clockwise at the pump drive spindle).
The pump must be checked for smooth operation by hand.
Fixing and Lubrication
The pump must be fixed securely to maintain position and alignment. When secured by lubricated
bolts, torque them evenly to the suggested torque (see Maintenance).
Start drive and bring up to speed slowly. Flush with process fluid.
Note: motor baseplate assemblies should be pre-checked in case the drive alignment has been disturbed.
Gland Leakage
If oil seal is fitted, there should not be any fluid leakage.
Problem-finding Chart
Problem
Remedy
LEAKAGE
Screws not tight
Re-torque
Seal scratched or worn
Replace seal
FLOW RATE ERROR
Gear worn on diameter
or width
Return to ITW Dynatec
Gear teeth damage
Return to ITW Dynatec
Plates worn, scratched or not
flat
Return to ITW Dynatec
Low inlet pressure (cavitation)
Check process
High outlet pressure (slippage)
Check process
c.2000
DYNAMELT M ASU Manual 20-36
Appendix 42
Revised 3/05
Cleaning
Before removal from machine, the pump should be rotated for a short period (with inlet supply
shut off) to discharge process fluid. Care should be taken, when removing and stripping the pump,
to allow for any residual fluid. Pump components can be solvent or ultrasonically cleaned by immersion, using a compartmentalized wire baset. Dry in air. Stubborn residues may be removed
with a brass wire brush. Avoid burnishing the sharp edges of gear and gear races.
Fluid immersion in rust inhibitor is advised. If components are to be stored for some time, they
should be lightly smeared with oil.
Maintenance
Tightening Torque
for High Tensile ISO 12.9 Lubricated Bolts (300°C max)
Bolt Size & Qty.
M5
(4)
M10, 12 (4)
M10, 12 (4)
Bolt Location
Torque Nm/ Ft.lbs.
retainer cap
7.1/ 5.2
mounting bolts
mounting bolts
41/ 30 at ambient temperature
24/ 18 at production temperature
Notes: If mounting bolts are torqued at production temperature, they should be re-torqued (to 41
Nm/30 Ft lb.) when machine is at ambient temperature.
1 Nm = 8.85 in/lbs. Torques given above are for Metric and UNF threads. Multiply by 0.8 for
UNC and BSF threads.Multiply by 0.8 for BSVV threads (multiply by 0.67 for stainless steel)
ITW Dynatec frequently provides special features at their customer’s request. Please consult with
ITW Dynatec, quoting job and pump references, if questions arise.
Appendix 43
Revised 4/06
c. 2000
DYNAMELT M ASU Manual 20-36
Reconditioning
Should reconditioning (overhauling) become necessary, return the pump to ITW Dynatec.
Pump Shaft Seal Replacement
The ITW Part Number for all Standard Tool Steel High Accuracy Pump Shaft Seals (8.5cc and
smaller) is PN 807729.
DANGER HOT SURFACE & HIGH VOLTAGE
If the pump is not operable but the heating system will function, raise the
temperature of the application system to the operating temperature to aid in the
pump disassembly process. Otherwise, a heat gun or other controlled heating
method is recommended to melt hardened hot melt material. Never use a torch
or an open flame on any of the components of the application system. Once the
system is up to temperature, disconnect all incoming power before proceeding.
Pump Shaft Seal (O-ring) Replacement:
In most cases, the pump does not have to be
removed from the ASU in order to replace the
shaft seal.
Pump
1. Disconnect the drive coupling so that the
pump may be accessed.
Cap
2. Remove the four screws in the pump “cap”
and remove the cap.
3. Within the cap is the pump shaft seal. Remove the old seal.
Shaft
4. Clean all pump parts, paying particular
attention to the pump shaft seal groove.
5. Lightly lubricate the shaft seal before inserting it in the shaft seal groove.
6. Before re-assembling, wrap a small piece of paper around the shaft so that the shaft’s
woodruff key seat does not damage the new seal.
7. Re-assemble. Remove paper.
8. Re-tighten four screws.
9. Re-connect drive coupling.
10. Return ASU to operation and check pump for leaks.
c.2000
DYNAMELT M ASU Manual 20-36
Appendix 44
Revised 3/05
Rebuild Kit for 8.5cc TSHA Pump, PN 111939
The rebuild kit for the PN 108875 8.5cc TSHA pump consists of the following parts:
PN
Description
Qty.
PN
Description
Qty.
111699
111699
111701
111702
111704
Drive Shaft
Idler Shaft
Bushing, Front Plate
Bushing, Back Plate
Dowel
1
1
1
1
2
111707
111709
807729
111705
078I001
Retaining Ring
Screw, 10-24
Pump Shaft Seal
Key
Key, Woodruff
1
4
1
1
1