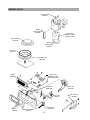
1
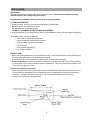
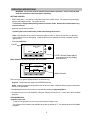
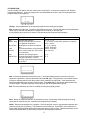
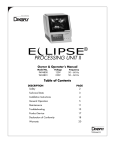
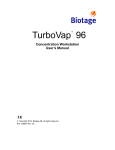
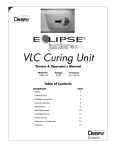
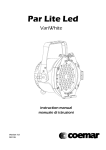
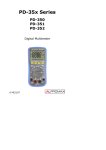
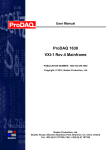
NEYTECH Qex
Ney
Owner & Operator's Manual
Model No
94-94-400
94-94-401
Voltage
100-120V
230V
50/60Hz
50/60Hz
Description
Safety ...............................................
Installation ........................................
Control Panel Description .................
Operating Instructions ......................
Setup ................................................
Maintenance .....................................
Troubleshooting ...............................
Specifications ...................................
Service Parts ....................................
Declaration of Conformity .................
Accessories ......................................
Product Service ................................
Warranty...........................................
1
Page
2
3
4
5
8
9
10
11
12
13
14
14
Back
SAFETY
!
• Never operate furnace in close proximity to combustible materials or place materials on top of the furnace.
• The furnace must be electrically grounded to a three wire electrical outlet or receptacle. The electrical
•
•
•
•
•
•
service provided must be a dedicated line of the proper size according to local electrical codes.
Disconnect the line cord before attempting to service the furnace.
Do not attempt to service the furnace until you read and understand the service manual. (See Manual
under Accessories on page 11)
Do not operate the furnace controls with tongs or other tools; the tongs will damage the control switches.
Do not use solvents or liquid cleaners on the control panel; they will enter the panel and damage it.
Do not place firing trays or other hot objects directly in front of the furnace; they will melt the graphic
overlay.
If the furnace is not used in the manner as specified in this manual, the protection provided by the
furnace may be impaired.
OSHA AND CALIFORNIA PROPOSITION 65:
MUFFLE DUST EXPOSURE
In keeping with the policy of Degussa-Ney Dental Inc. to build safe products, comply with all National and State
statutes and keep you, the valued customer informed; the services of a Certified Industrial Hygienist firm were
employed to test and evaluate the lab operator’s exposure to respirable refractory ceramic fiber (RCF) and
crystobalite (a form of crystalline silica) present in the furnace muffle.
When it becomes necessary to replace the muffle, the person doing this work is recommended to wear a
HEPA filter respirator and protective gloves as a precautionary matter.
Seal used muffle in a plastic bag and dispose of in accordance with local, state and Federal regulations.
Because this product and many similar products on the market today contain crystalline silica and ceramic
fibers, it is necessary under the statutes of California Proposition 65 that Degussa-Ney Dental Inc. include the
following statement:
“This product contains substance(s) known to the State of California to cause cancer.”
Material Safety Data Sheets for RCF materials supplied upon request.
SYMBOL TABLE
- Alternating current
I - On (Supply)
O - Off (Supply)
!
Courant alternatif
Marche (alimentation)
Arrêt (alimentation)
- Caution, Hot Surface
- Protective Conductor Terminal
Attention, surface chaude
Borne de masse, châssis
- Caution
Attention
2
INSTALLATION
UNPACKING:
Carefully unpack and remove the furnace from its shipping carton. Save the carton and other packing
material for future use in transporting the furnace.
Shipping damage should be reported to the carrier as soon as detected.
LIFTING AND CARRYING:
• Get a firm footing. Keep your feet shoulder width apart for a stable base.
• Bend your knees. Don't bend at the waist.
• Grip the handles of the packaging insert.
DO NOT LIFT FURNACE BY THE TOP MUFFLE ASSEMBLY!
• Keep the load close to your body and carry the unit to the destination. Keep your back upright during lifting.
The shipping carton contains the following:
• One furnace complete with power cord
• Owner & Operator's Manual (this document)
• Vacuum tubing, connections, and fuses
• Door insulation
• Card; Special Operating (2)
• Kit; Special, CD-ROM
INSTALLATION:
• Remove all packing material from in and around the furnace. The furnace should be located at least 15cm
(6") away from walls, shelves and heat sensitive materials.
• The furnace should not be located directly under shelves or other airflow restrictions.
• Furnace Connections: Connect the furnace to a power circuit or receptacle with an overcurrent protection
(circuit breaker or fuse) rating of 20 Amps (10A for 230V model). This circuit should be a grounded 3 wire
circuit and only supply the furnace.
Electric Vacuum Pump Connections:
• Plug the external electric vacuum pump into the socket located directly below the furnace power cord. On
the 230V model a short adapter cord is included which can be modified to the local wiring conventions if
necessary. Customers with newer style pumps may not need to use adapter on 230V models.
• Connect vacuum pump hose to barbed fitting.
3
CONTROL PANEL DESCRIPTION
On/Off key changes
furnace from active to
standby mode and back. In
the off or standby mode the
muffle and display are
turned off.
Memory Card Slot
Insert memory card
in slot. Card loads
and save programs.
LCD displays program
names and parameters
along with user
interface information.
Adjusting wheel
selects and
changes parameters, push to
select or save.
ESC Reverts
the display back
one stage.
Cancels
programming.
Function Keys (F1-F4) - The display will
indicate various command options listed
above the keys (F1 -F4) on the LCD.
Command examples include: Edit, Start,
Stop, Setup, etc.
Muffle Movement Opens and closes
the muffle. Pressing
a second time stops
movement.
LCD DISPLAY DESCRIPTION:
Area to customize furnace by
adding name.
General Program
Information
Muffle
Temperature
Vacuum
Pressure
(barometer)
V x.x
700mm
▼
▼
▼
Date/Time
01.01.2000
01:35:35
“V x.x” indicates the
software version
Lab: xxxxxxxxx
Neytech Qex
Program
▼
▼
▼
119°C
Setup
Command Names of F2 and
F4 keys
4
OPERATING INSTRUCTIONS
WARNING: The furnace must be installed properly before operation. Please read and imple
ment the installation instructions before operating.
GETTING STARTED:
• FIRST TIME ONLY: Plug the line cord of the furnace into a power circuit. The furnace will go through a
series of self-diagnostic tests. The muffle will open.
The furnace is shipped with packing material inside the muffle. Remove this material before any
keys are pressed.
• Install the ceramic door insulation.
Operating the furnace without this platform will damage the furnace!
Note: If the operation of the furnace causes the lights to "blink" or "flicker" the furnace is on the same
circuit breaker or fuse as the lighting. Install the furnace on a separate circuit that is isolated from the
lighting circuit.
• Press the On/Off Key
On/Off
Esc
▼
▼
▼
▼
▼
▼
Neytech Qex
V x.x
F1
F2
F2
F3
F3
F4
Mode Selection Screen is displayed after 3 seconds:
LCD Contrast (Rotate adjustment wheel to set the display
contrast level.)
!
Lab:
Esc
Neytech Qex
V x.x
700mm
F1
▼
▼
▼
01.01.2000
01:35:35
▼
▼
▼
119°C
Setup
Program
F2
F2
F3
F3
Mode Selection
F4
There are 2 menu options displayed above the function keys.
Program - Loads Neytech programs from EEPROM memory.
Setup - Support programs and operations such as set time / date, calibration offset, program locking and
memory card operations.
• The highlighted function key can also be activated by pressing the Adjusting Wheel.
• To operate the unit, it must be loaded by a Program memory card, by the PC, or from one of the 6 available
programs.
CARD OPERATION:
Operation from card:
To start a firing program from a memory card insert the Program card.
The contents of this card are now available to the Qex by pressing F2. The display shows all 6 available
programs.
5
PC OPERATION:
Connect the RS-232 cable to the rear of the furnace and press PC > Qex on the computer (see “Neytech
Programming Manual”). All six (6) programs are now downloaded to the Qex. After the transmission (the
program listing screen appears).
1
2
3
4
5
6
F1
Edit
Display
F2
F3
F4
Display - Lists all parameters of the selected programs before starting the program.
Edit- Activates the edit mode. The screen is divided into two parts. The left side shows various parameters
which may be selected and added to the program which is shown on the right side.
A new program name can also be entered. (See Operations and Programming Examples).
Parameter
Description
Programming Range
Gas
Rate & Temp
Activates Gas solenoid
Change of temperature per minute
to a specified temperature.
Muffle goes to position for specified
time.
Controls temperature for specified time
Turns vacuum pump On, Off or leave
on continuously.
Operator alert during program.
Controls temperature indefinitely until
manually instructed to continue
the firing cycle. (Press function Key F4
to continue).
0 = off, 1 = on
.1 -9.9°C/min 10-220°C/min (positive or negative)
50°C - 1200°C
0 - 9 (0 = closed)
00:00 - 59:59 min
00:00 - 59:59 Hrs
On, Off, Cont
Pos & Time
Hold
Vacuum
Tone
Wait & Tone
Add
F1
Edit
F2
Start
F3
0-9
0-5
Delete
F4
Add - Activates the parameter selection process. Turning the adjusting wheel moves the cursor from
parameter to parameter. Select a parameter and press Add again. This parameter is now enhanced and
turning the adjusting wheel moves the program cursor (located in the right field). A new parameter will
always be added above the program cursor location. Press Add again to include the selected parameter
into the program. Repeat this process until the program has all the parameters required.
Edit- The new parameters can now be modified by turning the adjusting wheel.
Save
F1
F2
F3
F4
Save - Stores the modified parameter in permanent memory, a small delay, while the program is being
saved, will be experienced. (See “Operation and Programming” example).
Delete - Removes parameters from a program. Place the program cursor to the particular parameter and
press the function key F4 (Delete). This parameter is now enhanced. Press ESC if this command is no
longer valid. Pressing Delete again remove this parameter from the program. Deleted parameters are not
saved to EEPROM unless an Add or Edit command is used and Save is pressed.
6
Start - Starts the firing program. The start function key is replaced with Stop. After completion of a parameter command the next parameter will be moved up on the screen.
OPERATION AND PROGRAMMING EXAMPLES:
The supplied program card contains a sample program called “Example”’ in order to illustrate the special
program operation in more detail.
Loading the Programs
• Press ESC until the display shows the Mode Selection Screen. Insert the program card (label towards
display) and observe the message on the display. Press card (F2) to view the programs on the card.
Viewing the Program
• Turn the adjusting wheel so that the cursor points to program 6. Press the function key F3 (Display). The
display shows the parameters of program 6 called “Example”.
Explanation of Program Parameters
• The first parameter Set Pos 0 & Time 0:00 will bring the muffle to the down position at its fastest speed.
The second parameters Hold 0:10 leaves the present condition unchanged for 10 minutes. Note: At this
stage there is no temperature control. The third parameter Pos 9 & Time 0:20 brings the muffle to the up
position for a duration of 20 seconds. The last parameter aborts the firing cycle.
Running the Program called Example
• Bring muffle to the up position.
• Press “Start” and observe the display. The blinking cursor indicates the segment on which the control is
operating. After completion the next parameter is placed on the first line. At the end of the program
muffle is turned off and the display shows the program listing again.
Editing the Program called Example
• Turn the adjusting wheel until the cursor points to program 6, then press the Edit key. The program
cursor points to “Pos & Time”.
• To change the position to 4, press the function key “Edit” and turn the adjusting wheel clockwise until the
display shows Pos 4. Press the function key “Save” to store this setting.
• To change the Hold 0:10 min to hold 0:15 min, turn the adjusting wheel to Hold, press “Edit” and turn the
wheel until Hold 0:15 min is shown, then press “Save”.
Adding a Program Parameter
• To add a parameter press the function key “Add”. Turn the adjusting wheel to Tone and press “Add”
again.
• Turn the adjusting wheel to move the cursor in the program where to place the parameter Tone. Turn
the wheel to Pos 9 and press “Add”. The new parameter Tone is now placed above the parameter Pos 9
in the program. To Edit the parameter “Tone” follow the edit instructions above.
Deleting a Program Parameter
• Turn the adjusting wheel to move the cursor in the program to the parameter to be deleted. Turn the
wheel to Tone and then press “Delete”. Verify that this is the parameter to be deleted and press “Delete”
again. The parameter “Tone” is now removed, press EDIT, press SAVE to save these changes to
permanent memory.
Editing the Program Name
• From the program listing screen, select a program and press Edit. Turn the adjusting wheel counter
clockwise until a blinking cursor is visible in the program name field. Press >>Set>> and select the first
character by turning the adjusting wheel. Press >>Set>> to select the next character, after all characters
are selected press Save.
Storing the Program on the “Program” Card
• After completing a program from the “Edit” mode press the function key “ESC” to display the program
listing screen. Press ESC again and the mode selection screen is displayed. Press the function key
“Setup” and turn the adjusting wheel to Prog ➧
. Press the adjusting wheel to save the “Program” to the
memory card.
7
SETUP
The Setup screen provides operator access to a number of furnace controls and features. The Setup mode
is accessible from the mode selection screen.
• Press Setup key
• Turn adjusting wheel clockwise to move the cursor to an operation.
Press the adjusting wheel to select the operation.
Calib Temp: Adjustment to furnace temperature calibration. Range is + 30°C to -30°C. Factory setting is 0.
The value added / subtracted from 960°C (silver melting temperature).
Set Time (date): Turn the adjusting wheel to change the value and push to advance to the next number in time
and date display.
Edit Lab: Turn the adjusting wheel to Lab Name and push the wheel. The name of the company can be
written. It then will be displayed at the “Select Mode” screen. (See “Entering a Program Name”, pg.7)
Program to Card Transfer
Prog >>> : User can store the Special programs from the Qex memory card.
•
•
•
•
Select Setup from Mode Selection Screen
Insert Card
Move cursor to “Program to ”, push wheel
After the programs are downloaded, the current date/time is written on the card.
Card to Program Transfer
>>> Prog : Loads the memory card programs into the Qex. To download from the card to the Qex:
•
•
•
•
Select Setup from Mode Selection Screen
Insert Card
Move cursor to “ to Program”, push wheel
All programs are then transferred to card
(Note: Existing programs will be overwritten)
Clear Card Programs
Clear
: Erases all programs contained on the “Program” card.
• Insert Card
• Turn the adjusting wheel to Clear and press the wheel. On the right most “Function Key” the word “Clear”
will appear. Press this key to delete all programs from the card.
Prog Edit: Locks or unlocks the program editing operation. To activate this feature push the adjusting wheel
and dial a code between 1 and 1200. Press the adjusting wheel and a locked symbol ( ) will appear. To
unlock the edit function repeat the procedure and dial the previously entered code.
8
MAINTENANCE
General
Maintenance and care includes work which ensures perfect operational reliability of the Neytech Qex .
• Check the unit for mechanical damage in regular intervals. In this way accidents and unit breakdowns can
be prevented.
• Immediately remove contaminations from all movable components.
Before using any cleaning or decontamination method except those recommended by Degussa-Ney.
User should check with Degussa-Ney that the proposed method will not damage equipment.
Prior to cleaning, the unit must be switched off and unplugged.
When cleaning the unit make sure that no moisture can penetrate into the unit. In this way you avoid
short circuits which may result in the breakdown of the unit or in setting the unit on fire.
Do not open the unit. Hazardous voltages have been applied in the unit. Repairs must only be performed
by authorized service technicians.
Manipulations of the unit reduce the operational reliability and include the risk of damage to persons or
materials.
User has the responsibility for carrying out appropriate documentation if a hazardous material is spilt on or
inside the equipment.
Before using any cleaning or decontamination method except those recommended by the Degussa-Ney,
user should check with Degussa-Ney, that the proposed method will not damage the equipment.
Replacement Fuses:
Receptacle: F250V, 10A (230V only)
PCB-F1: F250V, 1.0A
9
TROUBLESHOOTING
Error Messages
In the event the microprocessor detects a malfunction the display shows an error window with a brief description and Err number. Except for vacuum and motor lift errors the Qex aborts the firing cycle, the power relays
open, an audible warning signal can be heard and the operator must unplug the unit from the AC line.
Err 1
Err 2
Err 3
Err 4
Err 5
Err 6
Err 7
Err 8
Err 9
• No Temp Signal
The thermocouple is open
• Temperature too high
The thermocouple reading is above 1210°C
• No Temp Increase
A thermocouple was installed with the wrong polarity (backwards).
• Triac Shorted
The muffle current sensor detected no current control (always on).
• Muffle Open
The muffle current sensor detected no current.
• No Vacuum
The vacuum sensor reading does not change:
- Check hose, electrical pump connections
- Check proper door closure
• Low Vacuum
The vacuum level achieved is not acceptable for porcelain firing:
- Check pump performance
- Check proper door closure
• Motor too Slow
The muffle travel took longer than 12 seconds:
- Check for excessive friction or interference.
• Motor: No Signal
The motor position sensor reads outside its operating range.
10
SPECIFICATIONS
OPERATIONAL
- Temperature Accuracy:
+/- 3°C at steady state
- Muffle Temperature Uniformity: +/- 5°C at steady state
ELECTRICAL
Voltage Ranges:
100-120V
230V
50/60Hz
50/60Hz
Currents:
13.0 Amps @ 100V
7.2 Amps @ 220V
14.5 Amps @ 120V
Wattage: 1740 Watt, with 300 Watt pump
Watt to Maintain 1000°C: less than 400 Watt, muffle closed, no vacuum pump
MECHANICAL
Exterior Dimensions:
Height
Width
Depth
Muffle open
46cm (18")
33cm (13")
45cm (17.7")
Muffle closed
30cm (12")
33cm (13")
42cm (16.6")
Interior Muffle Dimensions:
Height: 6.3cm (2.5") Diameter: 10cm (4")
Furnace Weight: 25Kg (55lbs) Shipping Weight: 30Kg (66lbs)
ENVIRONMENTAL
Ambient Operating Temperature: 5 - 40°C
Relative Humidity: Maximum 80%, non-condensing
11
SERVICE PARTS
Thermocouple
9494302
Muffle
Termination Kit
9493062
Muffle Assy
9494317 (120V)
9494318 (230V)
Door Insulation
9494293
Muffle
Retaining Ring
9492902
Door Oring
9357071
Door Machined
9361065
Display
R9494376
PCB Control
R9494389 (120V)
R9494390 (230V)
PCB Card
R9494322
Valve Kit
9494303
Triac 25A
9303015
Knob
9355028
PCB Encoder
R9494314
Membrane Switch
9354418
12
Gas Valve Kit
9494433
DECLARATION OF CONFORMITY
Degussa-Ney Dental Inc.
13553 Calimesa Blvd.
Yucaipa, CA 92399
USA
Degussa-Ney Dental Inc. certifies that the following product:
Names: Neytech Qex
High Temperature Vacuum Furnace
Serial Numbers: GWE xxxx-xxx (Where x is a number from 0-9)
Conforms with the basic requirements of the following EC guidelines:
- Low Voltage Directive 73/23/EEC
with 1. Modification 93/68/EEC
- EMC - Electromagnetic Compatibility 89/336/EEC
with 1. Modification 92/31/EEC
2. Modification 93/68/EEC
The following Harmonized Standards were applied:
• EN 61010:1993 + A2:1995 (Safety)
• EN 61010-2-010:1992 + A1: 1996 (Safety)
• EN 61326:1998 (EMC)
Degussa-Ney Dental Inc.’s quality system meets these requirements:
• ISO 9001:1994 (Quality)
Our European Representative is:
Eamonn deBarra
12 Fitzhaven Square
South Circle Road
Limerich, Ireland
Electronic Project Engineer
Director / General Manager
Mechanical Project Engineer
13
ACCESSORIES
DESCRIPTION
PART NUMBER
Tongs; 25cm (10") Stainless Steel
Tongs; 30cm (12") Stainless Steel
93-90-014
93-90-015
Vacuum Pump; 100-125V; 50/60Hz
Vacuum Pump; 220-250V; 50/60Hz
94-94-198
94-94-199
Kit; Special, CD-ROM
Card; Program
94-94-407
94-94-408
Service Manual, Qex
93-63-133
PRODUCT SERVICE
Three methods of product service are available for the NEYTECH Qex . The first is telephone assistance
available at the numbers listed below. The second is to return the furnace for servicing using the instructions
below. The final is to call Degussa-Ney at the phone numbers below and obtain a service manual for a
nominal fee.
BEFORE PACKING THE FURNACE, DO THE FOLLOWING:
• Remove all firing trays, work platforms, and other loose items from inside the muffle.
• The original packing material should be used for the return shipment. Contact Degussa-Ney for replacements if they are not available.
• Call Degussa-Ney for an RMA number (Return Material Authorization). This is used to track and identify
your furnace. Material received without this number may not be identifiable.
• Equipment damaged in shipment as the result of improper packing may not be paid by the carrier. Degussa-Ney Dental Inc. will not be responsible for damages resulting from improper packing.
Ship Prepaid To:
909.795.2461
FAX 909.795.5268
Degussa-Ney Dental Inc.
Equipment Division
RMA Number __________
13553 Calimesa Blvd.
Yucaipa, CA 92399-2303 USA
14
Notes:
15
WARRANTY
WARRANTY: Except with respect to those components parts and uses which are hereinafter described,
Degussa-Ney Dental Inc. (Degussa-Ney) warrants this furnace to be free from defects in material and
workmanship for a period of two years from the date of sale. Degussa-Ney’s liability under this warranty is
limited solely to repairing or, at Degussa-Ney’s option, replacing those products included within the warranty which are returned to Degussa-Ney within the applicable warranty period (with shipping charges
prepaid), and which are determined by Degussa-Ney to be defective. This warranty shall not apply to any
product which has been subject to misuse; negligence; or accident; or misapplied; or modified; or repaired
by unauthorized persons; or improperly installed.
INSPECTION: Buyer shall inspect the product upon receipt. The buyer shall notify Degussa-Ney in writing
of any claims of defects in material and workmanship within thirty days after the buyer discovers or should
have discovered the facts upon which such a claim is based. Failure of the buyer to give written notice of
such a claim within this time period shall be deemed to be a waiver of such claim.
DISCLAIMER: The provisions here-in stated Degussa-Ney sole obligation and exclude all other remedies
or warranties, expressed or implied, including those related to MERCHANTABILITY and FITNESS FOR A
PARTICULAR PURPOSE.
LIMITATION OF LIABILITY: Under no circumstances shall Degussa-Ney be liable to the buyer for any
incidental, consequential or special damages, losses or expenses.
LIMITATION OF ACTIONS: The buyer must initiate any action with respect to claims under the warranty
described in the first paragraph within one year after the cause of action has accrued.
Corporate and Sales Office:
DEGUSSA-NEY DENTAL, INC.
65 West Dudley Town Road
Bloomfield, CT 06002-1316 USA
860.242.6188
FAX 860.769.5050
Product Service Office:
DEGUSSA-NEY DENTAL, INC.
Equipment Division
13553 Calimesa Blvd.
Yucaipa, CA 92399-2303 USA
909.795.2461
FAX 909.795.5268
Neytech Qex 0118 9363135
16