1
Lesson A7–7
Operating, Calibrating, and Maintaining
Grain Harvesting and Handling Systems
Unit A.
Mechanical Systems and Technology
Problem Area 7.
Lesson 7.
Agricultural Equipment Systems
Operating, Calibrating, and Maintaining Grain Harvesting and Handling Systems
New Mexico Content Standard:
Pathway Strand: Power, Structural and Technical Systems
Standard: II: Apply principles of operation and maintenance to mechanical equipment,
structures, biological systems, land treatment, power utilization, and technology.
Benchmark: II-A: Perform scheduled services routines to maintain machinery and equipment.
Performance Standard: 7. Maintain vehicle, machinery, and equipment cleanliness and
appearance. 9. Design a preventative maintenance schedule. 11. Calibrate metering,
monitoring, and sensing equipment.
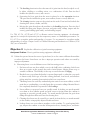
Student Learning Objectives.
achieving the following objectives:
Instruction in this lesson should result in students
1. Explain the operating principles of grain harvesting equipment.
2. Explain the calibration of grain harvesting equipment.
3. Identify proper maintenance procedures for grain harvesting equipment.
4. Explain the principles of operating grain drying and handling equipment.
5. Explain the calibration of grain drying and handling equipment.
6. Identify proper maintenance procedures for grain drying and handling equipment.
7. Identify the grain quality standards associated with a given crop.
New Mexico Agricultural Mechanics and Technology Lesson Plan Library
Unit A. Problem Area 7. Lesson 7. Page 1.
List of Resources.
The following resources may be useful in teaching this lesson:
Recommended Resources. One of the following resources should be selected to accompany the
lesson:
Combines-Reducing Harvesting Losses (VAS 3049). University of Illinois, Urbana,
Illinois: ITCS Instructional Materials.
Combines Selecting and Servicing (VAS 3048). University of Illinois, Urbana, Illinois: ITCS Instructional Materials.
Grain Drying, Handling and Storage Handbook (MWPS-13). Iowa State University,
Ames, Iowa, 1988.
Griffin, George A. Combine Harvesting. Moline, Illinois: Deere & Company, 1991.
GROWMARK. FS Grain Drying Guide. FS Supplies Division, Bloomington, Illinois.
Introduction to Combines (VAS 3047). University of Illinois, Urbana, Illinois: ITCS
Instructional Materials.
USDA. Official United States Standards for Grain. Federal Grain Inspection Service,
USDA, Washington, DC, 1995.
Other Resources. The following resources will be useful to students and teachers:
Farm equipment manufacturers (Case IH, Gleaner, John Deere, New Holland) literature on their line of harvesting equipment.
List of Equipment, Tools, Supplies, and Facilities
Writing surface
Overhead projector
Transparencies from attached masters
Copies of student lab sheets
Combine parts
Rope to make 10 square feet
Crop seeds (corn, soybeans, etc.)
Moisture tester
Terms.
The following terms are presented in this lesson (shown in bold italics):
Allowable storage time
Cleaning
Drying front
Drying zone
New Mexico Agricultural Mechanics and Technology Lesson Plan Library
Unit A. Problem Area 7. Lesson 7. Page 2.
Equilibrium moisture content
Feeding
Handling
Lodging
Tailings
Threshing
Interest Approach.
Use an interest approach that will prepare the students for the lesson. Teachers often develop approaches for their unique class and student situations. A possible
approach is included here.
Display to the class the parts from different combines (snapping rolls, cutter bar/knives/guards, rasp bars,
etc.). Ask students to identify what the parts are used for on a combine.
On the floor, mark-out ten square feet. Tell students this represents an area behind a combine. Place crop
seed (corn, soybean, etc.) in the area. Based on the number of seeds used, ask the students how efficient
the combine was.
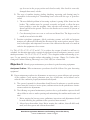
Summary of Content and Teaching Strategies
Objective 1:
Explain the operating principles of grain harvesting equipment.
Anticipated Problem: What are the operating principles of grain harvesting equipment?
I. Early combines were known as “harvester-threshers”, machines that were pulled through the
fields by teams of horses or mules. Some machines were known only as “threshers” since the
grain was first cut and then brought to a thresher for threshing and separating the grain from
the straw.
A. Today the combine is a complex machine used to harvest and thresh all kinds of grain in
a variety of crop and field conditions. The name “combine” developed when the harvesting and threshing operations were “combined” into one complete machine.
B. To understand the operation of a combine, look closely at each function of the machine.
Once the operation of each of these components is understood, it becomes easier to understand how they relate to each other and to the operation of the entire machine.
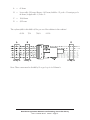
C. All combines perform six basic functions.
1. The gathering of the standing crop is referred to as the cutting function. Parts of the
combine involved include the platform, cutter bar and reel, corn head, snapping unit
(gathering chains, snapping rolls, and stripper plates).
2. Delivering the cut crop material to the threshing unit in a steady, uniform flow is
called the feeding function. Parts involved include the header or platform auger
(table auger), feeder house (feeder conveyor, paddle conveyor or feeder chain).
New Mexico Agricultural Mechanics and Technology Lesson Plan Library
Unit A. Problem Area 7. Lesson 7. Page 3.
3. The threshing function involves the removal of grain from the head, seedpod or cob,
by either a flailing or a rubbing action, or a combination of both. Parts involved
include the cylinder or rotor, and concave.
4. Separating the loose grain from the straw is referred to as the separation function.
The parts involve include the grates, straw walkers, beater or rotary deflector.
5. The cleaning function removes the grain from the trash. Parts involved include the
cleaning shoe (sieves, chaffer, and fan).
6. Moving the grain throughout the machine is the handling function. Parts involved
include the clean grain (augers, elevators, and grain tank), tailings (augurs and elevators), grain holding (grain tank), and unloading (augers).
Use TM: A7–7A, A7–7B and A7–7C to illustrate various harvesting equipment. An alternative
approach is to transfer the information from the transparency masters to a multimedia presentation. Use
LS: A7–7A to strengthen student understanding of concepts. Use text material to strengthen student
understanding of concepts. Chapter 1 and 2 in Combine Harvesting and Introduction to Combines (VAS
3047) are recommended.
Objective 2:
Explain the calibration of grain harvesting equipment.
Anticipated Problem: How is grain harvesting equipment calibrated?
II. Unless the operator knows the source of grain losses, he or she cannot calibrate the machine
to reduce the losses. Some losses are due to improper operation and others are caused by
improper adjustment.
A. Harvesting losses occur in different areas of the harvesting process.
1. Pre-harvest losses are those which occur in the field before combining. Such losses
show up as grain on the ground, the result of wind shatter, lodging, down crop, or
weather conditions. The inability of the crop to stand is known as lodging.
2. Header losses occur when the header is operated improperly or when the crop tends
to shatter easily. Each type of header: cutting platforms, corn heads, and windrow
pickup units has operating characteristics which can cause losses.
3. Threshing losses are caused by unthreshed grain carried over straw walkers, cracked
grain due to overthreshing, or cracked grain due to excessive tailings. Material that is
not completely threshed or separated is called tailings.
4. Straw walkers or separator losses are usually caused by feeding too much material
over them at slow cylinder speeds and wide concave spacing when the combine is
operating at excessive ground speeds. Too much material prevents the grain from
falling through the walkers and onto the cleaning shoe.
5. Cleaning shoe losses may be caused by too much air from the fan, too much material
on the chaffer, or improperly adjusted chaffer and sieve.
6. Leakage losses can occur almost anywhere on the combine. To guard against leakage, inspect the combine to see that all inspection doors, cleaning doors, and drainNew Mexico Agricultural Mechanics and Technology Lesson Plan Library
Unit A. Problem Area 7. Lesson 7. Page 4.
age doors are in the proper position and closed securely. Also check for torn seals,
damaged sheet metal, or holes.
B. The areas of combine (cutting, feeding, threshing, separating, and cleaning) may be
responsible for harvesting loss. Determining losses varies with the type of grain harvested.
1. The most difficult problem in harvesting soybeans is getting all the beans into the
header. The combine must be operated accurately and gently to allow the most
beans possible to enter the machine. After soybeans reach maturity, they tend to
shatter and fall on the ground. The loss at the header can account for 90 percent of
the total loss.
2. Corn harvesting losses can occur as ear losses and kernel loss. The largest corn loss
usually is in ears left in the field.
C. Precision agriculture equipment, global positioning systems, and yield and moisture
monitors are calibrated by following the directions in the owner/operator manual. Vibration, load weights, and temperature are some of the calibrations that need to be made in
order for the equipment to be accurate.
Use TM: A7–7D, A7–7E, A7–7F and A7–7G to reinforce the concepts of header loss and how it is
calculated. An alternative approach is to transfer the information from the transparency masters to a multimedia presentation. Use LS: A7–7B, A7–7C and A7–7D to strengthen student understanding of concepts. Use text material to strengthen student understanding of concepts. Chapter 5 in Combine Harvesting and Combines-Reducing Harvesting Losses (VAS 3049) are recommended.
Objective 3:
Identify proper maintenance procedures for grain harvesting equipment.
Anticipated Problem: What maintenance procedures should be followed for grain harvesting
equipment?
III. Proper maintenance and service adjustments are necessary to assure efficient, safe operation
of the combine. Costly repairs, premature wear, loss of field time, and accidents can be
reduced if the combine is properly maintained and adjusted.
A. The operator’s manual for the machine should be used in reference to specific maintenance intervals, location of service points, and instructions for the performance of maintenance and service adjustments.
B. The following are general maintenance practices that a good machine operator should
always follow in order to make operating and maintaining the combine much easier and
safer.
1. Before starting the harvest season, preliminary inspections and adjustments should
be made following the guidelines in the operators/owners manual.
2. Always keep the machine clean. Before starting the combine, clean all field trash,
mud, and excess grease and oil from the machine.
New Mexico Agricultural Mechanics and Technology Lesson Plan Library
Unit A. Problem Area 7. Lesson 7. Page 5.
3. Make sure that nuts, cap screws, shields, and sheet metal parts are tight. A loose
shield can vibrate, produce excess heat, produce irritating noise, and cause a
machine to fail if it falls in the way of moving parts.
4. Inspect the combine every day before starting. A brief look at all areas of the combine can help you spot potential machine failures and safety hazards.
5. Keep maintenance records. A simple chart showing when lubrication and service
adjustments were made can help insure that all needed maintenance has been performed.
6. Do not abuse the machine. Proper lubrication and adjustment is of little help if the
operator abuses the machine.
7. Check all fluid levels daily prior to starting.
8. Lubricate bearings and chains as called for in the operator’s/service manual.
9. Check tire air pressures periodically throughout the harvesting season.
10. Check belts frequently for correct tension, excessive wear, tearing, cracking, swelling, and unraveling.
a. When replacing a belt never pry it over the rim of a sheave.
b. Wipe off oil and grease as soon as they are spilled and then clean the belt with
suitable cleaner that will not soak into it.
c. Clean belts periodically in mild soap and water, do not use strong detergents.
d. Use of belt dressings is not recommended because they may deteriorate the belt.
e. Check pulleys for misalignment, excessive wear, damage, distortion, and accumulation of dirt and debris in the bottom of grooves.
11. Maintain correct chain tension, ¼ inch of sag per foot, between shaft centers.
a. Chains should be removed from the combine for cleaning and lubrication at the
end of every season.
b. Add or remove offset links (half links) to ensure correct length and tension.
c. Do not add new links to an old chain or old links to a new chain, this will change
the bite of the chain as it enters and leaves the sprocket.
d. Check alignment of all sprockets in drive and correct misalignment when necessary.
e. Do not put a new chain on worn sprockets, as its life will be shortened.
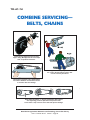
Use TM: A7–7H provide examples of the servicing of combine belts and chains. An alternative approach
is to transfer the information from the transparency masters to a multimedia presentation. Use text material to strengthen student understanding of concepts. Chapter 5 and 6 in Combine Harvesting and Combines Selecting and Servicing (VAS 3048) are recommended.
New Mexico Agricultural Mechanics and Technology Lesson Plan Library
Unit A. Problem Area 7. Lesson 7. Page 6.
Objective 4:
Explain the principles of operating grain drying and handling equipment.
Anticipated Problem: What are the principles for operating grain drying and handling equipment?
IV. The principles involved in the operation of grain drying and handling equipment involve
factors relating to system design and the removal of moisture
A. Goals of a well designed drying system include:
1. Timely harvest of top quality grain.
2. Safe and pleasant working conditions.
3. Ability to do important drying jobs efficiently such as:
a. Holding wet grain to be dried.
b. Drying wet grain
c. Cooling dried grain.
4. Capacity to handle grain at the harvesting rate.
5. Provisions for easy expansion in the future due to increased volume and harvesting
rate.
B. Grain dries due to the removal of water, leaving dry matter.
1. Grain is harvested at high moisture contents to minimize field losses.
2. Grain that is harvested as too wet for safe storage is usually dried for maximum marketing potential and storage flexibility. Grain must be artificially dried to reduce the
moisture content to a safe storage level to prevent spoilage.
a. A fan picks up air, carries it over an energy source (gas, electric, solar, etc.) to
improve its moisture-holding capability, pushes the air through the grain mass to
absorb the moisture from the grain and then carries it outside the system.
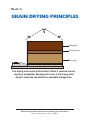
b. The layer being dried is referred to as the drying zone—only the grain in this
zone is drying. The grain above this zone remains wet while the layer below is
dry.
c. The leading edge of the drying zone is called the drying front.
4. Equilibrium moisture content is the point when continued contact with the drying
air results in no further moisture reduction. Drying system capacity should be sufficient to receive and handle the daily harvest rate and allow for increasing capacity in
the future.
5. Length of time grain can be stored at a given moisture content and temperature is
known as allowable storage time (AST).
a. Drying and storage systems are designed around the allowable storage time.
b. A combination of high moisture content and high temperature leads to fast mold
growth and rapid spoilage.
c. Factors that affect the condition of stored grain are insects, rodents, and bacteria.
New Mexico Agricultural Mechanics and Technology Lesson Plan Library
Unit A. Problem Area 7. Lesson 7. Page 7.
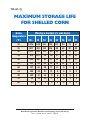
Use TM: A7–7I to illustrate the principles of grain drying. TM: A7–7J and TM: A7–7K will be helpful
in reinforcing the concepts of storage life and moisture content in grains. An alternative approach is to
transfer the information from the transparency masters to a multimedia presentation. Use text material to
strengthen student understanding of concepts. Grain Drying, Handling and Storage Handbook
(MWPS–13) and FS Grain Drying Guide are recommended.
Objective 5:
Explain the calibration of grain drying and handling equipment.
Anticipated Problem: How is grain drying and handling equipment calibrated?
V. Calibration of grain drying equipment is important to attain the proper moisture content for
stored grain. There are several factors that are taken into consideration when calibrating
grain drying equipment. They include:
A.
B.
C.
D.
Initial moisture content of the grain.
Temperature of the grain.
Relative humidity of the outside air.
Desired final moisture content of the grain, which is affected by the use of the grain.
Again, TM: A7–7J and A7–7K will help students in understanding this objective. An alternative
approach is to transfer the information from the transparency masters to a multimedia presentation. Use
text material to strengthen student understanding of concepts. Grain Drying, Handling and Storage
Handbook (MWPS–13) and FS Grain Drying Guide are recommended.
Objective 6:
ment.
Identify proper maintenance procedures for grain drying and handling equip-
Anticipated Problem: What maintenance procedures should be followed for grain drying and
handling equipment?
VI. Proper maintenance and service adjustments are necessary to assure efficient, safe operation
of the drying and handling equipment.
A. Costly repairs, premature wear, loss of harvesting time and accidents can be reduced if
the drying and handling systems are properly maintained and adjusted. The operator’s
manual for the equipment should be used in reference to specific maintenance intervals,
location of service points, and instructions for the performance of maintenance and service adjustments.
B. There are general maintenance practices to follow in order to make operating and maintaining the drying and handling systems much easier and safer.
1. Thoroughly clean all grain drying and handling equipment prior to use. Always keep
machinery and equipment clean. Excessive build-up of trash, debris, and fine dirt can
cause heat build-up, part fatigue and failure, and/or fires.
2. Inspect all bearing and friction surfaces for excessive wear.
3. Make sure that shields and other safety equipment are in place at all times.
New Mexico Agricultural Mechanics and Technology Lesson Plan Library
Unit A. Problem Area 7. Lesson 7. Page 8.
4. Keep up-to-date maintenance records. A simple chart showing when lubrication and
service adjustments were performed can help to insure that all needed maintenance
has been performed.
5. Inspect the equipment every day. A brief inspection of all areas can help you spot
potential machine failures and safety hazards.
6. Check all fluid levels daily.
7. Lubricate bearings and chains as called for in the operator’s/service manual.
8. Check belts frequently for correct tension, excessive wear, tearing, cracking, swelling, and unraveling.
9. Maintain correct chain tension, ¼ inch of sag per foot, between shaft centers.
10. Check all electrical equipment prior to use.
11. Insure that all fire extinguishers are properly charged and in working order.
Use text material to strengthen student understanding of concepts. Grain Drying, Handling and Storage
Handbook (MWPS–13) and FS Grain Drying Guide are recommended. Reinforce the major concepts of
this objective through classroom discussion.
Objective 7:
Identify the grain quality standards associated with a given crop.
Anticipated Problem: What are the grain quality standards?
VII. A set of standards established by the United States Department of Agriculture (USDA),
known as the Grain Grading Standards (USDA 1995), serve as a general guideline for characterizing physical grain quality.
A. This system was developed in 1916 to enable grain merchants to trade grain using consistent, measurable quality criteria.
B. Since 1916, numerous changes in the grading standards have occurred to reflect changes
in technology (the ability to measure quality) and customer demands.
C. Grade quality measurements are categorized as non-grade determining factors, grade
determining factors, and special grades.
1. Non-grade determining factors include moisture and possibly dockage, depending on
the grain.
2. Grade determining factors include test weight, damaged kernels, foreign material,
broken kernels, odor, and heating. Grades are assigned based on the lowest factor.
Sample grade is the lowest possible category in the grading system.
3. Special grades, depending on the grain, include infested, ergoty, garlicky, and
smutty. These words are added to the grade designation but do not determine the
numerical grade.
Use text material to strengthen student understanding of concepts. The Official United States Standards for
Grain are recommended. Have students research the Standards on the Internet. Assign different crop standards
to various groups of students. Refer the class to: www.access.gpo.gov/nara/cfr/waisidx_01/7cfr810_01.html. This
New Mexico Agricultural Mechanics and Technology Lesson Plan Library
Unit A. Problem Area 7. Lesson 7. Page 9.
is the Government Printing Office Web site. It contains the Code of Federal Regulations and includes the Official
Grain Standards.
Review/Summary.
Use the student learning objectives to summarize the lesson. Have
students explain the content associated with each objective. Student responses can be used in
determining which objectives need to be reviewed or taught from a different angle.
Application.
tent.
Use the accompanying lab sheets to help students in applying the lesson’s con-
LS: A7–7A—Combine Data Sheet
LS: A7–7B—Calculating Harvest Loss—Corn
LS: A7–7C—Calculating Harvest Loss—Soybeans
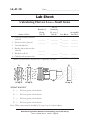
LS: A7–7D—Calculating Harvest Loss—Small Grain
Evaluation. Evaluation should focus on student achievement of the objectives for the lesson. Various techniques can be used, such as student performance, on the application activity. A
sample written test is attached.
Answers to Sample Test:
Part One: Matching
1 = c, 2 = i, 3 = a, 4 = b, 5 = e, 6 = f, 7 = h, 8 = j, 9 = g, 10 = d
Part Two: Completion
1. handling
2. non-grade, grade, special
3. ¼
4. quality
5. field losses
6. repairs, wear, time, accidents
7. harvesting, threshing
8. allowable storage time
9. insects, rodents, bacteria
Part Three: Short Answer
1. Timely harvest of top quality grain, safer and pleasant working conditions, ability to do
important drying jobs efficiently, capacity to handle grain at the harvesting rate, provisions for easy expansion to future, due to increased volume and harvesting rate.
2. Cutting, feeding, threshing, separating, cleaning, handling.
New Mexico Agricultural Mechanics and Technology Lesson Plan Library
Unit A. Problem Area 7. Lesson 7. Page 10.
Sample Test
Name_____________________________________
Test
Lesson A7–7: Operating, Calibrating, and
Maintaining Grain Harvesting and Handling Systems
Part One: Matching
Instructions. Match the term with the correct response. Write the letter of the term by the definition.
a.
b.
c.
d.
tailings
cleaning
cutting
drying front
e.
f.
g.
h.
drying zone
threshing
feeding
lodging
i. allowable storage time
j. equilibrium moisture content
_______ 1. Cutting or gathering the crop.
_______ 2. Length of time grain can be stored at a given moisture content and temperature.
_______ 3. Material that is not completely threshed or separated.
_______ 4. Removing the grain from the trash.
_______ 5. Layer of grain being dried.
_______ 6. Removal of the grain from the head, seedpod or cob.
_______ 7. Inability of the crop to stand.
_______ 8. Point when continued contact with the drying air results in no further moisture reduction.
_______ 9. Delivering the crop material to the threshing unit in a steady, uniform flow.
_______ 10. Leading edge of the drying zone.
Part Two: Completion
Instructions. Provide the word or words to complete the following statements.
1. Moving the grain throughout the combine is referred to as the _______________ function.
2. Grade
quality
measurements
are
categorized
_________________ and _________________ grades.
as
___________________,
3. A chain in correct tension would have _________ inch of sag per foot, between shaft centers.
New Mexico Agricultural Mechanics and Technology Lesson Plan Library
Unit A. Problem Area 7. Lesson 7. Page 11.
4. The Grain Grading Standards were developed in 1916 to enable grain merchants to trade
grain using consistent, measurable _______________ criteria.
5. Grain is harvested at high moisture contents to minimize _______________
______________________.
6. If the drying and handling system is properly maintained and adjusted costly
_____________, premature ________________, loss of harvesting ________________ and
_________________, can be reduced.
7. The name combine developed when the ____________________
___________________ operations were combined into one complete machine.
and
8. Drying and storage systems are designed around the __________ __________
______________.
9. Factors that affect the condition of
________________ and ________________.
stored
grain
are
________________,
Part Three: Short Answer
Instructions. Provide information to answer the following questions.
1. What are the five goals of a well designed drying system?
2. What are the six basic functions that a combine performs?
New Mexico Agricultural Mechanics and Technology Lesson Plan Library
Unit A. Problem Area 7. Lesson 7. Page 12.
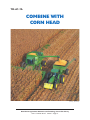
TM: A7–7A
COMBINE WITH
CORN HEAD
(Courtesy, John Deere)
New Mexico Agricultural Mechanics and Technology Lesson Plan Library
Unit A. Problem Area 7. Lesson 7. Page 13.
TM: A7–7B
COMBINE WITH
SOYBEAN HEAD
(Courtesy, John Deere)
New Mexico Agricultural Mechanics and Technology Lesson Plan Library
Unit A. Problem Area 7. Lesson 7. Page 14.
h
as
Tr
ating
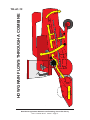
Separ
Clean
ing
rain
an G
e
l
C
Cutting
e
Fe
di
ng
Threshi n g
HOW GRAIN FLOWS THROUGH A COMBINE
TM: A7–7C
New Mexico Agricultural Mechanics and Technology Lesson Plan Library
Unit A. Problem Area 7. Lesson 7. Page 15.
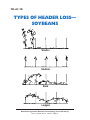
TM: A7–7D
TYPES OF HEADER LOSS—
SOYBEANS
Shatter
Stubble
Stalk
Lodged
New Mexico Agricultural Mechanics and Technology Lesson Plan Library
Unit A. Problem Area 7. Lesson 7. Page 16.
TM: A7–7E
CALCULATING
SOYBEAN LOSS
(2) Gathering
Unit Loss
(1) Total Crop Loss
(3) Pre-harvest
Loss
Cut
Standing
Beans
Beans
LOSS DATA WORKSHEET
Source of Loss
Column A
Beans Found
in 10 sq. ft.
area
Number of
Beans = to
1 bu./acre
Column B
Your Bean
Loss in
bu./acre
Column C
Acceptable
Loss Level in
40 bu./acre
yield
1. Total Crop Loss
40
1.3
2. Pre-Harvest Loss
40
0.1
3. Machine Loss
40
1.2
4. Gathering Unit Loss
40
1.1
Totals of:
40
0.4
b. Loose Stalk
40
0.2
c. Lodged Stalk
40
0.2
d. Stubble
40
0.3
a. Shatter
5. Cylinder and Separation Loss
New Mexico Agricultural Mechanics and Technology Lesson Plan Library
Unit A. Problem Area 7. Lesson 7. Page 17.
0.1
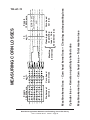
Corn head
kernel loss
Pre-harvest
ear loss
{
Machine
kernel loss
(Note: Count
only unthreshed
ears)
Equals
1/100th acre
Cleaning and
Corn head
separating
ear loss
loss + Corn
head kernel loss
10
sq. ft.
New Mexico Agricultural Mechanics and Technology Lesson Plan Library
Unit A. Problem Area 7. Lesson 7. Page 18.
Machine kernel loss – Corn head loss = Total machine loss
Cylinder loss = Kernels on partially shelled cobs
Machine kernel loss – Corn head kernel loss = Cleaning and separating loss
10
sq. ft.
Equals
1/100th acre
MEASURING CORN LOSSES
TM: A7–7F
TM: A7–7G
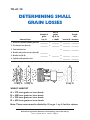
DETERMINING SMALL
GRAIN LOSSES
Source of Loss
Kernels of
grain/
1 sq. ft.
No. of
grains/
sq. ft. to
= 1 bu/A*
Acceptable
Loss bu./A loss/acre
1. Grain loss (behind combine) (Area D)
________ ÷ ________ = ________ ________
2. Pre-harvest loss (Area A)
________ ÷ ________ = ________ ________
3. Total machine loss
= ________ ________
4. Header and pre-harvest loss (Area B)
________
5. Header loss (B–A)
________ ÷ ________ = ________ ________
6. Cylinder and separation loss
= ________ ________
*Wheat—20 grains; Barley—15 grains; Oats—12 grains; Rye—24 grains.
A
B
D
C
10 sq. ft. 10 sq. ft.
10 sq. ft.
WHEAT HARVEST
A = 275 loose grains or loose heads.
B = 400 loose grains or loose heads.
C = 224 loose grains or loose heads.
D = 625 loose grains or loose heads.
Note: These counts must be divided by 10 to get 1 sq. ft. for first column.
New Mexico Agricultural Mechanics and Technology Lesson Plan Library
Unit A. Problem Area 7. Lesson 7. Page 19.
TM: A7–7H
COMBINE SERVICING—
BELTS, CHAINS
Check sprocket alignment with a straight
edge or string. Misalignment will cause rapid
wear of sprockets and chains.
Never pry a belt over a pulley. This breaks
the cords in the belt and will result in belt
roll-over and early belt failure.
Check pulley alignment. Pulley misalignment
will result in distortion of belts which results
in excessive wear and damage.
Keep chains adjusted to ¼” sag per foot between shaft centers.
Over tightening produces rapid chain and sprocket wear.
Loose chains “whip” and can cause chain and sprocket damage.
New Mexico Agricultural Mechanics and Technology Lesson Plan Library
Unit A. Problem Area 7. Lesson 7. Page 20.
TM: A7–7I
GRAIN DRYING PRINCIPLES
Wet grain
Drying zone
Dry grain
The drying zone starts at the bottom. When it reaches the top,
drying is completed. Spoilage will occur if the drying zone
doesn’t reach the top within the allowable storage time.
New Mexico Agricultural Mechanics and Technology Lesson Plan Library
Unit A. Problem Area 7. Lesson 7. Page 21.
TM: A7–7J
MAXIMUM STORAGE LIFE
FOR SHELLED CORN
Grain
Temperature
(°F)
Moisture Content (% wet basis)
15½
18
20
22
24
26
28
30
30
2,276
648
321
190
127
94
74
61
35
1,517
432
214
126
85
62
49
40
40
1,012
288
142
84
56
41
32
27
45
674
192
95
56
37
27
21
18
50
450
128
63
37
25
18
14
12
55
299
85
42
25
16
12
9
8
60
197
56
28
17
11
8
7
5
65
148
42
21
13
8
6
5
4
70
109
31
16
9
6
5
4
3
75
81
23
12
7
5
4
3
2
80
60
17
9
5
4
3
2
2
New Mexico Agricultural Mechanics and Technology Lesson Plan Library
Unit A. Problem Area 7. Lesson 7. Page 22.
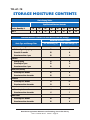
TM: A7–7K
STORAGE MOISTURE CONTENTS
Grain Drying Tables
Equilibrium Moisture Contents
Relative Humidity %
20
30
40
50
60
70
80
90
Corn %
7
8
10
11
13
14
16
18
Maximum Moisture Contents for Grain Harvest and Safe Storage
Maximum Moisture Content
Grain Type and Storage Time
For Harvesting (%)
For Safe Storage (%)
30
30
30
15
14
13
18
18
18
14
12
11
20
20
14
13
22
22
10
8
15
15
9
7
20
20
16
14
Shelled corn and sorghum
Sold as # grain by spring
Stored 6–12 months
Stored more than 1 year
Soybeans
Sold by spring
Stored up to 1 year
Stored more than 1 year
Wheat, oats, barley
Stored up to 6 months
Stored more than 6 months
Sunflower
Stored up to 6 months
Stored more than 6 months
Flaxseed
Stored up to 6 months
Stored more than 6 months
Edible beans
Stored up to 6 months
Stored more than 6 months
New Mexico Agricultural Mechanics and Technology Lesson Plan Library
Unit A. Problem Area 7. Lesson 7. Page 23.
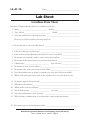
LS: A7–7A
Name_____________________________________
Lab Sheet
Combine Data Sheet
Directions: Complete this data sheet for a combine in your area.
1. Make ________________________________
Model _____________________________
2. Type of head ______________________________
Width _________________________
3. Does this combine have a floating cutter bar? _____________________________________
How can you tell if a head has a floating cutter bar?
4. How is the reel or corn snap roller turned? _______________________________________
_________________________________________________________________________
5. Is the reel a slat type or pickup type? ____________________________________________
6. Is the reel fore and aft adjustment mechanical or remote controlled? ___________________
7. How many row cornhead is used or can be used on this combine? _____________________
8. How many feeder chain sections are across the feeder throat? ________________________
9. Cylinder type? ___________________________
Type of beater? ____________________
10. How many sections of straw walkers?____________________________________________
11. How many holes across one section of straw walker? ________________________________
12. Does the machine have an (auger) or (return pan) at the end of the straw walker?
13. Where is the clean grain fan located on the combine? (You are in the driver’s seat).
14. How many augers in the grain tank? ____________________________________________
15. What drives the cylinder?_____________________________________________________
16. Where are the concaves adjusted? ______________________________________________
17. Size of the front tires? ______________________
rear tires?________________________
18. Does this combine have a straw spreader? ________________________________________
19. Why is leasing a combine more of an advantage to some people than buying?
20. How many steps are on the entrance ladder? ______________________________________
New Mexico Agricultural Mechanics and Technology Lesson Plan Library
Unit A. Problem Area 7. Lesson 7. Page 24.
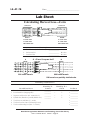
LS: A7–7B
Name_____________________________________
Lab Sheet
Calculating Harvest Loss—Corn
1/100th Acre
1/100th Acre
Area A
2–3/4 lb. ears
6–1/2 lb. ears
No broken ears
Area B
4–3/4 lb. ears
6–1/2 lb. ears
No broken ears
Harvesting Losses
1.
Total Ear Loss (behind machine)
______________
Bu./Acre
2.
Pre-harvest loss
______________
Bu./Acre
3.
Corn head loss
______________
Bu./Acre
A
A + B are 10 square feet!!
200 loose kernels
B
600 loose kernels
100 kernels on partially shelled cobs
Determining Total Kernel Loss
Record Kernel Losses
No. of
Kernels/Sq. Ft.
Counted
No. of
Kernels/Sq. Ft. =
1 Bu./A
Loss Bu./A
1.
Loose kernel loss behind combine
_________
÷
2
= __________
2.
Loose kernel loss (Snapping rolls)
_________
÷
2
= __________
3.
Separator and shoe loss (No. 1 minus No. 2)
_________
÷
2
= __________
4.
Cylinder loss (Kernels on partially shelled cobs)
_________
÷
2
= __________
5.
Total loss/acre (Add lines 2, 3, and 4)
= __________
6.
Total ear loss/acre (Line 3, Harvesting Losses)
= __________
7.
Total corn harvesting loss (Line 5 + Line 6)
= __________
New Mexico Agricultural Mechanics and Technology Lesson Plan Library
Unit A. Problem Area 7. Lesson 7. Page 25.
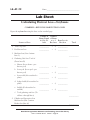
LS: A7–7C
Name_____________________________________
Lab Sheet
Calculating Harvest Loss—Soybeans
COMBINES—REDUCING HARVESTING LOSSES
Figure the soybean loss using the data on the attached page.
Sources of Loss
Column A Number
Beans Found of Beans
to = 1 Bean Loss in
in 1 Sq. Ft.
Bu./Acre Bu./Acre
Area
1. Total Crop Loss
___________
÷
4
___________
2. Pre-Harvest Loss
___________
÷
4
___________
3. Machine Loss (Line 1 minus
Line 2)
Total
___________
4. Gathering Unit Loss Total of:
(From Area B)
a. Shatter (Loose beans—preharvest pod)
___________
÷
4
___________
b. Loose pod (Loose pod—preharvest pod)
___________
÷
4
___________
c. Loose stalk (Not attached to
plant)
___________
÷
4
___________
d. Lodged stalk (Not attached to
plant)
___________
÷
4
___________
e. Stubble (Pods attached to
stubble)
÷
4
___________
___________
f. Total gathering unit loss (Total line a through line e)
5. Cylinder and Separation Loss
Machine loss (line 3) minus
Header loss (line 4f)
New Mexico Agricultural Mechanics and Technology Lesson Plan Library
Unit A. Problem Area 7. Lesson 7. Page 26.
___________
___________
A
=
62 beans
B
=
Loose stalk—29 beans, Shatter—142 beans, Stubble—22 pods × 3 beans/per pod =
66 beans, Lodged stalk—0, Pods—0.
C
=
194.8 beans
D
=
432 beans
The soybean yield for this field is 45 bu. per acre. How efficient is this combine?
65.5%
A
75%
79.4%
83.2%
B
D
C
10 sq. ft.
10 sq. ft.
10 sq. ft.
Note: These counts must be divided by 10 to get 1 sq. ft. for Column A
New Mexico Agricultural Mechanics and Technology Lesson Plan Library
Unit A. Problem Area 7. Lesson 7. Page 27.
LS: A7–7D
Name_____________________________________
Lab Sheet
Calculating Harvest Loss—Small Grain
No. of
Grains/Sq.
Ft. to = 1
Bu./A*
Loss Bu./A
Acceptable
Loss/Acre
Source of Loss
Kernels of
Grain/
1 Sq. Ft.
1. Grain loss (behind combine)
(Area D)
________
÷
________
= _______
________
2. Pre-harvest loss (Area A)
________
÷
________
= _______
________
= _______
________
= _______
________
= _______
________
3. Total machine loss
4. Header and pre-harvest loss
(Area B)
________
5. Header loss (B–A)
________
÷
________
6. Cylinder and separation loss
*Wheat—20 grains; Barley—15 grains; Oats—12 grains; Rye—24 grains.
A
B
D
C
10 sq. ft.
10 sq. ft.
10 sq. ft.
WHEAT HARVEST
A
=
200 loose grains or loose heads.
B
=
300 loose grains or loose heads.
C
=
100 loose grains or loose heads.
D
=
400 loose grains or loose heads.
Note: These counts must be divided by 10 to get 1 sq. ft. for first column.
New Mexico Agricultural Mechanics and Technology Lesson Plan Library
Unit A. Problem Area 7. Lesson 7. Page 28.