1
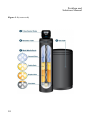
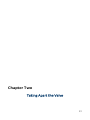
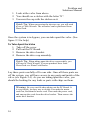
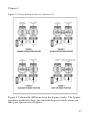
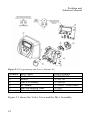
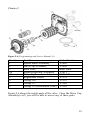
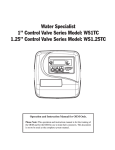
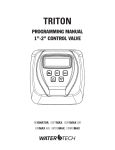
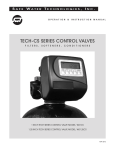
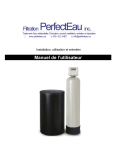
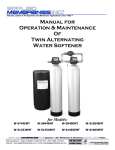
Problem and Solutions Manual By Caden Bird Table of Contents Table of Contents ........................................................................... iii Introduction ..................................................................................... 5 Identifying the Problem .................................................................. 7 Taking Apart the Valve ................................................................. 13 Various Problems and Solutions ................................................... 23 Putting the Valve Back Together .................................................. 27 Ordering Parts ............................................................................... 31 Index ............................................................................................. 35 Bibliography ................................................................................. 36 Glossary ........................................................................................ 37 iii Introduction This manual is designed to help the owner of a WaterTech system successfully maintain and repair their system. You will not need any prior knowledge about water softening systems to use this manual. This manual will help you be able to: Identify the issue with your system. Take apart the valve and find the specific problem. Solve the issue. Put the valve back together again. Put the system back into service. Identify and order any parts if needed. WaterTech products are protected by an industry-leading warranty, but sometimes they do fail. This manual will help you fix your system's problem without having to call a professional plumber. 5 Chapter 1 Identifying the Problem 7 Chapter 1 Why the System is not Working The first step into fixing a problem with your system is to look at your system and identify what part is either broken or malfunctioning. WaterTech offers many different models that help treat water differently, but they all basically work the same way. Our systems are plumbed into your waterline. The untreated water enters the system through the bypass and goes into the valve. From there, the water is sent into the tank where passes through the media. The media is engineered to remove chemicals and particles from your water. The water is then forced up back into the valve and sent back into your waterline, giving you treated water. Every few days the system will “regenerate”. This means that the system will wash the media of any chemicals or particles. That is what the Brine Tank or Salt Tank is for. This will help the system to continue to condition your water (see Figure 1.1). One reason your system may not be working is because the tank is cracked. You can easily see if this is the case because you will find a puddle of water at the base of your tank. Generally your issue will be with the valve or a programming issue. This will mean that you will have to take your system out of service and take apart the valve. 9 Problem and Solutions Manual Figure 1.1 (watertech) 10 Chapter 1 What to Look For If your system is failing to operate correctly, the problem will be visible. Locating the area where the problem is located will help you fix your system faster. Problems with Tank If you have a problem with your tank, your biggest indicator will be leaking water. If you find water on your tank or on the floor, look for cracks in the tank. Problems with Valve If you see water coming from the valve, or you can hear a sound coming from the valve while it is in service, then this is an indicator that your problem is in the valve. Problems with Brine Tank Brine Tanks sit beside your system and are very easy to check. You will be able to see if the problem is with the Brine Tank if you see leaking water, salt bridging, or kinked hoses. Problems with PC Board If you see no leaking water, and your system is still malfunctioning, then the problem is with the PC Board. 11 Chapter Two Taking Apart the Valve 13 Chapter 2 Once you have discovered your problem, the next step is to take apart the valve. You will need to be familiar with the different parts of the system. Figure 2.1 shows a basic outline of your entire system. Figures 2.3 and 2.4 show the different parts of the valve, which is where the most common problems occur. Figure 2.1 (Owner’s Manual) Before you take apart your system to find where your problem is, the first thing that you need to do is put the system into bypass operation position. This will prevent new water flowing into the system. Putting the System into Bypass 1. Locate the bypass. (it is directly behind the valve) 2. Put the red switch into bypass mode. (see figure 2.2) Locating the Meter 1. The meter is located at the back of the valve 2. Unscrew the cover 3. Pull out the meter Locating the Injector 15 Problem and Solutions Manual 1. Look at the valve from above. 2. You should see a sticker with the letter “E”. 3. Unscrew the cap with the sticker on it. Quick Tip: When unscrewing the injector cap, you will need to use a Clack Wrench. The wrenches can be purchased from WaterTech. Once the system is in bypass, you can take apart the valve. (See figure 2.3 for help) To Take Apart the Valve 1. Take off the cover. 2. Pull out the PC Board. 3. Remove the drive bracket. 4. Remove the drive cap assembly. Quick Tip: When taking apart the drive cap assembly, you will need a Clack Wrench. You can purchase these from WaterTech or a WaterTech Dealer. Lay these parts carefully off to one side. Once all these parts are off the system, you will have access to any parts and inside of the valve (see Figure 2.4). As you are taking apart the valve, you should be looking for any leaks or parts with chips on them. Warning: Be very careful when taking out the PC Board. It is very fragile. An easy way to do this is to undo the motor cord first, and then the meter cord. Then undo the power cord, and unwrap the cords from the drive bracket. Then remove the entire drive bracket. 16 Chapter 2 Figure 2.2 (Programming and Service Manual 12) Figure 2.2 shows the different ways the bypass works. The bypass operation position is how you want the bypass to look when you take your system out of bypass. 17 Problem and Solutions Manual Figure 2.3 (Programming and Service Manual 40) Number 1 2 3 4 5 6 Item Name Valve Cover Motor Drive Assembly PC Board Drive Reducing Gear Drive Gear Cover Order Number V3175CC-01 V3107-01 V3106-01 V3108CC-05BOARD V3110 V3109 Figure 2.3 shows the Valve Cover and the Dive Assembly. 18 Chapter 2 Figure 2.4 (Programming and Service Manual 41) Number 1 2 3 4a 4b 5 6 7 8 Item Name Spacer Stack Assembly Drive Cap Assembly Back Plate Piston Downflow Assembly Piston Upflow Assembly Regenerant Piston O-ring 228 O-ring 337 O-ring 215 (Distributor Tube) Order Number V3005 V3004 Back Plate V3011 V3011-01 V3174 V3135 V3180 V3105 Figure 2.4 shows the inside parts of the valve. Once the Drive Cap Assembly is off, you will be able to access any of these parts. 19 Problem and Solutions Manual Programming Knowing how to navigate the PC Board is also essential. The PC Board controls how the valve functions, and it can be programed to complete different tasks. It is also easy to navigate. General To go back to previous screen: Press [Regen]. To go to next screen: Press [Next]. To return to home screen at any time: Press [Set Clock]. Setting the Time Press [Set Clock]. Use [Up] and [Down] to reach desired hour. Press [Next] to change the minutes. Use [Up] and [Down] to reach desired minute. Press [Set Clock] again to set the time. Set Hardness Press [Next] and [Up] simultaneously and hold for 2-3 seconds. Use [Up] and [Down] to change Hardness. Press [Next] to go to next screen. 20 Chapter 2 Regen Day Use [Up] and [Down] to change the day to default regeneration. Press [Next] to go to the next screen. Regen Time Use [Up] and [Down] to change the hour. Press [Next]. Use [Up] and [Down] to change the minutes. Press [Next] or [Set Clock] to go back to the Home Screen. Manual Regen Press [Regen] once to make the system regenerate that night. Hold [Regen] to make the system regenerate immediately. 21 Chapter 3 Various Problems and Solutions 23 Here are some common problems and what causes them. System fails to regenerate The bypass is on. No power to system. The Hardness Setting is set too low. Meter turned off/No Days to Regen set. Defective meter. Gallons to Regeneration is set too high. Unit uses to Much Salt The Hardness Setting is set too high. The System is set to regenerate too often. Excessive water in brine tank. Too much water in the brine tank Bad stack, brine piston, or main piston. Kinked, plugged, or too long Drain Line. Kinked or Plugged Brine Line. The Injector is plugged. Salt Bridge in the Brine Tank. No Water Pressure The bypass is partially shut. Obstruction in system. Obstruction inside valve inlet/outlet port. Media bed failure. PC Board is Blank Power Cord not plugged in. Bad Transformer. Bad PC Board. No electricity to outlet. 25 Problem and Solutions Manual Salt Taste in the water Bad stack, brine piston, or main piston. Kinked, plugged, or too long drain line. Plugged Drain Flow Control Button (DLFC). Plugged injector. Salt setting is too high. If still too salty - increase rinse time (form 4 to 6 min.). Error Code Displayed If you have an error code, try a soft reset first. Soft Reset 1. Press and Hold [Next] + [Regen] for 3 seconds. 2. Unplug the power directly from the PC board, not the wall. If the soft reset does not fix the error code, and the problem still persist, then contact WaterTech or your local WaterTech dealer. 26 Chapter 4 Putting the Valve Back Together 27 When putting the valve back to together, make sure that the system is still in bypass mode. Carefully replace all parts as you found them. When replacing any part that has an O-ring, make sure to lubricate the O-ring. When tightening down parts, make sure to only hand tighten them. Putting the System Back Into Service When taking the system off bypass, follow these steps. 1. Move the red arrows into service position. 2. Run water through the system. 3. Turn on taps and faucets in the home or business to allow water to run through. Next, you need to make sure that the system has power running to the valve. The display should be on. Double check that your programming is the same and that the system has a regeneration day. If you had any custom programming before, you may need to reprogram. 29 Chapter 5 Ordering Parts 31 Once you have found your problem, you may need to order a new part. Here are the ways to order: Call WaterTech directly and place an order. Email us at [email protected]. Call a local WaterTech dealer. It is WaterTech’s preference that you contact us directly to order your part. This way we can double-check with you what your problem is, and we can make sure that you placed an order for the correct part. What to have ready when you order When you place an order, you will need to have this information with you: Name and Mailing address Model number Serial Number Part Number Warranty Number Payment Information To find your Model, Serial, and Warranty Number, look on the right side of the valve. You will find a sticker with the WaterTech logo and the information that you need. It will look like figure 5.1 Figure 5.1 (watertech) Quick Tip: For example, this system is a RP48-TM, with Serial Number 0732084. 33 Problem and Solutions Manual For Parts with No Visible Part Number You may need a new part that has no visible part number. These include meters, injectors, or tanks. When you need to replace one of these items, call WaterTech and we will place the order for you. WaterTech Contact Information Email [email protected] Call 888-254-8412 Address 2460 McIver Lane, #200 Carrollton, TX 75006 Website www.watertech.com 34 Index Bypass, 7, 11, 12, 13, 14, 21 Kinked hoses, 9 Leaking water, 9 PC Board, 14, 15, 17, 20 Regeneration, 18, 19, 21 Salt bridging, 9 System, 5, 7, 8, 11, 12, 13, 14, 18, 19, 20, 21 35 Bibliography Linton, Freeman. "Reionator." www.watertech.com. N.p.. Web. 2 Dec 2013. Triton 1” – 1.25” Control Valves Programming and Service Manual." www.watertech.com. N.p., 01 May 2013. Web. 2 Dec 2013. Peligro, Aaron. Personal interview. 11/14/2013 Linton, Bryce. Personal interview. 11/14/2013 "Owner's Manuals." www.watertech.com. N.p., 01 Jun 2013. Web. 2 Dec 2013. <http://www.watertech.com/customersupport/owners-manuals/>. Glossary Water Conditioning - Cleaning the water of any impurities or particulates. Regeneration - Part of the programming that allows the system to clean itself. Valve - At the top of the tank, it contains all the moving parts of the system. PC Board - PC stands for pressed circuit. This board controls the valve and is programmable. Bypass - A detachable switch that allows the water to flow into the tank. O-ring - Small rubber rings that seal the valve and help prevent water leakage. Salt Bridging - When the salt in the Brine Tank clumps together and does not dissolve. Media Fouling - When the media clumps together inside the tank and loses efficiency. 37 39 Telephone Website 888-254-8412 www.watertech.com