1
GE Consumer Products
TECHNICAL SERVICE GUIDE
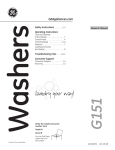
Profile Washer
H O ME
BACK
MY CYCLES
START
STOP
H E LP
P O W ER
MODEL SERIES:
WPGT9350
PUB # 31-9103 07/03
IMPORTANT SAFETY NOTICE
The information in this service guide is intended for use by
individuals possessing adequate backgrounds of electrical,
electronic, and mechanical experience. Any attempt to repair a
major appliance may result in personal injury and property
damage. The manufacturer or seller cannot be responsible for the
interpretation of this information, nor can it assume any liability in
connection with its use.
WARNING
To avoid personal injury, disconnect power before servicing this
product. If electrical power is required for diagnosis or test
purposes, disconnect the power immediately after performing the
necessary checks.
RECONNECT ALL GROUNDING DEVICES
If grounding wires, screws, straps, clips, nuts, or washers used
to complete a path to ground are removed for service, they must
be returned to their original position and properly fastened.
GE Consumer Products
Technical Service Guide
Copyright © 2003
All rights reserved. This service guide may not be reproduced in whole or in part
in any form without written permission from the General Electric Company.
–2–
Table of Contents
Backsplash ...................................................................................................................... 23
Basic Wash Cycle ........................................................................................................... 17
Bearing Housing Assembly .............................................................................................. 37
Brake Resistor................................................................................................................. 25
Clutch Shifter Assembly .................................................................................................. 35
Component Locator Views .............................................................................................. 20
Consumer Help Screens ................................................................................................. 15
Control Features ................................................................................................................ 7
Control Quick Reference Chart ....................................................................................... 42
Drain Pump ..................................................................................................................... 30
Factory Test Mode ........................................................................................................... 40
Field Service Mode .......................................................................................................... 38
Hall Sensor ...................................................................................................................... 34
Inverter ............................................................................................................................. 24
Inverter and Main Board Pin Connectors ......................................................................... 22
Main Control Board and Touch Screen LCD.................................................................... 23
Membrane Keypanel ........................................................................................................ 24
Model Number ................................................................................................................... 4
Motor Assembly ............................................................................................................... 33
My Cycles ........................................................................................................................ 14
Nomenclature .................................................................................................................... 4
Overview ........................................................................................................................... 6
Operation Overview ......................................................................................................... 17
Outer Tub and Suspension Assembly ............................................................................. 32
Parts ................................................................................................................................ 49
Protective Cover .............................................................................................................. 25
Pressure Sensor (Water Level Switch) ........................................................................... 26
Quick Start ......................................................................................................................... 8
Sales Demo Mode ........................................................................................................... 16
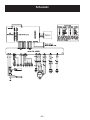
Schematic ....................................................................................................................... 48
Serial Number ................................................................................................................... 4
Stain Inspector ................................................................................................................. 10
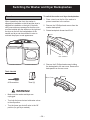
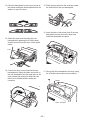
Switching the Washer and Dryer Backsplashes ............................................................. 54
Summary Screen ............................................................................................................ 12
Temperature Conversion Table ........................................................................................ 58
Thermistor/ATC Control (Auto Temp) .............................................................................. 32
Top Cover ........................................................................................................................ 28
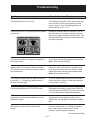
Troubleshooting ............................................................................................................... 43
Warranty ............................................................................................................................ 5
Water Valve Assembly ..................................................................................................... 27
Wash Basket ................................................................................................................... 29
Washer Components ...................................................................................................... 23
Wash Cycle Chart Example ............................................................................................ 19
Wash Cycles ..................................................................................................................... 9
Water Valve Assembly ..................................................................................................... 27
–3–
Nomenclature
Model Number
W P G T 9 3 5 0 B 0 W W
Back Splash
Color
GE Washer
Feature Pack
Common Brand Features
Exceptions:
H = Energy Star
P = Profile™
N = Special
Engr. Revision
Capacity/Configuration
L = Large S = Super Capacity Plus
X = Extra-Large K = Compact
G = Giant
Voltage
0 = US Voltage
Body Color
Model Year
Designator
Number of Cycles
00 = Infinite Electronic
Control Platform
B = Buttons (Touch Pad)
T = Touch Screen
Number of Speed
Combinations
Serial Number
Nomenclature
Note: Model number and serial number are
located on rear of backsplash.
•
The technical sheet is located inside
the control panel.
The first two characters of the serial number
identify the month and year of manufacture.
Example:
RF123456S = August, 2003
A - JAN
D - FEB
F - MAR
G - APR
H - MAY
L - JUN
M - JUL
R - AUG
S - SEP
T - OCT
V - NOV
Z - DEC
–4–
2005 - H
2004 - G
2003 - F
2002 - D
2001 - A
2000 - Z
1999 - V
1998 - T
1997 - S
1996 - R
1995 - M
1994 - L
The letter designating the year repeats
every 12 years.
Example:
T - 1974
T - 1986
T - 1998
Warranty
All warranty service provided by our Factory Service Centers or
an authorized Customer Care® technician. To schedule service,
on-line, 24 hours a day, visit us at www.GEAppliances.com or
call 800.GE.CARES (800.432.2737).
For The Period Of:
We Will Replace:
One Year
From the date of the
original purchase
Any part of the washer which fails due to a defect in materials or workmanship. During this
full one-year warranty, GE will also provide, free of charge, all labor and related service costs to
replace the defective part.
Second Year
From the date of the
original purchase
Any part of the washer which fails due to a defect in materials or workmanship. During this
additional one-year limited warranty, you will be responsible for any labor or related service costs.
Third through Fifth Year
From the date of the
original purchase
The suspension rod and spring assembly, and main electronic control board if any of these parts should
fail due to a defect in materials or workmanship. GE will also replace the washer lid or cover if they
should rust under operating conditions. During this additional three-year limited warranty, you will be
responsible for any labor or related service costs.
Third through Tenth
Year From the date of the
original purchase
The direct drive motor and outer washer tub if any of these parts should fail due to a defect in materials
or workmanship. During this additional eight-year limited warranty, you will be responsible for any
labor or related service costs.
Lifetime of Product
From the date of the
original purchase
The washer basket if it should fail due to a defect in materials or workmanship. During this product
lifetime limited warranty, you will be responsible for any labor or related service costs.
What Is Not Covered:
■ Service trips to your home to teach you how to use the
product.
■ Replacement of house fuses or resetting of circuit
breakers.
■ Improper installation, delivery or maintenance.
■ Damage to the product caused by accident, fire, floods
or acts of God.
■ Failure of the product if it is abused, misused, or
used for other than the intended purpose or used
commercially.
■ Incidental or consequential damage caused by possible
defects with this appliance.
■ Damage caused after delivery.
This warranty is extended to the original purchaser and any succeeding owner for products purchased for home use within the
USA. In Alaska, the warranty excludes the cost of shipping or service calls to your home. Proof of the original purchase date is
needed to obtain service under the warranty.
Some states do not allow the exclusion or limitation of incidental or consequential damages. This warranty gives you specific
legal rights, and you may also have other rights which vary from state to state. To know what your legal rights are, consult
your local or state consumer affairs office or your state’s Attorney General.
Warrantor: General Electric Company. Louisville, KY 40225
Note: The LCD screen is part of the main electronic board and under the 5 year part warranty. The
inverter board is covered by a 2 year part warranty.
–5–
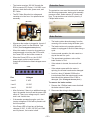
Overview
General
The GE Profile Harmony Washer is part of the GE
Profile Harmony Clothes Care system utilizing the
latest developments in washing technology.
H O ME
BACK
MY CYCLES
START
STOP
H E LP
P O W ER
The Harmony Washer does not use the typical agitator
found on conventional washers. Instead, the direct
drive motor, capable of spinning at 1010 rpm, and the
304 stainless steel wash basket create a centrifugal
force that pulls wash water through fabrics for a
thorough cleaning action. (See Operation Overview.)
Harmony Washers also utilize an automatic load
sensing system to determine load size and water
levels. The washer automatically fills the wash basket
with the appropriate amount of water needed for
optimal wash performance.
Other features include:
Communication Link to the Dryer - The washer uses a
serial cable to automatically inform the dryer about the
nature of the wash load, essentially presetting the
dryer controls so the user doesn’t have to.
Auto-Balance Suspension - The washer is
programmed to correct out of balance situations. (See
Operation Overview.)
Flow-ThruTM Dispensers - Each of the four dispensers is timed to release at the right time during the
wash cycle. Each reservoir is flushed with water to pre-dilute the product before adding it to the washer.
This flushing action removes all product to help keep the compartment clean and free flowing.
Note: The bleach dispenser fills during the main wash to dispense the bleach and refills during the rinse
cycle to flush any remaining bleach from the reservoir.
Direct Drive Motor - The washer does not use a transmission or mechanical brake. Direct drive
technology results in fewer moving parts for smooth, quiet operation. (See Motor Assembly.)
InfusorTM Wash - The washer has specific cycles that aids in mixing the detergent/water solution, and
dispersing the load evenly in the wash water. (See Operation Overview).
LCD Touch screen Display - All washer control functions, cycles, troubleshooting, and field service
diagnostics are accessed through a touch screen display. The washer can also be powered up by
touching anywhere on the touch screen or any key on the keypanel.
Centrifugal Wash - The washer uses a centrifugal washing action to clean clothes instead of an agitator.
The basket spins creating a strong flow of water under the centrifugal force. As water passes through
the fabric, its natural cleansing action washes away dirt without damaging or tangling the fabric.
Plastic Top & Backsplash - The washer top and backsplash have UV stabilizers to prevent yellowing
when exposed to sunlight.
–6–
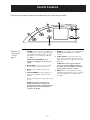
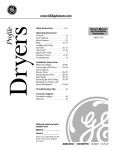
Control Features
Throughout this manual, features and appearances may vary from your model.
HOME
BACK
YCLES
MY C
HELP
START
STOP
POWER
Features of
the washer
control
panel
1 POWER. Press to “wake up” the display. If
the display is active, press to put the washer
into standby mode. You may also press the
Touch Screen or any button to “wake up”
the display.
NOTE: Pressing POWER does not
disconnect the appliance from the power
supply.
2 MY CYCLES. Press to use, create, rename,
modify or delete custom wash cycles.
3 BACK. Press to return to the previous
screen.
4 TOUCH SCREEN. Press the graphics on
the interactive display to use the washer
features.
Do not use sharp objects to press the Touch
Screen.
NOTE: If the washer is inactive for 5
minutes, the Touch Screen will go into
standby mode, and the display will be dark.
Press the Touch Screen or any button to
“wake up” the display.
–7–
5 HOME. Press to return to the “TOUCH TO
SELECT WASH CYCLE” screen (Home
Screen).
6 START/STOP. Press to start a wash cycle.
If the washer is running, pressing once will
pause the washer. Press again to restart the
wash cycle.
NOTE: If the washer is paused and the
cycle is not restarted within five minutes,
the washer will enter standby mode and the
current wash cycle will be canceled.
7 HELP. Press to set machine preferences, to
find help using the Touch Screen or to find
troubleshooting tips for common washer
problems.
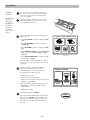
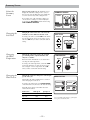
Quick Start
Getting
Started
If the Touch
Screen is
dark, press
POWER or
the Touch
Screen to
access the
wash cycles
menu.
Loosely load clothes no higher than the top
row of holes in the washer tub. Overloading
may reduce washer efficiency and possibly
increase wrinkling.
Add a low-sudsing, high-efficiency detergent.
Add diluted fabric softener, bleach or wash
boost additives as desired.
Select one of the five wash methods from the
Home Screen:
TOUCH TO SELECT WASH CYCLE
• Press BY COLOR to wash according to fabric
color.
• Press BY GARMENT to wash according to
clothing type.
BY
COLOR
BY
GARMENT
• Press BY FABRIC to wash according to fabric
type.
• Press SPECIAL CYCLES to wash non-garment
items, or to select a rinse and spin or spinonly cycle.
BY
FABRIC
SPECIAL
CYCLES
STAIN
INSPECTOR
Home Screen
• Press STAIN INSPECTOR to wash items with
specific types of stains.
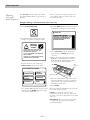
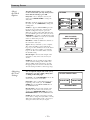
After selecting a wash method, use the Touch
Screen to select a specific wash cycle to match
your load.
Change any of the automatic settings, if
desired, by pressing the Touch Screen
and following the on-screen instructions.
SUMMARY SCREEN
COTTONS
By changing the settings you can:
• Remove heavier soil.
• Change the water temperature.
• Change the wash action to Vigorous, Normal,
Delicate or Hand Wash.
• Set a Delay Start, Extended Spin, Presoak or
Extra Rinse, or change the End-of-Cycle
Signal volume.
CYCLE
WASH ACTION
SOIL
TEMP
OPTIONS
TIME
0:54
NORMAL
• Adjust time settings.
Close the lid and press START.
The washer will not fill unless the lid is closed.
After you press START, a Cycle Status screen
will appear to indicate what stage of the cycle
the washer is in and the time remaining in
the cycle.
–8–
START
STOP
Wash Cycles
If the Touch Screen is dark, press POWER or the Touch Screen to access the wash cycles menu.
The default cycle settings are based on standard load types. Always follow the fabric manufacturer’s
care label when laundering.
Washing by
Color
Select By Color to wash loads sorted by color.
COLOR CYCLES include:
• Bright/Dark
Colors
• Light Colors
Washing by
Garment
Type
Washing by
Fabric Type
BY
COLOR
• New Colors
• Whites
Select By Garment to wash loads sorted by garment type.
GARMENT CYCLES include:
• Athletic Wear
• Jackets/Coats
• Play Clothes
• Blouses
• Jeans
• Sweaters
• Delicates
• Khakis
• Swimwear
• Dress Shirts
• Knits
• Underwear
• Easy Care
• Lingerie
• Silks (Washable)
• Everyday
Wear/Casual
• Mixed Garments
BY
GARMENT
Select By Fabric to wash loads sorted by fabric type.
FABRIC CYCLES include:
• Blends
• Cottons
Washing
Using the
Special
Cycles
• Mixed Colors
• Delicates
• Knits
• Polyester
• Silks (Washable)
BY
FABRIC
Select SPECIAL CYCLES to wash loads of nongarment items or to
select a rinse and spin or spin-only cycle.
SPECIAL CYCLES include:
• Blankets (Cotton)
• Blankets (Other)
• Comforter
• Super Clean
• Pet Bedding
(Washable)
• Handwash
Woolite® HE
• Throw Rugs
(Washable)
• Rinse and Spin
• Towels
• Sheets
• Quick Wash
• Sneakers
• Spin Only
–9–
SPECIAL
CYCLES
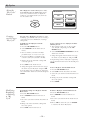
Stain Inspector
Washing
Using the
Stain Inspector
The Stain Inspector provides pretreatment
tips and optimum washing for specific types
of stains.
You select the specific stain, fabric type and
color, and the washer creates the wash cycle
for treating the stain.
Example: Washing a chocolate-stained, white cotton shirt
1 Press STAIN INSPECTOR.
4 Press the HELP button to find pretreatment
information for the specific type of stain.
CHOCOLATE
STAIN
INSPECTOR
2 Read and follow the instructions on the
Touch Screen before treating the fabric.
BEFORE
TREATING
FABRIC
- ADD AN ENZYME CONTAINING
DETERGENT, LIKE LIQUID TIDE(R) TO THE
'WASH BOOST' DISPENSER AND USE A
HIGH EFFICIENCY DETERGENT IN THE
DETERGENT DISPENSER.
OK
1) REFER TO FABRIC CARE LABEL FOR
INSTRUCTIONS. USE HELP FUNCTION
FOR ADDITIONAL STAIN TIPS
2) TEST STAIN REMOVAL TIPS ON HIDDEN
AREA OF FABRIC
3) DO NOT PUT STAINED ITEM INTO DRYER
(STAIN MAY BE SET INTO FABRIC)
3 Select FOOD/DAIRY/COOKING from
the list of stain categories and select
CHOCOLATE from the list of stains.
5 Select COTTONS from the list of fabric
types, and select WHITES from the list
of colors.
6 Fill the detergent tray with a low-sudsing,
high-efficiency liquid detergent such as
Tide® HE. Fill the Wash Boost tray with
the proper pre-treatment additive.
Wash
Boost Tray
FOOD/DAIRY/COOKING
TOMATO-BASED
BUTTER
MARGARINE
SALAD
DRESSING
CHOCOLATE
MAYONNAISE
MORE
Detergent Tray
7 Place the stained garment(s) in the washer
first; then add the rest of the load. For best
stain removal, only wash items with stains
matching your selection.
8 Press START.
You can find additional stain categories and
stains by pressing MORE in the lower right
corner of the Touch Screen.
The washer will run a Wash Boost presoak cycle
prior to the main wash cycle.
NOTE: For some stain cycles, the water
temperature for the presoak cycle may not be
the same as the water temperature for the main
wash cycle.
IMPORTANT: Check to make sure the stain
is completely removed before placing the
garment in the dryer.
– 10 –
Stain Inspector
Stain Selections
Below is a listing of the stain selections
available on the washer Touch Screen. For
additional information on handling these types
of stains, visit the Tide® Stain Detective at
www.tide.com/staindetective.
Stain Selections
Beverages
Food/Dairy/Cooking
Outdoor
Specialty Stains
• Alcoholic beverages
• Animal fat
• Dingy white socks
• Adhesive tape
• Coffee
• Baby formula
• Grass
• Asphalt/tar
• Fruit juice
• Butter/margarine
• Mud/dirt
• Glue (synthetic)
• Kool-Aid®
• Chocolate
• Clay
• Ink
• Milk
• Cooking oil
• Rust/iron
• Pine sap
• Soda
• Cream/cheese sauce
• Tea
• Egg
• Water
• Gravy
• Wine
• Grease
School/Office/Home
• Adhesive tape
• Crayon
• Glue (synthetic)
• Glue
(white/common)
• Ink
• Mildew
• Paint (water-based)
• Paint (oil-based)
Personal
• Baby stains
• Mayonnaise
• Milk
• Mustard
• Tomato-based
Waxes
• Feces
• Candle wax
• Perspiration
• Chap Stick®
• Urine
• Crayon
• Vomit
Cosmetics
• Chap Stick®
• Vegetable oil
• Deodorant/
antiperspirant
Heavy Oils
• Lipstick
• Motor oil
• Lotions
• Ointment/salve
• Makeup (oil-based)
• Pencil mark
• Makeup (waterbased)
• Rubber cement
• Wite-out®
– 11 –
• Silly Putty®
• Blood
• Pudding
• Salad dressing
• Rubber cement
Summary Screen
About the
Summary
Screen
After selecting a wash cycle, the Summary Screen
displays the automatic settings for the cycle you
have chosen. You can adjust these by touching the
screen location for any of the settings shown.
If you change any of the automatic settings, you
can save the new settings as a custom “My Cycle”
by pressing the MY CYCLES button and choosing
SAVE CURRENT SETTINGS.
SUMMARY SCREEN
COTTONS
CYCLE
WASH ACTION
SOIL
TEMP
OPTIONS
TIME
0:54
NORMAL
Changing the
Soil Level
Changing the soil level increases or decreases the
wash time to remove different amounts of soil.
To change the soil level, touch SOIL on the Touch
Screen; then use the arrows to select more or less
soil. Press OK when you have reached the desired
setting.
SOIL LEVEL
OK
MORE SOIL
HEAVY
LESS SOIL
Changing
the Wash
Temperature
Changing the temperature changes the wash and
presoak temperatures only. The final rinse will
always be a cold rinse.
LIGHT
TEMPERATURE
OK
HIGHER
Follow the fabric manufacturer’s care label when
selecting the wash temperature.
To change the wash temperature, touch the TEMP
pad on the Touch Screen; then use the arrows to
select a higher or lower temperature. Press OK
when you have reached the desired setting.
COLD
LOWER
Changing the
Wash Action
Changing the wash action changes the wash and spin
speeds of the cycle.
WASH ACTION
Always follow the fabric manufacturer’s care label
when changing the wash action.
To change the wash action, touch WASH ACTION
on the Touch Screen; then select the desired setting.
Typically, slower spin speeds result in less water
removed from clothes.
Wash Action
Wash Speed
Spin Speed
Normal
Medium
Fast
Vigorous
Fast
Fast
Delicate
Slow
Slow
Extra Slow
Extra Slow
Hand Wash*
– 12 –
VIGOROUS
DELICATE
NORMAL
HAND
WASH
*Use a low-sudsing, high-efficiency, gentle liquid
detergent such as Woolite® HE.
Summary Screen
About
the Wash
Options
The Wash Options allow you to set options
for the current wash cycle only. After you have
made all desired changes, press OK.
Delay Start – Use to delay the start of your
washer. Press DELAY START to change the
delay time.
Presoak – Soaks the clothes before beginning
the wash cycle. Press PRESOAK to change the
soaking time.
Additives – Appears ONLY AFTER a presoak
has been selected. Uses the contents of the
Wash Boost dispenser tray for a presoak.
When selected, the washer will drain after the
presoak and fill again for the wash cycle. Press
ADDITIVES to specify if you will NOT be using
a Wash Boost additive or if you do not want the
washer to drain after presoak.
OPTIONS
DELAY
START
PRE
SOAK
OK
1 HR
15 MIN
ADDITIVES
EXTRA
RINSE
SIGNAL
EXTENDED
SPIN
ARE YOU USING
PRESOAK ADDITIVES ?
Extra Rinse – Adds an additional cold rinse to
the end of the wash cycle.
Signal – Alerts you that the cycle is complete.
The clothes should be removed when the
beeper goes off so wrinkles won’t set in. Touch
SIGNAL to select the volume or to turn the
beeper off. The new volume will be saved as
the default setting.
YES
NO
Extended Spin – Increases the length of the
spin time to extract more water from your
clothes.
NOTE: The water level will vary depending
on the load size and type. The washer uses
adaptive filling and load sensing to provide
the appropriate water level for effective and
efficient wash performance and energy usage.
Adjusting
the Time
Settings
You can adjust the length of the wash cycle by
changing the cycle time, adding a Delay Start
or adding an Extending Spin.
ADJUST TIME SETTINGS
Cycle Time – Press CYCLE TIME; then use the
arrows to select more or less time.
Delay Time – Use to add a Delay Start to the
beginning of the wash cycle. Press DELAY
START; then set the DELAY START time in
the OPTIONS menu.
Extended Spin – Increases the length of the
spin time to extract more water from your
clothes. Press EXTENDED SPIN; then select
EXTENDED SPIN from the OPTIONS menu.
NOTE: After the wash cycle begins, you will
not be able to change the Cycle Time or Delay
Time. The washer will beep twice if you try to
change the times after the cycle begins.
– 13 –
CYCLE TIME
DELAY TIME
EXTENDED SPIN
My Cycles
About the
“My Cycles”
Feature
The “My Cycles” feature allows you to create,
store and reuse up to 6 custom cycles. Create
your own cycles from scratch, or adjust the
settings of a predefined wash cycle, then save
for one-touch recall.
YCLES
MY C
Creating
and Using a
“My Cycle”
MY CYCLES
USE
MODIFY
CREATE
RENAME
DELETE
SAVE CURRENT
SETTINGS
You can create “My Cycles” two ways, by either
modifying a predefined wash cycle or creating a
cycle from your own combination of settings
and options.
To build your own “My Cycle” from the
Home Screen:
1 Press the MY CYCLES button.
2 Select CREATE from the Touch Screen
menu.
3 Choose whether you want to modify a
predefined cycle or create a new cycle.
4 If you are modifying a predefined cycle,
select the wash cycle you wish to modify.
5 Change any of the automatic settings and
select any options.
To save a current cycle as a “My Cycle” from the
Summary Screen:
1 After setting a wash cycle, or after a wash
cycle has just completed, press the MY
CYCLES button.
2 Select SAVE CURRENT SETTINGS from the
Touch Screen menu.
3 Using the keypad on the Touch Screen, type
the name of your “My Cycle” and press OK.
To begin using your new “My Cycle” right away,
select it from the Touch Screen menu and press
START.
6 Press SAVE on the Touch Screen.
7 Using the keypad on the Touch Screen, type
the name of your “My Cycle” and press OK.
To begin using your new “My Cycle” right away,
select it from the Touch Screen menu and press
START.
To use a “My Cycle” from the Home Screen:
1 Press the MY CYCLES button.
2 Select USE from the Touch Screen menu.
3 Select the cycle name from the Touch Screen
menu.
4 Change any of the automatic settings and
select any options.
5 Press START.
Modifying,
Renaming
or Deleting
a “My
Cycle”
To modify the settings of a “My Cycle” from the
Home Screen:
1 Press the MY CYCLES button.
2 Select MODIFY from the Touch Screen
menu.
3 Select the cycle name from the Touch Screen
menu.
4 Change any of the automatic settings and
select any options.
5 Press SAVE on the Touch Screen.
– 14 –
To delete a “My Cycle” from the Home Screen:
1 Press the MY CYCLES button.
2 Select DELETE from the Touch Screen
menu.
3 Select the cycle name from the Touch Screen
menu.
4 Choose YES to delete the cycle or CANCEL
to return to the list of “My Cycles.”
My Cycles
To rename a “My Cycle” from the Home Screen:
1 Press the MY CYCLES button.
2 Select RENAME from the Touch Screen
menu.
3 Select the cycle name from the Touch Screen
menu.
4 Using the keypad on the Touch Screen, type
the name of your “My Cycle” and press OK.
Consumer Help Screens
About
the Help
Feature
Pressing the HELP button from the Home
Screen allows you to locate troubleshooting tips
for common washer problems, to find help with
using the Home Screen or to set machine
preferences.
Pressing the HELP button while on any other
screen allows you to find additional information
on features found on that screen. Press HELP;
then touch any pad on the Touch Screen for an
explanation of that feature. To exit the feature,
press HELP once to return to the previous
screen or twice to exit Help.
Using the
Troubleshooter
To locate Troubleshooting Tips for common
washer problems:
MACHINE
PREFERENCES
HOME SCREEN
HELP
TROUBLE SHOOTER
TROUBLE SHOOTER
PRESS DESCRIPTION FOR POSSIBLE CAUSES
1 Press the HELP button.
2 On the Touch Screen, select TROUBLE
SHOOTER.
3 On the Touch Screen, select the problem
description from the list. You can use the
arrows at the right of the screen to scroll
up and down through the list of additional
problems.
4 On the Touch Screen, select a possible cause
for the problem and follow the on-screen
instructions to find a solution.
Finding Help
Using the
Home Screen
Pressing the HELP button, then selecting
HOME SCREEN HELP allows you to find
additional information on features found on
the Home Screen. Touch any pad on the Touch
Screen for an explanation of that feature. To
exit the feature, press the BACK button.
– 15 –
NO FILL OR SLOW FILL
SPORADIC FILL
FILLING AND DRAINING AT THE SAME
TIME
MACHINE MOVES BEFORE WATER FILL
NO INFUSOR OR BASKET MOTION
Consumer Help Screens
Setting the
Machine
Preferences
The machine settings on the Help feature
allow you to control the volume of the button
beep and end-of-cycle signal, and turn the
washer/dryer communication feature on or off.
Button Beep
MACHINE PREFERENCES
END OF CYCLE
SIGNAL
The button beep controls the volume of the
beep that is made when you press any of the
buttons or the Touch Screen.
BUTTON BEEP
WASHER/DRYER
COMMUNICATION
To change the volume of the button beep:
1 From the Home Screen, press the HELP
button.
2 Select MACHINE PREFERENCES from the
Touch Screen.
3 Select BUTTON BEEP from the Touch
Screen.
4 Use the arrows to make the volume louder
or softer, or to turn the beep off.
5 Select OK from the Touch Screen.
The new volume is now saved as the default
setting.
End-of-Cycle Signal
The End-of-Cycle signal alerts you when the
cycle is complete.
To change the volume of the end-of-cycle
signal:
1 From the Home Screen, press the HELP
button.
2 Select MACHINE PREFERENCES from the
Touch Screen.
Washer/Dryer Communication
3 Select END OF CYCLE SIGNAL from the
Touch Screen.
Washer/Dryer communication allows your
washer to send cycle information to your dryer
to create a dry cycle that matches your wash
load.
4 Use the arrows to make the volume louder
or softer, or to turn the signal off.
After the wash cycle is complete,
communication begins once either the washer
or dryer Touch Screen is activated.
The new volume is now saved as the default
setting.
5 Select OK from the Touch Screen.
Once the information is sent, your dryer will
create the optimal dry cycle for your load.
To turn the Washer/Dryer Communication
feature on or off:
1 From the Home Screen, press the HELP
button.
2 Select MACHINE PREFERENCES from the
Touch Screen.
3 Select WASHER/DRYER
COMMUNICATION from the Touch
Screen.
4 Touch the pad at the bottom of the Touch
Screen to select ON or OFF.
5 Select OK from the Touch Screen.
Sales Demo Mode
Pressing HOME and MY CYCLES simultaneously
for three seconds will enter into the sales
demonstration mode. This mode allows the user
to view a wash cycle. To exit the Demo Mode
press HOME and MY CYCLES simultaneously for
three seconds or disconnect the power to the
machine.
– 16 –
Harmony Clothes
Care System
The Washer Talks, The Dryer Listens
The Result is Better Clothes Care
START
DEMO
LEARN
MORE
TRY THE
CONTROLS
Operation Overview
Note: Dry load and wet load sensing are used on
all cycles except the following:
Basic Wash Cycle
Note: See Component Locator Views for
identification and location of washer components.
After a load is placed in the basket, the user
selects the appropriate wash cycle on the LCD
touch screen and presses start.
Cycle time and wash patterns will vary depending
on user time adjustments, soil level adjustments,
fabric type, and wash-load weight.
Dry Load Sensing
Before an initial fill, the infusor rotates the dry
clothes load. This rotation is controlled by the
inverter which measures the amount of time it
takes for the motor to coast to a stop. The larger
the clothes load, the less momentum the motor is
capable of generating, so the faster it will stop.
The infusor will rotate back and forth up to four
times. This information is used to determine the
initial water fill level.
Water Fill
The washer automatically fills to the proper level
based on the load sensing measurements.
Depending on the cycle chosen and the quantity
of clothes, there are 27 possible water levels. This
information is stored in memory for the final rinse
at the end of the wash cycle. Water levels are
matched to load size using approximately onethird less water than typical top load washers.
SNEAKERS
COMFORTERS
BLANKETS (OTHERS)
BLANKETS (COTTONS)
THROW RUGS (WASHABLE)
The SNEAKERS cycle defaults to the minimum
water level. BLANKETS, THROW RUGS and
COMFORTERS cycle default to the maximum
water level.
Wash Water Temperature
During the fill, the washer monitors and regulates
wash water temperatures within 5°F (-15°C) of
the target temperature. This accuracy is achieved
using a thermistor, located in the outer tub, which
monitors the tub water temperature during the fill
cycle.
Based on information received from the
thermistor, the inverter controls the hot and cold
inlet valves to achieve the desired wash
temperature. (See Thermistor/ATC Control Auto
Temp.)
Target Water Temperatures:
Hot - 120°F (49°C)
Warm - 105°F (41°C)
Cold - 80°F (27°C)
Very Cold - 60°F (16°C)
Note: The washer can use as little as 17.5
gallons of water for small loads and has an
average water use of 27 gallons per load.
Wet Load Sensing
After the first fill, the infusor and basket lock
together and rotate to measure the clothes load.
During this time, the motor momentum is
measured again. The washer compares this
information to the previous dry load sensing
measurements and determines if additional water
is required.
During the fill, the basket slowly rotates in a
clockwise direction. This action mixes the
detergent and water to assure proper distribution
and assure the thermistor is reading an accurate
basket water temperature.
Basket Wash
The infusor and wash basket lock together and
rotate clockwise and then counterclockwise. This
action mixes the detergent and water while
distributing the clothes evenly in the wash water.
The basket wash speed is based on fabric type
and load size. Delicate fabrics are gently rotated
while heavier fabrics are rotated more vigorously.
– 17 –
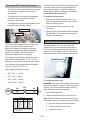
Centrifusion Wash
Spin
The locked infusor and wash basket begin a
clockwise spin (figure 1). The speed of the spin is
customized to the load type and fabric type. As
the basket spins faster, it creates a strong flow of
water under the centrifugal force (figure 2).
The infusor and wash basket lock together. The
basket spins very slowly at first. This allows dirty
wash water and lint to drain through the holes in
the bottom of the basket before a higher spin
begins. When the washer senses that the excess
water has drained, the wash basket accelerates
to a higher speed.
Spin speeds are adaptive to fabric type that is
selected by the user on the LCD touch screen.
They can be as slow as 350 rpm for hand-wash
items and up to 1010 rpm for heavier items. The
spin is designed to extract as much water and
detergent as possible without harming fabrics.
Note: During the spin cycle, excessive suds can
cause excessive torque on the motor. If the
washer detects this condition, it will run through
the rinse, drain, and spin cycle (up to three times)
in an attempt to eliminate the suds
As water passes through the fabric, its natural
cleansing action washes away dirt without
damaging or tangling the fabric.
Fabric
Note: The washer is programmed to correct out
of balance situations during spins. If the washer
senses an out of balance load, the spin is
stopped. The washer then refills to allow the
infusor wash cycle to redistribute the load before
starting the spin again. The washer attempts to
rebalance the load three times before optimizing
the spin to a lower speed where balance is
sustainable.
Soil
Water
Current
After several seconds of clockwise spinning, the
basket slows down and stops. The wash water
pools back into the wash basket. The wash
basket starts spinning in the counterclockwise
direction creating the same cleaning action. The
washer will change direction (up to four times)
before going to the next cycle.
Spray Rinse
The infusor and wash basket turn at a slow speed
while fresh, clean water is added to the wash
load. The spin cycle then drains this rinse water
and prepares the wash load for a final rinse.
Final Rinse
The washer retrieves the information it gathered
for adaptive fill cycle and uses that information to
refill the washer for the final rinse. Cold water
enters the basket through the fabric softener
dispenser to dilute the softener into the basket
and rinse the dispenser clean. The wash basket
fills to the optimal level and goes into a basket
wash cycle where the clothes and fabric softener
are mixed thoroughly. A final spin finishes the
cycle.
Infusor Wash
Following the centrifusion wash cycle, the basket
and infusor unlock. The infusor rotates to evenly
distribute the wash load while continuing to clean.
The redistribution of fabrics helps ensure that the
lint and dirt do not become trapped.
Note: All rinse cycles use cold water and the
(ATC) automatic temperature control is not used.
The cold rinse is the same temperature as the
incoming cold water supply.
– 18 –
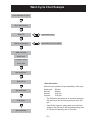
Wash Cycle Chart Example
User Selection of Cycle
Dry Load Sensing
Water Fill
Wet Load Sensing
Adjust Water Temp
Adjust Water Fill (only if needed)
Wash Process
Basket Wash
Centrifusion Wash
Infusor Wash
Spin and Drain*
Spray Rinse
*Spin Information
Maximum spin speeds will vary depending on the cycle:
Spin and Drain
Final Rinse
Spin and Drain
Hand-wash
Delicate
Normal
Vigorous
350 rpm
500 rpm
1010 rpm
1010 rpm
•
The Delicate cycle ramps up to maximum speed by
first spinning to 400 rpm then pausing, then to 500
rpm.
•
Normal and Vigorous cycles ramp up to maximum
speed by first spinning to 400 rpm and pausing, then
to 750 rpm and pausing, then to 1010 rpm.
– 19 –
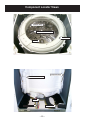
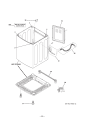
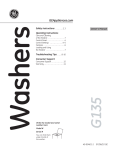
Component Locator Views
Balance Ring
304 Stainless Wash Basket
Tub Cover
Infusor
Suspension Rod
Pressure Sensor Hose
Motor
Wiring Harness
Drain Pump
– 20 –
Note: To view the
basket while it is in
operation, open the lid
and place a magnet
on the left front corner
of the top cover (in
front of the bleach
dispenser).
Lid Switch
Top Cover
Bleach Water Reservoir
Additive Dispenser
Pressure Sensor
Magnet
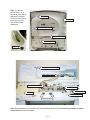
Serial Communication Link
Main Control Board
Water Valve Assembly
Pressure Sensor
Brake Resistor
Inverter
RF Choke & Fuse
Water Inlet Ports
Note: Backsplashes are reversible. Left control backspash shown. See Switching the Washer and Dryer
Backsplashes for more information.
– 21 –
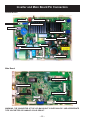
Inverter and Main Board Pin Connectors
Inverter Board
Lid Switch
Main Board CON1
Pressure Sensor
Hall Sensor
Main Board CON2
Thermistor
Water Valve Assembly
Washer Motor
Clutch Motor
Power LED
Drain Pump
120 VAC input From RF Choke
Ground
Brake Resistor
Main Board
LCD Backlight
(>800 VDC)
Touch Screen
Keypanel Membrane
LCD Display
Inverter
Serial Communication Link
WARNING: THE CONNECTOR AT THE LCD BACKLIGHT IS OVER 800 VDC. USE APPROPRIATE
TYPE VOLTMETER OR DAMAGE COULD RESULT.
– 22 –
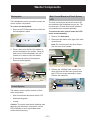
Washer Components
Backsplash
Main Control Board and Touch Screen
LCD
The backsplash must be removed to access the
control system components.
The main control board and touch screen LCD
are attached to the backsplash as one unit. The
touch screen LCD and main control board are
only available as a complete assembly.
To remove the backsplash:
1. Remove the 2 Phillips head screws that hold
the backsplash in place.
To remove the main control board and LCD
touch screen assembly:
1. Remove the Backsplash.
2. Disconnect the ribbon at the right of the main
control board.
Note: Do not disconnect any other ribbons
from the main control board.
2. Place a towel over the lid of the washer to
prevent scratches to the surface. Gently lift
each corner of the backsplash, then roll it
forward so it rests on top of the washer.
Disconnect Ribbon
3. Disconnect the wiring to the keypanel.
Remove the backsplash.
3. Remove the 4 Phillips head screws (2 on
each side) that hold the main control board
and LCD touch screen assembly in place.
Remove the assembly.
Control Board
Control System
The washer control system consists of three
main components:
•
Main control board and touch screen LCD
•
Membrane keypanel
•
Inverter
Caution: To prevent electrostatic discharge from
damaging any electronic components, use an
ESD wristband or touch a grounded metal
surface before servicing.
– 23 –
Membrane Keypanel
The membrane keypanel is attached to the
backsplash and is only available as a complete
assembly.
When ordering a replacement backsplash, the
part must be ordered as left or right, depending
upon installation.
The membrane keypanel is connected to the
control board by a ribbon cable.
Membrane Keypanel Test
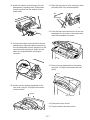
3. Lift the inverter box up. Press the tabs on the
side and gently pry it open.
To test the membrane keypanel, press the
appropriate pad and check for continuity (0 Ω)
between the following pins:
Pad
Power
My Cycles
Back
Help
Home
Start/Stop
5
4
3
2
1
Press
Press
4. Disconnect the wiring from the inverter board.
Remove the inverter.
1
7
Pins
1 and 3
1 and 4
2 and 3
2 and 4
1 and 7
1 and 5
MEMBRANE
RIBBON
Note: The number (1) molded on the membrane
connecter is not a pin reference number.
Testing the Inverter
CON2
Inverter
The inverter board is enclosed in a protective box
mounted on the top cover under the backsplash.
Power LED
To access and remove the inverter:
120 VAC Input From RF Choke
1. Follow steps 1 and 2 under Backsplash.
2. Remove the 2 Phillips head screws that hold
the inverter box in place.
IC300
– 24 –
•
•
The inverter receives 120 VAC through the
RD2 connector (RF Choke). If 120 VAC is not
present, check wall outlet, power cord, and
RF Choke.
The RF Choke filters the line voltage and
contains an in-line fuse. It is replaced as an
assembly.
Protective Cover
The protective cover must be removed to access
the following components: water valve assembly,
pressure switch, brake resistor, RF choke, and
fuse. The protective cover is held in place by 3
Phillips head screws.
RF Choke
Protective Cover
Fuse
Brake Resistor
•
•
•
•
Whenever the washer is plugged in, there is 5
VDC at pins 1 and 2 on the dark blue 7-pin
CON2. (See Testing the Inverter photo.)
The brake resistor absorbs energy from the
reversing of the motor during the brake cycle.
•
When the washer is turned on by pressing a
membrane pad or touching the LCD screen,
the Power LED on the inverter comes on.
The brake resistor only operates when the
washer is unplugged or the lid is lifted during a
cycle.
•
Under normal operation, the tub coasts to a
stop at the end of a cycle.
•
The approximate resistance value of the
brake resistor is 70 Ω.
•
If the resistor is shorted, the motor will not
start.
•
If the resistor opens while the motor is
spinning, the inverter board can be damaged.
•
Look for a burnt IC labeled IC300 on the
inverter board. Both the resistor and inverter
board should be replaced if the IC300 is
damaged. (See Testing the Inverter photo.)
When the Power LED is on, the 12-VDC
power supply on the inverter board is
energized and the below listed voltages are on
CON2:
CON2
1
2
3
4
5
Pins
Voltages
1 and 2
5 VDC
1 and 3
12 VDC
1 and 4
20 VDC
•
6
7
To remove the brake resistor:
1. Remove the 2 Phillips head screws that hold
the brake resistor in place.
After 5 minutes, if there is no additional screen
input, the washer shuts off and the power LED
shuts off. There is no voltage on pins 1 and 3
and 1 and 4 at this time.
•
If the washer operates through a cycle, the
inverter voltages at CON2 will be present until
the lid is opened.
•
If the Power LED is lit and any of the three
voltages (5 VDC, 12 VDC, 20 VDC) at CON2
are not present, the inverter is bad.
2. Disconnect the wiring to the brake resistor.
Screw
Brake Resistor
Screw
Disconnect
– 25 –
The frequency is monitored by the inverter which
turns off the water valves when the desired water
level is achieved.
Pressure Sensor (Water Level Switch)
The pressure sensor is connected by a clear
hose to an air reservoir near the bottom of the
outer tub and operates by a frequency (kHz)
signal to the inverter board.
Note: The water level will vary depending on the
load size which is measured by the dry load and
wet load sensing cycles. This information is sent
to the inverter, which then determines the
appropriate water level.
Pressure Sensor Test
Pressure Sensor
If the pressure sensor is not operating correctly,
perform the following test:
Disconnect
1. Set the wash cycle to SNEAKERS. This cycle
bypasses the load sensing feature and
defaults to the minimum water level.
Clear Pressure Hose
The pressure sensor wires (purple, orange, and
blue) are connected at pins 1, 3, and 4 at the 4-pin
red connector on the inverter board. (See Inverter
and Main Board Pin Connectors).
The approximate resistance value of the
transducer, measured between the purple and
orange wires, is 20 Ω.
2 1 3
PRESSURE
S/W
VX
OX
NX
WX
WX
4 3 1 2
WX
AX
BX
CX
NX
OX
PX
COLOR CODE
COLOR
LETTERS
LT. BLUE
BLACK
BROWN
DK.BLUE
ORANGE
PINK
RX
SX
GX
VX
WX
YX
Note: Before disconnecting the hose from the
pressure sensor, be sure the water level is below
the bottom of the spin basket.
RX
To remove the pressure sensor:
1. Remove the 2 Phillips head screws that hold
the Backsplash in place.
COLOR
2. Place a towel over the lid of the washer to
prevent scratches to the surface. Gently lift
each corner of the backsplash, then roll it
forward so it rests on top of the washer.
RED
GRAY
GREEN
PURPLE
WHITE
YELLOW
THE "X' INDICATES ONE SOLID COLORNO TRACER. WIRES WITH TRACER SHOW
BOTH COLORS, EXAMPLE - WR IS WHITE
WITH RED TRACER.
•
3. Set the washer to COMFORTER. This cycle
bypasses the load sensing feature and
defaults to the maximum water level.
4. Measure the water level from the center hub of
the infusor (it should be approximately
11 inches deep in the tub).
LID
LETTERS
2. Measure the water level from the center hub of
the infusor (it should be approximately
2 inches deep in the tub).
When the water level rises in the washer tub,
air is trapped in the reservoir. As the water
level rises, the air pressure in the reservoir
increases.
3. Remove the 3 Phillips head screws that hold
protective cover in place.
4. Disconnect wiring to the pressure sensor.
•
The pressure is translated into an electrical
signal (frequency) by the pressure sensor.
5. The pressure sensor is held in place by 3
tabs. With a flat blade screwdriver, press the
tabs back and lift the water level switch up
and out.
•
The frequency will vary from approximately 27
kHz (empty tub) to 22 kHz (full tub).
6. Disconnect the clear hose from the pressure
sensor.
•
This frequency can be measured at the
pressure sensor between the purple and
orange wires.
– 26 –
3. Note the placement of the wires, then
disconnect the wiring to the solenoid coils.
Water Valve Assembly
The water valve consists of a valve body and five
solenoid coils. It is only available as a complete
assembly. Each solenoid controls a specific water
function.
Disconnect
Water Valve Assembly
4. Remove the 2 water inlet hoses:
a. Squeeze each clamp and slide it back.
b. Carefully break the hoses loose.
Water Distribution Pipe
c. Remove the hoses.
Clamp
Bleach
Softener
Cold Water
Additive
Clamp
Hot Water
Inlet hoses
•
Each coil on the water valve assembly has an
approximate resistance value of 30 Ω.
•
The water valves receive power from the
inverter. They are connected to the 6-pin blue
connector on the inverter board. (See Inverter
and Main Board Pin Connectors.)
•
When energized, there should be
approximately 13-VDC at the appropriate coil.
AX
WX
PX
Bleach Softener
CV
Additive
HV
10 4
9 3
8 2
7 5
6 1
NX
BX
YX
NX
AX
WX
LETTERS
AX
BX
CX
NX
OX
PX
COLOR CODE
COLOR
LETTERS
LT. BLUE
BLACK
BROWN
DK.BLUE
ORANGE
PINK
RX
SX
GX
VX
WX
YX
5. Remove the 3 Phillips head screws that hold
the water valve assembly in place and the 2
Phillips head screws that hold the water
distribution pipe in place.
COLOR
RED
GRAY
GREEN
PURPLE
WHITE
YELLOW
THE "X' INDICATES ONE SOLID COLORNO TRACER. WIRES WITH TRACER SHOW
BOTH COLORS, EXAMPLE - WR IS WHITE
WITH RED TRACER.
6. Remove the water valve assembly and
distribution pipe.
Note: The distribution pipe separates from the
water valve assembly as shown below.
SX YX BX
N X C X OX
4 3 2 5 6 1
NX
I nv e r t e r
To remove the water valve assembly:
1. Remove the Backsplash.
2. Remove the 3 Phillips head screws that hold
protective cover in place.
– 27 –
Top Cover
The top cover is held in place by 2 Phillips head
screws located on the top/back of the washer and
two front tabs.
To remove the top cover:
4. The main wiring harness is held in place by
plastic clips on the inside corner of the washer
cavity. Remove the wiring harness from the
holding clips.
5. Remove the screw that holds the ground wire
to the upper back cover.
1. Remove the 2 Phillips head screws that hold
the top cover in place.
6. Disconnect the four wiring harness
connectors.
2. Remove the 4 Phillips head screws (2 on
each side) that hold the back cover in place.
Remove the back cover.
Disconnect
7. Lift the back of the top cover and slide it
forward to clear the front tabs. Remove the
top cover.
3. Disconnect the pressure sensor hose from
the outer tub.
Disconnect
– 28 –
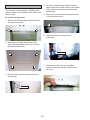
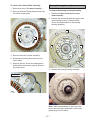
Wash Basket
Caution: If the basket is not free to rotate,
damage to the clutch coupler can occur. Ensure
that the washer is in the spin mode before
removing the wash basket. The wash basket will
rotate freely when it is in spin mode. Do not
attempt to remove the hub nut if the basket is not
free to rotate.
4. Remove the 10-mm hex-head screw that
holds the infusor in place with a socket or
Phillips head screwdriver (turn screw
counterclockwise to remove).
Note: The 10-mm screw has a rubber O-ring.
To remove the wash basket:
1. Remove the Top Cover.
2. Remove the 8 Phillips head screws that hold
the outer tub cover in place.
5. Pull the infusor up and out. WARNING: The
inner edge can be sharp. Wear Kevlar gloves
or equivalent protection.
6. Remove the 37.5-mm (1-1/2” SAE equivalent)
hub-nut with a socket or Crescent wrench
(rotate hub-nut counterclockwise to remove).
3. Place a flat-head screwdriver in the slot under
the infusor cap and gently pry off.
Hub Nut
Infusor Cap
7. Lift the wash basket up and out.
Infusor
– 29 –
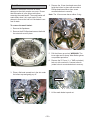
Drain Pump
•
The drain pump consists of a 120-VAC,
60-Hz, motor, impeller, and impeller housing.
•
The pump is capable of pumping to a standpipe height of 8 ft. The maximum length of the
drain hose is 10 ft. (An accessory drain hose
extension is not available at this time.)
•
The drain pump will operate independently of
other mechanical components and will
evacuate water at various times during the
cycle.
•
The drain-pump motor has an approximate
resistance value of 11 Ω.
•
Drain Pump Cover
4. Lift up the tab on the impeller housing with a
flat-head screwdriver. When viewed from the
impeller housing end, rotate the motor in a
counter clockwise direction to remove.
Tab
Pins 1 and 2 on the light blue 2-pin connector
on inverter board should measure 120 VAC
when drain pump is activated. (See Inverter
and Main Board Pin Connectors.)
LETTERS
AX
BX
CX
NX
OX
PX
NX
NX
COLOR CODE
COLOR
LETTERS
LT. BLUE
BLACK
BROWN
DK.BLUE
ORANGE
PINK
SX
RX
SX
GX
VX
WX
YX
1 2
SX
NX
DRAIN
PUMP
Motor
Impeller Housing
AX
COLOR
5. Remove any foreign objects from the impeller
and impeller housing. Inspect the impeller for
any damage and replace the pump assembly
if necessary.
RED
GRAY
GREEN
PURPLE
WHITE
YELLOW
THE "X' INDICATES ONE SOLID COLORNO TRACER. WIRES WITH TRACER SHOW
BOTH COLORS, EXAMPLE - WR IS WHITE
WITH RED TRACER.
To remove the drain pump:
Note: Water will remain in hoses even when the
tub appears empty. Use care to avoid water spills.
To clean the impeller and impeller housing:
WARNING: The drain pump bracket is not
grounded. Unplug the unit before servicing to
avoid electric shock.
1. Disconnect power to the machine.
Note: The impeller can be accessed for cleaning
without removing the drain hoses. Water will
remain in hoses even when the tub appears
empty. Use care to avoid water spills.
1. Disconnect power to the machine.
2. Remove the 4 Phillips head screws (2 on
each side) that hold the back cover in place.
Remove the back cover.
3. Remove the thin plastic cover over the drain
pump by pulling down on the ends to clear the
tabs.
2. Remove the 4 Phillips head screws (2 on
each side) that hold the back cover in place.
Remove the back cover.
Drain Pump Cover
3. Remove the thin plastic cover over the drain
pump by pulling down on the ends to clear the
tabs.
– 30 –
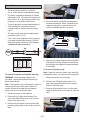
4. Remove the drain hoses from the pump:
Note: The drain hoses are difficult to remove due
to a sealing compound used at the factory.
7. Remove the 2 Phillips head screws that hold
the drain pump to the mounting plate. Remove
the drain pump.
a. Squeeze each clamp and slide it back.
b. Carefully break the hose loose by inserting
a small flat-blade screwdriver under the
hose to break the seal.
c. Remove the hose.
Clamp
Clamp
Caution: Care must to taken when reinstalling
and sealing the drain hoses to the outer tub to
ensure there is no water leakage.
5. Remove the 2 Phillips head screws that hold
the drain pump mounting plate to the washer
floor.
When installing, apply a thin coat of sealing
compound (part no. WH60X15) to the inner
surface of the drain hoses.
6. Disconnect the drain pump wires.
Disconnect
– 31 –
Thermistor/ATC Control (Auto Temp)
•
The control uses a water temperature sensor
(thermistor) to regulate the wash water
temperature.
•
The thermistor has a negative temperature
coefficient (as temperature increases,
resistance decreases).
•
Resistance can be measured at the purple 2-pin
connector on the inverter board. Make sure to
unplug the connector to isolate the thermistor
before taking resistance readings. (See Inverter
and Main Board Pin Connectors.)
To remove the thermistor:
1. Remove the 4 Phillips head screws (2 on
each side) that hold the back cover in place.
Remove the back cover.
The thermistor is located in the bottom of the
outer tub under the wash basket.
2. Disconnect the wiring connector at the
thermistor.
Bottom view
3. Remove the 2 Phillips head screws that hold
the thermistor to the bottom of the outer tub.
Remove the thermistor.
Thermistor
Outer tub and Suspension Assembly
To determine the temperature of the incoming
water, the washer control measures the
difference between the voltage sent and the
voltage returned from the water temperature
sensor. The washer control then makes
temperature adjustments accordingly.
The wash basket, outer tub, and motor are
suspended by four rod and spring assemblies.
The rod and spring assemblies are attached to
each corner of the washer cabinet. They extend
down and connect to the bottom of the outer tub.
The washer control should maintain the water
temperature in the tub within +/- 5°F (3°C) by
opening or closing the hot and cold water valves.
Suspension Rod
The thermistor has an approximate resistance
value of 121K Ω at 70°F (21°C).
.
Approximate resistance values at:
•
60F° (16C°) - 141K Ω
•
80F° (27C°) - 86K Ω
•
105F° (40C°) - 48K Ω
•
120F° (49C°) - 35K Ω
SX
NX
61
AUTO
TEMP
WX
SX
1 2
WX
To remove the outer tub:
WARNING: The outer tub assembly is heavy and
requires two people to remove it from the washer
housing. Care should be taken when removing
and installing the outer tub assembly.
VX
1. Remove the Top Cover.
2. Remove the drain hose from the outer tub:
LETTERS
AX
BX
CX
NX
OX
PX
COLOR CODE
COLOR LETTERS
LT. BLUE
BLACK
BROWN
DK.BLUE
ORANGE
PINK
RX
SX
GX
VX
WX
YX
COLOR
RED
GRAY
GREEN
PURPLE
WHITE
YELLOW
Note: Water will remain in hoses even when the
tub appears empty. Use care to avoid water spills.
a. Squeeze the clamp and slide it back.
b. Carefully break the hose loose.
THE "X' INDICATES ONE SOLID COLORNO TRACER. WIRES WITH TRACER SHOW
BOTH COLORS, EXAMPLE - WR IS WHITE
WITH RED TRACER.
c. Remove the hose.
– 32 –
3. Lift the outer tub up and disengage the
suspension rod assemblies from each corner
of the outer tub.
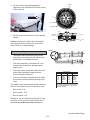
ROTOR
Rotor
COIL
Disengage
POWER
STATOR
PERMANENT MAGNET
HALL SENSOR ASSEMBLY
SHAFT
POWER
PERMANENT
MAGNET
4. Pull the outer tub assembly out of the washer
cabinet.
HALL SENSOR
ROTOR
STATOR
Caution: Care must to taken when reinstalling
and sealing the drain hoses to the outer tub to
ensure there is no water leakage.
ROTOR NUT
MOTOR
•
The motor varies speed and torque when the
pulse width modulated voltage from the
inverter changes frequency.
The motor reverses rotational direction when
the inverter reverses electrical polarity to the
motor.
The washer motor has an approximate resistance
value of 8 Ω between any two of the three wires:
•
Blue to red - 8 Ω
•
Red to yellow - 8 Ω
•
Blue to yellow - 8 Ω
HALL
SENSOR
LETTERS
AX
BX
CX
NX
OX
PX
NX
RX
YX
RX
NX
YX
COLOR CODE
COLOR
LETTERS
LT. BLUE
BLACK
BROWN
DK.BLUE
ORANGE
PINK
RX
SX
GX
VX
WX
YX
NX
1 23
The motor assembly is composed of a coil
wound stator, Hall sensor, and permanent
magnet rotor.
YX
CX
NX
RX
CX
YX
1 2 3 4
1
2
3
The washer has a direct drive pulse width
modulation motor that does not utilize a belt,
transmission, or mechanical brake.
•
•
NX
RX
1 2 345
•
4 5 2 3
Motor Assembly
YX
COLOR
RED
GRAY
GREEN
PURPLE
WHITE
YELLOW
THE "X' INDICATES ONE SOLID COLORNO TRACER. WIRES WITH TRACER SHOW
BOTH COLORS, EXAMPLE - WR IS WHITE
WITH RED TRACER.
Resistance can be measured at the yellow, 3-pin
connector on the inverter board or at the motor.
(See Inverter and Main Board Pin Connectors.)
(Continued Next Page)
– 33 –
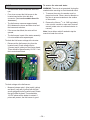
To remove the rotor and stator:
Hall Sensor
WARNING: The rotor is not grounded. Unplug the
washer before servicing to avoid electrical shock
•
The Hall effect sensor measures the motor
rpm.
•
Four wires connect the Hall sensor to the
inverter board at the 4-pin dark blue
connector. (See Inverter and Main Board Pin
Connectors.)
•
The Hall sensor measures approximately
9K Ω between the brown and blue wires and
the brown and red wires.
2. Remove the 24-mm (15/16 in. SAE equivalent)
rotor nut with a socket or open end Crescent
wrench (rotate rotor nut counterclockwise to
remove).
•
If the sensor has failed, the motor will not
operate.
Note: Use a rubber mallet if needed to tap the
wrench to break the nut free.
•
The Hall sensor is part of the stator assembly.
It is not available as a separate part.
1. To access the motor, the washer must be
placed on its side. Place a towel or blanket on
the floor to prevent scratches to the surface
of the washer.
To check the Hall sensor voltage at the inverter:
•
Bottom view
Disconnect the Hall sensor plug from the
inverter board. Check voltage on pins
3 (brown) and 4 (yellow) on the inverter board.
There should be approximately 12 VDC. If not,
the inverter board is bad.
Inverter Board
Rotor Nut
3
1
4
2
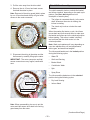
To check voltage at the Hall sensor:
•
Rotor
Measure between pins 1 (blue) and 4 (yellow)
and pins 2 (red) and 4 (yellow) with the Hall
sensor plugged into the inverter board. Rotate
the spin basket by hand. There should be
12-VDC pulses as the basket is rotated. If
pulses are present, the Hall sensor is good.
– 34 –
3. Pull the rotor away from the drive shaft.
Clutch Shifter Assembly
4. Remove the six 10-mm hex-head screws
that hold the stator in place.
The clutch assembly locks or unlocks the basket
and infusor together, depending on the wash cycle
pattern. (See Basic Wash Cycle for a brief
description of wash cycles.)
Note: Removal of the wiring guard (held in place
by one 10-mm hex-head screw) will give better
access to the motor connector.
Stator
•
The infusor is connected directly to the motor
shaft. Whenever the motor is rotating, the
infusor is rotating.
•
The clutch only locks or unlocks the wash
basket.
When the washer first starts a cycle, the infusor
moves back and forth several times to make sure
the basket and infusor are in the unlocked position
before starting. This action is called “clutching”
and confirms that the clutch motor is in the
unlocked position.
Wiring Guard
5. Disconnect the wiring to the stator and the
Hall sensor by carefully lifting up the stator.
IMPORTANT: The motor connector and Hall
sensor connector are very fragile, handle with
care.
Note: Wash cycle patterns will vary depending on
user time adjustments, soil level adjustments,
fabric types, and wash-load weights.
The infusor and basket are in the locked position
during the following cycles:
•
Water Fill
•
Wet Load Sensing
•
Basket Wash
•
Centrifusion Wash
•
Spin
•
Spray Rinse
The infusor and the basket are in the unlocked
position during the following cycles:
Stator Connecter
•
Dry Load Sensing
•
Infusor Wash
Hall Sensor Connector
Note: When reassembling, be sure to put the
motor and Hall sensor wires back in the wiring
guard away from the motor.
(Continued Next Page)
– 35 –
Clutch Operation
To diagnose the clutch motor:
•
The clutch locks and unlocks the basket by
engaging teeth on the inside of the rotor with
teeth on the clutch coupler.
•
•
When the basket and infusor are in the locked
position, the clutch moves downward and
engages the rotor and clutch coupler teeth
allowing the basket to rotate with the infusor.
Note: Disconnect power and unplug the clutch
motor connector at the inverter board.
The inverter supplies 120 VAC to the clutch
motor through the brown and white wires
when the clutch motor changes position.
•
The clutch motor has an approximate
resistance value of 2000 Ω. This can be
measured between the white and brown wires
on the inverter board. (See Inverter and Main
Board Pin Connectors.)
•
The rotation of the clutch motor causes an
internal switch to open or close. This can be
measured between the brown and blue wires
on the inverter board.
•
When the clutch is in the unlocked position the
switch should be closed (0 Ω).
•
When the clutch is in the locked position the
switch should be open (infinity).
Rotor Teeth
Clutch Motor
Locked
WX
NX
WX
CX
NX
CX
•
When the basket and infusor are in the
unlocked position, the clutch moves upward,
disengaging the clutch coupler and rotor teeth,
allowing the infusor to rotate independently of
the basket.
LETTERS
AX
BX
CX
NX
OX
PX
COLOR CODE
COLOR
LETTERS
LT. BLUE
BLACK
BROWN
DK.BLUE
ORANGE
PINK
RX
SX
GX
VX
WX
YX
COLOR
RED
GRAY
GREEN
PURPLE
WHITE
YELLOW
THE "X' INDICATES ONE SOLID COLORNO TRACER. WIRES WITH TRACER SHOW
BOTH COLORS, EXAMPLE - WR IS WHITE
WITH RED TRACER.
Clutch Motor
Unlocked
– 36 –
1 2 3
Clutch Coupler
CLUTCH
MOTOR
& CAM
To remove the clutch shifter assembly:
Bearing Housing Assembly
1. Remove the rotor. (See Motor Assembly.)
2. Remove the three Phillips head screws from
the clutch coupler plate.
To remove the bearing housing Assembly:
1. Remove the Motor Assembly and Clutch
Shifter Assembly.
2. Remove the screw that holds the ground wire
to the bearing housing. Remove all the
10-mm hex-head screws on the bearing
housing assembly
3. Remove the clutch coupler assembly.
4. Disconnect the wiring connector from the
clutch motor.
Gr
5. Remove the two 10-mm hex-head screws
that hold the clutch motor in place. Remove
the clutch motor.
ou
nd
4. Remove the bearing housing assembly.
Disconnect
Note: When reassembling, be sure to put the
motor and Hall sensor wires back in the wiring
guard away from the motor.
– 37 –
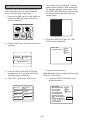
Field Service Mode
3. Press and hold MY CYCLES and BACK
simultaneously for 3 seconds:
Overview
•
The washer control has a field service mode that
can be accessed by the service technician in
order to give critical information on the status of
various components of the washer. This mode will
aid the service technician in quickly identifying
failed or improper operation of components and
systems.
The control will display any recorded
errors. If no errors have been recorded,
press EXIT to return to the HOME screen.
SERVICE MODE DIAGNOSTICS
THERE ARE NO SERVICE PROBLEMS
DETECTED WITHTHIS UNIT.
The service mode does not use error codes to
identify problems. Instead, the LCD screen
displays a list of components or systems to be
checked if a problem is detected.
EXIT
To enter the service mode:
Note: Once the service mode is entered, all
membrane keypanel buttons are disabled.
1. Press the POWER key to turn the washer on.
4. If errors have been recorded, use the error
chart in the troubleshooting section for proper
diagnostic procedures.
a. If the washer is on and the HOME screen
is displayed, proceed to step 2. If the
home screen is not displayed, press
HOME on the keypanel.
SERVICE MODE DIAGNOSTICS
WATER IS NOT DISPENSING INTO UNIT
PROPERLY.
CHECK WATER LINE CONNECTIONS,
WATER VALVES, AND DETERGENT
/ BLEACH / ADDITIVE DISPENSERS,
PRESSURE SENSOR SYSTEM.
REMEMBERTO ALWAYS UNPLUG UNIT
PRIORTO ANY SERVICING
TOUCH TO SELECT WASH CYCLE
EXIT
BY
COLOR
BY
GARMENT
•
SPECIAL
CYCLES
BY
FABRIC
STAIN
INSPECTOR
A MORE icon will be displayed on the LCD
screen if additional problems have been
recorded. Press MORE to list additional
errors.
SERVICE MODE DIAGNOSTICS
2. Press HELP. The main help screen is
displayed.
WATER IS NOT DISPENSING INTO UNIT
PROPERLY.
CHECK WATER LINE CONNECTIONS,
WATER VALVES, AND DETERGENT
/ BLEACH / ADDITIVE DISPENSERS,
PRESSURE SENSOR SYSTEM.
REMEMBERTO ALWAYS UNPLUG UNIT
PRIORTO ANY SERVICING
EXIT
MACHINE
PREFERENCES
MORE
HOME SCREEN
HELP
•
TROUBLE SHOOTER
– 38 –
Use the BACK pad on the keypanel
membrane to scroll back through the list. If
MORE is not displayed then there are no
additional errors.
5. If errors have been recorded, the following
steps MUST be performed.
IMPORTANT: Always disconnect power,
reconnect power, and run the setup/self
diagnostic mode prior to leaving the house. If
this process is not completed and a power
outage should occur, the setup/self
diagnostic mode screen will be displayed for
the customer. This may generate a second
service call when no problem exists.
a. Make a note of the listed errors. Press
EXIT, the screen prompts you to unplug
the washer before servicing.
SERVICE MODE DIAGNOSTICS
ATTENTION
d. When all errors have been corrected and
the setup/self diagnostic mode has been
completed, the washer displays the
following screen.
IN ORDER TO EXIT THE SERVICE MODE
THE UNIT MUST BE UNPLUGGED AND
SERVICED. THE UNIT WILL
AUTOMATICALLY RUN A SETUP POUTINE
AND SELF-DIAGNOSTICS UPON BEING
PLUGGED BACK IN.
Note: Pressing exit clears all error messages and
activates the setup mode program.
b. Disconnect power and make necessary
repairs.
CONGRATULATIONS ON THE
PURCHASE OF YOUR NEW GE
PROFILE WASHER!
A BRIEF SELF DIAGNOSTIC
WILL NOW BE RUN ON YOUR
WASHER. THIS MAY TAKE UP
TO 5 MINUTES
OK
List of self diagnostic checks:
Lid
•
Touch Screen
•
Beeper
•
Keypanel Buttons
•
Sensors
•
Water System
•
Drive System
•
Serial Communication Link
PLEASE READ YOUR
USER'S MANUAL PRIOR
TO OPERATION.
OK
c. After the problem has been identified in
service mode and repairs have been
made, the unit prompts the service
technician to run a setup/self diagnostic
check. The self diagnostic check consists
of a series of system tests to ensure the
washer is operating correctly. Follow the
on-screen instructions.
•
YOUR WASHER IS NOW
READY FOR YOUR USE.
– 39 –
e. Press OK to return the washer to normal
operation.
Factory Test Mode
The factory test mode allows the service tech to
make adjustments and run several important
tests on critical washer components.
1. Press the POWER pad to turn the washer on.
Press the HOME pad to ensure the home
screen is displayed.
5. The contrast screen is displayed. This test
shows screen resolution, which affects how
the washer’s graphics are displayed. Press
the START/STOP pad once to cycle through
the contrast screen (the black flips to the
opposite side).
TOUCH TO SELECT WASH CYCLE
BY
BY GARMENT
COLOR
BY
FABRIC
SPECIAL
CYCLES
STAIN
INSPECTOR
6. Press the START/STOP pad. The TEST
LOAD screen is displayed.
2. Press the HELP pad. The main help screen is
displayed.
TEST LOAD
TEST BRAKE RESISTOR
MACHINE
PREFERENCES
IPM TEMP
032
ATM TEMP
040
WATER TEMP
020
HOME SCREEN
HELP
CONTRAST
90
TROUBLESHOOTER
3. Press the HELP and START/STOP pads
simultaneously for 3 seconds. The Factory
Test Mode screen is displayed.
7. Using the test load screen:
Note: Read this section completely before using
the TEST LOAD screen.
a. Press the START/STOP pad to scroll
through the test list.
4. Press TEST LOAD on the LCD screen.
SPIN CYCLE
CONTINOUS
SPIN
FILL/DRAIN/
SPIN
PROGRAM
CYCLE
SPIN/
BRAKE
LQC SPIN
TEST LOAD
LQC ALPHA
TEST LOAD
IPM TEMP
TEST BRAKE RESISTOR
032
TEST COLD VALVE
ATM TEMP
040
TEST HOT VALVE
WATER TEMP
TEST BLEACH VALVE
020
TEST SOFTNER VALVE
TEST SPECIAL ADDITIVE
WATER - LEVEL FREQUENCY CONTRAST
90
259
DRY LOAD SENSING DATA
124 002 140 002 237 003 122 003 067
139 047 038 038
TEST PUMP MOTOR
– 40 –
b. To stop the current test and move to the
next test, press the START/STOP pad.
•
TEST BLEACH VALVE - Energizes bleach
valve.
c. Each test starts as soon as it is displayed
on the screen and each test will time out
after 5 minutes if the START/STOP pad is
not pressed again.
•
TEST SPECIAL ADDITIVE - Energizes special
additive valve.
•
WATER LEVEL FREQUENCY - Factory test
only, no value as a service test.
•
DRY LOAD SENSING DATA - Factory test
only, no value as a service test.
•
TEST PUMP MOTOR - Energizes the drain
pump. (Washer lid should be closed.)
•
COM TEST - Part of a serial communication
test between the washer and dryer. This test
runs a self diagnostic of the internal
communications within the main board.
Should the test fail, the LCD screen displays
COM ERROR when the TEST SOFTENER
VALVE test is activated. This is displayed
above the CONTRAST 90/180 box. Replace
the main board if COM ERROR is displayed.
d. To exit the TEST LOAD screen, press
START/STOP to scroll down the test list
until the screen darkens. Press any pad
on the keypanel membrane and the HOME
screen is displayed.
e. Once a test has been started, previous
tests cannot be accessed again. To
access the TEST LOAD screen again,
repeat steps 1 through 6.
Factory Test Information
Note: The lid can be open during all tests except
for the pump motor test.
The IPM TEMP, ATM TEMP, and WATER TEMP
tests are activated as soon at the TEST LOAD
screen is displayed. All other tests will time out
after 5 minutes.
•
TEST BRAKE RESISTOR - The control
measures a voltage drop across the resistor.
An error is displayed if the resistor fails the
test.
•
IPM TEMP - Displays the inverter board temp
in °C.
•
ATM TEMP - Displays the air temperature
within the inverter housing in °C.
Note: This temperature affects the LCD
display. If the temperature is below 30°F
(-1°C) the LCD backlight will not come on.
•
WATER TEMP - Displays the water
temperature in °C at the tub thermistor.
•
CONTRAST 90/180 - Displays current
screen resolution of 90 or 180. This can be
changed by pressing the CONTRAST box on
the LCD screen.
180 - High Contrast (dark)
90 - Low Contrast (light)
•
TEST COLD VALVE - Energizes the cold
water valve.
•
TEST HOT VALVE - Energizes the hot water
valve.
– 41 –
Control Quick Reference Chart
Wash Cycle
Mode
No Power
Demo
Mode
Power Up
(unit plugged in)
Cycle Started
Cycle Complete
Or Paused
Home & My Cycles
Buttons (3 secs)
Complete
Setup Mode
User
Interface
Mode
Home, Back, My Cycles, or
Help Buttons
Help Button
(other than Home Screen)
Help
Mode
Power & Start/Stop
Buttons (3 secs)
Help Button
(from Home Screen)
Back
Button
Home Screen Help
Button
Setup
Mode
Exit Button
(no error codes set)
Help Options
Screen
Exit Button
Power Cycled
(error codes set)
Field Service
Mode
My Cycles & Back
Buttons (3 secs)
Start/Stop & My Cycles
Buttons (3 secs)
Back
Troubleshooting
Button
Button
Start/Stop & Help
Buttons (3 secs)
Test
Mode
Any Mode
Troubleshooting
Mode
Power
Button
Standby
Mode
– 42 –
Factory Test
Mode
User Activity
Timeout
(5 min normally
or 1Hr when
Cycle Paused)
Any Mode
(except Wash Cycle
Mode)
Troubleshooting
Problem
Possible Cause and Repair
LCD backlight does not come on.
The backlight connection on the main board may
not be secure. Check the connection to make
sure it is secure. The LCD backlight does not
function below 30°F (-1.1°C).
Vertical lines on the LCD display when the washer
is turned on.
Re-seat LCD ribbon cable at connector CN6 on
the main board. If necessary, a piece of Scotch
tape may be added to the back of the ribbon. This
additional thickness will provide better contact for
the ribbon terminals.
TOUCH TO SELECT WASH CYCLE
BY
BY GARMENT
COLOR
BY
FABRIC
SPECIAL
CYCLES
STAIN
INSPECTOR
LCD screen too dark or too light as compared to
LCD dryer screen.
LCD refresh rate can be changed in Factory Test
Mode. (See Contrast setting.)
Replacement LCD screen too dark or too light.
LCD refresh rate is matched to inverter output at
the manufacturer.
Can occur when LCD screen is replaced. New
LCD screen must also be set to inverter output.
Adjust the refresh rate through the Factory Test
Mode. (See contrast setting.)
Touch screen pad activates an adjacent function
incorrectly, i.e. - Pressing one pad activates a
function of another pad.
The LCD display ribbon connection on the main
board may not be secure. Check the connection
to make sure it is secure.
Checkerboard pattern in MY CYCLES screen.
Electrostatic discharge on main board. Enter MY
CYCLES and press DELETE on the touch screen
LCD, this will clear the checkerboard pattern.
Scuff marks on the plastic backspash or cover
(Platinum models).
Can be removed by appliance polish, part no.
WR97X216 or a high quality of automotive paste
wax.
Motor will not rotate in Demo Mode (motor
pulses).
On some models there is a software algorithm
issue. Add enough water to the tub so the
pressure sensor changes frequency.
(Continued Next Page)
– 43 –
– 44 –
# *
# $
&
& # )
! # # . " " # # %% !" " "' ." ##"%&) $ (%# ' ( "*" !"' "'
." & #
""" - '." ,,
$% # !
*% &
+% ,! -% $$ ! $% $% !!
/ *% ,! ! +% & ))#
! " #
$% !!
' $ (%#
/ *% ,! !"' "' .") ' ." ,%% !"'
!" /%/ ". ,,) '*+ /"0 & +% ! $.#$ /%/
" !" " "' ." ##"%&) $ (%# ' ( "*" !"' "'
."
""" - '." ,, %%
' ' $ (%#
#( !"' "' "'#" ) % *'*+ # ! # $%* , *&
!" #$ $%&
– 45 –
.
3
!
" #!
, * + !!
") " '
$ 0 , ++*!"' %" ( "
!$%" ) "!&
! " $!*%+
, &
) &
!"% ++" &
%( *, ,"! " !&! ,' 1
%" ( )! $!$! - !
!&! $%## - ! *"!
$0$ #"%
.
,
& " #
2 3 '
$!*%+ $!! ! '
" * , ! "+"# ! '
!
%" ( " !$%" ) "!& -)./( #!
(
!!
) )%%# $!$!%&' %" ( "%%
."! ,"! % )! $!$!
"%%"- ! & "! ! $# $!$!%&' (
" ! "! *%("# ,"! % - ,"! /"%/ & !#0*%"0" / $!
!!
'
" $!! ! &+
$ 0 ,
'
$ % %
!"# $!$!%&' %" ( !" )! (( ! *%("# !"# $!$!%&' %" ( !" &+ " $+$
– 46 –
1.) Wiring connections
or
2.) Lid switch
or
3.) Inverter board
1.) Wiring connections
The home position signal from
or
the clutch motor has not been
2.) Clutch motor
detected after three complete
or
revolutions of the clutch motor.
3.) Inverter board
Screen will display #% ! Screen will display !# & &#
& )#%#) "# # $&# The ##&, +' %( &) % *
washer will stop operation.
&%+
Screen will display #% ! Screen will display % $#% &#
& )#%#) "# # $&# The !%&% + &,,&, "# # (#
washer will stop operation.
+
Motor not
rotating
properly
Clutch
1) House supply voltage
or
2.) Wiring connections
or
3.) Motor
or
4.) Hall sensor
or
5.) Inverter board
Low voltage at main plug
or
Hall sensor indicates the
motor is not turning within
50% of the desired speed
or
Motor rotating in only one
direction
or
Basket not reaching desired
speed
or
Hall sensor indicates the
motor is turning 20% faster
than the desired speed
1.) Wiring connections
The washer did not detect the
or
Screen will display % # ) Screen will display !
Lid Switch
lid was closed within 5 minutes
2.) Lid switch
"#
#
)
"#%'
%%(
&)
Operation will stop until the washer
Stuck Open
of displaying "Please close the
or
detects the lid has been closed.
% * &%+
lid"
3.) Inverter board
An attempt has been made to
start a cycle after 3 or more
consecutive cycles without the
washer detecting the lid has
been opened.
Screen will display !
Control sensed an LCD
1.) Wiring connections
"# # #$%%&' %%( &) display touchscreen input for or
longer than 30 seconds.
2.) LCD display touchscreen
% * &%+
Screen will display & # )
and if opening is detected, the screen will Screen will display !
Lid Switch
display % # ) Operation "# # ) "#%' %%( &)
Stuck Closed
will stop until the washer detects the lid
% * &%+
has been opened.
LCD Display No error displayed. Unit will continue to
Touchscreen operate normally.
– 47 –
! "
#! ! $ %! & ' ! # " &! ! "( ##
! & ! #! $ ! / #! $ ! " ) *
$ ! $- !"# * ! $ + " !#* , $ '$$$) *
* $ !
#
"
" ' ( &! '$"$# &$ ! "$ $ & . "$% $- "%#
# 0 ! '! ' &
!"# $ %% &! !# '$ ""# %" ")% ($
&
,
$ ' ( ! "#( # $
!"# $ %% &! !# '$ #&$) %&$ *+ !( ! "( ## "$% , "$ Schematic
– 48 –
PARTS
– 49 –
– 50 –
– 51 –
VIEW
NUMBER
1
1
2
3
4
5
10
10
11
12
20
21
22
24
25
26
27
30
32
40
41
60
61
62
63
64
65
68
69
70
80
90
91
92
100
110
112
130
140
CATALOG NUMBER
49-90151
31-15543
WH16X10052
WH16X10053
WH16X10054
WH16X10055
WH46X10098
WE19X10072
WH46X10097
WH43X10026
WH44X10116
WH02X10151
WH43X10027
WH02X10143
WH44X10117
WH02X10144
WH02X10145
WH02X10152
WH01X10204
WH01X10205
WH02X10146
WH12X10245
WH45X10054
WH12X10246
WH46X10099
WH45X10055
WH45X10056
WH02X10147
WH16X10056
WH46X10101
WH23X10020
WH12X10244
WH41X10081
WH41X10082
WH44X10118
WH01X10206
WH19X10027
WH19X10028
WH41X10083
DESCRIPTION
MANUAL, USE & CARE
MANUAL, MINI
HANGER ASM, PIVOT
HANGER ASM, PIVOT
HANGER ASM, PIVOT
HANGER ASM, PIVOT
PANEL ASM, FRONT WH-LH
CONTROL PANEL ASM WH-RH
PANEL, BACK
CAP, PULSATOR
LID ASM WH
P.F SCREW ASM
PULSATOR ASM
SCREW TAPPING, TRUSS HD
COVER ASSEMBLY,TUB
LEG ASM - REAR
LEG ASM W/CAP
WASHER
CLAMP
NUT
WASHER
PWB/PCB ASM - MAIN
BALANCE ASM
DISPLAY ASM - PWB/PCB
COVER, PROTECT
HUB, INNER TUB
TUB ASM - INNER
SCREW
SUSPENSION ASM
BACK COVER
PUMP ASM - DRAIN
LID SWITCH ASM
CONNECTOR - HOSE ASM
DRAIN HOSE ASM
TOP COVER WH
LID TRIM
HARNESS, PWB
POWER CORD ASM
DRAIN HOSE
– 52 –
QUANTITY
1
1
1
1
1
1
1
1
1
1
1
1
1
8
1
2
12
1
2
1
1
1
1
1
1
1
1
8
4
1
1
1
1
1
1
1
1
1
1
VIEW
NUMBER
150
151
160
163
170
180
182
184
186
200
201
202
205
210
215
230
240
241
275
276
290
300
305
340
305
345
350
360
380
390
360
400
410
415
421
422
423
9996
9997
422
9998
CATALOG NUMBER
WH47X10004
WH47X10005
WH01X10207
WH02X10148
WH39X10003
WH13X10017
WH41X10084
WH41X10085
WH41X10086
WH12X10247
WH41X10087
WH01X10208
WH39X10004
WH02X10149
WH39X10005
WH20X10024
WH19X10029
WH12X10248
WH41X10088
WH41X10089
WH41X10090
WH01X10209
WH02X10150
WH01X10210
WH02X10150
WH01X10211
WH12X10249
WH44X10119
WH47X10007
WH01X10212
WH44X10119
WH12X10250
WH01X10213
WH45X10057
WE08X10061
WH19X10031
WH19X10030
WH02X10158
WH02X10159
WE08X10058
WH02X10160
DESCRIPTION
DETERGENT BOX ASM
INSERT, DETERGENT BOX
HINGE
SCREW
MECH HSNG ASM - BEARING
VALVE ASM - INLET
PIPE
HOSE, INLET
HOSE, INLET
SENSOR SWITCH ASM
TUBE, PRESSURE S/W
RING, SNAP
STATOR ASM
BOLT
ROTOR ASM
MOTOR ASM W/CLUTCH
HARNESS, PWB
FILTER ASM -CIRC
HOSE, INLET
HOSE, INLET
GUIDE, WATER
NUT
WASHER
COUPLING ASM
WASHER
COUPLING
THERMISTOR ASM
COVER, PROTECT
BOX, BLEACH
CLAMP
COVER, PROTECT
RESISTOR
BLEACH CAP
TUB - OUTER
CABLE ASSEMBLY
CONNECTOR ASM
CONNECTOR ASM
SCREW PACK
SCREW PACK
CONNECTOR ASM
SCREW PACK
– 53 –
QUANTITY
1
1
2
6
1
1
1
1
1
1
1
1
1
6
1
1
1
1
1
1
1
1
1
1
1
1
1
1
1
4
1
1
1
1
1
1
1
1
1
1
1
Switching the Washer and Dryer Backsplashes
Overview
To switch the washer and dryer backsplashes:
When viewed from the front, the washer is
shipped for installation on the left and the dryer is
shipped for installation on the right. If the hose
utility connections are arranged so that the units
must be installed with the washer on the right and
the dryer on the left, the backsplashes of the
washer and dryer can be switched in order to
maintain the proper curved appearance.
1. Place a towel over the lid of the washer to
prevent scratches to the surface.
2. Remove the 2 Phillips head screws from the
washer backsplash.
3. Rotate backsplash forward and lift off.
Screw
Screw
Rear of Washer
4. Remove the 2 Phillips head screws holding
the backsplash to the rear cover. Remove the
backspash from the rear cover.
Tools Needed
Rear Cover
#2 Screwdriver
Towel (2)
WARNING!
•
Make sure the washer and dryer are
unplugged.
•
Turn both the home hot and cold-water valves
to the off position.
•
Turn the home gas shut-off valve to the Off
position (for gas dryer models).
– 54 –
Screws
5. Disconnect the ribbon at the right of the
washer control board by pulling the connector
at the end of the ribbon off the metal pins.
8. Remove the 4 Phillips head screws from the
dryer backsplash. Rotate backsplash forward
and lift off.
Note: Do not disconnect any other wires from
the washer control board.
Screws
Rear of Drye r
9. Disconnect the ribbon at the right of the dryer
control board by pulling the connector at the
end of the ribbon off the metal pins.
Note: Do not disconnect any other wires from
the dryer control board.
Rear of Washer
6. Remove the 4 Phillips head screws holding
the washer control board to the backsplash
then remove the control board and set it aside.
Screws
Rear of Dryer
10. Remove the 4 Phillips head screws holding
the dryer control board to the backsplash.
11. Remove the dryer control board and set it
aside.
Screws
7. Place a towel over the top surface of the dryer
to prevent scratches to the surface.
Screws
(Continued Next Page)
– 55 –
12. Place the backsplash from the dryer on top of
the washer and place the backsplash from the
washer on top of the dryer.
15. Place the gray wire from the serial port under
the strain relief of the new backsplash.
Strain Relief
16. Insert the tabs on the bottom front of the new
backsplash into the slots on the dryer and
rotate the backsplash into place.
13. Attach the dryer control board to the new
backsplash by replacing the 4 Phillips head
screws removed from the dryer control board
earlier.
Screws
14. Connect the dryer control board to the new
backsplash by sliding the ribbon connector on
the new backsplash onto the metal pins on the
control board and pushing in. Make sure the
ribbon is not twisted before inserting the
connector.
17. Secure the new backsplash to the dryer using
the 4 Phillips head screws removed earlier.
Screws
Rear of Drye r
– 56 –
18. Attach the washer control board to the new
backsplash by replacing the 4 Phillips head
screws removed from the washer control
board earlier.
21. Place the gray wire from the serial port under
the strain relief of the new backsplash.
Strain Relief
22. Insert the tabs on the bottom front of the new
backsplash into the slots on the washer and
rotate the backsplash into place.
19. Connect the washer control board to the new
backsplash by sliding the ribbon connector on
the new backsplash onto the metal pins on the
control board and pushing in. Make sure the
ribbon is not twisted before inserting the
connector.
23. Secure the new backsplash to the washer
using the 2 Phillips head screws removed
earlier.
Screw
Screw
20. Secure the new washer backsplash to the
rear cover using the 2 Phillips head screws
removed earlier.
Screws
Rear of Washer
24. Reconnect house utilities.
25. Plug the washer and dryer back in.
– 57 –
– 58 –
Notes
– 59 –