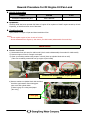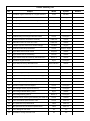
1
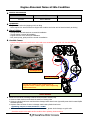
Trouble Shooting List
No.
Subject
Model
System
1
Intermittent engine check lamp on / engine hesitation
DI All
D27DTP
2
Cooling Fan Noise at Cold Start
RV All
DI Engine
3
DI Engine Cylinder Head Gasket Leakage
Actyon
D20DT
4
Turbo Charger Whistle Noise at Accelerating
Actyon
D20DT
5
REXTON II CDPF EGT Sensor Removal/Installation
Rexton II
D27DTP
6
Engine Hesitation after First Delivery
RV All
EURO IV Engine
7
Rework Procedure for DI Engine Oil Pan Leak
C/D/Q-Car
D20DT
8
Troubleshooting for DI Engine Alternator Noise
RV All
DI Engine
9
Installation Notice for Air Cleaner Assembly
C/D/Q-Car
D20DT
10
Modification of DI Fuel Tank Vent. Tube
C/D/Q-Car
D20DT
11
DI Engine Cylinder Head Cover Gasket Leakage
Y/C/D/Q
Engine
12
E-EGR & Throttle Body Initialization
RV All
EURO IV Engine
13
Engine Noise Come inside Vehicle
A/Sports
D20DT
14
Engine Power Lack at Accelerating
C/D-Car
D20DT
15
Engine Check Lamp ON caused by HID Modification
Rexton II
D27DT
16
Intermittent Engine Not Start
Kyron
DI Engine
17
Engine Stop Caused by IMV Malfunction
Rexton/Rodius
D27DT
18
Engine Check Lamp Turn ON (P0400)
Rexton
D27DT
19
Engine Abnormal Noise at Idle Condition
Actyon
D20DT
20
Troubleshooting for Compression Pressure Leak
RV All
DI Engine
21
Engine Check Lamp ON (Vacuum Hose Damage)
Rexton
D27DT
22
Engine Check Lamp Turn ON (P0400)
Rexton
D27DT
23
Lack of Engine Power (Fuel Pipe Leak)
Kyron
D20DT
24
Instruction of Belt Tensioner Replace
RV All
DI Engine
25
Lack of Engine Power (Injector Corrosion)
RV All
DI Engine
26
Turbo Charger Whistle Noise_Case 1
Kyron
D20DT
27
Turbo Charger Noise_Case 2
Rexton II
DI Engine
28
Precautions when removing and installing tire wheel nut
RV All
Chassis
29
How to check DC5 speed A/T DTC code
RV All
DC5 A/T
30
DC 5 speed A/T Limp Home Mode
Y/D/A
DC5 A/T
31
MB 5 speed A/T N2, N3 abnormal speed sensor
Y/D/A
DC5 A/T
32
How to distingush T/C motor
All
T/C
33
Impossible to change from 4H to 2H
All
T/C
Remark
34
New REXTON under part Noise
New Rexton
Chassis
35
4WD Abnormal
All
T/C
36
TGS LEVER bearing bushing part supply
All
Chassis
37
REXTON II Poor shifting
Rexton II
Chassis
38
Limp Home Mode by abnormal vehicle speed sensor
Actyon
Chassis
39
Tightening torque of vehicle lower part
All
Chassis
40
REXTON II Air con Gas leakage
Rexton II
HVAC
41
Noise occurrence when depressing brake pedal fully
Rexton II
Chassis
42
Rework case due to diagnosis error regarding brake system Rexton II
Chassis
43
DC A/T electric fault
Y/D/A
DC5 A/T
44
Trouble shooting for front hub noise occurrence
Y/C/D/Q
Chassis
45
Troubleshooting for front shock absorber
A/Sports
Chassis
46
Coolant temperature rises while driving
Actyon
Electric
47
Cooling Fan Noise at Cold Start
All
DI Engine
48
Electric wiring connection failure - DC5 A/T Electric Kit
Y/D/A
DC5 A/T
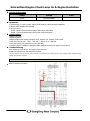
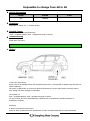
Intermittent Engine Check Lamp On & Engine Hesitation
♠ Vehicle Information
MODEL
SYSTEM
DI ALL
D27DTP ENGINE
S.G.N
♠ Symptoms
1) Intermittent (1-2 time / week) engine check lamp turn ON and engine hesitating
2) Engine RPM unstable after starting
3) DTC (on ECU)
P1253 - Minimum Rail Pressure Control Malfunction (IMV Fault)
P1259 - Too Large High Pressue Fuel in Rain Pressure System
♠ Repair History
Replace HP pump
Replace Injectors
Replace engine main wiring, HP Pump (2nd), Injector (No. 5 again), Fuel Sender
Check IMV valve at idle : - Spec. : 650 mA - Actual : 710 ~ 850 mA
Check IMV power line (between fuse box and IMV)
Symptom (engine hesitation) reproduce while checking the wiring of engine room fuse box
♠ Troubleshooting
Poor contact on C102 Pin no. 8 of engine room fuse box
Repair the connector pin and symptoms cleared
This sysmptom was caused by poor contact of connector pin of IMV power line, please check related wiring
before fuel system replace
Check Details
▶ EWD for Rexton II D27DTP
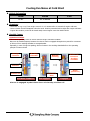
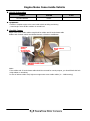
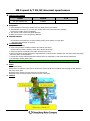
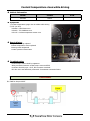
Cooling Fan Noise at Cold Start
♠ Vehicle Information
MODEL
SYSTEM
RV ALL
ALL DI ENGINE
S.G.N
♠ Symptoms
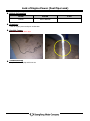
- Noise like “U~ng, U~ng” from engine room for 2 or 3 minutes after 10 seconds of engine cold start
- Noise is louder and then disappear when the accel. Pedal is pressed a little bit right after engine cold start
- Engine idle condition, noise can be heard easily around engine room then inside vehicle
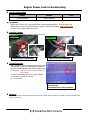
♠ Possible Causes
Operation Principle
This noise is operating sound of viscous clutch at engine cold start condition
Noise can be heard temporary because the viscous clutch is engaged duringthe time period for movement
of silicon oil from working chamber to storagechamber
Especially, in case of long time parking, silicon oil exists in the working chamberRefer to the operating
principle of viscous clutch
Storage
chamber
Working
chamber
Silicon oil
moves to
working
chamber
Bimetal
bending
Bimetal
Silicon Oil
Cold Start Condition
Rotor
(Rotation)
Oil Return
Hole
Not engaged
Engaged
Viscous is engaged by the friction force of viscosity of silicon oil
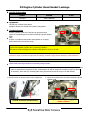
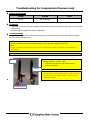
DI Engine Cylinder Head Gasket Leakage
♠ Vehicle Information
MODEL
SYSTEM
S.G.N
ACTYON
D20DT ENGINE
♠ Symptoms
Oil leak from cylinder head gasket
Symptom doesn’t be cleared with cylinder head gasket.
♠ Troubleshooting
Remove cylinder head cover and vacuum pump and then
repair the unmatching pace of intake camshaft cap and cylinder
head
▶ Note
If there is oil leak around cylinder head gasket on DI eigine,
firstly check leak from vacuum pump
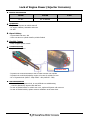
SYMC engine inclines to right side about 15 degrees, so leaked engine oil can move to front side of
cylinder head gasket (cylinder No.1) at driving condition.
Please don't make misjudgement cylinder head gasket to oring of oil leak
Check the origin of oil leak at engine idle and driving condition using centain developer (white material)
Check Details
▶ Check and rework procedure of vacuum pump oil leak
* volumn of oil leak from vacuum pump will be increased at engine driving condition when engine oil pressure
reach to maxmimum level (about 5 bar). Small amount oil leak at engine idle condition is hard to detect
* If necessary, lower the A/T mounting parts using lift jack and check the origin of oil leak directly
1. Check oil leak of vacuum pump on the naked eyes
Oil leak should be checked firstly
2. Check the matching face of intake camshaft cap and
cylinder head
Spec. of matching face (gap)
: within 0.03mm
Check Details
3. Replace intake camshaft cap if the gap is more than
specification
4. Check vacuum pump internal roughness
Intake camshaft cap
- Spray the loctite on lower face of
camshaft cap when installation
- You should feel nothing when you
scrach matching facing with finger nail
5. Tighten vacuum pump mounting bolt (10 NM)
Remark
- Do not reuse vacuum pump o-ring, replace with new one
- Clean the oil contamination on cylinder head gasket and cylinder block using cleaner
- Keep the tightening torque of cylinder head camshaft cap (#12, for vacuum pump area)
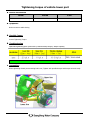
Tightening Torque
Camshaft cap mounting bolt : 25 Nm
→ Do not make gab by over-tightening
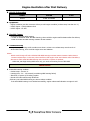
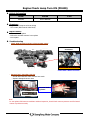
Turbo Charger Whistle Noise at Accelerating
♠ Vehicle Information
MODEL
SYSTEM
ACTYON
D20DT ENGINE
S.G.N
♠ Symptoms
- Whistle noise (beep sound) from turbo charger area at accelerating (over 1,500 RPM)
- Noise is gone while VGT vacuum hose is disconnected by hand
; because of less turbo pressure generation
- Distinguishable noise tone (like high tone beep sound) compare to normal operation sound of D20DT VGT
turbo charger
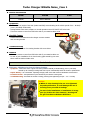
♠ Possible Cause
Tubro charger noise caused by gas leakage from turbo charger mounting area and loosened exhaust
manifold
Carbon deposit
25 Nm
Residue of
gas leakage
40 Nm
Nut loosen on #5 Ex. manifold
Turbo charger gas leakage
♠ Troubleshooting
Retightened #5 exhause manifold and clean
the carbon deposit of turbo charger
Carbon deposit
Tightening Torque
- Ex. Manifold mounting nut : 40 Nm
- Turbo Charger mounting nut : 25 Nm
Notice
In case of turbo charger noise, check the gas leaking
from exhaust mounting area frist
(Do not replace turbo charger without checking gas
leakage)
Ex manifold gas leakage
Check Details
▶ In case of turbo charger noise…
※ Turbo charger truns about 200,000 RPM while accelerating, if there is abnormal operating sound (whistle),
find the root cases with reference to below sample cases.
1) Check the intake hose clamp connection of front and rear side of turbo charger
Especially, air leaking from rubber crack makes abnormal noise.
2) Check air cleaner housing bolt connection.
Intake air leak caused by air cleaner housing positiong problem
3) Exhause gas leak caused by EGR pipe bellow lower area crack
Check the carbon deposit of bellow lower area
4) Alternator noise (whistle noise while accelerating)
Check the noise after disconnecting fan belt
5) Exhaust manifold mounting nut and turbo charger mounting nut (beep sound while accelerating)
Retightent mounting nut
Replace gasket in case of damage
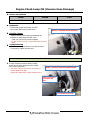
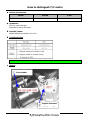
REXTON II CDPF EGT Sensor Removal/Installation
♠ Vehicle Information
MODEL
SYSTEM
REXTON II
D27DTP CDPF
S.G.N
♠ Background
This is a insturction manual for Rexton II CDPF EGT Sensor
Check Details
▶ How to replace CDPF EGT Sensor
1. Loosen the hexagonal stopper bolt (4mm)
2. Remove the EGT Sensor
Tightening Specification : 45 ± 4.5 Nm
A
CDPF EGT SENSOR
Hexagonal stopper nut
(4mm hexagon)
※ To prevent EGT Sensor loosening, lock-up using stopper bolt
▶ Caution
- If the stopper bolt doesn't be removed, EGT sensor's bitch can be damaged
- Take care not to be damaged bending area (A) of EGT sensor while installation by wrench
- Keep the tightening torque
Engine Hesitation after First Delivery
♠ Vehicle Information
MODEL
SYSTEM
RV ALL
EURO IV ENGINE
S.G.N
♠ Symptoms
- Engine hesitation just after customer delivery at cold engine condition (coolant temp. less than 60 º C)
- D20DT Engine : cylinder balance fault
- D27DT Engine : No DTC
♠ Possible Causes
- Unfinished initial Idle MDP learning
: in case of unfinished initial Idle MDP learning, there could be engine small hesitation after first delivery
※ EURO IV model has MDP learning condition at idle condition
♠ Troubleshooting
- Keep the engine running at idle condtion more than 1 minute over coolant temp more than 60 ºC
- At idle MDP learning, there could be engine noise and vibration.
Notice
- Vehicle could be sign off with unfinished Idle MDP learning at winter season because it takes time to
increase coolant temp. In this case, there could be a little engine noise and vibration sfter first delivery
- Be sure to finish initial idle MDP learning when the ECU or Injector is replaced.
※ SCAN-100 just disply driving MDP count only, you can't see learning count of idle MDP.
Check Details
▶ Initial MDP learning condition
- Coolant temp : over 60 ºC
- Learning time : 30 ~ 120 seconds (considering MDP learning failure)
- After ECU or Injector (C3I coding) replace
- Recode C3I code value through SCAN-100
; ECU carry out initial MDP learning one time at above condition
※ if the initial MDP learning is not finished successfully, engine makes small vibration at engine is cold
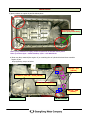
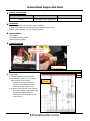
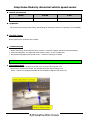
Rework Procedure for DI Engine Oil Pan Leak
♠ Vehicle Information
MODEL
SYSTEM
KYRON/ACTYON/ACTYON_SUT
D20DT ENGINE
S.G.N
♠ Symptoms
Recently SYMC has been reported field claim of engine oil fan replace on D20DT engine caused by oil leak
Especially, oil leak from lower area of alternator
♠ Troubleshooting
Spray sealant on engine oil pan and then install the oil fan.
Notice
- Do not replace engine oil pan in case of oil leak
- Do not disassemble the engine by this reason (for 4WD model, disassemble front axle first)
Check Details
▶ REWORK PROCEDURE
1) Disassemble front axle assy for 4WD model. (don't need to disassembly front model for 2WD model)
2) Remove engine oil fan for enough work space
3) Clean up remaining sealant using scraper or brush (clean up cylinder block side as well)
(Take care remaining material do not go engine oil pan inside)
Remove the sealant inside oil pan groove
clearly
4) Remove sealant on cylinder block side and then
check the gap between front timing gear
case cover and cylinder block
[if there is gap, fix it using sand paper
(No. 600) ]
Check gap
Check Details
5) Spray sealant on engine oil pan like below photo
Spray inner hole
(Don't spray outer hole)
Note 1) Pay attention to spary sealat circled area as shown above photo
Note 2) Sealant Spec. : DOBO Sealant, P/No. : 665 989 50 A0
6) Clean any dirty material (like engine oil) on matching face of cylinder block and then assemble
engine oil pan
Keep tightening torque as below
M6*85 : 3EA
(10Nm)
Common : M6*20 : 20EA (10Nm)
M8*40 : 4EA (25Nm)
M6*35 : 3EA
(10Nm)
FRONT ENGINE
REAR ENGINE
Troubleshooting for DI Engine Alternator Noise
♠ Vehicle Information
MODEL
SYSTEM
RV ALL
DI ENGINE
S.G.N
♠ Symptoms
- Turbo charger whistle noise (wind noise) from engine
front side at idle and at engine acceleration condition
(between 1,200 ~ 1,800 RPM) like turbo charger sound.
- Noise is gone when vacuum hose of turbo actuator
is disconnected
♠ Possible Causes
This is turbo charger normal operation sound
; VGT air boosting sound and passing sound of exhaust gas
Disconnect
vacuum hose
. VGT type turbo charger used on Actyon / Actyon sports /
Kyron/Rexton II models, vane inside turbo charger is
widen at accelerating and it increase input air volume
very quickly
. In this time, turbo charger makes whistle noise (whizz~)
→ Normal operating sound
T/Charger
in case of D20DT engine, check the
sound after disconnecting vacuum
hose for turbo charger.
If there is no sound, DO NO
REPLACE
ALTERNATOR
(VGT turbo charger operating sound)
♠ Troubleshooting
Refer to below check details
Check Details
▶ CHECK PROCEDURE FOR ALTERNATOR NOISE
. Disconnect vacuum hose for turbo charger and
check whether noise caused by trubo charger
whistle noise
Turbo charger noise
(check turbo charger such as
oil leas, wheel balancing etc)
No Noise
Noise
. Check noise pattern at max. electric load
condition (with A/C, seat warmer, head lamp)
and acceleration/deceleration condition
No Noise
Check sub component
around engine except
alternator
Check EGR pipes
Noise increase
at electric load
condtion
. Check whether noise is gone after disconnecting
engine fan belt about 3 minute at engine
accelerating condition
Refer to turbo charger check
procedure on service manual
No Noise
Check alternator charging
voltage
(over 13.7 V at engine idle)
Noise
. Check engine condtion except alternator and
pulleys around fan belt
: if you remove engine fan belt, pulleys including alternator
don't rotate
(REMARK)
- In cas of damaged diaod inside alternator, there could be abnormal alternator noise (whizz ~ ).
- This noise usually get increases at the electric load condtion (head lamp, warmer etc) and
also charging voltage is abnormally high
Installation Notice for Air Cleaner Assembly
♠ Vehicle Information
MODEL
SYSTEM
KYRON/ACTYON/ACTYON_SUT
D20DT ENGINE
S.G.N
♠ Symptoms
This is installtion notice for air cleaner assembly
Please refer to below work procedure when you replace air cleaner assembly
♠ Work Procedure
: Push air clearner element up / down / left /right side by hand
and make tight position inside housing while replacing air cleaner
element
Do not air cleaner element come off the housing.
: Tighten the air cleaner housing bolt by numeric order as shown
left photo by pushing upper housing cover by hand
: While installation air cleaner house, use only '-' screw driver
or electric tool
Tightening Torque
- Air cleaner mousing bolt : 5 Nm
CAUTION
Do not over tighten air clear housing using such as air tool
Modification of DI Fuel Tank Vent. Tube
♠ Vehicle Information
MODEL
SYSTEM
KYRON/ACTYON/ACTYON_SUT
D20DT ENGINE
S.G.N
♠ Background
This is a modification notice for fuel tank ventilation tube on D20DT engine
♠ Modification Details
BEFORE
ITEM
Changes
- Vantilation hose is connected to right
side of frame
(refer to below photo)
AFTER
- Rotate ventilation hose 90 º and make
connection to mounting bracket for
fuel tank
- Change hose size (370 → 165 mm) &
delete mounting clip
FRAME
Photos
Fuel Tank
Mounting Bracket
* Insert the ventilation hose into
upper hole of fuel tank mounting
bracket
Parts
Info.
- Fuel Tank Assy : 2211009404
- Ventilation Tube : 2218009401
- Fuel Tank Assy : 2211009405
- Ventilation Tube : 2218009402
Check Details
▶ Effective date by model
Model
Effective Date
ACTYON
ACTYON SPORTS
VIN No.
049664
Oct. 20th, 2008
KYRON
084772
Remark
We will inform effective date & VIN no. for
ACTYON SPORTS
▶ Interchangeability
ITEM
Interchangeability
(between old & new)
Fuel Tank Assy
YES
Should replace ventilation tube
(new type) together
Ventilation Tube
NO
Should use correct ventilation tube
Check the part no for fuel tank assy first
Remark
CAUTIONS
- If you use new type fuel tank assy in steady of old type fuel tank, you should replace ventilation tube
with new type (part no. 22180009402) at the same time
- SYMC do not allow any modification for fuel system, please don't make any changed to rework
. Don't cut off ventilation tube for voluntary modificaction
. Other voluntary modification
DI Engine Cylinder Head Cover Gasket Leakage
♠ Vehicle Information
MODEL
SYSTEM
REXTON/RODIUS/ACTYON/KYRON
ENGINE
S.G.N
Origin of oil leak
♠ Symptoms
Oil leakage from cylinder head cover
♠ Troubleshooting
Remove the cylinder head cover and then spray sealant (loctite)
on crescretic seal
After sealant spray on
crescretic edge of
cylinder head, install
cylinder head cover
Spray sealant (loctitie) on cylinder
head cover gasket not to be damaged
by the edge of cylinder cover
Check Details
▶ Note
- Spray a small sealant (loctite) and take care not to flow inside engine
- Do not replace cylinder head cover by this reason
- RECHECK OIL LEAKAGE USING CERTAIN DEVELOPER
▶ How to check oil leak
1. Clean leak oil using certain cleaner (WD40) and then spray developer (white material) around leak area
2. Check oil leak at engine idle and at driving condition
3. Clean developer using cleaner
Spray developer to check oil leak
Developer
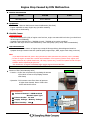
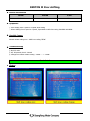
E-EGR & Throttle Body Initialization
♠ Vehicle Information
MODEL
SYSTEM
RV ALL
ALL EURO IV ENGINES
♠ Background
This is a SCAN-100 update function for EURO IV engine
♠ Update details
New function of "INITIALIZATION & RELEARNING" on EURO IV DI engine
1] Rail Pressure Reset
; To reset ECU relarn value according to HP Pump aging
ECU memorize offset valuve to HP Pump performance
correction
HP Pump max. offset value : 50 Nm
2] EGR Position Relearning
; To relearn max. open position and max. close position
for E-EGR.
Display DTC in case of incorrect EGR position
P1407, 8 Fault EGR close (open) position
3] Throttle Body Relearning
; To relearn max. open position and max. close position
for throttle body
In case of incorrect T/Body position, abnormal tapping
noise happens at engine off and driving condition
Notice
Please carry out initialization & relearning when you replace
related component (HP Pump, E-EGR, Throttle Body, ECU)
S.G.N
Engine Noise Come inside Vehicle
♠ Vehicle Information
MODEL
SYSTEM
ACTYON SPORTS
D20DT
S.G.N
♠ Symptoms
Customer complain engine noise come inside vehicle at idling and driving
; actual engine noise at idle condition is normal level
♠ Possible Causes
Engine noise come inside vehicle trough hole for rubber seal of hood release cable
Rubber seal of target vehicle was deleted because of deck top modificaion
Addition
wiring
for deck top
modification
Hood release
cable
DRIVER SIDE DASH
BOARD
Notice
If the rubber seal of hood release cable should be removed for certain purpose, you should block this hole
using sealant or something
In case of without rubber seal, high tone engine noise come inside vehicle (2 ~ 3 dB incresing)
Engine Power Lack at Accelerating
♠ Vehicle Information
MODEL
SYSTEM
ACTYON/KYRON
D20DT ENGINE
S.G.N
♠ Symptoms
- Engine lack of power at re-accelerating after accelerating/decelerating ; refer to photo #1
- Engine lack of powe at quick accelerating, nomal at smooth accelerating ; refer to photo #2
- No DTC or DTC related Intake Air Sensor
♠ Possible Causes
Wiring damage caused by engine running movement
Photo #1
Short circuit at decelerating
Photo #2
Short circuit at accelerating
♠ Troubleshooting
- Same sympotm could be happened when HFM sensor
disconnected, at this time ECU substitute intake air
value as internal MAP data and decide engine power
(substitution : change from 420 to 800 according to
engine RPM)
- In case of wiring damage, there is large variation
on the value for intake air volume
(5 ~ 1,000 m/stk)
HFM Sensor value after sensor
disconnection
ECU substitution at idle condition
♠ Request
When a customer complaint enigne lack of power, check intake air value on SCAN-100 after disconnection
sensor connector.
Engine Check Lamp ON caused by HID Modification
♠ Vehicle Information
MODEL
SYSTEM
REXTON II (EURO IV)
D27DT
S.G.N
♠ Symptoms
Engine check lamp turns ON and lack of power at driving
DTC in ECU : P1234 - VGT Operation Fault
P213B - Abnormal Throttle Control
♠ Possible Causes
Unstable power source caused by HID modification
(Symptom happens when head lamps turn ON)
Ballast and Bulb
♠ Recommendation
- Check symptom happens whether head lamp turns ON
- HID (High Intensity Discharge) consumes a lot current, 13 ~ 15 A, when it turns ON/OFF and
high-frequency waves generated by ballast makes unexptected errors on vehicle CAN system
(ex. Warning lamp of curise control and ABS)
Check Details
▶ Symptoms by unauthorized HID modification
1) cluster warning lamps turns ON when head lamp auto ON at Auto mode or turn on head lamp switch
- ESP warning lamp ON (on the vehicle without ESP option)
- 4WD check, 4 Low lamp ON (on 2WD model)
- Auto curise ON (on the vehicle without Auto Cruise option)
- POWER lamp ON (regardless of operation of WINTER/POWER switch)
2) A/T LHM (gear holding) caused by CAN system error
3) Malfunction on electric units
Intermittent Engine Not Start
♠ Vehicle Information
MODEL
SYSTEM
KYRON
DI ENGINE (D27DT, D20DT) A/T
S.G.N
♠ Symptoms
Engine intermittent not start (only engine cranking)
Engine check lamp turns ON and glow plug warning lamp turns ON
Engine could start after 3-4 time cranking repeatly
♠ Repair History
ECU replace
Immobilizer antenna replace
Main (IP) wiring replace
♠ Troubleshooting
Engine intermittent not start caused by poor connection of C102 in engine room fuse box
Pin #3 & Pin #4 of C102
was damaged by poor
connection
Check
Pin #3 : ECU power
line
Pin #4 : PTC power
Details line
BAT+
▶ Check details
1. Check all related fuses and relayes
2. Check battery output (12 v) at engine
main relay Pin 30 and Pin 86
→ If battery power doesn't check,
check B+ is transferred through
C102 Pin #3 and C202 Pin #13
3. At IG ON, check ECU Pin #9 is grouned
→ At IG ON condition, engine main relay
operates and battery power is
transferred to ECU through Pin #87
and Pin #87a
IGN 1
Poor
connectio
n
Engine Stop Caused by IMV Malfunction
♠ Vehicle Information
MODEL
SYSTEM
REXTON/STAVIC
D27DT ENGINE
S.G.N
♠ Symptoms
- DTC P1253 - Minimum Rail Pressure Control Malfunction (IMV Fault)
- Engine impossible to start, Engine stop just after restarting
- Engine stop at decelerating
♠ Possible Causes
IMV Malfunction
- After disconnecting EF5 (15A) of engine room fuse box, engine can start with loud noise (you should turn
off the engine immediately)
- Unstable engine idle RPM 704 ~ 768 RPM (normal : 736 RPM at hot engine condition)
- Bad fuel is the major cause of IMV malfunction, check fuel quality (color, smell, water contamination)
♠ Recommendation
- There was some other reason of engine stop except HP Pump problem, please diagnose based on
symptom through customer interview (vehicle speed, engine temp., RPM, engine check lamp, noise etc)
Note
※ If you disconnect IMV fuse, IMV is fully opened and make maximum fuel pressure (over 1,000 BAR)
; In case of engine not start after removal and installation of fuel system (cylinder head, engine main
wiring, common rail, cylinder head cover, HP Pump, Injector etc), run the fuel system at IMV full open
condition and let remaining air goes out.
You should turn off engine immediately after engine start and insert IMV fuse.
Check Details
IMV
▶ Function of IMV (Inlet Metering Valve)
- Function : Control the rail pressure by regulating the amount
of fuel which is sent to the pumping element
of HP Pump
- Operation : ECU increase curret flow when rail pressure
is higher than demand. Piston of IMV close
orifice and block fuel flow
Specifications
■
Solenoid Control : PWM method
Normal Open Type
■ Piston Stroke : 1.4 mm
Solenoid
■ Supply Voltage : Battery Voltage
■ Filter Density : 140 ㎛
Piston
Engine Check Lamp Turn ON (P0400)
♠ Vehicle Information
MODEL
SYSTEM
REXTON
D27DT ENGINE
S.G.N
♠ Symptoms
- Engine check lamp turns ON at driving
- DTC P0400 (EGR Control Valve Fault)
♠ Repair History
- EGR modulator replace
- Vacuum line check (leakage)
- Engine check lamp turns ON again (after delect DTC using SCAN 100) at EGR operation condition
♠ Possible Causes
- A lot carbon deposit at intake manifold and EGR valve mounting area
EGR passage is block
almost
90% by carbon
♠ Troubleshooting
Clean the carbon deposit of intake manifold and reinstall EGR
Note
You could find carbon deposit at intake manifold at the vehicle of over 50,000 km mileage
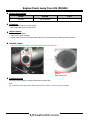
Engine Abnormal Noise at Idle Condition
♠ Vehicle Information
MODEL
SYSTEM
ACTYON
D20DT ENGINE
S.G.N
♠ Symptoms
- Engine abnormal noise (tapping noise) at idling
- Noise repeart 3-4 second interval at engine idle condtion and noise can be heard minutely at driving
♠ Repair History
-
Timing chain and belt tensioner removal & installation
Timing damper removal & installation
Engine acoustic cover removal & installation
Belt, water pump, pulley and fan removal & installation
♠ Possible Causes
- Lossen timing chain and interference with head cover caused by lower guide rail assembly damage
Damaged area
Check Damages
Check the sliding rail additionally if
engine noise comes again after replacing
chain tensioner
Check Details
▶ Check the root cause according to below check procedure step by step
1. Remove chain tensioner and check the tension of timing chain
2. Remove cylinder head cover and check the damage inside head cover (especially area which located IN/EX
camshaft sproket)
3. Replace chain tensioner if there is damage mark inside cylinder head cover
Tightening Torque of chain tensioner : 65 Nm
4. If the noise don’t be cleared after new chain tensioner, please check damage on guide rails
; check the engine noise again at idle condition after replacing chain tensioner
Troubleshooting for Compression Pressure Leak
♠ Vehicle Information
MODEL
SYSTEM
RV ALL
ALL DI ENGINE
S.G.N
♠ Symptoms
- Compression pressure leak (with air leaking sound) from injection mounting area caused by reuse of injector
mounting bolt
- Symptom happen regardless of engine temperature
♠ Troubleshooting
Remove injectors and clean the injection mounting area using air suction tool and then install the injector
with new injector mounting bolt
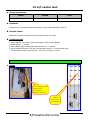
Instruction of Injector mounting bolt replacement
- Injector bolt (M6*60) should be replaced with new one whenever Injector is removed
Caution
- In case of Injector mounting bolt reuse, engine compression pressure could leak by mounting bolt
deformation
Check Details
Washe
r
* Injector Bolt (M6*60), P/No. : 665 990 02 01
Tightening torque : 10 Nm + 180 º
→ Tighen the bolt about 10 Nm and then turn it
about 180 degrees
Clamp
* Remark
- Do not reuse Injector Washer (P/No. : 665 017 00 67)
- Do not use Injector Clamp (P/No. : 665 017 00 03)
more than 5 times
▶
Injector
mounting bolt
Engine Check Lamp ON (Vacuum Hose Damage)
♠ Vehicle Information
MODEL
SYSTEM
REXTON
D27DT ENGINE
S.G.N
♠ Symptoms
- Intermittent engine check lamp turn ON
- DTC P0400 (EGR Control Valve Fault)
Before : vacuum hose interfere
♠ Possible Causes
- Vacuum Hose for 4WD locking hub damage by
interference with engine acoustic cover
→ EGR out of control by vacuum leakage
※ In case of vacuum leak, it effect EGR valve operation
firstly
♠ Troubleshooting
- Cut out the damaged vacuum hose and reconnect
- If necessary, replace vacuum hose
Check Details
▶ In case of P0400 on Rexton D27DT model,
check vacuum hose interference and modify
hose route if necessary
→ Pull down vaccum hose a little bit and tie up
with neighborhood pipe
(keep some space from engine acoustic cover)
After : modify route of vacuum hose
secure the space
more than 10
mm
Pull down and tie up
Engine Check Lamp Turn ON (P0400)
♠ Vehicle Information
MODEL
SYSTEM
REXTON
D27DT ENGINE
S.G.N
♠ Symptoms
- Engine check lamp turns ON at driving
- DTC P0400 (EGR Control Valve Fault)
♠ Repair History
- EGR modulator replace
- EGR valve and EGR vacuum hose replace
- ECU replace
♠ Troubleshooting
- Check EGR vacuum pressure using vacuum gauge
Vacuum test from the EGR
modulator
Normal : -0.9±0.02 bar
Unit:0.9bar=90kPa=675mm
- Vacuum leak : less than -0.5 bar
→ Found 4WD solenoide valve vacuum hose crack
→ Replace damaged vacuum hose
vacuum leak
by hose
4WD SOLENOID
VALVE
Note
Do not replace EGR vacuum modulator without inspection, should check vacuum pressure and find actual
reason of problem correctly
Lack of Engine Power (Fuel Pipe Leak)
♠ Vehicle Information
MODEL
SYSTEM
KYRON
D20DT ENGINE
♠ Symptoms
- Lack of engine power and poor acceleration
♠ Possible Causes
- Fuel leak from fuel return pipe
♠ Troubleshooting
- Replace fuel return pipe with new one
S.G.N
Instruction of Belt Tensioner Replace
♠ Vehicle Information
MODEL
SYSTEM
S.G.N
RV ALL
ALL DI ENGINE
♠ Background
On the investigation of replaced belt tensioner, SYMC figured out the it was replaced by mis-diagnosis.
Please check belt tension according to this instruction guide and DO NOT REPLACE BELT TENSIONER
DUE TO OIL CONTAMINATION
♠ Instruction
Check belt tensioner operation and clean oil contamination of
belt tensioner housing according to below precedure
1. Remove the fan belt
2. Spray WD40 around contaminated area
3. Wait around 5 minutes
4. Blow the contamination away using
compression air
Belt
; Take care not to direct contact compression
air into rubber part of belt tensioner
5. Clean up the rubber part with clean cloth
6. Install the fan belt
Tensioner
Ventilation
hole
VENTILATION HOLE
Belt tensionor has ventilation hole to discharge the hot
and pressed evaporative oil gas which is generated
during operation
This oil gas can misjudge as oil leakage if its mixed with
dust around
Check Details
▶ Belt Tensioner Operation Principle
DOWN
UP
Oil Reservoir
Expansion Stage (UP) : Oil flow into the Piston through check valve
Compression Stage (DOWN) : Oil flow out though oil gap of piston upper to oil reservoir
Updated : 2008.06.17
Check Details
▶ Caution
Take care not to damage the rubber bellow of belt tensioner
while removal and installation of fan belt using wrench
Special attention
to interference
using the wrench
Note
- There is no functional problem if belt tensioner has more than 50% oil inside
- In case of fan belt noise, check the sysmptom with released technical information ISI-07EN012
before fan belt replace
Water Pump
Pulley
Pulley-Water Pump P/No. : 6642050110
Improvement history for Water Pump Pulley
Increase the depth of pulley groove and modified
groove layout to improve belt positioning (prevent
movement)
TARGET VEHICLE
Vehicles sign-off before Apr. 1st, 2007
Lack of Engine Power (Injector Corrosion)
♠ Vehicle Information
MODEL
SYSTEM
RV ALL
ALL DI ENGINE
S.G.N
♠ Symptoms
- Engine lack of power at vehicle start off
- No engine vibration, hesitation and noise.
- No DTC
♠ Repair History
- Injector back leak test : OK
- Some corrosion on cylinder head by vehicle flooded
♠ Possible Causes
- Partly clogged Injector nozzle
♠ Troubleshooting
- Replace all 5 Injectors
Injection hole
- Injection hole could be blocked in case of water intrusion into cylinder
- Injection hole could be blocked by engine oil in case of vehicle turn over
- No. of Injection hole (D27DT : 5EA, D20DT : 6EA, D27DPT : 7EA)
♠ Recommendation
- In case of blocked injection hole, its very difficult to troubleshooting
; Can't be detected by Injector back leak test
- In case of flooded vehicle or vehicle turn over, replace all Injector with new one
- In case of flooded vehicle, replace vacuum modulator at the same time.
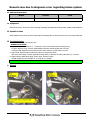
Turbo Charger Whistle Noise_Case 1
♠ Vehicle Information
MODEL
SYSTEM
KYRON
D20DT ENGINE
S.G.N
♠ Symptoms
♠
- Wind noise from engine front side (intake manifold) at accelerating at the vehicle speed of 40 ~ 80 km/h
(over 1,500 RPM) continuously
- Distinguishable noise tone compare to normal operation sound of D20DT VGT turbo inlet
- This noise seems to come from EGR valve side if you seated at driver seat
Secure the
gab
Possible Causes
- Interference noise between turbo charger vacuum actuator
and mounting bracket
♠ Troubleshooting
- Fixed the interference of mounting bracket with screw driver
♠ Remark
- This noise seems to come from EGR valve side if you seated at driver seat
- In case of poor installation of air clear housing (gab caused by poor mounting)
there could be similar whistle noise
Check Details
▶ Field Case : Whistle noise from air cleaner housing
- Symptom : Wind noise from engine front side (intake manifold) at accelerating (over 1,500 RPM)
caused by air cleaning housing leak due to poor workmanship while air cleaner replacement
- Repair History : No result after replacing Tharger, EGR valve and Vacuum Modulator several times
- Possible Causes : Unexpected air input casused by air cleaner housing leak
- Troubleshooting : Reinstall air cleaner housing (housing bolt tightening torque : 4.2 ~ 6.2 Nm)
NOTICE
When air clear housing bolts are over tightened
beyond specification, it could damage the nut of
housing lower part and air leakage
In case of mis-installation or installation of wrong
part (ex, Rodius air clear element) ; housing will
be get loose due to thickness difference
Turbo Charger Noise_Case 2
♠ Vehicle Information
MODEL
SYSTEM
REXTON II
D27DTP ENGINE
S.G.N
♠ Symptoms
- Whistle noise (beep sound) from engine front side at accelerating at the vehicle speed of
40-50 km/h (between 1,000 ~ 2,000 RPM) like turbo charager noise
- Noise can be heard at engine stall test (around 1,800 RPM)
- Noise is severe at cold engine than hot engine
- Normal (no noise) at engine idle condition
- Noise is gone when fan belt is removed
♠ Possible Causes
- Noise comes from idle pulley bearing
♠ Troubleshooting
- Check whether noise is disapperared after
removing engine fan belt, EEGR valve one by one
Also should check clamps and bolts of
IN/EX hose
Noise is gone when
fan belt is removed
Check Details
▶ Characteristic of Rexton II (D27DPT) Turbo Charger
1) Noise Characteristic
At accelerating over 1,000 RPM, there is whistle sound
It means that turbo charger works normally.
Also, at releasing accel. Pedal (tip-out) suddenly, there
would be exhaust harsh sound such as "shriring ~ "
and sould level will be different according to vehicle
variation, road condition and engine temp.
(Before engine warm-up, sould level could be bigger
than hot engine condition)
Point : Turbo Charger on D27DTP engine is controlled by ECU
PWM signal according to combustion condition, engine
temperature and so on. This lead to a little bit different
sound tone at turbo charger operating
* Vane control actuator
2) Operation Principle
Engine Status
Low load & low rpm
High load & high rpm
Modulator Duty (%)
Vane Control Actuator
Vane Passage
0.75
(Duty Increases)
0.45
(Duty Decrease)
Pulling
(Vacuum Applies)
Return
(Vacuum Release)
Narrow
Wide
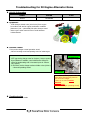
Precautions when removing and installing Tire Wheel Nut
♠ Vehicle Information
MODEL
SYSTEM
ALL
CHASSIS
S.G.N
♠ Symptoms
Impossible to remove Tire wheel Nut
♠ Possible Causes
Mounting Bolt and Nut damaged due to inflow inside of bolt/nut when removing and installing tire wheel nut
♠ Troubleshooting
1) Remove metal chip completely before installing Tire wheel Nut
2) Tighten Nut after pre-install wheel nut with hand
Check Details
▶ Precautions
Remove metal chip completely before installing Tire wheel Nut
▶ Picture
Picture 1
Damaged teeth
Picture 2
metal chip occurrence
How to check DC5 speed A/T DTC code
♠ Vehicle Information
MODEL
SYSTEM
ALL (DC 5 speed A/T)
TRANSMISSION
S.G.N
♠ Symptoms
* DC5 speed A/T Inspection or action per the situation of affairs
♠ Inspection or action per the situation of affairs
Vehicle State
DTC
Inspection / Action
Shifting D3 ↔ D4 faulty
P2503 Faulty recognition of currently
selected gear
1.Check the related harness for open,
short and contact.
2.Check shift pressure solenoid valve
3.Replace Valve body
D4 Shifting at below 50 km
after indicating 'D' at D3→D4
or D4→D5 shifting point
P2500 Invalid transmission gear ratio
P2502 Poor gear mesh, transmission
slip
P220A Abnormal speed sensor output
signal(N2, N3)
1.same After reset in same condition
2.Check Oil quantity
3.Replace valve body
4.Replace A/T
Not displaying shifting grade
at instrument cluster and
impossible driving, Emergency P2105 3-4 shift solenoid valve - short
mode go into while
driving(Holding:D)
Impossible vehicle
forwading,reversing
Emergency mode while
driving(holding:D)
1.Check the related harness for open,
short and contact.
2.Adapter Plug Locking not contract
P2500 Invalid transmission gear ratio
P2502 Poor gear mesh, transmission
slip
1.T/C internal part burned
P2200 T/M Oil temperature sensor short
P2203 Faulty speed sensor N3 signal
P220A Abnormal speed sensor output
signal(N2, N3)
1.Check the related harness for open,
short and contact.
2.Electric Kit damage
P2100 Defective 1-2, 4-5 shift solenoid
valve
P2106 Defective lockup clutch solenoid
valve
1.Check the related harness for open,
short and contact.
2.Check solenoid resistance
3.Replace Electric KIT, Solenoid valve
1.Check the related harness for open,
P2106 Defective lockup clutch solenoid short and contact.
valve
2.Check lock up valve resistance
3.Check Electric KIT
1.Check the related harness for open,
Defective modulator pressure solenoid
short and contact.
valve
2.Check module pressure valve
P2221 Abnormal T/M oil temperature
resistance
sensor signal
3.Check Electric KIT
How to check when DC 5 speed A/T go into Emergency mode
♠ Vehicle Information
MODEL
SYSTEM
Rexton, Kyron, Rodius
DC5 A/T
S.G.N
♠ Symptoms
shifting meter of instrument cluster not display normaly(D1~D5), only D display
==> Holding for protection A/T (Emergency mode going into)
when diagnose with scan-100
: P2106 lockup solenoid abnormal / P2101 1-2,4-5 Shifting solenoid valve short
♠ Possible Causes
disconnected No7 wiring of C901 connector
♠ Troubleshooting
①
②
③
※
Check A/T oil quantity -> Normal
Measure resistance of each solenoid valve after disconnecting C901 connector => normal
Measure resisance in TCU connector after connecting C901 connector
when shaking C901 connector, No 7 wiring disconnected
Check Details
▶ Maintenance guide
wiring disconnection part
Firstly measure resistance in TCU side, and then Measure C901 connector
Resistance value of A/T solenoid valve can be changed highly according to A/T inner part temperature
* Check fully beforehand, because You can misjudge "A/T inside defect" above phenomenon
※ Check TCU sensor data value {Scan-100}
- TCU solenoid supply voltage indicate 3.9 volt when go into A/T emergency mode
- 3.5 volt indicated when NO 7 wiring of C901 connector disconnected
MB 5 speed A/T N2, N3 abnormal speed sensor
♠ Vehicle Information
MODEL
SYSTEM
ALL (DC 5 Speed A/T)
CHASSIS
S.G.N
♠ Symptoms
1. Speed indicator of Instrument cluster does not display (Emergency Mode)
2. Intermittently occurrence (1 or 2 time per month) Occurrence interval shorten gradually,
Recovered normally when Key OFF/ON,
3. TCU Trouble code P0700 TCU signal abnormal
4. Mainly occurrence in car of long driving distance
♠ Possible Causes
※ Dust powder: Generation due to inside coating peeling off of mission oil cooler pipe
(Not inner part particular of mission)
♠ Troubleshooting
1. Check A/T Oil quantity
2. Check wiring contract condition between TCU and N2, N3 sensor
(Check C901 connector↔Adaptor, Check Plug↔Electric Kit wiring)
3. Check dust powder on N2,N3 sensor after removing valve body
4. Remove and Clean Foreign particular foreign particular on N2,N3 sensor of Electric KIT, and then install valve body,
and then check normal operation
** In that case foreign material attached on N2,N3 sensor is magnetism, It may cause Sensor malfunction
** If necessary, replace mission filter
Check Details
▶ Refer
N3,N2 Speed sensor
Speed sensor is located in upper part of electric KIT, Sensor signal part is installed while keeping equality distance
with front carrier gear
N3 speed sensor senses sun gear speed of front carrier gear
N2 Speed sensor senses the speed of carrier of front carrier gear
▶ Picture
How to distingush T/C motor
♠ Vehicle Information
MODEL
SYSTEM
ALL
CHASSIS
♠ Symptoms
Comes on 4wd check light
Impossible to change 4wd mode
♠ Possible Causes
installed different specification T/C motor
♠ Troubleshooting
Check Details
▶ Picture
Part number
English Character
S.G.N
Impossible to change from 4H to 2H
♠ Vehicle Information
MODEL
SYSTEM
ALL
CHASSIS
S.G.N
♠ Symptoms
Impossible to change 4H --> 2H while driving
♠ Possible Causes
equipped with another specification tire
(front : equipped Hankook, Rear : equipped woosung or Kumho)
♠ Troubleshooting
Install Same Tire bland
Check Details
▶ Picture
In that case 4WD vehicle,
power train can be damaged while high speed driving because it is impossible to absorb front/rear speed or
rotation difference
Conversion is delayed due to occurrence Wind up Phenomenon of power train system of transfer case or
auto locking hub when changing to 2wd again
Tire supplier is 3
front : equipped Hankook, Rear : equipped woosung or Kumho
Tire size is same, but tire external diameter is different due to manufacture standard tolerance of
manufacture company
Precaution
to protect same defect reoccurrence,
must use same company and same specification tire after checking brand and Tire external diameter
New REXTON under part Noise
♠ Vehicle Information
MODEL
SYSTEM
S.G.N
New REXTON
CHASSIS
199007
♠ Symptoms
Noise occurrence at the lower part of body when engine start/off and
① while idling(Parking)
② when engine start/off
③ when driving uneven road
♠ Possible Causes
Interference noise between steel tube and washer
♠ Troubleshooting
Insert plane washer to separate steel tube mounting nut (14mm) After removing insulator
Washer specification: Φ14.5 Plain washer
Check Details
4WD Abnormal
♠ Vehicle Information
MODEL
SYSTEM
ALL
CHASSIS
♠ Symptoms
Impossible to change 2H --> 4H
♠ Possible Causes
Vacuum leakage
♠ Troubleshooting
Refer to the below instruction
Check Details
▶ Picture
1)stop the engine While 2wd mode, and then remove front left and right tire
Remove hose connected in locking hub actuator
2)Check if vacuum is made with vacuum gauge
(Normal if vacuum keep up approx 30 second)
3)Check also if vacuum is maintained in locking hub actuator with vacuum gauge
※If minute leakage occurred, it may cause clink noise due to poor 4WD engage
S.G.N
TGS LEVER bearing bushing part supply
♠ Vehicle Information
MODEL
SYSTEM
ALL
CHASSIS
S.G.N
♠ Symptoms
Noise occurrence while driving due to TGS lever bearing wear
Especially occurrence at that time Mileage 50,000 ~ 60,000 km
♠ Possible Causes
TGS lever bearing wear
♠ Troubleshooting
Part number : 2029920010
Part Name: Bushing
No relation DURA lever and BTRA TGS LEVER
Check Details
▶ Picture
Bearing Bushing >
REXTON II Poor shifting
♠ Vehicle Information
MODEL
SYSTEM
S.G.N
REXTON II
CHASSIS
372101
♠ Symptoms
① Poor shifting from 2 speed to 3 speed while driving
② When shifting from 2 speed to 3 speed, Impossible to shift after rasing 3000RPM~4000RPM
♠ Possible Causes
Chassis variant coding error : Shift lever coding "BTRA"
♠ Troubleshooting
① No DTC code
② A/T Oil quantity check : Normal
③ Change ECU chassis variant coding : "BTRA" ----> "DURA"
Check Details
▶ Picture
Limp Home Mode by abnormal vehicle speed sensor
♠ Vehicle Information
MODEL
SYSTEM
S.G.N
ACTYON
CHASSIS
364001
♠ Symptoms
Car derived only D1(Limp Home Mode), Speed gauge of Instrument cluster not operating (0 km standstill)
♠ Possible Causes
Wheel speed sensor connector poor contact
♠ Troubleshooting
① When test driving, above phenomenon not reoccur (customer complain that occurred intermittently)
② When ECU diagnosis, TCU signal abnormal (history code) / No TCU trouble code
③ RR RH wheel equipped wheel speed sensor : connector verified poor contact
Check Details
▶ Occurrence cause
- If Wheel speed sensor equipped at RR RH wheel occurred vehicle speed error,
"speed meter of Instrument cluster not operating and Limp Home Mode go into
(Refer : Vehicle not equipped with ABS can not possible to diagnose with scan-100)
Tightening torque of vehicle lower part
♠ Vehicle Information
MODEL
SYSTEM
S.G.N
ALL
CHASSIS
-
♠ Symptoms
Noise occurrence while driving
♠ Possible Causes
Loosen Tightening Torque
♠ Troubleshooting
Specified tightening spec (REXTON II, New KYRON, Actyon, Actyon Sports)
Check Details
▶ precautions
When tightening chassis part mounting bolt & nut, Tighten with specified torque with torque wrench surely
Upper Arm
Lower Arm
REXTON II Air con Gas leakage
♠ Vehicle Information
MODEL
SYSTEM
S.G.N
Rexton II
CHASSIS
6862
♠ Symptoms
Cold wind not come when using Air conditioner
♠ Possible Causes
Air con Gas leakage at Air con suction hose & suction pipe
♠ Troubleshooting
1) Chek if O-ring damaged after loosening No 2 Nut (10mm), If damaged, Replace O ring
2) Loosen No 1
3) Assemble No 1 After assembling No 2 Nut(10mm)
Check Details
▶ picture
Noise occurrence when depressing brake pedal fully
♠ Vehicle Information
MODEL
SYSTEM
Rexton II
CHASSIS
S.G.N
♠ Symptoms
Noise occurrence when depress brake pedal fully
♠ Possible Causes
Being push occurrence between brake pedal return spring and brake pedal bracket when depressing brake pedal
fully
♠ Troubleshooting
Attach pad after applying grease between brake pedal return spring and brake pedal bracket
Check Details
▶ Picture
Rework case due to diagnosis error regarding brake system
♠ Vehicle Information
MODEL
SYSTEM
REXTON II
CHASSIS
S.G.N
♠ Symptoms
Same phenomenon occurrence after repairing regarding Intermittently brake problem (brake pedal hardness)
♠ Possible Causes
Brake badness occurrence by vacuum generation impossible due to boost vacuum hose connecting state bad
♠ Troubleshooting
- Check Vacuum pump and Vacuum line
- Brake boost check
1. stop the engine after idling for 1 ~ 2 minutes, at this time depress with normally power,
1st time distance is big, 2nd time pedal distance become shooter better than 1st time,
3rd time pedal distance become shorter better than 2nd time, at that case is normal
2. At this time, depress brake pedal several times in engine stop state,
after that, start engine in brake pedal depressing state, at that time if brake pedal down, it is normal
3. Depress brake pedal While idling, at this state, stop the engine,
if pedal height does not variable for 30 seconds, it is normal
Check Details
▶ Picture
DC A/T electric fault
♠ Vehicle Information
MODEL
SYSTEM
RODIUS/STAVIC
CHASSIS
S.G.N
♠ Symptoms
Indicated "D" on instrument cluster while driving or start engine again after engine off
♠ Possible Causes
Interference occurrence between wiring and center console lower part
♠ Troubleshooting
①
②
③
④
※
When diagnose TCU, P2220 (T/M oil temperature sensor short) appeared
Check A/T OIL => Normal
Check adaptor plug installing state and connector pin => Normal
Check voltage B7 wiring of TCU side (oil temperature sensor) =>0.04mV(wiring short)
B7 wiring basic voltage (when KEY ON) : P,N=5V, R=1.364V, D=1.363V
Check Details
▶ picture
"D" holding due to
short circuit
occurrence
between B7 and
Wiring
short circuit
occurrence
Trouble shooting for front hub noise occurrence
♠ Vehicle Information
MODEL
SYSTEM
REXTONⅡ,KYRON,
ACTYON/SPORTS(2WD Vehicle)
CHASSIS
S.G.N
♠ Symptoms
When full turning while low speed driving, Noise occurrence at Front Huber
♠ Possible Causes
♠ Troubleshooting
- When checking, Off A/Con (Don't confuse Air con compressor operation noise)
- Retighten Front upper arm, Lower arm, etc
- Check Noise after removing and installing Tire
⇒ If same phenomenon occurred, Replace retainer ring
Check Details
▶ picture
Retainer Ring
Troubleshooting for front shock absorber
♠ Vehicle Information
MODEL
SYSTEM
Actyon sports
CHASSIS
S.G.N
♠ Symptoms
Noise come from in right front shock absorber while driving uneven road or depressing brake pedal
♠ Possible Causes
Interference between front coil spring and bracket when vehicle is bounced
♠ Troubleshooting
1.
2.
3.
4.
Check whether coil spring is interfered or not
Remove front shock absorber assembly
Insert plain washer at upper mounting of shack absorber (Interference upper part) : see the photo
Install front shock absorber
Check Details
▶ Picture
[Plain washer install location]
[Plain washer
Coolant temperature rises while driving
♠ Vehicle Information
MODEL
SYSTEM
ACTYON
D20DT
S.G.N
♠ Symptoms
1) Coolant temperature gauge rises in sudden while driving
2) DTC (on ECU)
H-P0644 - CAN Cluster error
H-P0613 - TCU CAN data error
H-P1115 - Coolant temperature sensor error
♠ Repair History
Engine room wiring replaced
Coolant temperature sensor replaced
Cluster ground retightened
Trouble symtoms remain same
♠ Troubleshooting
Coolant temp. sensor check by registance
Wring connection between coolant temp. sensor and ECU
Connector check by eyes : C115, ECU connector terminals
ECU Pin #101 was defectively connected : Intermittent connection failure
Check Details
▶ EWD for Actyon D20DT
Cluster
Coolant
Temp.
sensor
Cooling Fan Noise at Cold Start
♠ Vehicle Information
MODEL
SYSTEM
RV ALL
D20DT
S.G.N
♠ Symptoms
- Airbag warning lamp on
- DTC : Driver & Passenger seat pretensioner low/high resistance
♠ Possible Causes
- Vehicle static electricity by occasion caused seat belt pretentioner resistance error
♠ Troubleshooting
Airbag warning lamp on
(Dri/Pas seat belt
pretensioner)
Clear SCAN 100
fault code
Battery disconnection
30 seconds
Check the airbag
warning lamp
No Warning
lamp
Trouble cleared
Connect the battery
Warning
lamp on
Replace the seat belt
assy
Connect seat belt
pretensioner
Electric wiring connection failure - DC5 A/T Electric Kit
♠ Vehicle Information
MODEL
SYSTEM
REXTON, RODIUS, KYRON
DC5 A/T
♠ Symptoms
-
Electrical Limp Home Mode
Solenoid valve resistance are normal
Electrical wiring short(open)
Intermittent driving impossible
Shifting shock
♠ Possible Cause
- Connection damaged by exterior vibration
- 7mm nut was stuck by high temperature
♠ Troubleshooting
- Check the electric circuit (Solenoid, Wiring from TCU to plug connector)
- Replace the electric kit
<P/No : 20327 00089>
S.G.N