1
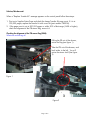
CLJ9500/
9500mfp
Unclearable “Replace
Transfer Kit” Message
Security Level: For HP and Channel Partner Internal Use
Date Written/Updated: November 14, 2006
Document Number: c00414127
Document Summary
D On occasion, the front panel message, “Replace Transfer Kit” will not clear even after a new
Transfer Kit has been installed.
D After troubleshooting the issue, it may be necessary to replace the SR44 sensor.
Issue Description:
A “Replace Transfer Kit” message on the control panel of the CLJ9500/9500mfp that can not
be cleared could be caused by two different things:
1. CLJ9500 or the CLJ9500mfp’s have been seen to post the “Replace Transfer Kit” on the
control panel before the 200,000 page point (200K is the recommended life for the
transfer kit) and the customer is unable to clear the message.
2. “Replace Transfer Kit” occurs as expected at the proper page count (200,000 pages),
however the customer is unable to clear the message after replacing the transfer kit.
The error creates a hard stop to the printer until the message is cleared and the customer
cannot clear the message via the front panel Reset menu. Technicians have unsuccessfully tried
to clear the message by clearing the Transfer Kit count in service mode.
Issue Background:
There are two scenarios when the control panel will post a “Replace Transfer Kit.” The first
and primary instance is at 200,000 pages when the transfer belt has reached the
recommended end of life. In this instance replacing the transfer kit should clear the message, if
it does not, see workaround listed below.
The second instance where the “Replace Transfer Kit” message may appear is when the device
is not recognizing the presence of the Intermediate Transfer Belt (ITB) for some reason or is
sensing that the belt has shifted and is not aligned. In this instance further troubleshooting
should be performed. See workaround listed below.
Page 1 of 4
Solution/Workaround:
When a “Replace Transfer Kit” message appears on the control panel follow these steps:
1. Print out a Supplies Status Page and check the Image Transfer Kit page count, if it is at
200,000 pages; replace the transfer kit with a new kit (part number C8555A).
2. If the page count is not at 200,000 pages or within 20% of that range (160K or higher),
check the alignment of the ITB sensor flag, sensor 44.
Checking the alignment of the ITB sensor flag (SR44).
What are we looking at?
Pulling the ITB out of the drawer,
notice the flag (see figure 1).
Take the ITB out of the drawer, and
look inside, to the left. You will
notice the sensor itself (See figure
2)
Figure 1
Figure 2
Page 2 of 4
On the picture to the left (Figure 3), the tab on the ITB has the
hole aligned so the sensor has light passing through. This
creates the error message.
If this is a new ITB, the hole should be to the right of the sensor
(see figure 2), thus blocking the path of the light. This will
remove the error message.
Figure 3
Figure 4
If the Alignment is off (see figure 3): check the seating of the sensor housing, and
the sensor itself. If the seating is correct, but the
alignment is still off, replace the ITB.
If the Alignment is correct (see Figure 4): check to
see if the sensor is working properly. Tape the flag on
the ITB so the hole is covered; make sure it’s opaque so
light can’t get through. (See figure 5). Re-insert the ITB.
• If the error is still present, replace Sensor 44. (See
pages 262 and 313 in the Service Manual) PN:
WG8-5624-000CN
•
•
Figure 5
If the error goes away, the sensor is working properly. Check that the cable
connections are secure by reseating the connections. (See page 262 for cable
connection locations)
If the error does not go away, use the following workaround:
Page 3 of 4
1. Turn the printer off and pull the power cable from the engine
2. Have the customer remove all toner, image drums, the toner bottle and cleaning
blade, the transfer roller and ITB.
3. Close the doors, plug the power cable into the engine and power on the unit.
4. The unit will begin the boot cycle and then request the consumables.
5. Install the consumables as requested on the front control panel by the engine,
closing the doors between each installation, the only exception being the toner
and image drums. When the first toner or image drum is requested, have the
customer install all four toner or image drum cartridges.
At this point, it is hoped that the error has been cleared. If the error has not been cleared,
please escalate the case for visibility and next steps.
Feedback Requested:
Please gather the following information. If the printer cannot print due to the unclearable error,
have the customer view the Embedded Web Server to obtain the information:
1. If the error was cleared with the workarounds provided, which workaround cleared
the message?
2. Serial number and model of engine
3. The current page count of the engine
4. Firmware revision
5. When the message appeared. I.E. Was the customer aware it was to be replaced (as
expected) or was the message prematurely posted?
6. What was occurring when the message posted? A print job? A jam was cleared?
Coming out of power save, etc?
7. If the error could be cleared, please also gather for Division:
a. Configuration page
b. Event log
c. Supplies status page
d. Menu map
e. Usage page
Document Attributes
Author: Cindy Kyle, Color LaserJet Technical Marketing
Product Models: HP Color LaserJet 9500n, 9500hdn, 9500gp, HP Color LaserJet 9500mfp
Product Numbers: C8547A, C8546A,
Page 4 of 4