1
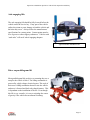
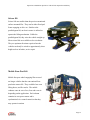
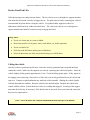
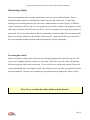
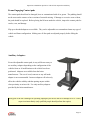
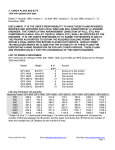
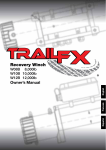
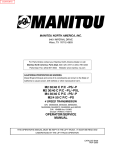
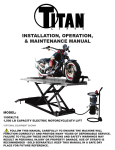
Learning guide
INSPECTION & INSTALLATION SPECIALIST
VEHICLE HOIST OPERATION AND SAFETY
COURSE NUMBER: i050-01
Inspection & Installation Specialist: Vehicle Hoist Operation And Safety
Notice
Due to the wide range of vehicles makes and models, the information given during the class will be
general in nature and should not be taken as specific to any vehicle/unit. Please consult manufacturer
specifications for the correct number/specifications and repair procedures for the vehicle you are
testing. This document is meant to be used as a guideline only.
For further information, please contact:
1888 224 3834
No part of this book may be reproduced, stored in any retrieval system or transmitted in any form or by
any means (including but not limited to electronic, mechanical, photocopying and recording) without
prior written permission of CARS Network. This applies to all text, illustrations, tables and charts.
Copyright © 2010 CARS Network
Page ii
Inspection & Installation Specialist: Vehicle Hoist Operation And Safety
Introduction
OBJECTIVES
Upon successful completion of this segment the participant will be able to:
•
Safely use hoisting and lifting equipment to lift vehicles and perform service procedures
•
Identify various types of vehicle hoists in common use and determine suitability of equipment
for tasks to be performed
•
Understand the function and operation of safety devices on lifting equipment and verify their
operation
•
Perform necessary routine maintenance on vehicle hoisting equipment to preserve safe function
and prevent premature equipment failure or down time
Page 1
Inspection & Installation Specialist: Vehicle Hoist Operation And Safety
Hoists
This course will discuss the variety of vehicle lifts used in the automotive industry—in particular the
in-ground and surface mounted lifts most commonly used in automotive industry. The course contains
guidelines for safely using the shop equipment. For details instructions on operating any equipment
consult the service manual. No one should ever operate a lifting or hoisting device without proper
training—NEVER operate a device unless you completely understand the safe procedures. Never use
an unsafe lifting or hoisting device. Safety regulations are usually available from the provincial
workplace safety ministry.
New employees should be shown the following immediately before operating any
hoisting device:
•
Show the location of the capacity plates on the various hoists.
Note: Explain that the capacity is the maximum load when a vehicle is properly positioned and
that the load capacity cannot be exceeded.
•
Explain the effect of weight and balance
Note: i.e. how a vehicle that is stable will become unbalanced when the mass (weight)
changes with the removal of a component such as an engine. If I remove this engine what
will happen? Does the salt spreader have to be removed before a vehicle can be safely
lifted
•
Explain the effect of customer installed accessories or vehicle loads on the balance of the
vehicle.
•
Demonstrate the operation of the controls to raise and lower a vehicle
Note: How the hoist operates – up and down.
•
Demonstrate the operation of the safety release mechanisms.
•
Show the adjustments for the lifting pads – including applicable extensions for that particular
model of hoist.
Page 2
Inspection & Installation Specialist: Vehicle Hoist Operation And Safety
•
Explain the maintenance of the lifting pads
Note: Dirty, contaminated surfaces and the possibility of the hoist arm or vehicle moving
on the lift pad.
•
Explain the use of support stands for oversize vehicle being lifted, to support the vehicle while
being serviced.
•
Show the locations of “pinch points” and other hazards of each type of hoist.
•
Explain the daily, monthly or periodic maintenance an operator may be required to perform.
Lifting Devices:
•
Explain and show the operation of the floor jacks, transmission jacks and of the engine hoist.
•
Show the maintenance points on each item.
•
Ensure that only qualified individuals using approved parts and following the manufacturer’s
guidelines only repair these devices.
Support Devices:
•
Show location of axle stands and of engine supports
•
Explain operation of each device.
•
Explain that axle/support stands are NOT to be modified or repaired but only replaced.
Page 3
Inspection & Installation Specialist: Vehicle Hoist Operation And Safety
Program Binder
•
Create a binder to maintain hoist training information, to be shown to inspectors as required.
•
Keep this binder in a secure location and update the information as required.
How to maintain the program binder:
•
Once the equipment has been reviewed have the person sign and supervisor sign the
acknowledgement form and file in the rear of the program binder.
•
If any one other than a C of Q holder is being evaluated it may be necessary to have them
demonstrate their skills over a period of time by having a qualified person observe their use of
the equipment.
•
Provide a copy of the daily checklist as a reminder of some of the things to check.
Page 4
Inspection & Installation Specialist: Vehicle Hoist Operation And Safety
Suggested example of front page of binder (company policies):
Company Policy
Any employee who uses or operates hoisting or lifting devices shall be given safety indoctrination
before being allowed to use the equipment.
Once safety procedures and operating characteristics have been reviewed, the employee and
supervisory staff shall sign a letter of acknowledgement stating that both parties have reviewed the
appropriate information and understand the requirements to safely and properly operate these lifting
devices.
Each indoctrination shall include but not be limited to:
Operating controls,
Safety devices,
Pinch points,
Location of hoist capacity plates,
Weights and balances,
Lifting contact surface,
Extension and accessories,
Daily maintenance,
Lift point information, i.e. service manuals, Automotive Lift institute guides etc.
Equipment shall be maintained in accordance with the manufactures, industry and government
requirements and practices.
Any decommissioned equipment shall be rendered unusable before scrapping or sold on an “as is”
basis.
Page 5
Inspection & Installation Specialist: Vehicle Hoist Operation And Safety
Suggested example of second page of program binder:
Training
Supervisory staff shall instruct and review the following with each employee of
<Company Name Here> that in the course of their duties will be operating lifting devices.
A person who is a holder of a Provincial Certificate of Qualification shall receive a review of the
procedures for all lifting devices used by <Company Name Here> at the time of their hire.
Persons who are not holders of Provincial Certificates of Qualification shall receive instruction on the
operation of each type of hoisting device and shall operate those devices under supervision until such
time as they demonstrate proficiency in the operation and use of these lifting devices.
A record shall be kept of all sign off sheets.
Page 6
Inspection & Installation Specialist: Vehicle Hoist Operation And Safety
Suggested example of third page of program binder:
Training Checklist
All new employees who in the performance of their duties will be require to operate a hoist or lifting
device shall receive the following indoctrination from supervisory staff.
•
Be shown, and explain the operating features, safety features, and characteristics on the hoists
in use by <Company Name Here>, including a review of weight and balance of a vehicle on a
hoist.
List hoists used by <Company Name Here> and specific notes:
Examples:
- Bishamon two post hoists– make sure to explain that the two post asymmetrical and the
equal arm hoists have the same capacity no matter the visual appearance.
- Wheeltronics 8000lb & 11000 lbs hoists
- Ammco 9000 lbs hoist
- Acanus 4-post 12000 lbs
- Bishamon 4-post 7000 lbs.
- Mohawk 15000 lbs.
•
Be shown, and explain the operating features, safety features, and characteristics on the lifts in
use by <Company Name Here> and specific notes:
List hoisting equipment used by <Company Name Here> and specific notes:
Examples:
- Blackhawk engine hoist 1500 lbs
- Blackhawk engine stands (2) 500lbs
- Nolan engine stand for diesels and Allison automatics 1500lbs
- Lincoln 3000 lbs floor jacks
- Various brands of 10000 lbs axle stands
- Tall support stands 2000 lbs
- GM Specialty tools: engine/transmission support kit – (no published rating)
- OTC Transmission jacks – 1000 lbs.
Page 7
Inspection & Installation Specialist: Vehicle Hoist Operation And Safety
Suggested Daily 2-Post Hoist Inspection
Hoists are to be inspected daily before the beginning of the shift.
All defects are to be reported immediately to service management.
The following items are to be checked daily:
•
Lift pad condition.
•
Swing arms for damage to the arm, the pivot pins and retainers and the arm locks.
•
Inspect the mounts. Do they appear loose or damaged?
•
Does the floor around the mounting surface have any excessive or new cracking?
•
Are there any noticeable oil leaks from the controls or pistons?
•
Does hoist operate smoothly and properly (unusual noises)
•
Visual inspection of cables
Suggested Daily 4-Post Inspection
Hoists are to be inspected daily before the beginning of the shift.
All defects are to be reported immediately to service management
The following items are to be checked daily:
•
Check mechanical locks in each runway.
•
Clean debris from roller wheel tracks and locks.
•
Inspect the mounts. Do they appear loose or damaged?
•
Does the floor around the mounting surface have any excessive or new cracking?
•
Are there any noticeable oil leaks from the hydraulic fittings, pistons, or lines?
•
Check turn plate and slip plates for ease of operation and blow debris out weekly.
•
Cable, hoses, latches show any sign of damage or looseness.
•
Does the hoist operate smoothly and properly
Page 8
Inspection & Installation Specialist: Vehicle Hoist Operation And Safety
Sample of suggested course completion form (keep one copy from each mechanic or
hoist operator in the program binder):
Acknowledgement of Indoctrination
I <mechanic’s name>_________________________________ have reviewed with the
supervisory staff the features, limitations, and characteristics and requirements of the
hoists and lifting devices used by <Company Name Here>.
I understand my responsibility to use these devices as intended and within the limitation
prescribed by the manufacturer, to report any deficiencies or problems with a device.
I will consult the appropriate service documentation or reference material for the correct
lift points and considerations before lifting any vehicle or object.
I will not modify, alter, or reconfigure any lifting device.
I will maintain the device as prescribed.
I will use appropriate additional supports as required for each operation.
I will inspect before using on a daily basis any hoist that I may be operating.
Signed (mechanic’s signature here):
_________________________________________________________
Supervisor’s signature: ______________________________________
Date: ________________________
Page 9
Inspection & Installation Specialist: Vehicle Hoist Operation And Safety
Lifting Capacity
Every hoist is equipped with its manufacturer’s maximum lifting capacity. This is the maximum
weight that particular hoist is capable of lifting safely. The lifting capacity is stamped on the hoist or
may be listed on the hoist nameplate. If the nameplate is unreadable or missing, contact the service
representative for a replacement.
Do not exceed the maximum lifting capacity as posted for your individual lift. This will affect the
safety of the workplace, risk the vehicle falling, hurt any worker in the area, or damage the lift.
Centre of Gravity:
Point between the front and rear of the vehicle
where weight is distributed equally
Before lifting a vehicle, you must position it within
the hoist. The vehicles center of gravity is used to
evenly distribute the weight evenly to all swing arm
contact points. This will improve stability of the
vehicle once raised. Every vehicle has a different
centre of gravity depending on wheel base, weight
distribution, location of drivetrain assembly, and
whether or not the vehicle is carrying heavy cargo.
In many rear wheel-drive vehicles the centre of
gravity is under the front seat area. On front wheel
drive vehicles the centre of gravity is just forward of
the front seat area to the dash assembly depending on
manufacturer.
Typical centre of gravity for a rear wheel
drive vehicle
On many lifts, the manufacturers have fixed labels
with drawings showing proper positioning of a
vehicle depending on its size or design. These labels
will also vary in accordance to hoist designs, such as,
long or short swing arm. If in doubt be sure to refer
to the vehicle’s service information of exact
locations. The contact pads should be placed only
according to these specifications. Failing to properly
position the contact pads will increase in the
vehicle’s instability.
Page 10
Inspection & Installation Specialist: Vehicle Hoist Operation And Safety
•
Single piston in-ground lift—COG directly over the
piston
•
Two piston in-ground lift—COG on the centre line
between the two pistons
•
Two-column drive through surface mounted lift—
COG between the two columns
•
Four column lifts—mid-point of the runway
Exception: Alignment ramps—the front wheels must be
on the swivel plates, the rear wheels must be on the slip
plates (remove pins after lifting and stabilizing vehicle)
In-Ground Lifts
In-ground lifts refers to lifts or hoists with assemblies located below the floor surface. They may
incorporate one or more piston depending on the application required. Depending on the whether the
primary use of the hoist will be for small vehicles, mid-sized (such as pick up trucks and SUV’s).
Some in-ground lifts may have three or more pistons for full size trucks. I.e. fire trucks or transit buses.
Drive Over, Drive On:
•
Both styles usually contact the vehicle’s
frame or rocker panel
•
Lifts with two pistons (one front, one rear)
are used on vehicles with a rear axle or
support rail (larger vehicles)—often the
piston at the front of the vehicle moves
within its pit and is positioned under the front
control arms or frame. The rear piston is
fixed and located beneath the rear axle
Typical In-Ground Lift
Page 11
Inspection & Installation Specialist: Vehicle Hoist Operation And Safety
The drive-through hoists allow the vehicle to enter between the swing arms giving more access to the
vehicle from underneath. Typically, they will use two pistons to raise the vehicle.
Drive-over hoists have the swing arms close together and use one piston. The swing arms are close
together and are low enough for the technician to drive over them without contacting the vehicle.
There are three different kinds of in-ground hoists.
They are: Semi-hydraulic, Full-hydraulic and Electric oil pump.
Types:
•
Semi-Hydraulic: this system has a self contained air/oil reservoir that supplies pressure to the
piston system to raise the vehicle. The reservoir is part of the in ground assembly.
•
Full Hydraulic: full hydraulic systems use separate air/oil reservoir. The reservoir is not a part
of the in ground assembly.
• Electric: oil does not use pressurized air but instead an electric pump to pressurize the oil in the
piston.
Hydraulic fluid leaks, suddenly “shooting upward” or dropping during operation, physical damage
indicate malfunctions! The hoist should be serviced immediately.
Page 12
Inspection & Installation Specialist: Vehicle Hoist Operation And Safety
Surface Mounted Lift
Surface mounted lifts are above ground hoists that are bolted to the floor. They are typically driven by
an electrical motor. Powered by an electric motor, that operates either a screw-type drive, or a
hydraulic pump or cylinder. These typically have and upright two-column frame that the vehicle must
drive through. The lift arms travel up each side column, synchronized by a steel roller chain or cable
assembly. A hydraulic pump and cylinder(s) provide the lifting power using either a leaf-chain, or
cable system.
Four column surface mounted lifts
Four column or post surface lifts you will most
often see used as a alignment work. The vehicle
is driven onto the hoist by the use of ramps. The
ramps are the lifting device on these types of lifts
and lift the vehicle by its wheels. The lift
assembly may be equipped with “free-wheeling
jacks” that will ride on the inner rails. The “freewheeling jacks” can be used to raise the vehicle
off the tires for added flexibility on the work
required if wheel removal is necessary. An
advantage to this kind of lift is that it allows all
types of vehicles within its lifting capacity to be
driven on and raised rather quickly. They also
allow full access to the undercarriage with little to
no obstruction. Other than alignments, these hoists
prove to be very effective for exhaust and driveline
work where the need for the entire underbody to be
accessible.
Typical Four Post Surface Mounted Lift
Page 13
Inspection & Installation Specialist: Vehicle Hoist Operation And Safety
Drive-on Lifts
Some drive-on lifts may not be wide enough to accommodate trucks with dual wheels. Before spotting
a truck on the hoist, always check the load rating of the hoist prior to use.
Roll off protection
Drive-on lifts are equipped with a roll-on ramp.
When the lift rises the roll-on ramp will pivot and
act as a runway stop. This will prevent the vehicle
from rolling off the back of the hoist in the case of
failing to secure prior to operation. The wheels
should be manually chocked prior to operation to
prevent the need of the roll off protection. If ramps
do not rise and act as chocks the wheels must be
manually chocked. Wheel Chocks come in various
sizes and types; they are designed to assist in holding a
vehicle in place by placing under both front and rear of a
tire.
Wheel chocks come in various shapes
and sizes depending on need.
Page 14
Inspection & Installation Specialist: Vehicle Hoist Operation And Safety
Axle-engaging lifts
The axle-engaging lift should be fully lowered before the
vehicle enters the service bay. If any part of the vehicle
strikes the piston or posts, damage to both the vehicle and
the hoist may occur. Always follow the manufacturers’
specifications for contact points. Contact points must be
free of grease or other slippery substances. Vehicles with
“stub axles” will need “wheel engaging adapters.
Typical Surface Mounted Lift
Drive on parallelogram lift
Most parallelogram lifts are drive-on, meaning they use a
ramp for the vehicle is lifted. The lifting mechanism is
powered by a high voltage electrical motor. This style of
hoist uses a lifting mechanism that will raise the vehicle
and move it forward and back only short distances. This
is dependant on the installation of the lift. Even though
this lift is very versatile, it is easy to misjudge the center
of gravity if the vehicle has an unusual overhang.
Page 15
Inspection & Installation Specialist: Vehicle Hoist Operation And Safety
Scissor lift
Scissor lifts are smaller than the previous mentioned
surface mounted lifts. They can be either fixed pad
frame engaging or drive on. Similar to the
parallelogram lift, an electric motor is utilized to
operate the lifting mechanism. Unlike the
parallelogram lift, they raise the vehicle straight up.
Most scissor lifts are available as low rise hoists.
They are optimum for minor repairs where the
vehicles need only be raised to approximately chest
height such as in brakes, or tire repair.
Mobile Four-Post Lift
Mobile four-post wheel-engaging lifts are used
are longer vehicles that the conventional fourpost hoist can not lift. They would be best seen
lifting buses, and fire trucks. The mobile
columns come in sets of two, four and even six
depending on the application. Each column
contains its own power motor and is
synchronized via a central control so that they
may operate in unison.
Page 16
Inspection & Installation Specialist: Vehicle Hoist Operation And Safety
Rocker Panel/Pad Lifts
Unibody passenger cars and perimeter frames. The car is driven over or through two support members
who must then be located correctly to engage the car. The pads must be firmly contacting the vehicle’s
recommended lift points before raising the vehicle. Use padded rubber supports to allow for
adjustment to different body widths and wheel bases. The vehicles are driven over or through two
support members that then be located correctly to engage the frame.
Safety notes:
•
Never use a hoist arm as a crane or ladder
•
Hoist area must be free of grease, tools, cords, debris, etc. before operation
•
Never overload a lift
•
Fully lower the lift before driving on or off the hoist
•
Move the hoist arms out of the way before driving on or off the hoist
Lifting the vehicle
Once the vehicle is positioned on the hoist. Raise the correctly positioned arms and pads until they
contact the vehicle. Make sure the supports are correctly contacting the vehicles lift points. Raise the
vehicle slightly off the ground, approximately 1 foot. Check the lifting points again. If they appear to
be slipping or not contacting a flat surface or if the arm is incorrectly positioned lower the vehicle and
start over. Unequal weight distribution may make the vehicle unstable. Shaking the vehicle slightly
will help determine the stability. Raise the vehicle to the desired height. Recheck the vehicle hoist
contact with the vehicle. Ensure the hoist’s locks are working and engaged. Lowering of the support
arms onto the locks may be necessary. If the hoists locks do not work, do not use hoist and contact the
hoist service representative.
Note: NEVER leave the controls unattended while the lift is in motion
Page 17
Inspection & Installation Specialist: Vehicle Hoist Operation And Safety
Maintaining Stability
Removing components such as engine, transmission, axle, may cause a shift in balance. Service
information often contains recommended procedures for removing components. Using a large
breaking bar or loosening fasteners may also cause a sudden change in centre of gravity, or shift the
vehicle, causing the vehicle to fall. Use four appropriate jack stands to stabilize and support the vehicle.
If the cargo is unstable, DO NOT raise the vehicle. Never use transmission or engine jacks in place of
jack stands. Never lower the vehicle so that it is suspended by auxiliary stands, if the movement of the
hoist is too swift the stands may shift and the vehicle may fall. Always check the service manual for
the correct procedures and precautions when removing major vehicle components.
Lowering the vehicle
Before lowering the vehicle remove all tools, trays and shop equipment from the hoist arm area. Be
sure no one is standing under the vehicle as it is lowered. The need to raise the vehicle off the locks
before lowering the vehicle may be necessary. Never override or tie off the stop controls or leave the
controls unattended while lowering the vehicle. Move the hoist arms out of the way when the hoist has
lowered completely. Driving over or striking any part of the hoist may damage the vehicle or hoist.
Note: Never override the safety features of the devices!
Page 18
Inspection & Installation Specialist: Vehicle Hoist Operation And Safety
Frame Engaging Contact pads
The contact pads should not be damaged, loose or contaminated with oil or grease. The padding should
not be worn on the corners or have sections of material missing. If damage or excessive wear evident,
the pads should be replaced. Before placing the lift arms under the vehicle, inspect the contact pads for
cracks, wear, and damage.
Flip-up or threaded adapters are available. They can be adjustable to accommodate almost any type of
vehicle and frame configuration. Making sure all four pads are adjusted properly before lifting the
vehicle.
Auxiliary Adapters
Even with adjustable contact pads, it may still be necessary to
use auxiliary adapters depending on the configuration of the
vehicles frame or if modifications to the vehicle have been
performed. Adapters are available from the hoists
manufacturers. The use of wood, concrete or any self-made
adapter is not recommended. Incorrect adapters will adversely
affect the vehicles stability and thus putting anyone within
close proximity at serious risk. Use only auxiliary adapters
provided by the hoist manufacturer.
If any part of the lift is damaged or operating improperly do not use the lift or attempt to fix it—notify
supervisor immediately (only qualified people should perform the repairs)
Page 19
Inspection & Installation Specialist: Vehicle Hoist Operation And Safety
Maintaining your Hoist
In order for your hoist to maintain its ability to operate efficiently and safely, regular maintenance and
inspections must be performed.
For telescopic style swing arms that are found on all non-drive on type hoists the following list is
recommended as part of the inspection and maintenance procedure.
•
Lubricate all swivel points
•
Inspect the arms for permanent bending
•
Inspect all adapters and auxiliary adapters
•
Inspect all welds for breaks and/or stress cracks
•
Replace any parts that show wear or may be broken. Only replace with original equipment.
For above ground hoists, the same list applies but there are a few things more that an accredited repair
technician may inspect. Mainly due to the difference in mechanisms used to raise the vehicle.
•
Inspect the drums, sprockets and sheaves for damage and wear. They must roll freely
•
Inspect the sheaths on the cables, the coatings must be free from wear
•
Lubricate cables and chains
•
Inspect cables and chains for stretching and wear.
•
Inspect slack sensors for correct operation
•
Clean arms and frame. keeping sand, dirt, salt can make their way into moving parts of the
hoist and hinder it’s performance
•
Have the chain serviced if there is a sudden increase in slack, deformed, bent, broken
•
Have the cables replaced if deformed, corroded, kinked, unstranded, or a sudden increase in
slack
Page 20
Inspection & Installation Specialist: Vehicle Hoist Operation And Safety
If A Problem Is Found
1.
notify your supervisor immediately if any discrepancies are found
2.
replace any damaged or worn parts with manufacturers recommended components
3.
do not continue to operate the equipment if there is a question of safety
For In-Ground Lifts
Always check the hoist in the full down position, this will ensure that all air and oil pressure has been
bled off
Watch closely for smooth piston operation. A piston that is vibrating or jerky could indicate a leak
somewhere in the system
Check and clean all filters and magnets
Inspect the cylinder for any signs of damage such as nicks or dings on the sides
Inspect for oil leaking around the cylinder or blow-by
Only have Qualified hoist service personnel install and or repair any parts deemed questionable.
Shop Floor
Almost all surface mounted hoists are secured directly to the floor. Check the hoist area for cracks or
concrete that has come loose. If a problem is noticed, contact your supervisor immediately. You
should also check the floor anchors for tightness.
Page 21
Inspection & Installation Specialist: Vehicle Hoist Operation And Safety
Terms:
Asymmetrical Lift Arms: Refers to lifts with front arms that are a different length than the rear arms,
position arms as directed by manufacturer
Capacity Plate – a plate or label attached by the equipment manufacturer to indicate lifting capacity
etc.
Explain – shall also imply demonstrating, showing, operating of a device.
Hoisting Device – a device used to lift a motor vehicle
Lifting Device – a device used to lift a component such as engine or transmission
Maintenance – shall include, cleaning, lubrication, tightening, or level checks as required by the
manufacturer.
Qualified – a person who is trained or a manufactures’ agent, or shop supervisory staff using
information provide by the manufacture for the purpose of maintenance of the equipment.
Support Device – a device used to support a vehicle or component while being serviced.
Tall Stand – a stand used to support vehicles being worked on while they are elevated.
NOTES:
___________________________________________________________________________________
___________________________________________________________________________________
________________________________________________________________________________
___________________________________________________________________________________
___________________________________________________________________________________
________________________________________________________________________________
Page 22
Inspection & Installation Specialist: Vehicle Hoist Operation And Safety
Page 23