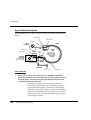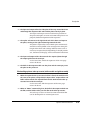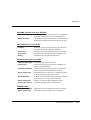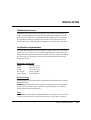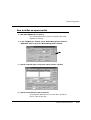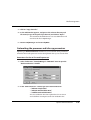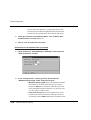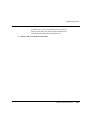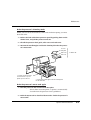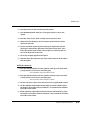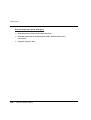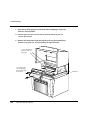
1
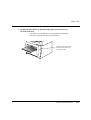
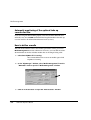
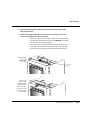
DPX 5080
Operator’s Manual
I
M
A
G
I
N
E
S
T
R
A
I
G
H
T
F
O
R
W
A
R
D
P
R
E
P
R
E
S
S
DPX 5080
Operator’s Manual
© September 2001 Purup-Eskofot A/S. All rights reserved.
No part of this publication may be copied or in any other way
reproduced, nor may it be stored in a retrieval system, without
the prior written permission of Purup-Eskofot A/S.
The information in this manual is subject to change without
notice. Purup-Eskofot A/S assumes no responsibility or liability
for any errors or inaccuracies that may appear in this book.
DPX 5080, RipMate, RipManager, RipWatch, DotMonitor and OPI
Manager are trademarks of Purup-Eskofot A/S. Other manufacturers’ trademarks are used in an editorial fashion, with no
intention of infringement.
Head office
Purup-Eskofot A/S
Industriparken 35-37
DK-2750 Ballerup
Denmark
Tel: (+45) 44 73 66 66
Fax: (+45) 44 73 68 68
This equipment has been tested and found to comply with the
limits for a Class A digital device, pursuant to part 15 of the
FCC Rules. These limits are designed to provide reasonable
protection against harmful interference when the equipment
is operated in a commercial environment.
This equipment is supplied with a shielded cable. It must
be operated with a shielded cable in order to meet FCC Class A
emission limits.
This equipment generates and can radiate radio frequency
energy and, if not installed and used in accordance with the
instruction manual, may cause harmful interference to radio
communications. Operation of this equipment in a residential
area is likely to cause harmful interference, in which case the
user will be required to correct the interference at his or her
own expense.
Manual edition: 1
RipMate Software version: 4.1
PN 730-00-074-01
ii
DPX 5080 • Operator’s Manual
CONTENTS
Before using the DPX 5080
What you can find in the manuals . . . . . . . . . . . . . . . . . . . . . . . . .v
What you should know before starting . . . . . . . . . . . . . . . . . . . . .v
GENERAL DESCRIPTION AND INSTALLATION
1 • Specifications
Functional specifications • Imagesetter . . . . . . . . . . . . . . . . . . . .1•1
Approved media types . . . . . . . . . . . . . . . . . . . . . . . . . . . . . . . . . . . .1•2
Functional specifications • Processor . . . . . . . . . . . . . . . . . . . . . .1•2
Physical specifications . . . . . . . . . . . . . . . . . . . . . . . . . . . . . . . . . . .1•3
Options . . . . . . . . . . . . . . . . . . . . . . . . . . . . . . . . . . . . . . . . . . . . . . . . .1•4
2 • Description
Features . . . . . . . . . . . . . . . . . . . . . . . . . . . . . . . . . . . . . . . . . . . . . . . .2•1
Available options . . . . . . . . . . . . . . . . . . . . . . . . . . . . . . . . . . . . . . . .2•1
Location of major parts . . . . . . . . . . . . . . . . . . . . . . . . . . . . . . . . . . .2•2
Laser safety . . . . . . . . . . . . . . . . . . . . . . . . . . . . . . . . . . . . . . . . . . . . .2•3
Operational description . . . . . . . . . . . . . . . . . . . . . . . . . . . . . . . . . .2•4
Processor service program . . . . . . . . . . . . . . . . . . . . . . . . . . . . . . . .2•6
Identification of processor parts . . . . . . . . . . . . . . . . . . . . . . . . . . .2•8
3 • Installation
Technical assistance . . . . . . . . . . . . . . . . . . . . . . . . . . . . . . . . . . . . .3•1
Installation requirements . . . . . . . . . . . . . . . . . . . . . . . . . . . . . . . . .3•1
WORKING WITH THE DPX 5080
4 • Initial Preparation
Overview . . . . . . . . . . . . . . . . . . . . . . . . . . . . . . . . . . . . . . . . . . . . . . . .4•1
Setting up the processor . . . . . . . . . . . . . . . . . . . . . . . . . . . . . . . . . .4•1
Setting up the chemistry . . . . . . . . . . . . . . . . . . . . . . . . . . . . . . . . . .4•2
Starting up the DPX 5080 system . . . . . . . . . . . . . . . . . . . . . . . . . .4•4
5 • Media Set-up
Specifying media and cassettes in RipManager . . . . . . . . . . . . . .5•1
Mounting and unmounting media cassettes . . . . . . . . . . . . . . . .5•1
Loading media into an input cassette . . . . . . . . . . . . . . . . . . . . . .5•2
Preloading the media into the imagesetter . . . . . . . . . . . . . . . . . .5•5
Operator’s Manual • DPX 5080
iii
Contents
Changing to a different input cassette . . . . . . . . . . . . . . . . . . . . . .5•5
Setting up the output tray . . . . . . . . . . . . . . . . . . . . . . . . . . . . . . . . .5•6
6 • Calibration
Calibrating the DPX 5080 . . . . . . . . . . . . . . . . . . . . . . . . . . . . . . . . .6•1
7 • Media management
How to keep track of media and cassettes . . . . . . . . . . . . . . . . . .7•1
What you can define in “Media Management” . . . . . . . . . . . . . . . . . . .7•1
Automatic monitoring of the optional take-up cassette for film . . .7•2
How to define a media . . . . . . . . . . . . . . . . . . . . . . . . . . . . . . . . . . . .7•2
How to define an input cassette . . . . . . . . . . . . . . . . . . . . . . . . . . .7•5
Backing up and retrieving media and cassette definitions . . . .7•8
Customizing the processor and take-up parameters . . . . . . . . .7•9
8 • Maintenance
Maintenance requirements . . . . . . . . . . . . . . . . . . . . . . . . . . . . . . . .8•1
Imagesetter maintenance . . . . . . . . . . . . . . . . . . . . . . . . . . . . . . . . .8•1
Processor maintenance • Procedures . . . . . . . . . . . . . . . . . . . . . .8•1
9 • Troubleshooting
Error information from DotMonitor . . . . . . . . . . . . . . . . . . . . . . .9•1
Media will not load . . . . . . . . . . . . . . . . . . . . . . . . . . . . . . . . . . . . . . .9•1
Media jams . . . . . . . . . . . . . . . . . . . . . . . . . . . . . . . . . . . . . . . . . . . . . .9•1
iv
DPX 5080 • Operator’s Manual
BEFORE USING THE DPX 5080
What you can find in the manuals
This manual contains information about the installation, calibration, and
daily use of the DPX 5080, including the handling of media and cassettes,
and concentrating mainly on the mechanical systems.
For information about RipMate as such and RipWatch, including a
number of valuable tips about how to get the most out of your RIP and
imagesetter, please see the separate RipMate Operator’s Manual, RipMate
Workstation User’s Guide and RipMate Options Manual.
What you should know before starting
We recommend that you read the manuals before starting to work with the
DPX 5080/RipMate system. Please note in particular that the RipMate
installation instructions must be carefully followed in order to ensure proper
installation of all system components.
This manual assumes that you have some familiarity with imagesetting
as well as a basic working knowledge of Microsoft Windows NT. If you are in
doubt about general operating procedures for Windows NT, please consult
the manuals supplied with your PC.
Operator’s Manual • DPX 5080
v
General Description
and Installation
1•0
DPX 5080 • Operator’s Manual
SPECIFICATIONS
Functional specifications • Imagesetter
Working principle
Internal drum.
Light source
675 nm, 10 mW visible red laser diode.
Output media
Polyester plates and film.
Maximum media format
Polyester plates: 340 x 508 mm (13.4" x 20").
Film:
355 x 508 mm (14" x 20").
Maximum imaging format
Polyester plates: 340 x 488.9 mm (13.4" x 19.25").
Film:
355 x 488.9 mm (14" x 19.25").
Resolution
900 to 3600 dpi.
Speed of exposure
At 2540 dpi:
28 plates per hour.
At 900 dpi:
45 plates per hour.
Spot size
10 - 25 microns.
Image repeatability
25 microns (0.00098") over 4 plates or films.
Media loading
Daylight cassette with automated loading.
Operator’s Manual • DPX 5080
1•1
Specifications
Media definition
Up to 10 different media can be defined.
Cassette definition
Up to 16 different cassettes can be defined and monitored.
Capacity of input cassette
Up to 61 m (200 feet) per roll.
Media thickness
4-8 mil (0.1 - 0.2 mm).
Approved media types
To ensure optimal results, Purup-Eskofot recommends that you use only
media that have been tested and approved for use in the DPX 5080. Please
ask your local Purup-Eskofot dealer for the current list of approved media
types.
Functional specifications • Processor
Automatic replenishment control
Oxidation.
Consumption.
Temperature range for chemistry
20 - 45°C (68 - 113°F).
Temperature control for chemistry
+/– 0.5°C accuracy.
Temperature range for plate dryer
30 - 50°C (86 - 122°F).
1•2
DPX 5080 • Operator’s Manual
Specifications
Capacity of chemistry tanks
Activator:
3.5 litres (0.9 U.S. gallons).
Stabilizer:
2.5 litres (0.6 U.S. gallons).
Waste:
15 litres (3.9 U.S gallons).
Physical specifications
Dimensions (H x W x D)
130 x 105 x 110.5 cm (51" x 41.4" x 43.5").
Weight
250 kg (551 lbs).
Power consumption
1650 W.
Power requirements
200 - 240 V, 50/60 Hz.
Ambient temperature
18 - 28°C (65 - 82°F).
Relative humidity
30 - 75%, non-condensing.
Noise level
Less than 65 dBA.
Data interface
Differential Fast SCSI-2.
Two RS 232 cables.
WARNING: The DPX 5080 is Class I electrical equipment. For your personal
safety, it must be connected to a protective ground (earth) in accordance
with national and local regulations.
Operator’s Manual • DPX 5080
1•3
Specifications
Options
Mechanical system
Film handling.
Software
RipMate Extended.
InRIP OPI Manager.
MediaSaver.
EasyTrap.
Harlequin Dispersed Screening.
Harlequin Chain Screening.
Harlequin Micro Screening.
1•4
DPX 5080 • Operator’s Manual
DESCRIPTION
Features
The DPX 5080 is a fully integrated imagesetter and processor that produces
polyester printing plates. A film handling option is available.
The imagesetter unit is a high-precision, 2-up, internal drum imagesetter
driven by Purup-Eskofot’s RipMate software RIP and associated software. The
processor unit is 100% computer-controlled and -monitored.
Among the advantages of the DPX 5080 are:
• An extremely simple and efficient media path.
• A wide range of output resolutions (from 900 to 3600 dpi) for flexibility in
meeting the speed and quality demands of each individual job.
• An unusually wide range of spot sizes that are automatically optimized to
the chosen output resolution.
• The ability to image screen rulings up to 300 lpi (118 lines per cm).
• Compact size and low noise level to fit into any working environment.
• User-friendly and service-friendly design.
Available options
The DPX 5080 can be driven by RipMate Basic, an entry-level RIP tailored to the
needs of smaller prepress installations, or by RipMate Extended, which includes
multi-user spooling as well as the RipWatch module for remote queue control
and output surveillance.
RipMate Extended is required if you wish to add optional workflow
modules like InRIP OPI Manager, MediaSaver film packing and EasyTrap
InRIP trapping or advanced screening techniques such as Harlequin Dispersed (stochastic) Screening, Harlequin Chain Screening, and Harlequin
Micro Screening. Upgrades from RipMate Basic to RipMate Extended are
available.
A film handling option is available as a set that includes a take-up cassette,
an extra input cassette, a buffer module and a guide assembly.
Operator’s Manual • DPX 5080
2•1
Description
Location of major parts
The drawing below shows the main external parts of the DPX 5080.
Cassette lid
Input cassette
Take-up cassette
(if film handling
option is installed)
Processor
door
(not visible)
Top lid
Processor panel
Output tray
(in storage
postiion)
2•2
DPX 5080 • Operator’s Manual
Description
Laser safety
The DPX 5080 is a Class I laser product and contains a laser which, however,
is totally shielded by the cabinet. When the cabinet is opened, the interlock
system automatically switches off the laser, and there is no risk of laser
radiation.
WARNING: Only authorized service personnel may override the interlock
system. The laser warning labels on both sides of the drum assembly are
intended for such personnel.
CAUTION
VISIBLE AND INVISIBLE
LASER RADIATION WHEN OPEN
DO NOT STARE INTO BEAM
This warning appears on both sides of the drum assembly
Operator’s Manual • DPX 5080
2•3
Description
Operational description
The DPX 5080 has a very short, efficient media path, shown schematically
below.
Input sensor
Input rollers
Feed rollers
DRUM
INPUT
CASSETTE
Buffer rollers
INPUT
MODULE
BUFFER Output
MODULE sensor Knife
TAKE-UP
CASSETTE
(if film handling
option is installed)
OPTICS
UNIT
th
pa
dia
Me
Buffer sensor
OUTPUT
MODULE
Output guide
CONVEYOR
To processor
Output rollers
Basic operation
1 • When a job is sent to the imagesetter or a “PRELOAD” command is
given, the feed rollers close on the plate just long enough to feed it to
the input rollers. The input rollers then pull the plate from the input
cassette and load it into the drum.
During plate loading, the carriage upon which the
optics unit is located moves to the middle of the drum.
At each end of the carriage, a semicircular guide hoop is
mounted. These guides support the plate during loading
and prevent it from falling onto the optics unit. Sensors
on the guides report an error to RipManager if the plate
is not properly loaded.
2•4
DPX 5080 • Operator’s Manual
Description
2 • The input and output rollers feed the plate all the way around the drum
and through the output module and hold the plate securely in place.
The input and output sensors monitor the position of
the plate and report an error to the RIP if the plate is not
properly loaded and positioned for exposure.
3 • The optics unit moves to the right-hand end of the drum and exposes
the plate, starting at the right and moving towards the left.
The plate is exposed by a laser which spins continuously
around a central spindle as the carriage moves along the
length of the drum. The carriage will only move as far as
necessary to expose the job, depending on the job parameters, the format of the page, and its orientation in the drum.
4 • The input and output rollers then transfer the exposed plate through
the output guide into the conveyor.
At the same time, media for exposure of the next page
enters the drum.
5 • The knife in the output module cuts the plate and the conveyor passes
the plate to the processor.
Film handling option w. take-up cassette, buffer module and guide assembly
1 • When the optional take-up cassette for film is fitted, the media feed is
the same as for plates, except that the input rollers, output rollers and
buffer rollers transfer the exposed film from the drum into the take-up
cassette instead of the conveyor.
At the same time, film for exposure of the next page
enters the drum.
2 • When an “EJECT” command is given, the knife in the output module cuts
the film, and the buffer rollers pass the film to the take-up cassette.
The take-up cassette can then be removed and the film
can be developed in an external processor.
Operator’s Manual • DPX 5080
2•5
Description
Processor service program
The processor service program monitors the built-in processor unit during
normal operation and displays the status, so the operator can check that
the DPX 5080 is running correctly.
The Processor Service window contains five sections: Busy, Warning,
Info, Error and Temperatures. When an item in any of the first four sections
is activated or relevant, the white box next to it becomes coloured. The
meanings of the various items are listed below.
BUSY (indicator box turns GREEN)
• Standby (Off) . . . . . . . .The processor is in standby mode.
• Feeding . . . . . . . . . . . . . .Media is entering the processor.
• Activator Temperature . .The heating element is on to keep the activator
temperature within +/– 2°C of the requested value.
2•6
DPX 5080 • Operator’s Manual
Description
WARNING (indicator box turns YELLOW)
• Waste Container Full . .The waste container is full and must be emptied.
Until this is done, no plates can be produced.
• Motor Overload . . . . . .The motor has been overloaded. Check whether a
plate has become jammed in the processor rack.
INFO (indicator box turns BLUE)
• Feeding . . . . . . . . . . . . . .A plate is entering the processor (goes off when
the plate has been completely loaded).
• Processing . . . . . . . . . . .The plate is passing through the activator tank.
• Processing 2 . . . . . . . . . .The plate is passing through the stabilizer tank.
• Drying . . . . . . . . . . . . . . .The plate is passing through the dryer.
ERROR (indicator box turns RED)
• Interlock (Cover open) . .Not applicable to the DPX 5080.
• Liquid Level . . . . . . . . . .The activator level is low. Until it is refilled, no
plates can be produced.
• Activator Temperature . .The temperature of the activator is too high or
there is an error in the temperature circuit.
• Dryer Temperature . . . .The temperature in the dryer is too high or there
is an error in the temperature circuit.
• Motor Overload . . . . . .A media jam or other malfunction has occurred in
the chemistry racks, gears or dryer unit.
• Motor Tachometer . . . .There is an error in the tachometer circuit.
• Exit Sensor Timeout . . .The plate did not come out of the dryer.
TEMPERATURES
• Activator Temperature . .Shows the current temperature of the activator.
• Dryer Temperature . . . .Shows the current temperature in the dryer.
Operator’s Manual • DPX 5080
2•7
Description
Identification of processor parts
Activatoroverflow
pipe (blue)
Activator rack
Stabilizer overflow
pipe (black)
Stabilizer rack
Activator
replenishment
bottle
Dryer section
Stabilizer
replenishment
bottle
Activator
replenishment
pump
FRONT
Processor unit, viewed from the top
2•8
DPX 5080 • Operator’s Manual
Stabilizer
replenishment
pump
INSTALLATION
Technical assistance
Installation of the DPX 5080 is not difficult, but in order to ensure that the
entire system is properly installed and configured, the hardware and software must be installed by an authorized Purup-Eskofot service technician
in accordance with the installation instructions in the DPX 5080 Service
Manual and with national and local regulations concerning electrical safety.
Installation requirements
The DPX 5080 must be placed on a hard, flat, stable surface with a free space
of 20 cm (8") at the back and on the right, approximately 1 metre (40") on
the left for opening the processor door, and free access at the front for sliding
out the processor, opening the cassette lid and top lid and inserting and
removing cassettes.
Dimensions and weight
Height:
Width:
Depth:
Net weight:
Gross weight:
130.0 cm (51.2").
105.0 cm (41.4").
110.5 cm (43.5").
250 kg (551 lbs).
275 kg (606 lbs).
Electrical supply
The DPX 5080 must be connected to a grounded (earthed) 200-240 V AC, 50 or
60 Hz wall outlet.
WARNING: The DPX 5080 is Class I electrical equipment. For your personal
safety, it must be connected to a protective ground (earth) in accordance
with national and local regulations.
Fuses
WARNING: The DPX 5080 is provided with fuses in the phase only, not in the
neutral. If the machine is connected to a power system that uses phase-
Operator’s Manual • DPX 5080
3•1
Installation
to-phase connection to achieve one of the indicated voltages, make sure the
connection is done in accordance with national and local regulations.
Power, SCSI and RS 232 connections
The illustration below shows the power, SCSI and RS 232 connections.
However, it is recommended that installation of these be carried out by an
authorized Purup-Eskofot service technician.
Electronics cover
Power
Differential SCSI
RS-232 to
imagesetter
RS-232 to
processor
Location of electrical and data connections, on back of unit
3•2
DPX 5080 • Operator’s Manual
Working with the
DPX 5080
4•0
DPX 5080 • Operator’s Manual
INITIAL PREPARATION
IMPORTANT: Before carrying out the activities below, make sure that the
DPX 5080 and the RipMate software have been properly installed by an
authorized Purup-Eskofot service technician according to the instructions
in the DPX 5080 Service Manual and RipMate Operator’s Manual.
Overview
Chapters 4, 5 and 7 explain the operations that are necessary in order to get
your first output from the DPX 5080:
• Setting up the processor (Chapter 4).
• Setting up the chemistry (Chapter 4).
• Starting up the DPX 5080 system (Chapter 4).
• Specifying media and cassettes in RipManager (Chapters 5 and 7).
• Loading media into an input cassette (Chapter 5).
• Setting up the output tray (Chapter 5).
More information about the various functions of the DPX 5080 and RipMate
are found in this manual and in the RipMate Operator’s Manual.
Setting up the processor
1 • Before starting, make sure that:
• the processor has been properly installed.
• the processor is clean.
• the processsor rack is in place and the overflow pipes have been
properly mounted (blue for activator, black for stabilizer).
• Windows NT has been started up on the RIP PC.
2 • Check that all necessary cables (power, SCSI and RS-232’s to imagesetter
and processor) are properly connected.
CAUTION: Never connect or disconnect a SCSI cable or
RS 232 cable to any unit while the power is on.
Operator’s Manual • DPX 5080
4•1
Initial preparation
Setting up the chemistry
1 • Open the processor door.
2 • Release the lock of the processor by pushing down on the chrome
lever, and pull out the processor unit.
When the processor panel is open, power is automatically shut off.
WARNING: Do not lean on the processor or place anything heavy on it when it is pulled out, as this may
cause the DPX 5080 to tip forward.
3 • Lift off the processor feed guide, roller cover and rack cover.
4 • Check that the two overflow pipes are in place (blue for activator,
black for stabilizer).
Processor
feed guide
Roller cover
Rack cover
1 • Open the
processor door
Front panel of
processor unit
2 • Push chrome lever
down to release lock
so you can pull the
processor unit out
4•2
DPX 5080 • Operator’s Manual
4 • Check that both overflow
pipes are in place (blue for activator,
black for stabilizer)
}
3 • Lift these off
Initial preparation
5 • Pour the pre-mixed stabilizer into the stabilizer rack up to the level
mark (a large circular cut-out in the overflow pipe).
The stabilizer tank can hold 2.5 litres.
6 • Pour the pre-mixed activator into the activator rack up to the level
mark (a large circular cut-out in the overflow pipe).
The activator tank can hold 3.5 litres.
7 • Put the roller cover, rack cover and processor feed guide back in place.
8 • Fill the stabilizer replenishment bottle with pre-mixed stabilizer, place
the bottle in the holder marked “Stabilizer,” and reattach the stabilizer
feed tube to the bottle.
9 • Fill the activator replenishment bottle with pre-mixed activator, place
the bottle in the holder marked “Activator,” and reattach the activator
feed tube to the bottle.
Activator
replenishment bottle
Stabilizer
replenishment bottle
10 • Push the processor unit in until it clicks into place, and close the
processor door.
Operator’s Manual • DPX 5080
4•3
Initial preparation
Starting up the DPX 5080 system
Use the following procedure for daily start-up or any time the DPX 5080 has
been switched off.
1 • Switch the DPX 5080 on.
Power switch
2 • Switch the RIP PC on and start up the program modules in the following
order:
• RipManager.
• RipMate.
• (if you are running RipMate Extended) RipWatch.
RipManager must always be started up first.
3 • From the “DPX 5080” menu in RipManager, select “Processor Service
Program” and click on “OK.”
The Processor Service window will be displayed.
4 • Check that all the indicators in the “Error” section and “Warning”
section are off.
The Busy and Info indicators will be green and blue,
respectively, during the start-up cycle.
4•4
DPX 5080 • Operator’s Manual
MEDIA SETUP
Specifying media and cassettes in RipManager
The RipManager program module lets you define and track up to 16 different
input cassettes. You can specify the type of media they contain, the length
of the media roll at the time of loading, and how soon you want to receive a
notice via the RIP that the media is running low.
If you are using the optional take-up cassette for film, RipManager also
lets you set the maximum media output to the take-up cassette (up to the
default value of 10 m/33 ft) and adjust the amount of extra media that is fed
into the take-up cassette when an EJECT command is performed.
For an explanation of how to use these functions, see Chapter 7 • Media
Management.
Mounting and unmounting media cassettes
The DPX 5080 uses daylight loading media with the emulsion side out. The
upper bay at the front of the DPX 5080 is for the input cassette and the lower
bay is for the optional take-up cassette for film.
• To mount either type of cassette in the DPX 5080, line it up with the holding
forks in the relevant bay and slide it straight in until it clicks into place.
• To remove a cassette, pull it straight out.
To mount the
input cassette,
slide it straight
in until it locks
into place
To remove the
input cassette, pull
it straight out
Operator’s Manual • DPX 5080
5•1
Media setup
Loading media into an input cassette
1 • Place the cassette on a table and open it by releasing the lock springs
on both sides.
To open cassette,
pull locks on sides
forward
2 • Remove the spindle from the cassette and unscrew the right-hand
retainer to remove it from the spindle.
Unscrew right-hand
retainer from spindle
3 • Slide the media onto the spindle, making sure it fits tightly against the
left-hand retainer.
Be sure to place the media roll as shown, with the emulsion
side facing down (the roll is shown here with a loose end,
but actually, it should still be taped down at this point).
5•2
DPX 5080 • Operator’s Manual
Media setup
4 • Screw the right-hand retainer back onto the spindle, making sure it
fits tightly against the media.
5 • Place the spindle in the cassette.
6 • Carefully remove the fastening tape from the media roll and pull out
enough media so that it extends past the lip of the cassette.
7 • Close the lid of the cassette, making sure not to trap or distort the media.
8 • If you have the film option and have loaded film, slowly pull out the
protective wrapper/leader until about 2.5 cm (1") of media is exposed
and then carefully peel off the entire protective wrapper/leader or, if
necessary, cut it off with scissors.
With some types of media, a small sticky area (daylight
loading residue) is left across the width of the media
when the protective wrapper is removed. This must also
be cut off.
9 • Tighten the media roll in the cassette by turning the knob on the
left-hand side of the cassette clockwise until the edge of the media is
Operator’s Manual • DPX 5080
5•3
Media setup
lined up with the lip of the cassette.
The cassette is now ready for loading.
Turn knob clockwise
to tighten media
roll in cassette
5•4
DPX 5080 • Operator’s Manual
Media setup
Preloading the media into the imagesetter
Under normal operation, the media is automatically fed into the imagesetter
from the input cassette when a job is sent for exposure. If for some reason
you need to preload the media manually, use the following procedure.
1 • Start RipManager, if it is not already running.
2 • From the “DPX 5080” menu, choose “Media Management” to open the
“Media Management” window.
3 • In the list of cassettes, click on the name of the currently mounted cassette.
See Chapter 7 • Media Management for instructions on
how to define media and input cassettes and store this
information in RipManager so it appears in the list.
4 • Click on the “Preload” button.
NOTE: the first time a plate job is received from the RIP after the input cassette
has been changed, an empty plate with a length of about 41 cm will be produced before the actual job is exposed.
Changing to a different input cassette
Before removing an input cassette from the imagesetter, you must roll the
loaded media back into the cassette.
1 • Start RipManager, if it is not already running.
2 • From the “DPX 5080” menu, choose “Media Management” to open the
“Media Management” window.
3 • Click on the “Unoad” button.
The media will be retracted into the cassette. You can
then remove the cassette from the imagesetter and
mount a different one.
Operator’s Manual • DPX 5080
5•5
Media setup
Setting up the output tray
The output tray is designed to catch the finished plates as they leave the
processor. When jobs are being output, the tray must be mounted in its
horizontal position. At all other times, we recommend that it be hung vertically on the front of the processor panel. Otherwise, it may be damaged.
To mount the output tray:
1 • Lift the tray off its storage brackets and position it with the lip facing
forward.
If necessary, turn tray
so lip is facing out
2 • Place the tray so that its back end is above the storage brackets but
below the holding clips on the wall of the processor panel.
Holding clip
Place the back end of
the tray between the
holding clips and the
storage brackets.
Storage bracket
5•6
DPX 5080 • Operator’s Manual
Media setup
3 • Tilt the tray into position so the two holding clips fit into the holes at
the back of the tray.
The output tray should now be sitting firmly in horizontal
position, supported by the storage brackets.
Tilt the tray down in front and up
at the back, so the holes in the
tray engage the clips.
Operator’s Manual • DPX 5080
5•7
6•0
DPX 5080 • Operator’s Manual
CALIBRATION
Calibrating the DPX 5080
IMPORTANT: The DPX 5080 must be calibrated before use. For information
on how to do this, please see the “Calibration” chapter of the RipMate
Operator’s Manual.
Operator’s Manual • DPX 5080
6•1
7•0
DPX 5080 • Operator’s Manual
MEDIA MANAGEMENT
How to keep track of media and cassettes
The Media Management function in RipManager makes it possible for
RipMate to keep track of the amount of media left in any given input
cassette and to warn you when the media is low, so you won’t run out of
media unexpectedly. You can define and track up to 16 different input
cassettes and up to 10 different media types.
Since RipMate does not know which cassette has been physically placed
in the DPX 5080, you have to give it this information by selecting the relevant
cassette from the Preloaded – Upper drop-down menu in the Media Management window. RipMate then compares the name of the loaded cassette with
the cassette name that is part of the Page Setup associated with each given
job.
If the two cassette names match, the job will be output. If not, the job
will be put on hold, and a dialogue will come up on the RIP PC to warn you.
You can output the job after changing the cassette and selecting the new
cassette’s name in the Media Management window. For more information
about this, see “Cassette Management” in the RipMate Operator’s Manual.
IMPORTANT: Only the Media Management function in RipManager
should be used for tracking cassettes and media, not the Media Manager,
Cassette Manager or Media Monitor functions in RipMate’s Output menu.
What you can define in “Media Management”
To use media management, you start by defining names for each of the
media you expect to use, because you will need to select the relevant media
when you define a cassette.
You can then define one or more cassettes, including:
• the name or number of the cassette.
• the type and length of media loaded.
• the points at which you want the RIP to give you the first and second
Media Low warnings.
• if relevant, an Adjustment Factor to fine-tune the length of the exposed
plates.
Operator’s Manual • DPX 5080
7•1
Media management
Automatic monitoring of the optional take-up
cassette for film
If you are using the film handling option, note that the DPX 5080 will automatically carry out an EJECT command if the length of media in the take-up
cassette reaches the allowed maximum of 10 m (33 feet).
How to define a media
You will need to define at least one media type before starting to use the
Media Management function. Whenever necessary, you can add any other
desired media to the list or delete media that are no longer being used.
1 • Shut down RipMate if it is running.
You cannot define new cassettes or media types while
RipMate is running.
2 • In the “RipManager” window, select “Media Management” from the
“DPX 5080” menu to open the “Media Management” window.
3 • Click on “Edit Cassettes” to open the “Edit Cassettes” window.
7•2
DPX 5080 • Operator’s Manual
Media management
4 • Without selecting a cassette, click on “Edit Media” to open the “Edit
Media” window.
5 • Click on an unused line in the media list.
6 • In the “Name” field, type in the desired name for the new media.
Use a name that uniquely identifies that media type. The
name you define here will automatically be added to the
Media drop-down list in the Edit Cassettes window, so
you can select it when you define input cassettes.
Operator’s Manual • DPX 5080
7•3
Media management
7 • From the “Type” drop-down list, select the relevant type of media.
8 • In the “ Width” field, type in the width of the media in mm.
9 • In the “Thickness” field, type in the thickness of the media in micrometers (µm).
This value is used by the imagesetter to maintain
accuracy when exposing different media thicknesses.
10 • In the “Online Processor“ section, type in the desired processing values.
You can find these values in the media’s specification sheet.
11 • Click on “OK.”
You will return to the Edit Cassettes window, where the new
media will now be available in the Media drop-down list.
12 • If you want to define another media, repeat steps 4-11.
13 • When you have finished defining media, you can define input cassettes
as described below, or you can click on “OK” to return to the “Media
Management” window.
14 • When you are completely finished defining media and cassettes, click
on “OK” to close the “Media Management” window.
15 • You can now restart RipMate by selecting “Start-up RipMate” from
RipManager’s “RipMate” menu.
7•4
DPX 5080 • Operator’s Manual
Media management
How to define an input cassette
1 • Shut down RipMate if it is running.
You cannot define new cassettes or media types while
RipMate is running.
2 • In the “RipManager” window, select “Media Management” from the
“DPX 5080” menu to open the “Media Management” window.
3 • Click on “Edit Cassettes” to open the “Edit Cassettes” window.
4 • Click on an unused line in the cassette list.
To change the definition of a cassette that is already in
the list, click on that line.
Operator’s Manual • DPX 5080
7•5
Media management
5 • In the “Name” field, type in the desired name for the cassette.
6 • From the “Media” drop-down list, select the media you will be using in
this cassette.
• To get the full benefit of the Media Management
function, use each of your input cassettes consistently
for only one type of media. If you do load a different
type of media in a cassette, remember that you also
need to change the cassette definition.
• If the desired media type is not in the list, you must
define it in the Edit Media window using the procedure
given above under “How to Define a Media.”
7 • In the “Length” field, type in the number of meters of media in the roll.
You should be able to find this value on the media’s
packaging or specification sheet.
• If you do not type in a length, RipManager will use a
default value of 60 meters.
8 • Check that “Offset” has been set to “0.”
This parameter regulates the distance from the side edge
of the media (as it lies in the input cassette) to the edge
of the exposed area. It should always be 0.
9 • Set the “Media Low Warnings” as desired.
As jobs are exposed, RipManager calculates the amount
of media used. When the amount of media remaining in
the cassette reaches the levels specified by you, RipMate
displays the messages Info: Media Low (first warning)
and Warning: Media Low (second warning) in its “Output
Controller/Monitor” window.
10 • If relevant, use the “Media Feed Adjustment” section to calibrate the
plate length.
This function is used for fine-tuning the plate length if
you are exposing polyester plates in “cut to size” mode.
7•6
DPX 5080 • Operator’s Manual
Media management
The desired plate length is specified in RipMate, using
the Configure Device window, which is accessed from
the Page Setup window. However, if the actual plate
length produced does not match the desired length, you
can use Media Feed Adjustment to correct it:
a • In the “Expected Length” field, type in the same
value that you entered in the “Configure Device”
window for the desired plate length.
b • Measure the exact length of an exposed plate and
type it into the “Actual Length” field.
c • Click on “Set.”
RipManager will calculate the necessary correction factor
and display it in the Adjustment Factor field. This factor
is part of the cassette definition for this particular cassette
and will be remembered until you change it.
• To delete the correction factor and return to the factory
setting, click on Reset.
11 • When you have finished defining the cassette, click on “OK.”
You will return to the Media Management window, where
the new cassette will now be available in the Preloaded –
Upper drop down list.
12 • If you want to define another cassette, repeat steps 3-10.
13 • When you are completely finished defining media and cassettes, click
on “OK” to close the “Media Management” window.
14 • You can now restart RipMate by selecting “Start Up RipMate” from
RipManager’s “RipMate” menu.
Operator’s Manual • DPX 5080
7•7
Media management
Backing up and retrieving media and cassette definitions
The media and cassette definitions you set up are stored in the DPX 5080’s
firmware and are found there by RipManager. We recommend that you store
a backup copy of your media and cassette definitions in another location,
in case it is needed later. Remember to update the backup file if you add or
remove media or cassette definitions.
The Copy to File and Copy from File buttons in the Edit Media and Edit
Cassettes windows are used for backing up the media and cassette definitions, respectively.
How to back up the media or cassette definitions
1 • Shut down RipMate.
2 • Open the “Edit Cassettes” or “Edit Media” window as described under
“How to define an input cassette” or “How to define a media” above.
3 • Click on “Copy to File.”
4 • In the window that appears, navigate to the desired directory, type in
whatever file name you desire and click on “Save.”
The entire list of media or cassette definitions will be
copied to disk.
• The best strategy is to store the backup on a diskette or
on another computer in your network, rather than on
the RIP PC.
5 • Return to RipManager and restart RipMate.
How to retrieve and load the media or cassette definitions
1 • Shut down RipMate.
2 • Open the “Edit Cassettes” or “Edit Media” window as described under
“How to define an input cassette” or “How to define a media” above.
7•8
DPX 5080 • Operator’s Manual
Media management
3 • Click on “Copy from File.”
4 • In the window that appears, navigate to the relevant directory and
file name (or type in the path if you know it) and click on “Open.”
The stored media definitions or cassette definitions will
overwrite the list in RipManager.
5 • Return to RipManager and restart RipMate.
Customizing the processor and take-up parameters
RipManager’s Device Preferences window lets you customize some parameters
related to the media processor and to the optional take-up cassette for film.
Parameters for the on-line media processor
1 • Select “Preferences” from RipManager’s “DPX 5080” menu to open the
“Device Preferences” window.
2 • In the “Online Processor” section, type in the desired values for:
• “Activator Temperature”
• “Activator Anti-Oxidation Rate”
• “Stabilizer Anti-Oxidation Rate”
The anti-oxidation function replenishes the activator
and stabilizer to compensate for the oxidation that
Operator’s Manual • DPX 5080
7•9
Media management
occurs when the chemistry is exposed to the air. The
amount of anti-oxidation replenishment required can
be found in the specification sheets for the chemistry.
2 • Check that “Activator Anti-Oxidation Mode” and “Stabilizer AntiOxidation Mode” are both set to “1.”
3 • Click on “OK” to confirm the new values.
Parameters for the optional take-up cassette
1 • Select “Preferences” from RipManager’s “DPX 5080” menu to open the
“Device Preferences” window.
2 • In the “Takeup Cassette ” section, type in the desired values for
“Maximum Takeup Length” and/or “Extra Feed on Eject.”
• Maximum Takeup Length means the maximum amount
of media that can be fed into the take-up cassette
before an EJECT must take place. Default is the maximum allowable length of 10 meters (33 feet), but you
can also specify a lower value.
• Extra Feed on Eject means the length of extra, unexposed media that is fed into the take-up cassette in
connection with an EJECT command. The default value
7•10
DPX 5080 • Operator’s Manual
Media management
is 300 mm (11.8"), but some processors may require a
longer lead to make sure that the exposed media is not
exposed to light before entering the processor.
3 • Click on “OK” to confirm the new values.
Operator’s Manual • DPX 5080
7•11
8•0
DPX 5080 • Operator’s Manual
MAINTENANCE
Maintenance requirements
The DPX 5080 requires very little maintenance. However, to keep it in perfect
working order, we strongly recommend that you follow the maintenance
instructions below.
Imagesetter maintenance
The imagesetter unit should be serviced every three months by an authorized
Purup-Eskofot service technician, who will perform the necessary cleaning
and lubrication.
Processor maintenance • Procedures
In order to avoid problems with your output, such as brown coloring, milky
appearance, streaks, or low density, the processor unit and circulation pump
must be cleaned each time the chemistry is changed. The cleaning procedure
consists of the following operations, which are described in detail on the
following pages:
• Drain the processor’s waste tank.
• Drain the processor’s chemistry tanks.
• Drain the processor’s waste tank again.
• Clean the processor.
• Clean the activator circulation pump.
• Refill the chemistry.
• Drain the processor’s waste tank again.
WARNING: Corrosive chemicals are used in the processor. For your
personal safety, use gloves and safety glasses when performing processor
maintenance.
CAUTION: The waste tank has a capacity of only 15 litres and must therefore be drained before and during processor maintenance, as described
below.
Operator’s Manual • DPX 5080
8•1
Maintenance
Drain the processor’s waste tank
1 • Switch the DPX 5080 on and open the processor door.
2 • Remove the drain hose from its storage hook on the inside of the door
and connect it to the waste tank drain point, which is located in front of
the chemistry containers.
3 • Place the free end of the hose in an empty container.
You will be draining off about 15 liters of fluid. If you do
not have a single container that can hold that amount,
you can use several smaller containers (see step 4).
4 • Press and hold the drain switch until the waste tank is empty.
The drain switch is located on the side wall of the electronics box. By releasing the switch, you can stop the flow
long enough to switch containers, if necessary.
4 • Press and hold
the drain switch
until the drain tank
has been emptied.
2 • Remove the drain hose from its
storage position and connect it to
the drain point for the waste tank.
3 • Put the other end in a suitable
empty container that can hold at
least 15 litres. Or use several smaller
conttainers.
5 • Disconnect the drain hose from the processor and store it on the side
panel.
8•2
DPX 5080 • Operator’s Manual
Maintenance
Drain the processor’s chemistry tanks
Before you can clean the chemistry tanks and circulation pump, you must
drain the tanks.
1 • Release the lock of the front processor panel by pushing down on the
chrome lever, and pull the processor unit out.
2 • Lift off the processor feed guide, roller cover and rack cover.
3 • Unscrew the overflow pipes and let the chemistry flow into the processor’s waste tank.
Processor
feed guide
Roller cover
Rack cover
1 • Push the chrome lever down
to release the lock so you can
pull the processor unit out.
}
2 • Lift these off.
3 • Unscrew the overflow pipes and let the chemistry drain
into the waste tank.
Drain the processor’s waste tank again
1 • Push the processor unit in until it locks into place.
This is done to restore power, as power is automatically
shut off when the processor unit is pulled out.
2 • Drain the waste tank as described above under “Drain the processor’s
waste tank.”
Operator’s Manual • DPX 5080
8•3
Maintenance
Clean the processor
1 • Push the release lever down and pull out the processor unit.
2 • Lift up and remove the plate that separates the dryer section from the
tank section.
3 • Remove the processor rack by carefully lifting it from the left-hand
side while pulling it towards the left, in order to release it from the
drive gears.
Carefully remove rack
as shown
3
2
1
4 • Clean the rack with lukewarm water and a soft brush.
5 • Clean the activator and stabilizer tanks by pouring clean water into the
tanks and letting it drain away.
At the same time, use a soft brush to clean the two sensors on the side
wall of the activator tank, near the gear.
Clean the activator circulation pump
1 • Screw the overflow pipes back into place and fill the activator tank
with clean water.
8•4
DPX 5080 • Operator’s Manual
Maintenance
2 • Push the processor unit in until it locks into place.
3 • Turn the DPX 5080 off. Then turn it on again and let it run for one
minute.
4 • Push the release lever down and pull out the processor unit.
5 • Remove the overflow pipe of the activator tank and let the water
drain from the tank.
6 • Put the rack back in place by first lowering its right-hand side and
pushing it in towards the right until it fits into the drive gears. Then
lower the left-hand side of the rack into place so it fits into the cutouts in the back wall of the tank.
7 • Screw the overflow pipe back into place.
8 • Slide the plate that separates the dryer section from the tank section
back into place.
Refill the chemistry
1 • Pour pre-mixed stabilizer into the stabilizer rack up to the level mark
(a large circular cut-out in the overflow pipe).
The stabilizer tank can hold 2.5 litres.
2 • Pour pre-mixed activator into the activator rack up to the level mark
(a large circular cut-out in the overflow pipe).
The activator tank can hold 3.5 litres.
3 • Put the rack cover, roller cover and processor feed guide back in place.
4 • Fill the stabilizer replenishment bottle with pre-mixed stabilizer, place
the bottle in the holder marked “Stabilizer,” and reattach the stabilizer
feed tube to the bottle.
5 • Fill the activator replenishment bottle with pre-mixed activator, place
the bottle in the holder marked “Activator,” and reattach the activator
feed tube to the bottle.
Operator’s Manual • DPX 5080
8•5
Maintenance
Drain the processor’s waste tank again
1 • Push the processor unit in until it locks into place.
2 • Drain the waste tank as described above under “Drain the processor’s
waste tank.”
3 • Close the processor door.
8•6
DPX 5080 • Operator’s Manual
TROUBLESHOOTING
Error information from DotMonitor
The DPX 5080/RipMate system includes a DotMonitor module that gives
you running information about what the system is doing. It monitors the
DPX 5080 and provides specific information about any hardware errors that
occur. These messages appear in the DotMate HyperTerminal window.
To avoid unnecessarily filling up the screen of the RIP PC, we recommend
that you only open the DotMate HyperTerminal window when troubleshooting.
The easiset way to do this is by selecting Start DotMonitor from the DPX
5080 menu in RipManager.
Media will not load
If the DPX 5080 refuses to load media from the input cassette, check that:
• The media has been placed in the input cassette so the emulsion side is
facing down when the cassette is mounted in the DPX 5080.
• The edge of the media has been cut cleanly and is parallel to the lip of the
input cassette.
• The edge of the media is lined up with the edge of the cassette lip.
Media jams
If the RIP reports a Media jam error, media is stuck in the drum and must
be removed. Note that all media must be removed from the DPX 5080 before
you can resume operation. Proceed as follows:
1 • Turn the DPX 5080 off.
The power switch is on the left-hand side of the rear panel.
2 • If the optional take-up cassette for film is mounted, open the cassette
lid, pull the cassette out of its bay and cut the media so you can
remove the cassette.
Operator’s Manual • DPX 5080
9•1
Troubleshooting
3 • Open the top lid by gripping it under both sides and flipping it all the way
back to a vertical position.
4 • Pull the input cassette out of its bay and cut the media so you can
remove the cassette.
5 • Remove the imagesetter’s light shield by first pressing the two black lock
buttons so they pop out, and then pulling the light shield off.
5 • Press the black lock
buttons to release the
light shield
2 & 4 • Remove the
cassettes by pulling
them out and cutting
the media free.
9•2
DPX 5080 • Operator’s Manual
Light shield
Troubleshooting
6 • Look into and around the imagesetter drum and remove any media
that you find there.
7 • Lower the spring-loaded flap on the front of the conveyor unit and
remove any media that is in the conveyor.
If necessary, you can move the conveyor forward by pulling
on the rod at the bottom of the unit (CAUTION: be careful
not to break the attached cable!).
After removing any media found, carefully push the conveyor back in and make sure that the rod at the bottom
clicks into place on top of the black stud underneath it.
Pull down the flap
to access any
media caught in
the conveyor
Conveyor
unit
If necessary, the
conveyor can be
pulled forward (be
careful not to break
the attached cable!).
Be sure the conveyor
locks into place when
you push it back.
Operator’s Manual • DPX 5080
9•3
Troubleshooting
8 • Put the light shield back in place, and push the two black buttons in so
they lock into place.
9 • Lower the top lid.
10 • Before remounting the cassettes, make sure that the take-up cassette
(if present) has been emptied and that the media in the input cassette
has been cut cleanly and parallel to the lip of the cassette.
11 • Slide the input cassette and, if relevant, the take-up cassette into their
bays and lower the cassette lid.
12 • Turn the DPX 5080 on.
9•4
DPX 5080 • Operator’s Manual
I
M
A
G
I
N
E
S
T
R
A
I
G
H
T
F
O
R
W
A
R
D
P
R
E
P
R
E
S
S
w w w . p u r u p - e s k o f o t . c o m