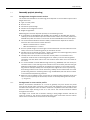
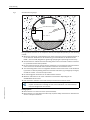
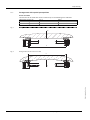
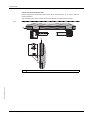
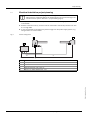
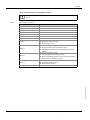
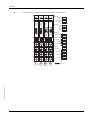
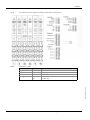
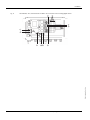
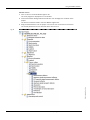
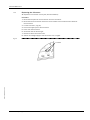
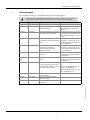
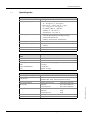
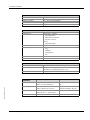
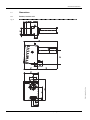
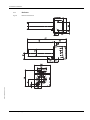
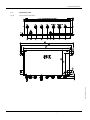
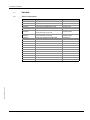
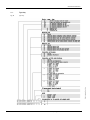
1
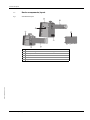
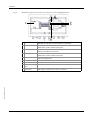
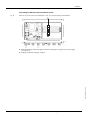
Front page OPERATING INSTRUCTIONS VICOTEC320 Measurement of NO, NO2 , CO and Visibility Installation Operation Maintenance Document Information Glossary Document ID Title: Part No.: Version: Release: Skilled persons: Persons who, based on their technical training and knowledge as well as knowledge of the relevant regulations, can assess the tasks given and recognize the dangers involved. Operating Instructions VICOTEC320 8011703 2-2 2013-07 Described Product: Product name: VICOTEC320 Variants: VICOTEC321 VICOTEC322 VICOTEC323 VICOTEC324 Manufacturer SICK AG Erwin-Sick-Str. 1 Phone: Fax: E-mail: Competent persons: Persons who, based on their technical training on, and knowledge concerning the specific device, as well as knowledge of the relevant regulations, can assess the tasks given and recognize the dangers involved. Instructed persons: Persons properly instructed on the tasks assigned, possible risks and necessary protective measures. · 79183 Waldkirch · Germany +49 7641 469-0 +49 7641 469-1149 [email protected] Trademarks Windows is a Microsoft Corporation trademark. Other product names used in this document may also be trademarks and are only used for identification purposes. Original Documents The English edition 8011703 of this document is an original document of SICK AG. SICK AG assumes no liability for the correctness of an unauthorized translation. Please contact the manufacturer or your local representative in case of doubt. Legal information Subject to change without notice. © SICK AG. All rights reserved. 2 VICOTEC320 Operating Instructions 8011703/2013-07 (V 2-2) © SICK AG Warning Symbols Information Symbols Hazard (general) Important technical information for this product Hazard by voltage Supplementary information Hazard in potentially explosive atmospheres Hazard by ultraviolet radiation (UV light) Signal Words DANGER Immediate hazard which will result in severe personal injury or death. WARNING Risk or hazardous situation which could result in severe personal injury or death. CAUTION Hazard which could result in less severe or minor injuries and/or property damage. VICOTEC320 Operating Instructions 8011703/2013-07 (V 2-2) © SICK AG 3 Contents 4 Contents 1 For your Safety . . . . . . . . . . . . . . . . . . . . . . . . . . . . . . . . . . . . . . . . . . . . . . . . . . . . . . . . . 7 1.1 Short summary of the most important hazards . . . . . . . . . . . . . . . . . . . . . . . . . . . . . . . . . . 8 1.2 1.2.1 1.2.2 1.2.3 1.2.4 1.2.5 1.2.6 1.2.7 Basic information . . . . . . . . . . . . . . . . . . . . . . . . . . . . . . . . . . . . . . . . . . . . . . . . . . . . . . . . . . . . 8 Detail level of these Operating Instructions. . . . . . . . . . . . . . . . . . . . . . . . . . . . . . . . . . . 8 Scope of application and identification . . . . . . . . . . . . . . . . . . . . . . . . . . . . . . . . . . . . . . 9 Designated users . . . . . . . . . . . . . . . . . . . . . . . . . . . . . . . . . . . . . . . . . . . . . . . . . . . . . . . . . . 9 Responsibility of the operator . . . . . . . . . . . . . . . . . . . . . . . . . . . . . . . . . . . . . . . . . . . . . . . 9 Intended use . . . . . . . . . . . . . . . . . . . . . . . . . . . . . . . . . . . . . . . . . . . . . . . . . . . . . . . . . . . . . . 9 Warranty limits . . . . . . . . . . . . . . . . . . . . . . . . . . . . . . . . . . . . . . . . . . . . . . . . . . . . . . . . . . . 10 Further literature . . . . . . . . . . . . . . . . . . . . . . . . . . . . . . . . . . . . . . . . . . . . . . . . . . . . . . . . . 10 2 Product Description . . . . . . . . . . . . . . . . . . . . . . . . . . . . . . . . . . . . . . . . . . . . . . . . . . 11 2.1 Functional principle . . . . . . . . . . . . . . . . . . . . . . . . . . . . . . . . . . . . . . . . . . . . . . . . . . . . . . . . . 12 2.2 Performance features . . . . . . . . . . . . . . . . . . . . . . . . . . . . . . . . . . . . . . . . . . . . . . . . . . . . . . . 12 2.3 Special features . . . . . . . . . . . . . . . . . . . . . . . . . . . . . . . . . . . . . . . . . . . . . . . . . . . . . . . . . . . . 12 2.4 Device variants . . . . . . . . . . . . . . . . . . . . . . . . . . . . . . . . . . . . . . . . . . . . . . . . . . . . . . . . . . . . . 12 2.5 Device components/layout . . . . . . . . . . . . . . . . . . . . . . . . . . . . . . . . . . . . . . . . . . . . . . . . . . . 13 3 Project Planning . . . . . . . . . . . . . . . . . . . . . . . . . . . . . . . . . . . . . . . . . . . . . . . . . . . . . . 15 3.1 3.1.1 3.1.2 3.1.3 Assembly project planning . . . . . . . . . . . . . . . . . . . . . . . . . . . . . . . . . . . . . . . . . . . . . . . . . . . Arrangement along the tunnel section . . . . . . . . . . . . . . . . . . . . . . . . . . . . . . . . . . . . . . Arrangement in cross-section profile. . . . . . . . . . . . . . . . . . . . . . . . . . . . . . . . . . . . . . . . Arrangement with special prerequisites . . . . . . . . . . . . . . . . . . . . . . . . . . . . . . . . . . . . . 3.2 Electrical installation project planning . . . . . . . . . . . . . . . . . . . . . . . . . . . . . . . . . . . . . . . . . 20 4 Installation . . . . . . . . . . . . . . . . . . . . . . . . . . . . . . . . . . . . . . . . . . . . . . . . . . . . . . . . . . . . . 21 4.1 Transport. . . . . . . . . . . . . . . . . . . . . . . . . . . . . . . . . . . . . . . . . . . . . . . . . . . . . . . . . . . . . . . . . . . 22 4.2 Scope of delivery . . . . . . . . . . . . . . . . . . . . . . . . . . . . . . . . . . . . . . . . . . . . . . . . . . . . . . . . . . . . 22 4.3 Material required . . . . . . . . . . . . . . . . . . . . . . . . . . . . . . . . . . . . . . . . . . . . . . . . . . . . . . . . . . . 22 4.4 Assembly preparation . . . . . . . . . . . . . . . . . . . . . . . . . . . . . . . . . . . . . . . . . . . . . . . . . . . . . . . 22 4.5 4.5.1 4.5.2 4.5.3 Assembly . . . . . . . . . . . . . . . . . . . . . . . . . . . . . . . . . . . . . . . . . . . . . . . . . . . . . . . . . . . . . . . . . . . Fitting the assembly consoles . . . . . . . . . . . . . . . . . . . . . . . . . . . . . . . . . . . . . . . . . . . . . . Fitting the VICOTEC320 sensors. . . . . . . . . . . . . . . . . . . . . . . . . . . . . . . . . . . . . . . . . . . . Fitting the connection unit . . . . . . . . . . . . . . . . . . . . . . . . . . . . . . . . . . . . . . . . . . . . . . . . . 4.6 4.6.1 4.6.2 Electrical installation . . . . . . . . . . . . . . . . . . . . . . . . . . . . . . . . . . . . . . . . . . . . . . . . . . . . . . . . 26 Connecting the sensors to the connection unit . . . . . . . . . . . . . . . . . . . . . . . . . . . . . . 26 Connection unit cabling . . . . . . . . . . . . . . . . . . . . . . . . . . . . . . . . . . . . . . . . . . . . . . . . . . . 26 5 Start-up and Operation. . . . . . . . . . . . . . . . . . . . . . . . . . . . . . . . . . . . . . . . . . . . . . 35 5.1 Start-up . . . . . . . . . . . . . . . . . . . . . . . . . . . . . . . . . . . . . . . . . . . . . . . . . . . . . . . . . . . . . . . . . . . . 36 5.2 5.2.1 Operation . . . . . . . . . . . . . . . . . . . . . . . . . . . . . . . . . . . . . . . . . . . . . . . . . . . . . . . . . . . . . . . . . . 36 Tunnel cleaning . . . . . . . . . . . . . . . . . . . . . . . . . . . . . . . . . . . . . . . . . . . . . . . . . . . . . . . . . . 36 16 16 16 18 23 23 24 25 VICOTEC320 · Operating Instructions · 8011703 V 2-2 · © SICK AG Contents 6 Using the SOPAS ET Software . . . . . . . . . . . . . . . . . . . . . . . . . . . . . . . . . . . . . 37 6.1 Operating the VICOTEC320 . . . . . . . . . . . . . . . . . . . . . . . . . . . . . . . . . . . . . . . . . . . . . . . . . . . 38 6.2 6.2.1 6.2.2 6.2.3 SOPAS ET software . . . . . . . . . . . . . . . . . . . . . . . . . . . . . . . . . . . . . . . . . . . . . . . . . . . . . . . . . . 38 SOPAS ET software functions for VICOTEC320 (Overview) . . . . . . . . . . . . . . . . . . . . . 38 Installing the SOPAS ET software . . . . . . . . . . . . . . . . . . . . . . . . . . . . . . . . . . . . . . . . . . . 38 Basic setting for the SOPAS ET software. . . . . . . . . . . . . . . . . . . . . . . . . . . . . . . . . . . . . 38 6.3 6.3.1 6.3.2 6.3.3 Using SOPAS ET . . . . . . . . . . . . . . . . . . . . . . . . . . . . . . . . . . . . . . . . . . . . . . . . . . . . . . . . . . . . . 39 Creating a connection . . . . . . . . . . . . . . . . . . . . . . . . . . . . . . . . . . . . . . . . . . . . . . . . . . . . . 39 Reading out the VICOTEC320 and operating manually . . . . . . . . . . . . . . . . . . . . . . . . 41 Saving, storing and printing the current parameter set . . . . . . . . . . . . . . . . . . . . . . . . 44 7 Scheduled Maintenance . . . . . . . . . . . . . . . . . . . . . . . . . . . . . . . . . . . . . . . . . . . . 45 7.1 7.1.1 Cleaning . . . . . . . . . . . . . . . . . . . . . . . . . . . . . . . . . . . . . . . . . . . . . . . . . . . . . . . . . . . . . . . . . . . . 46 Cleaning sensors. . . . . . . . . . . . . . . . . . . . . . . . . . . . . . . . . . . . . . . . . . . . . . . . . . . . . . . . . . 46 7.2 7.2.1 7.2.2 7.2.3 7.2.4 7.2.5 Maintenance . . . . . . . . . . . . . . . . . . . . . . . . . . . . . . . . . . . . . . . . . . . . . . . . . . . . . . . . . . . . . . . . 46 Persons authorized to carry out maintenance . . . . . . . . . . . . . . . . . . . . . . . . . . . . . . . . 46 Replacing the activated charcoal . . . . . . . . . . . . . . . . . . . . . . . . . . . . . . . . . . . . . . . . . . . 47 Replacing the drying agent cartridge . . . . . . . . . . . . . . . . . . . . . . . . . . . . . . . . . . . . . . . . 47 Replacing the lamp. . . . . . . . . . . . . . . . . . . . . . . . . . . . . . . . . . . . . . . . . . . . . . . . . . . . . . . . 48 Replacing the CO sensor . . . . . . . . . . . . . . . . . . . . . . . . . . . . . . . . . . . . . . . . . . . . . . . . . . . 49 8 Troubleshooting and Fault Clearance . . . . . . . . . . . . . . . . . . . . . . . . . . . . 51 8.1 Fault messages . . . . . . . . . . . . . . . . . . . . . . . . . . . . . . . . . . . . . . . . . . . . . . . . . . . . . . . . . . . . . 52 9 Technical Documentation . . . . . . . . . . . . . . . . . . . . . . . . . . . . . . . . . . . . . . . . . . 53 9.1 Operating data . . . . . . . . . . . . . . . . . . . . . . . . . . . . . . . . . . . . . . . . . . . . . . . . . . . . . . . . . . . . . . 54 9.2 9.2.1 9.2.2 9.2.3 Dimensions . . . . . . . . . . . . . . . . . . . . . . . . . . . . . . . . . . . . . . . . . . . . . . . . . . . . . . . . . . . . . . . . . 56 Sender/receiver unit . . . . . . . . . . . . . . . . . . . . . . . . . . . . . . . . . . . . . . . . . . . . . . . . . . . . . . 56 Reflector . . . . . . . . . . . . . . . . . . . . . . . . . . . . . . . . . . . . . . . . . . . . . . . . . . . . . . . . . . . . . . . . . 57 Connection unit . . . . . . . . . . . . . . . . . . . . . . . . . . . . . . . . . . . . . . . . . . . . . . . . . . . . . . . . . . . 58 9.3 9.3.1 9.3.2 9.3.3 9.3.4 Part Nos. . . . . . . . . . . . . . . . . . . . . . . . . . . . . . . . . . . . . . . . . . . . . . . . . . . . . . . . . . . . . . . . . . . . 59 Device components . . . . . . . . . . . . . . . . . . . . . . . . . . . . . . . . . . . . . . . . . . . . . . . . . . . . . . . 59 Type key . . . . . . . . . . . . . . . . . . . . . . . . . . . . . . . . . . . . . . . . . . . . . . . . . . . . . . . . . . . . . . . . . 60 Accessories . . . . . . . . . . . . . . . . . . . . . . . . . . . . . . . . . . . . . . . . . . . . . . . . . . . . . . . . . . . . . . 61 Expendable and wearing parts . . . . . . . . . . . . . . . . . . . . . . . . . . . . . . . . . . . . . . . . . . . . . 61 10 Mapping Table 10.1 10.1.1 10.1.2 10.1.3 10.1.4 Mapping Table . . . . . . . . . . . . . . . . . . . . . . . . . . . . . . . . . . . . . . . . . . . . . . . . . . . . . . . . . . . . . . 64 Measured values on SCU . . . . . . . . . . . . . . . . . . . . . . . . . . . . . . . . . . . . . . . . . . . . . . . . . . 64 Operating State Table . . . . . . . . . . . . . . . . . . . . . . . . . . . . . . . . . . . . . . . . . . . . . . . . . . . . . 64 Status . . . . . . . . . . . . . . . . . . . . . . . . . . . . . . . . . . . . . . . . . . . . . . . . . . . . . . . . . . . . . . . . . . . 64 Status of measured values. . . . . . . . . . . . . . . . . . . . . . . . . . . . . . . . . . . . . . . . . . . . . . . . . 64 . . . . . . . . . . . . . . . . . . . . . . . . . . . . . . . . . . . . . . . . . . . . . . . . . . . . . . . . 63 VICOTEC320 · Operating Instructions · 8011703 V 2-2 · © SICK AG 5 Contents 6 VICOTEC320 · Operating Instructions · 8011703 V 2-2 · © SICK AG For your Safety VICOTEC320 1 For your Safety Subject to change without notice Safety information Responsibility of the operator Intended use VICOTEC320 · Operating Instructions · 8011703 V 2-2 · © SICK AG 7 For your Safety 1. 1 Short summary of the most important hazards Read and always observe the safety and warning information in these Operating Instructions. WARNING: Danger through defective device The VICOTEC320 is likely to be unsafe when it: ● Shows visible damage on the outside. ● Has been penetrated by moisture. ● Has been stored or operated under irregular conditions. When safe operation is no longer possible: ▸ Put the VICOTEC320 out of operation, separate all connectors from the power supply and secure against unauthorized start-up. WARNING: Risk of explosions through explosive sample gas ▸ Do not use the VICOTEC320 to measure explosive, combustible or flammable gases. WARNING: Hazard in potentially explosive atmospheres ▸ Do not use the VICOTEC320 in potentially explosive atmospheres. CAUTION: Eye damage through very bright light UV radiation (VICOTEC322, -323, -324) and halogen light (VICOTEC321) can cause eye inflammation when eyes are subjected to the radiation for longer than 10 minutes. ▸ Wear protective goggles (normal glass or plastic is sufficient). 1. 2 Basic information 1.2.1 Detail level of these Operating Instructions Subject to change without notice These Operating Instructions contain a fundamental description of the VICOTEC320 series measuring system and serve as guide for installation, operation and scheduled maintenance. They also contain information on safe operation of VICOTEC320 series devices. ▸ Read and observe the corresponding Sections in these Operating Instructions. 8 VICOTEC320 · Operating Instructions · 8011703 V 2-2 · © SICK AG For your Safety 1.2.2 Scope of application and identification These Operating Instructions are applicable for VICOTEC320 series devices The following variants are available to measure different components: ● VICOTEC 321 to measure visibility and NO2 ● VICOTEC 322 to measure visibility and NO ● VICOTEC 323 to measure visibility, NO and NO2 ● VICOTEC 324 to measure NO and NO2 The Identification number of the VICOTEC320 (type plate) is located as follows: Table 1 Type plate locations Device Sender/receiver unit Reflector Connection unit 1.2.3 Type plate location Outside: Next to the connections Inside: At the bottom of the left enclosure side Outside: Next to the connections Inside: At the middle of the right enclosure side Outside: At the top of the right enclosure side Inside: Next to the connections Designated users The VICOTEC320 may only be installed and put into operation by skilled persons who, based on their technical training and knowledge as well as knowledge of the relevant regulations, can assess the tasks given and recognize the dangers involved. The VICOTEC320 may only be maintained by persons properly instructed on the tasks assigned, possible risks and protective measures. 1.2.4 Responsibility of the operator Subject to change without notice ● Only operate the VICOTEC320 according to the intended use (→ §1.2.5). ● Follow all specifications in these Operating Instructions and only operate the VICOTEC320 as described in these Operating Instructions. Contact your local SICK representative before performing any work described where the information in these Operating Instructions is inadequate or capable of being misunderstood. ● Keep these Operating Instructions for future use. ● Pass these Operating Instructions on to a new owner. ● Pay attention to the prescribed maintenance work. ● Do not change any settings on or in the device and do not modify any components when such changes are not described in these Operating Instructions or in documents referred to in these Operating Instructions. ● In addition to the Operating Instructions, follow local laws, regulations and operating directives applicable at the respective installation location. 1.2.5 Intended use Devices of the VICOTEC320 series only serve continuous measurement of concentrations of certain gases, visibility (not on all types) and the temperature in the atmosphere in road tunnels. VICOTEC320 · Operating Instructions · 8011703 V 2-2 · © SICK AG 9 For your Safety 1.2.6 Warranty limits The following parts have limited service lives shorter than five years: ● Lamp (one to four years depending on parameter settings, ambient conditions and contamination in the tunnel) ● Drying agent cartridge in the reflector (one to two years) 1.2.7 Further literature Other Instructions Subject to change without notice ● SOPAS ET Software Manual ● VICOTEC320 Service Manual 10 VICOTEC320 · Operating Instructions · 8011703 V 2-2 · © SICK AG Product Description VICOTEC320 2 Product Description Subject to change without notice Functional principle Design VICOTEC320 · Operating Instructions · 8011703 V 2-2 · © SICK AG 11 Product Description 2. 1 Functional principle The VICOTEC320 is a sensor system for continuous measurement of NO, NO2 and CO (option) concentrations as well as visibility and temperature in road tunnels. The following functional principles are used: ● NO, NO2: DOAS (Differential Optical Absorption Spectroscopy) ● CO: Electrochemical cell ● Visibility: Transmission measurement For the functional principles, please see the relevant literature, e.g. the internet. 2. 2 Performance features ● ● ● ● ● ● 2. 3 Special features ● ● ● ● ● 2. 4 Fast, representative local measurement Very low detection limits for NO and NO2 Automatic function monitoring and self-adjustment Independent maintenance prompt when contaminated Very sturdy design: IP 69K, stainless steel 1.4571 Compatible to assembly consoles and measuring path lengths of the VICOTEC 410/400 from SICK Operating hour meter for UV lamp and Logbook function High-precision adjustment through automatic mirror tracking Temperature recording Reflector, heated Communication via CAN System bus or Ethernet (optional) Device variants The following variants are available to measure different components: ● VICOTEC 321 (halogen lamp) to measure visibility and NO2 ● VICOTEC 322 (UV lamp) to measure visibility and NO ● VICOTEC 323 (UV lamp) to measure visibility, NO and NO2 ● VICOTEC 324 (UV lamp) to measure NO and NO2 The sender/receiver unit and the reflector are available for the following measuring distances: ● 10 m ● 20 m The connection unit is available with the following interfaces: ● Analog/digital ● Ethernet ● The connection unit can contain an optional CO sensor (electrochemical cell) 12 VICOTEC320 · Operating Instructions · 8011703 V 2-2 · © SICK AG Subject to change without notice The device variants differ in ● measurable components, ● measuring path, ● connection unit interfaces. Product Description 2.5 Device components/layout Fig. 1 VICOTEC320 layout 3 4 2 1 5 6 6 Reflector LED matrix to signal automatic beam tracking Sender/receiver unit Dust protection tube Connection unit Plug connections Subject to change without notice 1 2 3 4 5 6 4 VICOTEC320 · Operating Instructions · 8011703 V 2-2 · © SICK AG 13 Subject to change without notice Product Description 14 VICOTEC320 · Operating Instructions · 8011703 V 2-2 · © SICK AG Project Planning VICOTEC320 Project Planning Subject to change without notice 3 VICOTEC320 · Operating Instructions · 8011703 V 2-2 · © SICK AG 15 Project Planning 3. 1 Assembly project planning 3.1.1 Arrangement along the tunnel section The number and distribution of measuring points depends on the ventilation system used. Single factors are: ● Type of tunnel profile ● Section route ● Ventilation system design ● Number and arrangement of fans ● Regional regulations Measuring point selection depends primarily on the following criteria: ● A combination of VICOTEC320 with VICOTEC 411 (visibility) or VICOTEC 414 (CO and visibility) is recommended for optimum measurement results. In this case, position the VICOTEC 411/414 units closer to each other and the VICOTEC320 units further apart. ● The recommended distance between visibility measurements depends on whether these are also to be used for smoke detection: – Without smoke detection: 400 m – With smoke detection: 150 m ● An even spread along the tunnel length is recommended for semi and transverse ventilation, with at least 2 measuring points per ventilation section. ● NO/NO2 can be measured every 400 – 1000 m. Position the measuring points preferably at the tunnel exit in tunnels with one-way traffic. ● Two-way traffic can still arise in tunnels with one-way traffic. It is therefore recommended to install at least 3 measuring points for visibility in tunnels with lengthwise ventilation: one each about 150 m from the entrance and at least one in the middle of the tunnel. ● It is recommended to install additional fog sensors (e.g. VISIC620) near the tunnel portals when there is a risk that fog can be sucked into the tunnel. Dust particles acting as additional condensation crystals can strengthen the fog effect in the tunnel sections. Fog moisture overlays visibility due to dust particles. Fog sensors serve to prevent fog drifts being sucked into the tunnel. Alternately, visibility can be measured at the tunnel portals using extractive measuring devices (e.g. VICOTEC450) that heat the air sucked in and therefore evaporate fog moisture. ● When the tunnel roadway curves, ensure that the measuring beam between single sensors is not interrupted by the tunnel wall, fixtures or vehicles passing each other (see → p. 18, §3.1.3). Arrangement in cross-section profile Particle concentration distribution in a tunnel is generally very even across the profile cross-section during traffic movement. Traffic flows and lengthwise flows through natural ventilation and the piston effect of vehicle movement in separate tunnel sections for each direction effect rapid swirling of the air in the tunnel. The turbulence behind vehicles strengthens this effect. The height is not critical due to excellent swirling. A fitting height between 2.8 and 4.5 meters is aimed at. The sensors contaminate faster when fitted lower and the maintenance effort increases when the sensors are fitted higher. 16 VICOTEC320 · Operating Instructions · 8011703 V 2-2 · © SICK AG Subject to change without notice 3.1.2 Project Planning Fig. 2 VICOTEC320 fitting height VICOTEC320 sensor 400 2.8 … 4.5 m Fitting location selection of the respective sensor pairs depends primarily on the following criteria: ● Mount the sensors at a safe distance from traffic movement (see for example Section 2 of the German “Richtlinie für die Ausstattung und den Betrieb von Straßentunneln RABT”, version 2006 (Regulations governing equipping and operating road tunnels)). ● Good access for maintenance and checking work must be ensured. Locate the sensors in a protected recess when possible. ● Do not locate sensors in close vicinity to ventilators or in the fresh air flow from blowout units so that the measured value records the effective concentration ratios. ● The measuring beam must run lengthwise between sensors and must not be hindered by fixtures or vehicles passing each other. Fixtures that shine (e.g. emergency exit signs) should be at least 1 m from the optical axis. ● No reflecting paint should be on the wall between sensors. ● Maintain a distance of 10 to 20 m between both sensors depending on the VICOTEC320 variant used. ● Plan sufficient clearance to be able to flap or remove the enclosure cover. Subject to change without notice Measured values are kept constant at first when the light beams are interrupted. A malfunction message is sent to the evaluation unit when interruptions last longer than two minutes. Fitting options: ● Both sensors on a wall in a recess (recommended). ● Both sensors on a wall above the side strip; requires safety measures for maintenance work in cramped conditions. VICOTEC320 · Operating Instructions · 8011703 V 2-2 · © SICK AG 17 Project Planning 3.1.3 Arrangement with special prerequisites Tunnel curvature The sensors can be used with tunnel curvatures up to the following curve radiuses: Measuring section (A) Inner radius (R1) Outer radius (R2) Fig. 3 10 m Min. 58 m Min. 147 m 20 m Min. 115 m Min. 438 m Fitting sensors on the inner curve wall R1 A Fig. 4 Fitting sensors on the outer curve wall A Subject to change without notice R2 18 VICOTEC320 · Operating Instructions · 8011703 V 2-2 · © SICK AG Project Planning Tunnel with sound insulation wall Provide appropriate assembly bases onsite when fitting sensors on a tunnel wall with sound insulation. The assembly bases must provide a firm base suitable for reliable sensor fitting. Fig. 5 Fitting sensors with sound insulation 1 1 Sound insulation Subject to change without notice 1 VICOTEC320 · Operating Instructions · 8011703 V 2-2 · © SICK AG 19 Project Planning 3. 2 Electrical installation project planning Observe the relevant safety regulations during all installation work. Take suitable protective measures against all possible local risks or those arising in connection with the system. See also → „For your Safety“ (page 7) ● Sender/receiver unit (2) must always be fitted on the left (see → Fig. 6), so that visor (4) is accessible. ● Position connection unit (1) so that it can be connected to the sender/receiver unit with a 1 m long cable. ● It must be possible to separate every device singly from the power supply system, e.g. using a switch or circuit breaker. Fig. 6 Sensor arrangement 2 3 1 4 B Connection unit Sender/receiver unit Reflector Visor Measuring section (10 or 20 m) Max. 0.7 m (Cable length max. 1 m) Subject to change without notice 1 2 3 4 A B A 20 VICOTEC320 · Operating Instructions · 8011703 V 2-2 · © SICK AG Installation VICOTEC320 4 Installation Subject to change without notice Transport Assembly Installation VICOTEC320 · Operating Instructions · 8011703 V 2-2 · © SICK AG 21 Installation 4. 1 Transport Only use the packing provided by SICK to transport sensors. Warranty claims are void when this is not observed. The packing can be obtained from SICK free of charge when required. 4. 2 Scope of delivery The scope of delivery includes: ● Sender/receiver unit (incl. screws for fastening on assembly console) ● Reflector (incl. screws for fastening on assembly console) ● Connection unit (incl. dowels and screws for wall fitting) ● Connection lines from the connection unit to the sender/receiver unit and to the reflector Not included in the scope of delivery: ● Stainless steel assembly consoles for the sensors 4. 3 Material required Tools required Apart from standard tools (such as drill, water level, tape measure), you also need the following tools for the installation: ● Drill tips 8 and 15 mm ● Blowout pump for dowel holes ● 18 and 19 mm socket wrench ● Rubber or plastic hammer ● Two laser adjustment units (obtainable from SICK; see → p. 61, §9.3.3) Additional material required ● 2 stainless steel assembly consoles incl. fixing accessories ● Connection lines acc. to → Table 2 (page 26) Assembly preparation ▸ Secure the place of work ▸ Provide adequate lighting and power ▸ Provide a jack lift or stable ladder with clearance to wall Subject to change without notice 4. 4 22 VICOTEC320 · Operating Instructions · 8011703 V 2-2 · © SICK AG Installation 4.5 Assembly Assembly work must only be carried out by skilled persons familiar with the assembly work. 4.5.1 Fitting the assembly consoles The assembly consoles comprise 2 parts: Fig. 7 Assembly console 1 1 2 2 Wall holder for wall fitting Angle bracket to fasten the sensor Two screws fasten the wall holder and the assembly console together. The angle bracket can be swiveled up to ±7.5° to compensate any assembly unevenness. Subject to change without notice Observe the following points during assembly: ▸ Keep the length of the measuring section as exact as possible. Record small deviations in the Assembly protocol. ▸ Mount both assembly consoles at the same height. Height differences in the optical axis can be compensated later by swiveling the angle bracket. ▸ Only use high-strength and absolutely non-corrosive fastening material made of stainless steel because the tunnel atmosphere is highly corrosive. ▸ Align both assembly consoles at the same tilt angle to the tunnel wall. Different tilt positions to the tunnel perpendicular make the following sensor alignment difficult. Insert washers under the wall holder when necessary. ▸ Ensure there is enough space to remove the tube and device cover. ▸ Observe local valid safety measures. Procedure 1 Determine the installation location for the assembly consoles according to the project planning. 2 Drill the wall holder openings according to the Drilling plan, see figure 8. 3 Insert dowels or wall ties according to the manufacturer's assembly specifications (walls must be made of at least B25 concrete). 4 Screw the wall holder on and tighten the screws with 70 Nm according to the manufacturer's assembly specifications, use a torque wrench as necessary. 5 Screw the consoles on provisionally at first. VICOTEC320 · Operating Instructions · 8011703 V 2-2 · © SICK AG 23 Installation Fig. 8 Wall holder assembly drilling plan 210 210 +2 0 182 105 5 01 15 182 0 15 5 0 x 15 50 105 5 01 01 A Tolerances for measuring path A 10 ±0.1 m 20 ±0.2 m 4.5.2 Fitting the VICOTEC320 sensors 1 Position the sender/receiver unit on the left assembly console and screw it on lightly with both the retaining screws included in the delivery. 2 Position the reflector on the right assembly console and screw it on lightly with both the retaining screws included in the delivery. 3 Screw a laser adjustment unit on each sensor above the tube using both knurled-head screws. WARNING: Laser class 2 ▸ Do not point the laser beam at persons. ▸ Do not look directly into the laser beam. 4 Switch the laser adjustment unit on one sensor on. 5 Align the sensor horizontally so that the laser beam strikes the vertical line of the crosshair of the other laser adjustment unit. To do this, tap very lightly against the front lower edge of the sensor enclosure with a rubber hammer (see → Fig. 9). Horizontal sensor alignment Subject to change without notice Fig. 9 6 Tighten both screws of the sensor with 45 Nm, use a torque wrench as necessary. 7 Loosen the two screws of the angle bracket slightly 24 VICOTEC320 · Operating Instructions · 8011703 V 2-2 · © SICK AG Installation 8 Align the sensor vertically so that the laser beam strikes the horizontal line of the crosshair of the other laser adjustment unit. To do this, tap very lightly against the front lower edge of the angle bracket with a rubber hammer (see → Fig. 10). Fig. 10 Vertical sensor alignment 9 10 11 12 4.5.3 Tighten both screws of the angle bracket, use a torque wrench as necessary. Check again whether the laser beam strikes the crosshair and correct as necessary. Switch the laser adjustment unit off. Repeat steps 5 to 11 on the opposite sensor and laser adjustment unit. Fitting the connection unit Position the connection unit so that it can be connected to the sender/receiver unit with the 1 m long cables. 1 Determine the installation location for the connection unit according to the project planning. 2 Drill the openings according to the Drilling plan, see figure 11. 3 Insert dowels or wall ties according to the manufacturer's assembly specifications (walls must be made of at least B25 concrete). 4 Screw the connection unit on. Fig. 11 Connection unit assembly drilling plan 420 +2 x 08 25 170 Subject to change without notice 08 08 08 VICOTEC320 · Operating Instructions · 8011703 V 2-2 · © SICK AG 25 Installation 4. 6 Electrical installation WARNING: Danger though electrical voltage. ▸ Only allow an authorized electrician to work on the electric system. ▸ Observe the relevant safety regulations during all installation work. ▸ Take suitable protective measures against local risks and those arising from the system. 4.6.1 Connecting the sensors to the connection unit 1 Plug the connection lines mounted fixed on the connection unit in the corresponding sockets of the sender/receiver unit. 2 Connect the connection line to the reflector unit (12 m/22 m) included in the delivery to the connection unit and plug in to the reflector. 3 Fasten the connection lines to the tunnel wall. 4 Fit the power separation options provided for each device in the project planning. 4.6.2 Connection unit cabling Connection lines The following connection lines can be used: Connection lines For Line/type VICOTEC322, -323, -324: Energy supply: 115/230 V AC; 50/60 Hz VICOTEC321: Energy supply: 100 - 240 V AC; 50/60 Hz Digital input A2Y(L)2Y Relay outputs Ethernet CAN bus Analog outputs: 0 … 20 mA A2Y(L)2Y Max. length Cross-section Dependent on cable resistance 3 x 1.5 mm2 Dependent on cable resistance Dependent on cable resistance – 100 m – Category 5 copper line according to ANSI/ TIA -568 – Fiber optic cable – Up to about 5 km according to type Li12YC11(TP) [1] Screened and Dependent on twisted in pairs cable resistance 2 x 2 x 0.75 mm2 4 x 2 x 0.75 mm2 4 x 2 x 0.75 mm2 [1]Unitronic LiHCH(TP) or equivalent cables can also be used Warranty claims are void when you use cables not released by SICK for use with the VICOTEC320 (→ Table 2). 26 VICOTEC320 · Operating Instructions · 8011703 V 2-2 · © SICK AG Subject to change without notice Table 2 Installation Cabling of voltage supply ▸ Fig. 12 For VICOTEC322, -323, -324: Set the mains voltage for the connection unit to 115 V or 230 V before connecting the unit to the power supply system. Use slide switch (1) in the connection unit to the correct voltage. Slide switch and voltage supply (shown on VICOTEC322, -323, -324) 2 1 1 2 ▸ Fig. 13 Slide switch for voltage selection (only for VICOTEC322, -323, -324) Terminals for voltage supply (position also for VICOTEC321) Connect voltage supply according to terminal designation (L1/N/PE). Connection options for peripherals Subject to change without notice 1 1 2 3 4 5 2 1 3 2 1 1 3 4 5 VICOTEC322, -323, -324 4 5 VICOTEC 321 Sender/receiver unit connection (2x) Reflector connection Ethernet (when used) Analog signals (when used) Voltage supply VICOTEC320 · Operating Instructions · 8011703 V 2-2 · © SICK AG 27 Installation Input/output cabling for analog/digital variants The CAN bus terminator must be set to “ON” (LED must be on; see → page 32, Fig. 17) The inputs and outputs of the connection unit are assigned as follows: Table 3 Inputs/outputs assignment Input or output Analog Output 1 Output 2 Output 3 Output 4 Output 5 Digital Relay 1 Relay 2 Relay 3 Relay 4 Visibility Temperature NO NO2 CO Operation/fault for NO, NO2, visibility ● Operation: Relay is closed ● Fault: Relay is open Maintenance request signal ● No maintenance request: Relay is open ● Maintenance request (e.g.: contamination): Relay is closed Measuring operation signal ● Measuring operation: Relay is open ● Not in measuring operation (e.g. during maintenance, adjustment etc.): Relay is closed Operation/fault for CO (option) ● Operation: Relay is open ● Fault: Relay is closed Maintenance mode (measured values frozen) Subject to change without notice Input 1 Assignment 28 VICOTEC320 · Operating Instructions · 8011703 V 2-2 · © SICK AG Installation Fig. 14 I/O modules and circuit diagram of analog modules without CO inlets/outlets I Analog Out Visibility + State State State State Analog Output Analog Output Digital Output Digital Input 0...20mA 0...20mA Load 500Ω Load 500Ω Signal Relais 1 2 1 II Analog Out NO + II - 11 1 2 1 2 3 4 3 4 NO - II - 12 NO2 + II - 21 NO2 - II - 23 2 Shield Shield AO1 AO2 - - AO1 AO2 - - DO1 DO2 DO3 DO4 DI1 DI2 DI3 DI4 III Digital Out Operation/Fault Maintenance call Not in measuring mode Not assigned 11 21 11 21 11 I - 11 Visibility - I - 12 Temperature + I - 21 Temperature - I - 23 21 11 21 III - 11 III - 12 III - 22 III - 21 III - 14 III - 13 III - 23 III - 24 IV Digital In IV - 11 Maintenance 12 22 12 22 12 22 12 22 Not used 13 23 13 23 13 23 13 23 Not used Not used 14 24 24 II 14 24 III 14 IV - 21 IV - 22 IV - 13 IV - 14 IV - 21 IV - 22 24 IV internal external Subject to change without notice I 14 IV - 12 VICOTEC320 · Operating Instructions · 8011703 V 2-2 · © SICK AG 29 Installation Fig. 15 I/O modules and circuit diagram of analog modules with CO inlets/outlets Table 4 Significance of LEDs LED Green Green Green Green Off Significance Active Contact closed Actual current value = rated current value 0 mA Ion < 22 mA Ion 22 mA Subject to change without notice Module Digital out Digital in Analog out Analog in 30 VICOTEC320 · Operating Instructions · 8011703 V 2-2 · © SICK AG Installation Cabling of reflector heating ▸ For VICOTEC322, -323, -324: Connect the blue and brown lead of the line between reflector heating and connection unit to the “reflector heating” terminals (→ page 32, Fig. 17). ▸ For VICOTEC321: Connect the blue and brown lead of the line between reflector heating and connection unit to terminals 1 and 2 (A) of the terminal strip. Fig. 16 Reflector heating connection on VICOTEC321 B A A B Terminals 1 and 2 Fuse 2 A, slow Reflector heating Subject to change without notice Checking cabling Correct cabling can be checked as follows: ● The gateway LEDs are green (State, CAN, I/O). ● The error LED on the gateway is off. ● The 120 V LED (only on VICOTEC322, -323, -324) and the 24 V LED are green. ● The status LEDs of the I/O module blink green. ● The reflector heating LED is green (only on VICOTEC322, -323, -324). ● The alignment LEDs on the sender/receiver unit flash sequentially. VICOTEC320 · Operating Instructions · 8011703 V 2-2 · © SICK AG 31 Installation Fig. 17 VICOTEC322, -323, -324: Positions of LEDs in the connection unit for analog/digital variant 1 2 1 3 4 9 9 7 6 5 Subject to change without notice 8 32 VICOTEC320 · Operating Instructions · 8011703 V 2-2 · © SICK AG Installation Fig. 18 VICOTEC321: Positions of the LEDs in the connection unit for analog/digital variant 1 Gateway state 2 I/O module state 3 Gateway CAN 4 Gateway I/O 5 Gateway error LED is green: CAN bus terminator is activated. Subject to change without notice 6 120 V 7 24 V 8 Reflector heating 24 V 9 CAN bus connection Green LED blinks in operation Red LED on: CAN bus is connected but not initialized LED1 blinks in I²C bus cycle pulse LED2 blinks in data transfer cycle pulse LEDs blink: Data transfer via CAN bus LEDs on: No CAN bus connected LED1 blinks in I²C bus cycle pulse LED2 blinks in data transfer cycle pulse LED on: No I/O module found on gateway or one or more modules failed during operation VICOTEC320 · Operating Instructions · 8011703 V 2-2 · © SICK AG 33 Installation Connecting the Ethernet cable for Ethernet variant Fig. 19 Ethernet connection (shown for VICOTEC322, -323, -324. Corresponding for VICOTEC321) 1 ▸ Subject to change without notice ▸ Lead the Ethernet cable through the nearest cable gland (→ page 27, Fig. 13) and plug into switch (1). Cabling of reflector heating: → page 31 34 VICOTEC320 · Operating Instructions · 8011703 V 2-2 · © SICK AG Start-up and Operation VICOTEC320 Start-up and Operation Subject to change without notice 5 VICOTEC320 · Operating Instructions · 8011703 V 2-2 · © SICK AG 35 Start-up and Operation 5. 1 Start-up The start-up must only be performed by authorized technicians and is described in the Service Manual. Wait two hours after start-up until the system has heated up. It has then reached a thermal balance and delivers measured values within the tolerance band. 5. 2 Operation 5.2.1 Tunnel cleaning Subject to change without notice Cover every sensor tube with a protective cap during tunnel cleaning. 36 VICOTEC320 · Operating Instructions · 8011703 V 2-2 · © SICK AG Using the SOPAS ET Software VICOTEC320 Using the SOPAS ET Software Subject to change without notice 6 VICOTEC320 · Operating Instructions · 8011703 V 2-2 · © SICK AG 37 Using the SOPAS ET Software 6. 1 Operating the VICOTEC320 The VICOTEC320 runs automatically after start-up and does not require further operator intervention. You can however use the SOPAS ET software to change the configuration or display measured values. 6. 2 SOPAS ET software The SOPAS ET software serves to set the VICOTEC320 parameters. The parameter records can be stored as a Project file as well as archived on the PC. Measured values can also be read out. 6.2.1 SOPAS ET software functions for VICOTEC320 (Overview) The Online Help of the SOPAS ET software (Help menu) describes the general function of the software and how to use it. ● Menu language selection (German, English) ● Setting up communication with the VICOTEC320 ● Password protected configuration for different operator levels ● Output current measured values ● System diagnostics 6.2.2 Installing the SOPAS ET software Refer also to the booklet in the CD-ROM sleeve for installation information. 1 Start the PC and insert the Installation CD. 2 Call setup.exe directly from the CD when installation does not start automatically. 3 Follow the operating instructions to complete installation. 6.2.3 Basic setting for the SOPAS ET software Table 5 Basic setting for the SOPAS ET software (extract) Parameter Operating interface language Unit of measure for lengths User groups (operating level) Download parameters when modified Value English[1] Metric Operator Immediate, fail-safe in the VICOTEC320 EEPROM Upload parameters after switching on-line Automatic Screen split 3 (project tree, help, workarea) Subject to change without notice [1]The software must be restarted after changes 38 VICOTEC320 · Operating Instructions · 8011703 V 2-2 · © SICK AG Using the SOPAS ET Software 6.3 Using SOPAS ET 6.3.1 Creating a connection Connect data interfaces ▸ Connect PC (Ethernet interface) and VICOTEC320 via crossover Ethernet line. Start the SOPAS ET software and call the Scan Wizard 1 Ensure the supply voltage of the VICOTEC320 is switched on. 2 Switch the PC on and start the SOPAS ET software. SOPAS ET opens the Program window with the English user interface as standard. 3 To change the language setting, click on CANCEL and use the TOOLS/OPTIONS menu to switch the program interface language to GERMAN/DEUTSCH. 4 Terminate and restart SOPAS ET after changing the language setting. 5 Select the CREATE A NEW PROJECT option in the dialog window and confirm with OK. 6 Click on CONFIGURATION in the main window under SCAN WIZARD. The SCAN WIZARD dialog window appears. Configure the Ethernet connection 1 Select the ENABLE IP COMMUNICATION checkbox under INTERNET PROTOCOL/INTERNET PROTOCOL (IP) in the SCAN WIZARD dialog window. 2 Select the ENABLE AUTOIP checkbox. 3 Click on EXTENDED…. 4 Select COLA DIALECT “Binary” and TCP PORT “2112” and confirm with OK. 5 Click on AUTO IP CONFIGURATION…. 6 Click on SEARCH in the AUTO IP CONFIGURATION dialog window. All connected sensors are shown. 7 To change the IP address, subnet mask or gateway of a particular sensor, mark the sensor and click on EDIT. The sensor IP address must not be changed when the VICOTEC320 is integrated in a network or connected to a customer WLAN module. The IP address of the PC can be adapted to the sensor address in order to create a connection. The procedure depends on the operating system on the PC and is described in the Help function on the PC. Subject to change without notice 8 Close the AUTO IP CONFIGURATION dialog window. 9 Click on INSERT in the SCAN WIZARD dialog window. 10 Enter the sensor IP address and confirm with OK. A new entry appears in the IP ADDRESS CONFIGURATION list. 11 Confirm settings with OK. VICOTEC320 · Operating Instructions · 8011703 V 2-2 · © SICK AG 39 Using the SOPAS ET Software Perform a scan 1 Click on SCAN in the SCAN WIZARD register tab. The scan progress is displayed in a new window. 2 Close the PROGRESS dialog window with OK after the message SCAN COMPLETE is displayed. The devices found are listed in the SCAN WIZARD register tab. 3 Drag the desired device into the project tree with the left mouse button held down. The stored parameters for the selected device are read out. VICOTEC320 menu tree Subject to change without notice Fig. 20 40 VICOTEC320 · Operating Instructions · 8011703 V 2-2 · © SICK AG Using the SOPAS ET Software 6.3.2 Reading out the VICOTEC320 and operating manually The corresponding operator level must first be selected to configure a device with the SOPAS ET software. The SOPAS ET software runs in the operator level OPERATOR after startup and parameters can only be read. 1 Select the LOGIN ON DEVICE command in the TOOLS menu. 2 Select MAINTENANCE under USERLEVEL in the dialog window and click on LOGIN. 3 Double-click a register tab in the project tree to start it. 4 To save all the data, select the EXPORT DEVICE command in the PROJECT menu. The following tabs are important for you; the other tabs are shown colored gray and are only relevant for Service technicians. Bargraph measured values Subject to change without notice This screen shows whether the sensors are in measuring operation or whether a fault or maintenance requirement exist. Apart from that, the current measured values for visibility, temperature, NO and NO2 are displayed (depending on the device variant). When fault or maintenance request is shown, the measurement triggering the fault or maintenance request is shown next to the measured values. The UNSAFE LED next to the measured values signals that the measured value is “unsafe” (e.g.: Calibration range exceeded. Logbook). VICOTEC320 · Operating Instructions · 8011703 V 2-2 · © SICK AG 41 Using the SOPAS ET Software Alignment Device information This screen shows the serial number, device process and operating hours of the lamp. 42 VICOTEC320 · Operating Instructions · 8011703 V 2-2 · © SICK AG Subject to change without notice The beam is tracked automatically to the center of the reflector. Manual alignment is only possible for authorized users: 1 Click on START ALIGNMENT. Measuring operation is interrupted during alignment. 2 Click on MEASURING after alignment has completed. Using the SOPAS ET Software Logbook All sensor messages are stored in the Logbook. Messages marked with a red dot are still active, messages with a green dot are already completed. Messages can be filtered according to type: ▸ Click on the dropdown box and select the type of message required. Fig. 21 Logbook Messages can be exported as follows: 1 Click on EXPORT. 2 Select the storage location and file names. 3 Click on SAVE. The Logbook is saved as a Log file. Operating mode switch Subject to change without notice Fig. 22 Operating mode switch This screen serves to switch between Measuring mode and Maintenance mode. Apart from that, a reference cycle and a system reset can also be initiated. The parameters are not deleted. The connection between SOPAS and VICOTEC320 must be established again after a system reset (→ p. 39, §6.3.1). VICOTEC320 · Operating Instructions · 8011703 V 2-2 · © SICK AG 43 Using the SOPAS ET Software 6.3.3 Saving, storing and printing the current parameter set Subject to change without notice 1 Saving the parameter set. The saved file can then be restored, for example on new hardware. Select: EXPORT PROJECT/ DEVICE 2 Storing the project (a “project” can be several devices). This file can then, for example, be printed but can however not be restored in the device. a) To store the current parameter set, select the SAVE AS command in the PROJECT menu. b) Enter a file name in the dialog window and confirm with SAVE. The SOPAS ET software stores the current settings in an SPR file. 3 To print the current parameter set, select the PRINT/PRINT PREVIEW command in the PROJECT menu. The SOPAS ET software displays a preview of the tabular list of all parameter values. 4 Select the PRINT command in the FILE menu dialog window. The PRINT dialog window opens to configure the printer. 5 Edit the settings as required and confirm with OK. The current project settings are printed in tabular form. 44 VICOTEC320 · Operating Instructions · 8011703 V 2-2 · © SICK AG Scheduled Maintenance VICOTEC320 7 Scheduled Maintenance Subject to change without notice Maintenance work VICOTEC320 · Operating Instructions · 8011703 V 2-2 · © SICK AG 45 Scheduled Maintenance 7. 1 Cleaning 7.1.1 Cleaning sensors The tube can be removed in order to clean the protective screen of the sender/receiver unit or reflector. CAUTION: Eye damage through very bright light UV radiation (VICOTEC322, -323, -324) and halogen light (VICOTEC321) can cause eye inflammation when eyes are subjected to the radiation for longer than 10 minutes. ▸ Wear protective goggles (normal glass or plastic is sufficient). 1 Loosen both nuts at the end of the tube and pull the tube off. 2 Clean the protective screens with clean optical tissues. 3 Check the tube and the optical beam path for contamination through deposits or animals and clean when necessary. 4 Position the tube and tighten both nuts. 7. 2 Maintenance 7.2.1 Persons authorized to carry out maintenance Maintenance going beyond the tasks described here must be performed by authorized technicians only and is described in the Service Manual. Subject to change without notice WARNING: Danger though electrical voltage. Live parts are accessible when the device is open! ▸ Switch the supply voltage off before opening the device. ▸ Only use suitable, insulated tools. 46 VICOTEC320 · Operating Instructions · 8011703 V 2-2 · © SICK AG Scheduled Maintenance 7.2.2 Replacing the activated charcoal The activated charcoal sachet is located in the sender/receiver unit. ▸ Replace the used activated charcoal sachet with a new activated charcoal sachet. Fig. 23 Replacing the activated charcoal sachet 7.2.3 Replacing the drying agent cartridge The drying agent cartridge is located in the reflector. ▸ Unscrew the lid with pin key and replace the drying agent cartridge. Replace the drying agent cartridge Subject to change without notice Fig. 24 VICOTEC320 · Operating Instructions · 8011703 V 2-2 · © SICK AG 47 Scheduled Maintenance 7.2.4 Replacing the lamp Fig. 25 Position of the lamp VICOTEC322, -323, -324 VICOTEC321 1 3 1 3 2 1 2 3 3 2 3 Lamp plug Lamp Lamp retaining screws Exchange the lamp at regular intervals. These intervals depend on the parameter settings for the device and the ambient conditions in the tunnel and are about 1 to 4 years. 1 Disconnect all poles of the connection unit from the mains. 2 Open the enclosure cover of the sender/receiver unit. 3 Disconnect plug (1) (On VICOTEC322, -323, -324: Loosen the screw on the plug). 4 Loosen the retaining screws (3) of the lamp and take lamp (2) out. 5 Insert the new lamp and fasten with both retaining screws. 6 Connect the plug (on VICOTEC322, -323. -324: Screw the plug tight.). 7 Close the enclosure cover of the sender/receiver unit. Measured values are output about 5 minutes after the lamp has been exchanged but can be outside the tolerances during the first 30 minutes. 48 VICOTEC320 · Operating Instructions · 8011703 V 2-2 · © SICK AG Subject to change without notice WARNING: Lamp is hot. Risk of skin burns ▸ Let the lamp cool down before exchanging it. Scheduled Maintenance 7.2.5 Replacing the CO sensor ▸ Replace the CO sensor once a year (recommendation). Procedure 1 Disconnect all poles of the connection unit from the mains. 2 Disconnect both connection lines from the terminals of the small electronic board of the CO sensor. 3 Loosen 2 screws (→ Fig. 26). 4 Pull off the upper part of the CO sensor. 5 Insert the new CO sensor. 6 Screw the new CO sensor tight. 7 Reconnect both connection lines. 8 Switch the voltage supply of the connection unit on again. Fig. 26 Position of the CO sensor in the connection unit (shown for VICOTEC322, -323, -324) Subject to change without notice 2 screws VICOTEC320 · Operating Instructions · 8011703 V 2-2 · © SICK AG 49 Subject to change without notice Scheduled Maintenance 50 VICOTEC320 · Operating Instructions · 8011703 V 2-2 · © SICK AG Troubleshooting and Fault Clearance VICOTEC320 Troubleshooting and Fault Clearance Subject to change without notice 8 VICOTEC320 · Operating Instructions · 8011703 V 2-2 · © SICK AG 51 Troubleshooting and Fault Clearance 8. 1 Fault messages Error messages are shown in the SOPAS configuration software Logbook. Only those error messages are shown that the user can clear in own responsibility. Please contact SICK Customer Service for all other error messages. Error message Significance Lamp fault Lamp does not go on. Mirror adj. End Mirror tracking has reached maximum position. Clearance Exchange lamp (→ p. 48, §7.2.4). Check alignment and realign when necessary (see Service Manual). Sudden signal loss of more than Check for animals or dirt in the 50% (light path interrupted). dust tubes or other obstacles in the optical beam path (→ p. 46, §7.1.1). UV lamp current for spectrome- Exchange the UV lamp if ter operation exceeds 1000 mA required (→ p. 48, §7.2.4) or cor(limit). rect the parameter settings (see Service Manual). Exchange the UV lamp if UV lamp current for visibility required (→ p. 48, §7.2.4) or cormeasurement operation rect the parameter settings (see exceeds 1000 mA during Service Manual). adjustment (limit). External temperature sensor Check connection, exchange defective. the sensor if required (see Service Manual). Temperature sensor signal Check connection, exchange invalid. the sensor if required (see Service Manual). Check the wiring of the CO senThe read in current of the CO sensors is below the error limit sor. (see SOPAS ET: Factory setting Check the settings of the ana35 mA) or above 21 mA. log input (in SOPAS ET). Otherwise: Replace the CO sensor (→ page 49, §7.2.5). Shows when the last system start was made. Shows when the last adjustment was made. Shows when the last spantest was made. Visibility No signal System Lamp spectro System Lamp 4Q System Temp. Extern Temperature Temp failure System CO failure System Systemstart System Zero adjust System Spantest Subject to change without notice Source System System 52 VICOTEC320 · Operating Instructions · 8011703 V 2-2 · © SICK AG Technical Documentation VICOTEC320 9 Technical Documentation Subject to change without notice Operating data VICOTEC320 · Operating Instructions · 8011703 V 2-2 · © SICK AG 53 Technical Documentation Operating data Measured value recording Measured variable: Measuring range: T90: Reference cycle interval NO/NO2/CO/visibility/temperature – NO: min. 0 ... 20 ppm, max. 0 ... 45 ppm (0 ... 25 mg/m3, 0 ... 60 mg/m3) – NO2: min. 0 .. 1 ppm, max. 0 ... 5 ppm (0 ... 2 mg/m3, 0 ... 10 mg/m3) – CO (option): Max. 0 -- 300 ppm – Visibility: 0 ... 15*10-3 m-1 – Temperature: –25...+55 °C – NO/NO2: UV/VIS spectroscopy (DOAS principle, Differential Optical Absorption Spectroscopy) – CO: Electrochemical cell – Visibility: Transmission measurement 10 or 20 m, +/- 1 % – 5 ... 360 s (adjustable) – CO: 50 s – 60 s – 2 h (Adjustable: 0 .. 1440 min) Max. measurement error Temperature: Visibility: Accuracy: - NO: - NO2 (VICOTEC321): - CO: ±2K ± 0.8*10-3/m ± 5 % of measuring range ± 1 ppm ± 0.05 ppm Approx. 10 ppm Measuring principle: Measuring section: Interval - measuring cycle: Device features Measuring path length: Light source: Material: Device dimensions: (W x H x D) Weights: Enclosure color: Temperature sensor: 54 10 or 20 m VICOTEC 321: Halogen lamp VICOTEC 322, -323, -324: UV Deuterium lamp Stainless steel enclosure (1.4571) Sender/receiver unit: 718 x 470 x 310 mm Reflector: 617 x 278 x 245 mm Connection unit: 450 x 254 x 148 mm Sender/receiver unit: 20 kg Reflector: 9 kg Connection unit: 8 kg Gray RAL 7042, powder-coated Pt 1000 VICOTEC320 · Operating Instructions · 8011703 V 2-2 · © SICK AG Subject to change without notice 9. 1 Technical Documentation Ambient conditions Ambient temperature: Storage temperature: Relative humidity: Ambient air pressure: Protection class: –25 … +55 °C; CO cell: –20 … +40 °C –25 … +75 °C; CO cell: –40 … +55 °C 10 ... 95 % non-condensing 700 … 1200 hPa IP 69K Interfaces Display: Relay outputs: LEDs For NO, NO2, visibility: – Operation/Fault – Maintenance request – Function control For CO: – Operation/Fault – Maintenance mode – NO – NO2 – Visibility – Temperature – CO 10 BaseT Compact Flash Type II Digital inputs: Analog outputs: Ethernet: Slot: Mechanical installation Measuring section: Allowable fitting location[1] 10 or 20 m Along the measuring section: 0° Transverse to measuring section: ± 15° Electrical connection line: → p. 22, §4.3 [1]Allowable enclosure tilt during operation Electrical installation Mains fuses: Subject to change without notice Secondary fuses: Supply voltage: Power input: VICOTEC322, -323, -324 VICOTEC321 115 V: 2 A, slow, 5x20 mm 230 V: 1 A, slow, 5x20 mm 24 V DC: 6.3A, slow, 5x20mm 120V: 1.6A slow, 5 x 20 mm 230 V AC +6 % /–10 %; 50 Hz 115 V AC +6 % /–10 %; 60 Hz 200 VA 3.15 A, 5x20 mm (not accessible) 24 V DC: 2 A, slow Reflector heating (→ Fig. 16) 85 - 264 VAC, 47 - 63 Hz VICOTEC320 · Operating Instructions · 8011703 V 2-2 · © SICK AG 100 VA 55 Technical Documentation Dimensions 9.2.1 Sender/receiver unit Fig. 27 Sender/receiver unit dimensions Subject to change without notice 9. 2 56 VICOTEC320 · Operating Instructions · 8011703 V 2-2 · © SICK AG Technical Documentation Reflector Fig. 28 Reflector dimensions Subject to change without notice 9.2.2 VICOTEC320 · Operating Instructions · 8011703 V 2-2 · © SICK AG 57 Technical Documentation Connection unit Fig. 29 Connection unit dimensions Subject to change without notice 9.2.3 58 VICOTEC320 · Operating Instructions · 8011703 V 2-2 · © SICK AG Technical Documentation 9.3 Part Nos. 9.3.1 Device components Part number 1028793 1041130 1040009 1041069 1050553[1] 1044818 1052357[1] 1028736 1040643 1051332[1] 1051333[1] 1051235 1031236 1041126 1040642 1028627 1041127 1041128 1041129 Designation VIC320-A011 CONNECTION UNIT VIC320-A012 CONNECTION UNIT VIC320-A013 CONNECTION UNIT VIC320-A014 CONNECTION UNIT VIC320-A016 CONNECTION UNIT VIC320-A0151 connection unit with electrochemical cell for CO VIC320-A0161 connection unit with electrochemical cell for CO VIC320-R01 REFLECTOR MS=20M VIC320-R02 REFLECTOR MS=10M VIC320-R03 REFLECTOR MS=20M VIC320-R04 REFLECTOR MS=10M VIC321-M05 OPTIC HEAD MS=20M VIC321-M06 OPTIC HEAD MS=10M VIC322-M03 OPTIC HEAD MS=20M VIC322-M04 OPTIC HEAD MS=10M VIC323-M03 OPTIC HEAD MS=20M VIC323-M04 OPTIC HEAD MS=10M VIC324-M03 OPTIC HEAD MS=20M VIC324-M04 OPTIC HEAD MS=10M Type VIC320-A011 VIC320-A012 VIC320-A013 VIC320-A014 VIC320-A016 VIC320-A0151 VIC320-A0161 VIC320-R01 VIC320-R02 VIC320-R03 VIC320-R04 VIC321-M05 VIC321-M06 VIC322-M03 VIC322-M04 VIC323-M03 VIC323-M04 VIC324-M03 VIC324-M04 Subject to change without notice [1]Only for VICOTEC321 VICOTEC320 · Operating Instructions · 8011703 V 2-2 · © SICK AG 59 Technical Documentation Type key Fig. 30 Type key Subject to change without notice 9.3.2 60 VICOTEC320 · Operating Instructions · 8011703 V 2-2 · © SICK AG Technical Documentation 9.3.3 Accessories Part No. 2031397 2034795 2040063 9.3.4 Designation Assembly console made of 1.4571 stainless steel Laser adjustment unit (1 piece) Filter and cuvette case for linearity test Expendable and wearing parts Designation UV lamp Halogen lamp Drying agent cartridge (reflector) Activated charcoal sachet (sender/receiver unit) CO sensor Subject to change without notice Part No. 2033796 2055423 2012785 5323946 2045856 VICOTEC320 · Operating Instructions · 8011703 V 2-2 · © SICK AG 61 Subject to change without notice Technical Documentation 62 VICOTEC320 · Operating Instructions · 8011703 V 2-2 · © SICK AG Mapping Table VICOTEC320 10 Mapping Table Subject to change without notice Mapping Table for SCU VICOTEC320 · Operating Instructions · 8011703 V 2-2 · © SICK AG 63 Mapping Table 10 . 1 Mapping Table Mapping Table for SCU parameter settings 10.1.1 Measured values on SCU ● Measured value (MV) Index MV01 MV02 MV03 MV04 MV05 10.1.2 Measured value VIS [1/Km] T [K] NO (not used on VICOTEC321) NO2 [ppm] CO [ppm] Operating State Table ● States (S) Index S01 S02 S03 S04 S05 S06 S07 S08 S09 S10 10.1.3 Operating state Initialization Warming up Measuring Maintenance Maintenance Switch Zero adjust Alignment RCycle RESTART Span Test Status ● Failure, Maintenance, Uncertain, Check, Extended Index F01..F64 M01..M32 U01..U08 C01..C08 E01..E16 Status of measured values ● MVxx (xx = 01..04) Index MVxxF01..F64 MVxxE01..E32 MVxxU01..U16 MVxxM01..M08 MVxxC01..C08 64 Diagnostic message Failure messages Extended messages Uncertain messages Maintenance messages Check messages VICOTEC320 · Operating Instructions · 8011703 V 2-2 · © SICK AG Subject to change without notice 10.1.4 Diagnostic message Failure messages Maintenance messages Uncertain messages Check messages Extended messages I nd e x A Activated charcoal, replacing . . . . . . . . . . . . . . . . . . 47 Alignment . . . . . . . . . . . . . . . . . . . . . . . . . . . . . . . . . 42 Assembly consoles . . . . . . . . . . . . . . . . . . . . . . . . . . 23 S Bargraph measured values . . . . . . . . . . . . . . . . . . . 41 Scan Wizard . . . . . . . . . . . . . . . . . . . . . . . . . . . . . . . Sensor arrangement . . . . . . . . . . . . . . . . . . . . . . . . . Smoke detection . . . . . . . . . . . . . . . . . . . . . . . . . . . . SOPAS ET . . . . . . . . . . . . . . . . . . . . . . . . . . . . . . . . . Sound insulation wall . . . . . . . . . . . . . . . . . . . . . . . . Switching operating mode . . . . . . . . . . . . . . . . . . . . C T B Cabling . . . . . . . . . . . . . . . . . . . . . . . . . . . . . . . . . . . . CO sensor . . . . . . . . . . . . . . . . . . . . . . . . . . . . . . . . . - Replacing . . . . . . . . . . . . . . . . . . . . . . . . . . . . . . . . Curve radiuses . . . . . . . . . . . . . . . . . . . . . . . . . . . . . D Device information . . . . . . . . . . . . . . . . . . . . . . . . . . Drilling plan, assembly console . . . . . . . . . . . . . . . . Drilling plan, connection unit . . . . . . . . . . . . . . . . . . Drying agent cartridge, replacing . . . . . . . . . . . . . . . 28 12 49 18 39 16 16 38 19 43 Tools . . . . . . . . . . . . . . . . . . . . . . . . . . . . . . . . . . . . . 22 Tunnel cleaning . . . . . . . . . . . . . . . . . . . . . . . . . . . . 36 Tunnel curvature . . . . . . . . . . . . . . . . . . . . . . . . . . . . 18 Type plate . . . . . . . . . . . . . . . . . . . . . . . . . . . . . . . . . . 9 42 23 25 47 E Ethernet connection . . . . . . . . . . . . . . . . . . . . . . . . . 39 F Fitting height . . . . . . . . . . . . . . . . . . . . . . . . . . . . . . . 17 Fog . . . . . . . . . . . . . . . . . . . . . . . . . . . . . . . . . . . . . . . 16 I I/O module . . . . . . . . . . . . . . . . . . . . . . . . . . . . 29 - 30 Identification . . . . . . . . . . . . . . . . . . . . . . . . . . . . . . . . 9 L Lamp, replacing . . . . . . . . . . . . . . . . . . . . . . . . . . . . Laser adjustment unit . . . . . . . . . . . . . . . . . . . . . . . Layout . . . . . . . . . . . . . . . . . . . . . . . . . . . . . . . . . . . . LEDs . . . . . . . . . . . . . . . . . . . . . . . . . . . . . . . . . . . . . . Logbook . . . . . . . . . . . . . . . . . . . . . . . . . . . . . . . . . . . 48 24 13 30 43 M Maintenance operation (menu) . . . . . . . . . . . . . . . . 43 Mapping Table . . . . . . . . . . . . . . . . . . . . . . . . . . . . . 64 O One-way traffic . . . . . . . . . . . . . . . . . . . . . . . . . . . . . 16 P Peripherals . . . . . . . . . . . . . . . . . . . . . . . . . . . . . . . . 27 R Reference cycle . . . . . . . . . . . . . . . . . . . . . . . . . . . . 43 Reset . . . . . . . . . . . . . . . . . . . . . . . . . . . . . . . . . . . . . 43 Roadway curves . . . . . . . . . . . . . . . . . . . . . . . . . . . . 16 VICOTEC320 · Operating Instructions · 8011703 V 2-2 · © SICK AG 1 8011703/2013-07/2-2/ISubject to change without notice Australia Phone +61 3 9457 0600 1800 334 802 – tollfree E-Mail [email protected] Belgium/Luxembourg Phone +32 (0)2 466 55 66 E-Mail [email protected] Brasil Phone +55 11 3215-4900 E-Mail [email protected] Canada Phone +1 905 771 14 44 E-Mail [email protected] Ceská Republika Phone +420 2 57 91 18 50 E-Mail [email protected] China Phone +86 4000 121 000 E-Mail [email protected] Phone +852-2153 6300 E-Mail [email protected] Danmark Phone +45 45 82 64 00 E-Mail [email protected] Deutschland Phone +49 211 5301-301 E-Mail [email protected] España Phone +34 93 480 31 00 E-Mail [email protected] France Phone +33 1 64 62 35 00 E-Mail [email protected] Great Britain Phone +44 (0)1727 831121 E-Mail [email protected] India Phone +91–22–4033 8333 E-Mail [email protected] Israel Phone +972-4-6881000 E-Mail [email protected] Italia Phone +39 02 27 43 41 E-Mail [email protected] Japan Phone +81 (0)3 3358 1341 E-Mail [email protected] Magyarország Phone +36 1 371 2680 E-Mail [email protected] Nederlands Phone +31 (0)30 229 25 44 E-Mail [email protected] SICK AG | Waldkirch | Germany | www.sick.com Norge Phone +47 67 81 50 00 E-Mail [email protected] Österreich Phone +43 (0)22 36 62 28 8-0 E-Mail [email protected] Polska Phone +48 22 837 40 50 E-Mail [email protected] România Phone +40 356 171 120 E-Mail [email protected] Russia Phone +7-495-775-05-30 E-Mail [email protected] Schweiz Phone +41 41 619 29 39 E-Mail [email protected] Singapore Phone +65 6744 3732 E-Mail [email protected] Slovenija Phone +386 (0)1-47 69 990 E-Mail [email protected] South Africa Phone +27 11 472 3733 E-Mail [email protected] South Korea Phone +82 2 786 6321/4 E-Mail [email protected] Suomi Phone +358-9-25 15 800 E-Mail [email protected] Sverige Phone +46 10 110 10 00 E-Mail [email protected] Taiwan Phone +886 2 2375-6288 E-Mail [email protected] Türkiye Phone +90 (216) 528 50 00 E-Mail [email protected] United Arab Emirates Phone +971 (0) 4 88 65 878 E-Mail [email protected] USA/México Phone +1(952) 941-6780 1 (800) 325-7425 – tollfree E-Mail [email protected] More representatives and agencies at www.sick.com