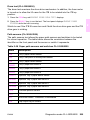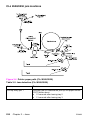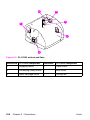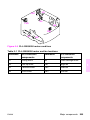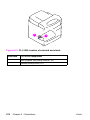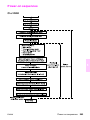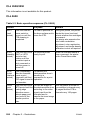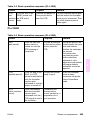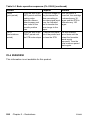
1
hp LaserJet quick reference service guide color service volume III hp color LaserJet quick reference service guide volume III April 2003 edition © 2003 Copyright Hewlett-Packard Development Company, LP Reproduction, adaptation or translation without prior written permission is prohibited, except as allowed under copyright laws. The information contained herein is subject to change without notice. The only warranties for HP products and services are set forth in the express warranty statements accompanying such products and services. Nothing herein should be constructed as constituting an additional warranty. HP shall not be liable for the technical or editorial errors or omissions contained herein. Trademark credits Adobe™ and PostScript™ are registered trademarks of Adobe Systems, Inc., which may be registered in certain jurisdictions. Microsoft®, MS-DOS®, Windows®, and Windows NT® are U.S. registered trademarks of Microsoft Corporation. UNIX® is a registered trademark in the United States and other countries, licensed exclusively through X/Open Company Limited. PANTONE® is a registered trademark of Pantone incorporated. Publication number 5851-1493 Edition 1, 4/2003 Hewlett-Packard Development Company, LP 20555 S.H. 249 Houston, TX 77070 Ordering other manuals This HP Color LaserJet Family Quick Reference Service Guide has been created to help the HP LaserJet service engineer quickly troubleshoot common printer problems. Although this reference is intended to provide information that the service engineer needs for onsite repair of HP LaserJet color products, it is not intended to replace the service manual for any product. For detailed information about the HP LaserJet color products described in this guide, see the user guide or service manual for that product. Service manuals for HP LaserJet products are available from Hewlett-Packard. This is the phone number for the Service Parts Order Desk: (800) 227-8164 (U.S. only) If you are located outside of the U.S., contact your local HP Sales and Service Office. See “Service support” on page 287. ENWW iii Supported products Note This guide will be updated as the service needs change, as new products are introduced, or as information becomes available Table 0-1 Supported products Supported product Model number Maximum pages Service manual per month (printing) part number CLJ 2500 CLJ 2500L CLJ 2500n CLJ 2500tn CLJ 2500se C9706A C9705A C9707A C9708A C9694A 30,000 C9706-90926 CLJ 4500 CLJ 4500N CLJ 4500dn C4084A C4089A C4094A 35,000 C7085-90921 CLJ 4550 CLJ 4550n CLJ 4550dn CLJ 4550hdn C7085A C7086A C7087A C7088A 35,000 C7085-90921 CLJ 4600n CLJ 4600dn CLJ 4600dtn CLJ 4600hdn C9660A C9661A C9662A C9663A 85,000 C9660-90901 CLJ 5500 CLJ 5500n CLJ 5500dn CLJ 5500dtn CLJ 5500htn C9656A C7131A C9657A C9658A C9659A 120,000 C9656-90930 CLJ 8500 CLJ 8500n CLJ 8500dn C3983A C3984A C3985A 60,000 C7096-90986 CLJ 8550 CLJ 8550n CLJ 8550dn CLJ 8550gn CLJ 8550mfp C7096A C7097A C7098A C7099A C7834A 60,000 C7096-90986 iv ENWW Contents 1 Control panel Using the control panel. . . . . . . . . . . . . . . . . . . . . . . . . . . . . . . . . . . . 2 Control panel layouts . . . . . . . . . . . . . . . . . . . . . . . . . . . . . . . . . . 2 Setting the control panel display language . . . . . . . . . . . . . . . . . 6 Upgrading the firmware . . . . . . . . . . . . . . . . . . . . . . . . . . . . . . . . . . . 8 Using Internet Explorer (for flashable firmware) . . . . . . . . . . . . . 9 Using HP Web Jetadmin . . . . . . . . . . . . . . . . . . . . . . . . . . . . . . . 9 Using a manual download (for parallel connections) . . . . . . . . 10 Using FTP . . . . . . . . . . . . . . . . . . . . . . . . . . . . . . . . . . . . . . . . . 10 2 Service and troubleshooting Troubleshooting . . . . . . . . . . . . . . . . . . . . . . . . . . . . . . . . . . . . . . . . 15 Pre-troubleshooting checklist . . . . . . . . . . . . . . . . . . . . . . . . . . 16 Basic troubleshooting . . . . . . . . . . . . . . . . . . . . . . . . . . . . . . . . . . . . 19 Environmental specifications . . . . . . . . . . . . . . . . . . . . . . . . . . . 22 Printing information pages . . . . . . . . . . . . . . . . . . . . . . . . . . . . . . . . 26 Configuration page . . . . . . . . . . . . . . . . . . . . . . . . . . . . . . . . . . 26 Demonstration page . . . . . . . . . . . . . . . . . . . . . . . . . . . . . . . . . 28 Menu map . . . . . . . . . . . . . . . . . . . . . . . . . . . . . . . . . . . . . . . . . 30 Event log . . . . . . . . . . . . . . . . . . . . . . . . . . . . . . . . . . . . . . . . . . 31 Supplies Status page . . . . . . . . . . . . . . . . . . . . . . . . . . . . . . . . 32 Troubleshooting control-panel messages . . . . . . . . . . . . . . . . . . . . 34 CLJ 2500 control panel light messages . . . . . . . . . . . . . . . . . . 34 Alphabetical printer messages . . . . . . . . . . . . . . . . . . . . . . . . . 49 Numerical error messages . . . . . . . . . . . . . . . . . . . . . . . . . . . . 91 Numbered error codes for the CLJ 8550mfp . . . . . . . . . . . . . 154 Service mode functions . . . . . . . . . . . . . . . . . . . . . . . . . . . . . . . . . 183 To gain access to the service mode . . . . . . . . . . . . . . . . . . . . 183 Service menu items . . . . . . . . . . . . . . . . . . . . . . . . . . . . . . . . . 186 NVRAM Initialization . . . . . . . . . . . . . . . . . . . . . . . . . . . . . . . . . . . 190 To perform NVRAM initialization . . . . . . . . . . . . . . . . . . . . . . . 190 Hard disk initialization. . . . . . . . . . . . . . . . . . . . . . . . . . . . . . . . . . . 192 Calibration bypass (CLJ 4600 and CLJ 5500 only) . . . . . . . . . 193 Calibrate Now (CLJ 4600 and CLJ 5500 only) . . . . . . . . . . . . 193 Cold Reset . . . . . . . . . . . . . . . . . . . . . . . . . . . . . . . . . . . . . . . . 194 To perform a cold reset . . . . . . . . . . . . . . . . . . . . . . . . . . . . . . 194 Registration page. . . . . . . . . . . . . . . . . . . . . . . . . . . . . . . . . . . 196 Setting registration numbers (CLJ 4500 and CLJ 4550 only) . 197 ENWW v Engine test . . . . . . . . . . . . . . . . . . . . . . . . . . . . . . . . . . . . . . . . . . . 199 Diagnostics mode CLJ 4500/4550 . . . . . . . . . . . . . . . . . . . . . . . . . 200 Gaining access to the diagnostics mode . . . . . . . . . . . . . . . . . 201 Engine diagnostics CLJ 4500/4550 . . . . . . . . . . . . . . . . . . . . . 203 Troubleshooting printer accessories CLJ 8500/8550 . . . . . . . . . . . 209 Service LED descriptions . . . . . . . . . . . . . . . . . . . . . . . . . . . . 210 3 Jams General paper path checklist . . . . . . . . . . . . . . . . . . . . . . . . . . . . . 214 Paper-path troubleshooting . . . . . . . . . . . . . . . . . . . . . . . . . . . . . . 215 Paper-path test . . . . . . . . . . . . . . . . . . . . . . . . . . . . . . . . . . . . 215 Jams . . . . . . . . . . . . . . . . . . . . . . . . . . . . . . . . . . . . . . . . . . . . . . . . 218 CLJ 2500 jams . . . . . . . . . . . . . . . . . . . . . . . . . . . . . . . . . . . . . 218 CLJ 4500/4550 jam locations . . . . . . . . . . . . . . . . . . . . . . . . . 221 CLJ 4600/5500 jam locations. . . . . . . . . . . . . . . . . . . . . . . . . . 223 CLJ 8500/8550 jam locations. . . . . . . . . . . . . . . . . . . . . . . . . . 226 Persistent jam troubleshooting . . . . . . . . . . . . . . . . . . . . . . . . . . . . 229 CLJ 2500 . . . . . . . . . . . . . . . . . . . . . . . . . . . . . . . . . . . . . . . . . 229 CLJ 4500/4550. . . . . . . . . . . . . . . . . . . . . . . . . . . . . . . . . . . . . 229 CLJ 4600/5500. . . . . . . . . . . . . . . . . . . . . . . . . . . . . . . . . . . . . 229 CLJ 8500/8550 . . . . . . . . . . . . . . . . . . . . . . . . . . . . . . . . . . . . 238 4 Print quality Printer cleaning page . . . . . . . . . . . . . . . . . . . . . . . . . . . . . . . . . . . 240 Life expectancies of print cartridges . . . . . . . . . . . . . . . . . . . . . . . . 241 Image quality . . . . . . . . . . . . . . . . . . . . . . . . . . . . . . . . . . . . . . . . . 242 Drum functional test . . . . . . . . . . . . . . . . . . . . . . . . . . . . . . . . . 242 Print density test and color checks . . . . . . . . . . . . . . . . . . . . . 243 Understanding color variations . . . . . . . . . . . . . . . . . . . . . . . . 243 Common causes of color variation. . . . . . . . . . . . . . . . . . . . . . 244 Adjusting color balance . . . . . . . . . . . . . . . . . . . . . . . . . . . . . . 245 Repetitive defects troubleshooting . . . . . . . . . . . . . . . . . . . . . . . . 249 Imaging drum defects . . . . . . . . . . . . . . . . . . . . . . . . . . . . . . . 250 5 Illustrations Major components . . . . . . . . . . . . . . . . . . . . . . . . . . . . . . . . . . . . . 256 CLJ 2500 major components . . . . . . . . . . . . . . . . . . . . . . . . . . 256 CLJ 4500/4550 major components . . . . . . . . . . . . . . . . . . . . . 260 CLJ 4600 major components . . . . . . . . . . . . . . . . . . . . . . . . . . 267 CLJ 5500 major components . . . . . . . . . . . . . . . . . . . . . . . . . . 271 CLJ 8500/8550 major components . . . . . . . . . . . . . . . . . . . . . 277 vi Contents ENWW Power-on sequences . . . . . . . . . . . . . . . . . . . . . . . . . . . . . . . . . . . 283 CLJ 2500 . . . . . . . . . . . . . . . . . . . . . . . . . . . . . . . . . . . . . . . . . 283 CLJ 4500/4550 . . . . . . . . . . . . . . . . . . . . . . . . . . . . . . . . . . . . 284 CLJ 4600 . . . . . . . . . . . . . . . . . . . . . . . . . . . . . . . . . . . . . . . . . 284 CLJ 5500 . . . . . . . . . . . . . . . . . . . . . . . . . . . . . . . . . . . . . . . . . 285 CLJ 8500/8550 . . . . . . . . . . . . . . . . . . . . . . . . . . . . . . . . . . . . 286 A Service support Obtaining work instructions . . . . . . . . . . . . . . . . . . . . . . . . . . . . . . 288 To gain access to work instructions . . . . . . . . . . . . . . . . . . . . 288 Embedded web server . . . . . . . . . . . . . . . . . . . . . . . . . . . . . . . . . . 289 Obtaining service notes . . . . . . . . . . . . . . . . . . . . . . . . . . . . . . . . . 289 To gain access to service notes . . . . . . . . . . . . . . . . . . . . . . . 289 Service websites . . . . . . . . . . . . . . . . . . . . . . . . . . . . . . . . . . . . . . 290 HP Customer Care Online . . . . . . . . . . . . . . . . . . . . . . . . . . . . 290 HP learning center . . . . . . . . . . . . . . . . . . . . . . . . . . . . . . . . . . 290 Parts . . . . . . . . . . . . . . . . . . . . . . . . . . . . . . . . . . . . . . . . . . . . 290 Index ENWW Contents vii viii Contents ENWW 1 Control panel Contents Using the control panel . . . . . . . . . . . . . . . . . . . . . . . . . . . . . . . . . . . . . . . . . . . . 2 Control panel layouts. . . . . . . . . . . . . . . . . . . . . . . . . . . . . . . . . . . . . . . . . . 2 Setting the control panel display language . . . . . . . . . . . . . . . . . . . . . . . . . 6 Upgrading the firmware . . . . . . . . . . . . . . . . . . . . . . . . . . . . . . . . . . . . . . . . . . . 8 Using Internet Explorer (for flashable firmware) . . . . . . . . . . . . . . . . . . . . . 9 Using HP Web Jetadmin . . . . . . . . . . . . . . . . . . . . . . . . . . . . . . . . . . . . . . . 9 Using a manual download (for parallel connections). . . . . . . . . . . . . . . . . 10 Using FTP . . . . . . . . . . . . . . . . . . . . . . . . . . . . . . . . . . . . . . . . . . . . . . . . . 10 ENWW 1 Using the control panel This section has information about the layout of each product’s control panel and how to set the control panel display language. Control panel layouts CLJ 2500 control panel layout 1 2 3 4 5 6 7 8 9 10 Figure 1-1 Control panel layout (CLJ 2500) 1 Black print cartridge light 6 Imaging drum light 2 Cyan print cartridge light 7 CANCEL JOB button 3 Magenta print cartridge light 8 Attention light (amber) 4 Yellow print cartridge light 9 Ready light (green) 5 ROTATE CAROUSEL button 10 GO button and Go light (green) 2 Chapter 1 – Control panel ENWW CLJ 4500/4550 control panel layout 1 1 2 6 3 7 4 8 9 10 5 Figure 1-2 Control panel layout (CLJ 4500/4550) 1 Control panel display 6 Attention light 2 Ready light 7 MENU button* 3 Data light 8 ITEM button* 4 GO button 9 VALUE button* 5 CANCEL JOB button 10 SELECT button * Rocker buttons ENWW Using the control panel 3 CLJ 4600/5500 control panel layout 11 11 1 10 10 1 9 2 9 2 88 3 3 4 4 5 5 6 7 6 7 Figure 1-3 Control panel layout (CLJ 4600/5500) 1 PAUSE/RESUME button 6 Help button 2 CANCEL JOB button 7 Back arrow button 3 Ready light 8 Down arrow button 4 Data light 9 SELECT button 5 Attention light 10 Up arrow button 11 Control panel display 4 Chapter 1 – Control panel ENWW CLJ 8500/8550 control panel layout 3 1 4 2 10 9 8 7 1 5 6 Figure 1-4 Control panel layout (CLJ 8500/8550) 1 GO button 6 SELECT button 2 MENU button 7 Attention (amber) light 3 Control panel display 8 Data (green) light 4 -VALUE+ button 9 Ready (green) light 5 CANCEL JOB button 10 ITEM button ENWW Using the control panel 5 Setting the control panel display language Note This section only applies to those products that have a control panel display. Product Procedure CLJ 2500 This is not supported for this product. CLJ 4500 CLJ 4550 1 Press and hold SELECT at the printer control panel while turning the printer on. Continue holding SELECT until SELECT LANGUAGE (in English) appears on the control panel display, and then release the SELECT button. 2 When LANGUAGE=ENGLISH * appears on the control panel display, press VALUE repeatedly until the appropriate language appears. 3 Press SELECT to save the language selection. An asterisk appears next to the selected language. 4 Press GO. After the printer warms up, READY appears on the control panel display in the selected language. Note If the message does not appear in the language that you selected, press the printer standby button (power switch) and repeat the instructions for changing the display language. CLJ 4600 CLJ 5500 1 Press SELECT to open the MENUS. 2 Press DOWN ARROW to highlight CONFIGURE DEVICE, and then press SELECT. 3 Press DOWN ARROW to highlight SYSTEM SETUP, and then press SELECT. 4 Press DOWN ARROW to highlight LANGUAGE, and then press SELECT. 5 Press UP ARROW or DOWN ARROW to select the appropriate language, and then press SELECT to set the selection. 6 Press PAUSE/RESUME. 6 Chapter 1 – Control panel ENWW Product Procedure CLJ 8500 CLJ 8550 1 Press and hold SELECT while turning the printer on. When CONFIG LANGUAGE (in English) appears on the control panel display for approximately one second, release SELECT. When the printer has restarted, LANGUAGE = ENGLISH appears on the display. Note Only -VALUE+, SELECT, and GO are active while the display language is being configured. All other buttons are ignored. If you press GO without selecting a language, the printer brings itself online and all subsequent messages are in English. However, because no display language was selected, the LANGUAGE = ENGLISH message reappears (after the power-on self test) when the printer is turned on again. This message appears every time the printer is turned on until you select a language by using this procedure. 2 Press -VALUE+ until the language you want appears on the control panel display. 3 Press SELECT to save the selection. An asterisk (*) appears to the right of the selection. The language that is selected is the default language until another selection is made by using this procedure. 4 Press GO. 5 Turn the printer off and back on. ENWW Using the control panel 7 1 Upgrading the firmware There are several ways that you can upgrade the product’s firmware. The following table lists whether or not your product has firmware available on www.hp.com. Product Firmware available Location on HP website CLJ 2500 3.002.00 Not available by website CLJ 4500 CLJ 4550 Yes Not available by website CLJ 4600 Yes http://www.hp.com/go/clj4600_firmware CLJ 5500 Yes http://www.hp.com/go/clj5500_firmware CLJ 8500 CLJ 8550 Yes Not available by website The following is a list of procedures available for upgrading firmware: z “Using Internet Explorer (for flashable firmware)” on page 9 z “Using HP Web Jetadmin” on page 9 z “Using a manual download (for parallel connections)” on page 10 z “Using FTP” on page 10 8 Chapter 1 – Control panel ENWW Using Internet Explorer (for flashable firmware) This procedure describes how to upgrade a single printer by using a Web browser and file transfer protocol (FTP) works with Internet Explorer 5.x and later. 1 Before you can use Internet Explorer as an FTP client, you need to change a browse setting: a In Internet Explorer, on the Tool menu, click Internet Options. b On the Advanced tab, select the Enable folder view for FTP sites check box, and then click OK. 3 Download the firmware image file from the HP website (www.hp.com). The firmware image file is located on the Driver Download page for each specific printer model. 4 Locate the downloaded file on your computer and run the .exe file to extract the downloaded files. The following example uses the HP LaserJet 9000 printer as an example. Two files are created in a folder named “lj9000.rfu”, which is the new firmware file, and a README file, which explains how to download it to the printer. The following instructions are taken from this readme file. 5 Open a Windows Explorer window and browse to the folder that contains the .rfu file. 6 In the URL address text box, type the letters FTP, type the IP address of the printer, and then press Enter on the keyboard. For example type, FTP://192.168.0.1. A folder named "Port 1" in appears in the browser window. 7 Drag the .rfu file from the Windows Explorer window to the window in Internet Explorer. The printer should now indicate that it is performing the upgrade. Using HP Web Jetadmin 1 Print a Configuration page to determine the printer's IP address. 2 Go to the main page for HP Web Jetadmin. Go to http://www.hp.com/go/webjetadmin to download HP Web Jetadmin for Windows or Linux. 3 For a single printer, select the IP hostname or IP address of the printer in the Quick Device Find field in the top-right corner and then click Go. For multiple printer updates, see the HP Web Jetadmin User documentation. 4 Click the right arrow below Go and move to the Update menu option. 5 Select Update and Update Printer (not Update Jetdirect) and continue. 6 Click Browse to locate the firmware image file downloaded from the Internet. ENWW Upgrading the firmware 9 1 7 Click Upload to move the firmware image file from the C: drive to the HP Web Jetadmin server. 8 Click Refresh in the upper-right corner. (It looks like a page that contains two arrows in a circle.) 9 Select the date code to send to the printer (firmware file name). The date code format is YYYYMMDD. YYYY is 200x (the year), and MM and DD are the month and the date. 10 Click Update Firmware. HP Web Jetadmin sends the selected image to the printer. Using a manual download (for parallel connections) 1 Print a Configuration page to determine the firmware version. 2 Download the firmware from the HP website and copy it to a directory on the computer. 3 Open up a Command Prompt (MS-DOS prompt) window by doing one of the following: Click Start, point to Programs, and then click Command Prompt. Click Start, point to Programs, point to Accessories, and then click Command Prompt. 4 Change the drive and the directory to indicate where the firmware file is located. 5 Do one of the following: For a parallel-connected printer: Type copy /b filename port name, where filename is the firmware file name and port name is the name of the port, such as LPT1. For a shared printer: Type copy /b filename port name\\computername\sharename, where filename is the firmware file name and port name is the name of the port, such as LPT1. The control panel displays PERFORMING UPGRADE. Using FTP 1 Connect the printer to the network. 2 Verify that the product is configured with an IP address (you might need to configure the I/O device TCP/IP-DHCP). 3 Print a Configuration page. The EIO HP Jetdirect page contains the IP Address and the Host Name. 10 Chapter 1 – Control panel ENWW 4 Open up a Command Prompt (MS-DOS prompt) window by doing one of the following: Click Start, point to Programs, and then click Command Prompt. Click Start, point to Programs, point to Accessories, and then click Command Prompt. 5 In the command prompt window, change to the drive by typing “C:”. 6 Type the directory in which the .rfu file resides: “cd c:folder name in which the .rfu resides”. 7 At the C:\> type the ftp IP address (for example, C:\>ftp 12.34.56.78). 8 Press Enter, if prompted for a user name, and then press Enter again, if prompted for a password. 9 Type put (file name .rfu). Note If the connection timed out message appears, type “bye” and go back to step 7. Various messages appear while the update is in progress. 10 Type “bye” when the FTP prompt returns. This could take a few minutes. 11 Exit at the regular Command Prompt to return to Windows. ENWW Upgrading the firmware 11 1 12 Chapter 1 – Control panel ENWW 2 Service and troubleshooting Contents Troubleshooting . . . . . . . . . . . . . . . . . . . . . . . . . . . . . . . . . . . . . . . . . . . . . . . . 15 Pre-troubleshooting checklist . . . . . . . . . . . . . . . . . . . . . . . . . . . . . . . . . . 16 Basic troubleshooting . . . . . . . . . . . . . . . . . . . . . . . . . . . . . . . . . . . . . . . . . . . . 19 Environmental specifications . . . . . . . . . . . . . . . . . . . . . . . . . . . . . . . . . . . 22 Printing information pages . . . . . . . . . . . . . . . . . . . . . . . . . . . . . . . . . . . . . . . . 26 Configuration page . . . . . . . . . . . . . . . . . . . . . . . . . . . . . . . . . . . . . . . . . . 26 Demonstration page . . . . . . . . . . . . . . . . . . . . . . . . . . . . . . . . . . . . . . . . . 28 Menu map . . . . . . . . . . . . . . . . . . . . . . . . . . . . . . . . . . . . . . . . . . . . . . . . . 30 Event log . . . . . . . . . . . . . . . . . . . . . . . . . . . . . . . . . . . . . . . . . . . . . . . . . . 31 Supplies Status page . . . . . . . . . . . . . . . . . . . . . . . . . . . . . . . . . . . . . . . . 32 Troubleshooting control-panel messages. . . . . . . . . . . . . . . . . . . . . . . . . . . . . 34 Control Panel Lights . . . . . . . . . . . . . . . . . . . . . . . . . . . . . . . . . . . . . . . . . 34 Alphabetical printer messages . . . . . . . . . . . . . . . . . . . . . . . . . . . . . . . . . 49 Numerical error messages . . . . . . . . . . . . . . . . . . . . . . . . . . . . . . . . . . . . 91 Numbered error codes for the CLJ 8550mfp . . . . . . . . . . . . . . . . . . . . . . 154 Service mode functions . . . . . . . . . . . . . . . . . . . . . . . . . . . . . . . . . . . . . . . . . 183 To gain access to the service mode . . . . . . . . . . . . . . . . . . . . . . . . . . . . 183 Service menu items . . . . . . . . . . . . . . . . . . . . . . . . . . . . . . . . . . . . . . . . . 186 NVRAM Initialization . . . . . . . . . . . . . . . . . . . . . . . . . . . . . . . . . . . . . . . . . . . . 190 To perform NVRAM initialization . . . . . . . . . . . . . . . . . . . . . . . . . . . . . . . 190 Hard disk initialization . . . . . . . . . . . . . . . . . . . . . . . . . . . . . . . . . . . . . . . . . . . 192 Calibration bypass (CLJ 4600 and CLJ 5500 only) . . . . . . . . . . . . . . . . . 193 Calibrate Now (CLJ 4600 and CLJ 5500 only) . . . . . . . . . . . . . . . . . . . . 193 Cold Reset. . . . . . . . . . . . . . . . . . . . . . . . . . . . . . . . . . . . . . . . . . . . . . . . 194 Registration page . . . . . . . . . . . . . . . . . . . . . . . . . . . . . . . . . . . . . . . . . . 196 Setting registration numbers (CLJ 4500 and CLJ 4550 only) . . . . . . . . . 197 ENWW 13 Setting the registration number (CLJ 4500/4550 only): . . . . . . . . . . . . . .197 Setting margin numbers (CLJ 4500/4550 only): . . . . . . . . . . . . . . . . . . .197 Engine test . . . . . . . . . . . . . . . . . . . . . . . . . . . . . . . . . . . . . . . . . . . . . . . . . . .199 Diagnostics mode CLJ 4500/4550 . . . . . . . . . . . . . . . . . . . . . . . . . . . . . . . . .200 Gaining access to the diagnostics mode . . . . . . . . . . . . . . . . . . . . . . . . .201 Engine diagnostics CLJ 4500/4550 . . . . . . . . . . . . . . . . . . . . . . . . . . . . .203 Developer test (CLJ 4500/4550) . . . . . . . . . . . . . . . . . . . . . . . . . . . . . . .204 Drum test (CLJ 4500/4550) . . . . . . . . . . . . . . . . . . . . . . . . . . . . . . . . . . .205 Path sensors (CLJ 4500/4550) . . . . . . . . . . . . . . . . . . . . . . . . . . . . . . . .205 Path sensors (CLJ 2500/4600/5500/8500/8550) . . . . . . . . . . . . . . . . . . .206 Door sensor test (CLJ 4500/4550). . . . . . . . . . . . . . . . . . . . . . . . . . . . . .206 Door sensor test (CLJ 8500/8550 2,000-sheet input unit) . . . . . . . . . . . .208 Troubleshooting printer accessories CLJ 8500/8550 . . . . . . . . . . . . . . . . . . .209 Service LED descriptions. . . . . . . . . . . . . . . . . . . . . . . . . . . . . . . . . . . . .210 Service LED interpretation CLJ 8500/8550 . . . . . . . . . . . . . . . . . . . . . . .211 14 Chapter 2 – Service and troubleshooting ENWW Troubleshooting When the printer malfunctions or encounters an unexpected situation, information on the printer control panel (messages and/or illuminated LEDs) alert you to the situation. This section contains a pre-troubleshooting checklist that helps eliminate many possible causes of the problem. The remainder of the chapter provides steps for correcting the problems that have been identified. Before beginning any trouble shooting procedure, check the following: z Are supply items (for example), the print cartridges, fuser, and rollers) within their rated life? z Does the configuration page reveal any configuration problems? See “Configuration page” on page 26. Note The customer is responsible for checking and maintaining supplies, and for using supplies that are in good condition. The customer is responsible for media and print-cartridge supplies. The customer is also responsible for replacing the fuser, transfer roller, and all paper pickup, feed, and separation rollers that are at or near the end of their rated life. ENWW Troubleshooting 15 2 Pre-troubleshooting checklist WARNING! Always turn off, then unplug, the printer before servicing. Current is present in the DC power supply whenever the printer is plugged in. Before troubleshooting any specific printer problem, evaluate the following printer conditions: Note This is a generalized troubleshooting list. Not all checklist items will apply to all of the printers in this guide. z Is the printer on and/or does a readable message appear on the control-panel display (CLJ 2500-is the Ready LED illuminated)? Yes. Proceed troubleshooting. No. Make sure that the printer is plugged in and turned on. Verify that the fan(s) or motor(s) briefly run. If the printer has a control panel, but no messages appear on the display, verify the control-panel display wireharness is connected at both ends. Verify firmware DIMM(s) are seated and operating properly. Remove any HP Directjet or other EIO cards, and then try to turn the printer on again. Check the fuse on the power supply to make sure it is not open. z Does an error message appear on the control-panel display or does the control panel LEDs indicate a service error? Yes. Use the error message or control panel lights (CLJ 2500) section of this chapter to understand the message or LED pattern. Print an event log and look for reoccurring errors. No. Proceed troubleshooting. z Can you print a configuration page? Yes. Proceed troubleshooting. No. If an error message or service LED pattern appears on the control panel when you attempt to print a configuration page, Use the error message or control panel lights (CLJ 2500) section of this chapter to understand the message or LED pattern. z Does the print quality meet the customers requirements? Yes. Proceed troubleshooting. No. Verify that the correct media is being used and that it has been properly stored. Compare the images with the print defect samples found in the printer’s service manual. 16 Chapter 2 – Service and troubleshooting ENWW z Can the customer print successfully from the host computer? Yes. End. No. Verify the maintenance, media, voltage, environmental component, hardware, and configuration elements below. Repeat control panel error message or service LED pattern actions and image defect corrective actions until all errors and defects are corrected. Maintenance z Has the printer been maintained on a regular basis? z Are all of the maintenance units within their rated life? 2 Media z Is the customer using media as specified in the printer user guide and in the HP LaserJet Family Print Media Guide? z Is the media stored correctly and within environmental limits? Voltage Has the line voltage been checked to make sure that it meets the printer requirements? (Large motors used near the printer can cause temporary voltage changes.) See “Electrical specifications” on page 23. Operating environment z Is the operating environment within the parameters listed in the printer service manual? z Is the printer installed on a solid, level surface? z Is the printer protected from substances such as office cleaning materials and the ammonia gas that is produced by diazo copiers? z Is the printer protected from direct sunlight? Non-HP components z Have all non-HP components (toner, typeface DIMMs, memory boards, and EIO cards) been removed from the printer? CAUTION Hewlett-Packard recommends the use of HP products in this printer. Use of non-HP products can cause problems that require service not covered by the Hewlett-Packard warranty or service agreements. ENWW Troubleshooting 17 Hardware z Are the ITB (or ETB) unit and fusing unit seated correctly? z Are all doors, drawers, and covers closed? z (For the CLJ 4500) Is the duplex-unit power cord plugged into the printer, and is the paper-duck power-supply plug connected to the duplexer? Configuration z Has the printer hardware or software configuration changed? Or could the problem be associated with any specific software? (Contact the Customer Care Center for software-related problems). z Could the problem be related to network configuration changes? Remove the printer from the network and make sure that the failure is associated with the printer before beginning troubleshooting. 18 Chapter 2 – Service and troubleshooting ENWW Basic troubleshooting z Does the printer perform the initialization and power on steps? See “Does the printer turn on successfully?” on page 19. z Does the control panel show READY, OFFLINE, or POWERSAVE ON? See “Is the printer ready?” on page 20. z Does the event log show repeating errors? See “Troubleshooting controlpanel messages” on page 34. z Does media jam in the printer. See “Jams” on page 218. z Will the printer print information pages. See “Printing information pages” on page 26. z Does the print quality meet the customer’s expectations? See “Image quality” on page 242. z Can the customer print from the host system. See the appropriate service manual for your product. Table 2-1 Basic troubleshooting # Verification steps 1 Does the printer turn No power. on successfully? When the printer is connected to a grounded power source, the control panel lights should be displayed, and the fans should run. In the CLJ 2500, the control panel lights should cycle one after another and the cartridge carousel should rotate. Possible problems Solutions 1 Verify that the printer is plugged into an active electrical outlet of the correct voltage. 2 Verify that the power cable is functional. 3 Verify that the power on-off switch is on (CLJ 2500), that the power-on button is pushed in (CLJ 4500), that the on-off switch is switched on (CLJ 4600 and CLJ 5500), or that the three power switches are all switched on (CLJ 8500 and CLJ 8550). 4 (CLJ 8500 and CLJ 8550 only) Verify that the circuit breaker in the copy module has not been tripped). ENWW Basic troubleshooting 19 2 Table 2-1 Basic troubleshooting # Verification steps Possible problems Solutions Does the printer turn The control panel is 1 Remove any HP Jetdirect or blank. other EIO cards, and then try to on successfully? turn the printer on again. continued 2 Check the fuse in the power supply, and replace the power supply if necessary. 3 Verify that the DC controller is functioning, and replace if necessary. (CLJ 2500 only) Control panel lights do not cycle. Verify that the control panel cable is seated in both the control panel and the formatter. If the cable is connected correctly, replace the control panel. Verify that the DIMMs are seated correctly in the DIMM slots. (CLJ 4500 only) The 1 Verify that the ribbon cable is front panel display is seated in both the formatter and dark, and an error the DC controller. message appears. 2 Replace the interconnect PCB. 2 Is the printer ready? The printer should function without errorindicator light messages appearing on the control panel or (CLJ 2500 only) error messages appearing on the Printer Status and Alerts screen. Control panel lights, Consult the lists of control panel other than the Ready light messages on page 2 to identify light, are on or and correct the error. blinking. (CLJ 2500 only) An error message appears in the Printer Status and Alerts screen. See the appropriate service manual. There is a problem, See the appropriate service manual. but no control panel lights are on or blinking, and no messages appear on the Printer Status and Alerts screen. 20 Chapter 2 – Service and troubleshooting ENWW Table 2-1 Basic troubleshooting # Verification steps Possible problems 3 Do engine tests and information pages print? Note Print an engine test (see page 199). For the CLJ 2500, turn the printer off and then on again before printing an engine test. The engine test should print without paper-feed problems or print-quality problems. Also print a Demo page or a configuration page (see page 26). Solutions The formatter must be connected to a power source to perform an engine test. 2 The engine test is not successful. An error-indicator light message appears on the control panel. Consult the lists of control panel light messages on page 2 to identify and correct the error. (CLJ 2500 only) Printer Status and Alerts software generates an error message. See “Troubleshooting control-panel messages” on page 34. Poor print quality. See “Image quality” on page 242. 4 Is the software installed correctly? Software is not installed or an error occurred during software installation. Uninstall and then reinstall the printer software. Make sure that you use the correct installation procedure and the correct port setting. 5 Does the printer print from the computer? Connect the parallel cable or USB cable to the printer and to the computer. Use a word-processing application to send a print job to the printer. A USB cable and a parallel cable are both connected to the printer. When both cables are connected, the USB automatically disables itself. Disconnect both cables and then reinstall the one you want to use. ENWW The cable is not Reconnect the cable. connected correctly. An incorrect printer driver is selected. Reset the printer driver. (Check for the correct port setting.) Other devices are connected to the parallel port. Disconnect the other devices and try to print again. Basic troubleshooting 21 Environmental specifications Table 2-2 Operating environment specifications Product Item Operating Storage CLJ 2500 Temperature 15° to 32.5° C (59° to 90.5° F) -20° to 40° C (-4° to 104° F) 10% to 80% 95% or less (printer and print cartridge) Relative humidity CLJ 4500 Temperature CLJ 4550 Recommended 20 to 26° C (68 to 79° F) Allowed 15 to 30° C (59 to 86° F) Humidity Recommended 20 to 50% RH Allowed 10 to 80% RH Altitude Allowed 0 to 35° C (32 to 95° F) -20° to 40° C (-4° to 104° F) 35% to 85% RH 95% or less 0 to 3100 m (0 to 10,000 ft) 0 to 3100 m (0 to 10,000 ft) CLJ 4600 Temperature Recommended 17° to 25° C (63° to 77° F) 0° to 35° C (32° to 95° F) Allowed 10° to 30° C (50° to 86° F) -20° to 40° C (-4° to 104° F) 22 Humidity Recommended 30% to 70% RH Allowed 10% to 80% RH 35% to 85% RH 95% or less Altitude Allowed 0 to 2600 m (0 to 8530 ft) 0 to 2600 m (0 to 8530 ft) Chapter 2 – Service and troubleshooting ENWW Table 2-2 Operating environment specifications Product Item Operating Storage CLJ 5500 Temperature Recommended 17° to 25° C (63° to 77° F) 0° to 35° C (32° to 95° F) Allowed 10° to 30° C (50° to 86° F) -20° to 40° C (-4° to 104° F) 2 Humidity Recommended 30% to 70% RH Allowed 20% to 80% RH 35% to 85% RH 95% or less Altitude Allowed 0 to 2600 m (0 to 8530 ft) 0 to 2600 m (0 to 8530 ft) CLJ 8500 Temperature CLJ 8550 Recommended 20 to 26° C (68 to 79° F) Allowed 15 to 30° C (59 to 86° F) 0 to 35° C (32 to 95° F) -20 to 60° C (-4 to 140° F) Humidity Recommended 20 to 50% relative humidity 35 to 85% RH Allowed (RH) 10 to 95% RH 10 to 80% RH Altitude Allowed 0 to 3,048 m (0 to 10,000 ft) 0 to 3,048 m (0 to 10,000 ft) Table 2-3 Electrical specifications Product Item 110-volt models 220-volt models CLJ 2500 Power 115 to 127 V (+/- 10%) 60 Hz (+/- 2Hz) 220 to 240 V (+/- 10%) 50 Hz (+/- 2 Hz) Power consumption Printing color = 400 W Printing mono = 224 W Standby = 30 W Off = 0 W Printing color = 403 W Printing mono = 217 W Standby = 31 W Off = 0 W Minimum recommended circuit capacity (for a typical product) 12 Amps 6 Amps requirement ENWW Basic troubleshooting 23 Table 2-3 Electrical specifications Product Item 110-volt models 220-volt models CLJ 4500 Power CLJ 4550 requirement 100 to 127 V (+/- 10%) 50/60 Hz (+/- 2Hz) 220 to 240 V (+/- 10%) 50/60 Hz (+/- 2 Hz) Power consumption Printing = 470 W Standby = 80 W PowerSave = < 45 W Printing = 480 W Standby = 90 W PowerSave = < 45 W Minimum recommended circuit capacity (for a typical product) 16.0 Amps at 120 V 7.1 Amps at 220 V 100 to 127 V (+/- 10%) 50/60 Hz (+/- 2Hz) 220 to 240 V (+/- 10%) 50/60 Hz (+/- 2 Hz) Power consumption Printing = 426 W Standby = 34 W PowerSave = 30 W Off = 0 W Printing = 430 W Standby = 36 W PowerSave = 32 W Off = 0 W Minimum recommended circuit capacity (for a typical product) 6 Amps 3 Amps 100 to 127 V (+/- 10%) 50/60 Hz (+/- 2Hz) 220 to 240 V (+/- 10%) 50/60 Hz (+/- 2 Hz) Power consumption Printing = 592 W Standby = 54 W PowerSave = 48 W Off = 0 W Printing = 562 W Standby = 51 W PowerSave = 44 W Off = 0 W Minimum recommended circuit capacity (for a typical product) 6 Amps 3 Amps CLJ 4600 Power requirement CLJ 5500 Power requirement 24 Chapter 2 – Service and troubleshooting ENWW Table 2-3 Electrical specifications Product Item 110-volt models 220-volt models CLJ 8500 Power CLJ 8550 requirement 100 to 127 V (+/- 10%) 50/60 Hz (+/- 2Hz) 220 to 240 V (+/- 10%) 50/60 Hz (+/- 2 Hz) Power consumption Printing color = 375 W Printing b/w = 750 W Standby = 190 W PowerSave = < 45 W Off = < 2 W Printing color = 375 W Printing b/w = 750 W Standby = 190 W PowerSave = < 45 W Off = < 2 W Minimum recommended circuit capacity (for a typical product) 12 Amps at 120 V 6 Amps at 220V ENWW Basic troubleshooting 25 2 Printing information pages Note You can also gain access to information pages for the CLJ 2500, CLJ 4600, and CLJ 5500 through the embedded web server. For information on using the embedded web server, see. Configuration page Use the configuration page to view current printer settings and properties, to help troubleshoot printer problems, or to verify installation of optional accessories, such as memory (DIMMs), paper trays, and printer languages. The following sections are included the configuration page of most printers: z Printer Information. Contains basic information about the printer, such as the product name, printer name, and page count. z Configuration menu. Lists the current settings of the configuration menu items. z Event Log. Contains information about printer errors. z Usage information. Contains the number and types of pages printed z Installed personalities and options. This section contains information about optional items that might be installed, such as DIMMs or an HP Jetdirect print server card. z Memory. Lists memory-related information, such as the total memory installed. z Security. Contains information about security features, such as whether the printer control panel password is enabled or disabled. z Paper Tray Information. Contains information about the trays, such as whether optional trays are installed, and the type and size of paper that might be set for each tray. z I/O menu. Lists the current settings of the I/O menu items. z Calibration density settings. (CLJ 4500 and CLJ 4550 only) Contains, on the bottom row of text, four separate blocks of numbers. The first block is for cyan, second for magenta, third for yellow, and the last is for black. If the numbers are near zero, no calibration was done. z Consumables: % of Life Remaining. (CLJ 8500 and CLJ 8550 only) Lists the percentage of the maximum rated life remaining for the transfer kit, fuser kit, and drum kit. z Color Adjust. (CLJ 8500 and CLJ 8550 only) Lists the number of pages since the last manual color adjustment. 26 Chapter 2 – Service and troubleshooting ENWW To print a configuration page Table 2-4 Printing a configuration page Product Instructions CLJ 2500 Press GO and CANCEL JOB simultaneously. (The Supplies Status page also prints. If you have an HP Jetdirect print server card installed, the HP Jetdirect page listing the HP Jetdirect information prints as well.) Note You can also print a configuration page in the embedded Web server, or from the HP Color LaserJet 2500 Series Toolbox CLJ 4500 CLJ 4550 1 Press MENU until INFORMATION MENU appears on the printer control panel display. 2 Press ITEM until PRINT CONFIGURATION appears on the display. 3 Press SELECT to print the configuration page. Note If the printer is configured with EIO cards (for example, an HP JetDirect Print Server), an additional configuration page will print that provides interface configuration information. CLJ 4600 CLJ 5500 1 Press SELECT to enter the MENUS. 2 Press DOWN ARROW to highlight INFORMATION. 3 Press SELECT to select INFORMATION. 4 Press DOWN ARROW to highlight PRINT CONFIGURATION. 5 Press SELECT to select PRINT CONFIGURATION. The message PRINTING... CONFIGURATION appears on the display until the printer finishes printing the configuration page. The printer returns to the READY state after printing the configuration page. Note If the printer is configured with EIO cards (for example, an HP Jetdirect Print Server) or an optional hard disk drive, an additional configuration page will print that provides information ENWW Printing information pages 27 2 Table 2-4 Printing a configuration page Product Instructions CLJ 8500 CLJ 8550 1 Press MENU until INFORMATION MENU appears on the printer control panel display. 2 Press ITEM until PRINT CONFIG PAGE appears on the display. 3 Press SELECT to print the page. To print a continuous configuration page: 1 Press MENU until INFORMATION MENU appears on the printer control panel display. 2 Press ITEM until PRINT CONTINUOUS CONFIG PAGES appears on the display. 3 Press SELECT to print the page. Note Press CANCEL JOB to stop printing. The printer will print all of the pages in the buffer before stopping. Demonstration page Use this page to simulate printing a color image. If the image print quality is poor, print a demonstration page to make sure that the problem is not related to software, communications, or file quality. To print a demonstration page Table 2-5 Printing a demonstration page Product Instructions CLJ 2500 Press GO when the printer is Ready (Ready light on) and is not printing. You can also view this page from the HP Color LaserJet 2500 Series Toolbox. CLJ 4500 CLJ 4550 1 Press MENU until INFORMATION MENU appears on the printer control panel display. 2 Press ITEM until PRINT LASERJET DEMO appears on the display. 3 Press SELECT to print the demonstration page. 28 Chapter 2 – Service and troubleshooting ENWW Table 2-5 Printing a demonstration page Product Instructions CLJ 4600 CLJ 5500 1 Press SELECT to enter the MENUS. 2 Press DOWN ARROW to highlight INFORMATION. 3 Press SELECT to select INFORMATION. 4 Press DOWN ARROW to highlight PRINT DEMO. 2 5 Press SELECT to select PRINT DEMO. CLJ 8500 CLJ 8550 1 Press MENU until INFORMATION MENU appears on the printer control panel display. 2 Press ITEM until PRINT LASERJET DEMONSTRATION appears on the display. 3 Press SELECT to print the page. ENWW Printing information pages 29 Menu map Use the menu map to navigate through control panel menus. To print a menu map Table 2-6 Printing a menu map Product Instructions CLJ 2500 The CLJ 2500 does not have a control panel. Note For information about menu items found in the embedded web server, see hp embedded web server for hp LaserJet printers and mfps. CLJ 4500 CLJ 4550 1 Press MENU until INFORMATION MENU appears on the printer control panel display. 2 Press ITEM until PRINT MENU MAP appears on the display. 3 Press SELECT to print the menu map. CLJ 4600 CLJ 5500 1 Press SELECT to enter the MENUS. 2 Press DOWN ARROW to highlight INFORMATION. 3 Press SELECT to select INFORMATION. 4 Press DOWN ARROW to highlight PRINT MENU MAP. 5 Press SELECT to select PRINT MENU MAP. CLJ 8500 CLJ 8550 1 Press MENU to cycle through the printer control panel menus. 2 From the Information Menu, select PRINT MENU MAP. 3 Press SELECT to print the menu map. 30 Chapter 2 – Service and troubleshooting ENWW Event log The event log lists the printer events, including printer jams, service errors, and other printer conditions. To print an event log Table 2-7 Printing an event log 2 Product Instructions CLJ 2500 The last three events appear on the Configuration page. For a full list of events, see the HP Color LaserJet 2500 Toolbox, (click the Device tab, and then click Information.) CLJ 4500 CLJ 4550 1 Press MENU until INFORMATION MENU appears on the printer control panel display. 2 Press ITEM until SHOW EVENT LOG appears on the display. 3 Press SELECT to print the event log. CLJ 4600 CLJ 5500 1 Press SELECT to enter the MENUS. 2 Press DOWN ARROW to highlight DIAGNOSTICS. 3 Press SELECT to select DIAGNOSTICS. 4 Press DOWN ARROW to highlight PRINT EVENT LOG. 5 Press SELECT to select PRINT EVENT LOG. CLJ 8500 CLJ 8550 1 Press MENU to cycle through the printer control panel menus. 2 From the Information Menu, select PRINT EVENT LOG. 3 Press SELECT to print the event log. ENWW Printing information pages 31 Supplies Status page The Supplies Status page lists the remaining life of HP print cartridges and HP imaging drums. It also lists the estimated number of pages that can be printed with the remaining supplies, number of pages printed, and other supplies information. The following information is included on the supply status page of most printers: z Ordering Information—Contains basic information about how to order new HP supplies. z Print-cartridge—Contains a section for each of the print cartridges and provides information about HP print cartridges. This information includes the part number for each print cartridge, whether each print cartridge is low, and the life remaining for each print cartridge. z Recycling Information—Contains information about the website you can visit for information about recycling. z Imaging-drum area—Contains the same information for the imaging drum that the print-cartridge area provides for the print cartridges. z Warranty Note—Contains information about how the printer warranty is affected when you use non-HP supplies. It also requests that you call the HP fraud hotline if a supply that is being detected as a non-HP supply was sold as a genuine HP supply. To print a supplies status page Table 2-8 Printing a supplies status page Product Instructions CLJ 2500 Press GO and CANCEL JOB simultaneously. (The Configuration page also prints. If you have an HP Jetdirect print server card installed, the HP Jetdirect page listing the HP Jetdirect information prints as well.) Note You can also print a configuration page in the embedded Web server, or from the HP Color LaserJet 2500 Series Toolbox CLJ 4500 CLJ 4550 1 Press MENU until INFORMATION MENU appears on the printer control panel display. 2 Press ITEM until SHOW EVENT LOG appears on the display. 3 Press SELECT to print the event log. 32 Chapter 2 – Service and troubleshooting ENWW Table 2-8 Printing a supplies status page (continued) Product Instructions CLJ 4600 CLJ 5500 1 Press SELECT to enter the MENUS. 2 Press DOWN ARROW to highlight INFORMATION. 3 Press SELECT to select INFORMATION. 4 Press DOWN ARROW to highlight SUPPLIES STATUS. 2 5 Press SELECT to select PRINT SUPLIES STATUS. CLJ 8500 CLJ 8550 ENWW The CLJ 8500/8550 do not support a supplies status page. For information about the percentage of consumables remaining, print a configuration page. Printing information pages 33 Troubleshooting control-panel messages This section provides a list of control panel messages that are found in the CLJ 2500. Alphabetical error messages are listed first on page page 49, followed by numerical messages on page 91. Control panel messages that are selfexplanatory are not included. See the service manual for more detailed information. CLJ 2500 control panel light messages The following section describes the meaning of the light patterns in the Printer Status area. Information about the printer status also appears in the Printer Status and Alerts software and the embedded Web server. Several errors have secondary light patterns, which provide more information about the specific type of error that occurred.The following errors types have secondary light patterns: z Attention with Ability to Continue errors (see page 39) z Accessory errors (see page 42) z Service errors (see page 46) Control Panel Lights Use the following legend to read the light messages in Table 2-10, “Printer Status light messages for CLJ 2500.” Table 2-9 Control Panel lights (CLJ 2500) Light Description Light is off. Attention light (amber) is on. Attention light (amber) is blinking. Ready light (green) is on. Go light (green) is on. Ready light (green) is blinking. Go light (green) is blinking. 34 Chapter 2 – Service and troubleshooting ENWW Table 2-10 Printer Status light messages (CLJ 2500) Message Description Solution All control panel lights cycle one after another. The printer is in Startup Pressing buttons has no effect until the state. printer is in the Ready state. The printer is in Ready state. z z z The printer is receiving or processing data. ENWW No action is needed. Pressing GO prints a Demo page. Pressing GO and CANCEL JOB simultaneously prints a Configuration page and a Supplies Status page, as well as an HP Jetdirect page if an HP Jetdirect print server card is installed. Pressing CANCEL JOB cancels the current job. One or two pages might print as the printer clears the print job. The printer returns to the Ready state (Ready light on) after the job has been canceled. Troubleshooting control-panel messages 35 2 Table 2-10 Printer Status light messages (CLJ 2500) (continued) Message Description Solution Attention error. The top cover is open. Close the top cover. Attention error. The printer is out of media. Load media. Attention error. The printer has a jam. 1 Clear the jam (see pages See “CLJ 2500 jams” on page 218). 2 If the location of the jam is not apparent, check the embedded Web server to find the jam location. If the jam was under the imaging drum, toggle the registration sensor to check its movement and replace the registration sensor if it does not move freely. If the jam was in the fuser area, toggle the fuser exit sensor to check its movement and replace the fuser exit sensor if it does not move freely. z z The top cover has been opened and then closed You pressed ROTATE CAROUSEL. 36 z z Pressing GO returns the printer to the Ready state. If you do not press GO, the printer automatically returns to the Ready state after approximately 10 seconds. Pressing ROTATE CAROUSEL brings another print cartridge to the top position. Chapter 2 – Service and troubleshooting ENWW Table 2-10 Printer Status light messages (CLJ 2500) (continued) Message Description Solution A manual-feed job was 1 Load media into tray 1. sent to the printer, and 2 If the printer does not begin printing the printer is waiting for after the pages have been reloaded, the special media. press GO. Or, just press GO to try to print from another tray if another tray is installed. The printer has finished 1 Reload the pages. printing the first side of a 2 If the printer does not begin printing manual-duplex job, and after the pages have been reloaded, the printer is waiting for press GO. the pages to be reloaded so it can print the second side. Someone is trying to z print by Source (tray) and there is no paper in z the selected tray. Add paper to the selected tray to print from it. Press GO to try to print from another tray. The print image is larger Load the correct-size media and press than the size of media in GO. the tray. The printer has an Attention with Ability to Continue error. 1 Press GO for the printer to attempt to recover from the error and print whatever data it can. If successful, the printer completes the job while the Ready light blinks. 2 If unsuccessful, the Attention with Ability to Continue message continues to appear. Perform one of these steps: Press and hold GO and CANCEL JOB simultaneously to see a secondary light pattern. (See “Attention with Ability to Continue secondary messages (CLJ 2500)” on page 39.) Press CANCEL JOB to cancel the print job. If the problem has been resolved, the printer returns to the Ready state (Ready light on) ENWW Troubleshooting control-panel messages 37 2 Table 2-10 Printer Status light messages (CLJ 2500) (continued) Message Description Solution Accessory error. An error has occurred with either the EIO port or a DIMM slot. (The printer stops printing, and pressing any button has no effect.) Press and hold GO and CANCEL JOB simultaneously to see a secondary light pattern. (See “Accessory error secondary messages (CLJ 2500)” on page 42.) Service error. (The printer stops printing, and pressing any button has no effect.) 1 If the printer is connected to a power strip or surge protector, disconnect it and connect the power cable directly to a working wall outlet. 2 Turn the printer off and then on. If the problem persists, leave the printer off for 15 minutes to reset the printer. 3 If the problem continues, press and hold GO and CANCEL JOB simultaneously to see a secondary light pattern. (See “Service error secondary messages (CLJ 2500)” on page 46.) 38 Chapter 2 – Service and troubleshooting ENWW Attention with Ability to Continue secondary messages (CLJ 2500) 2 If the printer has an Attention with Ability to Continue error (the Attention light is blinking and the Go light is on), press and hold GO and CANCEL JOB simultaneously to see the secondary error message. You can also view the embedded Web server, which provides a text message that corresponds to the error and its secondary light pattern. Table 2-11 Attention secondary messages (CLJ 2500) Message Description Solution 20 Insufficient Memory error The printer memory is full. Press GO to resume printing. If you lose some data, try to free some printer memory by removing any unnecessary fonts, macros, or any data currently in printer memory. If you continue to lose data, you might need to add more printer memory. For a temporary solution, simplify the image. 41.3 Unexpected Size error or 41.x Printer error 1 Load the correct size of media. If the correct size is loaded, press GO. 2 If printing does not resume, open the top cover, remove the imaging drum, and check for a jam inside the printer. ENWW Troubleshooting control-panel messages 39 Table 2-11 Attention secondary messages (CLJ 2500) (continued) 40 Bad Transmission error 1 Press GO to try to print a portion of the job. 2 If the printer is connected to the network, make sure that the cable is securely connected between the HP Jetdirect print server card and the network port. 3 If the printer is directly connected to a computer, the cable between the printer and computer has a bad connection or the cable is of poor quality. Disconnect the cable and reconnect it. Make sure that you are using a high-quality USB or IEEE1284 compliant, size-B parallel cable. 4 If the error persists, replace the appropriate cable. 22 Buffer Overflow error 1 Press GO to try to print a portion of the job. 2 The connection between the printer and the computer might be loose. Turn the printer off and check the cable connection to make sure that it is secure. 3 The cable is malfunctioning. Try using a different, highquality USB or IEEE-1284 compliant, size-B parallel cable. See chapter 7 for ordering information. 4 If the error persists, reduce the complexity of the print job, and try again to print. 40 Chapter 2 – Service and troubleshooting ENWW Table 2-11 Attention secondary messages (CLJ 2500) (continued) Chosen Personality Not Available error The current job was canceled because the printer language (personality) is not supported. 1 Press GO to clear the message. 2 If you printed the job using one of the PCL drivers, try printing using the PS driver, or vice versa. 2 3 Turn off the printer and remove or replace the language font DIMM. CAUTION You must turn off the printer before inserting or removing DIMMs. Data Received error The printer received data and is waiting for a form feed. Press GO to print the last page. Sending another print job can also cause the page to print. General Attention with Ability to Press GO to try to continue printing. Continue error If the error persists, switch printer drivers and try again to print. ENWW Troubleshooting control-panel messages 41 Table 2-11 Attention secondary messages (CLJ 2500) (continued) 68.x Permanent Storage error Press GO to clear the message. Check the printer settings. The nonvolatile memory (NVRAM) Remove the Jetdirect card, if it is temporarily full. is installed, and then perform a cold reset (see page 194). Perform a NVRAM init (see page 190). Accessory error secondary messages (CLJ 2500) If the printer has an Accessory error (the Attention light, Ready light, and Go light are blinking), press and hold GO and CANCEL JOB simultaneously to see the secondary error message. You can also view the embedded Web server, which provides a text message that corresponds to the error and its secondary light pattern. 42 Chapter 2 – Service and troubleshooting ENWW Table 1. Accessory error secondary messages (CLJ 2500) Message Description Solution 8x.yyyy EIO error A problem exists with the print server card. 1 Remove the print server card and reinstall it to make sure that it is correctly installed. 2 CAUTION You must turn off the printer before inserting or removing the print server card to avoid 3 damaging the print server card. Make sure that you are using a supported print server card. See chapter 7 for ordering information. To continue printing, remove the print server card from the EIO port and connect a parallel or USB cable. You must change the port or reinstall the software. 4 If the print server card still is not working, replace the print server. ENWW Troubleshooting control-panel messages 43 2 Table 1. Accessory error secondary messages (CLJ 2500) (continued) 53.x1.zz Printer (DIMM Slot 1) error A problem exists with the DIMM in DIMM slot 1. 1 Remove the DIMM and reinstall it to make sure that it is correctly installed. 2 Make sure that you are using a supported DIMM. See chapter 7 for ordering information. CAUTION You must turn off the printer before inserting or removing 3 Move the DIMM to a different DIMMs to avoid damaging them. DIMM slot. If the DIMM works in a different slot, then DIMM slot 1 is malfunctioning. 4 Many of the first printers of this model were shipped with an 8 MB flash DIMM in DIMM slot 1. If the printer has an 8 MB flash DIMM in DIMM slot 1, then replace the DIMM. The 8 MB flash DIMM will not work in any DIMM slot other than DIMM slot 1. 5 To continue printing, remove the DIMM from DIMM slot 1. 53.x2.zz Printer (DIMM Slot 2) error A problem exists with the DIMM in DIMM slot 2. 1 Remove the DIMM and reinstall it to make sure that it is correctly installed. 2 Make sure that you are using a supported DIMM. See chapter 7 for ordering information. CAUTION You must turn off the printer before inserting or removing 3 Move the DIMM to a different DIMMs to avoid damaging them. DIMM slot. If the DIMM works in a different slot, then DIMM slot 2 is malfunctioning. 4 To continue printing, remove the DIMM from DIMM slot 2. 44 Chapter 2 – Service and troubleshooting ENWW Table 1. Accessory error secondary messages (CLJ 2500) (continued) 53.x3.zz Printer (DIMM Slot 3) error A problem exists with the DIMM in DIMM slot 3. 1 Remove the DIMM and reinstall it to make sure that it is correctly installed. 2 Make sure that you are using a supported DIMM. See chapter 7 for ordering information. CAUTION You must turn off the printer before inserting or removing 3 Move the DIMM to a different DIMMs to avoid damaging them. DIMM slot. If the DIMM works in a different slot, then DIMM slot 3 is malfunctioning. 4 To continue printing, remove the DIMM from DIMM slot 3. ENWW Troubleshooting control-panel messages 45 2 Service error secondary messages (CLJ 2500) If the printer has a service error (Attention light, Ready light, and Go light are on), press and hold GO and CANCEL JOB simultaneously to see the secondary error message. You can also view the embedded Web server, which provides a text message that corresponds to the error and its secondary light pattern. Table 2-12 Service error secondary messages (CLJ 2500) Message Description Solution 51.x Bad beam detect error 1 Press GO. The page that contains the error will automatically be reprinted. 2 Turn the printer off and then on. 3 Replace the laser/scanner. 52.x Scanner error 1 Press GO. The page that contains the error will automatically be reprinted. 2 Turn the printer off and then on. 3 Turn the printer off, and then reseat the laser/scanner cable. 4 Replace the laser/scanner. 46 Chapter 2 – Service and troubleshooting ENWW Table 2-12 Service error secondary messages (CLJ 2500) (continued) 55.x Engine communication 1 Turn the printer off and then error on. 2 Check the connections to the formatter and the dc controller. 3 Replace the formatter. 4 Replace the dc controller. 2 5 Replace the laser/scanner. 49.xxxxx Formatter/engine 1 Turn the printer off and then error on. (The control-panel lights are 2 Replace the formatter. blinking, or the magenta-printcartridge, yellow-printcartridge, and imaging-drum lights are on.) 50.X Fuser error 1 Turn the printer off for approximately 20 to 30 minutes, and then turn the printer on. 2 If the error persists, replace the fuser. ENWW Troubleshooting control-panel messages 47 Table 2-12 Service error secondary messages (CLJ 2500) (continued) 57.x Fan motor error 1 Turn the printer off and then on. 2 Turn the printer off, and then reseat the cable that connects the fan and the formatter. 3 Replace the fan. 4 Replace the dc controller. 64 Scan buffer error 1 Turn the printer off and then on. 2 Replace the formatter. 48 Chapter 2 – Service and troubleshooting ENWW Alphabetical printer messages The following table contains the alphabetical error messages for all of the printer models that are covered in this guide. Because different models require different procedures, make sure that you find the exact wording of the error message on the control panel display. Model numbers are not specified for every message in the table. 2 Note Self-explanatory messages are not included. Table 2-13 Alphabetical printer messages Message Description Action ACCESS DENIED MENUS LOCKED A user has attempted to Contact the printer select a menu value while the administrator to gain access printer control panel is locked. to the control panel. BAD DUPLEXER CONNECTION The duplexer is not correctly installed. 1 Verify that the power cord is connected to the duplexer and the short power cord from the duplexer is connected to the printer. 2 Turn the printer off and then on. 3 If the error continues, verify that the duplexer is correctly installed. 4 If the error persists, replace the duplexer. CANNOT DUPLEX CLOSE REAR BIN ENWW The printer cannot duplex 1 Close the rear output bin because the rear output bin is door. open. 2 If the error message persists, turn the printer off and then on. Troubleshooting control-panel messages 49 Table 2-13 Alphabetical printer messages (continued) Message Description CANNOT DUPLEX CHECK REAR BIN The printer cannot duplex 1 Close the rear output bin. because the rear output bin is 2 If the error message open or the media is not persists, turn the printer supported by the duplexer. off and then on. alternates with Action Verify that the duplexer supports the media. See “Supported media weights and sizes” in the appropriate service manual. CANNOT DUPLEX CHECK PAPER CHECK CONTROL PANEL SETTINGS The page might not be printing because the control panel setting for the media type or size does not match the media in the tray. See the appropriate service manual for information about configuring the media type and size for each tray. CHECK TRAY 1 PAPER GUIDES The width of the paper guides does not match the size of the media selected for the print job. Adjust the paper-width guides to the edge of the page. Make sure that the media size selected for the print job is the same as the size of media loaded in tray 1. CHOSEN PERSONALITY NOT AVAILABLE FOR HELP PRESS PJL encountered a request 1 Press HELP for detailed for a personality that did not information. exist in the printer. The job is 2 Press UP ARROW and aborted and no pages will be DOWN ARROW to step printed. through the instructions. alternates with CHOSEN PERSONALITY NOT AVAILABLE TO CONTINUE PRESS 50 Chapter 2 – Service and troubleshooting ENWW Table 2-13 Alphabetical printer messages (continued) Message Description Action CLEAR DUPLEX JAM LOWER LEFT DOOR The printer senses a media jam in the duplexer. 1 Open the left lower cover, remove the duplexer, remove the jammed media, reinstall the duplexer, and close the left lower cover. 2 The fusing assembly and diverter assemblies can also cause duplex printing problems. Verify that they are operating correctly. 3 Open the left lower cover and defeat the delivery cover interlock. Toggle the sensors at the paper exit and entrance. While running the sensor monitor test from the Service Mode Menu, verify that sensors 8 and 9 on the printer control panel indicate 1 (on) when toggled. Note This procedure will not work if the left lower cover interlock is not defeated. 4 If the error message persists, replace the duplexer. ENWW Troubleshooting control-panel messages 51 2 Table 2-13 Alphabetical printer messages (continued) Message Description Action CLEAR FUSER JAM LOWER LEFT DOOR The printer senses a media WARNING! jam in the fuser area. The Do not touch the fuser; it printer expected a page to could be very hot and come through the fuser, but could cause burns. the paper has not toggled PS1903, or PS1903 has been toggled an extended period of 1 Open the left lower cover, time. remove the jammed media, and close the left lower cover. 2 On the left side of the fuser, check the fuser exit flag and the reflective absorptive sticker that the sensor (PS1903) uses. 3 Perform the sensor monitor test in the Service Mode Menu. Toggle PS1903 and check to make sure that sensor 2 on the printer control panel indicates 1 (on) when toggled. 52 Chapter 2 – Service and troubleshooting ENWW Table 2-13 Alphabetical printer messages (continued) Message Description Action CLEAR INPUT DEVICE JAM Check the event log message. These instructions are for event log message 13.11.1<X>. There is a jam in the 2,000sheet input tray. 1 Open the vertical transfer unit (VTU) and remove any media. Event log message: 13.11.1<x> 2 Verify that the paper entry sensor (PS31) moves freely. <x> Description: 1 Timeout at the paper entry sensor (PS31) B Timeout at the paper exit sensor (PS32) 3 Verify that the feed, separation, and pickup rollers are properly seated. 4 If the problem persists, open the VTU and override the VTU closed sensor (PS35). Perform a paper-path test from the 2,000-sheet input unit, and verify that the feed rollers are advancing the paper. If rollers do not rotate, check the connections at the pickup assembly and the controller PCA in the 2,000-sheet input unit. 5 If the rollers rotate and drop down but do not advance the paper, replace the feed and separation rollers by using the maintenance kit. 6 If the rollers do not rotate or do not drop down, replace the pickup assembly. 7 If the problem persists, replace the VTU, which includes PS31. ENWW Troubleshooting control-panel messages 53 2 Table 2-13 Alphabetical printer messages (continued) Message Description Action CLEAR INPUT DEVICE JAM Check the event log message. These instructions are for event log message 13.11.2<X>. There is a jam in the 2,000sheet input tray. 1 Open the VTU and remove any media. Event log message: 13.11.2<x> 2 Verify that the paper entry sensor (PS31) moves freely. X description 1 Page stays too long at the paper entry sensor (PS31) B Page stays too long at the paper exit sensor (PS32) 3 Verify that the feed, separation, and pickup rollers are properly seated. 4 If the problem persists, open the VTU and override the VTU closed sensor (PS35). Perform a paper path test from the 2,000-sheet input unit, and verify that the feed rollers are advancing the paper. If the rollers do not rotate, check the connections at the pickup assembly and the controller PCA in the 2,000-sheet input unit. 5 If the rollers rotate and drop down but do not advance the paper, replace the feed and separation rollers by using the maintenance kit. 6 If the rollers do not rotate or do not drop down, replace the pickup assembly. 7 If the problem persists, replace the VTU, which includes PS31. 54 Chapter 2 – Service and troubleshooting ENWW Table 2-13 Alphabetical printer messages (continued) Message Description Action CLEAR INPUT DEVICE JAM Check the event log message. These instructions are for event log message 13.11.3<X>. There is a jam in the 2,000sheet input tray. 1 Open the vertical transfer unit (VTU) and remove any media. Event log message: 13.11.3<x> 2 Verify that PS31 and PS32 in the VTU move freely. CLEAR INPUT JAM The printer senses a media jam in the transfer or registration area, in an input tray, or in the duplexer. X description 3 If either PS31 or PS32 is 1 At power on, the paper damaged, replace the entry sensor (PS31) in the VTU. VTU is active B At power on, the paper exit sensor (PS32) in the VTU is active 1 Open the front door, press the white button on the lower (green) lever, and swing the lever to the right. Open the right upper door, remove the transfer drum, and remove the jammed media from under the metal paper guide. Reinstall the transfer drum, and close the right upper door. Swing the lower (green) lever to the left, and close the front door. 2 Open each input tray, remove any jammed media, and close the input tray. 3 Open the left lower cover, remove the duplexer, remove the jammed media, reinstall the duplexer, and close the left lower cover. 4 Check the entire paper path for paper. ENWW Troubleshooting control-panel messages 55 2 Table 2-13 Alphabetical printer messages (continued) Message Description Action CLEAR MAILBOX JAM Check the event log message. These instructions are for event log messages 13.22.01 and 13.22.02. The printer senses a media jam in the multi-bin mailbox. 1 Open the jam access door and remove any media. Event log message: 13.22.01, 13.22.02 2 Verify that the left (faceup) output-bin-full sensor (PSFaceFull) flag moves freely. 3 Verify that the flipper shaft is in place. 4 If the message persists, replace the flipper assembly. 5 If the message persists, replace the multi-bin mailbox controller board PCA. CLEAR MAILBOX JAM Check the event log message. These instructions are for event log message 13.22.03. The printer senses a media jam in the multi-bin mailbox. 1 Check for a jam at the double-belt system and delivery head assembly. Event log message: 13.22.03 2 Ensure free movement of the double belt (both belts). 3 Ensure parallel position of the double belt system. 4 Verify that the metallic tape is in place and in good condition. 5 If the message persists, replace the transport belt motor (M5). 6 If the message persists, replace the multi-bin mailbox controller board PCA. 7 If the message persists, replace the delivery head assembly. 56 Chapter 2 – Service and troubleshooting ENWW Table 2-13 Alphabetical printer messages (continued) Message Description Action CLEAR MAILBOX JAM Check the event log message. These instructions are for event log message 13.22.04. The printer senses a media jam in the multi-bin mailbox. 1 Check for a jam in the delivery head assembly. Event log message: 13.22.04 2 Ensure free movement in the sensor flags (PSExit1) on the delivery head assembly. 3 Verify that the delivery roller fingers are over the ejector rollers on the delivery head assembly. 4 If the message persists, replace the flat ribbon cable that connects to the delivery head assembly to the controller board PCA. 5 If the message persists, replace the multi-bin mailbox controller board PCA. 6 If the message persists, replace the delivery head assembly. ENWW Troubleshooting control-panel messages 57 2 Table 2-13 Alphabetical printer messages (continued) Message Description Action CLEAR MAILBOX JAM Check the event log message. These instructions are for event log message 13.22.05. The printer senses a media jam in the multi-bin mailbox. 1 Check for a jam in the delivery head assembly. Event log message: 13.22.05 2 Ensure free movement in the sensor flags (PSExit2) on the delivery head assembly. 3 Verify that the delivery roller fingers are over the ejector rollers on the delivery head assembly. 4 If the message persists, replace the flat ribbon cable that connects to the delivery head assembly to the controller board PCA. 5 If the message persists, replace the multi-bin mailbox controller board PCA. 6 If the message persists, replace the delivery head assembly. CLEAR OUTPUT JAM UPPER LEFT DOOR The printer senses a media 1 Open the left upper door, jam in the top (face-down) remove the jammed output bin. This message media, and close the left might be caused by the paper upper door. not reaching PS11 or by the 2 Verify that PS30, PS10, paper toggling PS11 for an PS11, and PS3 sensors extended period of time. and the surrounding area are clean. 3 Perform the sensor monitor test in the Service Mode Menu to verify that all paper-path sensors are functioning correctly or to locate the paper jam. 58 Chapter 2 – Service and troubleshooting ENWW Table 2-13 Alphabetical printer messages (continued) Message Description Action CLEAR PAPER JAM The printer senses a media 1 Open and shut the front jam. Because this is a generic door of the printer to clear media jam message, the any media from the media might be at any point in printer. Be sure to check the paper path. the fuser area because media can get wrapped around the fuser and be difficult to find. 2 Check all areas of the printer for jammed media, because the printer is unable to determine the location of the media jam 3 Perform the sensor monitor test in the Service Mode Menu to verify that all paper-path sensors are functioning correctly or to locate the paper jam. CLEAR TRANSFER JAM The printer senses a media jam in the transfer drum area when media has not reached PS5. In some cases the media might wrap around the transfer drum and become lodged near the imaging drum. Open the right upper door, remove the transfer drum, remove the jammed media, reinstall the transfer drum, and close the right upper door. CLEAR TRAY 4 JAM The printer senses a media jam in tray 4. Open tray 4 and the vertical transfer unit (VTU), remove the jammed media, and close the tray and the VTU. Note Most transfer jams for the CLJ 8500/8550 are related to media or environment. Contact HP Support for assistance. ENWW Troubleshooting control-panel messages 59 2 Table 2-13 Alphabetical printer messages (continued) Message Description Action CLEAR UNEXPECTED PAPER SIZE JAM THEN LOAD TRAY 1 <TYPE> <SIZE> The printer senses a media jam in tray 1, or the media is longer than what was expected. 1 Open the right upper door and remove the jammed media. 2 Load the media type and size indicated on the <type> = Media type specified printer control panel. in the printer driver or application <size> = Media size specified in the printer driver or application The <type> and <size> can be the default media type and size if an automatic paper override has occurred or if GO was pressed during a mount request. CLEARING PAPER FROM PRINTER The printer is attempting to No action is required. remove unusable media (such as a misfed page jam). CLOSE <LOCATION> DOOR The printer senses that one of 1 Close the door indicated the doors is not closed in the message. correctly. 2 Check the function of the door interlocks (see the service manual for interlock locations). CLOSE FRONT COVERS FOR HELP PRESS The covers need to be closed. 1 Press HELP for more information. 2 Close the front covers. Note This message might also appear if the fuser is missing or incorrectly installed. Ensure that the fuser is correctly installed. CLOSE FRONT DUPLEX DRAWER 60 The duplex drawer is not completely closed. Chapter 2 – Service and troubleshooting Close the duplex drawer. ENWW Table 2-13 Alphabetical printer messages (continued) Message Description Action CLOSE MIDDLE FRONT DRAWER The drawer that holds the intermediate transfer belt is open. 1 Close the ITB drawer. 2 If the message persists, remove the printer’s leftside cover and inspect Note the mechanical linkage This drawer is called the that closes SW1. ITB drawer, but is referred to as the middle front 3 Refer to the wiring drawer for end users. diagram to verify the wiring; the two-wire Switch SW1 indicates the connector should be drawer is open. When the firmly seated to SW1 and drawer is closed, a plastic the wiring harness should protrusion on the lower left be firmly seated to corner of the drawer pivots an connector J1003 of the arm that allows SW1 to toggle DC controller PCB. to the open position. 4 If the message persists, use an ohmmeter to verify functionality of SW1. CLOSE TOP COVER ENWW SW2 indicates whether the 1 Close the top cover. printer’s toner access cover is 2 If the message persists, closed. When the toner remove the printer’s top access cover is closed, a assembly cover and lever is pushed down. This in check all mechanical turn rotates a pivot forward, linkages associated with opening the top cover switch SW2. (SW2). 3 Verify that the connector on J1003 of the DC controller PCB is firmly seated. Troubleshooting control-panel messages 61 2 Table 2-13 Alphabetical printer messages (continued) Message Description Action CLOSE UPPER REAR DRAWER Switch SW5 monitors the closing of the printer’s upper rear door (this door provides access to the fusing assembly). When the fusing door is closed, a tab on the rear door pushes a door switch actuator that runs along the left side of the printer and closes SW5. 1 Close the upper rear drawer. 2 If the message persists, remove the printer’s leftside cover and inspect the mechanical linkage of SW5 and the lever. 3 Refer to the wiring diagram and verify that all connections (J103 of the DC controller PCB and to SW5) are firmly seated. 4 Verify that both the drum drawer and the ITB drawer are firmly closed. Closing these drawers also closes SW4. Note The ITB drawer is referred to as the middle front drawer for end users. Closing the rear door, the drum drawer, and the ITB drawer closes SW4 and SW5. When either of these switches is open, the +24 V supply is disabled. This safety feature protects the operator from any high voltages. 62 Chapter 2 – Service and troubleshooting ENWW Table 2-13 Alphabetical printer messages (continued) Message Description Action CLOSE UPPER FRONT DRAWER The drawer that holds the 1 Open the drawer and imaging drum (the drum then firmly push it closed drawer) is open. Switch SW3 using one hand in the indicates that the drawer is middle of the drawer. open. When the drawer is 2 If the message persists, closed, a plastic protrusion on remove the printer’s leftthe lower left corner of the side cover and inspect drawer pivots an arm that the mechanical linkage allows SW3 to toggle to the that closes SW3. open position. 3 Refer to the wiring diagram and verify the wiring. The two-wire connector should be firmly seated to SW3 and the wiring harness should be firmly seated to connector J1003 of the DC controller PCB. 4 If the message persists, use an ohmmeter to verify functionality of SW3. 5 Verify that FM3 (in the front of the imaging drum drawer) is functioning properly. The fan connects through J77 to J1022 on the DC controller. Note Closing the drawer also closes SW4 (the drum drawer switch). When SW4 is open, the +24 V supply is disabled. This safety feature protects the operator from any high voltages when the drum drawer or ITB drawer is open. ENWW Troubleshooting control-panel messages 63 2 Table 2-13 Alphabetical printer messages (continued) Message Description Action CONFIG LANGUAGE The printer has recognized the key sequence for selecting the display language. Wait for the display language options to appear and then select the appropriate language. For more information about selecting the display language, see the service manual. CONTINUOUS PAGE PRESS The printer configuration page is being printed CANCEL JOB continuously. Press CANCEL JOB to terminate continuous configuration page printing and return the printer to the READY state. Note The HP LaserJet 4550 Paper Path test runs from the Information Menu. CONTINUOUS TEST PRESS CANCEL JOB 64 A continuous configuration page is printing. Chapter 2 – Service and troubleshooting Press CANCEL JOB to exit the configuration page printout mode. If the printer is in the process of printing when CANCEL JOB is pressed, the printer finishes printing the buffered pages before returning online. ENWW Table 2-13 Alphabetical printer messages (continued) Message Description Action CPR SENSOR OUT OF RANGE The CPR sensor is not behaving correctly. 1 Force a calibration by selecting CALIBRATE NOW from the PRINT QUALITY menu. See “Calibrate Now (CLJ 4600 and CLJ 5500 only)” on page 193. 2 If the message persists, verify that the cables are seated properly and the connectors J32 (on the color registration detection unit) and J1119 (on the DC controller) are making good contact. 3 If a laser/scanner unit has recently been replaced, make sure it has been installed properly. If it is installed properly, replace it with a new one. 4 Replace the color registration detection unit. 5 If the message persists, replace the DC controller PCB. Calibrate the printer after replacing the DC controller. Press CANCEL JOB and resend the last page of the job, making sure that a form feed is sent with it, or press GO to feed a new sheet of media through the printer. (CLJ 4500/4550) The printer has received and processed data and is waiting for a form feed. DATA RECIEVED PRESS GO KEY The printer has received and Press GO. processed data. The printer is waiting for a form feed. DATA RECEIVED (CLJ 4600/5550) ENWW Troubleshooting control-panel messages 65 2 Table 2-13 Alphabetical printer messages (continued) Message Description DATA RECEIVED TO PRINT LAST PAGE PRESS The printer received data and is waiting for a form feed. When the printer receives another file, the message should disappear. (CLJ 8500/8550) Action Press SELECT to continue. DENSITY SENSOR OUT OF A density sensor out-of-range The density sensor might be error was detected during a dirty. Inspect and clean the RANGE color calibration. alternates with Note The density sensor on the CLJ 8500/8550 is cleaned whenever the top right door is opened and closed. A piece of foam attached to the transfer drum wipes the density sensor lens. This error is more often related to a printer failure that causes the density pattern not to be written to the ITD. Defeat the right upper door interlocks and examine the ITD during calibration to see if the patterns are written correctly. CLEAN DENSITY SENSOR DETECTABLE SIZE IN TRAY XX FOR HELP PRESS sensor. A tray has been loaded with paper that is a standard size and the switch in the tray is set to custom. 1 2 Press HELP for detailed information. Press UP ARROW and DOWN ARROW to step through instructions. alternates with DETECTABLE SIZE IN TRAY XX RECOMMEND MOVE SWITCH TO STANDARD 66 Chapter 2 – Service and troubleshooting ENWW Table 2-13 Alphabetical printer messages (continued) Message Description DIAGNOSTICS MODE The extended diagnostics power-up key sequence has been entered. See the diagnostics procedures in the service manual. DISK DEVICE FAILURE A device failure has occurred 1 on the specified drive. alternates with READY FOR MENUS PRESS (CLJ 4600/5500) Action No action is required. 2 3 4 Printing can continue for jobs that do not require access to the disk drive. To clear the message, turn the printer off and then on. If the message persists, remove and reinstall the EIO disk drive. If the message persists, replace the EIO disk drive. DISK DEVICE FAILURE (CLJ 8500/8550) The printer hard disk’s Replace the printer hard internal self-test routine has disk. been invoked to read minimum and maximum logical block addresses (with no retries) and has detected a failure. If access to the printer hard disk is not required, printer operation can continue. DISK FILE OPERATION FAILED The printer received an 1 illogical PJL command (such 2 as a download to a nonexistent directory). 3 alternates with READY FOR MENUS PRESS (CLJ 4600/5500) DISK FILE OPERATION FAILED (CLJ 8500/8550) ENWW Printing can continue. Turn the printer off and then on. If the message persists, a problem might exist with the software program. The printer received an No action is required. illogical PJL command (such as a download to a nonexistent directory). Troubleshooting control-panel messages 67 2 Table 2-13 Alphabetical printer messages (continued) Message Description Action DISK IS FULL (CLJ 8500/8550) The printer hard disk is full. 1 At the host computer, delete data from the printer hard disk by using the printer drivers or a disk-management program. 2 To clear all data from the printer hard disk, reformat the printer hard disk at the printer control panel: DISK FILE SYSTEM IS FULL alternates with READY FOR MENUS PRESS (CLJ 4600/5500) DISK IS WRITE PROTECTED Press MENU until CONFIGURATION MENU appears on the display. b Press ITEM until INITIALIZE DISK appears on the display. c Press SELECT to reformat the printer hard disk. The printer received a PJL1 Use the HP Web file system command that Jetadmin software to attempted to store something delete files from the EIO on the file system but was disk drive and try again. unsuccessful because the file 2 To remove this message system is full. from the display, turn the printer off and then on. The file system device is protected and no new files can be written to it. alternates with READY FOR MENUS PRESS (CLJ 4600/5500) 68 a Chapter 2 – Service and troubleshooting 1 To enable writing to the disk, turn off the write protection by using HP Web Jetadmin. 2 To remove this message from the display, turn the printer off and then on. ENWW Table 2-13 Alphabetical printer messages (continued) Message Description Action DISK IS WRITE PROTECTED (CLJ 8500/8550) A user has attempted to save See the system to the printer hard disk while administrator for access to the printer hard disk is write- the printer hard disk. protected. DOORS OPEN TEST ABORTED A printer door has been Close the door, and restart opened during a test. The test the test. has been aborted. DRUM ERROR REPLACE DRUM KIT (CLJ 4500/4550) An error has been detected with a component of the printer drum kit. DRUM ERROR REPLACE DRUM KIT (CLJ 8500/8550) The printer has detected an 1 Turn the printer off and on error in the imaging-drum to reset the printer. memory device. Printing can 2 Reconnect connector continue but will be stopped J209, and reconnect relay as soon as the waste-toner connectors J47 and J48 signal is triggered. Printing on the controller board. behavior is determined by the 3 Replace the drum kit. TONER LOW control panel setting. Replace the drum kit. See the service manual for information about the TONER LOW setting. DRUM LIFE LOW REPLACE Approximately 80 percent of the drum’s life has been DRUM KIT consumed. (CLJ 4500) Continue printing and order the drum kit. Drum replacement will be required in the near future. -orDRUM LIFE LOW ORDER DRUM KIT (CLJ 4550) DRUM LIFE LOW REPLACE DRUM KIT (CLJ 8500/8550) The imaging drum is almost past its specified life. Printing can continue; however, print quality might be degraded. DRUM LIFE OUT REPLACE The imaging drum has reached the end of its DRUM KIT expected life. (CLJ 4500/4550) ENWW Although printing can continue, the drum kit should be replaced for optimum printer operation. Replace the drum kit. Troubleshooting control-panel messages 69 2 Table 2-13 Alphabetical printer messages (continued) Message Description Action DRUM LIFE OUT REPLACE DRUM KIT (CLJ 8500/8550) The imaging drum is past its 1 Replace the drum kit. specified life or the waste2 Remove the drum toner cartridge in the imaging cartridge from the printer, drum is full. Printing cannot and clean the waste-toner continue until the drum kit has sensor window with a dry been replaced. cloth. 3 Reconnect connector J221 on the controller board, and connectors J631 to J633 and relay connector J71 on the waste-toner sensor. 4 Reconnect connector J209, and relay connectors J47 and J48 on the controller board. 5 Replace the drum cartridge. 6 Replace the waste-toner sensor. DUPLEXER ERROR CHECK An error has occurred in the duplexer. DUPLEXER (CLJ 4500/4550) 70 Chapter 2 – Service and troubleshooting 1 Verify that the duplexer is correctly installed. 2 Verify that the small power cord from the duplexer is plugged into the printer, and the power cord from the AC outlet is plugged into the duplexer. ENWW Table 2-13 Alphabetical printer messages (continued) Message Description Action DUPLEX ERROR CHECK DUPLEXER (CLJ 8500/8550) The printer has detected an error in the duplexer. 1 Open the left lower cover, press the green tab on the right side of the duplexer, and pull the duplexer out of the printer. Check for and remove any jammed media from the duplexer. Reinstall the duplexer. 2 Turn the printer off and on to reset the printer. 3 If the message persists, replace the duplexer. EIO DISK X NOT FUNCTIONAL FOR HELP PRESS The EIO disk in slot X is not working correctly. (CLJ 4600/5500) EIO <N> INITIALIZING An EIO accessory is initializing. Remove the EIO disk from the slot indicated and replace it with a new EIO disk drive. No action is required. <n> = EIO slot number: 1 Bottom EIO slot 2 Top EIO slot EIO <N> NOT FUNCTIONAL (CLJ 8500/8550) An EIO card error exists, but printing can continue. The configuration page will indicate that EIO <n> is not supported. 1 Turn the printer off and on to reset the printer. 2 Replace the offending EIO accessory. <n> = EIO slot number: 1 Bottom EIO slot 2 Top EIO slot EIO X INITIALIZING YYY alternates with The EIO device in slot X is No action is required. initializing. The YYY value increments every 10 seconds during this process. DO NOT POWER OFF ENWW Troubleshooting control-panel messages 71 2 Table 2-13 Alphabetical printer messages (continued) Message Description Action No action is required. EIO X NOT FUNCTIONAL The EIO slot specified does not have a card installed or is (CLJ 4500/4550) not functional. ENGINE TEST The printer is running an internal test to verify operation. When the printer is finished, the printer returns to the ready state but remains offline. FACE UP OUTPUT BIN FULL The top output bin on the multi-bin mailbox is full. Press GO to bring the printer online. 1 Remove all media from the top output bin in the multi-bin mailbox to continue printing. 2 Check the functionality of the Bin Full flag. FLASH DEVICE FAILURE A device failure has occurred 1 Printing can continue for on the specified drive. jobs that do not require the flash DIMM. alternates with 2 To remove this message from the display, turn the printer off and then on. READY FOR MENUS PRESS 3 If the message persists, remove and reinstall the flash DIMM. 4 If the message persists, replace the flash DIMM. FLASH FILE OPERATION FAILED alternates with READY FOR MENUS PRESS 72 The printer received a PJL1 Printing can continue. file system command that 2 Turn the printer off and attempted to perform an then on. illogical operation (for example, to download a file to 3 If the message reappears, there a a non-existent directory). problem may exist with the software program. Chapter 2 – Service and troubleshooting ENWW Table 2-13 Alphabetical printer messages (continued) Message Description FLASH FILE SYSTEM IS FULL The printer received a PJL1 Use HP Web Jetadmin file system command that software to delete files attempted to store something from the flash memory on the file system but was and try again. unsuccessful because the file 2 To remove this message system is full. from the display, turn the printer off and then on. alternates with READY FOR MENUS PRESS FLASH IS WRITE PROTECTED The file system device is protected and no new files can be written to it. alternates with 1 To enable writing to the flash memory, turn off the write protection by using HP Web Jetadmin. 2 To remove this message from the display, turn the printer off and then on. READY FOR MENUS PRESS INCORRECT FUSER LOWER LEFT DOOR Action The printer has detected that 1 Remove the fuser and an incompatible fuser install the fuser specified (possibly the wrong voltage of for use with this printer. fuser for the printer) has been Printing cannot continue installed. until the correct fuser is installed in the printer. 2 Reconnect connector J222 on the controller board and connector J26 on the fuser. 3 Replace the controller board. INCORRECT SUPPLIES FOR STATUS PRESS At least one supply item is incorrectly positioned in the printer and another supply item is missing, incorrectly placed, out, or low. 1 Press SELECT and then press HELP for help. 2 Follow the instructions on the display to locate and replace the incorrect supply. 3 Press UP ARROW and DOWN ARROW to step through the instructions. ENWW Troubleshooting control-panel messages 73 2 Table 2-13 Alphabetical printer messages (continued) Message Description The print cartridge is not installed, not correctly installed in the printer, or not CAUTION being detected by the Press the blue button to cartridge sensor. rotate the carousel to prevent damage to the <Color> = Cyan, magenta, printer. yellow, or black INSTALL <COLOR> (CLJ 8500/8550) Action 1 Insert the cartridge or make sure that the installed cartridge is correctly seated in the printer. Note The color-toner carousel will not rotate unless the following conditions are met: The blue toner lever is locked. The clear door is closed. The imaging drum is installed. The black print cartridge is installed completely, including removing the orange seal from the black print cartridge and swinging the upper (blue) lever to the left. The right upper door is closed. 2 Turn the printer off and on to reset the printer. 3 If the cartridge is installed correctly, check that the sensor PS1901C is functioning correctly. If necessary, replace the sensor. 4 Clean the sensor with a toner wipe. 74 Chapter 2 – Service and troubleshooting ENWW Table 2-13 Alphabetical printer messages (continued) Message INSTALL <COLOR> (CLJ 8500/8550) continued Description Action 5 Reconnect connector J221 on the controller board, and reconnect connector J621 and relay connector J70 on the remaining color-toner sensor. 6 Make sure that the black print cartridge is installed. If cartridge is installed, turn the printer off, reinstall the cartridge, and then turn the printer on. 7 Reconnect connectors J641 and J644 on the main relay PCA, and connector J102 on the power supply. 8 Reconnect connector J227 on the controller board, and connector J647 on the main relay PCA. 9 Check electrical continuity between connector J644-1 (PBK) and J644-2 (PMP) when the door switch (SW644) is turned on. If no electrical continuity exists, replace the black print cartridge on/off switch. 10 Move the upper lever (blue) to the left. Replace the lever if it is cracked. ENWW Troubleshooting control-panel messages 75 2 Table 2-13 Alphabetical printer messages (continued) Message Description Action 11 Replace the black print cartridge if it is deformed or damaged. INSTALL <COLOR> (CLJ 8500/8550) continued 12 Replace the remaining color-toner sensor. 13 Replace the controller board. INSTALL <COLOR> CARTRIDGE The cartridge is either not installed or not correctly installed in the printer. 1 Insert the cartridge or make sure the cartridge is fully seated. alternates with 2 Press HELP for detailed information. FOR HELP PRESS 3 Press UP ARROW and DOWN ARROW to step through the instructions. (CLJ 4600/5500) 4 If the error persists, replace the cartridge. 5 Verify that the connectors between the memory tag antenna, memory controller board, and the DC controller are seated properly. 6 Replace the antenna PCB for the indicated color. 7 Replace the memory controller PCB. 8 Replace the DC controller PCB. Calibrate the printer after replacing the DC controller. See “Calibrate Now (CLJ 4600 and CLJ 5500 only)” on page 193. 76 Chapter 2 – Service and troubleshooting ENWW Table 2-13 Alphabetical printer messages (continued) Message Description Action INSTALL FUSER FOR HELP PRESS The fuser is either not installed or not correctly installed in the printer. 1 Insert the fuser or make sure that the installed fuser is fully seated. 2 Press HELP for detailed information. 3 PRESS UP Arrow and DOWN ARROW to step through the instructions. 4 If the error persists, verify that the connectors J18 (on the fuser) and J1101 (on the DC controller) are good; replace them if necessary. 5 Replace the fuser assembly. 6 Replace the DC controller PCB. Calibrate the printer after replacing the DC controller. See “Calibrate Now (CLJ 4600 and CLJ 5500 only)” on page 193. INSTALL FUSER LOWER LEFT DOOR The printer has detected that 1 Install the fuser and verify the fuser is not installed. that it is working correctly. 2 Reconnect connector J26 on the fuser. 3 Reconnect connector J222 on the controller board. 4 If the message persists, replace the controller board. ENWW Troubleshooting control-panel messages 77 2 Table 2-13 Alphabetical printer messages (continued) Message Description Action INSTALL IMAGING DRUM OPEN FRONT DOOR The printer has detected that 1 Install the imaging drum the imaging drum is not before attempting to print. installed. If the condition persists, take the imaging drum out All doors must be closed for and reinstall it. the printer to detect the Note imaging drum. The imaging drum must be installed and the upper lever must be to the left in order for the carousel to rotate. 2 Turn the printer off and on to reset the printer. 3 Replace the drum cartridge. 4 Replace the drum cartridge if the drum cartridge on/off switch guide is deformed. 5 Make sure that the drum cartridge is installed. Install the drum cartridge if it is not installed. If the drum cartridge is already installed, turn the printer off, reinstall the drum cartridge, and turn the printer on. 78 Chapter 2 – Service and troubleshooting ENWW Table 2-13 Alphabetical printer messages (continued) Message INSTALL IMAGING DRUM OPEN FRONT DOOR continued Description Action 6 Reconnect connectors J641 to J643 and J647 on the main relay PCA, connectors J671 and J673 on the subrelay PCA, connector J102 on the power supply, and connector J227 on the controller board. 7 Check electrical continuity between connector J641-1 (+24 VB) and J642-3 (PMP) on the main relay PCA when the door switch (SW641) is turned on. If there is no electrical continuity, replace the right cover switch on the main relay PCA. 8 Check electrical continuity between connector J671-2 (PMP) and J671-2 (PFUPR) on the subrelay PCA when the door switch (SW671) is turned on. If no electrical continuity exists, replace the delivery cover/front cover switches on the subrelay PCA. 9 Measure the voltage across connector J641-1 (+24 VB) and J641-A1 (GND) on the main relay PCA after the printer is turned on. If the voltage is not 24 V, replace the power supply. ENWW Troubleshooting control-panel messages 79 2 Table 2-13 Alphabetical printer messages (continued) Message Description INSTALL IMAGING DRUM OPEN FRONT DOOR continued Action 10 Measure the voltage across connector J647B11 (+24UH) and J647-4 (GND) on the main relay PCA after the printer is turned on. If the voltage is not 24 V, replace the main relay PCA. 11 Check the drum cartridge on/off switch lever on the printer. Set the lever at the correct position if it is disconnected. Replace the lever if it is cracked. 12 Reconnect connector J209, and reconnect relay connectors J47 and J48 on the controller board. 13 Replace the controller board. 80 Chapter 2 – Service and troubleshooting ENWW Table 2-13 Alphabetical printer messages (continued) Message Description Action INSTALL TRANSFER DRUM OPEN RIGHT DOOR The printer has detected that 1 Install the transfer drum the transfer drum is not before attempting to print. installed. 2 Take the transfer drum out and reinstall it. All doors must be closed for 3 Make sure that the the printer to detect the transfer drum is installed. transfer drum. If the right upper cover interlock is If the transfer drum defeated, this error will occur is not already unless the density sensor is installed, install the covered with paper. transfer drum. If the transfer drum is already installed, turn the printer off, verify that the transfer drum is in the correct position, and turn the printer on again. 4 Reconnect connector J1101 on the density sensor PCA, intermediate connectors J75 and J46, and connector J206 on the controller board. 5 Measure the voltage across connector J704-1 (+24 VAR) and GND on the density sensor PCA after the printer is turned on. If the voltage is not about 24 V, replace the density sensor PCA. 6 Replace the controller board. ENWW Troubleshooting control-panel messages 81 2 Table 2-13 Alphabetical printer messages (continued) Message Description Action INSTALL TRANSFER UNIT FOR HELP PRESS The transfer unit is either not 1 Insert the transfer unit or installed or not correctly make sure the installed installed in the printer. transfer unit is fully seated. 2 Press HELP for detailed information. 3 Press UP ARROW and DOWN ARROW to step through the instructions. 4 If the error persists, verify that the ETB connectors (J36 and J38 on the ETB and J1111 on the DC controller PCB) are good. Replace connectors as necessary. 5 Replace the ETB. 6 Replace the DC controller PCB. Calibrate the printer after replacing the DC controller. See “Calibrate Now (CLJ 4600 and CLJ 5500 only)” on page 193. LOCK TONER LEVER The blue lever inside the clear 1 Open the front door of the door is not locked. printer, open the clear door, and swing the blue toner lock lever on the carousel to the right. 2 Remove the print cartridge, and then reinstall it, making sure the cartridge is all the way in the printer. 3 Swing the blue toner lock lever on the carousel to the left until it clicks, and then close the clear and front doors. 82 Chapter 2 – Service and troubleshooting ENWW Table 2-13 Alphabetical printer messages (continued) Message Description Action MAILBOX COMM ERROR CHECK CABLES CYCLE POWER Communication with the multi-bin mailbox has been lost. 1 Verify that all cables are connected correctly. NON HP CARTRIDGE DETECTED A new cartridge has been installed that is not made by HP. This message continues to appear until an HP cartridge is installed or CANCEL JOB is pressed. If you believe the cartridge is an HP cartridge, please call the HP fraud hotline at 1877-219-3183. 2 Turn the printer off and on to reset the printer. Any printer repair required as a result of using nonHP cartridges is not covered under HP warranty. To continue printing, press CANCEL JOB. The first pending job will be cancelled. NON HP CARTRIDGE IN USE alternates with READY FOR MENUS PRESS OUT OF MEMORY JOB CLEARED The printer has detected that If you believe the cartridge is a non-HP print cartridge is an HP cartridge, please call currently installed. the HP fraud hotline at 1877-219-3183. Any printer repair required as a result of using nonHP cartridges is not covered under HP warranty. The printer personality for the 1 Reprint the job. If the current job could not be run in message persists, turn the available memory. The the printer off and on to job was canceled, and no reset the printer before pages were printed. sending the print job again. 2 Install more printer memory. For more information on printer memory options, see the service manual. ENWW Troubleshooting control-panel messages 83 2 Table 2-13 Alphabetical printer messages (continued) Message Description PCL MEMORY FULL STORED DATA LOST The resource save area for the printer personality is full. Fonts downloaded to the printer RAM might have been deleted. PRESS SELECT TO INITIALIZE DISK The printer hard disk is new or has been formatted for another file system. Action Turn the printer off and on to clear the printer RAM. 1 Press SELECT to reformat the printer hard disk. All data that is currently on the printer hard disk will be lost. 2 If you do not want to initialize the printer hard disk, wait until the message clears (10 seconds) or press GO and the disk will not be initialized. This will render the disk non-functional, but the configuration page will show that the disk is installed. PRESS SELECT TO LOSE DISK DATA PRESS GO KEY TO CANCEL 84 This is a request to confirm 1 If you want to proceed initialization of the printer with initialization, press SELECT. hard disk (see PRESS SELECT TO INITIALIZE 2 If you do not want to DISK above). Initialization will initialize the printer hard perform a high-level check of disk, wait until the the disk. message clears (10 seconds) or press GO and the disk will not be initialized. This will render the disk non-functional, but the configuration page will show that the disk is installed. Chapter 2 – Service and troubleshooting ENWW Table 2-13 Alphabetical printer messages (continued) Message Description Action REINSTALL TRANSFER BELT This message occurs if you 1 Check SW1 to make sure do not have the intermediate it is operating correctly, transfer belt installed in the and make sure the cables printer or if sensor PS5 does are connected. not detect the home position 2 Verify that the ITB is marks (on the ITB). The ITB installed in the printer. must be rotating before PS5 3 If the ITB is installed and is able to detect its “home seated properly, verify positioning” marks. Both the that PS5 is not damaged. ITB and the imaging drum are PS5 is located on the ITB driven by the drum motor assembly. If the sensor (M4). appears to be damaged, replace the ITB assembly. 4 Clean PS5. 5 Check all wiring within the ITB drawer. Note the connection on the ITB assembly (located on the front, lower, left-hand corner of the assembly). When the drawer is closed, the connector “mates” with a receptacle connector on the drawer. Verify that the connector and wiring are in good condition. Make sure that there is no paper in the connector at the base of the drawer. 6 Verify that the drum motor (M4) is rotating the imaging drum and the ITB. Run the drum test from diagnostic mode to verify drive-spindle movement for both the imaging drum and ITB. 7 Verify that the imaging drum connector is seated into the connector J204 of the developing PCB. ENWW Troubleshooting control-panel messages 85 2 Table 2-13 Alphabetical printer messages (continued) Message Description Action REMOVE PAPER TOP OUTPUT BIN The top output bin holds 250 1 Verify that the PS9 sheets of paper. Sensor PS9 sensor flag and arm move along with its sensor flag freely. detects the height of the 2 Verify PS9 is free of dust output paper stack. Perform and debris (top assembly the action items if this cover must be removed to message appears when no access sensor). paper is in the output bin. 3 Verify all connectors are firmly seated. Refer to the wiring diagram. Note PS9 (a three-wire sensor) plugs into a through-wall connector on the printer’s chassis and then into a 14pin wire harness, which plugs into J206 on the developing PCB. All signals from the developing PCB are routed to J201 on the developing PCB to J1017 on the DC controller PCB. RESTORING FACTORY SETTINGS (CLJ 8500/8550) The printer is resetting the printer’s factory defaults. The printer is in the process of completing a cold reset. When the reset is completed, the printer returns to the ready state but remains offline. SELECT LANGUAGE The language selection Select a new language when power-up key sequence has prompted. been entered. The printer will prompt the user to select a new display language once it has completed initialization. 86 Chapter 2 – Service and troubleshooting Reset the EIO type and configure the printer before bringing the printer online. For more information about factory defaults and configuring the printer control panel, see the service manual. ENWW Table 2-13 Alphabetical printer messages (continued) Message Description Action SERVICE MODE The Service Mode power-up key sequence has been entered. The printer remains in Service Mode until you press GO. Press GO to close Service Mode. SIZE MISMATCH TRAY XX=<SIZE> FOR HELP PRESS The tray is loaded with media 1 Adjust the side and rear that is longer or shorter in the media guides against the feed direction than the size paper. that is configured for the tray. 2 If the media used is Letter, Letter-R, A4, A4R, Executive, B5 JIS, B5R, A5, A5-R, A3, 11 by 17, or Legal size, the tray switch should be set to STANDARD. Set the tray switch to CUSTOM for all other media sizes. The tray switch must be set before the size can be selected at the control panel. alternates with READY FOR MENUS PRESS 3 Reset the paper size in the Paper Handling menu. ENWW Troubleshooting control-panel messages 87 2 Table 2-13 Alphabetical printer messages (continued) Message Description Action TONER OUT REPLACE <COLOR> The printer is out of the specified toner and cannot continue. 1 Replace the print cartridge specified. <color> = Cyan, magenta, yellow, or black 2 If the message persists, reconnect connector J226 on the controller board and connector J5001 on high-voltage converter 1 PCA. 3 Check the contact on the black print cartridge and the contact on the printer for damage. Replace defective parts. (Replace the black print cartridge if it is defective.) Check the contacts. If they are disconnected, return them to their correct positions. 4 If the message persists, replace the high-voltage converter 1 PCA. 5 If the message persists, replace the controller board. TOO MANY FILE STORAGE DEVICES REMOVE EITHER DISK 88 The printer can support only one physical printer hard disk and two have been detected. Printing will not be possible until one of the hard disks has been removed. Chapter 2 – Service and troubleshooting Turn the printer off and remove the extra printer hard disk. Note The 8500/8550 DN model comes with a factoryinstalled internal hard disk on the formatter board. ENWW Table 2-13 Alphabetical printer messages (continued) Message Description Action TOP OUTPUT BIN FULL The top (face-down) output bin of the printer is full. 1 Remove all media from the top (face-down) output bin on the printer to continue printing. 2 If the message persists, verify that the PS30, PS10, PS11, and PS3 sensors and the surrounding area are clean. TRAY 1 CONTAINS UNKNOWN MEDIA (CLJ 8500/8550) Media was stacked in tray 1 Configure the media type for for continuous manual feed tray 1 or remove the printing, and the job has been remaining media. completed. However, there is still media in the input tray. The printer considers the input tray not to be configured. TRAY 1 LOAD <TYPE> <SIZE> (CLJ 8500/8550) A user has requested a media Load the media type and size that is not currently size specified on the printer installed in tray 1. control panel display. After tray 1 is loaded, the printer <type> = Last media type automatically brings itself configured for the input tray online. <size> = Last media size configured for the input tray. If the correct media type and size are loaded in tray 1 and the media does not feed into the printer, verify that the printer control panel settings for tray 1 (Cassette mode) match the media type and size requested. ENWW Troubleshooting control-panel messages 89 2 Table 2-13 Alphabetical printer messages (continued) Message Description Action TRAY 1 SIZE = <SIZE> This message appears when 1 Press -VALUE+ to view media is placed in tray 1 and the selections. (CLJ 8500/8550) the tray is configured for 2 Press SELECT when the Cassette Mode. <size> = Last media size configured for the input tray media size and type you want appears. 3 Press GO to bring the printer online. If no key is pressed for 30 seconds after the media is detected in the input tray, the displayed size is automatically selected, the message is cleared, and printing begins. TRAY X EMPTY [TYPE] [SIZE] (CLJ 8500/8550) An input tray not currently selected has run out of media. 1 Load the media type and size specified on the printer control panel display. <x> = Input tray number (2, 3, 2 Replace the upper/lower or 4) cassette lifter (remaining <type> = Last media type paper sensor lever) if it is configured for the input tray damaged. Also, if the lifter <size> = Last media size is out of position, set it in configured for the input tray its correct position. 3 If the message persists, reconnect connector J1201 on the pick-up PCA and connector J210 on the controller board. 4 If the message persists, replace the tray 2 and tray 3 remaining paper sensors 1 and 2. 5 If the message persists, replace the pick-up PCA. 6 If the message persists, replace the controller board. 90 Chapter 2 – Service and troubleshooting ENWW Table 2-13 Alphabetical printer messages (continued) Message Description Action WASTE TONER FULL REPLACE DRUM KIT The waste-toner-full sensor 1 Replace the drum kit. PS13 detects a waste-toner2 Check the sensor, and full condition. A light receiver replace it if it is defective. and light pipe arrangement, along with a window in the drum assembly, look for a waste fill condition. Verify that the sensors and light pipes are not blocked. Numerical error messages The following table contains the numerical error messages for all of the printer models that are covered in this guide. Because different models require different procedures, make sure that you find the exact combination of numbers and words that appears in the error message on the control panel display. Note For error messages pertaining to the CLJ 8500mfp, see “Numbered error codes for the CLJ 8550mfp” on page 154. ENWW Troubleshooting control-panel messages 91 2 Table 2-14 Numerical error messages Message Description Action The printer cannot read or 1 Turn the printer off and write to at least one print then on. cartridge memory tag, or at 2 Exchange the cartridge least one memory tag is for the color indicated (CLJ 4600, CLJ 5500) missing. with a cartridge in another slot to determine XX Description whether the error follows Note 00 memory error on the cartridge or stays The printer cannot supply item with the slot. If the error always determine 10 memory tag missing follows the cartridge, whether the error exists replace that cartridge. in the cartridge or in the YY Description Otherwise, continue with printer reader/writer. 00 black print cartridge step 3. 01 cyan print cartridge 02 magenta print cartridge 3 Reseat the connectors between the memory 03 yellow print cartridge PCB (J602-J605) and the antenna PCBs (J901AD), the memory PCB, and the DC controller PCB (J1028). 10.XX.YY SUPPLIES ERROR FOR HELP PRESS 4 If the message persists, replace the antenna PCB. 5 If the message persists, replace the memory PCB. 6 If the message persists, replace the DC controller PCB. Calibrate the printer after replacing the DC controller. 13.XX JAM ERROR MESSAGES 92 For more information about jam error messages, see “Jams” on page 218. Chapter 2 – Service and troubleshooting ENWW Table 2-14 Numerical error messages (continued) Message Description Action 40 EIO X DATA ERROR A connection with the card in the specified slot has broken. 1 Press SELECT to resume printing. alternates with PRESS GO TO CONTINUE (CLJ 4500) -or40 EIO BAD TRANSMISSION (CLJ 4550) 40 EIO X BAD TRANSMISSION TO CONTINUE PRESS (CLJ 4600, CLJ 5500) Note A loss of data will occur. 2 Check that all cables are connected to the EIO ports and that the EIO board is seated properly. 3 Turn the printer off and on to reset it. 4 If possible, print to another network printer to verify that the network is working properly. 40.X HP EIO ERROR (CLJ 8500/8550) ENWW Troubleshooting control-panel messages 93 2 Table 2-14 Numerical error messages (continued) Message Description Action 41.2 PRINTER ERROR (CLJ 8500/8550) A beam detect laser scanner error has occurred on the previous page. The page will be reprinted and the job will continue. 1 Open and close the front door of the printer to remove any remaining pages from the printer. 2 Turn the printer off and on to reset the printer. 3 Reconnect connector J1001 on the laser driver PCA and connector J205 on the controller board. 4 Reconnect connector J2 on beam detect PCA, relay connector J40, and connector J211 on the controller board. 5 If the problem persists, replace the laser/scanner unit. 6 If, after replacing the laser/scanner unit, the problem persists, replace the controller board. 94 Chapter 2 – Service and troubleshooting ENWW Table 2-14 Numerical error messages (continued) Message Description Action 41.3 UNEXPECTED PAPER SIZE LOAD TRAY 1 [WIDTH] [LENGTH] (CLJ 8500/8550) Tray 1 is configured for a 1 Verify that the correct specific media size, but the media size (width and printer detects a different length) is loaded in size being fed from tray 1. tray 1. For example, the printer was 2 Verify that the paper expecting a letter-sized guides are set correctly. page but detected that a 3 Load the requested size legal-sized page was fed media in tray 1. Or, press instead. GO to print on the default size. 4 Verify that the media width sensor on the paper guides is working properly. 5 Reconnect connector J1701 on the tray 1 width detection PCA, relay connector J33, and connector J208 on the controller board. 6 If the error persists, replace the tray 1 pick-up assembly. 1 Verify that the correct 41.5 UNEXPECTED PAPER A tray is configured for a specific media type, but the media type is loaded in TYPE printer detects that a the input tray and the different media type is printer control panel is alternates with loaded. The most common configured correctly. cause for this error is a jam 2 Clean the detection CHECK PAPER IN TRAY X at registration plate (under windows of OHT sensors (CLJ 4500/4550) the ITB) where the customer 1 and 2. does not remove the paper. The engine tries to check the OHT sensor and receives an error message. ENWW Troubleshooting control-panel messages 95 2 Table 2-14 Numerical error messages (continued) Message 41.5 UNEXPECTED PAPER TYPE LOAD TRAY X [TYPE] [SIZE] (CLJ 8500/8550) Description Action The printer was expecting 1 Open and close the front one type of media to be fed door to remove the page from an input tray and a from the printer. different type was fed. For 2 Verify that the correct example, the printer was media is loaded in the expecting transparencies input tray and the printer and plain paper was fed. control panel is configured correctly. 3 Clean the detection windows of OHT sensors 1 and 2. 4 Reconnect connectors J1801 and J1802 of OHT sensors 1 and 2, connector J214 on the controller board, and relay connector J17. 5 If the error persists, replace OHT sensors 1 and 2. 6 If the error persists, replace the controller board. 41.X PRINTER ERROR FOR HELP PRESS alternates with 41.X PRINTER ERROR TO CONTINUE PRESS (CLJ 4600, CLJ 5500) 96 A printer error has occurred. 1 Press SELECT to continue or press HELP for more information. X Description 1 unknown misprint error 2 beam detect misprint error 3 media feed error (size) 4 no VSYNC error 5 media feed error (type) 6 ETB detection error 7 feed delay error 9 noise VSREQ 2 If the message persists, turn the printer off and then on. Chapter 2 – Service and troubleshooting ENWW Table 2-14 Numerical error messages (continued) Message Description Action 49.ERROR XXXX CYCLE POWER (CLJ 4500/4550) A firmware error occurred that caused the processor on the formatter to abort operation. This type of error can be caused by invalid print commands, corrupt data, or invalid operations. In some cases, electrical noise in the cable can corrupt data during transmission to the printer. Other causes include poorquality parallel cables, poor connections, or home-grown applications. 1 Turn the printer off and on to reset the printer. 2 Verify that all cables are connected. 3 Cancel all print jobs and then resend. Try to isolate any offending print job. 4 Delete the print job from the Windows spooler or from the print server. 5 If the formatter pan assembly or DC controller was removed, Note make sure that the ribbon On rare occasions, when cable between the DC the formatter is at fault, controller and the the error is usually interconnect PCB is indicated by a 79 Service connected. Error. Note The printer control panel reads 49 (FFFF) and the display is dark if the ribbon cable is not connected. (CLJ 4500/ 4550) To verify that the formatter is functioning properly, run the formatter tests that are available in the diagnostics mode. If the formatter passes, the formatter is not defective. Do not replace the formatter. See the note in the Description column for information about the formatter. ENWW Troubleshooting control-panel messages 97 2 Table 2-14 Numerical error messages (continued) Message Description 49.XXXX PRINTER ERROR TO CONTINUE TURN OFF THEN ON (CLJ 4600, CLJ 5500) A critical firmware error has 1 Press CANCEL JOB to occurred that caused the clear the print job from processor on the formatter the printer memory. to abort operation. This type 2 Turn the printer off and of error can be caused by then on. invalid print commands, 3 Try printing a job from a corrupt data, or invalid different software operations. In some cases, application. If the job electrical noise in the cable prints, go back to the first can corrupt data during application and try transmission to the printer. printing a different file. If Other causes include poorthe message appears quality parallel cables, poor only with a certain connections, defective EIO software application or devices, or home-grown print job, contact the applications. software vendor for Note assistance. On rare occasions, when the formatter is at fault, 4 If the message persists with different software the error is usually applications and print indicated by a 79 Service jobs, disconnect all the Error. printer cables that connect it to the network or computer. 49.XXXX ERROR CYCLE POWER (CLJ 8500/8550) Action 5 Turn the printer off. 6 Remove all memory DIMMs or third-party DIMMs from the printer. (Do not remove the firmware DIMM in slot J1.) 7 Remove all EIO devices from the printer. 8 Turn the printer on. 98 Chapter 2 – Service and troubleshooting ENWW Table 2-14 Numerical error messages (continued) Message Description Action 9 If the error no longer exists, install each DIMM and EIO device one at a time, making sure to turn the printer off and then on as you install each device. 49.XXXX PRINTER ERROR TO CONTINUE TURN OFF THEN ON (CLJ 4600, CLJ 5500) 10 Replace a DIMM or EIO device if you determine that it causes the error. 49.XXXX ERROR CYCLE POWER (CLJ 8500/8550) 11 Reconnect all cables that connect the printer to the network or computer. continued 12 If the error persists, replace the firmware DIMM. 13 If the error persists, replace the formatter and calibrate the printer. 49 ADAC OR AFAC (CLJ 4500/4550) The printer is printing a PostScript file using Windows 3.1 or 9x. No action required. 49 FF01 TO FF05 (CLJ 4500/4550) An NEC firmware ROM error has occurred. Replace the firmware. 49 FF02 (CLJ 4500/4550) Unsupported EDO memory Remove unsupported has been installed. memory. 49 04CC (CLJ 4500/4550) Indicates a media timing Print one transparency of issue. This occurs when heavy glossy sheet at a printing multiple copies of time. transparencies or heavy or glossy media with either the PCL or PostScript driver. The message also can indicate a timing mismatch between the engine and formatter. ENWW Troubleshooting control-panel messages 99 2 Table 2-14 Numerical error messages (continued) Message Description Action 49 04E7 (CLJ 4500/4550) Occurs during Resend the print job. decompression of the strip buffers when the end of the strip marker is missing. This is triggered by one of the following: 1) The marker is corrupt; 2) The strip buffer size given to HiLite is too small; 3) The strip buffer size given to HiLite is too large. Note This error is primarily associated with the firmware and should not require a new formatter. 100 Chapter 2 – Service and troubleshooting ENWW Table 2-14 Numerical error messages (continued) Message Description Action 49 04FF (CLJ 4500/4550) A large print job (800 to 1,200 pages) or complex graphics can cause the printer to quit printing. 1 Determine the page that is causing the failure. If the page contains an image, try to move the image down on a portrait page or to the left on a landscape page to move the image out of the strip that is failing. The movements have to be very small so that the next strip will not fail. 2 Put the printer in lossy mode with a sequence of PJL commands: ESC%-12345X@PJL @PJL Default Service mode=HPBOISEID @PJL Default Diagnostics=ON @PJL Enter Language = PCL ESC%-12345X@PJL Esc*z9999P Esc*z50P Esc*z201X To turn off lossy mode use the following commands: ESC%-12345X@PJL @PJL Default Diagnostics=OFF @PJL Default Service Mode=EXIT @PJL EOJ ESC%-12345X@PJL Using the printer in lossy mode might affect performance and print quality. 49 FFFF (CLJ 4500/4550) ENWW An issue reported by the life Replace the formatter. test when replacing the fuser. This error might also occur during the boot cycle. Troubleshooting control-panel messages 101 2 Table 2-14 Numerical error messages (continued) Message Description Action 49FFOX (CLJ 4500/4550) When this error message appears, you can scroll through the printer control panel to obtain all of the error information. No action required. 49 OBOA (CLJ 4500/4550) A request is not understood. Check the command being This error message is sent; the I/O card might not generated when the I/O card support a particular feature. does not support a command that was sent to it. 49 OB22 (CLJ 4500/4550) This error message is Verify the action being sent. generated when the I/O card receives a control panel menu action that it does not recognize. 50.X FUSER ERROR (CLJ 4500/4550) A fuser error has occurred. X Description 1 low temperature error 2 fuser warm-up service 3 high fuser temperature 4 faulty fuser 5 fuser voltage mismatch (verify that you have not installed a 110 V fuser in a 220 V printer or vice-versa). 6 fuser heater cutoff 7 fuser motor malfunction (see recommended action for 50.7 Fuser error) 102 Chapter 2 – Service and troubleshooting Note Closely inspect the mechanical linkage. The gears along the gear drive path can bind the gears, which will prevent M1 from rotating. ENWW Table 2-14 Numerical error messages (continued) Message Description Action 50.X FUSER ERROR FOR HELP PRESS (CLJ 4600, CLJ 5500) A fuser error has occurred. 1 Turn the printer off and allow it to cool down. X 1 2 3 4 5 6 2 Reinstall the fuser, and check the connector J4034 that connects the fuser and the printer. Replace the connector if it is damaged. Description low fuser temperature fuser warmup service high fuser temperature faulty fuser inconsistent fuser open fuser 3 Turn the printer off and remove the fuser. Measure the resistance between the connector pins on the fuser. If resistance does not meet the following guidelines, replace the fuser. J4034-5 to J4034-6: 300 to 500 KOhms J4034-1 to J4034-2: less than 1 KOhm 4 Check for continuity between connector pins J4034-4 and J4034-2. If no continuity exists, replace the fuser. 5 If the error persists, replace the fuser powersupply PCB. 6 If the error persists, replace the DC controller PCB. Calibrate the printer after replacing the DC controller. ENWW Troubleshooting control-panel messages 103 2 Table 2-14 Numerical error messages (continued) Message Description Action 50.1 FUSER ERROR CYCLE POWER (CLJ 8500/8550) A low-temperature error has 1 Verify that the fuser is occurred in the fuser. completely seated inside the printer. 2 Turn the printer off and on to reset the printer. 3 If the error persists, turn the printer off and remove the fuser. Measure the resistance across fuser connectors J26F-A4 (FXTHU) and J26F-A3 (GND). If it is not in the range of 250 kOhms to 600 kOhms (room temperature), check the wiring from the connector J222 on the controller board up to the upper thermistor. If the wiring is normal, replace the fuser kit. 4 If the error persists, reconnect connector J222 on the controller board and connector J26 on the fuser. 5 If the error persists, replace the fuser kit. 6 If the error persists, replace the power supply. 104 Chapter 2 – Service and troubleshooting ENWW Table 2-14 Numerical error messages (continued) Message Description Action 50.2 FUSER ERROR CYCLE POWER (CLJ 8500/8550) A warm-up error has occurred in the fuser. 1 Turn the printer off and on to reset the printer. 2 Verify that the fuser is completely seated inside the printer. 3 Check for media jams in the fuser. 4 If the error persists, replace the fuser kit. 50.3 FUSER ERROR CYCLE POWER (CLJ 8500/8550) A high-temperature error 1 Turn the printer off and has occurred in the fuser. then on to reset the The controller board saves printer. this error through an 2 Turn the printer off and electrical charge in capacitor unplug it. Place a flat C259. blade of a screwdriver between the two wires of C259 to short out the capacitor and clear the memory. 3 If the error persists, replace the fuser kit. 4 If the error persists, replace the power supply. 5 If the error persists, replace the controller board. ENWW Troubleshooting control-panel messages 105 2 Table 2-14 Numerical error messages (continued) Message Description Action 50.4 FUSER ERROR CYCLE POWER (CLJ 8500/8550) A fuser drive or power unit error has occurred in the fuser. 1 Turn the printer off and on to reset the printer. 2 Verify that the fuser is completely seated inside the printer. 3 If the error persists, replace the fuser kit. 4 If the error persists, replace the power supply. 5 If the error persists, replace the controller board. 50.6 FUSER ERROR CYCLE POWER (CLJ 8500/8550) A heater error has occurred 1 Turn the printer off and in the fuser. on to reset the printer. 2 Verify that the fuser is completely seated inside the printer. 3 Reconnect connector J222 on the controller board, connector J26 on the fuser, and connector J101 on the power supply. 4 If the error persists, replace the fuser kit. 5 If the error persists, replace the power supply. 6 If the error persists, replace the controller board. 106 Chapter 2 – Service and troubleshooting ENWW Table 2-14 Numerical error messages (continued) Message Description Action 50.7 FUSER ERROR (CLJ 4500/4550) The fusing motor (M1) 1 Turn the printer off and drives the fusing assembly, on to reset the printer. the paper transport (web) 2 Remove the left-side assembly, the ITB lift cover of the printer. mechanism, the transfer Verify that the fusing roller, the transfer roller lift motor (M1) connector is mechanism, and the faceseated firmly into J102 of down output delivery drive the feed PCB. assembly. A 50.7 fuser error appears when PS6 detects 3 Ensure that the connector at J110 of the no motion within the fuser. feed PCB is firmly seated Photosensor PS6 is the (this connector contains fusing-unit pressure switch. the wiring for PS6, which provides fuser-motion feedback). Note Closely inspect the mechanical linkage. The gears along the gear drive path can bind the gears, which will prevent M1 from rotating. 4 If the error persists, observe the drive shaft of M1 while turning on the printer. If this shaft does not rotate, the failure is related to the motor drive circuitry. Refer to the printer wiring diagram to verify that connectors J102 and J106 of the feed PCB are firmly seated. If the error persists, replace the fusing motor and the feed PCB in sequence. ENWW Troubleshooting control-panel messages 107 2 Table 2-14 Numerical error messages (continued) Message Description Action 5 If the shaft rotates (both forward and reverse) and the 50.7 fuser error appears, the cause of the error is related to the motion feedback circuitry. 50.7 FUSER ERROR (CLJ 4500/4550) continued 6 Remove the fusing assembly and verify that the sensor flag is in good condition and functional. 7 Verify that the connector at sensor PS6 is firmly seated. 8 Clean the sensor. 9 If the error persists, replace sensor PS6. 51 LASER ERROR (CLJ 4500) A beam detect error or laser 1 Turn the printer off and failure has occurred. on to reset the printer. -or51.X PRINTER ERROR (CLJ 4550) 2 Verify that connectors J1102 on the laser driver PCB and J1008 on the DC controller are seated properly. 3 Verify that connectors J551 on the beam detect PCB and J1006 on the DC controller are seated correctly. 4 If the error persists, replace the laser/scanner unit. 108 Chapter 2 – Service and troubleshooting ENWW Table 2-14 Numerical error messages (continued) Message Description Action 51 LASER ERROR CYCLE POWER (CLJ 8500/8550) A beam detect error or laser 1 Turn the printer off and failure has occurred. on to reset the printer. 2 Reconnect connector J1001 on the laser driver PCA and connector J205 on the controller board. 3 Reconnect connector J2 on the beam detect PCA, relay connector J40, and connector J211 on the controller board. 4 If the error persists, replace the laser/scanner unit. 5 If the error persists, replace the controller board. 51.XY PRINTER ERROR FOR HELP PRESS alternates with 51.XY PRINTER ERROR TO CONTINUE TURN OFF THEN ON (CLJ 4600, CLJ 5500) A printer error has occurred. 1 Press SELECT to continue. X Description 2 Turn the printer off and 1 beam detect error then on. 2 laser error 3 Reseat the connectors between the laser/ Y Description scanner and DC 0 no color controller PCB (J1009 K black J1012). C cyan M magenta 4 Replace the laser/ Y yellow scanner assembly if it is defective. Calibrate the printer after replacing the laser/scanner. See “Calibrate Now (CLJ 4600 and CLJ 5500 only)” on page 193. 5 If the error persists, replace the DC controller PCB. Calibrate the printer after replacing the DC controller. ENWW Troubleshooting control-panel messages 109 2 Table 2-14 Numerical error messages (continued) Message Description Action 52 SCANNER ERROR (CLJ 4550) A scanner error has occurred. 1 Turn the printer off and on to reset the printer. 2 Verify connectors J551 on the beam detect PCB, J1103 on the scanner motor, and J1006 on the DC controller are fully seated and connected correctly. -or52 PRINTER ERROR (CLJ 4550) 3 If the error persists, replace the laser/scanner unit. 52 SCANNER ERROR CYCLE POWER (CLJ 8500/8550) A scanner error has occurred. 1 Turn the printer off and on to reset the printer. 2 Reconnect connector J901 on the scanner motor PCA, relay connector J40, and connector J211 on the controller board. 3 Measure the voltage across connector J647B11 (+24UH) and J647-4 (GND) on the main relay PCA after the printer is turned on. If the voltage is not 24 V, replace the power supply. 4 Measure the voltage across connector J211-7 (SCND) and J211-6 (GND) on the controller board after the printer is turned on. If the voltage changes from 0 V to 17 V or more, replace the laser/scanner unit. 5 If the error persists, replace the controller board. 110 Chapter 2 – Service and troubleshooting ENWW Table 2-14 Numerical error messages (continued) Message Description 52.XY PRINTER ERROR FOR HELP PRESS A printer error has occurred. 1 Press SELECT to continue. X Description (CLJ 4600) 2 Turn the printer off and 1 scanner error then on. 2 scanner startup error 3 Reseat the connectors 3 scanner rotation error between the laser/ scanner and DC Y Description controller PCB (J1009 0 no color J1012). K black C cyan 4 Replace the laser/ M magenta scanner assembly if it is Y yellow defective. Calibrate the alternates with 52.XY PRINTER ERROR TO CONTINUE TURN OFF THEN ON (CLJ 4600, CLJ 5500) Action printer after replacing the laser/scanner. See “Calibrate Now (CLJ 4600 and CLJ 5500 only)” on page 193. 5 If the error persists, replace the DC controller PCB. Calibrate the printer after replacing the DC controller. 53.X0.ZZ PRINTER ERROR TO CONTINUE TURN OFF THEN ON (CLJ 4600, CLJ 5500) ENWW An error has occurred in the 1 Press SELECT to onboard RAM. continue. 2 Turn the printer off and then on. Troubleshooting control-panel messages 111 2 Table 2-14 Numerical error messages (continued) Message Description 53.XY.ZZ PRINTER ERROR (CLJ 4500/4550) A memory error has 1 Verify that the DIMM is occurred. If a DIMM caused installed correctly. the error, the DIMM will not 2 Turn the printer off and be recognized (configured). then on to reset the printer. X = Memory Type 3 Remove and replace the 0 ROM (CLJ 4500/4550) DIMM that caused the 1 RAM error. 2 font DIMM (CLJ 8550 53.XY.ZZ PRINTER ERROR TO CONTINUE PRESS CANCEL JOB (CLJ 4600, CLJ 5500) 53.XY.ZZ ERROR DIMM SLOT N (CLJ 8500/8550) Action only) Y = Device Location 0 onboard (CLJ 4500/4550) 1 DIMM slot 1 2 DIMM slot 2 3 DIMM slot 3 4 DIMM slot 4 (CLJ 4600, CLJ 5500, CLJ 8500/8550) 5 DIMM slot 5 (CLJ 8500/ 8550) 6 DIMM slot 6 (CLJ 8500/ 8550) 7 DIMM slot 7 (CLJ 8500/ 8550) 8 DIMM slot 8 (CLJ 8500/ 8550) ZZ = Error Number 00 unsupported memory 01 unrecognized memory 02 unsupported memory size (CLJ 4600, CLJ 5500, CLJ 8500/8550) 03 failed RAM test 04 exceeded maximum RAM size (CLJ 4600, CLJ 5500, CLJ 8500/8550) 112 Chapter 2 – Service and troubleshooting ENWW Table 2-14 Numerical error messages (continued) Message Description 53.XY.ZZ PRINTER ERROR (CLJ 4500/4550) 05 invalid DIMM speed (CLJ 4600, CLJ 5500) 05 exceeded maximum ROM size (CLJ 8500/8550) 06 invalid DIMM speed; check DRAM (CLJ 8500/ 8550) 07 DIMM is reporting incorrect checksum (CLJ 8500/8550) 10 DIMM address (CLJ 8500/8550) 11 PDC XROM out of bounds (CLJ 8500/8550) 12 could not make temporary mapping (CLJ 8500/8550) 13 invalid RAM type (CLJ 8500/8550) 14 DIMM not paired properly (CLJ 8500/8550) 15 bad firmware upgrade DIMM checksum (CLJ 8500/ 8550) 16 more than one set of firmware upgrade DIMMs (CLJ 8500/8550) 17 not enough DRAM to run (CLJ 8500/8550) 53.XY.ZZ PRINTER ERROR TO CONTINUE PRESS CANCEL JOB (CLJ 4600, CLJ 5500) 53.XY.ZZ ERROR DIMM SLOT N (CLJ 8500/8550) continued Action 2 N = EIO slot number (CLJ 8500/8550) 1 bottom EIO slot 2 top EIO slot 53.10.05 PRINTER ERROR TO CONTINUE TURN OFF THEN ON (CLJ 4600, CLJ 5500) ENWW A DIMM is installed in both 168-pin DIMM Slot 4 and 100-pin DIMM Slot 5. Remove one of the DIMMs, or move one of the DIMMs to a different slot. This is an invalid configuration. DIMMs cannot be installed in both of these slots at the same time. Troubleshooting control-panel messages 113 Table 2-14 Numerical error messages (continued) Message Description Action 54.1 PRINTER ERROR (CLJ 4500/4550) An internal power failure has 1 Turn the printer off and occurred. then turn it on. 2 If the error persists, replace the high-voltage power supply. 3 Check the fuser to make sure that no jams are present. CAUTION 54.1 errors can be caused by damaging the thermistor while clearing fuser jams. 4 Make sure that no fluctuation in the power supply to the printer is occurring. Check that the electrical specifications are met. 5 If the error persists, replace the low-voltage power supply. 54.1 TEMPERATURE SENSOR ERROR CYCLE POWER (CLJ 8500/8550) The temperature/humidity sensor in the printer has malfunctioned. The temperature/humidity sensor is located below tray 2. 1 Reconnect connector J801 and relay connector J55 on the temperature/ humidity sensor, and connector J206 on the controller board. 2 If the error persists, replace the cassette cross member assembly, which includes the temperature/humidity sensor. 3 If the error persists, replace the controller board. 114 Chapter 2 – Service and troubleshooting ENWW Table 2-14 Numerical error messages (continued) Message Description Action 54.2 PRINTER ERROR (CLJ 4500/4550) A problem exists with the carousel assembly. Either the carousel is not rotating or the sensor has failed. Drive motor (M3) provides drive for the print cartridge carousel. If motion is not detected, a 54.2 error appears. M3 is a 6-phase stepping motor and receives its drive signal from J203 of the developing PCB. Photosensor PS10 monitors “movement” (and the position) of the print cartridge carousel. Different width tabs (four tabs, one for each cartridge) on the leftend of the carousel housing pass through PS10 to provide positioning information. The black print cartridge tab is the home position. Print cartridge position within the carousel is monitored by PS11. If PS11 fails or is improperly connected, a 54.2 error appears. Another indicator of this is that the carousel starts to rotate then stops immediately. A 54.2 error message can also occur if the sensor is installed backwards. 1 Turn the printer off and then on to reset the printer. ENWW 2 Open the color print cartridge door and look for an obstruction. If necessary, remove the print cartridges individually by manually releasing the carousel brake and rotating the carousel around to each cartidge position and removing the cartridges. Turn the printer off and on to reset the printer. Note The printer cannot operate with the top cover removed unless the carousel brake has been released or removed. 3 Verify that the carousel drive motor wiring harness is firmly seated into connector J203 of the developing PCB. 4 Verify that PS10 is working correctly and not excessively dirty (clean if necessary) and that the wiring harness is firmly seated into both the sensor assembly and connector J206 of the developing PCB. Troubleshooting control-panel messages 115 2 Table 2-14 Numerical error messages (continued) Message Description 54.2 PRINTER ERROR (CLJ 4500/4550) continued Action 5 Verify that PS11 is connected and functioning properly. 6 Verify that all connectors to the developing PCB and the DC controller PCB are firmly seated. 7 Verify that the rotary drive assembly is working. Replace it on older units that have more than 50K of life. The following URL provides help with cartridge installation and removal: http://www.hp.com/go/ ljsupplies. 116 Chapter 2 – Service and troubleshooting ENWW Table 2-14 Numerical error messages (continued) Message Description Action 54.2 CAROUSEL ERROR CYCLE POWER (CLJ 8500/8550) The print cartridge carousel 1 is not working correctly. This could be caused by an 2 obstruction in the carousel path, such as a loose shutter or disengaged print cartridge. In very rare circumstances, this error can be caused by a broken gear on the rear of the carousel assembly or a broken position flag on the carousel gear. ENWW Turn the printer off and on to reset the printer. Open the carousel door and waste toner tray. Look for an obstruction, such as a print cartridge shutter catching on the waste toner tray. Verify that the toner lock lever is fully locked. If the message does not clear after closing the doors, turn the printer off and on to reset the printer. 3 Clean the carousel position sensor (PS3) by using compressed air. If the problem persists, replace the sensor. 4 Reconnect connector J701 on carousel motor PCA; connectors J641, J642, J644, and J648 on the main relay PCA; connector J672 on the subrelay PCA; and connector J102 on the power supply. 5 Check operation of the carousel stopper arm. Replace the carousel stopper solenoid if necessary. 6 If the error persists, replace the carousel motor (M1). 7 If the error persists, replace the controller board. Troubleshooting control-panel messages 117 2 Table 2-14 Numerical error messages (continued) Message Description 54.2 CAROUSEL ERROR CYCLE POWER (CLJ 8500/8550) continued Action 8 Check the electrical continuity between connector J641-1 (+24 VB) and J642-3 (PMP) on the main relay PCA when the door switch (SW641) is turned on. If no electrical continuity exists, replace the main relay PCA. 9 Check the electrical continuity between connector J644-1 (PBK) and J644-2 (PMP) on the main relay PCA when the door switch (SW644) is turned on. If no electrical continuity exists, replace the black print cartridge on/off switch. 10 Check the electrical continuity between connector J642-1 (PYMC) and J642-2 (PBK) on the subrelay PCA when the door switch (SW673) is turned on. If no electrical continuity exists, replace the print cartridge cover switch in the subrelay PCA. 118 Chapter 2 – Service and troubleshooting ENWW Table 2-14 Numerical error messages (continued) Message 54.2 CAROUSEL ERROR CYCLE POWER (CLJ 8500/8550) continued Description Action 11 Check electrical continuity between connector J642-1 (PYMC) and J648-1 (+24 VAR) on the main relay PCA when the door switch (SW642) is turned on. If no electrical continuity exists, replace the main relay PCA. 12 Measure the voltage across connector J6481 (+24 VAR) and J6483 (GND) on the main relay PCA after the printer is turned on. If the voltage is not 24 V, replace the main relay PCA. 13 Reconnect connectors J704 and J706 on the carousel motor PCA, and connector J220 on the controller board. 14 Reconnect connector J43 on the carousel position sensor, and reconnect relay connector J42 and connector J207 on the controller board. 15 Measure the voltage across connector J220A6 (RLSROT) and J220-B5 (GND) on the controller board after the printer is turned on. If the voltage changes to about 3.5 V from 0 V, replace the carousel motor PCA. ENWW Troubleshooting control-panel messages 119 2 Table 2-14 Numerical error messages (continued) Message Description Action 54.3 PRINTER ERROR (CLJ 4500/4550) The printer is not receiving 1 Verify that the data back from the density densitometer is clean; sensor (PS14) located in the perform the toner density bottom of the imaging drum sensor cleaning drawer. procedure in chapter 7 of the online user guide. 2 Inspect the density sensor wiring harness for damage. The harness runs from the density sensor through the leftside upper control arm of the imaging drum drawer to J1010 of the DC controller PCB. Verify that the cable is firmly seated into the J1010 of the DC controller PCB. 3 If the error persists, replace the density sensor assembly. 54.3 CALIBRATION WARNING PRESS GO TO CONTINUE (CLJ 8500/8550) The process marks in the density sensing pattern are corrupted. 1 Press GO. 2 Print a configuration page and troubleshoot the error as an imagequality problem. 3 Check the transfer guide for cracks and replace the transfer guide as needed. 54.4 PRINTER ERROR (CLJ 4500/4550) The optional equipment is not recognized. 54.4 WASTE TONER SENSOR ERROR CYCLE POWER (CLJ 8500/8550) The waste-toner sensor has 1 Replace the waste-toner failed. Printing cannot sensor assembly. continue. 2 Replace the imaging drum. 120 Chapter 2 – Service and troubleshooting Turn the printer off and then on to reset the printer. ENWW Table 2-14 Numerical error messages (continued) Message Description Action 54.5 PRINTER ERROR (CLJ 4500/4550) A waste-toner sensor has malfunctioned. 1 Turn the printer off and then on to reset the printer. 2 Remove the drum cartridge and clean the waste toner detection window by using a dry cloth. 3 Clean the waste toner sensor unit at the printer side by using a dry cloth. 4 Check the light guide and clean it if necessary. Replace the light guide if the ends are scarred. 5 Reconnect the wastetoner sensor unit connector and the DC controller PCB connector (J1009) correctly. 6 If the error persists, replace the waste-toner sensor (PS13). ENWW Troubleshooting control-panel messages 121 2 Table 2-14 Numerical error messages (continued) Message Description Action 54.6 PRINTER ERROR (CLJ 4500/4550) The OHT sensor has 1 Remove the ITB and reported an error condition. verify that the OHT This can be caused by sensor prism is in place. contamination in the 2 Lift the registration flap connectors, a blocked and verify that the OHT sensor, or a defective sensor is not blocked. sensor. 3 Remove the ITB drawer and inspect the drawer connectors for contamination such as a piece of paper. 4 If the error persists, verify that all connectors are firmly seated. 5 If the error persists, replace the sensor. 6 If the error persists, replace the ITB drawer. 122 Chapter 2 – Service and troubleshooting ENWW Table 2-14 Numerical error messages (continued) Message Description Action 54.X PRINTER ERROR (CLJ 4600, CLJ 5500) X 1 2 3 5 6 7 8 Turn the printer off and then on, and then check items in the order listed. Check the indicated sensor. 54.1 error Check the fuser. See 50.X Fuser error. 54.3 error Check the connections. Replace the color registration detection assembly if necessary. 54.5 error Check the connections. Replace the color registration detection assembly if necessary. 54.6 error Check the connections. Replace the color registration detection assembly if necessary. 54.7, 54.8, 54.9, or 54.10 error Check the connections. Replace the drum phase sensor for the indicated color if necessary. 54.11, 54.12, 54.13, or 54.14 error Check the connections. Check the cartridge and replace it if necessary. Replace the color registration detection assembly if necessary. 54.19 error Check the ETB connection. Replace the ETB, if necessary. Replace the DC controller if necessary. ENWW Description temperature carousel rotation error Dmax density sensor CPR sensor OHT sensor yellow drum phase sensor magenta drum phase sensor 9 cyan drum phase sensor 10 black drum phase sensor 11 yellow density sensor 12 magenta density sensor 13 cyan density sensor 14 black density sensor 15 yellow CPR sensor 16 magenta CPR sensor 17 cyan CPR sensor 18 Black CPR sensor 19 ETB speed control sensor 20 CPR sensor 21 yellow toner remaining sensor 22 magenta toner remaining sensor 23 cyan toner remaining sensor 24 black toner remaining sensor 25 top sensor Troubleshooting control-panel messages 123 2 Table 2-14 Numerical error messages (continued) Message Description Action 54.X PRINTER ERROR (CLJ 4600, CLJ 5500) continued 54.20 error Check the connection. Replace the color registration detection assembly. 54.21, 54.22, 54.23, or 54.24 error Check the connections. Replace the toner level sensing PCB if necessary. Replace the DC controller if necessary. 55 DC CONTROLLER ERROR The print engine is not communicating with the (CLJ 4500/4550) 1 Turn the printer off and on to reset the printer. 55.X PRINTER ERROR FOR HELP PRESS alternates with formatter. The 2 Reseat the connectors communication link between between the formatter the formatter and DC and DC controller. controller was lost. This can 3 If the problem persists, occur because of a timing replace the DC controller error or intermittent PCB. Calibrate the connection between the printer after replacing the formatter and DC controller. DC controller. 55.X PRINTER ERROR TO CONTINUE PRESS (CLJ 4600, CLJ 5500) 4 Replace the formatter if necessary. Initialize NVRAM. 55 PRINTER ERROR CYCLE POWER (CLJ 8500/8550) Indicates a printer command 1 Turn the printer off and error. The commands on to reset the printer. cannot be exchanged 2 Verify that the controller between the printer and its board is fully seated. controller. 56.1 ERROR CYCLE POWER (CLJ 8500/8550) An input feed error (such as 1 If the input tray you are requesting to feed trying to print from is not transparencies through the installed, install the input duplexer) has occurred, or tray. the input tray is not installed. 2 Turn the printer off and on to reset the printer. 124 Chapter 2 – Service and troubleshooting ENWW Table 2-14 Numerical error messages (continued) Message Description 56.2 ERROR CYCLE POWER (CLJ 8500/8550) An illegal output error has 1 Open the printer and occurred. For example, the remove media from the multi-bin mailbox is not paper path. installed and it was selected 2 Verify that the media type as the output destination, or is set in the printer transparencies are present control panel. in the duplexer. 3 Turn the printer off and on to reset the printer. 57.1 FAN FAILURE (CLJ 4500/4550) Action The printer detected that the 1 Turn the printer off and fan (an exhaust fan located on to reset the printer. in the upper, left rear corner Visually check to see if of the printer) is not rotating. the fan is rotating (if you This fan operates off cannot see any rotation, +24 Vdc and is controlled by place your hand over the the DC controller PCB outlet vents to feel microprocessor. whether exhaust air is moving). 2 Remove the printer’s leftside cover. Check to see if anything is preventing the fan from rotating freely. 3 Verify that the fan’s connector is firmly seated into connector J208 of the developing PCB. 4 If the error persists, replace the fan. ENWW Troubleshooting control-panel messages 125 2 Table 2-14 Numerical error messages (continued) Message Description Action 57.1 FAN FAILURE (CLJ 8500/8550) Fan 1 (FM1) has failed or is CAUTION obstructed. Turn the printer off and do not operate the printer in this condition to prevent serious damage. 1 Turn the printer off and on to reset it. 2 Reconnect connectors J702 and J706 on the carousel motor PCA, and connector J220 on the controller board. 3 Reconnect connector J701 on the carousel motor PCA, connectors J648 and J641 on the main relay PCA, and connector J102 on the DC power supply. 4 Measure the voltage across J702-3 (FAN1ON) and J701-2 (GND) on the carousel motor PCA after the printer is turned on. If the voltage changes from 0 V to 24 V, replace fan 1. 5 Measure the voltage across connector J701-1 (+24 VB) and J701-2 (GND) on the carousel motor PCA after the printer is turned on. If the voltage is about 24 V, replace the carousel motor. 126 Chapter 2 – Service and troubleshooting ENWW Table 2-14 Numerical error messages (continued) Message 57.1 FAN FAILURE (CLJ 8500/8550) continued Description Action 6 Measure the voltage across connector J641-1 (+24 VB) and J641-4 (GND) on the main relay PCA after the printer is turned on. If the voltage is not 24 V, replace the main relay PCA. 7 Check the ac power supply. 8 If the problem is not corrected after the printer is turned off and on again, find the cause of activation of the overcurrent/overvoltage detection circuit in the power supply. Wait more than two minutes before turning the power on again. 9 If the error persists, replace the power supply. ENWW Troubleshooting control-panel messages 127 2 Table 2-14 Numerical error messages (continued) Message Description Action 57.2 FAN FAILURE (CLJ 4500/4550) The printer detected that the 1 Turn the printer off and fan (an exhaust fan located on to reset the printer. in the upper, right rear Visually check to see if corner of the printer) is not the fan is rotating (if you rotating. This fan, operates cannot see any rotation, off +24 Vdc and is enabled place your hand over the by the DC controller PCB outlet vents to feel micro-processor. whether exhaust air is moving). 2 Remove the printer’s leftside cover. Check to see if anything is preventing the fan from rotating freely. 3 Verify that the fan’s connector is firmly seated into connector J208 of the developing PCB. 4 If the error persists, replace the fan. 128 Chapter 2 – Service and troubleshooting ENWW Table 2-14 Numerical error messages (continued) Message Description Action 57.2 FAN FAILURE (CLJ 8500/8550) Fan 2 (FM 2) has failed or is CAUTION obstructed. Turn the printer off and do not operate the printer in this condition to prevent serious damage. 1 Turn the printer off and on to reset it. 2 Reconnect connectors J703 and J706 on the carousel motor PCA, and reconnect connector J220 on the controller board. 3 Reconnect connector J701 on the carousel motor PCA, connector J648 on the main relay PCA, and connector J102 on the DC power supply. 4 Measure the voltage across connector J703-3 (FAN2ON) and J703-1 (GND) on the carousel motor PCA after the printer is turned on. If the voltage changes from 0 V to 24 V, replace fan 2. 5 Measure the voltage across connector J701-1 (+24 VB) and J701-2 (GND) on the carousel motor PCA after the printer is turned on. If the voltage is about 24 V, replace the carousel motor. ENWW Troubleshooting control-panel messages 129 2 Table 2-14 Numerical error messages (continued) Message Description 57.2 FAN FAILURE (CLJ 8500/8550) continued Action 6 Measure the voltage across connector J641-1 (+24 VB) and J641-4 (GND) on the main relay PCA after the printer is turned on. If the voltage is 24 V, replace the main relay PCA. 7 Check the ac power supply. 8 If the problem is not corrected after the printer is turned off and on again, find the cause of activation of the overcurrent/overvoltage detection circuit in the power supply. Wait more than two minutes before turning the printer on again. 9 If the error persists, replace the power supply. 130 Chapter 2 – Service and troubleshooting ENWW Table 2-14 Numerical error messages (continued) Message Description 57.3 FAN ERROR The intake fan is located in 1 Turn the printer off and the front, center of the drum then on to reset the drawer. (The drum drawer is printer. Because the fan referred to as the upper front is difficult to see, listen to drawer for end users.) Fan hear if the fan is rotating. rotation stops when the 2 Verify that FM3 drawer is opened. A fan connector 27 is not error message appears damaged or broken. when fan motion is not Verify that the fan detected by the DC connector is firmly seated controller’s micro-processor into connector J1022 of if the drawer is closed and the DC controller PCB. the printer is not in 3 Verify that the fan PowerSave mode. connector is firmly seated into connector J1022 of the DC controller PCB. alternates with CLOSE UPPER FRONT DRAWER (CLJ 4500/4550) Action 4 If the error persists, replace the fan. ENWW Troubleshooting control-panel messages 131 2 Table 2-14 Numerical error messages (continued) Message Description Action 57.3 FAN FAILURE (CLJ 8500/8550) Fan 3 (FM 3) has failed or is CAUTION obstructed. Turn the printer off and do not operate the printer in this condition to prevent serious damage. 1 Turn the printer off and on to reset it. 2 Reconnect connectors J645 and J647 on the main relay PCA, J18 and J74 relay connectors, and connector J227 on the controller board. 3 Reconnect connector J641 on the main relay PCA, and connector J102 on the power supply. 4 Measure the voltage across J645-3 (FAN3ON) and J645-1 (GND) on the main relay PCA after the printer is turned on. If the voltage changes from 0 V to 24 V, replace fan 3. 5 Measure the voltage across connector J641-1 (+24 VB) and J641-4 (GND) on the main relay PCA after the printer is turned on. If the voltage is not 24 V, replace the main relay PCA. 6 If the error persists, replace the controller board. 132 Chapter 2 – Service and troubleshooting ENWW Table 2-14 Numerical error messages (continued) Message 57.3 FAN FAILURE (CLJ 8500/8550) continued Description Action 7 Measure the voltage across connector J641-1 (-24 VB) and J641-4 (GND) on the main relay PCA after the printer is turned on. If the voltage is not 24 V, replace the main relay PCA. 8 Check the ac power supply. 9 If the problem is not corrected after the printer is turned off and on again, find the cause of activation of the overcurrent/overvoltage detection circuit in the power supply. Wait more than two minutes before turning the printer on again. ENWW Troubleshooting control-panel messages 133 2 Table 2-14 Numerical error messages (continued) Message Description Action 57.X PRINTER ERROR TO CONTINUE TURN OFF THEN ON (CLJ 4600) A printer fan error has occurred. Turn the printer off and then on. 57.3 Cartridge fan (F2) X Description 1 Reconnect the connector 3 cartridge fan (vertical fan, J1004 on the DC F2) controller PCB. 4 formatter fan (horizontal 2 Immediately after starting fan, F1) the print operation, measure the voltage between pins 1 and 3 on the J1004 connector. If the voltage changes from 0 V to12 V or 24 V, replace the cartridge fan. 3 If the error persists, replace the DC controller PCB. Calibrate the printer after replacing the DC controller. 57.4 Formatter fan (F1) 1 Reconnect the connector J1003 on the DC controller PCB. 2 Immediately after turning the printer on, measure the voltage between pins 1 and 3 on the J1004 connector. If the voltage changes from 0 V to 24 V, replace the formatter fan. 3 If the error persists, replace the DC controller PCB. Calibrate the printer after replacing the DC controller. 134 Chapter 2 – Service and troubleshooting ENWW Table 2-14 Numerical error messages (continued) Message Description Action 57.X PRINTER ERROR TO CONTINUE TURN OFF THEN ON (CLJ 5500) X Description 3 cartridge fan (vertical fan, FM3) 4 formatter fan (horizontal fan, FM2) 7 power supply fan (FM1) Turn the printer off and then on. 57.3 Cartridge fan (FM3) 1 Reconnect the connectors J10 for the cartridge fan and J1102 on the DC controller PCB. 2 Immediately after starting the print operation, measure the voltage between pins 1 and 3 on the J10 connector. If the voltage changes from 0 V to 12 V or 24 V, replace the cartridge fan. 3 If the error persists, replace the DC controller PCB. Calibrate the printer after replacing the DC controller. See “Calibrate Now (CLJ 4600 and CLJ 5500 only)” on page 193. 57.4 Formatter fan (FM2) 1 Reconnect the connectors J11 for the formatter fan and J1102 on the DC controller PCB. 2 Immediately after turning the printer on, measure the voltage between pins 4 and 6 on the J1102 connector. If the voltage changes from 0 V to 12 V or 24 V, replace the formatter fan. ENWW Troubleshooting control-panel messages 135 2 Table 2-14 Numerical error messages (continued) Message Description Action 57.7 Power supply fan (FM2) 57.X PRINTER ERROR TO CONTINUE TURN OFF THEN ON (CLJ 5500) continued 1 Reconnect the connectors J1104 and J1133 on the DC controller PCB. 2 Disconnect the connector J1133. 3 Immediately after turning the printer on, measure the voltage between pins 1 and 3 on the J1133 connector. If the voltage changes from 0 V to 12 V or 24 V, replace the power supply fan. 4 If the error persists, replace the low-voltage power supply. 5 If the error persists, replace the DC controller PCB. Calibrate the printer. after replacing the DC controller. 58.1 ERROR CYCLE POWER (CLJ 8500/8550) The paper diverter inside 1 Open the right upper the right upper door is out of door and check for a position, causing an error in media jam or misfed feeding from tray 1. media. 2 Turn the printer off and on to reset the printer. 136 Chapter 2 – Service and troubleshooting ENWW Table 2-14 Numerical error messages (continued) Message Description Action 58.X PRINTER ERROR FOR HELP PRESS A memory tag error was detected. 1 Turn the printer off and then on. alternates with X Description 3 CPU 4 power supply 58.X PRINTER ERROR TO CONTINUE TURN OFF THEN ON (CLJ 4600, CLJ 5500) 59.X MOTOR ERROR CYCLE POWER (CLJ 8500/8550) The main motor (M4) is not working properly. X Description 0 general error 1 startup error 2 rotation error 2 If the error persists, replace the memory PCB. 3 If the error persists, replace the DC controller PCB. Calibrate the printer after replacing the DC controller. 1 Turn the printer off and on to reset the printer. 2 Reconnect connector J219 and relay connector J1 on the controller board. 3 Replace the main motor (M4). 4 Reconnect connectors J641 to J643 and J647 on the main relay PCA, connectors J671 and J673 on the subrelay PCA, connector J102 on the power supply, and connector J227 on the controller board. 5 Check electrical continuity between connector J641-1 (+24 VB) and J642-3 (PMP) on the main relay PCA when the door switch (SW641) is turned on. If no electrical continuity exists, replace the main relay PCA. ENWW Troubleshooting control-panel messages 137 2 Table 2-14 Numerical error messages (continued) Message Description 59.X MOTOR ERROR CYCLE POWER (CLJ 8500/8550) continued Action 6 Check electrical continuity between connector J671-2 (PMP) and J671-2 (PFUPR) on the subrelay PCA when the door switch (SW671) is turned on. If no electrical continuity exists, replace the subrelay PCA. 7 Measure the voltage across connector J647B11 (+24 UH) and J6474 (GND) on the main relay PCA after the printer is turned on. If the voltage is not 24 V, replace the main relay PCA. 8 If the error persists, replace the controller board. 138 Chapter 2 – Service and troubleshooting ENWW Table 2-14 Numerical error messages (continued) Message Description Action 59.XY PRINTER ERROR FOR HELP PRESS A printer motor error has occurred. 1 Turn the printer off and then on. alternates with 59.X Y PRINTER ERROR TO CONTINUE TURN OFF THEN ON (CLJ 4600, CLJ 8500/ 8550) X Description 0 motor error 1 motor startup error 2 motor rotation error 3 fuser motor startup error 4 fuser motor rotation error 5 print cartridge motor startup error 6 print cartridge motor rotation error 9 ETB motor startup error A ETB motor rotation error B developing disengaging motor startup error C developing disengaging motor rotation error Y Description 0 no color K black C cyan M magenta Y yellow ENWW 2 This message might also appear if the transfer unit is missing or incorrectly installed. Ensure that the transfer unit is correctly installed. CLJ 4600 ETB motor error 1 Clean the ETB unit intermediate connector, J4017. If the connector is damaged, replace it. 2 Reconnect the connectors J4022 for the ETB motor, J4017 between the ETB and the printer, and J4014 on the DC controller PCB. 3 If the error persists, replace the ETB motor. 4 If the error persists, replace the DC controller PCB. Calibrate the printer after replacing the DC controller. Troubleshooting control-panel messages 139 2 Table 2-14 Numerical error messages (continued) Message Description 59.XY PRINTER ERROR FOR HELP PRESS alternates with 59.X Y PRINTER ERROR TO CONTINUE TURN OFF THEN ON (CLJ 4600, CLJ 8500/ 8550) continued Action Fuser motor error 1 Reconnect the connectors J4030 for the fuser motor and J1002 on the DC controller PCB. Replace any damaged parts. 2 If the error persists, replace the fuser drive assembly. 3 If the error persists, replace the DC controller PCB. Calibrate the printer after replacing the DC controller. Print cartridge motor error 1 Reconnect the print cartridge connector on the DC controller PCB (J1013 for cyan, J1031 for magenta, J1032 for yellow, and J1033 for black). 2 If the error persists, replace the drum drive assembly for the indicated print cartridge. 3 If the error persists, replace the DC controller PCB. Calibrate the printer after replacing the DC controller. 140 Chapter 2 – Service and troubleshooting ENWW Table 2-14 Numerical error messages (continued) Message 59.XY PRINTER ERROR FOR HELP PRESS alternates with 59.X Y PRINTER ERROR TO CONTINUE TURN OFF THEN ON (CLJ 4600, CLJ 8500/ 8550) continued Description Action Developing disengaging motor error 1 Reconnect the connectors J4024 and J1019 between the developing disengaging motor and the DC controller PCB. 2 If the error persists, replace the developing disengaging drive assembly. 3 If the error persists, replace the DC controller PCB. Calibrate the printer after replacing the DC controller. CLJ 5500 1 Turn the printer off and then on. 2 This message might also appear if the transfer unit is missing or incorrectly installed. Ensure that the transfer unit is correctly installed. ETB motor error 1 Clean the ETB unit intermediate connector, J36. If the connector is damaged, replace it. 2 Reconnect the connectors J38 for the ETB motor and J1111 on the DC controller PCB. ENWW Troubleshooting control-panel messages 141 2 Table 2-14 Numerical error messages (continued) Message Description 59.XY PRINTER ERROR FOR HELP PRESS alternates with 59.X Y PRINTER ERROR TO CONTINUE TURN OFF THEN ON (CLJ 4600, CLJ 8500/ 8550) continued Action 3 If the error persists, replace the ETB motor. 4 If the error persists, replace the DC controller PCB. Calibrate the printer after replacing the DC controller. See “Calibrate Now (CLJ 4600 and CLJ 5500 only)” on page 193. Fuser motor error 1 Reconnect the connectors J18 for the fuser motor and J1101 on the DC controller PCB. Replace any damaged parts. 2 If the error persists, replace the fuser drive assembly. 3 If the error persists, replace the DC controller PCB. Calibrate the printer after replacing the DC controller. See “Calibrate Now (CLJ 4600 and CLJ 5500 only)” on page 193. Print cartridge motor error 1 Reconnect the print cartridge connector on the DC controller PCB (J1124 for cyan, J1126 for magenta, J1125 for yellow, and J1127 for black). 142 Chapter 2 – Service and troubleshooting ENWW Table 2-14 Numerical error messages (continued) Message Description Action 59.XY PRINTER ERROR FOR HELP PRESS 2 If the error persists, replace the drum drive assembly for the indicated print cartridge. alternates with 3 If the error persists, replace the DC controller PCB. Calibrate the printer after replacing the DC controller. See “Calibrate Now (CLJ 4600 and CLJ 5500 only)” on page 193. 59.X Y PRINTER ERROR TO CONTINUE TURN OFF THEN ON (CLJ 4600, CLJ 8500/ 8550) continued Developing disengaging motor error 1 Reconnect the connectors J16 for the developing disengaging motor and J1100 for the DC controller PCB. 2 If the error persists, replace the developing disengaging drive assembly. 3 If the error persists, replace the DC controller PCB. Calibrate the printer after replacing the DC controller. 62 NO SYSTEM (CLJ 4500/4550, CLJ 4600, CLJ 5500) ENWW A printer firmware problem 1 Turn the printer off and exists. Either there is no on to reset the printer. firmware DIMM installed or 2 Reseat the firmware the DIMM has failed. If the DIMM, making sure it is formatter was just replaced, in the slot surrounded by make sure that all of the a white line with the text DIMMs have been moved “ROM ONLY IN THIS from the old formatter to the SLOT.” new one. Troubleshooting control-panel messages 143 2 Table 2-14 Numerical error messages (continued) Message Description Action 62.X PRINTER ERROR (CLJ 4500/4550) A problem exists with the internal memory. 1 Turn the printer off and on to reset the printer. X Description 0 internal memory 1 DIMM slot 1 2 DIMM slot 2 3 DIMM slot 3 62.X SERVICE CYCLE POWER (CLJ 8500/8550) 62.M BAD MPTR (CLJ 4500/4550) A problem exists with the internal memory. X Description 0 internal memory 1 DIMM slot 1 2 DIMM slot 2 3 DIMM slot 3 4 DIMM slot 4 5 DIMM slot 5 6 DIMM slot 6 7 DIMM slot 7 8 DIMM slot 8 The firmware ran out of memory trying to build the static entity directory. 2 Reseat the DIMM. 3 If the error persists, replace the bad DIMM. 4 If the error persists, replace the formatter board. 1 Turn the printer off and on to reset the printer. 2 Perform DRAM DIMM test from the formatter diagnostics in the Service Menu. 3 If the problem persists, replace the bad DIMM. 1 Check printer settings to determine which values have been changed. 2 Clear the message by pressing GO. 63 SERVICE CYCLE POWER (CLJ 8500/8550) The internal RAM memory test failed. 1 Turn the printer off and on to reset the printer. 2 Perform DRAM DIMM test from the formatter diagnostics in the Service Menu. 3 If the problem persists, replace the bad DIMM. 144 Chapter 2 – Service and troubleshooting ENWW Table 2-14 Numerical error messages (continued) Message Description Action 64 PRINTER ERROR FOR HELP PRESS Scan buffer error. 1 Turn the printer off and then on. 2 Perform a cold reset. alternates with 64 PRINTER ERROR TO CONTINUE TURN OFF THEN ON (CLJ 4600, CLJ 5500) 65 PRINTER ERROR CYCLE POWER (CLJ 8500/8550) 3 If the message persists, replace the formatter or firmware DIMM. Indicates a DRAM controller 1 Turn the printer off and error. on to reset the printer. 2 Perform DRAM DIMM test from the formatter diagnostics on the Service Menu. 3 If the problem persists, replace the bad DIMM. 66.X0.YY C-LINK COMM ERROR CHECK CABLES AND CYCLE POWER (CLJ 8500/8550) ENWW A communication error 1 Verify that the C-link and exists between the 2,000power cables are sheet input unit or the multiconnected. bin mailbox and the printer. 2 Turn the printer off and on to reset the printer. X = device number in the link YY = error code from the optional device Troubleshooting control-panel messages 145 2 Table 2-14 Numerical error messages (continued) Message Description Action 66.11.01 INPUT DEVICE FAILURE CHECK CABLES AND CYCLE POWER (CLJ 8500/8550) A 2,000-sheet input unit lifting motor error exists. 1 Verify that the C-link and power cables are connected. 2 Turn the printer off and on to reset the printer. 3 Verify that no objects or paper are stored in the left side of the tray. 4 Verify that the lifting plate moves freely by hand. 5 Verify that the paper size plates are installed correctly, and that they are not bent. 6 If the error persists, replace the paper-deck drive assembly bushing. 7 If the error persists, replace the paper-deck drive assembly. 8 If the error persists, replace the paper tray (tray 4) for the 2,000sheet input unit. 146 Chapter 2 – Service and troubleshooting ENWW Table 2-14 Numerical error messages (continued) Message Description Action 66.11.02 INPUT DEVICE FAILURE CHECK CABLES AND CYCLE POWER (CLJ 8500/8550) A 2,000-sheet input unit feed motor error exists. 1 Verify that the C-link and power cables are connected. 2 Turn the printer off and on to reset the printer. 3 Verify that there are no objects in the left side of the tray. 4 Verify that the paper tray raised sensor (PS34) is working properly (perform a sensor test). 5 Check for proper installation of the pick-up roller. 6 Check the pick-up assembly and the paperdeck drive assembly cabling. 7 If the error persists, replace the pick-up assembly. 8 If the error persists, replace the paper-deck drive assembly. ENWW Troubleshooting control-panel messages 147 2 Table 2-14 Numerical error messages (continued) Message Description Action 66.11.03 INPUT DEVICE FAILURE CHECK CABLES AND CYCLE POWER (CLJ 8500/8550) A 2,000-sheet input unit lifting and feed motor error exists. 1 Verify that the C-link and power cables are connected. 2 Turn the printer off and on to reset the printer. 3 Verify that no objects are in the left side of the tray. 4 Verify that the lifting plate moves freely by hand. 5 Verify that the paper-size plates are installed correctly, and that they are not bent. 6 If the error persists, replace the paper-deck drive assembly bushing. 7 If the error persists, replace the paper-deck drive assembly. 8 Check that the paper tray raised sensor (PS34) is working properly (perform a sensor test). 9 Check for proper installation of the pickup roller. 10 Check the pickup assembly cabling. 11 If the error persists, replace the pickup assembly. 148 Chapter 2 – Service and troubleshooting ENWW Table 2-14 Numerical error messages (continued) Message Description Action 66.22.08 OUTPUT DEVICE FAILURE CHECK CABLES AND CYCLE POWER (CLJ 8500/8550) A multi-bin mailbox flipper motor error exists. 1 Verify that the C-link and power cables are connected. 2 Turn the printer off and on to reset the printer. 3 Check for jams in the flipper assembly area. 4 If the error persists, replace the flipper assembly. 5 If the error persists, replace the multi-bin mailbox controller board PCA. 66.22.09 OUTPUT DEVICE FAILURE CHECK CABLES AND CYCLE POWER (CLJ 8500/8550) A multi-bin mailbox external 1 Verify that the C-link and memory error exists. power cables are connected. 2 Turn the printer off and on to reset the printer. 3 If the error persists, replace the multi-bin mailbox controller board PCA. 66.22.XX OUTPUT DEVICE FAILURE CHECK CABLES AND CYCLE POWER (CLJ 8500/8550) A multi-bin mailbox error exists. 1 Verify that the C-link and power cables are connected. XX = error code from the optional device 2 Turn the printer off and on to reset the printer. 3 If the error persists, replace the C-link cables. 4 If the error persists, replace the multi-bin mailbox controller board PCA. ENWW Troubleshooting control-panel messages 149 2 Table 2-14 Numerical error messages (continued) Message Description Action 67.X ERROR POWER CYCLE (CLJ 8500/8550) Indicates an electronic controller error exists. 1 Turn the printer off and on to reset the printer. 68 NVRAM ERROR CHECK SETTINGS (CLJ 4500/4550) One or more settings saved 1 Check the printer settings in the non-volatile storage to determine which device are invalid. Some values have been settings might have been changed. reset to factory defaults. 2 Clear the message by pressing GO. 68 NVRAM ERROR SETTINGS CHANGED (CLJ 8500/8550) One or more settings saved 1 Check the printer control in the non-volatile storage panel settings. One or device are invalid. Some more fields have been settings might have been reset to their factory reset to factory defaults. defaults during the error recovery. X Description 1 controller board error 2 controller board IC malfunction 3 internal communication malfunction 2 If the error persists, replace the controller board. 2 Perform a factory defaults reset (see the service manual). 3 Perform a cold reset (see the service manual). 68 NVRAM FULL CHECK SETTINGS (CLJ 4500/4550) A non-volatile storage 1 Check the printer settings device is full. Some settings to determine which might have been reset to values have been factory defaults. changed. 2 Clear the message by pressing Go. 150 Chapter 2 – Service and troubleshooting ENWW Table 2-14 Numerical error messages (continued) Message Description Action 68 NVRAM FULL SETTINGS LOST (CLJ 8500/8550) A non-volatile storage device is full. Some settings might have been reset to factory defaults. Check the printer control panel settings. One or more fields might have been reset to their factory defaults during error recovery. The next time the printer is turned off and on, NVRAM will clear and all factory defaults will be restored. 68.X PERMANENT STORAGE ERROR FOR HELP PRESS alternates with 68.X PERMANENT STORAGE ERROR TO CONTINUE PRESS (CLJ 4600, CLJ 5500) 68.X PERMANENT STORAGE FULL FOR HELP PRESS alternates with 68.X PERMANENT STORAGE FULL TO CONTINUE PRESS (CLJ 4600, CLJ 5500) One or more printer settings 1 Press SELECT to saved in the non-volatile continue. storage device is invalid and 2 Turn the printer off and has been reset to its factory then on. default. Pressing the SELECT 3 Check the printer settings button should clear the to determine which message. Printing can settings have been continue, but you might changed. experience unexpected behavior. X Description 0 onboard NVRAM 1 removable disk (flash or hard) 1 Press SELECT to continue. A non-volatile storage device is full. Pressing the SELECT button should clear the message. Printing can continue, but you might experience unexpected behavior. 2 For 68.0 errors, turn the printer off and then on. X Description 0 onboard NVRAM 1 removable disk (flash or hard) 4 For 68.1 errors, use the HP Web Jetadmin software to delete files from the disk drive. 3 If a 68.0 error persists, execute an NVRAM initialization. 5 If a 68.1 error persists, reinitialize the hard disk. ENWW Troubleshooting control-panel messages 151 2 Table 2-14 Numerical error messages (continued) Message Description 68.X PERMANENT STORAGE WRITE FAIL TO CONTINUE PRESS (CLJ 4600, CLJ 5500) A non-volatile storage 1 Press SELECT to device is failing to write. continue. Pressing the SELECT button 2 Turn the printer off and should clear the message. then on. Printing can continue, but 3 If the problem persists, you might experience initialize NVRAM. unexpected behavior. X Description 0 onboard NVRAM 1 removable disk (flash or hard) 79 SERVICE (XXXX) PRINTER ERROR (CLJ 4500/4550) 79.XXXX PRINTER ERROR TO CONTINUE TURN OFF THEN ON (CLJ 4600, CLJ 5500) 79 SERVICE XXXX CYCLE POWER (CLJ 8500/8550) A hardware error has occurred. Action 4 Reinitialize the hard disk. 1 Turn the printer off and then on. 2 If the problem persists, X Description reseat the firmware 01XX IO ASIC register error DIMM. 02XX video ASIC register 3 Reseat the formatter. error 03XX IDE ASIC register 4 If the problem persists, error (CLJ 4500/4550) replace the firmware DIMM. 5 If the problem persists, replace the formatter, and then calibrate the printer. 1 Turn the printer off. Disconnect all communication cables X Description and EIO cards. Turn the 01XX IO ASIC register error printer on. 02XX video ASIC register 2 Run extended formatter error diagnostics from the 03XX IDE ASIC register Service Mode Menu to error troubleshoot the failure. A hardware error has occurred. 3 If the problem persists without the communications connected, replace the formatter board. 152 Chapter 2 – Service and troubleshooting ENWW Table 2-14 Numerical error messages (continued) Message Description Action 80 SERVICE (YYYY) EIO ERROR (CLJ 4500/4550) A critical EIO failure has occurred. X indicates the slot number of the device. YYYY (YYY in the case of the CLJ 8500/8550) indicates the error type. 1 Turn the printer off and on to reset the printer. 8X.YYYY EIO ERROR (CLJ 4600, CLJ 5500) 2 If the error persists, reseat the EIO card. 3 If the error persists, replace the EIO card. 2 8X.YYY (CLJ 8500/8550) ENWW Troubleshooting control-panel messages 153 Numbered error codes for the CLJ 8550mfp These error messages appear on the copy module LCD at the time they occur. A history of errors can be reviewed through the copy module service mode (COPIER > DISPLAY > ERR). See “Service mode functions” on page 183. Note Errors described as “printer” or “printer unit” will also appear as error messages on the printer’s LCD. E000/E003 (CLJ 8550mfp) E000:The fusing assembly warm-up is faulty. This error occurs when it takes longer than the reference time for the assembly to reach the standby temperature after the fusing heater has been turned on. E003:The fusing temperature is abnormally low. This error occurs when the fusing assembly temperature drops below 120° C after it has reached the target value. 154 Chapter 2 – Service and troubleshooting ENWW Table 2-15 Cause and solutions for E000/E003 errors Cause Upper thermistor (open circuit) Lower thermistor (open circuit) Upper fusing heater, upper thermal switch (open circuit) Lower fusing heater, lower thermal switch (open circuit) Upper or lower thermistor Upper or lower thermistor Connector ENWW Issue Solution Remove the fusing assembly, and measure the resistance between connectors J26F-A4 (FXTHU) and J26F-A3 (GND) on the fusing assembly side. Is it between 250 KΩ and 600 KΩ (normal temperature)? Measure the resistance between connectors J26F-A2 (FXTHL) and J26F-A1 (GND) on the fusing assembly side. Is it between 250 KΩ and 600 KΩ (normal temperature)? With the fusing assembly removed, is there electrical continuity between connectors J27F-3 (HTUH) and J27F4 (HTUC) on the fusing assembly side? Check the wiring from connector J222 on the dc controller PCB to the upper thermistor; if it is normal, replace the fuser assembly. Is there electrical continuity between connectors J26F-3 (HTLH) and J26F4 (HTLC) on the fusing assembly side? Check the lower fusing heater and the lower thermal switch. Replace the fuser assembly if any problems are found. Is the upper or lower thermistor in even contact with the upper/lower fusing roller? Mount the thermistor properly. Is the upper or lower thermistor soiled? Clean the area of contact with the upper or lower fusing roller. Are connector J222 on the dc controller PCB and connector J26 of the fusing assembly connected securely? Connect the connectors securely. 2 Check the wiring from connector J222 on the dc controller PCB to the lower thermistor; if it is normal, replace the fuser assembly. Check the upper fusing heater and thermal switch. Replace the fuser assembly if any problems are found. Troubleshooting control-panel messages 155 Table 2-15 Cause and solutions for E000/E003 errors (continued) Power supply (printer unit) Replace the power supply of the Replace the dc controller PCB. printer unit. Is the problem corrected? CAUTION If E001 or E003 is indicated, be sure to discharge the error memory capacitor (C259) on the dc controller PCB after troubleshooting the problem, as it may contain error memory. (Short out JP201 on the dc controller PCB to discharge C259; see the Printer Unit Service Manual.) E001 (CLJ 8550mfp) The fusing assembly has overheated. This error occurs when the fusing temperature during standby or copying exceeds 230° C. Table 2-16 Cause and solutions for E001 error Cause Upper thermistor (short circuit) Lower thermistor (short circuit) Power supply (printer unit) Issue Solution With the fusing assembly removed, measure the resistance between connectors J26F-A4 (FXTHU) and J26F-A3 (GND) on the fusing assembly side. Is it 2 KΩ or less? Measure the resistance between connectors J26F-A2 (FXTHL) and J26F-A1 (GND) on the fusing assembly side. Is it 2KΩ or less? Check the wiring from connector J222 on the dc controller PCB to the upper thermistor; if normal, replace the fuser assembly. Replace the power supply of the printer unit. Is the problem corrected? End. Replace the dc controller PCB. Check the wiring from connector J222 on the dc controller PCB to the lower thermistor: if normal, replace the fuser assembly. CAUTION If E001 or E003 is indicated, be sure to discharge the error memory capacitor (C259) on the dc controller PCB after troubleshooting the problem, as it may contain error memory. (Short out JP201 on the dc controller PCB to discharge C259; see the Printer Unit Service Manual.) 156 Chapter 2 – Service and troubleshooting ENWW E004 (CLJ 8550mfp) The upper and lower fusing heaters have an open circuit. This error occurs when no ac current is found in the fusing heater at the start of temperature control. Table 2-17 Cause and solutions for E004 error Cause Upper fusing heater/ upper thermal switch (open circuit) Lower fusing heater, lower thermal switch (open circuit) Connectors Power supply (printer unit) Issue Solution With the fusing assembly removed, is there electrical continuity between connectors J27F-3 (HTUH) and J27F4 (HTUC) on the fusing assembly side? Check the upper fusing heater and the upper thermal switch. Replace the fuser if problems are found. Is there electrical continuity between connectors J27F-3 (HTLH) and J26F4 (HTLC) on the fusing assembly side? Check the lower fusing heater and the lower thermal switch. Replace the fuser assembly if problem parts are found. Are connector J222 on the dc controller PCB, connector J26 of the fusing assembly, and connector J101 of the printer unit power supply connected securely? Replace the power supply of the printer unit. Is the problem corrected? Connect the connectors securely. End. Replace the dc controller PCB. E009 (CLJ 8550mfp) Table 2-18 Cause and solutions for E009 error Cause Fusing assembly ENWW Issue Solution Does the rated voltage of the fusing Check the product number of the assembly match the printer’s voltage? fuser assembly; if necessary, replace the fusing assembly or the printer unit power supply. Troubleshooting control-panel messages 157 2 Table 2-18 Cause and solutions for E009 error (continued) Connectors Are connector J222 on the dc controller PCB and connector J26 of the fusing assembly connected securely? Connect the connectors. Replace the dc controller PCB. E010/E011 (CLJ 8550mfp) E010:The main motor start-up is faulty. This error occurs when the revolution of the main motor fails to reach a specific value. E011:The main motor rotation is faulty. This error occurs when the revolution of the main motor fails to reach a specific value. Table 2-19 Cause and solutions for E010/E011 errors Cause Connector Main motor Issue Solution Are connector J219 on the dc Connect the connectors securely. controller PCB and the relay connector J1 connected securely? Does the voltage change from about 5 Replace the main motor. to 0 V between connector J219-4 Replace the dc controller PCB. (MON) on the dc controller PCB and connector J219-5 (GND) when the power is turned on? E013 (CLJ 8550mfp) A specific number of copies have been made after the waste toner case full warning has been issued (DISPLAY > SENSOR > W-TONER). Table 2-20 Cause and solutions for E013 error Cause Issue Waste toner Is the photosensitive drum cartridge full of waste toner? case 158 Chapter 2 – Service and troubleshooting Solution Replace the photosensitive drum cartridge. Replace the dc controller PCB. ENWW E019 (CLJ 8550mfp) At the time of power-on or while the drum motor is rotating during printer operation, the light-receiving cell of the waste toner sensor does not detect light for a specific time even when the waste toner case is not full. Table 2-21 Cause and solutions for E019 error Cause Waste toner detection window Connectors Issues Solution Is the waste toner detection window of the photosensitive drum soiled? Wipe the waste toner detection window with a dry cloth. Are connector J21 on the dc controller PCB, connectors J631 and J633 of the waste toner sensor, and the relay connector J71 connected securely? Waste toner Is the light-emitting/receiving section of the waste toner detection block of the detecting block (light- printer unit soiled? emitting/ receiving section; printer unit) Waste toner Replace the waste toner detection block of the printer unit. Is the problem detection corrected? block (printer unit) Connect the connectors securely. Dry-wipe the light-emitting/ receiving section of the waste toner detection block with a dry cloth. End. Replace the photosensitive drum unit. If the problem cannot be corrected, replace the dc controller PCB. E020 (CLJ 8550mfp) During image stabilization correction control, the LED intensity signal (LEDCNT) is weak or is not generated at all. Table 2-22 Cause and solutions for E020 error Cause Density sensor (lightemitting/ receiving section) ENWW Issue Solution Is the density sensor soiled? Clean the density sensor with the special brush located near the sensor. Troubleshooting control-panel messages 159 2 Table 2-22 Cause and solutions for E020 error (continued) Connector (density detection PCB) Density detection PCB Are connector J1101 on the density Connect the connectors detection PCB, relay connectors J75 securely. and J46, and connector J206 on the dc controller PCB connected securely? Is the voltage 24 V between connectors Replace the density detection J206-5 (+24 UH) on the density PCB. detection PCB and GND when the Replace the dc controller PCB. copier is turned on? E021 (CLJ 8550mfp) This error occurs when the developing rotary position sensor (PS3) does not detect the rotation position flag even when the developing rotary motor has rotated for a specific time. This error can also occur when the PS3 detects a faulty or wrong rotation flag width. Note On rare occasions, a broken carousel gear or broken position flag on the carousel gear can cause this error. The CLJ 8500/8550/8550mfp carousel assembly cannot be replaced. Table 2-23 Cause and solutions for E021 error Cause Print cartridge Developing rotary motor drive assembly Connector (developing rotary drive assembly) 5-V supply line (developing rotary position sensor) 160 Issue Solution Is the shutter of each print cartridge open properly when in its proper position in the printer? Close the print cartridge cover, and turn the power off and then on. Is the developing rotary stopper arm still holding the developing rotary assembly in place? Are connectors J704 and J706 on the developing rotary motor PCB and connector J220 on the dc controller PCB connected securely Replace the print cartridge whose shutter is not open. Are connector J43 of the developing rotary position sensor, relay connector J42, and connector J207 on the dc controller PCB connected securely? Connect the connectors securely. Chapter 2 – Service and troubleshooting Go to step 6. Go to step 3. Connect the connectors securely. ENWW Table 2-23 Cause and solutions for E021 error (continued) Developing rotary position sensor Developing rotary stopper Replace the developing rotary position sensor. Is the problem corrected? Is the operation of the developing rotary stopper arm normal? Disconnect connector J705 of the developing rotary stop solenoid (SL5); then, measure the resistance between connectors J605-10 and J605-12 on the harness side and between J705-11 and J705-12. Is it about 30Ω to 60Ω? Developing Does the voltage between connectors rotary motor J220-A6 (RLSROT) and J220-B5 (GND) on the dc controller PCB change from PCB about 0 to about 3.5 V immediately after the copier is turned on? Is the fuse (FU701, FU702) on the Fuse (developing developing rotary motor PCB blown? rotary motor PCB) End. Replace the developing rotary stopper solenoid. 2 Replace the developing rotary motor PCB. Replace the fuse. Replace the developing rotary motor. If the problem cannot be corrected, replace the dc controller PCB. E032 (CLJ 8550mfp) The counter for the copy data fails to operate. This error occurs when the illegal prevention bit of the control device goes to zero (0) when the open circuit detection mechanism is not disabled. ENWW Troubleshooting control-panel messages 161 E040 (CLJ 8550mfp) The holding plat lifter (multi-feeder) is faulty. This error occurs during multifeeder pick-up, when the holding plate position sensor (PS1302) does not detect the holding plate even when the dc controller PCB has generated the holding plate solenoid (SL4) ON signal. Table 2-24 Cause and solutions for E040 error Cause Issue Connectors Are connector J213 on the dc controller PCB; connectors J641, J642, J643, and J647 on the printer side main relay PCB; connectors J671 and J672 on the sub-relay PCB; connector J1302 of the holding plate solenoid; and connector J102 of the power supply connected securely? Multi-feeder Does the voltage between connectors J1301-2 (+24 UH) and J1301-1 (GND) tray PCF on the multi-feeder tray PCB change from 0 to 24 V? Is +24 UH present on the multi-feeder +24 UH tray PCB and the holding plate solenoid? Disconnect connector J1302 of the Holding holding plate solenoid from the multiplate feeder tray PCB. Measure the solenoid resistance between connectors J13021 (MPTSLD) and J1302-2 (+24 UH) on the harness side. Is it about 160Ω? 162 Chapter 2 – Service and troubleshooting Solution Connect the connectors securely. Replace the multi-feeder tray PCB. See the CLJ 8550 mfp service manual. Replace the holding plate solenoid. Replace the dc controller PCB. ENWW E054 (CLJ 8550mfp) Note This error pertains to the duplexing unit, which is an accessory. The duplexing feeding roller 1 home position sensor (PS23) does not detect the home position of the duplexing feeding roller 1 when copy paper is being fed to the duplexing unit. 2 Table 2-25 Cause and solutions for E054 error Cause Duplexing feeding roller 1 home position sensor lever Duplexing feeding roller drive gear Duplexing driver PCB Duplexing feeding roller 1 home position sensor (PS23) Duplexing feeding clutch (CL5) ENWW Issue Solution Is the duplexing feeding roller 1 home position sensor level damaged? Replace the lever. Is the drive gear of the duplexing feeding Replace the worn or cracking roller worn or cracked? gear. Are connectors J2003, J2004, and J2007 Connect the connectors on the duplexing driver PCB connected securely. securely? Replace the duplexing feeding roller 1 home position sensor. Is the problem corrected? Replace the sensor. Disconnect connector J2003 of the Replace the duplexing feeding duplexing feeding clutch, and measure clutch. the resistance between connectors J2003-1 and J2003-2 on the harness side. Is it about 140Ω? Troubleshooting control-panel messages 163 Table 2-25 Cause and solutions for E054 error (continued) Duplexing Replace the duplexing motor. Is the problem corrected? motor (M8) Duplexing driver PCB Replace the duplexing motor (M8). Replace the duplexing driver PCB. E055 (CLJ 8550mfp) The duplexing driver PCB has detected that the horizontal registration guide has moved in excess of the maximum distance from when the home position was detected. Table 2-26 Cause and solutions for E055 error Cause Horizontal registration guide Horizontal registration guide home position sensor (PS25) lever Horizontal registration guide drive gear Duplexing driver PCB Issue Solution Is the horizontal registration guide mounted correctly? Mount the guide correctly. Is the horizontal registration guide home position sensor lever damaged? Replace the lever. Is the horizontal registration guide drive Replace the worn or cracked gear worn or cracked? gear. Are connectors J2006 and J2005 of the Connect the connectors duplexing driver PCB connected securely. securely? Replace the sensor. Horizontal Replace the horizontal registration guide home position sensor (PS25). Is registration the problem corrected? guide home position sensor (PS25) 164 Chapter 2 – Service and troubleshooting ENWW Table 2-26 Cause and solutions for E055 error (continued) Horizontal Replace the horizontal registration motor (M7) motor. Is the problem corrected? Duplexing driver PCB Replace the horizontal registration motor (M7). Replace the duplexing driver PCB. E066(CLJ 8550mfp) During image stabilization control, the dc controller PCB cannot detect the temperature sensor signal (TMPSNS) or the humidity sensor signal (HUMSNS). Table 2-27 Cause and solutions for E066 error Cause Connector (temperature and humidity sensor) temperature and humidity sensor Issue Solution Are connectors J801 on the temperature and humidity sensor and connector J206 on the dc controller PCB connected securely? Connect the connectors securely. Replace the temperature and humidity End. sensor. Is the problem corrected? Replace the dc controller PCB. E100 (CLJ 8550mfp) The laser of the scanner unit is faulty. This error occurs when the dc controller PCB detects DBERR for 2.5 seconds or longer after the scanner motor has rotated at a specific speed. Table 2-28 Cause and solutions for E100 error Cause Connector (laser driver signal line) Connectors (BD line) Issue Solution Are connector J1001 on the laser Connect the connectors driver PCB and connector J205 on the securely. dc controller PCB connected securely? Are connector J2 on the BD PCB, relay connector J40, and connector J211 on the dc controller PCB connected securely? Is the voltage between connectors Laser scanner unit J211-1 (+5 V) on the dc controller PCB and J211-3 (GND) 5 V immediately after the copier is turned on? ENWW Connect the connectors securely. Replace the laser scanner unit. Replace the dc controller PCB. Troubleshooting control-panel messages 165 2 E110 (CLJ 8550mfp) This error occurs when the scanner motor fails to reach a specific revolution within 10 seconds after it has started to rotate. This error can also occur when the BC PCB detects an error within 2.5 seconds after the scanner motor has started to rotate. Table 2-29 Cause and solutions for E110 errors Cause Connector Laser scanner motor Issue Solution Are connector J901 on the laser Connect the connectors securely. scanner motor PC, relay connector J40, and connector J211 on the dc controller PCB connected securely? Does the voltage between Replace the laser scanner motor. connectors J211-7 (SCND) on the dc Replace the dc controller PCB. controller PCB and J211-6 (GND) change from 0 to 17 V or more when the copier is turned on? E196/E197/E198(CLJ 8550mfp) E196:The EEPROM (IC212) on the dc controller has an error. E197:A machine internal communication error occurs more than once. Or, the reception interruption on the dc controller side does not occur for a specific time for internal communication. E198:The IC on the dc controller has an error. Table 2-30 Cause and solutions for E196/E197/E198 errors Cause Issue Solution Replace the dc dc controller Turn the copier off and then on. Is the problem corrected? controller PCB. PCB 166 Chapter 2 – Service and troubleshooting ENWW E202 (CLJ 8550mfp) The scanner home position is not detected.This error occurs when the scanner does not return to the home position when it has been started. In response to this code, the control panel keys will lock, and the “Wait” message will appear. This code is indicated only on the Error History screen in service mode. 2 Table 2-31 Cause and solutions for E202 error Cause Original scanner home position sensor (PS101) Wiring Issue Solution Is the scanner at home position when E202 is indicated? Does J1609A-2 on the reader controller PCB generate 5 vdc when the scanner is at PS101? See the CLJ 8550 mfp service manual. Check the wiring from the reader controller PCB to PS101; if normal, replace PS101. Is there any fault in the wiring or connectors from J1605 on the reader controller PCB to J303 and J302 on the scanner motor driver PCB? Replace the scanner motor driver PCB. Is the problem corrected? Connect the wiring correctly. Scanner motor driver PCB Replace the scanner motor (PM1). Is Scanner motor (PM1) the problem corrected? ENWW End. End. Replace the reader controller PCB. Troubleshooting control-panel messages 167 E203 (CLJ 8550mfp) The scanner motor driver PCB or the scanner motor is faulty. This error occurs when the scanner home position is detected during back-scanning (not requiring return to the scanner home position sensor). It can also occur if a deviation occurs during back-scanning (returning to the scanner home position sensor). Table 2-32 Cause and solutions for E203 error Cause Scanner motor driver PCB/ Scanner motor Reader controller PCB 168 Issue Solution Does the scanner move until “E203” is indicated? Does the voltage between connectors J303-B1 (RST) on the scanner motor driver PCB and J303B4 (GND) and between connectors J303-B2 (MOVE) and J303-B4 (GND) change from 5 to 0V? See the CLJ 8550 mfp service manual. Replace the scanner motor driver PCB. If the problem cannot be corrected, replace the scanner motor. Chapter 2 – Service and troubleshooting Replace the reader controller PCB. ENWW E211/E215 (CLJ 8550mfp) E211:The scanning lamp (fluorescent lamp) thermistor has an open circuit. This error occurs when the temperature does not reach 10° C after supplying the scanning lamp heater with power for two minutes (starting at 0° C or less). It can also occur when the temperature drops to 0° C or less during temperature control. E215:The scanning lamp (fluorescent lamp) thermistor has a short circuit. This error occurs when the scanning lamp thermistor detects 170° C or more when the fluorescent lamp ON signal (FLON) is off (including power-on). Table 2-33 Cause and solutions for E211/E215 errors Cause Issue Solution Disconnect connector J1610 of the reader controller PCB, and measure the resistance between connectors J1610-5 (GND) and J1610-6 (FL_TH) on the harness side. Is it 100 Ω or less or 100 KΩ or more? Lamp heater Disconnect connector J2039 of the lamp heater, and measure the resistance between connectors J20392 (GND) and J2039-3 (FL_TH). Is it 100 Ω or less or 100 K Ω or more? Are connector J1610, connectors Flat cable J2037 and J2015 of the flat cable, and (between connector J2039 of the lamp heater J2037 and J2015) and connected securely? connectors Reader controller PCB ENWW Is the voltage 38 V between connectors J1611-1 (GNDU) and J1611-2 (+38V) on the harness side of the reader controller PCB? The reader controller PCB is faulty. Replace the lamp heater. Connect the connectors securely. Replace the flat cable. Or, check each of the connectors. See the CLJ 8550 mfp service manual. Replace the reader controller PCB. Troubleshooting control-panel messages 169 2 E216, E219 (CLJ 8550mfp) E216:The scanning lamp (fluorescent lamp) fails to turn on when the power has been turned off and then on. This error occurs when the intensity sensor does not detect light from the scanning lamp in 15 seconds. E219:The scanning lamp (fluorescent lamp) has reached the end of its life. This error occurs when the thermistor of the scanning lamp detects a temperature of 150° C or more while the scanning lamp is on. Table 2-34 Cause and solutions for E216/E219 errors Cause Fluorescent lamp Inverter PCB Reader controller PCB Issue Solution Replace the fluorescent lamp. Is the End. problem corrected? Replace the inverter PCB. Is the problem corrected? Replace the reader controller PCB. E217 (CLJ 8550mfp) The temperature does not exceed the setting when the lamp heater is powered for three minutes or more while the scanning lamp heater is going through constant temperature control. Table 2-35 Cause and solutions for E217 error Cause Issue Lamp heater, Replace the lamp heater. Is the problem corrected? reader controller PCB 170 Chapter 2 – Service and troubleshooting Solution Replace the reader controller PCB. ENWW E218 (CLJ 8550mfp) The scanning lamp (fluorescent lamp) is absent, or the inverter PCB (copy module) is faulty. This error occurs when activation is attempted and the scanning lamp is not mounted or the lamp filament is broken. Table 2-36 Cause and solutions for E218 error Cause Scanning lamp Issue Solution Is the scanning lamp mounted properly? Mount the lamp properly. (See note below.) Replace the scanning lamp. Is the problem corrected? Inverter PCB Are connectors J1002 and J1003 on the inverter PCB, and connector J1602 on the reader controller PCB connected securely? Replace the lamp. Connect the connectors securely. Replace the inverter PCB. Note If you have removed and then remounted the scanning lamp, be sure to execute intensity adjustment in service mode (FUNCTION > MISC-R > USE-LAMP). If you have mounted a new scanning lamp, be sure to execute intensity adjustment and CCD adjustment in service mode (FUNCTION > MISC-R > LAMP-ADJ and FUNCTION > CCD > CCD-ADJ, respectively.) ENWW Troubleshooting control-panel messages 171 2 E240 (CLJ 8550mfp) One of the following has occurred: 1 The communication between the dc controller PCB and the reader controller PCB is faulty. This error occurs when the DPPRDY signal is sent for less than 0.25 seconds from the reader controller to the dc controller PCB after power-on. 2 The communication between the dc controller PCB and the formatter or between the reader controller PCB and the formatter is faulty. This error occurs when the signals between the formatter and the dc controller PCB or between the formatter and the reader controller PCB cannot be exchanged for a specific time after power-on. Table 2-37 Cause and solutions for E240 error Cause Interface cable Video interface PCB, reader controller PCB PS/PCL board dc controller PCB Issue Solution Is the interface cable used to connect the copy module and the printer unit connected securely? Further, are the copy module power cord and the printer unit power cord connected securely? Make the connections secure, and turn on the copy module. Replace the video interface PCB or the reader controller PCB. Turn the unit off and remove the Replace the formatter. formatter, and turn on the printer unit and copy module as one (as a Replace the dc controller PCB. copier). Is E240 indicated? E243 (CLJ 8550mfp) The communication between the control panel CPU PCB and the reader controller PCB is not possible 20 seconds or more after power-on. Table 2-38 Cause and solutions for E243 error Cause Connectors Issue Solution Are connector J901 on the control Connect the connectors securely. panel CPU PCB and connector J1608 on the reader controller PCB connected securely? Replace the control panel CPU PCB. End. Control panel CPU Is the problem corrected? Replace the reader controller PCB. PCB, reader controller PCB 172 Chapter 2 – Service and troubleshooting ENWW E351 (CLJ 8550mfp) Table 2-39 Cause and solutions for E351 error Cause Power supply ECO PCB/ AP-IP PCB Issue Solution Are the PCBs and connectors connected securely? (If the power supply is cut abnormally, the copier can indicate “E351” when it warms up. If this occurs, turn the copier off and then on to reset.) Are the CO PCB and AP-IP PCB connected securely? Make the connections secure, and turn the copier off and then on. 2 Connect the PCBs securely. Replace the parts in the order indicated: ECO PCB AP-IP PCB E353 (CLJ 8550mfp) E353 is indicated in response to a mismatch of the serial number of the reader controller PCB and that of the EEPROM while the reader controller PCB is being replaced. See the CLJ 8550 mfp service manual. E355 (CLJ 8550mfp) E355 is indicated in response to a mismatch of the serial numbers of the copy module, the reader controller PCB, and the EEPROM while the reader controller PCB is being replaced (as when the wrong serial number is entered). If this code appears, enter the correct serial number of the copy module using OPTION > USER > SERIAL in service mode. ENWW Troubleshooting control-panel messages 173 E401 (CLJ 8550mfp) The error shown on the touch-screen display is in the ADF. See the CLJ 8550 mfp service manual. This error indicates that either the pick-up motor (M1) fails to rotate or the pickup roller sensor (S5) is faulty. In normal operation, a flag is attached to the spindle of the pick-up motor (M1), and the rotation of the motor is checked in reference to the flag blocking the pick-up roller sensor (S5). The E401 error is indicated when the sensor does not turn on and off two times or more within one second. E402 (CLJ 8550mfp) The error shown on the touch-screen display is in the ADF. See the CLJ 8550 mfp service manual. This error indicates that either the belt motor (M3) fails to rotate or the belt motor clock (S10) is faulty. This error occurs when the number of belt motor clock pulses within 200 ms is less than a specific value. E403 (CLJ 8550mfp) The error shown on the touch-screen display is in the ADF. See the CLJ 8550 mfp service manual. This error indicates that either the ADF motor (M2) fails to rotate, or the ADF motor clock sensor (S9) is faulty. This error occurs when the number of ADF motor clock pulses within 200 ms is less than a specific value. E404 (CLJ 8550mfp) The error shown on the touch-screen display is in the ADF. See the CLJ 8550 mfp service manual. This error indicates that either the delivery motor (M5) fails to rotate or the delivery motor clock sensor (S13) is faulty. This error occurs when the number of ADF motor clock pulses within 200 ms is less than a specific value. E411 (CLJ 8550mfp) The error shown on the touch-screen display is in the ADF. See the CLJ 8550 mfp service manual. This error indicates that either the document tray paper sensor (S1) or the registration sensor (S3) is faulty. This error occurs when the sensor output is 2.3 V or more in the absence of paper. 174 Chapter 2 – Service and troubleshooting ENWW E545, E546 (CLJ 8550mfp) The error shown on the touch-screen display is in the output device. Note Output devices are not supported on the LJ8550 MFP. This error indicates that the bin flapper 1 (for E545) or bin flapper 2 (for E546) of the sorter-H1 is faulty. These errors occur when the bin flapper solenoid sensor (PI12) does not detect solenoid operation even when the solenoid (SL3 for E545 or SL4 for E546) is driven during initialization or face-down delivery. This error can also occur when the bin flapper sensor remains on even when the solenoid has stopped operation. E677, E678, E679 (CLJ 8550mfp) E677 indicates that an error has occurred during the initial communication between the ACC controller PCB and an accessory. The error occurs when the ACC controller PCB and the accessory are not ready for communication within four seconds (possibly due to a problem in the power supply), or when an initial communication error with each accessory has occurred. E678 indicates that the communication between the ACC controller PCB and an accessory has been interrupted. The error occurs when the accessory is turned off in the middle of communication, or when the cable of the accessory has been disconnected in the middle of communication. E679 indicates that an error has occurred in the protocol used for communication between the ACC controller PCB and an accessory. This error occurs when the read/write/parity check of data is faulty, and communication does not end within a specific time. Table 2-40 Cause and solutions for E677/E678/E679 errors Cause Accessories power, accessories ENWW Issue Solution Are the power cables of the accessories and the communication cable to the printer unit connected securely? Turn the power off and then on. Replace the ACC controller PCB. Troubleshooting control-panel messages 175 2 E710, E711 (CLJ 8550mfp) These are IPC (initialization) errors. E710 occurs when the IPC sync register for the copy module and the copy module-related accessories fail to go to one (1) within three seconds. E711 occurs when data has been written 10 times or more to the error register within 1.5 seconds during the communication between the copy module and copy module-related accessories. Table 2-41 Cause and solutions for E710/E711 errors Cause Issue Copy module Turn the copy module rear power Reader controller PCB, accessories (connected to the copy module) Solution End. switch off and then on; then, turn on the control panel power soft switch. Is the problem corrected? Replace the reader controller PCB. Is Refer to the Service Manual for the problem corrected? the reader-unit accessory in question. E712 (CLJ 8550mfp) The error shown on the touch-screen display is in the ADF. See the CLJ 8550 mfp service manual. This error indicates that the IC for communication on the ADF side is faulty. This error occurs when the communication with the copy module has been interrupted for five seconds or more. E717 (CLJ 8550mfp) This error occurs when the copy module is started after disconnecting the copy data control without canceling the open circuit detection mechanism of the copy module. If this error has occurred, execute error clear and set COPIER > OPTION > IN-FACE > B-CLR in service mode to “0”, and then disconnect the copy data controller. Note The copy data controller is not available for the LJ8550 MFP. 176 Chapter 2 – Service and troubleshooting ENWW E805 (CLJ 8550mfp) The heat discharge fan 1 (FM, used for the fusing assembly and area near the feeding assembly) is faulty. This error occurs when the motor lock signal (FAN1LK) goes to one (1) for 1.5 seconds or more while the fan is rotating. Table 2-42 Cause and solutions for E805 error Cause Connectors (heat discharge fan 1 drive assembly) Connectors (24 V for heat discharge fan 1 drive) Heat discharge fan 1 Developing rotary motor PCB Main relay PCB The dc power ENWW Issue Solution Are connectors J702 and J706 on the developing rotary motor PCB and connector J220 on the dc controller PCB connected securely? Connect the connectors securely. 2 Are connector J701 on the developing Connect the connectors rotary motor PCB, connectors J648 securely. and J641 on the main relay PCB, and J102 on the dc power supply connected securely? Does the voltage change to about 24 V between connectors J702-3 (FAN1ON) on the developing rotary motor PCB and J702-1 (GND)? Does the voltage change to about 24 V between connectors J701-1 (+24 VB) and J701-2 (GND) on the developing rotary motor PCB immediately after the copier is turned on? Does the voltage between connectors J641-1 (+24 VB) and J641-4 (GND) on the main relay PCB change to 24 V immediately after the copier is turned on? Is the dc power present? Replace the heat discharge fan 1. Replace the developing rotary motor PCB. Replace the main relay PCB. See the CLJ 8550 mfp service manual. Replace the dc controller PCB. Troubleshooting control-panel messages 177 E806 (CLJ 8550mfp) The heat discharge fan 2 (FM2, used for the area around the intermediate transfer drum) is faulty. This error occurs when the fan motor lock signal (FAN2LK) goes to one (1) for 1.5 seconds or more while the fan is rotating. Table 2-43 Cause and solutions for E806 error Cause Connectors (heat discharge fan 2 drive assembly) Connectors (24 V for heat discharge fan 2 drive) Heat discharge fan 2 Developing rotary motor PCB Main relay PCB The dc power (printer unit) 178 Issue Solution Are connectors J603 and J706 on the Connect the connectors securely. developing rotary motor PCB and connector J220 on the dc controller PCB connected? Is connector J701 on the developing Connect the connectors securely. rotary motor PCB, connectors J648 and J641 on the main relay PCB, and connector J102 on the dc power supply connected securely? Does the voltage change to about 24 V between connector J703-3 (FAN2ON) and J703-1 (GND) on the developing rotary motor PCB immediately after the copier is turned on? Does the voltage change to about 24 V for connector J702-1 (GND)? Does the voltage change to about 24 V between connectors J701-1 (+24 VB) and J701-2 (GND) on the developing rotary motor PCB immediately after the copier is turned on? Does the voltage change to 24V between connectors J641-1 (+24 VB) and J641-4 (GND) on the main relay PCB immediately after the copier is turned on? Is the dc power present in the printer unit? Chapter 2 – Service and troubleshooting Replace the heat discharge fan 2. Replace the developing rotary motor PCB. Replace the main relay PCB. See the CLJ 8550 mfp service manual. Replace the dc controller PCB. ENWW E807 (CLJ 8550mfp) The heat discharge fan (FM3, used for the area around the scanner) is faulty. This error occurs when the fan motor lock signal (FAN3LK) goes to one (1) for 1.5 seconds or more while the fan is rotating. Table 2-44 Cause and solutions for E807 error Cause Connectors (heat discharge fan 3 drive assembly) Connectors (24 V for heat discharge fan 3 drive) Heat discharge fan 2 Main relay PCB The dc power (printer unit) ENWW Issue Solution Are connectors J681 and J682 on the pre-exposure LED relay PCB and relay connectors J18 and J17, connectors J645 and J647 on the main relay. PCB, and connector J227 on the dc controller PCB connected securely? Are connectors J641 on the main relay PCB and J102 on the dc power supply connected securely? Connect the connectors securely. Does the voltage change to about 24 V between connectors J645-3 (FAN3ON) on the main relay PCB and J6451(GND) immediately after the copier is turned on? Does the voltage change to 24V between connectors J641-1 (+24 VB) and J641-4 (GND) on the main relay PCB immediately after the copier is turned on? Is the dc power present in the printer unit? Replace the heat discharge fan 3. 2 Connect the connectors securely. Replace the main relay PCB. See the CLJ 8550 mfp service manual. Replace the dc controller PCB. Troubleshooting control-panel messages 179 E808 (CLJ 8550mfp) The fusing drive circuit power unit is faulty. This error occurs when the fusing heater safety circuit has detected a fault in the upper and lower fusing heaters. Table 2-45 Cause and solutions for E808 error Cause Fusing assembly Power supply (printer unit) Issue Solution Replace the fusing assembly. Is the problem corrected? End. Replace the power supply on the printer side. Is the problem corrected? (The fusing heater drive circuit or the fusing heater safety circuit is faulty.) End Replace the dc controller PCB. E809 (CLJ 8550mfp) The power supply cooling fan (FM4, used for the area around the copy module main power supply) is faulty. This error occurs when the fan error signal (FANERR) goes to zero (0) for 1.5 seconds or more while the fan is rotating. Table 2-46 Cause and solutions for E809error Cause Connectors (power supply cooling fan drive assembly) Power supply (cooling fan) The dc power 180 Issue Solution Are the relay connector J2031, Connect the connectors securely. connectors J7 and J8 on the copy module main power supply PCB, and connector J1602 on the reader controller PCB connected securely? Does the voltage change to 24 V between connectors J7-3 (+24 VB) on the copy module main power supply PCB and J7-4 (GND) immediately after the copier is turned on? Is dc power present in the copy module? Chapter 2 – Service and troubleshooting Replace the power supply cooling fan. See the CLJ 8550 mfp service manual. Replace the dc controller PCB. ENWW E810 (CLJ 8550mfp) This error occurs when the drum cartridge detecting switch does not turn on at power-on or when the cover is opened/closed. Table 2-47 Cause and solutions for E810 error Cause Drum cartridge Drum cartridge switching lever Drum cartridge switching guide Connector (memory inside the drum cartridge) Memory (inside the drum cartridge) Issue Solution Is the drum cartridge set in the copier correctly? Set the cartridge correctly, and turn the copier off and then on. Check the drum cartridge switching If the lever is displaced, set it to lever on the printer side. Is it displaced the correct position. If the lever or cracked? is cracked, replace it. Is the drum cartridge switching guide defective? Replace the drum cartridge. Are connector J209 on the dc controller Connect the connectors PCB and relay connectors J47 and J48 securely. connected securely? Replace the drum cartridge. Is the problem corrected? End. Replace the dc controller PCB. E812 (CLJ 8550mfp) This error occurs when the intermediate transfer drum (ITD) home position is not detected within a specific time (about 10 seconds). Table 2-48 Cause and solutions for E812 error Cause Issue Intermediate Is the intermediate transfer drum (ITD) set in the printer properly? transfer drum (ITD), Density sensor ENWW Solution Set the drum properly, and turn the power off and then on. See “E020 (CLJ 8550mfp)” on page 159 Troubleshooting control-panel messages 181 2 E813 (CLJ 8550mfp) This error occurs when both the upper fusing roller temperature detection signal (FXTHU) and the lower fusing roller temperature detection signal (FXTHL) indicate -10° C or less. Table 2-49 Cause and solutions for E813 error Cause Fusing assembly Checks Action Is the fusing assembly set in the printer properly? Connector (fusing assembly) Connector (dc controller PCB) Is connector J26 of the fusing assembly connected securely? Set the fusing assembly properly, and turn the power off and then on. Connect the connector securely. Is connector J222 on the dc controller PCB connected securely? Connect the connector. Replace the dc controller PCB. E814 (CLJ 8550mfp) A specific number of copies have been counted after the photosensitive drum end of life warning has been issued. Table 2-50 Cause and solutions for E814 error Cause Drum cartridge Checks Action Replace the drum cartridge. Is the problem corrected? End. Replace the dc controller PCB. E903 (CLJ 8550mfp) The error shown on the touch-screen display is in the side HCI. See the CLJ 8550 mfp service manual. This error indicates one of three problems: 1 An error has been detected in the paper deck lifter motor. 2 The lifter upward movement takes longer than the specified time. 3 The paper level change time is in excess of a specific value while the lifter is moving up. E999 (CLJ 8550mfp) A timing problem has occurred with the copy module. Power cycle the unit to alleviate the problem. 182 Chapter 2 – Service and troubleshooting ENWW Service mode functions Service mode allows for the modification of page counts and certain registration values for the printer. Note The CLJ 2500 does not have a control panel display. Service mode information is modified and/or set using the following PJL commands from the MS-DOS Editor window. Follow the instruction in table 2-52 on page 186 to modify or set service information. To gain access to the service mode Table 2-51 Gaining access to the service mode Product Instructions CLJ 2500 The CLJ 2500 does not have a control panel. For service mode functions, open the Embedded Web server by using one of these methods: z From the HP Color LaserJet 2500 Series Toolbox, click the picture of the printer on the Device tab (Windows 98, NT 4.0, Me, 2000, and XP only). z For network printers only, type the IP address for the printer. To find the IP address, print a Configuration page at the printer control panel by pressing GO and CANCEL JOB simultaneously. The embedded Web server has three tabs that contain settings and information about the printer. See the service manual for more information about each tab. Note For more information about the embedded web server, see hp embedded web server for hp LaserJet printers and mfps. ENWW Service mode functions 183 2 Table 2-51 Gaining access to the service mode Product Instructions CLJ 4500 CLJ 4550 Note In the CLJ 4500, when the configuration page is printed while in service mode, all event log messages are printed as well. The CLJ 4550 event log can be printed from the Information menu. If both the formatter and DC controller are replaced at the same time, use service mode to execute the color plane registration sequence to ensure optimum print quality. 1 Hold down the CANCEL JOB key and SELECT key while turning the printer on until the display is blank and the 3 LEDs are on. 2 Press the right side of the MENU key, and then press the SELECT key. Service mode will be displayed on the front panel briefly followed by two rows of asterisks. The printer will go through its normal start up cycle then display SERVICE MODE on the front panel. Entering the Service Mode Menu 1 From a READY state, press MENU until SERVICE MENU appears. 2 Press ITEM – (the left side of the key) and VALUE – simultaneously. 3 Press the MENU key to access the Service menu. 184 Chapter 2 – Service and troubleshooting ENWW Table 2-51 Gaining access to the service mode Product Instructions CLJ 4600 CLJ 5500 The Service menu is PIN protected for added security. When you select SERVICE from the list of menus, you are prompted to enter your 8-digit PIN number. The PIN for this printer is 04550002. 1 Press UP ARROW or DOWN ARROW until the first digit of the PIN is displayed. 2 Press SELECT to save the digit. The display will replace the digit with an asterisk. 3 Repeat steps 1 and 2 until all eight digits are entered. 4 Press RIGHT or LEFT ARROW at any time to move to the previous digit. CLJ 8500 CLJ 8550 1 From a READY state, press MENU until SERVICE MENU appears. 2 Press ITEM – (the left side of the key) and VALUE – simultaneously. ENWW Service mode functions 185 2 Service menu items Table 2-52 Service menu items Product Service menu items CLJ 2500 The CLJ 2500 does not have a control panel display. Service mode information is modified or set using PJL commands. The “X” AND “#” entries in the PJL command list below are placeholders. Replace them with the correct serial and formatter information and page counts. Page count information is found on the printer configuration page (See page 26). ESC%-12345X @PJL SET SERVICEMODE=HPBOISEID @PJL SET SERIALNUMBER=XXXXXXXX @PJL SET FORMATTERNUMBER=XXXX @PJL SET PAGES=### @PJL SET COLORPAGES=### @PJL SET SERVICEMODE=EXIT ESC%-12345X Access the MS-DOS command prompt and open the MS-DOS editor window. 1 Go to the Windows Start menu and open the Programs, then Accessories menus. 2 Select Command Prompt from the menu list. 3 The command prompt window appears. Type in “EDIT” (no quotation marks) and then press the ENTER key. 4 The MS-DOS editor widow will appear. The CLJ 2500 does not have a control panel. For service mode functions, see hp embedded web server for hp LaserJet printers and mfps. 186 Chapter 2 – Service and troubleshooting ENWW Table 2-52 Service menu items (continued) Product Service menu items CLJ 2500 continued Create the escape sequence (ESC) in the MS-DOS editor window. 1 Press and hold down the CTRL key. Press the P key, and then release both keys. 2 Press the ESC key. The editor will insert a left pointing arrow symbol. 2 3 Type the PJL command line next to the arrow. Send the PJL command to the printer. 1 Open the File menu and select Save As to save and name the PJL command file. 2 Open the File menu and select Exit to return to the MS-DOS prompt window. 3 Type in “C:\Copy_filename.txt LPT1;” (no quotation marks) and press the ENTER key. 4 The PJL file containing the PJL command is sent to the printer. CLJ 4500 CLJ 4550 ENWW The Service menu provides the options listed below. Press the ITEM key to scroll through the Service menu. z Serial number z Transfer maintenance count z Fuser maintenance count z Color page count z Total page count z Registration page (see page 196) z Diagnostics mode (see page 200) z Paper path test (see page 204) z Developer test (see page 204) z Drum test (see page 205) z Door sensor test (see page 206) z Formatter diagnostics (see page 202) z Engine test (see page 199) See the page number referenced opposite the item for more details. Service mode functions 187 Table 2-52 Service menu items (continued) Product Service menu items CLJ 4600 CLJ 5500 z CLEAR EVENT LOG Allows you to clear the printer’s internal event log z TOTAL PAGE COUNT Allows you to reset the page count after replacing the formatter. The page count should reflect the number of pages printed on the print engine rather than the formatter. z TRANSFER KIT COUNT Allows you to reset the page count of the current transfer unit if the value is lost. This item automatically resets to zero when the transfer unit is replaced and the user selects the choice to reset the transfer count. z FUSER KIT COUNT Allows you to reset the page count of the current fuser if the value is lost. This item automatically resets to zero when the fuser is replaced and the user selects the choice to reset the fuser count. z SERIAL NUMBER Allows you to update the serial number if you replace the formatter. z SERVICE ID If you replace the formatter, this item allows you to set the date to the date the printer was first used, rather than the date the new formatter was installed. z COLD RESET PAPER If the customer uses default paper size of A4 (used in Europe), this item allows you to reset the default if you replace the formatter. 188 Chapter 2 – Service and troubleshooting ENWW Table 2-52 Service menu items (continued) Product Service menu items CLJ 8500 CLJ 8550 z z z z z z z ENWW NVRAM SETTING menu is provided to replace values that might be lost when a formatter board or control board is replaced in the field Serial number Formatter number Total page count Color page count Duplex count Transfer life left Fuser life left Engine setting 1-registration values are located on a sticker inside of the front of the printer. Engine setting 2-same as above. CR paper size (cold reset) Clear event log FORMATTER DIAGNOSTICS menu is provided for manufacturing and field service personnel to perform specific diagnostic tests on the formatter board and its related components. Execute tests Fault setting-determines how the printer will perform when an error is encountered. ROM CRC-memory test DRAMM DIM-memory test IDE ASIC-formatter IDE ASIC test Disk-hard disk test VX ASIC-formatter VX ASIC test Fault log-event error log Power off to exit-turn printer power off to exit the formatter diagnostics Paper path Developer motor Drum motor Sensor monitor Exit service mode Service mode functions 189 2 NVRAM Initialization NVRAM initialization should always be executed immediately after replacing the firmware or the formatter board. This procedure aligns the firmware with the formatter. Not performing NVRAM initialization could result in deterioration of print quality. Before initializing NVRAM, be sure to gather and write down the information listed below, if possible. z Total page count and color page count. z Percentage of life remaining for both the transfer kit and the fuser kit. z Serial number. Note This information is available on the configuration page or through the service mode. After replacing the firmware or the formatter board, the following settings are changed or lost. If you do not wish to accept the new values, use Service Mode to enter the previous settings that you wrote down prior to initializing. z Total page count and total color page count z Transfer kit percentage of life remaining z Fuser kit percentage of life remaining z Printer serial number To perform NVRAM initialization Table 2-53 Performing NVRAM initialization Product Instructions CLJ 2500 1 Turn the printer off. 2 Press and hold the GO button. 3 Turn the printer on and continue to hold the GO button. 4 After the Go, Ready, and Attention LEDs turn on, continue holding for at least 20 seconds. During this process, the Attention, Ready, and Go LEDs will each turn off. 5 Release the GO button. 6 The device LEDs will begin cycling from front to back. The NVRAM-init process runs until the printer is in the Ready state. 190 Chapter 2 – Service and troubleshooting ENWW Table 2-53 Performing NVRAM initialization Product Instructions CLJ 4500 CLJ 4550 1 Turn on the printer while holding down both the CANCEL JOB and SELECT keys until all the LED lights are on, then release the keys. 2 Press CANCEL JOB. 3 Press SELECT. CLJ 4600 CLJ 5500 2 1 Turn the printer on and watch the control panel display. 2 When the display begins showing the memory count, press and hold DOWN ARROW until all three lights on the control panel are lit. 3 Press DOWN ARROW. 4 Press PAUSE/RESUME. The display should show SKIP DISK LOAD. 5 Press DOWN ARROW until NVRAM INIT is highlighted. 6 Press DOWN ARROW. The printer will initialize NVRAM and then continue its power-on sequence. CLJ 8500 CLJ 8550 ENWW Not applicable NVRAM Initialization 191 Hard disk initialization Table 2-54 Hard disk initialization Product Instructions CLJ 2500 series Not applicable CLJ 4500 CLJ 4550 Not applicable CLJ 4600 CLJ 5500 1 Turn the printer on. 2 As the printer performs its power-on sequence, press and hold the PAUSE/RESUME button until all three lights on the control panel are lit. 3 Press ENTER. The display should show INITIALIZE DISK. 4 Press SELECT. The printer will initialize the hard disk and continue its power-on sequence. CLJ 8500 CLJ 8550 1 From the host computer, delete data from the printer hard disk using the printer drivers or a disk management application. 2 To clear all data from the printer hard disk, reformat the printer hard disk from the printer control panel. To reformat the printer hard disk: 192 z a Press MENU until CONFIGURATION MENU appears on the display. z b Press ITEM until INITIALIZE DISK appears on the display. z Press SELECT to reformat the printer hard disk. Chapter 2 – Service and troubleshooting ENWW Calibration bypass (CLJ 4600 and CLJ 5500 only) During certain diagnostic procedures on the CLJ 8550 or CLJ 8550, you will need to bypass the automatic calibration that is performed whenever the printer is turned on. To bypass calibration 1 Turn the printer on and watch the control panel display. 2 When the display begins showing the memory count, press and hold DOWN ARROW until all three lights on the control panel are lit. 3 Press UP ARROW. 4 Press PAUSE/RESUME. The display should show SKIP 5 Press UP ARROW until SKIP DISK LOAD. CALIBRATION is highlighted. 6 Press SELECT. The printer will skip calibration and then continue its power-on sequence. Calibrate Now (CLJ 4600 and CLJ 5500 only) Use the following procedure to calibrate the CLJ 8500 or CLJ 8550 whenever you replace the DC controller, the ETB, the drum drive motors, the drum drive gears, or a laser/scanner. 1 Press SELECT to enter the MENUS. 2 Press DOWN ARROW to highlight CONFIGURE DEVICE. 3 Press SELECT to select CONFIGURE 4 5 6 7 DEVICE. Press DOWN ARROW to highlight PRINT QUALITY. Press SELECT to select PRINT QUALITY. Press DOWN ARROW to highlight CALIBRATE NOW. Press SELECT to select CALIBRATE NOW. 8 Wait for the printer to calibrate. ENWW Hard disk initialization 193 2 Cold Reset Cold reset clears all data from the print buffer and returns the printing menu and the configuration menu to the factory default settings. To perform a cold reset Product Instructions CLJ 2500 1 Turn the printer off. 2 Press and hold down the GO button. 3 Turn the printer on and continue to hold the GO button 9 After the Go, Attention, and Ready LEDs turn on, continue holding the GO button for approximately five seconds, but not longer than fifteen seconds. During this process, the Attention LED will turn off. 4 Release the GO button. Note If either the Go or Ready LED turned off or no LEDs turned off before the GO button was released, then repeat steps 1 through 5. 10 The printer LEDs will begin cycling from front to back. The cold-reset process runs until the printer is in the Ready state. CLJ 4500 CLJ 4550 Select RESTORE FACTORY DEFAULTS from the Reset menu. CLJ 4600 CLJ 5500 1 Turn the printer on. 11 As the printer performs its power-on sequence, press and hold SELECT until all three lights on the control panel are lit. 12 When SELECT LANGUAGE appears on the display, press UP ARROW until COLD RESET appears on the display. 13 Press SELECT. The printer will perform a cold reset and then continue its power-on sequence. 194 Chapter 2 – Service and troubleshooting ENWW Product Instructions CLJ 8500 CLJ 8550 1 Print a configuration page to record the previous printer settings. 2 Turn the printer off. 14 Hold down GO while turning the printer on. Release GO after COLD RESET appears on the printer control panel display. 2 COLD RESET (in English) appears on the display for one second to verify that the key sequence has been recognized, followed by the power-on self-test message. Once the power-on self-test is finished, the message RESTORING FACTORY SETTINGS displays in English. ENWW Hard disk initialization 195 Registration page Product Instructions CLJ 2500 Not applicable CLJ 4500 Note CLJ 4550 You must set the registration values if both the formatter and DC controller are replaced at the same time or if the formatter was previously installed in another printer. If the DC controller is replaced by itself, these values are copied from the formatter to the DC controller. If a new formatter is replaced, or if an NVRAM initialization is performed (see page 190), these values are loaded onto the formatter from the DC controller. Printing a registration page 1 Scroll through the Service menu until PRINT REGISTRATION PAGE is displayed. 2 Select the paper tray to pull paper from (only when setting left side margins will the tray actually matter). 3 Press SELECT to print the registration page. CLJ 4600 1 Press SELECT to enter the MENUS. CLJ 5500 2 Press DOWN ARROW to highlight DIAGNOSTICS. 3 Press SELECT to select DIAGNOSTICS. 4 Press DOWN ARROW to highlight PQ TROUBLESHOOTING. 5 Press SELECT to print the pages. CLJ 8500 Not applicable CLJ 8550 Not applicable 196 Chapter 2 – Service and troubleshooting ENWW Setting registration numbers (CLJ 4500 and CLJ 4550 only) On each of the color bars in the process section are bold numbers that indicate the current number set on the control panel. These bold numbers will always be in the middle of the bars. To set the correct value for each of the colors, look at the lines within the bar and find the grouping that has the color line directly on top of the black line (it will have more white space). Print at least five registration pages to see if the new settings are correct. Note Using a magnifying glass to look at the lines will help in selecting the best number. Setting the registration number (CLJ 4500/4550 only): 1 Use the ITEM key to select the appropriate color (cyan, magenta, or yellow) to view or change its registration number. 2 Press the +VALUE- key to change the registration number to the one identified. 3 Press the SELECT key to enter the value. Setting margin numbers (CLJ 4500/4550 only): The top margin number is not tray dependent like the left side margin. You can print the registration page from whichever tray has paper. Using a ruler, measure from the top edge of the paper to the series of lines. Find the line that is 13 mm (0.5 in) away from the edge of the paper. Setting the top margin registration value: 1 Press the ITEM key to scroll through the Service menu until top margin is displayed. 2 Press the +MENU- key until the number to be entered is displayed. 3 Press the SELECT key to enter the number. Print another registration page and the number just entered will align with the arrow and be bold. The left-side margin setting is tray dependent. Tray 1 has its own number while Trays 2 and 3 are combined. The procedure is the same as the top margin with one exception. The page must be printed from the tray that will be adjusted. ENWW Hard disk initialization 197 2 Printing from Tray 1: 1 Press the ITEM key until PRINT REGISTRATION PAGE TRAY = 1 (default) is displayed. 2 Press the SELECT key. 3 Measure from the left side of the paper to the lines and find the line that is 13 mm (0.5 in) from the edge of the paper. If the number for the line is different then the current number: 1 Press the ITEM key until TRAY 1 LEFT MARGIN = # is displayed. 2 Press the +VALUE- key to change the number to the number required. 3 Press the SELECT key. Printing from Tray 2 and 3: 1 Press the ITEM key until PRINT REGISTRATION PAGE TRAY = 2 or 3 is displayed. 2 Press the SELECT key. 3 Measure from the left side of the paper to the lines and find the line that is 13 mm (0.5 in) from the edge of the paper. If the number for the line is different then the current number: 1 Press the ITEM key until TRAY 2 AND 3 LEFT MARGIN = # is displayed. 2 Press the +VALUE- key to change the number to the number required. 3 Press the SELECT key. 198 Chapter 2 – Service and troubleshooting ENWW Engine test The test patterns either contain vertical lines or horizontal lines, depending on the product. When an image defect appears, a test print can be made to identify the problem. The test print can be made by pressing the test print switch located on the right side of the printer (see figure below). The engine test does the following: z Verifies that the print engine is functioning correctly (the formatter PCB is completely bypassed during an engine test). z Isolates printer problems. z Checks and adjusts registration. z Can be activated with the formatter PCB removed. 2 Table 2-55 Engine test button Product Location of engine test button CLJ 2500 The engine test switch is inside tray 1, on the left side, just below the front cover. To print an engine test, turn the product off and then on again, open tray 1, and then press the engine-test switch. Note The formatter must be connected to the ECU to perform an engine test. Otherwise, the printer does not print the engine test. CLJ 4500 CLJ 4550 The engine test button is accessed through a small hole on the side of the printer. Note The engine test does not print from tray 1. For the printer to perform an engine test, tray 2 or tray 3 must be installed and loaded with paper, and the print cartridge must be installed in the printer. CLJ 4600 CLJ 5500 The engine test button is accessed through a small hole on the side of the printer. CLJ 8500 CLJ 8550 The CLJ 8500/8550 do not support this function. ENWW Engine test 199 Diagnostics mode CLJ 4500/4550 This section provides an overview of the diagnostic tools incorporated into the HP Color LaserJet 4500 series and 4550 series printers. CAUTION Use caution when performing printer diagnostics to avoid risk of injury. Only trained service personnel should access the diagnostic mode with the skins removed. There are two diagnostic sections built into the firmware, one for the formatter and the other for the engine. Each section contains different tests that allow the service technician to verify printer functionality. While in diagnostic mode there are no error messages associated with these tests. Therefore, determination of the problem will rely on the technicians skill. To exit diagnostic mode, turn the printer off. Note In the 4550 series, you can abort a test run by pressing the CANCEL JOB key and holding it down until the display shows the menu again. In some cases, it will take several seconds. To cancel the NVRAM test while it is running, press the CANCEL JOB key and hold it down until the display show the menu again. NVRAM is put back in its original form, and an error is logged in the Fault log. When the Attention LED is on, then there has been an error in the test. Press the MENU key to get to the Fault log menu, the ITEM key to see the different log messages, and the -VALUE+ key to scroll the message back and forth. 200 Chapter 2 – Service and troubleshooting ENWW Gaining access to the diagnostics mode z To access the diagnostics mode, hold down the left side of the ITEM key and turn on the printer. Formatter diagnostics are designed to be used by qualified service personnel. This set of tests are designed to thoroughly test the functionality of the formatter. If all the tests pass, the formatter is working correctly and it is likely that the problem resides elsewhere. Listed below are descriptions of the formatter tests available. CAUTION NVRAM can be lost if the printer is turned off during testing. Note In the 4550 series, you can abort a test run by pressing the CANCEL JOB key and holding it down until the display shows the menu again. In some cases, it will take several seconds. To cancel the NVRAM test while it is running, press the CANCEL JOB key and hold it down until the display show the menu again. NVRAM is put back in its original form, and an error is logged in the Fault log. When the Attention LED is on, then there has been an error in the test. Press the MENU key to get to the Fault log menu, the ITEM key to see the different log messages, and the -VALUE+ key to scroll the message back and forth. ENWW Diagnostics mode CLJ 4500/4550 201 2 Table 2-56 Formatter diagnostics CLJ 4500/4550 Test Description REPEAT If set to yes, the tests will run continuously until interrupted. In the 4550 series only, CANCEL JOB will abort the test. ON FAULT The following will occur for each setting: BREAK – The test will stop when a failure occurs. PAUSE – Stops the test for a short period of time then resume with the remaining tests. CONT – Continues to execute the tests even when a failure occurs. ROM CRC 4500 series only. Tests the firmware ROM for correct functionality. DRAM Tests the on-board RAM and the DIMMs. SRAM 1 Tests the SRAM inside the ASIC. SRAM 2 Tests the SRAM physically mounted on the formatter. NVRAM Do not interrupt the NVRAM test. Doing so will cause the printer to lose all NVRAM values. Tests the formatter NVRAM. This test takes 18 minutes to run and should only be used when NVRAM values are being lost. In almost all cases, this test should never be run. In the 4550 series only, CANCEL JOB will abort the test. Do not turn off the printer or corruption of the NVRAM could result; if the NVRAM test must be aborted, use the CANCEL JOB key. EXECUTE TESTS 202 Runs the selected tests. Chapter 2 – Service and troubleshooting ENWW Engine diagnostics CLJ 4500/4550 A good understanding of how the printer operates is required to use the engine diagnostics successfully. To have a better view of the areas being exercised, remove the left-side cover and the ITB drawer. Defeat the two ITB drawer switches located on the left side of the drawer cavity. Listed below are the diagnostics available and a brief description of what the diagnostic will do. Table 2-57 Engine diagnostics CLJ 4500/4550 Menu item Description Continuous Selected test will run once. Selected test will run in a continuous loop. In the 4550 series only, CANCEL JOB will abort the test. Turns on the motors that control the paper path section of the printer. In the 4550 series only, CANCEL JOB will abort the test. Paper Path Rotates the carousel and the developers. In the 4550 series only, CANCEL JOB will abort the test. Test Developer Test Turns on the drum drive motor that drives the drum and ITB. In the 4550 series only, CANCEL JOB will abort the test. Drum Test Displays the state for each of the paper path sensors and switches. In the 4550 series only, this test will continue running until the CANCEL JOB key is pressed. Path Sensors Displays the state for each of the door and drawer switches. In the 4550 series only, this test will continue running until the CANCEL JOB key is pressed. Door Sensors Selected test will run once. Selected test will run in a continuous loop. In the 4550 series only, CANCEL JOB will abort the test. ENWW Diagnostics mode CLJ 4500/4550 203 2 Developer test (CLJ 4500/4550) The developer test rotates the carousel stopping at each print cartridge and rotating the developer sleeve. For the best view of the carousel and the print cartridge sleeves, remove the drum cartridge. The drum drawer must be closed before the test can run. 1 Press the ITEM key until ENGINE DIAGS DEVELOPER TEST is displayed. 2 Press the SELECT key to run the test. The front panel displays ENGINE DIAGS E2:DEVELOPER while the test is running. Watch the carousel and make sure that the print cartridge developer sleeve rotates. The sequence is black followed by a pause, then magenta, cyan, and finally yellow. The test takes approximately 35 seconds. While the developer test is running you will see the drum turn if it is installed, as well as the drive gear for the ITB. 204 Chapter 2 – Service and troubleshooting ENWW Drum test (CLJ 4500/4550) The drum test exercises the drum drive mechanism. In addition, the fuser motor is turned on to allow the lift cams for the ITB to be rotated into the ITB up position. 1 Press the ITEM key until ENGINE DIAGS DRUM TEST displays. 2 Press the SELECT key to run the test. The front panel displays ENGINE DIAGS E3:DRUM while the test is running. Watch to see if the ITB lift cams turn and if both the drum drive gear and the ITB drive gear is rotating. Path sensors (CLJ 4500/4550) The path sensors test allows the paper path sensors and switches to be tested for correct operation. The table below shows the correlation between the identifier on the front panel and the sensor or switch it represents. Table 2-58 Paper path sensors and switches CLJ 4500/4550 Name Description PS8 Tray 2 paper detect sensor PS3 Tray 1 last piece of media pulled sensor PS4 Tray 1 paper detect sensor SW801 Tray 2 paper size switch 2 SW802 Tray 2 paper size switch 1 SW803 Tray 2 paper size switch 0 PS3001 Optional Tray 3 paper detect sensor SW3001 Optional Tray 3 paper size switch 2 SW3002 Optional Tray 3 paper size switch 1 SW3003 Optional Tray 3 paper size switch 0 PS10 Carousel position sensor PS11 N/A N/A 500-sheet feeder: 1=installed, 0=uninstalled PS9 Top output tray full sensor ENWW Diagnostics mode CLJ 4500/4550 205 2 1 Press the ITEM key until ENGINE DIAGS PATH SENSORS is displayed on the front panel. 2 Press the SELECT key to activate the test. The front panel will display A through N with a binary value below it. When running this test, make sure the ITB drawer is installed with Tray 2 and Tray 3 (if installed) removed. In this state, the default value on the front panel should be: 0X111111110010, where the x can be either 0 or 1. If there is any other value, then there is a possible problem. Identify the sensor or switch in the table above and test to see if the value changes. Cassette papersize settings for each tray are described in the table below. Table 2-59 Paper-size settings CLJ 4500/4550 Paper Size Tray 2 switches (DEF) Tray 3 switches (HIJ) A4 000 000 B5 001 001 Custom (A5) 010 011* Custom (B5 ISO) 011 011* Letter 100 100 Executive 101 101 Legal 110 110 No tray installed 111 111 . Path sensors (CLJ 2500/4600/5500/8500/8550) See chapter 5 for locations of path sensors. Door sensor test (CLJ 4500/4550) The door sensor test allows service personnel to open and close doors on the printer while watching the sensor status on the front panel. Switches 4 and 5 are in series with each other, which causes the value to toggle under identifier A. 206 Chapter 2 – Service and troubleshooting ENWW Once the door sensor test is initiated, the front panel displays the status for each sensor listed in the table below. As a door is opened and closed, the state of the sensor changes the indicator values on the front panel. Table 2-60 Sensor status CLJ 4500/4550 Name Description SW4 and Front and rear door switches. SW5 2 SW1 ITB drawer switch. SW2 Print cartridge door SW3 Drum drawer switch. Drum detect Detect if a drum cartridge is installed. Fuser Detects if fuser is installed. Changes the state of the sensor if not detected or removed when rear door is opened and closed. 1 Press the ITEM key until ENGINE DIAGS DOOR SENSORS is displayed on the front panel. 2 Press the SELECT key to activate the test. The front panel displays A through F with a binary value below it. All the doors and drawers should be closed. In this state, the display will show all 0’s. Open the doors and drawers one at a time to verify correct functionality. If operating correctly, the 0 will change to a 1. If a 1 is displayed with all doors and drawers closed, there is a bad switch or connection. ENWW Diagnostics mode CLJ 4500/4550 207 Door sensor test (CLJ 8500/8550 2,000-sheet input unit) 1 Set the DIP switches on the 2,000-sheet input unit’s controller PCA for the sensor test. (See page 430 for an explanation of the settings.) 2 For each paper sensor: a Open the paper tray and the VTU on the 2,000-sheet input a unit. b Remove the metal spring that holds the sensor unit in place (secured by 1 screw) (see figure 153 callout 2 and figure 154 callout 2). c Pull out the sensor unit. 4 Use the switch that is located on the unit’s power supply to switch to diagnostic mode. 5 Manually activate the sensor. When you activate the sensor, the bottom service LED on the controller PCA comes on. When you release the sensor, the LED goes off. If the LED does not come on, there is a problem with the sensor. Replace the corresponding field replaceable unit. 6 To stop the test, turn the power supply switch back to operational mode and set the DIP switches on the controller PCA to the off position. 208 Chapter 2 – Service and troubleshooting ENWW Troubleshooting printer accessories CLJ 8500/8550 Status LED descriptions CLJ 8500/8550 The status light on the front of the CLJ 8500/8550 provides status information. Table 2-61 Status LED on the 2,000-sheet input unit CLJ 8500/8550 State Description Solid green The unit is on and ready. None required. Solid amber The unit is experiencing a hardware malfunction. Isolate the problem using one of the other procedures described in this section. Flashing amber The unit has a media jam or a Clear the jam or remove the page needs to be removed page. from the 2,000-sheet input unit, even if the page is not jammed. The VTU might be open. Off Close the door. The printer might be in Power Press GO. Save mode. The unit is not receiving power. ENWW 2 Resolution Check the power supply and the power cables. Troubleshooting printer accessories CLJ 8500/8550 209 Service LED descriptions 1 2 3 Figure 2-1 Rear view of 2,000-sheet input unit (CLJ 8500/8550) 1 Service LEDs 2 DIP switches 3 Power supply Note Be sure to turn the power supply off and set all DIP switches to the off position when you finish the test, or the unit will not work. The DIP switch is ON if it is to the right. The DIP switch is OFF if it is to the left. Note To go from one test to another or to change the DIP switch settings, turn the power supply on the 2,000-sheet input unit to operational mode. Reset the DIP switches on the controller PCA, and then switch the power supply back to diagnostic mode to enable the new diagnostic test. 210 Chapter 2 – Service and troubleshooting ENWW Service LED interpretation CLJ 8500/8550 If the CLJ 8500/8550 2,000-sheet input unit is working properly, it will pick up paper from tray 4 and expel it; the bottom service LED will flash regularly every 0.5 seconds. Table 1. Patterns of LED flashing (CLJ 8500/8550) 2 Long Short Description (1 sec) (0.3 sec) Recommended action 3 1 Lifter malfunction Verify that the tray lifts freely by lifting it by hand. Verify that the paper size plates are installed correctly (in the same corresponding slots) and are not bent. If neither of these is the problem, replace tray 4. 2 1 Registration sensor delay jam The media does not reach the sensor. Open the VTU door and remove the media. Replace the paper feed (VTU) assembly or the paper pick-up assembly. 2 2 Registration sensor stationary jam/initial jam Open the VTU door and remove the media. Check the sensors and replace the corresponding field replaceable unit. 2 3 Jam sensor delay jam The media did not reach the sensor. Open the VTU door and remove the media. Replace the paper feed (VTU) assembly or the paper pick-up assembly. 2 4 Jam sensor stationary jam/initial jam Open the VTU door and remove the media. 1 1 VTU door is open Close the door. 1 2 Tray 4 is open Close the tray. Wrong paper size loaded Load the correct size of paper or check sensors. No paper in tray 4 Load paper or check sensors. 1 ENWW 3 Troubleshooting printer accessories CLJ 8500/8550 211 212 Chapter 2 – Service and troubleshooting ENWW 3 Jams Contents General paper path checklist . . . . . . . . . . . . . . . . . . . . . . . . . . . . . . . . . . . . . 214 Paper-path troubleshooting . . . . . . . . . . . . . . . . . . . . . . . . . . . . . . . . . . . . . . 215 Paper-path test . . . . . . . . . . . . . . . . . . . . . . . . . . . . . . . . . . . . . . . . . . . . 215 Jams . . . . . . . . . . . . . . . . . . . . . . . . . . . . . . . . . . . . . . . . . . . . . . . . . . . . . . . . 218 CLJ 2500 jams . . . . . . . . . . . . . . . . . . . . . . . . . . . . . . . . . . . . . . . . . . . . 218 CLJ 4500/4550 jam locations . . . . . . . . . . . . . . . . . . . . . . . . . . . . . . . . . 221 CLJ 4600/5500 jam locations . . . . . . . . . . . . . . . . . . . . . . . . . . . . . . . . . 223 CLJ 8500/8550 jam locations . . . . . . . . . . . . . . . . . . . . . . . . . . . . . . . . . 226 Persistent jam troubleshooting . . . . . . . . . . . . . . . . . . . . . . . . . . . . . . . . . . . . 229 CLJ 2500 . . . . . . . . . . . . . . . . . . . . . . . . . . . . . . . . . . . . . . . . . . . . . . . . . 229 CLJ 4500/4550 . . . . . . . . . . . . . . . . . . . . . . . . . . . . . . . . . . . . . . . . . . . . 229 CLJ 4600/5500 . . . . . . . . . . . . . . . . . . . . . . . . . . . . . . . . . . . . . . . . . . . . 229 CLJ 8500/8550 . . . . . . . . . . . . . . . . . . . . . . . . . . . . . . . . . . . . . . . . . . . . 238 ENWW 213 General paper path checklist z Verify that media is correctly loaded in the input trays and that all length and width guides are set correctly. z Clean the printer. Debris in the paper path, such as toner and paper dust inhibits free movement of media through the printer and blocks the sensors. z Change the printer input and output selections to determine if the problem is associated with a particular area of the printer. z Check the condition of the pickup rollers and feed rollers. Worn separation pads on the multipurpose tray can cause media to multifeed. Bent separation tabs can cause media misfeeds and multifeeds. Replace the tray, if necessary. z Defective paper-tray switches can cause paper jams by indicating the wrong paper size to the formatter. z Scraps of paper that remain in the paper path can cause intermittent paper jams. Always check that the paper path is clear when you clean the printer and when you clear paper jams. Also, remove the fuser and carefully check it for jammed paper. 214 Chapter 3 – Jams ENWW Paper-path troubleshooting Paper-path test CLJ 2500 paper-path test If media is not being picked up or is not moving through the paper path, you might want to observe all of the paper-motion activities. Override the door interlock (SW301) to observe: z motor rotation z solenoid action z pickup-roller motion z drive-roller, transfer-roller, fuser-roller and gear, and delivery-roller motion Push a piece of heavy paper into the slot in the top cover (callout 1) to engage SW301 (this overrides the door interlock). 1 Figure 3-1 CLJ 2500 door interlock ENWW Paper-path troubleshooting 215 3 CLJ 4500/4550 paper-path test 1 Press the ITEM key until you see ENGINE DIAGS PAPER PATH TEST on the control panel display. 2 Press the SELECT key to activate the test. While the test is running you will see ENGINE DIAGS E1:PAPERPATH on the control panel display. The test takes approximately 15 seconds to run. The following components function during the paper-path test: the fusing motor (M1), paper path motor (M2), and associated gears and assemblies. The paper pick roller for tray 2 can be activated by manually activating the paper picksolenoid (SL2). This test will not pick paper and move it through the paper path. To test this function, simply run a Configuration page. For multiple pages, select Continuous Configuration page on the control panel display. The paper-path test allows the service technician to verify the operation of components within the paper path. When the test is initiated, both the M1 and M2 are activated. You will see the ITB lift cams rotate once and the ITB drive gear turn briefly. The remaining portion of the test simply allows both the M1and M2 to run, and to move the gears and rollers that are associated with them. Note If an error occurs during the paper-path test, the message PATH_1PAPER PATH TEST FAILED appears. CLJ 4600/5500 paper-path test This diagnostic test generates one or more test pages that you can use to isolate the cause of jams. To isolate a problem, you can specify which input tray to use, specify whether to use the duplex path, and specify the number of copies to print. Multiple copies can be printed to help isolate intermittent problems. The following options become available after you enter the diagnostic mode: z Print test page. Run the paper path test from the default settings: Tray 2, no duplex, and one copy. To specify other settings, scroll down the menu and select the setting, then scroll back up and select PRINT TEST PAGE to start the test. z Source. Select Tray 1, Tray 2, or Tray 3 (if the optional 500-sheet paper feeder is installed). z Duplex. Enable or disable 2-sided printing. z Copies. Set the numbers of copies to be printed; the choices are 1,10, 50, 100, and 500. 216 Chapter 3 – Jams ENWW CLJ 8500/8550 paper-path test The paper-path test simulates a page moving through the paper path from input trays 1, 2, and 3 to the output bins. Removing some engine parts (such as the transfer drum) prevents paper from feeding completely. It is possible to select the input and output trays for the test by indicating in the PAPER PATH menu, the input tray and output bins to use (by selecting ON or OFF). Multiple input trays can be selected, but only a single output can be selected. A page is fed from each input tray to the selected output. If a jam occurs during the test, the test should continue with the next input tray in the list. CAUTION Because jam detection is OFF in this mode, an unattended test might result in damage to the printer. The pickup rollers, feed rollers, registration roller, transfer-belt press clutch (CL4), cleaning-roller press cam and solenoid (SL1), fuser, transfer belt, and output feed roller can be tested during the paper-path test. For safety reasons, the fuser, high-voltage supplies, and scanner are all turned off during testing. 1 From the Service Mode menu, press MENU until PAPER PATH appears. 2 Press ITEM until REPETITIONS appears. 3 Press -VALUE+ to specify the number of repetitions (1 to 10) and then press SELECT. 4 Press ITEM until the input source that you want to test appears (you can select more than one input source for the test). 5 Press -VALUE+ until ON or OFF appears on the display, and then press SELECT. 6 Press ITEM until OUTPUT= appears on the display. 7 Press -VALUE+ until TOP OUTPUT BIN or LEFT OUTPUT BIN appears on the display. 8 Press SELECT to select the output destination. 9 Press ITEM until EXECUTE TEST appears on the display, and then press SELECT to perform the paper-path test. Note To stop the paper path test, press CANCEL JOB. The transfer drum can be removed by opening the right upper door open and overriding the right cover interlock. However, media might not feed past the transfer area unless 11-by-17 inch or A3-sized media is used. ENWW Paper-path troubleshooting 217 3 Jams CLJ 2500 jams Occasionally, paper or other print media can become jammed during a print job. Causes include the following: z Input trays are loaded improperly or are overfilled. z Optional tray 2 or optional tray 3 is removed during a print job. z The top cover is opened during a print job. z Too many sheets have accumulated in an output area or blocked an output area. z The media being used does not meet HP specifications. See the user guide for information about print-media specifications. z The environment in which the paper was stored is too humid or too dry. See the user guide for information about print-media storage specifications. z Non-HP supplies are installed in the printer. Jams can occur in these locations: z Inside the printer z In input areas z In output areas Find and remove the jam by using the instructions on the following pages. If the location of the jam is not obvious, look first inside the printer. Loose toner might remain in the printer after a jam. This problem should resolve itself after a few sheets have been printed. 218 Chapter 3 – Jams ENWW CLJ 2500; to clear jams from inside the printer CAUTION Jams in this area might result in loose toner on the page. If you get toner on your clothes or hands, wash them in cold water. (Hot water will set the toner into the fabric.) 1 Open the top cover. 2 Remove the imaging drum by pushing it away from you and lifting it out of the printer. Note You cannot reach jams by removing the print cartridges. 3 Complete one of these steps: If the leading edge or the trailing edge of the paper is visible, carefully pull the paper out of the printer. If the paper is too difficult to remove, remove the jam as described in “CLJ 2500; to clear jams from output areas” on page 220. 4 After the jam has been removed, replace the imaging drum and close the top cover. 5 Press GO if the Go light is blinking. If the Attention light is still blinking, then another jam is present. See “CLJ 2500; to clear jams from input areas” on page 219 and “CLJ 2500; to clear jams from output areas” on page 220. CLJ 2500; to clear jams from input areas 1 Open optional tray 2 or optional tray 3 to expose the jam. 2 Complete one of these steps: If the jam has already partially entered the printer, see “CLJ 2500; to clear jams from inside the printer” on page 219. If the jam is only in the input tray, remove the jam by pulling it out by the visible edge. Realign all of the paper in the tray and proceed to step 4. 3 If you could not remove the jam from inside the printer or by pulling it out of the tray, grasp the jam from the outside of the printer and carefully pull it free. 4 Push the paper down to lock the metal lift plate into place (tray 2 only) and slide the tray back into the printer. 5 Open the top cover, close it again, and then press GO if the Go light is blinking. If the Attention light is still blinking, then another jam is present. See “CLJ 2500; to clear jams from inside the printer” on page 219 and “CLJ 2500; to clear jams from output areas” on page 220. ENWW Jams 219 3 CLJ 2500; to clear jams from output areas CAUTION Jams in these areas might result in loose toner on the page. If you get toner on your clothes or hands, wash them in cold water. (Hot water will set the toner into the fabric.) 1 Complete one of these steps: If the paper is not almost completely visible from the top output bin, proceed to step 2. If the paper is almost completely visible, pull it carefully out of the printer and proceed to the step 9. 2 Open the rear output door. 3 If the leading edge of the paper is visible from the rear opening, carefully pull the paper out. 4 If the jam is too far into the printer to remove, turn off the printer and disconnect the power cable. CAUTION Always turn off the printer and disconnect the power cable before you remove the fuser. 5 Rotate the locks on the fuser to the unlocked position. 6 Grasp the fuser handles and pull to remove the fuser from the printer. WARNING! The parts on the internal surface of the fuser are very hot. To avoid burning yourself, do not touch those parts. 7 Using both hands, slowly and steadily remove any paper from inside the printer. Then, carefully reinsert the fuser and secure the locks. 8 Reconnect the power cable and turn on the printer. 9 Open the top cover, close it again, and then press GO if the Go light is flashing. If the Attention light is still blinking, then there is another jam. See “CLJ 2500; to clear jams from inside the printer” on page 219 and “CLJ 2500; to clear jams from input areas” on page 219. 220 Chapter 3 – Jams ENWW CLJ 4500/4550 jam locations 10 9 11 8 7 12 6 13 5 3 4 3 2 1 Figure 3-2 Jam locations (CLJ 4500/4550) (shown with the optional 500-sheet paper feeder and duplex unit installed) See the following tables for the associated error messages. Table 3-1 Jam locations and error messages (CLJ 4500) 1 13.11 Paper in the paper path is too 2 3 4 8 long. Check the Tray 1 area. Check the entire paper path. 13.10 Paper in the paper path is too 9 short. Check the Tray 1 area. Check the entire paper path. 13.9 Irregular paper jam in the paper 10 path. Check the Tray 1 area. Check the entire paper path. 13.8 Door open jam. Check the rear 11 door, duplex cover, and rear output door. 13.7 Jam in paper feed area. Check the entire paper path. ENWW 13.3 Jam in duplex reverse unit. Inspect the rear of the duplex unit and the duplex tray. 13.2 Jam in fusing area. Check the fuser assembly, output assembly, and duplex unit. 13.1 Jam in fusing area. Check the fuser assembly, output assembly, and duplex unit. 13.1 Paper jam. OPEN MIDDLE FRONT DRAWER alternates with CHECK IN REAR OF DRAWER. Check the middle front drawer. Check and pull out the fuser. Jams 221 Table 3-1 Jam locations and error messages (CLJ 4500) 5 13.6 Jam in duplex paper feed area. Inspect the rear of the duplex unit and the duplex tray. 6 13.5 Jam in duplex paper feed area. 7 12 13.1 Paper jam: Check in rear of drawer. Check the rear of the middle front drawer. Reseat the transfer roller. 13 13.0 Jam in input feed area. Check the input trays and duplex unit. Inspect the rear of the duplex unit and the duplex tray. 13.4 Jam in duplex unit. Inspect the rear 14 13.12 Paper did not clear the input of the duplex unit and the duplex tray. sensor in time. Table 3-2 Jam locations and associated error messages (CLJ 4500) 1 13.25 Paper in the paper path is too 2 3 4 5 6 7 222 long. Check the Tray 1 area. Check the entire paper path. 13.24 Paper in the paper path is too short. Check the Tray 1 area. Check the entire paper path. 13.23 Irregular paper jam in the paper path. Check the Tray 1 area. Check the entire paper path. 13.21 Door open jam. Check the rear door, duplex cover, and rear output door. 13.20 Jam in paper feed area. Check the entire paper path. 13.13 Jam in duplex paper feed area. Inspect the rear of the duplex unit and the duplex tray. 13.12 Jam in duplex paper feed area. Inspect the rear of the duplex unit and the duplex tray. 13.11 Jam in duplex unit. Inspect the rear of the duplex unit and the duplex tray. Chapter 3 – Jams 8 9 10 11 12 13 13.10 Jam in duplex reverse unit. Inspect the rear of the duplex unit and the duplex tray. 13.6 Jam in fusing area. Check the fuser assembly, output assembly, and duplex unit. 13.5 Jam in fusing area. Check the fuser assembly, output assembly, and duplex unit. 13.5 Paper jam. OPEN MIDDLE FRONT DRAWER alternates with CHECK IN REAR OF DRAWER. Check the middle front drawer. Check and pull out the fuser. 13.5 Paper jam: Check in rear of drawer. Check the rear of the middle front drawer. Reseat the transfer roller. 13.1 Jam in input feed area. Check the input trays and duplex unit. 14 13.2 Paper did not clear the input sensor in time. ENWW CLJ 4600/5500 jam locations Jams occur in the areas shown in Figure 3-3 . Jam messages correlate with these areas. For instructions to clear jams, see the following pages. 1 3 2 3 4 5 Figure 3-3 Jam locations (CLJ 4600/5500) Table 3-3 Jam locations and error messages (CLJ 4500) 1 Top-cover area 2 Duplex Path 3 Paper path ENWW 4 5 Paper input path Trays Jams 223 Table 3-4 Jam locations and error messages (CLJ 4600/5500) Message 13.01.00 JAM IN TRAY X Solution Media is delayed in the feed area of the specified tray. 1 Open the covers and the ETB. 2 Pull media by both corners to remove it. 13.02.00 JAM IN TRAY X Media is stuck in the feed area of the specified tray. 1 Open the covers and the ETB. 2 Pull media by both corners to remove it. 13.05.00 JAM IN PAPER PATH Media is delayed in the paper input path or has not reached the fuser paper sensor in the expected time. 1 Open the covers and the ETB. 2 Pull media by both corners to remove it. 13.09.00 JAM IN TOP Media has crumpled into an accordion fold as it enters the fuser. COVER AREA 1 Open the top cover. WARNING! The fuser is hot, wait 10 minutes for it to cool down. 2 Firmly lift the two green handles on either side of the fuser to disengage the fuser rollers. 3 Open the fuser cover, and remove the media. 4 Firmly press down on the two green handles on either side of the fuser to re-engage the fuser rollers. 13.0A.00 JAM IN TOP During a duplex print job, media was delayed in the output bin before it entered the duplex path. COVER AREA 1 Open the top cover. WARNING! The fuser is hot, wait 10 minutes for it to cool down. 2 Firmly lift the two green handles on either side of the fuser to disengage the fuser rollers. 3 Pull media by both corners to remove it. 4 Firmly press down on the two green handles on either side of the fuser to re-engage the fuser rollers. 224 Chapter 3 – Jams ENWW Table 3-4 Jam locations and error messages (CLJ 4600/5500) Message 13.12.00 JAM IN DUPLEX PATH Solution During a duplex print job, media was removed from the output bin before it entered the duplex path, or media has entered the duplex path, but it is stuck. 1 Open the top cover and the front cover. (Do not open the ETB.) 2 Pull media by both corners to remove it. 13.21.00 JAM IN PAPER PATH One of the covers is not completely closed. Ensure both covers are closed before printing. 1 Open the covers and the ETB. 3 2 Pull media by both corners to remove it. ENWW Jams 225 CLJ 8500/8550 jam locations Figure 3-4 Printer paper path (CLJ 8500/8550) Table 3-5 Jam detection (CLJ 8500/8550) Issue Cause Pick-up delay jam 1 The page has not reached the pick-up unit paper sensor (PS17) within about: z 1.2 seconds after leaving tray 2 z 1.3 seconds after leaving tray 3 226 Chapter 3 – Jams ENWW Table 3-5 Jam detection (CLJ 8500/8550) (continued) Issue Cause Pick-up delay jam 2 The media does not reach the registration roller paper sensor (PS1) within about: z 1.9 seconds after leaving tray 2 z 2.0 seconds after leaving tray 3 z 1.8 seconds after leaving tray 1 Transfer jam The separation sensor (PS5) does not detect the media for the specified time or longer within 1.5 to 2.2 seconds after the top of paper signal: z about 0.1 seconds (normal mode) z about 0.4 seconds (overhead transparency mode) z about 0.3 seconds (high-gloss mode) Fusing delivery paper delay jam The media has not reached the fusing delivery sensor (PS1903) since the top of paper signal within about: z 3.2 seconds (normal mode) z 12.8 seconds (overhead transparency mode) z 9.6 seconds (high-gloss mode) Fusing delivery stationary jam The media has not passed through the fusing delivery sensor (PS1903) after PS1903 detects the leading edge of the media within approximately: z 2.4 seconds (normal mode/letter-sized media landscape) z 9.6 seconds (overhead transparency mode/lettersized media landscape) z 7.2 seconds (high-gloss mode/letter-sized media landscape) z 4.2 seconds (normal mode/11-by-17 inch-sized media) z 17.0 seconds (overhead transparency mode/11-by-17 inch-sized media) z 12.7 seconds (high-gloss mode/11-by-17 inch-sized media) Fusing unit paper coil jam The fusing delivery sensor (PS1903) does not detect the media for the specified time or longer within 0.2 to 1.2 seconds after PS1903 detects the leading edge of the media within approximately: z 0.8 seconds (normal mode) z 3.2 seconds (overhead transparency mode) z 2.4 seconds (high-gloss mode) ENWW Jams 227 3 Table 3-5 Jam detection (CLJ 8500/8550) (continued) Issue Cause Top (face-down) output bin delivery delay media jam The media has not reached the top (face-down) output bin delivery sensor (PS11) within the specified time after the fusing delivery sensor (PS1903) detects the media: z about 4.0 seconds (normal mode) z about 16.0 seconds (overhead transparency mode) z about 12.0 seconds (high-gloss mode) Top (face-down) tray delivery The media has not passed through the top (facedown) stationary jam output bin delivery sensor (PS11) after PS11 detects the media within approximately: z 2.4 seconds (normal mode/letter-sized media landscape) z 9.6 seconds (overhead transparency mode/lettersized media landscape) z 7.2 seconds (high-gloss mode/letter-sized media landscape) z 4.2 seconds (normal mode/11-by-17 inch-sized media) z 17.0 seconds (overhead transparency mode/11-by-17 inch-sized media) z 12.7 seconds (high-gloss mode/11-by-17 inch-sized media) Wrong media size feed jam The controller board detects media size with the registration roller paper sensor (PS1), and it stops the engine if the media size differs more than 15 mm between the specified media size and the actual media size. On the other hand, if the difference is within +7.5 to 15 mm, or -3.7 mm or less, the media is automatically delivered. Door-open jam The sensors listed below detect the media when a cover is opened or closed: z registration paper roller sensor (PS1) z pick-up unit paper sensor (PS17) z separation sensor (PS5) z top (face-down) output bin delivery sensor (PS11) z fusing delivery sensor (PS1903) Initial residual jam The sensors listed below detect the media the specified time after the power switch is turned ON: z separation sensor (PS5) z fusing delivery sensor (PS1903) 228 Chapter 3 – Jams ENWW Persistent jam troubleshooting CLJ 2500 See the service notes and work instructions for this product. CLJ 4500/4550 See the service notes and work instructions for these products. CLJ 4600/5500 If jams occur repeatedly, use the information in this section to diagnose the root cause of the problem. The tables in this section list possible causes and recommended solutions for jams in each area of the paper path. Items are listed in the order in which you should investigate. In general, items at the beginning of the list are relatively minor repairs. Items at the end of the list are more significant repairs. CLJ 4500/4550; basic troubleshooting for paper jams The basic troubleshooting process for paper jams consists of the following: 1 Gather data. 2 Identify the cause of the problem. 3 Fix the problem. CLJ 4500/4550; data collection To troubleshoot paper jams, gather the following information: z the exact paper-jam error code that appears on the control panel z the location of the leading edge of the media in the paper path z whether media is in the paper path when the jam occurs, or if media is stuck in the input tray z whether the jam occurs at power-up or while paper is moving z whether the media is damaged, and if it is, where the damage occurs on the media and where in the paper path the media stops z whether the jam occurs when feeding from one particular tray z whether the jam occurs only when using duplex printing z whether a particular type of media is jamming ENWW Persistent jam troubleshooting 229 3 z whether any of the supplies are non-HP (non-HP supplies are known to cause jams) z whether the customer is storing the media correctly, overloading the trays, damaging the edge of the media during loading, or using media that has already been fed through the printer CLJ 4500/4550; general paper path troubleshooting Use the following suggestions to isolate the cause of the problem. After you have identified the cause, use the tables that follow to find a recommended solution. Note Use the paper path test in the Diagnostics menu to print pages while troubleshooting. For more information, see “CLJ 4600/5500 paper-path test” on page 216. z View or print the event log and determine if a particular jam error occurs more often than others. Try to identify a pattern. z From the event log, determine the frequency of a particular jam. If a jam occurs repeatedly around the same page count, consider this a single jam that the customer tried to clear. z Try printing from all available input trays to identify whether the problem is isolated to one tray. z Print the job in both simplex and duplex modes to identify if the problem occurs only in one mode or the other. z Try printing on paper from an unopened ream that has been stored correctly. If the jam does not occur with this media, then the customer’s media might be causing the problem. z If the jam occurs from when the printer is turned on, check the paper path for small torn pieces of paper. Also check for broken sensors or flags, and check for loose or defective connections. z If the paper is torn, folded, or wrinkled (typically along the leading edge), inspect the paper path for items that could be causing the damage. z If the customer is using non-HP supplies, try replacing those supplies with genuine HP supplies to see if the problem goes away. z If necessary, instruct the customer on proper media storage, correct loading technique, and printer operation. Make sure the customer knows not to grab paper in the output bin during duplex printing. 230 Chapter 3 – Jams ENWW CLJ 4500/4550; paper path checklist z Verify that media is correctly loaded in the input trays and that all length and width guides are set correctly. z Clean the printer. Toner and paper dust in the paper path can inhibit free movement of media through the printer and can block the sensors. z Use the paper path test in the Diagnostic menu to vary the input selections of the printer to determine if the problem is associated with a particular area of the printer. z Worn rollers or separation pads can cause multifeeds. Check the condition of the pickup rollers and separation pads. Bent separation tabs (on the front corners of the input trays) can cause misfeeds and multifeeds. Replace the tray if necessary. z Defective paper tray switches can cause jams by communicating the wrong paper size to the formatter. z Defective paper sensors along the paper path might signal a false jam. z Scraps of media left in the paper path can cause intermittent jams. Always check that the paper path is clear when cleaning the printer and when clearing jams. Also, remove the fuser and carefully check it for jam debris. ENWW Persistent jam troubleshooting 231 3 CLJ 4600/5500; jams in tray 1 Table 3-6 Causes for jams in tray 1 (CLJ 4600/5500) Issue Solution Pickup roller is dirty, worn, or damaged. Clean the pickup roller. If it is still dirty after cleaning, or if it is worn or damaged, replace the pickup roller. Separation pad is defective. Clean the separation pad. If it is still dirty after cleaning, or if it is worn or damaged, replace the separation pad. Drive gears are damaged. Check the drive gears in the paper pickup unit. Replace the pickup drive assembly if the gears are damaged. Multi-purpose tray pickup solenoid 1 Disconnect the connector J1020 for the multiis defective. purpose tray pickup solenoid from the DC controller PCB. 2 Measure the resistance between the cable-side connectors J1020-11 and J1020-10. 3 If the measured resistance is NOT about 160 ohms, replace the multi-purpose tray pickup solenoid. Pickup motor is defective. Replace the paper pickup drive assembly. Paper pickup assembly is defective. Replace the paper pickup assembly. DC controller PCB is defective. Replace the DC controller PCB. Calibrate the printer after replacing the DC controller. 232 Chapter 3 – Jams ENWW CLJ 4600/5500 jams in tray 2 Table 3-7 Causes for jams in tray 2 (CLJ 4600/5500) Issue Solution Separation tabs in the paper cassette are deformed. Straighten the tabs on the front corners of the tray, or replace the cassette. Pickup roller is worn or damaged. Replace the pickup roller. Feed roller is dirty, worn, or damaged. Clean the feed roller. If it is still dirty after cleaning, or if it is worn or damaged, replace the feed roller. Drive gears are damaged. Check the drive gears in the paper pickup unit. Replace the pickup drive assembly if the gears are damaged. Cassette pickup solenoid is damaged. 1 Disconnect the connector for the cassette pickup solenoid from the DC controller PCB. 2 Measure the resistance between the cable-side connectors J1020-13 and J1020-12. 3 If the measured resistance is NOT about 160 ohms, replace the cassette pickup solenoid. Pickup motor is defective. Replace the paper pickup drive assembly. Paper pickup assembly is defective. Replace the paper pickup assembly. DC controller PCB is defective. Replace the DC controller PCB. Calibrate the printer after replacing the DC controller. ENWW Persistent jam troubleshooting 233 3 CLJ 4600/5500; jams in tray 3 Table 3-8 Causes for jams in tray 3 (CLJ 4600/5500) Issue Solution Separation tabs in the paper cassette Straighten the tabs on the front corners of the tray, are deformed. or replace the cassette. Pickup roller is worn or damaged. Replace the pickup roller. Feed roller is dirty, worn, or damaged. Clean the feed roller. If it is still dirty after cleaning, or if it is worn or damaged, replace the feed roller. Drive gears are damaged. Check the drive gears in the paper pickup unit. Replace the pickup drive assembly if the gears are damaged. Connector to the printer has poor contact. Reconnect all connectors to the printer. Replace any damaged connectors. Paper feeder pickup solenoid is damaged. 1 Disconnect the connector J4006 for the paper feeder solenoid from the paper feeder PCB. 2 Measure the resistance between the cable-side connectors J4006-2 and J4006-1. 3 If the measured resistance is NOT about 160 ohms, replace the paper feeder pickup solenoid. Pickup motor is defective. Replace the paper pickup drive assembly. Paper feeder PCB is defective. Replace the paper feeder PCB. Paper pickup assembly is defective. Replace the paper pickup assembly. DC controller PCB is defective. Replace the DC controller PCB. Calibrate the printer after replacing the DC controller. CLJ 4600/5500; jams in the paper path Table 3-9 Causes for jams in the paper path (CLJ 4600/5500) Issue Solution Registration shutter is defective. (This applies to jams that occur before the registration roller.) Make sure the shutter is clean, moves smoothly, and that the spring is in place. If the shutter is damaged, replace the paper pickup assembly. Drive gears are damaged. (This applies to jams that occur before the registration roller.) Check the drive gears in the paper pickup unit. Replace the pickup drive assembly if the gears are damaged. 234 Chapter 3 – Jams ENWW Table 3-9 Causes for jams in the paper path (CLJ 4600/5500) (continued) Issue Solution Registration roller and registration sub roller are dirty, worn, or damaged. (This applies to jams that occur before the registration roller.) Clean the registration roller or registration sub roller if it is dirty. If it is still dirty after cleaning, or if it is worn or damaged, replace the paper pickup assembly. Attaching roller is damaged. (This applies to jams in which paper is crumpled into an accordion as it enters the ETB.) Check if the attaching roller is damaged. If it is damaged, replace the ETB. Calibrate the printer after replacing the ETB. Cartridge shutter open/close mechanism is damaged. (This applies to jams in which paper is crumpled into an accordion fold somewhere on the ETB belt.) The shutters in each print cartridge should open as you close the ETB. If a shutter does not open, replace that print cartridge. Also check for a damaged shutter mechanism in the printer. Cartridge drive motor assembly is Inspect the cartridge drive assembly in each print damaged. cartridge. If any are damaged, replace the assembly for that print cartridge. Attaching roller is defective. Make sure the attaching roller is clean and the spring is in place. If the roller is damaged, replace the ETB. Calibrate the printer after replacing the ETB. Paper leading edge sensor is defective. Replace the pickup PCB. DC controller PCB is defective. Replace the DC controller PCB. Calibrate the printer after replacing the DC controller. CLJ 4600/5500; jams in the top cover Table 3-10 Causes for jams in the top cover (CLJ 4600/5500) Issue Solution Fuser paper sensor or sensor lever is defective. Make sure the fuser paper sensor lever moves smoothly and is set in place. Replace the lever if it is damaged. Replace the sensor if it is defective. Fuser sleeve or pressure roller does not rotate smoothly. If the fuser drive gears are worn or damaged, replace the fuser. Fuser inlet guide is dirty or has built-up toner. Clean the fuser inlet guide. ENWW Persistent jam troubleshooting 235 3 Table 3-10 Causes for jams in the top cover (CLJ 4600/5500) Issue Solution Fuser sleeve or pressure roller is dirty, worn, or damaged. Clean the fuser sleeve or pressure roller. If it is damaged, replace the fuser. Fuser delivery sensor or sensor lever is defective. Make sure the fuser delivery sensor lever moves smoothly and is set in place. Replace the lever if it is damaged. Replace the sensor if it is defective. Fuser delivery roller is worn. Replace the fuser. Fuser delivery roller drive gears are worn or damaged. Replace the fuser. Face-down delivery roller is defective. Replace the fuser. DC controller PCB is defective. Replace the DC controller PCB. Calibrate the printer after replacing the DC controller. 236 Chapter 3 – Jams ENWW CLJ 4600/5500; jams in the duplex path Table 3-11 Causes for jams in the duplex path (CLJ 4600/5500) Issue Oblique rollers are worn or damaged. Solution Replace the oblique rollers. Oblique roller drive gears are worn Replace the ETB unit. Calibrate the printer after or damaged. replacing the ETB. Duplex feed guide is damaged. Replace the ETB unit. Calibrate the printer after replacing the ETB. 3 ENWW Persistent jam troubleshooting 237 CLJ 8500/8550 Use this checklist to identify and resolve Transfer Wrap Jams (TWJ). Make sure to educate the customer on why Transfer Wrap Jams occur and how to prevent them in the future. You cannot resolve Transfer Wrap Jams by replacing any hardware on the printer. Extensive testing and analysis has pointed out these observations: z Transfer Wrap Jams occur when the leading edge of the paper does not properly fall away from the Intermediate Transfer Drum (ITD). Paper with high moisture content will jam in some printers. Paper with a rough edge is more susceptible to this type of jam. z The number one cause of TWJ is print media with moisture content beyond appropriate specification (4% to 6% by weight). If the media has too much moisture, the stiffness decreases dramatically and causes the paper not to fall away from the ITD properly. z The CLJ 8500/8550 is the only LaserJet product with an Intermediate Transfer Drum. The curvature of the drum and the natural curl of some paper can lead to TWJ. Heavier media (24 lb and greater) falls away from the ITD more easily because of its weight and stiffness. z Paper is hygroscopic; it gives up or absorbs moisture depending on the environment. Paper left overnight in a tray may absorb enough moisture to cause problems the following day. Likewise, paper left unwrapped might also absorb enough moisture to cause problems. z Paper that is stored outside an "office environment" might require as many as 2 weeks of storage near the printer before it returns to a moisture content within specifications. z CLEAR TRANSFER JAM is reported as 13.00.10 in the event log. For a printer with a High Capacity Output (HCI) tray, 13.x1.31 and 13.x1.3B are usually present because pages are being fed through the Vertical Transfer Unit (VTU) when the jam occurs in the printer. If the customer fails to clear these pages, the jams are reported when the customer attempts to restart the printer. z Duplexing can lead to TWJ because of the fusing of the first side. The temperature of the fuser causes some moisture to vaporize out of the media; the pressure of the rollers may induce curl in the paper. On the second pass, TWJ might occur depending the orientation of the curl. z The reports of TWJ increase dramatically in the United States during the summer months and are typically related to areas with high relative humidity (greater than 50 percent relative humidity). 238 Chapter 3 – Jams ENWW 4 Print quality Contents Printer cleaning page . . . . . . . . . . . . . . . . . . . . . . . . . . . . . . . . . . . . . . . . . . . 240 Life expectancies of print cartridges . . . . . . . . . . . . . . . . . . . . . . . . . . . . . . . . 241 Image quality . . . . . . . . . . . . . . . . . . . . . . . . . . . . . . . . . . . . . . . . . . . . . . . . . 242 Drum functional test . . . . . . . . . . . . . . . . . . . . . . . . . . . . . . . . . . . . . . . . 242 Print density test and color checks . . . . . . . . . . . . . . . . . . . . . . . . . . . . . 243 Understanding color variations . . . . . . . . . . . . . . . . . . . . . . . . . . . . . . . . 243 Common causes of color variation . . . . . . . . . . . . . . . . . . . . . . . . . . . . . 244 Adjusting color balance . . . . . . . . . . . . . . . . . . . . . . . . . . . . . . . . . . . . . . 245 Imaging drum defects . . . . . . . . . . . . . . . . . . . . . . . . . . . . . . . . . . . . . . . 250 ENWW 239 Printer cleaning page Table 4-1 Printer cleaning page Product* Instructions CLJ 2500 The following procedure must be performed from the HP Color LaserJet 2500 Series Toolbox, which is supported for Windows 98, NT 4.0, Me, 2000, and XP. To clean the engine when the computer is running a different supported operating system, see the Readme on the software CD-ROM, or visit http://www.hp.com/support/clj2500. 1 Make sure that the product is turned on and in the Ready state. 2 Open the HP Color LaserJet 2500 Series Toolbox. 3 On the Troubleshooting tab, click Cleaning Page, and then click Print. A page with a pattern prints from the product. 4 At the product, remove any media from tray 1 (multipurpose tray). 5 Remove the page that printed and load it face-down into tray 1. 6 At the computer, click Clean. For even better results, repeat this procedure several times. CLJ 4500 CLJ 4550 The CLJ 4500/4550 do not include this feature. CLJ 4600 CLJ 5500 The CLJ 4600/5500 do not include this feature. CLJ 8500 CLJ 8550 The CLJ 8500/8550 do not include this feature. 240 Chapter 4 – Print quality ENWW Life expectancies of print cartridges Table 4-2 Life expectancies of print cartridges Product Description Estimated life* (at 5% coverage*) CLJ 2500 Black print cartridge 5,000 pages Cyan print cartridge 4,000 pages Yellow print cartridge 4,000 pages Magenta print cartridge 4,000 pages Black print cartridge 9,000 pages Cyan print cartridge 6,000 pages Yellow print cartridge 6,000 pages Magenta print cartridge 6,000 pages Black print cartridge 9,000 pages Cyan print cartridge 8,000 pages Yellow print cartridge 8,000 pages Magenta print cartridge 8,000 pages Black print cartridge 13,000 pages Cyan print cartridge 12,000 pages Yellow print cartridge 12,000 pages Magenta print cartridge 12,000 pages Black print cartridge 17,000 pages Cyan print cartridge 8,500 pages Yellow print cartridge 8,500 pages Magenta print cartridge 8,500 pages CLJ 4500 CLJ 4550 CLJ 4600 CLJ 5500 CLJ 8500 CLJ 8550 4 * The estimated toner cartridge life is based on letter- or A4-sized paper with an average of five percent toner coverage and a medium density setting. In some color LaserJet products, print cartridge life can be extended further by using the draft-mode settings, which conserves toner. ENWW Life expectancies of print cartridges 241 Image quality For information and examples of image defects, see your product’s service manual. Note Whenever you experience color-related issues, calibrate the product before trying any other steps. Drum functional test Note The CLJ 2500, CLJ 4600, CLJ 5500 do not support the drum functional test Table 4-3 Drum functional test Product Instructions CLJ 4500 1 Press the ITEM key until ENGINE DIAGS DRUM TEST is displayed. CLJ 4550 2 Press the SELECT key to run the test. The front panel will display ENGINE DIAGS E3:DRUM while the test is running. Watch to see if the ITB lift cams turn and if both the drum drive gear and the ITB drive gear are rotating. CLJ 8500 1 Press the left side of the ITEM button and the -VALUE+ button at the same time. CLJ 8550 2 Press ITEM until DRUM MOTOR appears on the display. 3 Press -VALUE+ until EXECUTE TEST appears on the display. 4 Press SELECT to initiate the drum test. 242 Chapter 4 – Print quality ENWW Print density test and color checks Use the configuration page to check the print density of the black, primary, and process color levels. Solid black- and color-filled areas on the configuration page demonstrate the ability to print at full density. In addition to the items listed above, the configuration page provides the following information: z It helps isolate the problem to the software or the product. z It shows that all colors print. The following media-related items are responsible for many image formation and print-quality defects: z rough paper z heavy paper z transparencies out of the specified thickness range z paper that has absorbed too much moisture from the atmosphere z room environment (humidity too high or low) 4 Understanding color variations The printed output might not match the computer screen, and the colors printed on successive pages might not match. While color variations are inherent in this printing method, they can indicate changes in the printing environment, print media, or product components. ENWW Image quality 243 Common causes of color variation The following list outlines the major causes of color variations between computers, applications, and output devices. z Halftone patterns produced on monitors and the types of patterns used in the print jobs are different and might cause variations in the printed output. z The printed output differs from the image on the monitor because the monitor and the print media have different reference values of black and white. The monitor screen has charcoal gray for the black level, and the white on the monitor screen is actually blue. Black on the print media is limited only by the fill capability of the product, and most good quality paper has a very high white level. In addition, phosphor (used in color monitors) and toner have entirely different spectra characteristics and different color-rendering capabilities. Differences between output are common. Blues generally match better than reds. z The color of the ambient light changes the perception of color. Fluorescent light lacks many colors present in incandescent light, and the color range of natural light is broader than any artificial light. When comparing color, choose a standard light source for reference and understand that the perceived color will change as the light changes. z Long-term color variations occur as paper ages. Use high-quality paper and protect the paper from sunlight to help minimize discoloration. z Environmental changes can cause color variation. The development process places a high potential across an air gap to attract toner to the imaging drum. Changes in relative humidity vary the point at which the toner travels to the imaging drum. z All consumable components have a finite life span, and as these components reach the end of their useful life, their ability to produce consistent print quality diminishes. z Paper roughness can cause colors to look different. Use standard paper. Color selection process The user selects the color in the application, but the operating system might convert or modify some characteristics of the color before sending the information to the printer driver. The printer driver might also modify color characteristics depending upon the selected output mode. Any color characteristics not addressed by the printer driver or applications are set to the product default. The default color might not match the color the user selected. 244 Chapter 4 – Print quality ENWW Adjusting color balance These products feature automatic color calibration to provide high-quality color output. In situations that require critical color control, you can manually adjust the density balance of the product’s four toner colors. CAUTION This procedure should only be performed by your network administrator. Performing this procedure changes the color balance of the product by altering halftones and affects all print jobs. Note Whenever you experience color-related issues, calibrate the product before trying any other steps. Table 4-4 Adjusting color calibration Product Instructions CLJ 4500 CLJ 4550 Print a calibration page 4 1 Press MENU until CALIBRATION MENU displays. 2 Press ITEM until PRINT CALIBRATION PAGE displays. 3 Press SELECT to print the color balance calibration page. The page consists of four color bars (cyan, magenta, yellow, and black) and a box containing gray balance circles. The factory default setting for each color is zero. The range of settings is -5 to +5. Note Adjusting densities using the four color bars provides coarse color balance adjustments. After making these adjustments, you can fine-tune color densities by adjusting the gray balance. (See step 4 for instructions.) ENWW Image quality 245 Table 4-4 Adjusting color calibration (continued) Product Instructions CLJ 4500 CLJ 4550 continued Adjust color density 1 Examine the cyan density bar (C), the magenta density bar (M), the yellow density bar (Y), and the black density bar (K) on the color balance calibration page from a distance of 2 meters (6 feet). If the center oval for each bar matches the background pattern more than the other ovals, the color density does not need to be adjusted. If an oval left of center or right of center matches the background more than the center oval, proceed to step 2. 1 Press ITEM until [COLOR] DENSITY displays. 2 Press the right side of the VALUE key to increase the value, or press the left side to decrease it, until the number corresponding to the oval that most closely matches the background pattern is displayed. 3 Press SELECT to save the value. An asterisk (*) displays next to the selected setting. 4 Repeat step 1. Adjust gray balance 1 Adjusting densities using the gray balance pattern allows you to finetune color balance. This process affects all four color bars. Examine the gray balance circles in the box at the bottom of the color balance calibration page. If the circle in the center most closely matches the background pattern, then the gray balance does not need to be adjusted. If the circle does not match, proceed to step 2. 2 Locate the gray circle that most closely matches the background. The magenta (M) and yellow (Y) numbers associated with this circle indicate the optimum gray balance settings for these colors. 3 Adjust the magenta and yellow settings (yellow is horizontal and magenta is vertical) until the gray circle is in the middle. Use the values from the bars above to select the value to be entered. 4 After making adjustments to the magenta and yellow settings, press GO to return the product to the READY state. 246 Chapter 4 – Print quality ENWW Table 4-4 Adjusting color calibration (continued) Product Instructions CLJ 4600 CLJ 5500 1 Press SELECT to enter the MENUS. 2 Press DOWN ARROW to highlight CONFIGURE DEVICE MENU. DEVICE MENU. 4 Press DOWN ARROW to highlight PRINT QUALITY. 5 Press SELECT to select PRINT QUALITY. 6 Press DOWN ARROW or UP ARROW to highlight ADJUST COLOR. 3 Press SELECT to select CONFIGURE 7 Press DOWN ARROW or UP ARROW to highlight the desired color. 8 Press DOWN ARROW or UP ARROW to highlight the correct density setting. 9 Press SELECT to select the density setting. 10 Press RIGHT or LEFT ARROW to set the density for the next color. 11 After setting the density for each color, press PAUSE/RESUME. CLJ 8500 CLJ 8550 Do not perform the color balance adjustment procedure until all of the following troubleshooting methods have been completed: z Experiment with the printer driver and application settings to adjust the color output. z Clean the density sensor. z Complete the troubleshooting solutions located in the service manual. Print the color adjust page 1 Press GO and -VALUE+ at the same time. COLOR ADJUST MENU appears on the product control panel display. 2 Press ITEM until PRINT TEST PAGE appears on the display. 3 Press SELECT to print the color adjust page. 4 Press GO to exit the Color Adjust Menu. 5 Note the numbers beside the red arrows for later reference. 6 The color adjust page indicates the last set of saved color settings with a red arrow next to the saved setting. The default for each color is 0 (other possible settings consist of -6 through 6). 7 Determine the color adjustment numbers for each color in the color ramps. 8 Examine the color adjust page from a distance of 6 feet (approximately 2 m). Find the circle of each color that most closely matches the background color. It might be necessary to squint slightly to match the colors. Record the number in the circle. ENWW Image quality 247 4 Table 4-4 Adjusting color calibration (continued) Product Instructions CLJ 8500 CLJ 8550 continued 9 Press GO and -VALUE+ at the same time. COLOR ADJUST MENU appears on the display. 10 Press ITEM until the option you want appears on the display. 11 Press -VALUE+ until the number recorded earlier appears on the display. 12 Press SELECT to enter the number into the product memory. An asterisk (*) appears to the right of the selection. 13 Repeat steps above to adjust the color screens, as necessary. Reprint the color adjust page 14 Examine the new color adjust test page and verify that the color adjustment is correct. z z 248 Verify that each of the color ramps (black, cyan, magenta, and yellow) matches the background for each color and has a red arrow next to the circle. If another circle matches the background more closely, return to step 4 to reset the values at the control panel to the number shown in that circle. Verify that the circles in the neutral axis areas of the color adjust test page are neutral gray (gray without a color tint), and then verify that one of the circles in the ramp is a color very close to the background. If the circles are not neutral gray, additional corrections to cyan, magenta, or yellow might be necessary. If there is an overall tint of color in the circles, make the adjustments suggested by the following table. However, the most accurate correction is determined by the circles in the individual black, cyan, magenta, and yellow ramps. Chapter 4 – Print quality ENWW Repetitive defects troubleshooting Repetitive defects are defects that occur on the page. Most repetitive defects are caused by problems with one of the following: z Developer roller z Fuser z Charge roller z Imaging drum z Cleaning roller z Transfer belt or transfer drum z Transfer roller See the service manual for the specific product model for the appropriate repetitive defect ruler. The first occurrence of a repetitive print defect is the defect closes to the leading edge of the media. Measure from the first occurrence of the print defect to the first repetition of the defect and compare this measurement to the repetitive defect table in this section CAUTION Do not expose the imaging drum to light, and be careful not to scratch or get fingerprints on the drum surface during cleaning. Do not blow on the imaging drum. ENWW Repetitive defects troubleshooting 249 4 Imaging drum defects Causes: z Damage such as scratches or dents on the imaging drum. These usually appear as black or white marks on the page. z Paper dust adhering to the imaging drum. These usually appear as white marks in the dark printed areas of the page. z Exposure of portions of the imaging drum to light. This causes light sections in the printed output. The life of the imaging drum is shortened by exposure to light. Actions: z Print at least four configuration pages to determine if the defect repeats in the same horizontal orientation. z Inspect the imaging drum for scratches, dents, or other damage. Replace if needed. z If the problem is dust, remove the dust with isopropyl alcohol applied with a lint-free, static-free wipe. Try this only if the print defect is unacceptable and the only other alternative is replacing the imaging drum. z Defects caused by exposure to light might clear up over time. If severe, replace the imaging drum. Note The following defect rulers are to scale if this manual is printed on A5-size paper. 250 Chapter 4 – Print quality ENWW Table 4-5 Repetitive defects Product Distance Probable cause CLJ 2500 22.1 mm (.87 inches) Pre-ICL roller CLJ 4500/4550 ENWW 33.9 mm (1.33 inches) Developer sleeve 37.9 mm (1.49 inches) ICL roller 38.1 mm (1.5 inches) Charging roller 41.9 mm (1.65 inches) RS roller 44.3 mm (1.74 inches) T1 transfer 56.9 mm (2.24 inches) T2 transfer 66.6 mm (2.62 inches) Pressure roller 75.6 mm (2.98 inches) Fuser film 89.0 mm (3.5 inches) Transfer belt drive roller 90.0 mm (3.54 inches) Transfer belt tension roller 148.3 mm (5.84 inches) Cartridge drum 40 mm (1.6 inches) Charge roller 152 mm (6 inches) Imaging drum 37 mm (1.5 inches) Black developer sleeve 30 mm (1.2 inches) Color developer sleeve 131 mm (5.2 inches) Fuser 40 mm (1.6 inches) ITB ICL roller 53 mm (2.1 inches) Transfer roller Repetitive defects troubleshooting 4 251 Table 4-5 Repetitive defects (continued) Product Distance CLJ 4600 14 mm (0.5 inches) Toner charging roller 33 mm (1.3 inches) Developing cylinder 38 mm (1.5 inches) Primary charging roller media attaching roller fuser delivery roller 39 mm (1.5 inches) Toner feed roller 44 mm (1.7 inches) cassette feed sub roller 49 mm (1.9 inches) face-down delivery roller 54 mm (2.1 inches) cassette feed roller registration roller 57 mm (2.2 inches) registration sub roller 63 mm (2.5 inches) Fuser pressure roller 75 mm (2.9 inches) Photosensitive drum or transfer roller (center-to-center distance) 94 mm (3.7 inches) photosensitive drum CLJ 5500 252 Probable cause 107 mm (4.2 inches) Fuser sleeve 14 mm (0.5 inches) Toner charging roller 36 mm (1.4 inches) Developing cylinder 38 mm (1.5 inches) Fuser delivery roller 41 mm (1.6 inches) Print cartridge Output bin delivery roller 43 mm (1.7 inches) Toner feed roller 44 mm (1.7 inches) Transfer/media attaching roller 53 mm (2.0 inches) Registration roller 63 mm (2.5 inches) Sub-registration roller 79 mm (3.0 inches) Fuser pressure roller 82 mm (3.2 inches) Transfer roller 94 mm (3.7 inches) Photosensitive drum Cassette feed roller Cassette separation roller 107 mm (4.2 inches) Fuser sleeve Chapter 4 – Print quality ENWW Table 4-5 Repetitive defects (continued) Product Distance Probable cause CLJ 8500/8550 38 mm (1.5 inches) Color developer roller 44 mm (1.7 inches) Charging roller 52 mm (1.9 inches) Black developer roller 56 mm (2.2 inches) Cleaning roller 65 mm (2.6 inches) Developer DSD wheels 66 mm (2.7 inches) Transfer roller 105.5 mm (6.0 inches) Fuser 195 mm (7.8 inches) Image drum 222 mm (8.9 inches) Transfer belt 4 ENWW Repetitive defects troubleshooting 253 254 Chapter 4 – Print quality ENWW 5 Illustrations Contents Major components . . . . . . . . . . . . . . . . . . . . . . . . . . . . . . . . . . . . . . . . . . . . . 256 Power-on sequences . . . . . . . . . . . . . . . . . . . . . . . . . . . . . . . . . . . . . . . . . . . 283 ENWW 255 Major components CLJ 2500 major components 4 5 3 6 2 2 7 2 2 8 1 Figure 5-1 CLJ 2500 assembly locations without optional trays Reference CLJ 2500 component Reference CLJ 2500 component 1 Power-base assembly 5 Front frame assembly 2 Fuser assembly 6 Rotary-drive assembly 3 Middle frame assembly 7 Main drive assembly 4 Rear frame assembly 8 Rotary (carousel) assembly 256 Chapter 5 – Illustrations ENWW 6 2 3 1 4 5 7 Figure 5-2 CLJ 2500 photosensors and switches Reference CLJ 2500 component 1 Tray 1 sensor 2 Roller-engaging sensor 3 Developing-rotary-engaging sensor 4 Fuser-delivery sensor 5 Front fuser detection sensor 6 Door-open detection switch 7 Power switch ENWW 5 Major components 257 2 3 4 1 5 6 Figure 5-3 CLJ 2500 motors and fans Reference CLJ 2500 component Reference CLJ 2500 component 1 Engaging motor 4 2 Developing-rotary motor 5 Main motor 3 Toner-cartridge motor Cooling fan 258 Chapter 5 – Illustrations 6 Fuser motor ENWW 3 1 8 2 7 4 6 9 5 Figure 5-4 CLJ 2500 printed circuit assemblies Reference CLJ 2500 component 1 Developing-rotary/toner-level detection PCA 2 Transfer-belt home-position detection PCA 3 Density-detection PCA 4 Waste-toner-detection PCA 5 Registration-detection PCA 6 Dc controller 7 Sub high-voltage power-supply PCA 8 High-voltage power-supply PCA 9 Power supply ENWW 5 Major components 259 CLJ 4500/4550 major components Figure 5-5 CLJ 4500/4550 assembly location diagram (1 of 2) 260 Chapter 5 – Illustrations ENWW 5 Figure 5-6 CLJ 4500/4550 assembly location diagram (2 of 2) ENWW Major components 261 PS11 PS9 PS10 PS3102 PS12 PS3101 PS14 PS13 PS8 PS5 PS7 PS3 PS6 PS1 PS301 PS2 PS4 PS3103 PS3105 PS3104 PS3001 Figure 5-7 CLJ 4500/4550 sensor locations 262 Chapter 5 – Illustrations ENWW This table corresponds to Table 5-7 on page 262 Reference CLJ 4500/4550 component Reference CLJ 4500/4550 component PS1 ITB unit life sensor PS12 Toner level sensor PS2 Registration paper sensor PS13 Waste toner sensor PS3 Last paper sensor PS14 Density sensor PS4 Multi-purpose tray paper sensor PS301 OHT sensor (multi-purpose tray PCB) PS5 ITB home position sensor PS3001 Paper feed detection sensor PS6 Fusing unit pressure release PS3101 sensor Reversing unit paper sensor PS7 Delivery paper sensor PS3102 Face-up sensor PS8 Cassette paper sensor PS3103 Reversing unit stationary paper sensor PS9 Face-down tray paper full sensor PS3104 Duplex pick-up paper sensor PS10 Carousel home position sensor PS3105 Side registration home position sensor PS11 Toner cartridge press sensor ENWW Major components 5 263 CL2 CL3 CL1 CL4 SL2 SL1 Figure 5-8 CLJ 4500/4550 printer solenoids and clutches Reference CLJ 4500/4550 component SL1 Multi-purpose tray pick-up solenoid SL2 Paper pick-up solenoid CL1 Registration clutch CL2 ITB unit separation clutch CL3 ITB cleaning roller separation clutch CL4 Secondary transfer roller separation clutch 264 Chapter 5 – Illustrations ENWW M3 FM1 M5 FM2 M4 FM3 M1 M2 Figure 5-9 CLJ 4500/4550 motors and fans Table 5-1 CLJ 4500/4550 motor and fan locations Reference CLJ 4500/4550 components Reference CLJ 4500/4550 components M1 Fusing motor M5 Toner cartridge motor M2 Pick-up motor FM1 Large fan M3 Carousel motor FM2 Small fan M4 Drum motor FM3 Front fan ENWW Major components 5 265 1 2 2 8 3 7 6 5 4 Figure 5-10 CLJ 4500/4550 PCB locations Table 5-2 PCB assembly Reference CLJ 4500/4550 component 1 Developing PCB 2 DC controller PCB 3 Interconnect PCB 4 Paper size sensor PCB 5 Paper feed PCB assembly 6 Formatter PCB 7 Firmware DIMM 8 I/O card 266 Chapter 5 – Illustrations ENWW CLJ 4600 major components 1 11 2 10 3 4 5 9 6 7 8 Figure 5-11 CLJ 4600 assembly location diagram 5 Reference CLJ 4600 Component Reference CLJ 4600 Component 1 Fuser drive assembly 9 Paper pickup assembly 2 Drum drive assy (blk) 10 ETB assembly 3 Drum drive assy (c/m) 11 Fuser assembly 4 Drum drive assy (y) 5 Drum drive assy (c/m) 6 Disengaging drive assy 7 Paper pickup drive assy 8 Cassette ENWW Major components 267 Figure 5-12 CLJ 4600 location of switches Reference CLJ 4600 Component SW1 cassette paper size detection switch SW2 cassette paper size detection switch SW3 cassette paper size detection switch SW4 door switch (shown in the photo below) SW5 on/off switch SW1001 test print switch 268 Chapter 5 – Illustrations ENWW Figure 5-13 CLJ 4600 location of sensors 5 Figure 5-14 CLJ 4600 location of solenoids Reference CLJ 4600 Component SL1 cassette pickup solenoid (paper pickup drive assembly) SL2 multi-purpose tray pickup solenoid (paper pickup drive assembly) ENWW Major components 269 2 1 11 10 3 4 9 5 8 6 7 Figure 5-15 CLJ 4600 PCB locations Reference CLJ 4600 Component 1 I/O daughter card 2 Firmware DIMM 3* Formatter (simplex) Formatter (duplex) 4 DC controller PCB 5 Memory controller PCB 6 Memory tag antenna PCBs 7 Low-voltage power supply PCB 8 Pickup PCB 9 Toner sensor PCB 10 High-voltage power supply PCB 11 Fuser power supply PCB * The formatter is available with either simplex or duplex capability. Be sure to use the correct formatter for the model of printer you are servicing. The HP Color LaserJet 4600 and 4600n printers do not have duplex capability. 270 Chapter 5 – Illustrations ENWW CLJ 5500 major components 11 1 2 10 3 4 5 9 6 7 8 Figure 5-16 CLJ 5500 assembly location diagram Reference CLJ 5500 component 1 Fuser drive assembly 2 Drum drive assembly (black) 3 Drum drive assembly (cyan/magenta) 4 Drum drive assembly (yellow) 5 Drum drive assembly (cyan/magenta) 6 Disengaging drive assembly 7 Paper pickup drive assembly 8 Cassette 9 Paper pickup assembly 10 ETB assembly 11 Fuser assembly ENWW 5 Major components 271 5 1 4 2 3 Figure 5-17 CLJ 5500 location of switches Reference CLJ 5500 component 1 test print switch, SW101 2 paper length detection switch, SW1, SW2, SW3 3 paper width detection switch, SW4, SW5, SW6 4 power switch 5 door open detection switch, SW1 272 Chapter 5 – Illustrations ENWW 1 13 2 12 3 11 10 4 9 8 5 7 6 Figure 5-18 CLJ 5500 location of sensors Reference CLJ 5500 component 1 output bin full sensor, PS6 2 fuser delivery sensor, PS7 3 fuser paper sensor, PS8 4 cartridge home position sensors, PS1, PS2, PS3, PS4 5 developing disengaging sensor, PS5 6 paper stack surface sensor, PS902 7 cassette paper sensor, PS901 8 horizontal registration/transparency sensor, IS1 9 top of page sensor, PS801 10 multi-purpose tray paper sensor, PS802 11 pickup sensor, PS9 12 ETB speed sensor, PS10 13 paper feed sensor, PS903 ENWW 5 Major components 273 1 2 Figure 5-19 CLJ 5500 location of solenoid and clutch Reference CLJ 5500 component 1 multi-purpose tray pickup solenoid, SL1 2 cassette pickup clutch, CL1 274 Chapter 5 – Illustrations ENWW FM2 FM3 M6 M4 M5 M3 FM1 PM3 M2 PM1 PM2 M1 Figure 5-20 CLJ 5500 location of motors and fans Reference CLJ 5500 component Reference CLJ 5500 component M1 cyan drum motor M6 ETB motor M2 yellow drum motor PM1 developing disengaging motor M3 magenta drum motor PM2 pickup motor M4 black drum motor PM3 lifter motor M5 fuser motor FM1 power supply fan FM2 formatter fan FM3 cartridge fan ENWW Major components 5 275 1 2 11 10 3 4 9 5 8 6 7 Figure 5-21 CLJ 5500 PCB locations Reference CLJ 5500 component 1 I/O daughter card 2 Firmware DIMM 3 Static discharge PCB assembly 4* Formatter (simplex) Formatter (duplex) 5 DC controller PCB 6 E-label memory controller PCB 7 Cassette sensor PCB 8 Multi-purpose tray sensor PCB 9 Toner sensor PCB 10 High-voltage power supply PCB 11 Fuser power supply PCB * The formatter is available with either simplex or duplex capability. Be sure to use the correct formatter for the model of printer you are servicing. The HP Color LaserJet 5500 and 5500n printers do not have duplex capability. 276 Chapter 5 – Illustrations ENWW CLJ 8500/8550 major components Delivery assembly Black cartridge cam assembly Black cartridge guide assembly Delivery drive assembly Paper pickup assembly Left cover feeder assembly Transfer belt assembly 5 Registration roller assembly Tray 1 pickup assembly Tray 1 assembly Registration frame assembly Figure 5-22 CLJ 8500/8550 major assembly locations (1 of 2) ENWW Major components 277 Solenoid assembly Drum/cartridge drive assembly Delivery frame assembly Fuser assembly Tray 2 Tray 3 Color toner cartridge Black toner cartridge Imaging drum Figure 5-23 CLJ 8500/8550 major assembly locations (2 of 2) 278 Chapter 5 – Illustrations ENWW 5 Figure 5-24 CLJ 8500/8550 printer sensors Reference CLJ 8500/855 component Reference CLJ 8500/8550 component PS1 Registration roller paper sensor PS1206 Tray 2 paper-level sensor 1 PS3 Carousel position sensor PS1207 Tray 3 paper-out sensor PS5 Separation sensor PS1208 Tray 2 paper-out sensor PS10 Top (face-down) output bin paper-full sensor PS1301 Tray 1 paper sensor ENWW Major components 279 Reference CLJ 8500/855 component Reference CLJ 8500/8550 component PS11 Top (face-down) output bin delivery sensor PS1302 Lifting plate position sensor PS17 Pick-up unit paper sensor PS1801 OHT sensor 1 PS18 Pick-up unit cover sensor PS1802 OHT sensor 2 PS19 Tray 1 last page sensor PS1901C Color toner cartridge sensor PS29 Tray 2 last page sensor PS1902 Color toner lever sensor PS30 Left cover sensor PS1903 Fusing delivery sensor PS1201 Tray 3 sensor THU Upper thermistor PS1202 Tray 2 sensor THL Lower thermistor PS1203 Tray 3 paper-level sensor 2 TPU Upper thermo switch PS1204 Tray 3 paper-level sensor 1 TPL Lower thermo switch PS1205 Tray 2 paper-level sensor 2 280 Chapter 5 – Illustrations ENWW 5 Figure 5-25 CLJ 8500/8550 printer motors and heaters Reference CLJ 8500/855 component Reference CLJ 8500/855 component M1 Carousel motor FM1 Fan 1 motor M2 Drum motor FM2 Fan 2 motor M3 Cartridge motor FM3 Fan 3 motor M4 Main motor HU Upper fuser heater M5 Pick-up motor HL Lower fuser heater ENWW Major components 281 7 Figure 5-26 CLJ 8500/8550 PCA assemblies Reference CLJ 8500/855 component 1 PCA, cassette-size sensing 2 PCA, main relay 3 PCA, controller board PCA, controller board for HP CLJ 8550 MFP 4 PCA, carousel motor (M1) 5 PCA, subrelay 6 PCA, tray 1 7 PCA, ECO-2 assembly (HP CLJ 8550 MPF) Interface PCB assembly (HP CLJ 8550 MPF) Interface cable (HP CLJ 8550 MPF) IOT cable (HP CLJ 8550 MPF) ECO-2 cable (HP CLJ 8550 MPF) 282 Chapter 5 – Illustrations ENWW Power-on sequences CLJ 2500 5 ENWW Power-on sequences 283 CLJ 4500/4550 This information is not available for this product. CLJ 4600 Table 5-3 Basic operation sequence (CLJ 4600) Period WAIT (wait period) Purpose From the time the power switch is turned on until the ETB cleaning is completed. To clear a potential on During this period, the printer the drum surface and to checks the toner level and clean the ETB. detects whether the cartridges are present. The printer also executes the pulse width modulation adjustment, color registration adjustment, and image density calibration control as required. STBY From the end of the To keep the printer (standby WAIT or LSTR ready to print. period) period or last rotation until the formatter inputs a print command or until the power is turned off. INTR (initial rotations period) From immediately after the formatter inputs a print command until the / TOP signal is sent to the formatter. To stabilize the photosensitive drum’s sensitivity in preparation for a print operation. PRINT (print period) From the end of the INTR period until the leading edge detection sensor detects paper and then turns off the transfer positive bias. To form an image on the photosensitive drum according to the video signal input from the formatter and to transfer the toner image to the paper. 284 Remark Chapter 5 – Illustrations When the formatter sends a sleep command, the printer enters PowerSave mode. After the power is turned on, the cartridge is cleaned every 35 pages and the ETB is cleaned every 100 pages. ENWW Table 5-3 Basic operation sequence (CLJ 4600) Period LSTR (last rotations period) Purpose From the end of the To deliver the paper out PRINT period until of the printer and to the ETB motor clean the ETB. stops. Remark The last rotations period lasts until the instant the formatter sends a print command. Then the initial rotations period starts again. CLJ 5500 Table 5-4 Basic operation sequence (CLJ 5500) Period WAIT (wait period) From the time the power switch is turned on until the ETB cleaning is completed. Purpose Remark To clear a potential on the drum surface and to clean the ETB. During this period, the printer checks the toner level and detects whether the cartridges are present. The printer also executes the pulse width modulation adjustment, color registration adjustment, and image density calibration control as required. STBY (standby period) From the end of the To keep the printer WAIT or LSTR ready to print. period or last rotation until the formatter inputs a print command or until the power is turned off. INTR (initial rotations period) From immediately after the formatter inputs a print command until the / TOP signal is sent to the formatter. ENWW When the formatter sends a sleep command, the printer enters PowerSave mode. To stabilize the photosensitive drum’s sensitivity in preparation for a print operation. Power-on sequences 285 5 Table 5-4 Basic operation sequence (CLJ 5500) (continued) Period Purpose Remark To form an image on the photosensitive drum according to the video signal input from the formatter and to transfer the toner image to the paper. After the power is turned on, the cartridge is cleaned every 35 pages and the ETB is cleaned every 100 pages. PRINT (print period) From the end of the INTR period until the leading edge detection sensor detects paper and then turns off the transfer positive bias. LSTR (last rotations period) From the end of the To deliver the paper The last rotations PRINT period until out of the printer and period lasts until the the ETB motor stops. to clean the ETB. instant the formatter sends a print command. Then the initial rotations period starts again. CLJ 8500/8550 This information is not available for this product. 286 Chapter 5 – Illustrations ENWW A Service support Contents Obtaining work instructions. . . . . . . . . . . . . . . . . . . . . . . . . . . . . . . . . . . . . . . 288 To gain access to work instructions. . . . . . . . . . . . . . . . . . . . . . . . . . . . . 288 Embedded web server . . . . . . . . . . . . . . . . . . . . . . . . . . . . . . . . . . . . . . . . . . 289 Obtaining service notes . . . . . . . . . . . . . . . . . . . . . . . . . . . . . . . . . . . . . . . . . 289 To gain access to service notes . . . . . . . . . . . . . . . . . . . . . . . . . . . . . . . 289 Service websites. . . . . . . . . . . . . . . . . . . . . . . . . . . . . . . . . . . . . . . . . . . . . . . 290 ENWW 287 Obtaining work instructions To gain access to work instructions 1 Open a web browser, such as Internet Explorer or Netscape Navigator. 2 Type http://partner.americas.hp.com in the Address or Go box, and then press Enter. 3 Under enter site, click hp partner web. 4 Type your user name and password, and then click OK. 5 Click support. 6 Under technical support information, click technical support website. 7 Click online work instructions. 8 Select the product that you want from one of the lists. Table 5-5 Commonly used work instructions Product Number Descriptions CLJ 4500 CLJ 4550 bpl90005 HP Color LaserJet 4500 and 4550 series Printers Error 54.2 bpl90006 HP Color LaserJet 4500 and 4550 series Printers Printing Blank Pages bpl90008 HP Color LaserJet 4500 and 4550 series Printers 13.0 Paper Jam (HP Color LaserJet 4500) 13.1 (HP Color LaserJet 4550) bpl90043 HP Color LaserJet 4500 and 4550 series Printers Five Types of Ghosting bpl90129 HP Color LaserJet 4500 and 4550 series Printers Middle Front Drawer Will Not Open or Close bpl90333 HP Color LaserJet 4600 series Printers - Multi feeds from Tray 2 or Tray 3 CLJ 4600 288 Appendix A – Service support ENWW Embedded web server Use the HP Embedded Web Server to view information pages for the CLJ 2500, CLJ 4600, and CLJ 5500. Here is how to gain access to the embedded Web server. 1 Open a Web browser. 2 In the Address or Go to field, type the IP address assigned to the product (for example: http://192.168.1.1) or the host name (for example: http://myproduct). If you do not know the IP address for the product, it is listed on the Configuration page. Obtaining service notes To gain access to service notes 1 Open a web browser, such as Internet Explorer or Netscape Navigator. 2 Type http://partner.americas.hp.com in the Address or Go box, and then press Enter. 3 Under enter site, click hp partner web. 4 Type your user name and password. 5 Click support. 6 Under technical support information, click technical support website. Appendix 7 Click the product type, such as laserjet or laserjet color. 8 Select the product that you want from the list. ENWW Embedded web server 289 Service websites HP Customer Care Online Go to the following website for information about software drivers, support documentation, and frequently asked questions. http://www.hp.com/go/support HP learning center The learning center make web-based training modules available to HP partners. To open an account and access the learning center, go to the following websites. z Direction for opening an account: htpp://vsslfpro.zcce.compaq/plm/contact/index.html z Log-in page: http://vsslfpro.compaq/plm Parts The following website allows you to search for HP product parts using the HP product name or model number, part number, or by choosing an HP product from a list. See the hp LaserJet Quick Reference Color Parts Guide (5851-1642) for a complete parts list and printer illustrations http://www.hp.com/go/partsinfo To order parts, go to http://www.partsdirect.hp.com 290 Appendix A – Service support ENWW Index Numerics C 2,000-sheet input tray DIP switches, CLJ 8500/8550 210 jams 53 motor errors 146 sensor test, CLJ 4500/4550 208 status light, CLJ 8500/8550 209 cables, troubleshooting 21, 40 calibration CLJ 4600/5500 193 color 245 Cancel Job button CLJ 2500, locating 2 CLJ 2500, using 35 CLJ 4500/4550, locating 3 CLJ 4600/5500, locating 4 CLJ 8500/8550, locating 5 carousel developer test, CLJ 4500/4550 204 errors 115, 117 Rotate button, CLJ 2500 2, 36 cartridges carousel errors 115, 117 developer test, CLJ 4500/4550 204 error messages 92 life expectancies 241 lock toner lever message 82 non-HP 83 replacing, customer responsibilities 15 status lights 2 status page, printing 32 toner out message 88 troubleshooting 74 checklist, pre-troubleshooting 16 checks. See tests circuit capacity specifications 23 cleaning page, printing 240 CLJ 2500 accessory error messages 42 assemblies, illustrations 256 Attention with Ability to Continue messages 39 control panel lights and buttons 2 jams, clearing 218 language selection, not supported 6 lights, status 34 motors and fans 258 paper path test 215 PCAs 259 power-on sequences 283 sensors and switches 257 service error messages 46 Service menu 186 service mode, accessing 183 A access denied, control panel menus 49 accessory error messages, CLJ 2500 42 alphabetical list, error messages 49 Attention light accessory error messages, CLJ 2500 42 Attention with Ability to Continue messages, CLJ 2500 39 CLJ 2500, locating 2 CLJ 2500, messages 35 CLJ 2500, status 34 CLJ 4500/4550, locating 3 CLJ 4600/5500, locating 4 CLJ 8500/8550, locating 5 service error messages, CLJ 2500 46 B Back arrow button 4 Bad Transmission error 40 beam detect errors 46, 94, 108 belt, transfer 85 bins errors 125 full 72, 89 jams 58 top, sensor errors 86 Black print-cartridge light 2 buffer errors 40, 48, 145 buttons CLJ 2500 2 CLJ 4500/4550 3 CLJ 4600/5500 4 CLJ 8500/8550 5 engine test 199 ENWW Index 291 CLJ 4500/4550 assemblies, illustrations 260 clutches 264 color calibration 245 control panel lights and buttons 3 diagnostics mode 200 drum test 242 jams, clearing 221 language, setting 6 motors and fans 265 paper path test 216 PCBs 266 registration, setting 197 sensors 262 Service menu 187 service mode, accessing 184 solenoids 264 CLJ 4600 assemblies, illustrations 267 calibration 193 color calibration 247 control panel lights and buttons 4 jams, clearing 223 jams, troubleshooting persistent 229 language, setting 6 paper path test 216 PCBs 270 power-on sequences 284 sensors 269 Service menu 188 service mode, accessing 185 solenoids 269 switches 268 CLJ 5500 assemblies, illustrations 271 calibration 193 clutches 274 color calibration 247 control panel lights and buttons 4 jams, clearing 223 jams, troubleshooting persistent 229 language, setting 6 motors and fans 275 paper path test 216 PCBs 276 power-on sequences 285 sensors 273 Service menu 188 service mode, accessing 185 solenoids 274 switches 272 292 Index CLJ 8500/8550 2,000-sheet input tray status light 209 assemblies, illustrations 277 color calibration 247 control panel lights and buttons 5 drum test 242 heaters 281 jams, clearing 226 language, setting 7 motors 281 paper path test 217 PCAs 282 sensors 279 Service menu 189 service mode, accessing 185 transfer wrap jams 238 CLJ 8550mfp error messages 154 close door error messages 60 clutches CLJ 4500/4550 264 CLJ 5500 274 cold reset 194 color calibration 245 matching, troubleshooting 243, 244 color LaserJet 2500. See CLJ 2500 color LaserJet 4500/4550. See CLJ 4500/4550 color LaserJet 4600. See CLJ 4600 color LaserJet 5500. See CLJ 5500 color LaserJet 8500/8550. See CLJ 8500/8550 components, illustrations CLJ 2500 256 CLJ 4500/4550 260 CLJ 4600 267 CLJ 5500 271 CLJ 8500/8550 277 configuration page information included on 26 not printing, troubleshooting 16, 21 printing 27 consumables. See supplies ENWW D Data light CLJ 4500/4550, locating 3 CLJ 4600/5500, locating 4 CLJ 8500/8550, locating 5 DC controller errors 124 default settings, restoring 194 demonstration page printing 28 troubleshooting 21 using 28 density sensor 66, 120 density test 243 developer test 204 diagnostics density test 243 developer test 204 door sensors, CLJ 4500/4550 206 drum test 205, 242 engine test 199 mode, CLJ 4500/4550 200 paper path test 215 path sensors, CLJ 4500/4550 205 DIMMs DRAM controller errors 145 errors 112, 144 flash, troubleshooting 72 ENWW troubleshooting 44 DIP switches, 2,000-sheet input tray for CLJ 8500/8550 210 disk failure errors 67 full errors 68 initialization 84, 192 multiple, not supported 88 write-protected 68, 69 documentation ordering iii part numbers iv service notes 289 work instructions 288 door sensor test, CLJ 4500/4550 206 doors, error messages 60 Down arrow button 4 downloading firmware manually 10 using FTP 10 using Internet Explorer 9 websites 8 DRAM controller errors 145 drum test 205, 242 drum, imaging error messages 69 life out 70 repetitive defects, troubleshooting 249 status light 2 status page, printing 32 troubleshooting 78 drum, transfer 81 duplexer errors 70 jams 51, 55 troubleshooting 49 duty cycles iv E EIO errors 43, 71, 93, 153 electrical specifications 23 Embedded Web Server 289 engine test performing 199 troubleshooting 21 environment, printer specifications 22 troubleshooting 17 Index control panel access denied 49 accessory error messages, CLJ 2500 42 Attention with Ability to Continue messages, CLJ 2500 39 CLJ 2500 lights and buttons 2 CLJ 4500/4550 lights and buttons 3 CLJ 4600/5500 lights and buttons 4 CLJ 8500/8550 lights and buttons 5 error messages, alphabetical list 49 error messages, CLJ 2500 34 error messages, numerical list 91 language, setting 6 menu map 30 service error messages, CLJ 2500 46 Service menu 186 service mode 183 troubleshooting 16, 19 copy module error messages, CLJ 8550mfp 154 CPR sensor 65 customer support 290 Cyan print-cartridge light 2 Index 293 error messages accessory, CLJ 2500 42 alphabetical list 49 Attention with Ability to Continue, CLJ2500 39 CLJ 2500 34 CLJ 8550mfp 154 numerical list 91 service, CLJ 2500 46 event log 31 F face-down output bin, jams 58 face-up output bin full 72 factory default settings, restoring 194 fans CLJ 2500 illustrations 258 CLJ 4500/4550 illustrations 265 CLJ 5500 illustrations 275 errors 48, 125 feed roller, replacing 15 firmware errors 143 firmware upgrades NVRAM initialization 190 using FTP 10 using HP Web Jetadmin 9 using Internet Explorer 9 using manual download 10 versions supported 8 flash DIMMs, error messages 72 formatter DC controller errors 124 diagnostics, CLJ 4500/4550 202 errors 97 NVRAM initialization 190 troubleshooting 21 fraud hotline 32, 83 FTP firmware upgrades 9, 10 fuser errors 47, 102 incompatible 73 jams 52 not installed 77 replacing 15 294 Index G Go light/button accessory error messages, CLJ 2500 42 Attention with Ability to Continue messages, CLJ 2500 39 CLJ 2500, locating 2 CLJ 2500, messages 35 CLJ 2500, status 34 CLJ 4500/4550, locating 3 CLJ 8500/8550, locating 5 service error messages, CLJ 2500 46 H hard disk failure errors 67 full errors 68 initialization 84, 192 multiple, not supported 88 write-protected 68, 69 heaters, CLJ 8500/8550 281 Help button 4 HP color LaserJet 2500. See CLJ 2500 HP color LaserJet 4500/4550. See CLJ 4500/ 4550 HP color LaserJet 4600. See CLJ 4600 HP color LaserJet 5500. See CLJ 5500 HP color LaserJet 8500/8550. See CLJ 8500/ 8550 HP Customer Care 290 HP Embedded Web Server 289 HP Jetdirect print servers, EIO errors 43 HP Technical Training 290 HP Web Jetadmin, firmware upgrades 9 I illustrations, components CLJ 2500 256 CLJ 4500/4550 260 CLJ 4600 267 CLJ 5500 271 CLJ 8500/8550 277 imaging drum error messages 69 life out 70 repetitive defects, troubleshooting 249 status light 2 status page, printing 32 troubleshooting 78 indicator lights. See lights ENWW J jams 2,000-sheet input tray 53 CLJ 2500, clearing 218 CLJ 4500/4550, clearing 221 CLJ 4600/5500, clearing 223 CLJ 8500/8550, clearing 226 duplexer 51 error messages 59 face-down output bin 58 fuser 52 input tray 55 multi-bin mailbox 56 persistent, troubleshooting 229 transfer wrap, CLJ 8500/8550 238 tray 1 60 tray 4 59 troubleshooting checklist 214 Jetadmin, firmware upgrades 9 Jetdirect print servers, EIO errors 43 K keys. See buttons L language, control panel 6 languages, printer 41, 50 laser/scanner errors 46, 94, 108, 110 LEDs. See lights lever, toner 82 life expectancies, print cartridges 241 ENWW lights 2,000-sheet input tray, CLJ 8500/8550 209 accessory error messages, CLJ 2500 42 Attention with Ability to Continue messages, CLJ 2500 39 CLJ 2500, locating 2 CLJ 2500, status 34 CLJ 4500/4550 3 CLJ 4600/5500 4 CLJ 8500/8550 5 service error messages, CLJ 2500 46 troubleshooting 19 locked control panel menus 49 lossy mode 101 M Magenta print-cartridge light 2 mailboxes bin full error message 72 communication errors 83 communication, troubleshooting 145 errors, troubleshooting 149 jams 56 manuals ordering iii part numbers iv service notes 289 work instructions 288 margins, registration 197 matching, color 243, 244 media error messages 39, 89 size mismatch 87 unexpected size 95 unexpected type 95 media jams. See jams memory DIMM errors 44, 112, 144 insufficient 39, 83, 144 NVRAM errors 42, 150 NVRAM initialization 190 Menu button CLJ 4500/4550, locating 3 CLJ 8500/8550, locating 5 menu map 30 menus locked 49 Index Index information pages configuration 26 demonstration 28 event log 31 menu map 30 printing 26 troubleshooting 21 initialization hard disk 192 NVRAM 190 instructions, work 288 Internet Explorer, firmware upgrades 9 IP address 289 Item button CLJ 4500/4550, locating 3 CLJ 8500/8550, locating 5 295 messages, error accessory, CLJ 2500 42 alphabetical list 49 Attention with Ability to Continue, CLJ 2500 39 CLJ 2500 34 CLJ 8550mfp 154 numerical list 91 service, CLJ 2500 46 mfp error messages 154 models supported iv motors CLJ 2500 illustrations 258 CLJ 4500/4550 illustrations 265 CLJ 5500 illustrations 275 CLJ 8500/8550 illustrations 281 errors 48, 137 multi-bin mailboxes bin full error message 72 communication errors 83 communication, troubleshooting 145 errors, troubleshooting 149 jams 56 N networks EIO errors 43 troubleshooting printing 18 non-HP supplies 17, 32, 83 non-volatile memory diagnostics, CLJ 4500/4550 202 errors 42, 150 initialization 190 numerical list, error messages 91 NVRAM diagnostics, CLJ 4500/4550 202 errors 42, 150 initialization 190 O OHT sensor 122 operating environment specifications 22 troubleshooting 17 ordering parts 290 service manuals iii output bins errors 125 full 72, 89 jams 58 top, sensor errors 86 296 Index P pages per month iv paper error messages 39, 89 size mismatch 87 unexpected size 95 unexpected type 95 paper jams. See jams paper path CLJ 2500 jams, clearing 218 CLJ 4500/4550 jams, clearing 221 CLJ 4600 jams, clearing 223 CLJ 8500/8550 jams, clearing 226 jams, persistent 229 test 215 transfer wrap jams, CLJ 8500/8550 238 troubleshooting 214 paper pickup roller, replacing 15 parallel ports, troubleshooting 21 part numbers, service manuals iv parts 290 Pause/Resume button, CLJ 4600/5500 4 PCAs CLJ 2500 259 CLJ 8500/8550 282 PCBs CLJ 4500/4550 266 CLJ 4600 270 CLJ 5500 276 personalities, troubleshooting 41, 50 pickup roller, replacing 15 ports, troubleshooting 21, 40 power electrical specifications 23 troubleshooting 19 unplugging printer 16 power-on sequences CLJ 2500 283 CLJ 4600 284 CLJ 5500 285 ENWW R Ready light accessory error messages, CLJ 2500 42 CLJ 2500, locating 2 CLJ 2500, messages 35 CLJ 2500, status 34 CLJ 4500/4550, locating 3 CLJ 4600/5500, locating 4 CLJ 8500/8550, locating 5 service error messages, CLJ 2500 46 recycling 32 registration area jams 55 registration numbers, CLJ 4500/4550 197 registration page, printing 196 repetitive defects, troubleshooting 249 replacing supplies, customer responsibilities 15 reset, cold 194 restoring factory default settings 194 rollers, replacing 15 Rotate Carousel button 2, 36 S scan buffer errors 48, 145 secondary error messages, CLJ 2500 accessory 42 Attention with Ability to Continue 39 service 46 Select button CLJ 4500/4550, locating 3 CLJ 4600/5500, locating 4 CLJ 8500/8550, locating 5 ENWW sensors CLJ 2500 257 CLJ 4500/4550 262 CLJ 4600 269 CLJ 5500 273 CLJ 8500/8550 279 CPR, troubleshooting 65 density, troubleshooting 66, 120 door tests, CLJ 4500/4550 206 OHT, troubleshooting 122 temperature/humidity 114 testing, CLJ 4500/4550 205 separation roller, replacing 15 service error messages, CLJ 2500 46 service manuals ordering iii part numbers iv Service menu CLJ 2500 186 CLJ 4500/4550 187 CLJ 4600/5500 188 CLJ 8500/8550 189 service mode, accessing 183 service notes 289 settings, restoring factory default 194 size mismatch, paper 87 software, troubleshooting 21 solenoids CLJ 4500/4550 264 CLJ 4600 269 CLJ 5500 274 specifications electrical 23 operating environment 22 status lights. See lights status page, supplies 32 storage environment, specifications 22 supplies error messages 73 imaging drum errors 69 life expectancies 241 non-HP 17 replacing, customer responsibilities 15 status page, printing 32 support websites 290 switches CLJ 2500 257 CLJ 4600 268 CLJ 5500 272 Index Index pre-troubleshooting checklist 16 print cartridges carousel errors 115, 117 developer test, CLJ 4500/4550 204 error messages 92 life expectancies 241 lock toner lever message 82 non-HP 83 replacing, customer responsibilities 15 status lights 2 status page, printing 32 toner out message 88 troubleshooting 74 printer languages, troubleshooting 41, 50 products supported iv 297 T technical support 290 temperature/humidity sensor errors 114 tests density 243 developer 204 diagnostics mode, CLJ 4500/4550 200 door sensors, CLJ 4500/4550 206 drum 205, 242 engine 199 paper path 215 path sensors, CLJ 4500/4550 205 toner cartridges. See print cartridges toner lever unlocked error message 82 toner out message 88 top output bin full 89 sensor errors 86 transfer belt 85 transfer drum 81 transfer jams 55, 59 transfer roller, replacing 15 transfer unit, troubleshooting 82 transfer wrap jams, CLJ 8500/8550 238 trays CLJ 2500 error messages 37 feed errors 124 jams 55 jams, tray 1 60 jams, tray 4 59 registration 196, 197 size mismatch error message 87 tray 1 errors 50, 89, 136 unexpected size message 95 unexpected type message 95 See also 2,000-sheet input tray 298 Index troubleshooting accessory errors, CLJ 2500 42 calibration 193 checklist 16 CLJ 8550mfp 154 color 243, 244, 245 configuration page 16 control panel 16, 19 engine test 199 error messages, alphabetical list 49 error messages, numerical list 91 jams. See jams networks 18 paper path 214, 215 power 19 repetitive defects 249 service error messages, CLJ 2500 46 software 21 supplies 15, 73 U unexpected size message 39, 95 unexpected type message 95 unlocked toner lever 82 unplugging printer 16 Up arrow button 4 upgrading firmware using FTP 10 using HP Web Jetadmin 9 using Internet Explorer 9 using manual download 10 versions supported 8 USB ports, troubleshooting 21 V Value button, locating CLJ 4500/4550 3 CLJ 8500/8550 5 voltage 17, 23 ENWW W waste toner errors 91, 120 Web Jetadmin, firmware upgrades 9 websites firmware upgrades 8 HP Web Jetadmin 9 parts information 290 support 290 work instructions 288 work instructions 288 Y Index Yellow print-cartridge light 2 ENWW Index 299 300 Index ENWW Supported Products: hp color LaserJet 2500/2500L/2500n/2500tn/2500se hp color LaserJet 4500/4500n/4500dn hp color LaserJet 4550/4550n/4550dn/4550hdn hp color LaserJet 4600/4600dn/4600dtn/4600hdn hp color LaserJet 5500/5500n/5500dn/5500dtn/5500htn hp color LaserJet 8500/8500n/8500dn hp color LaserJet 8550/8550n/8550dn/8550gn/8550mfp © 2003 Hewlett Packard Development Company, LP www.hp.com *5851-1493* *5851-1493* 5851-1493