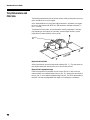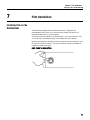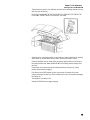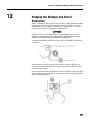
1
Wrapping & Labeling Workhorse ® Automatic Stretch Wrapper User’s Guide 64063805 R00 ©Mettler-Toledo, LLC 2012 No part of this manual may be reproduced or transmitted in any form or by any means, electronic or mechanical, including photocopying and recording, for any purpose without the express written permission of Mettler-Toledo, LLC. U.S. Government Restricted Rights: This documentation is furnished with Restricted Rights. Attention: Retail Quality Manager - MTWR If you have a problem with one of our products or publications, or just a suggestion on how we can serve you better, please fill out this form and send it to the address on the opposite side of this page (U.S. postage paid), or fax it to us at (614) 438-4355. Your feedback will help us to improve product performance, quality, and service. Part / Product Name: Part / Model Number: Customer Feedback Date: Provided By: Customer Name: Address: Phone Number: Fax Number: Your comments: Do not write in space below. For METTLER TOLEDO use only. Response (if appropriate) and corrective action taken. Workhorse User's Guide 64063805 ( Replaces 17297000A) METTLER TOLEDO® is a registered trademark of Mettler-Toledo, LLC ©2012 Mettler-Toledo, LLC Printed in USA FOLD THIS FLAP FIRST NO POSTAGE NECESSARY IF MAILED IN THE UNITED STATES BUSINESS REPLY MAIL FIRST CLASS PERMIT NO. 414 COLUMBUS, OH POSTAGE WILL BE PAID BY ADDRESSEE Mettler-Toledo, LLC Retail Quality Manager - MTWR P.O. Box 1705 Columbus, OH 43216 USA Please seal with tape. Contents 1 Introduction .................................................................................................... 1-1 2 Safety ............................................................................................................ 2-1 3 General Information & Specifications............................................................... 3-1 Dimensions.........................................................................................................................3-1 Specifications .....................................................................................................................3-2 Power................................................................................................................................... 3-2 Supply Voltage ........................................................................................................... 3-2 Installed Power .......................................................................................................... 3-2 Tolerance Of Installed Power ........................................................................................ 3-2 Speed................................................................................................................................... 3-2 Dimensions .......................................................................................................................... 3-2 Wrapper Only Dimensions ........................................................................................... 3-2 Minimum Doorway Opening Requirements For Installation............................................... 3-2 Shipping Weight ................................................................................................................... 3-3 Package Specifications .......................................................................................................... 3-3 Minimum / Maximum Package Dimensions ................................................................... 3-3 Film ..................................................................................................................................... 3-3 4 Wrapper Parts and Controls ............................................................................ 4-1 Main Components ...............................................................................................................4-1 Power Controls ...................................................................................................................4-3 Control Panel ......................................................................................................................4-4 5 Overview of Operation..................................................................................... 5-1 Machine Operation ..............................................................................................................5-1 6 Trays and Film ................................................................................................ 6-1 Tray Sizes ...........................................................................................................................6-1 Tray Dimensions and Film Size ............................................................................................6-2 7 Film Installation ............................................................................................. 7-1 Installing Film on the Workhorse® .......................................................................................7-1 8 Film Overtravel and the Film Retainer .............................................................. 8-1 9 Wrapping Speeds ........................................................................................... 9-1 10 Sealing Plate Temperature and Adjustment .................................................... 10-1 11 Upper Ejector and Adjustment ....................................................................... 11-1 12 Stopping the Wrapper and End of Production .................................................. 12-1 13 Problems, Causes, Solutions ......................................................................... 13-1 Error Codes.......................................................................................................................13-2 Problems Without Error Codes ...........................................................................................13-6 14 Cleaning / Maintenance ................................................................................ 14-1 Cleaning ...........................................................................................................................14-1 Daily and Weekly Cleaning .................................................................................................. 14-2 Weekly Only ....................................................................................................................... 14-2 Elevator Removal / Remounting ..........................................................................................14-3 15 Voice Option................................................................................................. 15-1 16 Automatic Weighing System Option ............................................................... 16-1 17 Manually Clearing the Wrapper ..................................................................... 17-1 18 Printed, Registered Film Option ..................................................................... 18-1 19 Warranty ...................................................................................................... 19-1 Chapter 1: Introduction 1 Introduction The Workhorse® is designed to be just what the name implies, a workhorse. Built from tough, corrosion resistant materials such as, aluminum, stainless steel, and industrial grade plastics, the Workhorse® is the most advanced automatic stretch wrapper available today. But it's not just the material that make the Workhorse®, wrapper ready for the present and future. It's the way the wrapper was designed to be operated - Easy! Using advanced electronic controls and on board self-diagnostics, the Workhorse® is not only simple to use, but simple to repair, minimizing downtime and eliminating most routine service. With a minimum of maintenance and care, the Workhorse® will provide the user with years of outstanding performance and satisfaction. 1-1 Workhorse User's Guide Workhorse® ZS Workhorse® ZS with 90S90 Powered Conveyor and Model 707 Indexer/Labeler 1-2 Chapter 2: Safety 2 Safety WARNING: FAILURE TO ADHERE TO THE FOLLOWING INSTRUCTIONS COULD RESULT IN SERIOUS BODILY INJURY OR PROPERTY DAMAGE. Carefully read and understand the Operator’s Manual. The Workhorse® uses an electrically heated sealing belt. Use caution when working near the belt, even after the wrapper has been turned off. The Workhorse® cycles through a complete wrapping operation when the package sensors are triggered. Be aware of this and keep hands and clothing away from the moving parts of the wrapper when the power is on. NEVER attempt to defeat any of the various safety interlocks on the guards. DO NOT attempt internal adjustments or repairs. These must be performed by trained and qualified service personnel. DO NOT allow water to enter the electrical enclosures. Use caution when cleaning and disconnect the power. REMEMBER: the wrapper is a wipe-down, NOT a wash-down machine. NO ONE but qualified operators, age 18 or older, should operate the wrapper. DO NOT permit distraction of the operator while the wrapper is in use. DO NOT permit personnel with loose clothing, ties, or jewelry near the wrapper when in use. Maintain a firm footing in the area surrounding the wrapper. DO NOT allow unqualified personnel to attempt repairs. Switch the wrapper OFF when not in use. Keep the wrapper clean and in good running order. SWITCH OFF and LOCK OUT the wrapper before attempting any cleaning or maintenance. DO NOT attempt to operate a damaged or a malfunctioning wrapper. Use in accordance with the manufacturer’s instructions. DO NOT attempt to force oversized packages through or into the wrapper. Keep the area around the wrapper clean, dry, and free of obstructions. DO NOT use extension power cords. 2-1 Workhorse User's Guide For your notes 2-2 Chapter 3: General Information & Specifications 3 General Information & Specifications Dimensions 3-1 Workhorse® User's Guide Specifications Power Supply Voltage 208/240 VAC, 60 Hz, 3 Phase, 12.5 amps, (dedicated circuit), NEMA L15-20R TwistLock receptacle required Installed Power 2500 Watts Tolerance Of Installed Power + 5% Speed Packages per Minute: 30 Normal / 21 selectable and/or program to tray size. Dimensions Wrapper Only Dimensions Type ZS Depth 64” Width 54.5 Height 52 Infeed Height 31.5” + 2” Discharge Height 41.0” + 2” Minimum Doorway Opening Requirements For Installation Type Minimum Dimension ZS 56.25” ZS* 40.00” ZS** 47.00” * Dimension only with infeed and discharge fully removed. ** Infeed disconnected and secured to the front panel of the wrapper, discharge NOT removed. 3-2 Chapter 3: General Information & Specifications Shipping Weight Approx. 840 lb (Wrapper Only) Package Specifications Package Orientation: Longest tray dimension - perpendicular to package travel. Minimum / Maximum Package Dimensions MIN MAX (A) Width- 5.1” 16” (B) Length- 5.1” 10.2” (H) Height- 0.5” 6.0” **IMPORTANT NOTE: Not ALL packages within these dimensions will run through the wrapper. For example, a tray that has ALL of the MAXIMUM (16” wide, 10” Long, and 6” high) dimensions may not wrap because the maximum film width may not cover the entire package. Film 50 - 100 gauge stretch film 3” I.D. core 9” maximum O.D. 2 film arbors standard - Automatic select Minimum / maximum dimensions: MIN. MAX. Roll Width- 14” 21” Pulled Length- 9 3/4” 27 1/2” 25 cm 70 cm 3-3 Workhorse® User's Guide For your notes 3-4 Chapter 4: Wrapper Parts and Controls Main Components 4 Wrapper Parts and Controls On the next several pages, the main parts of the Workhorse®, and the layout of the keyboard can be found. The numbers that indicate the various parts will be used in subsequent sections of this manual. Main Components 4-1 Exact® Workhorse® User's Guide Ref# 1 2 3 4 5 6 7 8 9 10 11 12 13 14 15 16 17 18 19 20 21 22 23 24 25 26 27 28 29 30 31 32 33 34 35 4-2 Description Main Power Switch Serial / Identification Plate Reel (arbor) # Indicator Lower Side Cover, #1 Side Film Threading Diagram Fixed Film Transfer Belts (Do not Move with Carriage) Film Distributor Carriage Film Transfer Belts (Move with Carriage) Lower Ejector - Pusher Pad Upper Ejector Assembly Folder Roller / Plate Elevator Assembly Side Folder Plate(s) Exit Roller Assembly (Exit Transfer) Control Panel (Mounting Position Varies with Wrapper Configuration) Sealing Plate Thermostat (On X version wrappers, mounting is on the operator’s side - on Z version wrappers, on the opposite side) Maximum Infeed Width Guide (Used for Centering Trays on the Infeed) Infeed Assembly Machine Photocell / Reflector (Triggers Wrap Cycle) Outfeed Transfer Belts (Not Present with “S” Version Wrappers) Sealing Belt Adjustable Legs Elevator Access Door Locking Slider for Dancer / Tension Arm Dancer / Tension Arm Lower Side Cover (#2 Side) Diagnostics Box Port Film Roll Positioning Guide Film Arbor (reel) Emergency Stop Switch Distributor Cover - #2 Side Handle for Top Hood Discharge Cover(s) Top Hood Distributor Cover #1 Side Chapter 4: Wrapper Parts and Controls Power Controls Power Controls 1 40 41 A Main Power Switch Red Push Button - When pushed - ALL power to the wrapper is cut off. Black Push Button - When pushed - ALL power to the wrapper is engaged and the machine is ready for use. CAUTION - DO NOT attempt any cleaning or maintenance when the Main Power is “ON” Main Power Lockout Plate (When engaged, power switch is off and safety lockout lock can be installed) 4-3 Exact® Workhorse® User's Guide Control Panel 51 52 4-4 Start Button (Also acts as a Clear Button for Errors) “Up” TLU Selection Button - Selects TLU’s with a higher # than the one displayed at position 57 (TLU # Display) Chapter 4: Wrapper Parts and Controls Control Panel 53 “Down” TLU Selection Button - Selects TLU’s with a lower # than the one displayed at position 57 (TLU # Display) 54 Scale / Wrap Mode Selection Button – Operational ONLY when a Scale System is Attached. Indication for wrap / scale mode will appear at position 59. 55 Wrapping Speed Selection Button – used to override the programmed, or current wrap speed setting. Indication for current wrap Speed can be found at position 60. 56 57 58 Selection Push-button to Activate / Deactivate Voice Mode Option in “Automatic Mode” OR Activate Voice Prompt when in “On Demand Mode” (Active Only When Voice Option is Installed, see explanation - sec. #14.4) TLU Selection Display - Displays Currently Selected TLU (Tray Look Up numbers) Indicators for Printed Registered Film Operation (With film reader option installed ONLY - see sec #14.1) Registered Film Mode Active - Side #1 Registered Film Mode Active - Side #2 59 Indicators for Currently Selected Wrap / Scale Mode (ref. section 14.7) Wrap Only (The Only Possibility when no Scale System is Attached) Wrap AND Weigh 4-5 Exact® Workhorse® User's Guide Weigh Without Wrap (Packages Sent Through Wrapper Without Feeding Film) Manual Scale (Exposes Scale Grid and Stops ALL Motors to Allow the Scale to be Used as a “Hand” Scale. 60 Indicators for Current Speed Selection (Packages / Minute) High Speed - 30 Packages / Minute Low Speed - 21 Packages / Minute 61 Red Display Indicating Error Code #’s 62 Red Error LED’s Indicating Location of Error or Action Needed. Errors in the Weighing System. (If Attached.) Errors Where Calling For a Service Representative is Recommended. Indication that the Preventive Maintenance Interval has been Reached, and Your Local Service Company Should be Contacted 4-6 Chapter 5: Overview of Operation Machine Operation 5 Overview of Operation Machine Operation The following step-by-step procedure is a description of the basic operation of the wrapper. Each individual operation will be described, in detail, in the pages to follow. Operation Chapter Be sure the operator is familiar with all necessary safety precautions as described in Chapter 2. 2 Check the wrapper for any obstructions or product left anywhere in, on, or around the wrapper that may affect it’s use. 14 Verify the STOP button is depressed. 4 Push the black button on the main power switch to turn the main power on. 4 Allow some time for the sealing plate to warm up, and adjust with the thermostat if needed. 10 If a scale system is attached, select the needed operation mode (w/scale, wrap only, etc.) 4/16 Using the (+) or (-) buttons, select the appropriate tray size. 4 Be sure the film is present on both arbors, properly threaded, of adequate size and in the correct position on the arbor. 7 Verify that ALL covers and guards are closed and in place. 4 Release the STOP button. 4 Press the START button on the control panel. 4 Place the trays centered on the infeed and begin wrapping. After turning the main power ON, if the STOP button is depressed, the red display (^) should display “01” and the red LED on the right of the infeed on the display (62) should be lit, indicating the STOP button is engaged. When the STOP button is released, the display (61) should change to “00” and the LED on the infeed (62) should go out, indicating “Machine Ready – Press the START button”. IMPORTANT! Once the tray is placed on the infeed, LEAVE IT ALONE – NEVER push a tray, or try to straighten it once it has been placed on the infeed. The wrapper has safety interlocks that will stop the machine, under normal circumstances, should the package be severely misaligned. 5-1 Workhorse® User's Guide For your notes 5-2 Chapter 6: Trays and Film Tray Sizes 6 Tray Sizes Trays and Film Most trays have a size number molded into the bottom of the tray; this is generally the number that the installing technician will use to program the wrapper with the correct amount of film, stretch. etc. This is the number that should appear in the display position #57 in green. To select any particular tray size, simply press the [+] (#52), or the [-] (#53) button to display the desired TLU (Tray Look-Up) Number. Remember, only the tray sizes that are currently "active" will be displayed. That is, if the tray sizes to be run are - 2, 4,8, 10, 12,25, and 10X14 (displayed as 14 as there are only 2 digits available in the display), then these will be the only tray sizes that will be displayed. Your Authorized Service Agency can program additional TLU's if they are required. 6-1 Workhorse® User's Guide Tray Dimensions and Film Size The following measurements need to be taken with the actual product present in the tray that is intended to be run on the wrapper As the Workhorse® will only accept film length dimensions in centimeters, we suggest the use of a tape measure with BOTH inch, AND centimeter / millimeter increments. (1 inch = 2.54 cm) The dimensions that are taken, and the dimensions actually programmed / used may vary depending on such factors as: Film stretch, overall wrapper condition, product height variance, product pliability, and tray quality Required Film Roll Width Wrap a tape measure around the tray/product widthwise (Ref. “A”). The mark where the tape measure meets itself around the tray is the film roll width required. Required Film Programmed Length Place the tray/product to be wrapped on a flat surface. With the 4” mark of the tape measure placed on a lengthwise edge of the tray (Ref. “B”), measure the cover length of the tray, plus 4” on the opposite lengthwise edge of the tray. The TOTAL measurement at that point is the required programmed film length for that package (in centimeters). 6-2 Chapter 7: Film Installation Installing Film on the Workhorse® 7 Installing Film on the Workhorse® Film Installation The Workhorse® wrapper uses PVC stretch films from 50 - 100 gauge. And accommodates 2 rolls of film, one on each side of the wrapper from which it will automatically select (via TLU, or tray program). The rolls of film must be installed in the correct fashion, i.e. the correct size roll on the #1 and #2 sides, and threaded properly, for the wrapper to function normally. Standard film positioning is the small roll of film is placed on the arbor marked #1, and the large roll is placed on arbor #2. This may be reversed if needed, but remember to program the wrapper accordingly. FIRST, PRESS THE STOP BUTTON 7-1 Workhorse® User's Guide With the Dancer (Film Tension Arm) in the DOWN position, lift the lever on the arbor as shown. (If an empty roll of film is present, remove the core.) Slide the new, full roll of film onto the arbor as shown. BE SURE THE FILM UNWINDS IN THE CORRECT DIRECTION BY CHECKING THE FILM THREADING DIAGRAM EITHER IN THIS MANUAL OR ON EACH SIDE OF THE WRAPPER. Position the roll of film, front to back, using the numbered guide found on the cover behind the film roll. Most rolls of film will be placed between the 0 and the 2 on the guide (depending on film width and position on the film transport belts). Note: On Z version wrappers, there is a film roll stop on each side, and on X version wrappers, there is a film roll stop on the #1 side for film positioning. These stops should 7-2 Chapter 7: Film Installation Installing Film on the Workhorse® be set so that the greatest amount of film will be carried by the film belts that transport the film into the wrapping zone. Lock the film roll into the proper position with the lever on the end of the arbor. 7-3 Workhorse® User's Guide Lift the Dancer Bar as shown, and lock it in the up position by sliding the locking clip inwards. WHEN THE WRAPPER IS “ON” THIS WILL ALLOW THE (FILM) ARBOR BRAKE TO DISENGAGE AND ALLOW THE ROLL OF FILM TO SPIN FREELY. IF THE WRAPPER POWER IS NOT “ON” THE BRAKE WILL NOT DIS-ENGAGE. Locking Clip Open the distributor cover (Depending on which side) and press on the distributor release handle. DO NOT USE EXCESSIVE FORCE! 7-4 Chapter 7: Film Installation Installing Film on the Workhorse® Thread the film into place in the distributor as shown on the threading diagram (over the idler and under the dancer). PLACE THE LEADING EDGE OF THE FILM SO THAT IT IS EVEN WITH THE EDGE OF THE FILM “COMB”. DO NOT THREAD THE FILM PAST THIS POINT. When the film is in the proper position in the distributor, close the distributor by pressing down FIRMLY on the top section (be sure that it locks into place with a “click”). Close the distributor cover by lifting slightly and pulling lightly outward on the center of the holding bracket. Note: Newer models DO NOT have Locking Latches, simply lower the cover. Pull outward on the dancer locking clip allowing the dancer to drop to it’s normal position (Arbor brake will engage). If the Dancer Arm is NOT lowered, the film, when pulled, will violently lift the arm causing the wrapper to enter Error 43/44 condition (out of film) and possibly damaging the locking clip. The wrapper is now ready for use. Release the STOP button and begin wrapping. 7-5 Workhorse® User's Guide For your notes 7-6 Chapter 8: Film Overtravel and the Film Retainer 8 Film Overtravel and the Film Retainer If for some reason, the wrapper should go into a fault condition where (a) the sheet of film that has been pulled for a package is left in the machine, and (b) another sheet of film is pulled, the wrapper will detect this extra sheet of film and shut down with a film overtravel error. Error 46 will be displayed for side #1 or error 47 for side #2. In the unlikely event that an overtravel occurs, attention must be paid to the machine outline section of the control panel (62). An LED will light to indicate which side the overtravel has occurred on. IMPORTANT: The wrapper WILL NOT RUN UNTIL the overtravel condition has been cleared! The electronics will not allow the wrapper to re-start until the distributor cover, on the side of the overtravel occurrence, has been opened, and the film removed. This interlock has been installed to prevent damage to the wrapper by excess pieces of film becoming jammed in the film belts. PRESS THE STOP BUTTON PRIOR TO ATTEMPTING FILM REMOVAL! 8-1 Workhorse® Service Manual For your notes 8-2 Chapter 9: Wrapping Speeds 9 Wrapping Speeds The Workhorse® is capable of running at two different speeds (packages/minute). Most trays will be programmed to run at 31packs/minute, but this speed can be changed at any time to 21packs/minute by pressing the arrow button (55) on the control panel. When the display indicators show a single arrow (), the speed is 21 packs/minute. When a double arrow displays (), the speed is 31 packs/minute. Slow speed is generally used for unusually high or unstable trays that would be a problem at the normal working speed of 31packs/minute. Maximum working speed is attained by placing the packages on the infeed with: a) a 2-3 inch gap between packages for the "X' version wrappers. b) a 6-7 inch gap between packages for the "Z" version wrappers. DO NOT TRY TO OVERFEED OR FORCE PACKAGES INTO THE WRAPPER AT LESS THAN THE GAPS LISTED ABOVE. THE WRAPPING SPEED WILL BE LOWER THAN MAXIMUM BECAUSE OF INCREASED ERRORS (O5 & 86). 9-1 Workhorse® User's Guide For your notes 9-2 Chapter 10: Sealing Plate Temperature and Adjustment 10 Sealing Plate Temperature and Adjustment SAFETY WARNING! THE SEALING PLATE OF THE WORKHORSE CAN REACH TEMPERATURES AS HIGH AS 355º F (180º C). EVEN AFTER THE MACHINE HAS BEEN TURNED OFF, THE SEALING PLATE W1LL REMAIN HOT FOR SEVERAL MINUTES. USE CAUTION WHEN WORKING AROUND THE SEALING PLATE ! To adjust the temperature of the sealing plate, simply rotate the control knob. Turning the knob clockwise will increase the heat. Turning the knob counterclockwise will decrease the heat. On "X" configuration wrappers, the temperature control knob is mounted on the operator's, or front end of the wrapper. On "Z" configuration machines (including the inline configuration), the control knob will be mounted on the rear end of the machine. 10-1 Workhorse® User's Guide For your notes 10-2 Chapter 11: Upper Ejector and Adjustment 11 Upper Ejector and Adjustment The upper section of the ejector of the Workhorse® can be adjusted to accommodate very high profile packages. By using the aluminum knob (81) located at the base of the upper ejector, the height can be regulated. NEVER set the upper ejector so that it does not AT LEAST touch the top of the product! The main purpose of this part of the wrapper is to keep products and/or trays in place during the wrapping cycle. If contact with the package is not maintained, it’s possible for the package to fall back into the wrapping zone. We recommend that the height of the upper ejector NOT be adjusted unless absolutely necessary. Adjustment is usually unnecessary unless running large quantities of unusually high packages. It's also possible to raise the upper ejector, and lock it into the raised position by lifting the mechanism and pushing on the handle of the locking pin (83). To lower the ejector from the up and locked position, lift the ejector slightly and pull on the locking pin, gently lowering the upper ejector. ALWAYS remember to unlock and reset the upper ejector to the DOWN position BEFORE starting production! 11-1 Workhorse® User's Guide For your notes 11-2 Chapter 12: Stopping the Wrapper and End of Production 12 Stopping the Wrapper and End of Production When it is necessary to stop the machine for any reason, including emergencies, simply press the STOP button (30) located on the right hand side of the weed. It is always recommended, that if the wrapper will remain idle for any length of time, to also press the STOP button to avoid any possibility of an accidental start. SAFETY NOTE: Opening ANY cover on the Workhorse® MUST stop the wrapper in the event of an emergency, or just to thread the film. If opening a cover DOES NOT stop the wrapper , CONTACT AN AUTHORIZED SERVICE REPRESENTATIVE IMMEDIATELY. To release the stop button, simply turn the button LIGHTLY CLOCKWISE (In the direction of the arrow). When production is finished for the day, OR to clean the wrapper. ALWAYS turn the main power to the Workhorse® off. This is done by simply press the RED button (40) on the main power switch. The main power switch also has a provision for Lock-out capability. By lifting the yellow cover, and sliding the cover into position, the switch can be locked-out using any OSHA approved locking mechanism. 12-1 Workhorse® User's Guide For your notes 12-2 Chapter 13: Problems, Causes, Solutions Error Codes 13 Problems, Causes, Solutions When the wrapper is turned on, the wrapper will perform a short self test to determine if there is a problem that should keep the wrapper from starting. If no problem is found, the numerical indicator at position 61 on the operations panel will show "00", if a fault is found, it will display an error # to indicate what the problem is, and section 62 of the display will indicate a general section of the wrapper where the fault exists (see error chart below). If no fault is found, the start button can be pressed, which will initiate a short self diagnostic cycle. During this self test the wrapper will analyze it's functions and determine if there is a problem in need of correction. If a fault is found, the wrapper will stop, indicating an error. If no fault is found, the wrapper is ready for use. If an error should occur, use the chart found below and on the following pages to determine what the problem is. **lMPORTANT NOTE** THE REMEDY PROCEDURES LISTED HERE SHOULD BE CARRIED OUT ONLY BY TRAINED AND QUALIFIED OPERATORS. FIRST, DEPRESS THE STOP BUTTON AND TURN OFF THE MAIN POWER SWITCH. IF THE PROBLEM CANNOT BE RESOLVED BY THE PROCEDURES LISTED, CONTACT YOUR LOCAL AUTHORIZED SERVICE AGENT. DO NOT ATTEMPT ANY REPAIRS OR DEFEAT ANY SAFETY DEVICE! 13-1 Workhorse® User's Guide Error Codes Errors should only occur on wrappers equipped with optional - printed, registered film readers. ® Errors that should only occur with an optional weighing system attached © Error that should only occur with optional product exit photocell or weighing system Error should only occur on wrappers equipped with optional extended infeed. Error should only occur on wrappers equipped with optional automatic upper ejector. Errors that should only occur with an optional weighing system attached Error that should only occur with optional product exit photocell or weighing system 13-2 The following list of error codes includes a basic starting point for solving the problem that caused the error. These solutions are mainly operator related. Use the Chapter number that is listed above the solution to find more detailed solutions. Error code # Error description and possible solutions 00 MACHINE READY Press the start button on the operations panel (51) 01 STOP BUTTON IS DEPRESSED Release the stop push-button by twisting lightly clockwise (30) 02 AUTO SHUT-OFF (MACHINE NOT IN USE FOR 3 OR MORE MINUTES) Press the start button on the operations panel (51) 05 COVER OPEN Close ALL covers Place packages on infeed correctly Remove debris from infeed if present Clean safety photocells and reflectors 07 RESET Press the start button on the operations panel (51) 08 FOLDER OR EJECTOR CABLE BROKEN Cable switch is open, replace cable OR reset / repair switch 09 PREVENTATIVE MAINTENANCE INTERVAL REACHED Press the start button and continue wrapping 11 INCORRECT POSITION OF CAM Press the start button on the operations panel (51) Unlock the cam motion using the “T” Handle 12 INCORRECT POSITION OF THE ELEVATOR Press the start button on the operations panel (51) PRESS THE STOP BUTTON - Remove any product that may be caught in the wrapping area - Release the stop button Press the start button (51). Using the “T” Handle, relieve any possible bind in the wrapping area. Chapter 13: Problems, Causes, Solutions Error Codes Error code # 13 14 Error description and possible solutions INCORRECT POSITION OF THE FOLDERS Press the start button on the operations panel (51) PRESS THE STOP BUTTON - Remove any product that may be caught in the wrapping area - Release the stop button, and press start. Using the “T” Handle, relieve any possible bind in the wrapping area. SYSTEM CHECK REPORTS SENSOR FAULT @ SR2 Press the start button on the operations panel (51) Errors should only occur on wrappers equipped with optional - printed, registered film readers. ® Errors that should only occur with an optional weighing system attached © Error that should only occur with optional product exit photocell or weighing system Error should only occur on wrappers equipped with optional extended infeed. Error should only occur on wrappers equipped with optional automatic upper ejector. Errors that should only occur with an optional weighing system attached Error that should only occur with optional product exit photocell or weighing system 15 SYSTEM CHECK REPORTS SENSOR FAULT @ SR1 Press the start button on the operations panel (51) 18 LOSS OF PROGRAMMED TLU VALUES Reprogram values 41 FILM FEED MOTOR NOT FUNCTIONING PROPERLY **PRESS THE STOP BUTTON !** Remove any film that may be trapped in the film feed belts Press the start button on the operations panel (51) 43 FILM REEL #1 - OUT OF FILM (FINISHED OR TORN) Check film reel #1 for film presence and proper placement Replace empty reel 44 FILM REEL #2 - OUT OF FILM (FINISHED OR TORN) Check film reel #2 for film presence and proper placement Replace empty reel 45 UNUSED FILM PRESENT ON SIDE #1 (OVERTRAVEL) **PRESS THE STOP BUTTON !** Open cover on the side indicated on the operations panel and Remove all excess film 46 UNUSED FILM PRESENT ON SIDE #2 (OVERTRAVEL) **PRESS THE STOP BUTTON !** Open cover on the side indicated on the operations panel and Remove all excess film 47 PRINTED FILM PHOTOCELL-SIDE 1- MALFUNCTION Clean photocell and reflector 13-3 Workhorse® User's Guide Error code # 48 Errors should only occur on wrappers equipped with optional - printed, registered film readers. ® Errors that should only occur with an optional weighing system attached © Error that should only occur with optional product exit photocell or weighing system Error should only occur on wrappers equipped with optional extended infeed. Error should only occur on wrappers equipped with optional automatic upper ejector. Errors that should only occur with an optional weighing system attached Error that should only occur with optional product exit photocell or weighing system 13-4 49 Error description and possible solutions PRINTED FILM PHOTOCELL-SIDE 2- MALFUNCTION Clean photocell and reflector PRINTED FILM NOT POSITIONED PROPERLY Check the alignment of the film on the side indicated on the operations panel Check the alignment of the film eyespot to the photocell 66 MACHINE (INFEED) PHOTOCELL BLOCKED Remove ALL packages from the infeed Clean machine photocell and reflector 67 EXTENDED INFEED PHOTOCELL BLOCKED Remove ALL packages from the infeed Clean extended infeed photocell and reflectors 68 SAFETY PHOTOCELL BLOCKED Remove ALL packages Clean Safety photocells and reflectors 80 IMPROPER MOVEMENT OF AUTOMATIC CARRIAGE Press the start button on the operations panel (51) 81 IMPROPER MOVEMENT OF AUTO. UPPER EJECTOR Verify that ejector is NOT locked into the up position. Restart wrapper and reselect TLU 83 PACKAGES NOT TRANSFERRING FROM EXTENDED INFEED PROPERLY Clean extended infeed photocell and reflector Remove any debris and clean package transfer belts Set the infeed on / off selector switch to “1” (on) and press the start button 84 SAFETY PHOTOCELL BLOCKED Remove ALL trays from the infeed Clean the photocell and reflector Chapter 13: Problems, Causes, Solutions Error Codes Error code # Error description and possible solutions 85 PACKAGE TOO BIG OR MACHINE PHOTOCELL ACCIDENTALLY BLOCKED Product hanging off tray - correct placement of product in tray Select correct TLU number for tray size in use Remove any debris from infeed belts Clean infeed belts 86 PACKAGES ON INFEED TOO CLOSE Increase distance between packages as they are placed on infeed Product hanging off tray - correct placement of product in tray Remove debris from infeed and/or clean infeed belts 87 CARRIAGE PHOTOCELL OBSCURED DURING OPERATION Remove ALL packages from the infeed Remove any film that may be caught in the belts Clean the photocell and reflector 88 PACKAGE TOO SMALL OR MACHINE PHOTOCELL ACCIDENTALLY BLOCKED Use a larger tray Clean infeed belts and/or remove any debris clean machine photocell and reflector (19) 89 PACKAGE READ BY MACHINE PHOTOCELL, BUT NOT BY SAFETY PHOTOCELL Remove ALL packages from infeed Remove any debris on infeed and clean machine photocell and reflector (19) Clean infeed belts 90 PRODUCT EXIT PHOTOCELL BLOCKED Remove any packages from the sealing belt Press the start button on the operations panel (51) Clean photocell and reflector (100, 101 - see sec 16) 91 INCORRECT MOTION FROM SCALE UP/DOWN BELTS Press start button 92 SCALE ERROR Reset weighing system and press the start button Use the wrapper in “Wrap Only” mode 13-5 Workhorse® User's Guide Error code # Problems Without Error Codes Error description and possible solutions 93 PACKAGE WEIGHED BUT NOT LABELED Check and Reset Weighing and Labeling system Use the wrapper in “Wrap Only” mode 95 LABELING SYSTEM ERROR Check and Reset Weighing and Labeling system Use the Wrapper in “Wrap Only” mode 96 SCALE PHOTOCELL BLOCKED Remove packages at sealing belt and scale platform Clean photocell and reflector (122 & 123) 97 LABELING PHOTOCELL BLOCKED Remove package(s) at labeling station Clean photocell and reflector (124 & 125) 99 PACKAGES REMAINING AT PRODUCT EXIT PHOTOCELL Remove packages at product exit photocell (100, 101- sec 15) This is only a partial list, and the solutions listed only suggest a possible course of action, for more detailed information about a specific problem, refer to the Chapter of this manual that deals with the particular part of the wrapper that is exhibiting problems. Fault: The operations panel is not lit after turning the main power switch to the “On’ position. Cause: No main incoming power. Solution: Check the main power plug to ensure that it is connected properly. Fault: Packages are not sealed correctly - loose film on the tray bottom. Cause: a] Sealing plate temperature too low. b] Film too wide or long for tray being run. Solution: a] Increase the sealing temperature. (See sec. 10) b] Use the correct TLU for that tray, use a narrower film on that side. Reprogram the film parameters for that TLU. 13-6 Chapter 13: Problems, Causes, Solutions Problems Without Error Codes Fault: Package has holes in the bottom, or bottom is burnt Cause: Sealing plate temperature too high. Solution: Decrease the sealing plate temperature. (see Chapter 10) Fault: Package open on both ends or under package on both sides. Cause: Improper TLU for the tray being run, excessive product height, insufficient film length programmed. Solution: Use the correct TLU, or one for slightly larger tray. Note: If excessive height is the cause, have an authorized technician increase the film length value for that TLU on the next visit. Fault: Packages open on one side. Cause: a] Film reel not in proper position. b] TLU in use is not correct for product being run. c] Packages not being placed properly on the infeed. Solution: a] Adjust film so that it is correctly positioned for that side of the wrapper, ensure that the arbor locking handle is engaged and tight. b] Use a suitable TLU. (See fault #4) c] Place packages straight and centered on the infeed. Fault: Packages open lengthwise on the bottom. Cause: a] TLU in use is incorrect for that tray. b] Film is not wide enough. Solution: a] Select an appropriate TLU. b] Change the film reel to a wider roll of film. Fault: Film is loose on product. Cause: a] TLU in use is incorrect for tray. b] Film reel is too narrow. Solution: a] Select an appropriate TLU. b] Change the film reel to a wider roll of film. 13-7 Workhorse® User's Guide Fault: Product rolls out of wrapping area when ejected. Cause: a] Excessive film, or poorly positioned film reel. b] Product too high in tray, top-heavy. c] Upper ejector height not set properly. d] TLU in use is incorrect for tray in use. Solution: a] Use a narrower film on that side, be sure that film reel is positioned properly. b] Re-arrange product in tray to be more stable. c] Set upper ejector to the proper height. (See sec. 11) d] Select an appropriate TLU. Fault: Trays crush when folders move to tuck the film or when trays are being ejected from the wrapping area. Cause: a] Tray too big for product on the tray. b] Film width is too large for that tray. c] TLU in use is incorrect for that tray. Solution: a] Select a tray that is closer to the size of the product being run. b] Select an appropriate TLU, change the film reel to a narrower roll of film. c] Select an appropriate TLU for that tray. 13-8 Chapter 14: Cleaning / Maintenance Cleaning 14 Cleaning Cleaning / Maintenance There are two basic types of cleaning; the procedures that should be performed on a daily basis, at the end of production, and those that should be performed weekly (which are slightly more in-depth). The regularity of this cleaning schedule was based on SUPERMARKET MEAT ROOM use. PERFORM THE CLEANING MORE OFTEN AND THOROUGHLY WHEN THE WRAPPER IS LOCATED IN A PACKING PLANT! The Workhorse® is NOT a washdown machine! NEVER pour or spray water or any other liquid directly onto any part of the wrapper! When a cleaning solution is called for, use a mild soap and water solution on a cloth to wipe the wrapper down! NEVER, UNDER ANY CIRCUMSTANCES, attempt any cleaning procedure until the STOP BUTTON has been pressed in, and the MAIN POWER switch has been moved to the “OFF” position. 14-1 Workhorse® User's Guide Daily and Weekly Cleaning Remove all product and/or film debris from the: Infeed conveyor and belts ALL Photocells and reflectors Film transfer belts Elevator Product exit rollers and belts Sealing Belt [Only After The Belt Has Cooled!] Wipe down the following parts: Infeed conveyor and belts All covers Weekly Only Wipe down the ejector rollers Remove the elevator, and clean thoroughly. 14-2 Chapter 14: Cleaning / Maintenance Elevator Removal / Remounting Elevator Removal / Remounting BE SURE THE STOP BUTTON IS ENGAGED, AND THE MAIN POWER SWITCH MOVED TO THE "OFF" POSITION. Open the inspection door (23) and unlock the two locking levers. Lift the elevator, and begin to pull it out through the opening. Collapse all the mushrooms on the elevator by knocking them down by hand. (This will make it easier to extract the elevator through the opening) Pull the elevator the rest of the way through the opening. Clean the elevator thoroughly. Do not immerse the elevator in water at ay time! Re-insert the elevator into the wrapper by reversing the above procedure. Be SURE that the elevator is firmly seated on it's locating pins towards the front of the wrapper, and into the locking levers toward the rear of the wrapper. Lock the elevator into place by pressing down on the locking levers (95). Be sure that the chamfered edges of the locking blocks face upward (see drawing below) before pressing down on the levers. The elevator should now be about 3mm (1/8 inch) below the infeed polycord belts. Close the inspection door. **DO NOT POWER WASH THE ELEVATOR!** 14-3 Workhorse® User's Guide EXACT EQUIPMENT For your notes 14-4 Chapter 15: Voice Option 15 Voice Option The Workhorse® wrapper may be equipped with optional voice prompts. These voice prompts can be programmed by the installing or maintaining technician, to operate in one of two different modes: Automatic - If the wrapper were to go into an error condition, the voice prompt would automatically be heard, along with the error number being displayed (in area 61) on the operations panel. Manual - Should an error occur, the wrapper would simply show the error number (in area 61) on the display, the operator would then need to press the voice button (56) on the operations panel to hear the appropriate voice prompt. Note: These messages have been pre-recorded and then stored in the wrapper's electronics; the messages CANNOT be changed or altered by either the end user or the installing technician. 15-1 Workhorse® User's Guide For your notes 15-2 Chapter 16: Automatic Weighing System Option 16 Automatic Weighing System Option When the Workhorse® is installed with an automatic weighing system, like the Exact RLA/971 system, operations become slightly different. A transfer system will be added to the wrapper's discharge that will make the system a complete wrapping and weighing system. The wrapper's operating mode button (54) then becomes active, and the wrapper can be used in anyone of the four following modes: Wrapper Only - In this mode, the additional transfer section (beyond the sealing belt) becomes no more than an additional conveyor system, and the packages transfer out of the wrapper without any further action. Wrapper And Scale - In this mode, following the wrap cycle, the package will first be stopped on the sealing belt [at the product exit photocell (100)] for indexing onto the weighing platform (120). When the package leaves the sealing belt, it then transfers over the weighing platform to the scale photocell (122) where the package will "break" the beam of the photocell. The scale belts (121) will then drop, placing the package down onto the weighing platform. The scale will then weigh the package, and then begin to deliver a label for that package. This is the cue for the scale belts to rise again, and transfer the package on to the labeling station. When the package passes in front of the labeling photocell (124), the package will then stop, waiting for a label to be delivered to it. Once the label is delivered (and in the case of the RLA system, the arm is at a safe distance away from the package as not to interfere with it's movement) the conveyor will start to move again, completing the labeling cycle. 16-1 Workhorse® User's Guide Scale no Film - This mode works the same as the mode described in "Wrapper and Scale" with only one exception, the package will travel through the wrapper without film being issued to wrap it. This mode is ideal for pre-wrapped product that still needs to be automatically weighed and price labeled. Manual Scale - When this mode is selected, after a short pause, the wrapper will drop the scales belts, exposing the weighing platform. The wrapper will then shut down all other functions and motors. This will make the scale function the same as a basic backup scale, where normal scale weighing and label delivery functions occur, but no wrapping or transferring takes place at all. Note: To ensure proper and trouble-free operation, keep all photocells (100), (122), and (124), as well as their respective reflectors (101), (123), and (125) clean and free of debris. 16-2 Chapter 17: Manually Clearing the Wrapper 17 Manually Clearing the Wrapper The Workhorse® wrapper, with it's electronic controls and safety features, is the most jam-proof wrapper on the market today. On occasion, however, jams DO occur. Most jams can be manually cleared by simply removing the stuck package from the wrapping area. CAUTION MUST ALWAYS BE EXERCISED! NOTE: ALWAYS press the Stop Button in and turn the Main Power switch to the "off' position prior to removing any product that has become stuck in the wrapper. If the product is still un-removable, simply raise the dancer bar (25) and open the lower cover (24) to expose the main drive motor and the "T" handle. Insert the "T" handle into the end of the motor, and turn the handle COUNTERCLOCKWISE to relieve the jam. Once the product is free, remove the product, remove the "T" handle from the motor, return it to it's holder, close the cover, and lower the dancer bar. The wrapper can now be restarted and is then ready for use. 17-1 Exact® Workhorse® User's Guide For your notes 17-2 Chapter 18: Printed, Registered Film Option 18 Printed, Registered Film Option This option is generally found only on wrappers being used in central packing operations. Supermarket wrappers will not have this option installed. When the Workhorse® is equipped with the Printed, Registered Film option, the wrapper has the capability of running film with a pre-determined pattern. This pattern would then be placed on each package of the same size, in the same place on the package. This option requires the use of specially printed film. Consult with your authorized service agency or service manual pin 809000103 for printed film trial specifications. If further assistance is required, contact Exact Equipment. The option consists of two additional photocells (132) and reflectors (13 I) that are mounted to the wrapper near the film distributor on each side. These photocells are activated by using TLU number(s) that have a programmed film length value of 00 centimeters. When a TLU with this value is selected, the appropriate printed film indicator on the operations panel will illuminate (58), whether programmed for side #1 or side #2. Threading the film is only slightly different than threading plain film. Simply tear or cut the film off at the registration mark (eyespot) and place the film as usual into the film distributor. MAKE SURE the eyespot travels THROUGH the photocell beam (see illustration below). The use and particulars of this option are explained further in the Workhorse® Service Manual, part number 809000103. 18-1 Workhorse® User's Guide For your notes 18-2 Chapter 19: Warranty 19 Warranty Mettler-Toledo, LLC warrants equipment and apparatus sold against all defects in workmanship or materials for the following period(s) of time: Workhorse Automatic Wrapper - 1 year from date of shipment This warranty does not apply to expendable parts, malfunctions caused by packaging supply failure, conditions of misapplication, abuse, lack of maintenance, improper installation or abnormal environmental conditions. THE PROVISIONS OF THIS WARRANTY CONSTITUTE THE ONLY AGREEMENT BETWEEN THE PARTIES RESPECTING THE SUBJECT MATTER HEREOF. THERE ARE NO \VARRANTIES WHICH EXTEND BEYOND THE DESCRIPTION HEREIN, INCLUDING THE WARRANTIES OF MERCHANT - ABILITY AND FITNESS. Mettler-Toledo, LLC shall in no way be liable for any losses, costs, forfeitures or damages (including loss of profits; liabilities of the purchaser to it's customers, or third persons; liability of Exact Equipment to it's customers, employees, or other third persons; and all other special incidental or consequential damages) whether direct or indirect and whether or not resulting from, or contributed to by the default, negligence, whether in manufacture or design, or failure to warn on the part of Exact Equipment, it's agents, employees, and subcontractors, which might be claimed as a result of, or use (with or without an active malfunction) or malfunction of the equipment or apparatus covered by this warranty, or as a result of the failure of Exact Equipment to comply with or conform to any application terms or condition of sale. If the travel distance is more than 50 miles from Mettler-Toledo, LLC authorized service location, or if the work is requested by the Purchaser to be performed outside of the normal working hours, Purchaser agrees to pay Exact Equipment or it's authorized Service Distributor their standard premium for such hours and travel expenses. REMEDIES AND DAMAGES If equipment or apparatus sold shall fail to conform to the contract of sale, including, but not limited to the warranty of Mettler-Toledo, LLC, Purchaser's sole and exclusive remedy shall be at the sole option of Mettler-Toledo, LLC to repair or replace any nonconforming equipment or apparatus or parts thereof. 19-1 Workhorse® User's Guide For your notes 19-2 14001 Quality Management System certification. Development, production, and auditing in accordance with ISO9001. Environmental management system in accordance with ISO14001. Worldwide service. Our dense service network, among the best in the world, ensures the maximum availability and lifespan of your product. Conformité Européene This label is your guarantee that our products conform to the latest guidelines. On the Internet. You can find important information about our products and services, as well as our company, quickly and easily at http://www.mt.com and at www.mt.com METTLER TOLEDO 1900 Polaris Parkway Columbus, Ohio 43240 www.mt.com P/N: 64063805 METTLER TOLEDO® is a registered trademark of Mettler-Toledo, LLC ©2012 Mettler-Toledo, LLC